

Page 1
Aztech AMS 5.1 Multi-Channel Speakers
...the perfect home theatre with
AMS TheatreSurround!
Read on to explore what Aztech AMS 5.1 can offer you !
Page 2

©Copyright
The hardware described in this manual is protected by international copyright
laws. Under this copyright law, you are prohibited from duplicating the software
for any purpose other than making archival copies for the sole purpose of backing-
up against loss.
In addition, no part of this manual may be reproduced or transmitted, in any
form or by any means, electronic or mechanical, including photocopying,
recording, or information storage and retrieval systems, for any purpose other
than the purchasers personal use, without the prior written permission of Aztech
Systems Ltd.
All other company or product names are trademarks or registered trademarks
or service marks of their respective owners and are hereby recognized as
such.
Disclaimer Statement
Aztech Systems Ltd specifically disclaims all warranties, either expressed or implied,
including but not limited to implied warranties of merchantability and fitness for
a particular purpose, with respect to the hardware, software, and the accompanying
written materials. Aztech Systems Ltd reserves the right to revise or make
improvements to its product at any time and without obligation to notify any
person of such revisions or improvements.
In no event shall Aztech Systems Ltd be liable for any consequential or incidental
damages, including any loss of business profits or any other commercial damages,
arising out of the use of its product.
Part 15 FCC Compliance Statement
This device complies with Part 15 of FCC Rules. Operation is subject to the
following two conditions:
1. This device may not cause harmful interference, and
2. This device must accept any interference received, including interference
that may cause undesired operation.
Operating Environment
For Home or Office Use
Notice
This equipment has been tested and found to comply with the limits of a Class B
digital device, pursuant to Part 15 of the FCC Rules. These limits are designed to
provide reasonable protection against harmful interference in a residential
installation. This equipment generates, uses and can radiate radio frequency energy
and, if not installed and used in accordance with the instructions, may cause
harmful interference to radio communications. However, there is no guarantee
that interference will not occur in a particular installation, if this equipment does
cause harmful interference to radio or television reception, which can be
determined by turning the equipment off and on, the user is encouraged to try to
correct the interference by one or more of the following measures:
Reorient or relocate the receiving antenna.
Increase the separation between the equipment and receiver.
Connect the equipment into an outlet on a circuit different from that to which
the receiver is connected.
Consult the dealer or an experienced radio/TV technician for help.
Caution
To comply with the limits for the Class B digital device according to Part 15 of
FCC Rules, this device must be installed in computer equipment certified to comply
with the Class B limits. All cables used to connect the computers and peripherals
must be shielded and grounded. Operation with non-certified/shielded cables
may result in radio/TV interference.
Modification
Any modification not expressly approved by the manufacturer of this device could
void the users authority to operate the device.
Party Responsible for Product Compliance:
Aztech Labs, Inc.
45645 Northport Loop East
Fremont, CA 94538, U.S.A.
Version 1.0
P/N: 040-412001-101
Page 3

Safety Guidelines
Adhere to the following safety guidelines when using your
equipment to reduce the risk of fire, electric shock and injury
to people.
Understand all instructions in the manual. Follow
all instruction labels found on the equipment.
Except for the power adapter supplied, the
equipment should not be connected to other
adapters/power supplies.
Do not place the equipment under direct sunlight
or next to a radiator. Make sure there is sufficient
space surrounding the equipment to prevent
overheating. (This is particularly important if you
wish to place the equipment on a television)
Never spill liquid of any kind on the equipment.
Unplug the equipment from the socket outlet before
cleaning. Do not use liquid cleaners or aerosol
cleaners. Use a soft, damp cloth for cleaning.
Do not use the equipment near water, for example,
near a bathtub, kitchen sink, or laundry tub.
Do not place the equipment on an unstable stand
or table. The equipment may fall and become
damaged.
Refer to qualified servicing personnel under the
following conditions:
when liquid is spilled into the equipment
when the equipment is exposed to rain or water
when the equipment does not function correctly
even when operating instructions are followed
when the equipment exhibits a distinct change
in performance
Page 4

This page is intentionally left blank.
Page 5

Contents
Safety Guidelines................................................ 3
Introducing AMS 5.1 ........................................... 6
1
Before You Begin................................................ 7
2
2.1 IMPORT ANT - Before Applying
Power !! ......................................................7
Function Descriptions........................................ 8
3
3.1 Digital Control Unit (DCU).......................... 8
3.2 Remote Controller......................................9
3.2.1 Battery Compartment .................... 10
Connecting AMS 5.1 ........................................... 11
4
4.1 Output connection to the Satellite
Speakers.....................................................11
4.2 Audio Inputs from PC/AV Player ...............12
4.2.1 PC Sound Card............................. 12
4.2.2 CD/VCD/LD/DVD Player ............... 13
4.2.3 DVD Player/AC3 Decoder/AV
Amplifer ........................................ 13
4.3 Inputs from the Mains and DCU ................14
Operating AMS 5.1 .............................................. 15
5
5.1 Muting the Speakers ..................................15
5.2 Adjusting the volume.................................16
5.3 Selecting the Speaker Configurations ......17
5.3.1 Which configuration to select ........ 18
5.4 Adjusting the Bass, Treble and
Subwoofer level .........................................19
5.5 Selecting the Environmental Settings ......20
5.6 Programming Your Own Settings .............21
Recommended Positioning for AMS 5.1 ........... 22
6
Frequently Asked Questions .............................23
7
Techincal Specifications .................................... 25
8
Page 6

○○○○○
Introducing AMS 5.1
What AMS 5.1 can give you...
1
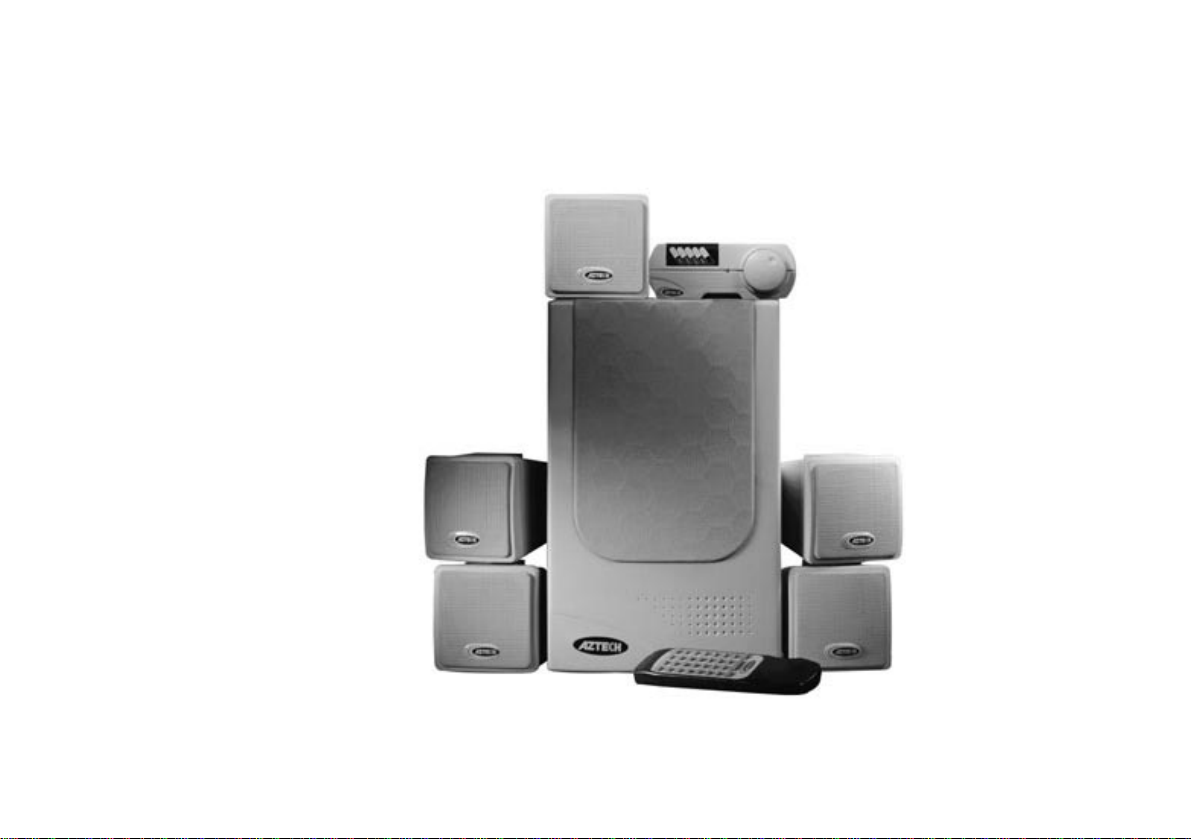
Congratulations on your purchase of the Aztech AMS 5.1 Multi-Channel
The Aztech AMS 5.1 Multi-Channel Speaker System is a high-end speaker system
consisting of a powered Subwoofer, 5 Satellite Speakers, a Digital Control Unit
The 5 satellite speakers are magnetically shielded. Interference with nearby
monitor, television or other visual equipment is thus eliminated, preventing picture
The controllers - DCU and Remote Controller, facilitate easy access and control.
Designed for home entertainment, the Remote Controller allows full control from
The AMS 5.1 also provides pre-defined environmental settings such as Jazz, Pop,
Rock and Cinema. You can even program and save your own settings and
The AMS 5.1 is compatible with all desktop PCs and audio/visual equipment such
The Aztech AMS 5.1 Multi-Channel Speaker System delivers the finest home-
theater quality sound to the desktop, bringing games, music and movies to life!
Introducing AMS 5.1
Speakers!
(DCU) and a Remote Controller.
distortion.
the comfort of your couch!
configurations!
as television, laser disc player and DVD player.
6
Page 7
2
Before You Begin
Before you start unpacking and connecting your
system, please make sure that you have the following
items inside your AMS 5.1 package. For any items
that are missing, please contact your dealer
immediately.
✔ 1 Subwoofer
✔ 5 satellite speakers with RCA connectors
(5 mounting brackets; 5 mounting screws)
✔ Remote Controller
Go through the checklist and power
Before You Begin
specifications before connecting your
AMS 5.1 speakers...
2.1 IMPORTANT - Before Applying
Power !!
For USA and Canada
Units shipped are designed for operation on
120volts AC only.
For United Kingdom (UK), Singapore,
Malaysia and Hong Kong (HK)
Units shipped are designed for operation on
230volts AC only.
○○○○○
✔ Digital Control Unit (DCU)
✔ This User Manual
✔ Warranty Card
✔ 1 Stereo Jack Cable (Green)
✔ 1 Stereo Jack Cable (White)
✔ Power Adapter
For Europe
Units shipped are designed for operation on
230volts AC only.
For Australia, New Zealand and Europe
Units shipped are designed for operation on
240volts AC only.
7
Page 8
○○○○○
Function Descriptions
3
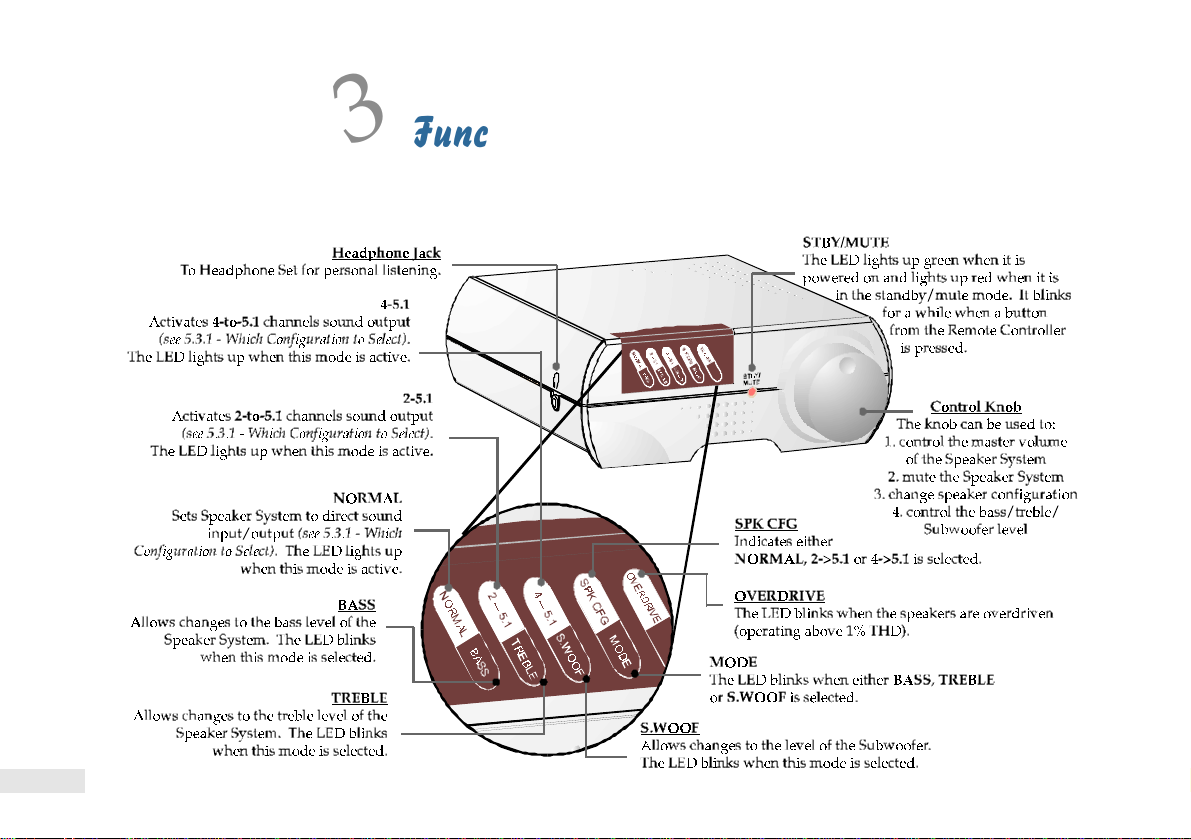
3.1 Digital Control Unit (DCU)
Function Descriptions
The function descriptions for the
Digital Control Unit and Remote
Controller...
8
Page 9
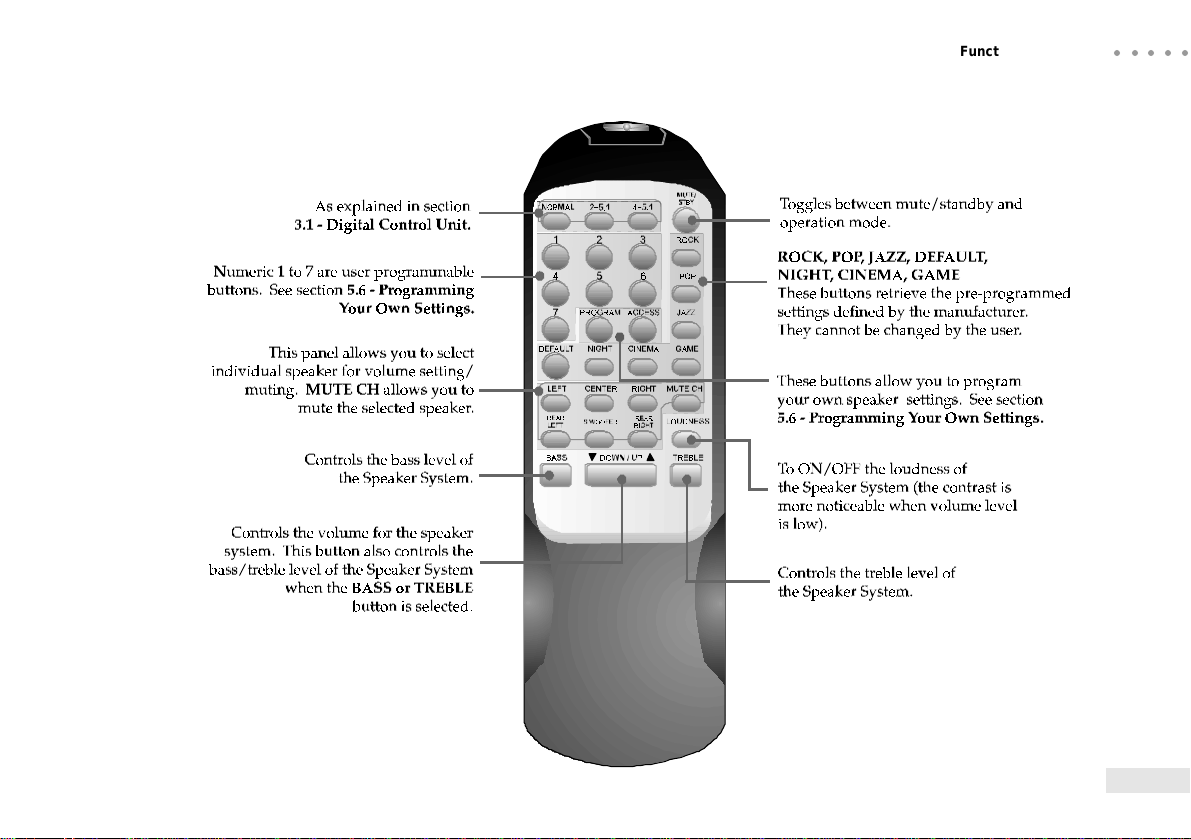
3.2 Remote Controller
Function Descriptions
○○○○○
9
Page 10

○○○○○
Function Descriptions
3.2.1 Battery Compartment
The AMS 5.1 Remote Controller works with two
1.5V 'AAA' batteries.
Please ensure that you have placed the batteries
according to the polarities shown.
Operating Range
10
➊
➋
If you will not be using the
Remote Controller for a long
period of time, it is advisable to
remove the batteries from its
compartment to prevent possible
damage from battery leakage.
Page 11

Connecting AMS 5.1
Connecting to the inputs and
outputs...
○○○○○
4.1 Output connection
to the Satellite Speakers
4
Connecting AMS 5.1
11
Page 12

○○○○○
Connecting AMS 5.1
4.2 Audio Inputs from PC/AV Player
You may connect the audio inputs from your sound
card or audio/visual player to the speaker system as
illustrated in the following sections.
4.2.1 Sound Card
Some of you may have 2 Line-Out jacks on
your sound card and others, only 1. Refer to
the following illustration for the correct
connection.
These connections are for sound cards with 2
Line-Out jacks (4-channel outputs)
You may select the 4->5.1 configuration to
activate the AMS TheatreSurround effect.
(see section 5.3 - Selecting the Speaker System
Configurations)
This connection is for sound cards with 1
Line-Out jack only (2-channel outputs)
You may select the 2->5.1 configuration to
activate the AMS TheatreSurround effect.
(see section 5.3 - Selecting the Speaker
System Configurations)
12
Page 13

4.2.2 CD/VCD/
LD/DVD Player
(2-channel output)
You may select the 2->5.1 configuration to
activate the AMS TheatreSurround effect.
(see section 5.3 - Selecting the Speaker
System Configurations)
4.2.3 DVD Player/
AC3 Decoder/AV
Amplifier
(6-channel output)
You may select the NORMAL configuration to
activate the AMS TheatreSurround effect.
(see section 5.3 - Selecting the Speaker
System Configurations)
Connecting AMS 5.1
The RCA-to-Stereo cables are not included in the package.
○○○○○
13
Page 14

○○○○○
Connecting AMS 5.1
4.3 Inputs from the Mains and DCU
14
Page 15

5
Operating AMS 5.1
Operating AMS 5.1 using the DCU
Operating AMS 5.1
and Remote Controller...
○○○○○
5.1 Muting the Speakers
The Mute function can be applied to either the entire
speaker set or individual speaker.
To standby/mute your speaker system
☞From DCU
Press
release.
(Control knob) for more than 2 seconds and
OR
☞From Remote Controller
The STBY/MUTE LED on the
Press .
To de-activate the standby/mute, repeat the same action.
DCU will light up red, indicating
that the speaker system is now in
mute/standby mode.
To mute individual speaker
☞From Remote Controller
Press followed by the button ,
, , , or ,
depending on which speaker you want to
mute.
Example: To mute the Subwoofer
Press
To de-activate the mute selection, press the
respective speaker again.
Example: To unmute the Subwoofer
Press
➫
.
.
15
Page 16

○○○○○
Operating AMS 5.1
5.2 Adjusting the volume
The volume can be adjusted for either the entire
speaker set or individual speaker.
To adjust the volume of your Speaker System
☞From DCU
Rotate
decrease/increase the volume.
(Control knob) left/right to
OR
☞From Remote Controller
Press
volume.
to decrease/increase the
To control the volume of individual speaker
☞From Remote Controller
1. Press
to have the volume adjusted.
2. Press
volume. (Do not exceed 3 seconds, else you need to
repeat step 1.)
Example: To increase the volume of your
Subwoofer
Press
, , , , or
, depending on which speaker you want
to decrease/increase the
➫
.
16
Page 17

5.3 Selecting the Speaker System Configurations
☞From Remote Controller
Operating AMS 5.1
○○○○○
☞From DCU
Press either , or .
1. Press
2. One of the LEDs will start to blink. Immediately rotate
3. The LED for the selected configuration will light up and blink for approximately 5 seconds, afterwhich the
LED will light up permanently, indicating that the selection is active.
Example: To select 2->5.1 configuration
Press
approximately 5 seconds)
When the LED stops blinking, the control knob will act as
the master volume control for the Speaker System.
(Control knob) once.
left/right to your desired configuration.
once ➫ rotate right to 2-5.1 selection (the LED lights up permanently after blinking for
continue next page...
17
Page 18

○○○○○
Operating AMS 5.1
...continued from previous page
5.3.1 Which configuration to select
Normal
This mode sets the speaker system to direct input/output configuration. Select this mode for direct audio
output. This configuration is suitable for all modes: 2-channel (stereo), 4-channel as well as 5.1-channel audio.
2-5.1
The 2-to-5.1 mode changes the conventional 2-channel (stereo) audio streams from your computer or audio/
visual equipment to full surround sound effects through the AMS 5.1.
Select this mode if you are connected to 1 audio output on your computer or audio/visual equipment.
You will experience the AMS TheatreSurround effect!
4-5.1
The 4-to-5.1 mode transforms the 4-channel audio streams from your computer or audio/visual equipment
to full surround sound effects through the AMS 5.1.
Select this mode if you are connected to 2 audio outputs on your computer or audio/visual equipment.
The simulated center channel effect will be activated and you will experience the AMS TheatreSurround
effect!
See section 4.2 - Audio Inputs from PC or AV Player.
18
Page 19

5.4 Adjusting the Bass, Treble and Subwoofer level
☞From DCU
Operating AMS 5.1
☞From Remote Controller
1. Press either
,
○○○○○
1. Press
2. The LED for MODE will start blinking, indicating that you can now
select either Bass, Treble or Subwoofer. At the same time, the BASS
LED will blink. (The LEDs will only blink for approximately 5 seconds.)
3. To adjust the bass level, rotate
(Rotate the Control knob before the LEDs stop blinking!)
4. To proceed to TREBLE mode, press
will blink. Rotate
Example: To increase the Subwoofer level
Press
(The blinking will stop after approximately 5 seconds. The Control knob will again acts as the master volume
control for the speaker system.)
(Control knob) twice.
or .
2. Press
left/right to decrease/increase.
when the LEDs are still blinking. Now, the LED for TREBLE
to decrease/increase the treble level.
decrease/increase the
bass, treble or Subwoofer
level.
If the LED for MODE stops
blinking before you proceed to
the next mode, you have to repeat
from step 1.
x4 (the LED for S.WOOFER blinks) ➫ rotate right to increase the Subwoofer level.
to
19
Page 20

○○○○○
Operating AMS 5.1
5.5 Selecting the Environmental Settings
The different environmental settings are: ROCK, POP, JAZZ, DEFAULT, NIGHT, CINEMA and GAME.
Play around for the settings that you prefer under different environments!
☞From Remote Controller
1. Press , , , , , or , depending on which environmental effect
you prefer.
Example: For games
Press
The setting will be changed immediately.
20
.
Page 21

5.6 Programming Your Own Settings
Adjust your own volume, bass and treble settings. You
may use one of the pre-programmed settings: ROCK,
POP, JAZZ, DEFAULT, NIGHT, CINEMA or GAME
as a starting point.
To recall your setting
☞From Remote Controller
Operating AMS 5.1
○○○○○
☞From Remote Controller
Press ➫ ➫ 'X'.
('X': you can select numeric 1-7, depending on your
preference)
Example: To store in numeric 1.
Press
Storing different settings to the same numeric will
overwrite your previous settings.
➫ ➫
.
Press
('X': the numeric that you have selected to store your
settings)
Example: To recall setting stored in numeric 1.
Press
'X'.
➫
➫ .
21
Page 22

○○○○○
Recommended Positioning for AMS 5.1
6
Recommended Positioning for AMS 5.1
The AMS 5.1 gives you the flexibility of placing your satellite speakers either on the desk, shelves or hanging them
up on the walls. The following shows the recommended position for the best sound effect.
center
rear-left
satellite speaker
left satellite
speaker
Subwoofer
satellite speaker
DCU
right satellite
speaker
rear-right
satellite speaker
secure the mounting bracket
to the rear of the speaker
with the mounting screw.
For best results, the rear
satellite speakers should
not be directed at the user.
mounting
bracket
mounting
screw
22
Page 23

7
Frequently Asked Questions
Frequently Asked Questions
Review this chapter for the most
commonly asked questions and their
possible solutions...
○○○○○
There is no sound from all the Satellite
Speakers/Subwoofer.
Check the following:
1. The power supply from the Subwoofer is
connected to the Mains and is powered on.
2. Cables from the Satellite Speakers are
connected to the respective jacks on the
Subwoofer as illustrated in section 4.1 -
Output connection to the Satellite
Speakers.
3. The mute or standby function is not
activated (the LED for STBY/MUTE on the
DCU should light up green).
4. The volume of the Speaker System is not
adjusted to the lowest.
5. The input source (example, PC/CD/LD/DVD
player) is connected properly (as illustrated
in section 4.2 - Audio Inputs from PC/AV
Player) and is playing audio.
There is no sound from the individual
Satellite Speaker(s).
Check the following:
1. Make sure that MUTE CH for the respective
Satellite Speaker(s) is not activated.
2. You should set the speaker configuration to
either 2-5.1 or 4-5.1 mode in order to hear
sound from all the speakers. If you are
connected to 1 audio output from your
computer/AV equipment, select 2-5.1 mode.
If you are connected to 2 audio outputs, select
4-5.1 mode. See section 5.3.1 - Which
Configuration to select.
3. Check the cable connections for the respective
speakers. Make sure that the cable connections
are not loose. If neccessary, unplug the cables
and plug in again.
You can also press one of the Environmental
Settings (example, Cinema) to un-mute any muted
Satellite Speakers.
23
Page 24

○○○○○
Frequently Asked Questions
There is no response from the Speaker
System when I press from the Remote
Controller.
Check the following:
1. You are operating your Remote Controller
within the operating range (see section 3.2.1
- Operating Range).
2. You have placed the batteries in the
compartment according to the polarities
indicated.
3. Your batteries may be getting weak. Replace
both batteries with new ones.
The operating distance between my
Remote Controller and DCU becomes
noticeably shorter. Why is it so ?
This is an indication that your batteries are
getting weak. Replace both batteries with new
ones.
If going through the suggested steps still do not solve
your problem, please contact your dealer immediately.
24
Page 25

Technical Specifications
○○○○○
8
Technical Specifications
8.1 Speaker Features
8.1.1 6 Channel Active Speakers
58 Watts RMS Output Power
Five 7 Watts RMS 4 Ohms 3 Satellite Speakers
One 23 Watts RMS 4 Ohms 5.5 Active
Subwoofer
One Digital Control Unit with 9-feet (3 meters)
Interface Cable
One Remote Controller
Three 9-feet (3 meters) Satellite Cables
Two 18-feet (6 meters) Satellite Cables
8.1.2 Supports 2-channel, 4-channel and 5.1-channel
inputs
Supports 5.1 Channel Analog Input
8.1.3 AMS Theatre Surround for 2-channel surround
Movie SoundTrack
Supports 2 Channel Analog Input with Selection
for Simulated Center and Rear Channel Output
8.1.4 AMS Theatre Surround for 4-channel Input
Supports 4 Channel Analog Input with Option
for Simulated Center Channel Output
8.2 Speaker Components
8.2.1 Active Subwoofer
23 Watts RMS 4 Ohms 5.5 Speaker Cone
External DC Power Supply
110 or 230V AC Input
Sturdy MDF Wood Cabinet for deep rich bass
8.2.2 Satellite Speakers
5 Satellite Speakers Center, Front Left, Front
Right, Rear Left and Rear Right
25
Page 26

○○○○○
Technical Specifications
7 Watts RMS 4 Ohms 3 Speaker Cone
Wide frequency range
Magnetically Shielded
One 9-feet (3 meters) Center Speaker Cable
Two 9-feet (3 meters) Front Speaker Cable
Two 18-feet (6 meters) Rear Speaker Cable
8.2.3 Digital Control Unit
MicroController Processing Unit
Rotary Pulse Switch for Control Knob
6 LED Indicators for Power, Standby and
Speaker Configuration Settings
Headphone Output
Power Standby Switch
Infra-Red Receiver
9-feet (3 meters) Interface Cable with 8 pin
Mini-DIN
Connector
8.2.4 Remote Controller
Infra-Red Transmitter
Requires two 1.5V AAA Battery
8.3 Interfaces
8.3.1 Active Subwoofer
3.5mm jack for Front-Channel Speaker Input
(Green)
3.5mm jack for Rear-Channel Speaker Input
(White)
3.5mm jack for Center-Channel Speaker Input
(Black)
5x RCA connector for Satellite Speaker Output
8-pin Mini-DIN connector for Digital Controller
Unit
8.3.2 Digital Control Unit
3.5mm jack for Headphone Output
8.3.4 Power Supply
1x DC Socket for Power Supply
26
Page 27

This page is intentionally left blank.
AMS 5.1 User's Manual
○○○○○
27
Page 28

Notes
 Loading...