

Page 1
AID1630
Induction Cooker
USER MANUAL
PLEASE KEEP THIS USER MANUAL FOR FUTURE USE.
Page 2

2
USER MANUAL CONTENTS
SAFETY INSTRUCTIONS...................................................................................2
PACKAGE CONTENTS...................................................................................4
APPLIANCE OVERVIEW.................................................................................4
BEFORE USE....................................................................................................5
USING THE INDUCTION COOKER..................................................................6
HELPFUL HINTS...............................................................................................6
CLEANING AND MAINTENANCE.................................................................11
SAFETY INSTRUCTIONS
• Do not immerse or expose your Induction Cooker’s main body and/
or its power cord to water or any kind of liquid substance to avoid
electric shock. In addition, do not use abrasive products (e.g.
steel wool pads) whenever cleaning since these may damage the
appliance’s surface.
• Do not touch the appliance while it is operating.
• Do not power on the appliance with an empty pot as this will cause
damage and deformation to the pot.
• Some parts of the appliance will become hot upon usage. Use the
dedicated handles and/or knobs whenever using the appliance.
• Your Aztech Induction Cooker is not intended for people with reduced
physical, sensory or mental capabilities, and/or lack of experience
or knowledge. Constant supervision (from a person responsible for
their safety) should be provided if such individuals would be using,
cleaning, or operating, the appliance.
• Keep the appliance out of reach of children. If children are within
the area during use, ensure to operate the appliance with extra care
for safety purposes. Keep its power cord safely kept away and out of
reach during use to avoid unwanted accidents.
• Should damages be found on the appliance, its power cord and/or
its other components – do not use the appliance and immediately
bring it to the Aztech Service Center for repair or replacement.
• Do not, in any kind of manner, disassemble, dismantle, and/or perform
appliance repair on your own and/or replace its components using
non-Aztech approved components and/or attachments.
NOTE: It is STRONGLY ADVISED to ensure that you have read all provided safety
guides and operating instructions in this user manual rst before proceeding.
Page 3

3
• Do not position the appliance in a humid environment and/
or in places exposed to multiple sources of heat such as stoves,
refrigerators, or microwave ovens and/ot near objects which will be
affected by magnet such as radios, televisions, automatic-banking
cards and casette tapes.
• Do not cook without load or overload of food. Otherwise, it will cause
deformation of the pot and the appliance. Note: The content of food
loaded in the pot should not be over 4kg.
• Do not carry the appliance during operation.
• Always unplug the power adapter if you are done using your
Induction Cooker and allow it to cool down before doing any
cleaning, relocation, and/or appliance maintenance.
• Ensure that it is OFF before removing the plug. When unplugging its
power adapter, do not pull or tug its cord. Hold the power adapter
rmly on its base when unplugging it from the power outlet. Also,
ensure that its power cord is kept away from any source of heat and/
or sharp edges that may cause external damage to the cord.
• Metallic objects such as knife, forks, spoons, and lids should not be
placed on the cooking plate as it may conduct heat and get hot.
• Do not use the appliance and/or its components for anything other
than its intended purpose. The appliance is intended for household use
only, commercial usage would void the warranty of the appliance.
• Before use, please check if the power voltage of your Induction
Cooker correctly corresponds to your home’s power supply.
• Ensure to ALWAYS position your Induction Cooker on a smooth, dry,
and stable ground. Placing the appliance on unstable surfaces
such as cushioned carpets and/or uneven surfaces may cause the
appliance to lose its balance during operation.
• Do not use wet hands in inserting or removing its power adapter to
prevent electrical shocks. It is recommended to thoroughly dry your
hands rst before every use.
• Do not place a sheet of paper between the pot and the cooking
plate. The paper may be burnt.
• Do not drop objects onto the cooking plate, in case it cracks,
immediately turn off the power supply and unlplug from the power
socket.
• When using high frequency, noise will be heard as it is the result of
the metal materials of pot and is not malfunction. While operating
the appliance, the running sound of fan will be heard as the fan will
rotate for quite some time to reduce the inner heat.
Page 4
4
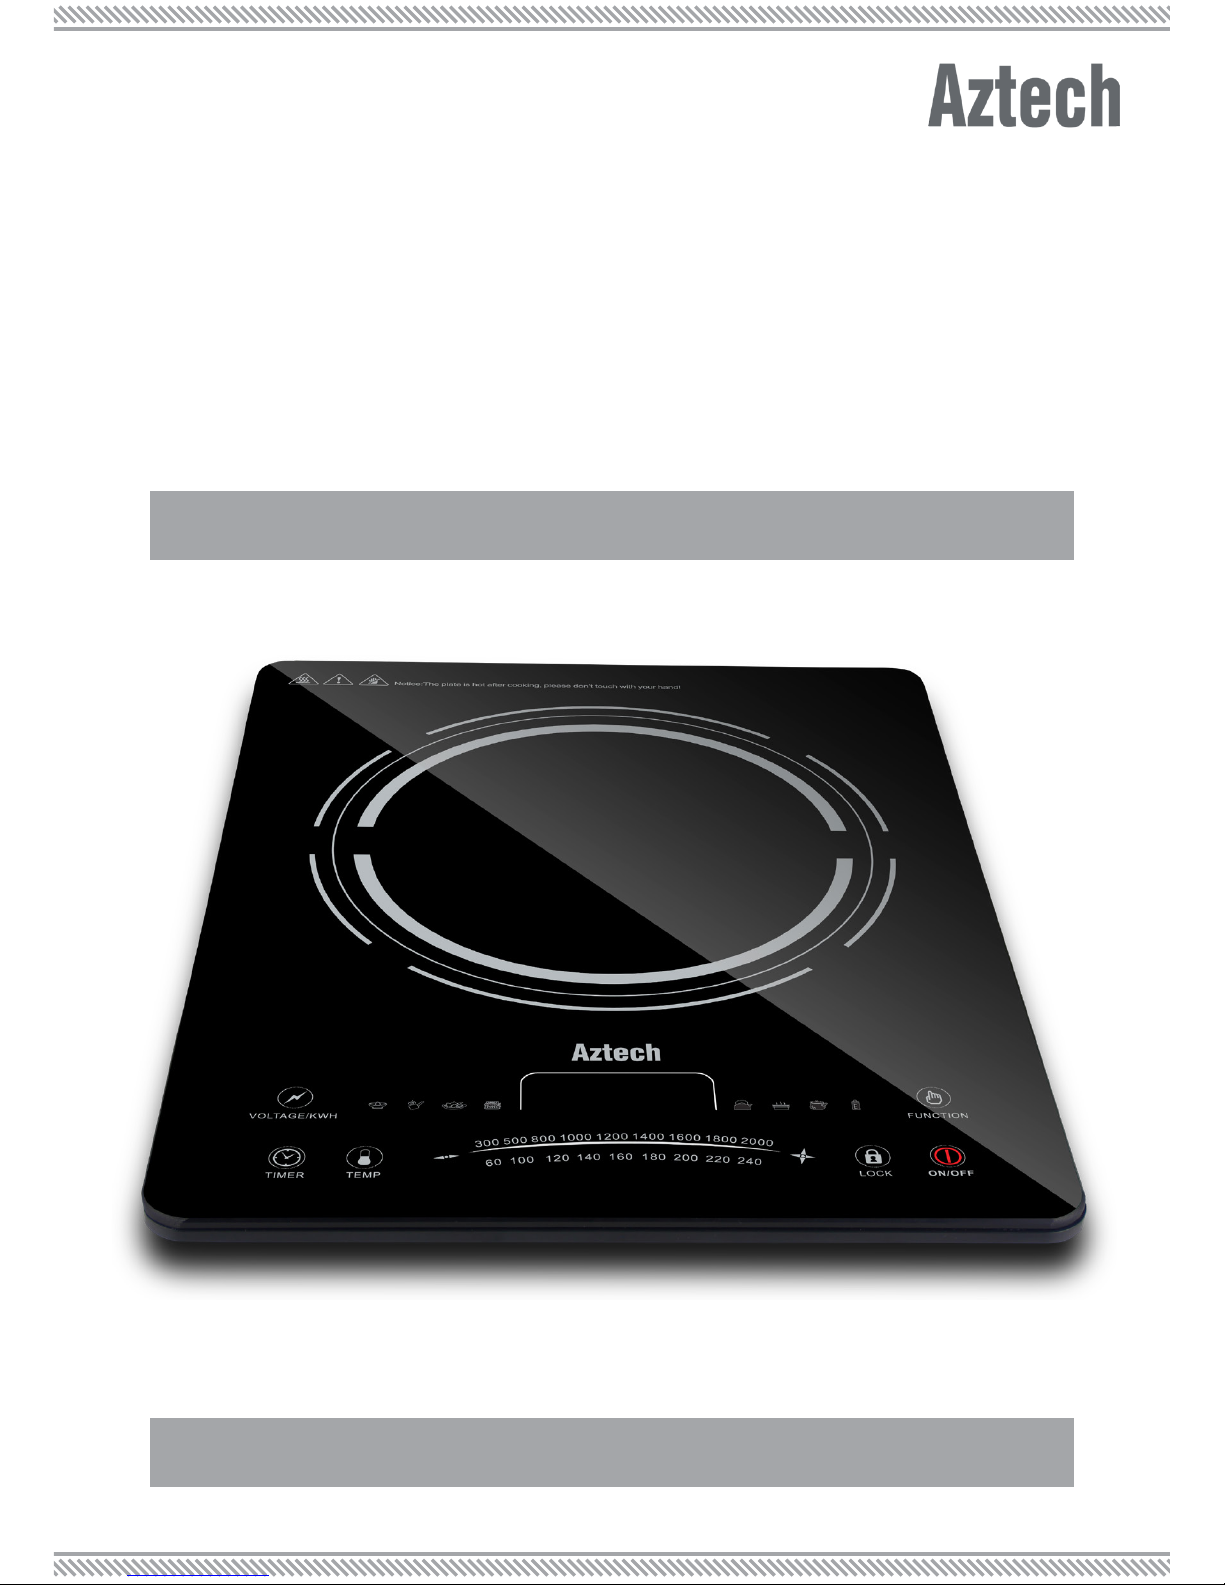
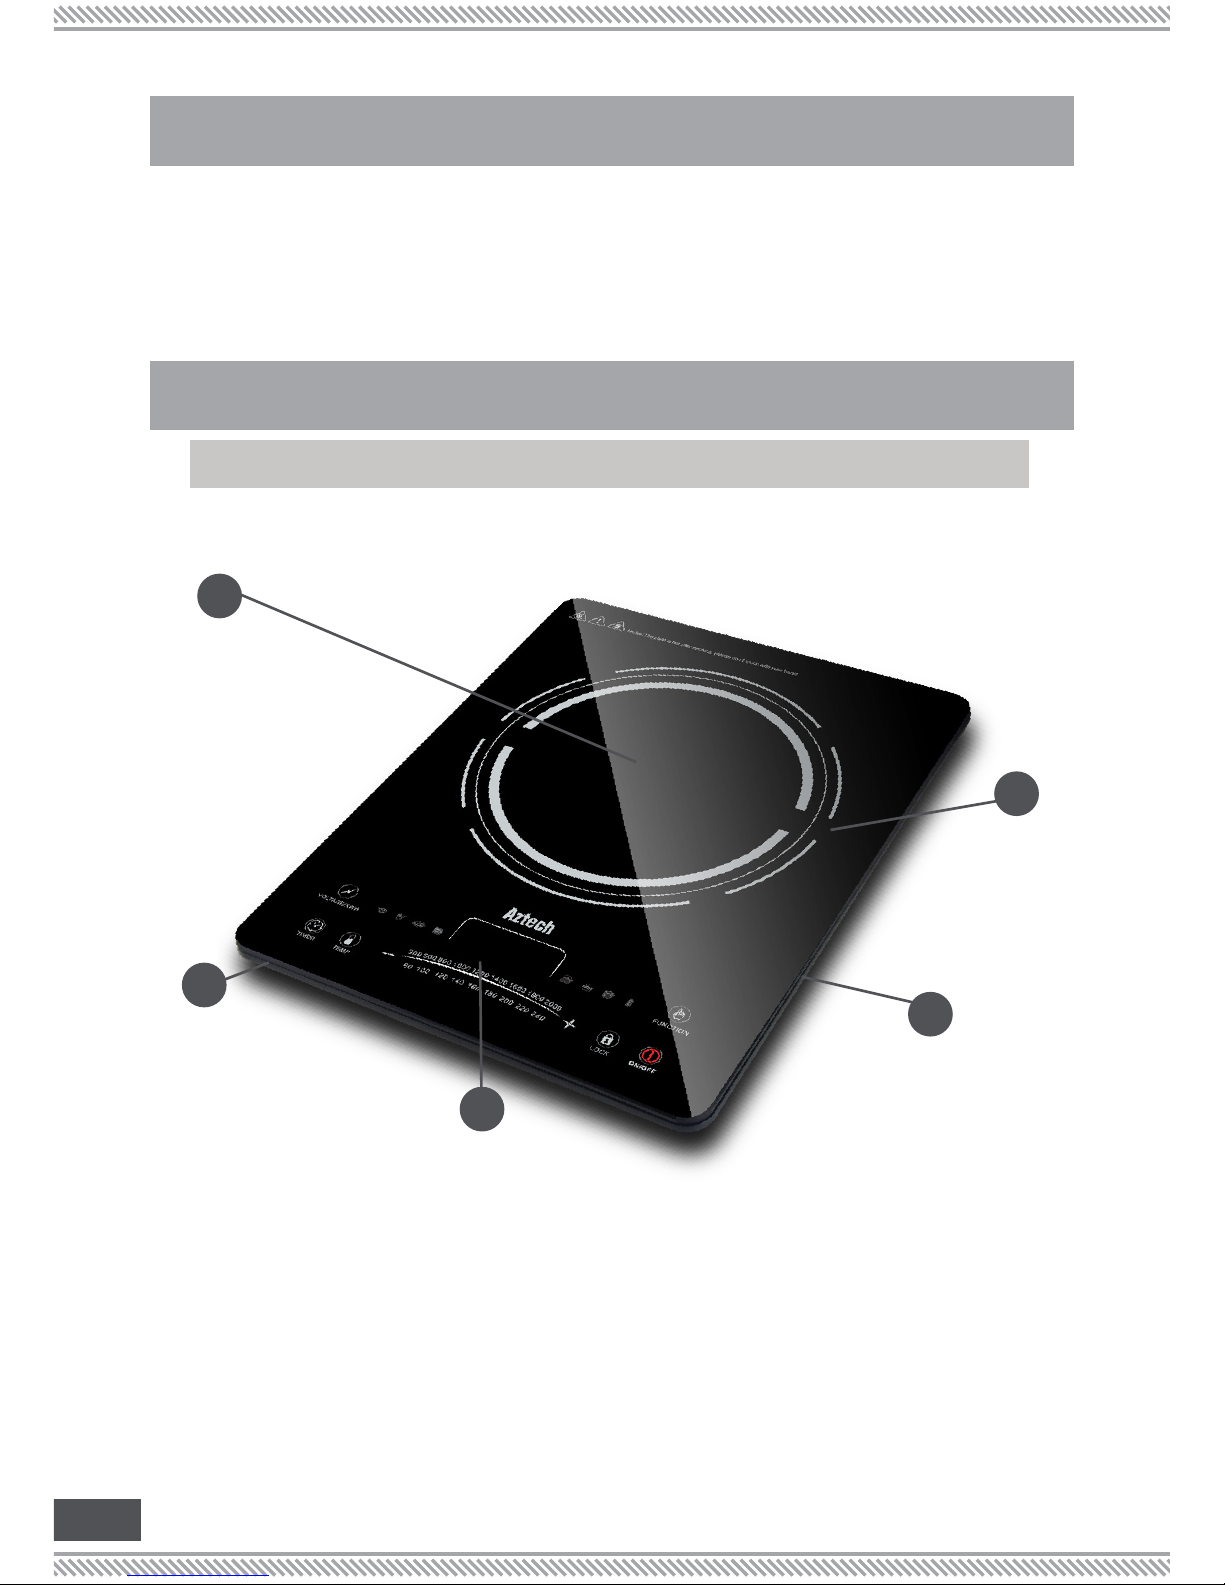
PACKAGE CONTENTS
• AID1630 Induction Cooker
• Easy Start Guide
INDUCTION COOKER COMPONENTS
APPLIANCE OVERVIEW
• User Manual
• Warranty Policy
1. Black Crystal Glass
2. Air Outlet
3. Control Panel
4. Air Inlet
5. Cooking Plate
3
4
1
2
5
Page 5

5
CONTROL PANEL
1
2 3 4
5 6
7
1. Voltage/KWH icon
2. Manual Modes icons
3. Pre-set Modes icons
4. Function icon
5. Timer icon
6. Temperature icon
7. Display Screen
8. Lock icon
9. On/Off icon
BEFORE USE
Before rst use, make sure that the appliance is unplugged and is in the “OFF”
state. Clean all accessories from the package, thouroughly dry them, and reassemble into the appliance. Plug the cord into the outlet and you are now ready
to use it. This will ensure that all residues left from the manufacturing process are
completely removed before using it.
8 9
Page 6

6
TIPS IN USING YOUR INDUCTION COOKER
• Before use, please check if the power voltage of your Induction Cooker
correctly corresponds to your home’s power supply.
• Do not position the appliance in a humid environment and/or in places
exposed to multiple sources of heat such as stoves, refrigerators, or
microwave ovens and/ot near objects which will be affected by magnet
such as radios, televisions, automatic-banking cards and casette tapes.
• Do not cook without load or overload of food. Otherwise, it will cause
deformation of the pot and the appliance. Note: The content of food
loaded in the pot should not be over 4kg.
• When using high frequency, noise will be heard as it is the result of the metal
materials of pot and is not malfunction. While operating the appliance, the
running sound of fan will be heard as the fan will rotate for quite some time
to reduce the inner heat.
• Do not power on the appliance with an empty pot as this will cause
damage and deformation to the pot.
OPERATING IN MANUAL MODE
USING THE INDUCTION COOKER
*HOT POT:
1. Place the appliance pot at the center of the cooking plate. Power on the appliance
and you will hear a “beeping” sound. The display on the screen will show “---”.
2. Touch the ON/OFF icon and followed by the cooking FUNCTION icon to select the
desired cooking function.
3. Touch the cooking FUNCTION Icon, the red light indicator for HOT POT will light
up. The display screen will show 1400. The default operating power level is at 1400W. The
power level can be adjusted by touching + or - icon. Cooking will start.
4. To cancel the selected cooking function, touch the ON/OFF icon.
5. After cooking has nished, power off and unplug the appliance.
Note: Press + icon to increase the power level and press - icon to reduce the power level.
Page 7

7
*FRY:
1. Place the appliance pot at the center of the cooking plate. Power on the appliance
and you will hear a “beeping” sound. The display on the screen will show “---”.
2. Touch the ON/OFF icon and followed by the cooking FUNCTION icon to select the
desired cooking function.
3. Continue touching the cooking FUNCTION Icon, the red light indicator for FRY will
light up. The display screen will show 220C. The default operating temperature level is at
220°C. The temperature level can be adjusted by touching + or - icon. Cooking will start.
4. To cancel the selected cooking function, touch the ON/OFF icon.
5. After cooking has nished, power off and unplug the appliance.
Note: Press + icon to increase the temperature level and press - icon to reduce.
*ROAST:
1. Place the appliance pot at the center of the cooking plate. Power on the appliance
and you will hear a “beeping” sound. The display on the screen will show “---”.
2. Touch the ON/OFF icon and followed by the cooking FUNCTION icon to select the
desired cooking function.
3. Continue touching the cooking FUNCTION Icon, the red light indicator for ROAST ---
will light up. The display screen will show 180C. The default operating temperature level
is at 180°C. The temperature level can be adjusted by touching + or - icon. Cooking will
start.
4. To cancel the selected cooking function, touch the ON/OFF icon.
5. After cooking has nished, power off and unplug the appliance.
Note: Press + icon to increase the temperature level and press - icon to reduce.
*STIR FRY:
1. Place the appliance pot at the center of the cooking plate. Power on the appliance
and you will hear a “beeping” sound. The display on the screen will show “---”.
2. Touch the ON/OFF icon and followed by the cooking FUNCTION icon to select the
desired cooking function.
3. Continue touching the cooking FUNCTION Icon, the red light indicator for STIR FRY ---
will light up. The display screen will show 240C. The default operating temperature level
is at 240°C. The temperature level can be adjusted by touching + or - icon. Cooking will
start.
4. To cancel the selected cooking function, touch the ON/OFF icon.
5. After cooking has nished, power off and unplug the appliance.
Note: Press + icon to increase the temperature level and press - icon to reduce.
Page 8

8
OPERATING IN PRE-SET MODE
*WATER:
1. Place the appliance pot at the center of the cooking plate. Power on the appliance
and you will hear a “beeping” sound. The display on the screen will show “---”.
2. Touch the ON/OFF icon and followed by the cooking FUNCTION icon to select the
desired cooking function.
3. Touch the cooking FUNCTION Icon, the red light indicator for WATER will light up. The
display screen will show AU. At this mode, you cannot select the power level by touching
the + or - icon. The water mode allows you to boil water in a fast way. The suggested
boiling time for 1 liter is 3-4 minutes, for 2-3 liters is 9-15 minutes. Cooking will start.
4. To cancel the selected cooking function, touch the ON/OFF icon.
5. After cooking has nished, power off and unplug the appliance.
Note: The boiling time may be vary depending on the purity of water and surrounding
pressure.
*STEAM:
1. Place the appliance pot at the center of the cooking plate. Power on the appliance
and you will hear a “beeping” sound. The display on the screen will show “---”.
2. Touch the ON/OFF icon and followed by the cooking FUNCTION icon to select the
desired cooking function.
3. Continue touching the cooking FUNCTION Icon, the red light indicator for STEAM will
light up. The display screen will show AU. The steam mode allows you to steam various
type of food such as tibs or chicken. Cooking will start.
4. To cancel the selected cooking function, touch the ON/OFF icon.
5. After cooking has nished, power off and unplug the appliance.
*SOUP:
1. Place the appliance pot at the center of the cooking plate. Power on the appliance
and you will hear a “beeping” sound. The display on the screen will show “---”.
2. Touch the ON/OFF icon and followed by the cooking FUNCTION icon to select the
desired cooking function.
3. Continue touching the cooking FUNCTION Icon, the red light indicator for SOUP will
light up. The display screen will show AU. Cooking will start.
4. To cancel the selected cooking function, touch the ON/OFF icon.
5. After cooking has nished, power off and unplug the appliance.
Page 9

9
*MILK:
1. Place the appliance pot at the center of the cooking plate. Power on the appliance
and you will hear a “beeping” sound. The display on the screen will show “---”.
2. Touch the ON/OFF icon and followed by the cooking FUNCTION icon to select the
desired cooking function.
3. Touch the cooking FUNCTION Icon, the red light indicator for MILK will light up.
The display screen will show AU. While operating, the appliance will turn into on and
off mode automatically to maintain the temperature. It is to make sure that the milk is
cooked evenly.
4. To cancel the selected cooking function, touch the ON/OFF icon.
5. After cooking has nished, power off and unplug the appliance.
1. While operating the appliance, you can always check the power level by touching
the VOLTAGE icon.
2. For example, while using the HOT POT cooking function, after selecting the require
power, you can check the voltage by touching the VOLTAGE icon. The display will show
0_20 which means 0.2KW/H. Press again the icon and it will display 235U which means the
current voltage is at 235V.
While operating the appliance, you can always check the temperature of the pot by
touching the TEMP icon.
VOLTAGE ICON
TEMPERATURE ICON
To prevent children from adjusting the appliance accidentally or changing the cooking
settings, press the LOCK icon. The red light indicator will light up and the appliance will
not respond to any touch on the voltage, function, timer, temperature, + and - icons. You
can press the LOCK icon when the appliance is operating. When the LOCK icon is on,
the only button that will function is the ON/OFF icon. To turn off the LOCK function, press
again the LOCK icon.
LOCK ICON
The timer can be set under two states: (a) Timer and (b) Preset Timer.
(A) TIMER
1. Timer function is to set the cooking time. It is only applicable for HOT POT, STIR-FRY, FRY,
and ROAST function.
2. After selecting the cooking function and power level, touch the TIMER icon and the
display screen will show 00:00. Adjust the desired minutes by pressing + or - icon. Touch
the TIMER icon again and the display screen will show 00:00. Adjust the desired hours by
pressing + or - icon.
3. Wait for 5 seconds. The timer will automatically set and the timer will start to count
down. Cooking will start.
TIMER ICON
Page 10

10
(B) PRESET TIMER
1. Preset time function is to set the cooking start time. It is only applicable for WATER, STIR-
STEAM, SOUP, and MILK cooking function.
2. After selecting the cooking function and power level, touch the TIMER icon and the
display screen will show 00:00. Adjust the desired minutes by pressing + or - icon. Touch
the TIMER icon again and the display screen will show 00:00. Adjust the desired hours by
pressing + or - icon.
3. Wait for 5 seconds. The timer will automatically set and the timer will start to count
down. Cooking will start.
1. Iron, cast iron, stainless steel (with high steel content), with diameter of 12cm - 26cm.
2. Flat bottom utensil.
SUITABLE UTENSIL
This appliance has an automatic utensil checking feature with unsuitable utensil. You
cannot select on the heating power even when the ONN/OFF button is pressed. Disp, lay
screen will show E1 error.
UNSUITABLE UTENSIL
Page 11

11
CLEANING AND MAINTENANCE
CLEANING THE INDUCTION COOKER
1. Unplug the power adapter and allow the appliance to cool down.
2. Using a damp cloth, wipe off its external surface to remove dirt and/or
other particles. Please do not use abrasive products in cleaning these
areas since these may damage the appliance’s surface.
3. Make sure all parts and accessories are dry thoroughly prior to plugging
in and using.
NOTE: Do not immerse your Induction Cooker’s main body and/or its
power cord, in water and/or in any kind of liquid substance.
• Polythene bags used on the product or packaging could be
dangerous. To avoid suffocation, keep away from babies and children.
Such bags are not toys.
• For safety’s sake, when using a non-stick cookware or electric
appliance with non-stick coatings, keep your pet birds out of the
room. Birds have respiratory systems that are sensitive to many kinds of
fumes, including from overheated non-stick.
• The temperature of all surfaces marked with this symbol will be
very hot when the appliance is in use and after use. CAUTION: HOT
SURFACE. Do not touch these surfaces as possible injury could occur.
Allow to cool completely before handling this appliance.
WARNING!
Page 12

Copyright © 2016 Aztech Technologies Pte Ltd (CRN:199800635M ). All rights reserved.
 Loading...