

Page 1

ADSL 4 Port Ethernet Router
Easy Start
Version 1.0
• Product warranty does not apply to damage caused by lightning, power surges or wrong voltage usage.
• This product is for use only in UL Listed computers.
Contents
Introduction ....................................................... 2
Minimum System Requirements ...........................2
ADSL Router Package ......................................... 2
ADSL Router Overview ........................................3
Typical ADSL Router Connections ......................... 4
Step 1: Connecting the ADSL Router to Your
Computer/Notebook ................................5
Step 2: Configuring Your Ethernet Network Card ... 9
Step 3: Configuring Your Internet Browser ............ 11
Step 4: Connecting to the Internet ....................... 12
Appendix A - Configuring Your ADSL Router for a New
Connection Profile............................................... 13
Page 2

2
Easy StartEasy Start
Easy StartEasy Start
Easy Start
Introduction
Thank you on your purchase of the ADSL 4 Port Ethernet Router! The ADSL Router provides
you with the high speed multi-user broadband access via ADSL.
The ADSL Router can be connected to any computer(s)/notebook(s) with a 10/100 BaseT Ethernet Network card. Its Auto MDIX Ethernet Ports allow both Straight and Cross
Ethernet Network cables to be used.
This documentation assumes that your computer/notebook already has an Ethernet Network
card installed.
Minimum System Requirements
• Pentium® MMX 233MHz with Ethernet Network card (installed with TCP/IP Protocol)
• Operating system support: OS independent (also depending on the Ethernet Card's
manufacturer's driver support for the Computer/Notebook)
Windows® configurations discussed: Windows® 98 / Windows® 98 Second Edition
/ Windows® Me / Windows® XP / Windows® 2000
• Web Browser support:
Microsoft Internet® Explorer™ 4.0 (or later versions)
Netscape® Navigator 4.7 (or later versions)
ADSL Router Package
o Telephone cable (RJ-11)
1
m Easy Start
1 The telephone extension cable used for this Router is a UL Listed Communication Circuit Accessory, minimum 26AWG.
2 Different countries are bundled with different types of power adapter. The above illustration is only a representative.
3 Depending on your country of purchase, your package may or may not come with a POTS Splitter. The POTS Splitter is required
if you are connecting a Telephone Set to the ADSL Router. Please refer to Step 1.2 - Connecting to the ADSL Line for details. POTS-
Splitter can also be purchased from your dealer.
POTS Splitter
(optional)
3
l ADSL 4-Port
Ethernet Router
q Router Documentation CD
n CAT-5 UTP Straight
Ethernet Network cable (RJ-45)
p
Power adapter (DC 5V)
2
Page 3
3
Easy StartEasy Start
Easy StartEasy Start
Easy Start
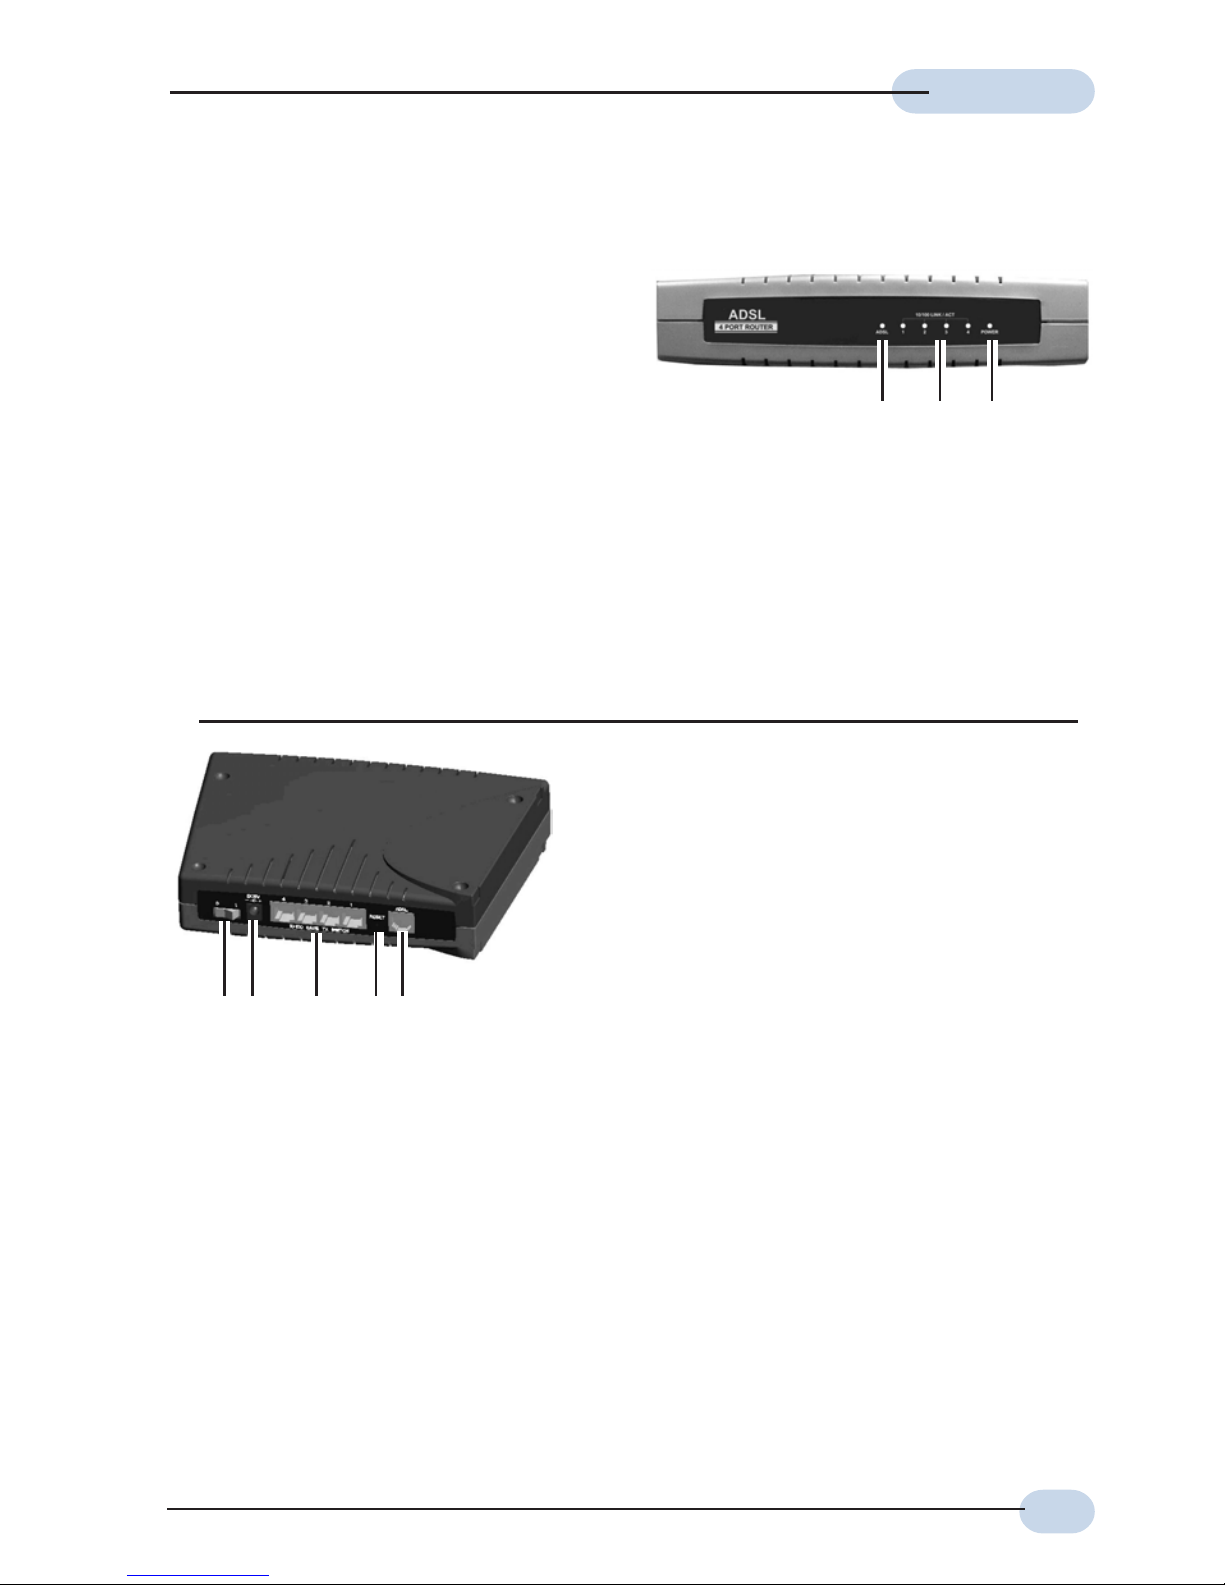
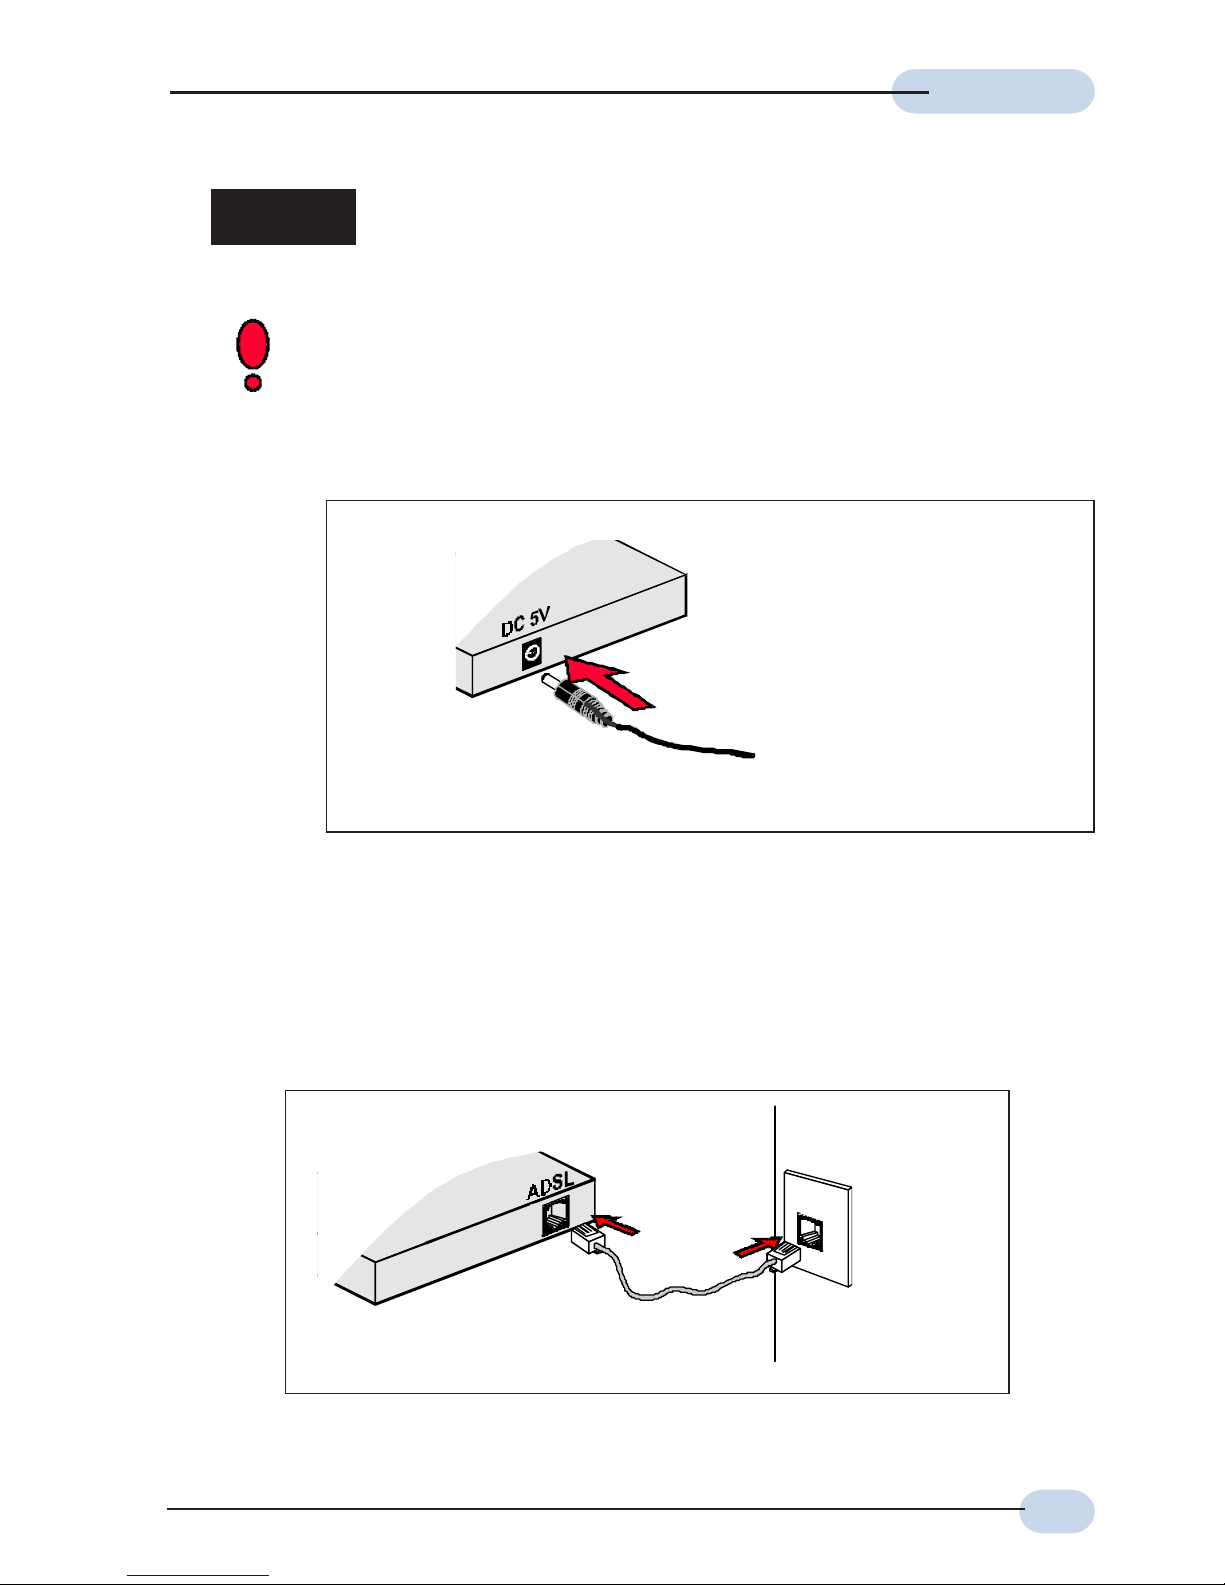
ADSL Router Overview
l Power LED
Lights up when Power switch (at
the rear) is pressed ON.
m 10/100 LINK/ACT (1 to 4)
Lights up when the Ethernet link
is established.
l Switch
To power on or off the ADSL Router.
(O - OFF position; I - ON position)
m DC5V
To connect to the Power Adapter that
comes with your package.
n 10/100 BASE TX SWITCH (1 to 4)
10 / 100 Base-TX Ethernet jack (RJ-
45) to connect to your Ethernet card or
Ethernet Switch/Hub.
o Reset
To reset your ADSL Router to factory default settings. All customised settings that
you have saved will be lost! Refer to the footer
4
on how to activate the reset function.
p ADSL
Telephone jack (RJ-11) to connect to the ADSL Line.
4 To activate the reset function:
- Ensure that the ADSL Router is powered on.
- Use a pencil tip or a paper clip to depress the reset button for about 5 seconds and release. DO
NOT POWER OFF OR RESTART THE ADSL ROUTER FOR THE NEXT 20 SECONDS! This is to allow
sufficient time for the Router to complete the reset function. The factory default settings will be
restored.
noplm
mln
Flickers at a slower interval when there is data transfer at 10 Mbps.
Flickers at a faster interval when there is data transfer at 100 Mbps.
n ADSL
Lights up when the ADSL Line is established.
Flickers at a slower interval when ADSL Router is trying to establish an ADSL
connection with your ADSL Service Provider.
Flickers at a faster interval when there is data transfer.
Page 4

4
Easy StartEasy Start
Easy StartEasy Start
Easy Start
Typical ADSL Router Connections
Up to 4 PCs Connections
For More than 4 PCs Connections
To connect to more than 4 computers/notebooks, you may further expand one of the Ethernet
Ports via an Ethernet Hub/Switch. For details on how to connect to the Ethernet Switch/
Hub, please refer to the documentation that comes with the unit.
to Computers/Notebooks with
Ethernet Network Cards
Computers or Notebooks with
Ethernet Network Cards
Ethernet
Switches/Hubs
to Computers/Notebooks with
Ethernet Network Cards
Computers or Notebooks with
Ethernet Network Cards
ADSL Router
ADSL Router
Page 5
5
Easy StartEasy Start
Easy StartEasy Start
Easy Start
Step 1: Connecting the ADSL Router to Your
Computer/Notebook
Power off your Computer/Notebook or/and any connected devices before
connecting to the ADSL Router!
Step 1.1 Connecting to the Power Outlet
Connect the other end of the
Power Adapter to the Power
Outlet.
Back view of the
ADSL Router
Step 1.2 Connecting to the ADSL Line
To connect the ADSL Router to the ADSL line, carried out Step 1.2(a).
To connect the ADSL Router to the ADSL line and a Telephone Set, carried out Step 1.2(b).
(a) To connect to the ADSL line
Back view of the
ADSL Router
Telephone Wall
Socket
Telephone cable
Page 6

6
Easy StartEasy Start
Easy StartEasy Start
Easy Start
(b) To connect to the ADSL line and a Telephone Set
Telephone cable
Back view of the
ADSL Router
Telephone Wall
Socket
The POTS Splitter (with built-in Micro-Filter) is a device that allows you to connect
both your ADSL Router and Telephone Set to the same Telephone Wall Socket. This
device will help to eliminate background noise on the telephone line, ensuring the
best possible phone performance. (When purchasing POTS Splitter from your
dealer, ensure that it has a built-in Micro-Filter).
Telephone Set
POTS Splitter
Connect the Telephone set to the
jack labelled TEL or PHONE and
the telephone cable to the jack
labelled LINE.
If you have Telephone set(s)/Facsimile
machine connected to other Telephone
Wall Socket(s), you will need to plug
in a Micro-Filter to each of the
Telephone Wall Socket before
connecting to the Telephone set as
illustrated.
Micro-Filter helps to eliminate noise
on the telephone line when your ADSL
Router and Telephone set are both
sharing the same line.
(Micro-Filter can be purchased from
your dealer).
Page 7

7
Easy StartEasy Start
Easy StartEasy Start
Easy Start
Step 1.3 Connecting to the Ethernet
Connect your computer(s)/notebook(s) to the ADSL Router as illustrated. The following
illustration shows the connection of a single computer.
Back view of a computer
Ethernet Network cable
Ethernet Port
Back view of
the ADSL
Router
Ethernet
Network Card
(All the Ethernet
Ports on the ADSL
Router are Auto
MDIX. Both Straight
and Cross Ethernet
Network cables can
be used).
To connect the ADSL Router to your Computer/Notebook, you need to have an Ethernet Port present
on your Computer/Notebook.
(See the following note if you are not sure of how an Ethernet Port looks like).
Locating the Ethernet Port on your Computer/Notebook
The following are some tips to help you locate your Ethernet Port on your
Computer/Notebook. Alternatively, you may refer to the documentation that
comes with your Computer/Notebook.
Most Computers/Notebooks have labels describing the Ports. For Ethernet Port,
you will see either ETHERNET, ETH or RJ45 labelled near the Port.
If your Computer/Notebook does not have such descriptions, try the following.
- Picture A gives the illustration of an Ethernet Port. All Ethernet Ports have 8
conductors on it. Do not mistaken with the LINE Port (Picture B) that has only
6 conductors.
- An Ethernet Port is slightly bigger than a LINE Port.
A. ETHERNET: B. LINE:
Page 8

8
Easy StartEasy Start
Easy StartEasy Start
Easy Start
Step 1.4 Checking Your Connections
Please check your connections before proceeding.
Step 1.5 Powering Up
- Power on the Power Outlet that the ADSL Router is connected to.
- Power on your Computer(s)/Notebook(s).
Proceed to Step 2.
LINE
ETHERNET
DC 5V
To your Power Outlet
To the Ethernet Port on your
Computer(s)/Notebook(s)
To your Telephone Wall
Socket (ADSL line)
Page 9

9
Easy StartEasy Start
Easy StartEasy Start
Easy Start
2.1 For Windows® 98 / Windows® Me
iii Click on the IP Address tab.
Click the option Obtain an IP address
automatically and click OK to save
the settings.
Ensure that your ADSL Router is powered
on. Restart your system.
Proceed to Step 3.
i From your Windows desktop, right-click on the Network Neighborhood icon. Select
Properties.
ii From the Configuration tab, select TCP/IP-> xxx where xxx refers to the model of your
Ethernet Network Card that is connected to the ADSL Router.
Click Properties.
Step 2: Configuring Your Ethernet Network Card
This documentation assumes that your computer/notebook is already installed with an
Ethernet Network card.
For multiple users connection, please ensure that all your computers/notebooks are configured
with the following settings.
(This screen shot uses 3Com EtherLink
Ethernet card model as an example).
Page 10

10
Easy StartEasy Start
Easy StartEasy Start
Easy Start
ii Ensure that the field Connect Using indicates the model of your Ethernet Network Card
that is connected to your ADSL Router.
(This is important especially if you have more than one Local Area Connection icons displayed
at the Network and Dial-up Connections / Network Connections window. Ensure that you have
selected the correct one.)
Select Internet Protocol (TCP/IP) and click Properties.
iii Select the option Obtain an IP
address automatically and click OK.
Click OK again to close.
Proceed to Step 3.
2.2 For Windows® 2000 / Windows® XP
i Windows® 2000:
a) From your Windows desktop, right-click on the icon My Network Places and
select Properties.
b) At the Network and Dial-up Connections window, right-click on the Local Area
Connection icon and select Properties.
Windows® XP:
(Instructions are based on default Start menu option)
a) From your Windows desktop, click Start > All Programs > Accessories >
Communications > Network Connections.
b) Right-click on the Local Area Connection icon that reflects the model of your
Ethernet Network Card that is connected to the ADSL Router and click
Properties.
(This screen shot uses 3Com EtherLink
Ethernet card model as an example).
Page 11

11
Easy StartEasy Start
Easy StartEasy Start
Easy Start
Step 3: Configuring Your Internet Browser
3.1 Microsoft® Internet Explorer™ (based on IE 5.5)
i From your Windows desktop, double-click on your Internet Explorer icon to
launch your Browser.
ii From the Menu, click Tools and select Internet Options... .
iii Clear the offline content:
- Select the General tab. Click on Delete Files buttons.
- Click on Delete all offline content to enable the option.
- Click OK.
- Click on Clear History button followed by Ye s.
iv Select the Connection tab. Click the field, 'Never dial a connection'. (This option will
be grayed off if you have never installed an analog modem on your computer/notebook
before. Proceed with 3.1 v).
v Disable the Proxies:
- At the Connection tab, click on LAN Settings button.
- Disable all proxies settings if it has been enabled.
- Click OK.
vi Click OK again to close the dialog box. You may now proceed to Step 4 to establish
your Internet connection.
3.2 Netscape® Browser (based on Netscape® 4.7)
i From your Windows desktop, double-click on your Netscape icon to launch your
Browser.
ii Clear the offline content:
- Click Edit > Preferences.
- Double-click on Advanced and click Cache. Click on Clear Memory Cache and
Clear Disk Cache buttons.
iii Disable the Proxies:
- Double-click on Advanced and click Proxies. Ensure that the option Direct
Connection to the Internet is enabled.
iv Click OK for the changes to take effect. You may now proceed to Step 4 to establish
your Internet connection.
Page 12

12
Easy StartEasy Start
Easy StartEasy Start
Easy Start
Step 4: Connecting to the Internet
i From your Internet Browser, key in http://startmodem/ (or http://192.168.1.1/) at the
Address bar and hit <Enter>.
ii An ADSL Web Management interface will be launched. This Web Interface allows you
to get connected to the Internet as well as providing the administrative rights to
configure your Router's behaviour.
To get connected with the default connection profile, on the Quick Start page, enter
your username and password as given by your ADSL Service Provider and click
Connect.
Dial On Demand: To enable, click on the box (a tick will appear indicating that the
selection is enabled) and click Connect. You will see 'Dial-On Demand enabled waiting for traffic’ on the Quick Start page. Internet connection will automatically be
initiated when the ADSL Router detects outgoing traffic from your computer, that is,
when you entered an address at your Web Browser.
Disconnect when idle for ( ) mins: Applicable only when Dial On Demand is enabled.
You may enter a value in which the Internet connection will disconnect automatically
when there is no activity detected after the indicated idle time. (You may also click
‘Disconnect’ button at the Status page to end the Internet connection immediately).
Upon successful verification and authentication, you will be connected to the Internet.
Click Status from the ADSL Web Management to view your connection status.
Page 13

13
Easy StartEasy Start
Easy StartEasy Start
Easy Start
1. The default profiles have the DHCP Server and NAT (Network Address
Translation) options enabled.
2. If you are not using one of the connection profiles predefined on the
ADSL Router, please proceed to Appendix A for instructions on how to
create a new connection profile.
Appendix A Configuring Your ADSL Router for a
New Connection Profile
By default, 3 connection profiles have already been predefined on your ADSL Router. The
following shows the basics attributes defined for each of the profiles.
1) ATM Protocol = PPPoE routed
VPI/VCI = 0/100
2) ATM Protocol = PPPoE routed
VPI/VCI = 8/35
3) ATM Protocol = PPPoE routed
VPI/VCI = 0/35
All above 3 profiles have the DHCP Server and NAT (Network Address Translation) options
enabled. The DHCP Server range is 192.168.1.2 to 192.168.1.21 and default LAN IP Address
is 192.168.1.1.
For more details, please refer to the Expert Mode > WAN Connections on the ADSL Web
Management. Click Edit that corresponds to the profile.
The following attributes are required for a new connection profile. Check with your ADSL
Service Provider for the values.
• The ATM/Line Protocol
• For IPoA routed / RFC 1483 ethernet / RFC 1483 routed:
The addresses for
WAN IP ___________________
WAN Subnet Mask ___________________
VPI and VCI values ___________________
Default WAN Gateway ___________________
DNS Relay (Enabled/Disabled) ___________________
(to select Enabled)
DNS Server (Primary) ___________________
DNS Server (Secondary) ___________________
(optional)
IP Route __________________ (no routes is defined by default)
Page 14

14
Easy StartEasy Start
Easy StartEasy Start
Easy Start
• For PPPoA routed / PPPoE routed:
The PPP Authorization's
VPI and VCI values ___________________
User Name ___________________
Password ___________________
Auto DNS (Enable/Disable) ___________________
• The Encapsulation method ___________________
(By default, the Encapsulation method used in IPoA is LLC SNAP. Do not change this setting
unless specified by your ADSL Service Provider).
• The addresses for
LAN IP address ___________________ (default is 192.168.1.1)
LAN Subnet Mask ___________________ (default is 255.255.255.0)
Remote Gateway ___________________ (default is 192.168.1.1)
• To enable or disable NAT __________________ (default is enabled)
i Power on your computer/notebook.
ii Launch your Web Browser. On the Address bar, key in your new LAN IP address if
you have changed it. Otherwise the default is http://192.168.1.1 (or http://startmodem)
and hit <Enter>.
iii From the ADSL Web Management page, click Expert Mode > WAN Connections.
iv Click Create a new service.
v Select the required ATM protocol and click Configure.
vi Fill in the entries with the above information.
vii Click Configure
viii Click Save config. Follow the instructions prompted to save the changes permanently.
Close your Browser to exit ADSL Web Management.
© Copyright December 2002. All Rights Reserved.
P/N: 040-511487-101 (Ref:1100)
 Loading...