

Page 1
ACO6626
Convection Oven
USER MANUAL
PLEASE KEEP THIS USER MANUAL FOR FUTURE USE.
Page 2

2
USER MANUAL CONTENTS
SAFETY INSTRUCTIONS...................................................................................2
PACKAGE CONTENTS...................................................................................4
APPLIANCE OVERVIEW.................................................................................4
BEFORE USE....................................................................................................5
USING THE CONVECTION OVEN..................................................................6
HELPFUL HINTS...............................................................................................6
CLEANING AND MAINTENANCE..................................................................9
SAFETY INSTRUCTIONS
• Do not immerse or expose your Convection Oven’s main body and/
or its power cord to water or any kind of liquid substance to avoid
electric shock. In addition, do not use abrasive products (e.g.
steel wool pads) whenever cleaning since these may damage the
appliance’s surface.
• Do not touch the inside of the appliance while it is operating.
• Ensure all packaging materials and any promotional labels or stickers
are removed from the oven before the rst use.
• Some parts of the appliance will become hot upon usage. Use the
dedicated handles and/or knobs whenever using the appliance.
• Your Aztech Convection Oven is not intended for people with reduced
physical, sensory or mental capabilities, and/or lack of experience
or knowledge. Constant supervision (from a person responsible for
their safety) should be provided if such individuals would be using,
cleaning, or operating, the appliance.
• Keep the appliance out of reach of children. If children are within
the area during use, ensure to operate the appliance with extra care
for safety purposes. Keep its power cord safely kept away and out of
reach during use to avoid unwanted accidents.
• Should damages be found on the appliance, its power cord and/or
its other components – do not use the appliance and immediately
bring it to the Aztech Service Center for repair or replacement.
• Do not, in any kind of manner, disassemble, dismantle, and/or perform
appliance repair on your own and/or replace its components using
non-Aztech approved components and/or attachments.
NOTE: It is STRONGLY ADVISED to ensure that you have read all provided safety
guides and operating instructions in this user manual rst before proceeding.
Page 3

3
• Do not position the appliance in a humid environment and/
or in places exposed to multiple sources of heat such as stoves,
refrigerators, or microwave ovens. It is also important to keep it away
from ammable/combustible materials such as electric burners,
curtains and/or cloths especially during use.
• During use of appliance, make sure it has at least four inches of space
on all sides to allow adequate air circulation.
• Always unplug the power adapter if you are done using your
Convection Oven and allow it to cool down before doing any
cleaning, relocation, and/or appliance maintenance.
• Always turn all the knobs to OFF before removing the plug. When
unplugging its power adapter, do not pull or tug its cord. Hold the
power adapter rmly on its base when unplugging it from the power
outlet. Also, ensure that its power cord is kept away from any source
of heat and/or sharp edges that may cause external damage to the
cord.
• Do not cover any part of the Convection Oven with metal foil.
• Never leave the appliance unattended while broiling or toasting.
• Always wear protective oven gloves when putting and removing
items from the appliance.
• Do not use the appliance and/or its components for anything other
than its intended purpose. The appliance is intended for household use
only, commercial usage would void the warranty of the appliance.
• Before use, please check if the power voltage of your Convection
Oven correctly corresponds to your home’s power supply.
• Ensure to ALWAYS position your Convection Oven on a smooth,
dry, and stable ground. Placing the appliance on unstable surfaces
such as cushioned carpets and/or uneven surfaces may cause the
appliance to lose its balance during operation.
• Do not use wet hands in inserting or removing its power adapter to
prevent electrical shocks. It is recommended to thoroughly dry your
hands rst before every use
Page 4

4
3
4
1
2
PACKAGE CONTENTS
• ACO6626
Convection Oven
• Baking Tray
• Wire Rack
CONVECTION OVEN COMPONENTS
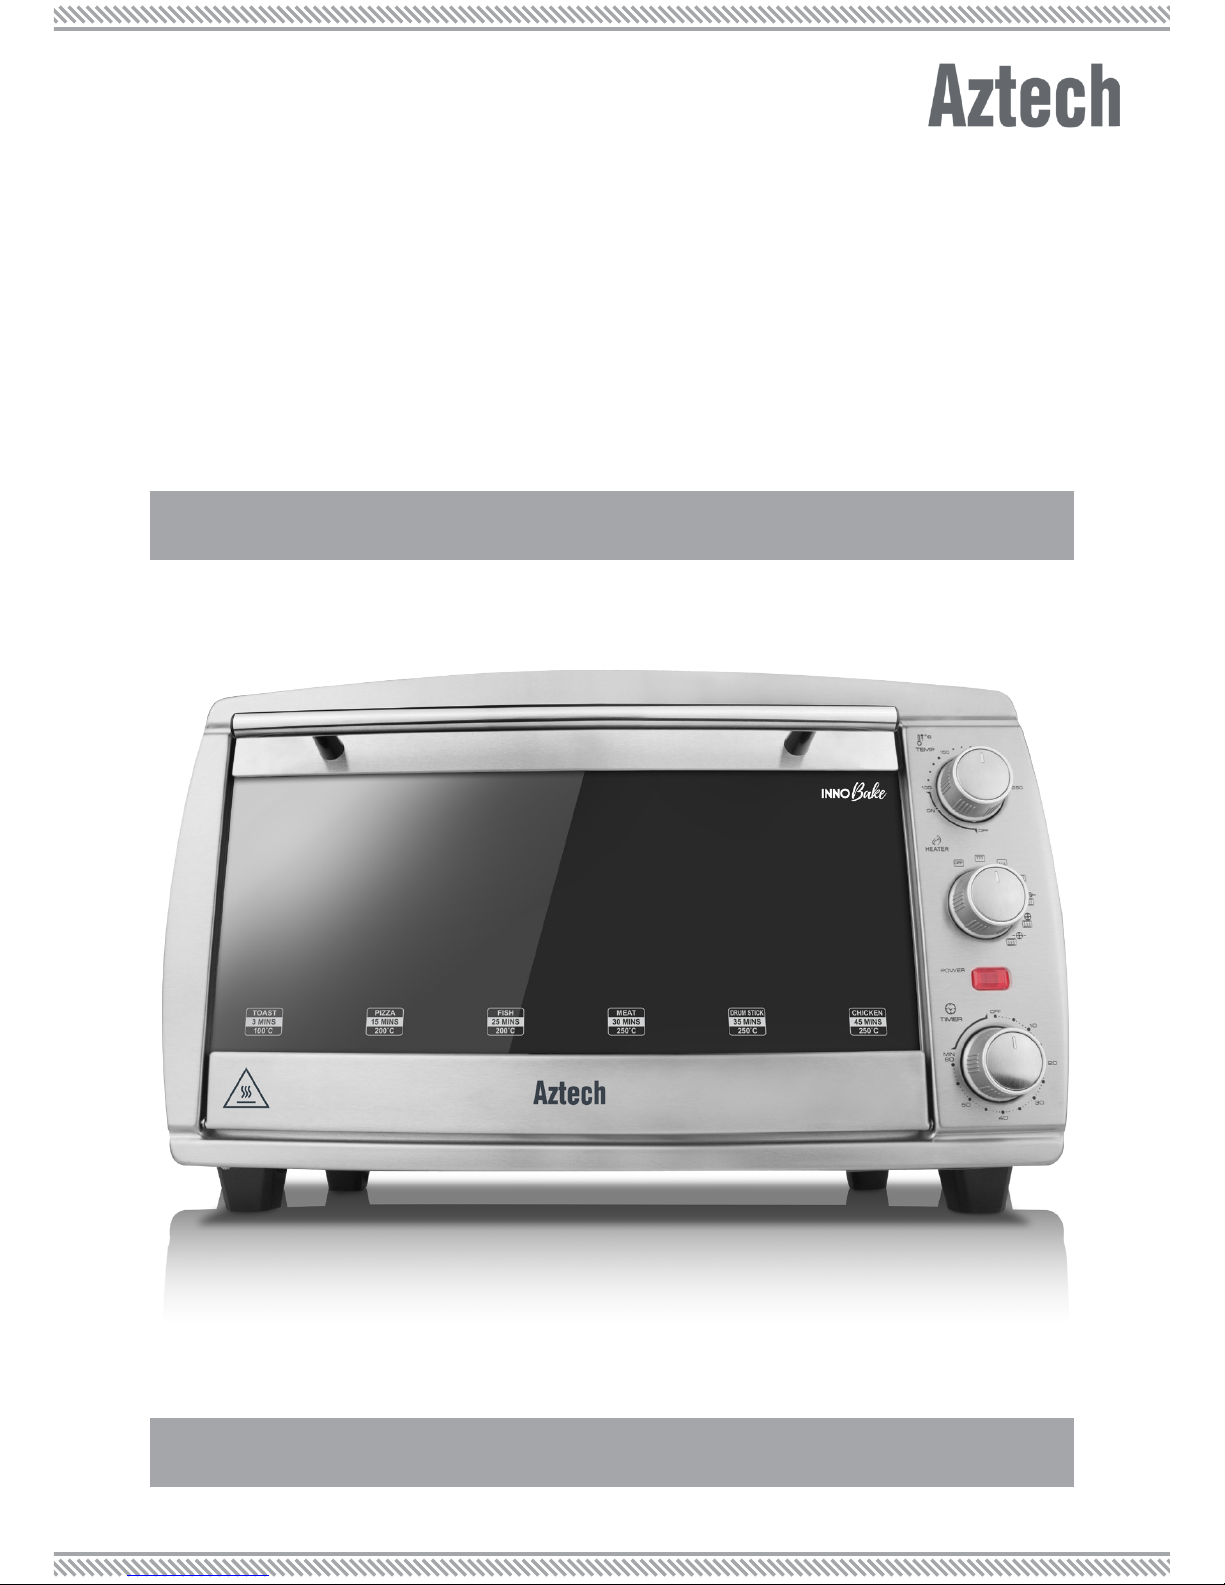
APPLIANCE OVERVIEW
• Tray Rack Handle
• Rotisserie Handle
• Rotisserie Skewer
• Crumb Tray
1. Thermostat switch knob
2. Heater & Functions switch
knob
3. Indicator light
4. Timer switch knob
5. Door handle
6. Tempered glass door
7. Baking tray
8. Wire rack
9. Tray Rack Handle
10. Rotisserie skewer
11. Rotisserie handle
12. Crumb tray
13. Inner oven lamp (not
shown, at the cavity
right corner)
7
• Easy Start Guide
• User Manual
• Warranty Policy
8
9
10
11
12
5
6
Page 5

5
HEATER & FUNCTIONS SWITCH KNOB
1 2 3
4
5
6
7
1. OFF
2. Top heating
3. Bottom heating
4. Top & Bottom heating
5. Top & Bottom heating &
Rotisserie function
6. Top & Bottom heating &
& Convection function
7. Top & Bottom heating
& Rotisserie function &
Convection function
BEFORE USE
Before rst use, make sure that the oven is unplugged and all knobs are in
the “OFF” position. Clean all accessories from the package, thouroughly dry
them, and re-assemble into the oven. Plug the cord into the outlet and you are
now ready to use it. It is recommended that you run it at the max temperature
for approximately 15 minutes. This will ensure that all residues left from the
manufacturing process are completely removed before using it.
Page 6

6
TIPS IN USING YOUR CONVECTION OVEN
• Before use, please check if the power voltage of your Convection Oven
correctly corresponds to your home’s power supply.
• Ensure to position your appliance on a smooth, dry, and stable ground.
• Do not position the appliance in a humid environment and/or in places
exposed to multiple sources of heat such as stoves. It is also important to
keep it away from ammable/combustible materials especially during use.
• Be relieved if there is any smoke during the rst use as it is normal for the rst
heating. It will disappear within 15 minutes.
• If you want to stop cooking even before the timer stops, just turn the timer
switch knob to OFF position.
• Place the crumb tray at the bottom for easy cleaning.
BAKE:
USING THE CONVECTION OVEN
1. Place the baking tray or wire rack with food into the bottom position of the oven.
Close the oven door.
2. Turn the heater switch knob to the third position , use the Bottom heating mode.
3. Turn the thermostat switch knob to the desired temperature.
4. Turn the timer switch knob to the desired cooking time.
5. When cooking is completed, open the oven door and remove the food.
6. Turn all the knobs to OFF position to switch off the oven.
Tips: Baking function can be used for roasting meats including chicken, baking cakes,
cookies and more.
BROIL:
1. Place the baking tray or wire rack with food into the top position of the oven.
Close the oven door.
2. Turn the heater switch knob to the second position , use the Top heating mode.
3. Turn the thermostat switch knob to the desired temperature.
4. Turn the timer switch knob to the desired cooking time.
5. When cooking is completed, open the oven door and remove the food.
6. Turn all the knobs to OFF position to switch off the oven.
Tips: Broiling function can be used for beef, chicken, sh and more others, and also can
be use to top-brown casseroles and gratins.
Page 7

7
TOAST:
1. Place the baking tray or wire rack with food into the middle position of the oven.
Close the oven door.
2. Turn the heater switch knob to the fourth position , use the Top & Bottom heating
mode.
3. Turn the thermostat switch knob to the desired temperature.
4. Turn the timer switch knob to the desired cooking time.
5. When cooking is completed, open the oven door and remove the food.
6. Turn all the knobs to OFF position to switch off the oven.
Tips: Toasting function can be used for bread, chicken, beef, and more others.Toasting
function can brown and crisp the outside of your bread while keeping the inside soft and
moist.
ROAST:
1. Place the baking tray or wire rack with food into the bottom position of the oven.
Close the oven door.
2. Turn the thermostat switch knob to the desired temperature.
3. Turn the heater switch knob to the fourth position , use the Top & Bottom heating
mode.
4. Turn the timer switch knob to the desired cooking time.
5. When cooking is completed, open the oven door and remove the food.
6. Turn all the knobs to OFF position to switch off the oven.
Tips: Roast function can be used for cooking a variety of meats and poultry that are
tender and juicy on the inside and roasted to perfection on the outside.
REHEAT:
1. Place the baking tray or wire rack with food into the bottom position of the oven.
Close the oven door.
2. Turn the thermostat switch knob to the desired temperature, suggested: 160°C.
3. Turn the heater switch knob to the fourth position , use the Top & Bottom heating
mode.
4. Turn the timer switch knob to the desired cooking time, suggested: 15 minutes.
5. When cooking is completed, open the oven door and remove the food.
6. Turn all the knobs to OFF position to switch off the oven.
Tips: Reheat function is ideal for reheating leftovers without browning.
Page 8

8
ROTISSERIE FUNCTION:
1. Turn the thermostat switch knob to the desired temperature.
2. Turn the heater switch knob to the desired position. Usually it is Top & Bottom heating mode.
3. Insert rotisserie rod into the center of the chicken or meat. (Reminder: Chicken and
large pieces of meat must be tied with cotton string to prevent them from hitting the
baking tray or the heaters.
4. Place rotisserie forks on rod. Ensure that the meat is in the center of the rod.
5. Tighten the screws on the rotisserie forks after the food is centered on the rod.
6. Use the rotisserie handle to insert arrow end of the rod into the drive socket in the right
side of the oven. Lift up the rod above the support bracket on the left side of the oven
and rest the rod on the bracket.
7. Turn the timer switch knob to the desired cooking time, then the cooking starts.
8. The moment the rod starts moving, check if the chicken or meats have enough space
when rotating. If it is too close to the heater or anywhere that may affect the moving
motor, you have to stop the timer and adjust the to a better position where it can move
smoothly.
9. You may have to stop the moving motor by turning off the oven to check the chicken
or the food you are cooking. If it needs more minutes to cook, just place back the food
inside and restart the timer.
10. Open the oven door completely when you move out the chicken or food. Place the
rotisserie handle with the hooks under the rotisserie rod. Lift and slide the rotisserie rod to
the left and remove from the oven carefully.
11. Place the chicken or food in a clean container or tray and then unscrew the rotisserie
forks from the rotisserie rod. Slide the food onto a serving tray or cutting surface.
12. Turn all the knobs to OFF position to switch off the oven if cooking is completed.
Additional: Convection function, you can choose Rotisserie & convection function for
help of more even cooking.
1 2 3 4
1. Rod 2. Fork 3. Screw 4. Arrow End
Page 9

9
CLEANING AND MAINTENANCE
CLEANING THE CONVECTION OVEN
1. Unplug the power adapter and allow the appliance to cool down.
2. Using a damp cloth, wipe off its external surface to remove dirt and/or
other particles. Please do not use abrasive products in cleaning these
areas since these may damage the appliance’s surface.
3. Removable wire rack, baking tray, and crumb tray can be washed, as
normal kitchenware.
4. Make sure all parts and accessories are dry thoroughly prior to plugging
oven in and using.
NOTE: Do not immerse your Convection Oven’s main body and/or its
power cord, in water and/or in any kind of liquid substance.
• Polythene bags used on the product or packaging could be
dangerous. To avoid suffocation, keep away from babies and children.
Such bags are not toys.
• For safety’s sake, when using a non-stick cookware or electric
appliance with non-stick coatings, keep your pet birds out of the
room. Birds have respiratory systems that are sensitive to many kinds of
fumes, including from overheated non-stick.
• The temperature of all surfaces marked with this symbol will be
very hot when the appliance is in use and after use. CAUTION: HOT
SURFACE. Do not touch these surfaces as possible injury could occur.
Allow to cool completely before handling this appliance.
WARNING!
Page 10

Copyright © 2016 Aztech Technologies Pte Ltd (CRN:199800635M ). All rights reserved.
 Loading...