

Page 1
AAP2645
Air Purier
USER MANUAL
PLEASE KEEP THIS USER MANUAL FOR FUTURE USE.
Page 2

Page 3

USER MANUAL CONTENTS
SAFETY INSTRUCTIONS...........................................................................3
PACKAGE CONTENTS..........................................................................5
APPLIANCE OVERVIEW .......................................................................5
USING THE AIR PURIFIER .......................................................................7
CARE AND MAINTENANCE...................................................................8
TROUBLESHOOTING...........................................................................11
SAFETY INSTRUCTIONS
NOTE: It is STRONGLY ADVISED to ensure that you have read all provided safety
guides and operating instructions in this user manual rst before proceeding.
• Should damages be found on the appliance, its power cord and/or
its other components – do not use the appliance and immediately
bring it to the Aztech Service Center for repair or replacement.
• Before use, please check if the power voltage of your Air Purier
correctly corresponds to your home’s power supply.
• Do not, in any kind of manner, disassemble, dismantle, and/or perform
appliance repair on your own and/or replace its components using
non-Aztech approved components and/or attachments.
• Do not use the appliance and/or its components for anything other
than its intended purpose. The appliance is intended for indoor
household use only, commercial usage would void the warranty of
the appliance.
• Do not use wet hands in inserting or removing its power adapter to
prevent electrical shocks. It is recommended to thoroughly dry your
hands rst before every use.
• Ensure to ALWAYS position your Air Purier on a smooth, dry, and
stable ground. Placing the appliance on unstable surfaces such as
cushioned carpets and/or uneven surfaces may cause the appliance
to lose its balance during operation.
• Do not position the appliance in a humid environment and/
or in places exposed to multiple sources of heat such as stoves,
refrigerators, or ovens. It is also important to keep it away from
ammable/combustible materials such as electric burners, curtains
and/or cloths especially during use.
3
Page 4

• Ensure that the Air Purier is positioned in a room wherein all windows
and doors are closed.
• Assemble each component as needed and as instructed. Ensure
that all components / parts are properly assigned and/or locked into
place.
• Do not put any object on top of your Air Purier’s outlet and/or position
the Air Purier in locations wherein its Air Inlets would be blocked.
• Do not insert foreign objects (e.g. pins, cloth buttons etc) and/or use
chemicals (e.g. solvents, aerosols) in your appliance’s air inlet and/
or outlets.
• During use, do not open/dislodge the appliance’s Front Panel. This
will stop the appliance’s operation.
• Keep the appliance out of reach of children. If children are within
the area during use, ensure to operate the appliance with extra care
for safety purposes. Keep its power cord safely kept away and out of
reach during use to avoid unwanted accidents.
• Always unplug the power adapter if you are done using your Air
Purier before doing any cleaning, relocation, and/or appliance
maintenance.
• When unplugging its power adapter, do not pull or tug its cord. Hold
the power adapter rmly on its base when unplugging it from the
power outlet. Also, ensure that its power cord is kept away from any
source of heat and/or sharp edges that may cause external damage
to the cord.
• Do not use the power cord to carry the appliance.
• Do not immerse, rinse, or expose your Air Purier and/or its power cord
to water or any kind of liquid substance.
• Your Air Purier is not intended for people with reduced physical,
sensory or mental capabilities, and/or lack of experience or
knowledge. Constant supervision (from a person responsible for
their safety) should be provided if such individuals would be using,
cleaning, or operating, the appliance.
4
Page 5

PACKAGE CONTENTS
• Air Purier
• Remote Control
• Easy Start Guide
• User Manual
• Warranty Policy
APPLIANCE OVERVIEW
AIR PURIFIER COMPONENTS
A
H
D
F
I E
G
C
B
C1C2C3
A. Control Panel with Digital Display. Provides access to your Air Purier’s
controls and displays the status and indicators of your appliance.
B. Front Panel. Encases the replaceable lters, air ducts, and other
internal components. The appliance would not operate/would stop
working if the Front Panel is improperly attached and/or removed.
C. Filters. Filters all contaminants and is composed of (C1)Washable Pre-
Filter, (C2) HEPA Filter, and (C3)Activated Carbon Filter.
D. Magnetic Lock. Locks in the Front Panel to the Main Body.
E. Air Inlets. Untreated-air passes into these inlets (with two on each
side). These inlets should always remain UNOBSTRUCTED.
F. Air Duct. Suctions air for further treatment and/or purication.
G. UV Lamp. Destroys and kills a variety of suctioned bacteria.
H. Handle. Provided to help you carry the appliance.
I. Air Outlet. Distributes puried air in your room. This outlet should always
remain UNOBSTRUCTED.
5
Page 6
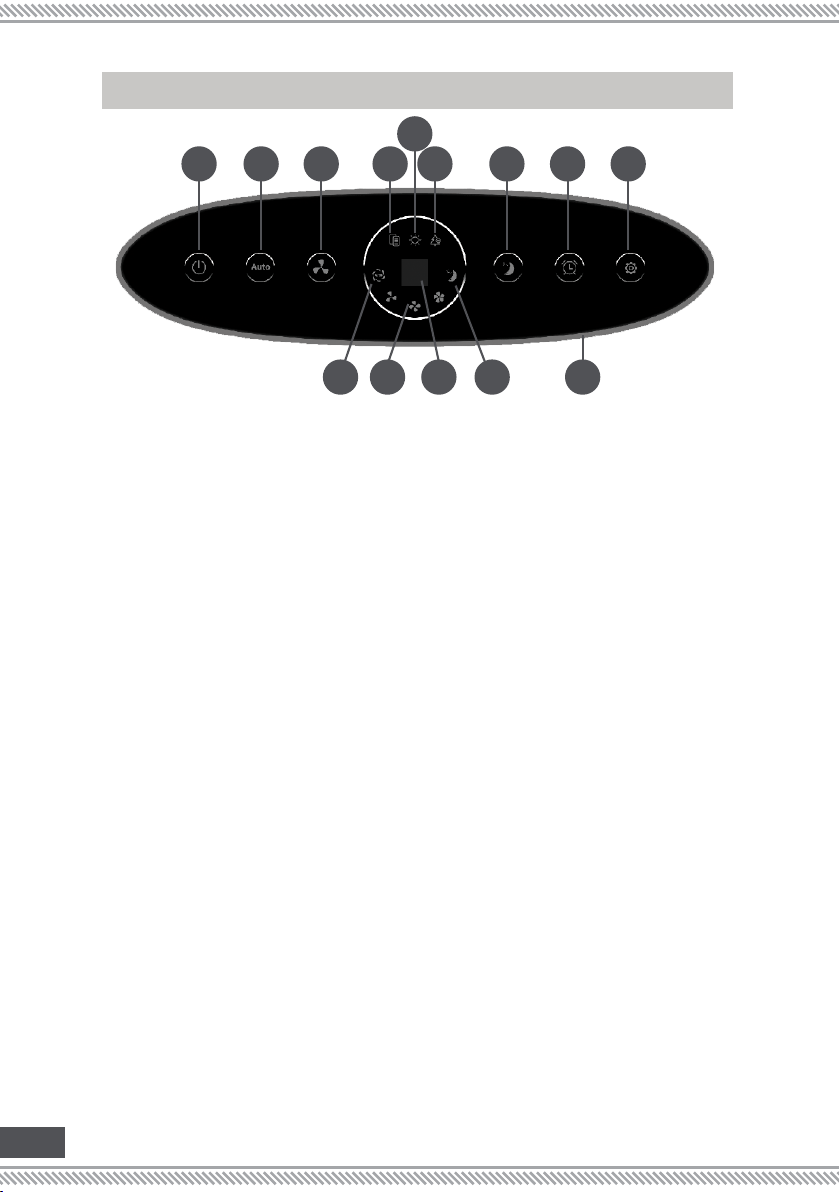
BUTTONS AND INDICATORS
A
DEF HC G IB
N
J K M
A. ON/OFF or Power. Press this button on the control panel or on the remote
control to turn ON/OFF the appliance.
B. Auto. Press this button on the control panel or on the remote control to enable
the AUTO feature of your Air Purier. Under this mode, the Air Purier will use its
sensor to detect your room’s current air quality and will automatically purify the
air using the fastest purifying setting until the indoor air quality is fully cleaned.
The appliance will immediately enter standby mode once the indoor air quality
is fully cleaned.
C. Speed. Press this button on the control panel or on the remote control to adjust
the current speed setting used by the Air Purier.
D. Filter Replacement Indicator. Indicates that the lters require replacement.
This LED would start blinking accompanied by ve audible beeps to indicate
that the lters already require changing. To turn OFF the Filter Replacement
Indicator, press the Sleep button for ve (5) seconds after replacing the lters.
E. UV Indicator. Indicates that the UV function is enabled. Press the Function
button on the control panel or on the remote control until UV is selected to
enable or disable the UV function.
F. Ion Indicator. Indicates that the Ionising function is enabled. Press the Function
button on the control panel or on the remote control to enable or disable
the ionising function of your Air Purier. This indicator will light up if the Ioniser
function is enabled.
G. Sleep. Press this button on the control panel or on the remote control for the
appliance to enter Sleep Mode. To exit this mode, simply press the Auto button
on the control panel or on the remote control.
H. Timer. Press this button on the control panel or on the remote control until the
preferred operation time (1H/2H/4H/8H) is selected. This can be done when
the device is powered ON or OFF.
I. Function. Allows you to enable the Ion and UV function.
J. Auto Mode Indicator. Indicates that the appliance is under Auto mode.
K. Speed Indicator. Indicates the current speed setting used by your Air Purier.
L. Timer Indicator. Indicates the selected time setting used by your Air Purier.
M. Sleep Mode Indicator. Indicates that the appliance is under Sleep Mode.
N. Air Indicator. Displays the air quality detected in the area. Red for Bad
6
L
Page 7

7-STAGE PURIFICATION PROCESS
1
1. Pre-Filter. Captures the largest particles, enhances the durability and
performance of the other lters.
2. 99.7% True HEPA Filter. Removes up top 99.7% of airborne pollutant particles
such as dust mites, smoke, and other airborne particles which are as small
as 0.3microns.
3. Activated Carbon Filter. Traps chemicals, odours, volatile organic
compounds (formaldehyde), viruses, and allergens.
4. Molecular Sieve Adsorption Layer. Strong absorption ability to block larger
particles to increase the lifespan for the activated carbon lter.
5. Cold Catalyst Filtration. Oxidises and breaks down compounds and toxic
substances such as benzene, ammonia, TOVC etc.
6. Ultraviolet Sterirlising Filter. Breaks down DNA of living organisms such as
bacteria, yeast, and mould spores, fungus, mildew and even molecular
bonds inside the RNA of a virus.
7. Negative Ion. Naturalises the air and eliminates airborne allergens and
germs.
2 3 4 5 6 7
USING THE AIR PURIFIER
TIPS IN USING YOUR AIR PURIFIER
• Before use, please check if the power voltage of your Air Purier
correctly corresponds to your home’s power supply.
• Ensure to ALWAYS position your Air Purier on a smooth, dry, and stable
ground.
• Do not position the appliance in a humid environment and/or in places
exposed to multiple sources of heat such as stoves, or ovens. Keep
the appliance away from ammable/combustible materials such as
electric burners, curtains and/or cloths especially during use.
7
Page 8

STEP 1: Unpack the Air Purier from
its packaging.
STEP 2: Remove the Front Panel
from the Main Body.
STEP 3: Unpack the lters from its
respective poly bag.
STEP 5: Install the Pre-Filter. STEP 6: Securely reinstall the
STEP 7 : Plug your Air
Purier to a power
outlet, press the ON/
OFF button, then
press AUTO.
STEP 4: Install the Activated
Carbon Filter and HEPA Filter.
Front Panel into the Main Body.
CARE AND MAINTENANCE
NOTE: Do not immerse the Air Purier’s main body, its power cord,
including its base in water and/or in any kind of liquid substance.
IN CLEANING THE APPLIANCE
Use a slightly damp cloth to wipe off accumulated dust on your Air Purier’s
external surface, its air inlets, and even its air outlet. You may also use a soft
brush in cleaning the air inlets in order to brush off dirt stuck in its holes.
8
Page 9

IN CLEANING / REPLACING FILTERS
The appliance will automatically remind you to replace the lters.
This is accompanied by a blinking Filter Replacement Indicator
and ve audible beeps. You may also regularly clean its lters to
keep your Air Purier in optimum performance.
FILTER
1 Pre-Filter About 2 months
2 HEPA Filter
3 Activated
Carbon
Filter
Usage Duration Action
(1 month if area
is dusty)
2 Months
2 Months
CLEANING
STEP 1: Remove the Front Panel
from the Main Body.
STEP 3: Press the SLEEP button
for 5 seconds to reset the Filter
Replacement Indicator.
FILTER
LIFESPAN
Use a Vacuum
Cleaner or rinse it with
hot water and dry
Use a Vacuum
Cleaner
Expose/dry in direct
sun light for 1 – 3 hours
STEP 2: Remove and install the
lters to be replaced.
STEP 4: Securely install the Front
Panel into the Main Body.
2800 Hours
2900 Hours
3000 Hours
ADDITIONAL NOTES :
• Regular lter cleaning and/or maintenance is recommended to
always have your Air Purier in top shape and performance.
• Filter Lifespans may vary from one environment (e.g. pollutants
present) to another. These can be changed/replaced if the
appliance sound and even the smell released becomes different.
• Each lter can be used for 1 whole year on an 8 hour average
running period.
• In replacing your lters, do not use non-Aztech approved lters. You
may contact your local dealer for these products.
9
Page 10

INSTALLING FILTERS
Ensure to install the lters according to this order : Activated Carbon Filter,
HEPA Filter, and Pre-Filter.
Activated Carbon Filter HEPA Filter Pre-Filter
REPLACING THE UV LAMP
The UV Lamp can be used for two (2) years. In replacing the UV Lamp:
1. Turn OFF your Air Purier
2. Remove the Front Panel and the three (3) lters as needed.
3. Remove the UV Lamp and replace as needed.
4. Reinstall the lters accordingly and attach the Front Panel in place.
10
Page 11

TROUBLESHOOTING
PROBLEM POSSIBLE REASON
The appliance is
1
not working
The Air Quality
2
indicator is always
RED in color
The Air Purier is
3
emitting an unusual
smell
The Air Purier is
4
producing too
much noise
Indoor air is still
contaminated but
5
the Air Purier is still
under Sleep mode
Check if the power adapter is properly plugged into the
power outlet.
Check if the Front Panel is properly locked into place.
The sensor might be severely affected by fumes, vapor,
sprays, and/or other similar chemicals. Try using your Air
Purier in a different room.
Check if the attached lters are still clean. Perform
cleaning if necessary.
Some of the lters might have reached its lifespan.
Replace the lters with new Aztech Air Purier lters.
Check if the HEPA Filter is still clean and/or still under its
recommended lifespan. Clean the lter using a vacuum
if necessary or replace the HEPA lter with an Aztech
approved lter.
Check if your Air Purier’s air inlets have blockages and/
or if its sensor is blocked. Try changing the location of
the Air Purier while ensuring that both the sensor and air
inlets are free from blockages.
Manually change the speed to HIGH to get the desired
effect.
11
Page 12

Copyright © 2016 Aztech Technologies Pte Ltd (CRN:199800635M ). All rights reserved.
 Loading...