

Page 1

Windows® 98 Second Edition, Windows® Me, Windows® XP and Windows® 2000 supported
Easy Start
(
Read Me First)
Version 1.5
Protocols Discussed:
RFC 1483
RFC 1577
RFC 2364
RFC 2516
ADSL USB Modem
Contents...
Safety Guidelines ..................................................... 2
About this Easy Start ............................................... 2
Package.................................................................. 2
LED Indicators ........................................................ 3
Step 1: Connecting the ADSL USB Modem ................ 4
Step 2: Installing the ADSL USB Modem Driver ......... 5
2.1 For Windows® XP .............................. 5
2.2 For Windows® Me.............................. 7
2.3 For Windows® 98 Second Edition ........ 8
2.4 For Windows® 2000 .......................... 9
Step 3: Running ADSL Modem Setup Program .......... 10
Step 4: Configuring the IP Settings (For RFC 1577
protocol only) ............................................ 12
4.1 For Windows® XP ............................. 12
4.2 For Windows® Me / Windows® 98
Second Edition .................................. 13
4.3 For Windows® 2000 ......................... 15
Step 5: Setting the PVCs values .............................. 16
Step 6: Establishing the Internet Connection ............. 16
(for RFC 2364 and RFC 2516 only)............. 16
Page 2
2
ADSL USB Modem Easy Start
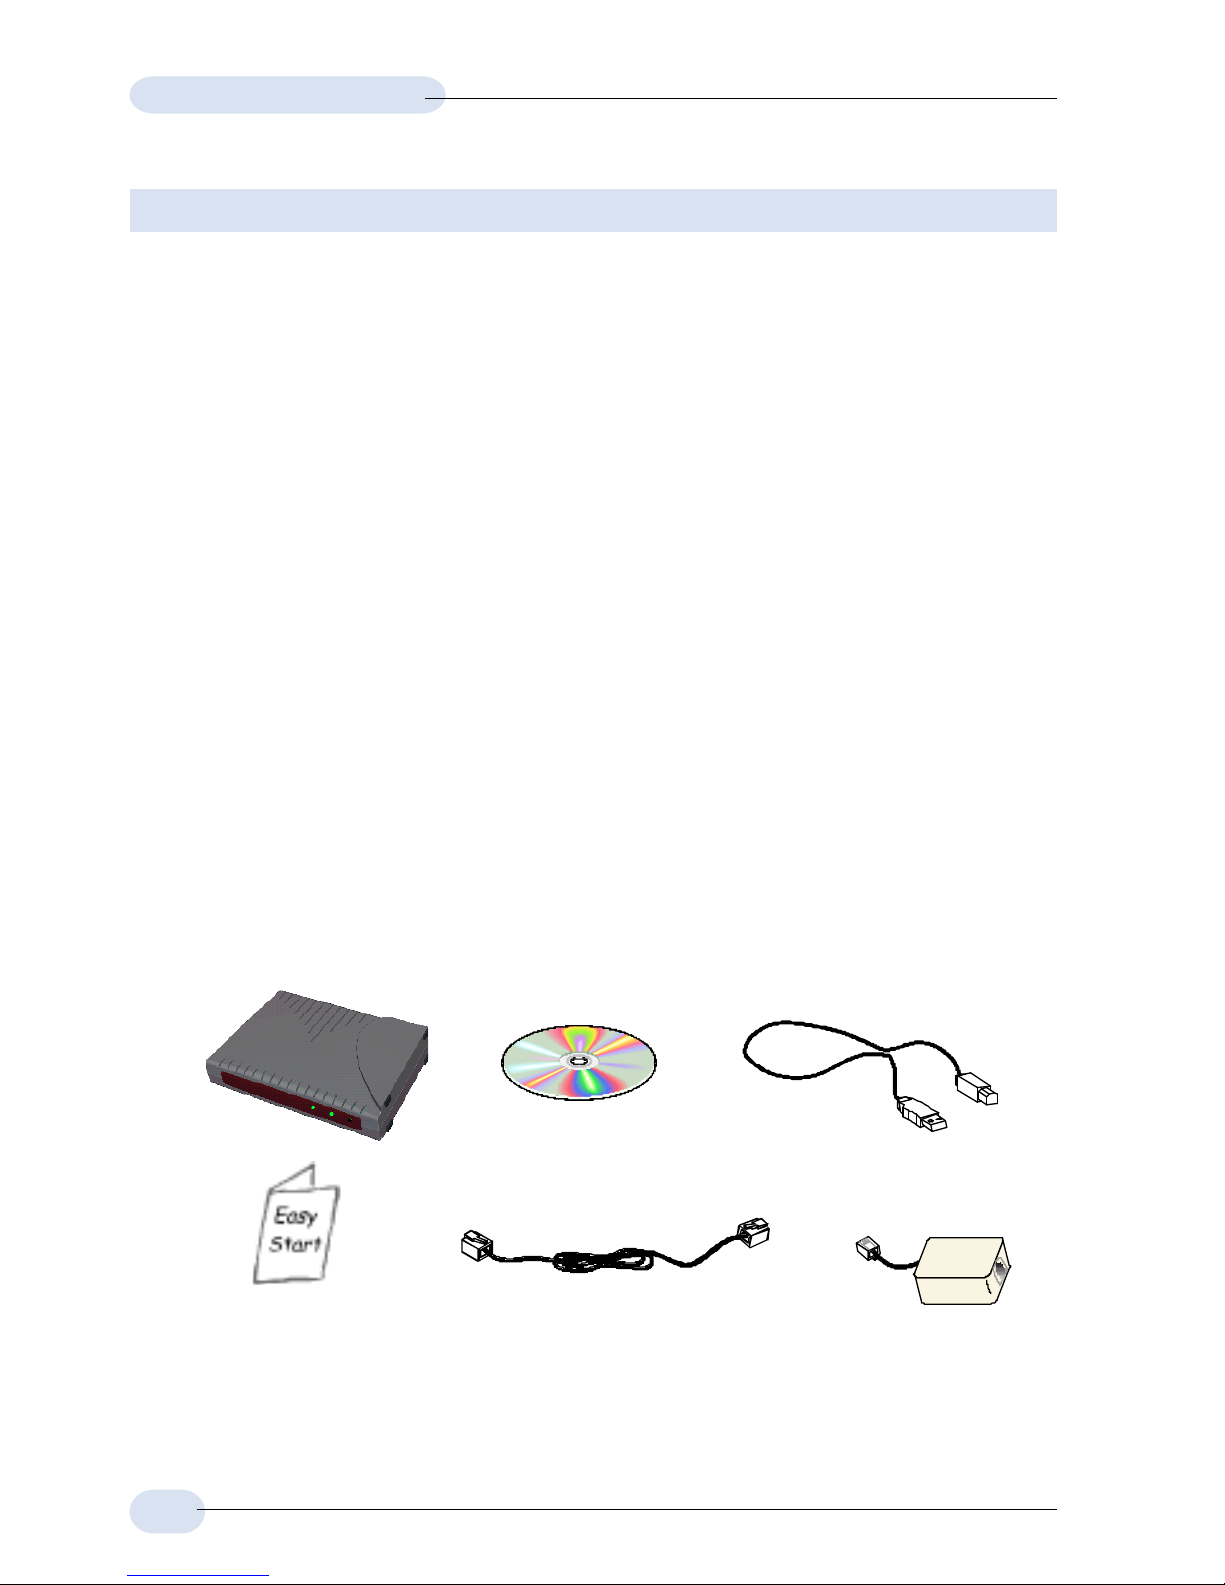
Package
Please check that you have the following items in your package. If you found
any missing items, please contact your dealer immediately.
(The actual cables that are included with your package may differ in appearance from country to
country)
Telephone extension cable
this Easy Start
USB cable
Installation CD
Product warranty does not apply to damage caused by lightning, power surges or wrong voltage.
Ë
Ì
Í
Î
Ê
ADSL USB Modem
Safety Guidelines
• Keep the modem away from fluid, direct sunlight and excessive heat
• During times of lightning strike/thunderstorm, do not use the modem
• This product is for use only in UL Listed computers
• To reduce the risk of fire, use only No. 26 AWG or larger telecommunication
line cord
About this
Easy Start
This booklet contains information on setting up your
ADSL USB Modem. It touches on the key installation
procedures to help you setup your modem in a breeze!
Ï
Micro-Filter
(optional)
1
1 Micro-Filter is only required for product model with '(M)'. If you are unsure of your product
model, refer to the label on your modem casing (e.g. DSL100U(M)). The Micro-Filter may or may
not be bundled with your package, depending on country purchased. If it is not bundled, you
may purchased it separately from your dealer.
Page 3
3
ADSL USB Modem Easy Start
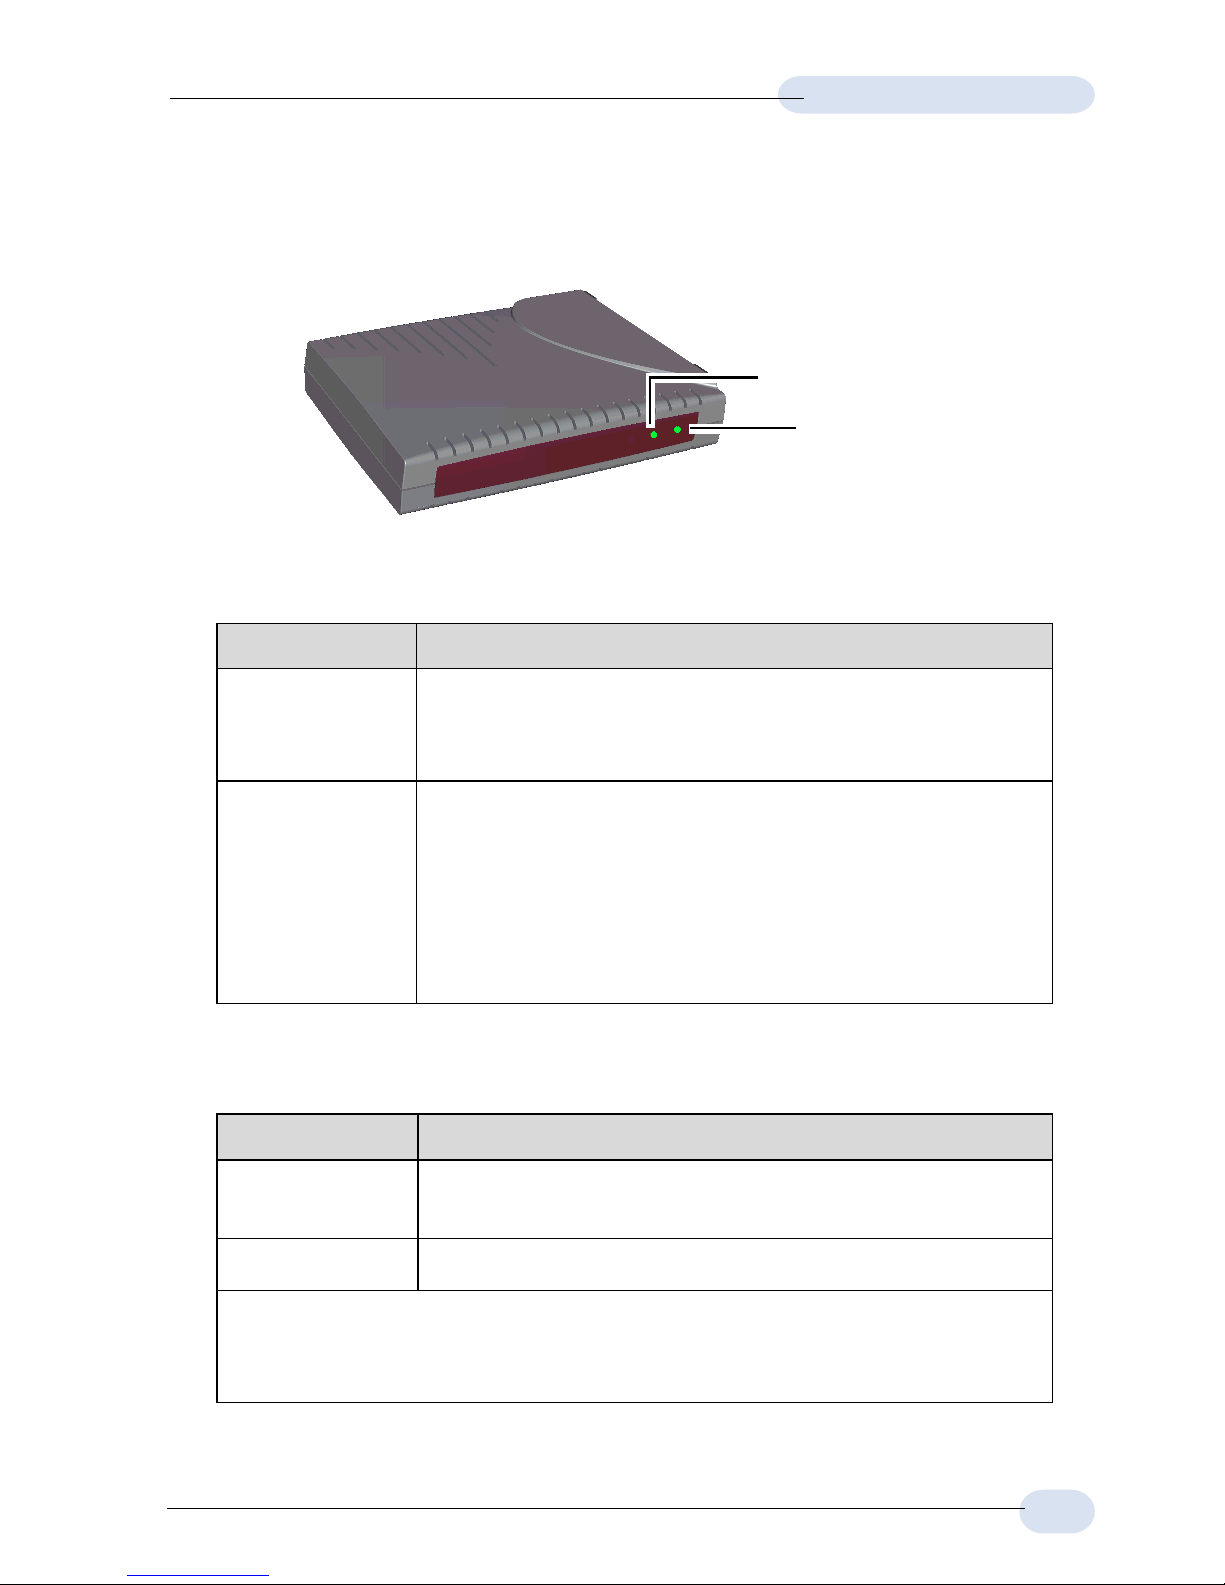
LED Indicators
Ê POWER
Ë ADSL LINK
Ê POWER
LEDs Activity Descriptions
Lights up When you have connected your modem to the
computer. Your computer must also be powered
on for the LED to light up.
Off i. You have not connected your modem to your
computer properly. See Step 1 - Connecting
Your ADSL USB Modem.
ii. You have not powered on your computer.
If problem persists, contact your dealer immediately.
Ë ADSL LINK
LEDs Activity Descriptions
Flashes Your modem is trying to establish an ADSL
connection.
Lights up When the ADSL connection is established.
If the ADSL Link LED keeps flashing and does not remain lit up, it
could be that your ADSL services has not been activated. Please
contact your ADSL Service Provider.
Page 4
4
ADSL USB Modem Easy Start
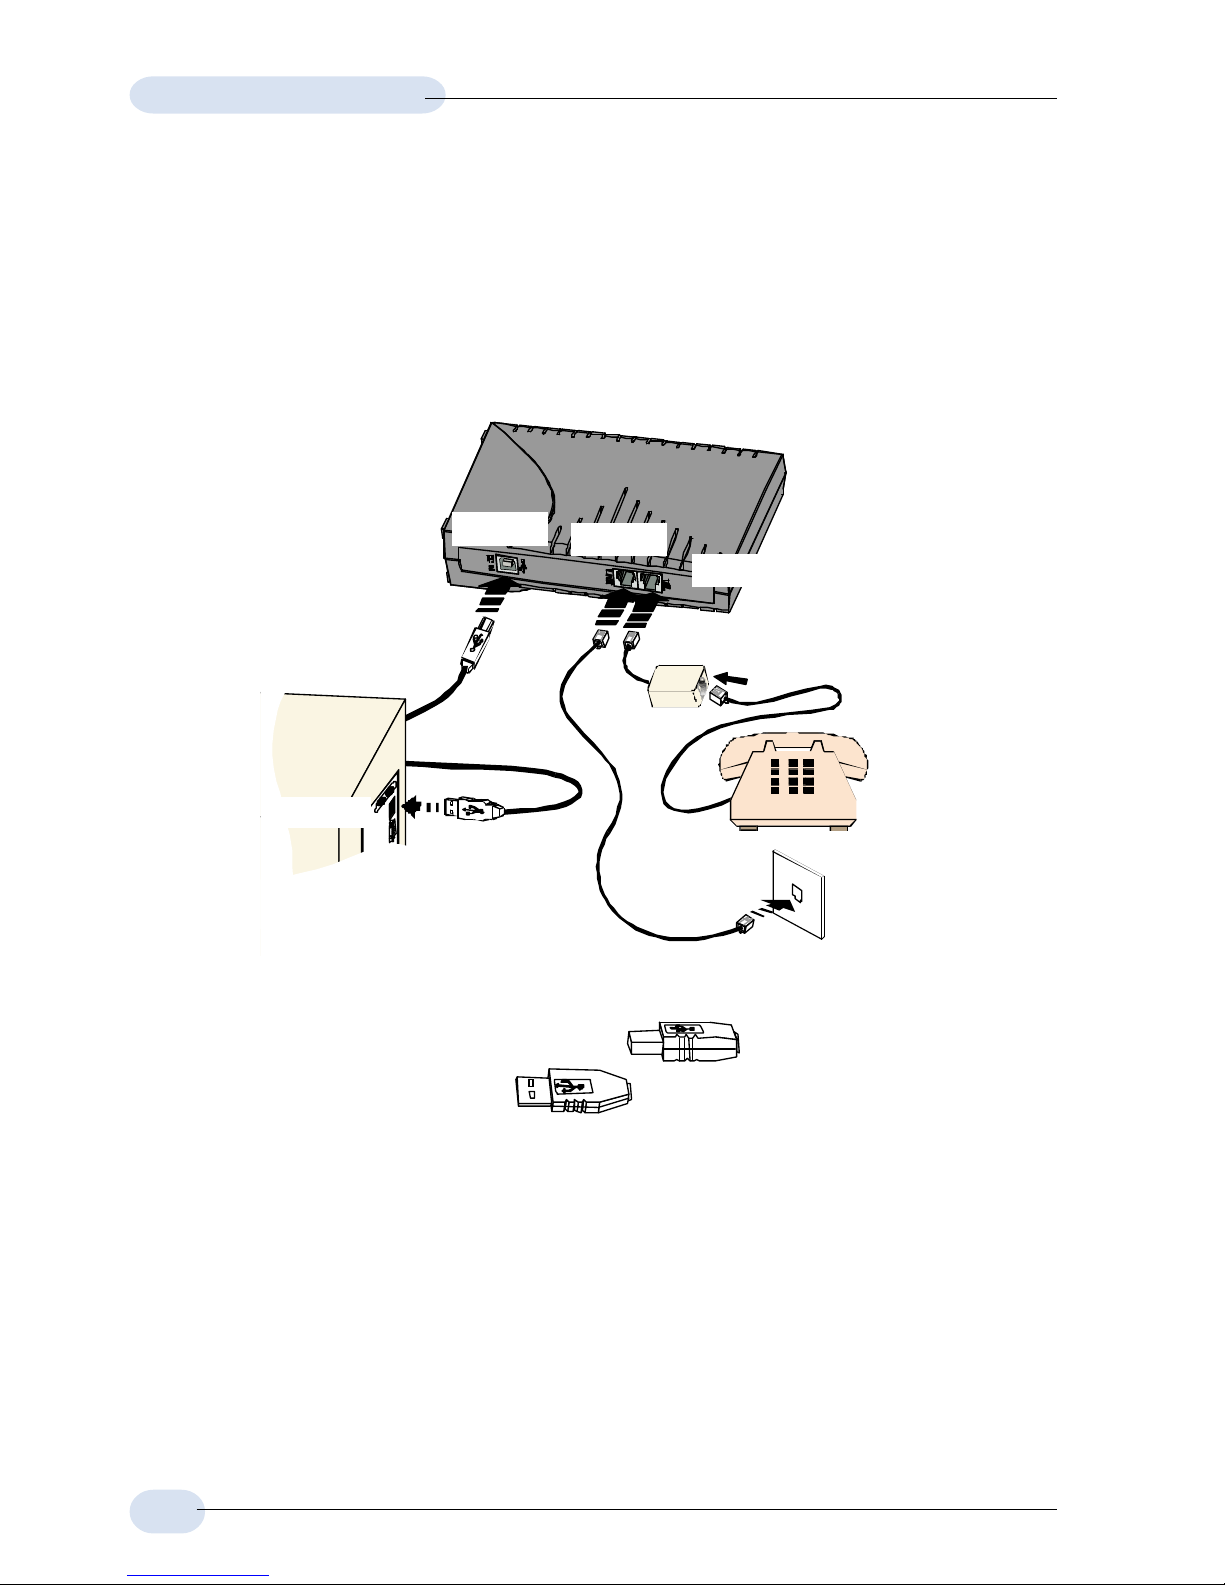
Step 1: Connecting the ADSL USB Modem
With the "Hot Swap" feature in this modem, you can connect your modem to your
computer anytime, without having to power off your system!
Carry out the connections as illustrated.
Ê Connect one end of the USB cable ( ) to the USB Port on your
modem and the other end ( ) to the USB port of your computer.
Ë Connect one end of the telephone extension cable to the Line Jack on your
modem and the other end to the telephone wall socket.
Ì A telephone set can be connected to the Tel Jack on your modem.
(This optional connection enables you to use your telephone and your modem
concurrently.)
2 Micro-Filter is only required for product model with '(M)'. If you are unsure of your product model,
refer to the label on your modem casing. For details on the usage of the Micro-Filter, please refer
to the Frequently Asked Questions section, 'Do I need to use Micro-Filter when using ADSL?'
Ë
Telephone set
Telephone
wall socket
Telephone
extension
cable
Ê
Ì
USB cable
USB port
USB Port
TEL jack
LINE jack
Micro-Filter
2
Page 5
5
ADSL USB Modem Easy Start
2.1 Installing the ADSL USB Modem Driver
- For Windows® XP
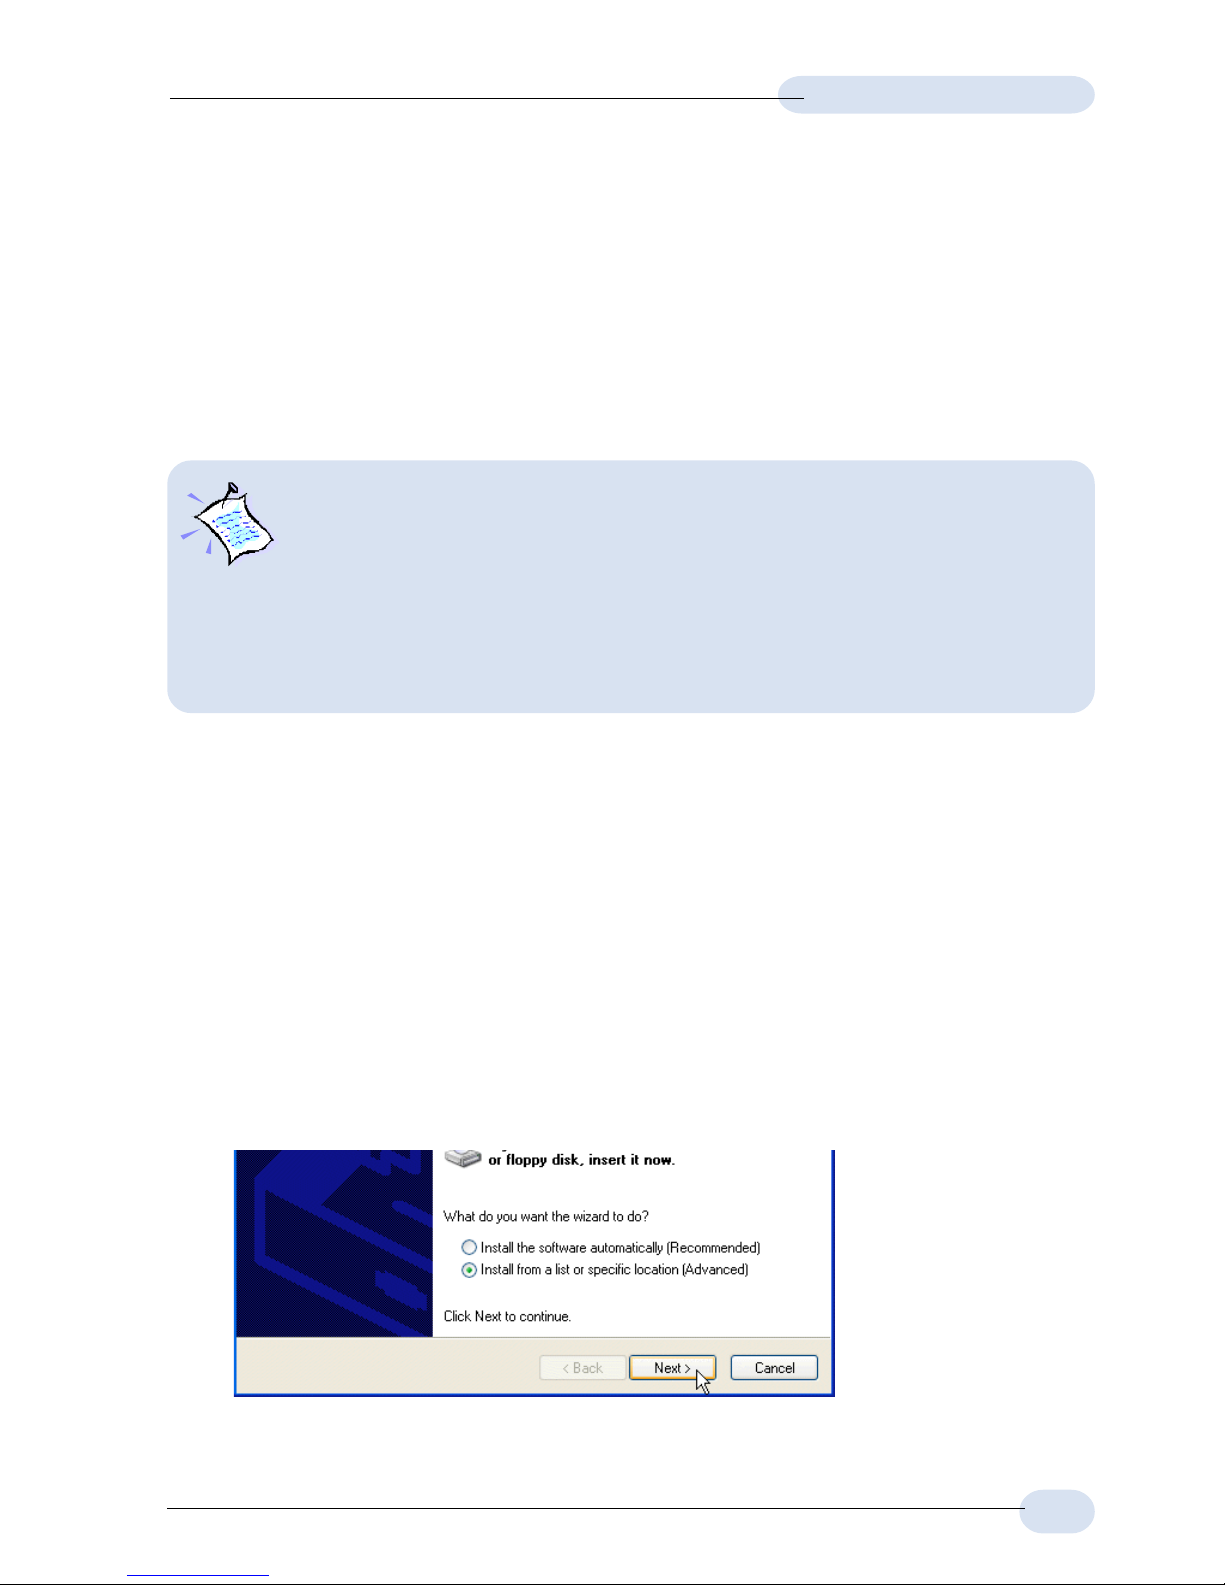
Power on your computer (if it is not powered on during connection). If you have
connected the USB cable from your computer to your modem as illustrated in Step
1, you will be prompted for the following driver installation.
Windows will detect your new device as USB device.
i. Place the Installation CD into your CD-ROM Drive.
Select Install from a list or specific location (Advanced) and click Next.
Step 2: Installing the
ADSL USB Modem Driver
The following contains the driver installation instructions for protocols RFC 1483,
RFC 1577, RFC 2364 and RFC 2516. You only need to install one of them, as
determined by your ADSL Service Provider.
1. For Windows® 98 Second Edition users, depending on your system’s
configurations, you may be prompted for your Windows CD-ROM dur-
ing the driver installation. Have it ready by your side.
2. The screen shots, screens information and steps illustrated in this
manual serve only as a guide. The exact information and steps you
see on your system may vary , depending on your system configurations. For any dissimilarities, follow closely to the instructions
as prompted on your PC screen.
Page 6

6
ADSL USB Modem Easy Start
ii. Click the option Include this location in the search.
Click Browse and navigate to your Installation CD for the required protocol
folder (RFC1483, RFC1577, RFC2364 or RFC2516 as determined by your
ADSL Service Provider).
Click Next.
(The example is based
on RFC2364)
Allow some time for the system to install the driver.
iv. Click Finish and proceed with the second stage of installation - Step 3:
Running ADSL Modem Setup Program.
iii. At the following prompt, click Continue Anyway. (This prompts occurs when
Windows does not have the record of your latest driver).
Page 7

7
ADSL USB Modem Easy Start
2.2 Installing the ADSL USB Modem Driver
- For Windows® Me
Power on your computer (if it is not powered on during connection). If you have
connected the USB cable from your computer to your modem as illustrated in Step
1, you will be prompted for the following driver installation.
Windows will detect your new device as USB device.
i. Place the Installation CD into your CD-ROM Drive.
Select Specify the location of the driver (Advanced) and click Next.
ii. Select Specify a location.
Click Browse and navigate to your Installation CD for the required protocol
folder (RFC1483, RFC1577, RFC2364 or RFC2516 as determined by
your ADSL Service Provider).
Click Next.
iii. Click Next again to proceed installation with the specified driver.
iv. Click Finish and proceed with the second stage of installation - Step 3:
Running ADSL Modem Setup Program.
(The example is based
on RFC2364)
Page 8

8
ADSL USB Modem Easy Start
2.3 Installing the ADSL USB Modem Driver
- For Windows
®
98 Second Edition
Power on your computer (if it is not powered on during connection). If you have
connected the USB cable from your computer to your modem as illustrated in
Step 1, you will be prompted for the following driver installation.
Windows will detect your new device as USB device.
i. Place the Installation CD into your CD-ROM Drive and click Next.
ii. Select Search for the best
driver for your device
(Recommended) and click
Next.
iii. Select Specify a location.
Click Browse and navigate
to your Installation CD for
the required protocol folder
(RFC1483, RFC1577,
RFC2364 or RFC2516 as
determined by your ADSL
Service Provider).
Click Next.
iv. Click Next to proceed installation with the specified driver.
v. Click Finish and proceed with the second stage of installation - Step 3:
Running ADSL Modem Setup Program.
(The example is based on RFC2364)
Page 9

9
ADSL USB Modem Easy Start
2.4 Installing the ADSL USB Modem Driver
- For Windows
®
2000
Power on your computer (if it is not powered on during connection). If you have
connected the USB cable from your computer to your modem as illustrated in
Step 1, you will be prompted for the following driver installation.
Windows will detect your new device as USB device.
i. Place the Installation CD onto your CD-ROM Drive and click Next.
ii. Select Search for a suitable driver for my device (recommended) and
click Next.
iii. Select Specify a location and click Next.
iv. Click Browse and navigate to your Installation CD for the required protocol
folder (RFC1483, RFC1577, RFC2364 or RFC2516 as determined by
your ADSL Service Provider).
Click OK.
(The example is based
on RFC2364)
Page 10

10
ADSL USB Modem Easy Start
Step 3: Running ADSL Modem
Setup Program
i. At the following Welcome prompt, click Next. The detection of the hardware
will begin.
For Windows® XP
You may be prompted a few times with the following window. This happens
when Windows does not have the record of this latest driver. Click Continue
Anyway to proceed. Proceed with step ii.
v. Click Next again to proceed installation with the specified driver.
vi. Click Finish and proceed with the second stage of installation. See Step
3: Running ADSL Modem Setup Program.
Page 11

11
ADSL USB Modem Easy Start
For Windows® Me
Upon copying files complete, click Finish to complete the installation. Restart
when prompted. Proceed with step ii.
For Windows® 98 Second Edition
You may be prompted for the Windows CD-ROM. Place the Windows CD-
ROM into your CD-ROM Drive and click OK.
At the prompt for files location, enter the path of your Windows CD-ROM (e.g
D:\win98) in the text box and click OK.
Restart when prompted. Proceed with step ii.
For Windows® 2000
You may be prompted with a Digital Signature Not Found window twice.
Click Yes on both occasions to proceed.
Click Finish to complete the installation.
ii. If you are installing RFC1577 protocol, please proceed with Step 4 - Configuring
the IP Settings. For the rest of the protocols, please proceed with Step 5 -
Setting the PVCs Values.
Page 12

12
ADSL USB Modem Easy Start
Step 4: Configuring the IP Settings
(For RFC 1577 protocol only)
4.1 Configuring the IP Settings - For Windows® XP
(Instructions are based on default Start menu option)
i. From your Windows taskbar, click Start > More Programs > Accessories >
Communications > Network Connections.
ii. From Other Places, click My Network Places. Right-click on the LAN Area
Connection and select Properties.
iii. Ensure that the field Connect Using indicates ADSL USB Modem.
(This verification is important as you may more than one Local Area Connection icons
installed in your system).
(Addresses shown here are examples)
Select Internet Protocol (TCP/
IP) and click Properties.
iv. Click Use the following IP address.
Enter the addresses as given by
your ADSL Service Provider.
Click Use the following DNS server
addresses. Enter the DNS server
addresses as given by your ADSL
Service Provider.
Click OK. Click OK again to
close.
Restart your system when prompted.
Proceed with Step 5 to set the VPI and VCI values.
Page 13

13
ADSL USB Modem Easy Start
4.2 Configuring the IP Settings
- For Windows® Me / Windows® 98 Second Edition
i. From your Windows desktop, right-click on the Network Neighborhood icon.
Select Properties.
ii. From the Configuration tab, select TCP/IP-> ADSL USB Modem and click
Properties.
iii. Select the IP Address tab.
Click Specify an IP address.
Enter the addresses as given
by your ADSL Service Provider.
(Addresses shown here
are examples)
iv. Select DNS Configuration tab.
Click Enable DNS.
Enter the Host name.
Enter the DNS Server Search Order.
addresses and click Add. (Values to be
provided by your ADSL Service Provider)
(Addresses shown here are examples)
Page 14

14
ADSL USB Modem Easy Start
v. Select the Gateway tab.
Enter the New Gateway
address assigned by your
ADSL Service Provider and
click Add.
vi. Select Advanced tab.
Select Yes from the Value
drop-down list and click
OK.
Proceed with Step 5 to set the VPI and VCI values.
Page 15

15
ADSL USB Modem Easy Start
4.3 Configuring the IP Settings - For Windows® 2000
i. From your Windows desktop, right-click on the icon My Network Places.
Select Properties.
At the Network and Dial-up Connections window, right-click on the Local
Area Connection icon and select Properties.
ii. Ensure that the field Connect Using indicates ADSL USB Modem.
(This verification is important as you may more than one Local Area Connection icons
installed in your system).
(Addresses shown here are examples)
Select Internet Protocol (TCP/IP)
and click Properties.
iii. Click Use the following IP address.
Enter the addresses as given by
your ADSL Service Provider.
Click Use the following DNS
server addresses. Enter the DNS
server addresses as given by your
ADSL Service Provider.
Click OK.
Click OK again to close.
Restart your system when prompted.
Proceed with Step 5 to set the VPI and
VCI values.
Page 16

16
ADSL USB Modem Easy Start
Step 5: Setting the PVCs values
Different Service Providers have different settings for their VPI and VCI. Check with
your ADSL Service Provider for the values and follow the below instructions to
change, if necessary.
i. From your Windows taskbar, click Start > Programs > ADSL USB Modem
> Configure (or Setting).
ii. Click Settings to change the VPI, VCI values and encapsulation.
Step 6: Establishing the Internet Connection
(for RFC 2364 and RFC 2516 only)
For RFC 1483 and RFC 1577 users, you need to install a thirdparty dial-up software to connect to the Internet.
i. To connect to the Internet, double-click shortcut icon ADSL USB Modem Dial-
up on the Windows desktop.
(The shortcut icon was created when you installed the modem driver successfully.)
ii. Enter your user name and password. Click Connect.
iii. Upon successful dial-up, you should be able to see an icon ( )
displayed on the Windows system tray. Double-click on the icon.
Duration indicates the amount of time you are connected to the Internet.
You may click Disconnect to end your session.
If you are not able to connect to the Internet, you may refer to the Frequently Asked
Questions, 'I am not able to connect to the Internet' on your Installation CD.
On commonly asked questions or on problems encountered during
setting up / when running your modem, please refer to the Frequently
Asked Questions (\manuals folder) on your Installation CD for
solutions.
Windows® 98 Second Edition, Windows® Me, Windows® XP and Windows® 2000 are registered trademarks of
Microsoft Corp.
© Copyright January 2002. All Rights Reserved.
P/N: 040-511425-151 (Ref: 100)
 Loading...