

Page 1
AZiO External HD Kit
User’s Guide
Page 2

Table of Contents
Overview ……………………………………………………………………………… 3
Precautions! ……………………………………………………………………..….. 4
Package Contents ………………………………………………………………..… 5
System Requirements for PC ……………………………………………………. 6
System Requirements for Mac ………………………………………………..… 7
Technical Specifications ………………………………………………………….. 8
Installing a 3.5” Hard Drive ……………………………………………………... 9
Setting up the Drive ……………………………………………………………… 17
Naming your Drive …………………………………………………………..…… 19
Partitioning/Formatting the Drive ……………………………………….….. 20
Formatting for Mac & PC compatibility ……………………………………………………………….…. 20
Partitioning/Formatting in Windows XP or 2000 …………………………………………………….. 20
Partitioning/Formatting in Windows Me or 98SE …………………………………………………….. 21
Formatting in Mac OS X ………………………………………………………………………………………. 21
Formatting in Mac OS 9 ………………………………………………………………………………………. 22
How to safely dismount the Drive ……………………………………………. 23
AZiO External HD Kit: Features Explored ……………………………...…… 24
Hi-Speed USB 2.0 ……………………………………………………………………………………………….. 24
FireWire 400 …………………………………………………………………………………………………….... 24
Serial ATA ……………………………………………………………………………………………………..…… 25
Frequently Asked Questions …………………………………………………... 26
Troubleshooting ………………………………………………………………….. 28
Troubleshooting for Mac users ………………………………………………………………………..…… 29
Warranty ……………………………………………………………………………. 32
Contact Information …………………………………………………………….. 33
Notices ………………………………………………………………………………. 34
Troubleshooting for PC users …………………………………………………………………………….... 28
Copyright © 2006 by AZiO Corp. – www.aziocorp.com
2
Page 3

Overview
Thank you for purchasing the AZiO External HD kit, one of the most stylish and
practical data storage solutions available. The AZiO HD Kit can convert your
internal 3.5” hard disk drive into a hi-speed external storage device. Use it to
store your collection of documents, photos, media files, and/or backup a copy of
all your important data. This external drive kit is very easy to install, is hotswappable, and is backed by AZiO Corporation’s 1-year Limited Warranty.
This AZiO product features high-quality construction, advanced external interface
technology, and state-of-the-art industrial design, assured to provide you with
years of reliable performance.
The information in this guide pertains to the following models:
ENC311-C41: USB 2.0 + FireWire 1394a Interface
ENC311-U41: USB 2.0 Interface
ENC311SU31: eSATA + USB 2.0 Interface
ENC311SU41: eSATA + USB 2.0 Interface
This guide contains important information for the proper installation, use, and
care of your AZiO product. Please read this guide carefully and retain it for future
reference.
Copyright © 2006 by AZiO Corp. – www.aziocorp.com
3
Page 4

Precautions!
Failure to follow the precautions below may result in damage to the device, loss
of data, and voiding of the warranty.
If using your AZiO product as a general-purpose storage device (as
opposed to a backup device) AZiO strongly recommends that you backup
the files stored on the device. AZiO will not be responsible for loss of data
or corruption; nor will AZiO perform recovery of lost data or files.
Do not attempt to disassemble or modify the internal components. If the
device is malfunctioning, contact AZiO Technical Support via the Support
page at www.aziocorp.com/support.php or call (909) 468-1198 (Pacific
Time) during regular business hours.
Dual-interface devices: Use only one interface at a time.
Do not expose the device to rain or use it in damp or wet conditions.
Never place containers of liquids on the device. This can damage the
device and increase the risk of electric shock, short-circuiting, fire, or
personal injury.
Do not use the device in temperatures outside the range of 40° F - 130°
F.
Do not use a third party AC adapter or power cord.
Do not bump, jar or drop the device.
Do not disconnect any cables while the device is powered on without first
un-mounting the device.
Copyright © 2006 by AZiO Corp. – www.aziocorp.com
4
Page 5

Package Contents
1) AZiO External HD Enclosure
2) AC Adapter & Power Cord
3) Software CD
4) Vertical Placement Stand
5) Quick-Start Guide
6) Mail-In Registration Card
7) USB 2.0 Cable
8) 6-pin to 6-pin FireWire Cable (ENC311-C41 Only)
9) eSATA to eSATA Cable (ENC311SU31 & ENC311SU41)
*If you are missing any item listed above, please contact Customer Service at
support@aziocorp.com
, or call (909) 468-1198.
Copyright © 2006 by AZiO Corp. – www.aziocorp.com
5
Page 6
System requirements for PC
Minimum 233 Mhz
Windows XP, 2000, Me or 98SE
Available interface port:
-USB 2.0 Users: USB Port
-FireWire 1394a Users: 6-pin FireWire Port
-eSATA Users: External Serial ATA (eSATA) Port
Windows XP (USB 2.0) users:
You must have Windows XP Service Pack 1 or later or the drive will operate at
USB 1.1 speeds. Go to www.microsoft.com and click on the Windows Update
link.
Windows 2000 users:
In order to use the USB 2.0 or the FireWire connection, you must have Windows
2000 Service Pack 4 or later. Go to www.microsoft.com and click on the
Windows Update link.
Windows Me (USB 2.0) users:
We strongly recommend getting the latest updates. Go to www.microsoft.com
and click on the Windows Update link.
Windows 98SE users:
In order to use the USB 2.0 connection you must install the USB 2.0 driver
included on the supplied CD. (See “Mounting a USB-Connected Drive” for
instructions).
In order to use the FireWire connection, you will need Windows 98
Second Edition 1394 Storage Supplement. You can download it at
http://www.microsoft.com/windows98/downloads/default.asp.
Copyright © 2006 by AZiO Corp. – www.aziocorp.com
6
Page 7
System Requirements for Mac
Power Macintosh (G5, G4, G3, Mac mini, iBook, PowerBook, or iMac)
Mac OS 9 or Mac OS X
ENC-303SU eSATA: MAC OS 10.2 or later
Available interface port:
-USB 2.0 users: USB Port
-FireWire 1394a users: 6-pin FireWire Port
-eSATA Users: External Serial ATA (eSATA) Port
Mac OS 9 Users:
Mac OS 9 does not support USB 2.0. If using the USB 2.0 interface on OS
9, the device will operate at USB 1.1 speed.
For FireWire connectivity, Mac OS 9 requires FireWire software version 2.7
or later. If you have Mac OS 9.1 or later you already have FireWire 2.7 or
later. Mac OS 9 updates are available at
http://docs.info.apple.com/article.html?artnum=75288.
USB 1.1 Compatibility:
This device is backward compatible with USB 1.1. However, if you
connect this device to a USB 1.1 port, it will operate at USB 1.1
speeds (up to 12 Mbps).
FireWire users with laptops:
If your laptop has a 4-pin FireWire port, you will need to obtain a
6-pin to 4-pin FireWire cable (not included).
eSATA users with SATA ports:
If your computer has a SATA port, please upgrade to eSATA by
using the included SATA to eSATA converter bracket.
Copyright © 2006 by AZiO Corp. – www.aziocorp.com
7
Page 8

Technical Specifications
Model #
USB 2.0 …………………..………………………………………………….…. ENC311-U41
USB 2.0 + FireWire 400 ……………………………………….……….… ENC311-C41
USB 2.0 + eSATA ………………………………………ENC311SU31/ENC311SU41
Dimensions:
Length x Width x Height (inches) …………………….………… 8.4” x 5.1” x 1.2”
Length x Width x Height (mm) …………………………….………. 213 x 129 x 30
Weight …………………………………………………………………………………………..... 1.5 lbs
Interface Transfer Rate (max. Mbps)
USB 2.0 …………………………………………………………………………………….. 480
FireWire 400 ………………………………………………………………………….……. 400
eSATA ……………………………………………………………………………………… 3,000
Chassis (approved/recognized) …………………………………………………..… FCC/CE/UL
Power Requirement ……………………………………………………….... +5VDC & +12VDC
Startup Current (max A) …………………………………………..…………….……… 2.0 (12V)
External Power Supply …………………………………………………………… 34W Switching
AC Input ……………………………………………………………… 100-240V ~ 47/63Hz 1.2A
DC Output ……………………………………………………………. 5.0V (2.0A), 12.0V (2.0A)
Copyright © 2006 by AZiO Corp. – www.aziocorp.com
8
Page 9

Installing a 3.5” Hard Drive
1. Configure your IDE Hard Drive as a Master
(Does not apply for SATA Hard Drives)
Your IDE drive has a jumper black at the back (situated between the ATA
interface connector and the power connector). The jumper block has an
array of pins. You may need to plug one or more jumpers onto specific
pins in order to configure the drive as a master. Your drive most likely
came with jumpers already attached to the jumper block.
Each IDE drive manufacturer has a different jumper arrangement for
specific drive configurations (master, slave, cable select, etc). Refer to the
instructions that came with your drive and, if necessary, arrange the
jumper(s) so that the drive is configured as a master. You should use
small needle-nose pliers or tweezers to remove/insert jumpers.
If you do not have your drive’s manual, most manufacturers make
manuals available for download from their websites. Be sure to download
the correct manual for your specific model as jumper configurations can
differ from model to model.
Copyright © 2006 by AZiO Corp. – www.aziocorp.com
9
Page 10
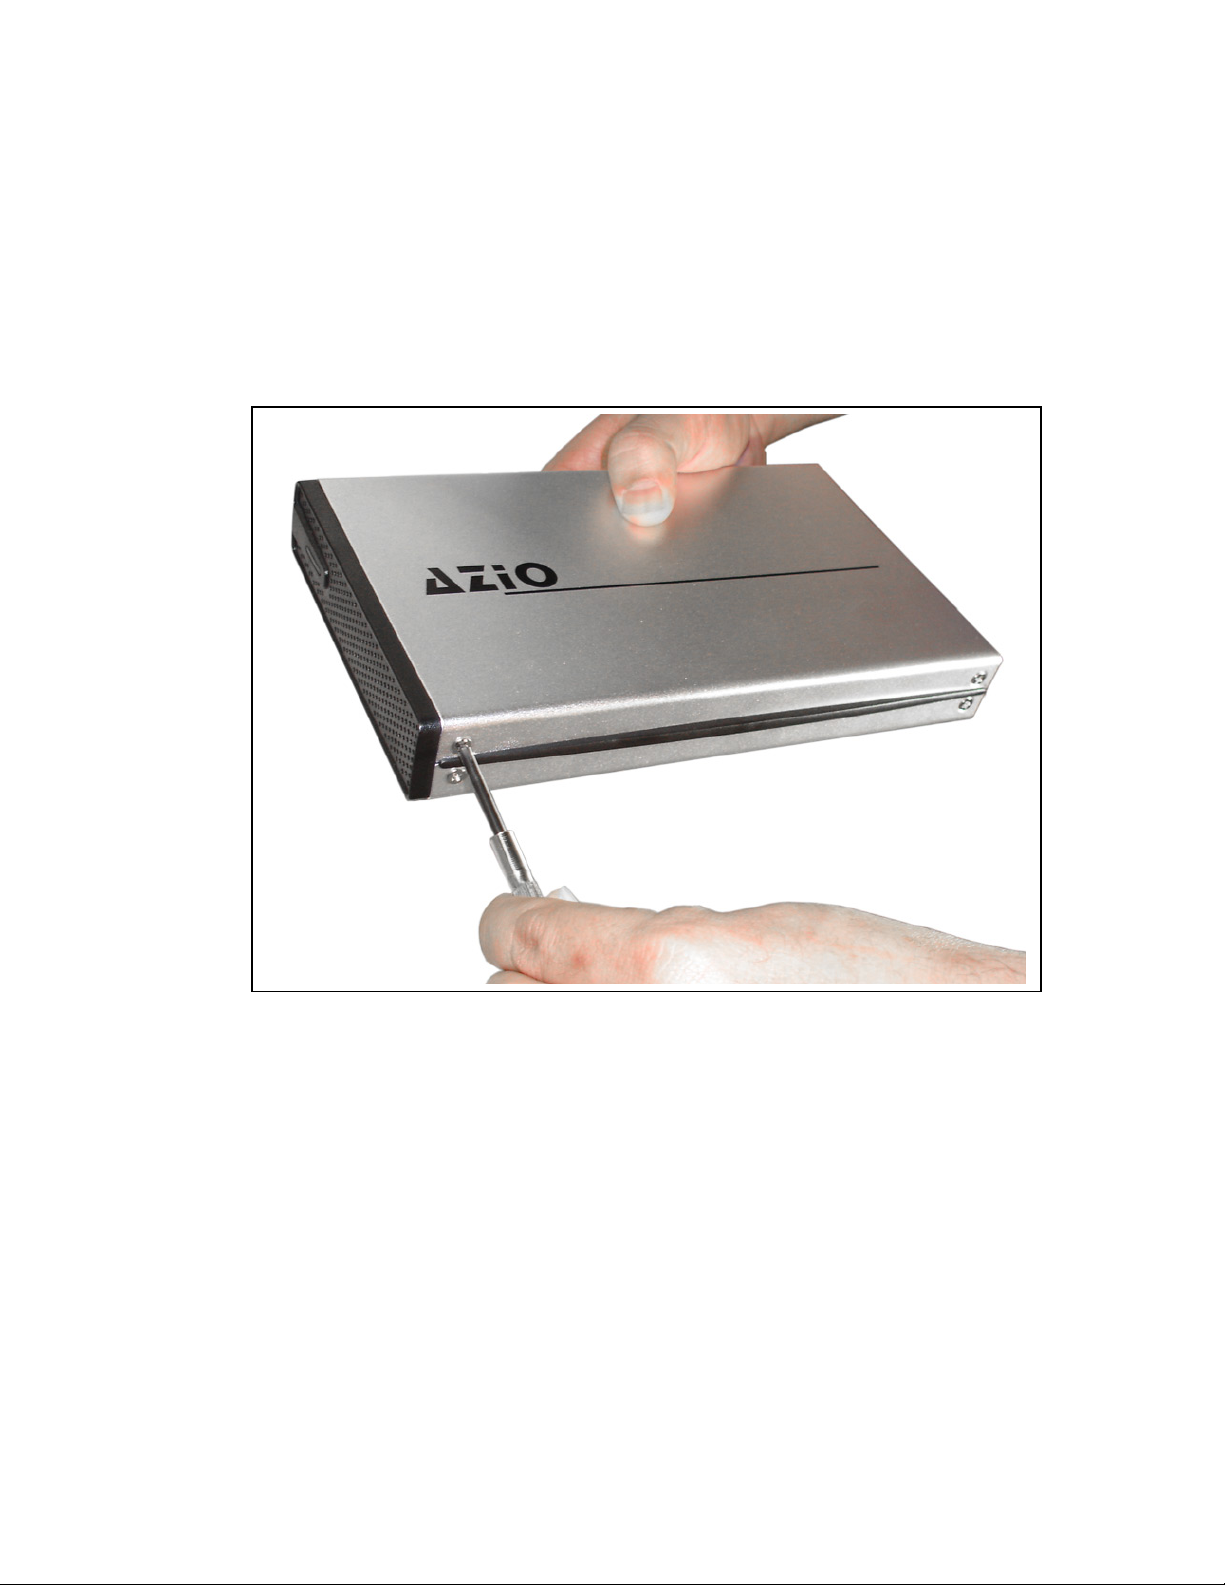
2. Disassemble the Drive Kit
Using a Philips screw driver, remove all four screws located on both sides
of the UPPER aluminum enclosure cover. (Do not remove the screws for
the bottom aluminum case).
Copyright © 2006 by AZiO Corp. – www.aziocorp.com
10
Page 11
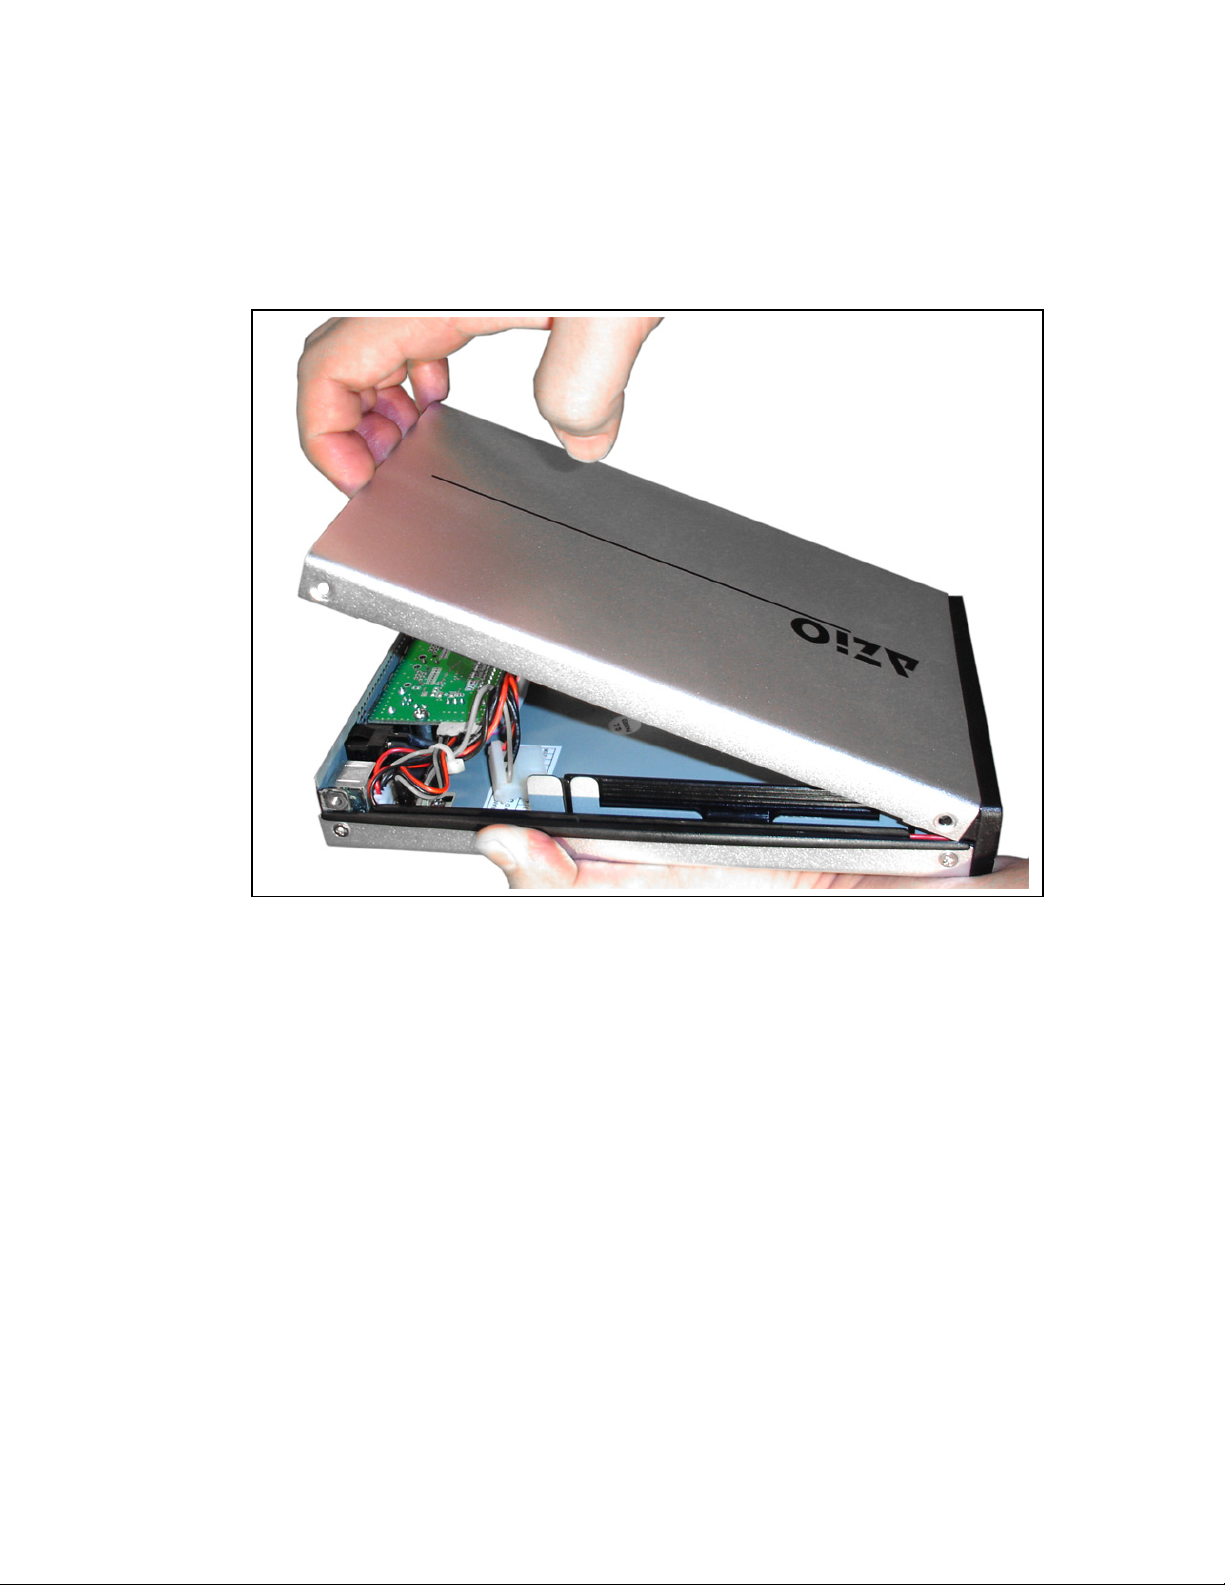
Open the drive kit by carefully remove the top cover from the body
chassis.
Warning: When handling the opened kit, never touch the PCB (printed
circuit board). It contains sensitive electronics that can be easily
damaged.
Copyright © 2006 by AZiO Corp. – www.aziocorp.com
11
Page 12

Unscrew both hard drive brackets and remove them for hard drive
installation.
Copyright © 2006 by AZiO Corp. – www.aziocorp.com
12
Page 13

3. Install the Hard Drive into the Drive Kit
The Drive Kit PCB contains the interface connector and the power cable.
Orient your 3.5” hard drive so that the drives connectors are aligned with
the interface connector and the power cable. Match the bracket pins to
the hard drive and snap on the support brackets to the drive.
Copyright © 2006 by AZiO Corp. – www.aziocorp.com
13
Page 14

While holding on to the hard drive brackets, connect the power and flatribbon IDE cables to the drive. For SATA drives, there will not be a flatribbon cable. Simply install the hard drive into the interface connector.
Insert the drive unit onto the bottom chassis of the drive kit.
Copyright © 2006 by AZiO Corp. – www.aziocorp.com
14
Page 15

Screw the hard drive brackets securely onto the support brace of the drive
kit.
Copyright © 2006 by AZiO Corp. – www.aziocorp.com
15
Page 16

4. Re-assemble the Drive Kit
Close the drive kit by carefully replacing the top cover back onto the
enclosure base.
Copyright © 2006 by AZiO Corp. – www.aziocorp.com
16
Page 17

Screw the top aluminum cover securely back onto the enclosure base.
Make sure the AZiO logo is facing the front of the drive kit.
Copyright © 2006 by AZiO Corp. – www.aziocorp.com
17
Page 18

Setting up the Drive
Mounting the Drive
This section assumes that your Drive is already formatted for your computer’s
operating system. If this is not the case, format the Drive according to the
instructions in the section “Formatting the Drive” and then return to this section.
Mac Users:
Once the Drive has been properly connected and powered on, it should mount
on your desktop.
Windows 2000/XP Users:
Once the Drive has been properly connected and powered on, you should see a
new hard drive icon and drive letter in My Computer/Windows Explorer.
Windows 98SE and Me Users:
[FireWire Users]
Once the Drive has been properly connected and powered on, you should see a
new hard drive icon with a new drive letter in My Computer/Windows Explorer. If
your computer cannot detect the Drive, you may need to manually search for
and install the driver named GPIO98.SYS. If you have Windows 98 Second
Edition Storage Supplement, this file should be located at
C:\WINDOWS\SYSTEM\IOSUBSYS\GPIO98.SYS.
[USB 2.0 Users]
Windows Me Users
Once the Drive has been properly connected and powered on, you should see a
new hard drive icon and drive letter in My Computer/Windows Explorer. If this is
not the case, you will need to update your Windows Me. To get the latest
update, go to www.microsoft.com
Windows 98SE Users
1. After the drive has been properly connected and turned on, the Add New
Hardware Wizard should appear with the message: “Found New Hardware
USB 2.0 Storage Adapter.” Click Next.
2. You will then see the message: “What do you want windows to do?” with
two options. Select “Search for the best driver for your device
(Recommended).” Click Next.
3. In the next window that appears, check the box labeled CD-ROM drive.
Click Next.
and click on Windows Update link.
Copyright © 2006 by AZiO Corp. – www.aziocorp.com
18
Page 19

4. You will then see the message: “Windows is now ready to install the best
driver for this device…” Click Next.
5. Once the installation is complete, you will see the message “Windows has
finished installing the software…” Click Finish and then eject the CD. You
should now see a new icon (a gray box with a green arrow) next to the
time display on your system tray.
Copyright © 2006 by AZiO Corp. – www.aziocorp.com
19
Page 20

Naming your Drive
If you didn’t already, you may want to give your Drive a unique name to
distinguish it from other storage devices connected to your computer. Usually,
you assign a name to a hard drive during the formatting setup process.
However, you can change the name of a hard drive at any time.
Mac Users:
1. Locate the Drive icon on your computer’s Desktop.
2. Click and hold the mouse button on the icon’s label until it is highlighted.
3. Type in a name and press Return/Enter.
PC Users:
1. Double-click on My Computer.
2. In the My Computer window click on the Drive icon.
3. In the File menu, select Properties.
4. Under the General tab of the Properties window, type a name in the text
field beside the Drive icon.
Copyright © 2006 by AZiO Corp. – www.aziocorp.com
20
Page 21

Partitioning/Formatting the Drive
PARTITIONING/FORMATTING A HARD DRIVE ERASES ALL DATA STORED ON THE DRIVE!
BEFORE YOU FORMAT THE DRIVE, BE SURE TO SAVE A COPY OF ANY FILES YOU WISH TO KEEP
TO ANOTHER STORAGE DEVICE.
Follow the instructions in this section if your IDE hard drive was not already
formatted prior to installation, or if you want to re-format the drive.
Formatting for Mac & PC Compatibility
If you need both PC and Mac compatibility, you have two formatting options:
1. Format the Drive on a PC with FAT32 file system.
2. Format the Drive on Mac OS 10.3 or later with the MS-DOS file system.
Mac OS 10.2 Users:
FAT32/MS DOS-formatted disks or disk partitions that are larger than 128 GB will
not mount on Mac OS 10.2 through 10.2.8. There are several ways to resolve
this issue:
1. Format the Drive using the Mac OS Extended file system.
2. Partition the Drive so that no partition is larger than 128 GB.
3. Upgrade to Mac OS 10.3 or later. Go to
http://docs.info.apple.com/article.html?artnum=107483 for details.
Mac OS X v.10.3+ Users:
If you connect an NTFS-formatted disk to a Mac running Mac OS X v.10.3 or
later, the computer can read the Mac-compatible files but you will not be able to
save any data to the disk.
Partitioning/Formatting the Drive in Windows 2000 or XP
If the external hard drive does not mount after you have plugged-in and turned
on your external drive, you will need to partition and format the drive by doing
the following:
1. Right-click on My Computer, click on Manage.
2. Click on Disk Management. A list of all the drives in your system will be
displayed.
3. If the Write Signature and Upgrade Disk Wizard auto-starts, you can use
this wizard to initialize the hard disk and create partition/format the drive.
Copyright © 2006 by AZiO Corp. – www.aziocorp.com
21
Page 22

4. Otherwise, locate the respective drive listed in the lower right side of the
window. Right-click on the drive, make a new partition and format the
drive. NOTE: Be sure to select the correct drive as partitioning and/or
formatting will wipe out all the data on the disk.
5. In the File System pop-up menu, select NTFS. Do not select FAT32 as you
cannot format the Drive using FAT32 file system on Windows 2000 or XP.
6. In the Allocation Unit Size pop-up, select “Default allocation size”.
7. In the Volume label field, type in a name for the Drive. You should give
the drive a unique name that will allow you to easily distinguish it from
other hard drives or storage devices.
8. Click Start. Once the format process is complete, the Drive will be ready
for use.
Partitioning/Formatting the Drive in Windows 98SE or Me
If the external hard drive does not mount after you have plugged-in and turned
on your external drive, you will need to partition and format the drive by doing
the following:
1. Right-click on My Computer and click on Properties.
2. Click on Device Manager.
3. Click on Disk Drives.
4. Double-click on the drive that corresponds to the external drive.
5. Click on Settings tab.
6. Make sure the Removable check-box is selected.
7. Click Ok and then restart the computer.
8. After the computer restarts, double-click on My Computer. The external
drive will now appear. Double-click the drive and you will be prompted to
format the drive.
9. Under Format type, select Full. Everything else should be left at the
default setting. In the label fiend under Other options you may assign a
name to the Drive. Click Start. Once the process is complete, the Drive will
be ready for use.
Formatting the Drive in Mac OS X
1. Launch the Disk Utility application (Applications folder > Utilities folder >
Disk Utilities). The Disk Utilities window will open with a small window at
on the left side and a large window with a series of tabs at the top.
You should see the Drive listed in the left window. Click on the Drive to
2.
highlight it. Information on the Drive will appear in the information
window.
3. Click on the Erase tab. In the Erase window you will see a Volume Format
pop-up menu and a Name field.
Copyright © 2006 by AZiO Corp. – www.aziocorp.com
22
Page 23

4. From the Volume Format pop-up, select Mac OS Extended.
5. In the Name field, type in a name for the Drive.
6. Click Erase. You should see a warning alert pop-up. Click Erase. Once
initializing is complete, you should see the Drive listed in the left window
of the Disk Utility screen with whatever name you assigned. Quit Disk
Utility and you should now see the Drive icon on the Desktop.
Formatting the Drive in Mac OS 9
Before you can re-format the Drive you will need to restart your computer from
the Mac OS 9 System Software CD that came with your computer or which you
purchased as an upgrade.
1. Insert the System Software CD into you CD drive.
2. With your AZiO External Drive connected and powered on, restart the
computer and hold down the C key while the computer is starting up.
3. You will see an alert message: “This disk is unreadable by this computer.
Do you want to initialize the disk?” Click OK.
4. In the Name field, type in a name for your Drive.
5. From the Format menu, select Mac OS Extended.
6. Click Initialize. When prompted with a warning message, click Continue.
Once initializing is complete, you should see the Drive mounted on your
Desktop with the name you assigned.
7. Restart your computer and eject the Mac OS 9 CD.
Copyright © 2006 by AZiO Corp. – www.aziocorp.com
23
Page 24

How to safely dismount the drive
NEVER TURN OFF YOUR EXTERNAL DRIVE WITHOUT DISMOUNTING IT FIRST. YOU MAY LOSE
DATA OR DAMAGE THE DRIVE.
When a device, such as a hard drive, is “mounted” to a computer, that means
the computer has detected the device and established a communications link
with it. When you dismount a device, the communications link is severed and the
computer can no longer access it.
PC Users
1. Make sure your computer is no longer accessing the AZiO External Drive.
2. In the system tray at the bottom of your screen, click the Safely Remove
icon.
3. Select the Drive. After a few seconds, Windows will give you a message
that it is safely to remove the device.
4. Click OK. The Drive has dismounted. You can then safely turn off or
disconnect the drive.
Mac Users
Drag the Drive’s icon to the Trash. The Drive will dismount and you can then
safely turn off or disconnect the drive.
Copyright © 2006 by AZiO Corp. – www.aziocorp.com
24
Page 25

AZiO EXTERNAL HD KIT: Features Explored
Hi-Speed USB 2.0
USB (Universal Serial Bus) is an interface technology for the serial transmission
of digital data. The original standard (USB 1.x) had an interface transfer rate of
up to 12 Mbps. USB 2.0 has a maximum interface transfer rate of 480 Mbps (60
Megabytes/s)- That’s up to 40 times faster than USB 1.
Supports up to 127 devices
Connecting more than one or two USB devices to a computer usually requires
the use of one or more USB-equipped hubs; a hub can typically accommodate
several USB devices.
Plug & Play
You do not need to assign ID numbers, or connect terminators. On most
operating system you do not need to install drivers.
Hot-Pluggable
Devices can be added/removed while the computer is on and running. Always
dismount a hard drive before turning it off/disconnecting it.
FireWire 400
(ENC-302C)
Also known as i.Link or IEEE 1394, FireWire is a serial data input/output
technology developed by Apple Computer and Texas Instruments. FireWire offers
high-speed communication and isochronous real-time data services, commonly
used for connection of data storage devices and digital video cameras.
400 Mbps Interface Transfer Rate
FireWire 400 can transmit data at up to 400 Mbps (50 MB/s). FireWire supports
both isochronous and asynchronous data transfers. Isochronous mode provides
guaranteed transmission of data at defined internals; it’s used when delayed or
out-of-order data frames are unacceptable, such as for capturing digital video. In
Asynchronous mode the intervals between transmissions can vary and data can
be resent if missed. Asynchronous mode is used for routine data transfers.
Support up to 63 devices
FireWire devices can be linked in a daisy-chain, where the devices are connected
to each other in series. A hub is only required when a very large number of
devices will share the same FireWire bus. With the use of FireWire hubs, up to
63 devices can be linked on a single FireWire bus. FireWire equipped AZiO
Enclosures come with two FireWire ports: One port is for connecting the device
Copyright © 2006 by AZiO Corp. – www.aziocorp.com
25
Page 26

to your computer and the other can be used for daisy-chaining other FireWire
devices.
Peer-to-peer, host-independent architecture
Data transmissions between FireWire devices on the same bus can take place
without the need for input from the host computer. This independence from the
host is one of the reasons FireWire devices are, on average, faster than USB 2.0
devices in routine day-to-day use, even though the rated maximum data transfer
is lower than that for USB 2.0.
Plug & Play
You do not need to assign ID numbers, or connect terminators. On most
operating system you do not need to install drivers.
Hot-Pluggable
Devices can be added/removed while the computer is on and running. Always
dismount a hard drive before turning it off/disconnecting it.
Serial ATA
(ENC-303SU)
Serial ATA is a computer bus technology primarily designed for transfer of data
to and from a hard disk. It is the successor to the legacy Advanced Technology
Attachment standard (ATA, also known as IDE). This older technology was
retroactively renamed Parallel ATA (PATA) to distinguish it from Serial ATA.
Currently, most PC motherboards or PCI SATA add-on cards do not have an
eSATA connector. eSATA may be enabled through the addition of a SATA to
eSATA bracket (conveniently included by AZiO).
External SATA (eSATA)
Initially SATA was designed as an internal interface technology. Designers quickly
realized the new interface could reliably be expanded outside the PC. SATA is
now “out of the box” as an external standard, with specifically defined cables,
connectors, and signal requirements as passed in mid-2004.
Key benefits of eSATA
Up to six times faster than contemporary external storage solutions: USB
2.0 and FireWire 400.
Hot-Pluggable: Devices can be added/removed while the computer is on
and running.
Robust and user friendly external connection.
Up to 2-m shielded cables and connectors.
Copyright © 2006 by AZiO Corp. – www.aziocorp.com
26
Page 27

Frequently Asked Questions
Q: Can I use my External Drive on two computers at the same time?
A: No. The Drive can only be used with one computer at a time. If you connect
the Drive to two computers at the same time, you may damage the Drive and
the computer.
Q: Can I format the Drive for multiple operating systems?
A: If you need both Mac and PC compatibility, you can format the Drive using
the FAT32 file system (on a PC) or the MS-DOS file system (on a Mac). Note:
FAT32/MS-DOS formatted disks or disk partitions that are greater than 128 GB
will not mount on Mac OS 10.2 through 10.2.8.
Q: What is the difference between FAT32 and NTFS?
A: FAT32 is an older and more compatible file system but it has certain
limitations, such as file size (maximum 4 GB). NTFS is more secure and has
fewer limitations. The NTFS file system can only be used on Windows 2000 and
XP. If you plan to use your drive on Windows 2000/XP only, consider
reformatting the Drive using the NTFS file system. If you plan to use your drive
on a Mac OS only, consider reformatting the Drive using the Mac OS Extended
file system.
Q: Does the AZiO External Drive work on Windows XP Media Center
Edition?
A: No. It is not supported at this time.
Q: Do I need drivers for my External Hard Drive?
A: For USB 2.0 on Windows 98SE, you will need to install the USB 2.0 driver
found on the supplied USB 2.0 Installation CD. All other supported operating
systems have the necessary USB 2.0 driver built in, with the exception of Mac OS
9, which supports USB 1 but not USB 2.0. You can connect the Drive to a USB 1
port, but it will operate at USB 1 speeds (up to 12 Mbps). Depending on your
operating system, you may need to download an update from the OS
manufacturer
Q: Is the AZiO External Drive compatible with Windows 95, 98 (1
Edition), or NT 4.0?
A: No.
Q: What should the jumper settings on my hard drive be set to?
A: The jumper should be set to “MASTER” or “SINGLE”. This does not apply for
SATA hard drives.
st
Copyright © 2006 by AZiO Corp. – www.aziocorp.com
27
Page 28

Q: Does the External Drive Kit support drives larger than 250gb?
A: Yes, our hard drive kits does not have a capacity limitation as of now.
Q: Can I use both the USB 2.0 and FireWire/eSATA interfaces of my
Drive at the same time?
A: No. If you do, you may lose data, damage the Drive, or even damage your
computer.
Q: Why doesn’t the FireWire Cable fit my FireWire port?
A: The supplied FireWire cable uses 6-pin connectors at both ends, but many
laptops have a 4-pin FireWire port. In order to connect the Drive to your laptop
via FireWire, you will need to obtain a 6-pin to 4-pin cable.
Q. Why doesn’t the eSATA Cable fit my SATA port?
A: The supplied eSATA cable uses the new External SATA standard at both ends,
but many computers still uses the older internal SATA “L-Shape” interface
standard. In order to connect the Drive to your computer, please use the
included eSATA to SATA converter bracket.
Q. What’s the difference between SATA and eSATA?
A: Initially SATA was designed as an internal interface technology. The original
cable design for internal use does not address EMI, ESD, or other attributes
required by an external interconnect. As the desire for external Serial ATA drives
became more popular, the Serial ATA II Work Group developed the External
Serial ATA (eSATA) standard to satisfy these requirements.
Q. Why does my drive shows less capacity than specification?
A. Hard drive capacity is defined in terms of decimal (base 10) capacity. In
decimal notation, one megabyte (MB) is equal to one million bytes and one
gigabyte (GB) is equal to one billion bytes. We are most accustomed to the
decimal system in everyday life. However, computer use the binary (base 2)
numbering system. In the binary number system, one megabyte is equal to
1,048,576 bytes, and one gigabyte is equal to 1,073,741,824 bytes.
Copyright © 2006 by AZiO Corp. – www.aziocorp.com
28
Page 29

Troubleshooting
If you experience a problem with your AZiO product, you should take the
following actions in the order specified.
1. Make sure you have followed all of the instructions in this guide.
2. Consult the Troubleshooting sections of this guide.
3. If the issue you are having is still not resolved, contact AZiO Customer
Care by one of the following options:
a) via LiveChat at our website’s support page,
www.aziocorp.com/support.php.
b) via support form from our website at
http://www.aziocorp.com/contact_support.php.
c) via telephone at (909) 468-1198.
Troubleshooting for PC Users
Q: The Power will not go on when I turn on the Drive.
A: Make sure all your connections are secure. Make sure you properly connected
the Drive’s internal power cable to the installed hard disk drive.
Q: My computer does not recognize the Drive.
A: Make sure all of your connections are secure. If you have an add-on card,
make sure it is working properly and/or update the driver. Make sure you
properly connected the Drive’s internal power cable to the installed IDE drive.
Make sure you have all the latest updates for your operating system. Make sure
your Drive is partitioned and formatted using a file system that is compatible
with your computer.
Q: The drive gives me a “Device cannot start. Code (10).”
A: This is a power issue. Make sure your connections are secure. The other
possibility is that the Drive has malfunctioned and requires service.
Q: I don’t see the Drive in “My Computer”, but it does appear in Device
Manager. (Windows XP & 2000 only)
A: You are probably using a brand new hard drive. You can initialize, partition,
and format unrecognized drives using Disk Management in Windows 2000/XP.
Q: How do I use Disk Management for Windows 2000/XP?
A: Under Windows 2000/XP, you need to use the utility called Disk Management.
Using Disk Management You might need to be logged on as an administrator or
a member of the Administrators group in order to perform some tasks. Disk
Management is a system utility for managing hard disks and the partitions or
volumes that they contain. With Disk Management, you can initialize new disks,
Copyright © 2006 by AZiO Corp. – www.aziocorp.com
29
Page 30

create volumes, and format volumes with the FAT, FAT32, or NTFS file systems.
Disk Management enables you to perform most disk-related tasks without
shutting down your computer; most configuration changes take effect
immediately. To open Disk Management Open Computer Management (Local). In
the console tree, click Disk Management. Notes To open Computer Management,
click Start, and then click Control Panel. Click Performance and Maintenance,
click Administrative Tools, and then double-click Computer Management. For
information about using Disk Management, in Computer Management, click Help
CAUTION: Doing the following will erase any existing data on the drive.
Q: After I connected the Drive to my PC, I got the following alert
message: “Hi-Speed USB device is plugged into non-Hi-Speed USB
Hub.” What does this mean?
A: Windows 2000 and XP users will get this alert message if you plug the Drive
into a USB port that only supports USB 1.1. This is fine, except the Drive will
operate at USB 1.1 speeds (up to 12 Mbps).
Q: When using a USB 2.0 connection, the Drive seems to be operating
slower than the rated 480 Mbps.
A: First, in order to reach USB 2.0 speeds, you need a connection that supports
USB 2.0. If the connection only supports USB 1.1 the Drive will operate at USB
1.1 speeds (up to 12 Mbps). The Drive will auto-sense the speed of your USB
port and adjust between USB 1.1 and USB 2.0 speed. Second, 480 Mbps is the
maximum
depending on a number of factors, including available CPU resources.
Troubleshooting for Mac Users
Q: The Power will not go on when I turn on the Drive.
A: Make sure all your connections are secure. Make sure you properly connected
the Drive’s internal power cable to the installed hard disk drive.
Q: My computer does not recognize the Drive.
A. First, make sure all the connections are secure. Second, check if your AZiO
Drive is listed in the Apple System Profiler. If the driver listed is “USB Authoring
Support” or “Toast USB Support”, disable this Extension(s) in the Extensions
Manager, as they can cause a conflict with the Drive.
Q: When I connected the Drive to my computer, I got the following
alert message: “Please insert disk ‘untitled’.”
A: If you get this alert message, your Mac is not recognizing your AZiO Drive and
the mouse curser may even freeze on screen. If this happens, hold down the
Apple/Control key and press the Period “.” Key. You should regain control of you
mouse. Restart your computer and rebuild the Desktop. (Refer to the manual
interface transfer rate of USB 2.0. Actual data transfer rates will vary
Copyright © 2006 by AZiO Corp. – www.aziocorp.com
30
Page 31

that came with your Mac for instructions on how to rebuild the Desktop. It is
good practice to periodically rebuilt the Desktop anyways). After your Mac
reboots, the AZiO Drive should mount normally and you should not have this
problem again.
Q: I setup my AZiO External Drive on Mac OS 9 and it was working fine.
Then when I upgraded to Mac OS X my computer asked me to reinitialize the Drive.
A: If this message appears, you have no choice but to re-initialize (reformat) the
AZiO Drive in order to use it on Mac OS X. You will need to copy the data stored
on your Drive to another storage device before upgrading to Mac OS X. After the
upgrade is complete, re-initialize the Drive on Mac OS X, and then copy the data
back to it.
Q: Why is my AZiO External Drive asking me to initialize it? It was
already formatted and it contains data.
A: On Mac OS 9, you may need to initialize a hard drive the first time you
connect it to your computer, even though the hard drive may have already been
formatted. Another reason is that the file system might have become corrupted,
in which case it needs to be repaired. Use disk utility software, such as Norton
Utilities, to repair the disk. Periodic testing of a hard drive is recommended to
keep it in good working order.
Q: Why can’t I transfer files larger than 2 GB?
A: This is a limitation of FAT32 file system. If you plan to use the AZiO Drive on
Mac OS only, and you do not need Windows compatibility, consider re-formatting
the Drive using the Mac OS Extended file system.
Copyright © 2006 by AZiO Corp. – www.aziocorp.com
31
Page 32

Warranty
Limited 1 Year Warranty
AZiO Corporation warrants this product against defect in material or
workmanship for 1 year from the date of purchase. If this product proves to be
defective, contact AZiO Corporation’s customer care for repair or replacement of
your unit. Return requests can not be process without the proof of original date
of purchase. This warranty applies only to the original purchase of the product
and is not transferable. This warranty does not cover any incompatibilities due to
the user’s computer, hardware, software or related system configuration in which
the product interfaces. The warranty does not cover any damage caused by
negligence, abuse, or non-authorized modifications. To the maximum extent
permitted by applicable law, in no event shall AZiO Corporation, its affiliates, or
its dealers be liable for any special, incidental, indirect or consequential damages
whatsoever regardless of cause or form of action.
Copyright © 2006 by AZiO Corp. – www.aziocorp.com
32
Page 33

Contact Information
Address:
19977 Harrison Ave.
Walnut, CA 91789
Telephone:
(909) 468-1198
Fax:
(909) 839-2629
Website:
www.aziocorp.com
Customer Service:
support@aziocorp.com
Technical Support:
support@aziocorp.com
Pre-Sale Questions:
sales@aziocorp.com
Copyright © 2006 by AZiO Corp. – www.aziocorp.com
33
Page 34

Notices
COPYRIGHTS
Copyright © 2006 AZiO Corporation. All rights reserved. No part of this
publication may be reproduced stored in a retrieval system, or transmitted in any
form or by any means, electronic, mechanical, photocopying, recording or
otherwise, without the prior written consent of AZiO Corporation.
TRADEMARKS
The AZiO name and its logo are registered trademarks of AZiO Corporation.
Other trademarks mentioned or appearing in this document are the property of
their respective owners.
CHANGES
The material in this document is for information only and subject to change
without notice. While reasonable efforts have been made in the preparation of
this document to assure its accuracy, AZiO assumes no liability resulting from
errors or omissions in this document, or from the use of the information
contained herein. AZiO reserves the right to make changes or revisions in the
product design or the product manual without reservation and without obligation
to notify any person of such revisions and changes.
FCC Information
FCC Compliance Statement
This equipment has been tested and found to comply with the limits for a Class B
Digital Device, pursuant to Part 15 of the FCC Rules. These limits are designed to
provide reasonable protection against harmful interference in a residential
installation. This equipment generates, uses and can radiate radio frequency
energy and if not installed and used in accordance with the instruction manual
may cause harmful interference to radio communication. However, there is no
guarantee that interference will not occur in a particular installation. If this
equipment does cause harmful interference to radio or television reception,
which can be determined by turning the equipment off and on, the user is
encouraged to try to correct the interference by one or more of the following
measures:
Reorient or relocate the receiving antenna.
Increase the separation between the equipment and receiver.
Connect the equipment into an outlet on a circuit different from that to
which the receiver is connected.
Consult the dealer or an experienced radio TV technician for help.
Copyright © 2006 by AZiO Corp. – www.aziocorp.com
34
Page 35

Copyright © 2006 by AZiO Corp. – www.aziocorp.com
35
 Loading...