

Page 1
Model:
E377-S31
External 3.5” USB 2.0
En
HDD Enclosure
Model:
E377-S31
User Manual
En
Page 2

Content
1. Package Contents..............................................................................1
2. Hardware and OS Requirements
3. Exterior Layout
4. Function Description
5. Physical Installation
A. Taking out the HDD tray.................................................................2
B. HDD installation..............................................................................2
...................................................................................1
....................................................................1
......................................................................2
...................................1
6. Driver Installation and Use..................................................3
A. Driver Installation...........................................................................3
B. Free Installation.....................................................................
C. Connection...........................................................................
D. Safely Remove the Device....................................................
.........3
...........3
.........3
7. Software Installation and Use
A. Backup Software Installation and Use...........................................3
B. Dr. Security: Encryption Software Installation and Use...
C. Dr. Power: Power Management Software Installation and Use......5
...........................................3
..............4
8. Troubleshooting.................................................................................6
9. Support & Warranty
.....................................................................6
Page 3
1. Package Contents
A complete unit contains the following items:
a. USB Cable...............................................................................................................................1
b. External Enclosure..................................................................................................................1
c. AC/DC Power Adapter............................................................................................................1
d. Installation CD.........................................................................................................................1
e. User Manual............................................................................................................................1
2. Hardware & OS Requirements
Hardware Requirements: Available USB 2.0 or 1.1 port required on your computer.
OS Requirements: Windows 98SE/Windows ME/ Windows 2000 / Windows XP / Windows 2003 /
Vista / 7、Mac OS X、various Linux Kernels
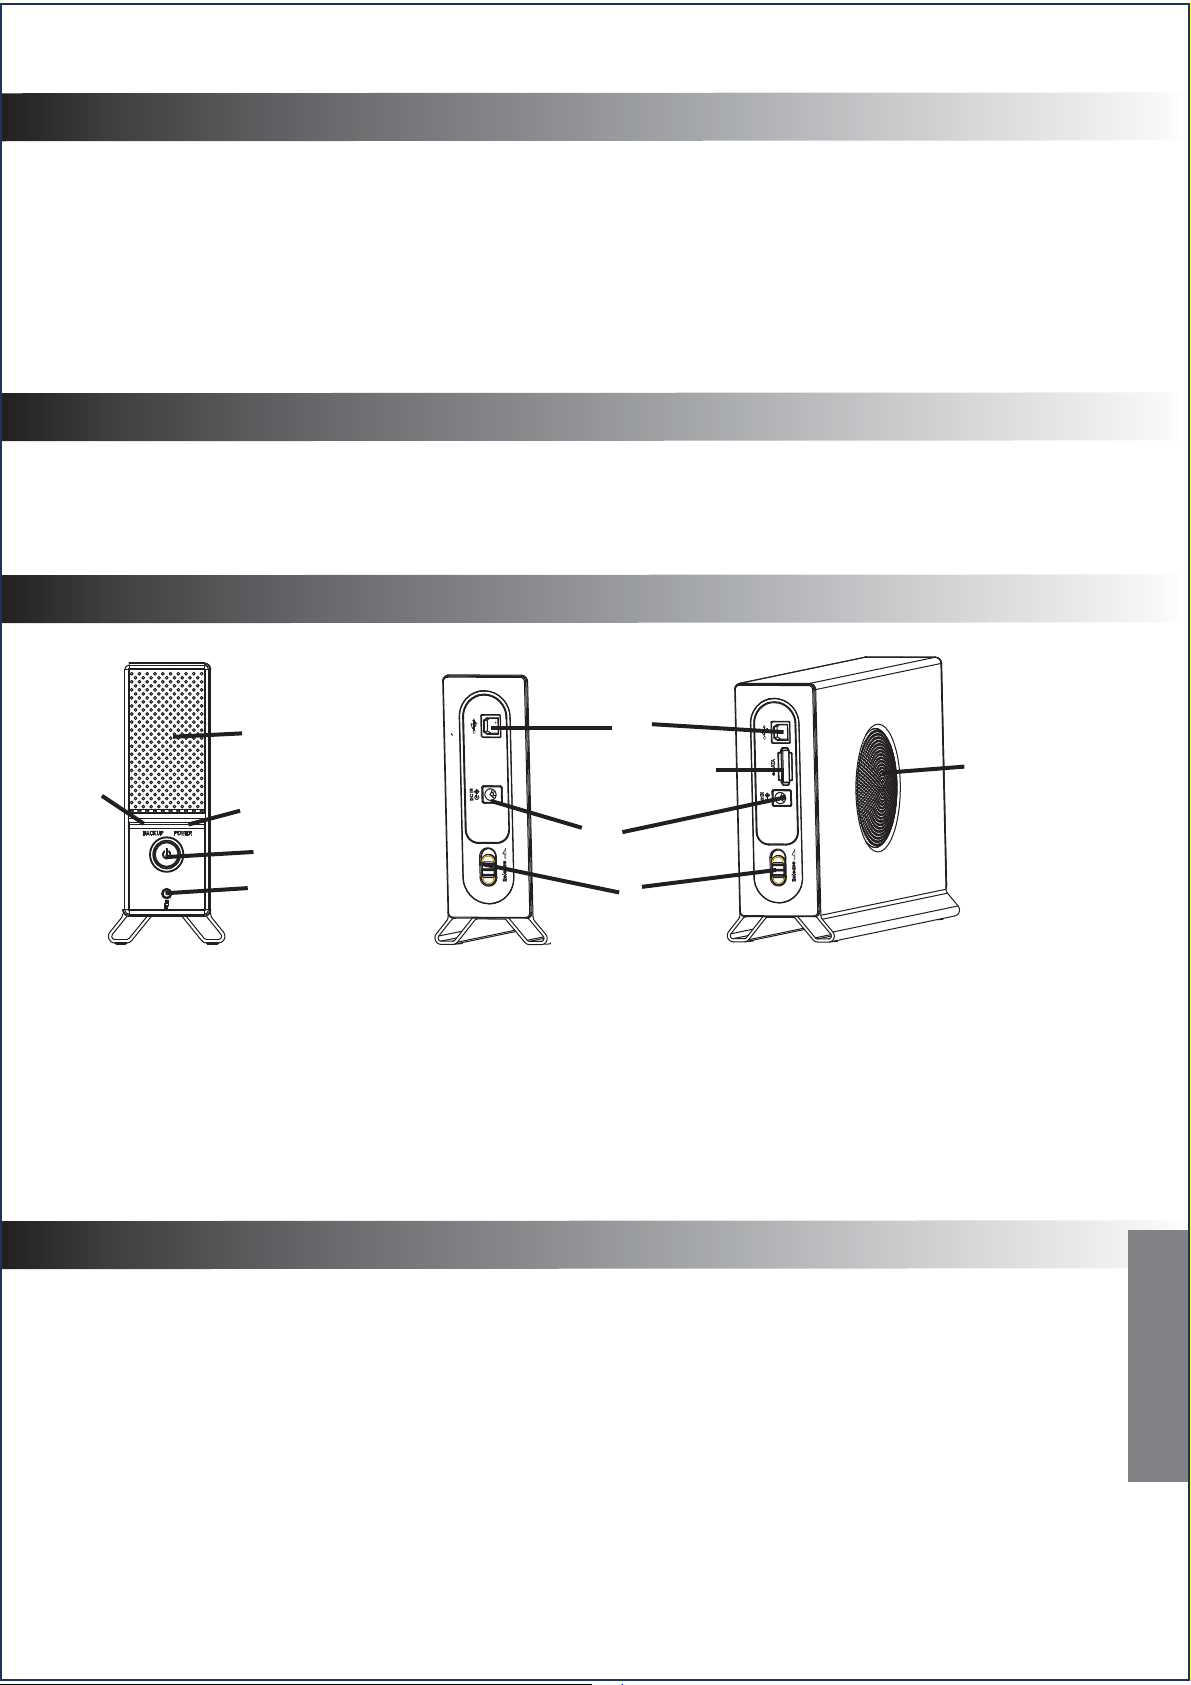
3. Exterior Layout
1
3
4
2
5
6
7
8
9
1
Front Panel Layout Rear Panel Layout
1. Ventilation window 4. Power & access indicator LED 7. N/A
2. Power switch 5. Backup Button 8. DC-IN
3. Backup indicator LED 6. USB port 9. Tray release button
4. Function Description
A. Supports 3.5” SATA Hard Disk Drives.
B. Supports USB 2.0 or 1.1 interface.
C. Supports OTB for easy backup access.
D. Supports encryption security function (Separates the disk into common regions and encrypted regions).
E. Supports P-SAVE sleep function:
1. When PC is in a dormant state, the external HDD will spin-down to power-save mode.
B. Preset time for spinning-down external HDD and enter power-save mode.
F. LED indicates data access and backup.
G. Built-in 3-inch cooling fan to protect your HDD from high temperature.
H. Patent pending screw-less design for easy operation.
1
AZiO Corp.
Page 4

5. Physical Installation
A. Take out the HDD tray
1). Push the release button on the rear panel 2). Carefully slide out the HDD tray.
upwards to eject the tray.
B. HDD Installation
1). Rotate the mounting brackets out as illustrated. 2). Insert the HDD.
3). Push the HDD back until the connectors 4). Push back the mounting brackets to
connects completely. secure the HDD.
5). Push the installed HDD back into the casing
to finish.
Push the HDD-installed tray back into the
casing until the tray and casing are fitted
securely.You will notice the release button
is back in its original position. Installation
is complete.
2
Page 5

6. Driver Installation and Use
A. Driver Installation:
USB drivers only needs to be installed if you are using Windows 98SE. Search the folder
named win98driver in the CD and run the Setup.exe file in the folder. The program will install the
drivers to your PC. Next time when you connect the device to the same computer there is no need to
reinstall the driver. The OS will automatically recognize the device.
B. Free Installation:This enclosure does not need any drivers when used with any OS newer than Win 98.
C. Connections:
1). Connect the device to POWER.
2). Connect the device to computer via USB cable.
3). Switch the power on.
D. Safely Remove the Device:
Whatever kind of M.S. OS (Windows 98SE / ME / 2000 / XP, etc.) you are using, please follow the steps
as shown below to safely remove the external case.
1). Double-click on the green arrow icon at the bttom-right corner of screen.
2). Windows will pop-up a dialog box to ask if you would like to safely remove this device.
3). Confirm removal prior to disconnecting or powering off.
7. Software Installation and Use
A. Backup Software Installation and Use
1). Installation:
a. Select folder one Touch Back Software in the software CD.
b. Run the file Setup.exe. The program will walk you through installation.
Remark: Before installing the backup software, ensure that the HDD is properly
installed and connected to the computer.
2). Use:
a. Double-click (or right-click, select Configure) the icon on the bottom-right of taskbar. Windows will pop
up a menu named HDDs options menu.
b. Select the model number of the external HDD.
c. Select Task, when windows pops up a prompt “cannot find destination file”, click OK.
d. Select Add, input the file or folder you want to backup to Source Directory and input the Task Directory
in which you would like to store the backup file or folder.
e. Click Save and then Close. Press the backup button to start backing up data.
3
AZiO Corp.
Page 6

B. Dr. Security: Encryption Software Installation and Use
1). Installation:
a. Select the folder HD Secure AP in software CD.
b. Run the file Setup.exe. The program will walk you through installation.
Remark: Before installing the encryption software, ensure that the HDD is
properly installed and connected to the computer.
2). Use:
a. Click Partition and select the capacity you would like to encrypt after running the software
(shown as Figure 1).
b. Select Change Password to set or change password.
c. Select Lock to hide the encrypted region and select Unlock to cancel. When unlocking, the
password will be needed (shown as Figure 2).
Figure 1 Figure 2
Warming: a.When setting the capacity of the encrypted region, the original data will be
lost.Please backup all the data before re-setting.
b.If the encrypted HDD is moved to another enclosure, the data in the
encrypted region cannot be accessed.
c.To format the encrypted area of HDD, the data will be lost.
4
Page 7

C. Dr. Power: Power Management Software Installation and Use
1). Installation:
a. Select the folder Dr Power AP in the software CD.
b. Run the file Setup.exe. The program will walk you through installation.
2). Use
a. Interface, as shown in Figure 1 will pop up when running Power Management software.
b. Adjust the time of HDD standby mode if needed (shown as Figure 2).
c. Turning ON ‘System Power Management’ will eable the HDD to spin-down when the PC sleeps.
Click ’Save’ and then close.
Remark: Before installing the power management software, ensure that the HDD
is properly installed and connected to the computer.
Figure 1 Figure 2
5
AZiO Corp.
Page 8

8. Troubleshooting
A. Check the OS you are using and make sure Driver is used only for Win 98SE systems.
B. Please make sure all cables are properly connected.
C. Make sure the AC/DC adapter is in proper condition.
D. Make sure your HDD has been partitioned/formatted.
E. If using a brand new HDD, please configure the HDD by Disk Management.
9. Support & Warranty
If you can't install or resolve the problem, please don’t take it apart.
Contact AZiO for further assistance.
If you need assistance with this product, please contact our customer care team:
A. By Phone: (909) 468-1198
B. By eMail: support@aziocorp.com
C. On LiveChat: Please visit the Support section of our website, www.aziocorp.com
Limited 1 Year Warranty
AZiO Corporation warrants this product against defect in material or workmanship for
1 year from the date of purchase. If this product proves to be defective, contact AZiO for
repair or replacement. Return units cannot be processed without the proof of original date
of purchase. This warranty applies only to the original purchase of the product and is not
transferrable. This warranty does not cover any incompatibilities due to the user’s computer,
hardware, software or related system configuration in which the product interfaces. The
warranty does not cover any damagecaused by negligence, abuse, or non-authorized
modifications. To the maximum extent permitted by applicable law, in no event shall AZiO
Corporation, its affiliates, or its dealers be liable for any special, incidental, indirect or
consequential damages whatsoever regardless of cause or form of action.
6
AZiO Corp.
 Loading...