

Page 1
MODEL:AWU212N
802.11n
WirelessUSBAdapter
UserManual
Page 2

802.11n Wireless USB Adapter
Copyright Statement
is the registered trademark of AZiO Corporation. All the products
and product names mentioned herein are the trademarks or registered
trademarks of their respective holders. Copyright of the whole product as
integration, including its accessories and software, belongs to AZiO Corpor ation.
Without the permission of AZiO Corporation, any individual or party is not allowed
to copy, plagiarize, imitate or translate into other languages.
All the photos and product specifications mentioned in this manual are for
reference only. As upgrade of software and hardware progresses, there will be
changes. And if there are changes, AZiO is not responsible for informing in
advance. If you would like to know more about our product information, please
visit our website at www.aziocorp.com.
1
Page 3

802.11n Wireless USB Adapter
Table of Content
Chapter 1
1.1 Welcome……………………….......…….....……….…………………………2
1.2 Product Feature…………………………………………………………………2
1.3 Content of Package………....…….…………………….……………………2
1.4 Before You Begin…...........……….…………………….……………………3
Chapter 2 Installation…………………………..……………………………………4
2.1 Software Installation…………...…….....……….…………………………4
2.2 Hardware Installation………………………………………………………6
Chapter 3 Configuration………………………………………………………..……7
3.1 General…….………………………………………………………..……7
3.2 Profile…….………………………………………………………..……7
3.2.1 Add/Edit…….……………………………………………………..……7
3.2.2 Remove...………………………………………………………………9
3.3.3 Duplicate
3.3.4 Set Default
3.3 Available Network……………………………………………………..……10
3.4 Status….........................……………………………………………..……11
3.5 Statistics……………..……….……..............………………………………12
3.6 WPS Setting………………...................…..……………..………………12
3.6.1
3.6.2
Chapter 4 Product Specifications…………..........…………………………….16
Introduction…………………...........……………………………………2
…………………………………………………………..…...9
………………………………………………………..…...10
Pin Input Config (PIN)
Push Button Config (PBC)
...……………………………………………13
……………………………………..……15
2
Page 4

802.11n Wireless USB Adapter
Chapter 1 Introduction
1.1 Welcome
Thank you for purchasing the AZiO AWU212N 802.11n wireless USB adapter. The
AWU212N adapter connects you with IEEE 802.11n networks at receiving rates of
up to 300Mbps. By using reflection signals, 802.11n's “Multiple In, Multiple Out”
(MIMO) technology increases range and reduces “dead spots” in the wireless
coverage area.
WPS (Wi-Fi Protected Setup) simplifies the security setup process and
management of Wi-Fi networks. The AWU212N also supports WMM for
Multimedia Applications with Quality of Service in Wi-Fi Networks.
1.2 Product Feature
Complies with IEEE 802.11n, IEEE 802.11g and IEEE 802.11b standards
Supports USB 2.0 standards
Provides 300Mbps receiving rate and 150Mbps sending rate
Supports 20MHz/40MHz frequency width
Auto-detects and changes the network transmission rate
Provides two work modes: Infrastructure and Ad-Hoc
Supports 64/128-bit WEP, WPA, WPA2 encryption methods and 802.1x
security authentication standard
WPS (Wi-Fi Protected Setup) simplifies security setup and management of
Wi-Fi networks
Supports WMM for Multimedia Applications with Quality of Service in
Wi-Fi® Networks
1.3 Contents of Package
One AWU212N
One Installation CD w/User Manual
One Quick Installation Guide
Contact your local authorized reseller or the store purchased from for any items
damaged and/or missing.
1.4 Before You Begin
You must have the following:
A laptop computer/desktop PC with an available USB 2.0 slot
Minimum 300MHz processor and 32MB memory
Windows 2000, XP*, Vista*, 7*
A CD-ROM Drive
802.11b/g/n Access Point (for infrastructure Mode) or another 802.11b/g/n
wireless adapter (for Ad-Hoc; Peer-to-Peer networking mode)
(*32 or 64 bits)
3
Page 5
Chapter 2 Installation
2.1 Software Installation
NOTE:
1.
2. Click
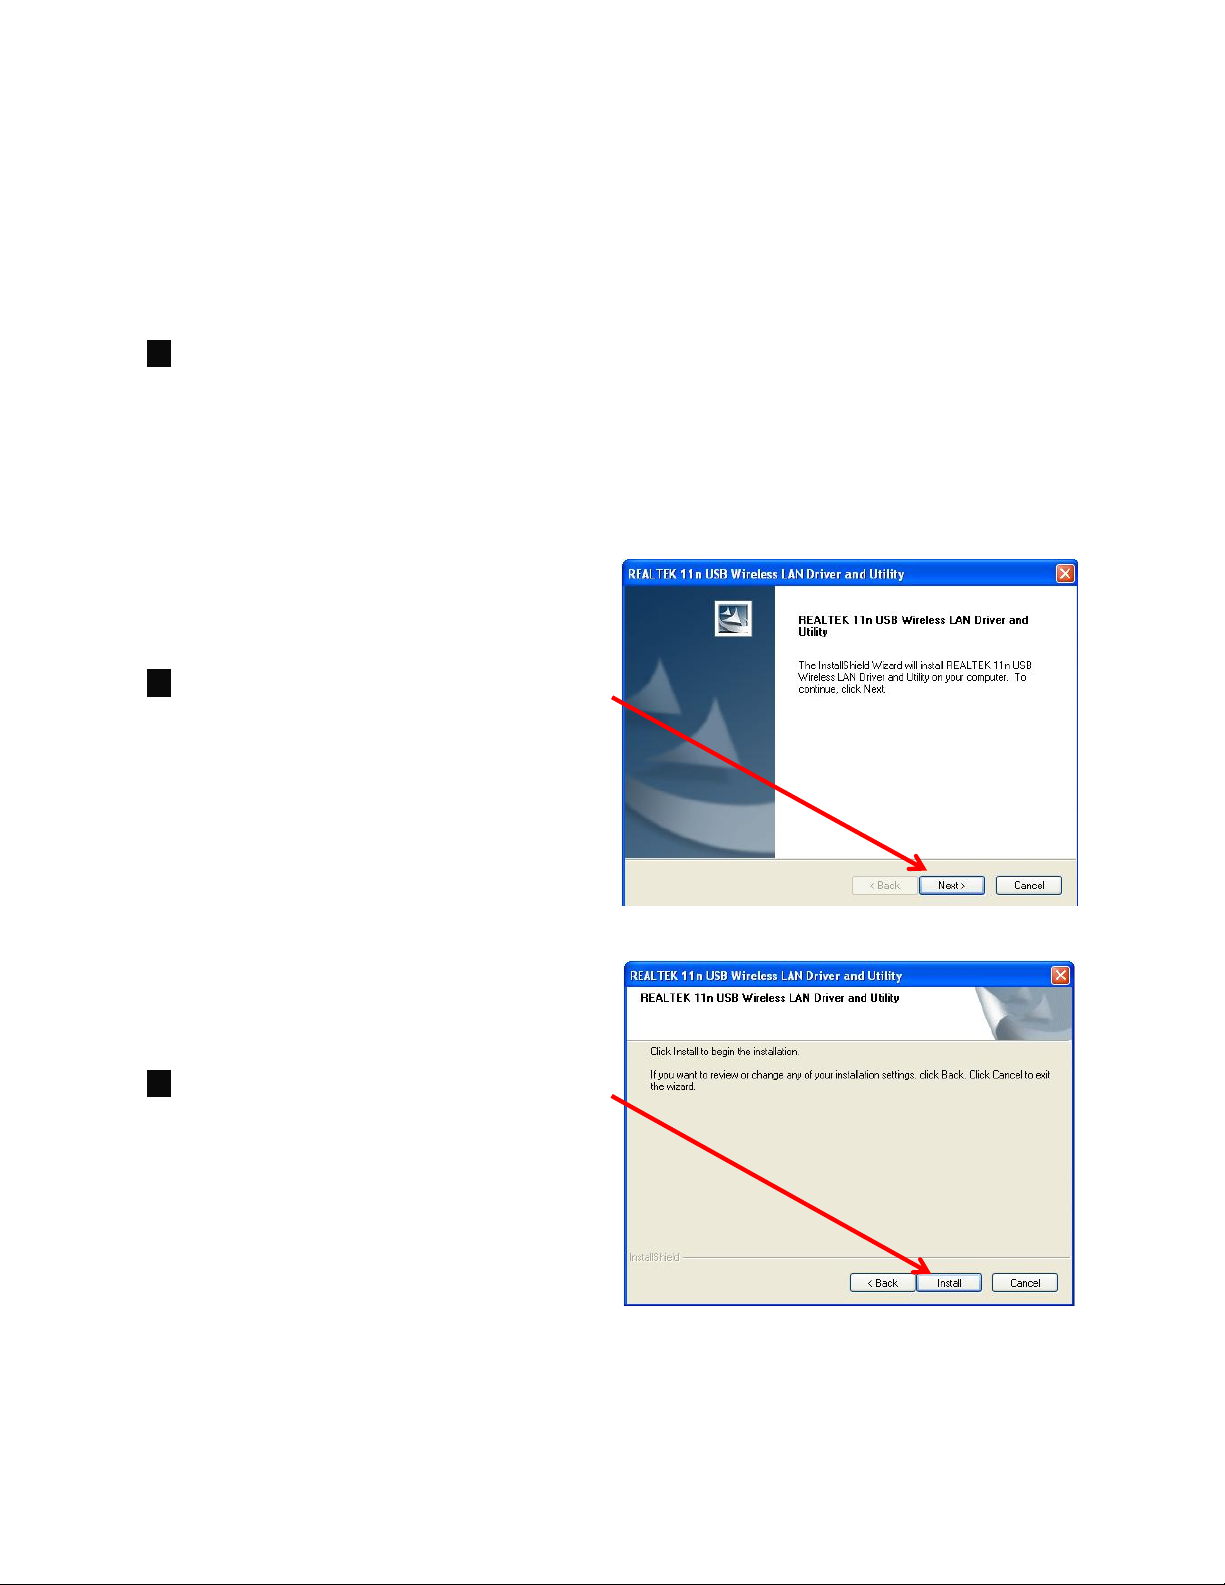
Snap-shot screens of the following installation procedure are based on Windows
XP. Installation procedures are similar for other windows operating systems.
Insert Installation CD to your
CD-ROM drive. B
double-click
r
owse the CD and
setup.exe
in Driver
folder to execute it. The wizard will
run and install all necessary files to
your computer automatically.
Next
setup language.
to continue after selecting
802.11n Wireless USB Adapter
3. Click Install to start the installation.
4
Page 6

802.11n Wireless USB Adapter
4. During the installation, the following
dialogue may appear. Click Continue
Anyway to continue.
5. Click Finish to complete the software
installation.
Now your computer will restart automatically.
5
Page 7

802.11n Wireless USB Adapter
2.2 Hardware Installation
LED Indicator:
Status Description
ON Indicates a valid connection
Flashing Indicates transferring or receiving data
Installation:
1. Power on your PC. Let the operating system boot up completely and log in as
necessary.
2. Insert AWU212N into a USB slot
of your computer.
3. Select install the software
automatically
(Recommended) when Found
New Hardware window
appears.
The software and hardware installation for AWU212N is now complete.
6
Page 8

802.11n Wireless USB Adapter
Chapter 3 Configuration
There are two ways to run REALTEK 11n USB Wireless LAN Utility as follows:
1. Click Start → Programs → REALTEK 11n USB Wireless LAN Utility →
REALTEK 11n USB Wireless LAN Utility to run the utility. Or…
2. Double click REALTEK 11n USB Wireless LAN Utility icon
utility.
to run the
3.1 General
The General tab shows detail information about the current connection.
3.2 Profile
Profiles can keep your favorite wireless setting among your hom e, offi ce, and
other public hotspot. You may save mu ltiple profiles and activate the one of your
preference.
7
Page 9

802.11n Wireless USB Adapter
3.2.1
Add/Edit
Profile Name: Specify a name for the profile
SSID: Name of intended wireless network.
Network Type:
Infrastructure:
Ad-hoc:
Peer-to-Peer network, no base station required.
A wireless Router and/or Access Point is required.
Check the checkbox to activate Ad-hoc mode.
Channel:
Authentication:
Channel of the connected wi reless network.
Select from Open System, Shared Key, WPA-PSK,
WPA2-PSK, WPA 802.1x, WPA2 802.1x, WEP 802.1x, WPA CCKM and WPA2
CCKM.
Encryption:
Select from WEP, TKIP, AES, and Disable
8
Page 10

802.11n Wireless USB Adapter
3.2.2
Remove
Select a profile and click Remove button to delete.
3.2.3
Duplicate
Select a profile which you want to copy and then click Duplicate.
Input the new profile name when Profile Name window appears.
9
Page 11

802.11n Wireless USB Adapter
3.2.4
Set Default
Select a profile and click the Set Default button to make it the default profile for
automatic connection.
3.3 Available Network
Under Available Network tab, the information from all surrounding wireless
networks from the last scan will be displayed.
Click
Refresh
to update and refresh.
10
Page 12

Double-click the network you want to connect.
802.11n Wireless USB Adapter
Modify the profile information as needed.
3.4 Status
The Status tab displays the detailed information of the current connection.
11
Page 13

802.11n Wireless USB Adapter
3.5 Statistics
The Statistics tab displays the detail counter information based on 802.11 MIB
counters. This page translates that MIB co unters into a format easier for user to
understand.
Reset: to renew the statistics.
3.6 Wi-Fi Protected Setup
Wi-Fi Protected Setup tab supports the configuration setup using PIN
configuration method or PBC configuration method.
WPS simplify the security setup and management of Wi-Fi networks.
12
Page 14

3.6.1 Pin Input Config (PIN)
1. Input AWU212N’s PIN Code into
AP and click Start PIN on the
AP-Router WPS config page
Note: AP operating page may vary
but similar from different brands
2. Click Pin Input Config (PIN)
under AWU212N Wi-Fi Protect
Setup tab
.
802.11n Wireless USB Adapter
3. Select one WPS AP you want to
connect and click Select.
13
Page 15

802.11n Wireless USB Adapter
4. Wait until PIN method window
appears, the secure connection
between AP and AWU212N will
be established automatically.
14
Page 16

3.6.2 Push Button Config (PBC)
1. Click Push Button Config
(PBC) under AWU212N Wi-Fi
Protected Setup tab.
802.11n Wireless USB Adapter
2. Click Start PBC on the
AP-Router WPS config page or
push the WPS button on your
AP.
Note: AP operating page may
vary but similar from different
brands
.
3. Wait until PBC method
window appear, the secure
connection between AP and
AWU212N will be established
automatically.
Note:
If there is more than one AP on PBC mode, there will be session overlap. Please use PIN
Input Config (PIN) or wait for awhile and push the button again.
15
Page 17

802.11n Wireless USB Adapter
Chapter 4 Product Specifications
Specifications:
Chipset Realtek RTL8191SU
Standards
Interface
OS
Frequency Range 2.412GHz~2.4835GHz
Modulation Method
speed
Output Power
Security 64/128-bit WEP, WPA/WPA2, 802.1x
Antenna type
Channels
Transmit distance
Operating Temperature 0ºC ~ 50ºC
Storage Temperature -40ºC~70ºC
Operating Humidity 10%~ 90% RH Non-condensing
Storage Humidity 5% ~ 90% RH Non-condensing
LED Link/Activity
Dimension(L x W x H) 60mm x 24mm x 8.5mm
Weight 7.7g
IEEE 802.11n, IEEE 802.11g, IEEE 802.11b
USB 2.0
11b
11g
Windows 2000/ XP*/ Vista*/ 7*
CCK
, O
FDM
11 Mbps/9 Mbps/6 Mbps/5.5 Mbps/2 Mbps/
1 Mbps
54 Mbps/48 Mbps/36 Mbps /24 Mbps/
18 Mbps/12 Mbps/11 Mbps/9 Mbps/6 Mbps
(*32 or 64 bits)
11n 300Mbps ~ 270Mbps
11b 18dBm
11g 15dBm
11n 13dBm
printed antenna
11 Channels (USA, Canada)
13 Channels (Europe)
14 Channels (Japan )
Indoors : up to 300
Outdoors : up to 600 feet
feet
16
Page 18

802.11n Wireless USB Adapter
Service & Warranty
Service
If you need assistance with the product, please visit our website at
www.aziocorp.com for frequently asked questions and troubleshooting tips.
Otherwise, please contact our dedicated customer care team.
There are several ways to reach us:
By Phone: (866) 468‐1198
By eMail: support@aziocorp.com
On Live Help: http://www.aziocorp.com/support/helpdesk.htm
Warranty
Limited 1 Year Warranty
AZiO Corporation warrants this product against defect in material or
workmanship for 1 year from the date of purchase. If this product proves to be
defective, contact AZiO Corporation’s customer care for repair or replacement of
your unit. Return requests cannot be process without the proof of original date of
purchase. This warranty applies only to the original purchase of the product and
is not transferable. This warranty does not cover any incompatibilities due to the
user’s computer, hardware, software or related system configuration in which the
product interfaces. The warranty does not cover any damage caused by
negligence, abuse, or non‐authorized modifications. To the maximum extent
permitted by applicable law, in no event shall AZiO Corporation, its affiliates, or
its dealers be liable for any special, incidental, indirect or consequential damages
whatsoever regardless of cause or form of action.
17
 Loading...