

Page 1
INSTRUCTION MANUAL
Digital Non-Programmable Radiant Floor
Heating Thermostat D-28F
4. Remove the screw on the back plate and take off the protective
terminal cover.
Description
D-28F digital thermostat is specifically designed for Radiant Floor Heating
Systems. It is so flexible that it can be used to control either ambient(air)
temperature (A Mode) or floor temperature (F Mode) or a combination of
air temperature with floor temperature limit(AF Mode). An auxiliary remote
sensor is provided to measure slab temperature in order to control the floor
temperature within desired maximum and minimum limits.
Installation
1. Look for a location which has a constant temperature in the house and
it is no near the door entry of heater or air conditioning outlet. The
mounting height should be about five feet above the floor.
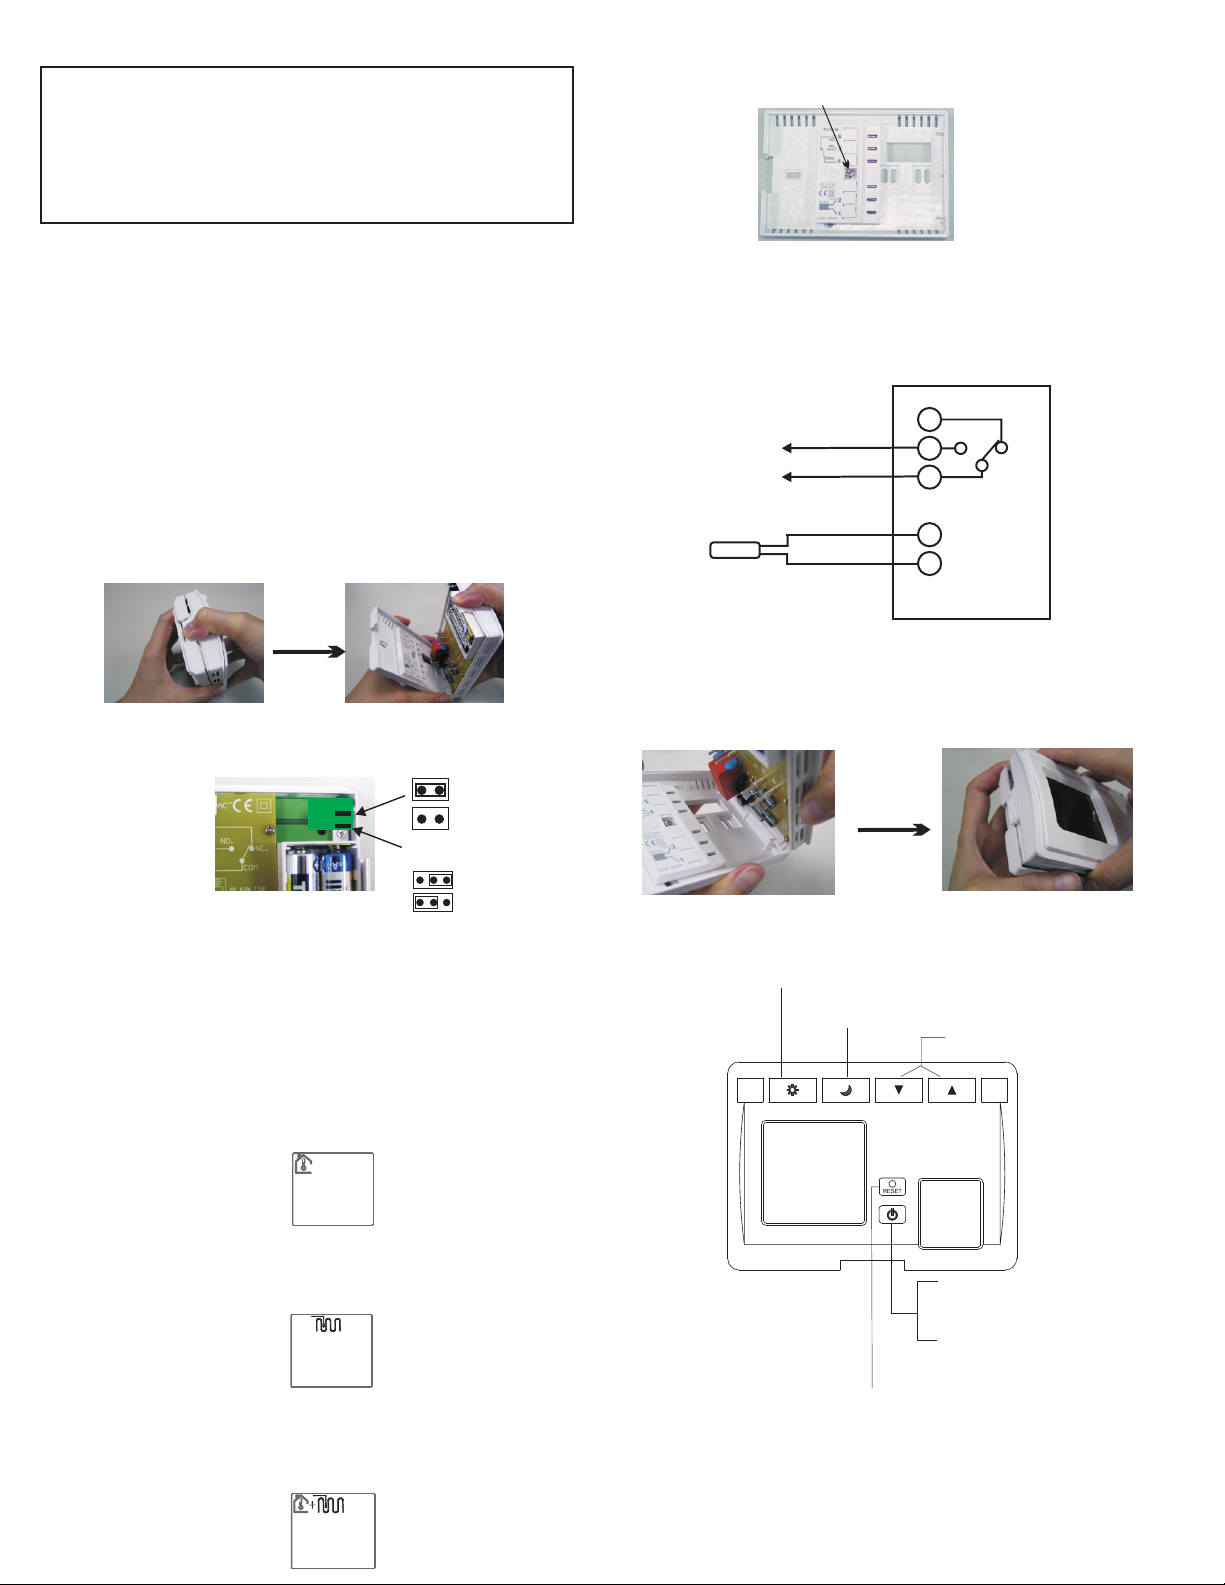
2. Open top housing as illustrations below :
Press down the lever on the left hand side of the enclosure and open
the unit by lifting the front cover.
3. Before installing the thermostat on the wall, it must be configured by
using the jumpers at the back for the front cover.
Room Sensor Jumper
Ena bled (j umper i nsert ed)
Dis abled ( jumpe r remov ed)
Heat/Cool Mode Jumper
(2nd jumper from top)
Hea ting
Back o f fr on t cov er
Heating/Cooling Mode:
Use the Heat/Cool Mode Jumper to select the system
operating mode. Heating should be selected for A/F/AF Mode
and Cooling can only be selected for A mode. Functions of
floor heating will be disabled if cooling mode is selected.
Coo ling
5. Follow the wiring diagram on Figure 1. Insert the wires into the terminal
blocks and use a screwdriver to tighten the screws on top of the
terminals. Use the screw to fix the terminal cover back to the back plate.
If your system is other than this type, please consult with your local
dealer or a professional electrician.
WIRING DIAGRAM:
NC
6
NO
LOAD
Easy
iew Large
V
Display
6. Install the back plate on the wall.
7. Put the front cover back to the back plate by aligning two hooks on the
right hand side of the inner enclosure. Make sure there is a click sound
when two parts are snapping together.
8. Press RESET before starting the operation of the thermostat.
COMF OR T setp oi nt
ECON OM Y se tp oint
5
COM
4
4
2
Floor Sensor
1
FIGURE 1
Incr ea se /De cr ea se
temp er ature s et po int
or
chan ge s ettin gs
General Operating Mode:
A mode: controls and displays the ambient temperature. Do
not connect the floor sensor. Insert the jumper to
enable the room sensor and LCD will show ambient
(air) mode symbol as shown below:
F mode: controls and displays the floor temperature. Floor
sensor should be connected. Remove the jumper to
disable the room sensor and LCD will show Floor
Heating mode symbol as shown below:
AF mode: controls and displays the ambient temperature with
maximum floor limit. Floor sensor should be
connected. Insert the jumper to enable the room
sensor and LCD will show Ambient/Floor Limit
Heating symbol as shown below:
1.St an db y but to n
when t he rm ost at
in ope ra ti on
2. Sel ec ti on bu tt on
for se tt in g adj us tm ent
Pres s “R ES ET” b ef or e chang in g
the in te rn al se tt in gs.
Page 2
Setting and Operation
Operation in General
seconds to enter Adjustment Mode. “Set” will be flashing on the bottom of the
LCD. Then follow the flashing symbol and use Up/Down Button to change
the setting. Press to go to the next adjustment.
A (Ambient Temperature Control) Mode Setting:
1. Press both Up and Down buttons at the same time for 5 seconds to enter
2. Press Up or Down button to select °C or °F
3. Press to access the COMFORT setpoint and press Up or Down
4. Press to access the ECONOMY setpoint and press Up or Down
5. Press to access the Differential setting and use Up or Down button to
6. Press once to go back to the normal operating mode and use
Note: There is a three-minute delay for the thermostat to start its operation
F (Floor Heating Control) Mode Setting:
1. Press both Up and Down buttons at the same time for 5 seconds to enter
2. Press Up or Down button to select °C or °F
3. Press to access the “Hi Limit” setpoint (maximum floor temperature)
4. Press to access the “Lo Limit” setpoint (minimum floor temperature)
5. Press to access the COMFORT floor temperature setpoint and press
6. Press to access the ECONOMY floor temperature setpoint and
7. Press to access the switching Differential and press Up or Down
8. Press again to go back to the normal operating mode and use
Note:
AF (Ambie nt/Air Temperature Control with Floor Maximum
Temperature Limit) Mode Setting:
1. Press both Up and Down buttons at the same time for 5 seconds to enter
2. Press Up or Down button to select °C or °F
3. Press to access the COMFORT setpoint and press Up or Down
4. Press to access the ECONOMY setpoint and press Up or Down
5. Press to access the “Hi Limit” setpoint (maximum floor temperature)
6. Press to access the Differential setting and use the Up or Down
6. Press once to go back to the normal operating mode and use
Note:
Manual Temperature Setting
In general, press both Up and Down buttons at the same time for 5
adjustment mode.
button to change the setting. Default: Heat: 21°F(70°C); Cool:
75°F(24°C)
button to change the setting. Default: Heat: 16°F(60°C); Cool:
80°F(27°C)
change the setting. 0.4/0.8/1.2/1.6/2°F, 0.2/0.4/0.6/0.8/1°C Default:
0.8°F/0.4°C
COMFORT setpoint.
after installation if Cool Mode was selected.
adjustment mode.
and use Up or Down button to change the setting. Default: 85°F(29°C)
and use Up or Down button to change the setting. Default: 59°F(15°C)
Up or Down button to change the setting. Default: 78°F(26°C)
press Up or Down button to change the setting. Default: 70°F(21°C)
button to select one of the 4 values: 1.2/2/4/6°F, 0.6/1/2/3°C Default:
2°F/1°C
COMFORT setpoint.
COMFORT setpoint cannot be set higher than “Hi Limit”,
ECONOMY setpoint cannot be set lower than “Lo Limit”
adjustment mode.
button to change the setting. Default: Heat: 21°F(70°C)
button to change the setting. Default: Heat: 16°F(60°C)
and use Up or Down button to change the setting. Default: 85°F(29°C)
button to change the setting. 0.4/0.8/1.2/1.6/2°F, 0.2/0.4/0.6/0.8/1°C
Default: 0.8°F/0.4°C
COMFORT setpoint.
COMFORT setpoint cannot be set higher than “Hi Limit”
v When the thermostat is calling for heat, Flame Symbol appears on the LCD
v When the thermostat is calling for cool, Snow Flake Symbol appears on the
LCD
v During the normal operating mode, press to run the COMFORT MODE
setpoint. Press to run the ECONOMY MODE setpoint
v If Cool Mode is selected with sensor probe connected, “Err” will be
displayed on LCD
v Press to disable the control output. Press again to enable the
output.
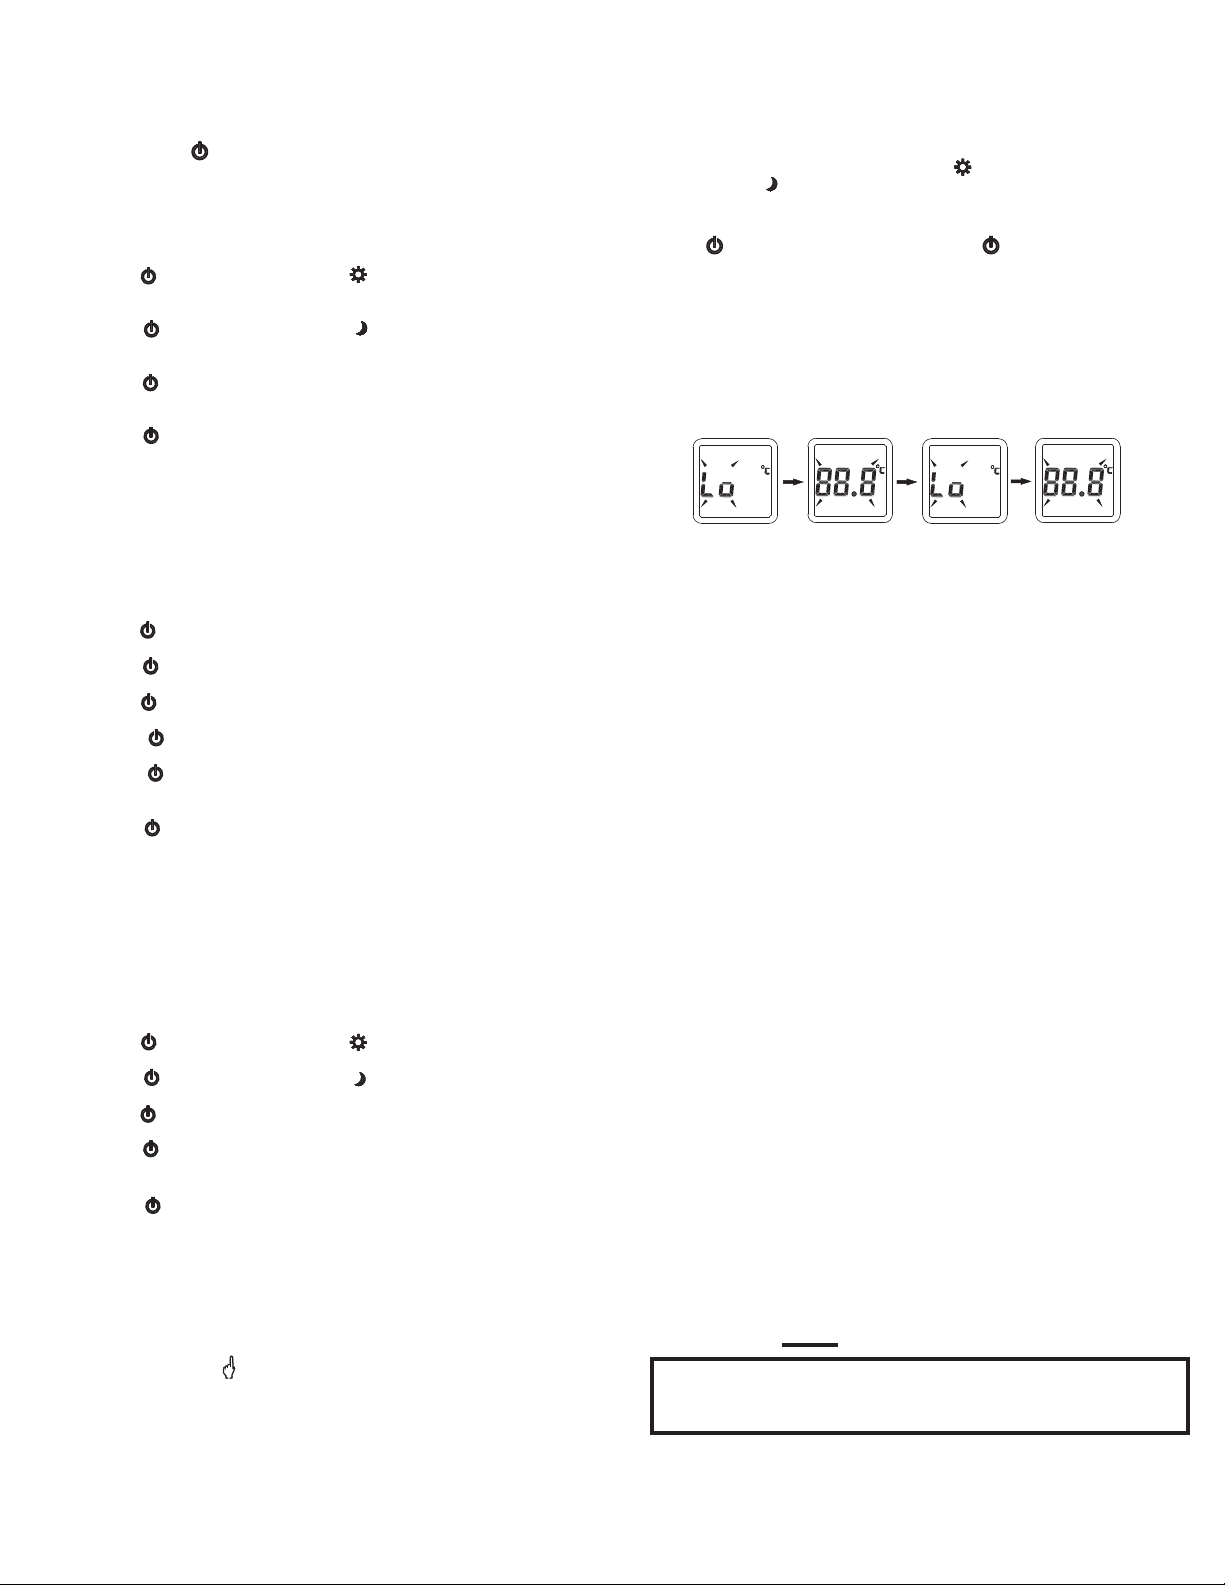
Replacing Battery
When the battery is low, LCD is flashing between “Lo” and “88.8".
Change the battery as soon as possible.
During the battery replacement, all the settings are retained in the memory.
Press RESET after replacing the batteries.
SPECIFICATIONS:
s Display Format: Liquid Crystal Display(LCD)
s Power Input : Battery 1.5 VDC AA x 2 with Battery-Low indicator &
protection
s Selectable display in °F or °C
s Temperature control range: Room: 40-95°F(5-35°C)
s Floor Temperature Control Range: 40-113°F(5-45°C)
s Temperature Display Range: 14-122°F(-10-50°C) with accuracy ±
0.2°F(0.1°C). Note: No decimal indicator above 100°F
s Maximum Floor Temperature Limit.(F & AF Mode): 68-113°F(20-
45°C) Default: 85°F(29°C)
s Minimum Floor Temperature Limit(F Mode only): 40-68°F(5-20°C)
Default: 59°F(15°C). Note: In AF Mode, only Maximum Limit is
available
s Contact Rating: 10A
s Floor limits switching differential: 4°F(2°C). Factory Preset (not
user adjustable)
s Freeze protection: factory preset. In effect when thermostat is
OFF by Power Button. A & AF Mode 40°F(5°C). F Mode:
50°F(10°C)
s Short Cycle Protection: 3 minutes delay start, available in cool-
mode only
s Dimension: 125W x 90Hx 35D mm
s Switching Differential: A/AF Mode: 0.4/0.8/1.2/1.6/2°F,
0.2/0.4/0.6/0.8/1°C Default: 0.8°F/0.4°C. F Mode: 1.2/2/4/6°F,
0.6/1/2/3°C Default: 2°F/1°C
s Sensor Probe: 10ft wire lead
s Material: Non flammable plastic
To change the setpoint instantly, press Up or Down button during the
normal operating mode to override the COMFORT or ECONOMY
setpoint. The symbol will be displayed on LCD besides the current
temperature.
Note: This manual change of the temperature setpoint will not change
COMFORT or ECONOMY settings.
AZEL
TECHNOLOGIES INC.
For more product information, please visit:
www.azeltec.com
P.O. Box 53138
10 Royal Orchard Blvd.
Thornhill, Ontario, Canada L3T 7R9
Ph: 905-223-5567 Fax: 905-223-3778
Email: [email protected]
 Loading...