

Page 1
User Manual
KEEP THIS MANUAL FOR FUTURE NEEDS
Page 2

MAGICBLADE FX User Manual XM1398-V1.0-NR
1
Thank you for your patronage. You have acquired a powerful and versatile
fixture. We are confident that you will be satisfied with our excellent products
and service. For your own safety, please read this user manual carefully before
installing and operating the device.
CONTENTS
1. SAFETY INSTRUCTIONS 2
2. FEATURES 4
3. FIXTURE OVERVIEW 5
4. DIMENSIONAL DRAWINGS 6
5. INSTALLATION INSTRUCTIONS 7
6. DMX-512 CONTROL CONNECTION 10
7. DMX-512 CONNECTION WITH DMX TERMINATOR 10
8. DEVICE DMX START ADDRESS SELECTION 10
9. OPERTING INSTRUCTIONS OF THE INTERNAL DMX WIRELESS SYSTEM 11
10. DISPLAY 12
10. DMX PROTOCOL 23
11. ERROR MESSAGES 27
12. CLEANING AND MAINTENANCE 27
Page 3
MAGICBLADE FX User Manual XM1398-V1.0-NR
2
1. SAFETY INSTRUCTIONS
1.1. IMPORTANT SAFETY WARNING
This device has left the factory in perfect condition. In order to maintain this condition and to
ensure safe operation, it is absolutely necessary for the user to follow the safety instructions and
warning notes written in this user manual.
In order to install, operate, and maintain the lighting fixture safely and correctly we suggest that
the installation and operation be carried out by qualified technicians and these instructions be
carefully followed.
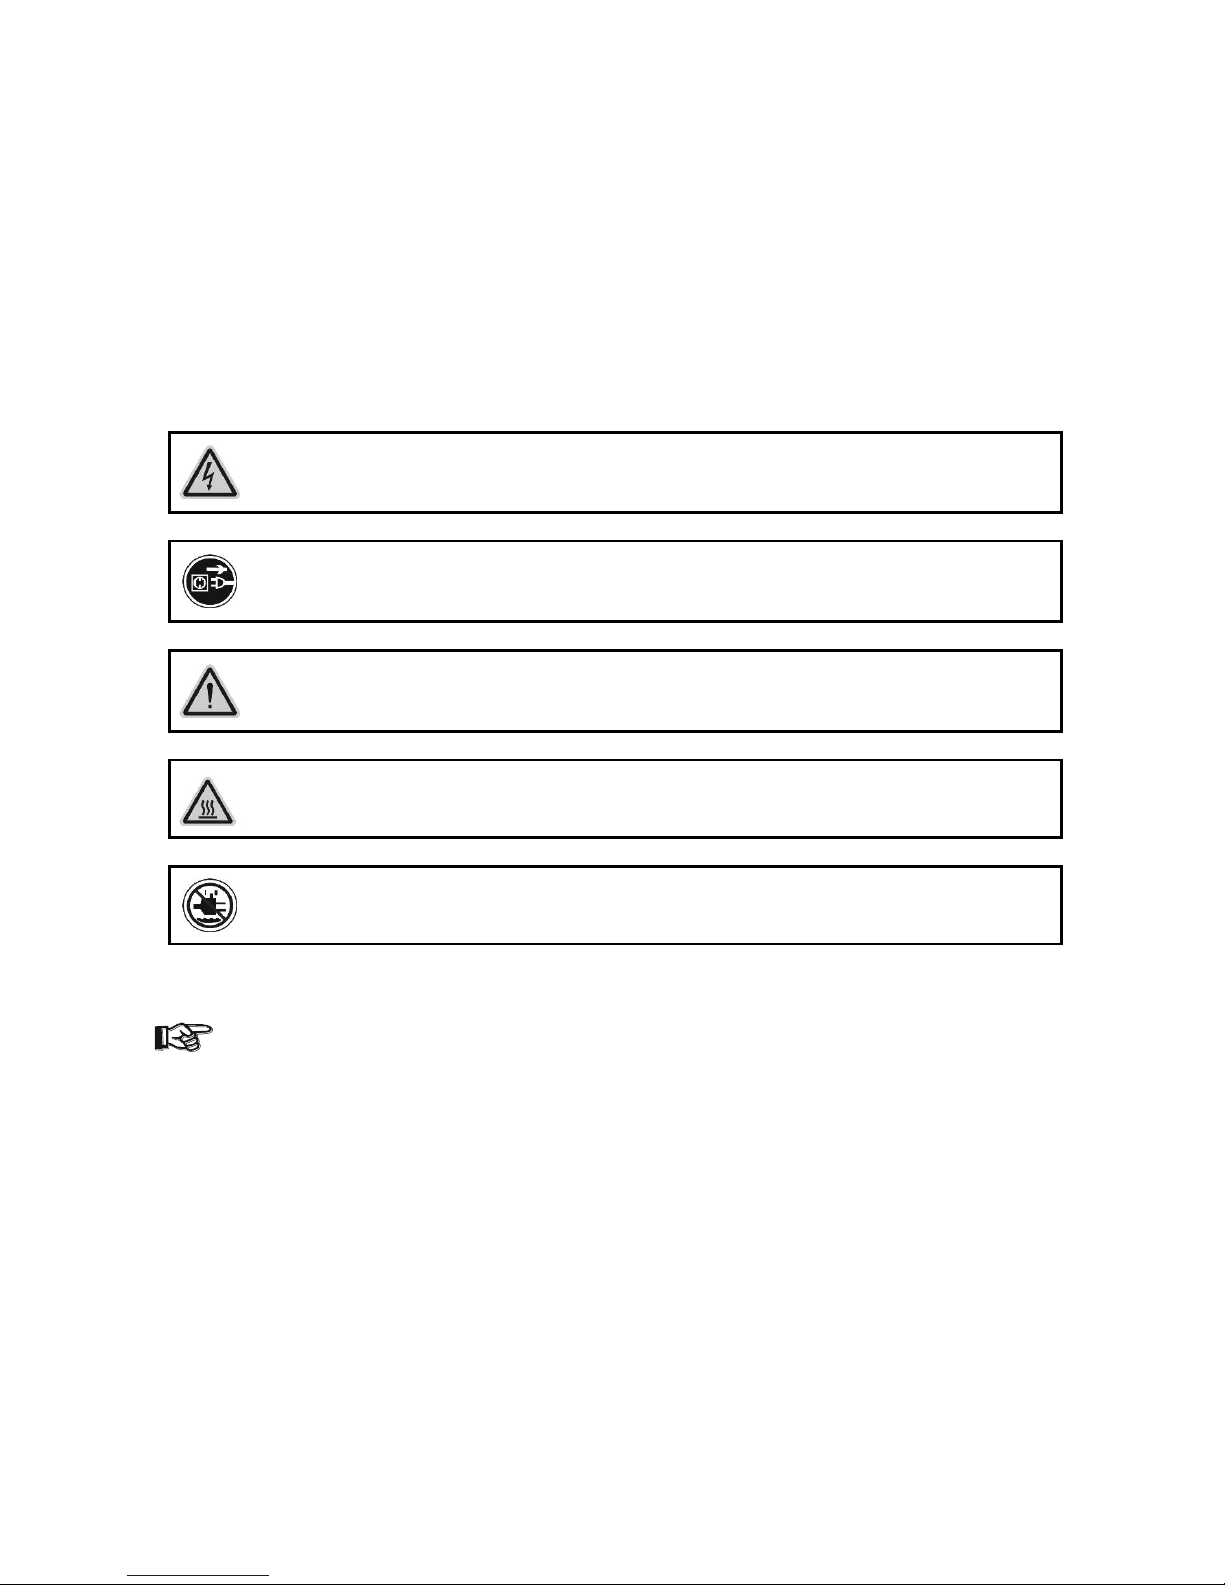
CAUTION!
HIGH VOLTAGE. RISK OF SEVERE OR FATAL ELECTRIC SHOCK
CAUTION!
ALWAYS DISCONNECT MAINS SUPPLY BEFORE REMOVING ANY FIXTURE
COVERS
CAUTION!
NEVER LOOK DIRECTLY INTO THE LIGHT SOURCE. SENSITIVE PERSONS
MAY SUFFER AN EPILEPTIC SHOCK
CAUTION!
NEVER TOUCH THE DEVICE DURING OPERATION! COVERS MAY BE HOT
CAUTION!
KEEP THIS DEVICE AWAY FROM RAIN AND MOISTURE
Important:
Damage caused by the disregard of this user manual is not subject to warranty. The
dealer and manufacturer will not accept liability for any resulting defects or problems.
• If the device has been exposed to temperature changes due to environmental conditions,
do not power on immediately. The resulting condensation could damage the device. Leave
the device powered off until it has reached room temperature.
• This device falls under protection-class I. Therefore, it is essential that the device be
earthed.
• If either lenses or display are damaged (damage may include cracks or gashes in the
material) they must be replaced.
• Electrical connections, such as replacing the power plug, must be performed by a
qualified person.
• Make sure that the available voltage is not higher than that which is stated at the end of
this manual.
• Make sure the power cord is never crushed or damaged by sharp edges. Should the power
cord suffer If this should be the case, replacement of the cable must be done by an
Page 4

MAGICBLADE FX User Manual XM1398-V1.0-NR
3
authorized dealer.
• If the external flexible power cord of this device is damaged, it shall be exclusively
replaced by the manufacturer or their service agent or a similar qualified person in order
to avoid injury.
• When the device is not in use or before performing maintenance, always disconnect the
device from the mains. Only handle the power cord from the plug. Never pull the plug out
of a socket by tugging the power cord.
• When powered on for the first time, some smoke or smell may occur. This is caused by
coating on metal parts when heated and is normal. If you are concerned, please contact
your distributor.
• Do not focus the beam onto flammable surfaces. The minimum distance between the
exiting lens of the device and the illuminated surface must be greater than 0.5 meter.
Please be aware that damage caused by any modifications to the device are not subject to
warranty. Keep away from children and non-professionals.
1.2. GENERAL GUIDELINES
• This device is a lighting effect for professional use on stages, in discotheques, theatres,
etc., the device was designed for indoor use only.
• This fixture is only allowed to be operated within the maximum alternating current as
stated in the technical specifications in section 2 of this manual.
• Handle the device with care, avoid shaking or using force when installing or maintaining
the device.
• When choosing the installation location, please make sure that the device is not exposed
to extreme heat, moisture or dust.
• If you use the quick lock cam when rigging the device, make sure the quick lock fasteners
are located in the quick lock holes correctly and securely.
• Operate the device only after having familiarized yourself with its functions. Do not
permit operation by persons not qualified for operating the device. Most damages are the
result of unprofessional operation.
• Please use the original packaging if the device is to be transported.
• The applicable temperature for the device is between -10°C to 45°C. Do not use the
device outside of this temperature range.
For safety reasons, please be aware that all modifications to the device are forbidden.
If this device is operated in any way different to the ones described in this manual, the
product may suffer damage and the warranty becomes void. Furthermore, any other
operation may lead to short-circuits, burns, electric shocks etc.
Page 5

MAGICBLADE FX User Manual XM1398-V1.0-NR
4
2. FEATURES
POWER SUPPLY
• AC 100-240V~,50/60Hz
• Power Consumption: 400W
OPTICS
• LED: 7x40W High-Power LEDs, RGBW 4 in 1 LED make extremely even and smooth color
mixing effect
• RGBW 4 in 1 LED make extremely even and smooth color mixing effect
• Extremely long Life: 50,000H and low power consumption
MOVEMENT
• Pan movement: 540。 /630
。
Optional (16 bit)
• Tilt movement: 265
。
(16 bit)
• Advanced moving system: fast, stable and quite, auto x-y repositioning
COLORS
• Excellent color mixing and rainbow effect
• Color temperature linear adjust from 2700K to 8000K, preset color temperature scenes with:
2700K, 3200K, 4300K, 5600K, 6500K, 8000K options
FEATURES
• 3 Control channel modes: 22 / 19 / 18 channels
• 2 operations modes: DMX-512, Master / Slave modes
• Pixel Control: can make extremely chasing effect
• Strobe effect with 1-25 flashes per second and pulse effect
• General dimming and blackout for all four colors
• Wireless receiver pre-installed
DISPLAY
• Advanced and convenient full –color LCD touch screen, with rechargeable battery
• Locked automatically after standby for 15 seconds to prevent error; hold the button for 3
seconds to activate
• Friendly reset detection: hold and button to lock pan /tilt reset, able to complete
reset detection inside flight case
SOFTWARE
7 pre-installed programs available upon selection
Upgrades: fast and convenient through DMX cable
Reset DMX address, remote lamp switch, reset can all be done by the controller
OTHER SPEC
Input signal isolation: guarantees stable signal transmission without interference
Advanced RDM function
WHIGHT
Net weight: 13 kg
Page 6
MAGICBLADE FX User Manual XM1398-V1.0-NR
5
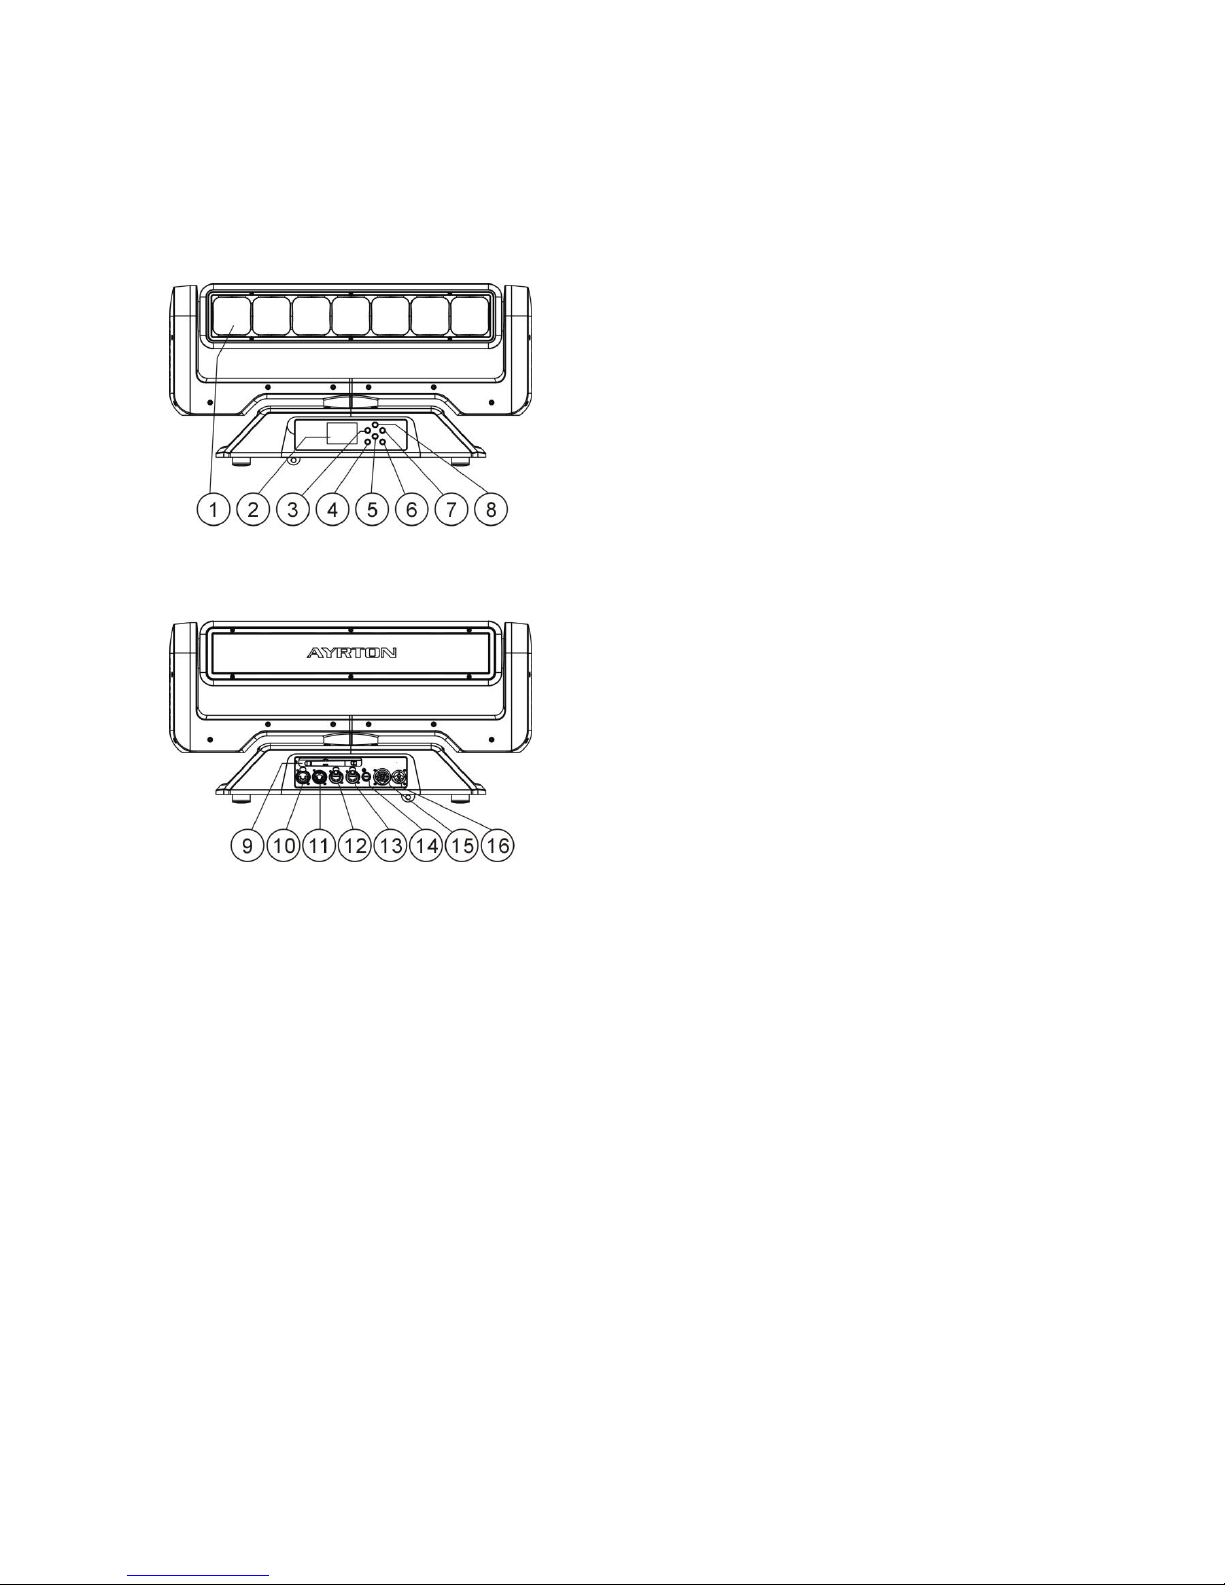
3. FIXTURE OVERVIEW
1) Lens
2) Display
3) Left-button
4) Mode/esc- button
5) Down-button
6) Enter-button
7) Right-button
8) Up-button
9) Antenna – Wireless DMX
10) 5-Pin DMX out
11) 5-Pin DMX in
12) RJ45 out
13) RJ45 in
14) Fuse
15) Power out
16) Power in
Page 7
MAGICBLADE FX User Manual XM1398-V1.0-NR
6
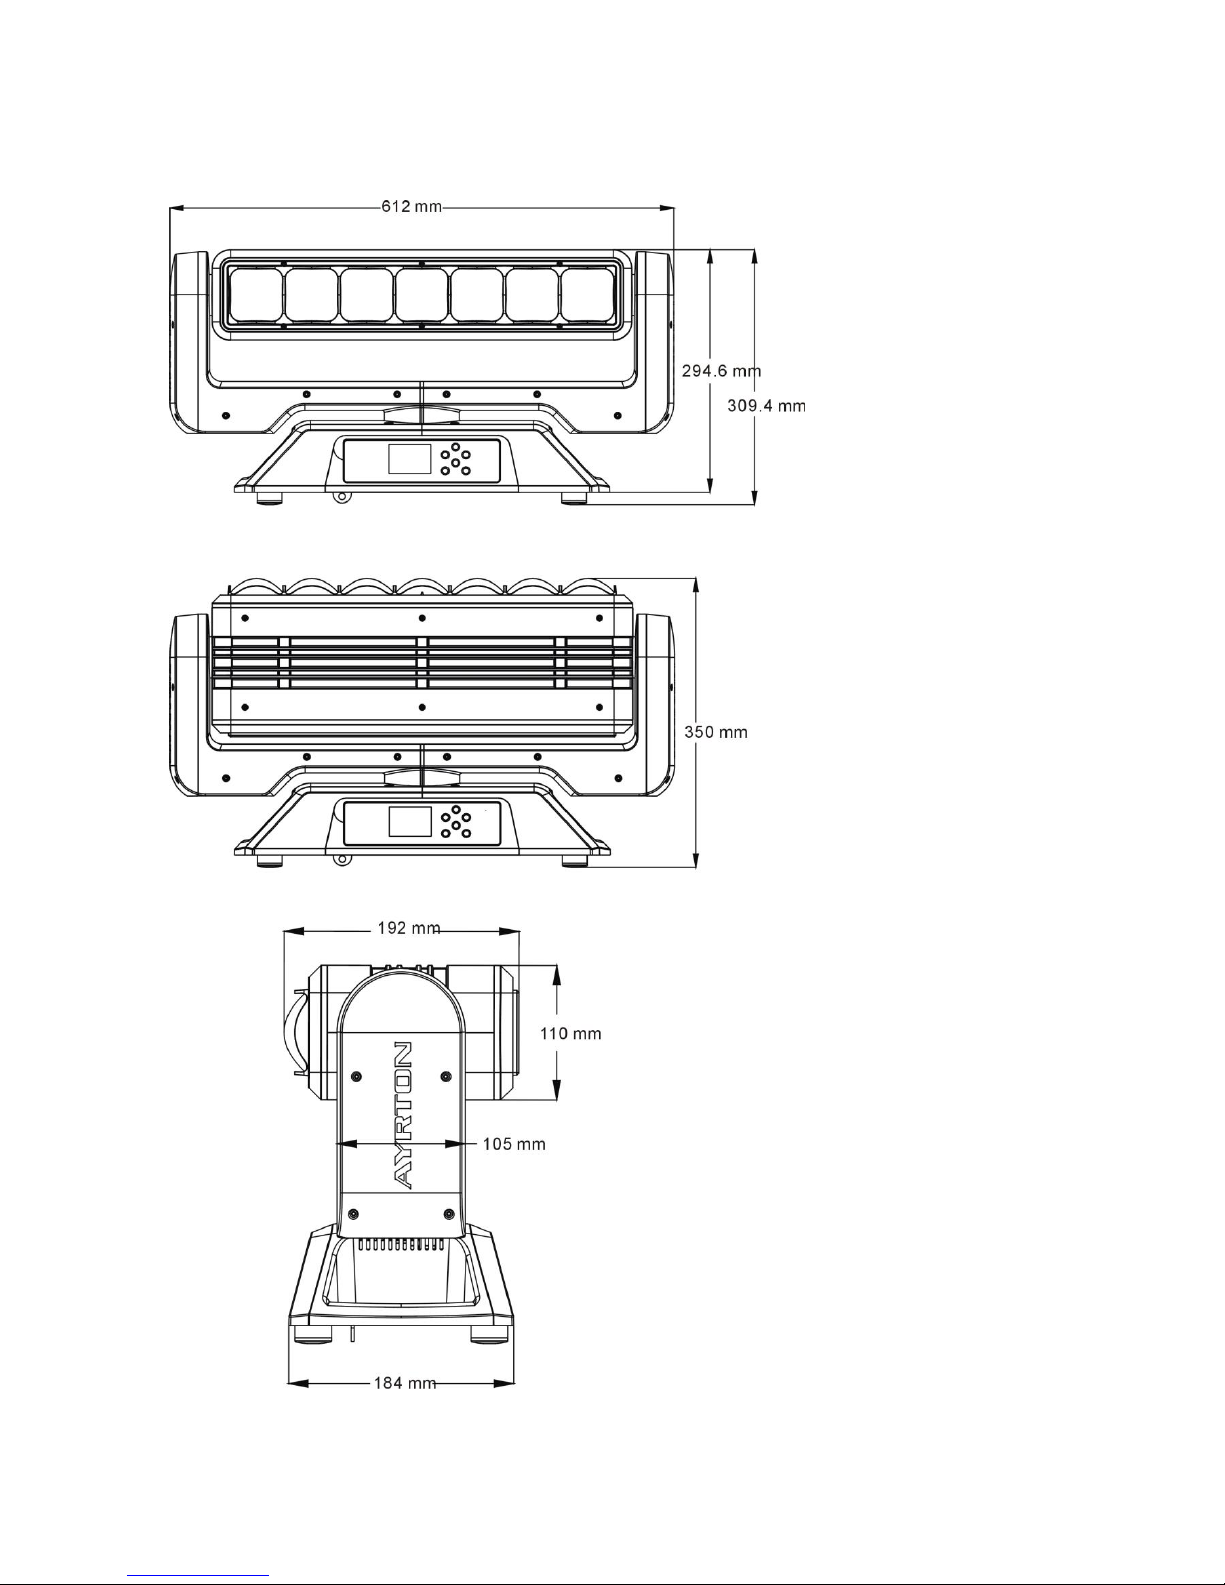
4. DIMENSIONAL DRAWINGS
Page 8
MAGICBLADE FX User Manual XM1398-V1.0-NR
7
5. INSTALLATION INSTRUCTIONS
CAUTION!
DO NOT OPERATE THIS DEVICE WITH OPEN COVER
5.1. RIGGING THE DEVICE
CAUTION!
PLEASE CONSIDER THE GB7000.1-2015, GB7000.217-2008 AND THE OTHER
RESPECTIVE NATIONAL NORMS DURING THE INSTALLATION. THE
INSTALLATION MUST ONLY BE CARRIED OUT BY A QUALIFIED PERSON.
• The structure on which the device is rigged must be able to support 10 times the weight of
the device for 1 hour without any critical deformation occurring.
• The installation must always be secured with a secondary safety attachment, e.g. the
included appropriate safety cable.
• Never stand directly below the device when rigging, de-rigging or maintaining the device.
• All electrical connections should be approved by a qualified electrician prior to using the
product.
• When the device is permanently installed these installations have to be approved by a
qualified person once a year.
• Overhead rigging requires extensive experience, including (but not limited to) calculating
working load limits, specifying installation/ rigging materials, and periodic safety
inspection of all installation material as well as the device. If you lack these qualifications,
do not attempt the rigging of this device yourself. Improper installation/ rigging can result
in serious bodily injury.
• Before rigging make sure that the installation area can hold a minimum point load of 10
times the device’s weight.
Page 9
MAGICBLADE FX User Manual XM1398-V1.0-NR
8
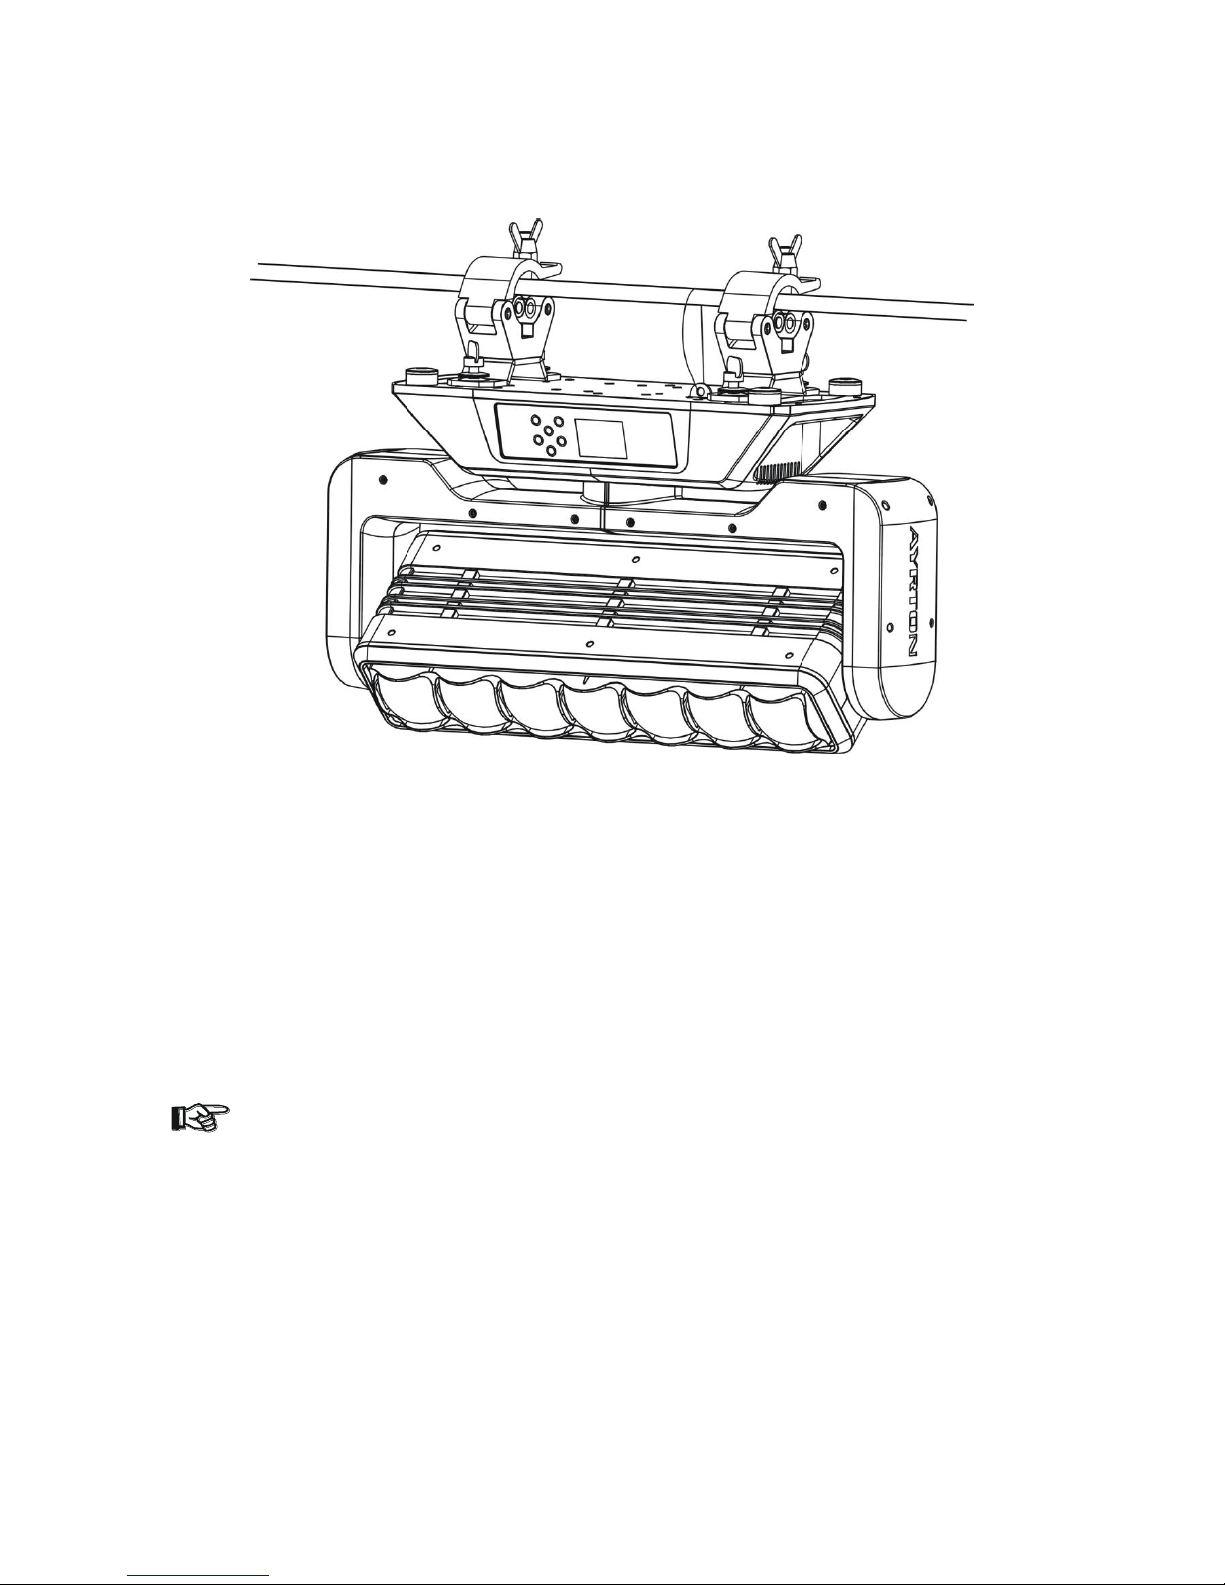
5.2. RIGGING USING THE OMEGA BRACKETS
• Fix the clamp to the bracket by tightening the M12 nut and bolt to the bracket through the
Ф13 hole in the middle of the bracket.
• Insert the quick-lock fasteners of the first Omega holder into the respective holes on the
bottom of the device. Tighten the quick-lock fasteners fully clockwise.
• Install the second Omega holder.
• Pull the safety cable through the holes on the bottom of the base and over the trussing
system or another suitable rigging point. Insert the end into the carabiner and tighten the
safety screw.
Important:
This step is very important to ensure safe rigging of the fixture.
Page 10
MAGICBLADE FX User Manual XM1398-V1.0-NR
9
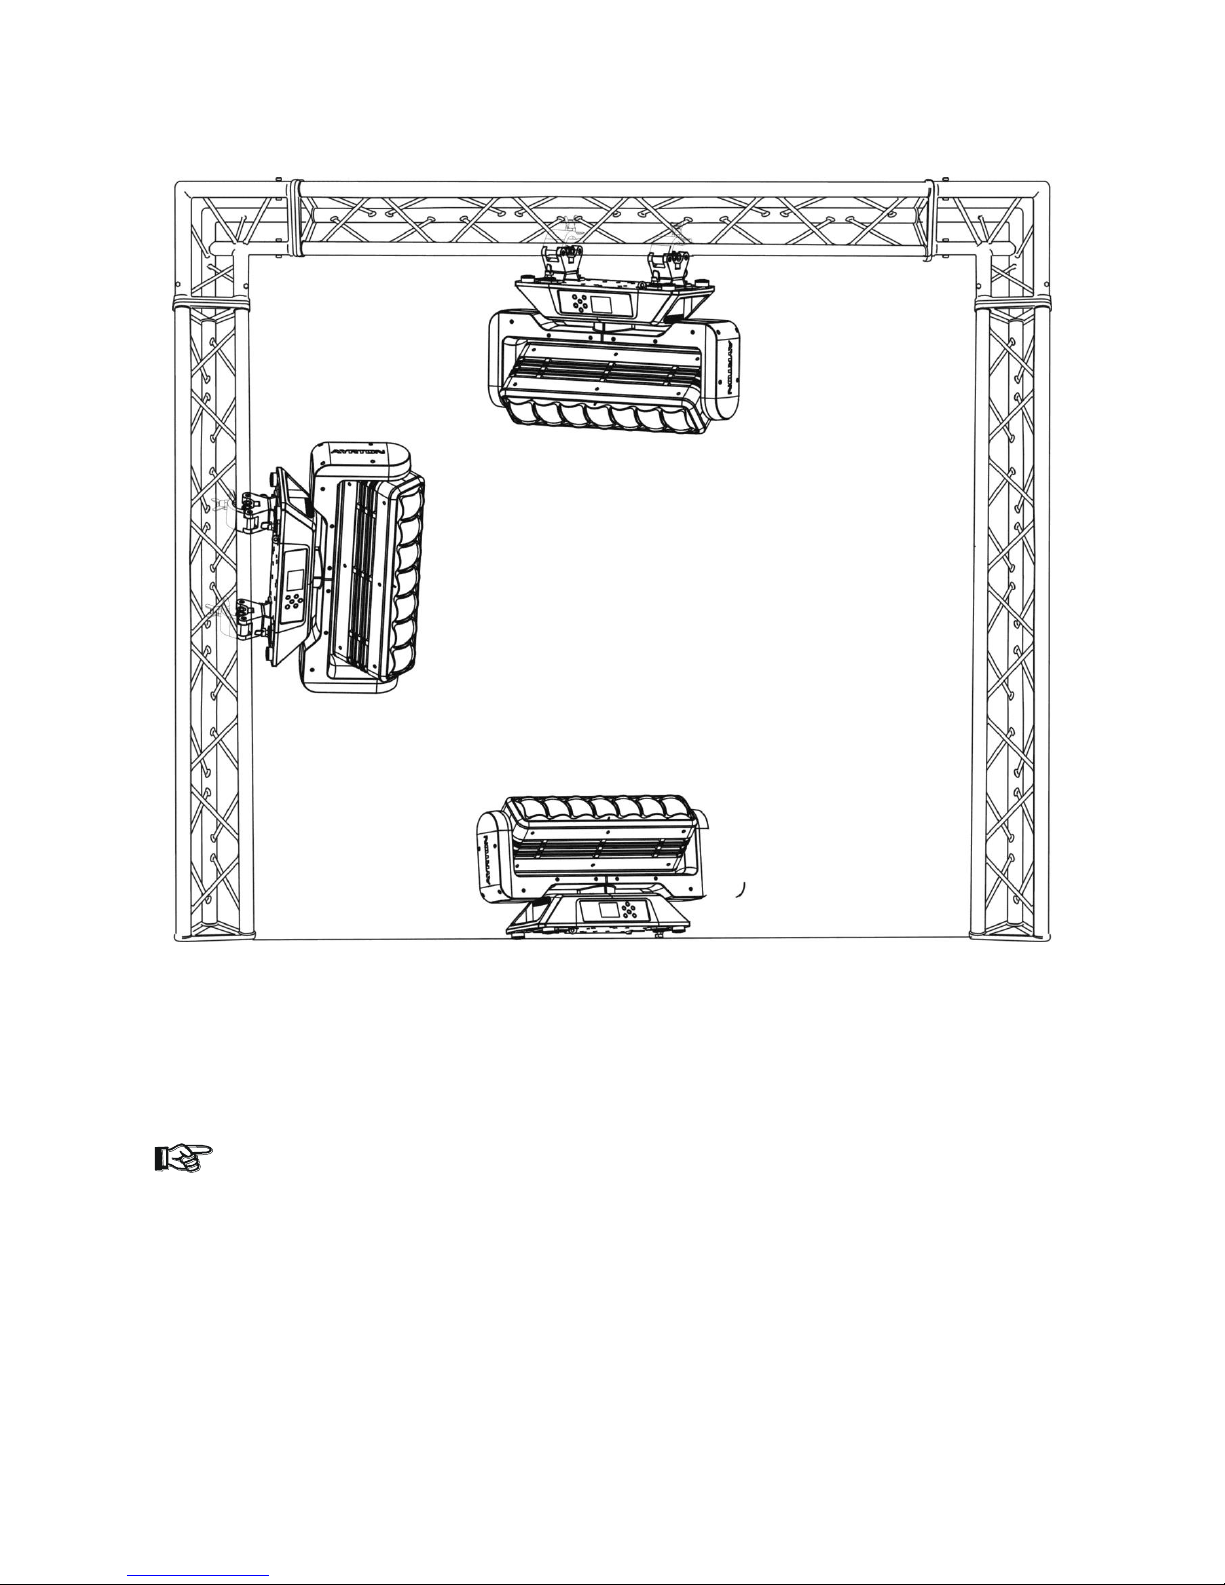
5.3. RIGGING DRAWINGS
• The device can be rigged in any of the orientations shown in the image above.
• The device must be kept at least 0.1 m away from any flammable materials (decoration
etc.).
• Always use and install the supplied safety cable as a safety measure to prevent accidental
damage and/or injury in the event the clamp fails.
Important:
Overhead rigging requires extensive experience, including (but not limited to)
calculating working load limits, specifying installation/ rigging materials, and periodic
safety inspection of all installation material as well as the device. If you lack these
qualifications, do not attempt the rigging of this device yourself. Improper installation/
rigging can result in serious bodily injury.
Page 11
MAGICBLADE FX User Manual XM1398-V1.0-NR
10
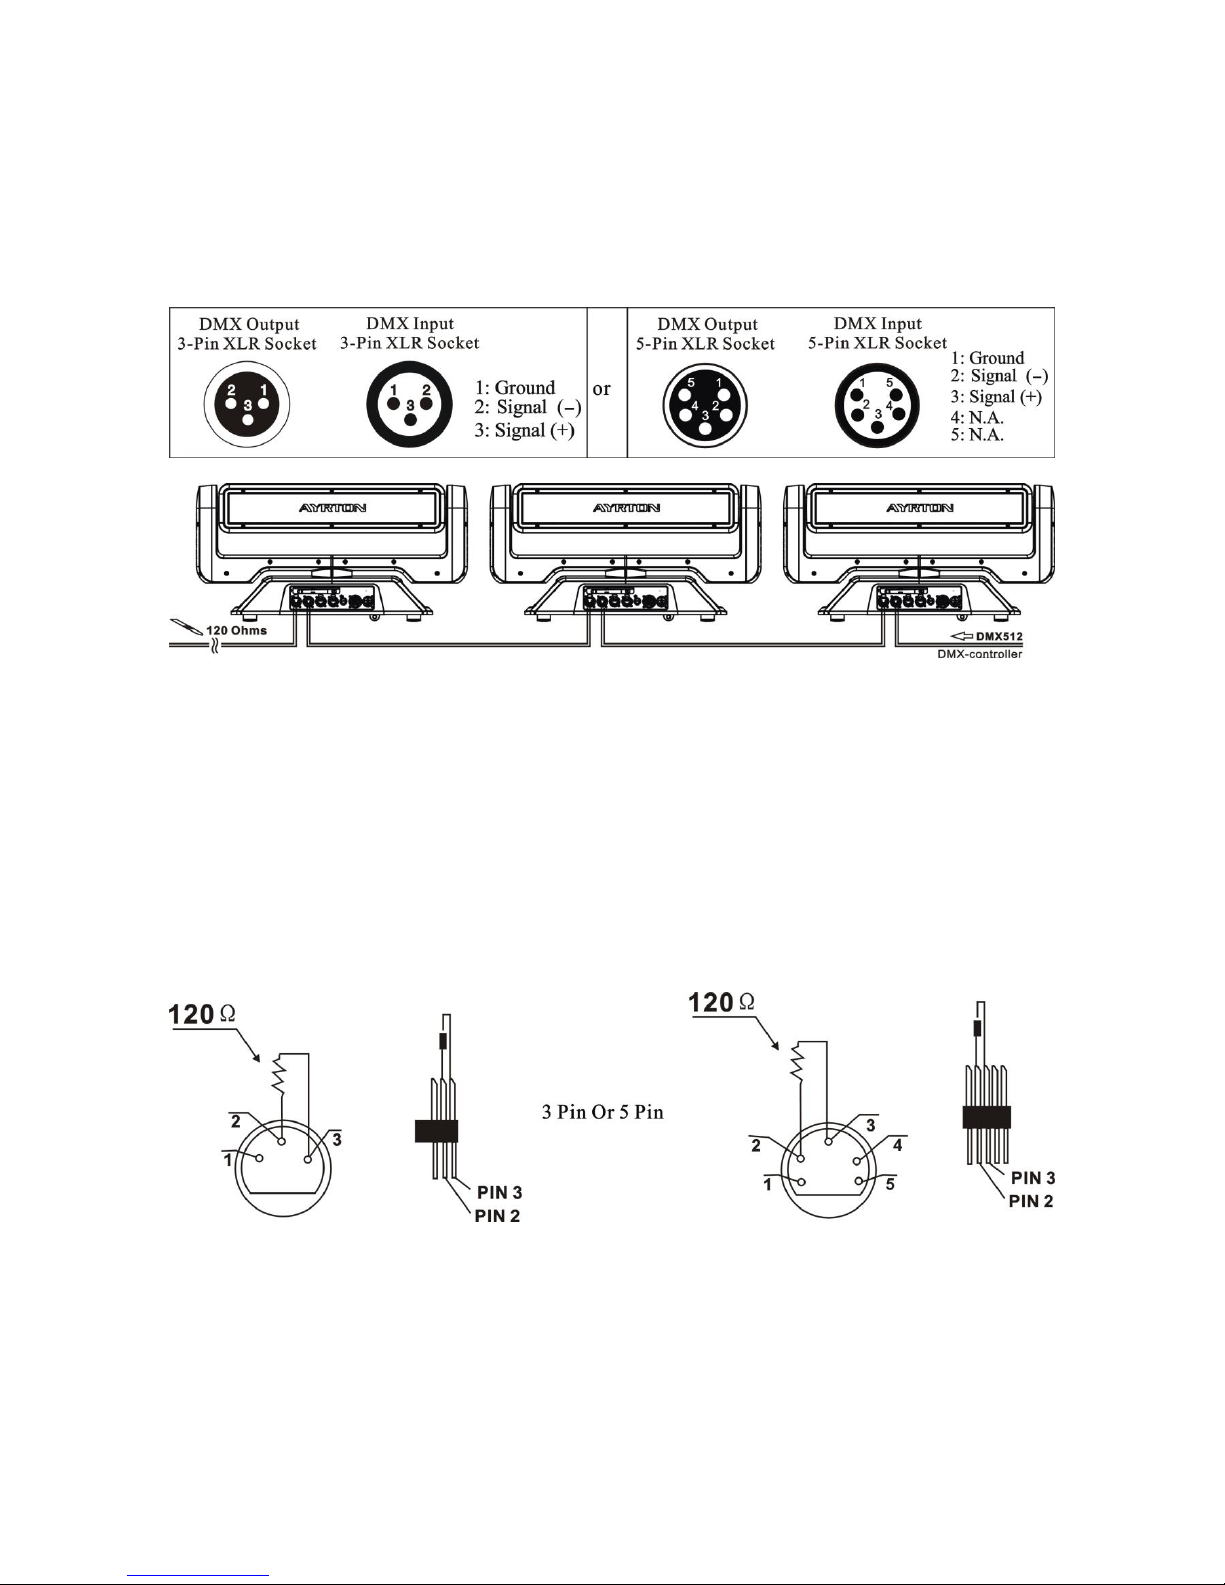
6. DMX-512 CONTROL CONNECTION
Connect the provided male side of the XLR cable to the female XLR output of your controller
and the female side of the XLR cable to the male XLR input of the device. You can connect
multiple devices together in a serial fashion. The cable needed should be two core, screened cable
with XLR input and output connectors. Please refer to the diagram below.
Address 45 Address 23 Address 1
7. DMX-512 CONNECTION WITH DMX TERMINATOR
For installations where the DMX cable has to run over a long distance or is in an electrically
noisy environment, such as in a discotheque, it is recommended to use a DMX terminator. This
helps in preventing corruption of the digital control signal caused by electrical noise. The DMX
terminator is an XLR plug with a 120 Ω resistor connected between pins 2 and 3,which is then
plugged into the output (female) XLR socket of the last fixture in the chain. Please see
illustrations below.
8. DEVICE DMX START ADDRESS SELECTION
All fixtures should be given a DMX starting address when using a DMX signal, so that the
correct fixture responds to the correct control signals. This digital starting address is the channel
number from which the fixture starts to “listen” to the digital control information sent out from
the DMX controller. The allocation of this starting address is achieved by setting the correct
address number on the display located on the base of the device.
Page 12

MAGICBLADE FX User Manual XM1398-V1.0-NR
11
You can set the same starting address for all fixtures or a group of fixtures, or set different
addresses for each fixture individually.
If you set the same address on all devices, all the devices will start to “listen” to the same control
signal from the same channel number. In other words, changing the settings of one channel will
affect all the fixtures simultaneously.
If you set a different address, each unit will start to “listen” to the channel number you have set,
based on the quantity of control channels of the unit. That means changing the settings of one
channel will affect only the selected device.
In the case of the led move head, which is a 22 channel fixture, you should set the starting
address of the first unit to 1, the second unit to 23(22 + 1), the third unit to 45 (22+ 23), and so
on.
9. OPERTING INSTRUCTIONS OF THE INTERNAL DMX WIRELESS
SYSTEM
1. Equipments:
DMX 512 controller, wireless transmitter, and the fixtures with wireless receiver.
2. Message from the LED indicator:
1) Rapid flashing red/Green: logging in to a transmitter
2) Slow flashing Red/Green: Logged on a transmitter and the DMX line is idle (No DMX is
connected to transmitter).
3) Solid Green: Logged on to a transmitter and receiving DMX data.
4) Solid Red: Not logged on to a transmitter (free)
3.WDMX in the menu of the fixture:
On a fixture installed with wireless system, in order to switch between wireless control system
and traditional DMX control (with cable), a new menu WDMX is added to the display board.
ON: (Activate WDMX)
1) When the fixture is on power,and the WDMX is activated to ON status, but did not connect to
the controller and did not log in to the transmitter, the fixture will search for the DMX signal
source. If the fixture is connected to the DMX controller it can be controlled by DMX controller;
if it is log in to the wireless transmitter, it can be controlled by the Transmitter
2) When the fixture is power off, and the WDMX is in ON status, if the fixture is connected to
DMX controller. After the fixture is power on, it can be controlled only by the DMX controller
which connected. The fixture can log in the wireless transmitter, and receive only radio signal
from transmitter, but not DMX from the transmitter.
OFF: (De-activate WDMX)
In this status, wireless system is not activated, so the fixture can not log in the transmitter.
REST: (reset WDMX memory);
Can remove the fixture from the connection with the transmitter, the fixture become free and
ready to log in any transmitter.
4. Setup the wireless system:
1) Connect the transmitter with the DMX controller
2) To make the fixture installed with wireless receiver log in to the transmitter
a) Initially, the indicator on the receiver fixture should be in Solid red
b) Press and hold the configuration button on transmitter for less than 3 seconds the
red/green LEDs on the transmitter and the receiver fixture will flash rapidly for about 5~ 10
Page 13
MAGICBLADE FX User Manual XM1398-V1.0-NR
12
seconds while the system goes through its setup procedure.
c) Once the receiver fixture is logged in to the transmitter (T1), the fixture with wireless
receiver will keep the memory, even if restart the power, this unit will log in the transmitter
(T1) automatically.
3) Use the DMX 512 to control the fixture
5.Remove the receivers from transmitter (T1) and to log in to another transmitter (T2)
Case 1: Remove a receiver:
a) On the control board of the fixture, enter menu to activated the function of REST;
b) The LED for wireless on the fixture should turn to Solid red; the receiver can log out from
the transmitter (T1);
c) press the configuration button on transmitter(T2) for less than 3 second, then the fixture
will start to connect with the transmitter(T2)
Case 2: Remove all receivers from a transmitter (T1) to log in to T2;
a) Press and hold the configuration button on the T1 as least 5 seconds, can clear the
connection with all the fixtures.
b) All the red/green LEDs on the receiver fixtures will turn to Solid red to indicate that the
receivers are unassigned and removed from the transmitter ( T1);
c) Press and hold the configuration button on the T2 less then less than 3 second , the fixtures
will connect with the T2
PS: 1. Please log the receivers out from the transmitter after every job, so that the receivers are in
free un assigned state and ready to be assigned to a transmitter.
2. Do not connect the fixture which is under the communication of wireless system to the
DMX controller, otherwise it will cause interference from the DMX controller.
10. DISPLAY
The Display offers several features: you can set the starting address, run the pre-programmed
program or reset the device.
The main menu is accessed by pressing the -button until the display starts flashing. Browse
through the menu by pressing the -button , -button , -button or -button.
Press the Enter-button in order to select the desired menu. You can change the selection by
pressing the -button , -button , -button or -button. Confirm every selection
by pressing the -button. You can leave every mode by pressing the -button. After
accessing the edit mode, the unit will automatically exit to the main menu after 15 seconds from
the last button press. When the unit is powered on, if no data signal is connectedafter 1 minute,
then the display will switch off automatically. The Display does not need external power to
operate. Hold down the -button for 3 seconds and the Display will turn on by using the
unit’s battery built in battery.
Page 14
MAGICBLADE FX User Manual XM1398-V1.0-NR
13
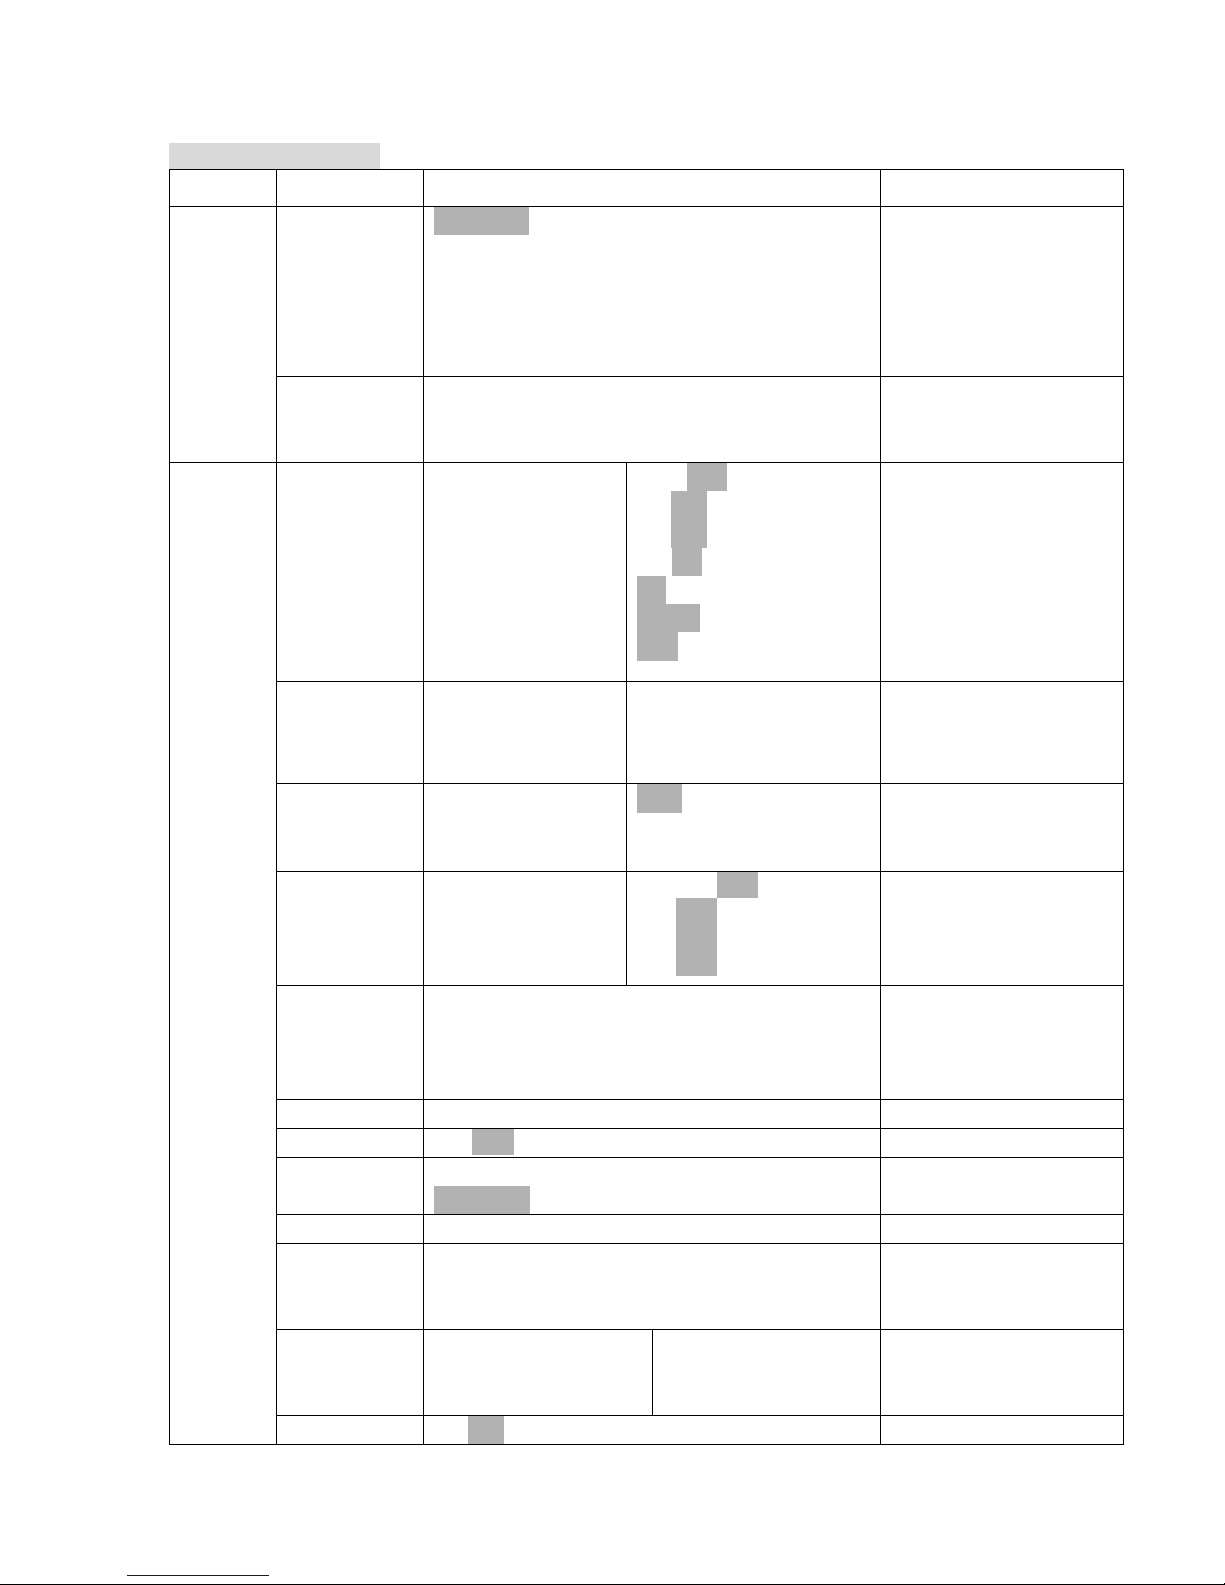
Default settings shaded
Address
Set Dmx Addr
A001~AXXX
DMX address setting
Users Mode
User Mode
Stand Mode
Basic Mode
Extend Mode
User Mode A
User Mode B
User Mode C
User’s mode to change
channel numbers
Edit User
Max channel
PAN
:
Preset User modes
:
Options
Status
No DMX Mode
Pan Reverse
Tilt Reverse
Pan Degree
Feedback
Pan/Tilt Spd
Hibernation
Close/Hold/Auto
ON/OFF
ON/OFF
630/540
ON/OFF
Speed 1~ 4
OFF , 01M~99M
Add. via DMX
Auto run if no DMX
Pan Reverse movement
Tilt Reverse movement
Pan Degree Select
Movement Feedback
Reset Pan/Tilt
Stand by Mode
Service PIN
Service PIN
RDM PID
Set Ip
Password=XXX
xxxxxx
xxx.xxx.xxx.xxx
Service Password“=050”
RDM PID Code
IP Addr
Fans Control
Head Control
Auto
Stage
Studio
Fans Speed select
Disp.Setting
Shutoff Time
Flip Display
Key Lock
DispFlash
02~60m 05m
ON/OFF
ON/OFF
ON/OFF
Display shutoff time
Reverse 180 degree
Key Lock
No Signal Rash
Signal Select
DMX
WDMX
Art—Net
sACN
DMX
Wireless DMX
Art-Net
sACN
Set Universe
xxx
Art-Net Universe NO.
Flip Pixel
ON/OFF
LED reverse order
Temp. C/F
Celsius
Fahrenheit
Temperature switch
between ℃/℉
Initial Pos.
PAN =XXX
Initial effect position
Wireless DMX
Activate WDMX
Act&Data Out
Rest WDMX
Activate WDMX
Act & Data Out
Reset Wireless DMX Mem
Trigger
DMX Value Disp.
Set To Slave
Auto Program
PAN……
Slave1,Slave2,Slave3
Master / Alone
DMX value display
Slave setting
Auto program
ResetDefault
ON/OFF
Restore factory set.
Page 15
MAGICBLADE FX User Manual XM1398-V1.0-NR
14
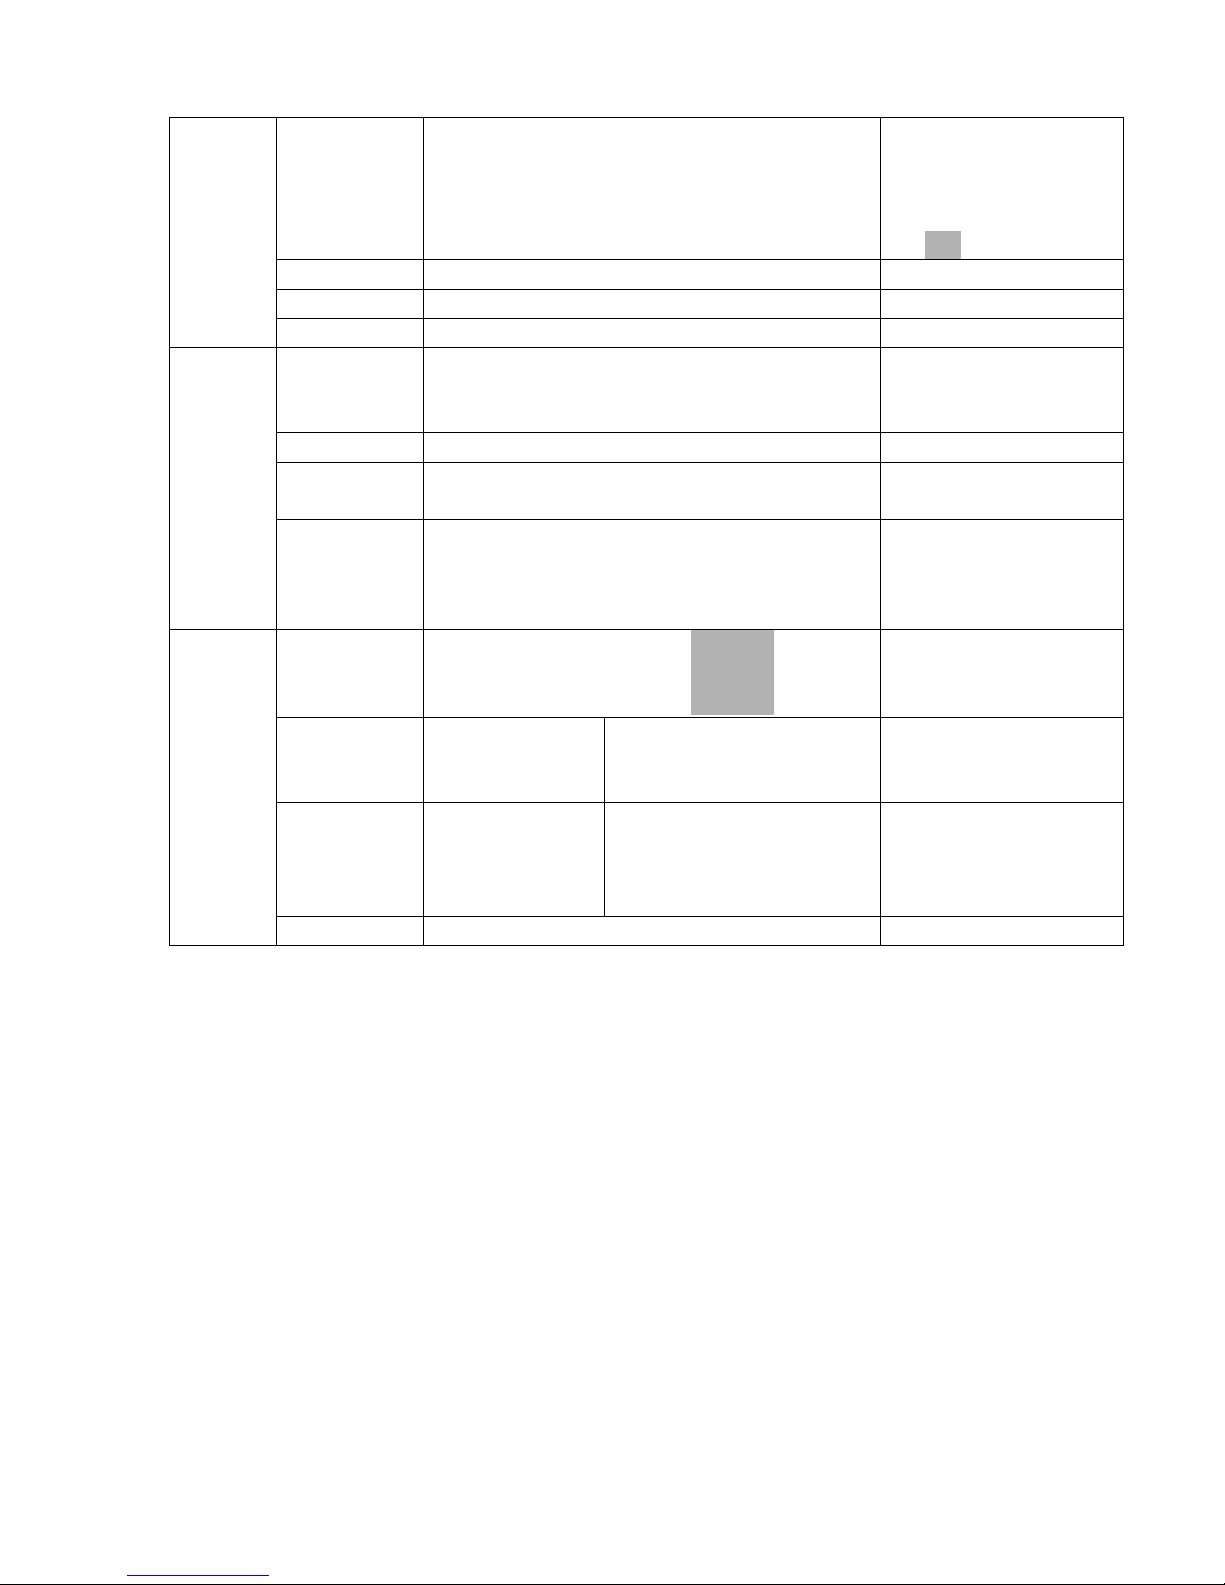
Info
Time Info.
Current Time
Ttl Life Hrs
Last Run Hrs
Timer PIN
Clr Last Run
XXXX(Hours)
XXXX(Hours)
XXXX(Hours)
Password=XXX
ON/OFF
Temp. Info
Head Temp.
XXX℃/℉
Software Ver
V1.0……
Software version
Network
IP,Mask,Mac
Network setting
Test
Home
All
Pan&Tilt
Other
Reset all motors
Reset Pan/Tilt
Reset Other
Test Channel
PAN ……
Test function
Manual Ctrl.
PAN =XXX
:
Fine adjustment of the
device
Calibration
-PasswordPAN
:
Password “050”
Calbrate and adjust the
effects to standard/right
position
Preset
Select Prog.
Prog. Part 1 = Program 1 ~ 10 Program 1
Prog. Part 2 = Program 1 ~ 10 Program 2
Prog. Part 3 = Program 1 ~ 10 Program 3
Select programs to be run
Edit Prog.
Program 1
:
Program 10
Program Test
Step 01=SCxxx
Step 64=SCxxx
Testing program
Program in loop
Save and exit
Edit Scenes
Edit Scene 001
~ Edit Scene 250
Pan,Tilt,……
--Fade Time--
--Secne Time-Input By Outside
Save and automatically
return
manual scenes edit
Scenes Input
XX~XX
Automat. scenes rec
9.1. Address
Set DMX Addr
With this function, you can adjust the desired DMX-address via the Display.
1. Access the main menu.
2. Tap the <Up/Down> button until “Set DMX Addr” is displayed.
3. Press ENTER, the display will show “Set DMX Addr”.
4. Tap the <Up/Down> button, the display will show “A001~AXXX”
5. Press ENTER to confirm or press <MODE/ESC> to return to the main menu.
9.2. USERS MODE SET
1.Tap <MODE/ESC> button, access the main menu, Tap the <Up/Down> button until
“Users mode set” is displayed. Press <ENTER>, the display will show “Users mode
set”.
2.The display shows “User Mode” , Press <Up/Down> button, then you can choose “Edit
User Mode A”, “Edit User Mode B” and “Edit User Mode C”.
3.Press <ENTER> to confirm or press <MODE/ESC> to exit
Page 16

MAGICBLADE FX User Manual XM1398-V1.0-NR
15
As well as Standard Mode, Basic Mode and Extended Mode, this fixture has another three
DMX modes which can be set according to user's needs. To set one of these user modes see
below:
1.Tap <MODE/ESC> button, access the main menu, Tap the <Up/Down> button until
“Users mode set” is displayed. Press <ENTER>, the display will show “Users mode
set”.
2.Choose “Edit User Mode A”, press “ENTER”
3.Set “Max Channel=xxx” the max channel
4.Set “Edit User Mode B”and “Edit User Mode C” as above
9.2.1. User Mode
With this function, you can create user defined channel orders.
9.2.2. Edit User Mode
With this function, you can adjust the rest user defined channel order.
1.Tap <MODE/ESC> button, access the main menu, Tap the <Up/Down> button until
“Users mode set” is displayed. Press <ENTER>, the display will show “Users mode
set”.
2.The display show “Edit User Mode” first channel, Press <Up/Down> the display will
show “Edit User Mode”.
3.Press <ENTER> to confirm or press <MODE/ESC> to return to the main menu.
9.3. Options
9.3.1. Status
No DMX Mode
With this function, when the drive is not DMX signal, it runs automatism, close, hold and
music, the default is hold.
1. Access the main menu.
2. Press <Up/Down>, the display will show “No DMX Mode”.
3. Press< ENTER>, the display will show“No DMX Mode”.
4. The display show “Hold”,Press <Up/Down>, the display will show “Close”, “Auto”,
“Music”.
5. Press <ENTER> to confirm or press <MODE/ESC> to return to the main menu.
Pan Reverse
With this function you can reverse the Pan-movement.
1. Access the main menu.
2. Press <Up/Down>, the display will show “Pan Reverse”.
3. Press< ENTER>, the display will show“Pan Reverse”.
4. The display show “OFF”,Press <Up/Down>, the display will show “ON”.
5. Press <ENTER> to confirm or press <MODE/ESC> to return to the main menu.
Tilt Reverse
With this function you can reverse the Tilt-movement.
1. Access the main menu.
2. Press <Up/Down>, the display will show“Tilt Reverse”.
3. Press< ENTER>, the display will show“Tilt Reverse”.
Page 17

MAGICBLADE FX User Manual XM1398-V1.0-NR
16
4. The display show “OFF”,Press <Up/Down>, the display will show “ON”.
5. Press <ENTER> to confirm or press <MODE/ESC> to return to the main menu.
Pan Degree
With this function, you can select pan degree for 630 or 540.
1. Access the main menu.
2. Press <Up/Down>, the display will show“Pan Degree”.
3. Press< ENTER>, the display will show“Pan Degree”.
4. The display show “540”,Press <Up/Down>, the display will show “630”.
5. Press <ENTER> to confirm or press <MODE/ESC> to return to the main menu.
Feedback
With this function, you can feedback switch of pan movement or tilt movement.
1. Access the main menu.
2. Press <Up/Down>, the display will show“Feedback”.
3. Press< ENTER>, the display will show“Feedback”.
4. The display show “ON”,Press <Up/Down>, the display will show “OFF”.
5. Press <ENTER> to confirm or press <MODE/ESC> to return to the main menu.
Pan/Tilt Spd
With this function, you can select scan mode from 1 to 4.
1. Access the main menu.
2. Press <Up/Down>, the display will show“Pan/Tilt Spd”.
3. Press< ENTER>, the display will show“Pan/Tilt Spd”.
4. The display show “Speed 1”,Press <Up/Down>, the display will show “Speed 2”,
“Speed 3”, “Speed 4”.
5. Press <ENTER> to confirm or press <MODE/ESC> to return to the main menu.
Hibernation ——Standby mode
The lamp and step motors will be power off if the fixture stay without DMX signal for 15
mins (Factory default).And the fixture will be reset before working once it receive DMX
signal again.
1. Access the main menu.
2. Press <Up/Down>, the display will show“Hibernation”.
3. Press< ENTER>, the display will show“Hibernation”.
4. The display show “15M”,Press <Up/Down>, the display will show “01M”,
“02M” …. “99M” or“OFF”.
5. Press <ENTER> to confirm or press <MODE/ESC> to return to the main menu.
9.3.2. Service PIN
Service PIN——The Password for this function is “50”.
RDM PID—— With this function you can call up various submenus via RDM.
This device is RDM ready. RDM stands for "remote device management" and makes
remote control of devices connected to the DMX-bus. ANSI E1.20-2006 by ESTA specifies
the RDM standard as an extension of the DMX512 protocol.
Page 18

MAGICBLADE FX User Manual XM1398-V1.0-NR
17
Manual settings like adjusting the DMX starting address are no longer needed. This is
especially useful when the device is installed in a remote area.
RDM ready and conventional DMX devices can be operated in one DMX line. The RDM
protocol sends own packages in the DMX512 data feed and does not influence conventional
devices.
If DMX splitters are used and RDM control is to be used, these splitters must support RDM.
The number and type of RDM parameters depend on the RDM controller being used.
Set IP
1. Access the main menu.
2. Press <Up/Down>, the display will show“Set IP.”.
3. Press< ENTER>, the display will show“Set IP”.
4. The display show“xxx.xxx.xxx.xxx”.
5. Press <ENTER> to confirm or press <MODE/ESC> to return to the main menu.
9.3.3. Fans Control
With this function, you can set the speed of the running fans. The options are Auto, High and
Low.
1. Tap <MODE/ESC> button,access the main menu,Tap the <Up/Down> button until
“Options” is displayed. Press ENTER, the display will show “Options”.
2. Press <Up/Down>, the display will show “Fans Control”, Press< ENTER>.
3. Press <Up/Down>, the display will show “Head Control”, Press< ENTER>.
4. The display show “Auto”, Press <Up/Down>, the display will show “Stage”, “Studio”.
5. Press <ENTER> to confirm or press <MODE/ESC> to return to the main menu.
9.3.4. Display Setting
Shut off time
With this function you can shut off the LCD display after 2 to 60 minutes.The default is 5
minutes.
Flip Display
With this function you can rotate the display by 180°.
1.Tap <MODE/ESC> button,access the main menu,Tap the <Up/Down> button until
“Options” is displayed. Press ENTER, the display will show “Options”. Tap the
<Up/Down> button until the display will show “Display Setting”. Press ENTER, the
display will show “Display Setting”.
2.Press <Up/Down>, the display will show “Flip Display”.
3.Press< ENTER>, the display will show “Flip Display”.
4.The display show “OFF”, Press <Up/Down>, the display will show “ON”
5.Press <ENTER> to confirm or press <MODE/ESC> to return to the main menu.
Key Lock
With this function you can activate the automatic key lock function. If this function is
activated, the keys will be locked automatically after exiting the edit mode for 15 seconds.
keeping press the <MODE/ESC> key for 3seconds if you do not need this function.
1.Tap <MODE/ESC> button,access the main menu,Tap the <Up/Down> button until
“Personality” is displayed. Press < ENTER>, the display will show “Personality”. Tap
the <Up/Down> button until the display will show “Display Setting”. Press ENTER, the
Page 19

MAGICBLADE FX User Manual XM1398-V1.0-NR
18
display will show “Display Setting”.
2.Press <Up/Down>, the display will show “Key Lock”.
3.Press< ENTER>, the display will show “Key Lock”.
4.The display show “OFF”, Press <Up/Down>, the display will show “ON”.
5.Press <ENTER> to confirm or press <MODE/ESC> to return to the main menu.
Displ Flash
With this function you can the entire display to be flipped by 180˚ to allow for better view
when the fixture is hung from truss or a ceiling. This function is disabled as default.
1.Tap <MODE/ESC>button , access the main menu , Tap the <Up/Down>button
until ”Personality” is displayed. Press ENTER, the display will show “Personality”. Tap
the <Up/Down>button until the display will show “Display Setting”. Press ENTER, the
display will show “Display Setting”.
2.Press <Up/Down>, the display will show ”Display Reverse”.
3.Press< ENTER>, the display will show ”Display Reverse”.
4.The display show “OFF”, Press <Up/Down>, the display will show “ON”.
5.Press <ENTER> to confirm or press <MODE/ESC> to return to the main menu.
9.3.5. Signal Select
1.Access the main menu.
2.Press <Up/Down>, the display will show“Signal Select”.
3.Press< ENTER>, the display will show“Signal Select”.
4.The display show “DMX”,Press <Up/Down>, the display will show “WDMX”,
“Art--Net”, “sACA”.
5.Press <ENTER> to confirm or press <MODE/ESC> to return to the main menu.
9.3.6. Set Universe
1. Tap <MODE/ESC> button,access the main menu, Tap the <Up/Down> button until
“Options” is displayed. Press ENTER, the display will show “Options”.
2. Press <Up/Down>, the display will show “Set Universe”.
3. Press< ENTER>, the display will show “Set Universe”.
4. The display show “000-255”,
5. Press <ENTER> to confirm or press <MODE/ESC> to return to the main menu.
9.3.7. Flip Pixel
1. Tap <MODE/ESC> button,access the main menu, Tap the <Up/Down> button until
“Options” is displayed. Press ENTER, the display will show “Options”.
2. Press <Up/Down>, the display will show “Flip Pixel”.
3. Press< ENTER>, the display will show “Flip Pixel”.
4. The display show “OFF”, Press <Up/Down>, the display will show “ON”.,
5. Press <ENTER> to confirm or press <MODE/ESC> to return to the main menu.
9.3.8. Temp. C/F
With this function, Display the temperature for Celsius or Fahrenheit.
1.Access the main menu.
2.Press <Up/Down>, the display will show“Temp. C/F”.
3.Press< ENTER>, the display will show“Temp. C/F”.
4.The display show “Fahrenheit”,Press <Up/Down>, the display will show “Celsius”.
5.Press <ENTER> to confirm or press <MODE/ESC> to return to the main menu.
Page 20

MAGICBLADE FX User Manual XM1398-V1.0-NR
19
9.3.9. Initial Pos.
With this function, Display initial effect position.
1.Access the main menu.
2.Press <Up/Down>, the display will show“Initial Pos.”.
3.Press< ENTER>, the display will show“Initial Pos.”.
4.The display show “XXX”.
5.Press <ENTER> to confirm or press <MODE/ESC> to return to the main menu.
9.3.10. Wireless DMX
From factory, this projector is prepared for wireless data transmission (W-DMX). If you wish to
de-activate W-DMX control, you can select the function “De-activate WDMX” by turning the
encoder. With the function “rest”, you can log out the projector from the wireless sender.
1.Access the main menu.
2.Press <Up/Down>, the display will show“Wireless DMX”.
3.Press< ENTER>, the display will show“Wireless DMX”.
4.The display show “Activate WDMX”, Press <Up/Down>, the display will show
“Act&Data Out”, “Rest WDMX”.
5.Press <ENTER> to confirm or press <MODE/ESC> to return to the main menu.
9.3.11. Trigger
DMX Value Disp.
With this function you can display the DMX 512 value of each channel. The display
automatically shows the channel with a value changing.
1. Access the main menu.
2. Tap the <Up/Down>button until“DMX Value Disp.”is displayed.
3. Press ENTER, the display will show “DMX Value Disp.”.
4. Tap the <Up/Down>button,choose each channel.
5. Press ENTER to confirm or press <MODE/ESC> to return to the main menu.
Set To Slave
With this function, you can define the device as slave.
1. Access the main menu.
2. Tap the <Up/Down>button until“Set To Slave”is displayed.
3. Press ENTER, the display will show“Set To Slave”.
4. Tap the <Up/Down>button,the display will show “Slave1”, ”Slave2”, ”Slave3”.
5. Press ENTER to confirm or press <MODE/ESC> to return to the main menu.
Auto Program
With this function, you can run the internal program. You can select the desired program
under “Select program”. You can set the number of steps under “Edit program”. You
can edit the individual scenes under “Edit scenes”. With this function, you can run the
individual scenes either automatically, i.e. with the adjusted Step-Time.
1. Access the main menu.
2. Tap the <Up/Down>button until“Auto Program”is displayed.
3. Press ENTER, the display will show“Auto Program”.
4. Tap the <Up/Down>button,the display will show “Master1”, ” Alone”.
5. Press ENTER to confirm or press <MODE/ESC> to return to the main menu.
9.3.12. ResetDefault
Page 21

MAGICBLADE FX User Manual XM1398-V1.0-NR
20
With this function, you can select restore factory set for ON or OFF, the default is OFF.
1.Access the main menu.
2.Press <Up/Down>, the display will show“ResetDefault”.
3.Press< ENTER>, the display will show“ResetDefault”.
4.The display show “OFF”,Press <Up/Down>, the display will show “ON”.
5.Press <ENTER> to confirm or press <MODE/ESC> to return to the main menu.
9.4. Info
9.4.1. Time info.
Current Time
With this function, you can display the temporary running time of the device from the last
power on. The display shows “XXXX”, “XXXX” stands for the number of hours. The
counter is resetted after turning the device off.
1. Access the main menu.
2. the display will show “Time Information”.
3. Press <Up/Down>, the display will show “Current Time”.
4. Press< ENTER>, the display will show“Current Time”.
5. The display will show “XXXX” (Hours) ;
6. Press <ENTER> to confirm or press <MODE/ESC> to return to the main menu.
Ttl Life Hrs
With this function, you can display the running time of the device. The display shows
“XXXX”, “XXXX” stands for the number of hours.
1. Access the main menu.
2. Press <Up/Down>, the display will show “Ttl Life Hrs”.
3. Press< ENTER>, the display will show“Ttl Life Hrs”.
4. The display will show “XXXX” (Hours) ;
5. Press <ENTER> to confirm or press <MODE/ESC> to return to the main menu.
Last Run Hrs
With this function, you can display last the running time of the lamp. The display shows
“XXXX”, “XXXX” stands for the number of hours
1. Access the main menu.
2. Press <Up/Down>, the display will show “Last Run Hrs”.
3. Press< ENTER>, the display will show“Last Run Hrs”.
4. The display will show “XXXX” (Hours) ;
5. Press <ENTER> to confirm or press <MODE/ESC> to return to the main menu.
Timer PIN
With this function, you can display the timer password.
1. Access the main menu.
2. Press <Up/Down>, the display will show “Timer PIN”.
3. Press< ENTER>, the display will show“Timer PIN”. The time password is 038.
4. Press <ENTER> to confirm or press <MODE/ESC> to return to the main menu.
Clr Last Run
With this function, you can clear last run time of the fixture. The display shows “ON” or
“OFF”, Press “Enter” to confirm.
1. Access the main menu.
Page 22

MAGICBLADE FX User Manual XM1398-V1.0-NR
21
2. Press <Up/Down>, the display will show “Clr Last Run”.
3. At“Timer PIN”menu input right password, Press< ENTER>, the display will show
“Clr Last Run”.
4. The display show “OFF”,Press <Up/Down>, the display will show “ON”.
5. Press <ENTER> to confirm or press <MODE/ESC> to return to the main menu.
9.4.2. Temp. Info
Head Temp.
With this function you can display the temperature on the display board of the base (near
CMY-filter) in Celsius.
1. Access the main menu.
2. Press <Up/Down>, the display will show “Head Temp.”.
3. Press< ENTER>, the display will show“Head Temp.”.
4. The display show “XXX °C/ °F”.
5. Press <ENTER> to confirm or press <MODE/ESC> to return to the main menu.
9.4.3. Software ver
With this function, you can display the software version of the device.
1. Access the main menu.
2. Press <Up/Down>, the display will show “Software ver”.
3. Press< ENTER>, the display will show“Software ver”.
4. The display show “Ver x.x”.
5. Press <ENTER> to confirm or press <MODE/ESC> to return to the main menu.
9.4.4. Network
1. Access the main menu.
2. Press <Up/Down>, the display will show “Network”.
3. At“Timer PIN”menu input right password, Press< ENTER>, the display will show
“Network”.
4. The display show “IP”, Press <Up/Down>, the display will show “Mask”, “Mac”.
5. Press <ENTER> to confirm or press <MODE/ESC> to return to the main menu.
9.5. Test
9.5.1. Home
With this function you can reset the device via the Control Board. You can select the different
reset functions by turning the encoder.
1.Access the main menu.
2.The display show “ All”, Press <Up/Down>, the display will show “All”,
“Pan&Tilt”.
3.Press <ENTER> to confirm or press <MODE/ESC> to return to the main menu.
9.5.2. Test Channel
With this function you can test each channel on its (correct) function.
1.Access the main menu.
2.Press <Up/Down>, the display will show “Test Channel”.
3.Press< ENTER>, the display will show “Test Channel”.
4.The display show “Pan Moving”frist channel, Press <Up/Down>, can choose other
channel.
5.Press <ENTER> to confirm or press <MODE/ESC> to return to the main menu.
Page 23
MAGICBLADE FX User Manual XM1398-V1.0-NR
22
9.5.3. Manual Ctrl.
With this function, you can adjust the lamp more easily. All effects will be canceled, the shutter
opens and the dimmer intensity will be set to 100 %. With the individual functions, you can
focus the light on a flat surface (wall) and erform the fine lamp adjustment.
1.Access the main menu.
2.Press <Up/Down>, the display will show “Manual Ctrl.”.
3.Press< ENTER>, the display will show “Manual Ctrl.”.
4.The display show “PAN=XXX”.
5.Press <ENTER> to confirm or press <MODE/ESC> to return to the main menu.
9.5.4. Calibration
With this function, you can calibrate and adjust the effect wheels to their correct positions. The
password of calibrate values is 050.
1.Access the main menu.
2.Press <Up/Down>, the display will show “Calibration”.
3.Press< ENTER>, the display will show “Calibration”.
4.The display show “Password=XXXX”.
5.Press <ENTER> to confirm or press <MODE/ESC> to return to the main menu.
9.6. Preset
1.Tap <MODE/ESC> button,access the main menu,Tap the <Up/Down> button until
“Preset” is displayed. Press ENTER, the display will show “Preset”.
2.The display show “Select programs”, Press <Up/Down>, the display will show “Edit
Program”, “ Edit Scenes” , “Rec. Controller”.
3.Press <ENTER> to confirm or press <MODE/ESC> to return to the main menu.
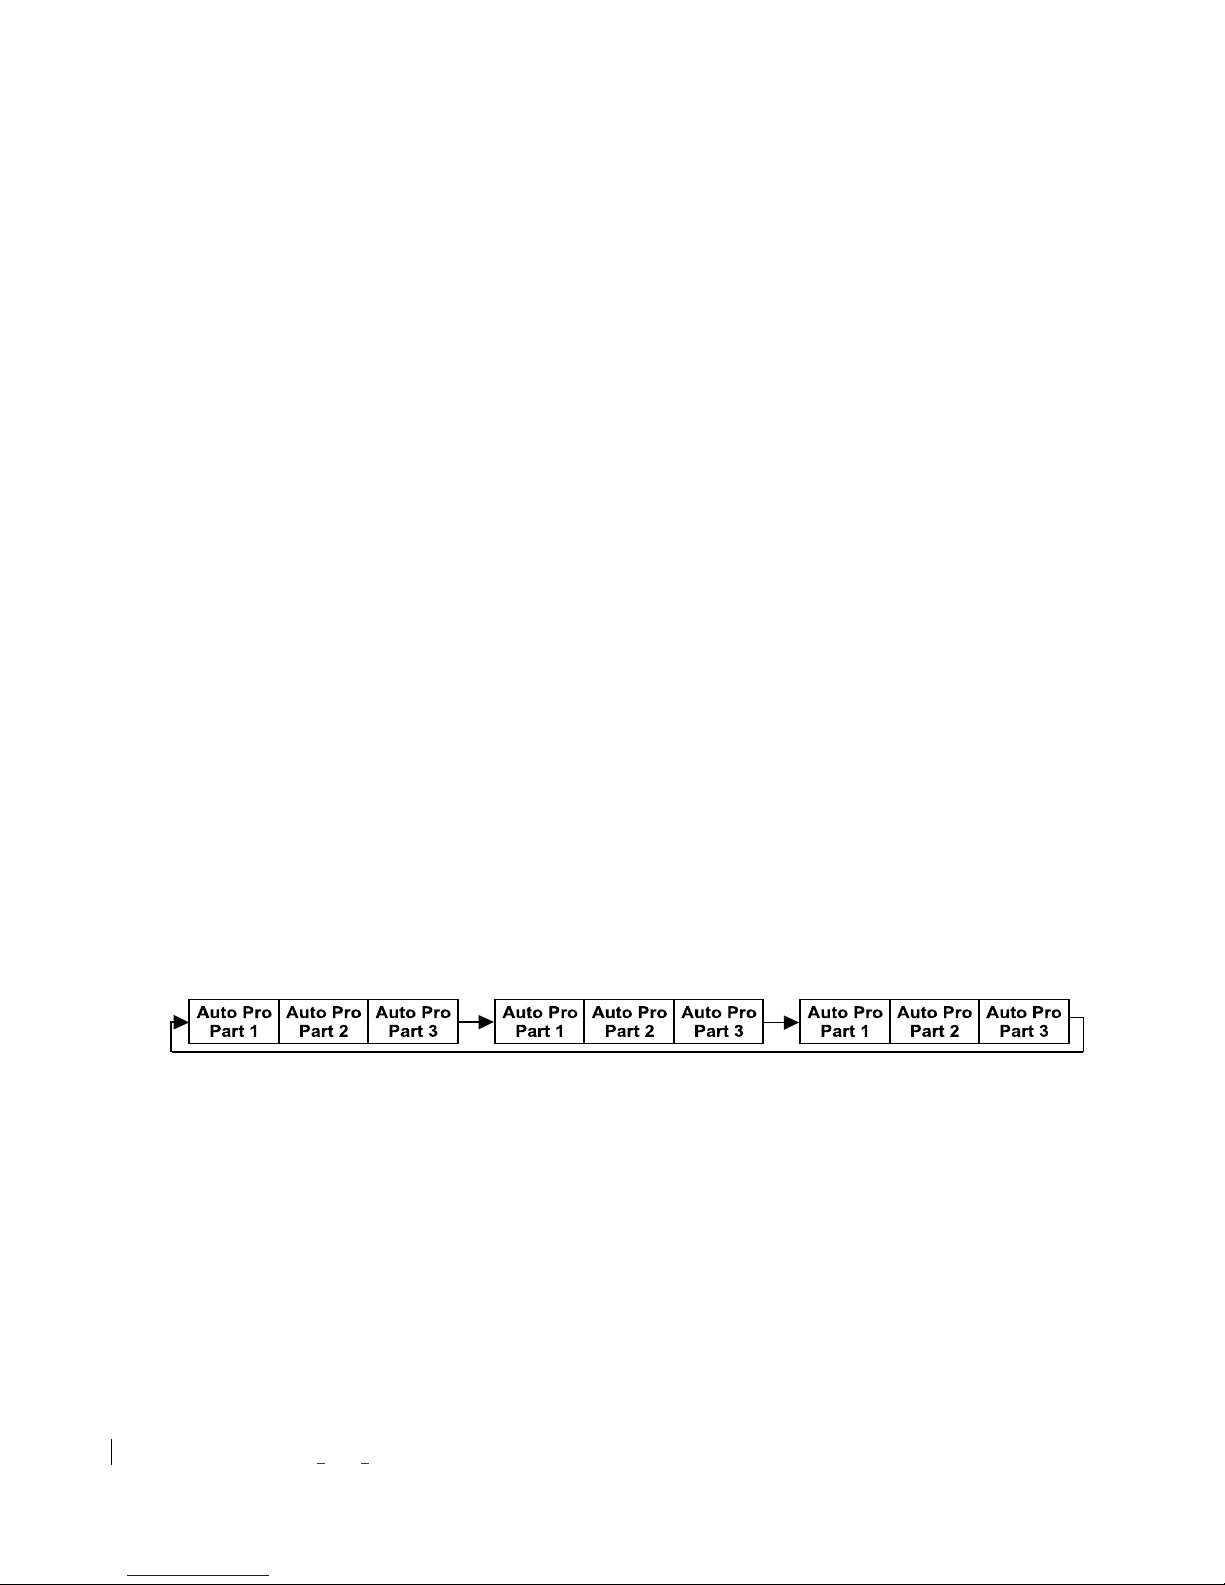
Run the auto program:A master fixture can output to three different program signals to
the slave fixture to operate. It means the host will send cyclically in the following orders
(The host will keep operating the program of Part 1) Then the slave fixture will make
the selectively receiving according to its own set.
1.If the slave fixture chooses Run For Slave 1 from the menu of 1-3,then it will receive
the part 1’s automatic program from link, in the same way, when the slave fixture
chooses Run For Slave 2,then it will receive the part 2’s automatic program from link.
2. Enter the menu of 1-3 Function Mode---Set To Slave, Here to set machine operate
which part of the program during the host-slave connection
3.Enter the menu of 1-4,1-5 Function Mode---Set To Master
4.Enter the menu of 8-1 Edit Program---Auto Program Part1.The host outputs three
groups driven program---Part1, Part2, Part3(Part1 program runs the same effect as the
host)
5.Enter the menu of 8-2 Edit Program---Edit Program. Edit the program’s connection,
connect the scene in order
6.The editor of the scene, there are as many as 250 scenario editors, and every scene can
have a program connection of 10.
Note:
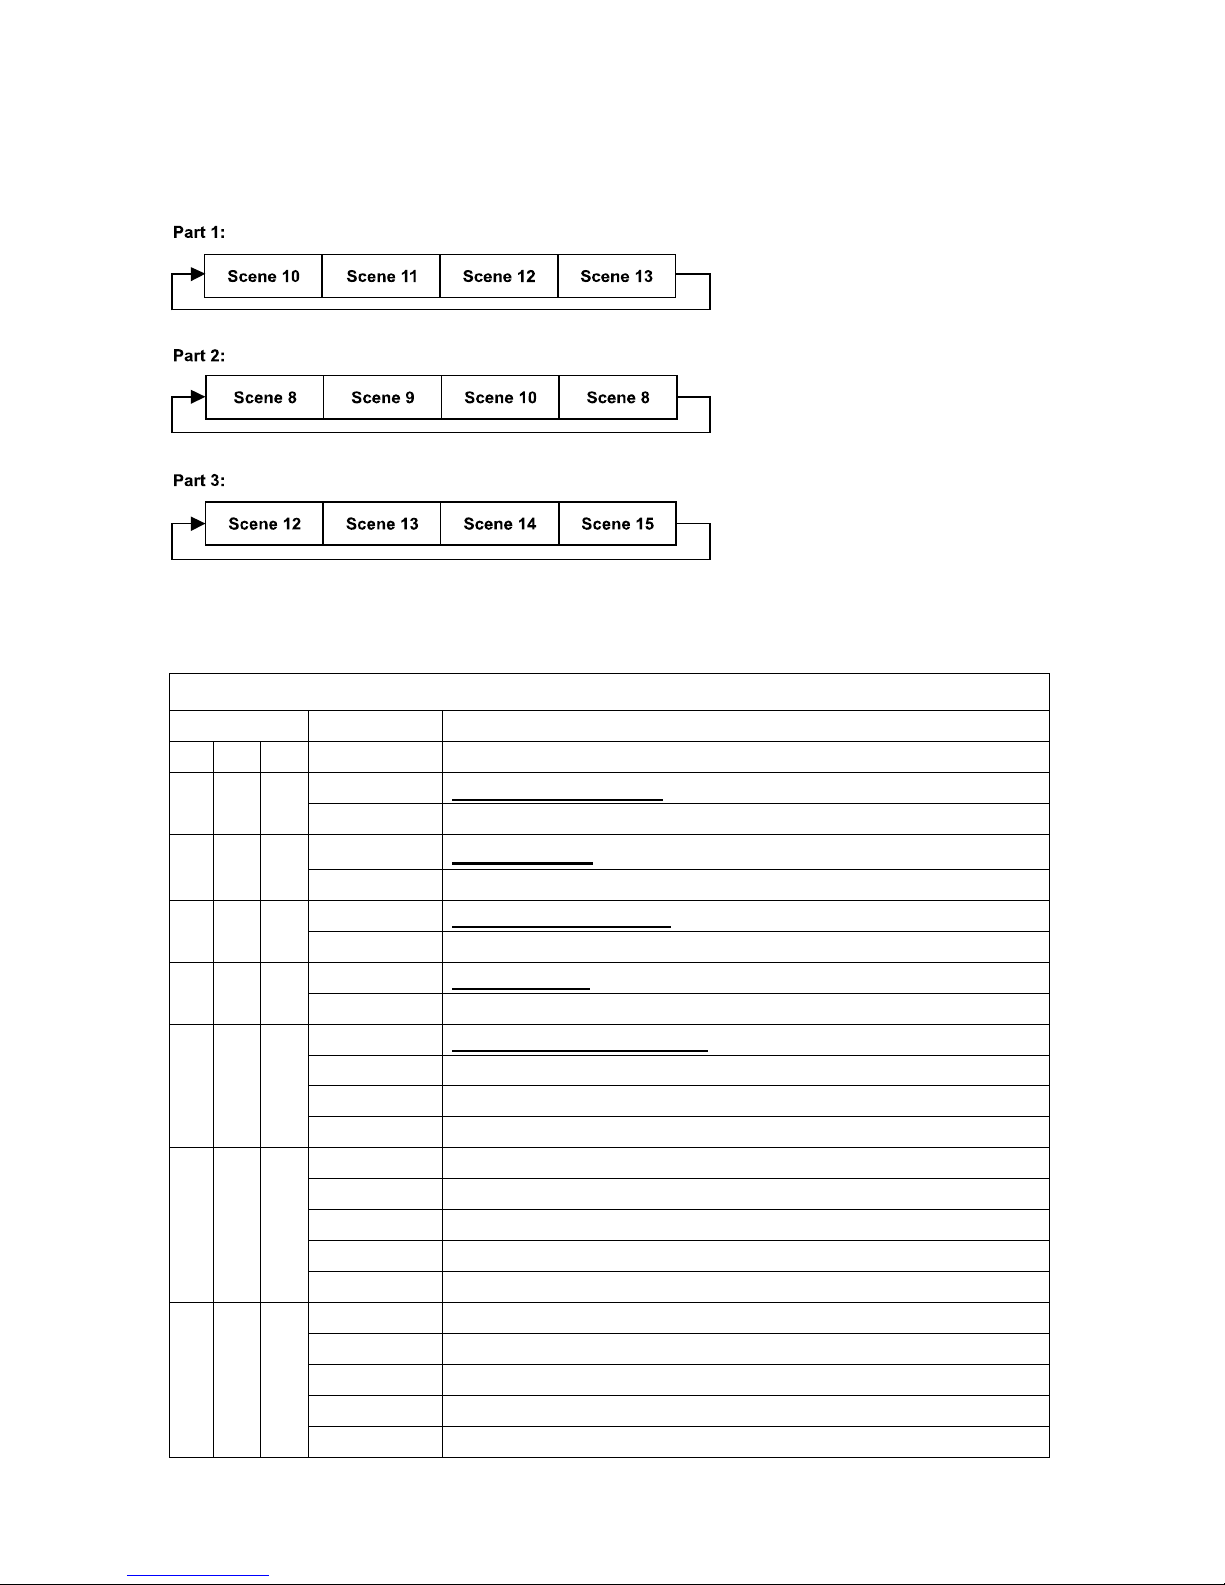
Part 2, Part 3 repeat in accordance with the Part1’s repeat. For example: When Part 1
Page 24
MAGICBLADE FX User Manual XM1398-V1.0-NR
23
uses Program 2, Part 2 uses Program 4, Part 3 uses Program 6, Assume: Program 2
includes scene of 10, 11, 12, 13; Program 4 includes scene of 8, 9, 10; Program 6
includes scene of 12, 13, 14, 15; Then it will run as below.
Example:
10. DMX PROTOCOL
DMX channel´s functions and their values (46DMX channels):
Mode/Channel
Value
Function
St
Ba
Ex
1 1 1
PAN Movement 8bit :
0-255
Pan Movement
2
2
Pan Fine 16bit
0-255
Fine control of Pan movement
3 2 3
TILT Movement 8bit :
0-255
Tilt Movement
4
4
Tilt Fine 16bit
0-255
Fine control of Tilt movement
5 3 5
Speed Pan/Tilt movement:
0-225
max to min speed
226-235
blackout by movement
236-255
no function
6 4 6
Pan Motor continuous rotation
0-127
no function
128-189
Forwards Pan rotation from fast to slow
190-193
No rotation
194-255
Backwards Pan rotation from slow to fast
7 5 7
Tilt Motor continuous rotation
0-127
no function
128-189
Forwards Tilt rotation from fast to slow
190-193
No rotation
194-255
Backwards Tilt rotation from slow to fast
Page 25

MAGICBLADE FX User Manual XM1398-V1.0-NR
24
8 6
Red LED -all arrays :
0-255
Red ( 0-Black , 255-100% Red )
9 7
Green LED-all arrays :
0-255
Green ( 0-Black , 255-100% Green )
10 8
Blue LED -all arrays :
0-255
Blue ( 0-Black , 255-100% Blue )
11 9
White LED -all arrays :
0-255
White ( 0-Black , 255-100% White )
19
Red LED -array 1 :
0-255
Red ( 0-Black , 255-100% Red )
20
Green LED-array 1 :
0-255
Green ( 0-Black , 255-100% Green )
21
Blue LED -array 1 :
0-255
Blue ( 0-Black , 255-100% Blue )
22
White LED -array 1 :
0-255
White ( 0-Black , 255-100% White )
23
Red LED -array 2 :
0-255
Red ( 0-Black , 255-100% Red )
24
Green LED-array 2 :
0-255
Green ( 0-Black , 255-100% Green )
25
Blue LED -array 2 :
0-255
Blue ( 0-Black , 255-100% Blue )
26
White LED -array 2 :
0-255
White ( 0-Black , 255-100% White )
。。。。。。
43
Red LED -array 7 :
0-255
Red ( 0-Black , 255-100% Red )
44
Green LED-array 7 :
0-255
Green ( 0-Black , 255-100% Green )
45
Blue LED -array 7 :
0-255
Blue ( 0-Black , 255-100% Blue )
46
White LED -array 7 :
0-255
White ( 0-Black , 255-100% White )
12
10
8
Shutter, strobe:
0-31
Led trun off
32-63
Led turn on
64-95
Strobe effect slow to fast
96-127
Led turn on
128-159
Pulse-effect in sequences
160-191
Led turn on
192-223
Random strobe effect slow to fast
224-255
Led turn on
Page 26

MAGICBLADE FX User Manual XM1398-V1.0-NR
25
13
11
9
Dimmer intensity:
0-255
Intensity 0 to 100%
14
12
10
Color Macro:
0-7
No function
8-39
from RED to YELLOW
40-71
from YELLOW to GREEN
72-103
from GREEN to CYAN
104-135
from CYAN to BLUE
136-167
from BLUE to MAGENTA
168-199
from MAGENTA to RED
200-231
from RED to WHITE
232-255
Crossfading colours from slow to fast
15
13
11
Color Presets:
0-4
No function
5--9
White2700k
10--14
White3200k
15-19
White4200k
20-24
White5600k
25-29
White6500k
30-34
White8000k
35-39
Yellow
40-44
Magenta
45-49
Cyan
50-54
Salmon
55-59
Turquoise
60-64
Light Green
65-69
Steel Blue
70-74
Orange
75-79
Straw
80-84
Pale Lavander
85-89
Pink
90-94
Red
95-99
Green
100-104
Blue
105-109
Rainbow1
110-114
Rainbow2
115-119
Rainbow3
120-124
Rainbow4
125-129
Rainbow5
130-134
Rainbow6
135-139
Rainbow7
140-144
Rainbow8
145-149
Rainbow9
Page 27
MAGICBLADE FX User Manual XM1398-V1.0-NR
26
150-154
Rainbow10
155-159
Rainbow11
160-164
Rainbow12
165-169
Rainbow13
170-174
Rainbow14
175-179
Rainbow15
180-184
Rainbow16
185-189
Rainbow17
190-194
Rainbow18
195-199
Rainbow19
200-255
Reserved
16
14
12
Color Presets Dimmer:
0-255
Dimmer 0% to 100%
17
15
13
Chase Patterns:
1--14
Led trun off
15-30
Chase 1
31-46
Chase 2
47-62
Chase 3
63-78
Chase 4
79-94
Chase 5
95-110
Chase 6
111-126
Chase 7
127-142
Chase 8
143-158
Chase 9
159-174
Chase 10
175-190
Chase 11
191-206
Chase 12
207-222
Chase 13
223-238
Chase 14
239-255
Chase 15
18
16
14
Chase Speed:
0-125
Fast to Slow Backward
126-130
Stop(Speed=0)
131-255
Slow to Fast Forward
19
17
15
Chase Fade:
0-255
Fade Chase
20
18
16
Zoom :
0-255
Zoom adjustment from 15 to 60
21
17
Zoom Fine :
0-255
Fine control for Zoom adjustment
22
19
18
Reset, internal programs:
0-79
Normal
80-84
All motor reset
Page 28

MAGICBLADE FX User Manual XM1398-V1.0-NR
27
85-87
Scan motor reset
88-90
no function
91-93
no function
94-96
no function
97-99
Others motor reset
100-119
Internal program 1 (secne1~8 of EEPROM)
120-139
Internal program 2 (secne9~16 of EEPROM)
140-159
Internal program 3 (secne17~24 of EEPROM)
160-179
Internal program 4 (secne25~32 of EEPROM)
180-199
Internal program 5 (secne33~40 of EEPROM)
200-219
Internal program 6 (secne41~48 of EEPROM)
220-239
Internal program 7 (secne49~56 of EEPROM)
240-255
Reserved
11. ERROR MESSAGES
When you turn on the device, it will first perform a reset. The display may show ”Err channel is
XX” should there be problems with one or more functions. “XX” stands for channel 1, 2, 3, 4, 5,
6 etc whose sensor has encountered a problem. For example, when the display shows “Err
channel is Pan movement”, it means there is an error on channel 1. If there are errors on channel
1, channel 3, channel 12 at the same time, you may see the error message, “Err channel is Pan
movement”, “Err channel is Tilt movement”“ “Err channel is Shutter” ,flash twice, and then the
device will generate a second reset. If the error messages persist after performing a reset more
than twice, the channels which have errors may not work properly however, all other functions
can work as usual. Please contact your dealer or manufacturer for service. Self repair is not
allowed.
PAN- movement Er
(PAN- yoke movement error) This message will appear after the reset of the fixture if the yoke’s
magnetic-indexing circuit malfunction (Optical Sensor or Magnetic Sensor fails) or the stepper
motor is defective (or its driving IC on the main PCB). The PAN- movement is not located in the
default position after the reset.
TILT- movement Er
(TILT- head movement error) This message will appear after the reset of the fixture if the head’s
magnetic-indexing circuit malfunctions ((Optical Sensor or Magnetic Sensor fails)) or the stepper
motor is defective (or its driving IC on the main PCB). The TILT- movement is not located in the
default position after the reset.
12. CLEANING AND MAINTENANCE
The following points have to be considered during inspection:
1) All screws for installing the devices or parts of the device have to be tightly connected and
must not be corroded.
2) There must not be any deformations to the housing, lenses, rigging and installation points
(ceiling, suspension, trussing).
3) Motorized parts must not show any signs of wear and must move smoothly without issue.
Page 29

MAGICBLADE FX User Manual XM1398-V1.0-NR
28
4) The power supply cables must not show any damage, material fatigue or sediment.
Further instructions depending on the installation location and usage have to be adhered to by a
qualified installer and any safety concerns have to be removed.
In order to ensure the device remains in good condition and does not fail prematurely, we suggest
regular maintenance.
1) Clean the inside and outside lens each week to avoid loss of output due to accumulation of
dust/ dirt on the lens.
2) Clean the fans each week to ensure maximum airflow and efficient thermal cooling. This will
ensure the light source is operated in the best possible condition.
3) A detailed electrical check by an approved electrician every quarter to make sure that the
circuit contacts are in good condition. This will prevent poor circuit contacts and the resultant
overheating.
We recommend frequent cleaning of the device. Please use a moist, lint- free cloth. Never use
alcohol or solvents.
Please refer to the instructions under “Installation instructions”.
Should you need any spare parts, please order genuine parts from your local dealer.
Remark: Errors and omissions for all information given in this manual are excepted. All
information is subject to change without prior notice.
 Loading...