

Page 1
CAMBRIDGE
USERS MANUAL
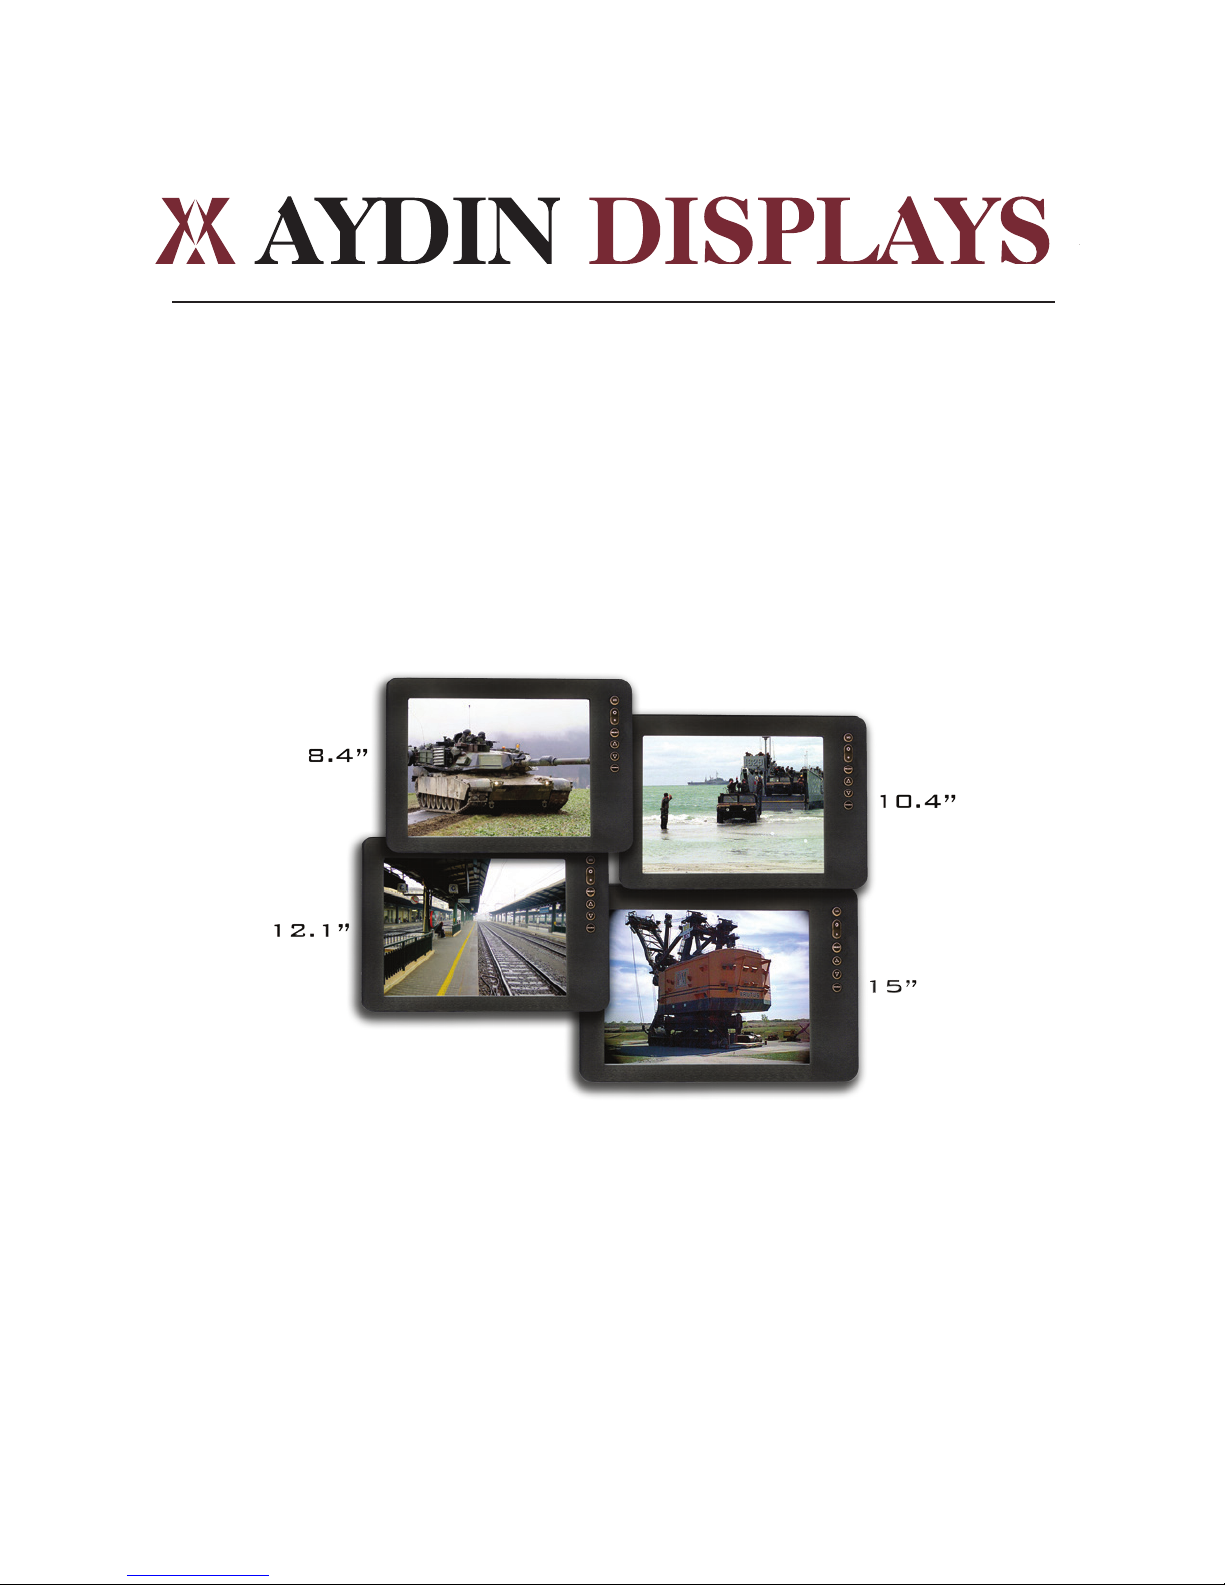
ALL WEATHER 8.4” - 15.0”
IP67 SEALED SERIES
PANEL MOUNT
VESA MOUNT
LCD Monitor User Guide
Part No. 150-7000-001
Page 2

Table of Contents
Safety .............................................................................................................................................. 1
Product Care and Maintenance ............................................................................................3
System Set-up........................................................................................................................... 5
Installation ................................................................................................................................. 6
Cable Connections.................................................................................................................. 8
Computer Hook-up ................................................................................................................10
Operator Controls ...................................................................................................................12
On-Screen Display (OSD) ......................................................................................................13
Appendix................................................... ................................................................................24
Page 3
SAFETY
General Safety Instructions
• Before operating this Monitor, read this User Manual thoroughly
• Retain this User Manual for future use
• Verify the computer system capability (see System Set-up) to insure operation of
the Monitor
• For expeditious installation, follow these User Manual instructions in the
sequence presented
• Adhere to all Caution and Warnings on system parts and as stated in this User
Manual
• All User Manual instructions for installation and operation must be followed
precisely
• Adjust only those controls covered by the User Manual’s operating instructions;
improper adjustment of other controls voids the unit’s warranty and may result in
unit damage, and
• Adhere to local installation codes.
Safety Icons
Warning! Shock Hazards
warning!
This icon is intended to tell you of a potential risk of electrical shock.
Caution! Instructional
caution!
This icon is intended to tell you of important operating and/or
maintenance instructions.
General Unit Safety
• Always disconnect the unit from the power source before cleaning
• Do not operate the unit with a damaged cord
• Do not operate if the unit has been dropped or damaged. The unit needs inspected
by qualied Aydin Service Personnel
• Position the power cord so it shall not be in contact with hot surfaces
• Do not allow anything to rest on the power cord, and
• Do not place the power cord where there shall be foot trac.
General Safety Precautions
warning!
• Power connections must be connected to a properly wired and grounded power source
• Any equipment to which the unit shall be attached must also be connected to properly
wired and grounded power sources
• Do not connect or disconnect the unit during an electrical storm
• Do not remove the unit covers – there are no user serviceable parts in the unit
• Do not disassemble or modify the unit to avoid the possibility of electrical shock,
damage to electrical components or scratching the Display surface, and
• Disassembly of the unit voids the warranty.
150-7000-001 1
Page 4
Fluids from LCD Display
caution!
• If the Monitor should ever become shattered, do not touch uids from an LCD Display
• If uid should get on hands or clothing, immediately wipe o with liquid soap or rubbing
alcohol; wash with water; consult with a doctor, and
• If uid gets in the eyes, ush eyes immediately with water for a minimum of 15 minutes;
consult with a doctor.
Electrical SAFETY
Connecting Cables
• Disconnect the power to the computer when the Monitor is being installed, and
• Upon installation, verify the power connector is securely seated on the unit.
Ratings and Grounding
This unit may be operated from an 8-30 VDC power source (external AC optional).
• Use the supplied power cable, and
• Always connect to a properly grounded power source.
Protection on Servicing
Servicing - User
• User care is limited to cleaning the unit
• Do not disassemble or modify the unit to avoid the possibility of an electrical shock,
damage to electrical components or scratching the Display surface, and
• Disassembly voids the warranty.
Servicing
Aydin Displays Qualied Service Personnel may be required if the unit:
• Does not operate normally when installation instructions are followed
• Does not operate normally when operating instructions are followed
• Has been dropped or damaged, or
• Exhibits a distinct change in performance, indicating a need for service.
Shipping
If the unit should need to be shipped to the Aydin Displays Service Center, the original
packing material should be used to insure safety in shipping. Repack the unit as it
would have originally been received from Aydin Displays.
Radio Frequency Interterence
caution!
This equipment generates, uses and can radiate radio frequency energy. If not
installed with the unit’s accompanying cables, it may cause harmful interference
to radio communications.
2 150-7000-001
Page 5
PRODUCT CARE AND MAINTENANCE
Product Care
This Monitor has been designed to provide optimum performance and
service without any required scheduled maintenance other than occasional cleaning.
Turn o the Monitor power before cleaning the Monitor, optional Touch Screen
warning!
caution!
Display Screen Cleaning
• A vinegar-based cleaner is preferred to prevent streaking and degradation of the
coatings, or
• A non-abrasive glass cleaner such as a professional foam glass cleaner
• Apply the cleaning solution to a soft clean cloth, dampening slightly
• Keep a fresh side of the cleaning cloth towards the screen surface to avoid
scratching it with accumulated grit, and
• To minimize the risk of abrasion to the screen, air drying is recommended.
or unit’s enclosure.
• Do not use abrasive cleaners or solvent-based (ammable) cleaners on the
Flat Panel or Touch Screen Display, its enclosure or any other electrical device (cables, power cord, etc)
• Do not use paper products as they may scratch the Display screen, and
• Do not directly apply cleaning solutions to the Display screen.
In marine or similar environments,
an added benet of a vinegar-based
cleaner is its eectiveness in
dissolving salt deposits.
Optional Touch Screen
Disconnect cabling from the Touch Screen Display before cleaning. A Touch Screen
warning!
Optional Touch Screen Cleaning
• Use a special screen cleaning tissue or a solution specically formulated for
antistatic coatings. Follow the manufacturer’s instructions, or
• Lightly dampen a soft clean cloth with water or a general purpose mild detergent
solution
• Keep a fresh side of the cleaning cloth towards the screen surface to avoid
scratching it with accumulated grit, and
• To minimize the risk of abrasion to the screen, air drying is recommended.
Monitor Enclosure
• Clean the unit enclosure with a soft clean cloth lightly dampened with a
general purpose mild detergent solution
• To rinse, wipe down with clean water, and
• Dry with a soft clean cloth.
Display will be activated by cleaning the Display. This may create a potentially
dangerous condition.
150-7000-001 3
Page 6
To avoid risk of electrical shock, do not disassemble the unit’s enclosure. Users
warning!
cannot service the Monitor. User maintenance is restricted to cleaning, as explained. Disassembling the unit voids the warranty.
Long-term Storage
• For long-term storage, it is suggested the unit be stored in a normal indoor environment and the Display glass be protected from accidental damage
• For pedestal mount units, disconnect the cable(s) and loosen the arm adjustment to
a point where the ball can be removed from the arm, or
• For Flush or Panel Mount units, cover the product with a protective covering that
shall not scratch or transfer any dyes to the Display screen.
4 150-7000-001
Page 7
SYSTEM SETUP
System Requirements
The computer must have this capability:
• Video card setting with a minimum native resolution of:
8.4 = 800 x 600 (SVGA)
10.4 = 1024 X 768 (XGA)
12.1 = 1024 x 768 (XGA)
15.0 = 1024 x 768 (XGA
• If the optional Touch Screen Display is ordered, an available COM port for the
connector is required.
Shipping Box Contents
The display is shipped in a custom box with custom foam packaging. We
recommend you save the box and all packaging materials in case the unit would
need to be returned to the Aydin Displays Service Center.
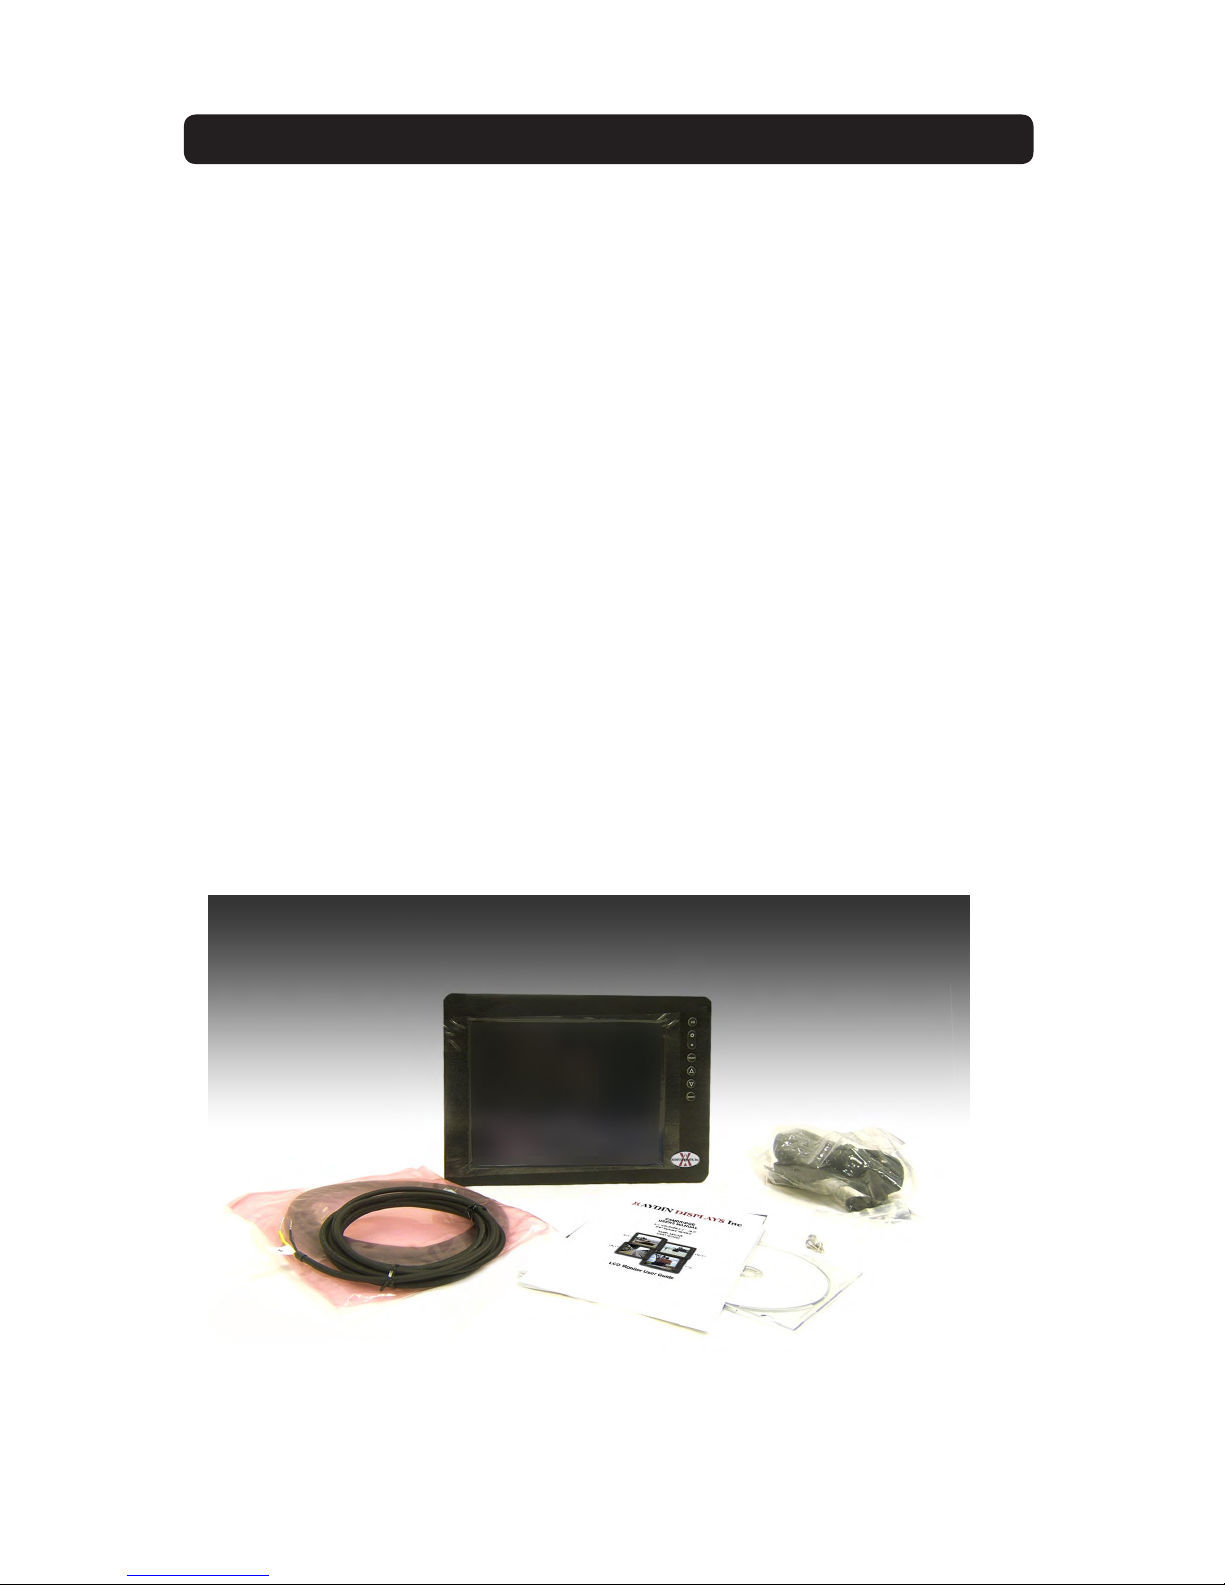
In the shipping box you shall nd:
• CFP 8.4, 10.4, 12.1 or 15.0
• Custom Power Cable
• Custom VGA Cable
• Mounting System and Hardware
• Touch Screen Cable if the optional Touch Screen is ordered
• USB Cable if the optional USB Pass-through is ordered, and
• User CD with contents:
• Optional Touch Screen Drivers
150-7000-001 5
Page 8
INSTALLATION
The display is designed to be mounted with a universal ball-and-socket mounting
kit, in a Flat Panel or optional Flush Mount conguration.
Optional Pedestal Mount
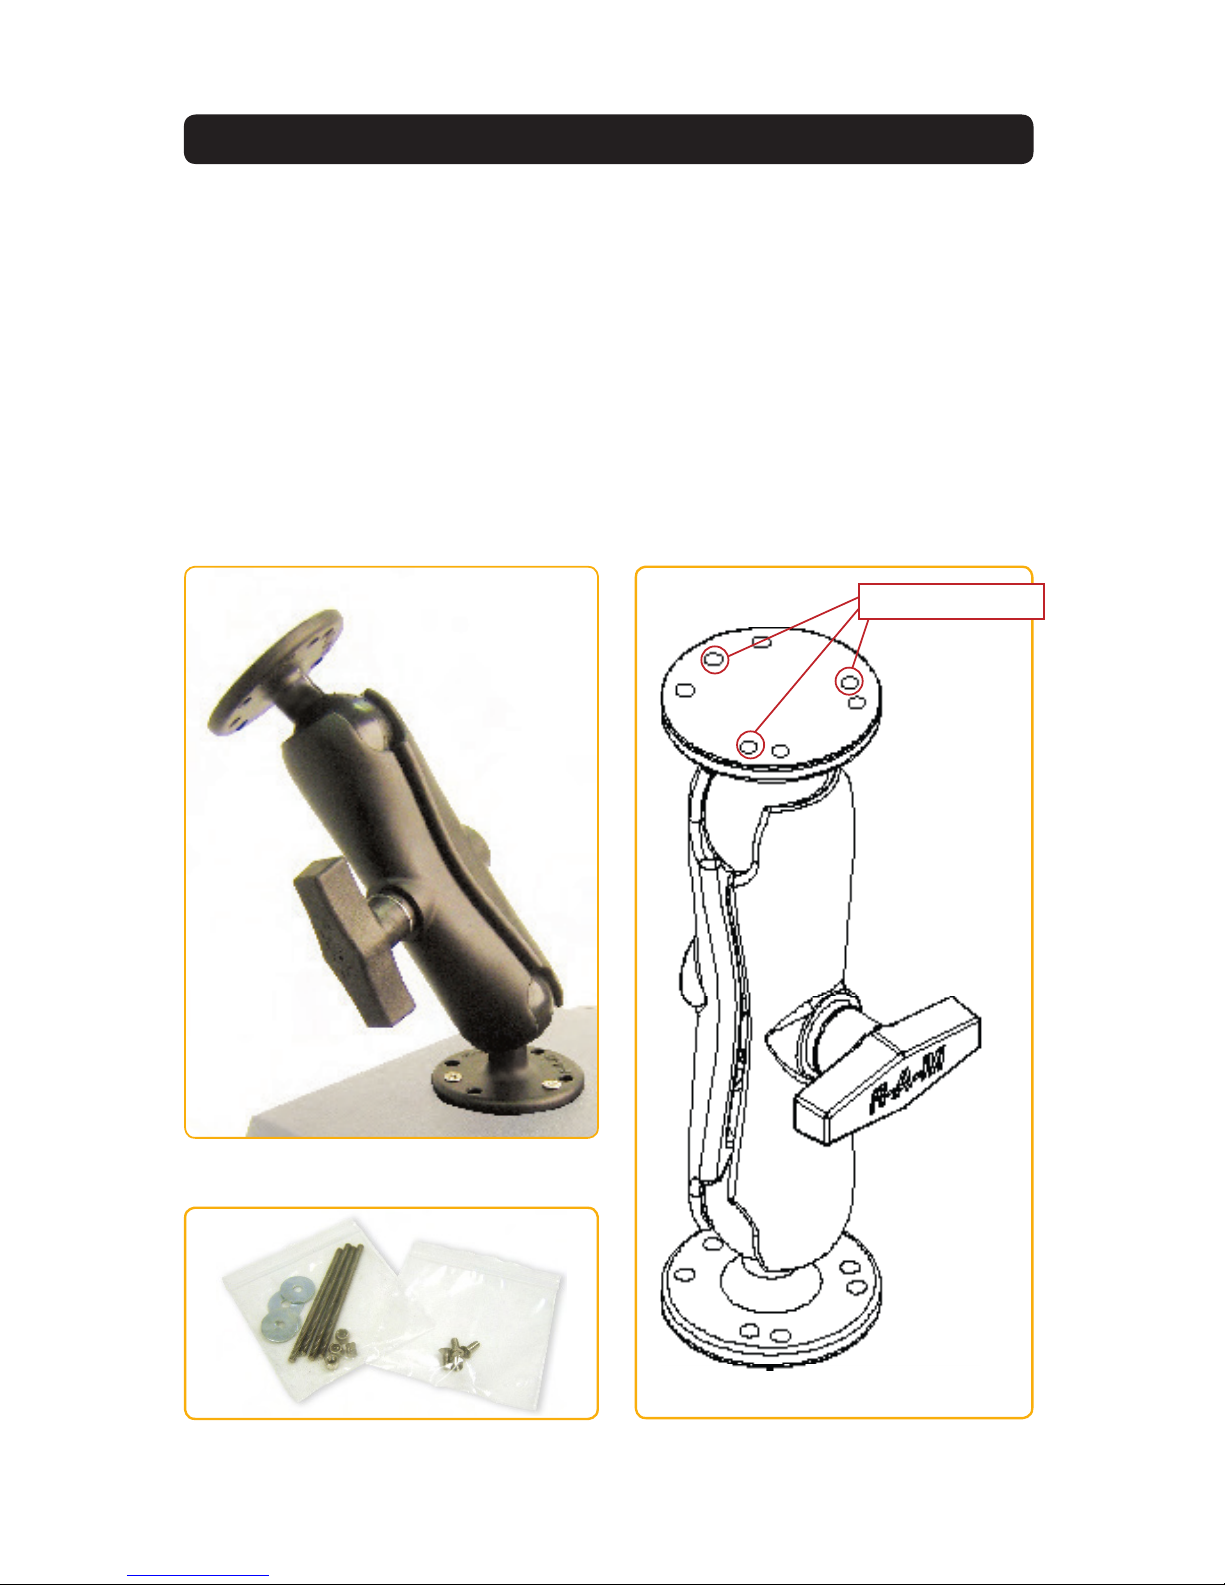
The display can be supplied with a RAM® universal ball-and-socket system mounting
kit (Figure 2). By installing the Monitor with this kit, the user can quickly adjust the
viewing angle to improve viewability in changing environments. This ball-and-socket
system has proven to be successful in supporting an extreme amount of weight in
high vibration and dicult-mount applications.
Locate the ball-and-socket system in the shipping box. The kit consists of two RAM
balls on mounting plates and a RAM arm, with an adjustable T-knob and a packet of
three (3) M4 x 10 counter-sunk stainless screws for mounting to the display.
Mounting Holes
Figure 2
Figure 3 Figure 4
6 150-7000-001
Page 9

There are three mounting holes in the back of the Monitor for the ball mounting plate.
Take care not to strip the screw holes or over tighten. (Figure 4)
• Line up one of the ball mounting plates on these three holes (Figure 4)
• With three (3) M4 x 10 counter-sunk stainless screws attach this mounting plate to
the back of the display.
• Mount the second ball mounting plate where the Monitor shall be installed
• Insert each ball into the RAM arm
• Lightly tighten the arm around the balls using the T-knob on the arm (Figure 2, 4)
• Adjust the Monitor to the viewing preference, and
• Tighten the T-knob to hold the Monitor in position.
It is recommended the remaining ball be mounted on a at surface. Because of the
various surface substrates the Monitor shall be mounted on, the installer shall provide
the screws to mount the other ball.
Panel Mount
The mounting hardware packet is included with the unit accessories in the shipping
box. This packet includes four (4) threaded screws (approximately 7.6 cm [3”] long),
four (4) Nylock nuts and four (4) at washers. For installation, there are four tapped
mounting holes on the four corners of the unit’s rear panel.
150-7000-001 7
Page 10
CABLE CONNECTIONS
Cables
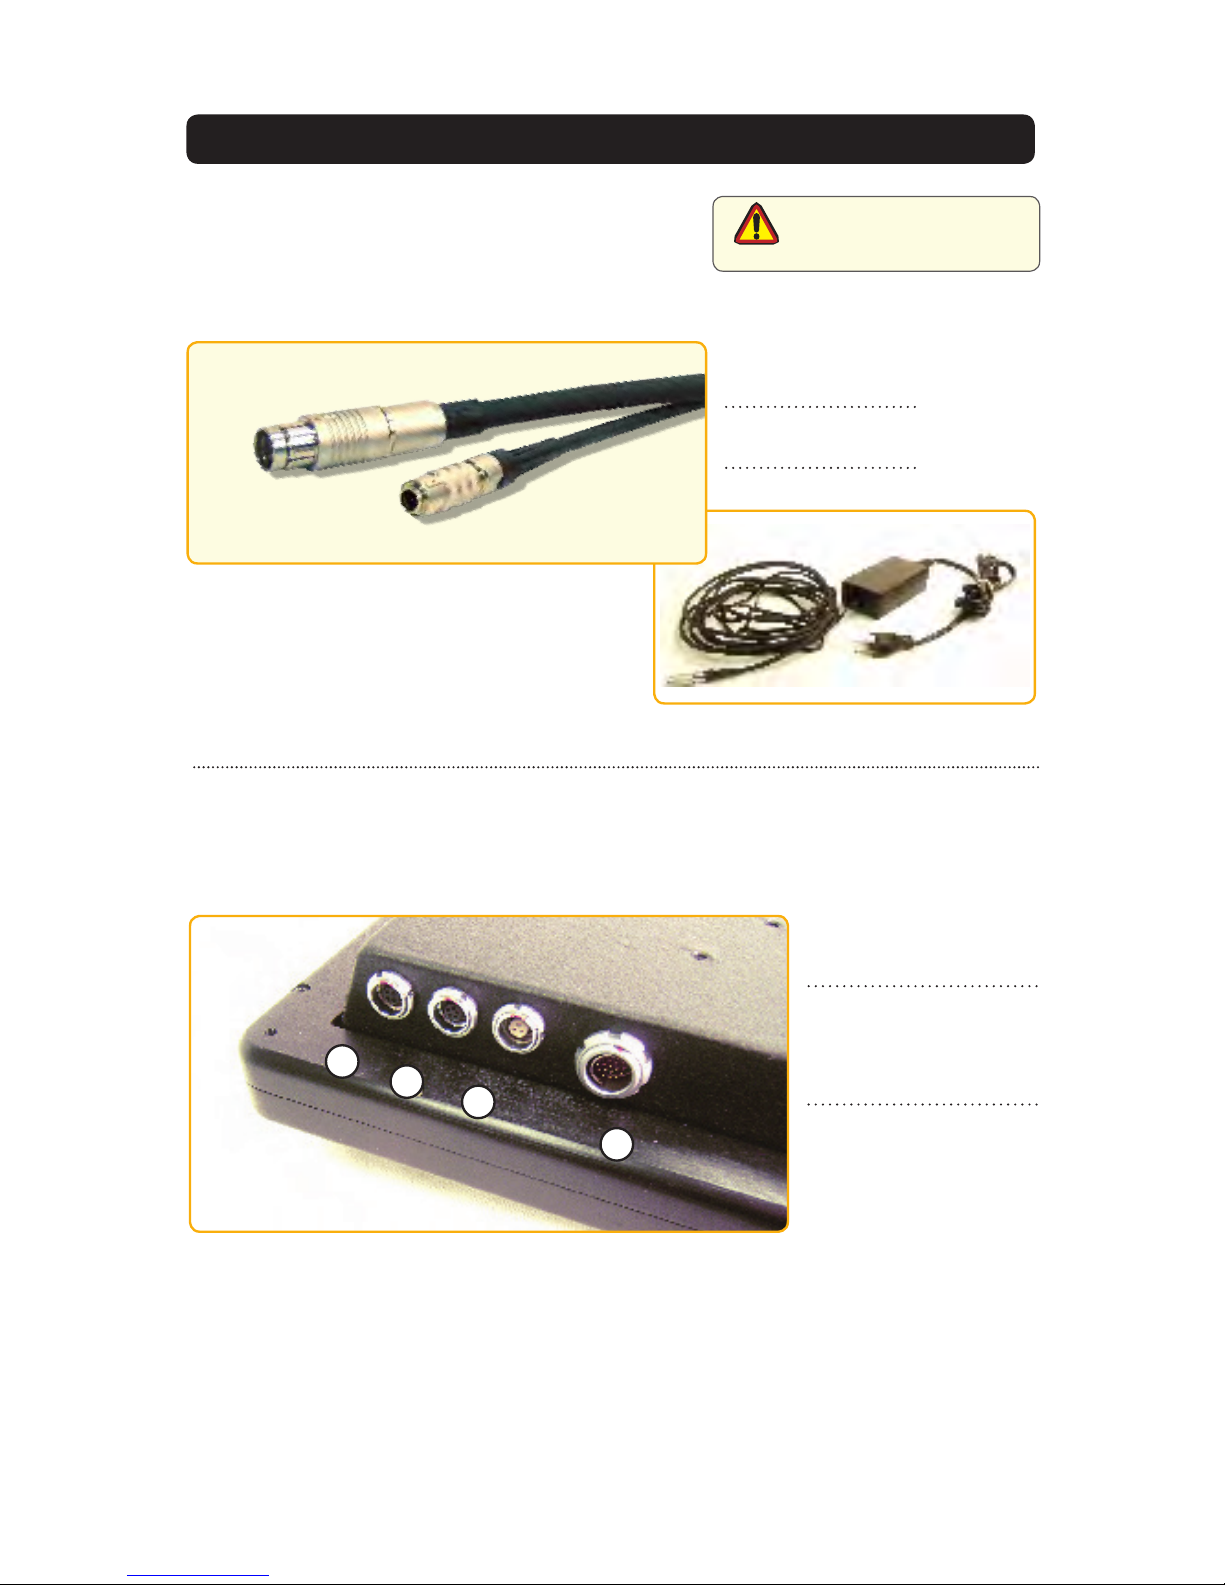
• The display is packaged with two cables:
VGA and DC Power
• The AC Power Adapter is optional. (Figure 6)
Figure 5
Use care when inserting or
caution!
1 VGA Input
2 DC Power Input
removing connectors.
Figure 6
Connectors
Connectors are located on the bottom of the unit housing, from left to right:
VGA, S-Video, Optional USB Pass-through, Optional Touch, Power and BNC.
(Figure 7)
Connectors are physically unique to insure the installer makes the proper connections.
1 Optional USB Input
2 Optional Touch Input
1
2
3
4
Figure 7
VGA Connector
• The IP68 sealed VGA Cable, 3 m (10 ft), is in the product accessory box
• Line up the red dots on the connectors
• Push the cable connector into the Monitor’s back panel connector,
#4 in Figure 7, and
• Plug the standard DB-15 (video) female connector to the computer’s
video source; secure.
3 Power Input
4 VGA Input
8 150-7000-001
Page 11
DC Power Connector
• The IP68 sealed DC Power Cable, 3 m (10 ft), is in the accessory box
• Line up the red dots to #5 in Figure 7
• Plug in the quick-connect three-pin connector
• To disconnect, pull the outside ring on the connector away from the unit until the
cable is free
• There are two ying leads: negative: black (-) and positive: yellow, labeled with
(+), and
• Connect the ying leads to the corresponding polarity on the DC voltage source,
primary terminal.
Conrm the DC
caution!
connections are made
to the correct polarity.
Optional AC Power Connector
• The optional AC Power Adapter Cable Set consists of a 3 m (10 ft) cable, the
power adapter and a 1.8 m (6 ft) cable
• The cable accepts voltage from 110 to 250 VAC and frequency from 47 to 63Hz
• The AC power plug is standard for 120 VAC/60Hz, common in North America, and
• Line up the red dots to #5 in Figure 7
• To disconnect, pull the outside ring on the connector away from the unit until free.
Optional USB Pass-through Connector
• The optional USB Pass-through Connector is an IP68 sealed four-pin connector
• The custom USB Cable is with shipping box accessories; it is .6 m (2 ft)
• Line up the red dots to #3 in Figure 7, and
• Plug together.
• To disconnect, pull the outside ring on the connector away from the unit until free.
Optional Touch Screen Connector
• The optional Touch Screen Connector is an IP68 sealed four-pin connector
• The connector is between the S-Video and Power Connector
• Line up the red dots to #4 in Figure 7, and
• Plug together.
150-7000-001 9
Page 12
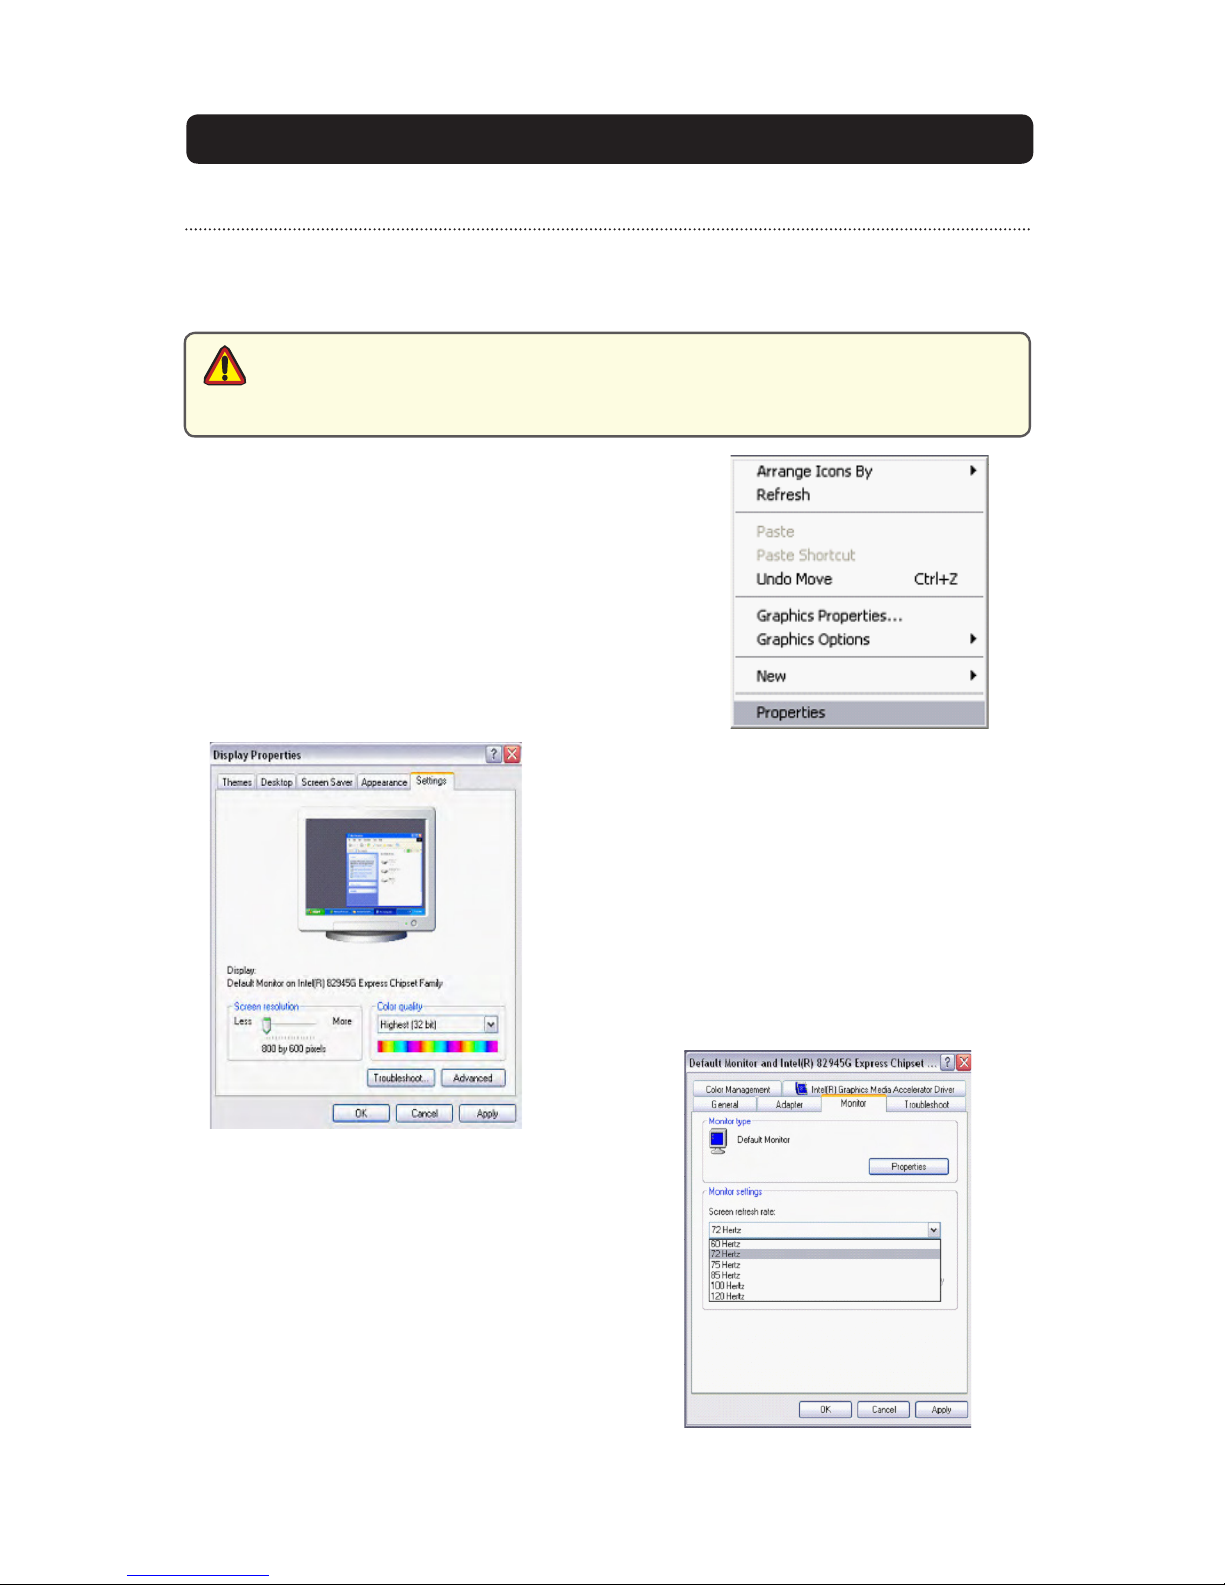
COMPUTER HOOKUP
• Select the Apply button.
Computer Display Properties - SVGA or XGA
Prior to connecting the display to the computer, verify the
computer display properties are set to 800 x 600 (SVGA) pixels for the 8.4, 10.4 and 12.1,
or for the 15” Monitor, 1024 x 768 (XGA) pixels.
• The optimum setting for viewing is 800 x 600 pixels (SVGA) or for the 15”
Monitor, 1024 x 768 pixels (XGA)
caution!
Setting the Display Settings
1. Right mouse click on an open area of the
2. Left mouse click on Properties to
3. Connect to a PC monitor to establish the
• The screen refresh rate must be set at 60Hz to minimize icker and screen split
• Pixel settings above the recommended setting exhibit fractured images.
desktop screen to bring up the Desktop Menu.
open the Display Properties menu.
computer display properties.
4. Select the Settings tab.
5. Under Screen Resolution, verify or slide
the bar until the Screen Resolution is
at 800 x 600 pixels (SGVA) or for 15”
Monitor, 1024 x 768 pixels (XGA)
6. Select the Advanced button to go to
the next menu to verify the Hz refresh
rate.
7. Select the Monitor tab.
8. Under Monitor Settings, verify the Screen
Refresh Rate is set at 60Hz.
• If so, select the Cancel button and go to
step 9.
• If not, select 60Hz
10 150-7000-001
Page 13
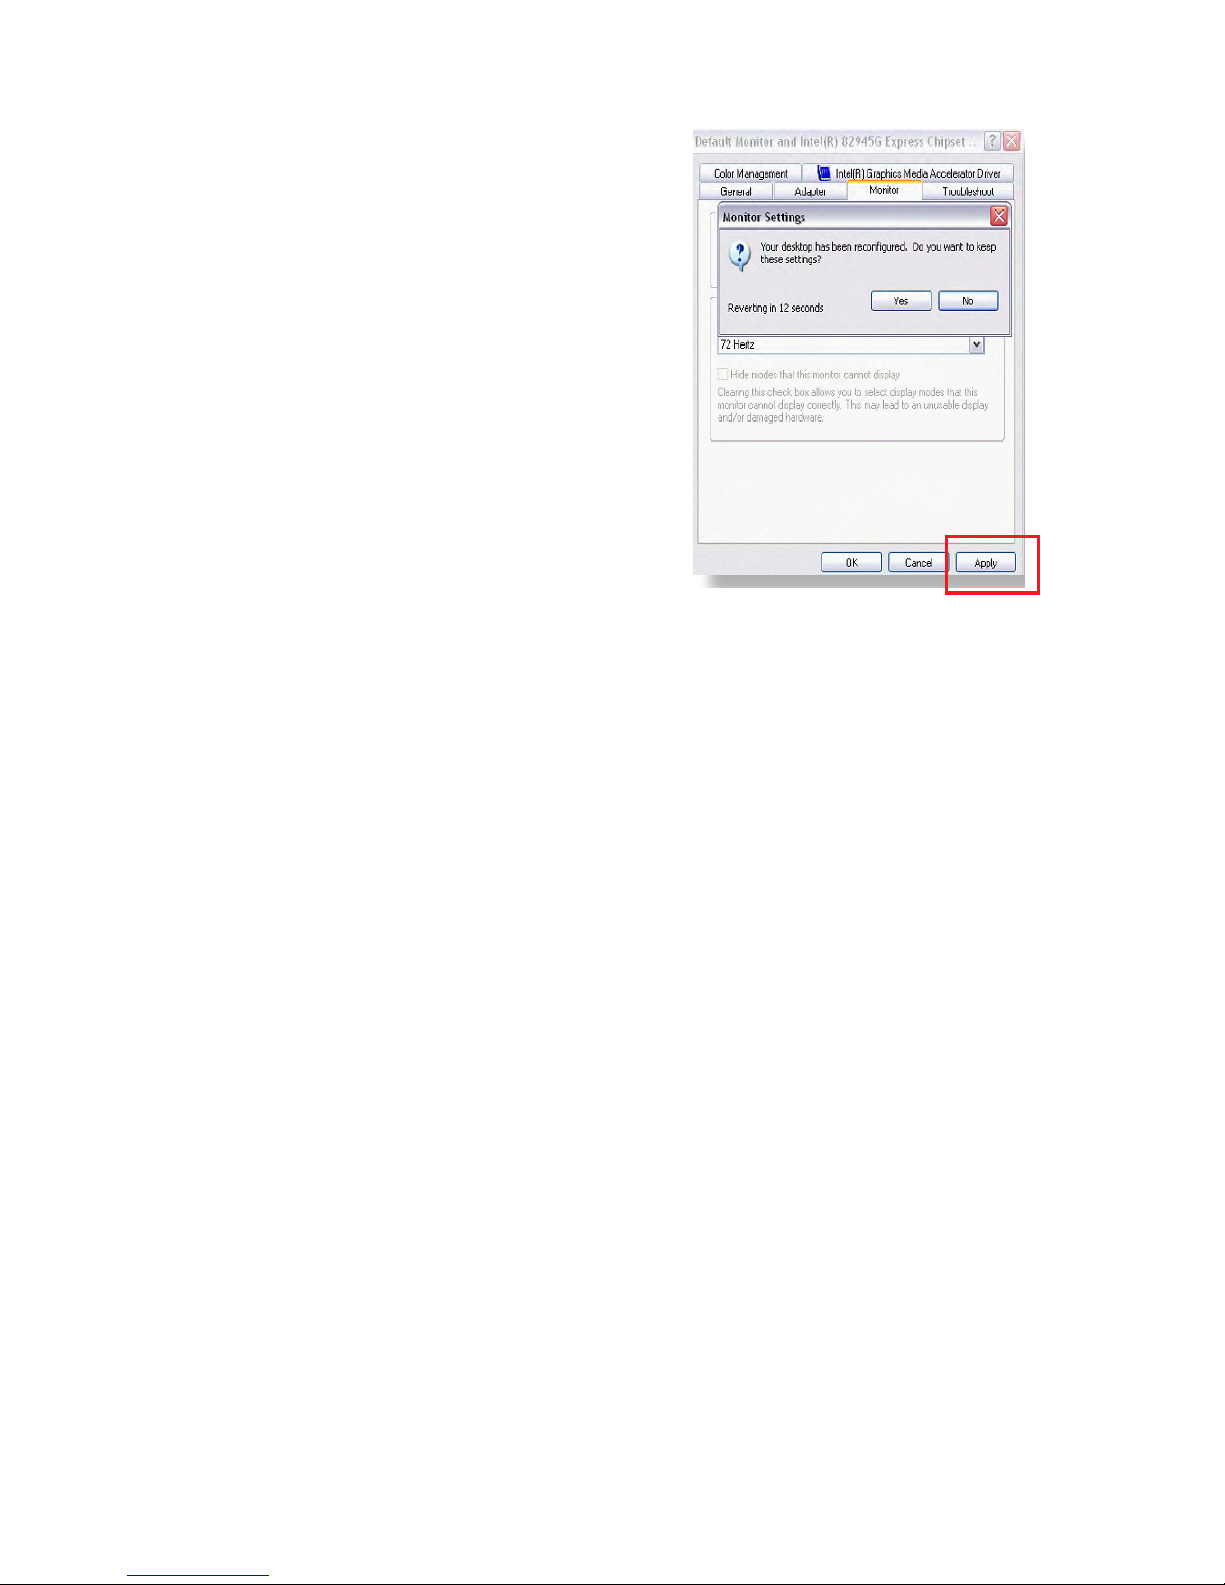
9. At the Monitor Settings dialog box,
select “Yes” to accept the new desktop
view settings
10. In the Display Properties dialog box,
verify the Screen Resolution is at 800
x 600 pixels (SVGA) or for 15”
Monitor, 1024 x 768 pixels (XGA)
11. Select the Apply button
12. At the desktop screen, shut down the
computer
13. Turn o the monitor
14. Disconnect the monitor from the
computer.
Power on the Monitor
• Connect the display to the computer
• Attach the power to the display
• Power up the computer
• The Windows Operating System should automatically apply the best generic driver
for this connection.
150-7000-001 11
Page 14
OPERATOR CONTROLS
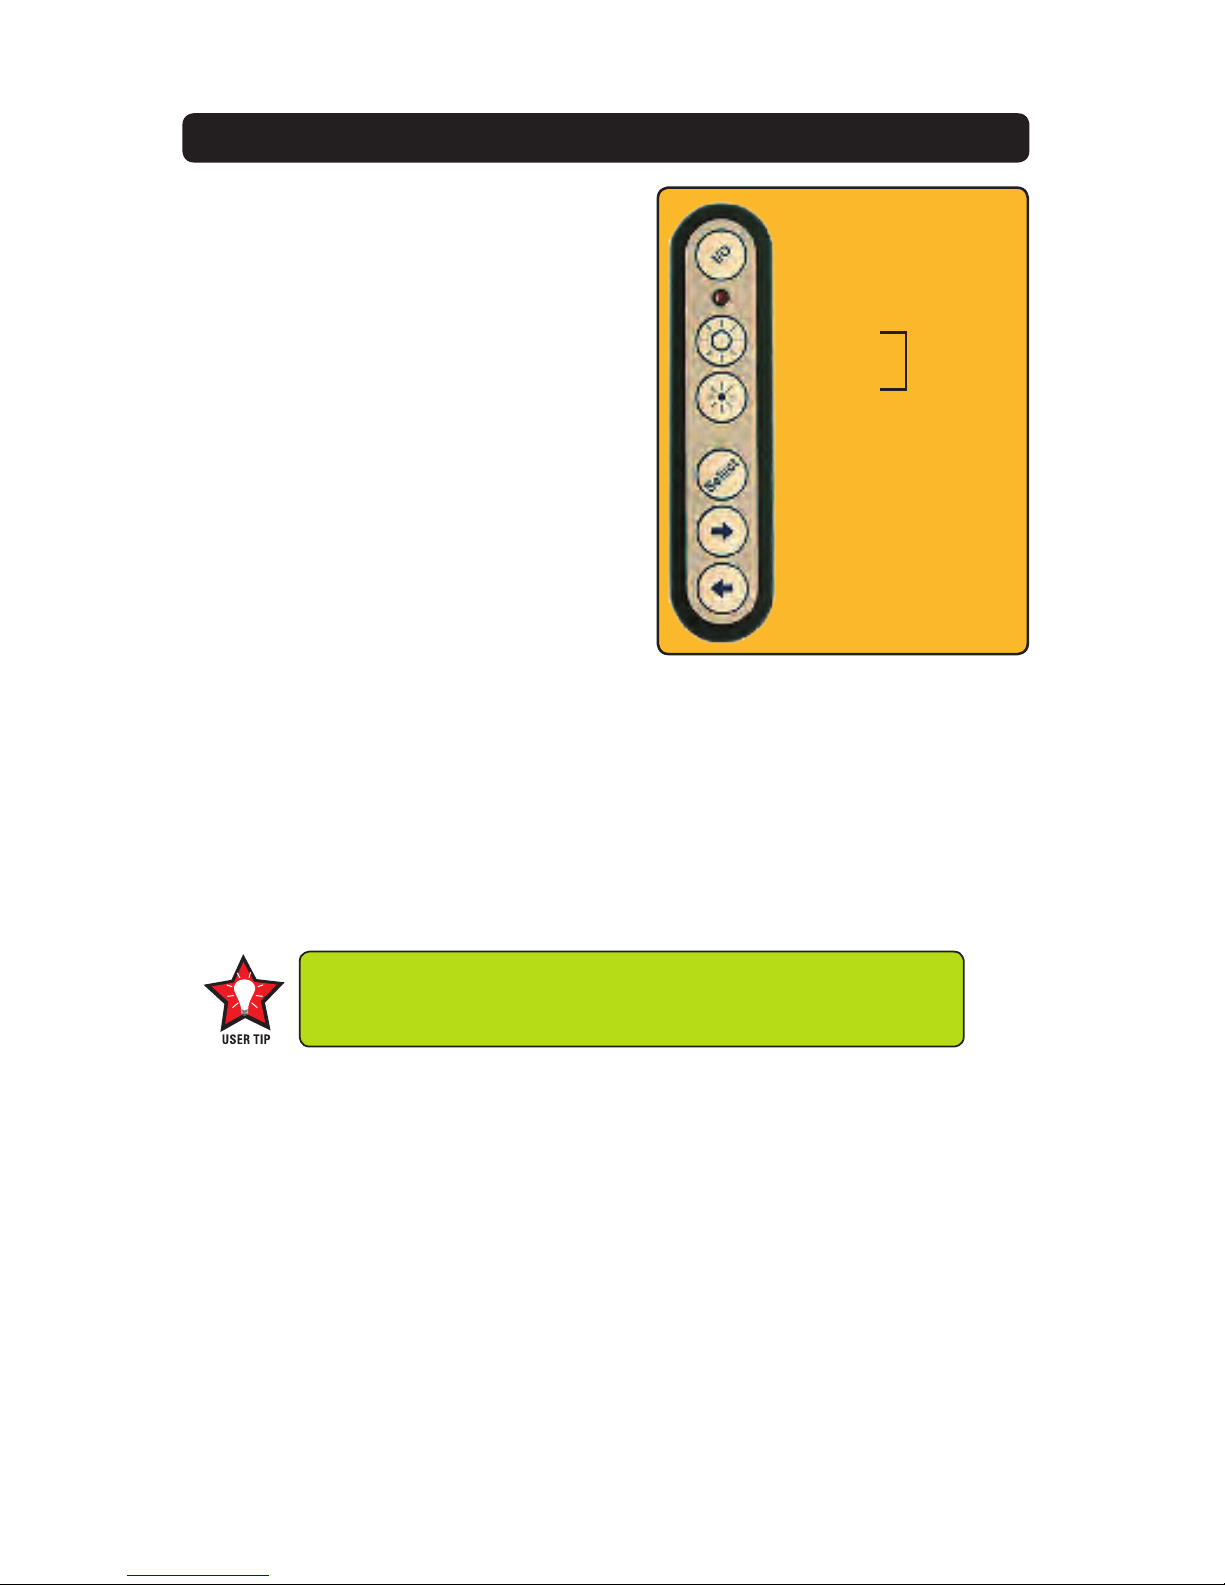
On the right hand side of the Monitor bezel
are six Operator Control buttons.
POWER ON/OFF Button
Note: Monitor defaults to an AUTO-OFF state when
power is applied.
• The POWER ON/OFF button is marked with
the I/O (Input/Output) symbol
• Momentarily pressing this button turns ON
or turns OFF the unit, and
• A Red LED located under the I/O button
glows when the unit is powered on.
Power On/O (I/O)
Button
Large sun
Small sun
Select Button
Brightness
Control
Optional Feature: Monitor defaults to an
AUTO-ON state when power is applied. This
feature must be ordered when the Monitor is
ordered. It is not an add-on after the unit is
built.
Right Button
Left Button
Brightness Buttons
These buttons control the brightness of the LCD panel display.
• The LARGE SUN button, when repeatedly pressed or held down causes the
display’s LCD panel backlight brightness to be stepped up in increments to its
brightest setting
• The SMALL SUN button, when repeatedly pressed or held down causes the
display’s LCD panel backlight brightness to be stepped down in increments to its
lowest setting, which is just above total black, suitable in very subdued light, as in
night time operations, and
• Adjusted settings are maintained when the unit is powered o, then powered on.
Adjust the brightness of the display to the lowest possible setting for
a given set of conditions and display characteristics. Doing so
provides the best viewing of the image, extends the lamp life of the
backlight and reduces the internal heat of the display.
SELECT Button
The SELECT Button is the access point to the On-Screen Display (OSD) Source
Screen Function Menu. (See On-Screen Display.)
Press the SELECT button twice to access the Video Source Menu, to move between
video inputs, Composite and S-Video.
RIGHT Button
The RIGHT Button is an adjustment tool in the On-Screen Display (OSD) Source
Screen Controls Menu. (See OSD Screen Control Menu Categories.)
LEFT Button
The LEFT Button is an adjustment tool in the On-Screen Display (OSD) Source Screen
Controls Menu. (See OSD Screen Controls Menu Categories.)
12 150-7000-001
Page 15
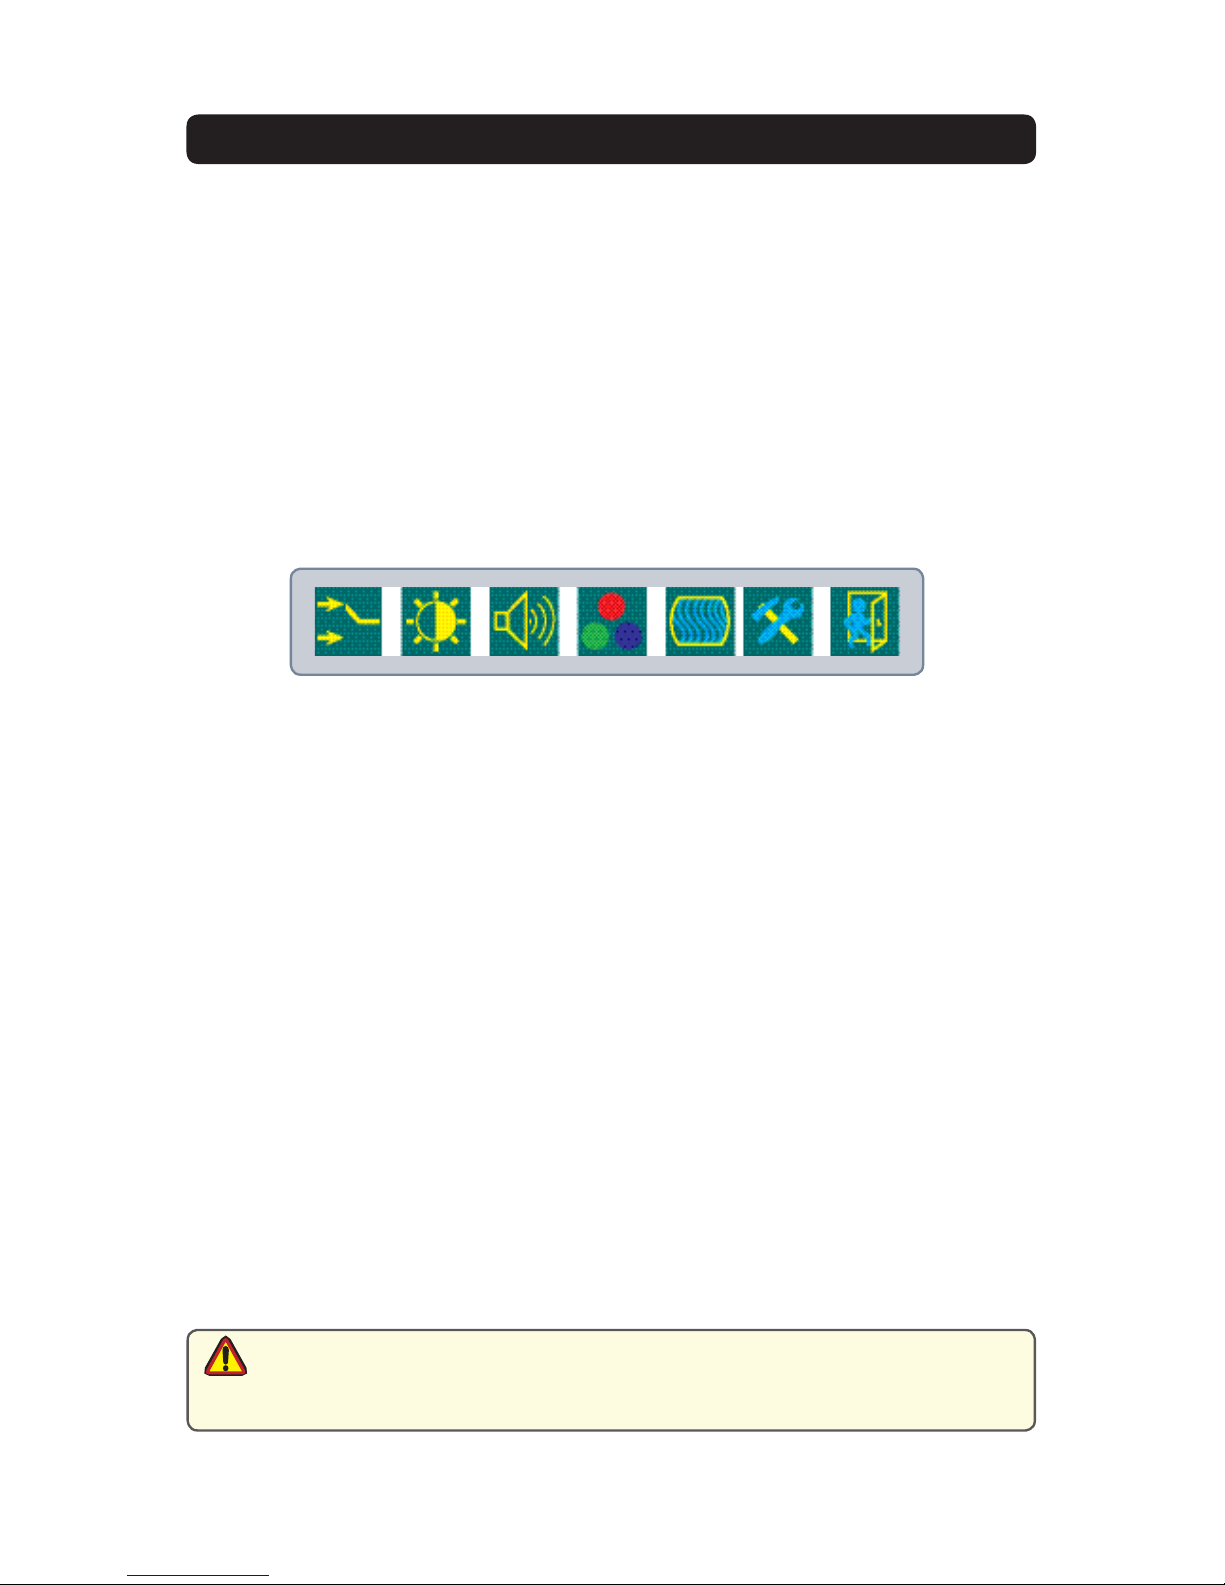
ONSCREEN DISPLAY
The On-Screen Display (OSD) user interface is the path to all display signal source
adjustments. The Source Screen Menu, with its user-friendly graphical interface,
provides access to ne-tuning the display.
OSD Source Screen Menu Activation
To activate the OSD menu in the current video source, press and release the SELECT
button.
Note: OSD Source Screen Menu closes after 15 seconds of inactivity. This setting can be
adjusted in the OSD Source Screen Menu: Miscellaneous under OSD Duration.
OSD Source Screen Menu Categories
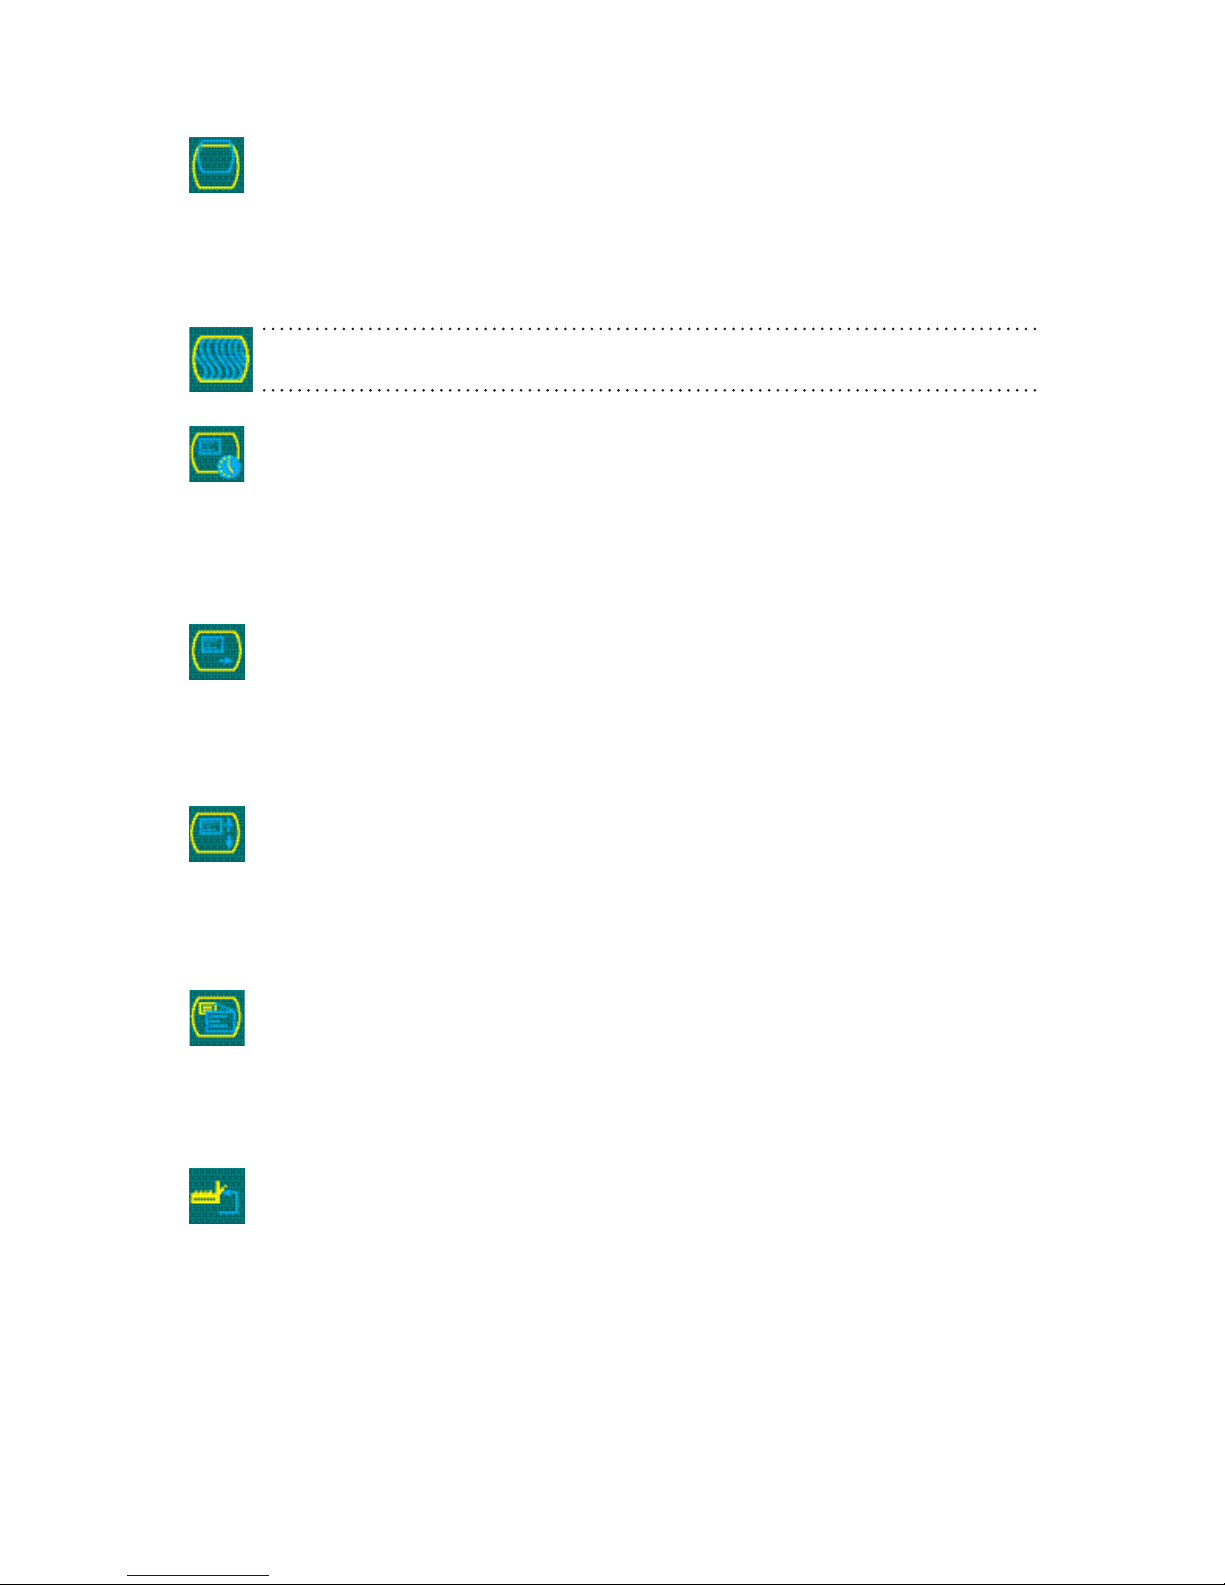
The Source Screen Menu is comprised of six icons, plus the Exit Door icon, each
representing distinct source screen categories and their corresponding functions menu
with adjustable settings.
General Instructions for Functions Menu Adjustments
• To open the OSD Source Screen Menu, press (once) the SELECT button
• Use the RIGHT or LEFT button to move across the OSD Source Screen Menu to
select the OSD Source Screen Display Category
• As each Category icon is highlighted, its related Functions Menu appears in the
lower section of the dialog box
• To activate a Display Category, with the RIGHT or LEFT button move the highlight
box over the Category’s icon
• Press (once) the SELECT button to choose the highlighted icon
• In the Functions Menu, a highlight bar is superimposed over the rst function
• Press the RIGHT or LEFT button to move the highlight bar through the
related Functions Menu
• Press (once) the SELECT button to activate the highlighted Functions Menu item
• Create the new value; adjustment controls are the RIGHT and LEFT buttons, which
increase or decrease the value of the parameter as indicated in the display bar
• Press (once) the SELECT button to save the new value; this returns the user to the
display screen, or wait 15 seconds and the OSD will exit, saving all changes
• To choose another Display Category, use the RIGHT or LEFT button to move across
the Source Screen Menu; repeat above instructions, or
• Use the RIGHT or LEFT button to move across the OSD Menu to highlight the last
icon, the Exit Door; press (once) the SELECT button to exit the OSD Menu
• Upon Exit, all changes are saved.
• New settings are stored in memory upon pressing the SELECT button to exit the
caution!
Source OSD Source Screen Category’s Function Menu
• If SELECT is not pressed, or inactivity is detected within the 15 second factory
default OSD duration, any function adjustments made will be saved.
150-7000-001 13
Page 16
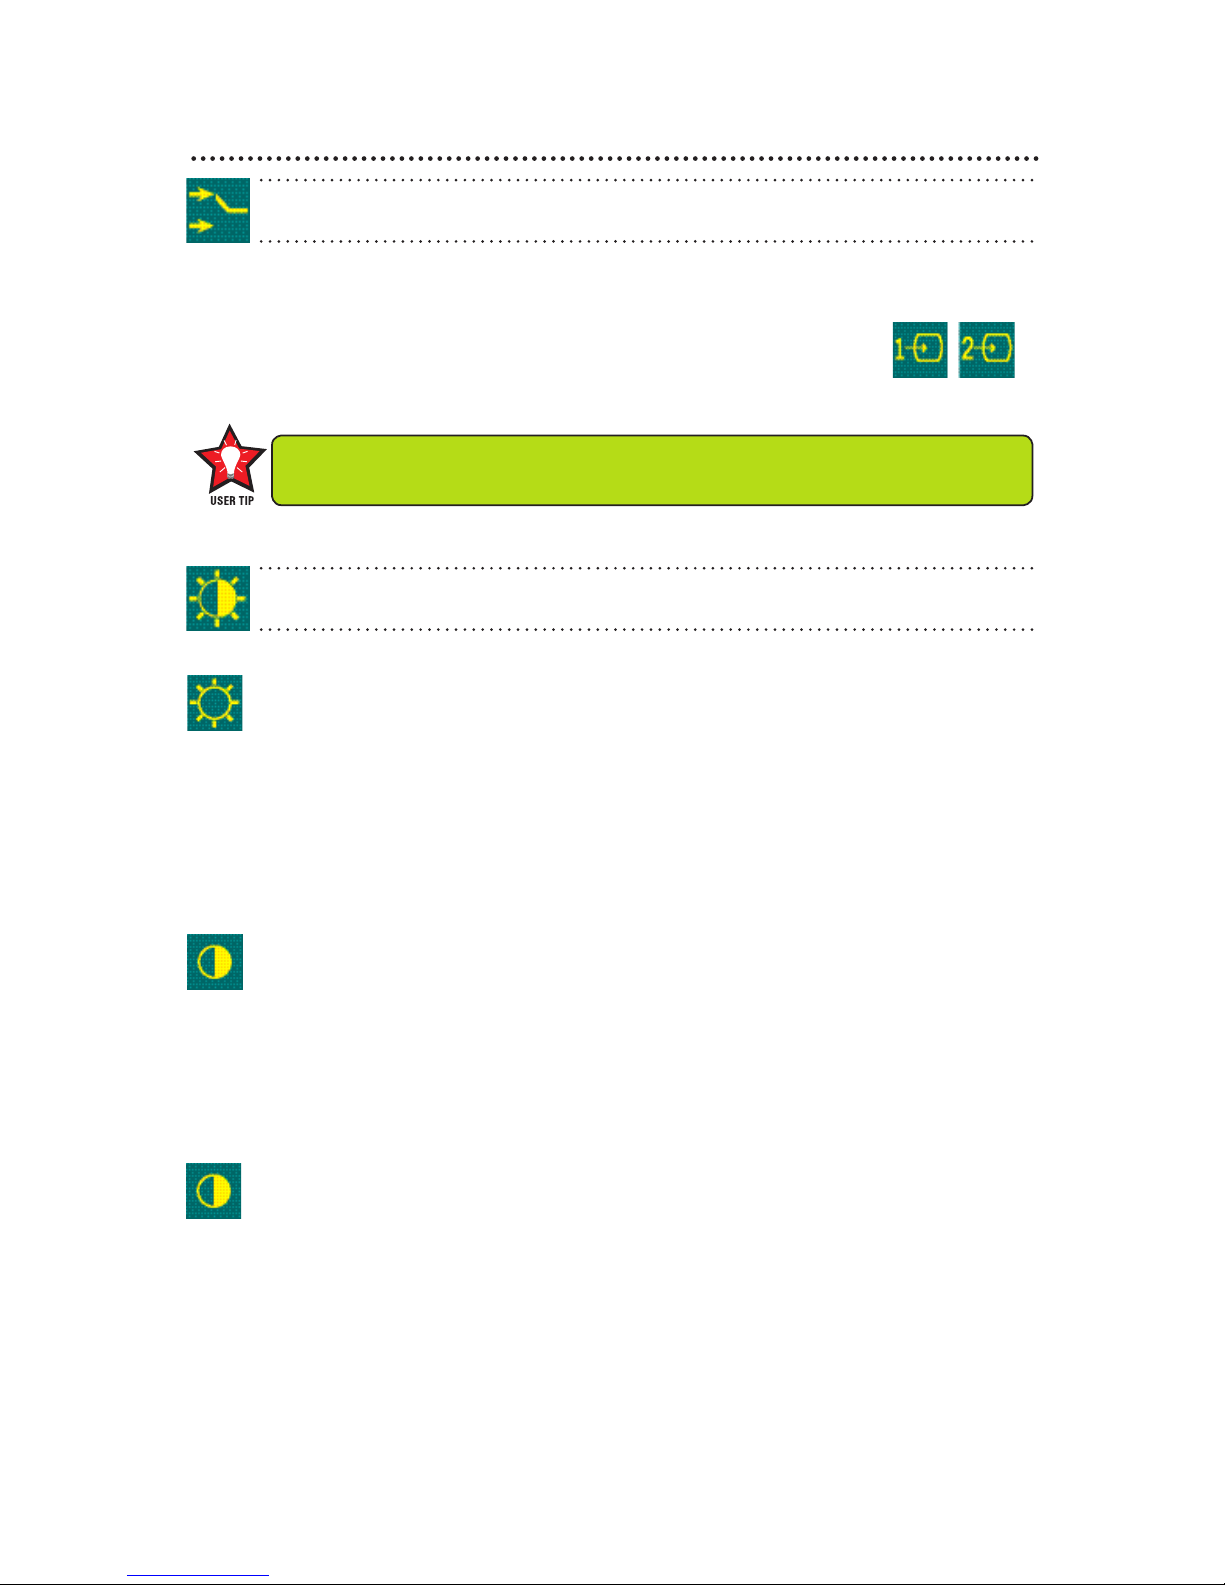
OSD Source Screen Menu Parameter Selections
Video Signal Input Menu
Video Signal Input
The Video Signal Input menu is preset. No changes may be made.
There is a checkmark beneath Box 1 representing the analog VGA
computer signal being altered into a digital signal on the LCD display.
It is recommended the LCD backlight brightness be adjusted to maximum before
ne-tuning the OSD Source Screen Menu Picture Menu Parameter: Brightness.
Brightness/Contrast/Black Level Menu
Brightness
Before adjusting the Brightness function parameters, it is recommended the LCD
panel backlight be set to its brightest (LARGE SUN button) in the ambient light source;
use the Brightness control toggle to adjust.
• Press the RIGHT or LEFT button to set the display’s desired brightness
• Press (once) the SELECT button to save changes.
Contrast
Contrast is the dierence in brightness between the light and dark areas of the pixels
of a picture.
• Press the RIGHT or LEFT button to set the display’s desired contrast, and
• Press (once) the SELECT button to save changes.
Black Level
Black Level adjustment intensies or decreases the display’s saturation of black.
• Press the RIGHT or LEFT button to set the display’s desired black level
• Press (once) the SELECT button to save changes.
14 150-7000-001
Page 17
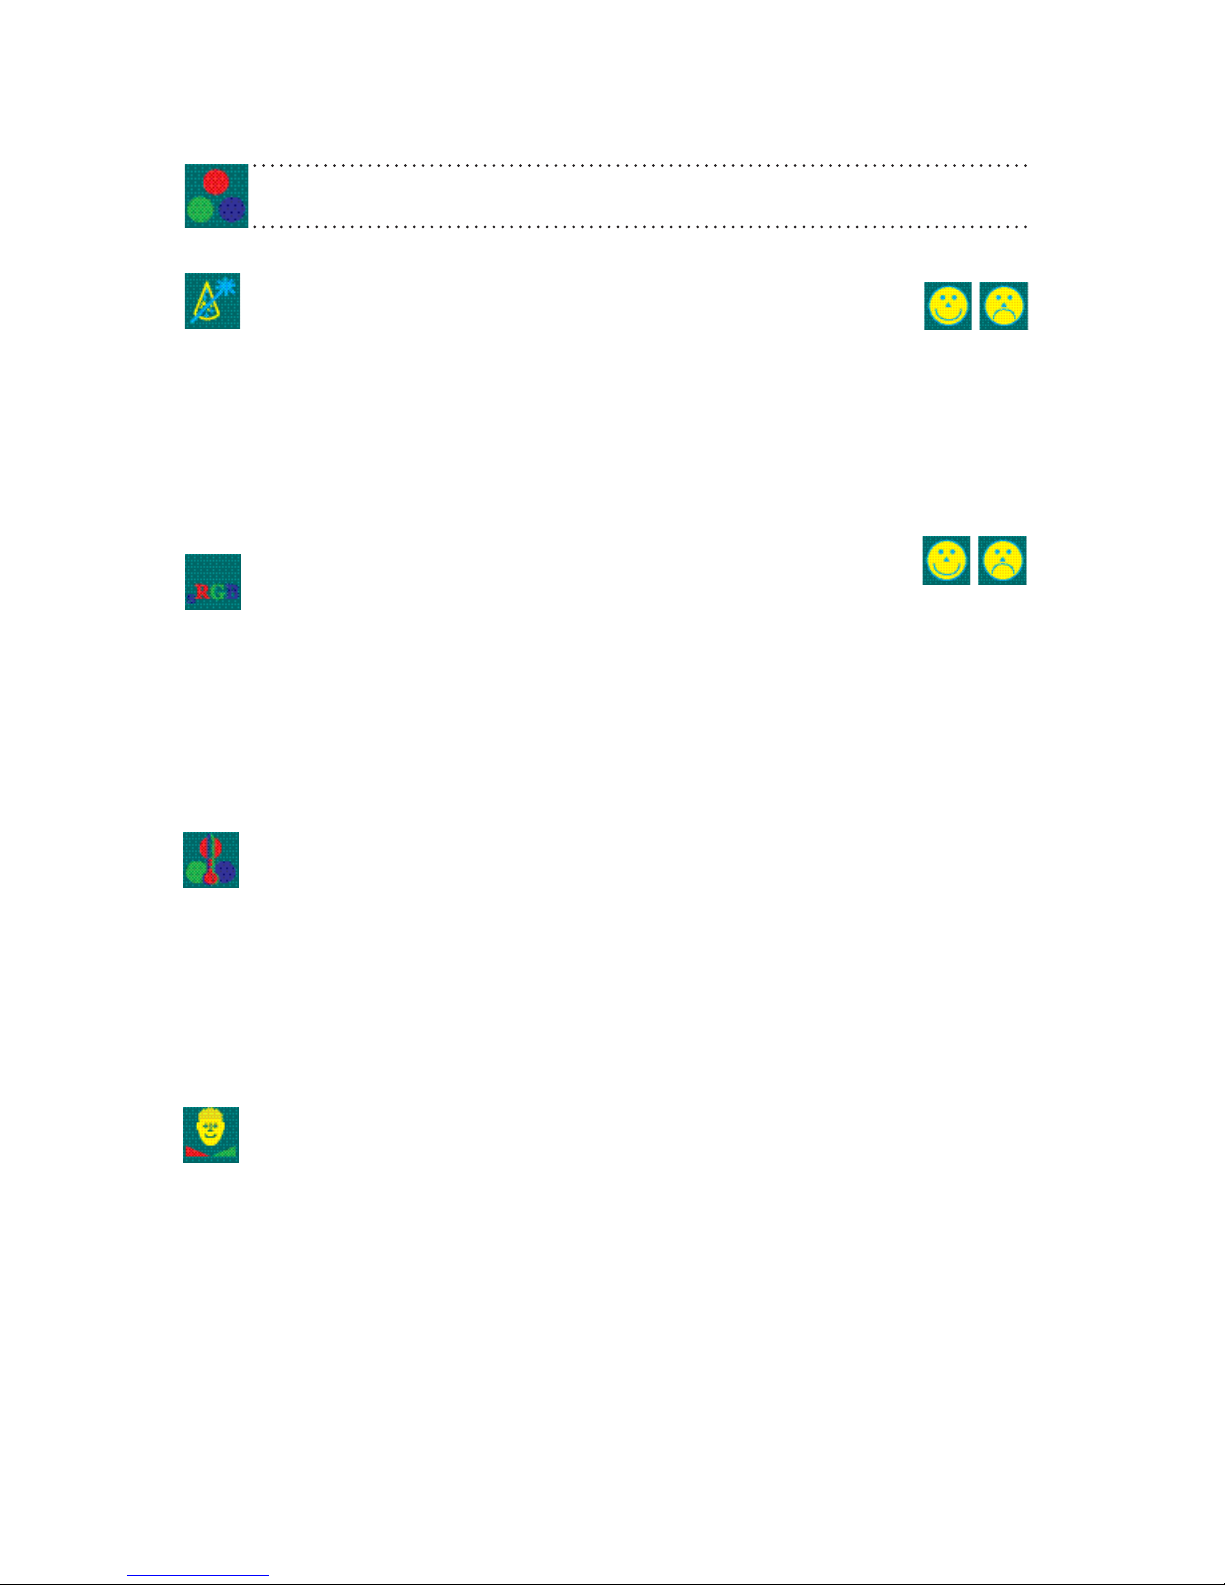
Color Adjustment Menu
Auto Color
• Press the SELECT button to run the Auto Color Set-up. Note screen icker
• A new dialog box pops up, with highlighted Happy and Sad Faces
• Press the SELECT button to choose the Happy Face if present Auto Color is acceptable or using LEFT button, choose the Sad Face if unacceptable, and
• Press the SELECT button to save the changes (or not save if Sad Face was chosen)
and Exit.
Standard Color Set-up
• Press the SELECT button to allow the OSD to automatically set Standard Color
• A new dialog box pops up with highlighted Happy and Sad Faces
• Press the SELECT button to choose the Happy Face if present Auto Color is acceptable or using LEFT button, choose the Sad Face if unacceptable, and
• Press the SELECT button to save the changes (or not save if Sad Face was chosen)
and Exit.
RGB Color Temperature Settings (Color Adjustments)
• Press the SELECT button to go to the RGB (Red, Green Blue) Color Temperature
Settings Menu
• Use the RIGHT or LEFT button to select one of the ve Temperature
settings
• Press the SELECT button to save the changes and Exit or Exit without making
changes.
• Best accomplished if viewing a screen shot with skin tone prior to adjusting
• Use the RIGHT or LEFT button to adjust the Color Skin Tone
• Press the SELECT button to save the changes and Exit or Exit without making
RGB Color Skin Tone Adjustment
changes.
150-7000-001 15
Page 18
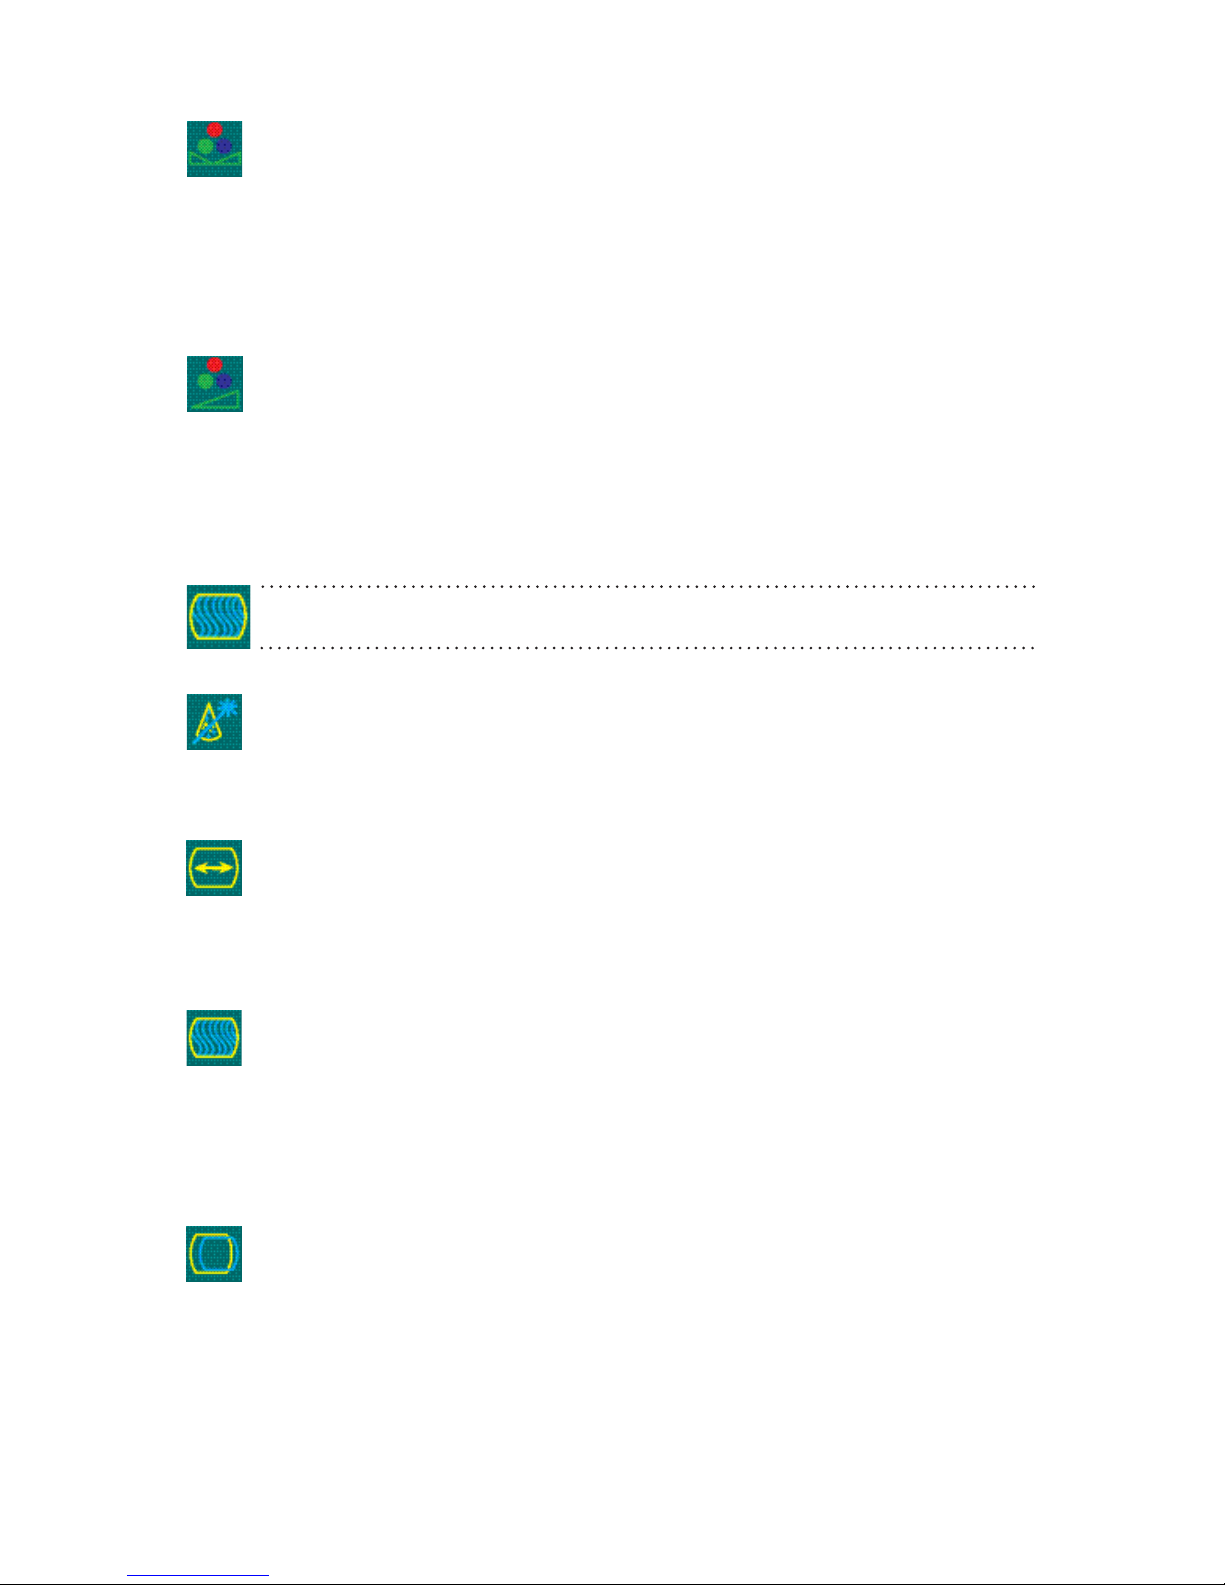
RGB Color Hue Adjustment
Hue is the pinks, blues and greens of the display.
• Use the RIGHT or LEFT button to adjust
• Press the SELECT button to save the changes and Exit or Exit without making
changes.
RGB Color Saturation Adjustment
Saturation is the vividness or intensity of the hue or color.
• Press the RIGHT or LEFT button to set the display’s desired saturation
• Press the SELECT button to save the changes and Exit or Exit without making
changes.
Image Setting Menu
Auto Conguration
• For optimal display viewing, set to auto congurate.
• Press the RIGHT or LEFT button to
• Press the SELECT button to save and Exit or Exit without making changes.
Image Width
adjust the width
Phase Adjustments
• Press the RIGHT or LEFT button to
to digital converter
• Press the SELECT button to save and Exit or Exit without making changes.
• Press the RIGHT or LEFT button to adjust horizontal position of the display
• Press the SELECT button to save and Exit or Exit without making changes.
16 150-7000-001
H-Position
adjust the signal phase in the analog
Page 19
V-Position
• Press the RIGHT or LEFT button to adjust the vertical position of the
display
• Press the SELECT button to save and Exit or Exit without making changes.
Miscellaneous - OSD Dialog Box Control
OSD Duration
• Press the RIGHT or LEFT button to adjust the time elapse between the last menu
activity and when the menu disappears. Factory default is 15 seconds
• Press the SELECT button to save and Exit or Exit without making changes.
OSD H-Position
• Press the RIGHT or LEFT button to adjust the horizontal position of the OSD menu
on the display
• Press the SELECT button to save and Exit or Exit without making changes.
OSD V-Position
• Press the RIGHT or LEFT button to adjust the vertical position of the OSD menu on
the display
• Press the SELECT button to save and Exit or Exit without making changes.
OSD Screen Zoom Setting
• Press the SELECT button to enable OSD dialog box Zoom feature
• Press the RIGHT button to go to Exit
• Press the SELECT button to save and Exit or Exit without making changes.
Factory Reset
•Press the SELECT button to Exit and return all OSD user settings to factory default.
150-7000-001 17
Page 20
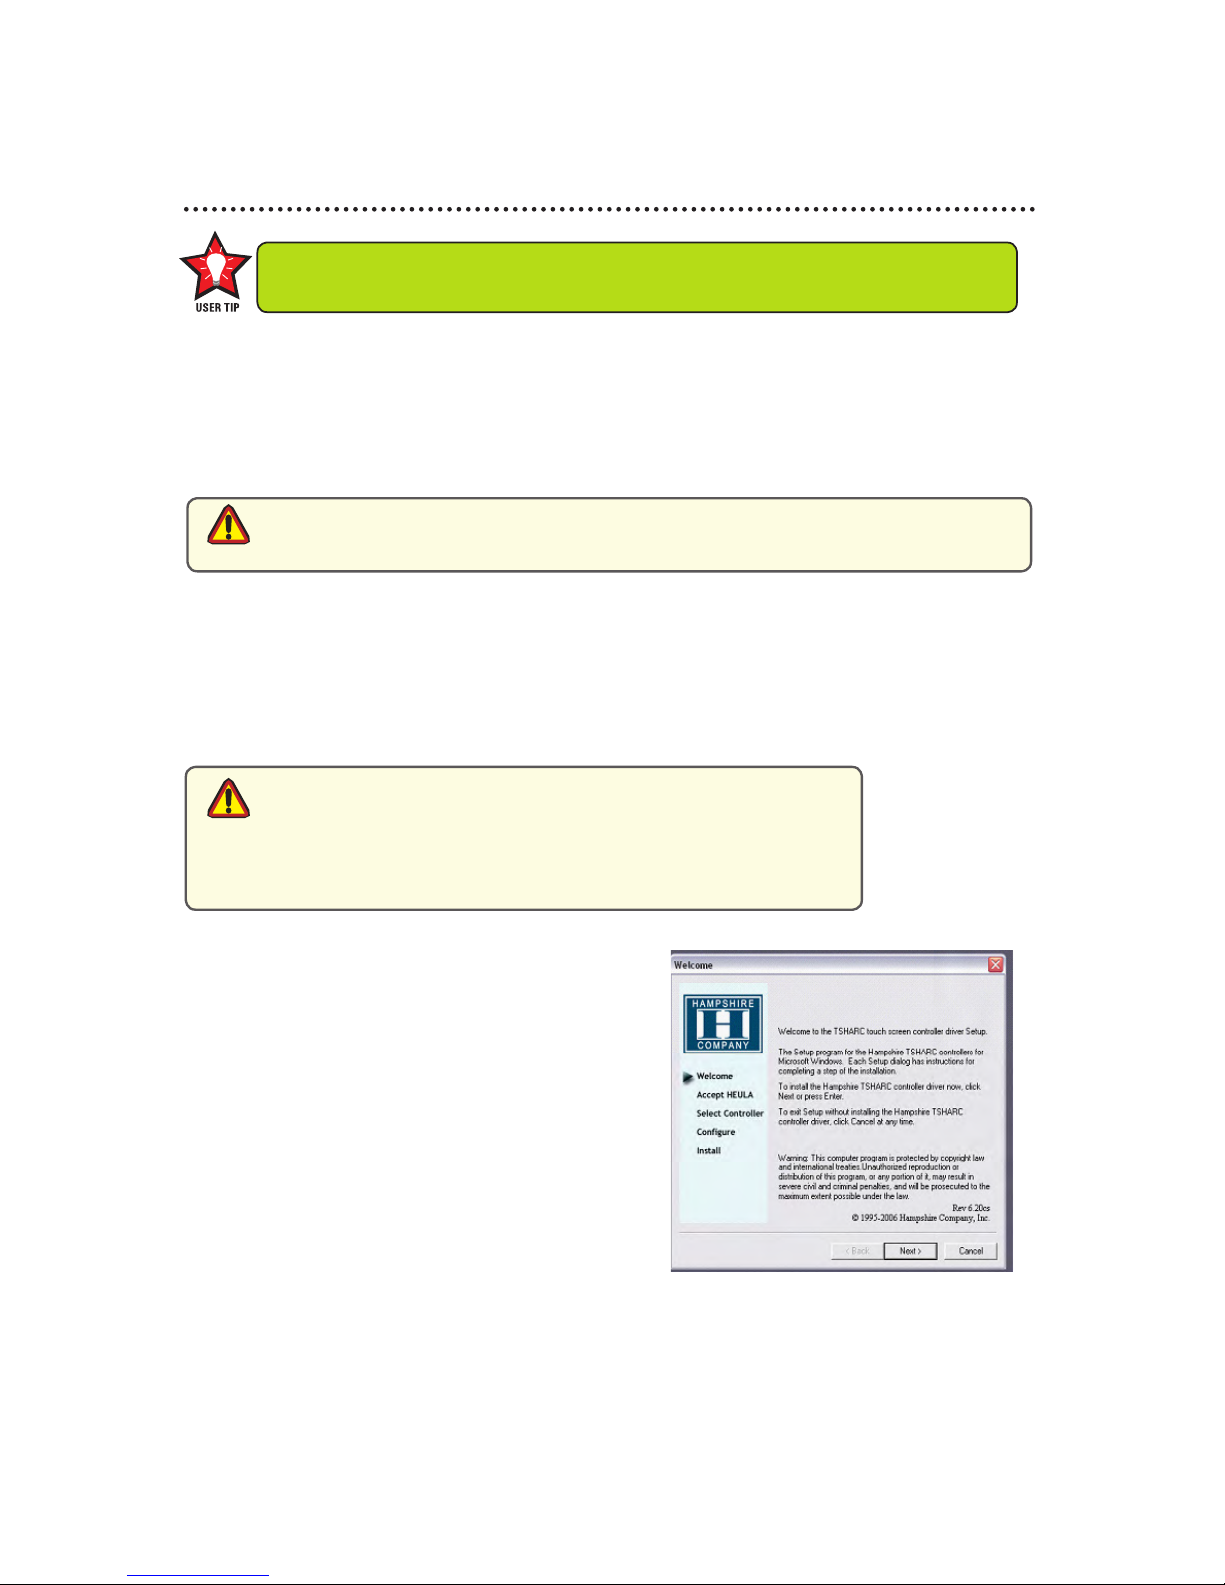
Resistive Touch Screen Installation
Drivers are available at www.hampshirecompany.com/drivers.html
TSHARC Touch Screen Controller Driver
A TSHARC Touch Screen Controller Installation CD is included in the shipping box with
the product accessories. The driver is compatible with these O/S: Windows® 98 SE
(Second Edition), ME, 2000 and XP.
Before loading Touch Screen Controller drivers, verify the COM ports are enabled
caution!
Installation
1. Attach the Touch Screen Cable connector to the 4-pin connector
2. Attach the Touch Screen Cable RS-232 connector to a computer serial port, or
3. Attach the Touch Screen Cable USB connector to a computer USB port.
(especially if using a laptop computer).
• If installing RS-232 connectors, the driver has to be installed
caution!
for each Touch Screen, or
• If installing USB connectors, the driver is installed one time
for multiple Touch Screens.
• If the Touch Screen connector is USB, Window shall load a
temporary USB driver. Wait for the driver to load.
1. Boot up the computer
2. Insert the TSHARC Controller Driver CD or go
to www.hampshirecompany.com/drivers.html
3. On the desktop, left double mouse click on
the My Computer icon
4. Locate the drive with the TSHARC Touch
Screen Controller Drivers Installation CD
5. Left mouse click to open
6. Left mouse double click to open the Resistive
Touch Driver le
7. Left mouse double click to open the le for
2000, XP, 98, ME O/S, and
8. Left mouse double click to run “set-up.exe”.
18 150-7000-001
Page 21
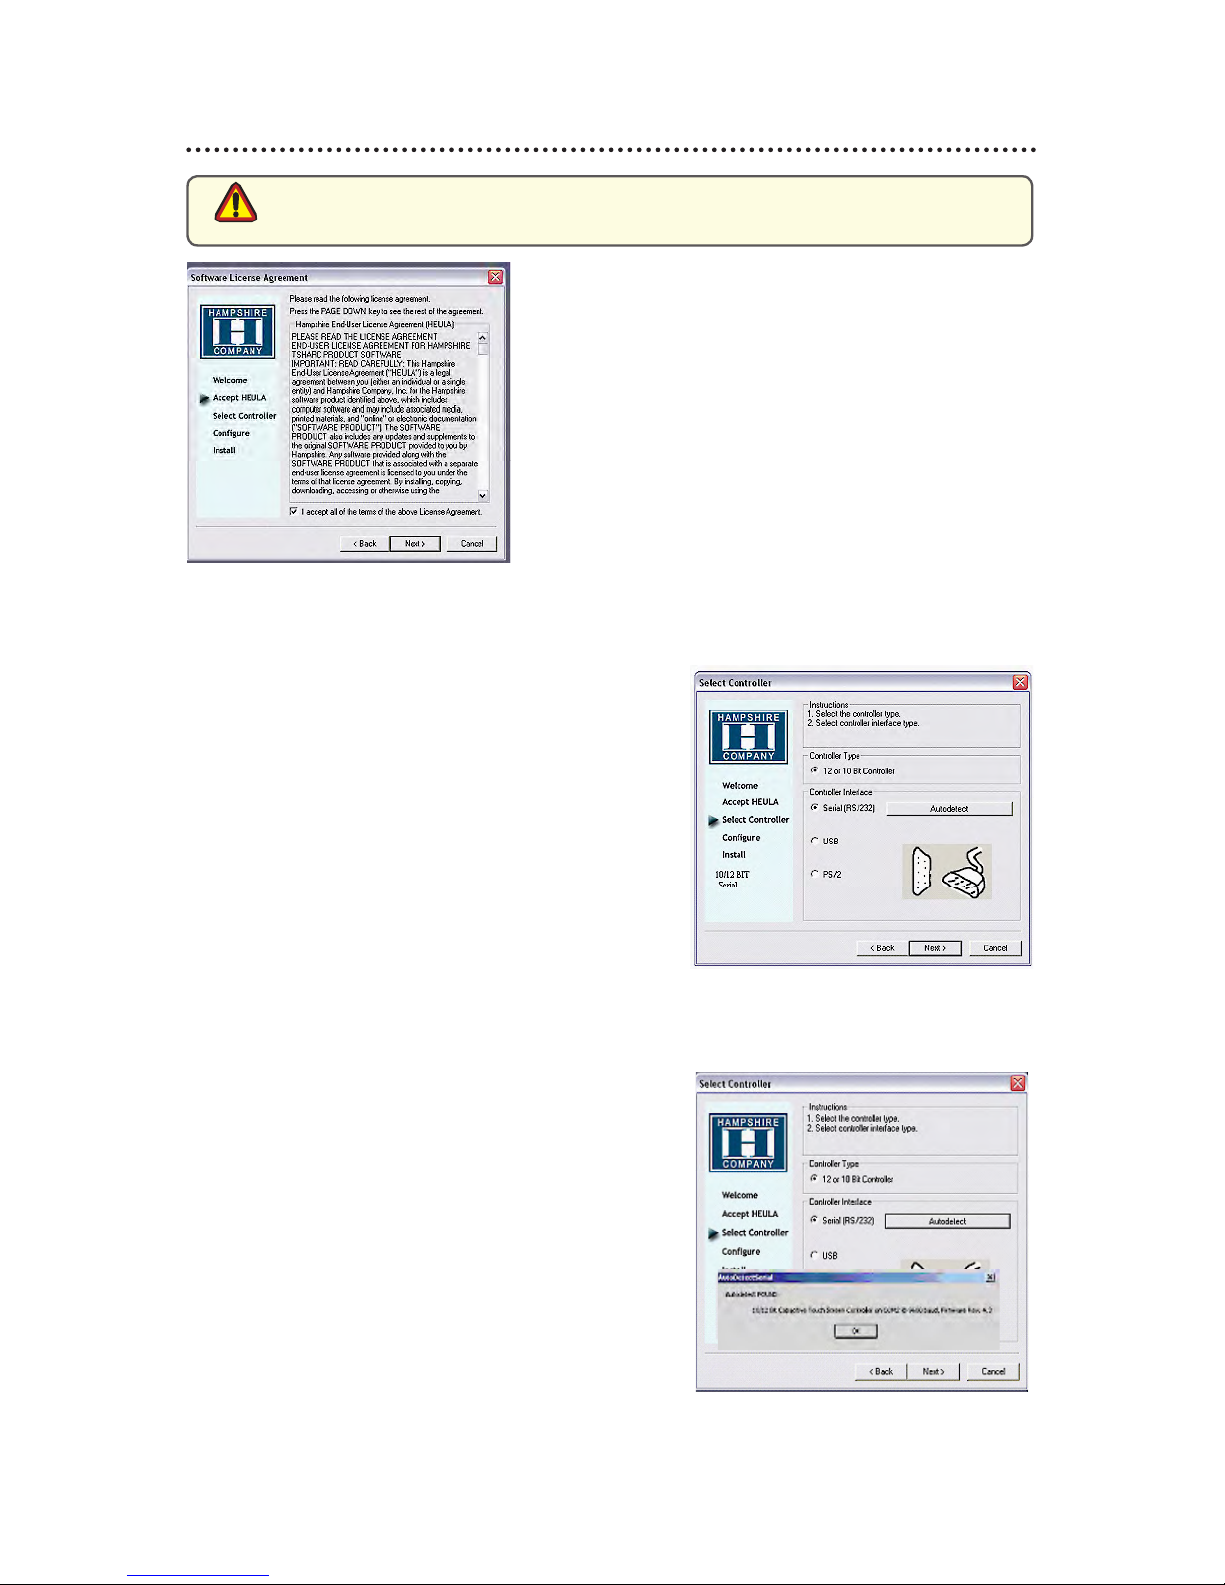
TSHARC Installation
If you need to cancel this driver installation at any time, select the Cancel button on
caution!
Select Controller
1. The TSHARC Driver is a 12-bit controller; the radio button is selected by default
Note: A PS/2 controller interface is not available.
2. Select the controller interface matching the
cable used to install the display
3. Select the Autodetect button if installing the
Touch Screen through a RS-232 (serial)
interface
4. There are two options for RS-232 installation:
Autodetect and Manual. Manual instructions
are found in section Manual RS-232 Controller
Set-up
5. If connecting through a USB interface, select
the USB radio button
6. Select Next
7. Following installation, select Finish, and
8. Reboot the computer when prompted.
the driver installation dialog screen.
1. At the Welcome screen, select Next to go to the
Software License Agreement (EULA)
2. After reading the EULA, if in agreement, check
the box “I accept all of the terms…”
3. Select Next.
Note: Any unlawful use of the TSHARC driver is a strict
violation of the United States and International copyright
laws. Using a TSHARC driver with any third party Touch
Screen is strictly prohibited.
Autodetect RS-232 Controller Set-up
1. Select the Autodetect button
2. The “AutoDetect Serial” dialog box lists the
detected RS-232 controller information. Select
OK
3. “Installing Touch Screen Driver” text box pops
up, indicating the progress of the installation
4. Following installation, select Finish, and
5. Reboot the computer when prompted.
150-7000-001 19
Page 22
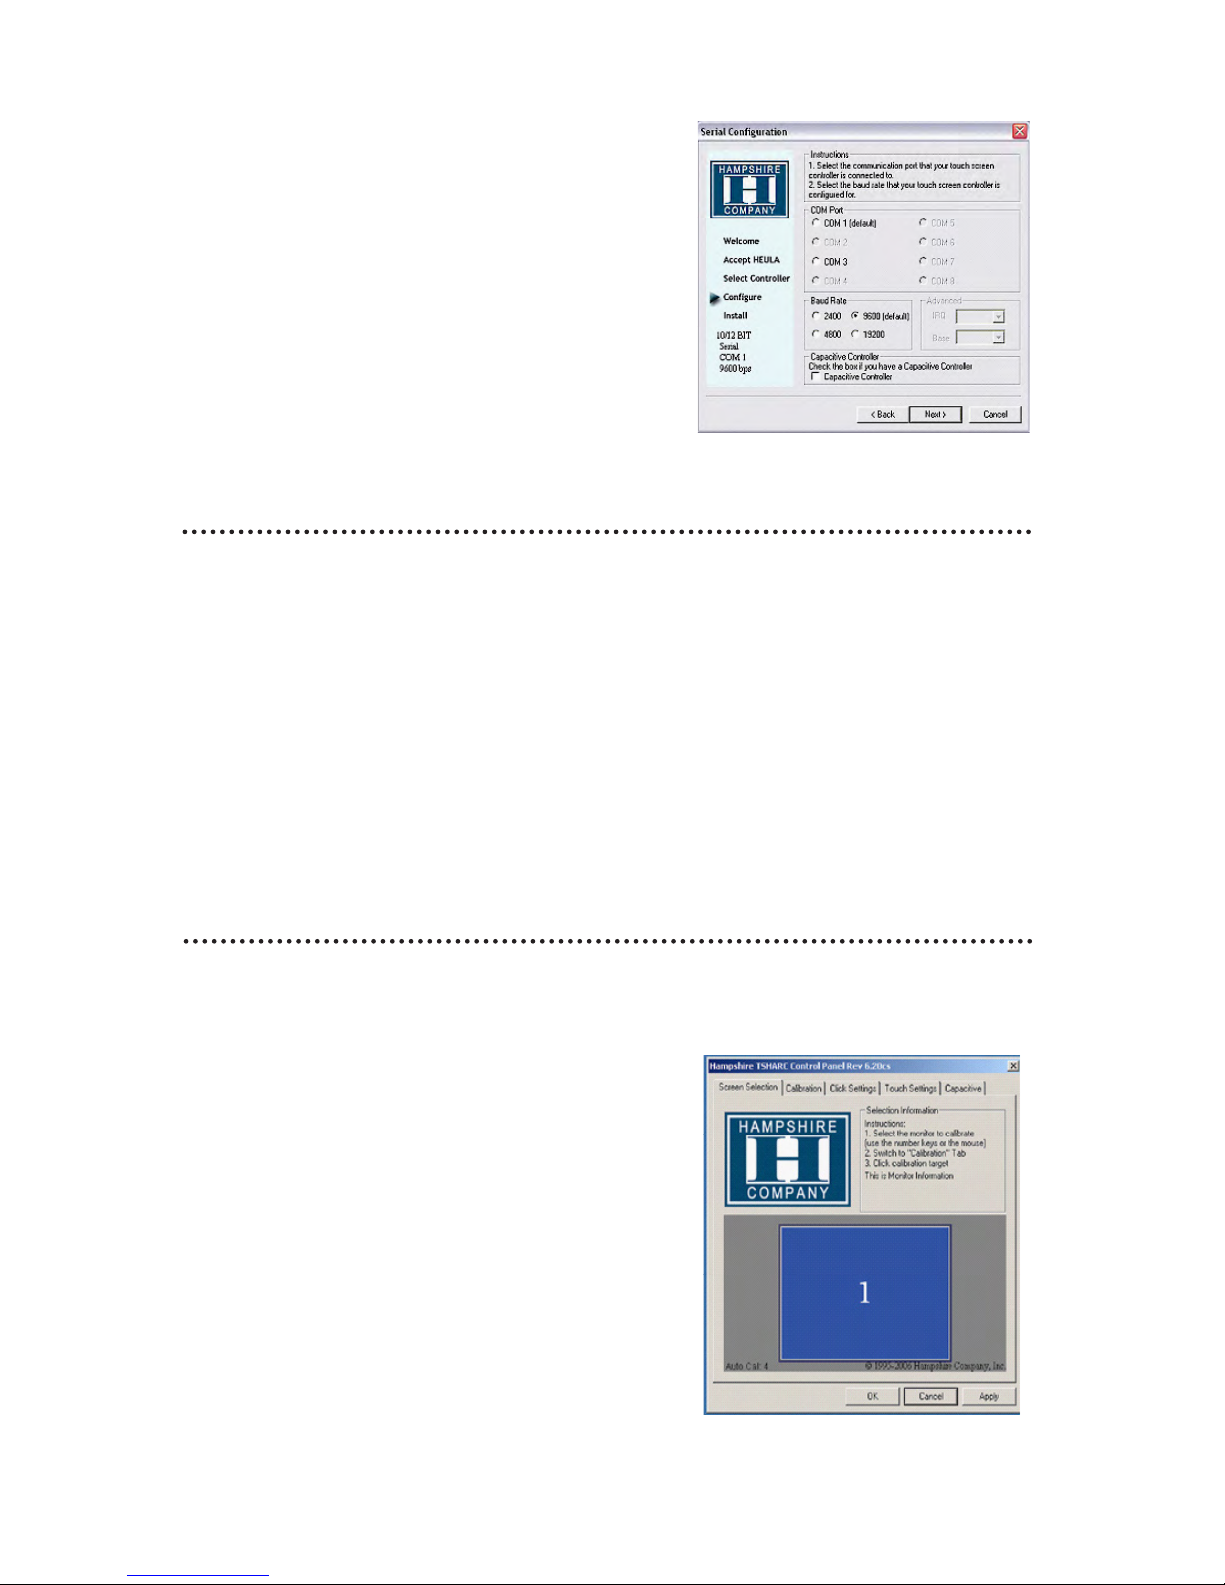
Manual RS-232 Controller Set-up
1. Select the Controller Interface RS-232
radio button
2. Select Next
Note: Do not select Autodetect
3. Follow the instructions, entering the COM port
selection
4. The Touch Screen Controller baud rate default
is 9600
Note: Capacitive Controller option is not available.
5. Select Next
6. Following installation, select Finish, and
7. Reboot the computer when prompted.
TSHARC Calibration Program
Upon reboot, the Touch Screen is functional, but not calibrated. Calibration must be
congured for the Touch Screen to work properly. The TSHARC Control Panel initiates
the calibration process.
• Go to Start > Programs > Hampshire TSHARC Control Panel. The Control Panel
has ve tabs. Each tab provides links to tools that can modify the TSHARC Drivers
to meet specic needs.
• Touch Screen Display Selection
• Calibration
• Click Settings
• Touch Settings
TSHARC Control Panel
Screen Selection
Note: If this is not a Multi-monitor installation, skip to section Calibration.
Conguring a Multi-monitor Installation
Note: Microsoft does not support a Multi-monitor
installation in Win98 SE.
1. The controller installation program opens
to the Screen Selection tab. Note the graphic
representation of the Monitors installed on the
system
2. Using the keypad or the mouse, select the
Monitor to calibrate
3. Switch to the Calibration tab. Go to the next
section: Calibration
4. When complete, return to the Screen Selection
tab; select the next Monitor. Repeat the
process until all Monitors are calibrated.
20 150-7000-001
Page 23
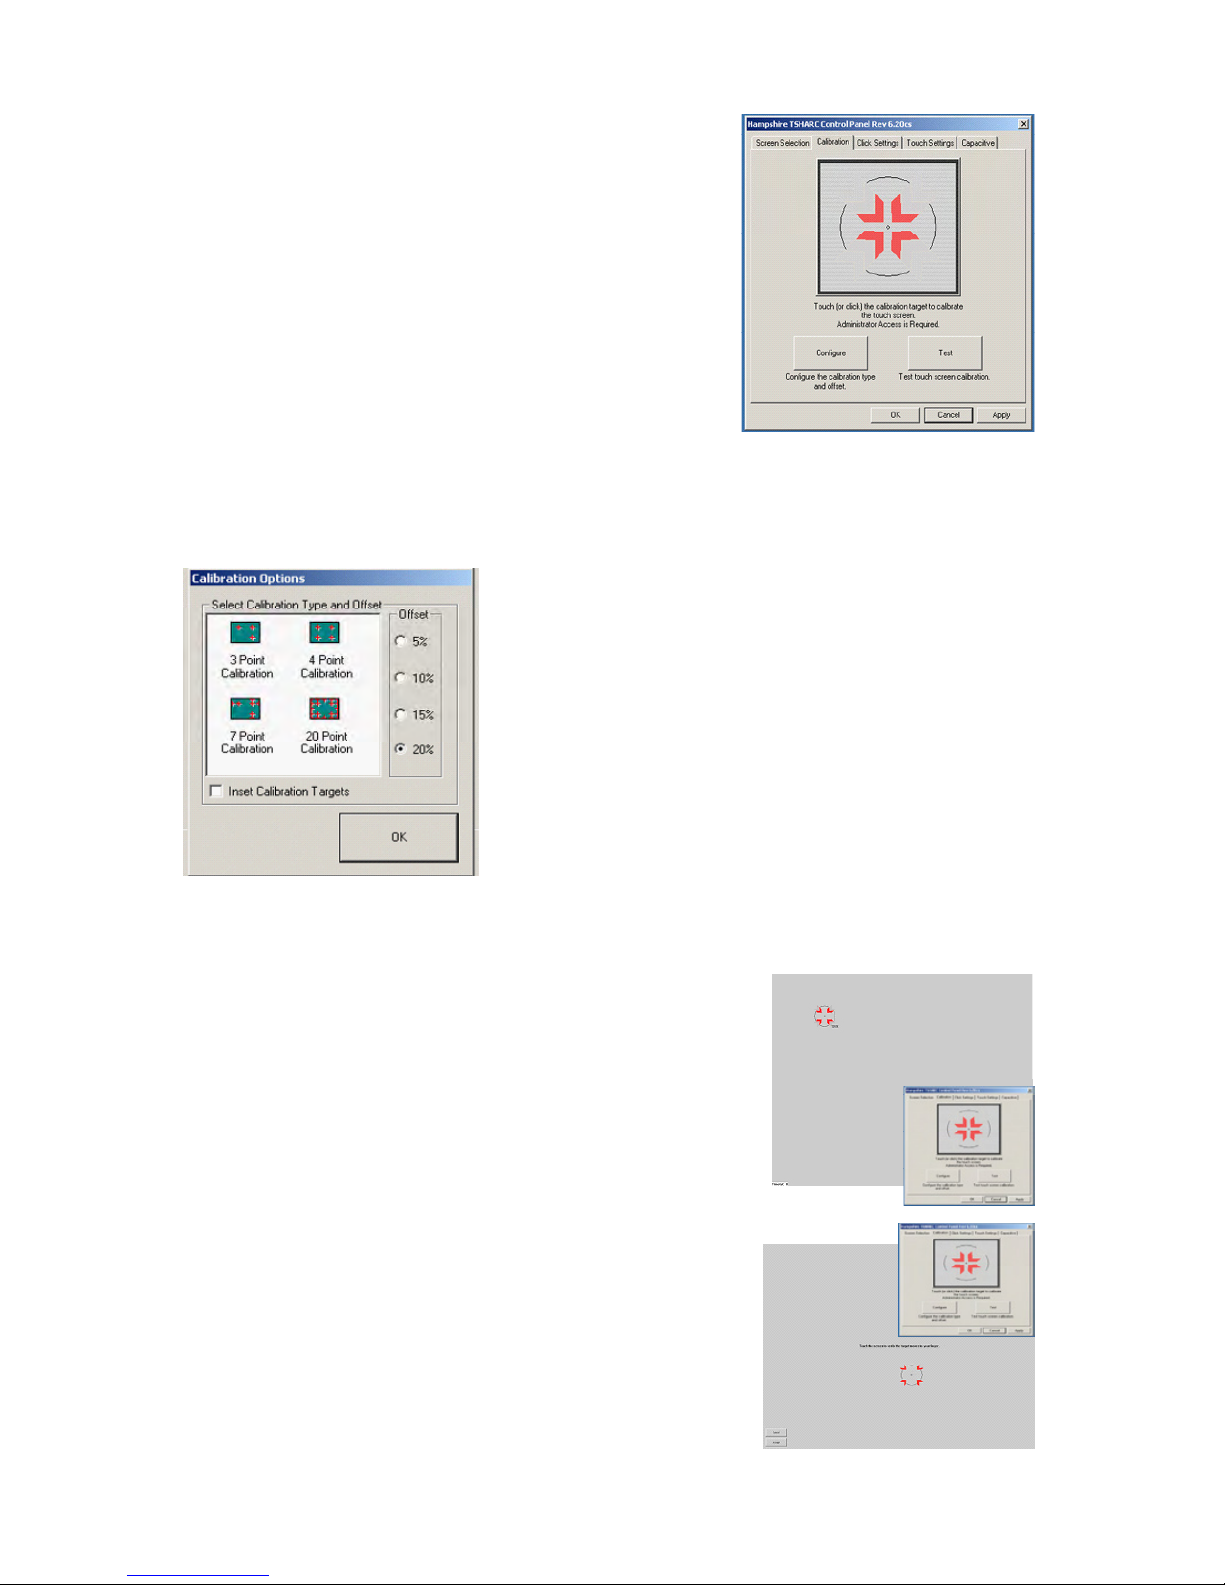
Calibration
then Calibration Process.
The calibration process aligns the Touch Screen overlay
to specic points on the Display screen.
1. Select the Calibration tab or, in ten seconds, the
calibration program launches, unless a Multi-monitor
situation is present, then go to section Conguring a
Multi-monitor Installation
2. There are three buttons: Graphic, Calibration and
Test. For default Four-point calibration, select the
Graphic square. This is the best known general
calibration; it compensates for skew and some edge
linearity anomalies, and
3. Go to section Calibration Process.
Custom Calibration Settings
1. To customize the calibration process, select the Calibration button to bring up
Calibration Options and the Oset menu
2. Select OK when calibration and/or oset selections
are made:
• Three-Point Calibration: Quick calibration of a
known good Touch Screen overlay. No correction is applied
• Four-Point Calibration: Compensates for skew
and some edge linearity anomalies
• Seven-Point Calibration: More accurate than
three-point calibration. No correction is applied
• Twenty-Point Calibration: Provides the highest
level of Touch Screen linearization and skew correction, and
• Oset: Varied linearity exists between Touch
Screen types; user may want to calibrate the
edges of the Touch Screen more precisely.
Default is 20%.
Calibration Process
1. Press the Center Graphic to start calibration
2. Targets are used to calibrate the Touch Screen. Follow
the on-screen instructions - “Touch” the target center,
“hold” until it shrinks, then “release” the target, and
3. Repeat the process for all targets.
Note: the calibration screen shall time-out and return to the
Calibration tab if the rst point is not touched within 10
seconds.
Calibration Verication Test
1. Touch the screen in several places to verify the
calibration target is displayed under the nger, and
2. Select the Accept button to apply and record the
calibration data.
Note: If the calibration target is not displayed under the nger,
select the Cancel button, repeat Custom Calibration Settings,
150-7000-001 21
Page 24
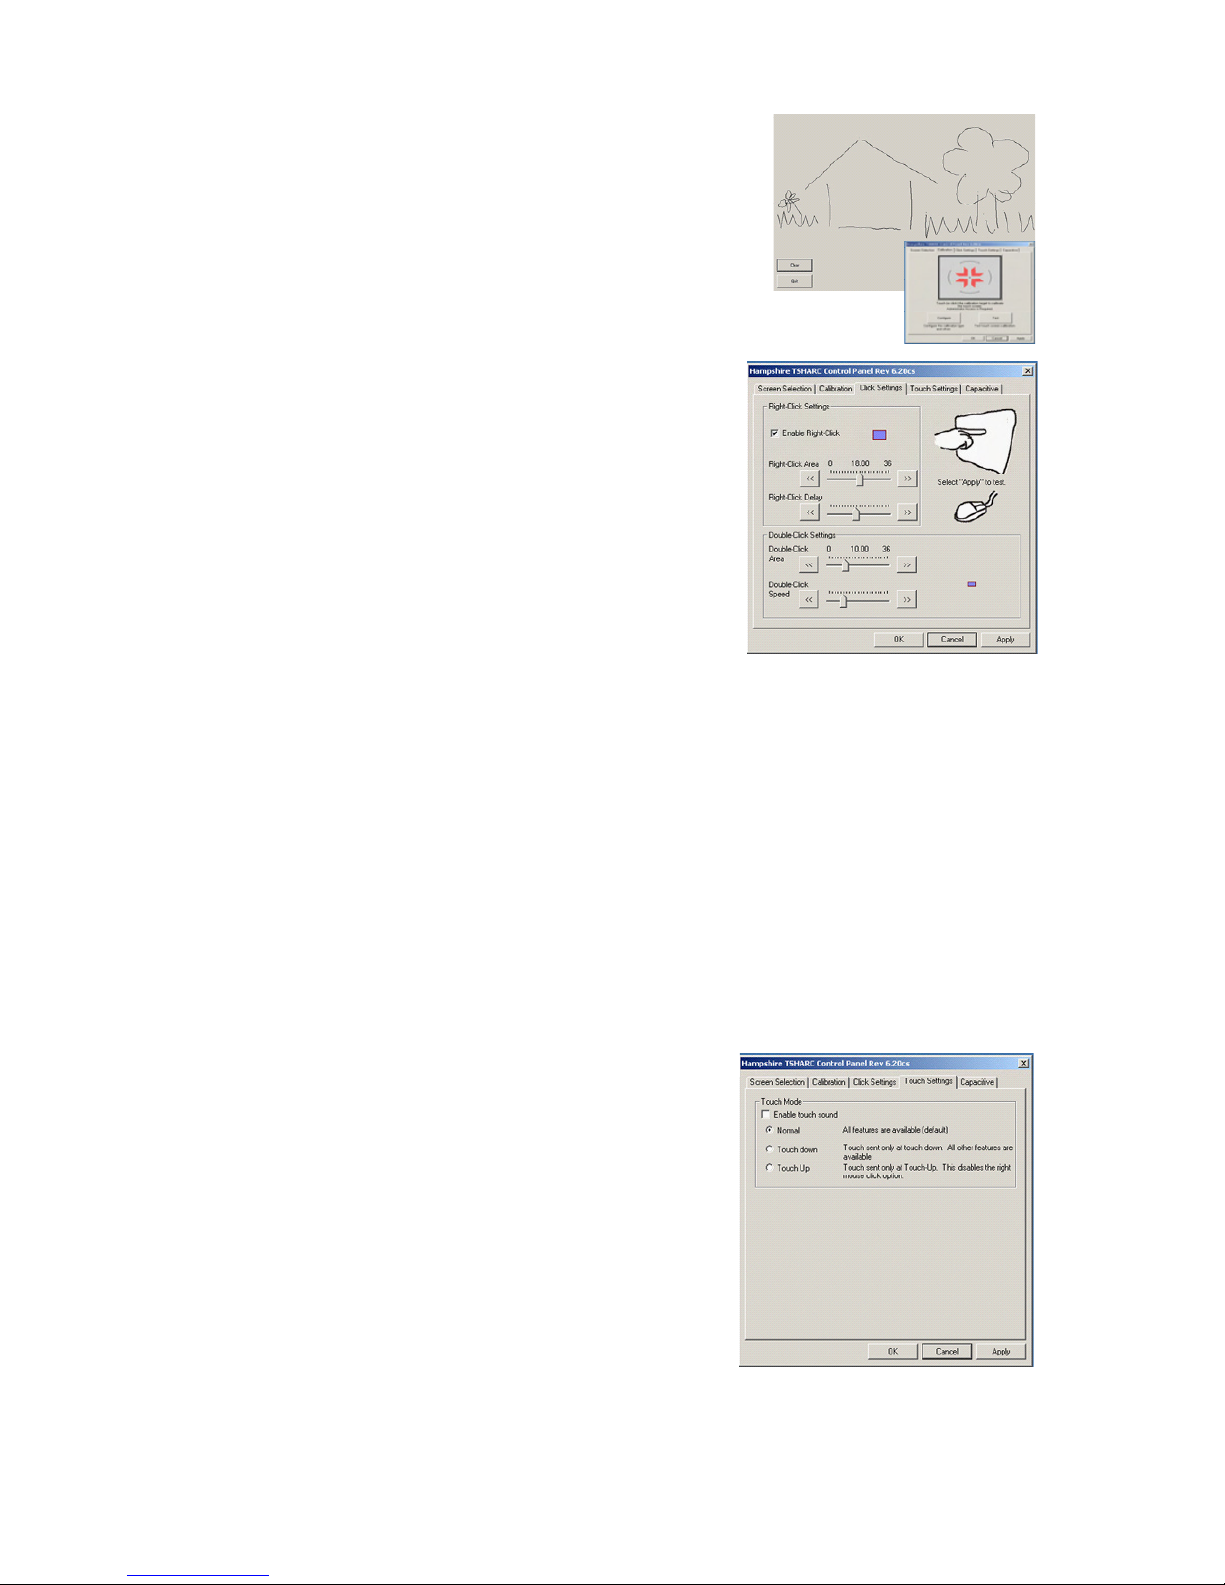
Calibration Drawing Test
1. Select the Test button on the Calibration tab
2. Using a nger or stylus, draw or write, and
3. Observe if the screen displays the drawing accu-
rately. If it does not, repeat the Custom Calibration
Settings and Calibration Process instructions
Click Settings
Right Click
1. If desirable for Touch Screen application, check the
“Enable Right Click” box to set the right click option
Right Click Area
2. Use the slide bar to set the Touch Screen event
area to a size slightly larger than the activator
– larger for a nger tip, smaller for a stylus; the
box displays the activator size
Right Click Delay
The timed-hold right click mouse event allows the
user to initiate a right click by holding down a touch
point for a specic period of time.
3. Use the slide bar to set the Right Click Delay value to the time necessary to
produce a right click event
Double Click Area
This step sets the area that shall allow for a double click event. Limit this to areas that
can be accurately touched several times.
4. Use the slide bar to set the double click area; the box displays the activator size
Double Click Speed
5. Use the slide bar to set sucient time to perform a double touch in the specied
area
6. Select the Apply button to enter the selection, and
7. Select the OK button to apply all Click Settings.
Touch Settings
1. Normal: Emulates a standard mouse, allowing a
single click, double click, drawing, dragging and
right click option (if enabled)
2. Touch Down: Allows for a click event to take
place at touch down. No draw or drag is available
3. Touch Up: Touch only. Double click is disabled. If
right click was earlier enabled, it shall be disabled.
Touch Sound
1. Check the Enable Touch Sound to enable a tonal
beep when the screen is touched
2. Select the Apply button to enter the selection, and
3. Select the OK button to apply all Touch Settings.
22 150-7000-001
Page 25
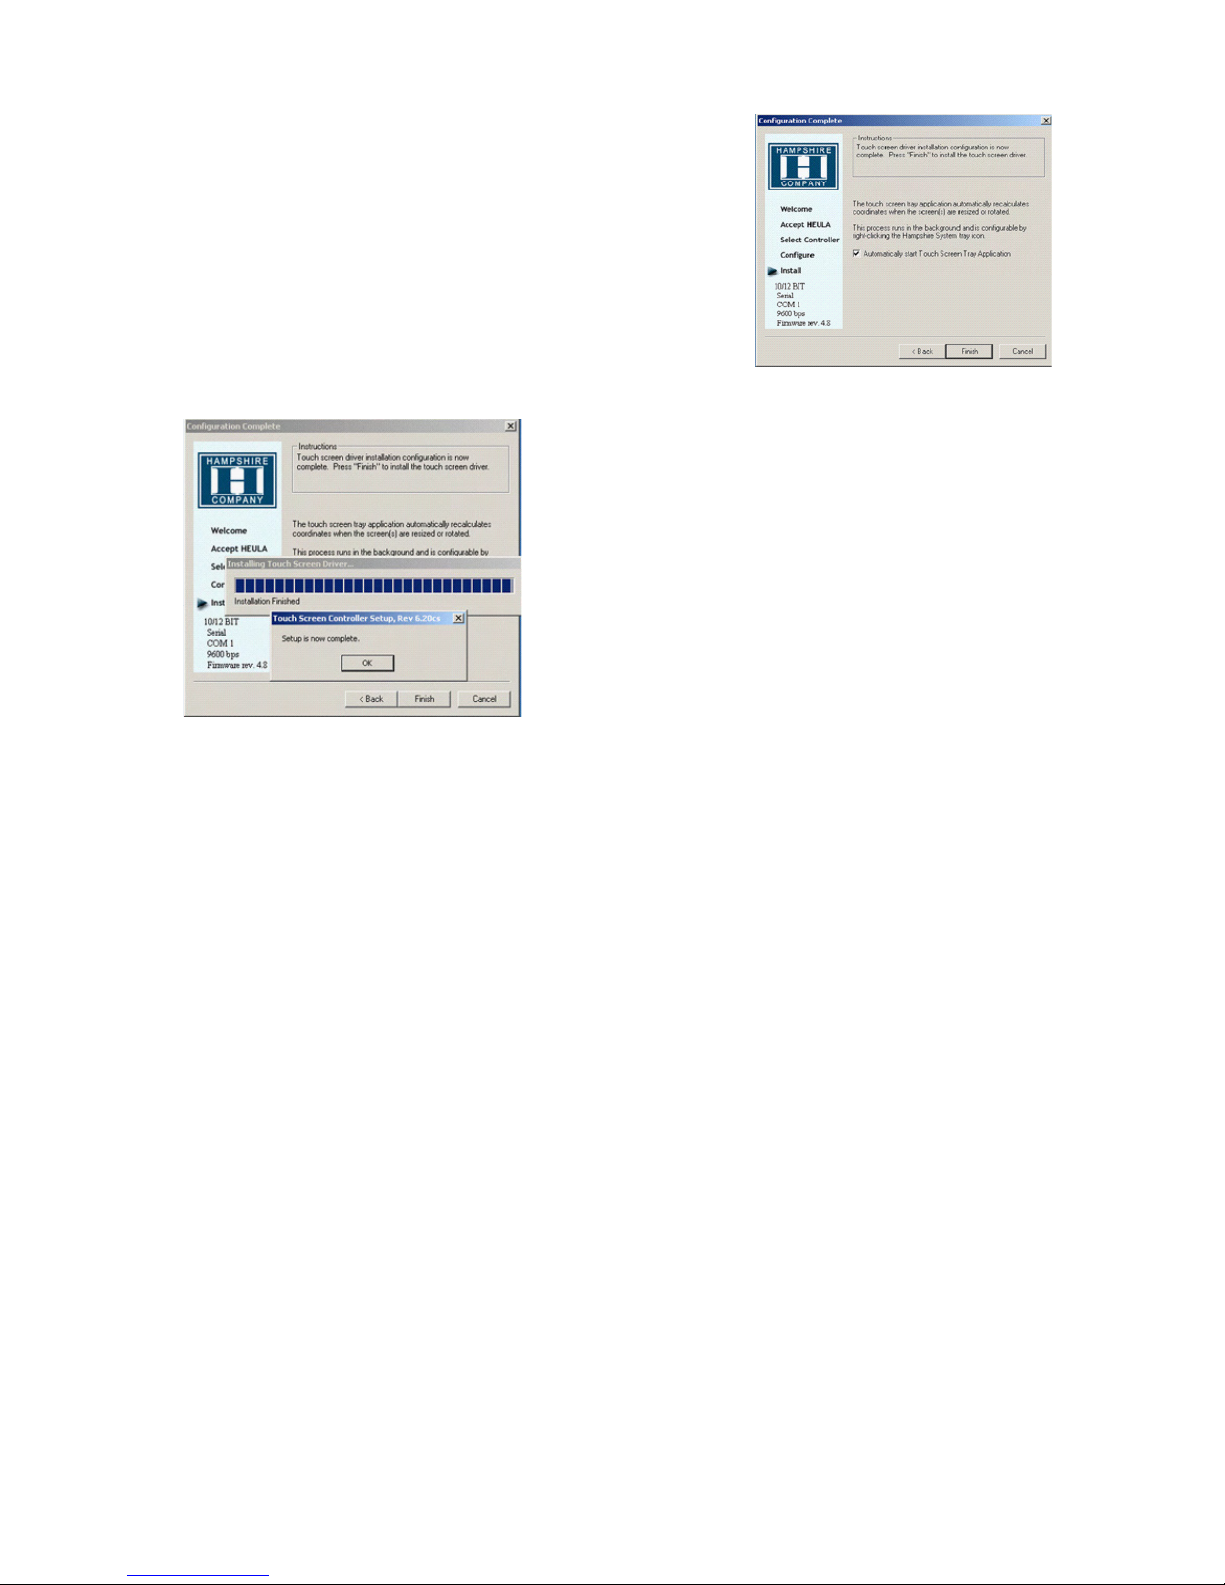
Capacitive Tab – Disabled
The Touch Screen is a resistive type; the Capacitive Tab
shall be disabled.
Touch Screen Tray Icon
1. If you do not want a Touch Screen Controller Icon to
display in the toolbar tray, go to step 3, or
2. If you want a Touch Screen Controller Icon to display
in the toolbar tray, select the box, and
3. Select the Finish button; the TSHARC drivers shall be
installed.
Installation Complete
1. At the dialog box, “Setup is now complete”,
select OK, exiting the TSHARC Touch
Screen Controller installation
2. The screen is now ready to go to work.
150-7000-001 23
Page 26
APPENDIX A
Mechanical Drawings
PDF diagrams of the display and its dimensions may assist you in installation
of the Monitor. You may nd them on our website at:
http://www.aydindisplays.com/305164.ihtml
Mount diagrams of the optional Flush Mount Bezel and its dimensions may assist you
in installation of the Monitor. You may nd them on our website at:
http://www.aydindisplays.com/305164.ihtml
APPENDIX B
Display
Symptom: No light behind button LEDs
Possible Problem Solution
No power, loose power connection Conrm the Monitor is properly connected to a
DC or AC power source.
Verify the power source is live or try another
battery or AC power outlet.
Verify the Monitor is powered on.
Reverse Polarity Check polarity of the power connection.
Symptom: Light behind button LEDs, no display, or “No Signal” error
message and/or no image on the display
Possible Problem Solution
Power on, no video signal Verify the video cable is plugged into the VGA
video connector.
Verify a video signal is coming out of the
computer (i.e., plug into a known good display
source).
Verify the incoming signal source selected
matches the Monitor signal source (Composite,
S-Video, VGA).
Check the Brightness front panel setting on the
Monitor. This may be set too low.
Check the Brightness and Contrast controls in
the OSD. These may be set too low.
Computer may have gone into power management stand-by. Press any key on the keyboard,
move the mouse or cursor, or it there is the
Touch Screen option, touch the screen to wake
up the computer.
24 150-7000-001
Page 27
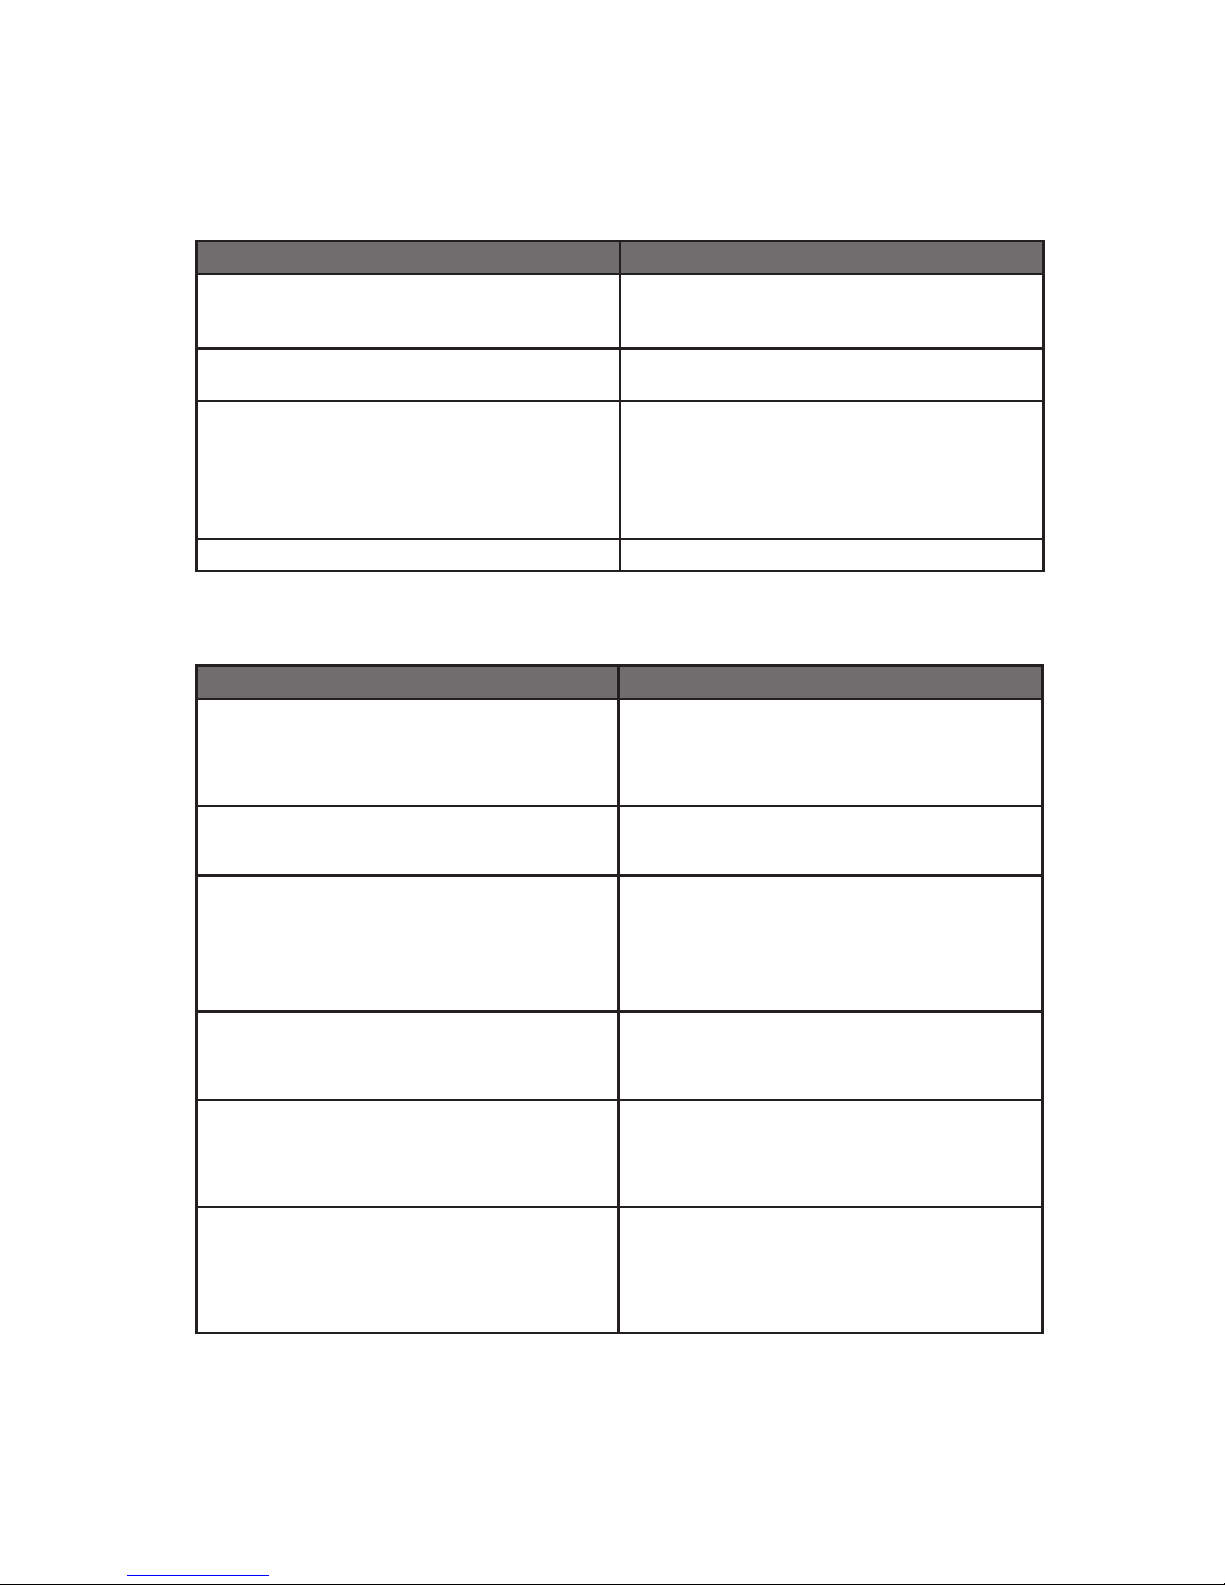
Symptom: Display has rolling “bars” across the screen or vertical
shaded bars on the image.
Possible Problem Solution
VGA video display is not set to view at 800 x
600 pixels, or 1024x768 pixels.
Defective video cable On a known good display source, conrm the
Interference from adjacent equipment For proper grounding and shielding, verify use
Horizontal size is not adjusted In the OSD, adjust the horizontal size controls.
Verify the computer video display settings of
the signal are set to match the display and 60
- 75Hz refresh rate.
video cable is not defective.
of a proper video cable.
Keep the cable away from sources of EMI
such as electric motors, or unshielded RF
sources such as radar and microwave.
Symptom: Picture quality, image stability is distorted.
Possible Problem Solution
Not working in 800 x 600 or 1024x768 pixel
resolution
Proper cable grounding and shielding Verify the use of a proper video cable with
Improper video display settings Check signal source for proper signal.
Press the arrow down button one time to auto
adjust the display.
Verify the video display settings match the
monitor, and 60 – 75Hz refresh rate.
suitable grounding and shielding. Keep the
video cable away from sources of EMI and RF.
Check for proper display properties selection
of the display pixel setting.
Verify the display refresh rate: 60 – 75Hz.
Display unit is farther than 3 m (10 ft) from
signal source
Multiple Monitors are driven from the same
signal source.
Monitor has incorrect or bad sync signals. Check for proper video cable installation, or
Single cable lengths in excess of the standard
3 m (10 ft) cable should be of high quality
shielded VGA cable.
Splitting the video signal divides the strength
of the signal. A video signal booster (line
driver) is recommended if installation requires
more than one Monitor driven from a single
video source.
replace suspected faulty cable.
Check the video source is within the display’s
operating range: max. 1280x1024 pixels, and
60 – 75Hz.
150-7000-001 25
Page 28
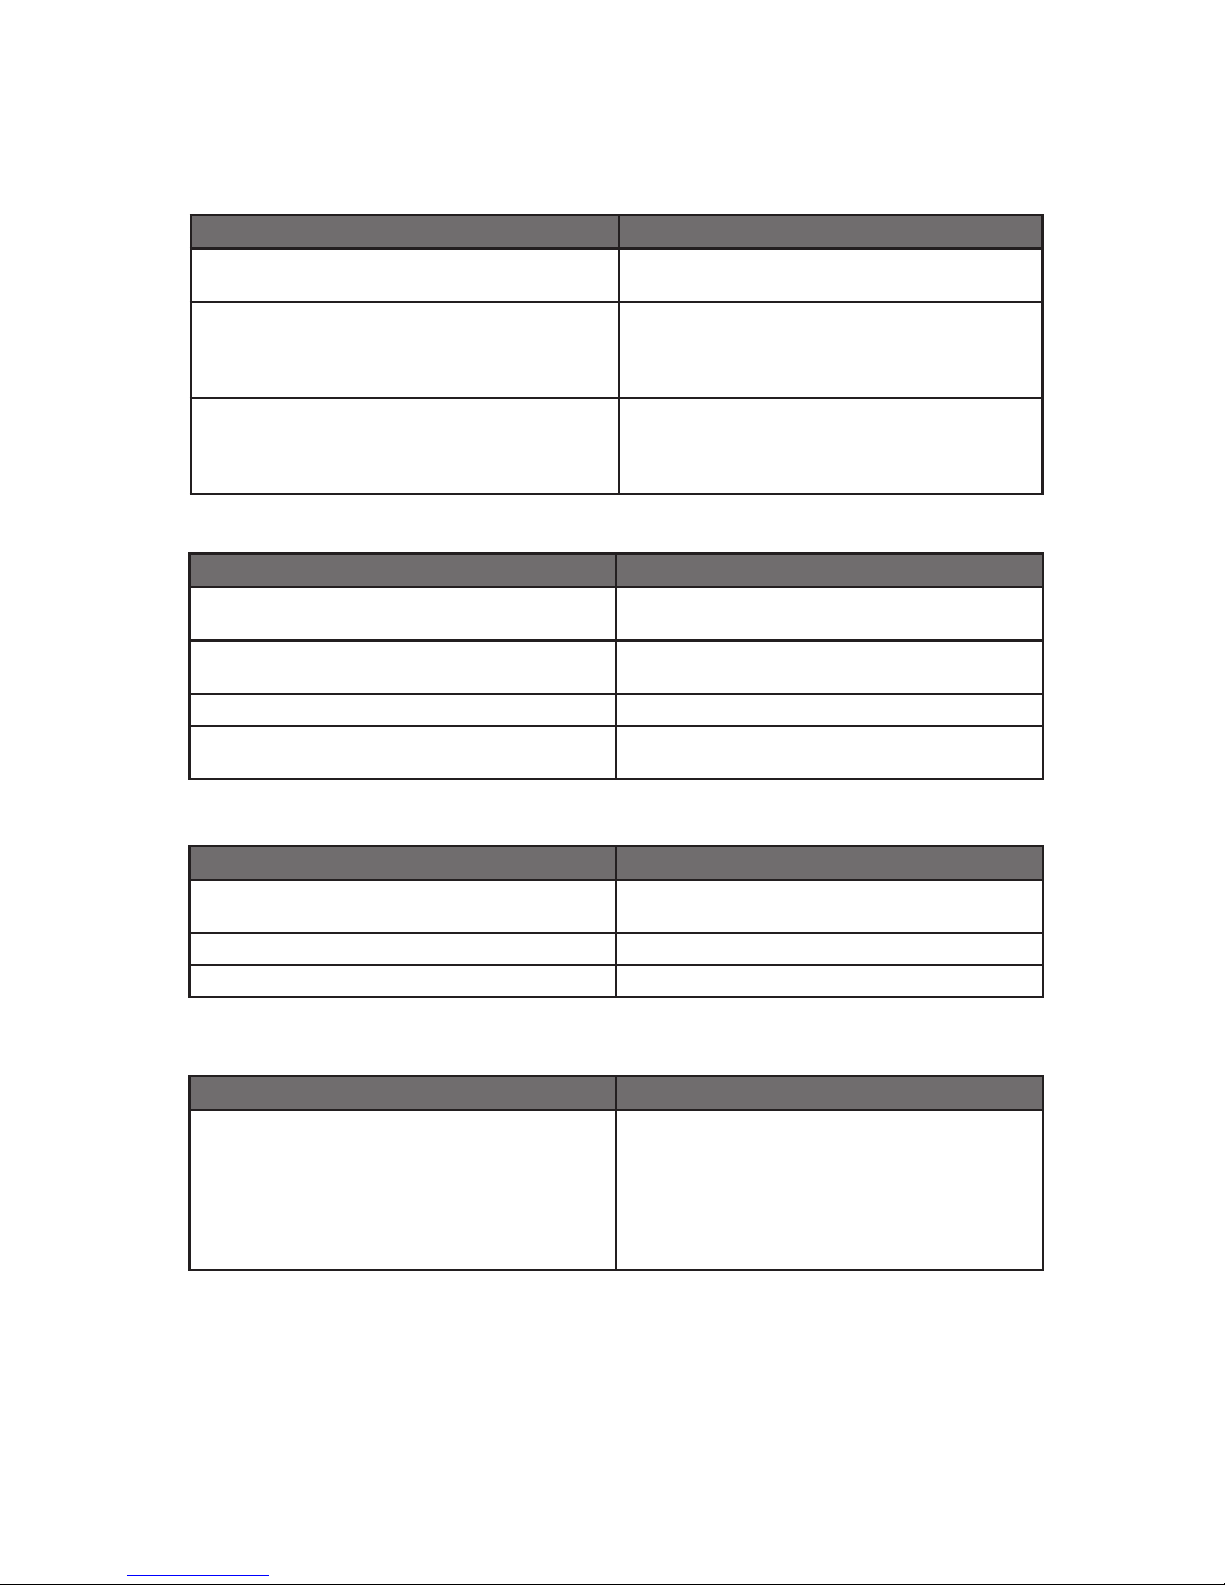
Symptom: Display image is not properly sized
Possible Problem Solution
OSD adjustments need to be made Adjust the vertical and horizontal size controls
through the OSD.
Improper video display settings Check for proper display properties selection
of the display settings. Monitor autosize will
only display full screen if source is 4:3 aspect
ratio.
VGA signal source “Auto Adjust” needs
activated
The VGA source is able to auto adjust the
Monitor to its optimum viewing setting. Press
the arrow down button one time to auto
adjust the display.
Symptom: Touch Screen (T/S) does not respond
Possible Problem Solution
T/S cable is not plugged in Verify the connections between the T/S and
the computer.
T/S cable is installed in a dierent COM port
than installed by the software
T/S controller driver has not been installed Install the TSHARC controller driver.
Hardware failure Contact an Aydin Technical Support Techni-
Install the T/S into another COM port. If using
a laptop, verify the COM port(s) is enabled.
cian (610-404-5370).
Symptom: T/S moves, but does not follow a nger or stylus
Possible Problem Solution
Controller is not calibrated Run the calibration in the TSHARC Control
Panel software.
T/S Controller Driver is not installed Install the TSHARC Controller Driver (pg. 18).
T/S cable is not installed correctly Verify the T/S cable is installed correctly.
Symptom: “Error in Calibration” message appears
Possible Problem Solution
The T/S Controller Driver is not installed
correctly
Uninstall the driver using “TSUN10.exe”. If a
previous T/S Controller Driver was installed,
all footprints must be removed. Go to the T/S
manufacturer’s web site or contact the manufacturer for instructions to uninstall drivers.
Reinstall the TSHARC Driver software.
26 150-7000-001
Page 29
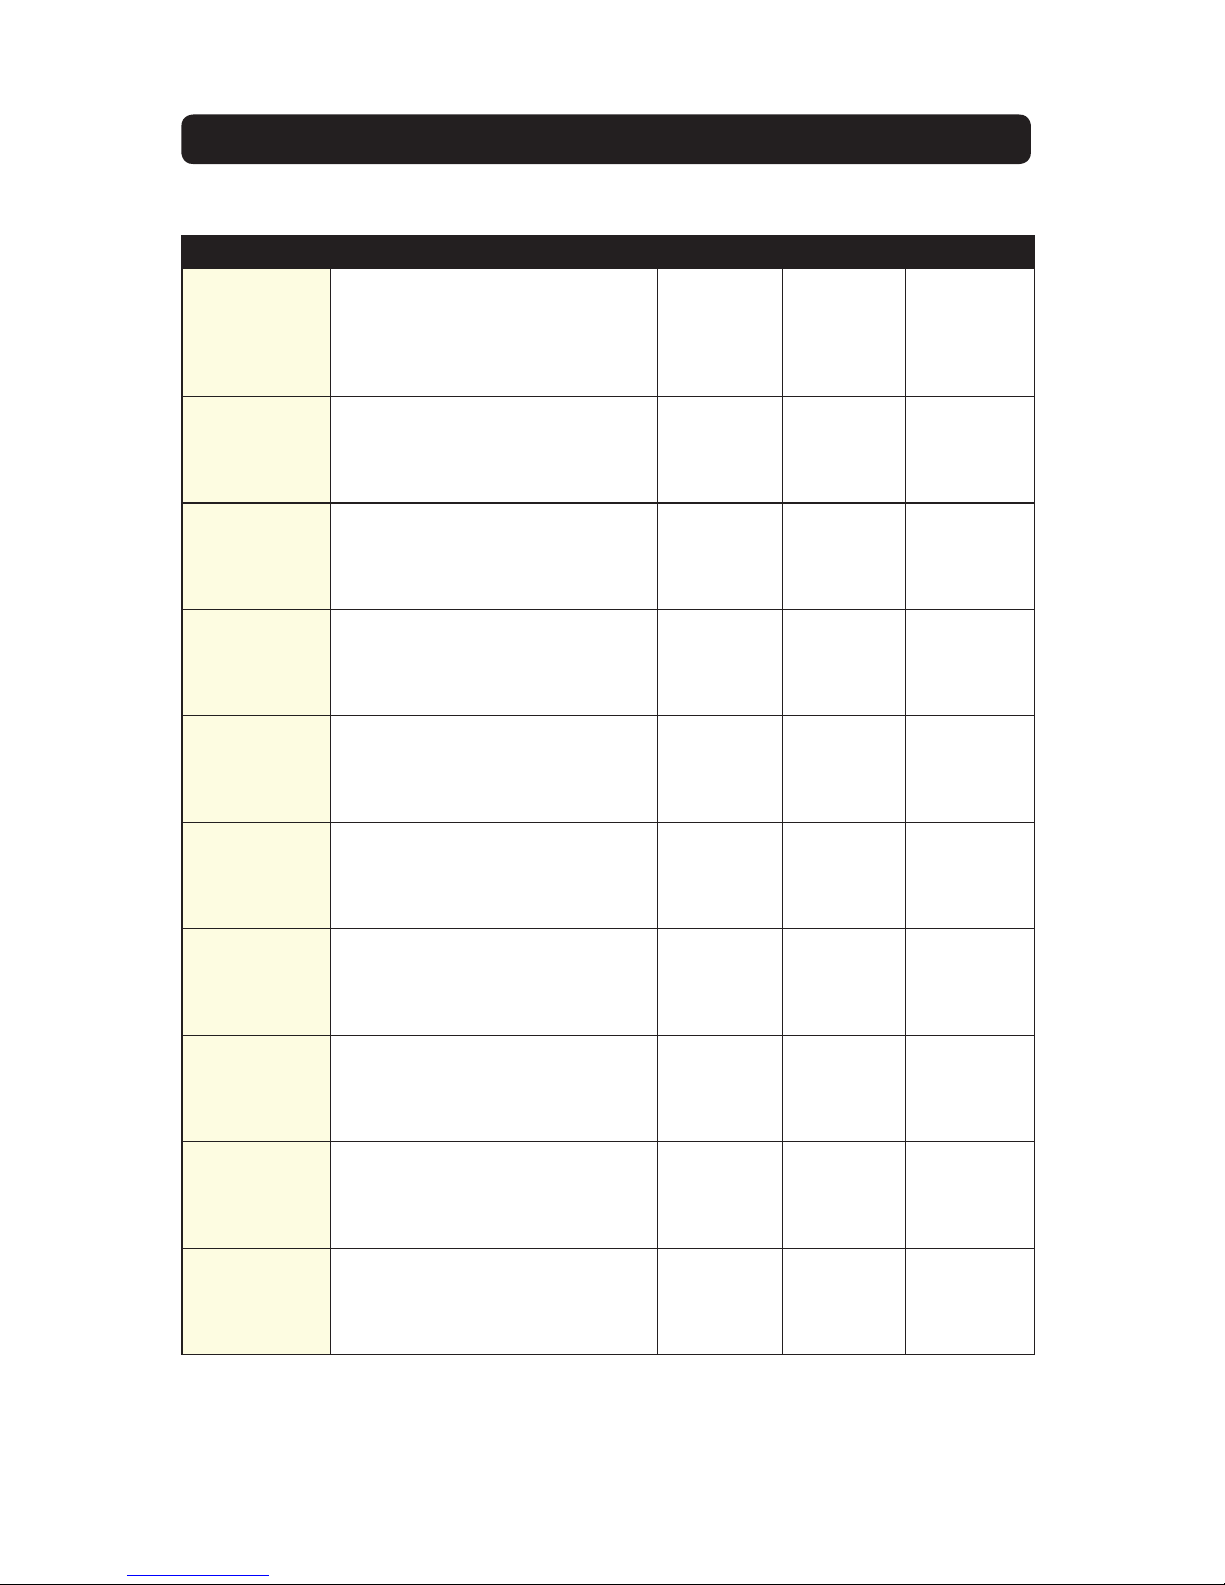
APPENDIX C
12M
Colors,
1024 x 768
pixels
1,000 nits
Technical Specications
Display
Sunlight
Readable
Dimming
Ratio
Video Input
Connectors
8.4”
TFT AM, SVGA, LCD, 256K
Colors. 800 x 600 pixels
1000 nit
700+ nits, Transective, AR/AG
300:1
VGA
VGA Optional Composite x 3 BNC’s
IP68 Fischer High Density to DB-15
JAE to Flying leads DC Input
JAE to DB-9 Touch (optional)
JAE to USB Port (optional)
Sunlight Readable
LED Backlight
1000:1
10.1” 12.1” 15.1”
Optional
XGA
Optional
XGA
Colors,
1024 x 768
pixels
1,000 nits
12M
Consumption
Wide Range
Conditioning
Housing
Mounting
Power
DC Power
Input
Power
Milled Aluminum, Black Anodized,
UV Clear Coat
Panel Mount or RAM Mount
6 Watts Min - 20 Watts Max
6 Watts Min - 15 Watts Max
8-30 VDC
(12, 24, 28 VDC nominal)
Internal Short Circuit Protection
Load Dump Protection
Over Voltage Protection
Reverse Polarity Protection
150-7000-001 27
Page 30
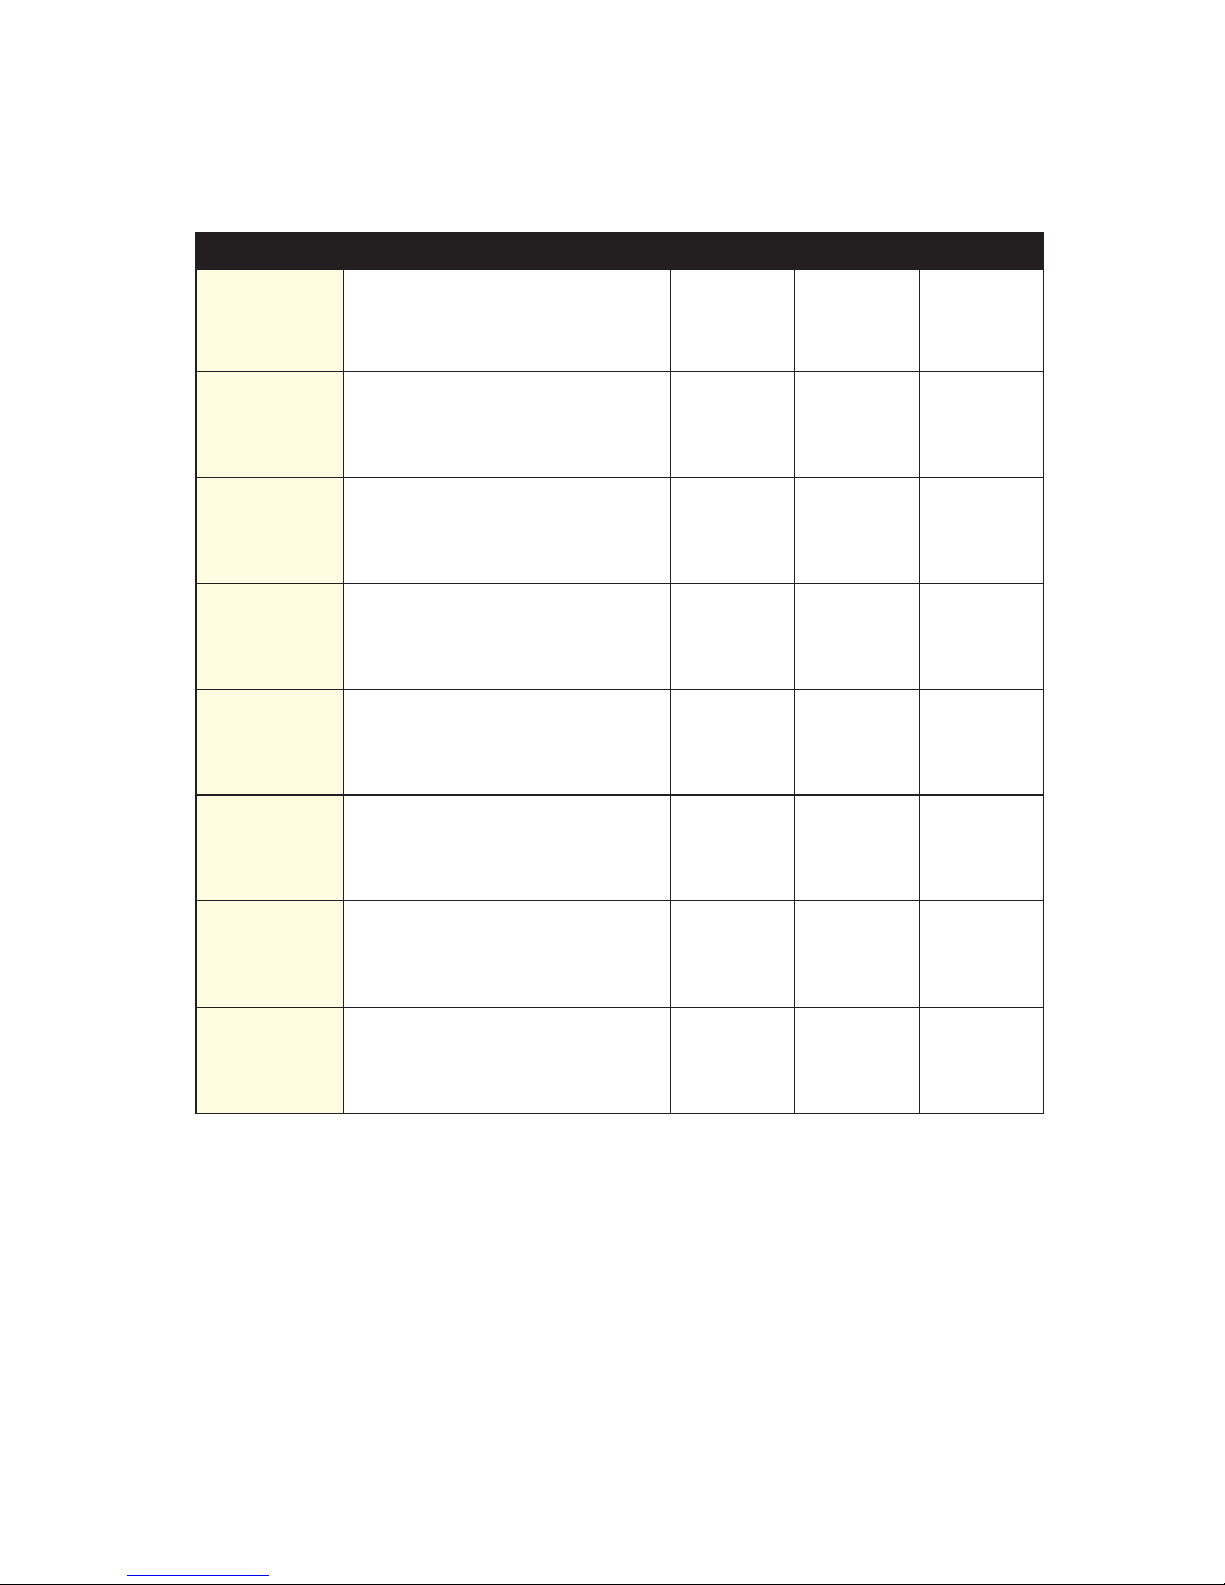
Environmental Specications
Environmental Specications
8.4”
10.1” 12.1” 15.1”
Operating
Temperature
0°C to 60°C (32°F to 140°F)
Operating
Tempature
w/ Internal
Heater
Option
-40°C to 60°C (-40°F to 140°F)
8.4”
Operating
Temperature
Operating
Storage
Tempature
Temperature
w/ Internal
Heater
Option
Shock
Storage
Temperature
Vibration
Shock
IP Rating
Vibration
0°C to 60°C (32°F to 140°F)
-40 to 70 C (-40 F to 158 F)
-40°C to 75°C (-40°F to 167°F)
-40°C to 60°C (-40°F to 140°F)
50 G
-40°C to 75°C (-40°F to 167°F)
5.8 G (5-500 Hz)
50 G
IP67 (NEMA 6P Submersible)
5.8 G (5-500 Hz)
10.1” 12.1” 15.1”
Humidity
IP Rating
EMI
Humidity
Altitude
EMI
Altitude
0-100%
IP67 (NEMA 6P Submersible)
Designed to meet FCC B, CE
0-100%
45,000 ft.
Designed to meet FCC B, CE
45,000 ft.
28 150-7000-001
 Loading...