

Axxion AXX-204 Operating Manual
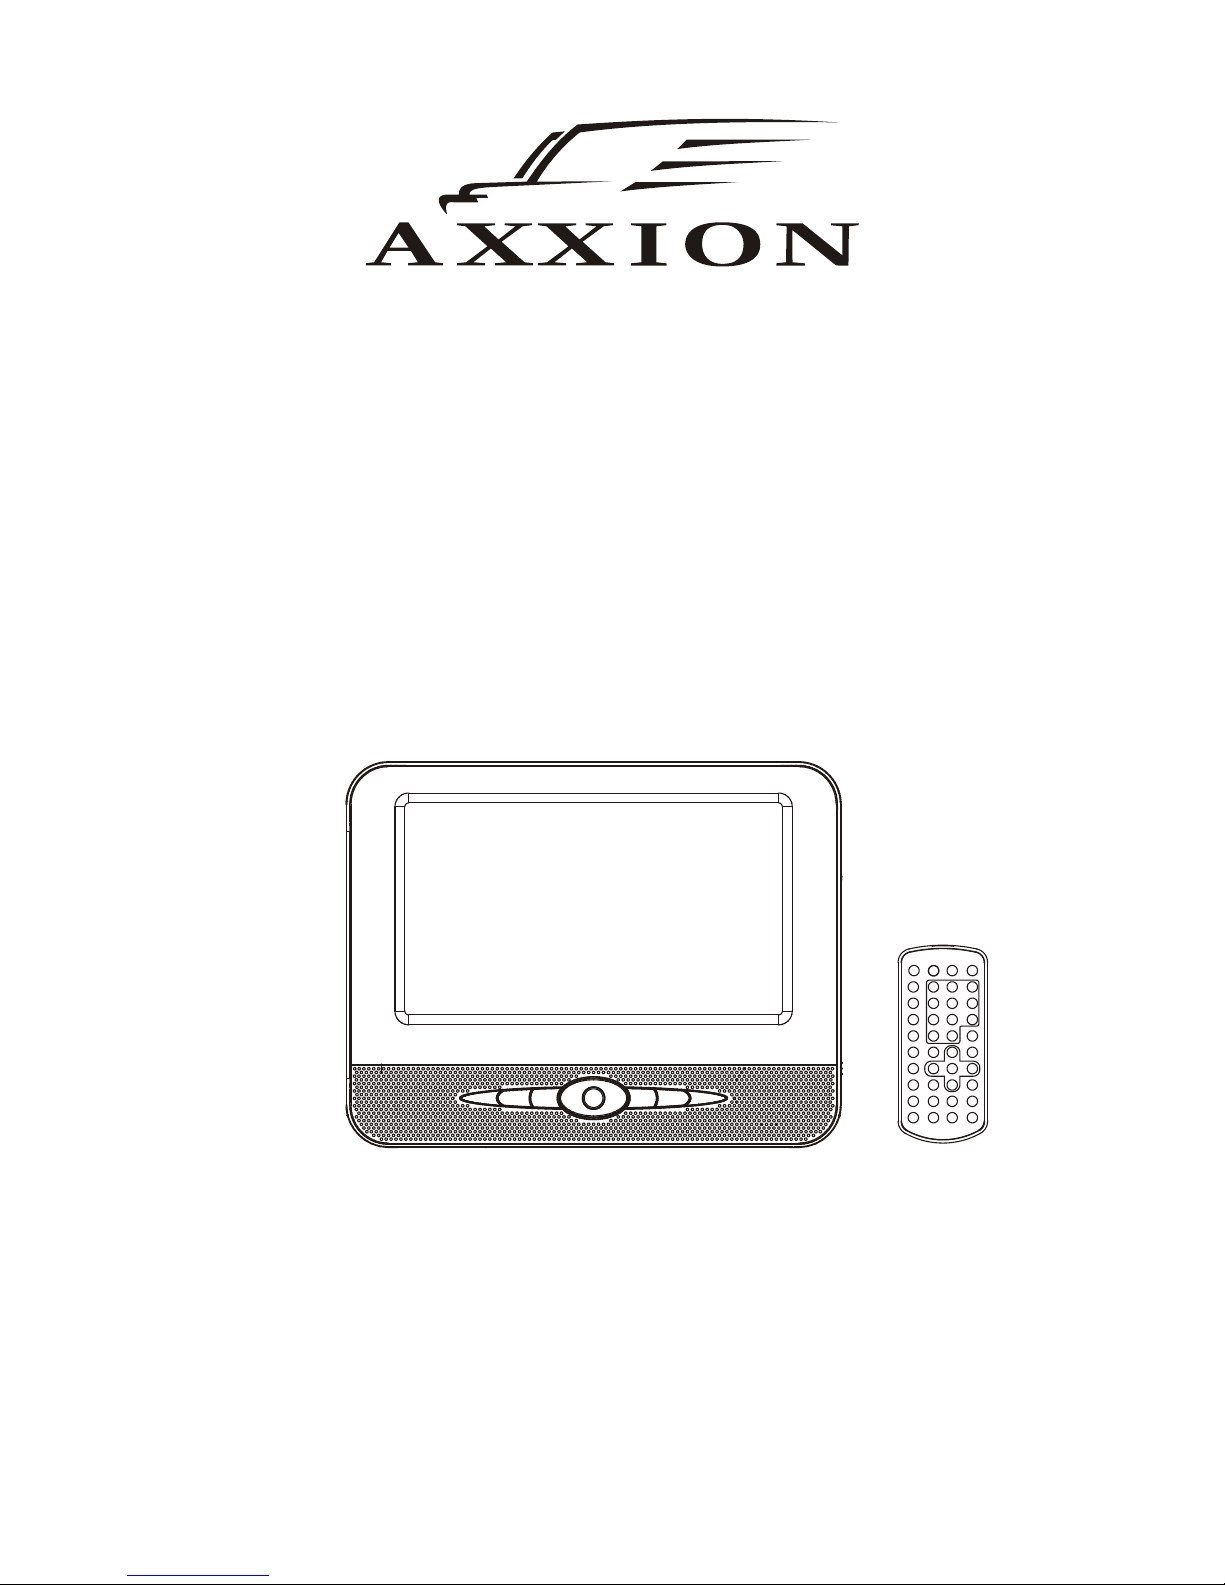
Operating Manual
PORTABLE LCD DVD PLAYER
Model: AXX-204
READ THESE INSTRUCTIONS INCLUDED IN THIS IM THOROUGHLY PRIOR TO CONNECTING AND OPERATING.
PLEASE RETAIN THIS MANUAL IN CASE YOU MAY NEED IT FOR FUTURE REFERENCE.
THE ILLUSTRATIONS & GRAPHICS HEREIN ARE FOR REFERENCE ONLY AND SUBJECT TO CHANGE WITHOUT NOTICE.
For information and support, www.stl.nl/axxion
GB-1
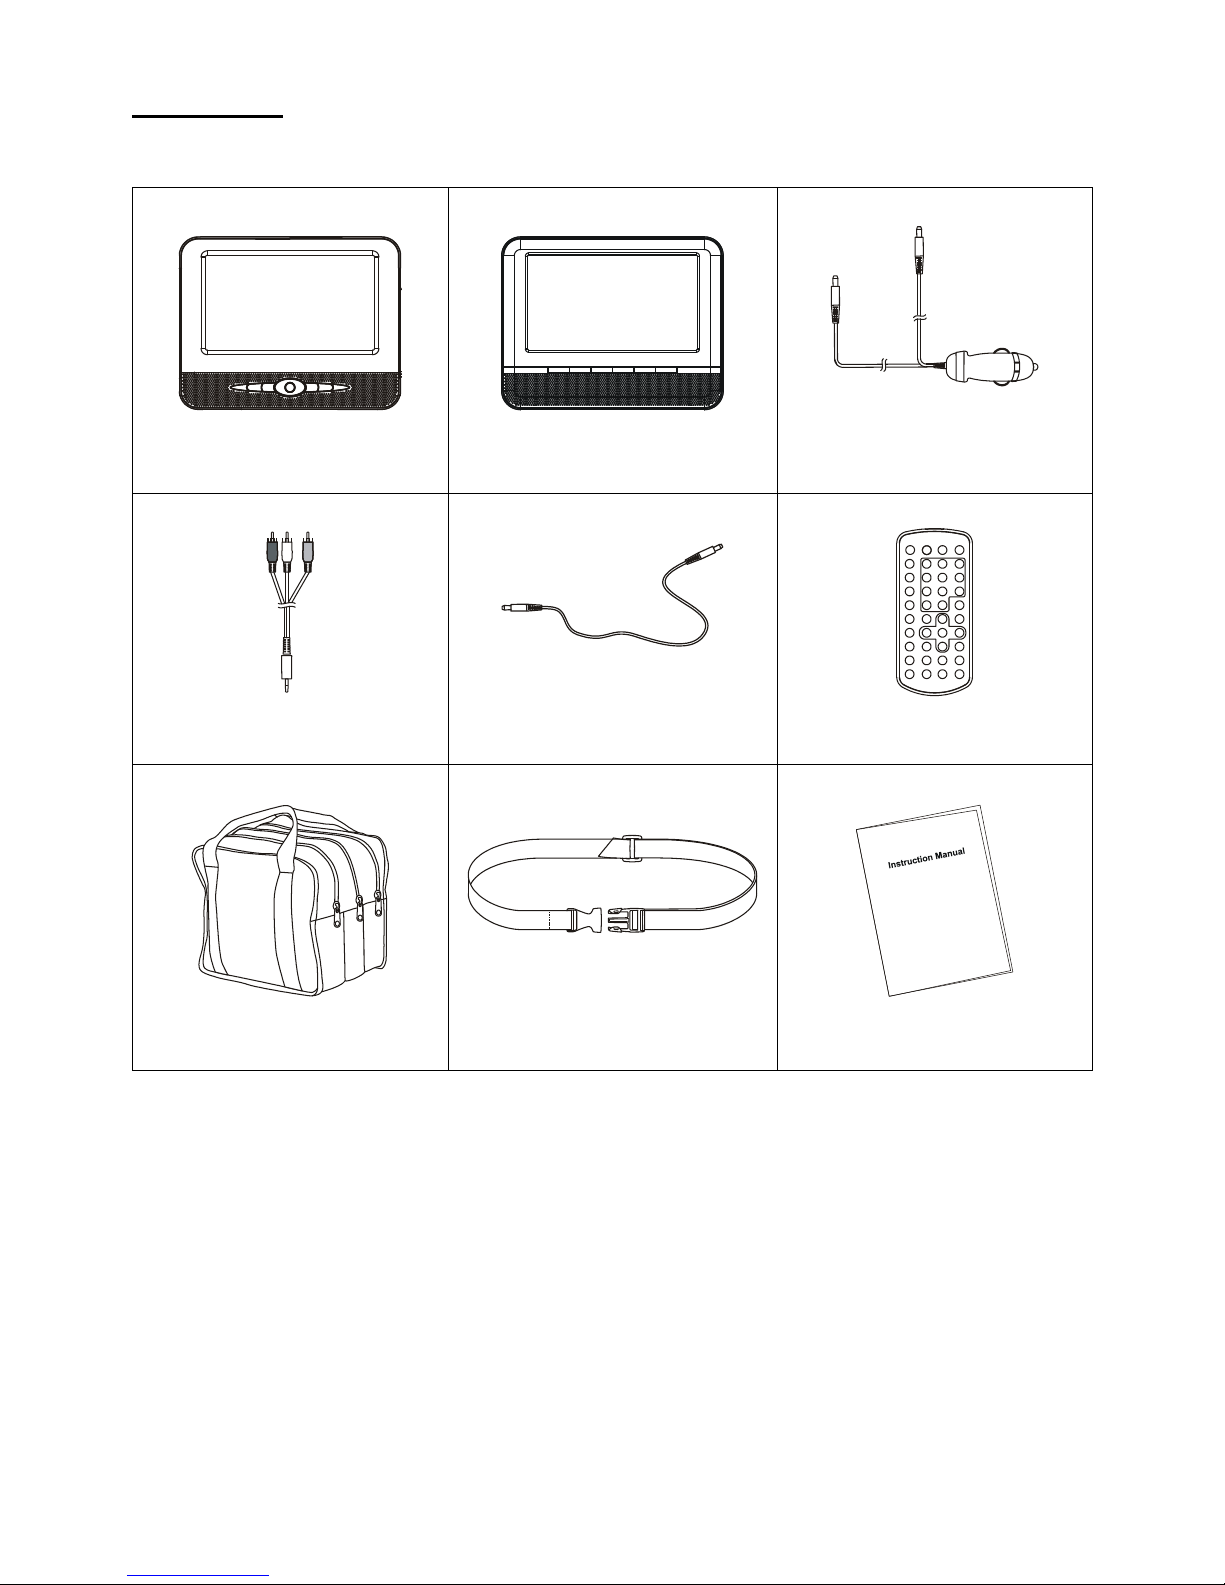
IN THE BOX
You should have the following items in the packaging:
Main Portable DVD player / Screen Unit
1PC
Slave Screen
1PC
Cigarette Lighter Plug
1PC
AV Cable
1PC
Slave Screen Connector Cable
1PC
Remote Control
(with 1 CR2025 battery)
1PC
Carry Bag
1PC
Vehicle Headrest Attachment Strap
1PC
Instruction Manual
1PC
NOTE: THE AXX-204 COMES WITHOUT AN AC ADAPTOR!
Please retain all packaging materials for when the product needs transportation.
GB-2
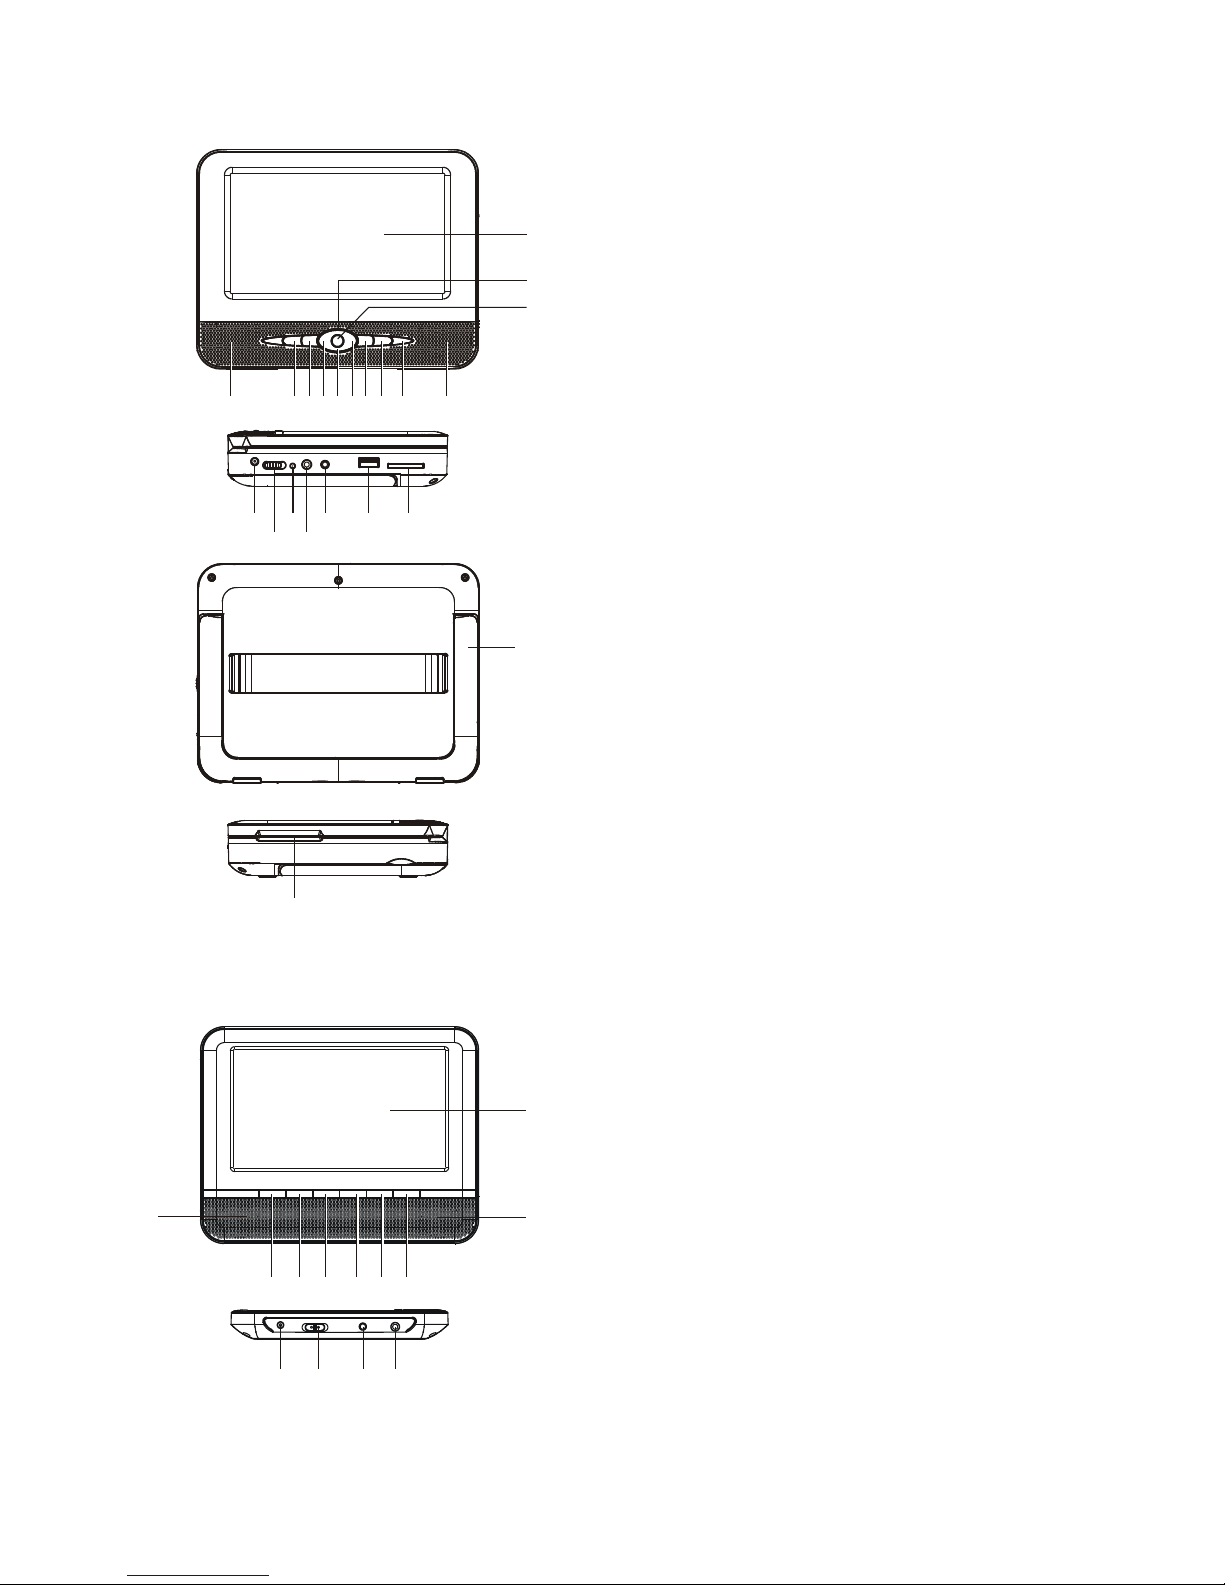
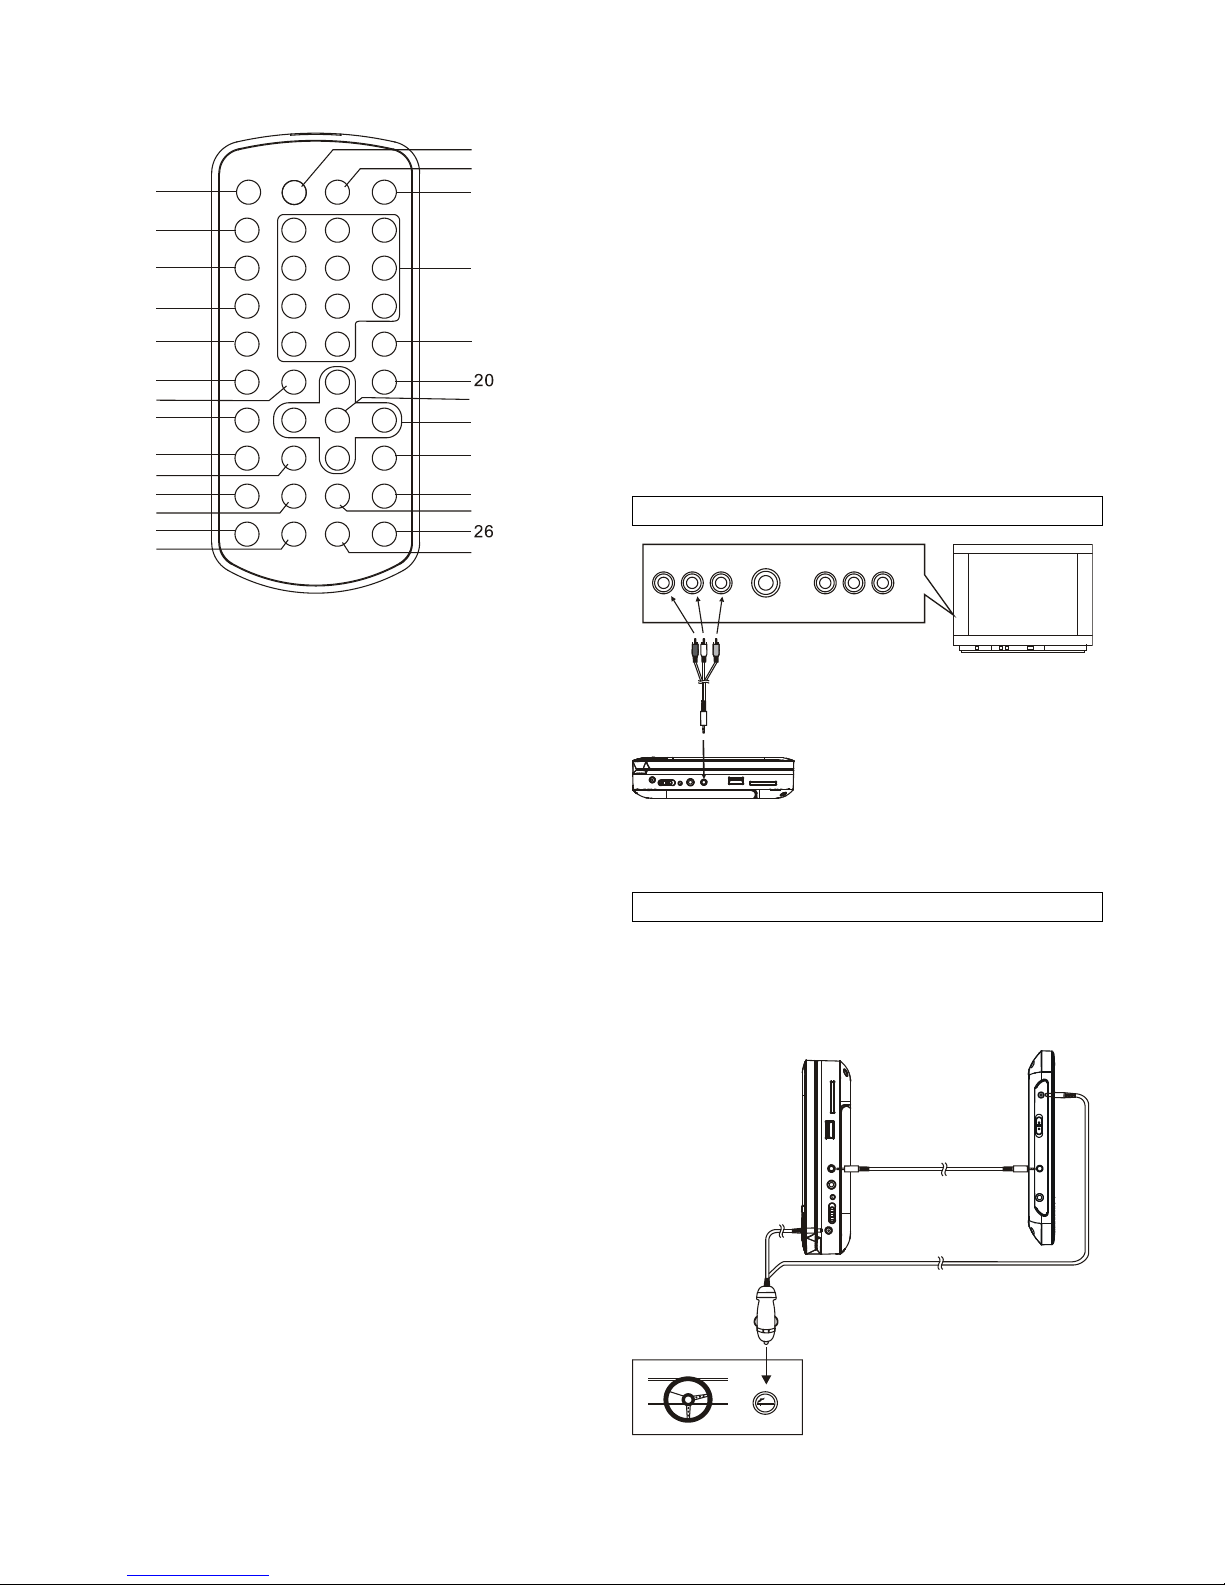
OVERVIEW OF THE DVD PLAYER:
1. SPEAKERS
2. PLAY/PAUSE KEY
3. STOP/USB/CARD KEY
4. VOL-/NAVIGATION LEFT KEY
5. NAVIGATION DOWN KEY
6. VOL+/NAVIGATION RIGHT KEY
7. PREVIOUS/FB KEY
8. NEXT/FF KEY
9. TFT SCREEN
10. NAVIGATION UP KEY
11. OK/SETUP KEY
12. DC IN JACK
13. POWER ON/OFF SWITCH
14. POWER/CHARGE INDICATOR
15. PHONE JACK
16. AV OUT JACK
17. USB PORT
18. SD/MMC CARD SLOT
19. BRACKET
20. DISC COVER OPEN AREA
21. REMOTE SENSOR
SLAVE SCREEN:
1. DISPLAY
2. BRIGHTNESS DOWN KEY
3. BRIGHTNESS UP KEY
4. COLOR DOWN KEY
5. COLOR UP KEY
6. VOL - KEY
7. VOL + KEY
8. DC IN JACK
9. POWER ON/OFF SWITCH
10. AV INPUT JACK
11. PHONE JACK
12. SPEAKERS
19
21
20
1 2 3 4 5 6 7 8
9
10
1
11
1213141516 17 18
1
2 3 4 5 6 7
8 9 10 11
12
12
GB-3
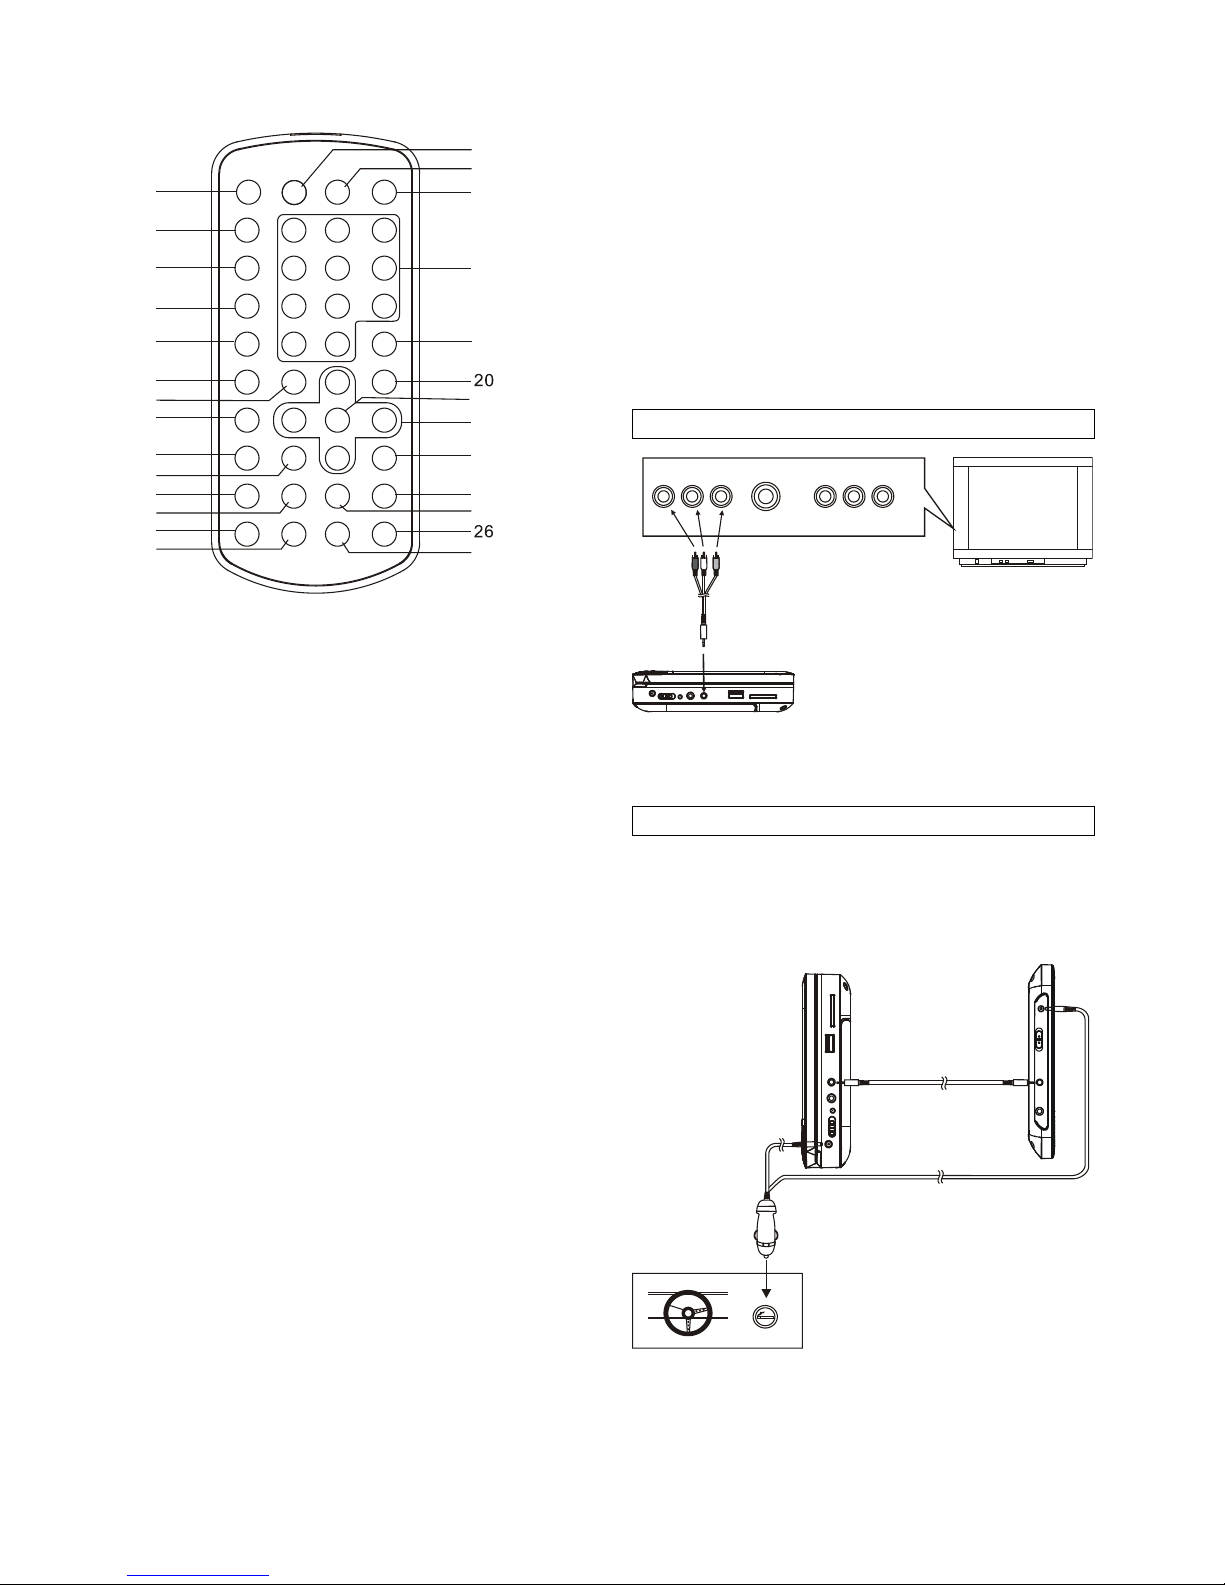
REMOTE CONTROL UNIT
2
3
4
5
6
7
8
9
10
11
12
13
14
15
16
17
18
19
21
22
23
24
25
27
1
1. MUTE button
2. VOLUME+ button
3. VOLUME- button
4. REPEAT 1/ALL&A-B button
5. MENU button
6. SUBTITLE button
7. PLAY button
8. TITLE button
9. AUDIO button
10. PAUSE/STEP button
11. F.BWD button
12. F.FWD button
13. ANGLE button
14. ZOOM button
15. DISPLAY button
16. SETUP button
17. TFT SET button
18. NUMERIC buttons
19. CLEAR button
20. STOP&DVD/SD/USB button
21. ENTER button
22. NAVIGATION buttons
23. SLOW button
24. NEXT button
25. PREVIOUS button
26. SEARCH button
27. PROGRAM button
BASIC CONNECTION
It is recommended to connect a multi-s yste m T V.
Ensure that this player and other equipment to be
connected are set to OFF mode and disconnect the
AC power cords before commencing connection.
Do not block ventilation holes of any of the
equipment and arrange them so that air can circulate
freely.
Read through the instructions before connecting
other equipment.
Ensure that you observe the color coding when
connecting audio, video cables.
Note:
During DVD play, the TV volume may be at a lower
level than during TV broadcasts, etc. If this is the
case, adjust the volume to the desired level.
If the DVD/CD player is connected to the TV through
a video cassette recorder, the picture may not be
played back normally with some DVDs. If this is the
case, do not connect the player via the VCR.
The mother unit of the DVD player is designed to
be used both for indoor and in-car, the slave is
only for in-car usage.
Connecting to a stereo TV set
AUDIO R
AV AUDIO/VIDEO INPUT
AUDIO L
VIDEO IN
S-VIDEO
YUV INPUT
After connection is firmed and securely done, plug AC
adapter (not included) to an applicable wall outlet and
turn on the player.
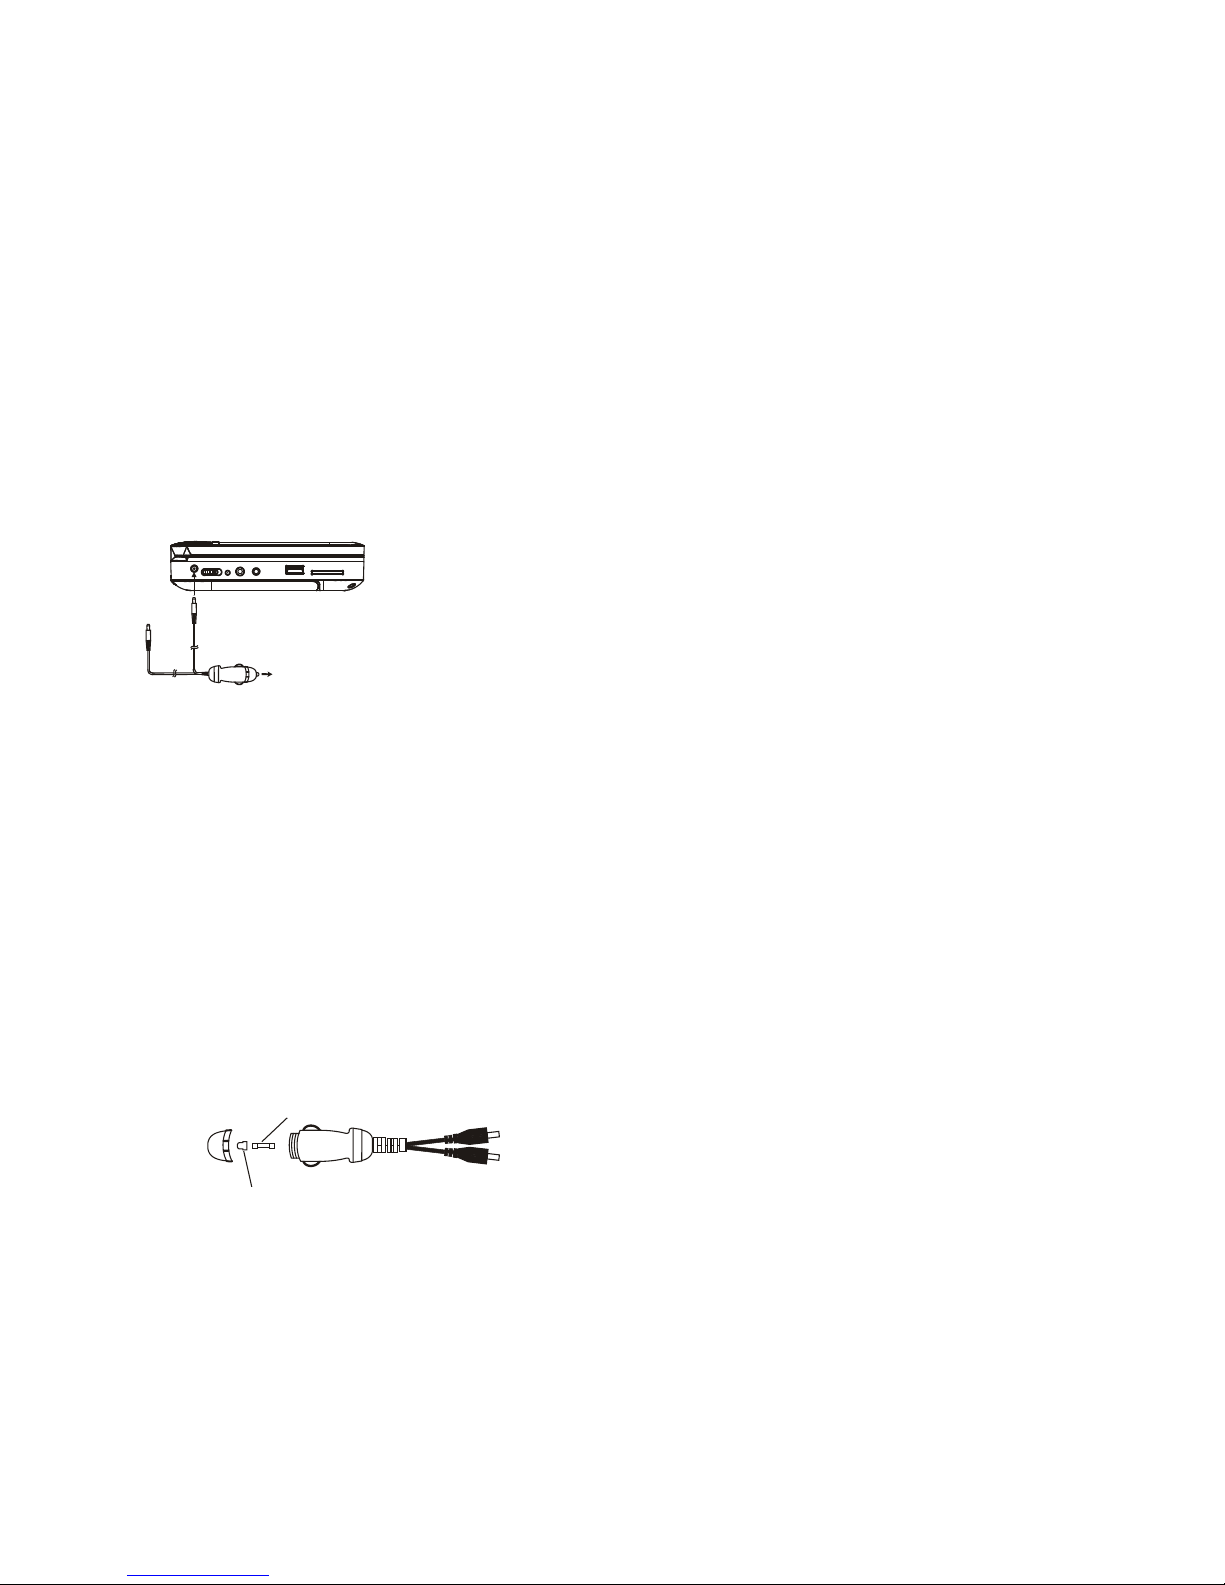
Connecting to an affiliated screen
This unit is equipped with another affiliated screen, you
can use the affiliated screen and player to appreciate
the programme at the same time, the connecting
method is illustrated as below using the in car adapter.
A/V cable
TV set
To the cigarette lighter socket
Slave screen
connector
GB-4
CHARGE THE BUILT-IN BATTERY
The player is with a rechargeable lithium battery. Before
using the battery, please make sure it is charged. If not,
charge it first. Slide the power switch to OFF position
and then connect one end of the AC adapter (not
included) to the wall outlet and the other end to the unit
for charging the built-in battery.
Note:
1. The battery only could be charged at powering off
mode.
2. If the unit is not in use for a prolonged period of time,
it is recommendable to charge the built-in battery
each three months.
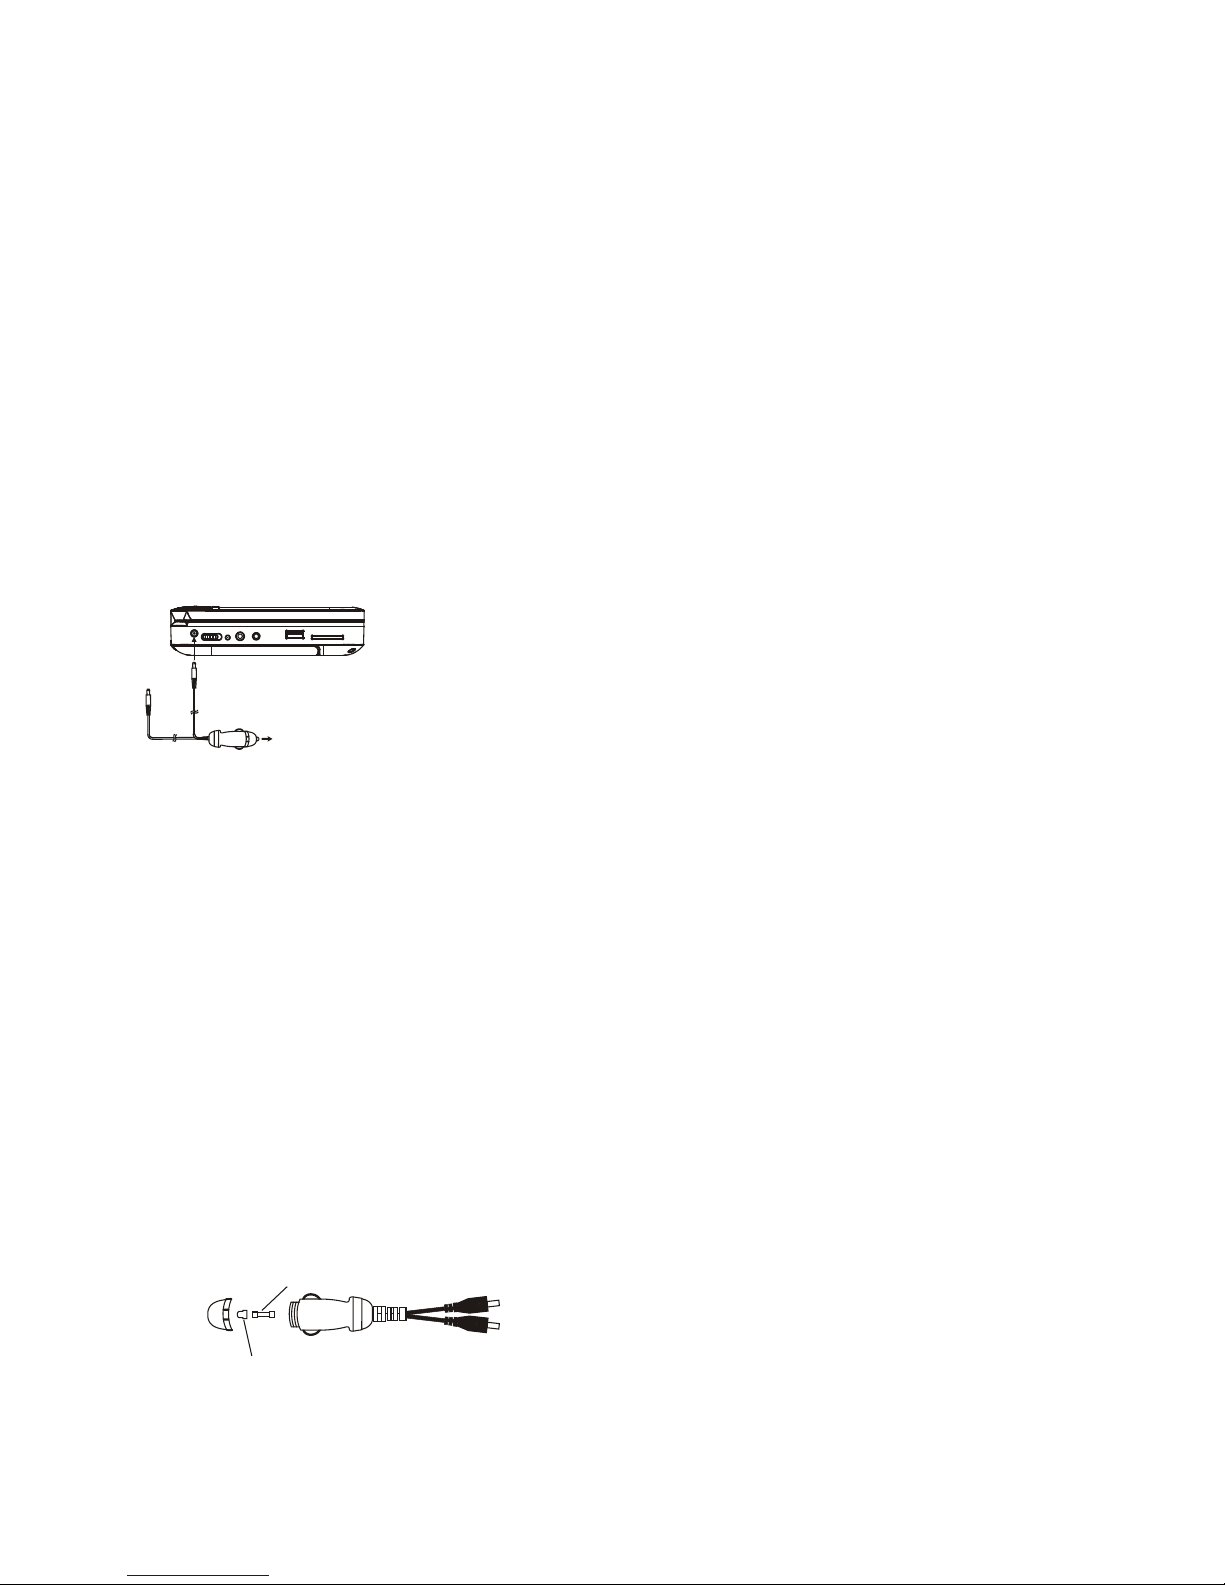
CONNECTING TO A CAR ADAPTOR
The car power adaptor is designed for use with vehicles
that have a 12V, negative ground electrical system.
WARNING:
Disconnect the car power adaptor when not in use. Not
in use in 24V vehicles.
CAUTIONS:
Use the unit only with the recommended car power
adaptor, use with other car power adaptor might
damage the unit.
The recommended car power adaptor is for use with
this unit only. Do not use it with other equipment.
In the interests of road traffic safety, do not operate
the unit or view video software while driving a vehicle.
Make sure the unit is fastened securely to prevent
from moving outside of the vehicle in an accident.
When the inside of the cigarette lighter socket is dirty
with ashes or dust, the plug section may become hot
due to poor contact. Be sure to clean the cigarette
lighter socket before use.
After use, disconnect the car power adaptor from
both the unit and cigarette lighter socket.
FUSE REPLACEMENT
FUSE
POSITIVE (+) CAP
NOTE: Don't throw out the positive (+) cap when
replace the fuse.
OPERATIONS
PRE PA R AT ION
Power on the TV set and select video input mode.
Power on the audio system which is connected to the
player.
GET STARTED
1. Slide POWER switch to turn on the player.
2. Open the disc tray by hand.
3. Place a disc onto the disc tray.
4. Close the disc tray by hand and the playback starts
automatically.
5. When a menu screen appears on the TV, press the
navigation buttons or press the numeric buttons to
select a preferred track number, then press
OK/ENTER button to start playback.
Note: If not any operation in about FOUR hours during
playback, the unit will be switched off. Before switching
off the unit, alert information shows on the screen for
warning. Press any button to continue operating while
the alert information is showing. If the unit is powered
off automatically, it is necessary to slide the POWER
SWITCH to OFF position first, and then slide the
POWER SWITCH to ON position to power on the unit
again.
ADJUST THE VOLUME
Press the VOLUME+/- button on the remote or press
and hold the VOLUME+/- button on the unit to increase
or reduce the volume.
MUTE
While the power is on, the audio output of the main unit
is to be shut off by pressing the button. Press it again to
resume sound output.
SKIP AHEAD OR BACK
Press PREVIOUS button during play to skip previous
chapter (DVD) or a track (CD), Press NEXT button
during play to skip next chapter (DVD) or a track (CD).
COLOR AND BRIGHTNESS ADJUSTMENT (FOR
THE LCD SCREEN)
Press TFT SET button on the remote repeatedly to
adjust the color intensity and brightness respectively
via navigation left/right button.
Press and hold this button for a moment to turn on or off
the TFT display.
RAPID ADVANCE/REVERSE
During playback, press and hold FF button or FB button
on the unit or press F.FWD or F.BWD button on the
remote respectively to scan the disc forward or
backward at X2, X4, X8, X20 normal speed.
Press PLAY button to resume normal play.
PAUSE/STEP PLAY
Press PAUSE/STEP button during playback to pause.
During pause mode, each time the PAUSE/STEP
button is pressed, the player will only play one frame; to
resume normal play, press PLAY button.
STOP PL AY BA C K
Press STOP button during playback to stop playback;
the player activates its resume function when STOP is
pressed in STOP mode; press PLAY button again,
playback resumes at the point it stopped previously;
open the disc tray or press the STOP button one more
time to clear the resume function.
SLOW-MOTION PLAY (DVD)
Press SLOW button during playback, the disc will be
played at 1/2 normal speed at first, each time this
button is pressed, the play speed becomes slower
To the cigarette lighter socket

GB-5
(down to 1/7 normal speed.)
Press PLAY button, normal play will resume.
REP EAT
Press REPEAT 1/ALL&A-B button during play, it will
repeat play one chapter/title or repeat all (for DVD disc),
or repeat play a track or all tracks (for CD), or repeat
the sections between two specific points (A-B).
SEARCH FOR PREFERRED SCENE
1. Press SEARCH button during play and highlight the
item to be played (Title, Chapter, or Chapter time) by
navigation buttons.
2. Input the desired number or time via the numeric
buttons.
3. Press OK/ENTER button to confirm and the playback
from the located scene starts.
4. To exit search menu, press SEARCH button directly.
PROGRAM PLAY (UP TO 16 MEMORIES)
1. Press PROGRAM during playback to display the
program menu.
2. Select location(s) to be memorized via navigation
buttons and then enter desired Titles/Chapters
numbers via numeric buttons.
Example: Track 3, press "3"
Track 12, press "+10" and then "2"
Track 21, press "+10" twice and then "1"
3. To start programmed playback, select PLAY on the
menu; pressing PROGRAM button again to exit
programming.
4. To clear a programmed item, enter program menu
and scroll to the item you want to clear, press
CLEAR button on the remote to clear the selected
item. To clear all items, select the <CLEAR> on the
menu, and then press OK button to confirm.
5. You can also cancel program mode by clearing all
the items in the program menu.
ZO OM PL AY
Press ZOOM button continuously to zoom in the picture
by 2, 3, and 4 times, zoom out by 1/2, 1/3, 1/4 normal
size.
Press this button once more when the picture is at 1/4
size to return to the normal size display.
Scroll to view the enlarged picture using Navigation
buttons.
ON SCREEN DISPLAY INFORMATION
When the player is in operation, press DISPLAY button
continuously, the screen will display parts of information
(current disc type, title number, chapter number,
playtime, audio language, audio type, subtitle language
and multi angle, etc) in a sequence.
CHANGING AUDIO SOUNDTRACK LANGUAGE
(DVD DISC)
It is possible to change the audio soundtrack language
to a different language from the one selected at the
initial settings (This operation works only with discs on
which multiple audio soundtrack languages are
recorded).
Press AUDIO button during DVD disc play, the sound
track will be changed with a selected sound track
showing on the screen.
NOTE: When no soundtrack languages are recorded,
pressing this button will not work.
MULTI-ANGLE VIEWING (DVD ONLY)
Press ANGLE button to select your desired angle to
view the scene.
Note: only the DVDs shot with multi-angle scenes have
this function.
CHANGING SUBTITLE LANGUAGE (DVD ONLY)
Press SUBTITLE button several times during DVD
playback, the subtitle language will be changed with the
selected subtitle language showing on the screen;
When the desired language appears, release the
button to view the subtitle in that language.
Note: this function only works on the DVDs recorded
with multi-language subtitles.
RETURN TO MAIN MENU AND PLAY THE TITLE
(DVD)
During playback, press MENU button to return to main
menu and press TITLE button to play the title.
MP3/MPEG 4 PLAYBACK
1. Load the MP3/MPEG 4 disc onto the disc tray. A
media menu shows on the screen, select a
corresponding media type (music, picture, video) to
play the disc with navigation left/right button and
press OK/ENTER Button to confirm. Then the TV
screen will show folders of the selected format on the
disc.
2. Select the folder you want by the navigation buttons
and then press OK/ENTER button to confirm.
3. The files in this folder are displayed and select your
favourable track via navigation buttons and press ok
button to start playback.
4. Press NEXT and PREVIOUS button to select track
directly.
5. Press REPEAT1/ALL&A-B button change play mode.
KODAK PICTURE CD / JPEG CD PLAYBACK
Load a Kodak picture CD/JPEG CD disc onto the disc
tray, then select the picture option on the media menu
to play the disc with navigation left/right button and
press OK/ENTER Button to confirm.
Slide show of Kodak Picture CD begins automatically;
Folders of JPEG picture CD are displayed on the TV
screen; use the navigation buttons on the remote to
select the desired folder and then press OK/ENTER
button to confirm.
The files in this folder are displayed and you can select
your favourable pictures using the up/down navigation
buttons on the remote and press OK/ENTER button to
start playback.
Preview of the picture and the corresponding
information of the picture( resolution, size, date) will be
displayed while you scroll across the file names.
KODAK PICTURE CD / JPEG CD OPERATIONS
1. PLAY MODES
Press REPEAT 1/ALL&A-B button to change play
mode.
During playback, press STOP to enter preview mode.
2. SKIP TO NEXT/PREVIOUS PICTURE
Press NEXT button to skip to the next picture or
PREVIOUS button to the previous picture.

GB-6
3. PICTURE ROTATIONS
Press RIGHT and LEFT navigation buttons to rotate the
picture Clockwise and anti-clockwise respectively.
4. PICTURE FLIP AND TURN
Press UP navigation button to flip the picture up or
down.
Press DOWN navigation button to flip the picture left or
right.
5. PICTURE ZOOM IN/OUT
Press ZOOM button continuously, the picture zooms in
by 2, 3, 4 times or zooms out by 1/2, 1/3, 1/4 the
original size.
Press this button once more when the picture getting
1/4 size to return to the normal play.
If the picture is enlarged, you may use the navigation
buttons to view blocked parts of the picture.
6. SLIDE SHOW TRANSITION MODES
During slide show playback, press the PROGRAM
button cyclically to select one slide show transition
effect to play picture.
EXTERNAL MEMORY MEDIA OPERATION
(USB&SD/MMC CARD)
Prepare the player for External Memory media
operation
1. Slide the POWER switch to ON position, Insert a
USB data traveller filled with media files into the USB
port or plug the SD/MMC card into the card slot, the
USB or the SD/MMC card is successfully detected
and read. A media menu shows on the screen, select
a corresponding media type via navigation right/left
button for play the inserted card or USB and press
OK/ENTER Button to confirm. Folders show on the
screen and use navigation buttons to select your
desired folder and track to play.
2. Press NEXT or PREVIOUS button to skip forward or
backward.
Note: Press and hold STOP button to call out the
source menu and make selection among USB, card
and disc via navigation RIGHT/LEFT button, press
OK/ENTER button to enter the selected mode.
CAUTION: To avoid electronic static discharge, don't
touch the USB port and card slot during playback.
INITIAL SETTINGS
Initial settings page is for you to make your preferred
settings up for your player. Once the initial settings are
done they are retained in the CPU of the player until
otherwise modified.
COMMON PROCEDURES FOR INITIAL SETTINGS
1. Press SETUP button on the remote or press and
hold OK/SETUP button on the unit to enter the setup
menu.
2. Use the navigation buttons to select the item you
want to modify, setting page with further setting items
displayed shows on the TV screen. Again use
navigation buttons to make changes. Press
OK/ENTER button to confirm modifications.
3. Use navigation buttons to switch to another setting
on the main setting page.
4. Press SETUP button on the remote or press and
hold OK/SETUP button on the unit to exit main
setting page.
1. SYSTEM SETUP
1.1 TV SYSTEM - it is used to select the TV mode.
Please select this option as per your TV set.
1.2 SCREEN SAVER - when the player is not in used
for several minutes, a running DVD logo will move
across the TV screen to protect the TV screen.
Options: On: Screen saver is enabled
Off: Screen saver is disabled
1.3 TV TYPE - it is used to select the TV scan mode,
please set as per your TV set.
Options: 4:3PS : Normal Pan & scan mode
4:3LB : normal Letter box mode
16:9 : 16:9 wide screen mode
1.4 PASSWORD - input password to unlock the system.
The steps are as follows:
1.4.1 Enter SYSTEM SETUP, select the PASSWORD
item by scrolling the down navigation button, and then
press the right navigation button to select the input box.
1.4.2 Input user's password "0000" to unlock it, in this
case, select the input box again to change the
password by inputting another new four numeric
numbers and then press ENTER/OK button to confirm.
When the password is changed, you are needed to
input the new one to unlock the system.
1.4.3 Once you forget your own password, use the
supervisor's password "8200" to unlock it.
NOTE: If wrong password was input in unlock status,
the system will lock.
1.5 RATING - Set the rating of this player. If you want to
change the rating of parental lock, please input the
password to unlock first.
Options: 1 KID SAFE / 2 G / 3 PG / 4 PG 13 / 5 PG-R /
6R / 7 NC-17 / 8 ADULT
1.6 DEFAULT - Reset to factory settings.
Options: RESTORE
2. LANGUAGE SETUP
2.1 OSD LANGUAGE - It is used to select different On
Screen Display language for different user.
2.2 AUDIO LANG - select preferred audio language.
(DVD only, need disc software support)
2.3 SUBTITLE LANG - Select preferred subtitle
language.
(DVD only, need disc software support)
2.4 MENU LANG - Select preferred disc menu
language.
(DVD only, need disc software support)
3. VIDEO SETUP
3.1 BRIGHTNESS - to set the brightness for the
display.
Options: 0/2/4/6/8/10/12
3.2 CONTRAST - to set the contrast effect for display.
Options: 0/2/4/6/8/10/12
3.3 HUE - to set the colour impression for display.
Options: -6/-4/-2/0/+2/+4/+6
3.4 SAT UR ATI ON - to set the saturation level for
display.
Options: 0/2/4/6/8/10/12
4. SPEAKER SETUP
4.1 DOWNMIX
Options: LT/RT - Left/Right mix mode
STEREO - Select this option if you don't have
a 5.1 channels amplifier.
GB-7
DISC HANDLING PRECAUTIONS
Hold the disc by the edge so the surface will not be soiled with finger prints. Finger prints, dirt and
scratches can cause skipping and distortion.
Do not write on the label side with a ball-point pen or other writing utensils.
Do not apply benzine, thinner, and liquid that prevents against static electricity.
Be careful not to drop or bend the disc.
Install only one disc on the disc tray.
Do not try to close the disc tray when the disc is not installed properly.
Be sure to store the disc in its case when not in use.
TROUBLESHOOTING
If your DVD player does not seem to be functioning properly, check the items below before you contact an
authorized service center.
Symptom
Check
Power does not turn on
or suddenly turns off.
Make sure the adapter is securely plugged in.
Turn the power off and then back on.
Battery pack is in place
but the power does not
turn on or suddenly turns
off.
Check that the battery pack is charged. If not, recharge it.
Remote control won't
work
Check that the battery is inserted in the "+" and "-" direction properly.
The battery may be flat. Replace it with a new one.
Check that the signal transmission is directed at the remote control sensor on the
DVD player.
Remove the obstacle between the remote controller and remote control sensor.
No picture or sound Check that the A/V cables are securely connected.
Check that the disc is a DVD, DVD-RW or AUDIO CD.
Do not use a disc that has scratches or dirt.
Check that the label-side of the disc is facing up.
The pick-up lens of the DVD player may be dirty. Contact the service center for lens
cleaning.
Check that the TV channel is set to VIDEO or AV if viewing with a TV.
No picture
Check that the LCD display is turned on.
No sound
Check the volume setting. If set to zero, turn up volume level.
Check that the headphones are plugged into the PHONES socket. Speakers cannot
be used with the headphones.
No picture and sound
Check that the battery is properly installed and the adapter is properly connected.
Distorted video or sound
Use a disc without scratches or dents.
IMPORTANT SAFETY INSTRUCTIONS
The apparatus shall not be exposed to dripping or splashing and that no objects filled with liquids, such as vases,
shall be placed on the apparatus.
When the AC/DC adapter is used as the disconnect device, the disconnect device shall remain readily operable.
To be completely disconnected the power input, the AC/DC adapter shall be disconnected from the mains
completely.
No naked flame sources, such as lighted candles, should be placed on the apparatus.
Minimum distances 2.0cm around the apparatus for sufficient ventilation. The ventilation should not be impeded by
covering the ventilation openings with items, such as newspapers, table-cloths, curtains, etc.
The use of apparatus is in tropical and/or moderate climates.
Attention should be drawn to the environmental aspects of battery disposal.
CAUTION: Danger of explosion if battery is incorrectly replaced. Replace only with the same or equivalent type.
Battery shall not be exposed to excessive heat such as sunshine, fire or the like.
Excessive sound pressure from earphones and headphones can cause hearing loss.
The marking plate is located at the back of the apparatus.

GB-8
SPECIFICATIONS
Power source: AC adaptor 9V (not included)
Car adaptor 12V
Power consumption: 9.5W (Main unit)
16.5W (Main unit & Slave screen)
TV systems supported: PAL/NTSC/AUTO
Operating Temperature Range: +5°C to +35°C
Continuous playing time: 120 minutes
Dimensions: 200.4(L) x 156.2(W) x 39(H) mm (main unit)
200(L) x 156(W) x 21(H) mm (Slave screen)
Operating Humidity Range: 10 % to 75 %
Battery of Remote Control: CR2025, 3V
Discs supported:
1. DVD-VIDEO disc
12 cm single-sided, single-layer
12 cm single-sided, dual-layer
12 cm double-sided, single-layer
8 cm single-sided, single-layer
8 cm single-sided, dual-layer
8 cm double-sided, single-layer
2. CD-DA/CD-R/CD-RW /MP3-CD/MP4
12cm disc
8cm disc
Audio signal output:
1. DVD (linear audio)
(1) Frequency response: 20Hz - 20KHz (48KHz sampling) & 20Hz-20KHz (96KHz sampling)
(2) S/N ratio: > 45dB
(3) Dynamic range: 90dB
2. CD audio:
(1) Frequency response: 20Hz - 20KHz
(2) S/N ratio: > 45dB
(3) Dynamic range: 90dB
Specifications are subject to change without notice.
If at any time in the future you should need to dispose of this product please note that: Waste electrical
products should not be disposed of with household waste. Please recycle where facilities exist. Check
with your Local Authority or retailer for recycling advice.
(Waste Electrical and Electronic Equipment Directive)
GB-9
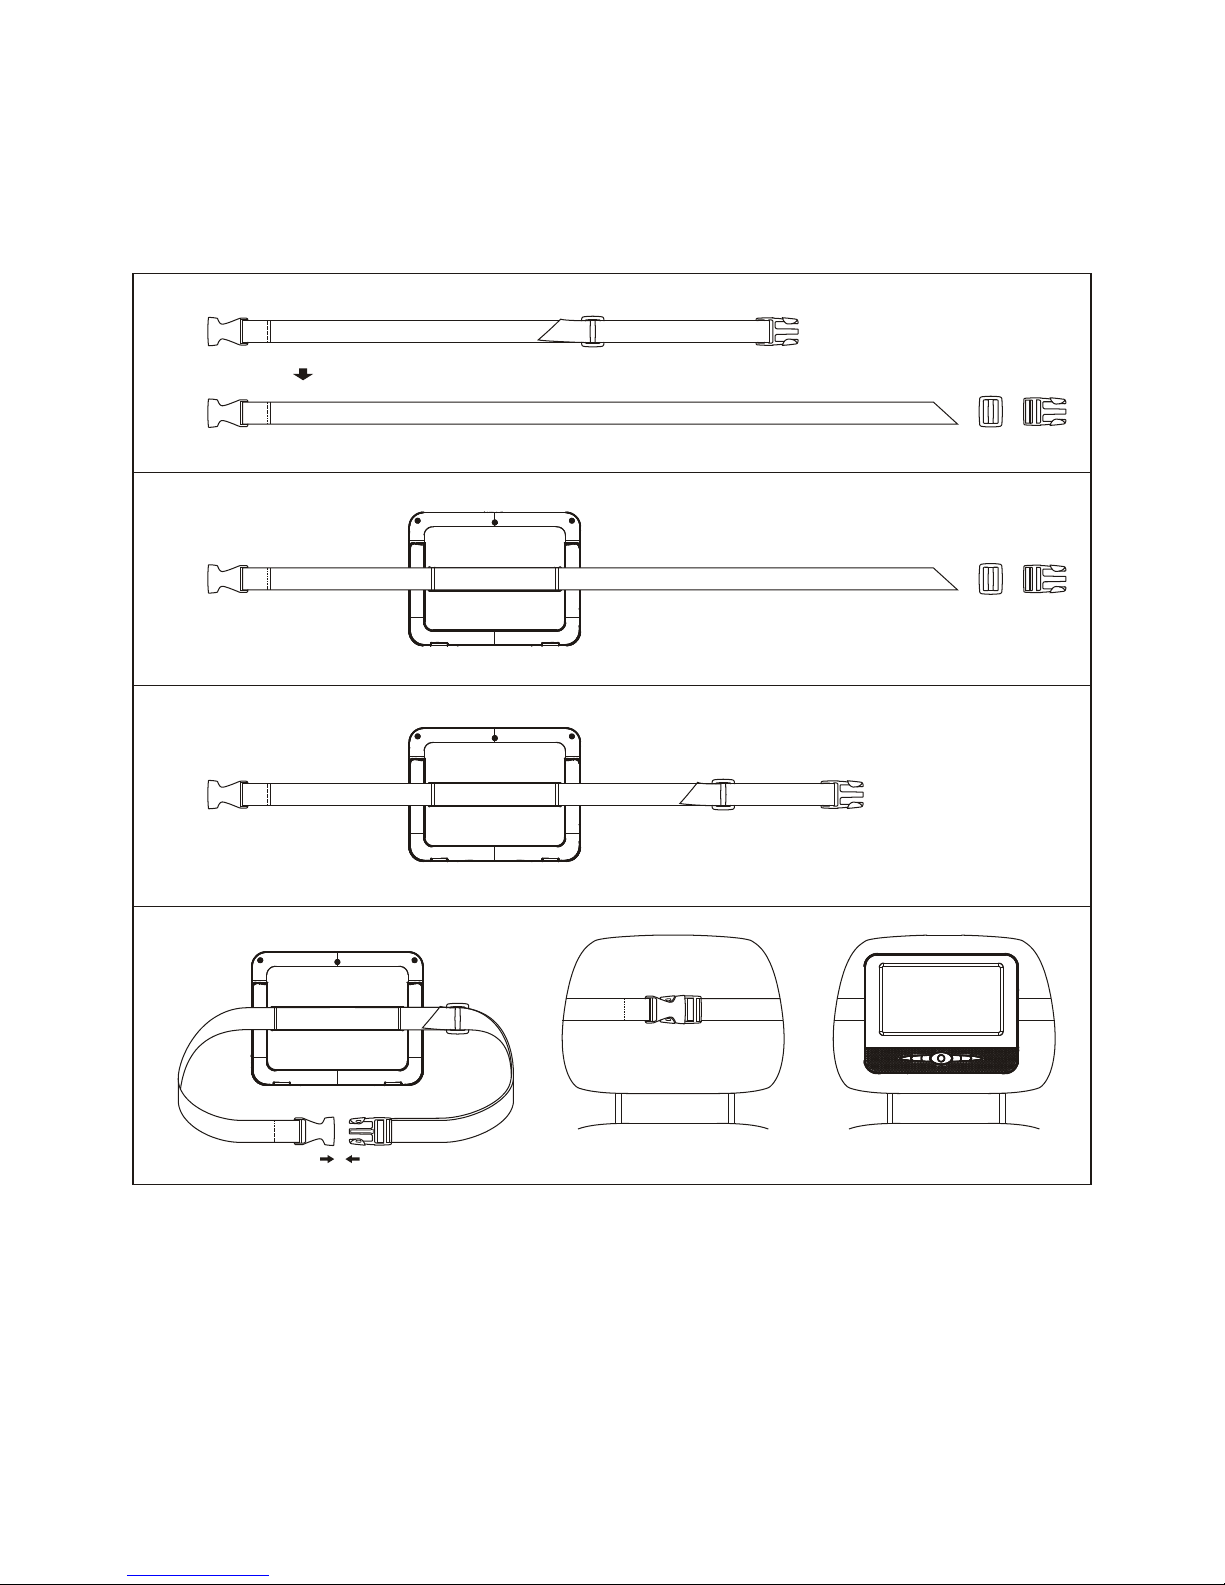
INSTALLATION OF THE PORTABLE DVD PLAYER IN A VEHICLE
There is a strap with plastic buckles contained in the package.
1. Remove the latch and the buckle off the strap as the diagram.
2. Reverse the unit and pass the strap through the metal bars.
3. Put the strap through the latch and the buckle. And then pass the strap through the latch again, pull the strap at
two opposite directions.
4. Buckle the two ends of the strap and adjust the length to fix the unit on the headrest.
1
2
3
4
Manual de instrucciones
REPRODUCTOR DE DVD LCD PORTÁTIL
Modelo: AXX-204
LEA LAS INSTRUCCIONES INCLUIDAS EN ESTE MANUAL ANTES DE REALIZAR LAS CONEXIONES Y DE USAR EL APARATO.
CONSERVE ESTE MANUAL PARA FUTURAS REFERENCIAS.
LAS ILUSTRACIONES Y GRÁFICOS AQUÍ CONTENIDOS SON SOLO PARA SU REFERENCIA Y ESTÁN SUJETOS A CABIOS SIN
NOTIFICACIÓN PREVIA.
Para información y asistencia, www.stl.nl/axxion

ES-1
EN LA CAJA
La caja deberá contener los siguientes artículos:
Reproductor principal de DVD portátil/
Pantalla
1PC
Pantalla secundaria
1PC
Conexión para encendedor de coche
1PC
Cable AV
1PC
Cable conector de la pantalla secundaria
1PC
Mando a distancia
(con 1 pila CR2025)
1PC
Bolsa de transporte
1PC
Correa de sujeción al apoyacabezas del
vehículo
1PC
Manual de instrucciones
1PC
NOTA: ¡EL AXX-204 NO INCLUYE EL ADAPTADOR DE CORRIENTE!
Por favor, retenga todos los embalajes y elementos de empaquetado para cuando quiera transportar el producto.

ES-2
VISTA GENERAL DEL REPRODUCTOR DE DVD:
1. ALTAV OCES
2. BOTÓN REPRODUCCIÓN/PAUSA
3. BOTÓN STOP/USB/CARD
4. BOTÓN VOL- / DIRECCIONAL IZQUIERDO
5. BOTÓN DIRECCIONAL ABAJO
6. BOTÓN VOL+ / DIRECCIONAL DERECHO
7. BOTÓN ANTERIOR/FB
8. BOTÓN SIGUIENTE/FF
9. PANTALLA TFT
10. BOTÓN DIRECCIONAL ARRIBA
11. BOTÓN OK/SETUP
12. TOMA DC IN
13. INTERRUPTOR DE ENCENDIDO/APAGADO
14. INDICADOR DE ENCENDIDO/CARGA
15. TOMA PHONE
16. TO M A AV OUT
17. PUERTO USB
18. RANURA PARA TARJETAS SD/MMC
19. SOPORTE
20. ÁREA DE LA COBERTURA DEL DISCO
21. SENSOR DEL MANDO A DISTANCIA
PANTALLA SECUNDARIA:
1. DISPLAY
2. BOTÓN BRILLO -
3. BOTÓN BRILLO +
4. BOTÓN COLOR -
5. BOTÓN COLOR+
6. BOTÓN VOL -
7. BOTÓN VOL +
8. TOMA DC IN
9. INTERRUPTOR DE ENCENDIDO/APAGADO
10. TOMA DE ENTRADA AV
11. TOM A PHONE
12. ALTAV OCES
19
21
20
1 2 3 4 5 6 7 8
9
10
1
11
1213141516 17 18
1
2 3 4 5 6 7
8 9 10 11
12
12
ES-3
UNIDAD DEL MANDO A DISTANCIA
2
3
4
5
6
7
8
9
10
11
12
13
14
15
16
17
18
19
21
22
23
24
25
27
1
1. Botón MUTE
2. Botón VOLUME+
3. Botón VOLUME-
4. Botón REPEAT 1/ALL&A-B
5. Botón MENU
6. Botón SUBTITLE
7. Botón REPRODUCCIÓN
8. Botón TITLE
9. Botón AUDIO
10. Botón PAUSE/STEP
11. Botón F.BWD
12. Botón F.FW D
13. Botón ANGLE
14. Botón ZOOM
15. Botón DISPLAY
16. Botón SETUP
17. Botón TFT SET
18. botones NUMÉRICOS
19. Botón CLEAR
20. Botón STOP&DVD/SD/USB
21. Botón ENTER
22. Botones DIRECCIONALES
23. Botón SLOW
24. Botón SIGUIENTE
25. Botón ANTERIOR
26. Botón SEARCH
27. Botón PROGRAM
CONEXIÓN BÁSICA
Se recomienda la conexión a un multisistema de TV.
Asegúrese de que este reproductor y otros equipos
con los que va a realizar la conexión se encuentran
apagados y desconectados de la toma de
alimentación antes de realizar las conexiones.
No bloquee las aberturas de ventilación de ninguno
de los equipos y dispóngalos de modo que el aire
circule por ellos libremente.
Lea todas las instrucciones antes de conectar otros
equipos.
Asegúrese de seguir el código de color cuando
conecte los cables de audio y vídeo.
Nota:
Durante la reproducción de un DVD, el volumen del
TV podría ser más bajo que el de la retransmisiones
televisivas, etc. En este caso, podrá ajustar el
volumen al nivel que desee.
Si el reproductor DVD/CD está conectado al TV
mediante una grabadora de cintas de vídeo, la
imagen podría no reproducirse normalmente para
algunos DVDs. Si ese fuera el caso, no conecte el
reproductor al VCR.
La unidad principal del reproductor de DVD ha
sido diseñada para su uso tanto en interiores
como en el coche, mientras que la unidad
secundaria solo es apta para el uso dentro del
coche.
Conexión a un aparato de TV estéreo
AUDIO R
AV AUDIO/VIDEO INPUT
AUDIO L
VIDEO IN
S-VIDEO
YUV INPUT
Una vez la conexión se haya realizado correctamente,
conecte el adaptador AC (no incluido) a una toma de
pared estándar para encender el reproductor.
Conexión de una pantalla secundaria
Esta unidad está equipada con una pantalla secundaria.
Podrá usarla junto con el reproductor para apreciar el
programa al mismo tiempo. El método de conexión se
ilustra debajo usando el adaptador para coche.
Cable A/V
TV
A la toma del encendedor
para coche
Conector de pantalla
secundaria
ES-4
CARGA DE LA BATERÍA INTERNA
El reproductor está dotado de una batería de litio
recargable. Antes de usarla, por favor, asegúrese de
que está cargada. Si no lo estuviera, cárguela primero.
Deslice el interruptor de encendido hasta la posición
OFF y después conecte un extremo del adaptador de
corriente (no incluido) a la toma de pared y el otro
extremo a la unidad, para la carga de la batería interna.
Nota:
1. La batería solo podrá cargarse en el modo de
apagado.
2. Si no usa la unidad durante periodos prolongados,
se recomienda cargar la batería interna cada tres
meses.
CONEXIÓN A UN ADAPTADOR DE COCHE
El adaptador de corriente para coche ha sido diseñado
para su uso en vehículos con un sistema eléctrico de
conexión a tierra negativa de 12v.
ADVERTENCIA:
Desconecte el adaptador de corriente para coche
cuando no lo esté usando. No lo use en vehículos de
24V.
PRECAUCIONES:
Use la unidad únicamente con el adaptador para
coche recomendado. El uso con otro tipo de
adaptadores para coche podría dañar la unidad.
El adaptador para coche recomendado solo podrá
usarse con esta unidad. No lo utilice con otros
equipos.
Por el bien de la seguridad en el tráfico, no use la
unidad ni vea vídeos durante la conducción del
vehículo.
Asegúrese de que la unidad está bien sujeta para
evitar que esta salga despedida del vehículo en un
accidente.
Cuando el interior de la toma de encendedor para
coche esté sucia de polvo o ceniza, la zona de
conexión podría calentarse debido a un mal contacto.
Asegúrese de que la toma del encendedor está
limpia antes del uso.
Después del uso, desconecte el adaptador para
coche de la unidad y de la toma de encendedor para
coche.
CAMBIO DE UN FUSIBLE
FUSIBLE
TAPA POSITIVA (+)
NOTA: No tire la tapa positiva (+)cuando sustituya el
fusible.
FUNCIONAMIENTO
PREPARACIÓN
Encienda el TV y seleccione el modo de entrada de
vídeo.
Encienda el sistema de audio al que esté conectado el
reproductor.
INICIACIÓN
1. Deslice el interruptor de encendido hasta la posición
ON para encender el aparato.
2. Abra la bandeja portadiscos con la mano.
3. Coloque un disco en la bandeja.
4. Cierre la bandeja portadiscos con la mano, entonces
la reproducción dará comienzo automáticamente.
5. Cuando una pantalla de menú aparezca en el TV,
pulse los botones direccionales o numéricos para
seleccionar el número de pista que desee, después
pulse el botón OK/ENTER para iniciar la
reproducción.
Nota: Si no hubiera ninguna operación por un espacio
de CUATRO horas, la unidad se apagará
automáticamente. Antes de que se apague la unidad,
se mostrará en la pantalla una información de alerta
como advertencia. Pulse cualquier botón para seguir
con el uso cuando se muestre la información de alerta.
Si la unidad se apaga automáticamente, primero será
necesario deslizar el botón de encendido hasta la
posición OFF, y después de nuevo hasta la posición
ON para volver a encender la unidad.
AJUSTE DEL VOLUMEN
Pulse el botón VOLUME+/- del mando a distancia o
manténgalo pulsado en la unidad para subir o bajar el
volumen.
SUPRESIÓN DE AUDIO
Con el aparato encendido, la salida de audio de la
unidad principal se desactivará pulsando el botón
MUTE. Pulse de nuevo este botón para recuperar el
audio.
SALTO HACIA DELANTE O HACIA ATRÁS
Pulse el botón ANTERIOR durante la reproducción
para pasar al capítulo (DVD) o pista (CD) anterior,
Pulse el botón SIGUIENTE durante la reproducción
para pasar al capítulo (DVD) o pista (CD) siguiente.
AJUSTE DEL BRILLO O EL COLOR (PARA LA
PANTALLA LCD)
Pulse el botón TFT SET del mando a distancia
repetidamente para ajustar la intensidad del color y del
brillo respectivamente con los botones
izquierda/derecha.
Mantenga pulsado este botón durante unos momentos
para apagar el display TFT.
AVANCE/RETROCESO RÁPIDO
Durante la reproducción, mantenga pulsado el botón
FF o FB de la unidad o pulse el botón F.F W D o F.BW D
del mando a distancia para realizar una búsqueda en el
disco hacia delante o hacia atrás a las velocidades X2,
X4, X8, X20.
Pulse el botón reproducción para reanudar la
reproducción normal.
A la toma del encendedor
para coche

ES-5
PAUSA/REPRODUCCIÓN FOTOGRAMA A
FOTOGRAMA
Pulse el botón PAUS E/STEP durante la reproducción
para entrar en pausa. Durante el modo pausa, cada
vez que pulse el botón PAUSE/STEP, el reproductor
solo reproducirá un fotograma; para reanudar la
reproducción normal, pulse el botón
REPRODUCCIÓN.
DETENCIÓN DE LA REPRODUCCIÓN
Pulse el botón STOP durante la reproducción para
detenerla; el reproducción activará su función de
reanudación cuando se pulse STOP en el modo STOP;
pulse de nuevo el botón REPRODUCCIÓN, y la
reproducción se reanudará desde el punto en que se
detuvo la vez anterior; abra la bandeja portadiscos o
pulse el botón STOP una vez más para desactivar la
función de reanudación de la reproducción.
REPRODUCCIÓN RALENTIZADA (DVD)
Pulse el botón SLOW durante la reproducción, y el
disco se reproducirá a una velocidad de 1/2 respecto la
velocidad normal. Cada vez que se pulse este botón, la
velocidad de reproducción será más lenta (hasta 1/7 de
la velocidad normal)
Pulse el botón REPRODUCCIÓN para reanudar la
reproducción a velocidad normal.
REPETICIÓN
Pulse el botón REPEAT 1/ALL&A-B durante la
reproducción, y se repetirá la reproducción de un
capítulo/título o todo (para discos DVD), o repita una
pista o todas (para un CD), o las secciones entre dos
puntos específicos (A-B).
BÚSQUEDA DE ESCENAS PREFERIDAS
1. Pulse el botón SEARCH durante la reproducción y
destaque el elemento que desee reproducir (título,
capítulo o tiempo del capítulo) con los botones
direccionales.
2. Introduzca el número o tiempo que desee con los
botones numéricos.
3. Pulse el botón OK/ENTER para confirmar, y la
reproducción de la escena seleccionada comenzará.
4. Para salir del menú de búsqueda, pulse
directamente el botón SEARCH.
REPRODUCCIÓN PROGRAMADA (HASTA 16
MEMORIAS)
1. Pulse el botón PROGRAM durante la reproducción
para mostrar el menú de programación.
2. Seleccione la ubicación(es) que desee memorizar
con los botones direccionales, introduciendo
después los números de Título/Capítulo que desee
con los botones numéricos.
Ejemplo: Pista 3, pulse "3"
Pista 12, pulse "+10" y después "2"
Pista 21, pulse "+10" dos veces y después
"1"
3. Para comenzar la reproducción programada,
seleccione REPRODUCIR en el menú; pulse de
nuevo el botón PROGRAM para salir de la
programación.
4. Para eliminar un elemento programado, entre en el
menú de programación y desplácese hasta el
elemento que desee eliminar, después pulse CLEAR
en el mando a distancia para eliminarlo. Para
eliminar todos los elementos, seleccione <CLEAR>
en el menú, después pulse el botón OK para
confirmar.
5. Podrá también cancelar el modo de programación
eliminando todos los elementos del menú de
programación.
ZOOM
Pulse el botón ZOOM de forma continua para aplicar el
zoom a la imagen, magnificándola 2, 3, o 4 veces
respecto de su tamaño original. El zoom de reducción
aplicable será de 1/2,1/3,1/4.
Pulse este botón una vez más cuando la imagen se
encuentre a 1/4 de su tamaño original para volver a su
visualización a tamaño completo.
Desplácese por la imagen aumentada con los botones
direccionales.
INFORMACIÓN DE APARICIÓN EN PANTALLA
Cuando el reproductor se encuentre en funcionamiento,
pulse el botón DISPLAY de forma continua, entonces la
pantalla mostrará información (tipo de disco, número
de título, número de capítulo, tiempo de reproducción,
idioma de audio, tipo de audio, idioma de subtítulos,
multiángulo, etc.) secuencialmente.
CAMBIO DEL IDIOMA DE LA PISTA DE AUDIO
(DISCO DVD)
Será posible cambiar el idioma de la pista de audio,
seleccionando uno distinto del de los ajustes iniciales
(esta función será solo válida para aquellos discos que
se hayan registrado con múltiples idiomas de audio).
Pulse el botón AUDIO durante la reproducción de un
DVD, y la pista de audio cambiará, siendo la nueva
selección la que se muestra en la pantalla.
NOTA: Cuando no se hayan registrado pistas de audio,
la pulsación de este botón no tendrá ningún efecto.
VISTA MULTIÁNGULO (PARA DVD)
Pulse el botón ANGLE para seleccionar el ángulo de
visionado de la escena que desee.
Nota: solo aquellos DVDs grabados desde diversos
ángulos dispondrán de esta función.
CAMBIO DEL IDIOMA DE SUBTÍTULOS (PARA D VD)
Pulse el botón SUBTITLE diversas veces durante la
reproducción de un DVD, y el idioma de subtítulos
cambiará, siendo la nueva selección de subtítulos la
que se mostrará en la pantalla.
Cuando el idioma de subtítulos que desee aparezca en
la pantalla, suelte el botón para ver los subtítulos en
ese idioma.
Nota: esta función solo será válida para aquellos discos
con la opción de subtítulos multiidioma.
REGRESO AL MENÚ PRINCIPAL Y
REPRODUCCIÓN DEL TÍTULO (DVD)
Durante la reproducción, pulse el botón MENU para
regresar al menú principal, después pulse el botón
TITLE para reproducir el título.

ES-6
REPRODUCCIÓN MP3/MPEG 4
1. Cargue el disco MP3/MPEG 4 en la bandeja
portadiscos. A continuación, un menú multimedia se
mostrará en la pantalla. Seleccione el tipo de archivo
multimedia correspondiente (música, imágenes,
vídeo) para reproducir con los botones direccionales
izquierda/derecha y pulse el botón OK/ENTER para
confirmar. entonces, la pantalla de TV mostrará las
carpetas del formato seleccionado en el disco.
2. Seleccione la carpeta que desee con los botones
direccionales y después pulse el botón OK/ENTER
para confirmar.
3. Se mostrarán los archivos en esta carpeta y podrá
seleccionar su pista favorita con los botones
direccionales. Pulsando el botón OK podrá iniciar la
reproducción.
4. Pulse el botón SIGUIENTE y ANTERIOR para
seleccionar directamente la pista.
5. Pulse el botón REPEAT1/ALL&A-B para cambiar el
modo de reproducción.
REPRODUCCIÓN DE CD DE IMÁGENES KODAK /
JPEG
Cargue un CD de imágenes Kodak / JPEG en la
bandeja portadiscos, después seleccione la opción de
imagen del menú multimedia para reproducir el disco
con los botones direccionales izquierda/derecha y
pulse el botón OK/ENTER para confirmar.
La presentación de imágenes del Cd de imágenes
Kodak dará comienzo automáticamente;
Las carpetas del CD de imágenes JPEG se mostrarán
en la pantalla de TV; use los botones direccionales del
mando a distancia para seleccionar la carpeta que
desee y después pulse el botón OK/ENTER para
confirmar.
Los archivos de esta carpeta se mostrarán entonces, y
usted podrá seleccionar sus imágenes favoritas con los
botones direccionales arriba/abajo del mando a
distancia y pulsar el botón OK/ENTER para iniciar la
reproducción.
La vista previa de la imagen y su información
correspondiente (resolución, tamaño, fecha) se
mostrarán cuando usted se desplace por los nombres
de los archivos.
FUNCIONAMIENTO DE UN CD DE IMÁGENES
KODAK / JPEG
1. MODOS DE REPRODUCCIÓN
Pulse el botón REPEAT 1/ALL&A-B para cambiar el
modo de reproducción.
Durante la reproducción, pulse STOP para entrar en el
modo de vista previa.
2. SALTO A LA IMAGEN SIGUIENTE/ANTERIOR
Pulse el botón SIGUIENTE para pasar a la imagen
siguiente o el botón ANTERIOR para pasar a la
anterior.
3. GIRO DE LA IMAGEN
Pulse el botón direccional DERECHA e IZQUIERDA
para girar la imagen hacia la derecha y hacia la
izquierda, respectivamente.
4. VOLTEADO DE LA IMAGEN
Pulse el botón de navegación ARRIBA para voltear la
imagen hacia arriba o hacia abajo.
Pulse el botón de navegación ABAJO para voltear la
imagen a la izquierda o la derecha.
5. ZOOM DE AUMENTO/REDUCCIÓN DE LA
IMAGEN
Pulse el botón ZOOM repetidamente, entonces la
imagen aumentará 2, 3, 4 veces respecto de su
tamaño original o se reducirá 1/2, 1/3, 1/4.
Pulse este botón una vez más cuando la imagen se
encuentre a 1/4 de su tamaño original para volver a su
visualización a tamaño completo.
Si la imagen estuviera aumentada, podrá desplazarse
por ella con los botones direccionales.
6. MODOS DE TRANSICIÓN DE LA PRESENTACIÓN
DE IMÁGENES
Durante la reproducción de una presentación de
imágenes, pulse el botón PROGRAM cíclicamente
para seleccionar un efecto de transición para
reproducir la presentación de imágenes.
USO DE MEDIOS DE ALMACENAMIENTO
EXTERNO (USB Y TARJETA SD/MMC)
Preparación del reproductor para el uso de un
medio de almacenamiento externo
1. Deslice el interruptor de encendido hasta la posición
ON, Conecta un dispositivo de memoria que
contenga archivos de reproducción en el puerto USB
o introduzca la tarjeta SD/MMC en la ranura para
tarjetas. El USB o tarjeta SD/MMC serán detectados
y leídos automáticamente. Un menú multimedia se
mostrará en la pantalla, seleccione el tipo de archivo
multimedia correspondiente con los botones
direccionales izquierda y derecha para la
reproducción de la tarjeta o el USB que haya
introducido y pulse el botón OK/ENTER para
confirmar. Las carpetas se mostrarán en la pantalla y
usted podrá usar los botones direccionales para
seleccionar la que desee y la pista que quiera
reproducir.
2. Pulse el botón SIGUIENTE o ANTERIOR para saltar
hacia delante o hacia atrás.
Nota: Mantenga pulsado el botón STOP para hacer
aparecer el menú de fuentes y efectuar la selección
entre USB, tarjeta o disco mediante los botones
direccionales DERECHA/IZQUIERDA; pulse el botón
OK/ENTER para entrar en el modo seleccionado.
PRECAUCIÓN: Para evitar la descarga electrostática,
no toque el puerto USB ni la ranura de introducción de
tarjetas durante la reproducción.
AJUSTES INICIALES
La página de ajuste iniciales le servirá para realizar su
configuración preferida del reproductor. Una vez se
haya realizado los ajustes iniciales, quedarán
guardados en la CPU del ordenador, a menos que se
modifiquen.
PROCEDIMIENTO HABITUAL PARA LOS AJUSTES
INICIALES
1. Pulse el botón SETUP del mando a distancia o
mantenga pulsado el botón OK/SETUP de la unidad
para entrar en el menú de configuración de la
unidad.
2. Use los botones direccionales para seleccionar el
elemento que desee modificar, seleccionando la
página con más elementos de ajuste mostrados en
la pantalla del TV. Vuelva a usar los botones
 Loading...