

Page 1
EN Installation / User Instructions / Warranty
FR Instructions de montage / Mode d'emploi / Garantie
ES Instrucciones de montaje / Manejo / Garantía
Showerpipe Citterio M
34640xx1
Page 2

English
Technical Information
Recommended water pressure 30 - 60 PSI
Max. water pressure 145 PSI
Recommended hot water temp. 120° - 140° F*
Max. hot water temp 176°F*
Flow rate - showerhead 2.5 GPM max.
Flow rate - handshower 2.5 GPM max.
Installation Considerations
• For best results, Hansgrohe recommends that
this unit be installed by a licensed, professional
plumber.
• Please read over these instructions thoroughly before beginning installation. Make sure that you
have all tools and supplies needed to complete
the installation.
• Inspect the product for shipping damage
before installation. Hansgrohe will not
honor claims for shipping damage after
the product is installed.
• The installation dimensions stated in these installation instructions are ideal for people of approximately 5'11" (1800 mm) in height. The mounting
height can be changed if required. However,
please note that changing the mounting height
of the showerpipe will also change the minimum
ceiling height, and that the other mounting dimensions will change.
• Make sure that the wall where the showerpipe is
to be installed is flat (no projecting joints or tiles),
and that the wall is strong enough to support the
showerpipe. The installation of stringers
at the mounting points is very strongly
suggested.
• The enclosed screws and anchors are suitable
for solid surface walls. If installing in a fiberglass
*Please know and follow all applicable local plumbing
codes when setting the temperature on the water heater.
or acrylic shower module, please contact the
manufacturer of the module regarding suggested
mounting points, wall reinforcement, and mounting hardware.
• Do not install this showerpipe in a steam shower.
• This showerpipe is for use with shower heads
rated at 2.5 GPM (9.5 l/min) or higher.
• To insure correct function of the thermostatic mixing valve, the hot supply must be on the left and
the cold supply must be on the right. If the hot
and cold supplies are reversed, the mixing valve
cannot function correctly.
• To prevent scald injury, the maximum output temperature of the shower valve must be no higher
than 120°F. In Massachusetts, the maximum output temperature can be no higher than 112° F.
• The shower arm is intended to support the showerhead only. Do not hang other objects on the
shower arm.
• The showerpipe must not to be used as a
grab bar. Please install a separate grab
bar if one is required.
• Keep this booklet and the receipt (or other proof
of date and place of purchase) for this product in
a safe place. The receipt is required should it be
necessary to request warranty parts.
2
Page 3

Français
Données techniques
Pression d’eau recommandée 30 - 60 PSI
Pression d’eau maximum 145 PSI
Température recommandée 120° - 140° F*
d'eau chaude
Température maximum d'eau chaude 176°F*
Capacité nominale - pomme de douche 2.5 GPM
Capacité nominale - douchette 2.5 GPM
* Vous devez connaître et respecter tous les codes de plomberie locaux applicables pour le réglage de la température
du chauffe-eau.
À prendre en considération pour l’installation
• Pour de meilleurs résultats, Hansgrohe recommande que ce produit soit installé par un plombier professionnel licencié.
• Veuillez lire attentivement ces instructions avant
de procéder à l’installation. Assurez-vous de disposer de tous les outils et du matériel nécessaires
pour l’installation.
• Avant son montage, s’assurez que le
produit n’a subi aucun dommage pendant le transport. Après le montage,
tout dommage de transport ou de surface ne pourra pas être reconnu.
• Les dimensions d’installation indiquées dans
la notice de montage sont idéales pour des
personnes d’une taille de 1800 mm environ et
doivent être ajustées selon le cas. Tenir compte
pour cela du fait qu’un changement de hauteur
modifie la hauteur minimum et que la modification des cotes de raccord doit entrer en ligne de
compte.
• Lors du montage du produit par un ouvrier
qualifié, il faut faire attention à ce que la surface
de fixation soit plane sur toute son étendue
(aucun dépassement de joint ni de carrelage),
que la construction de la paroi soit adaptée à
l’installation du produit et surtout ne présente
aucun point faible.
• Les vis et chevilles fournies avec le showerpipe
sont conçues pour une utilisation dans une
surface murale solide. Pour une installation dans
une cabine de douche en fibre de verre ou en
acrylique, veuillez contacter le fabricant de la
cabine de douche pour connaître les pièces de
fixation recommandées.
• Le produit n’est pas prévu pour une utilisation en
liaison avec un bain à vapeur.
• Pour s'assurer du bon fonctionnement de le
mélangeur thermostatique, l’alimentation en eau
chaude doit être à gauche, et l'alimentation en
eau froide, à droite. Si vous inversez les
conduites, le mélangeur thermostatique
ne fonctionnera pas correctement.
• Pour empêcher des blessures par ébouillantement, la température de sortie maximale du
robinet de douche ne doit pas excéder 120°F.
Au Massachusetts, la température de sortie maximale du robinet de douche ne doit pas excéder
112°F.
• Ce showerpipe doit être utilisé avec une pomme
de douche ou une douchette nominale de 9,5 l/
min (2,5 GPM) ou plus.
• Le bras de la douchette n’est conçu que pour
tenir la douchette et ne doit pas servir à la suspension d’autres objets!
• Le produit ne doit pas servir de poignée.
Montez pour cela une poignée séparée.
• Conservez ce livret et le reçu (ou une autre
preuve sur laquelle figurent la date et l’endroit
de l’achat) pour ce produit dans un endroit sûr.
Le reçu est requis si vous commandez des pièces
sous garantie.
3
Page 4

Español
Datos tecnicos
Presión recomendada en servicio 30 - 60 PSI
Presión en servicio max. 145 PSI
Temperatura recomendada del 120° - 140° F*
agua caliente
Temperatura del agua caliente max. 176°F*
Caudal máximo - ducha cabezal 2.5 GPM
Caudal máximo - teleducha 2.5 GPM
Consideraciones para la instalación
*Debe conocer y cumplir todos los códigos locales aplicables para ajustar la temperatura del calentador de agua.
• Para obtener mejores resultados, la instalación
debe estar a cargo de un plomero profesional
matriculado.
• Antes de comenzar la instalación, lea estas
instrucciones detenidamente. Asegúrese de tener
las herramientas y los insumos necesarios para
completar la instalación.
• Antes del montaje se debe examinarse
el producto contra daños de transporte.
Después de la instalación so se reconoce ningún daño de transporte o de
superficie.
• Las medidas indicadas en las instrucciones de
montaje resultan ideales para personas de 1800
mm de altura, por lo que deberán ajustarse
siempre que sea necesario. En este sentido, es
importante tener en cuenta que, en caso de
modificación de la altura de montaje, cambia la
altura mínima y habrá que adaptar las medidas
de conexión.
• En el momento del montaje del producto por
parte de personal especializado y cualificado
se deberá prestar una atención especial a que
la superficie de fijación en toda el área de la
fijación sea plana (sin juntas que sobresalen
ni azulejos desplazados), que la estructura de
la pared sea adecuada para un montaje del
producto y que, ante todo, no presente puntos
débiles. Los tornillos y tacos adjuntos son sólo
apropiados para hormigón. En el caso de otras
estructuras murales se deberán considerar las
indicaciones del fabricante de tacos.
• ¡El producto no ha sido diseñado para uso en
conexión con un baño de vapor!
• El brazo de la ducha cabezal solo está previsto
para soportar la ducha cabezal y no debe
cargarse con otros objetos!
• Este producto debe ser utilizado con una ducha
cabezal que tiene una capacidad nominal de
9,5 l/min (2,5 GPM) o más.
• Para evitar escaldaduras, la máxima temperatura
de salida de la válvula de la ducha no debe exceder los 120°F. En Massachusetts, la máxima
temperatura de salida de la válvula de la ducha
no debe exceder los 112°F.
• El producto no debe ser utilizado como
un elemento de sujeción. Debe montarse
un elemento de sujeción separado.
• Mantenga este folleto y el recibo (u otro comprobante del lugar y fecha de compra) de este
producto en lugar seguro. El recibo se requiere
en caso de ser necesario solicitar piezas bajo
garantía.
4
Page 5
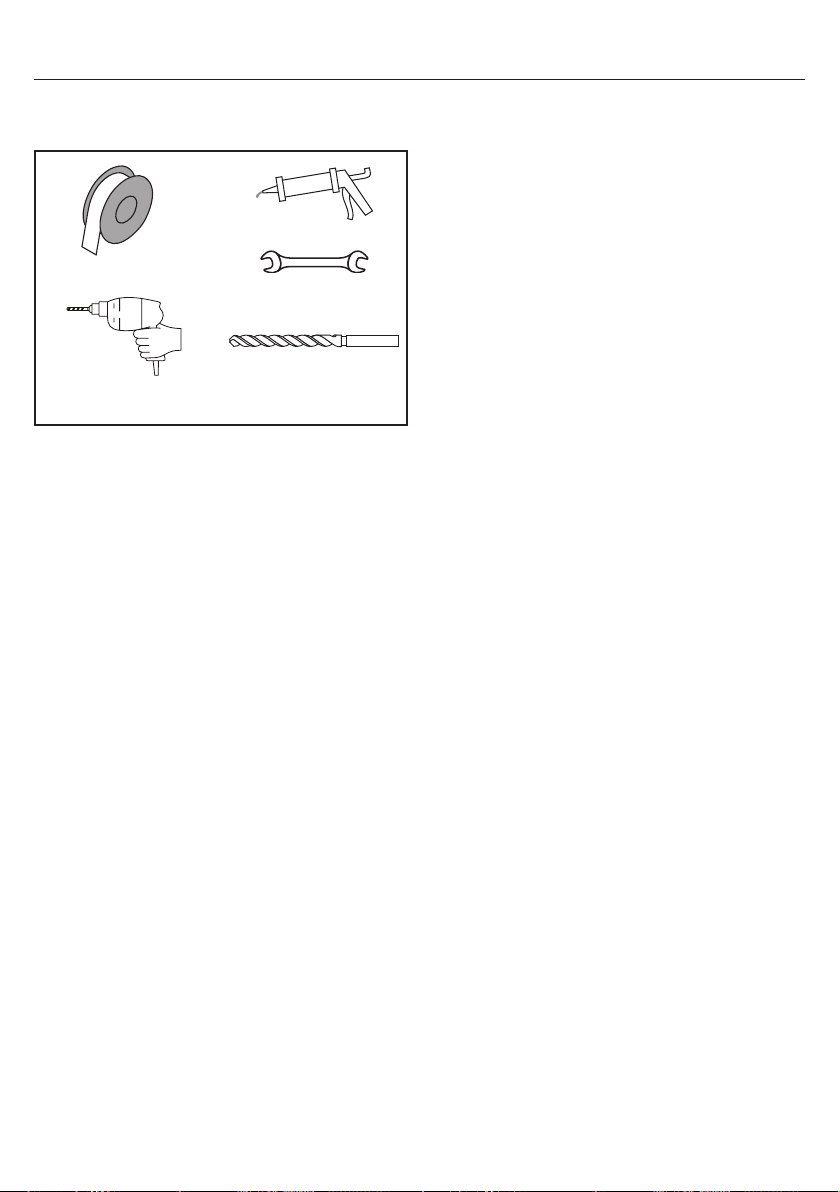
Tools Required / Outiles Utiles /
Herramientas Útiles
30 mm
¼" / 6 mm
5
Page 6
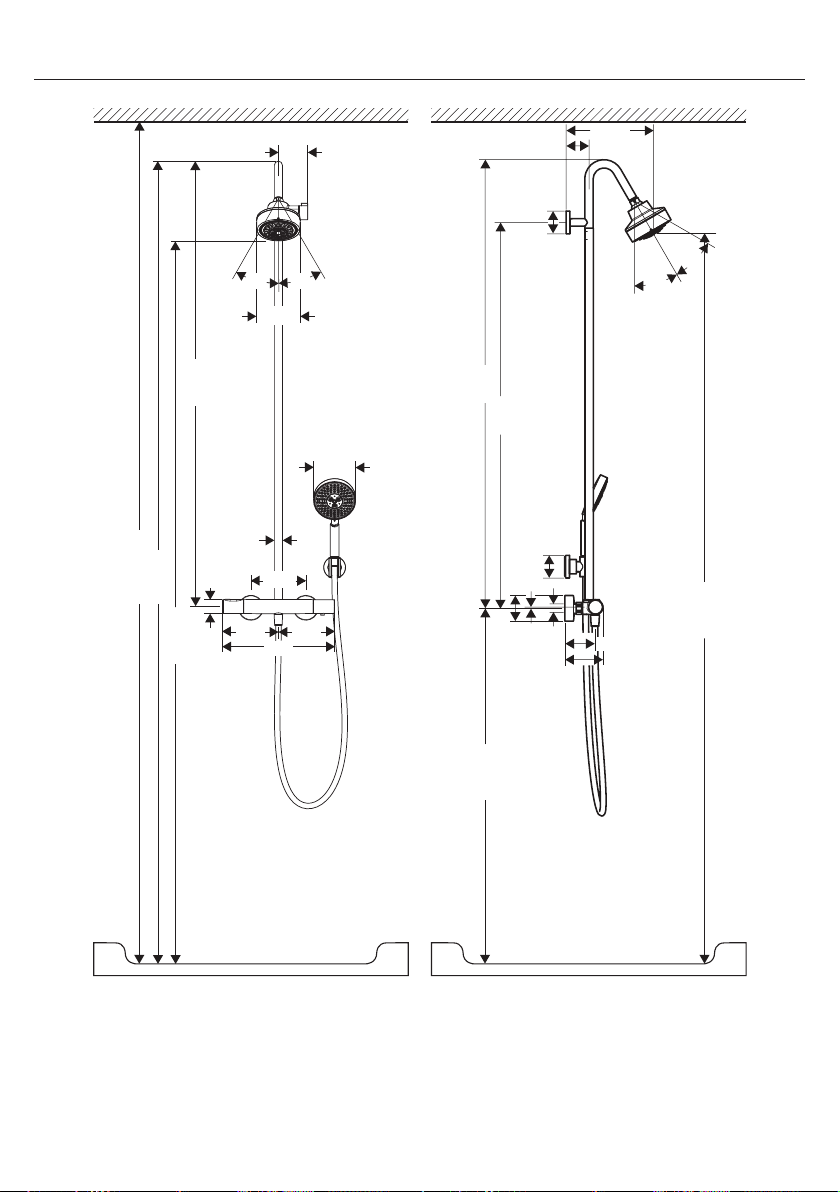
Installation Suggestions / Suggestions d'installation / Sugerencias para la
instalación
min. 91⅝"
90¹⁄₁₆"
79⁹⁄₁₆"
46⅝"
1½"
3⅛"
3
0
°
4⅝"
⅞"
5⅞"
6" 6"
12"
2⅜"
9⅛"
2⅜"
°
0
°
0
3
3
°
0
3
46¾"
40¼"
4½"
2⅜"
⅛"
79¹³⁄₁₆"
G½
3⅛"
4"
2⅝"
43⁵⁄₁₆"
6
Page 7
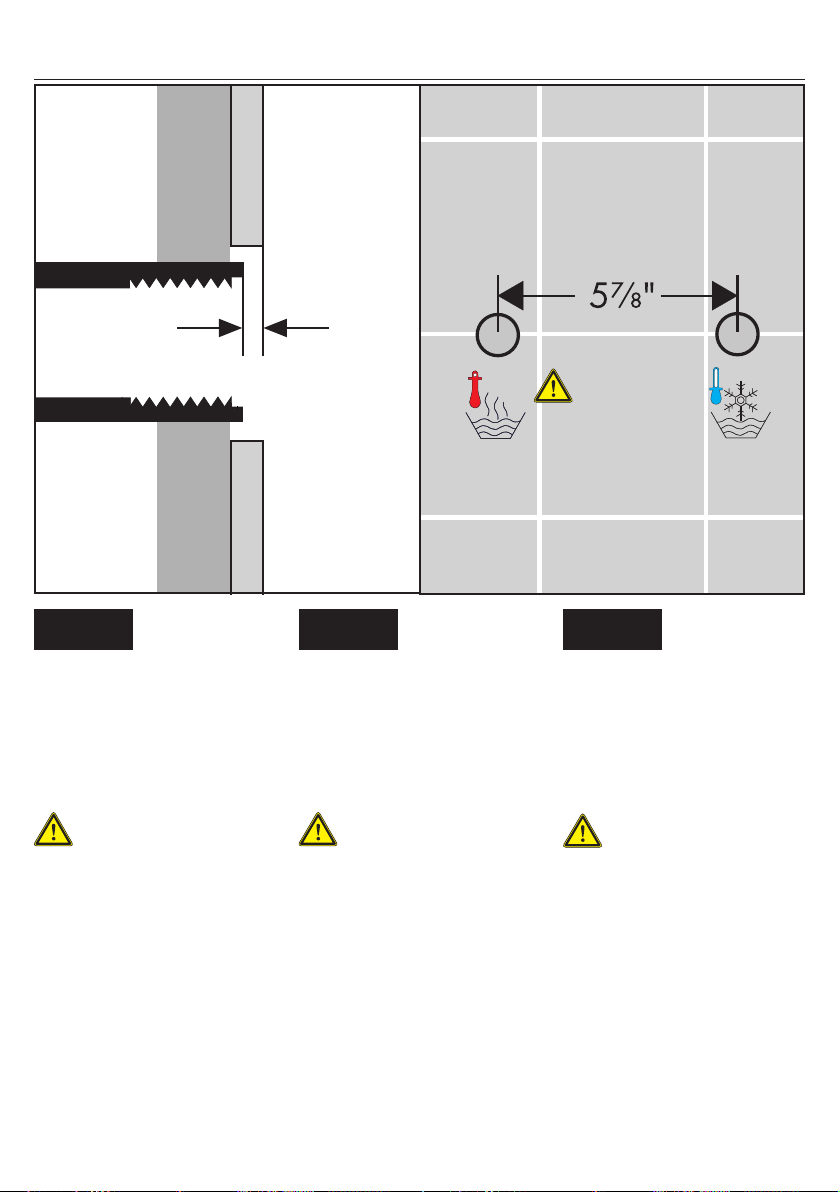
Rough in / Pièce intérieure / Piezas interiores
³⁄₁₆"
English Français Español
Install ½" NPT female fittings,
recessed ³⁄₁₆" behind the surface
of the finished wall, for the hot and
cold water supplies.
The fittings should be 5⅞" apart
on center.
For proper operation
of the thermostatic
mixer, the hot supply
must be on the left
and the cold supply
must be on the right.
Install the finished wall. Make
sure that the wall is watertight.
Installez deux raccords femelles
filetés NPT de ½ po NPT, encastré
à ³⁄₁₆ po à l’intérieur de la surface
du plafond fini.
Les raccords devraient être à 5⅞
po part sur le centre.
Pour l’opération correcte de la robinet
thermostatique, la
provision chaude doit
être sur la gauche et
la provision froide
doit être sur la droite.
Installez la surface finie de mur.
S’assurez que le mur est étanche.
Instale dos conexiónes hembras
NPT de ½", embutidan ³⁄₁₆"
detrás de la superficie de la pared
acabada.
Los conexiónes quedan una distancia de 5⅞" del centro.
Para la operación
apropiada de la
válvula termostática,
el suministro caliente
debe estar a la izquierda y el suministro
frío debe estar a la
derecha.
Instale la pared terminada.
Aségurese de que la pared es
hermética.
Rough in / Pièce intérieure / Piezas interiores
7
Page 8
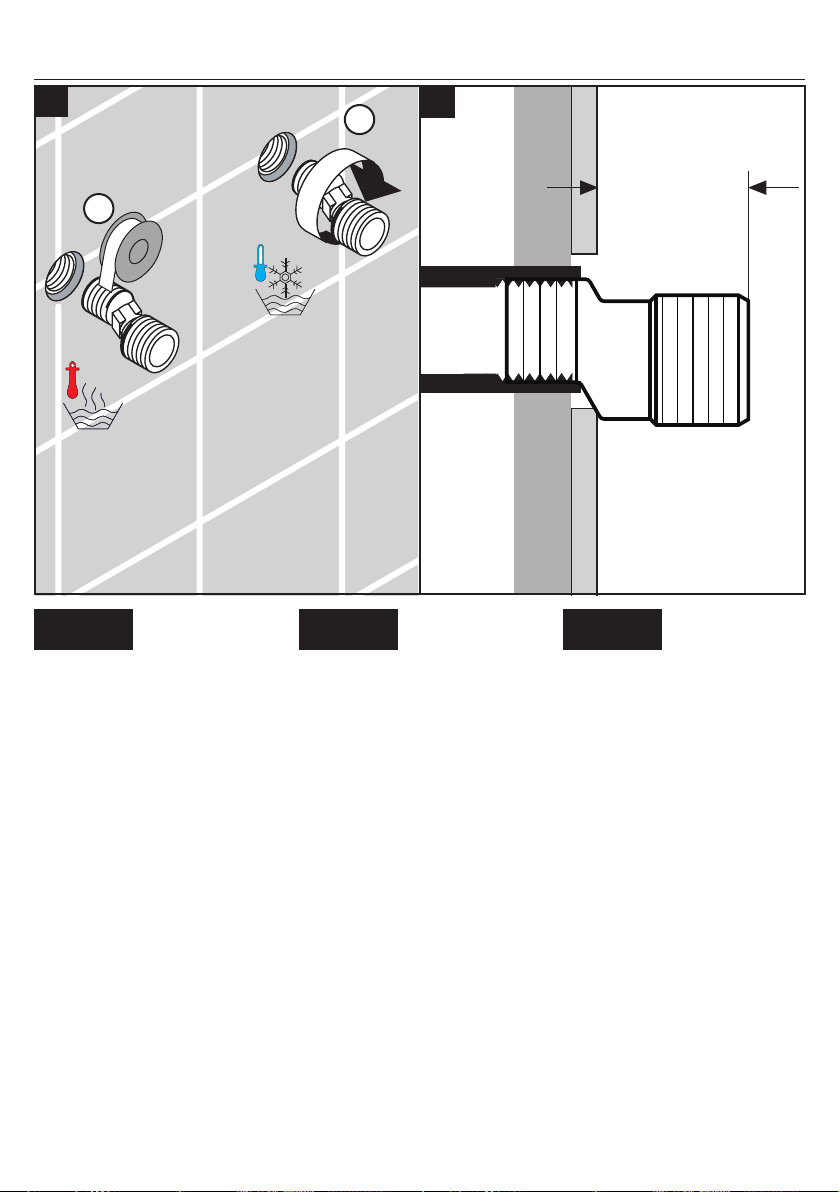
Installation / Installation / Instalación
1
2
2
min. 1⁵⁄₁₆"
1
max. 1⁷⁄₁₆"
English Français Español
Wrap the inlet threads on the
s-unions with teflon tape.
Screw the s-unions into the female
fittings.
The s-unions should be 5⅞" apart
on center and should extend
1⁵⁄₁₆"-1⁹⁄₁₆" outside the surface of
the finished wall.
Enveloppez les filets des raccords
unions en S avec du ruban Téflon.
Vissez les raccords unions en S
dans les raccords femelles.
Alignez les raccords unions de façon à ce qu’ils soient au niveau et
séparés d’une distance de 5⅞ po
à partir de leur centre.
Une partie de 1¼ -1⁷⁄₁₆ po de
l’extrémité des raccords unions en
S doit se trouver à l’extérieur de la
surface du mur fini.
Envuelva las roscas de las juntas
tipo s con cinta de Teflon.
Enrosque las juntas tipo s en las
conexiones hembra.
Alinee las juntas de manera que
queden niveladas y a una distancia de 5⅞ pulgados del centro.
El extremo de la junta tipo s debe
sobresalir 1¼ -1⁷⁄₁₆ pulgadas por
fuera de la superficie de la pared
terminada.
8
Installation / Installation / Instalación
Page 9
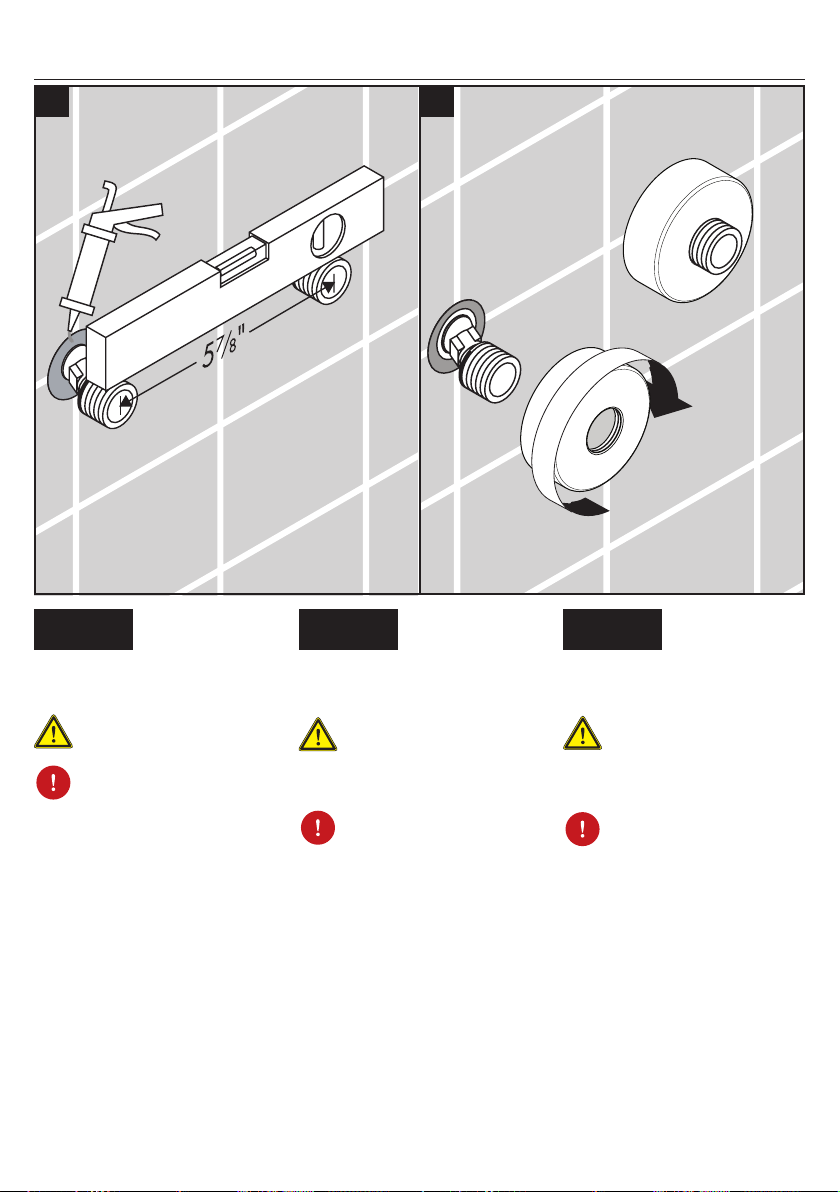
3 4
English Français Español
Make sure that the unions are
level.
Seal the wall around
the s-unions with
waterproof sealant.
Failure to seal the
wall can lead to
water damage.
Install the escutcheons.
S’assurez que les unions sont
niveau.
Scellez le mur autour des raccords à
l’aide d’un agent
d’étanchéité.
Si le mur n’est pas
scellé, l’eau pourrait
éventuellement causer des dommages.
Installez les ecussons.
Aségurese de que los adaptadores son planos.
Selle la pared alrededor des juntas
con un sellador
impermeable.
Si no se sella la
pared, pueden producirse daños por
acción del agua.
Instale los embellecedors.
Installation / Installation / Instalación
9
Page 10
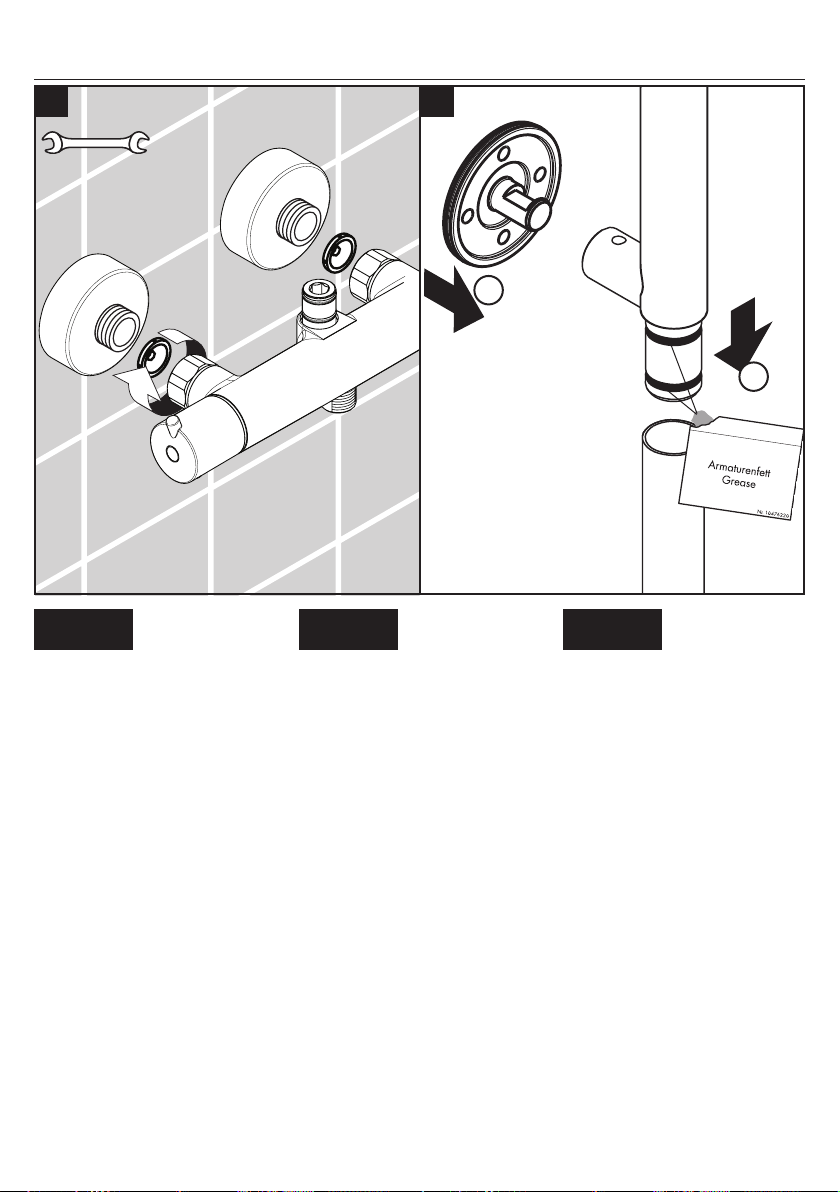
5
6
30 mm
1
English Français Español
Position the valve over the s-unions.
Secure the valve to the unions by
rotating the nuts clockwise.
Install the support on the shower
arm.
Lubricate the o-rings on the shower
arm.
Install the shower arm on the riser.
Placez le mélangeur sur les raccords en S.
Raccordez les brides aux raccords
en les tournant dans le sens des
aiguilles d’une montre.
Installez la bride sur le bras de
douche.
Lubrifiez les joints du bras de
douche.
Installez le bras de douche sur la
colonne montante.
Coloque el mezclador sobre las
juntas tipo s.
Conecte las bridas a las juntas
rotando las bridas en sentido
horario.
Instale la brida en el brazo de
ducha.
Lubrique las juntas del brazo de
ducha.
Instale el brazo de ducha en la
tubería de subida.
2
10
Installation / Installation / Instalación
Page 11
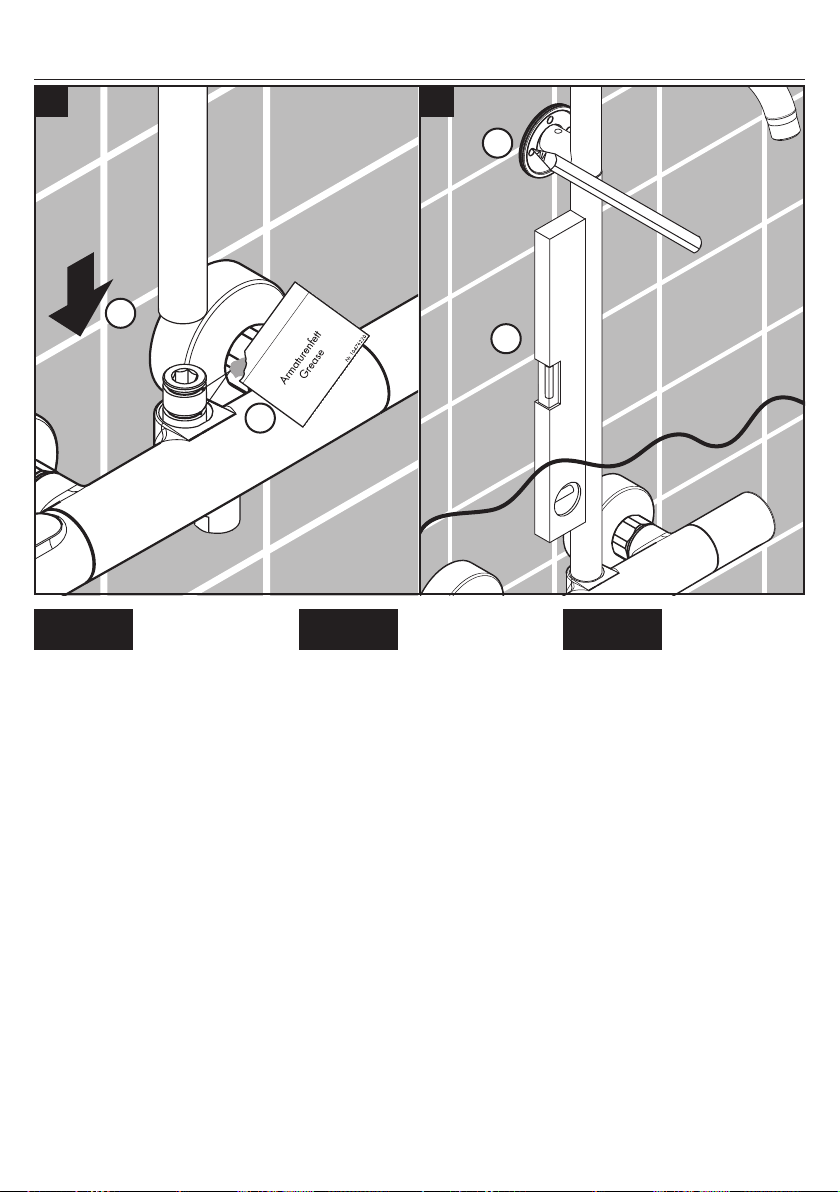
7 8
2
2
1
1
English Français Español
Lubricate the o-rings on the valve.
Install the riser on the valve.
Make sure that the riser is level.
Mark the positions of the screw
holes.
Lubrifiez les joints du robinet.
Installez la colonne montante sur
le robinet.
Assurez-vous que la colonne montante est au niveau.
Marquez la position du trou de
vissage.
Lubrique las juntas de la válvula.
Instale la tubería de subida en la
válvula.
Asegúrese de que la tubería de
subida quede nivelada.
Marque la posición del orificio
para el tornillo.
Installation / Installation / Instalación
11
Page 12
109
English Français Español
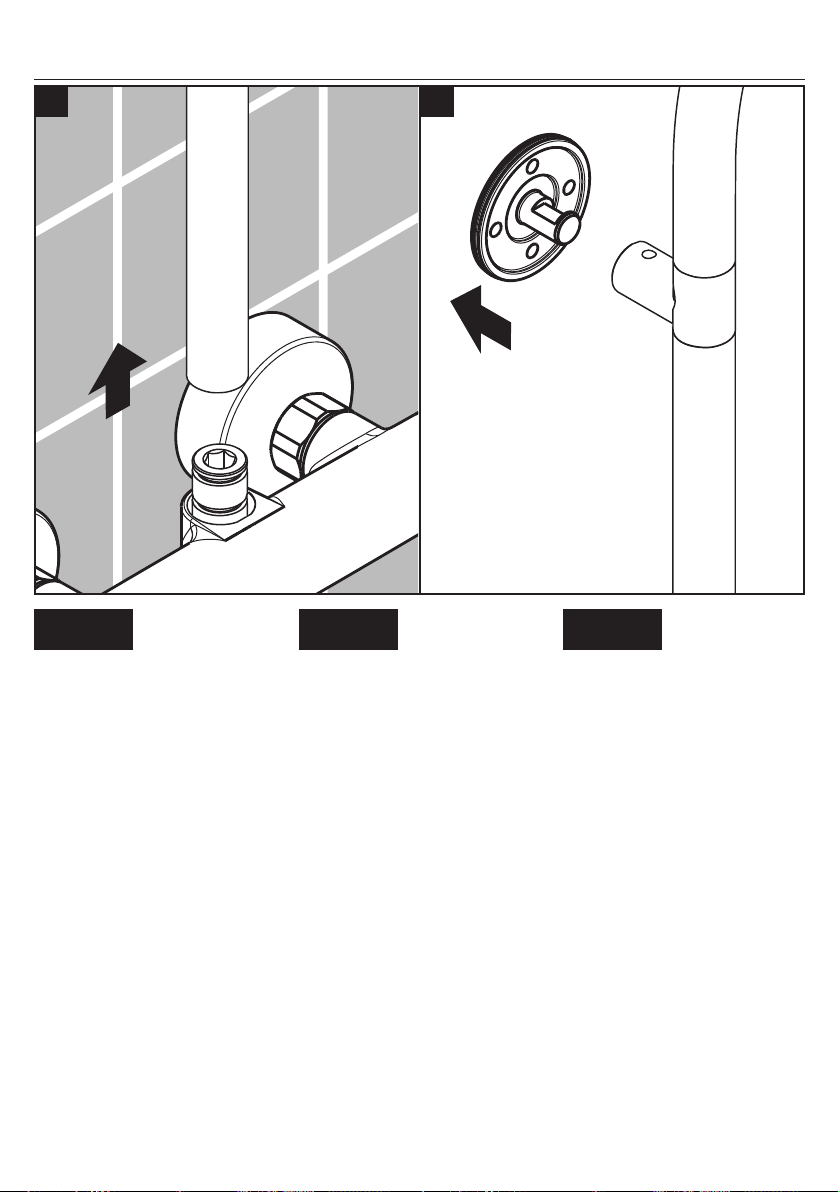
Remove the riser assembly.
Remove the mounting piece.
Retirez la colonne montante.
Retirez la bride.
Retire la tubería de subida.
Retire la brida.
12
Installation / Installation / Instalación
Page 13
11 12
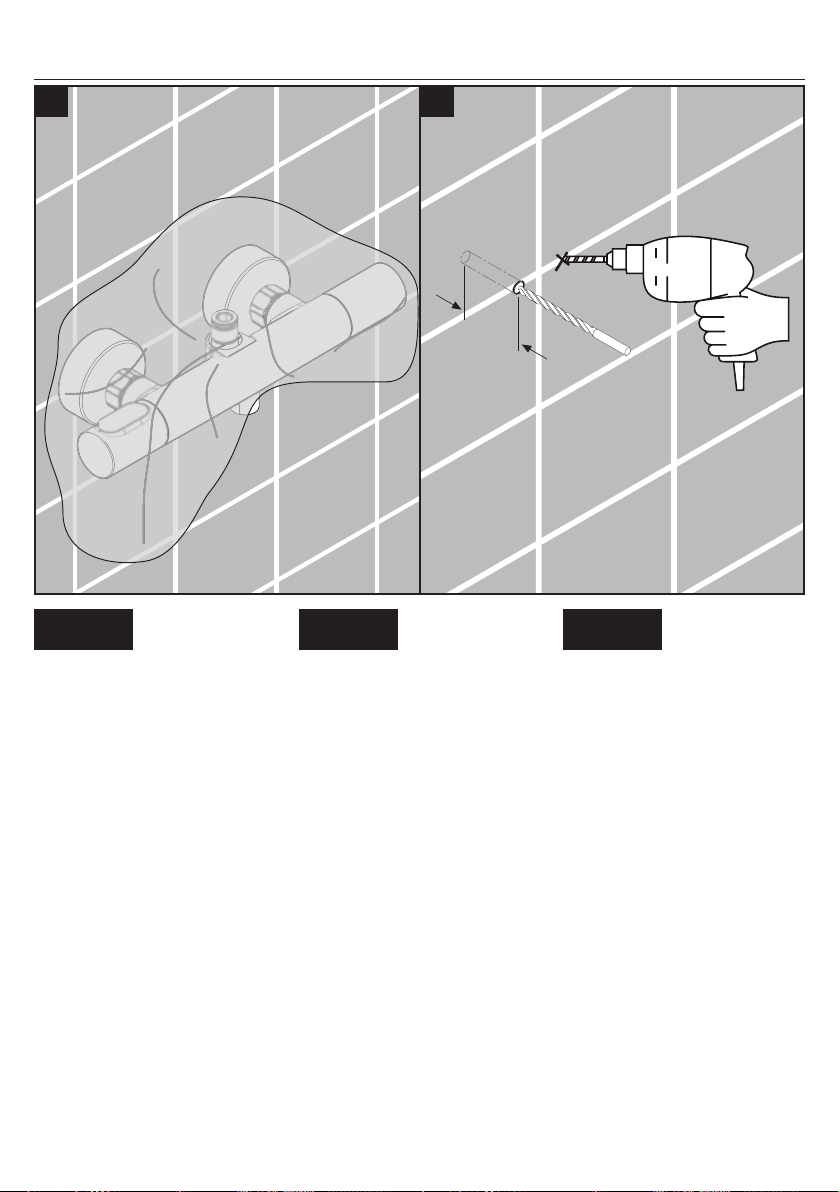
2"
6 mm / ¼"
English Français Español
Protect the valve.
Drill the screw holes.
Protegez le robinet.
Percez les trous de vissage.
Proteja la válvula.
Perfore el orificio para el tornillo.
Installation / Installation / Instalación
13
Page 14
13
14a
6 mm / ¼"
English Français Español
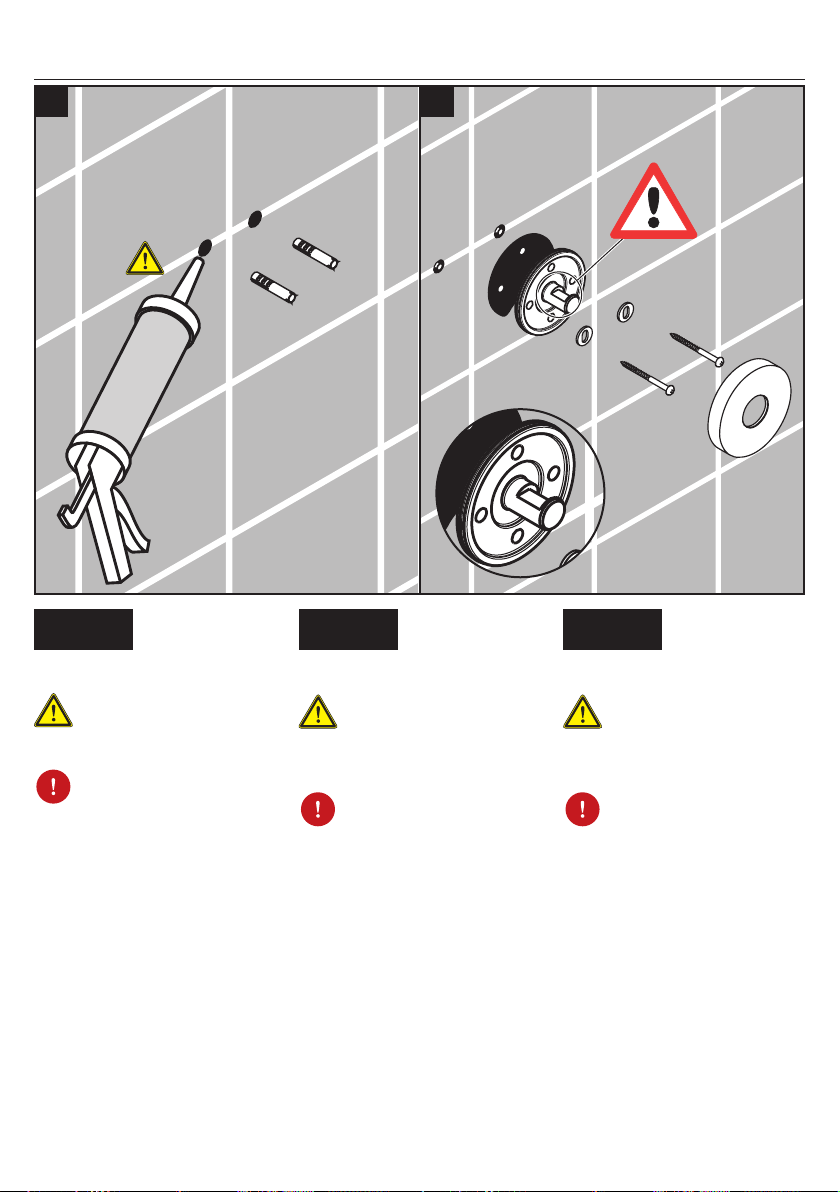
Install the anchors.
Seal the wall around
the anchors with waterproof sealant.
Failure to seal the
wall may result in
water damage.
Install the mounting piece.
Installez les chevilles.
Scellez le mur autour
de la cheville à
l’aide d’un agent
d’étanchéité.
Si le mur n’est pas
scellé, l’eau pourrait
éventuellement causer des dommages.
Installez la bride.
Instale los pernos de anclaje.
Selle la pared alrededor del perno de anclaje con un sellador
impermeable.
Si no se sella la
pared, pueden producirse daños por
acción del agua.
Instale la brida.
14
Installation / Installation / Instalación
Page 15
14b
or / o / ou
15
3
95239xx0
1
English Français Español
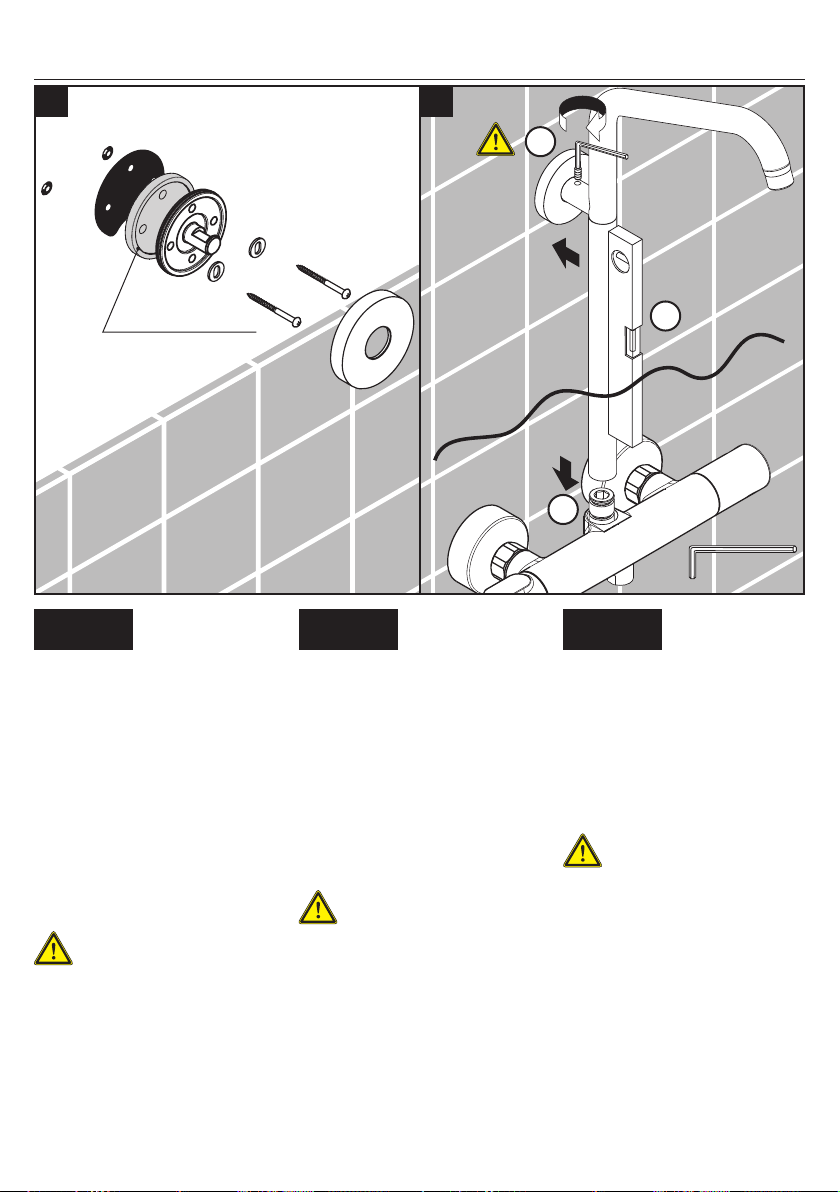
If the valve is mounted on tile, but
the top support is not, install tile
spacer 95239xx0 behind the top
support.
Install the riser on the valve.
Make sure that the riser is level.
Push the shower arm assembly
over the mounting piece.
Tighten the screw using a 3 mm
Allen wrench.
Do not over-tighten
the screw.
Si nécessaire, installez le disque
compensateurs 95239xx0.
Installez la colonne montante sur
le robinet.
Assurez-vous que la colonne montante est au niveau.
Installez le bras de douche
Serrez la vis.
Ne serrez pas trop
la vis.
Si es necesario, instale el pieza
desuplemento 95239xx0.
Instale la tubería de subida en la
válvula y la brida.
Instale el brazo de ducha.
Apriete el tornillo.
No apriete en exceso
el tornillo.
2
3 mm
Installation / Installation / Instalación
15
Page 16
16
8"
"
¹⁵⁄₁₆
English Français Español
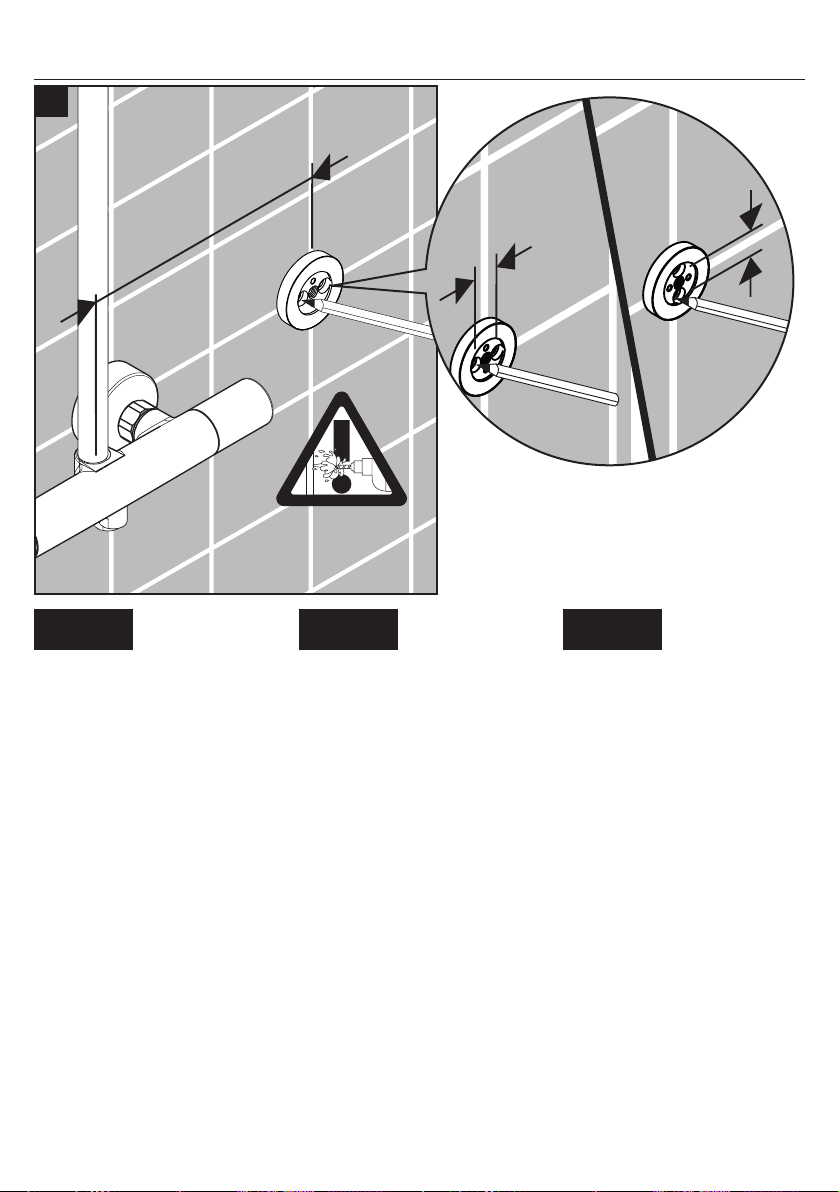
Position the handshower holder
escutcheon against the wall at the
desired mounting position.
Mark the positions of the screw
holes.
Placez le support sur ’emplacement souhaité.
Marquez les positions des trous de
vissage.
Coloque el soporte en el lugar
deseado.
Marque las posiciones de los
orificios para tornillos.
"
¹⁵⁄₁₆
16
Installation / Installation / Instalación
Page 17
17 18
2"
1
6 mm / ¼"
2
English Français Español
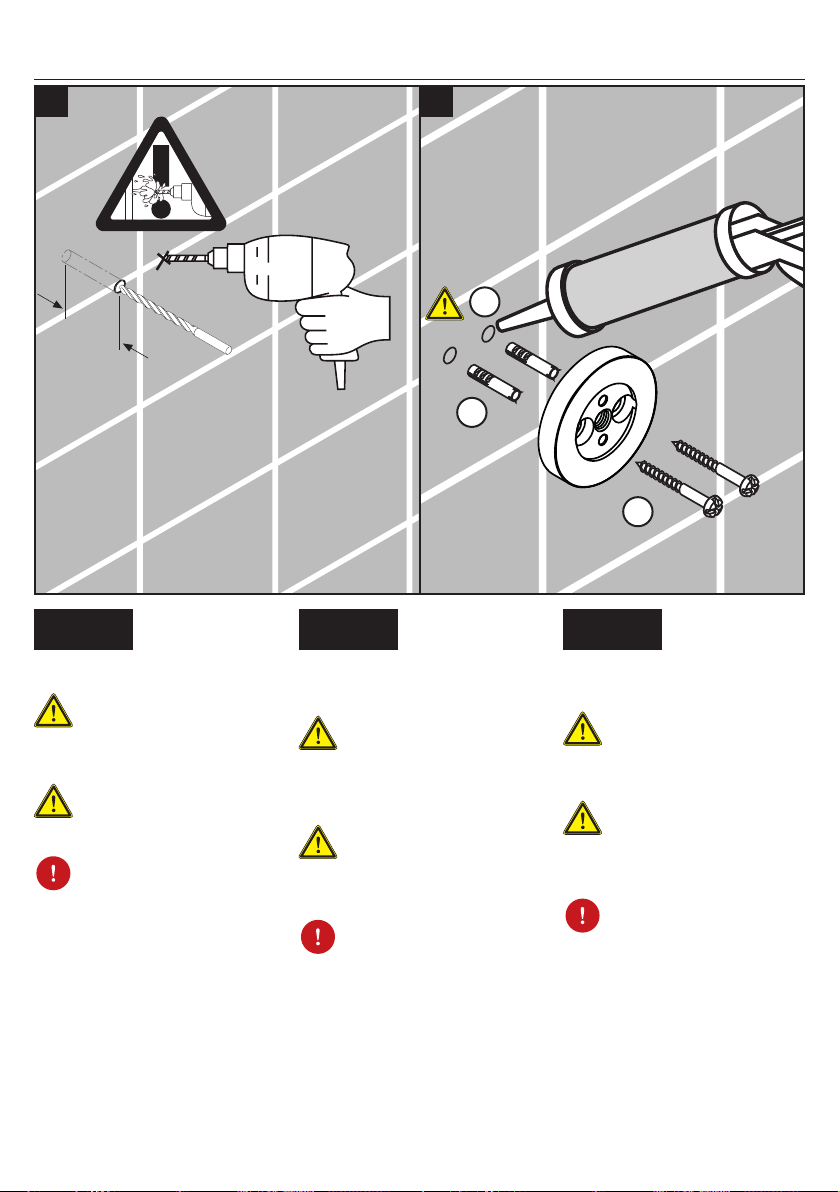
Drill the holes.
Do not drill into water lines.
Install the anchors.
Seal the wall around
the anchors using
waterproof sealant.
Failure to seal the
wall may lead to
water damage.
Install the escutcheon.
Percez les trous à l’aide d’une
mèche de ¼ po.
Ne pas entraînez
dans les tuyaux
d’eau.
Installez les chevilles.
Scellez le mur autour des chevilles à
l’aide d’un agent
d’étanchéité.
Si le mur n’est pas
scellé, l’eau pourrait
éventuellement causer des dommages.
Installez l'écusson.
Perfore los orificios con una broca
de ¼".
No taladre en caños
de agua.
Instale los pernos de anclaje.
Selle la pared alrededor de los pernos de
anclaje con un sellador impermeable.
Si no se sella la
pared, pueden producirse daños por
acción del agua.
Instale el florón.
3
Installation / Installation / Instalación
17
Page 18
19
20
1
18
2
5 mm
English Français Español
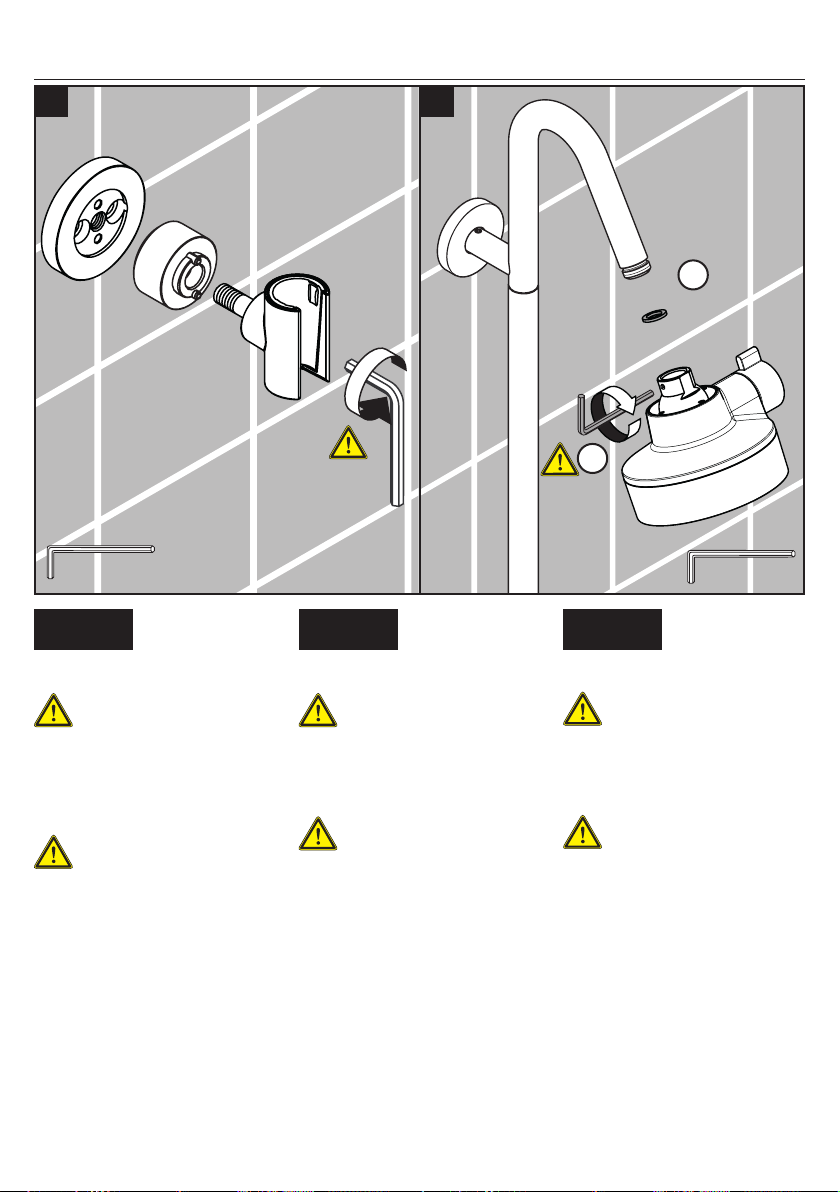
Install the handshower holder.
Do not over-tighten
the handshower
holder.
Install the shower head.
Tighten the safety screw.
Do not over-tighten
the safety screw.
18
Installez le support douchette.
Ne serrez pas trop le
support.
Installez la pomme de douche.
Serrez la vis de sûreté.
Ne serrez pas trop
la vis.
Instale el soporte de ducha.
No apriete en exceso
el soporte.
Instale la ducha.
Apriete el tornillo de seguridad.
No apriete en exceso
el tornillo.
Installation / Installation / Instalación
2 mm
Page 19
21
2
1
English Français Español
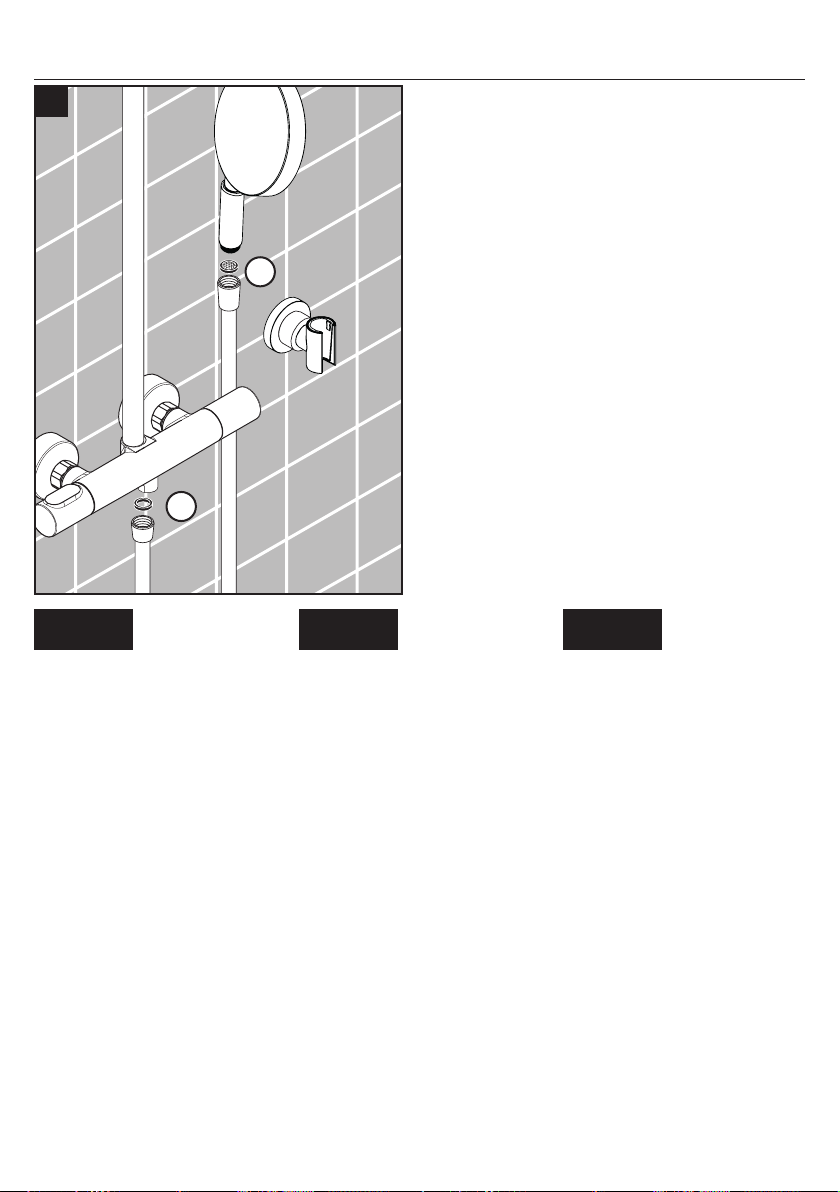
Place the hose washer the short
end of the handshower hose.
Connect this end to the valve.
Place the screen washer in the
long end of the handshower hose.
Connect this end to the
handshower.
Rest the handshower in the holder.
Placez la rondelle en caoutchouc
noir dans l’une des extrémités du
tuyau. Fixez cette extrémité au
robinet.
Placez le tamis dans l’autre
extrémité du tuyau. Fixez cette
extrémité à la douchette.
Déposez la douchette dans son
support.
Coloque la arandela de goma
negra en un extremo de la
manguera. Acople este extremo
al grifo de la bañera.
Coloque la arandela de filtro en
el otro extremo de la manguera.
Acople este extremo a la ducha
de mano.
Apoye la ducha de mano en el
soporte.
Installation / Installation / Instalación
19
Page 20
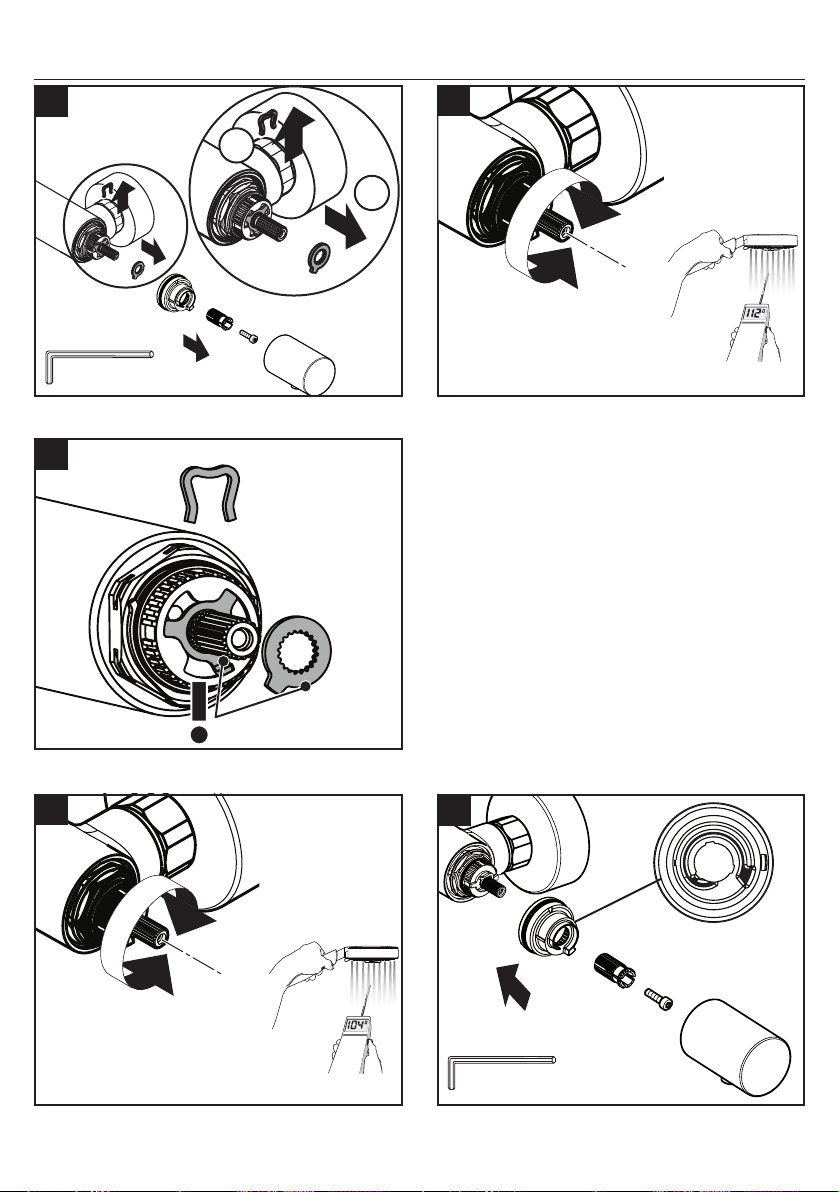
Set the high temperature limit stop / Réglage de la butée limite d’eau chaude / Ajuste el
tope de límite de alta temperatura
1
3 mm
3
2
2
1
**
**Follow all applicable local plumbing codes when setting
the high temperature limit stop. To prevent scald injury, the
maximum output temperature of the shower valve must be no
higher than 120°F. In Massachusetts, the maximum output
temperature can be no higher than 112°F.
**Pour empêcher des blessures par ébouillantement, la température de sortie maximale du robinet de douche ne doit pas
excéder 120°F. Au Massachusetts, la température de sortie
maximale du robinet de douche ne doit pas excéder 112°F.
**Al prevnent escalda herida, la temperatura de salida
máxima de la válvula de chaparrón no debe ser más alto que
120°F. En Massachusetts: la temperatura de salida máxima
de la válvula no puede ser más alto que 112°F.
20
4
5
3 mm
Page 21
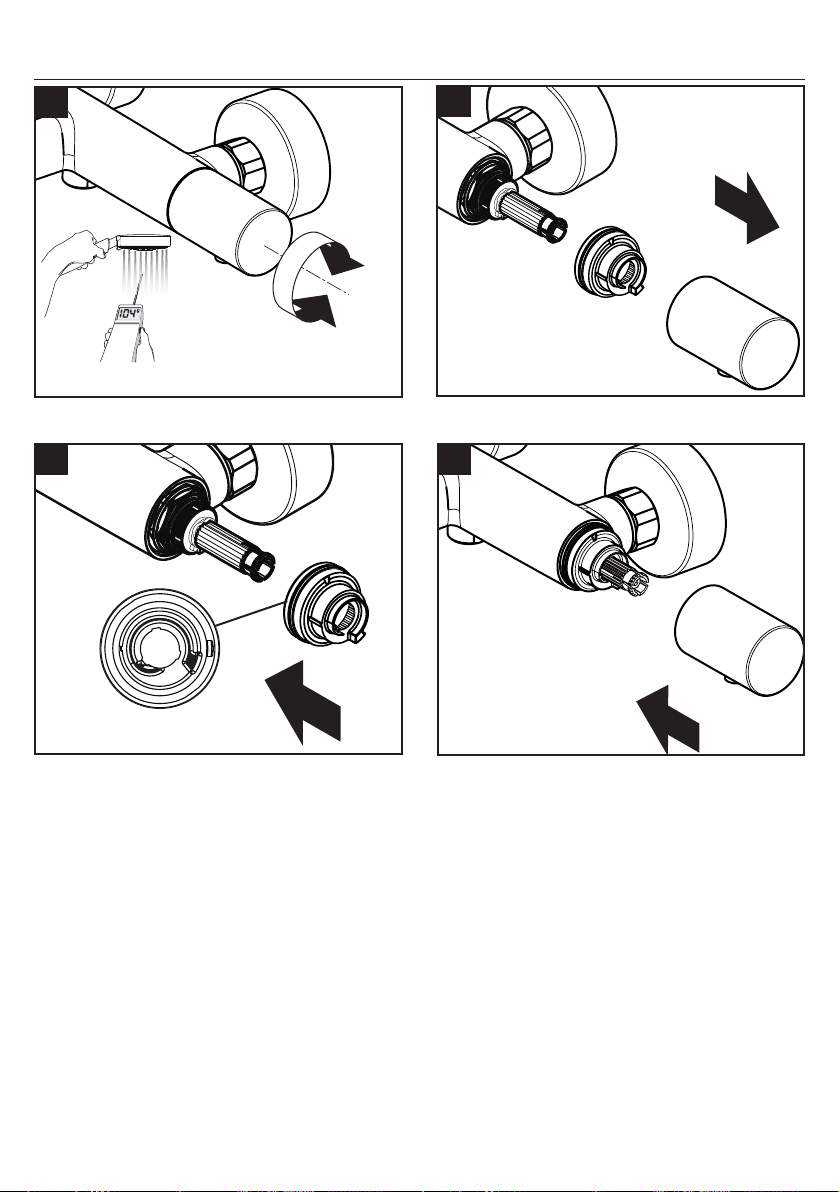
Justify the handle / Réglez la poignée / Ajuste la manija
1
3
2
4
21
Page 22
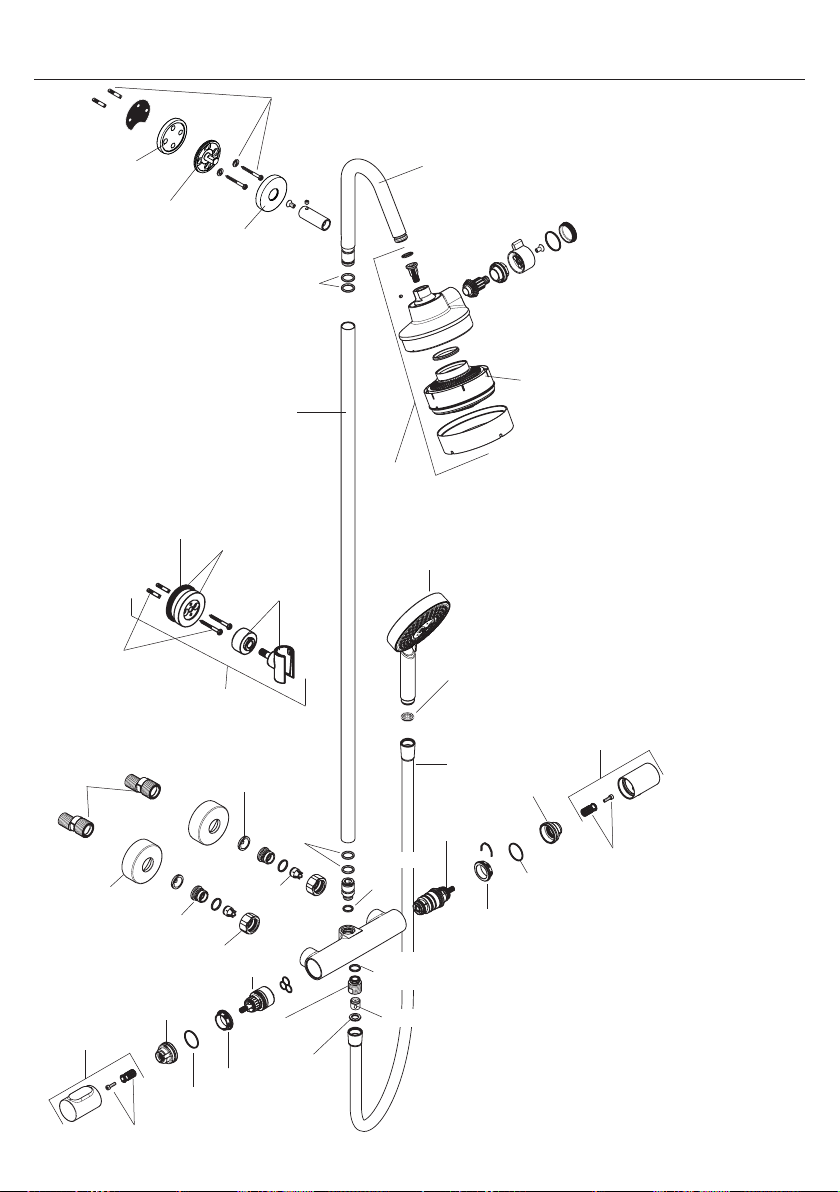
Replacement Parts / Pièces détachées / Repuestos
96179000
95239xx0
40916000
94140001
96467xx0
98288xx0
95688000
97530000
98137000
(17x1.5)
98289000
95692xx0
39525xx0
96157xx0
98283000
98913000
(26x1.5)
98134000
16x2.5
96743xx0
97716xx0
97705xx0
96922000
98131000
(15x2.5)
96737000
96044000
98058000
39740xx1
28514xx1
98282000
98214000
(12x2)
98129000
(14x2)
94074000
98995xx0
92020000
94246000
98287xx0
28276xx3
98289000
98290000
98390000
(26x1.5)
98913000
xx = Colors / Couleurs / Acabados
00 = Chrome
82 = Brushed Nickel
22
98290000
Page 23
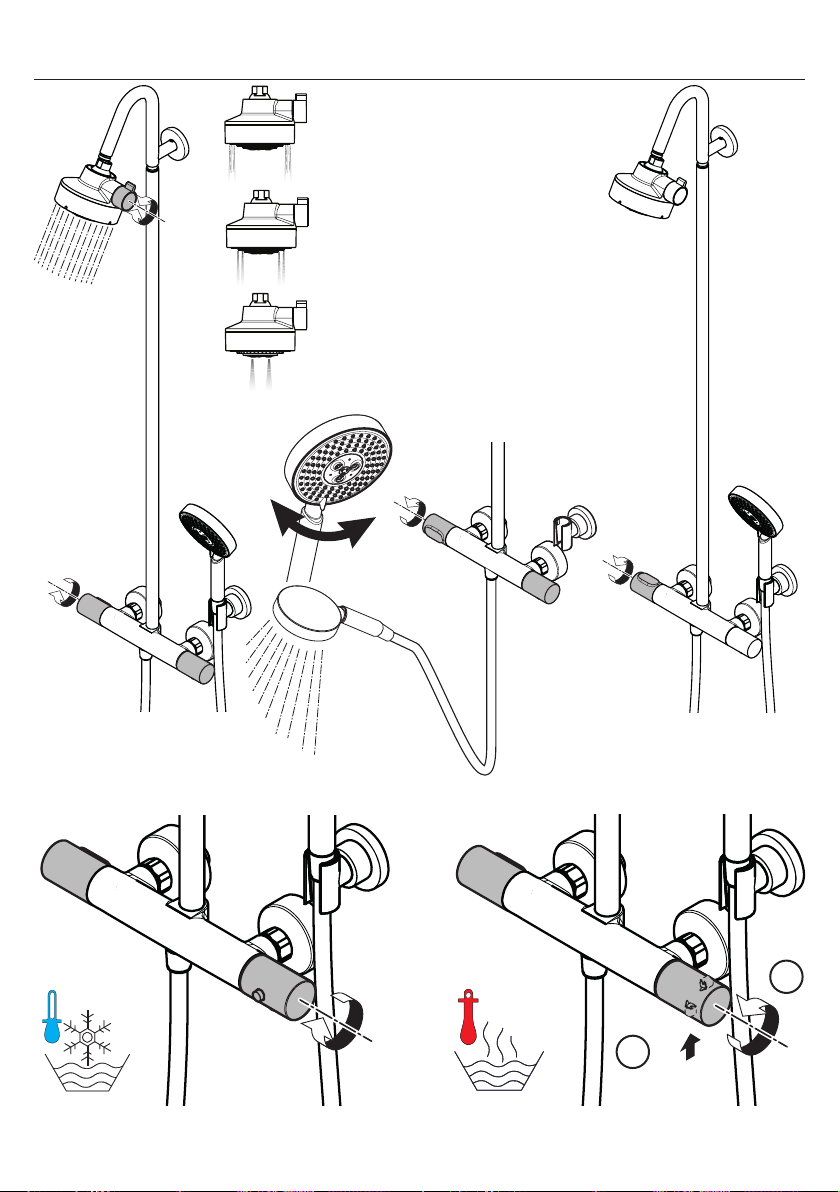
User Instructions / Instructions de service / Manejo
on / ouvert / abierto
off / fermé / cerrado
2.
1.
23
Page 24
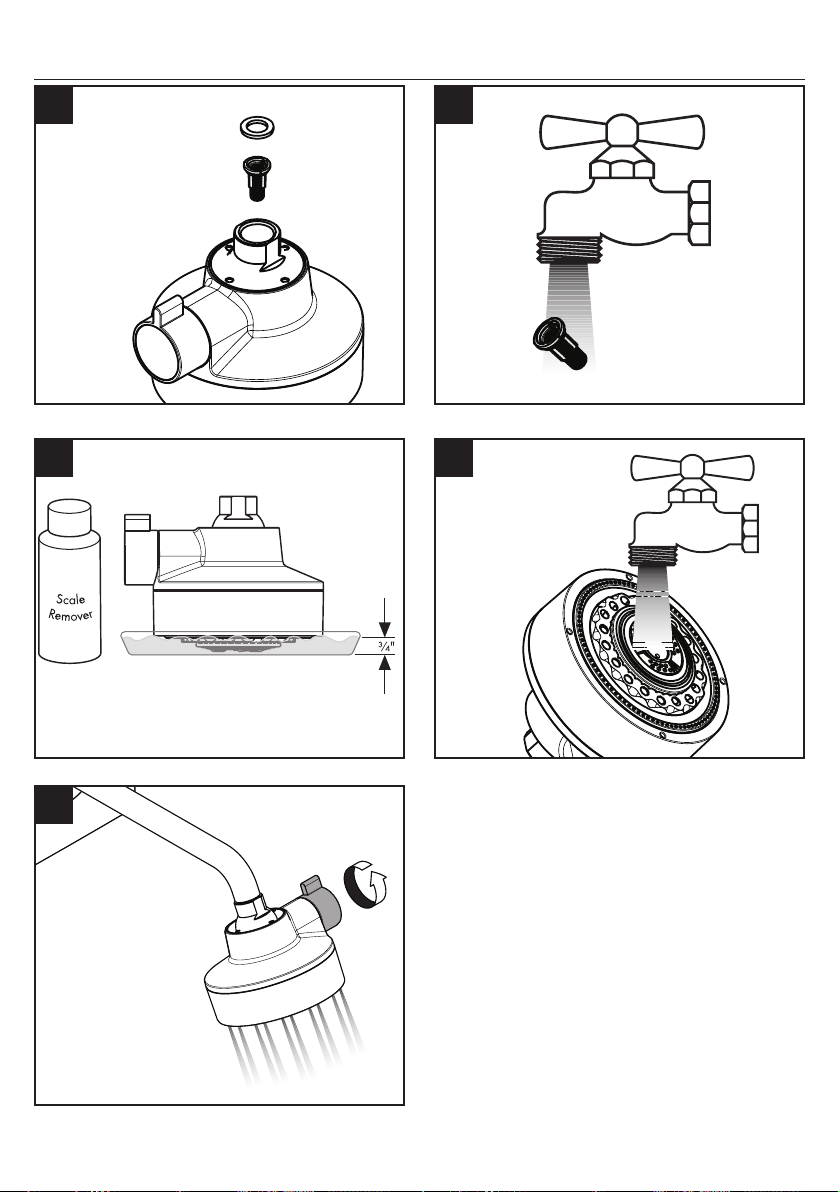
Cleaning / Nettoyage / Limpieza
1 2
3 4
Scale remover / Détartrant commercial /
Desincrustante comercial
5
> 1 min.
24
Page 25
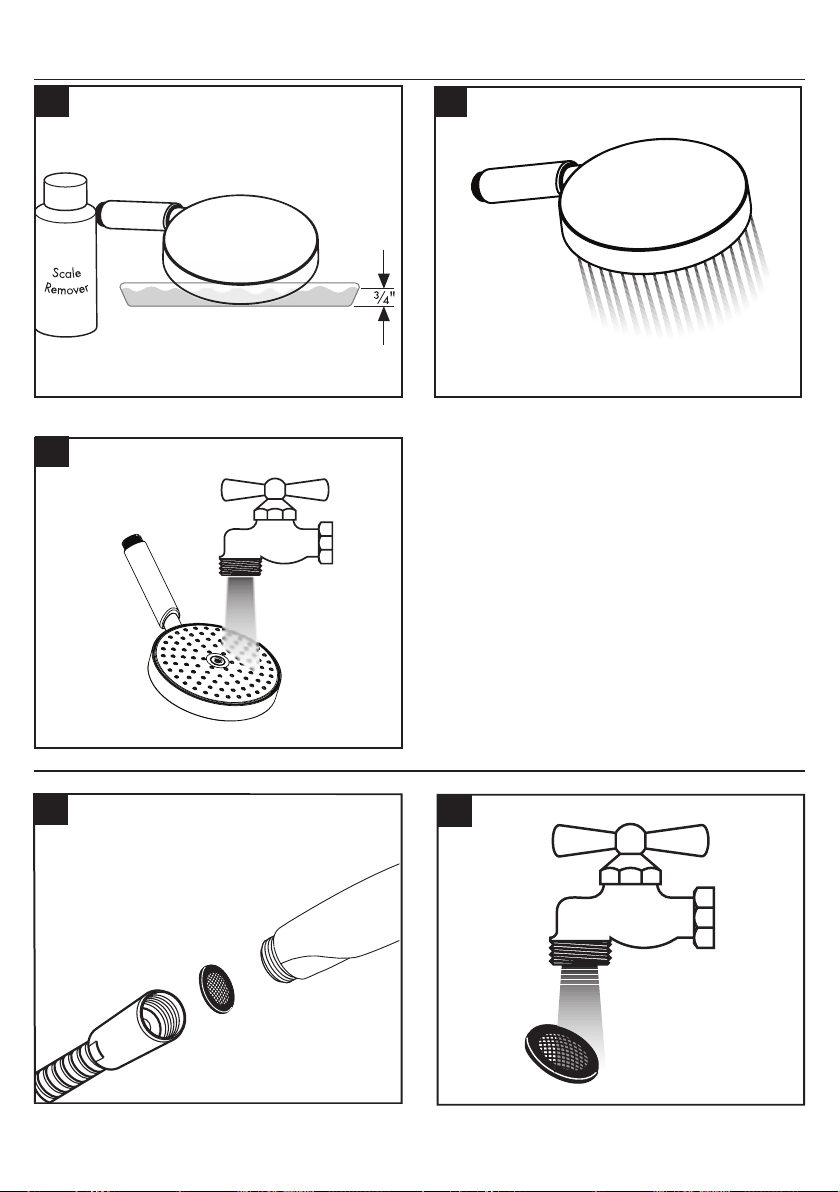
Cleaning / Nettoyage / Limpieza
1
3
2
> 1 min
1
2
25
Page 26
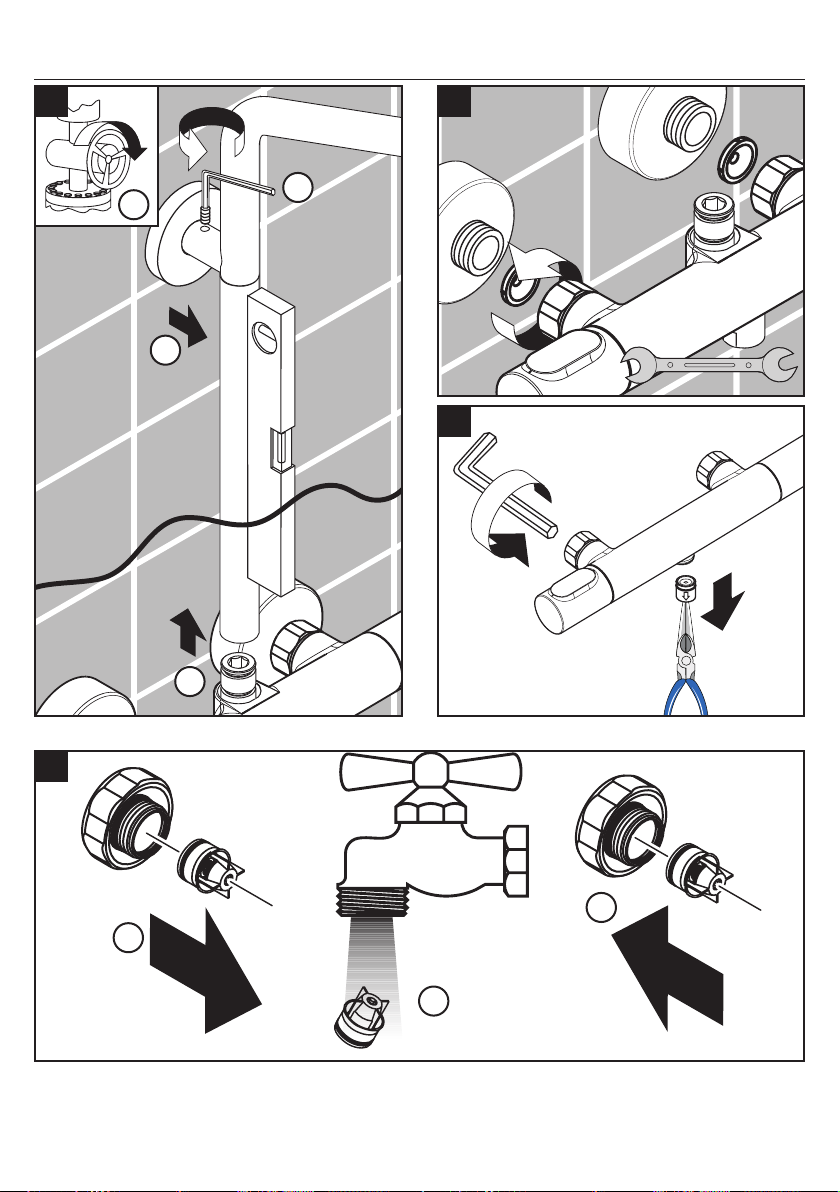
Maintenance / Entretien / Mantenimiento
1
2
1
2
3 mm
3
3
30 mm
10 mm
4
26
4
3
1
2
Page 27
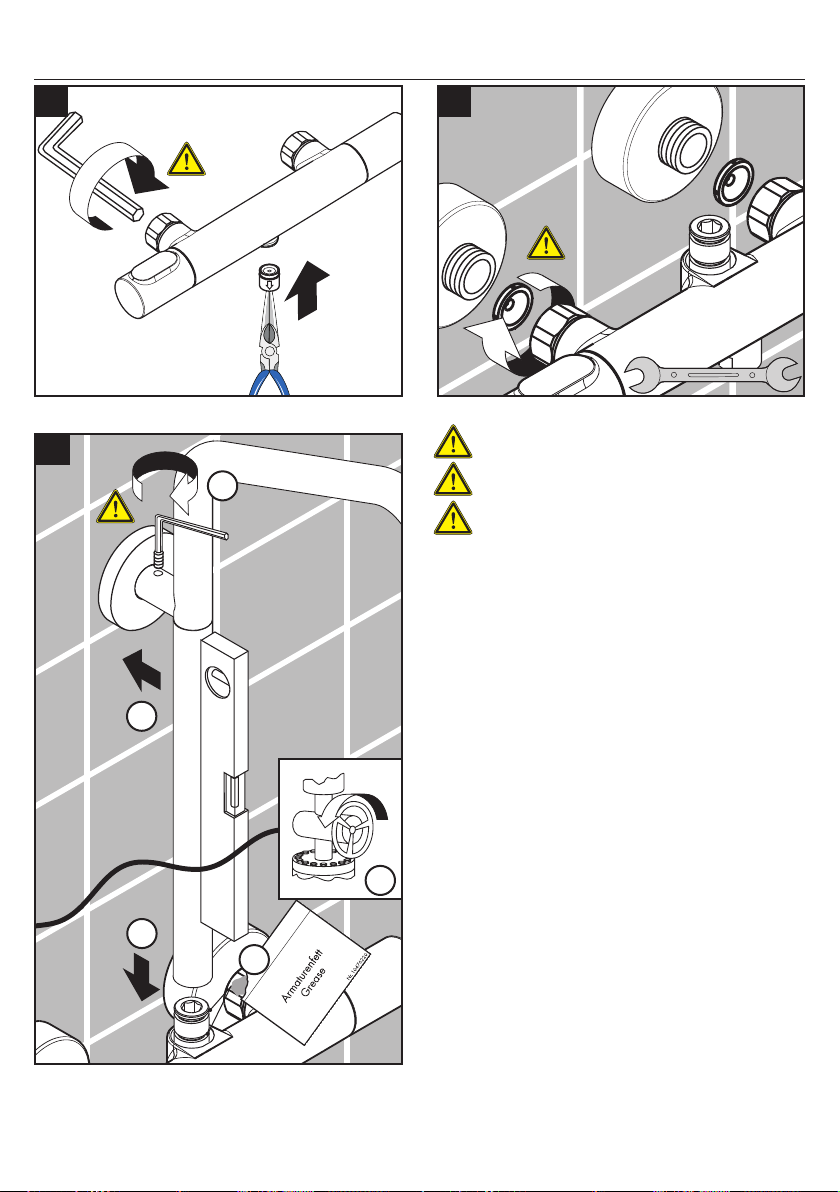
5
6
10 mm
30 mm
7
4
Do not over-tighten
Ne serrez pas trop
No apriete en exceso
3 mm
3
5
2
1
27
Page 28

Cleaning Recommendation for Hansgrohe Products
Modern bathroom faucets, kitchen faucets and shower products are made from different materials to comply with the needs
of the market with regard to design and functionality. To avoid damage to the product, it is necessary to take proper care of
it.
For best results:
• Prevent the buildup of mineral scale and /or soap residue by cleaning your Hansgrohe product(s) when needed.
• Select a cleaning agent specifically intended for the type of product.
• Do not use these types of cleaners as they will cause damage to your Hansgrohe product:
Any cleaning agent containing hydrochloric acid, formic acid, lye, or acetic acid.
Abrasive cleaning powders, pads, or brushes.
Steam cleaners.
“No rinse” cleaning agents.
• Always follow the instructions provided by the manufacturer of the cleaning agent.
• Do not mix cleaning agents, unless directed by the manufacturer.
• Do not spray cleaners directly onto the product as drops could enter openings and gaps and cause damage. When
using spray cleaners, spray the cleaner onto a soft cloth or sponge.
• Always rinse your Hansgrohe product thoroughly with clear water and polish dry with a soft cloth after cleaning.
Important
• Residue from soaps, shampoos, hair dye, and other toiletries and cosmetics can cause damage. Rinse the product with
clean water after each use.
• Residue from basin/tub/tile cleaner can cause damage to faucets and fittings. Immediately rinse any overspray from
the Hansgrohe product.
• Do not store any cleaning agents under your Hansgrohe product, such as in a vanity unit, as the fumes may damage
the product.
• Damage to the product caused by improper care or the use of improper cleaning agents is not
covered by the warranty.
• If a component of the product is damaged, replace it, as there is risk of injury.
Conseil de nettoyage pour les produits Hansgrohe
Les robinets pour les salles de bains et les cuisines modernes ainsi que les produits récents pour les douches se composent
de matériaux différents afin de satisfaire aux besoins du marché en termes de conception et de fonctionnalité. Afin d'éviter
d'endommager le produit, il est nécessaire d'en prendre soin.
Pour de meilleurs résultats :
• Empêchez l'accumulation de tarte et/ou de résidu de savon en nettoyant votre produit Hansgrohe lorsque c'est nécessaire.
• Sélectionnez un produit de nettoyage spécifiquement prévu pour ce type de produit.
• N'utilisez pas ces types de nettoyants car ils peuvent endommager votre produit Hansgrohe :
Tout produit de nettoyage contenant de l’acide chlorhydrique, de l’acide formique, de la potasse ou de l’acide
acétique.
Les poudres de nettoyage, les tampons ou les brosses abrasives.
Les nettoyeurs à vapeur.
Les produits de nettoyage « sans rinçage ».
• Ne mélangez pas les produits de nettoyage, à moins que cela soit indiqué par le fabricant.
28
Page 29

• Ne pulvérisez pas les nettoyants directement sur le produit car des gouttes pourraient entrer dans les ouvertures et
les fentes et causer des dommages. Lorsque vous utilisez des nettoyants par pulvérisation, pulvérisez le nettoyant sur
un chiffon ou une éponge douce.
Important
• Les residus de produits pour le corps comme les savons liquides, shampooings, gels de douche, teintures pour cheveux,
parfums, apres-rasage et vernis a ongles peuvent causer des deteriorations. Rincez le produit avec de l'eau propre
après chaque utilisation.
• Le résidu provenant des nettoyants pour cuvette/baignoire/carrelage peut endommager les robinets et les raccords de
tuyauterie. Rincez immédiatement toute surpulvérisation sur le produit Hansgrohe.
• De meme, il est interdit de stocker des detergents ou des produits chimiques sous les produits, par ex. dans un meuble
sous lavabo, car les vapeurs qui s'en degagent risquent d'abimer les produits.
• Les dommages au produit causés par un mauvais entretien ou par l'utilisation de produits de nettoyage inadéquats ne sont pas couverts par la garantie.
• Si un composant du produit est endommagé, remplacez-le, car il existe un risque de blessure.
Recomendación de limpieza para los productos de Hansgrohe
Hoy en día, las griferías de baño y de cocina así como duchas modernas se componen de materiales muy distintos para
satisfacer las exigencias del mercado respecto al diseño y la funcionalidad. Para evitar daños y reclamaciones hay que
tener en cuenta ciertos aspectos tanto en el uso como en su limpieza.
Para obtener mejores resultados:
• Evite la acumulación de restos de jabón o sarro limpiando el producto Hansgrohe cuando sea necesario.
• Seleccione un agente de limpieza diseñado específicamente para el tipo de producto.
• No use estos tipos de limpiadores, ya que causarán daño a su producto Hansgrohe:
Agentes limpiadores que contengan ácido clorhídrico, fórmico, acético o lejía.
Polvos, paños o cepillos de limpieza abrasivos.
Limpiadores a vapor
Agentes de limpieza "sin enjuague”.
• Siempre siga las instrucciones provistas por el fabricante del agente de limpieza.
• No mezcle los agentes de limpieza, a menos que esté indicado por el fabricante.
• No rocíe limpiadores directamente sobre el producto, ya que podrían caer gotas sobre las aberturas y espacios y
causar daños. Cuando use limpiadores en spray, rocíe el limpiador sobre un paño suave o esponja.
• Siempre enjuague su producto Hansgrohe con agua limpia y séquelo y lústrelo con un paño suave después de la
limpieza.
Importante
• Los residuos de productos de aseo como jabon liquido, champus, gel de ducha, tintes de pelo, perfumes, lociones de
afeitado y esmalte de unas pueden danar tambien los materiales. Enjuague el producto con agua limpia después de
cada uso.
• Los residuos de limpiadores para lavatorios, bañeras o azulejos pueden causar daño a los grifos y accesorios. Enjuague inmediatamente cualquier derrame que haya sobre el producto de Hansgrohe.
• Tampoco pueden generarse depositos de productos de limpieza o quimicos debajo de los productos, p. ej. En un
armario de lavabo. De lo contrario, los vapores generados pueden danar los productos.
• Los daños que resulten de un cuidado inadecuado o uso de agentes de limpieza inadecuados no
están cubiertos por la garantía.
• Si se daña un componente del producto, reemplácelo, ya que existe riesgo de lesión.
29
Page 30

Limited Consumer Warranty
This product has been manufactured and tested to the highest quality standards by Hansgrohe, Inc. (“Hansgrohe”). This warranty is limited to
Hansgrohe products that are purchased by a consumer in the United States or Canada after March 1, 1996, and installed in either the United
States or in Canada.
WHO IS COVERED BY THE WARRANTY
This warranty extends to the original purchaser only. This warranty is non-transferable.
WHAT IS COVERED BY THE WARRANTY
The warranty covers only your Hansgrohe manufactured product. Hansgrohe warrants this product against defects in material or workmanship
as follows:
Hansgrohe will replace at no charge for parts only or, at its option, replace any product or part of the product that proves defective because
of improper workmanship and/or material, under normal installation, use, service and maintenance. If Hansgrohe is unable to provide a
replacement and repair is not practical or cannot be made in timely fashion, Hansgrohe may elect to refund the purchase price in exchange
for the return of the product.
LENGTH OF WARRANTY
Replacement or repaired parts of products will be covered for the term of this warranty, as stated in the following two sentences. If you are a
consumer who purchased the product for use primarily for personal, family or household purposes, this warranty extends for as long as you
own the product and the home in which the product is originally installed. If you purchased the product for use primarily for any other purpose,
including, without limitation, a commercial purpose, this warranty extends only (i) for 1 year, with respect to Hansgrohe & Commercial products, and (ii) for 5 years, with respect to Axor products.
THIS WARRANTY DOES NOT COVER, AND HANSGROHE WILL NOT PAY FOR:
A. Conditions, malfunctions or damage not resulting from defects in material or workmanship.
B. Conditions, malfunctions or damage resulting from
(1) normal wear and tear, improper installation, improper maintenance, misuse, abuse, negligence, accident or alteration;
(2) the use of abrasive or caustic cleaning agents or “no-rinse” cleaning products, or the use of the product in any manner
contrary to the product instructions; or
(3) conditions in the home such as excessive water pressure or corrosion.
C. Labor and other expenses for disconnection, deinstallation, or return of the product for warranty service (including but not limited to proper
packaging and shipping costs), or for installation or reinstallation of the product.
D. Accessories, connected materials and products, or related products not manufactured by Hansgrohe.
E. Any Hansgrohe or Axor product sold for display purposes.
F. Hansgrohe Water Filtration System is subject to a 1-year limited warranty. Warranty does not include replacement filters.
TO OBTAIN WARRANTY PARTS OR INFORMATION
Contact your Hansgrohe retailer, or contact Technical Service at:
Hansgrohe, Inc.
1492 Bluegrass Lakes Parkway
Alpharetta, GA 30004
Toll-free 800-334-0455
In requesting warranty service, you will need to provide:
1. The sales receipt or other evidence of the date and place of purchase.
2. A description of the problem.
3. Delivery of the product or the defective part, postage prepaid and carefully packed and insured, to:
Hansgrohe, Inc.
1492 Bluegrass Lakes Parkway
Alpharetta, GA 30004
Toll-free 800-334-0455
When warranty service is completed, any repaired or replacement product or part will be returned to you postage prepaid.
Exclusions and Limitations
REPAIR OR REPLACEMENT (OR,IN LIMITED CIRCUMSTANCES,REFUND OF THE PURCHASE PRICE) AS PROVIDED UNDER
THIS WARRANTY IS THE EXCLUSIVE REMEDY OF THE PURCHASER.HANSGROHE NEITHER ASSUMES NOR AUTHORIZES
ANY PERSON TO CREATE FOR IT ANY OTHER OBLIGATION OR LIABILITY IN CONNECTION WITH THIS PRODUCT.
30
Page 31

HANSGROHE SHALL NOT BE LIABLE TO PURCHASER OR ANY OTHER PERSON FOR ANY INCIDENTAL,SPECIAL
OR CONSEQUENTIAL DAMAGES,ARISING OUT OF BREACH OF THIS WARRANTY OR ANY IMPLIED WARRANTY
(INCLUDING BUT NOT LIMITED TO ANY IMPLIED WARRANTY OF MERCHANTABILITY).
Some States do not allow the exclusion or limitation of incidental or consequential damages, so the above limitation or exclusion may not
apply to you. This warranty gives you specific legal rights, and you may also have other rights that vary from state to state.
TO THE EXTENT PERMITTED BY LAW,ANY IMPLIED WARRANTIES OF MERCHANTABILITY AND FITNESS FOR A
PARTICULAR PURPOSE,ARE LIMITED TO THE DURATION OF THE EXPRESS WARRANTY.
Some states do not allow limitations on how long an implied warranty may last, so the above limitations may not apply to you.
You may be required by law to give us a reasonable opportunity to correct or cure any failure to comply before you can bring any action
in court against us under the Magnuson-Moss Warranty Act.
PRODUCT INSTRUCTIONS AND QUESTIONS
Upon purchase or prior to installation, please carefully inspect your Hansgrohe product for any damage or visible defect. Prior to installing,
always carefully study the enclosed instructions on the proper installation and the care and maintenance of this product. If you have questions at any time about the use, installation or performance of your Hansgrohe product, or this warranty, please write us or call us toll-free at
800-334-0455.
31
Page 32

Hansgrohe, Inc. • 1490 Bluegrass Lakes Parkway • Alpharetta, GA 30004
Tel. 800-334-0455 • Fax 770-889-1783
www.hansgrohe-usa.com
US - Installation Instructions • Part No. 90202121 • Revised 01/2016
 Loading...