

Page 1
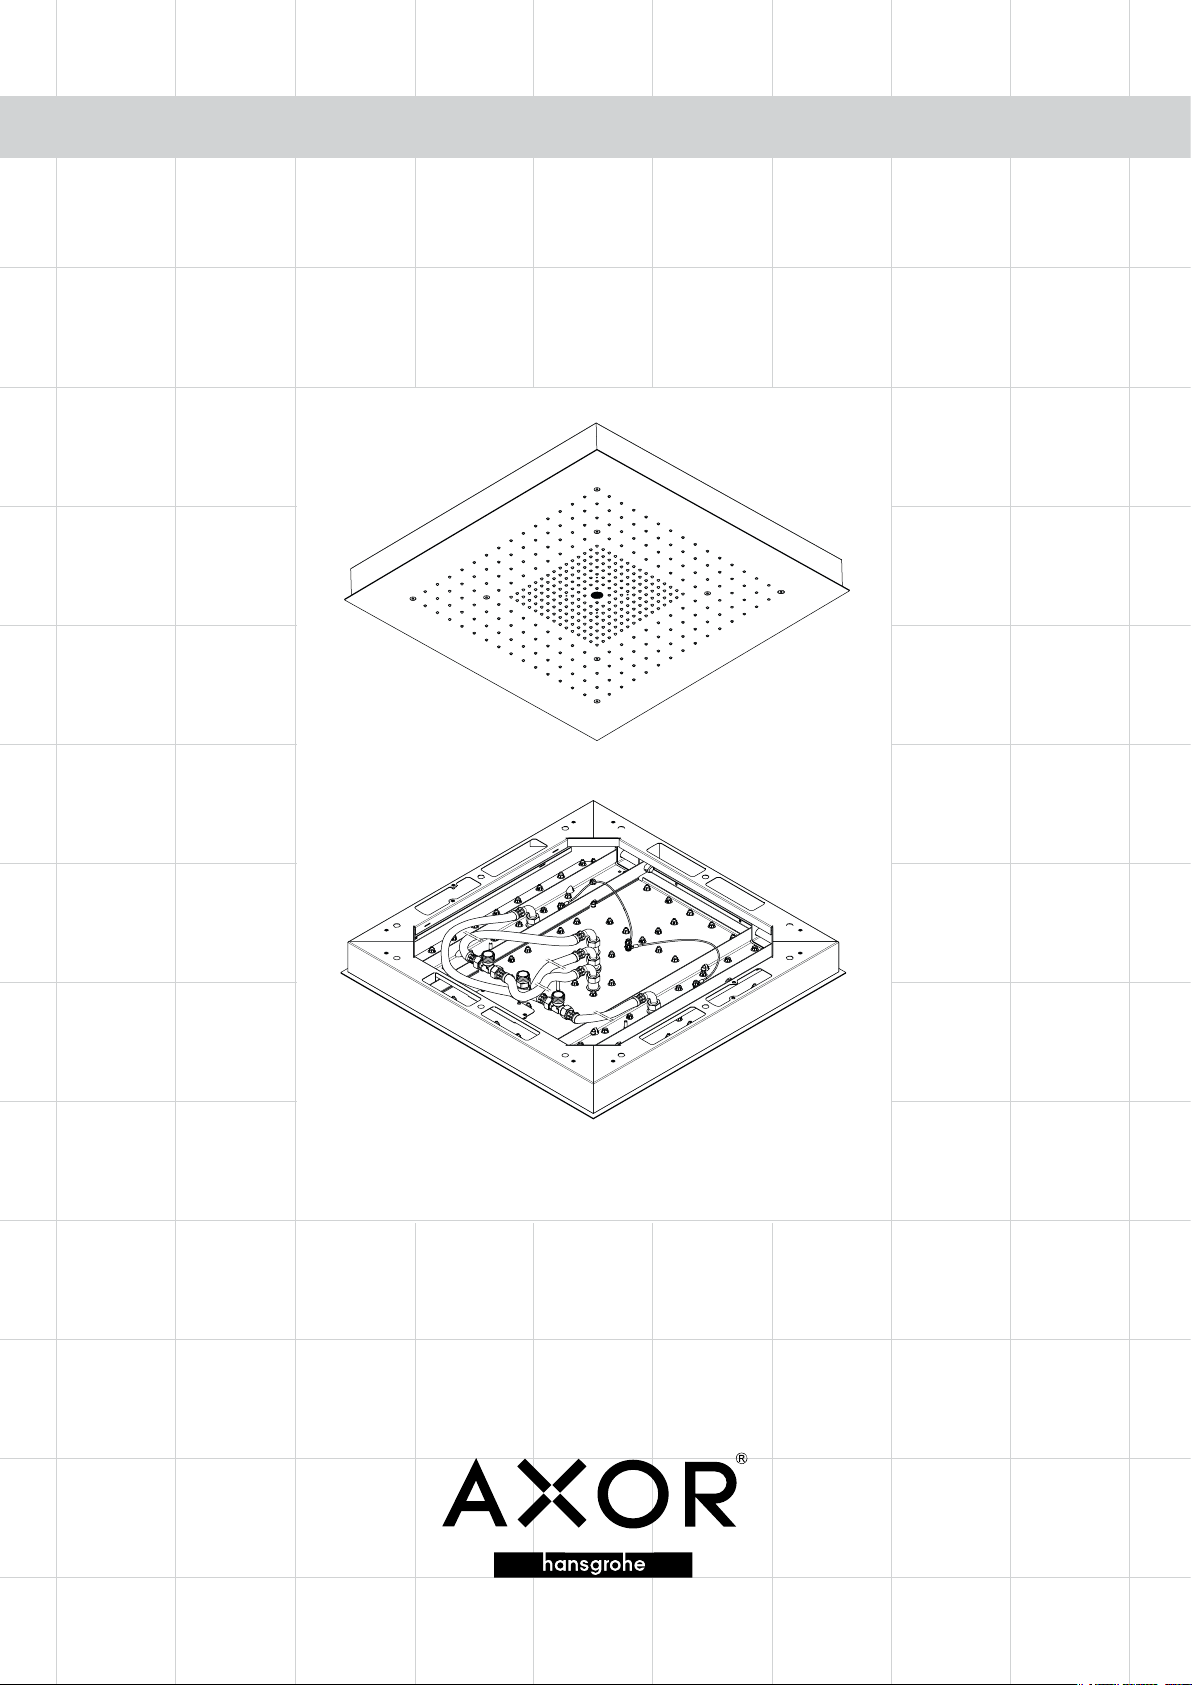
Installation Instructions / Warranty
Showerheaven
10625XX1
Page 2
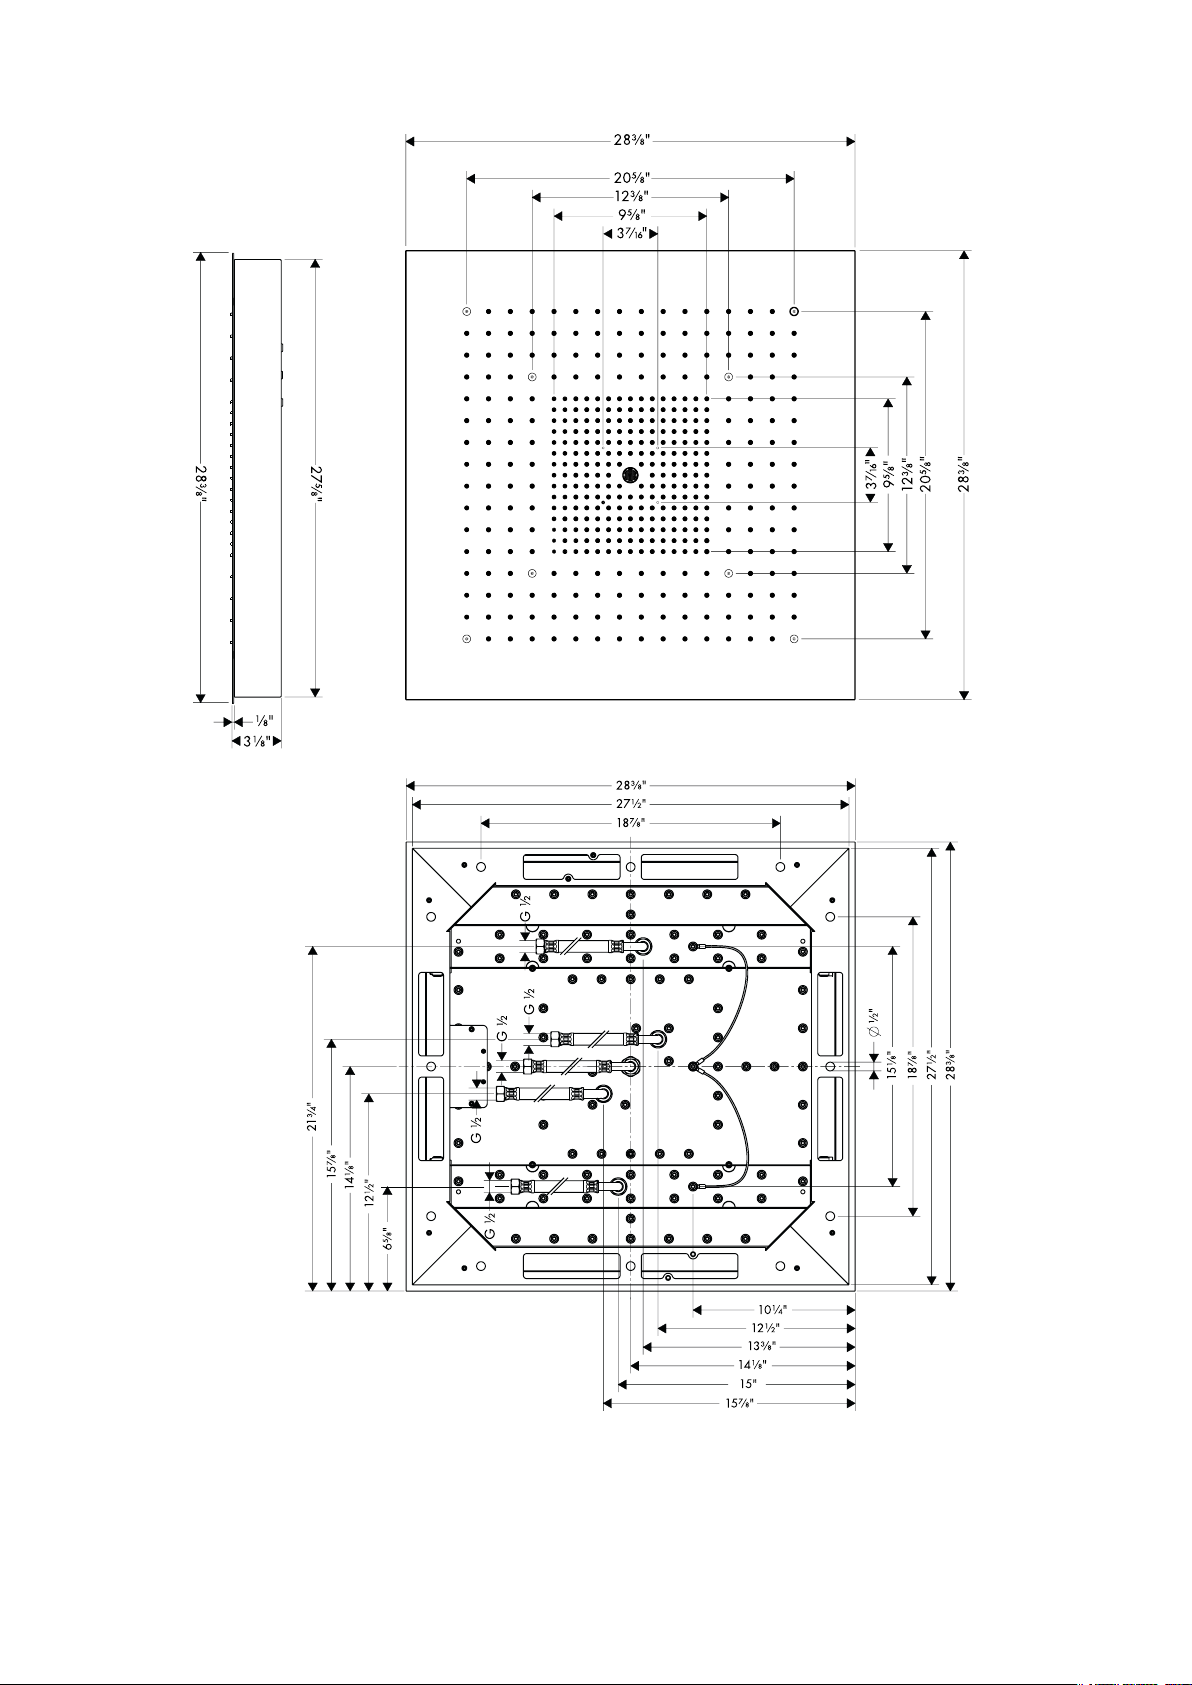
Page 3
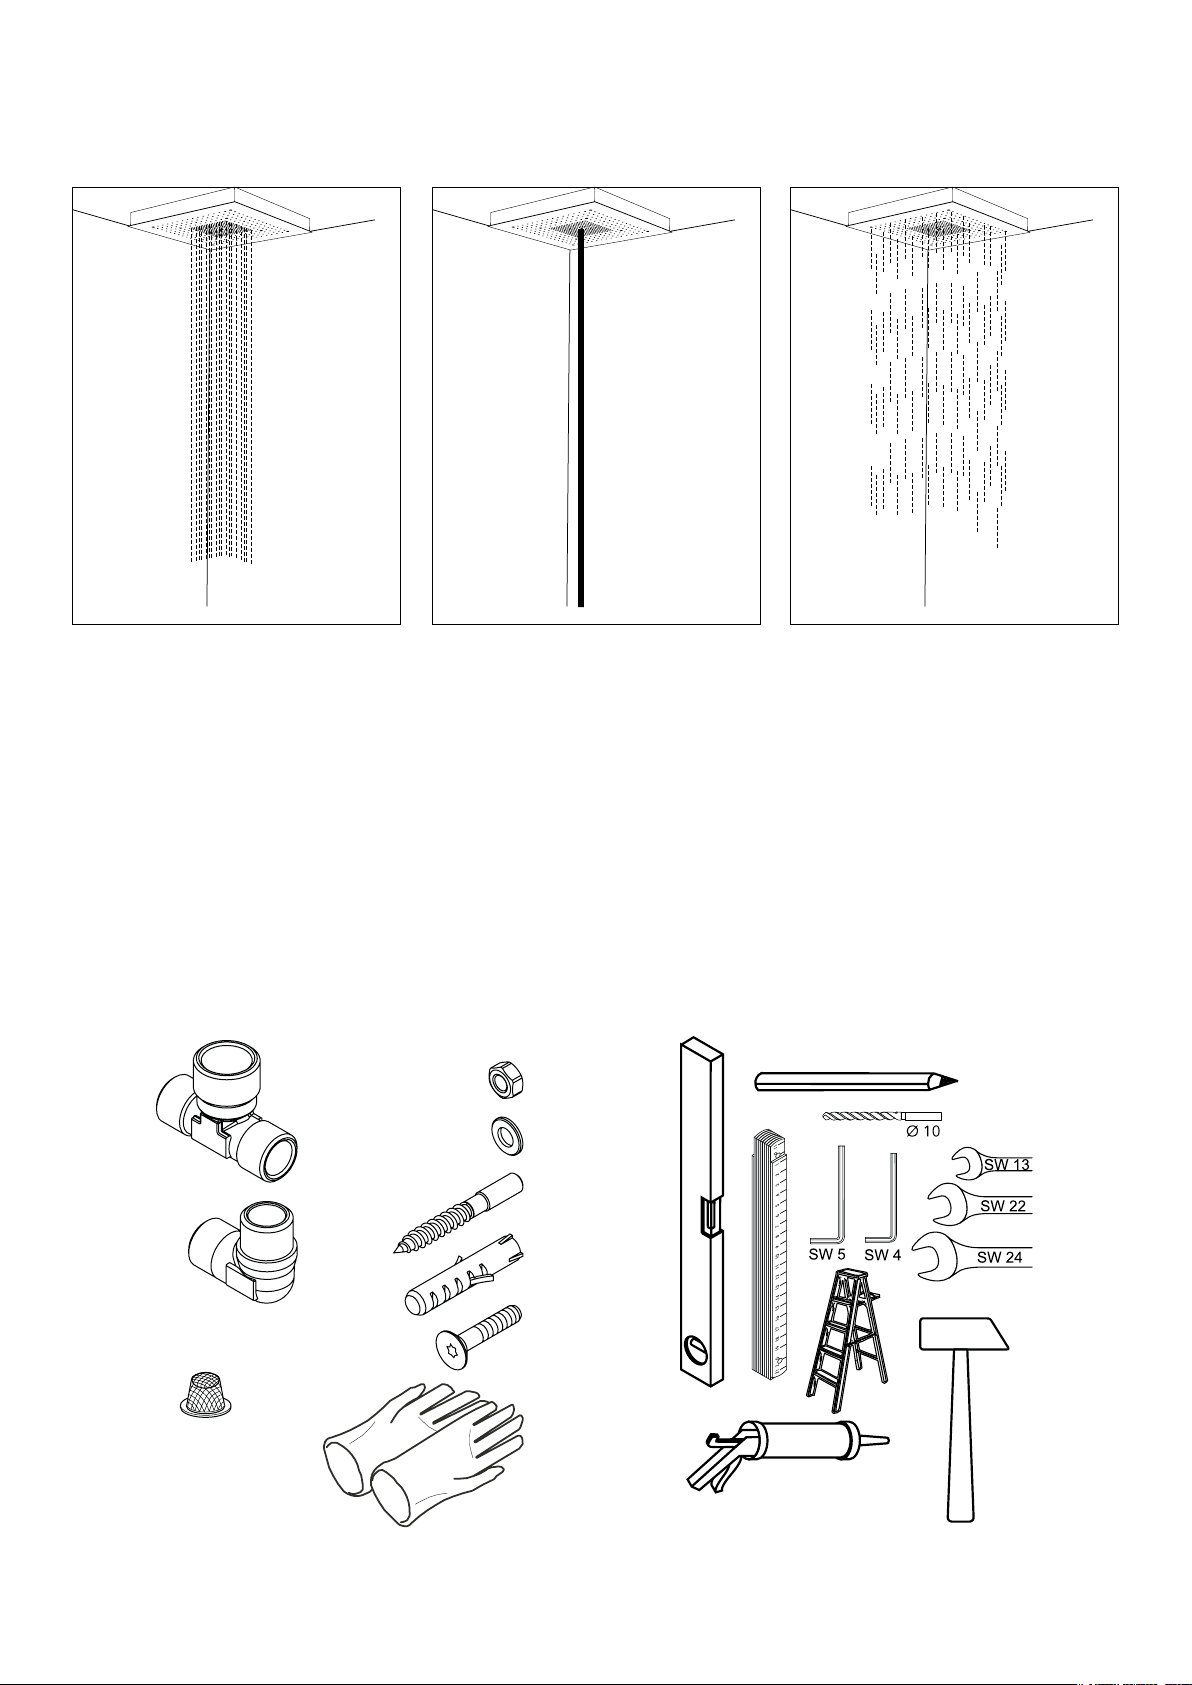
Spray Functions / Fonctions de jet / Funciones de rociado
Rain Laminar Body
Flow rate / Capacité nominale / Caudal máximo
2.5 gpm per spray mode
Package Contents / Contenu de l’emballage
/ Contenido del paquete
1x
x
1x
1x
1x
Required Tools (not included) / Outils requis
(pas inclus) / Herramientas necesarias (no
incluidos)
4x
8x
x
Page 4
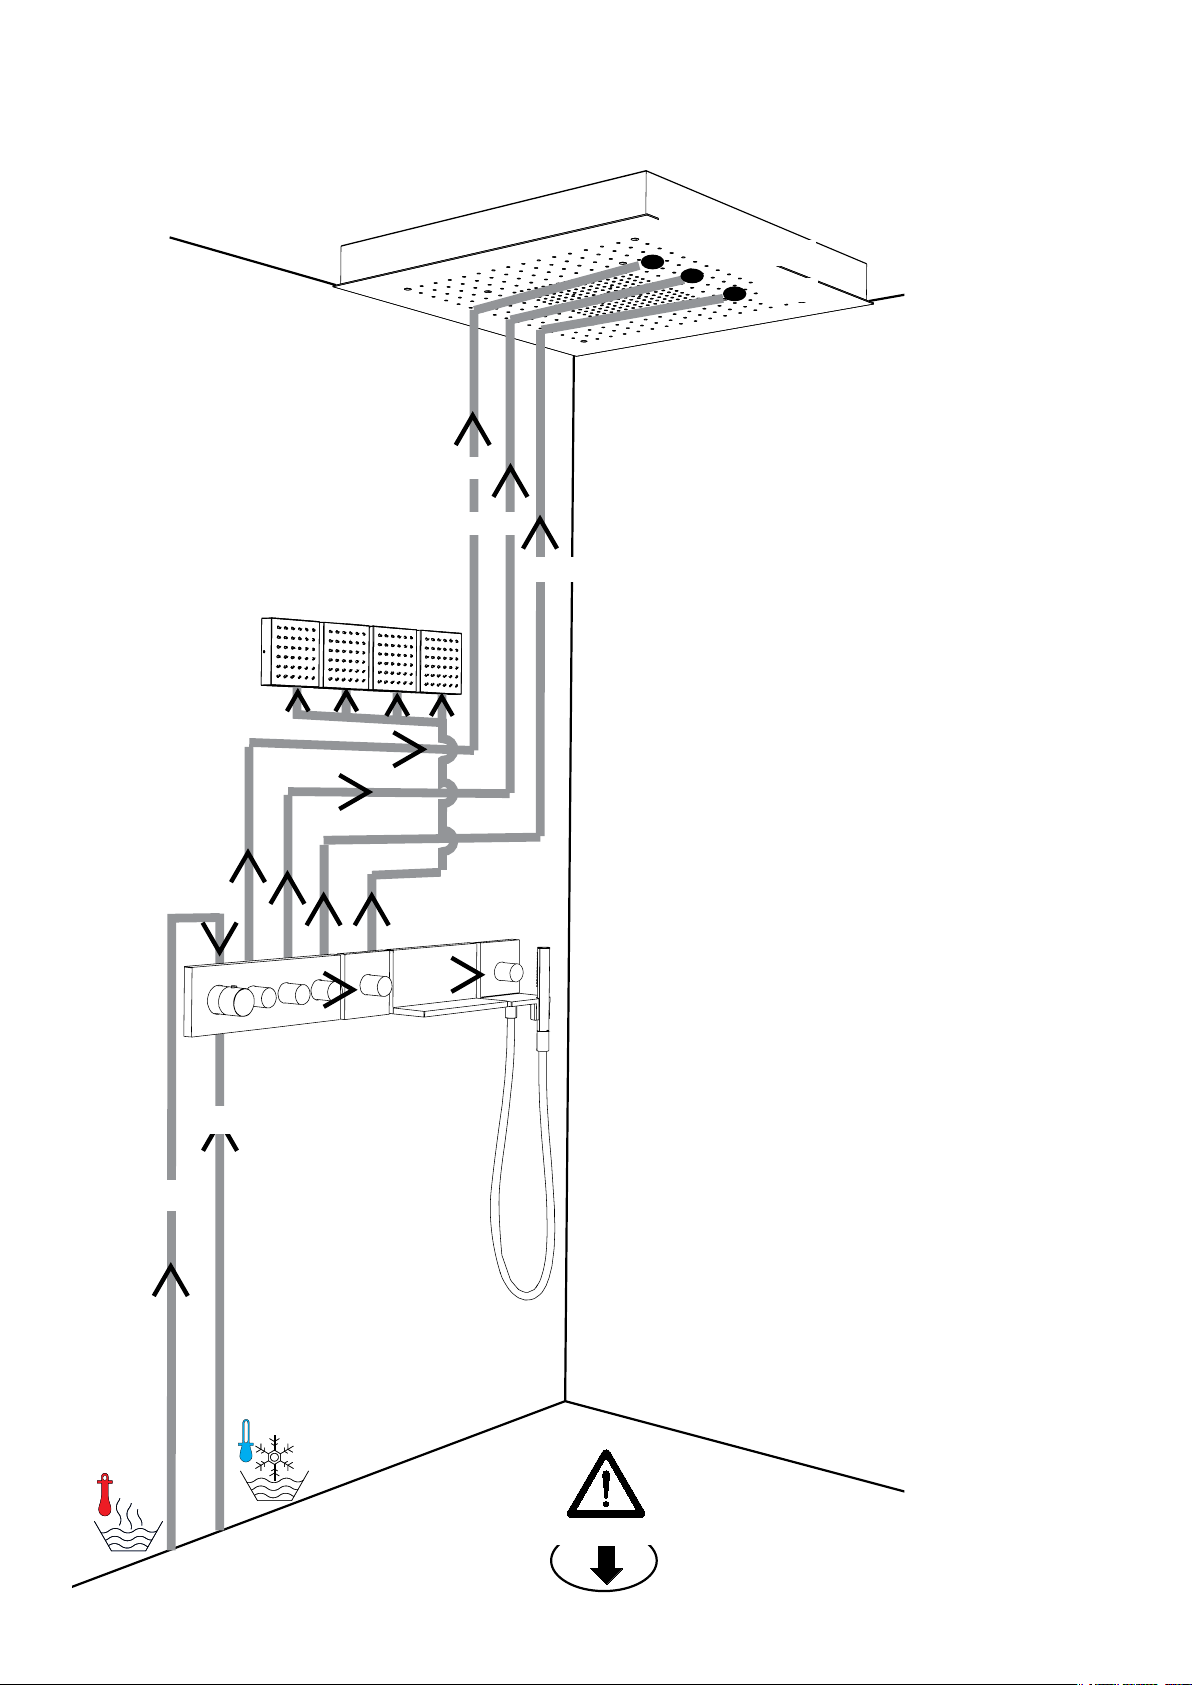
Installation Suggestions / Suggestions d’installation / Sugerencias para la instalación
Body
Laminar
Rain
½" NPT
½" NPT
½" NPT
¾" NPT
¾" NPT
½" NPT
Items used:
1 ShowerHeaven 10625XX1
1 Starck Thermostat Module 10750181
1 Trim for Thermostat Module 10751XX1
1 Volume control rough 10971181
1 Volume control trim 10972XX1
4 Shower module rough 28486181
4 Shower module 28491XX1
1 Starck handshower rough 10650181
1 Starck handshower trim 10651XX1
1 Rough / Extension for shelf 40878180
1 Starck shelf 40873XX0
>14.5 gpm
4
Page 5
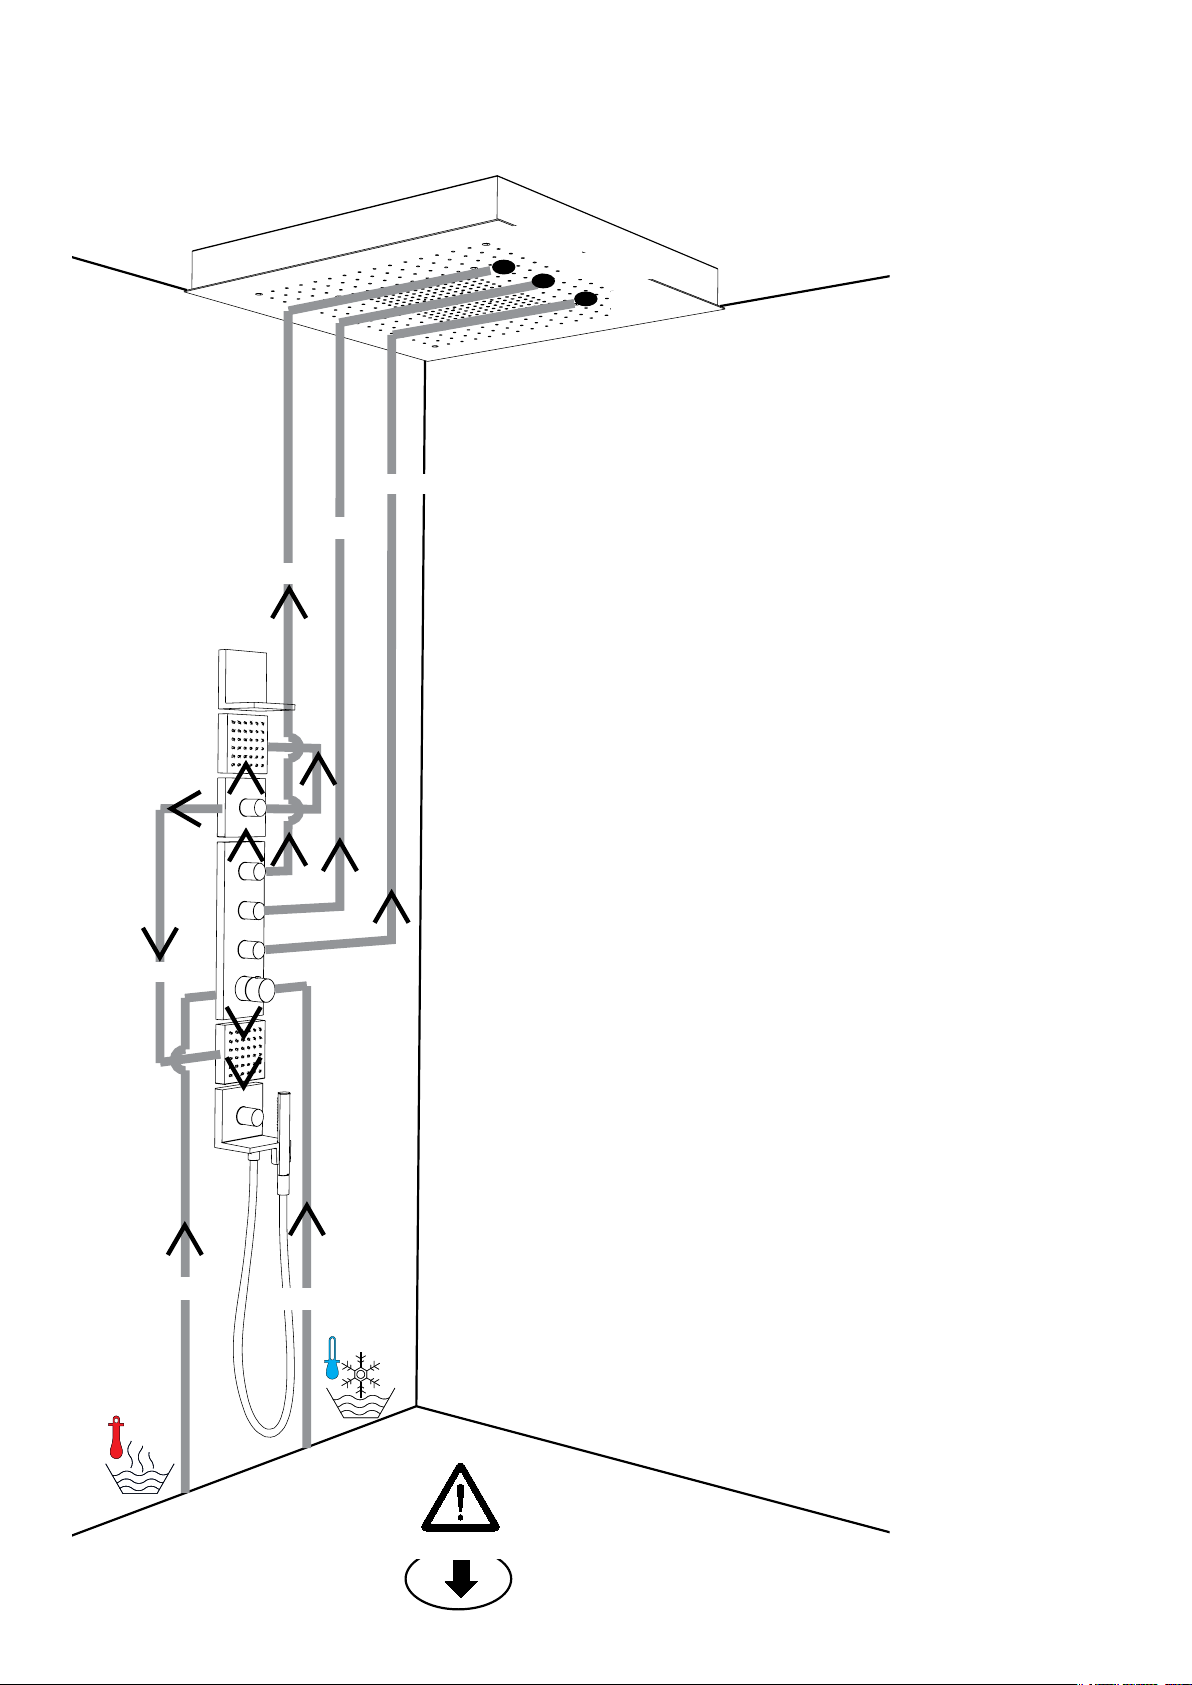
½" NPT
½" NPT
Body
Laminar
Rain
½" NPT
Items used:
1 ShowerHeaven 10625XX1
1 Starck Thermostat Module 10750181
1 Trim for Thermostat Module 10751XX1
1 Volume control rough 10971181
1 Volume control trim 10972XX1
½" NPT
¾" NPT
¾" NPT
2 Shower module rough 28486181
2 Shower module 28491XX1
1 Starck handshower rough 10650181
1 Starck handshower trim 10651XX1
1 Starck shelf 40872XX0
There are no controls on the ShowerHeaven. Each shower function is controlled by a separate volume control -- in this case, the
three volume controls integral to the Axor Starck 10750181.
Le ShowerHeaven ne comporte aucun réglage. Chaque fonction
de douche est contrôlée par un réglage de débit séparé – dans
ce cas, les trois réglages de débit intégrés du Axor Starck
10750181.
No hay controles en la ShowerHeaven.
Cada función de la ducha es controlada por un control de volumen distinto, en este caso, los tres controles de volumen incorporados a Axor Starck 10750181.
>14.5 gpm
5
Page 6
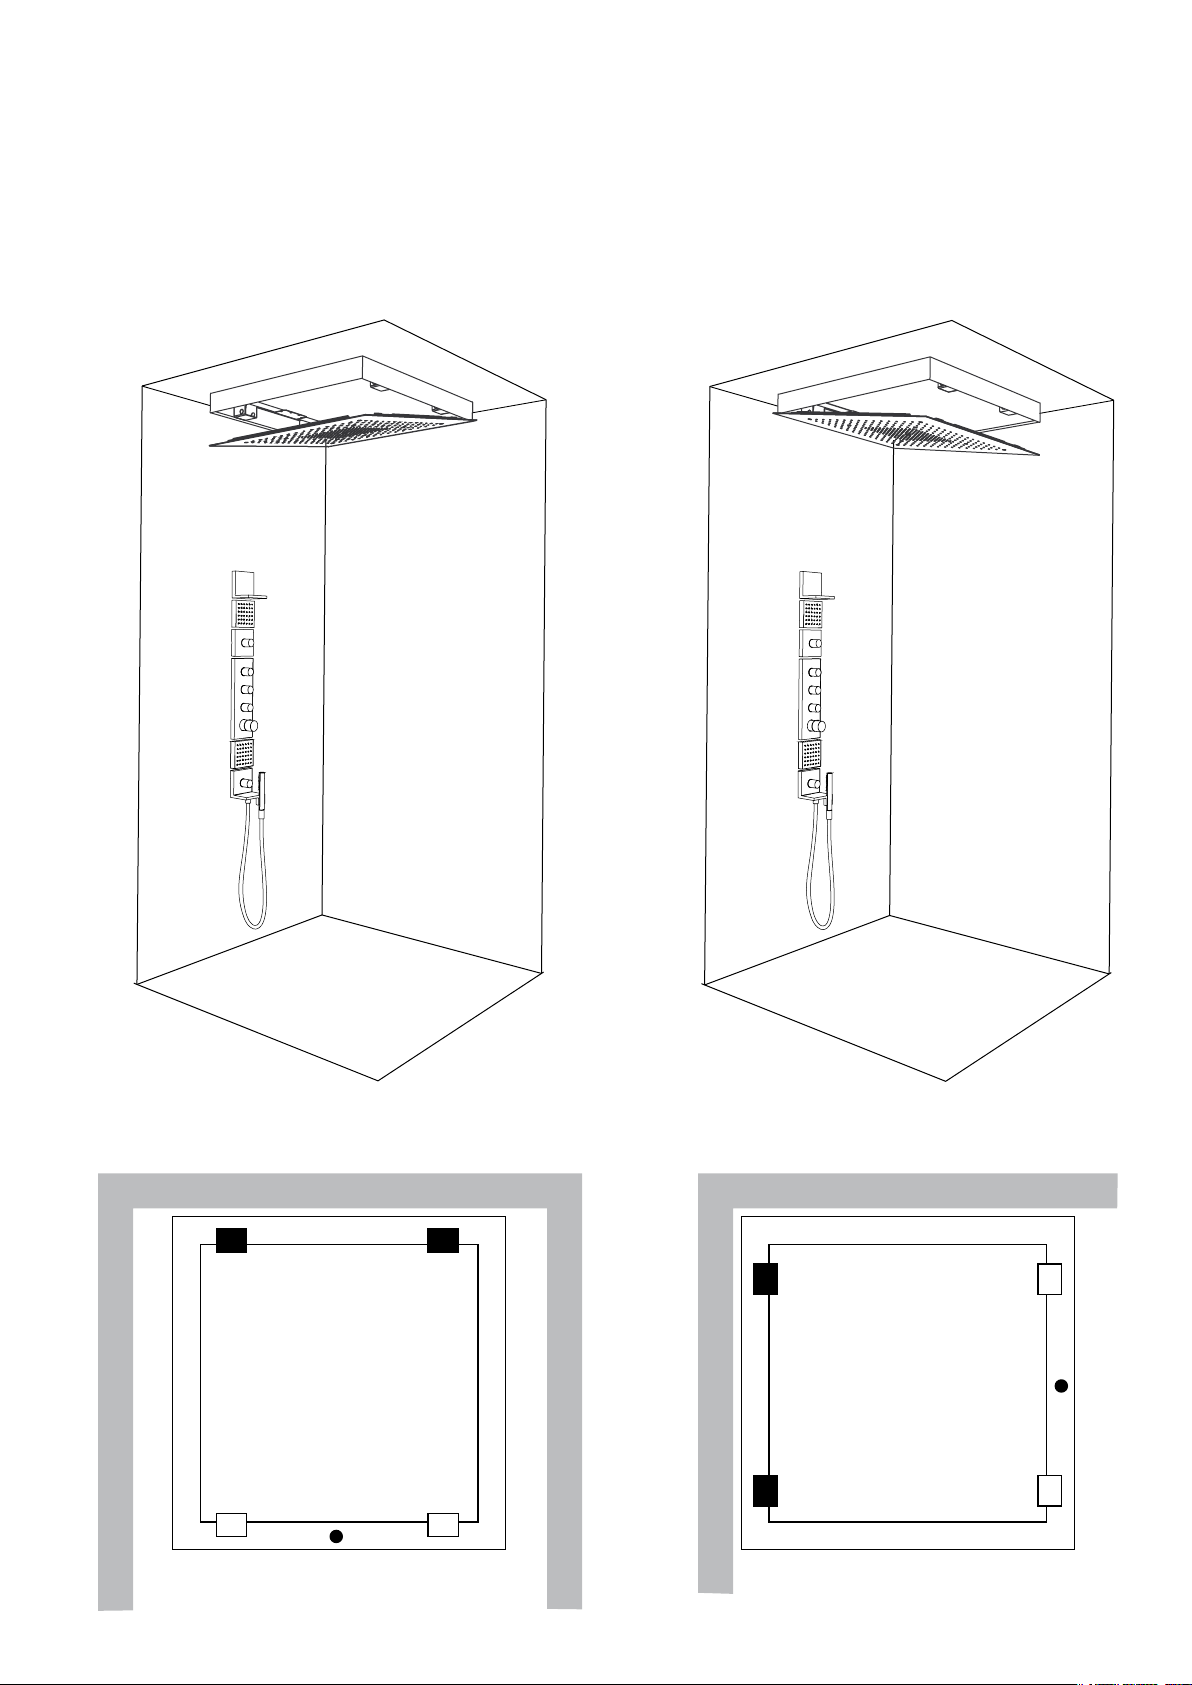
Decide where the hinges are to be positioned.
Décidez de l’endroit où vous souhaitez positionner les
charnières.
Decida dónde se ubicarán las bisagras.
Page 7

Installation Considerations
For best results, Hansgrohe recommends that this unit be installed by
•
a licensed, professional plumber.
Please read over these instructions thoroughly before beginning
•
installation. Make sure that you have all tools and supplies needed
to complete the installation.
To prevent scald injury, the maximum output temperature of the
•
shower valve should be no higher than 120°F. In Massachusetts,
the maximum output temperature of the shower valve can be no
higher than 112°F.
À prendre en considération pour l’installation
Pour de meilleurs résultats, Hansgrohe recommande que ce produit
•
soit installé par un plombier professionnel licencié.
Veuillez lire attentivement ces instructions avant de procéder à l’ins-
•
tallation. Assurez-vous de disposer de tous les outils et du matériel
nécessaires pour l’installation.
Pour empêcher des blessures par ébouillantement, la température
•
de sortie maximale du robinet de douche ne doit pas excéder
120°F. Au Massachusetts, la température de sortie maximale du
robinet de douche ne doit pas excéder 112°F.
Keep this booklet and the receipt (or other proof of date and place
•
of purchase) for this product in a safe place. The receipt is required
should it be necessary to request warranty parts.
Conservez ce livret et le reçu (ou une autre preuve sur laquelle g-
•
urent la date et l’endroit de l’achat) pour ce produit dans un endroit
sûr. Le reçu est requis si vous commandez des pièces sous garantie.
Consideraciones para la instalación
Para obtener mejores resultados, la instalación debe estar a cargo
•
de un plomero profesional matriculado.
Antes de comenzar la instalación, lea estas instrucciones
•
detenidamente. Asegúrese de tener las herramientas y los insumos
necesarios para completar la instalación.
Para evitar escaldaduras, la máxima temperatura de salida de la
•
válvula de la ducha no debe exceder los 120°F. En Massachusetts,
la máxima temperatura de salida de la válvula de la ducha no
debe exceder los 112°F.
Mantenga este folleto y el recibo (u otro comprobante del lugar y
•
fecha de compra) de este producto en lugar seguro. El recibo se
requiere en caso de ser necesario solicitar piezas bajo garantía.
Page 8
English
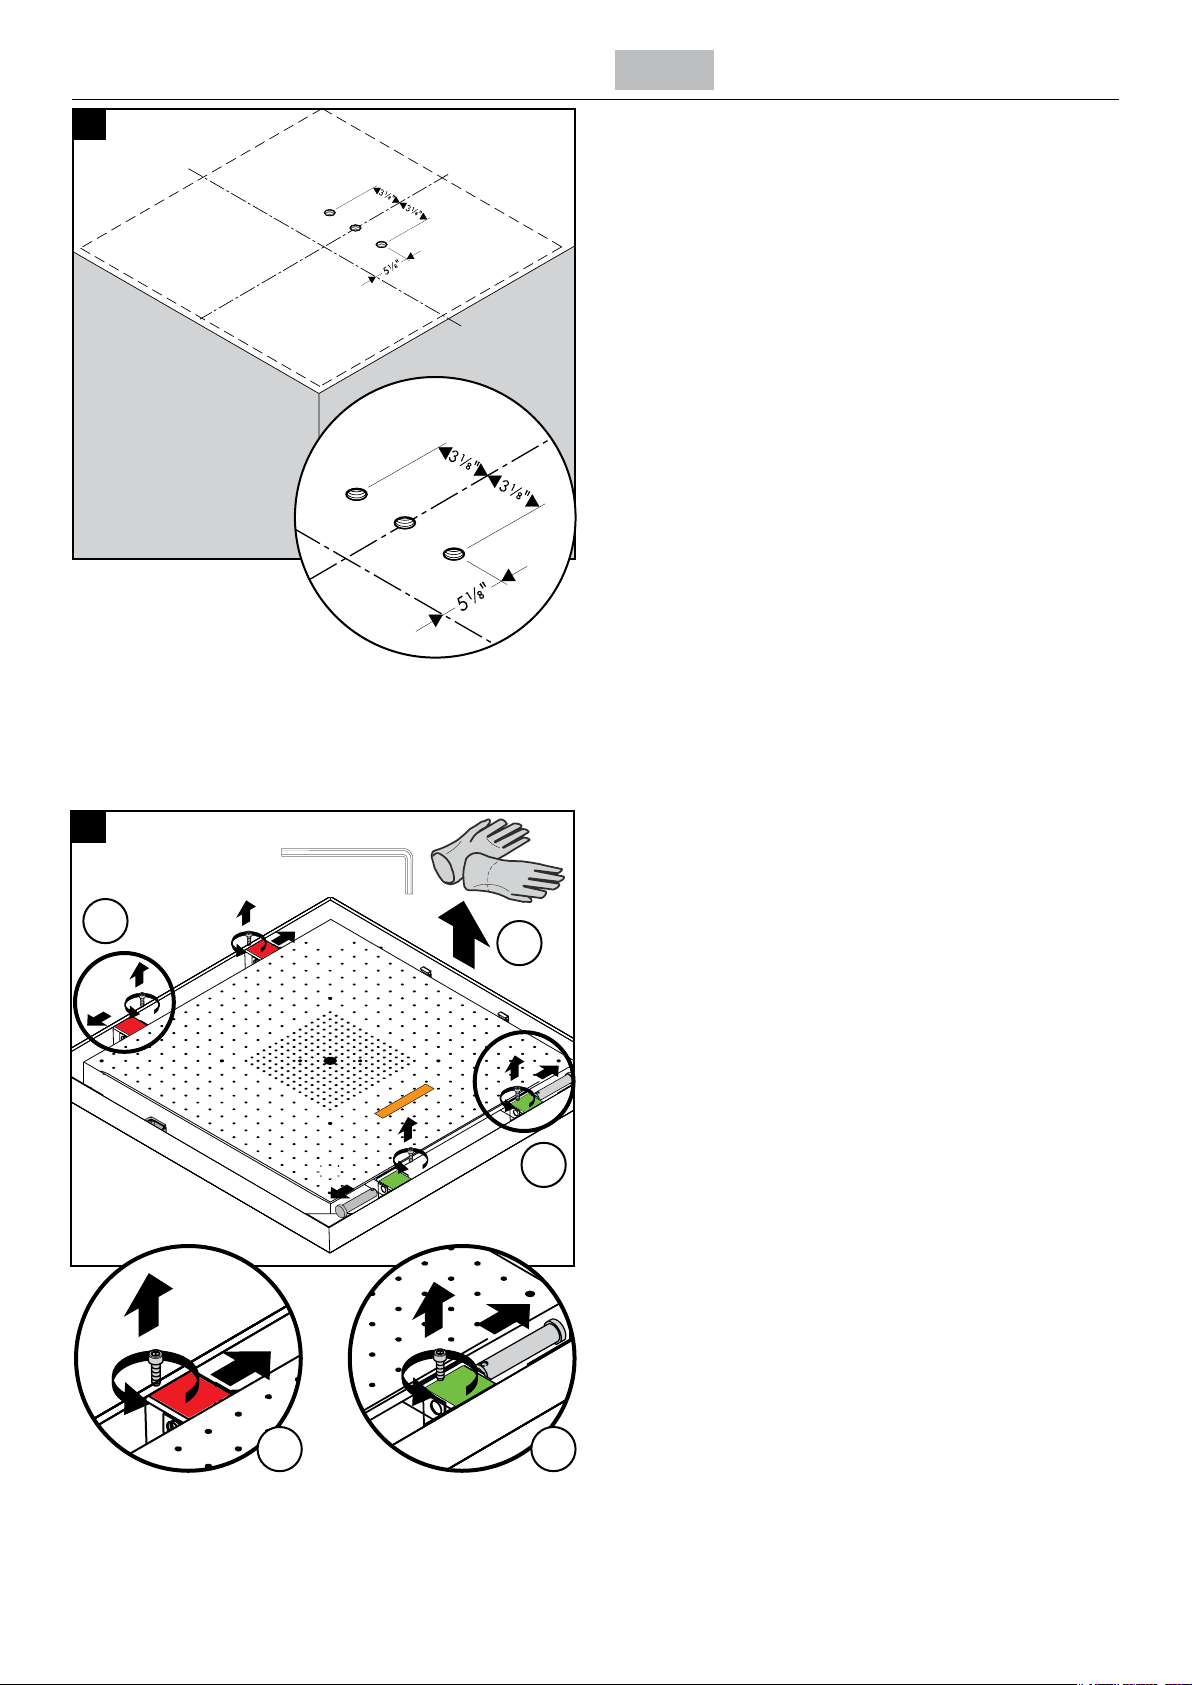
1
Roughing-In
The ShowerHeaven requires three ½" NPT female ttings,
positioned as shown in the diagram, ush with the surface of the
ceiling.
SW 5 mm
.
.
Installation
Wear gloves while installing the ShowerHeaven.
Remove the screws using a 5 mm Allen wrench. Remove the
hinge pins. (1), (2).
Remove the spray body from the frame (3).
1.
.
1.
8
Page 9

Français Español
Pièce intérieure
Le ShowerHeaven nécessite l’utilisation de trois raccords femelles
letés NPT de ½ po, positionnés de la façon indiquée sur le
schéma.
Piezas interiores
La ShowerHeaven requiere conexiones hembra NPT de ½”,
ubicadas como se muestra en el dibujo.
Installation
Retirez les vis à l’aide d’une clé hexagonale de 4 mm. Retirez les
broches de charnière. (1), (2).
Retirez la plaque de jet du cadre (3).
Instalación
Retire los tornillos con una llave Allen de 4 mm. Retire los pasadores de bisagra. (1), (2).
Retire el cuerpo de rociado del marco (3).
Page 10
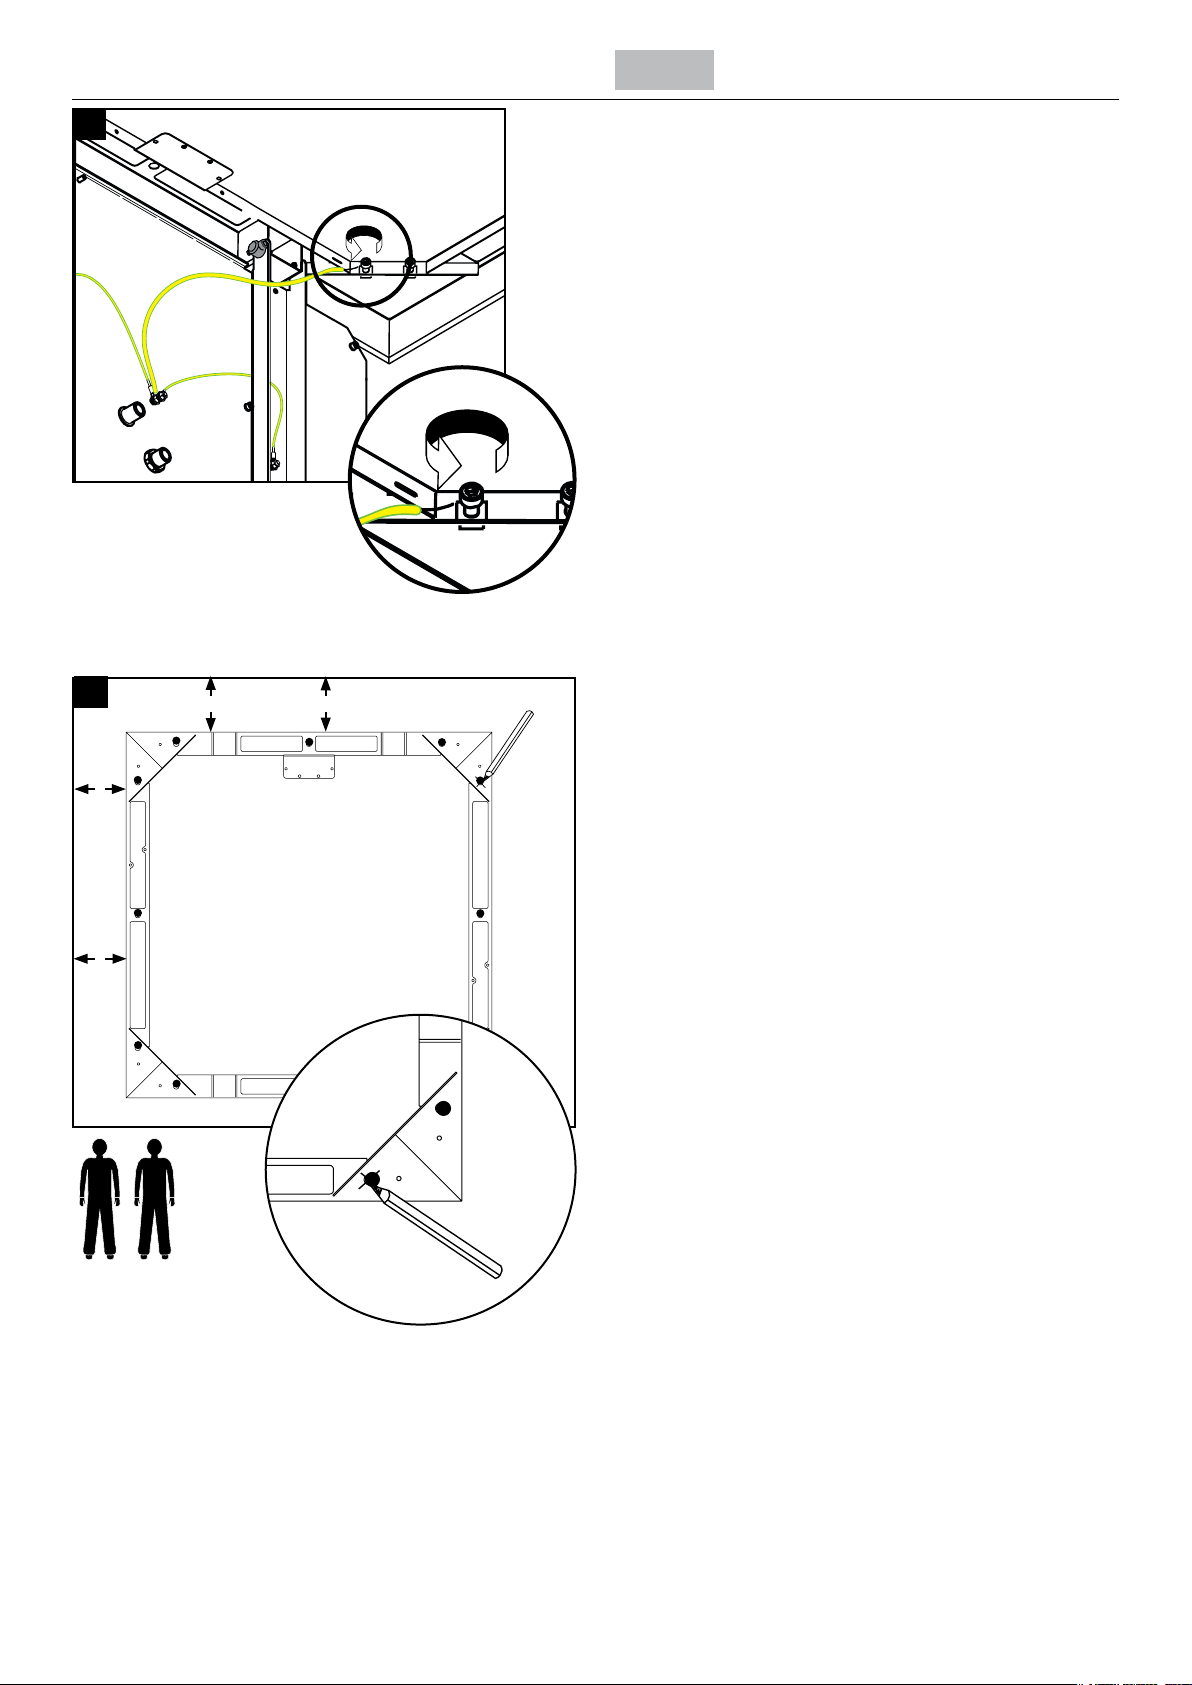
English
Disconnect the grounding wire from the frame.
4
X
X
Y Y
Have a helper hold the frame against the ceiling.
Mark the positions of the 12 screw holes.
1x
10
Page 11

Français Español
Débranchez le PE l du cadre. Desconecte el alambre PE del marco.
Demandez à quelqu’un de maintenir le cadre contre le plafond.
Marquez les positions des 12 trous de vissage.
Haga que un ayudante sostenga el marco contra el cielo raso.
Marque las posiciones de los 12 oricios para tornillos.
11
Page 12
English
5
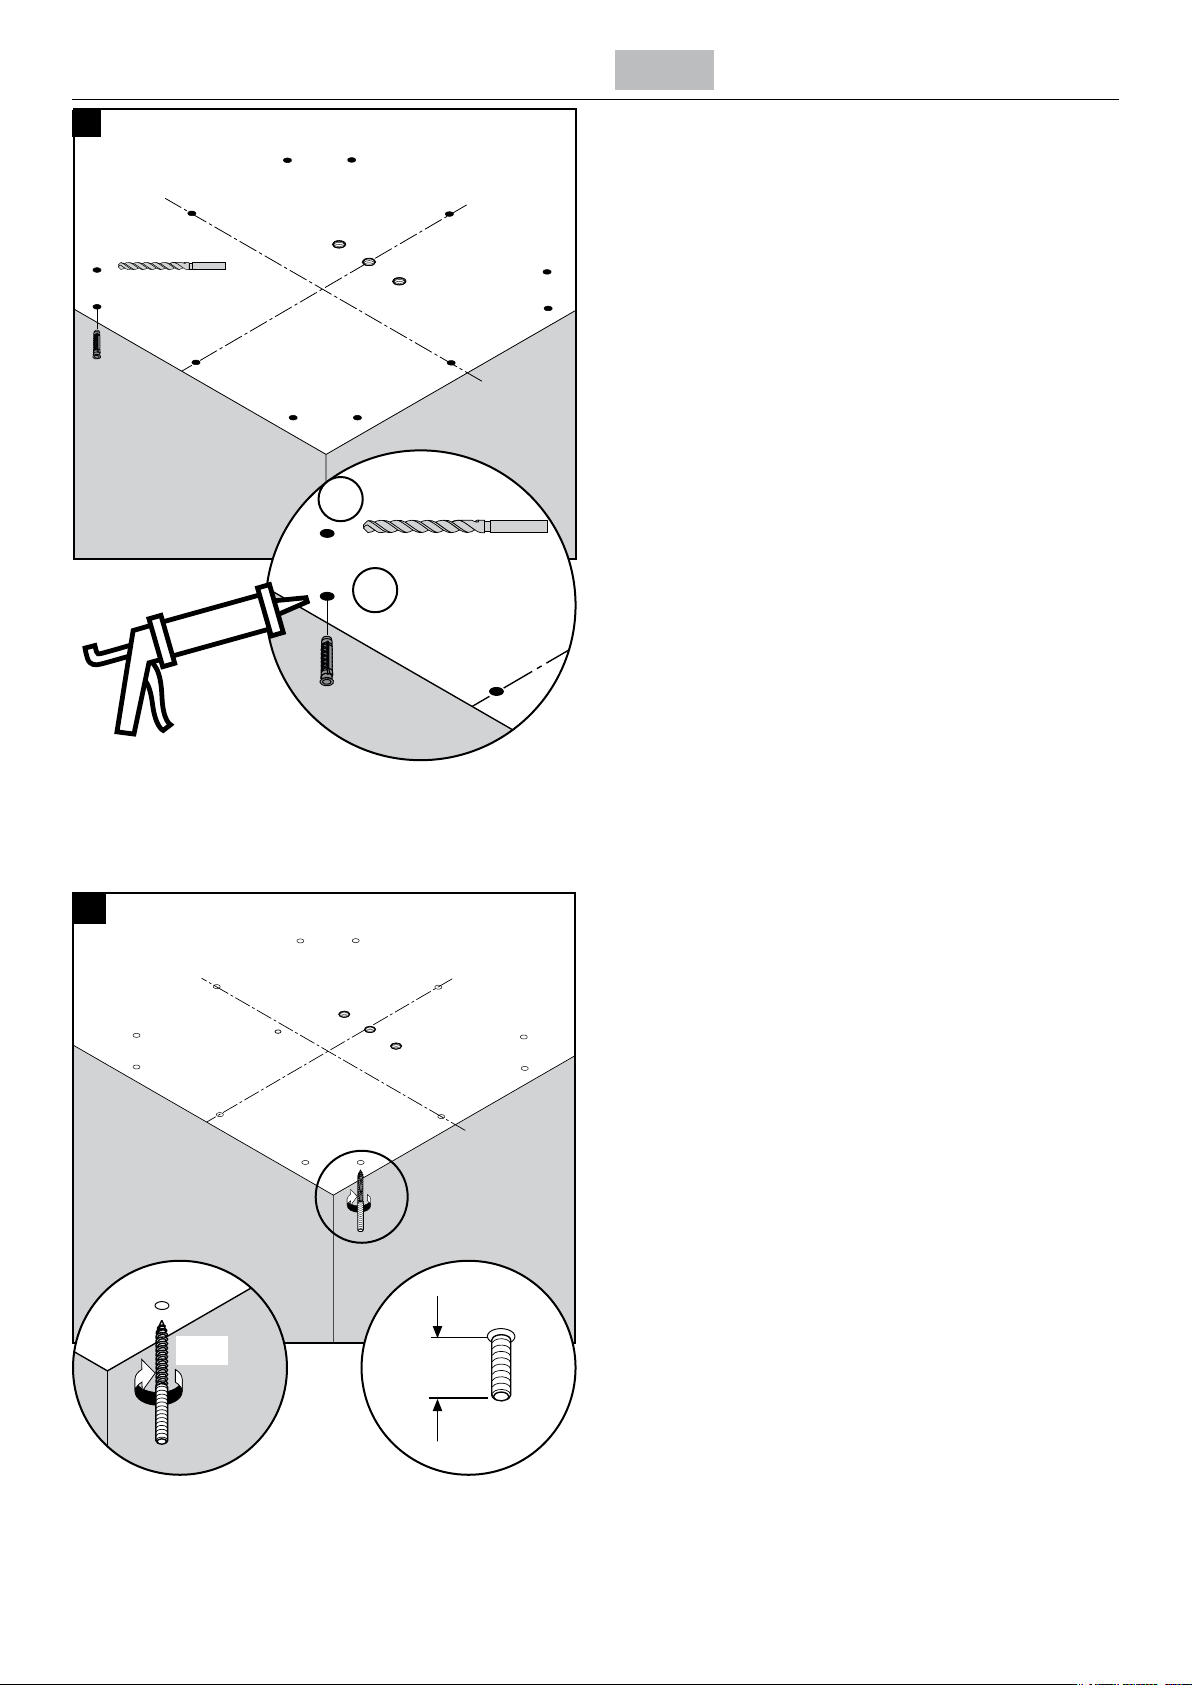
Drill the screw holes using a 10mm bit (1).
Install the anchors (2). Seal the ceiling around the anchors using
waterproof sealant.
1.
Ø 10 mm
.
1x
Install the screws.
The end of the screw should extend 1 ³⁄₁₆" outside the nished
surface of the ceiling.
1
1x
~1³⁄₁₆"
Page 13

Français Español
Percez les trous de vissage à l’aide d’une mèche de 10 mm (1).
Installez les chevilles (2). Scellez le plafond autour des chevilles
à l’aide d’un agent d’étanchéité.
Perfore los oricios para los tornillos con una broca de 10mm.
(1)
Instale los pernos de anclaje (2). Selle el cielo raso alrededor de
los pernos de anclaje con un sellador impermeable.
Installez les vis.
Une partie de 1³⁄₁₆ po de l’extrémité de la vis doit se trouver à
l’extérieur de la surface nie du plafond.
Instale los tornillos.
El extremo del tornillo debe sobresalir 1 ³⁄₁₆” de la supercie
terminada del cielo raso.
1
Page 14
English
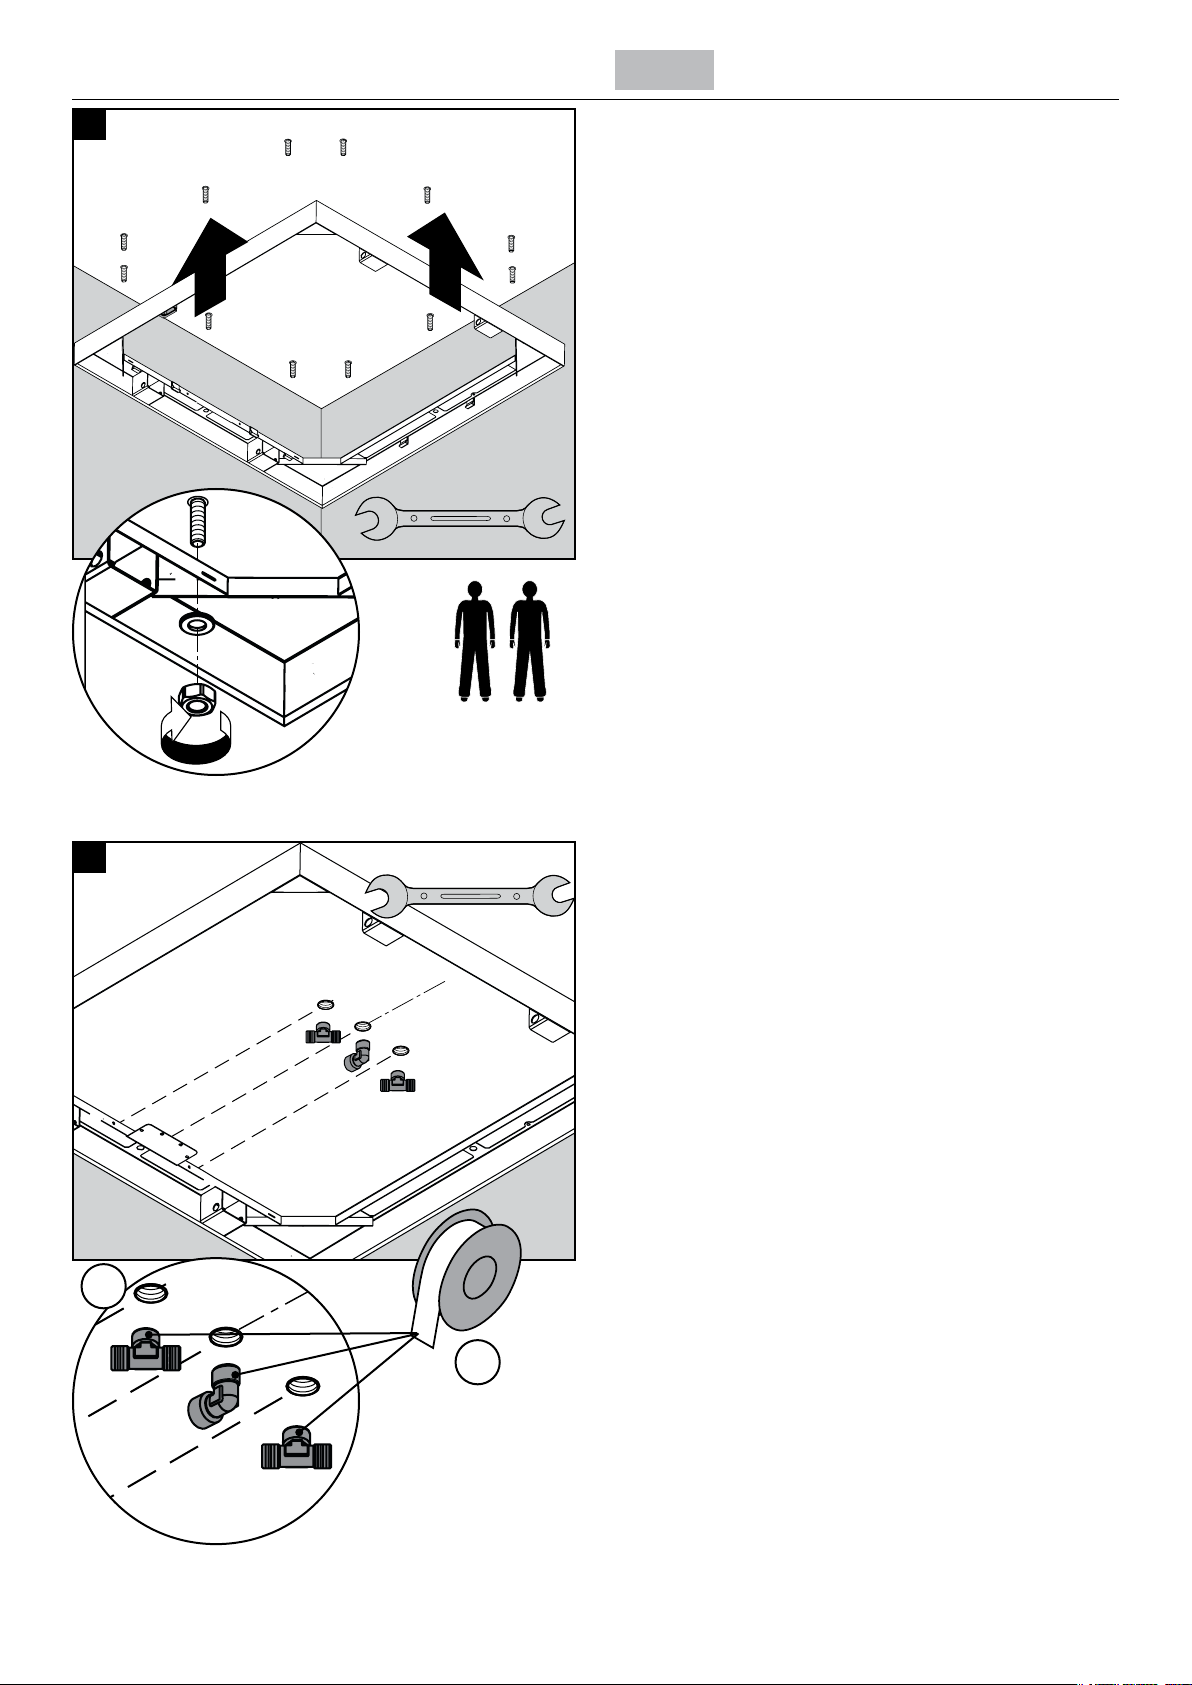
Position the frame over the screws.
Fasten the frame to the ceiling using the nuts and washers.
1 mm
8
4 mm
Wrap the threads on the supply elbow and tees using Teon
tape (1).
Install the supply elbow and tees (2).
.
1.
14
Page 15

Français Español
Placez le cadre sur les vis.
Fixez le cadre au plafond en utilisant les écrous et rondelles.
Coloque el marco sobre los tornillos.
Fije el marco al cielo raso con las tuercas y las arandelas.
Enveloppez les letages du coude d’alimentation et des raccords
en T à l’aide de ruban de Téon (1).
Installez le coude d’alimentation et les raccords en T (2).
Envuelva las roscas en el codo incluido y los tubos en “T” con
cinta de Teon (1).
Instale el codo incluido y los tubos en “T” (2).
15
Page 16
English
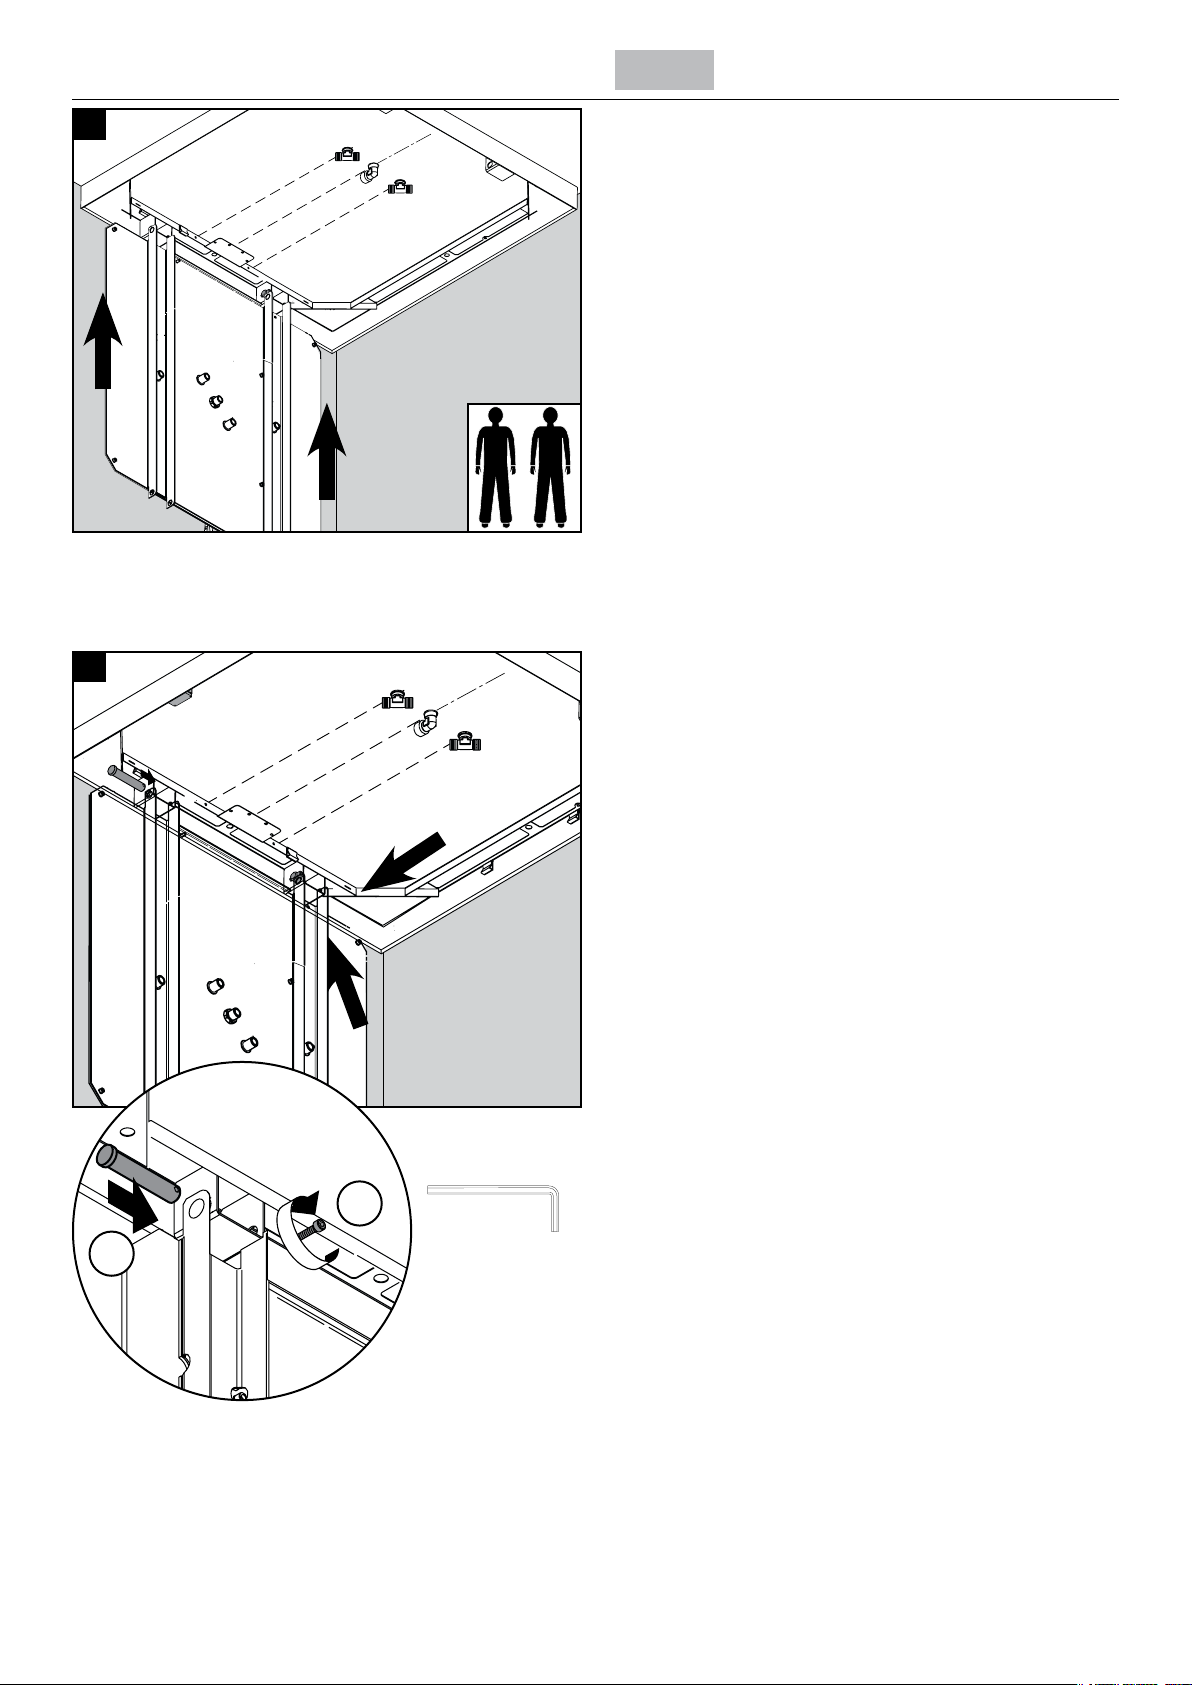
Position the body on the frame.
10
Install the hinge pins (1).
Install the screws (2).
5 mm
.
1
1.
Page 17

Français Español
Placez la plaque sur le cadre. Coloque el cuerpo en el marco.
Installez les broches de charnière (1).
Installez les vis (2).
Instale los pasadores de bisagra (1).
Coloque los tornillos (2).
1
Page 18
11
English
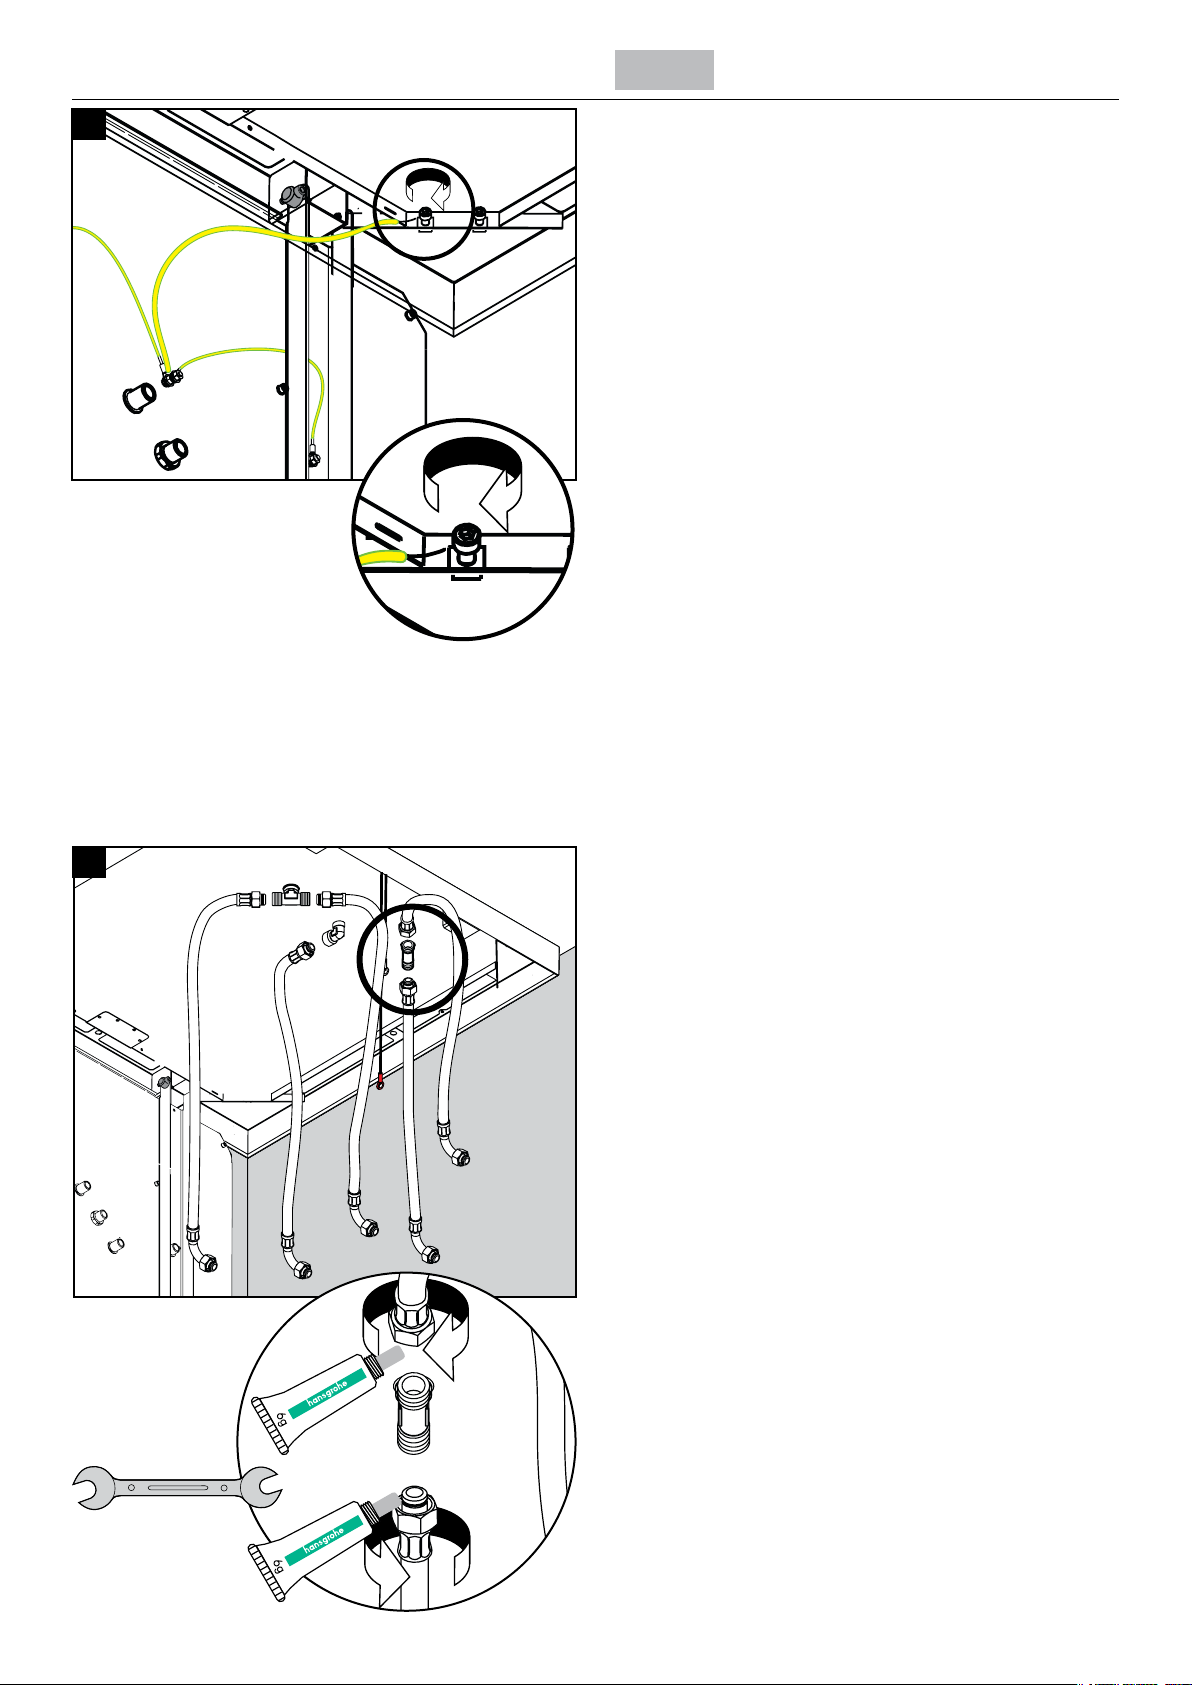
Reconnect the grounding wire.
1
Lightly lubricate the hose connectors using the enclosed grease.
Connect the hoses to the tees and elbow.
5x
18
4 mm
Page 19

Français Español
Installez le PE l du cadre. Conecte el alambre PE del marco.
Lubriez légèrement les raccords de tuyau à l’aide de la graisse
fournie.
Raccordez les tuyaux aux raccords en T et au coude.
Lubrique ligeramente los conectores de la manguera con la
grasa incluida.
Conecte las mangueras a los tubos en “T” y el codo.
1
Page 20
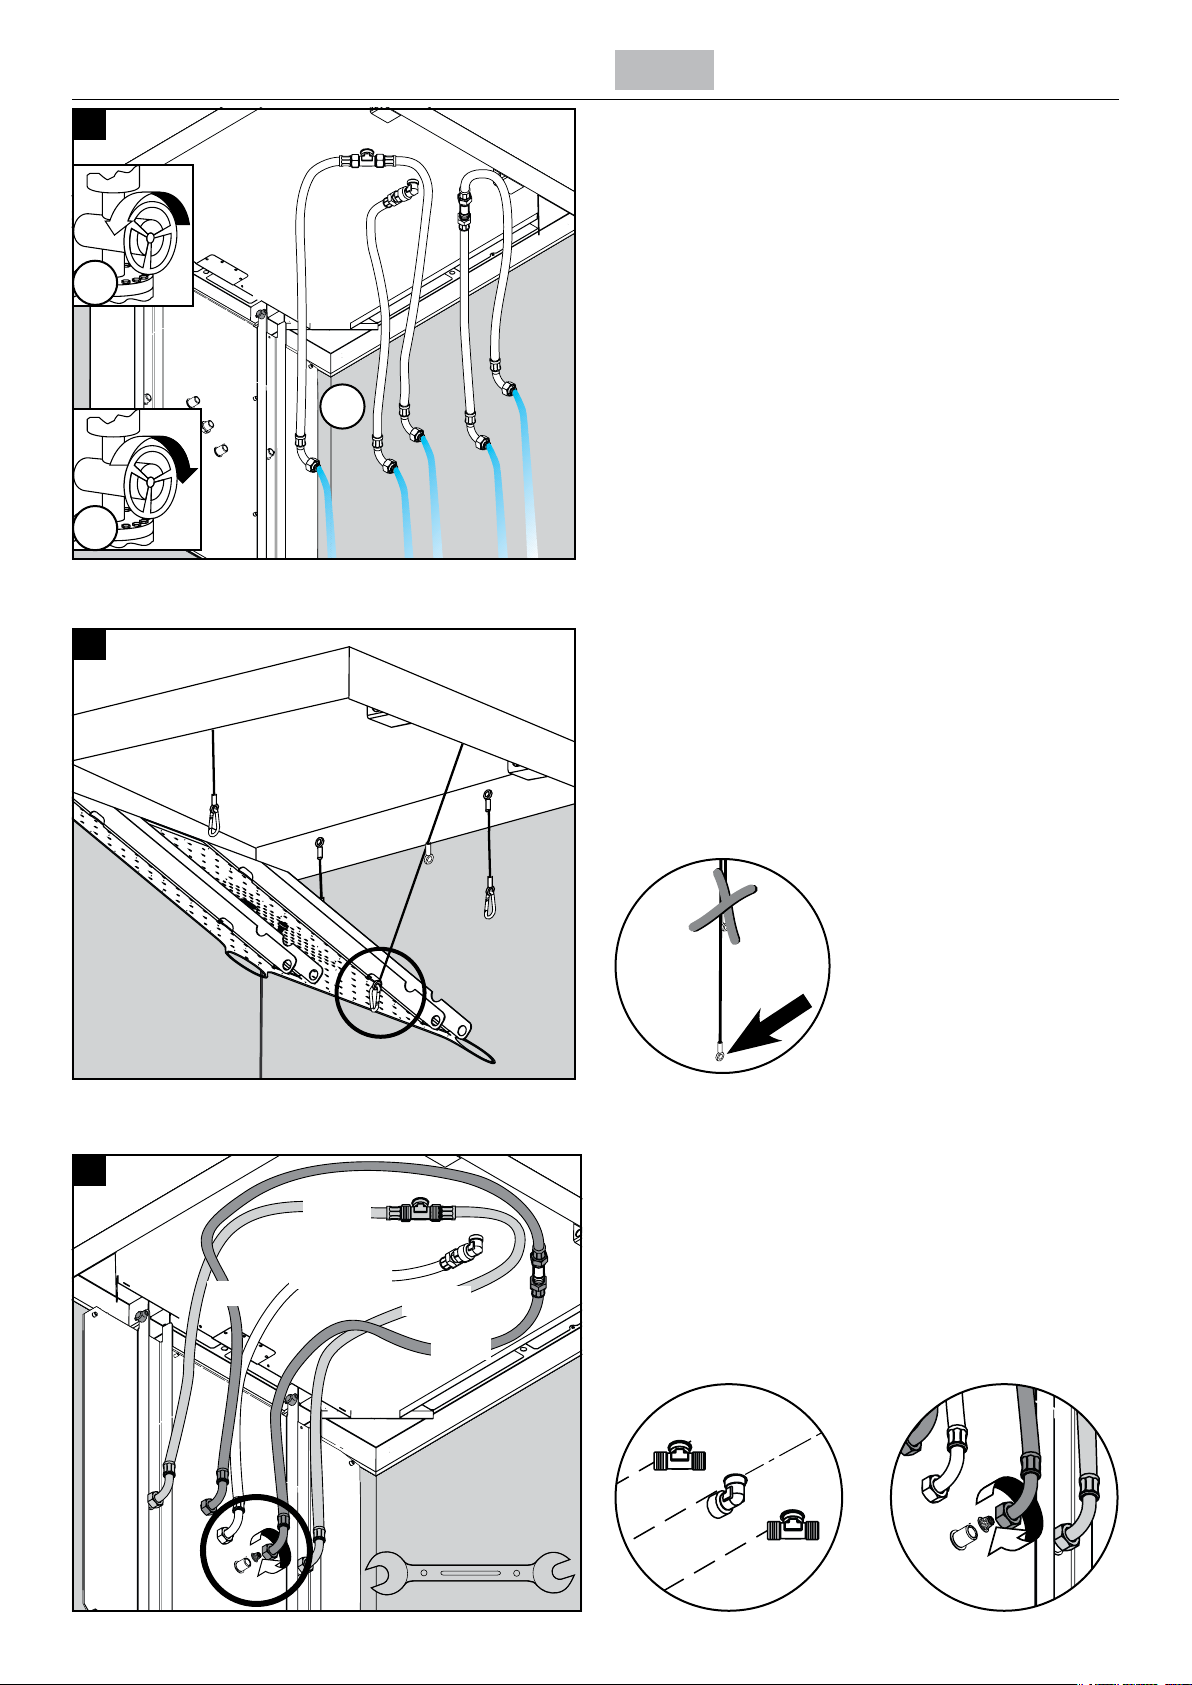
1
1.
.
English
Turn on the water at the main (1).
Flush the supplies and hoses (2).
Turn the water o at the main (3).
.
14
15
Body
Install the longer safety strap onto the snap hook on the body.
Install the lters in the body and rain spray hoses.. There is no
lter in the laminar spray hose.
Install the hoses on the spray body according to the illustrations.
0
Rain
Laminar
Body
Rain
4 mm
Body
Laminar
Rain
Page 21

Français Español
Ouvrez l’eau à la valve principale (1).
Rincez les conduites et les tuyaux (2).
Fermez l’eau à la valve principale (3).
Installez la courroie de sûreté la plus longue sur le crochet de la
plaque.
Abra el paso del agua en la entrada del suministro (1).
Lave las tuberías de suministro y las mangueras (2).
Cierre el paso del agua en la entrada del suministro (3).
Instale el eje de seguridad más largo en el gancho de presión
en el cuerpo.
Installez les ltres dans la plaque et les tuyaux de jet de pluie. Le
tuyau de jet laminaire ne contient aucun ltre.
Installez les tuyaux sur la plaque de jet en vous reportant aux
illustrations.
Instale los ltros en el cuerpo y las mangueras de rociado de
lluvia. No hay un ltro en la manguera de rociado en forma
laminar.
Instale las mangueras en el cuerpo de rociado según las guras.
1
Page 22
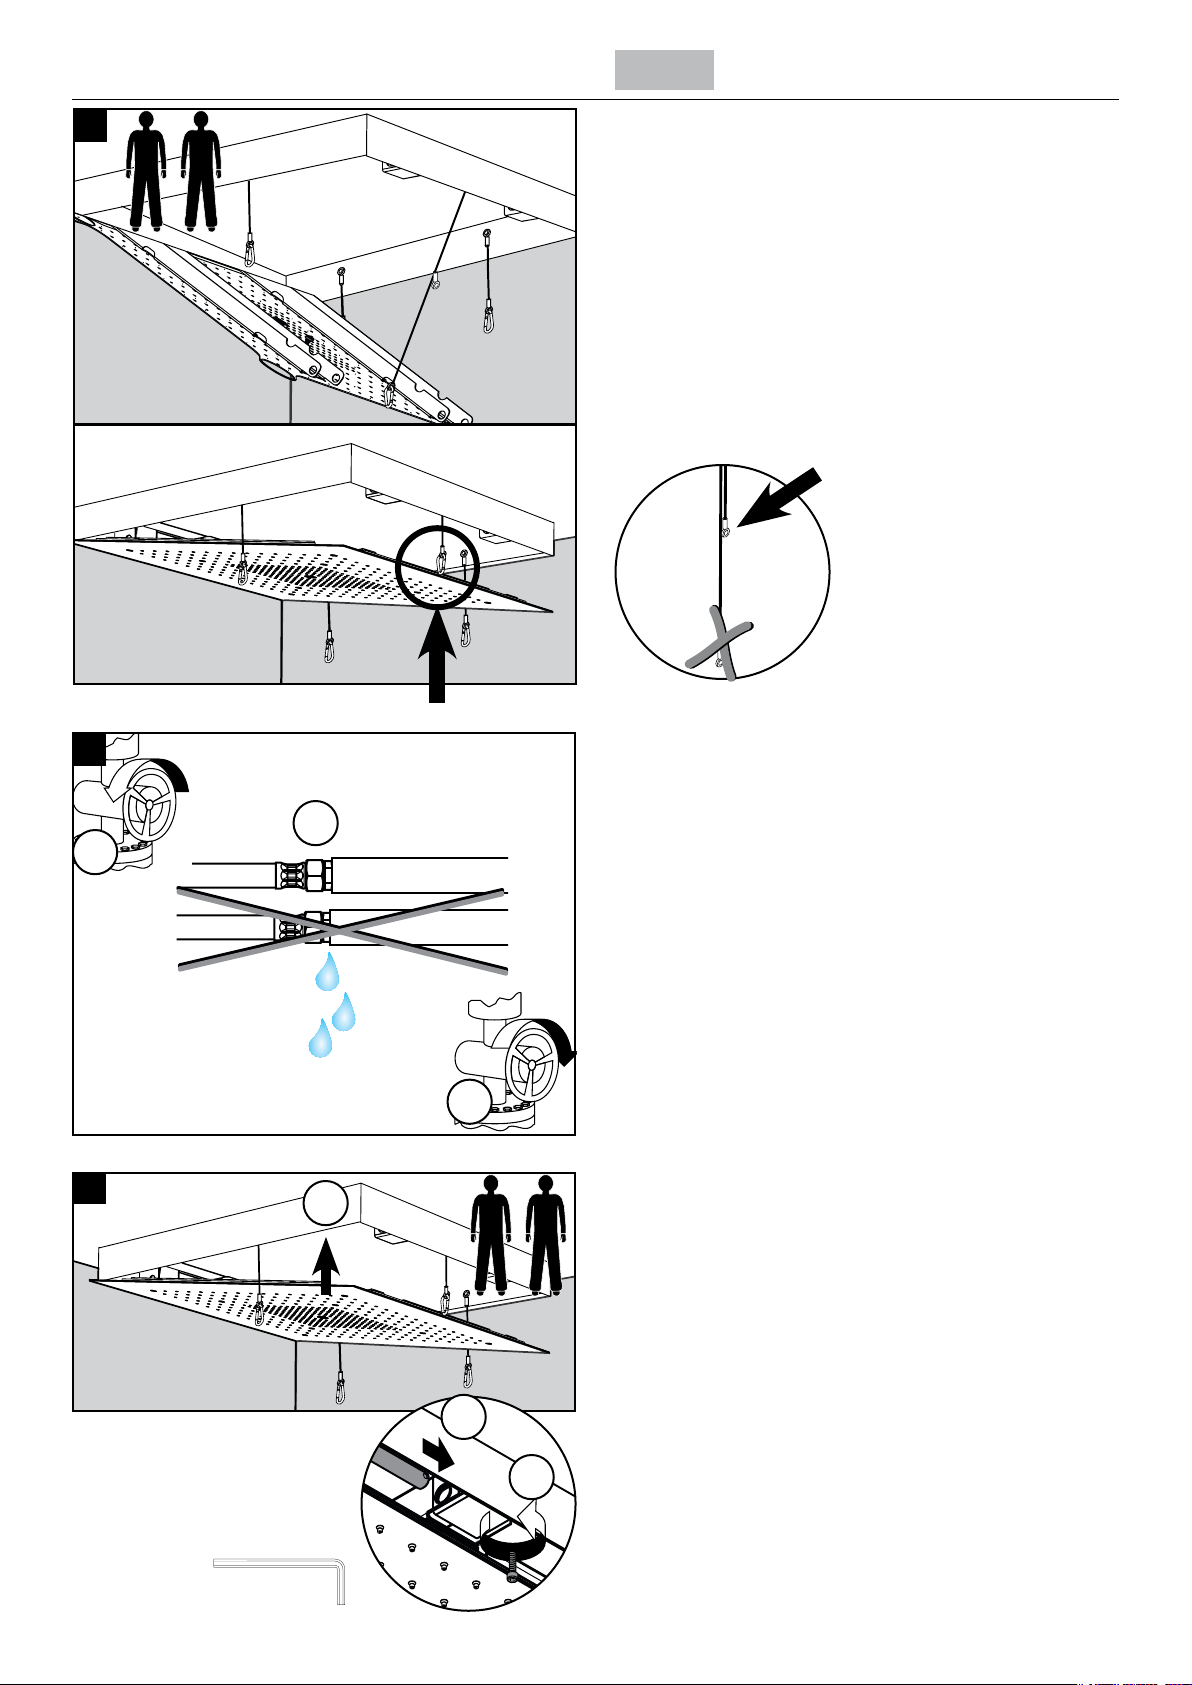
1
English
Connect the shorter safety strap to the snap hook.
1
1.
18
.
1.
Turn on the water at the supply (1).
Check the hose connections for leaks (2).
Turn the water o at the main (3).
.
Position the body against the frame (1).
Install the hinge pins (2).
Install the screws (3).
.
.
5 mm
Page 23

Français Español
Connectez la courroie de sûreté la plus courte au crochet.
Conecte el eje de seguridad más corto al gancho de presión.
Ouvrez l’eau à la valve principale (1).
Vériez les raccords de tuyau pour vous assurer qu’il n’y a
aucune fuite (2).
Fermez l’eau à la valve principale (3).
Placez la plaque contre le cadre (1).
Installez les broches de charnière (2).
Installez les vis (3).
Abra el paso del agua en el suministro (1).
Verique las conexiones de la manguera para asegurarse de
que no haya pérdidas (2).
Cierre el paso del agua en la entrada del suministro (3).
Coloque el cuerpo contra el marco (1).
Instale los pasadores de bisagra (2).
Coloque los tornillos (3).
Page 24
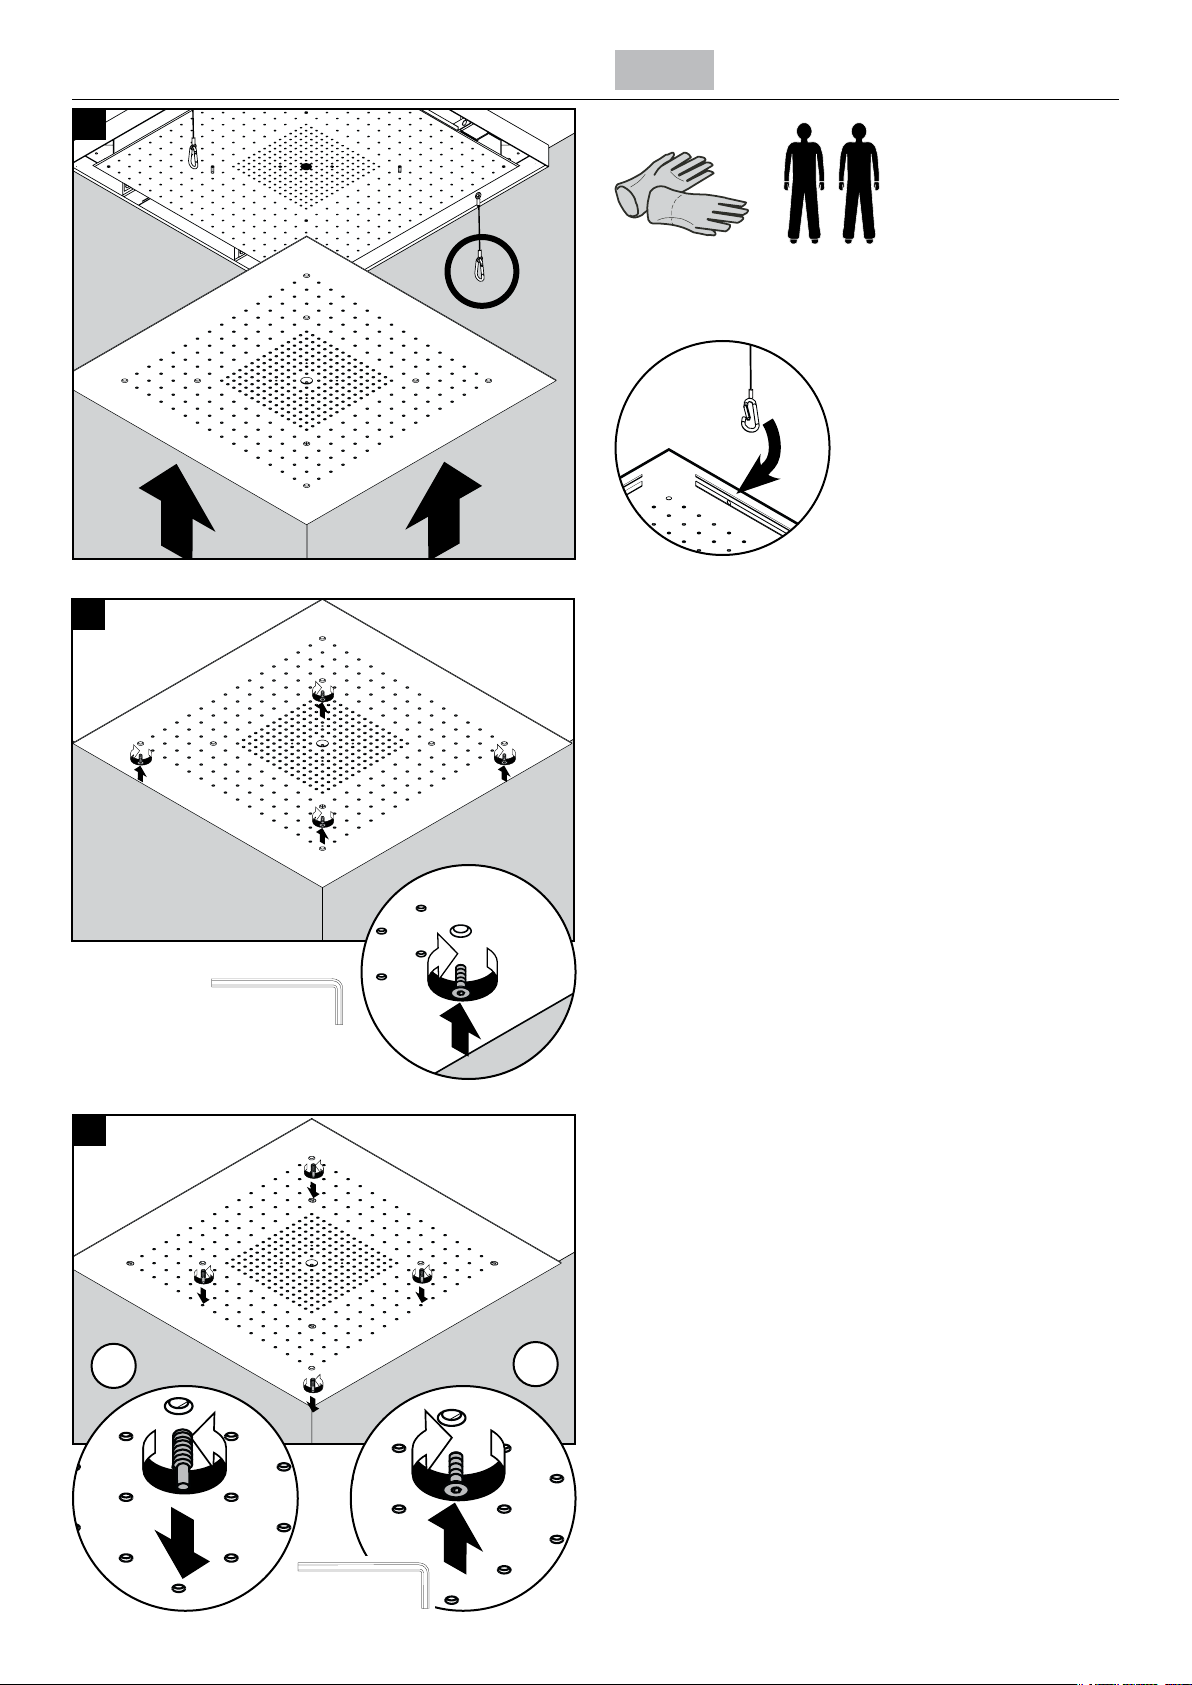
1
English
Connect the remaining three safety snap hooks to the face plate.
x
0
1
Install the four indicated screws using a 4 mm Allen wrench
4 mm
Remove the four studs (1).
Install the screws and tighten using a 4 mm Allen wrench (2).
4
1.
.
4 mm
Page 25

Français Español
Connectez les trois crochets de sûreté restants à la plaque
frontale.
Installez les quatre vis indiquées à l’aide d’une clé hexagonale
de 4 mm.
Conecte los tres ganchos de presión de seguridad restantes en la
placa frontal.
Instale los cuatro tornillos indicados con una llave Allen de 4
mm.
Retirez les quatre goujons (1).
Installez les vis et serrez-les à l’aide d’une clé hexagonale de
4 mm (2).
Retire los cuatro espárragos (1).
Instale los tornillos y apriételos con una llave Allen de 4 mm (2).
5
Page 26
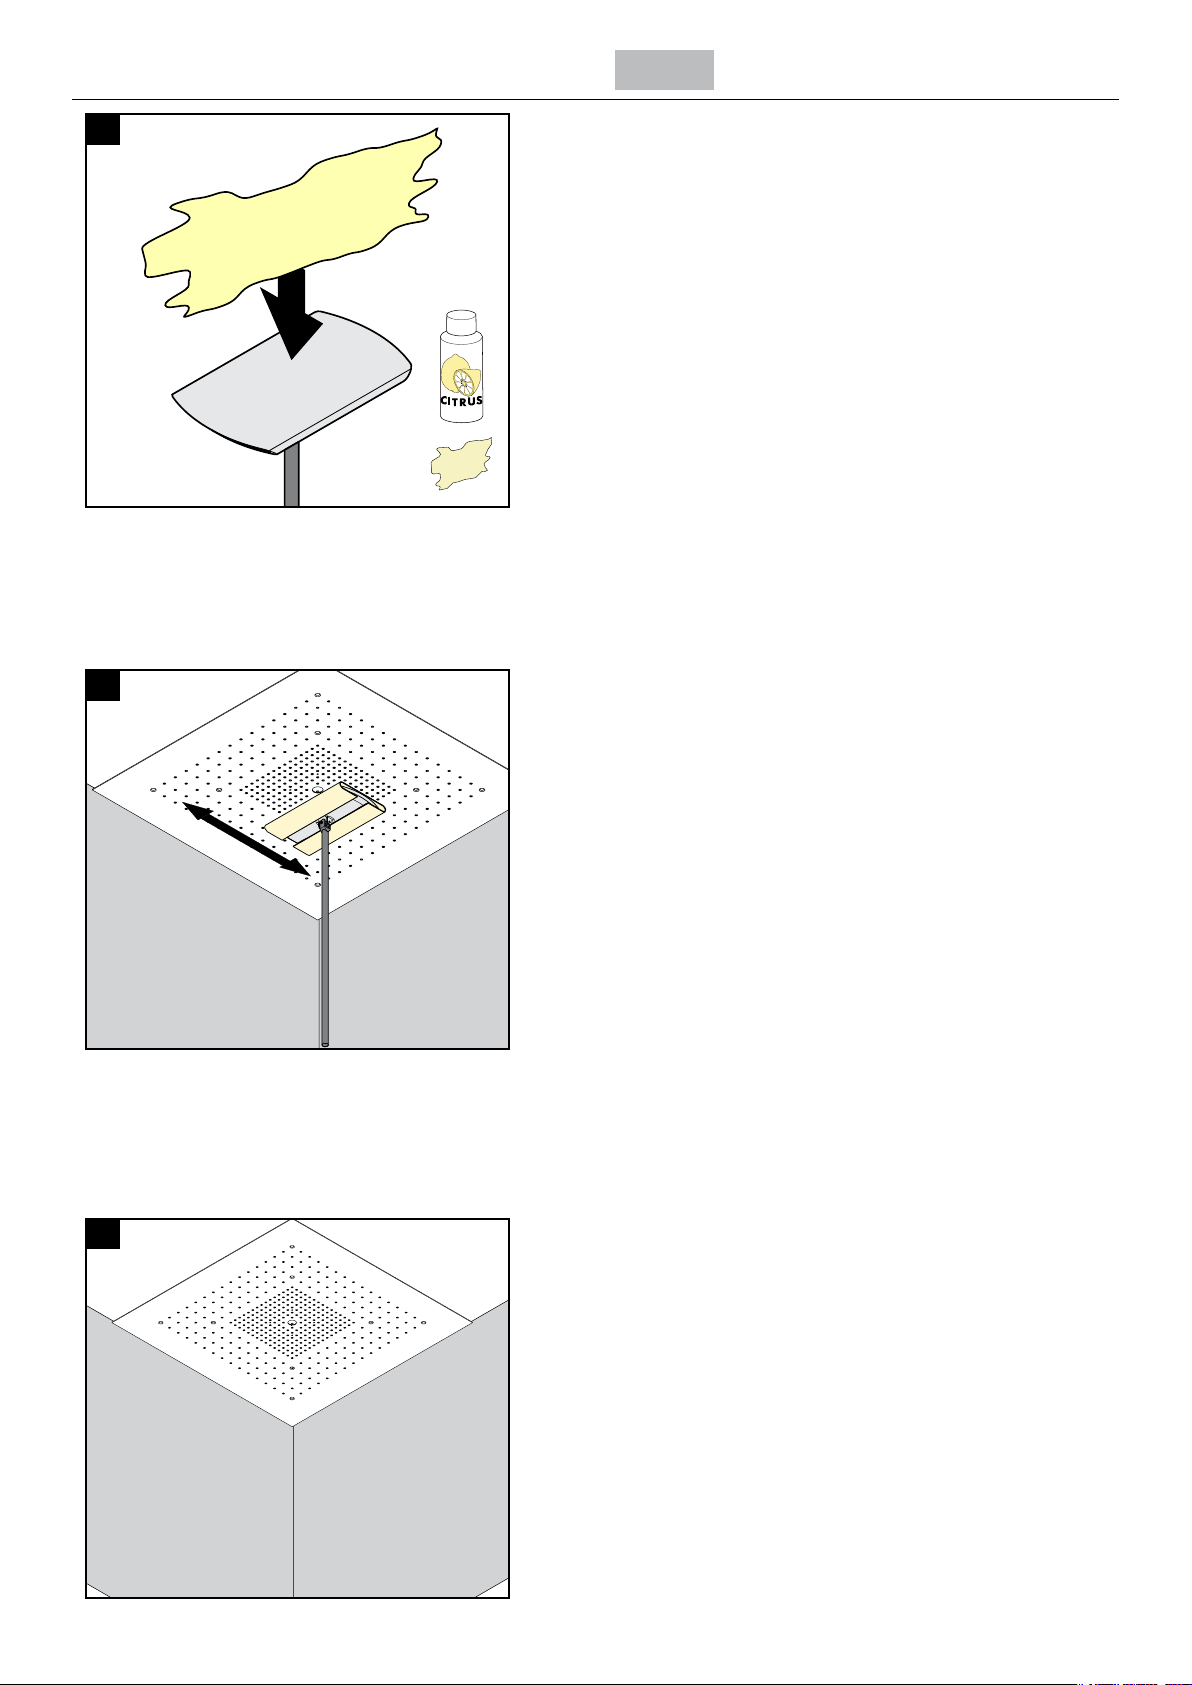
English
1
Cleaning
Moisten a soft cotton cloth with a commercial scale remover such
as CLR or LimeAway.
Wipe the faceplate using the cloth.
Allow the remover to remain on the face plate for the amount of
time shown in the label instructions.
Page 27

Français Español
Nettoyage
Imbibez un chion en coton doux d’un produit détartrant commercial tel que CLR ou LimeAway.
Essuyez la plaque frontale avec le chion.
Limpieza
Humedezca un paño de algodón suave con un desincrustante
comercial, como CLR o LimeAway.
Limpie la placa frontal con el paño.
Laissez le détartrant sur la plaque frontale pour la durée indiquée
dans les instructions de l’étiquette.
Deje actuar al desincrustante sobre la placa frontal durante el
tiempo indicado en las instrucciones de la etiqueta.
Page 28
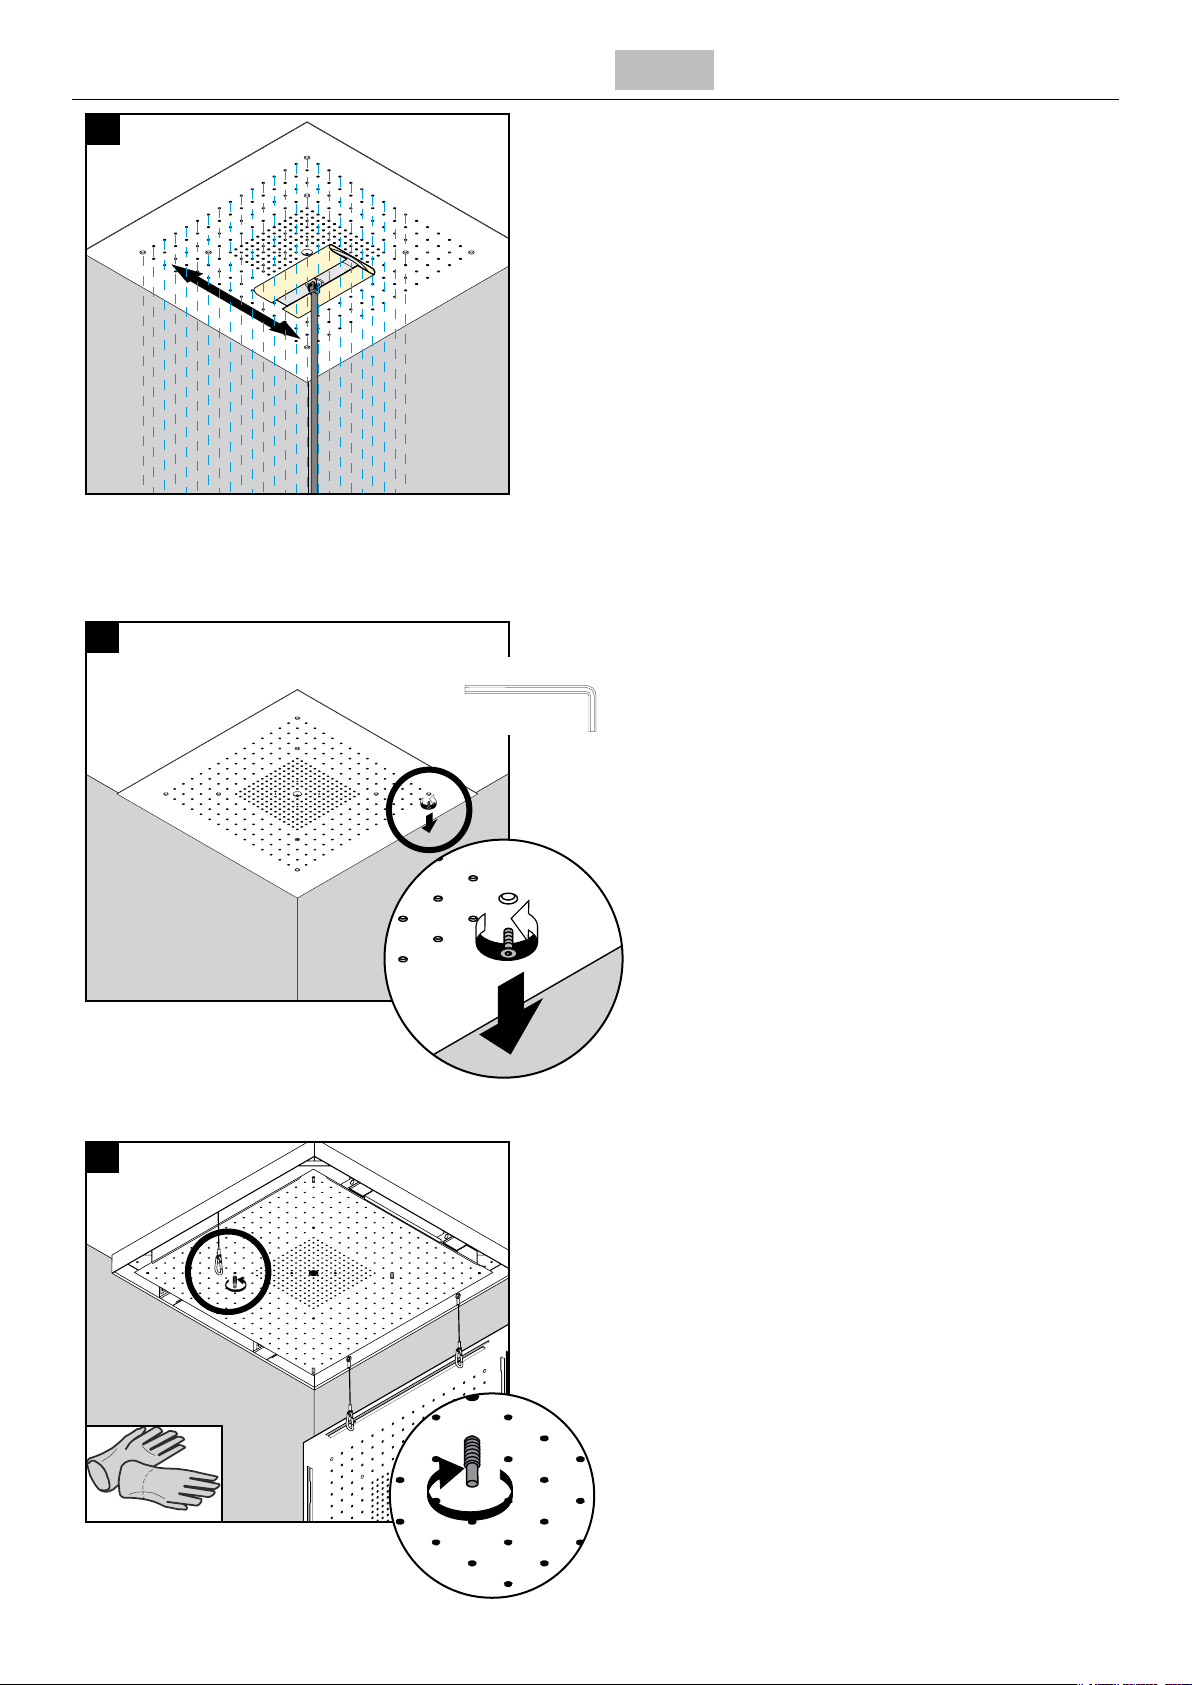
English
4
Turn the water on.
Wipe across the face plate using the cotton cloth.
Allow the ShowerHeaven to ush for at least 1 minute.
1
Remove the face plate screws.
4 mm
8
Install the studs as shown in the diagram.
Page 29

Français Español
Ouvrez l’eau.
Essuyez la plaque frontale d’un côté à l’autre avec le chion en
coton.
Rincez le ShowerHeaven pendant au moins 1 minute.
Retirez les vis de la plaque frontale.
Abra el suministro de agua.
Limpie toda la placa frontal con el paño de algodón.
Deje que la ShowerHeaven se lave durante 1 minuto como
mínimo.
Retire los tornillos de la placa frontal.
Installez les goujons de la façon indiquée dans le schéma.
Instale los espárragos como se muestra en el dibujo.
Page 30
English
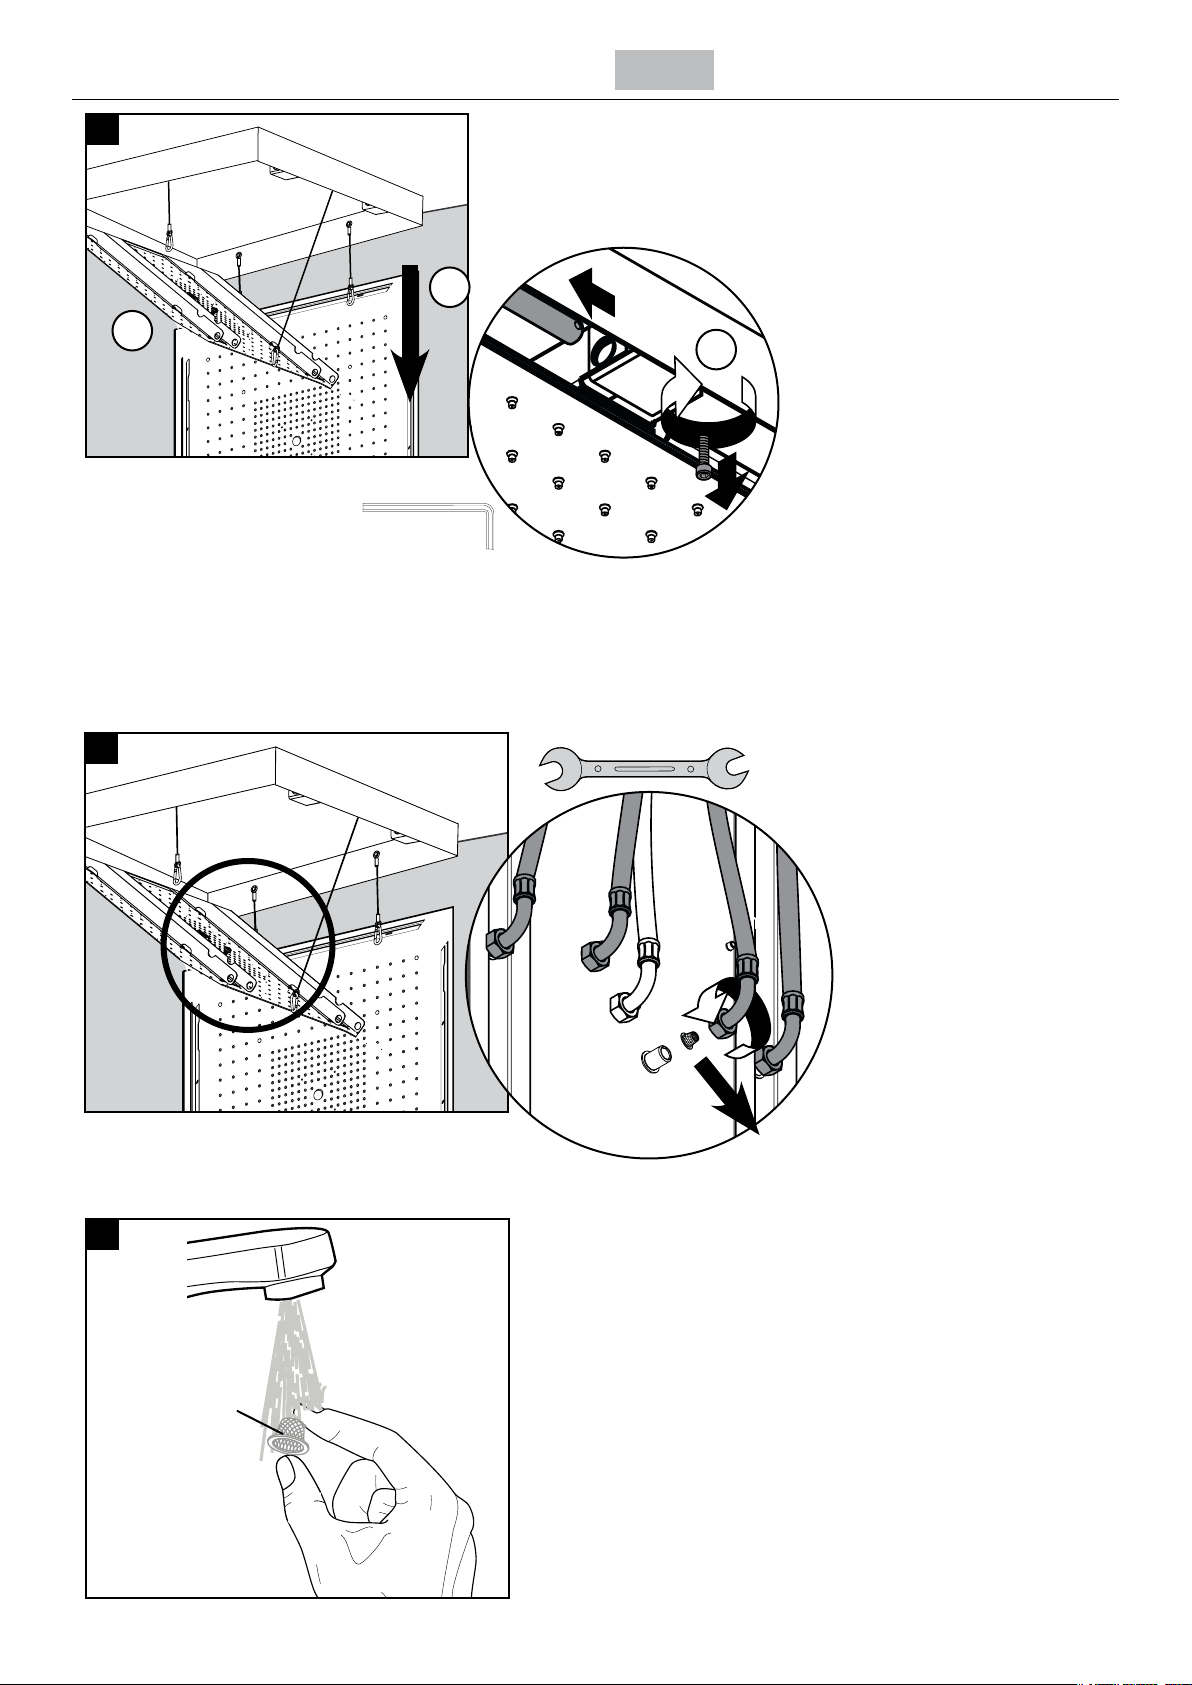
Lower the face plate.
Remove two of the hinge screws and two of the hinge pins.
Lower the spray body.
1.
x
.
.
5 mm
4
4 mm
Disconnect the hoses from the spray
body.
Remove the four lters (there is no lter
in the laminar spray hose).
4x
5
Flush the lters using clear water. Replace the lters if they are in
poor condition.
Reassemble the ShowerHeaven in reverse order.
000
0
Page 31

Français Español
Abaissez la plaque frontale.
Retirez deux des vis de charnière et deux des broches de
charnière.
Abaissez la plaque de jet.
Baje la placa frontal.
Retire dos de los tornillos de bisagra y dos de los pasadores de
bisagra.
Baje el cuerpo de rociado.
Déconnectez les tuyaux de la plaque de jet.
Retirez les quatre ltres (le tuyau du jet laminaire ne contient aucun
ltre).
Rincez les ltres à l’eau claire.
Réassemblez le ShowerHeaven dans l’ordre inverse.
Desconecte las mangueras del cuerpo de rociado.
Retire los cuatro ltros (no hay un ltro en la manguera de
rociado en forma laminar).
Lave los ltros con agua limpia.
Vuelva a colocar la ShowerHeaven en orden inverso.
1
Page 32
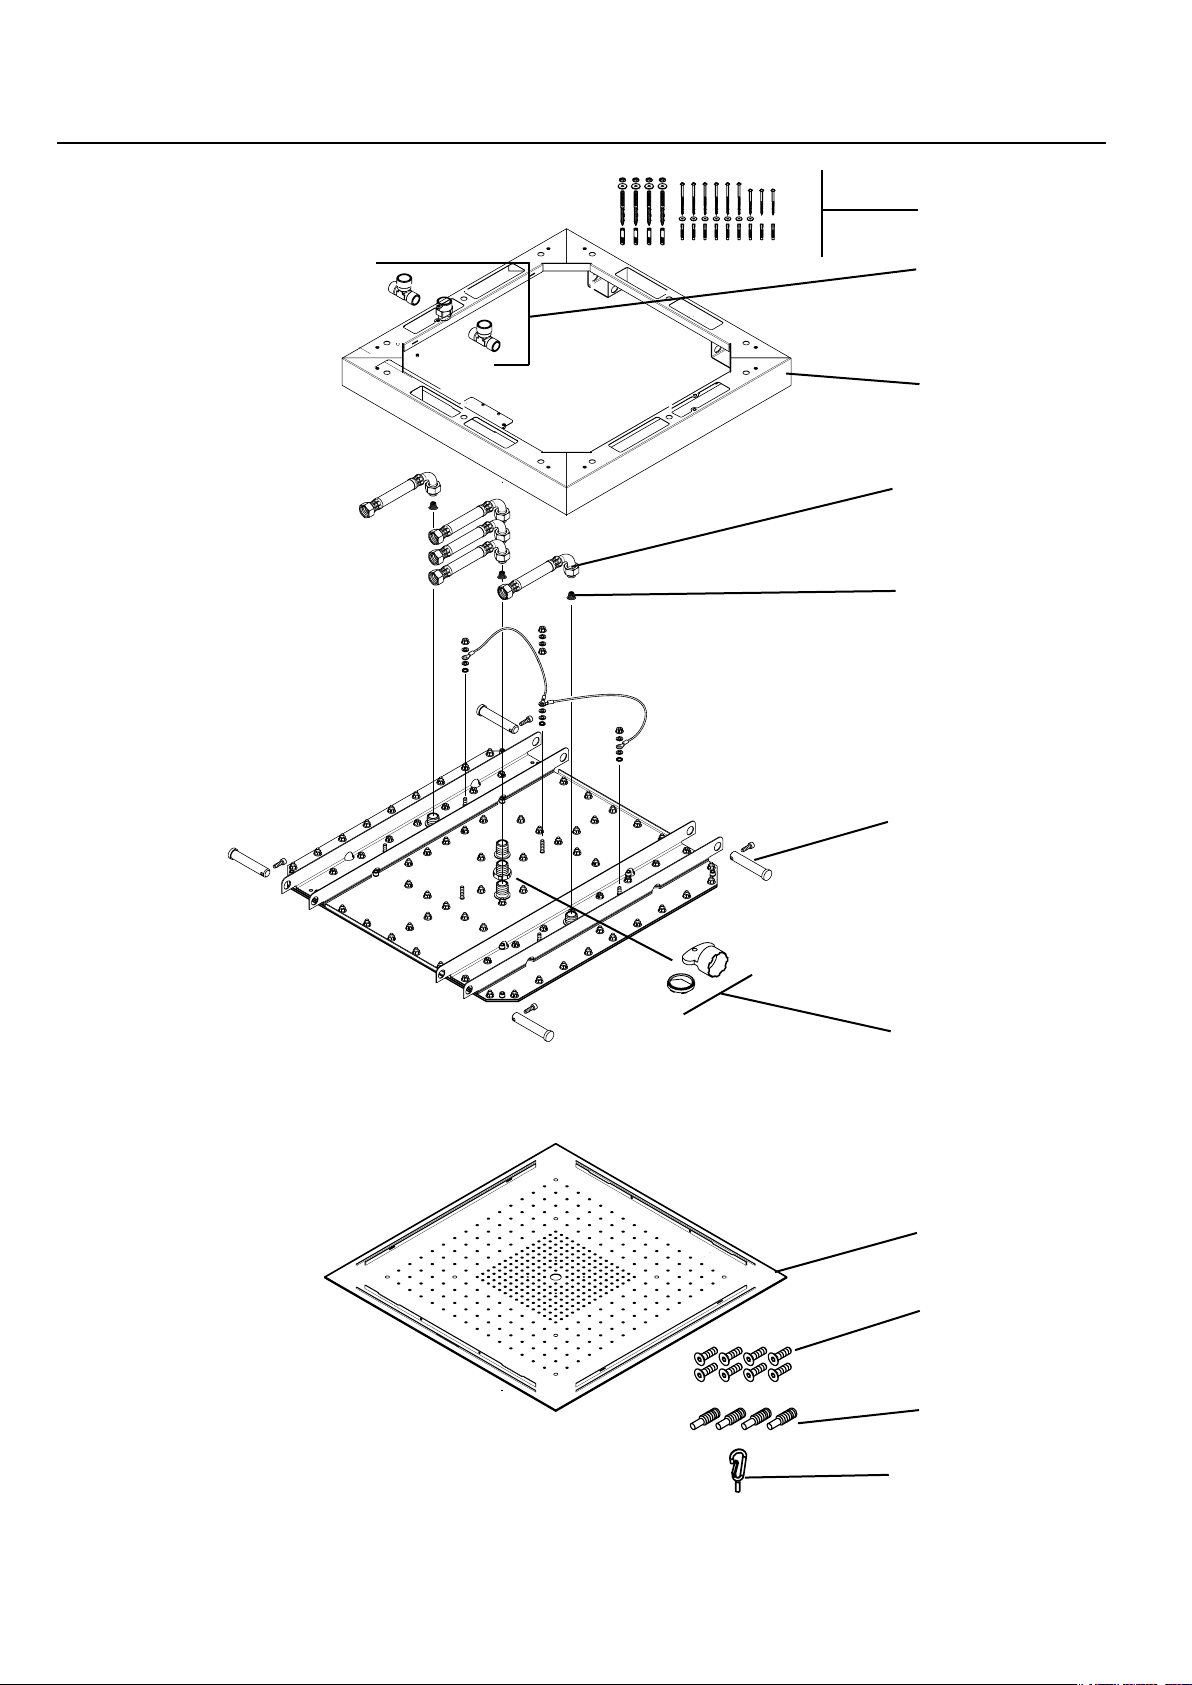
Replacement Parts / Pièces détachées / Repuestos
97722000
95142001
95145000
25963000
97973000
95146000
95147000
95144XX0
95149000
XX = colors / couleurs / acabados
80 = polished stainless steel
82 = brushed nickel
95150000
95151000
Page 33

Cleaning Recommendation for Hansgrohe Products
Modern lavatory faucets, kitchen faucets, and showers consist of very dierent materials to comply with the needs of the market with regard to design and functionality. To avoid damage and
returns, it is necessary to consider certain criteria when cleaning.
Cleaning Materials for Faucets and Showers
Acids are a necessary ingredient of cleaning materials for removing lime, however please pay attention to the following points when cleaning faucets and showers:
Only use cleaning materials which are explicitly intended for this type of application.
•
Never use cleaning materials which contain hydrochloric, formic, phosphoric, or acetic acid, as they cause considerable damage.
•
Never mix one cleaning material with another.
•
Never use cleaning materials or appliances with an abrasive eect, such as unsuitable cleaning powders, sponge pads, or micro ber cloths.
•
Cleaning Instructions for Faucets and Showers
Please follow the cleaning material manufacturer’s instructions. In addition, pay attention to the following points:
Clean the faucets and showers as and when required
•
Use the amount of cleaning product and the amount of time recommended by the manufacturer. Do not leave the cleaner on the xture longer than necessary.
•
Regular cleaning can prevent calcication.
•
When using spray cleaners, spray rst onto a soft cloth or sponge. Never spray directly onto the faucet as droplets can enter openings and gaps and cause damage.
•
After cleaning, rinse thoroughly with clean water to remove any cleaner residue.
•
Important
Residues of liquid soaps, shampoos, and shower foams can also cause damage, so rinse with clean water after using.
Please note: if the surface is already damaged, the eect of cleaning materials will cause further damage.
Components with damaged surfaces must be replaced or injury could result.
Damage caused by improper treatment is not covered under the warranty.
Recommandations pour le nettoyage des produits Hansgrohe
Les robinetteries modernes de lavabo, de cuisine et de douche utilisent des matériaux très diérents pour répondre aux besoins du marché en termes de conception et de fonctionnalité. Certaines règles de base doivent être respectées lors du nettoyage de ces produits an d’éviter de les endommager ou d’avoir à les retourner.
Produits de nettoyage pour robinetteries et douches
Les acides sont une partie intégrante nécessaire de tous les produits de détartrage; il faut cependant prendre les précautions suivantes lors du nettoyage des robinets et des douches :
N’utilisez que des produits/articles de nettoyage conçus spéciquement pour les articles de robinetterie et de douche.
•
N’utilisez jamais de produits/articles de nettoyage contenant de l’acide chlorhydrique, formique, phosphorique ou acétique car ils pourraient causer des dommages considérables.
•
Ne mélangez jamais deux produits de nettoyage.
•
N’utilisez jamais de produits/articles de nettoyage de nature abrasive tels que poudres de nettoyage, tampons-éponge ou chions microbre non appropriés.
•
Instructions de nettoyage pour robinetteries et douches
Veuillez suivre les instructions du fabricant de produits/articles de nettoyage. De plus, tenez compte des conseils suivants :
Nettoyez vos produits de robinetterie et de douche aussi souvent que nécessaire.
Utilisez la quantité de produit nettoyant et respectez la durée recommandée par le fabricant. Ne laissez pas le produit sur les articles de robinetterie plus longtemps que nécessaire.
•
Un nettoyage régulier peut prévenir la formation de dépôts calcaires.
•
Si vous utilisez des nettoyants en vaporisateur, vaporisez d’abord sur une éponge ou un chion. Ne vaporisez jamais directement sur un robinet : des gouttelettes pourraient s’inltrer dans
•
les ouvertures et les interstices et endommager celui-ci.
Après le nettoyage, rincez abondamment avec de l’eau propre pour éliminer tout résidu de produit nettoyant.
•
Important
Les résidus de savon liquide, de shampoing et de mousse pour la douche peuvent également endommager la robinetterie; rincez donc avec de l’eau propre après utilisation de ces produits.
Veuillez noter :
Les composants dont la surface est endommagée devraient être remplacés sous peine d’entraîner des blessures.
Les dommages dus à un mauvais traitement ne sont pas couverts par la garantie.
si la surface est déjà endommagée, les produits de nettoyage l’endommageront encore plus.
Page 34

Recomendación de limpieza para los productos de Hansgrohe
Hoy en día, las griferías de baño y de cocina así como duchas modernas se componen de materiales muy distintos para satisfacer las exigencias del mercado respecto al diseño y la funcionalidad. Para evitar daños reclamaciones hay que tener en cuenta ciertos aspectos tanto en el uso como en su limpieza posterior.
Para elucidado de las griferías y las duchas en principio hay que seguir lo siguiente:
Usar sólo detergentes previstos especícamente para este campo de aplicación.
•
No aplicar detergentes que contengan hipoclorito sódico, ácido clorhídrico, fórmico o acético porque pueden causar daños importantes.
•
Detergentes que contienen ácido fosfórico tampoco pueden ser aplicados ilimitadamente.
•
Por regla general no se deben mezclar detergentes.
•
Tampoco se deben utilizar utensilios abrasivos, como son polvos abrasivos, esponjas o paños de microbra.
•
Si tienen que seguir siempre las instrucciones de uso de los fabricantes de los detergentes.
•
La limpieza tiene que ser realizada según la dosicación y el tiempo de actuación, en función del objeto y ajustada a las necesidades especícas del mismo.
•
Gracias a una limpieza periódica se pueden evitar las incrustaciones de cal.
•
No conviene rociar el detergente en ningún caso sobre la grifería sino sobre los textiles y ejecutar la limpieza así porque el líquido puede entra en aperturas o hendiduras de la grifería y
•
causar daños.
Después de la limpieza hay que aclarar con suciente agua para eliminar completamente el resto de detergente.
•
La utilización de limpiadores a vapor no está permitida, las altas temperaturas pueden dañar los productos.
•
Indicaciones importantes
Los residuos de productos de aseo como jabón líquido, champús y gel de ducha pueden dañar también los materiales.
Por lo que también se deberá prestar atención a lo siguiente: aclarar con abundante agua después del uso.
Con materiales ya dañados la acción de detergentes incrementará el desgaste de estos.
Los componentes con supercies dañadas deberán cambiarse, en otro caso se corre el peligro de lesionarse.
Los daños que resulten de un uso inadecuado no están incluidos en nuestra garantía.
4
Page 35

Limited Lifetime Consumer Warranty
This product has been manufactured and tested to the highest quality standards by Hansgrohe, Inc. (“Hansgrohe”). This warranty is limited to Hansgrohe products which are purchased by a
consumer in the United States after March 1, 1996, and installed in either the United States or Canada.
WHO IS COVERED BY THE WARRANTY
This warranty extends to the original consumer purchaser only. This warranty is non-transferable.
WHAT IS COVERED BY THE WARRANTY
This warranty covers only your Hansgrohe manufactured product. Hansgrohe warrants this product against defects in material or workmanship as follows: Hansgrohe will repair at no charge
for parts only or, at its option, replace any product or part of the product that proves defective because of improper workmanship and/or material, under normal installation, use, service and
maintenance. If Hansgrohe is unable to provide a replacement and repair is not practical or cannot be timely made, Hansgrohe may elect to refund the purchase price in exchange for the return
of the product.
LENGTH OF WARRANTY
Replacement or repaired parts of products will be covered for the term of this warranty as stated in the following two sentences. If you are a consumer who purchased the product for use primarily for personal, family, or household purposes, this warranty extends for as long as you own the product and the home in which the product is originally installed. If you purchased the product
for use primarily for any other purpose, including, without limitation, a commercial purpose, this warranty extends only (i) for 1 year, with respect to Hansgrohe and Commercial products, and (ii)
for 5 years, with respect to AXOR products.
THIS WARRANTY DOES NOT COVER, AND HANSGROHE WILL NOT PAY FOR:
A. Conditions, malfunctions or damage not resulting from defects in material or workmanship.
B. Conditions, malfunctions or damage resulting from (1) normal wear and tear, improper installation, improper maintenance, misuse, abuse, negligence, accident or alteration, or (2) the use
of abrasive or caustic cleaning agents or “no-rinse” cleaning products, or the use of the product in any manner contrary to the product instructions. (3) Conditions in the home such as excessive water pressure or corrosion.
C. Labor or other expenses for the disconnection, deinstallation, or return of the product for warranty service, or for installation or reinstallation of the product (including but not limited to
proper packaging and shipping costs), or for installation or reinstallation of the product.
D. Accessories, connected materials and products, or related products not manufactured by Hansgrohe.
TO OBTAIN WARRANTY PARTS OR INFORMATION
Contact your Hansgrohe retailer, or contact Technical Service at:
Hansgrohe Inc.
1492 Bluegrass Lakes Parkway
Alpharetta GA 30004
Toll-free (800) 334-0455.
In requesting warranty service, you will need to provide
1. The sales receipt or other evidence of the date and place of purchase.
2. A description of the problem.
3. Delivery of the product or the defective part, postage prepaid and carefully packed and insured, to Hansgrohe Inc. 1492 Bluegrass Lakes Parkway, Alpharetta, Georgia 30004, Attention:
Technical Service, if required by Hansgrohe.
When warranty service is completed, any repaired or replacement product or part will be returned to you postage prepaid.
EXCLUSIONS AND LIMITATIONS
REPAIR OR REPLACEMENT (OR, IN LIMITED CIRCUMSTANCES, REFUND OF THE PURCHASE PRICE) AS PROVIDED UNDER THIS WARRANTY IS THE EXCLUSIVE REMEDY OF THE PURCHASER. HANSGROHE NEITHER ASSUMES NOR AUTHORIZES ANY PERSON TO CREATE FOR IT ANY OBLIGATION OR LIABILITY IN CONNECTION WITH THIS PRODUCT.
HANSGROHE SHALL NOT BE LIABLE TO PURCHASER OR ANY PERSON FOR ANY INCIDENTAL, SPECIAL, OR CONSEQUENTIAL DAMAGES, ARISING OUT OF BREACH OF THIS WARRANTY OR ANY IMPLIED WARRANTY (INCLUDING MERCHANTABILITY).
Some States do not allow the exclusion or limitation of incidental or consequential damages, so the above limitation or exclusion may not apply to you. This warranty gives you specic legal
rights, and you may have other rights which vary from State to State. You may be required by law to give us a reasonable opportunity to correct or cure any failure to comply before you can
bring any action in court against us under the Magnuson-Moss Warranty Act.
PRODUCT INSTRUCTIONS AND QUESTIONS
Upon purchase or prior to installation, please carefully inspect your Hansgrohe product for any damage or visible defect. Prior to installing, always carefully study the enclosed instructions on
the proper installation and the care and maintenance of the product. If you have questions at any time about the use, installation, or performance of your Hansgrohe product, or this warranty,
please call or write to us or call us toll-free at 800 334 0455.
5
Page 36

Hansgrohe, Inc. • 1490 Bluegrass Lakes Parkway • Alpharetta, GA 30004
Tel. 770-360-9880 • Fax 770-360-9887
www.hansgrohe-usa.com
US - Installation Instructions • Part No. 90465621 • Revised 01/2010
 Loading...