

Page 1

EN Installation / User Instructions / Warranty
FR Instructions de montage / Mode d'emploi / Garantie
ES Instrucciones de montaje / Manejo / Garantía
Starck Organic
12626001
Page 2

English
3⅛"
1"
5½"
¾" NPT
½" NPT
4¾"/4¾"
2⅛"
Tools Required / Outiles Utiles /
Herramientas Útiles
Technical Information
Recommended water pressure 15 - 75 psi
Max. water pressure 145 psi
Recommended hot water temp. 120° - 140° F*
Max. hot water temp 176°F*
Flow rate - handshower 2.5 gpm max.
*Please know and follow all applicable local plumbing
codes when setting the temperature on the water heater.
Installation Considerations
• For best results, Hansgrohe recommends that
this unit be installed by a licensed, professional
plumber.
• Please read over these instructions thoroughly before beginning installation. Make sure that you
have all tools and supplies needed to complete
the installation.
• To prevent scald injury, the maximum output temperature of the shower valve should be no higher
than 120°F. In Massachusetts, the maximum
output temperature of the shower valve can be no
higher than 112°F.
• Protection against backflow is provided by a
double check valve.
• Keep this booklet and the receipt (or other proof
of date and place of purchase) for this product in
a safe place. The receipt is required should it be
necessary to request warranty parts.
8 mm
2 mm
6 mm
2
Page 3

Français
Español
Données techniques
Pression d’eau recommandée 15 - 75 psi
Pression d’eau maximum 145 psi
Température recommandée 120° - 140° F*
d'eau chaude
Température maximum d'eau chaude 176°F*
Capacité nominale - douchette 2.5 gpm
* Vous devez connaître et respecter tous les codes de plomberie locaux applicables pour le réglage de la température
du chauffe-eau.
À prendre en considération pour
l’installation
• Pour de meilleurs résultats, Hansgrohe recommande que ce produit soit installé par un plombier professionnel licencié.
• Veuillez lire attentivement ces instructions avant
de procéder à l’installation. Assurez-vous de disposer de tous les outils et du matériel nécessaires
pour l’installation.
• Pour empêcher des blessures par ébouillantement, la température de sortie maximale du
robinet de douche ne doit pas excéder 120°F.
Au Massachusetts, la température de sortie maximale du robinet de douche ne doit pas excéder
112°F.
• La protection contre le retour d’eau est fournie
par un clapet de non-retour double.
• Conservez ce livret et le reçu (ou une autre
preuve sur laquelle figurent la date et l’endroit
de l’achat) pour ce produit dans un endroit sûr.
Le reçu est requis si vous commandez des pièces
sous garantie.
Datos tecnicos
Presión recomendada en servicio 15 - 75 psi
Presión en servicio max. 145 psi
Temperatura recomendada del 120� - 140� F*
agua caliente
Temperatura del agua caliente max. 176�F*
Caudal máximo - teleducha 2.5 gpm
*Debe conocer y cumplir todos los códigos locales aplicables para ajustar la temperatura del calentador de agua.
Consideraciones para la
instalación
• Para obtener mejores resultados, la instalación
debe estar a cargo de un plomero profesional
matriculado.
• Antes de comenzar la instalación, lea estas
instrucciones detenidamente. Asegúrese de tener
las herramientas y los insumos necesarios para
completar la instalación.
• Para evitar escaldaduras, la máxima temperatura
de salida de la válvula de la ducha no debe
exceder los 120°F. En Massachusetts, la
máxima temperatura de salida de la válvula de
la ducha no debe exceder los 112°F.
• La protección contra flujo inverso se proporciona
mediante una válvula de retención doble.
• Mantenga este folleto y el recibo (u otro
comprobante del lugar y fecha de compra) de
este producto en lugar seguro. El recibo se
requiere en caso de ser necesario solicitar piezas
bajo garantía.
3
Page 4

English
1a
2a
Installation – ½"
Requires ½" NPT male nipple recessed ⅜" behind
surface of finished wall.
Wrap the nipple with Teflon tape.
Install the mounting piece.
1
1b
4
2
8 mm
Installation – ¾"
Requires ¾" NPT female threaded pipe fitting recessed ⅜" behind surface of finished wall.
Page 5

Français Español
Installation – ½ po
Installez un raccord mâle fileté NPT de ½ po, encastré à ⅜ po à l’intérieur de la surface du plafond fini.
Enveloppez les filets du mamelon avec du ruban
Téflon.
Installez la pièce de montage.
Instalación – ½"
Esta instalación requiere un niple macho de ½" NPT
dentro ⅜" de la superficie del pared acabado.
Envuelva las roscas del niple con cinta de Teflon.
Instale la pieza de montaje.
Installation – ¾ po
Installez un raccord female fileté NPT de ¾ po, encastré à ⅜ po à l’intérieur de la surface du plafond
fini.
Instalación – ¾"
Esta instalación requiere un niple hembra de ¾ NPT
dentro ⅜" de la superficie del pared acabado.
5
Page 6

English
2b
3
Wrap the mounting piece with Teflon tape.
Install the mounting piece.
1
2
8 mm
Both ½" and ¾" installations
The mounting piece should extend 1⅝" outside the
surface of the finished wall.
Seal the wall around the nipple using
waterproof sealant.
Failure to seal the wall may lead to
water damage.
1⅝"
4
6
Position the support over the mounting piece.
Mark the position of the screw hole.
Do not drill into a water line!
Page 7
Français Español
Enveloppez les filets la pièce de montage avec du
ruban Téflon.
Installez la pièce de montage.
Les deux ½" et ¾" installations
Une partie de 1⅝ po de la pièce de montage se
trouver à l’extérieur de la surface du mur fini.
Scellez le mur autour du mamelon à
l’aide d’un agent d’étanchéité.
Si le mur n’est pas scellé, l’eau
pourrait éventuellement causer des
dommages.
Envuelva las roscas de la pieza de montaje con cinta
de Teflon.
Instale la pieza de montaje.
Ambas ½" y ¾" instalaciones
El extremo de la pieza de montaje debe sobresalir
1⅝ pulgadas por fuera de la superficie de la pared
terminada.
Selle la pared alrededor del niple
con un sellador impermeable.
Si no se sella la pared, pueden producirse daños por acción del agua.
Placez le support sur la pièce de montage.
Marquez le position de le trou de vissage.
Ne pas percez dans le tuyau d’eau !
Posicione el soporto sobre la pieza de montaje.
Marque la posicione del orificio para tornillo.
¡No perfore en el caño de agua!
7
Page 8
English
5
Ø 6 mm
3
1
2
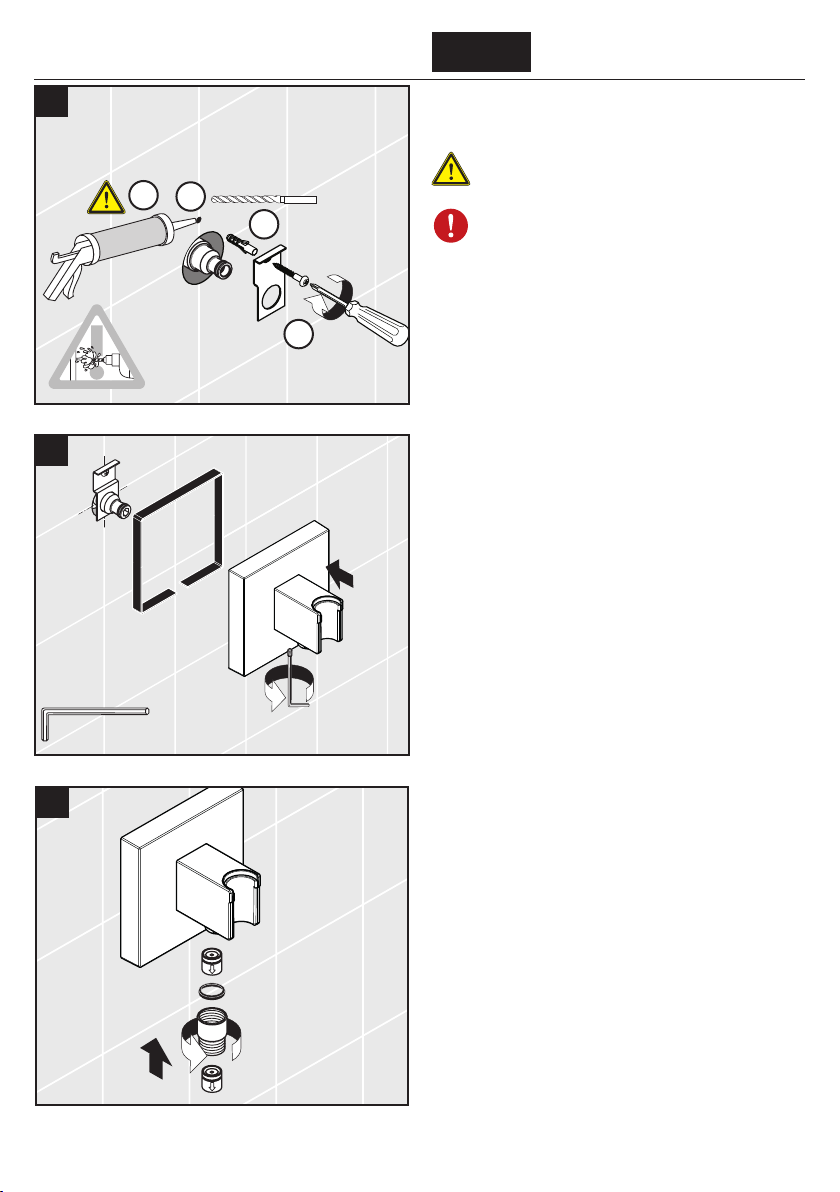
Drill the screw hole.
Install the anchor.
Seal the wall around the anchor using waterproof sealant.
Failure to seal the wall may lead to
possible water damage.
Install the support.
4
6
Install the handshower holder.
Tighten the screw.
1
7
8
2
2 mm
Install the double check valve.
The arrow on the check valve indicates the direction
of the water flow.
Page 9

Français Español
Percez le trou de vissage.
Installez la cheville.
Scellez le mur autour de la cheville à
l’aide d’un agent d’étanchéité.
Si le mur n’est pas scellé, l’eau
pourrait éventuellement causer des
dommages.
Installez le support.
Installez le support de la douchette.
Serrez le vis.
Perfore el orificio para tornillo.
Instale el perno de anclaje.
Selle la pared alrededor del
perno de anclaje con un sellador
impermeable.
Si no se sella la pared, pueden producirse daños por acción del agua.
Instale el soporto.
Instale el soporte de la ducha de mano.
Apriete el tornillo.
Installez le clapet anti-retour.
La flèche doit pointer en direction de l’écoulement
d’eau.
Instale la válvula antirretorno.
La flecha debe apuntar en la dirección del caudal
de agua.
9
Page 10
English
8
9
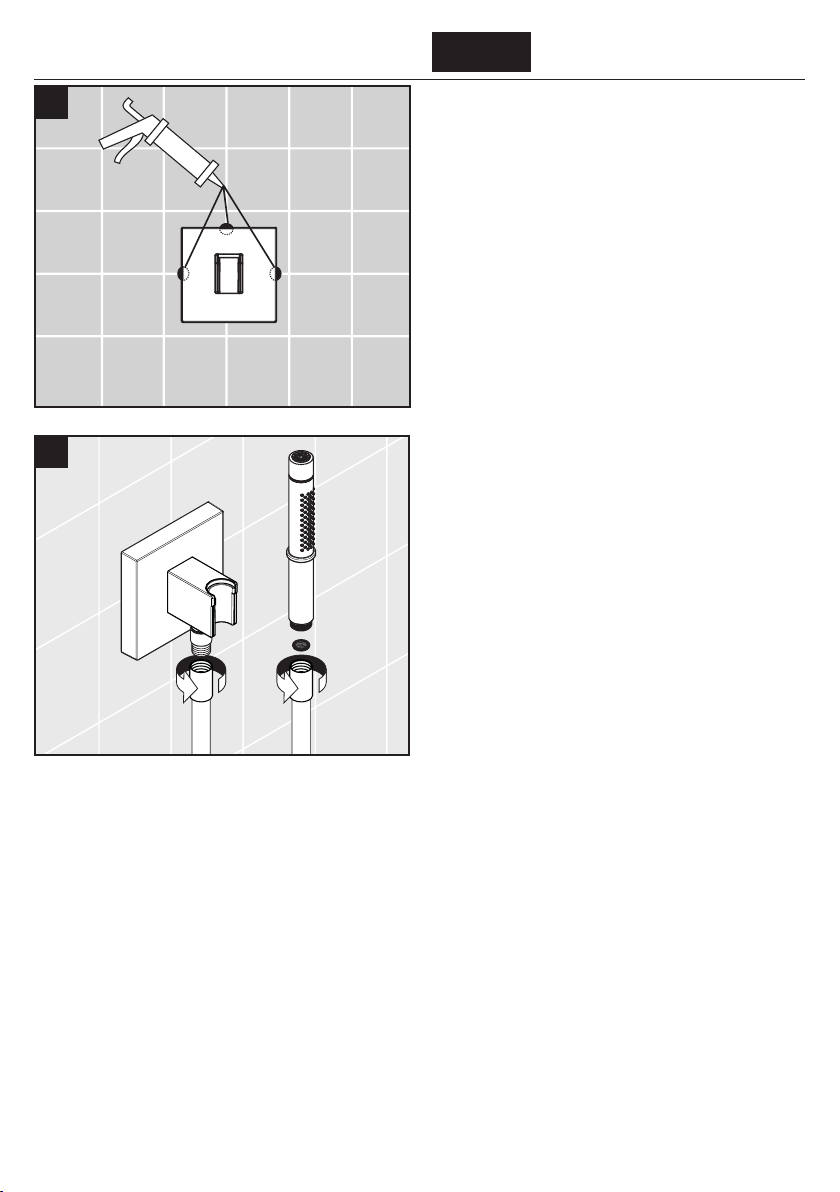
Place a small dab of sealant at the top and side grout
joints.
Place a rubber washer in one end of the handshower
hose. Connect this end to the outlet.
Place the screen washer in the other end of the handshower hose. Connect this end to the handshower.
Rest the handshower in the holder.
10
Page 11

Français Español
Appliquez une petite quantité d'un agent d'étanchéité
aux joints de coulis sur le dessus et les côtés.
Placez la rondelle de tuyau en caoutchouc noir dans
l’une des extrémités du tuyau. Vissez cette extrémité
du tuyau à la sortie pour douchette.
Placez le tamis dans l’autre extrémité du tuyau. Vissez
cette extrémité à la douchette.
Placez la douchette dans son support.
Coloque una pequeña cantidad de sellador impermeable en la parte superior y uniones de lechada de
cemento laterales
Enrosque este extremo a la salida de la ducha de
mano.
Coloque la arandela de filtro en el otro extremo y
conéctelo a la ducha de mano.
Coloque la ducha de mano en el soporte.
11
Page 12
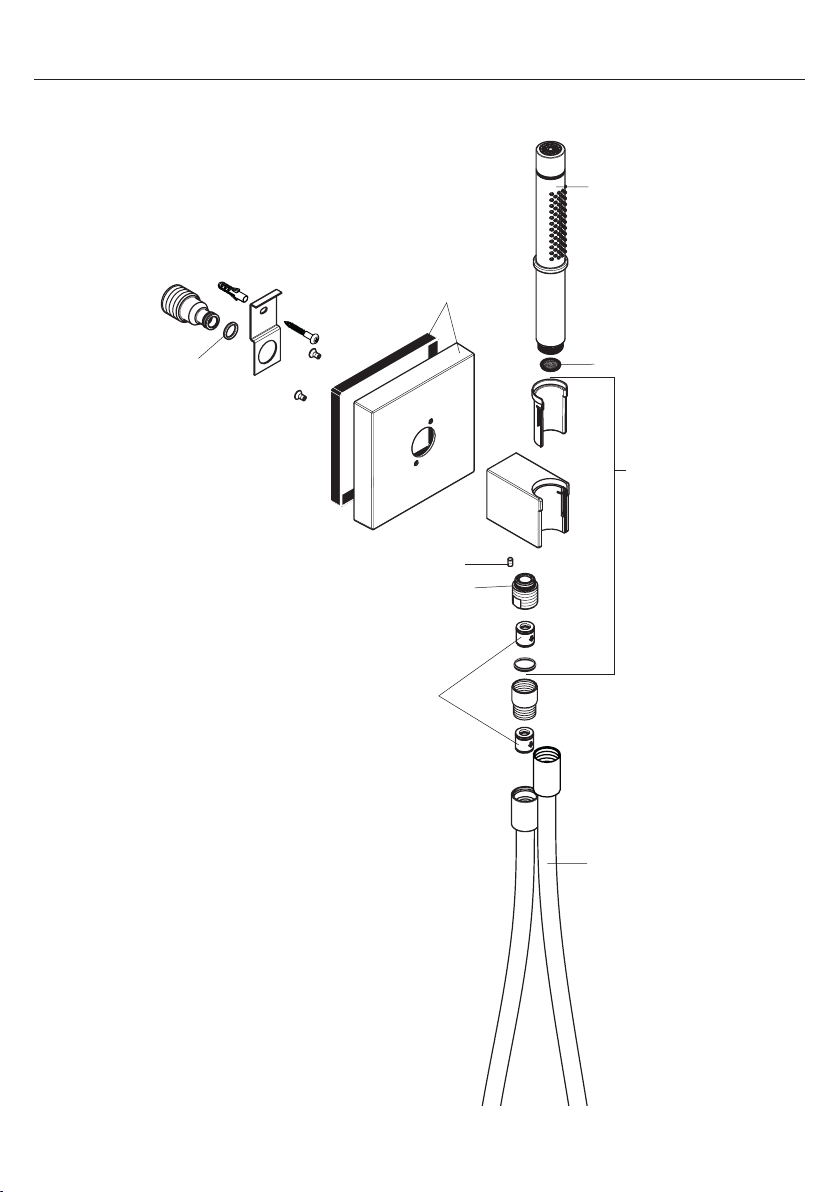
Replacement Parts / Pièces détachées / Repuestos
98359000
95390001
98127000
(11x2)
94246000
98358000
97669000
98129000
(14x2)
94074000
28282000
12
Page 13
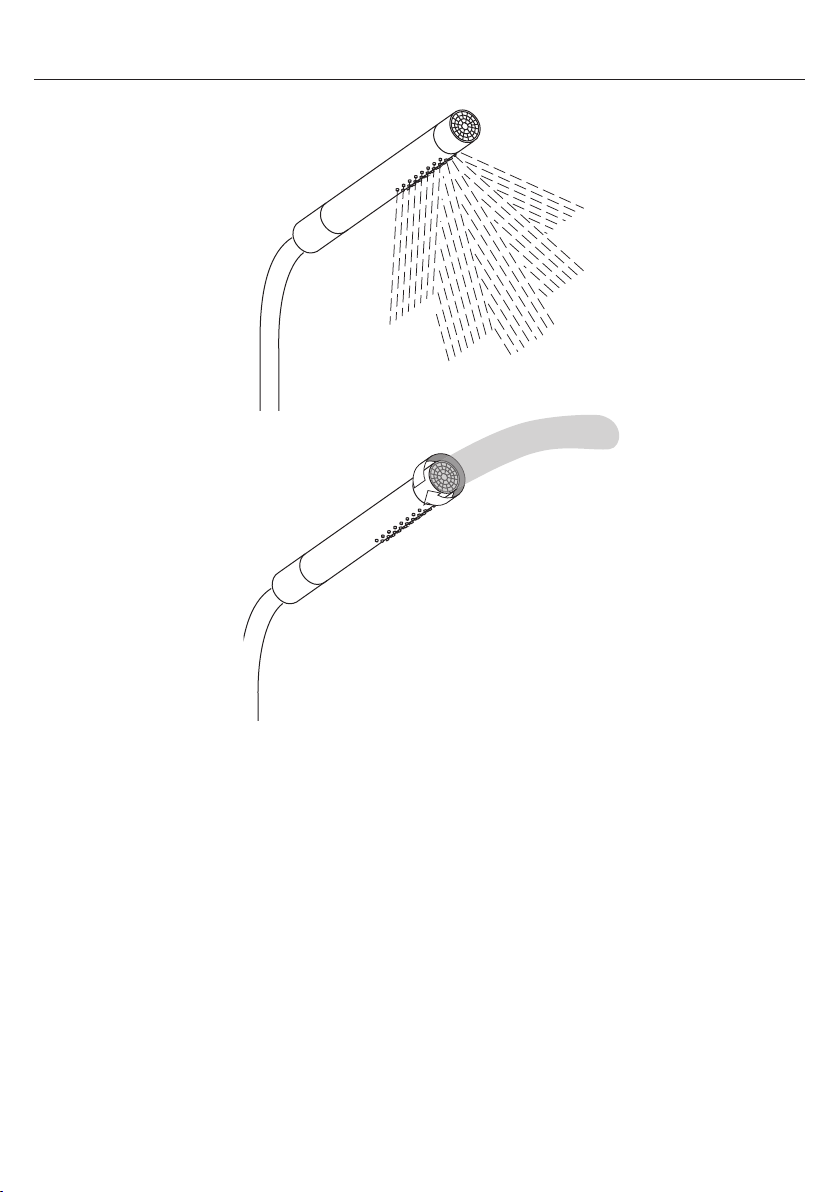
User Instructions / Instructions de service / Manejo
13
Page 14
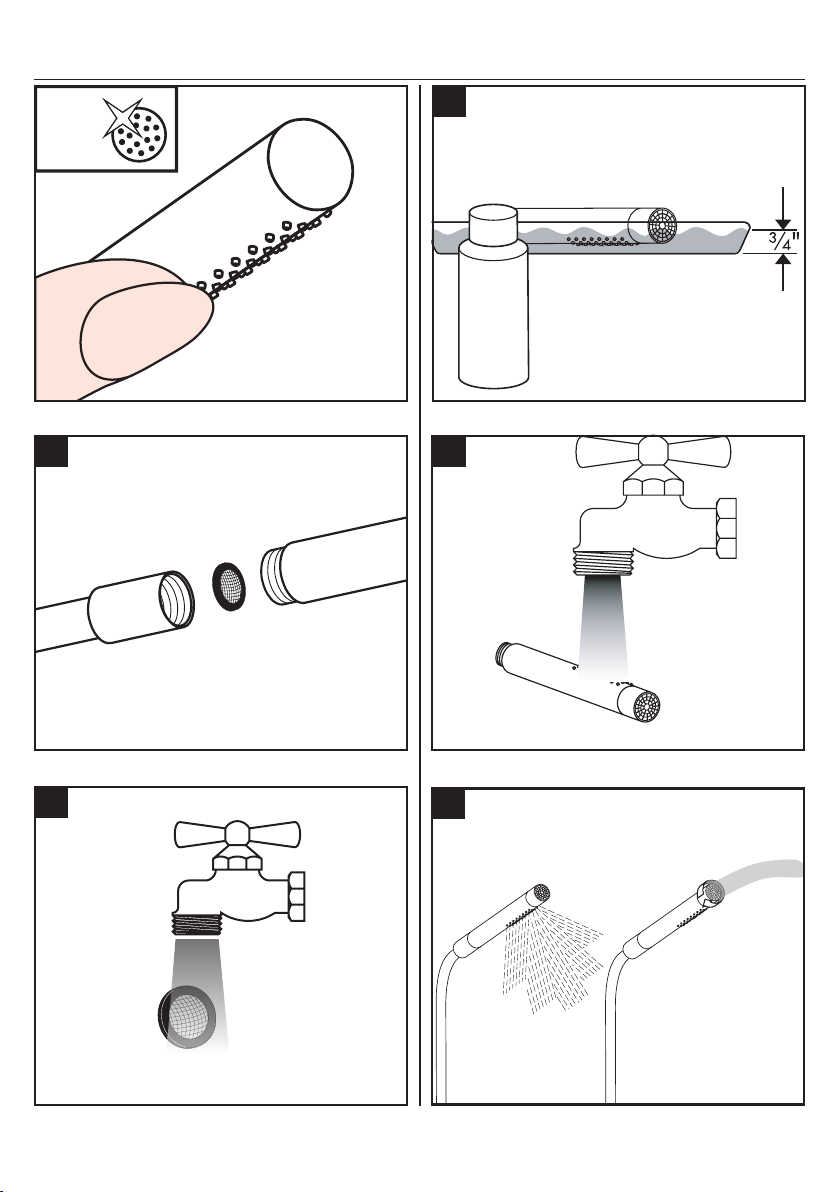
Cleaning / Nettoyage / Limpieza
Quick
Clean
1
S
c
a
R
e
m
o
1
2
2
3
scale remover
e
l
détartrant commercial
r
e
v
desincustante comercial
> 1 min.
14
Page 15
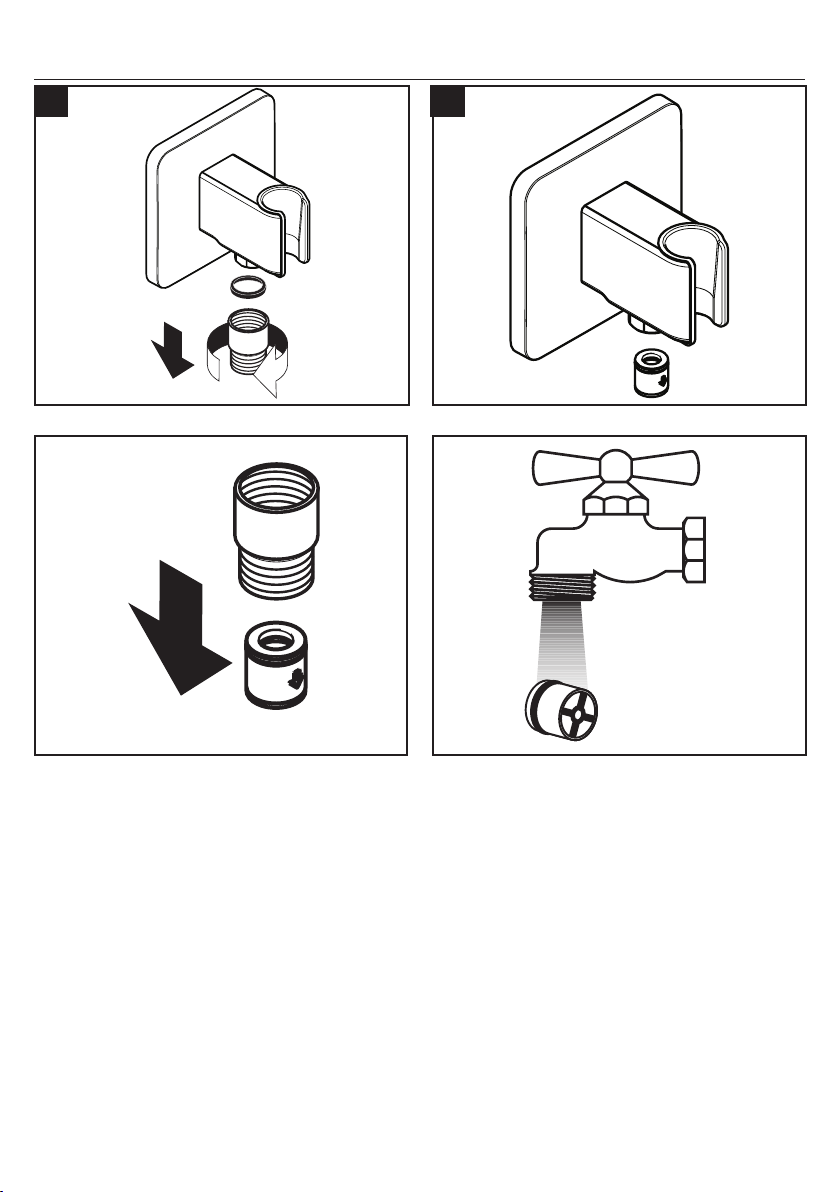
Cleaning / Nettoyage / Limpieza
21
15
Page 16

Cleaning Recommendation for Hansgrohe Products
Modern bathroom faucets, kitchen faucets and shower products are made from different materials to comply with the needs
of the market with regard to design and functionality. To avoid damage to the product, it is necessary to take proper care of
it.
For best results:
• Prevent the buildup of mineral scale and /or soap residue by cleaning your Hansgrohe product(s) when needed.
• Select a cleaning agent specifically intended for the type of product.
• Do not use these types of cleaners as they will cause damage to your Hansgrohe product:
Any cleaning agent containing hydrochloric acid, formic acid, lye, or acetic acid.
Abrasive cleaning powders, pads, or brushes.
Steam cleaners.
“No rinse” cleaning agents.
• Always follow the instructions provided by the manufacturer of the cleaning agent.
• Do not mix cleaning agents, unless directed by the manufacturer.
• Do not spray cleaners directly onto the product as drops could enter openings and gaps and cause damage. When
using spray cleaners, spray the cleaner onto a soft cloth or sponge.
• Always rinse your Hansgrohe product thoroughly with clear water and polish dry with a soft cloth after cleaning.
Important
• Residue from soaps and shampoos can cause damage. Rinse the product with clean water after each use.
• Residue from basin/tub/tile cleaner can cause damage to faucets and fittings. Immediately rinse any overspray from
the Hansgrohe product.
• Damage to the product caused by improper care or the use of improper cleaning agents is not
covered by the warranty.
• If a component of the product is damaged, replace it, as there is risk of injury.
Conseil de nettoyage pour les produits Hansgrohe
De nos jours le sanitaire moderne, la robinetterie et les douchettes se composent de matériaux très différents pour satisfaire
à la demande concernant le design et la fonctionnalité. Pour éviter les détériorations et les réclamations, aussi bien pour
l’utilisation que pour le nettoyage prochain, certains critères seront à prendre en considération.
A prendre en considération lors de l’entretien de la robinetterie et de douchettes:
• On doit seulement utiliser les produits de nettoyage qui sont formellement prévus pour ce domaine.
• Aucun contact avec l’application de nettoyants contenant de l’acide chlorhydrique, de l’acide formique ou de l’acide
acétique qui peuvent causer de considérables détériorations.
• Les nettoyants à base d’acide phosphorique, aussi, ne sont pas à utiliser sans réserves.
• Le mélange de nettoyants en général n’est pas autorisé.
• L’utilisation de produits de nettoyage récurants et des ustensiles comme des frottoirs, des éponges à récurer et des
torchons microfibres est exclue.
• Les conseils d’entretien des producteurs de nettoyants sont à suivre obligatoirement.
• Le nettoyage est à faire correspondre avec le dosage, le temps d’action, spécifique à l’objet et à la nécessité.
• Le dépôt de calcaire est évité par un nettoyage régulier.
• Pour le nettoyage avec produit vaporisé liquide, en aucun cas sur la robinetterie, mais au contraire aspergé sur le
chiffon (torchon, éponge) et effectuer comme cela le nettoyage, car les aérosols peuvent pénétrer dans les ouvertures et
fentes de la robinetterie et peuvent provoquer des détériorations.
16
Page 17

• Après le nettoyage rincez avec suffisamment d’eau claire pour éliminer les restes de produits attachés.
• L’utilisation d’appareil de nettoyage à vapeur n’est pas autorisée, car les températures importantes peuvent détériorer
les produits.
Indications importantes
• Les produits pour le corps comme les savons liquides, les shampooings ou les gels de douche peuvent causer des
détériorations.
• Ici aussi on doit: Après l’utilisation rincer soigneusement les restes avec de l’eau.
Conseil de nettoyage
• Les deteriorations imputables à un mauvais entretien ne peuvent être pris en considération par
notre garantie.
• Par l’action d’un nettoyant sur les revêtements déjà endommagé il se produit une aggravation des dégâts.
Recomendación de limpieza para los productos de Hansgrohe
Hoy en día, las griferías de baño y de cocina así como duchas modernas se componen de materiales muy distintos para
satisfacer las exigencias del mercado respecto al diseño y la funcionalidad. Para evitar daños y reclamaciones hay que
tener en cuenta ciertos aspectos tanto en el uso como en su limpieza.
Para el cuidado de las griferías y las duchas en principio hay que seguir lo siguiente:
• Usar sólo detergentes previstos específicamente para este campo de aplicación.
• No aplicar detergentes que contengan ácido clorhídrico, fórmico o acético porque pueden causar daños importantes.
• Detergentes que contienen ácido fosfórico tampoco pueden ser aplicados ilimitadamente. Por regla general no se
deben mezclar detergentes.
• Tampoco se deben utilizar utensilios abrasivos, como son polvos abrasivos, esponjas o paños de microfibra.
• Se tienen que seguir siempre las sugerencias de empleo de los fabricantes de los detergentes.
• La limpieza tiene que ser realizada según la dosificación y el tiempo de actuación, en función del objeto y ajustada a
las necesidades específicas del mismo.
• Gracias a una limpieza periódica se pueden evitar los depósitos de cal.
• No conviene rociar el detergente en ningún caso sobre la grifería sino sobre los textiles y ejecutar la limpieza así,
porque el líquido puede entrar en aperturas o hendiduras de la grifería y causar daños.
• Después de la limpieza hay que aclarar con suficiente agua para eliminar completamente el resto de detergente.
• La utilización de limpiadores a vapor no está permitida, las altas temperaturas pueden dañar los productos.
Indicaciones importantes
• Los residuos de productos de aseo como jabón líquido, champús y gel de ducha pueden dañar también los materiales.
• Por lo que también se deberá prestar atención a lo siguiente: aclarar con abundante agua después del uso.
• Con materiales ya dañados la acción de detergents incrementará el desgaste de estos.
• Los componentes con superficies dañadas deberán cambiarse, en otro caso se corre el peligro de
lesionarse.
• Los daños que resulten de un uso inadecuado no están incluidos en nuestra garantía.
17
Page 18

Limited Consumer Warranty
This product has been manufactured and tested to the highest quality standards by Hansgrohe, Inc. (“Hansgrohe”). This warranty
is limited to Hansgrohe products that are purchased by a consumer in the United States or Canada after March 1, 1996, and
installed in either the United States or in Canada.
WHO IS COVERED BY THE WARRANTY
This warranty extends to the original purchaser only. This warranty is non-transferable.
WHAT IS COVERED BY THE WARRANTY
The warranty covers only your Hansgrohe manufactured product. Hansgrohe warrants this product against defects in material
or workmanship as follows:
Hansgrohe will replace at no charge for parts only or, at its option, replace any product or part of the product that proves
defective because of improper workmanship and/or material, under normal installation, use, service and maintenance. If
Hansgrohe is unable to provide a replacement and repair is not practical or cannot be made in timely fashion, Hansgrohe
may elect to refund the purchase price in exchange for the return of the product.
LENGTH OF WARRANTY
Replacement or repaired parts of products will be covered for the term of this warranty, as stated in the following two sentences.
If you are a consumer who purchased the product for use primarily for personal, family or household purposes, this warranty
extends for as long as you own the product and the home in which the product is originally installed. If you purchased the
product for use primarily for any other purpose, including, without limitation, a commercial purpose, this warranty extends only
(i) for 1 year, with respect to Hansgrohe & Commercial products, and (ii) for 5 years, with respect to Axor products.
THIS WARRANTY DOES NOT COVER, AND HANSGROHE WILL NOT PAY FOR:
A. Conditions, malfunctions or damage not resulting from defects in material or workmanship.
B. Conditions, malfunctions or damage resulting from (1) normal wear and tear, improper installation, improper maintenance,
misuse, abuse, negligence, accident or alteration; (2) the use of abrasive or caustic cleaning agents or “no-rinse” cleaning
products, or the use of the product in any manner contrary to the product instructions; or (3) conditions in the home such as
excessive water pressure or corrosion.
C. Labor and other expenses for disconnection, deinstallation, or return of the product for warranty service (including but not
limited to proper packaging and shipping costs), or for installation or reinstallation of the product.
D. Accessories, connected materials and products, or related products not manufactured by Hansgrohe.
E. Any Hansgrohe or Axor product sold for display purposes.
F. Hansgrohe Water Filtration System is subject to a 1-year limited warranty. Warranty does not include replacement filters.
TO OBTAIN WARRANTY PARTS OR INFORMATION
Contact your Hansgrohe retailer, or contact Technical Service at:
Hansgrohe, Inc.
1492 Bluegrass Lakes Parkway
Alpharetta, GA 30004
Toll-free 800-334-0455
In requesting warranty service, you will need to provide:
1. The sales receipt or other evidence of the date and place of purchase.
2. A description of the problem.
3. Delivery of the product or the defective part, postage prepaid and carefully packed and insured, to:
Hansgrohe, Inc.
1492 Bluegrass Lakes Parkway
Alpharetta, GA 30004
Toll-free 800-334-0455
When warranty service is completed, any repaired or replacement product or part will be returned to you postage prepaid.
18
Page 19

Exclusions and Limitations
REPAIR OR REPLACEMENT (OR, IN LIMITED CIRCUMSTANCES, REFUND OF THE PURCHASE PRICE) AS
PROVIDED UNDER THIS WARRANTY IS THE EXCLUSIVE REMEDY OF THE PURCHASER. HANSGROHE NEITHER
ASSUMES NOR AUTHORIZES ANY PERSON TO CREATE FOR IT ANY OTHER OBLIGATION OR LIABILITY IN
CONNECTION WITH THIS PRODUCT.
HANSGROHE SHALL NOT BE LIABLE TO PURCHASER OR ANY OTHER PERSON FOR ANY INCIDENTAL,
SPECIAL OR CONSEQUENTIAL DAMAGES, ARISING OUT OF BREACH OF THIS WARRANTY OR ANY IMPLIED
WARRANTY (INCLUDING BUT NOT LIMITED TO ANY IMPLIED WARRANTY OF MERCHANTABILITY).
Some States do not allow the exclusion or limitation of incidental or consequential damages, so the above limitation or exclusion
may not apply to you.
This warranty gives you specific legal rights, and you may also have other rights that vary from state to state.
TO THE EXTENT PERMITTED BY LAW, ANY IMPLIED WARRANTIES OF MERCHANTABILITY AND FITNESS FOR
A PARTICULAR PURPOSE, ARE LIMITED TO THE DURATION OF THE EXPRESS WARRANTY.
Some states do not allow limitations on how long an implied warranty may last, so the above limitations may not apply to you.
You may be required by law to give us a reasonable opportunity to correct or cure any failure to comply before you can bring
any action in court against us under the Magnuson-Moss Warranty Act.
PRODUCT INSTRUCTIONS AND QUESTIONS
Upon purchase or prior to installation, please carefully inspect your Hansgrohe product for any damage or visible defect.
Prior to installing, always carefully study the enclosed instructions on the proper installation and the care and maintenance of
this product. If you have questions at any time about the use, installation or performance of your Hansgrohe product, or this
warranty, please write us or call us toll-free at 800-334-0455.
19
Page 20

Hansgrohe, Inc. • 1490 Bluegrass Lakes Parkway • Alpharetta, GA 30004
Tel. 800-334-0455 • Fax 770-360-9887
www.hansgrohe-usa.com
US - Installation Instructions • Part No. 90212621 • Revised 04/2013
 Loading...