

TASER 7 Home Defense Energy
Weapon
User Manual
For more cartridges or fresh batteries, go to taser.com
Model TS1018
IMPORTANT SAFETY INSTRUCTIONS
Read all warnings and instructions. Save these instructions.
The most up-to-date warnings and instructions are
available at www.axon.com
MMU0076 Rev: DRAFT 002
January 2021

Contents
1 Chapter 1: Overview
1 Important Safety and Health Information
4 Chapter 2: Ownership
5 Chapter3:IntroductiontotheTASER7EnergyWeapon
5 What Is the TASER 7 Energy Weapon?
5 Neuro Muscular Incapacitation (NMI)
5 Basic TASER 7 Energy Weapon Electrical Theory
7 Chapter 4: TASER 7 Energy Weapon Features
7 Safety Switch
8 Arc Switch
8 Battery Pack
8 Changing the Battery Pack
9 Speaker
9 Automatic Shut Down (AS)
9 Central Information Display (CID)
10 Cartridge Icons
10 System Status Icons
11 Battery Level Icons
11 Sample CID Displays
13 Spark Duration
13 Arc Switch
13 LASER and Mechanical Sights
13 LED Flashlight
14 Trigger Switch
14 Method of Operation
(Model TS1006)
15 Stealth Mode
i

TASER 7 Home Defense Energy Weapon User Manual
15 Function Test Mode
16 Chapter 5: Cartridges and Energy Weapon Operation
16 Remove the Cartridges from the Safety Clip
16 Cartridge Pair Assembly
17 TASER 7 Cartridge Characteristics
18 DigitalAnti-FelonIdentication(AFID)
18 TASER 7 Cartridges General Instructions
18 Loading the TASER 7 Cartridges
20 Cartridge Release Button
21 Unloading
21 Practicing with the TASER 7 Energy Weapon
23 Aiming and Probe Placement
23 Using the TASER 7 Energy Weapon
24 Deployment Instructions for Self-Defense
24 “Silence is Golden”
25 Warning Arc Display
25 What If I Miss?
26 Electrodes
26 Contact-Stun (Drive-Stun) Backup
27 Chapter 6: Maintenance/Troubleshooting
27 General Concepts
27 Function Test
28 Troubleshooting
28 LASER Sight and Flashlight Do Not Turn On
28 The Display is Inverted
28 Product Support
28 Product Returns
30 Chapter 7: Additional Items
30 Medical Research
30 Legality
30 Warranty
30 Warnings
30 Medical Research
31 Radio Waves
31 Compliance Marks
Contents
ii
Chapter 1: Overview
Important Safety and Health Information
The safety warnings posted at www.axon.com are for your protection as well as the safety of others.
Disregarding this information could result in death or serious injury.
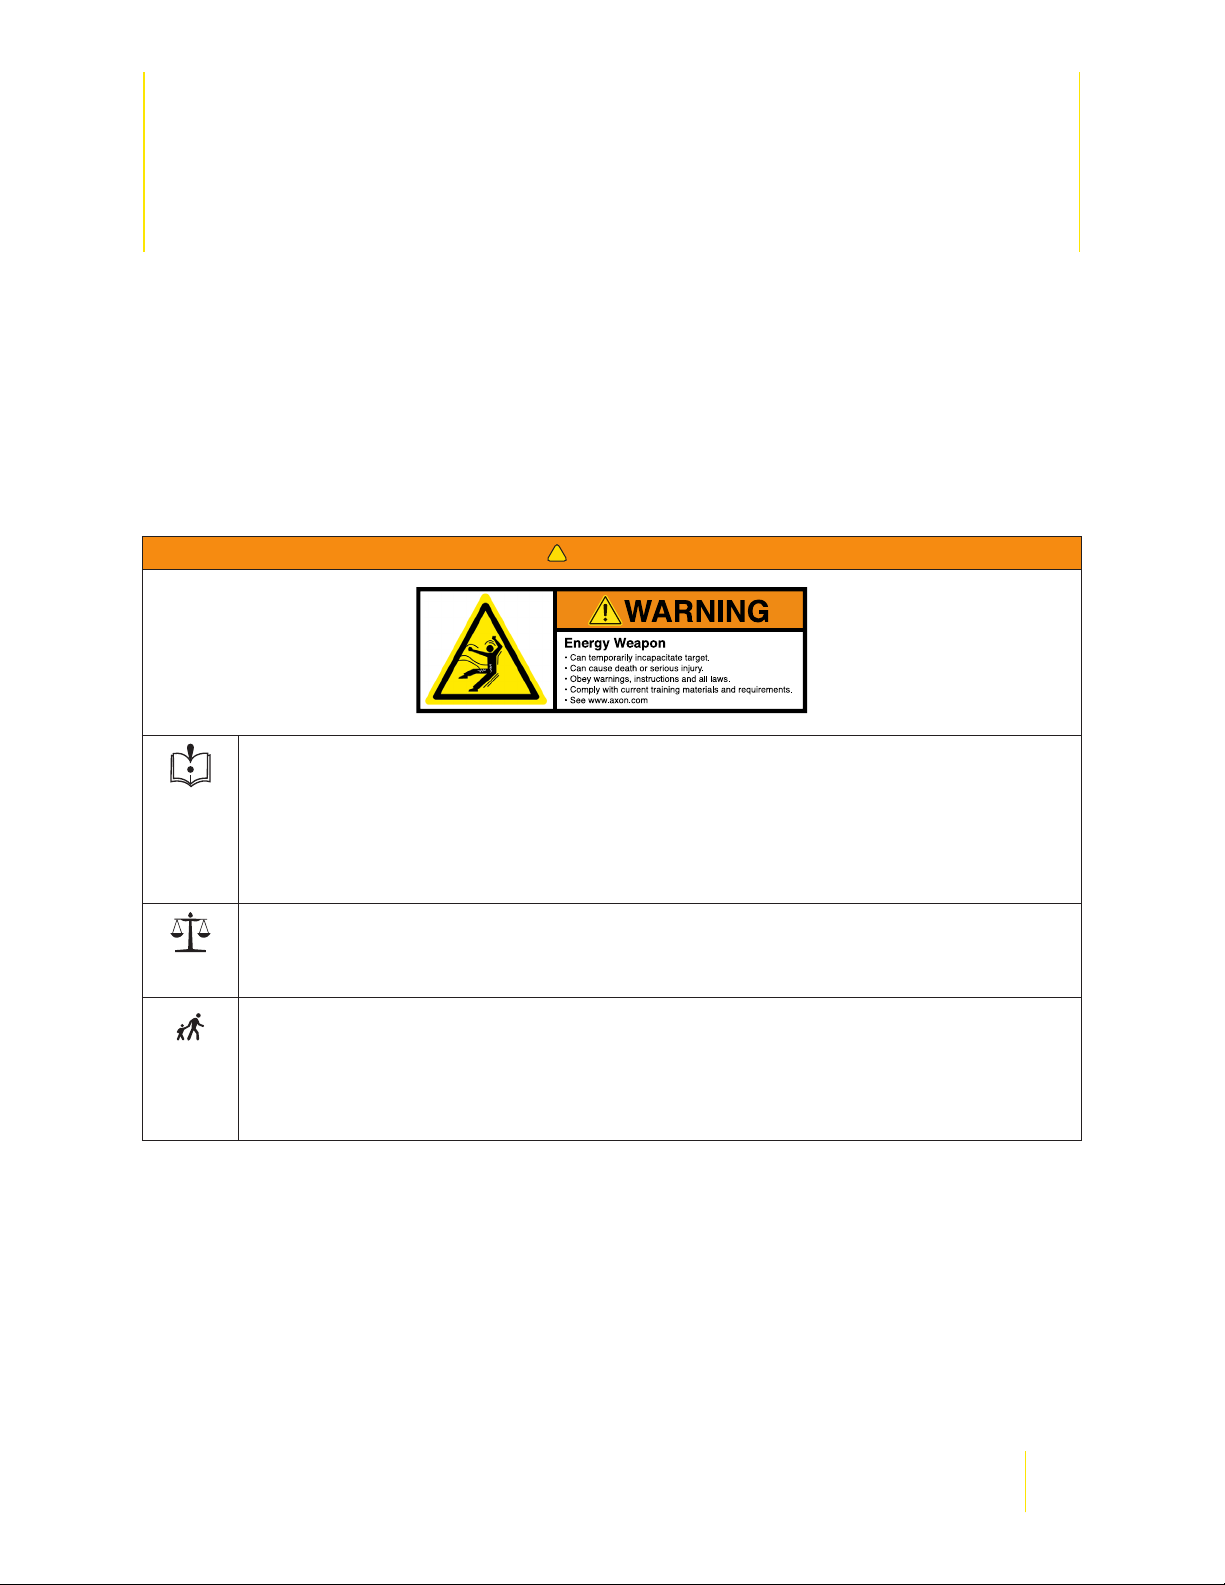
!
WARNING!
Read and Obey
Signicant dierences exist between dierent TASER energy weapon models. Do not use
or attempt to use any energy weapon model unless you have read, understood, and are
following all current instructions, warnings, and relevant TASER training materials before
using TASER energy weapons. Failure to do so could increase the risk of death of serious
injury to the user or others.
Obey Applicable Laws
Use of energy weapons must be legally justied and comply with applicable federal, state,
and local laws and regulations.
Store in a Secure Location
Energy weapons and cartridges are weapons and, as with any weapon, follow safe
weapon-handling practices and store your energy weapon securely. Store energy
weapons, cartridges, and accessories in secure locations inaccessible to children and
other unauthorized persons to prevent inappropriate access or use.
For a complete list of product warnings, go to www.axon.com.
1
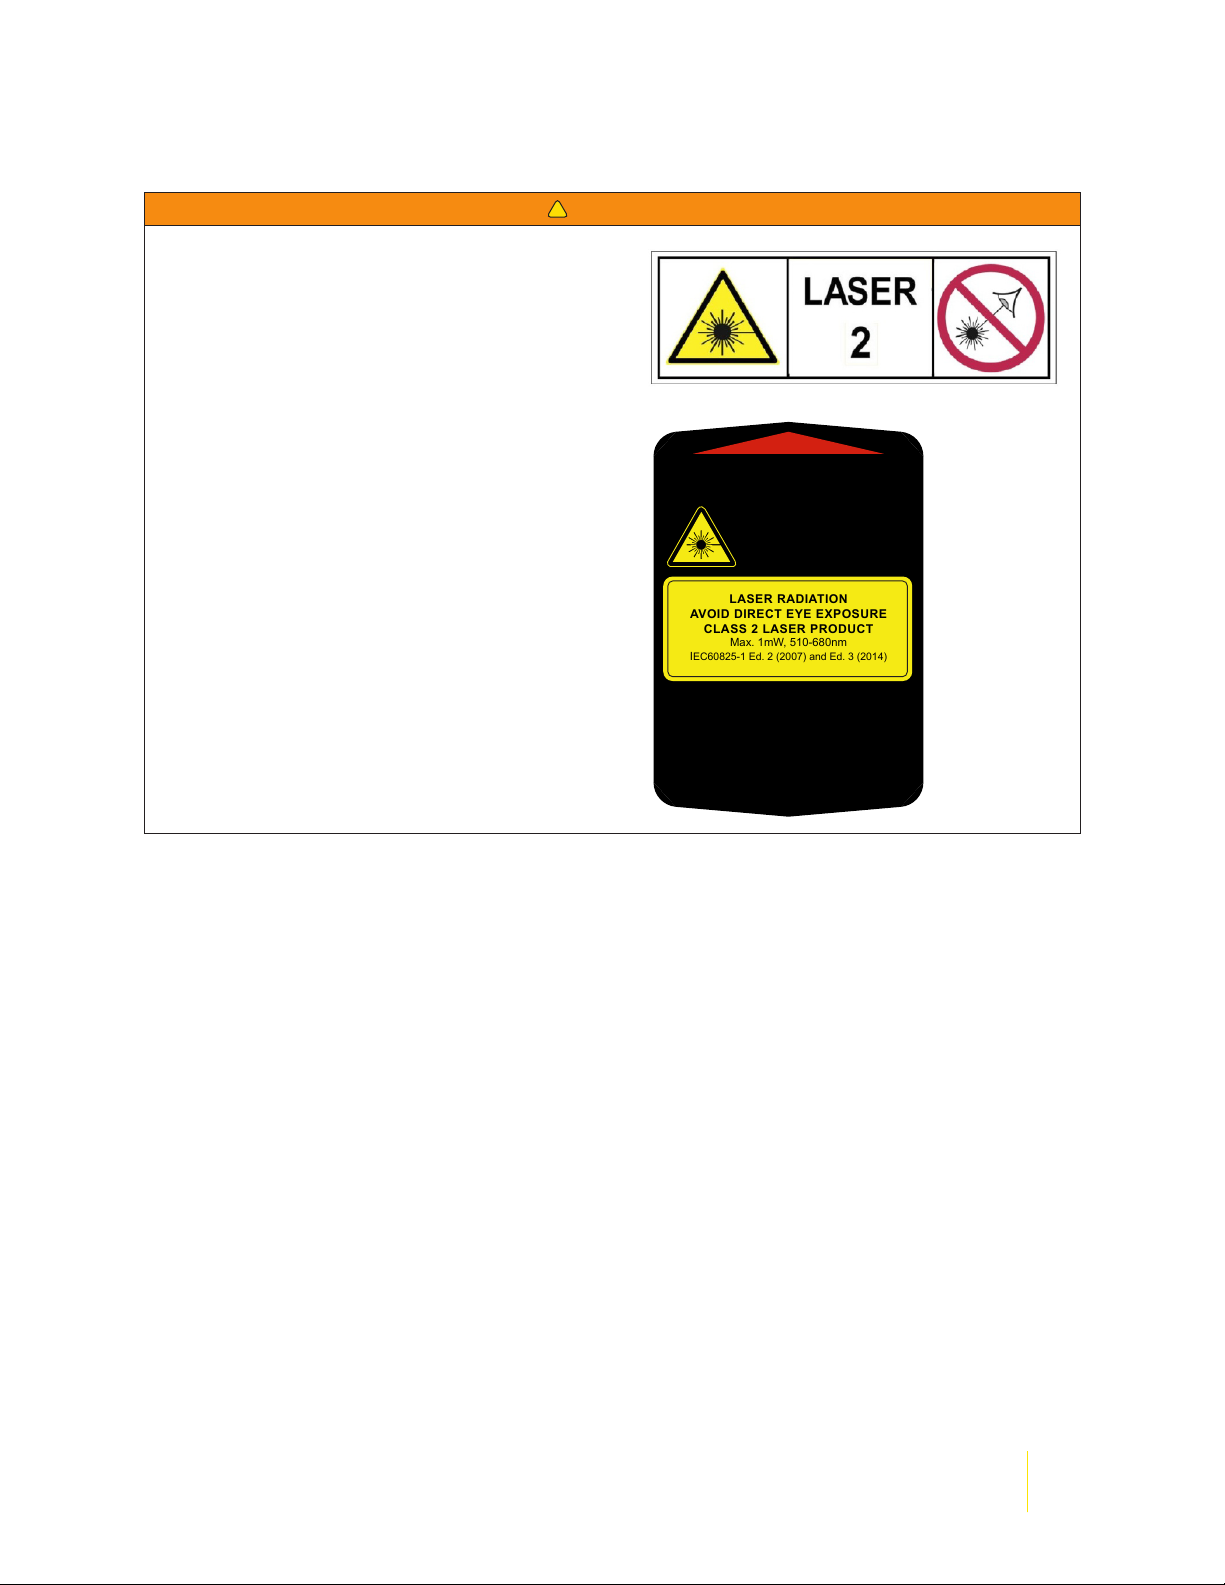
LASER Information
LASER RADIATION
AVOID DIRECT EYE EXPOSURE
CLASS 2 LASER PRODUCT
Max. 1mW, 510-680nm
IEC60825-1 Ed. 2 (2007) and Ed. 3 (2014)
LASER RADIATION
DO NOT STARE INTO BEAM
CLASS 2 LASER PRODUCT
TASER 7 Home Defense Energy Weapon User Manual
!
WARNING!
LASER RADIATION
DO NOT STARE INTO BEAM
COMPLIES WITH 21CFR 1040.10 AND 1040.11
EXCEPT FOR DEVIATIONS PURSUANT
TO LASER NOTICE NO. 50 DATED
JUNE 24, 2007 (IEC608251-1 ED.3 (2014))
CONDUCTED ENERGY WEAPON
• Can temporarily incapacitate target.
• Can cause death or serious injury.
• Obey warnings, instructions and all laws.
• Comply with current training materials
and requirements.
AXON ENTERPRISE, INC.
Chapter 1: Overview
2
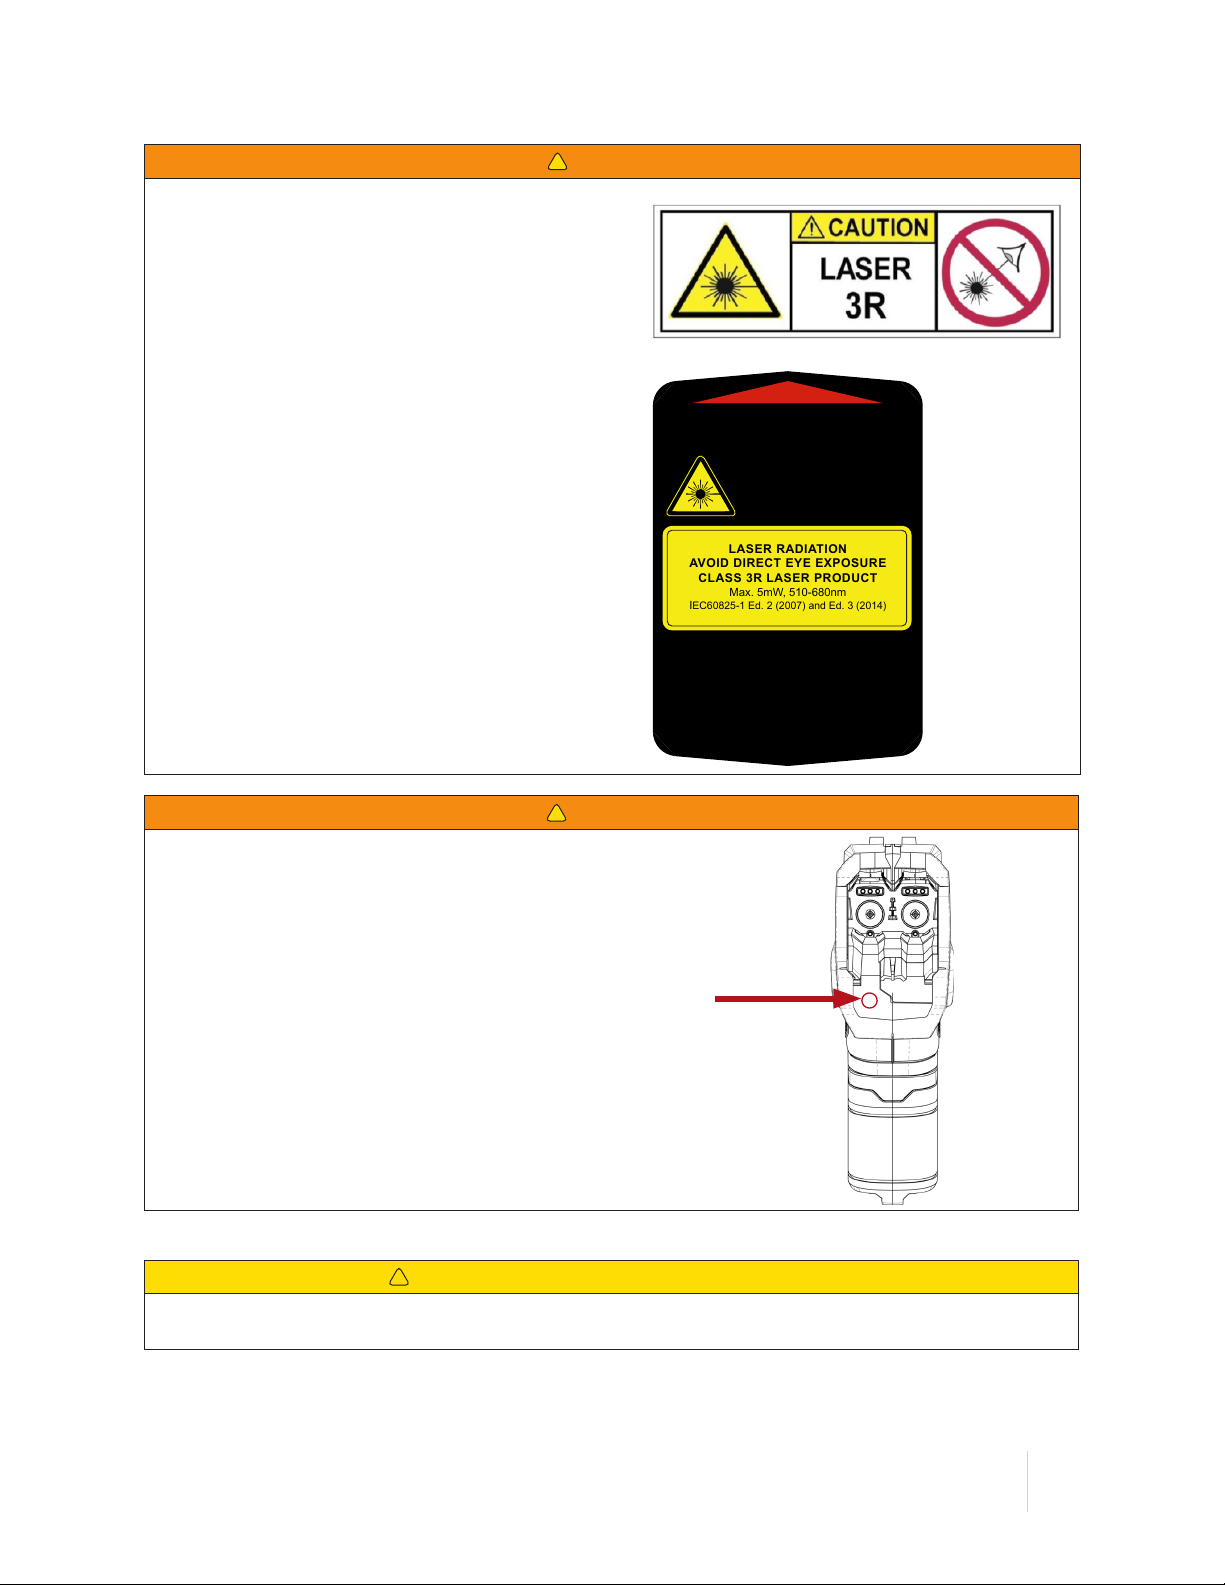
LASER RADIATION
LASER RADIATION
AVOID DIRECT EYE EXPOSURE
CLASS 3R LASER PRODUCT
Max. 5mW, 510-680nm
IEC60825-1 Ed. 2 (2007) and Ed. 3 (2014)
DO NOT STARE INTO BEAM
CLASS 3R LASER PRODUCT
TASER 7 Home Defense Energy Weapon User Manual
!
WARNING!
AVOID DIRECT EYE EXPOSURE
LASER LIGHT IS EMITTED
FROM THIS APERTURE
COMPLIES WITH 21CFR 1040.10 AND 1040.11
EXCEPT FOR DEVIATIONS PURSUANT
TO LASER NOTICE NO. 50 DATED
JUNE 24, 2007 (IEC608251-1 ED.3 (2014))
CONDUCTED ENERGY WEAPON
• Can temporarily incapacitate target.
• Can cause death or serious injury.
• Obey warnings, instructions and all laws.
• Comply with current training materials
and requirements.
AXON ENTERPRISE, INC.
!
WARNING!
AVOID EXPOSURE – LASER RADIATION IS EMITTED
FROM THIS APERTURE
CFR 1040.10 (h) (l) (iv) requirement:
!
CAUTION! LASER RADIATION EXPOSURE
Use of controls, adjustments or procedures other than those specied herein may result in
hazardous radiation exposure.
Chapter 1: Overview
3

Chapter 2: Ownership
Do not point the energy weapon at any law enforcement ocer or do anything that would cause law
enforcement ocers to feel threatened by your use of the energy weapon. Because the TASER energy
weapon is able to temporarily incapacitate a person, law enforcement ocers may be justied to use
lethal force to protect themselves.
Although the TASER 7 energy weapon incorporates yellow components to distinguish it as a non-
rearm, it could be mistaken for a rearm. Take appropriate care in carrying and displaying the
TASER7 energy weapon. Do not modify the TASER 7 energy weapon or do anything to the energy
weapon to make it look like a rearm.
Do not give a TASER energy weapon away as a gift or sell it without providing the new owner’s name,
email address, and phone number to customer service at team@taser.com. For more information,
see Legality (Chapter 7).
Taking a TASER-brand energy weapon into a state or municipality where energy weapons are
prohibited (see taser.com for a current list) or out of the United States (US) without the proper export
license is prohibited by law (similar prohibitions may exist in other countries).
Check with the Transporation Security Administration (TSA) or any other relevant agency for the most
recent regulations to determine whether you are permitted to travel aboard a commercial airplane
with a TASER energy weapon. Check local laws to determine whether you may possess or carry a
energy weapon in your destination.
It is recommended that you carry the TASER 7 energy weapon only in a manufacturer approved holster
or carrying case.
4

Chapter 3: Introduction to the TASER 7 Energy
Weapon
What Is the TASER 7 Energy Weapon?
The TASER 7 energy weapon is a rmware upgradable, 2-shot weapon manufactured by Axon
Enterprise, Inc.
The TASER 7 energy weapon uses two replaceable TASER 7 Cartridges containing compressed nitrogen
to deploy two small probes that are attached to the TASER 7 energy weapon by insulated conductive
wires. The TASER7 energy weapon transmits electrical pulses along the wires and into the body which
are designed to aect the sensory and motor functions of the peripheral nervous system and cause
involuntary muscle contractions. The cartridges have a 25-foot (7.6 m) range. The TASER 7 energy
weapon deploys the cartridges one at a time. It is possible to apply energy beyond the initial burst to
a deployed cartridge without deploying the remaining cartridge. It also is possible to apply a Warning
Arc display or drive-stun without deploying any of the cartridges loaded in the energy weapon.
The TASER 7 energy weapon has an estimated useful life of ve years.
Neuro Muscular Incapacitation (NMI)
TASER technology is designed to use electrical impulses similar to those in your body’s nervous system
to cause stimulation of the sensory and motor nerves. Neuro Muscular Incapacitation (NMI) occurs
when an energy weapon is able to cause involuntary stimulation of both the sensory nerves and the
motor nerves. It is not dependent on pain and can be eective on subjects with a high level of pain
tolerance.
Previous generations of stun guns primarily aected the sensory nerves only, resulting in pain
compliance. A subject with a very high tolerance to pain (e.g., a drug abuser, person in serious
psychological distress or a trained, focused ghter) may not be aected by the pain or may be able to
ght through the pain of a traditional stun gun.
Basic TASER 7 Energy Weapon Electrical Theory
• Electricity must be able to ow between the probes or the electrodes to deliver an electrical charge
and will generally follow the path of least resistance.
• Generally, the greater the spread between the probes on the target, the greater the eectiveness.
• Electricity will generally not pass to others in contact with the subject unless contact is made directly
between or on the probes, or the wires are touched.
• Exposure to water will not increase the power to the subject. The delivered electrical charge is
xed inside the TASER energy weapon, and will not increase signicantly even with environmental
changes.
5
TASER 7 Home Defense Energy Weapon User Manual
• The TASER 7 energy weapon always defaults to a 5-second activation, with activation by the trigger
or either Arc switch.
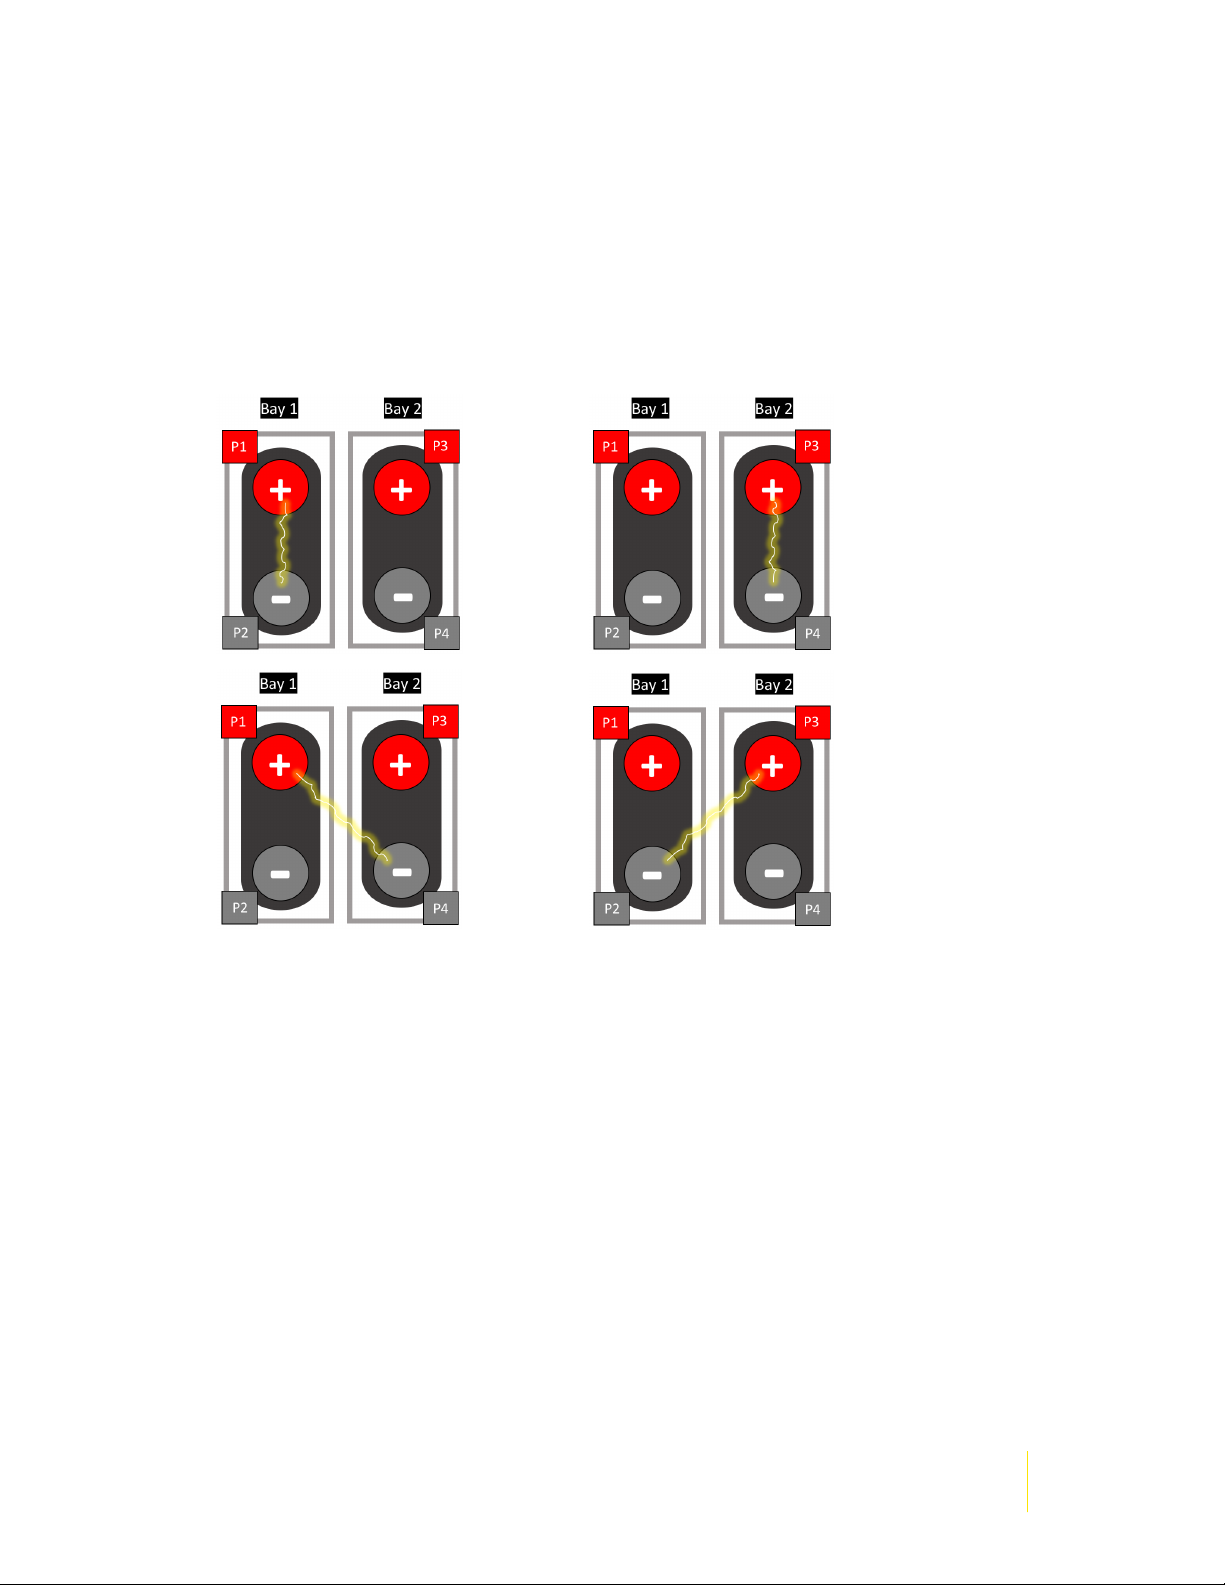
• After the second cartridge has been deployed, the TASER 7 energy weapon will always try to deliver
an Adaptive Cross Connect across all available electrode paths, delivering discharges using up to
four probes from the two cartridge bays. The Adaptive Cross Connect Technology delivers electrical
pulses in sequence, at up to 44 pulses per second, between all positive and negative probe
combinations: Left top probe to left bottom probe; left top probe to right bottom probe, right top
probe to right bottom probe, and right top probe to left bottom probe. (The illustrations below are
from the perspective of someone behind the cartridge bays, holding the weapon.)
Path 1
Path 3
Path 2
Path 4
• The Adaptive Cross Connect (ACC) technology can make the TASER 7 energy weapon eective
even if some probes do not hit the target. Electricity is intentionally driven between all contacts
to maximize the impact of the probe deployment and to compensate for close probe spreads or
clothing disconnects. ACC will attempt good quality connections more frequently if it detects that
other paths do not have a good connection.
• The Charge Metering technology is designed to maintain a xed charge output independent of load
conditions: good connection, partial connection, arcing to skin, etc.
Chapter 3: Introduction to the TASER7 Energy Weapon
6
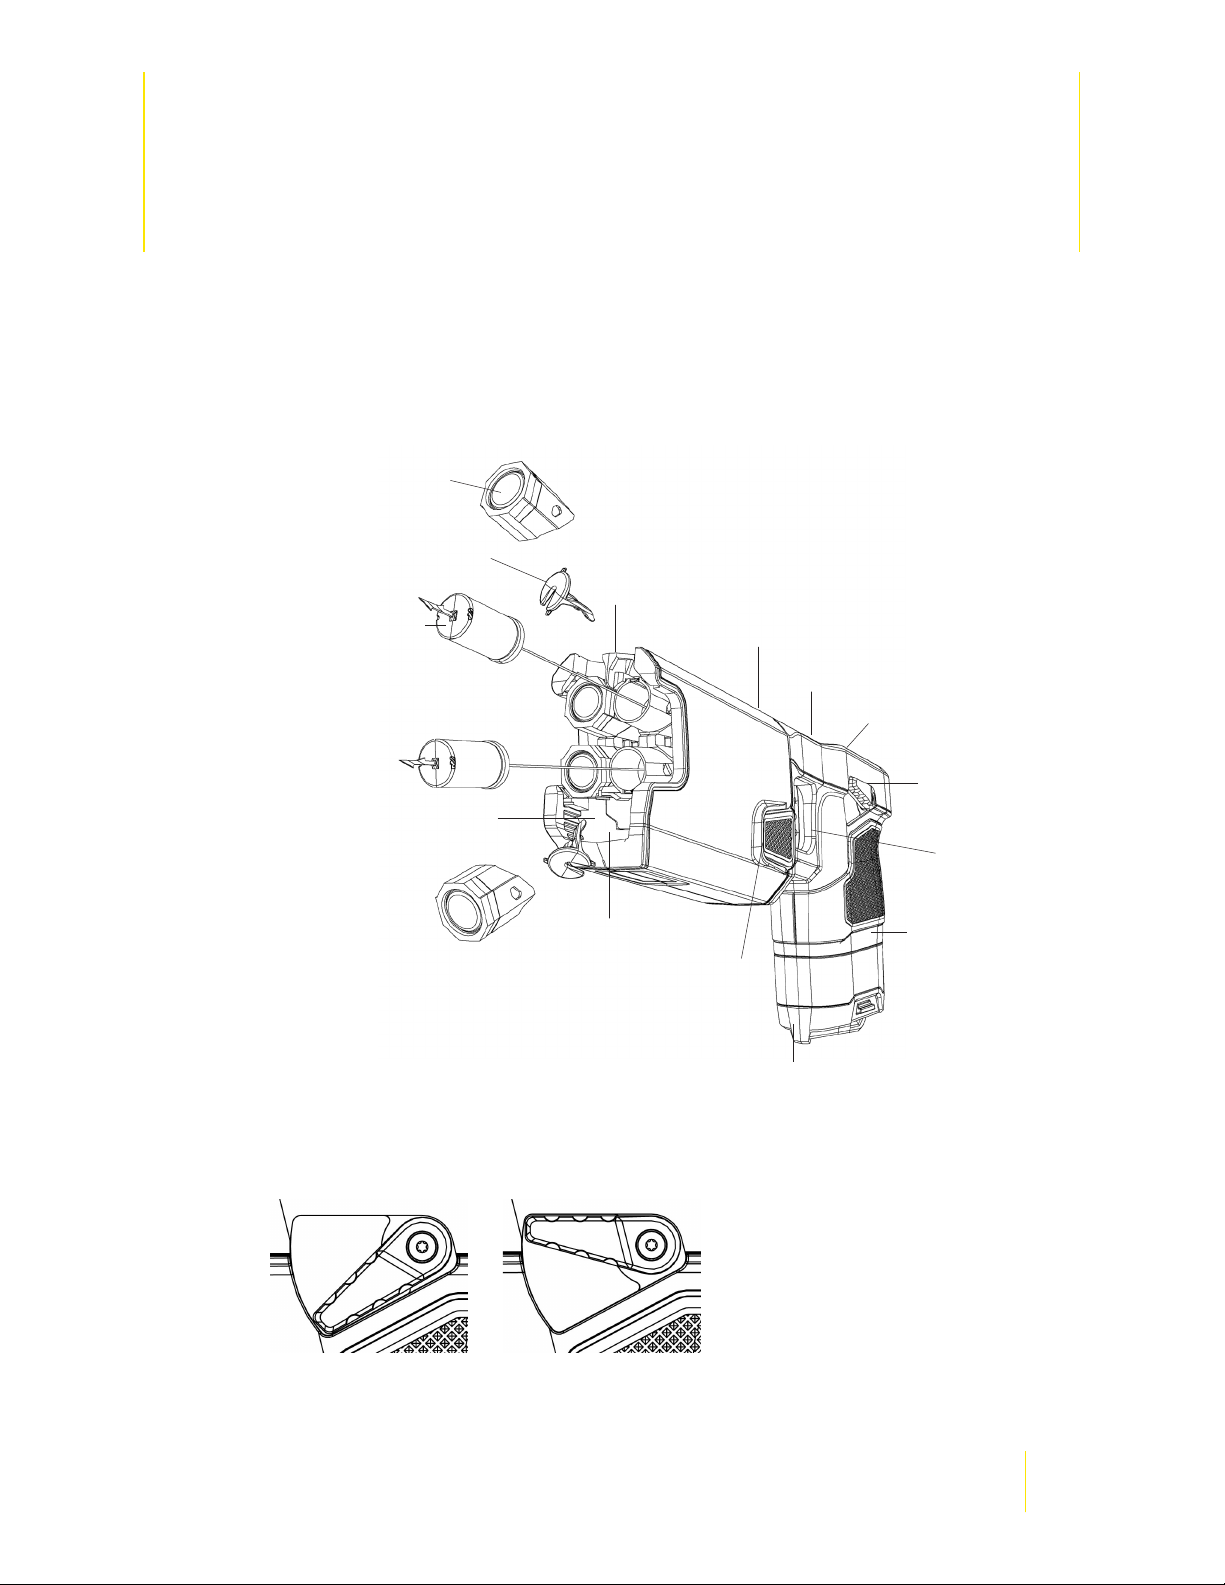
Chapter 4: TASER 7 Energy Weapon Features
Get to know the TASER 7 energy weapon.
Blast door
Ejector
Front sight
Smart Probe
Cartridge release button
Speaker (on right side of weapon)
Rear sight
Flashlight
LASER
Arc switch
Battery pack
Safety Switch
Ambidextrous safety that can be operated from either side of the energy weapon.
Safety switch
Trigger switch
Battery release
down (SAFE) up (ARMED)
7
TASER 7 Home Defense Energy Weapon User Manual
• Safety switch down (SAFE).
• Safety switch up (ARMED) and ready to deploy.
• Do not block the safety on one side of the energy weapon while attempting to move it on the other
side. This can break the safety and disable the energy weapon.
• If the energy weapon’s safety switch is left in the up (ARMED) position for more than 20 minutes,
the energy weapon turns o to avoid draining the battery.
• If the weapon has not been moved for ve minutes, an internal movement sensor will detect this
and the weapon will enter into “power save mode.” In power save mode, the LASERs and LED
ashlight shut o, and the weapon will not react to a trigger pull nor single Arc-button press. To re-
arm the energy weapon, perform one of the following procedures:
◊ Shift the safety to the down (SAFE) position and then shift it back to the up (ARMED) position.
◊ Press both Arc switches simultaneously.
Arc Switch
The Arc switch is used to employ a Warning Arc Display. Arc switch functions are described in Warning
Arc Display (Chapter 5). The weapon will arc for as long as the Arc switch is held down. If there has
been a probe deployment, a momentary press of any Arc switch will result in a 5-second activation
across the front of the weapon, or across all deployed cartridges.
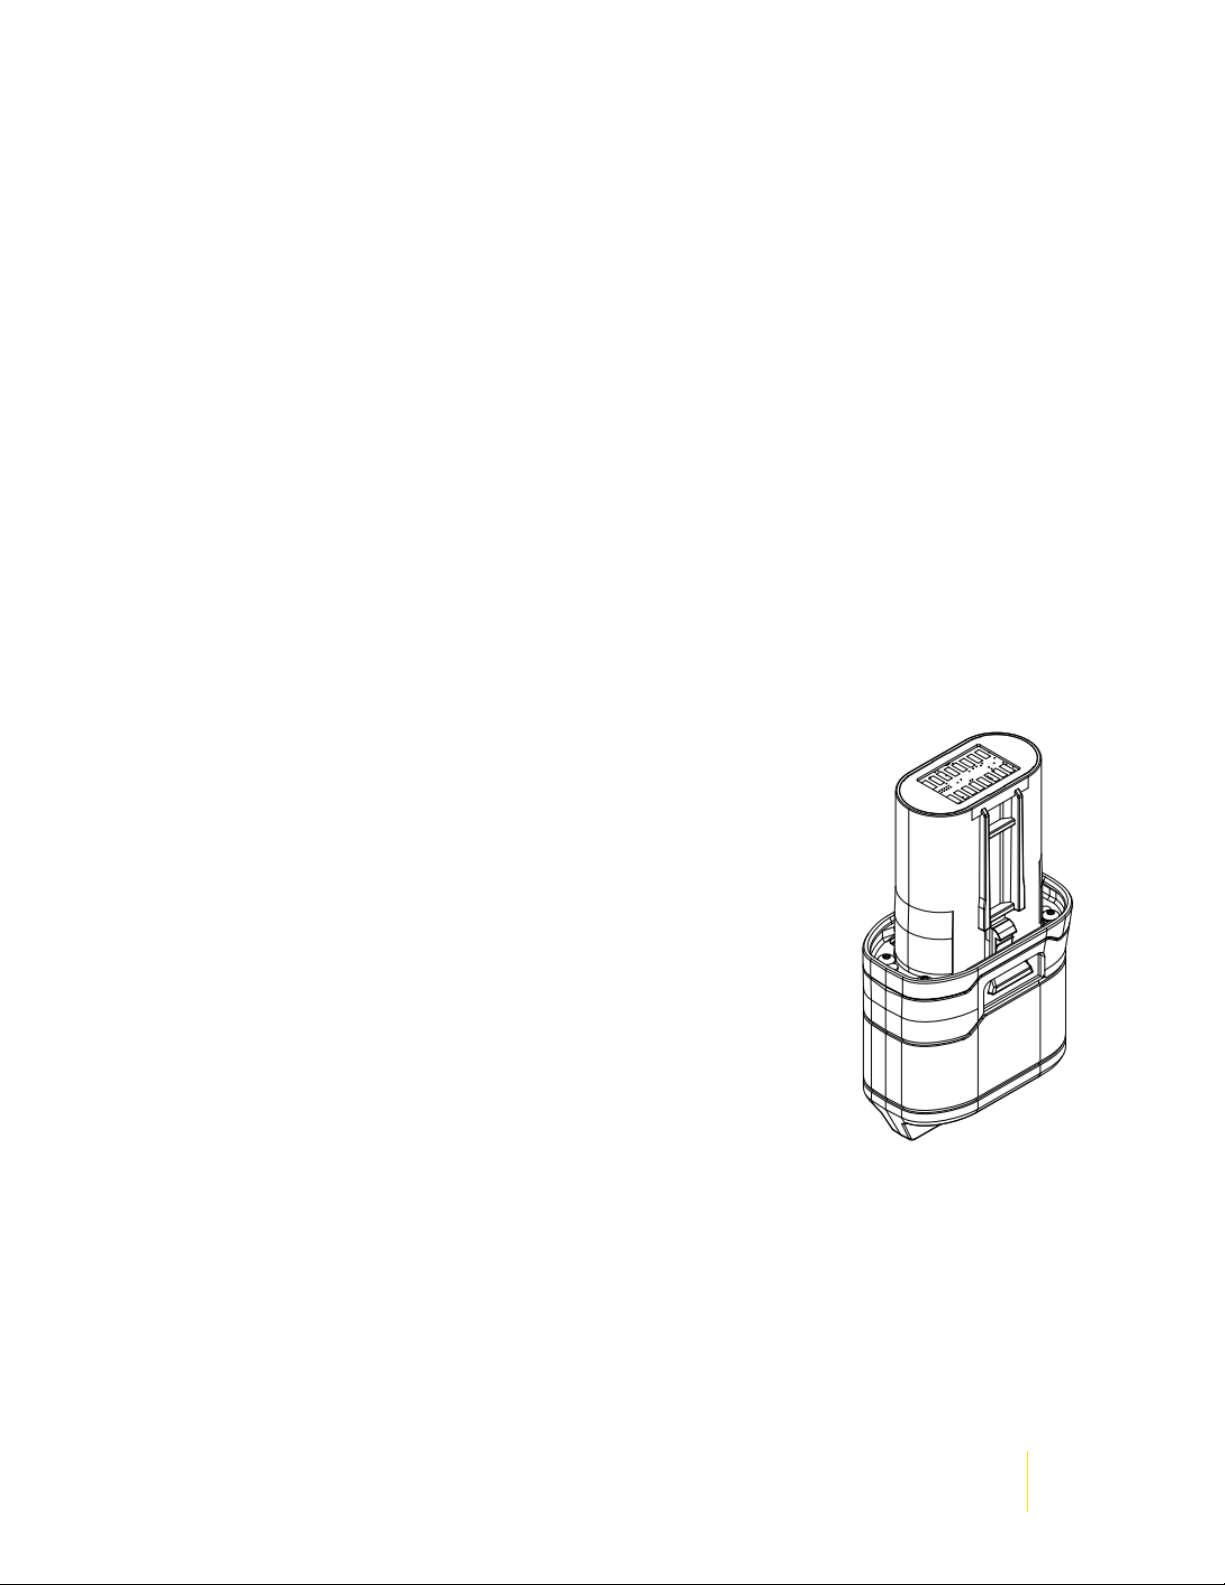
Battery Pack
Battery packs should be stored in their original packaging, including the
desiccant bag, until they are to be used. Do not store the battery pack
anywhere that the gold contacts on the top of the battery pack may touch
metal objects. If you cause an electrical short between these contacts, the
short will drain the lithium energy cells and may cause the pack itself to
become dangerously hot. This battery pack is not rechargeable.
The battery pack is a lithium energy cell power supply system for the
energy weapon. Battery packs contain data from the weapon.
Note: TASER 7 battery packs will not work with previous-generation energy
weapons such as the X2, X26, and X26P.
Battery packs have a useful life of approximately 500 single-bay discharges.
Battery capacity may vary depending on temperature, environment, use of
the ashlight and other factors. Battery packs will deplete faster in colder
weather and increased use of the ashlight.
For more information on installing a battery pack in a energy weapon, see Changing the Battery Pack.
(Model TS1006)
Changing the Battery Pack
1 Point the energy weapon in a safe direction.
2 Shift the safety switch to the down (SAFE) position.
3 Conrm that the Central Information Display (CID) is blank.
4 To remove the battery pack, depress the battery pack release buttons on each side of the
battery pack and remove it from the energy weapon.
Chapter 4: TASER 7 Energy Weapon Features
8

TASER 7 Home Defense Energy Weapon User Manual
5 Inspect the battery contacts. Ensure that they
appear in working order and are free from dirt
or other residue that may interrupt the battery
connection to the energy weapon.
6 Install the new battery pack and ensure that it
is fully inserted into the energy weapon. Apply
sucient force to ensure the battery pack
is fully seated. When the battery pack seats
properly, the release buttons should pop out
from the recessed position with an audible
click.
7 Pull on the bottom of the battery pack to
conrm that it is seated properly.
Speaker
The TASER 7 energy weapon has a small speaker
that can emit beeping alerts through a sound port
located on the right side of the weapon’s frame just
above the trigger.
Automatic Shut Down (AS)
The TASER 7 Home Defense energy weapon will shut
down its electrical output after ve seconds. The
energy weapon also contains a built-in speaker that
alerts you to the impending shut down.
Under stessful situations, audio exclusion might prevent you from hearing the audio alert.
With this feature, shut down will occur ve seconds after a trigger-initiated energy burst, but Arc
switch functioning will not be aected.
The energy weapon provides an audible beeping alert for the last two seconds of a trigger-initiated
cycle before automatically shutting down the cycle. After a 5-second deployment duration, the energy
burst will stop even if your nger is still pulling the trigger. The audible beeping alert will continue to
sound until the trigger is released. To re-energize the deployed cartridge, rst ensure that your nger
is o the trigger, and then press the Arc switch.
Pressing and holding the Arc switch before the 5-second, trigger-initiated cycle has ended will
cause the cycle to continue past the 5-second limit.
Central Information Display (CID)
The CID is a display on the back of the energy weapon that provides information about the energy
weapon. When the safety switch is shifted into the up (ARMED) position, the CID will display the
cartridge bays and battery status.
Chapter 4: TASER 7 Energy Weapon Features
9

Cartridge Icons
When a cartridge is loaded into the energy weapon, the cartridge displays on the CID
as a yellow rectangle as shown. This cartridge has not been deployed.
After a cartridge has been deployed, the cartridge deployed icon is displayed.
If no cartridge is loaded in the cartridge bay, the space otherwise occupied by a
cartridge icon will be blank.
If something is wrong with the cartridge, the cartridge bay error icon is displayed.
The icon will blink. If you see this, the cartridge might not deploy. See Unloading and
Loading the TASER 7 Cartridges (Chapter 5) for instructions on unloading and loading
cartridges from a TASER 7 energy weapon before performing the steps below:
1 Shift the safety switch to the down (SAFE) position.
2 Remove the cartridges.
TASER 7 Home Defense Energy Weapon User Manual
3 Reload the cartridges into the energy weapon. Conrm that you hear the distinct “click” sound
that indicates the cartridges are fully seated. If you do not hear the “click” sound, the energy
weapon should be sent to Axon for RMA. See Product Returns (Chapter 6) for instructions.
4 Shift the safety switch to the up (ARMED) position.
• If the fault is cleared, continue with daily functional tests and use the cartridges in the eld.
• If the cartridge shows as an X on the CID twice on the same energy weapon, go to step 5.
5 Shift the safety switch to the down (SAFE) position.
6 Swap the bay position of each cartridge.
7 Shift the safety switch to the up (ARMED) position.
• If the fault is cleared, continue with daily functional tests and use the cartridges in the eld.
• If the fault follows the cartridge and is observed in both bays of the energy weapon, the
aected cartridge(s) should be sent to Axon for RMA.
• If the problem occurs multiple times on the same bay of the energy weapon with two dierent
cartridges, the energy weapon should be sent to Axon for RMA.
System Status Icons
The system status icons are designed to inform you of a fault in the energy weapon. It is a
fault indicator only. It is the user’s responsibility to heed the fault indicators, conduct proper
maintenance and repair, and ensure that the energy weapon is working properly before any
use. Failure to heed the system status icons could cause serious injury or death.
All faults are recorded in the energy weapon’s log.
Chapter 4: TASER 7 Energy Weapon Features
10

TASER 7 Home Defense Energy Weapon User Manual
Major Fault Indication. A small X indicates that the logging, date and time
functions, or the ability for the energy weapon to successfully read the
battery pack information are not working properly. The energy weapon will
still produce an electrical arc (e.g., the energy weapon should still arc and
deploy cartridges), but the accountability functions are compromised.
Shift the safety switch to the down (SAFE) position and then to the up (ARMED) position; the fault may
clear.
If the fault still does not clear, do NOT attempt to use the energy weapon. The energy weapon may
need to be repaired or replaced. Contacting Axon Technical Support at 1 (800) 978-2737 can help
troubleshoot the problem to determine a potential solution to clear the fault. Otherwise, see Product
Returns (Chapter 6) for instructions.
Critical Fault Indication. This icon blinking on the CID indicates a
system failure.
Critical faults are rare. Shift the safety switch to the down (SAFE) position
and then to the up (ARMED) position; the fault may clear.
If the fault does not clear, do NOT attempt to use the energy weapon.
The energy weapon may need to be repaired or replaced. See Product Returns (Chapter 6) for
instructions.
Battery Level Icons
The battery is fully charged.
The battery is not fully charged, but still serviceable.
The battery needs to be replaced. This icon will blink.
Battery Error. If you see a blinking battery icon with an X through it, this indicates
that the energy weapon did not recognize the battery correctly. Remove the battery
pack and reinsert it. If the error is still present, try another battery pack. If the icon still
displays, the energy weapon should be serviced. See Product Returns (Chapter 6)
for instructions.
Sample CID Displays
The CID below shows a TASER 7 energy weapon loaded with two cartridges, one of which is deployed.
The battery is still at full capacity.
Chapter 4: TASER 7 Energy Weapon Features
11

TASER 7 Home Defense Energy Weapon User Manual
The CID below shows the left cartridge bay loaded, and the right cartridge bay empty. The battery is
at full capacity.
The CID below shows that the left cartridge has an error, and the right cartridge is deployed. The
battery is at full capacity.
The CID below shows that two cartridges are ready to be deployed, but there is a battery error.
The CID below shows a CID in Function Test mode. With the safety in the down (SAFE) position, the
TASER operator has pressed both Arc switches simultaneously. The rmware version and the
remaining battery charge (percentage) display.
The CID below shows the energy weapon is in the Function Test mode after the TASER operator
shifted the safety switch to the up (ARMED) position. The colors are reversed in Function Test mode—
the background is yellow, and the loaded cartridges are black.
The CID below shows a energy weapon updating rmware or synchronizing its log to the battery pack.
Do not remove the battery pack from the energy weapon until the hourglass icon disappears.
If there are both a battery error and a energy weapon error at the same time, the CID will alternate
between the two icons below:
Chapter 4: TASER 7 Energy Weapon Features
12

TASER 7 Home Defense Energy Weapon User Manual
Probe-Deployment Mode
When the TASER 7 energy weapon trigger is pulled and then released, it delivers an automatic Rapid
Arc deployment. The cycle continues for ve seconds unless the safety switch is shifted to the down
(SAFE) position during the cycle.
In probe-deployment mode, the CID display shows the deployment cycle duration for the cartridge
deployed. If you deploy a second TASER 7 Cartridge while the rst cycle is running, the CID will continue
to show the duration of the rst cartridge; the energy weapon will start Adaptive Cross Connect when
the second cartridge is red and the cycle duration will be extended ve additional seconds.
The cycle can be stopped at any time by shifting the safety switch to the down (SAFE) position.
If both cartridges are cycling and the safety switch is shifted to the down (SAFE) position, then the
electrical cycle will stop for BOTH cartridges.
Spark Duration
The CID displays a count indicating how many seconds the deployment cycle lasts. The energy weapon
will count up from the number 1 up to 99. At 99 seconds, the count will restart at one.
Arc Switch
If you press the Arc switch, the CID will display the deployment cycle duration. The energy weapon will
count up.
LASER and Mechanical Sights
The LASER and the mechanical sights of the TASER 7 energy weapon intersect within a 3-inch (7.6 cm)
circle at 15 feet (4.6 m). The top LASER is solid, i.e., it does not blink.
LED Flashlight
The TASER 7 energy weapon has a 210-lumen ashlight to aid the user in dark environments. The
ashlight automatically adjusts to conserve battery power whenever the battery percentage drops
below 20%.
Chapter 4: TASER 7 Energy Weapon Features
13

TASER 7 Home Defense Energy Weapon User Manual
Trigger Switch
Unlike a rearm trigger, the TASER 7 trigger is a momentary electrical switch. The trigger is operational
only when the safety is in the up (ARMED) position. Pulling and releasing the trigger will deploy the
selected cartridge and result in an approximately 5-second discharge cycle unless the safety is shifted
to the down (SAFE) position to discontinue the 5-second cycle. Pulling and holding the trigger for more
than ve seconds will result in a continuous discharge until the trigger is released, the safety is shifted
downward, or the battery is depleted—whichever happens rst. The rst cartridge will always deploy
from the left bay. The second deployed cartridge will be from the right bay.
In the event of an accidental discharge, immediately shift the safety switch to the down (SAFE)
position to stop the discharge cycle.
Method of Operation
Each sequential trigger pull deploys a cartridge. At the beginning of the event, the left most
active cartridge is selected by default.
1 Pull the trigger to deploy the selected cartridge.
The TASER 7 energy weapon energizes the left cartridge. Releasing the trigger automatically
selects the right cartridge while the left cartridge is deploying and discharging.
If you have engaged a target and contact is good, pressing the Arc switch will apply energy to all
deployed cartridge bays, but will not deploy an un-deployed cartridge. This allows you to apply
cycles to a continually resisting subject, if needed, without deploying the remaining cartridge.
All Arc presses will result in 5-second discharge activations, unless the Arc switch is held, in
which case the weapon will discharge until the battery is dead or the Automatic Shutdown
Feature stops the discharge after 5 seconds.
2 Pull the trigger to deploy the second cartridge.
When both the left and right cartridges are energized each of the two ring bays will run for
approximately ve seconds. The ring of the right cartridge causes the Adaptive Cross Connect
to be activated, and the weapon will discharge up to 44 pulses per second, between all positive
and negative probe combinations: Left top probe to left bottom probe; left top probe to right
bottom probe, right top probe to right bottom probe, and right top probe to left bottom probe.
To re-energize both deployed cartridge bays for ve seconds, press momentarily either the Arc
switch or the trigger. If the Arc switch or trigger is held down after the 5-second cycle ends, both
cartridge bays will continue to cycle until the battery is dead or the Automatic Shutdown feature
stops the discharge after ve seconds.
Chapter 4: TASER 7 Energy Weapon Features
14

TASER 7 Home Defense Energy Weapon User Manual
Note: Shifting the safety switch to the down (SAFE) position stops the cycle for all cartridge
bays.
Stealth Mode
You can set up your TASER 7 energy weapon to turn the ashlight and LASER sights o. When the
lights are turned o, the energy weapon is said to be in Stealth mode.
To put the energy weapon in Stealth mode, press both Arc switches and hold them for three seconds.
The CID will dim when Stealth mode has been activated. The energy weapon can remain in this mode
for 20 minutes before it will timeout. When you shift the safety switch to the up (ARMED) position, the
ashlights and LASERs will not illuminate. To take the energy weapon out of Stealth mode, shift the
safety switch to the down (SAFE) position.
Function Test Mode
Placing your TASER 7 energy weapon into the Function Test mode will log everything that occurs as a
test. This is ideal for performing function tests.
1 Press and release both Arc switches.
2 Shift the safety switch to the up (ARMED) position.
The display is inverted. Everything that was black is yellow, and everything that was yellow is
black.
3 Perform the test. See Product Returns (Chapter 6) for more information.
4 Shift the safety switch to the down (SAFE) position.
If you press the trigger in Function Test mode, the energy weapon will return to weapons mode
and a cartridge will deploy.
Chapter 4: TASER 7 Energy Weapon Features
15

Chapter 5: Cartridges and Energy Weapon
Operation
Remove the Cartridges from the Safety Clip
TASER 7 Cartridges (sold separately) are shipped with a safety clip in place. Carefully remove the
cartridges from the safety clip before attempting to load a cartridge into a TASER 7 energy weapon.
Cartridge Pair Assembly
TASER 7 Cartridges are shipped in pairs. The two cartridges are pressed together to each other via
plastic attachment tabs. They can be pulled apart and put back together. This feature is useful for
reloading the energy weapon when only one cartridge has been deployed.
16

TASER 7 Home Defense Energy Weapon User Manual
The cartridges may be easier to peel apart if they are pulled away at the front or back end.
TASER 7 Cartridge Characteristics
The TASER 7 energy weapon is designed to work with TASER 7 Cartridges manufactured by Axon
Enterprise, Inc. Do not use cartridges made by other companies with a TASER 7 energy weapon.
TASER 7 Cartridges sold for home defense have a 12-degree cartridge angle. Cartridge angle is the
angle of separation between the top and bottom probes when they are deployed. Cartridge angle is
printed on the top of a cartridge.
TASER 7 Cartridges have a wire length of 25 feet (7.6 m). The cartridges can be eective in engagement
ranges as close as four feet (1.22 meters)..
12°
Chapter 5: Cartridges and Energy Weapon Operation
17

TASER 7 Home Defense Energy Weapon User Manual
DigitalAnti-FelonIdentication(AFID)
When a TASER 7 Cartridge is deployed, the cartridge serial number, date of manufacture, energy
weapon serial number, and deployment date and time are recorded in the cartridge. That information
transfers to the energy weapon and the battery pack. A deployed TASER 7 Cartridge can be loaded
into any TASER 7 energy weapon to retrieve the data from the cartridge.
TASER 7 Cartridges General Instructions
Never place your hands, ngers or other body part in front of the cartridge. This is especially
important when loading and unloading the cartridge. Serious injury could result. When loading
and unloading always hold the cartridge on the sides.
Remove the TASER 7 Cartridge from the TASER 7 energy weapon before inspection.
Before installing and using a TASER 7 Cartridge, inspect the blast doors for cracks. The inspection
should include the break seams around the blast doors. If the blast doors or seams are cracked,
remove the TASER 7 Cartridge from service.
The energy weapon can determine whether the TASER 7 Cartridges loaded in the cartridge bays have
been deployed or not. The energy weapon also can determine whether all the cartridge bays are
loaded or not. This means the energy weapon will not select an empty bay or a deployed cartridge
when a live cartridge is available. Cartridge status is displayed on the CID.
Loading the TASER 7 Cartridges
TASER 7 Cartridges are shipped with a safety clip in place. Remove these covers before attempting to
load a cartridge into a TASER 7 energy weapon. See Remove the Cartridges from the Safety Clip for more
information.
Always treat your TASER 7 energy weapon as if it were loaded.
Chapter 5: Cartridges and Energy Weapon Operation
18

TASER 7 Home Defense Energy Weapon User Manual
Unloaded TASER 7 energy weapon viewed at an angle:
Loaded TASER 7 energy weapon viewed at an angle:
1 Point the energy weapon in a safe direction.
2 Ensure the safety switch is in the down (SAFE) position and your nger is not on the trigger or
Arc switch.
3 Ensure the protective safety clip is removed from the TASER 7 Cartridge.
Chapter 5: Cartridges and Energy Weapon Operation
19

TASER 7 Home Defense Energy Weapon User Manual
4 Keeping your hand away from the blast doors, gently push the TASER 7 Cartridge into the
cartridge bay until an audible click is heard.
5 Verify that the cartridge is secure by pulling on the sides of the cartridge.
Cartridge Release Button
TASER 7 Cartridges are held in the TASER 7 energy weapon after they are loaded. Press the cartridge
release button to release the cartridges before attempting to remove them from the energy weapon.
For further instructions, see Unloading.
Chapter 5: Cartridges and Energy Weapon Operation
20

TASER 7 Home Defense Energy Weapon User Manual
Unloading
1 Point the energy weapon in a safe direction.
2 Ensure the safety switch is in the down (SAFE) position.
3 Keep your hands away from the front of the cartridges.
4 With your thumb, press the release button.
5 Firmly pull the cartridges out of the bay by pulling on the sides of the cartridges.
5
Note the orientation of the
cartridge; the portion of the
4
cartridge that has writing on it
is the top of the cartridge. The
top of the cartridge must face
the upper part of the cartridge
bay. (This is a top view of the
cartridge.)
Practicing with the TASER 7 Energy Weapon
Axon recommends practicing with your TASER 7 Home Defense energy weapon to become familiar
with its functions and how it deploys.
Be aware of your surrounings when deciding where to place your training target. Ensure that the
target has a rm backing (for example, cardboard or a foam board) that will allow the probes to stick
and not bounce o and strike an unintended person or object. Do not use a wooden backing. Do not
place the target anywhere a probe that misses or penetrates the target could cause damage or injury.
Do not discharge TASER 7 cartridges without using a target. Probes that do not strike a target may
recoil back at you. We recommend using TASER conductive targets available at taser.com and a thick,
penetrable backing.
Safety rst! Always treat your TASER 7 energy weapon as if it were loaded.
• Wear eye protection when practicing with an energy weapon.
• Never put your hands or other body parts in front of the energy weapon, especially when changing
the cartridges.
Chapter 5: Cartridges and Energy Weapon Operation
21

TASER 7 Home Defense Energy Weapon User Manual
• Do not inadvertently point any cartridges at yourself or at anyone when loading.
• Cartridge covers must be removed prior to attempting to load.
1 Point your TASER 7 energy weapon in a safe direction; load the cartridges as described in
Loading the TASER 7 Cartridges above while keeping your ngers away from the blast doors.
2 Point your TASER 7 energy weapon towards the training target and shift the safety switch to the
up (ARMED) position.
3 Aim your TASER 7 energy weapon at the training target; keep in mind that the LASER is within 2
to 3 inches (5 to 7.6 cm) of the point of impact of the top probe. Aim at the target’s lower center
of mass (see ). To improve the accuracy of the bottom probe, avoid canting or tilting the energy
weapon.
4 Remember that the bottom probe comes out at a 12-degree downward angle. The lower
cartridge drops approximately 1 foot (0.3 m) for every (approximately) 4 feet (1.2 m) that it
travels away from the energy weapon. Stand about 10 feet (3 m) from your target. This will
result in a probe spread of about 2.5 feet (0.76 m). Place the LASER high enough on the target
so the bottom probe will hit the target.
5 Press the trigger switch once to discharge the cartridge and activate the 5-second cycle.
Remember that you can discontinue the discharge at any time by shifting the safety switch to
the down (SAFE) position.
6 After the TASER discharge cycle ends, and the safety switch is in the down (SAFE) position,
unload the expended cartridge as described in Unloading. Remove the expended cartridge and
replace it with a new one as described in Cartridge Pair Assembly.
Chapter 5: Cartridges and Energy Weapon Operation
22

TASER 7 Home Defense Energy Weapon User Manual
Aiming and Probe Placement
For most deployments, hold the energy weapon level. Tilt the energy weapon when necessary to align
the energy weapon probes with the target.
Level Tilted
When possible, aim the LASER at one of the large muscle groups (lower center of mass) such as the
torso or thigh areas, etc.
When possible, avoid intentionally targeting the energy weapon on sensitive areas of the
body such as the head, eyes, throat, chest/breast, or groin unless your safety or the situation
dictates otherwise.
The top probe is designed to impact the target near the LASER beam but exact placement can vary
depending on numerous factors, including but not limited to, the distance, movement of the user or
attacker, and environmental factors. If both the upper and lower LASERs are active, you should be
able to estimate where each probe will hit.
Be sure not to re at an attacker who is more than 25 feet or 7.6 m away (measure 15 feet or 7.6 m
to see how far this is – it will probably be further than you think). If you do deploy at someone more
than 25 feet or 7.6 m away, the probes will not have sucient wire to reach them and may recoil back
at you.
Using the TASER 7 Energy Weapon
The TASER 7 energy weapon is a serious, state-of-the-art defensive weapon and should be treated
accordingly. Although the energy weapon is designed to be as nonviolent as possible in stopping a
combatant, its use can result in injuries, including but not limited to, a probe embedded in an eye or
secondary injuries related to falling.
For a full list of warnings, see www.axon.com.
The energy weapon is to be used only for lawful purposes, including lawful self-defense or in the
defense of others. Check your state and local laws for applicable regulations. Depending on local and
state laws, the TASER 7 energy weapon may be kept in the house for home protection, or carried in
a car, purse, or backpack for personal protection when away from home. For a list of laws related
Chapter 5: Cartridges and Energy Weapon Operation
23

TASER 7 Home Defense Energy Weapon User Manual
to energy weapons, known to Axon as of the date of this manual, go to taser.com. However, you
should not solely rely on this list and should conduct independent research on each state’s applicable
laws prior to possessing or transporting the energy weapon (including the transporting of the energy
weapon across state lines and into other states where laws may vary).
An energy weapon is not a substitute for other preventive self-protection actions such as ensuring
doors are locked, and parking in well-lighted areas.
Deployment Instructions for Self-Defense
1 Obtain the TASER 7 energy weapon and ensure that the cartridge is installed.
2 If a person approaches in a manner you perceive to be threatening, shift the safety switch to
the up (ARMED) position.
3 Aim the LASER beam at the person’s body. Avoid intentionally aiming at a sensitive body location
such as the head, face, throat, chest, or groin, when possible.
4 Shout verbal commands to “get away,” if feasible. It is possible that the person will ee based
on the verbal commands and LASER.
5 If you determine that you need to deploy the TASER 7 energy weapon in self-defense, ensure
that you are within 25 feet (7.6 m) of the attacker.
6 Press the trigger switch.
7 As necessary, press the trigger switch until helps arrives.
8 As soon as it is safe to do so, call 911 and report the specic location of the threat.
“Silence is Golden”
The TASER energy weapon’s electrical current is relatively quiet when both probes make direct contact
with a human and an electrical circuit is completed and maintained. Multiple cartridge deployments
and Warning Arc displays are likely to make more noise. An open circuit or some practice conductive
targets produce a loud sound when used because the energy is arcing in the air across the TASER 7
energy weapon’s xed electrodes.
If the electrical current is loud during a eld deployment, and the subject is not reacting as expected,
the current may be shorting out and may not be eective. Deploy a second cartridge or consider other
options in that situation.
PotentialCausesofReducedorNoEectiveness
• Loose or Thick Clothing. If the probes lodge in clothing and are too far away from the subject,
energy weapon eectiveness may be reduced.
• Miss or Single Probe Hit. The electrical current must pass between a positive probe and a negative
one (top and bottom probe). If one probe misses, the energy weapon will not be eective.
• Low Nerve or Muscle Mass. If the probes impact in an area where there is very little muscle mass
(e.g., the side of the rib cage), the eectiveness may be reduced.
• Limited Probe Spread. Probe spreads of less than 12 inches (30 cm) may result in reduced energy
weapon eectiveness. They can, however, still function as a pain-compliance device.
• Wires Break. If a wire breaks (e.g., during a struggle), the current will not ow to the probes and the
energy weapon will not be eective.
Chapter 5: Cartridges and Energy Weapon Operation
24

TASER 7 Home Defense Energy Weapon User Manual
Warning Arc Display
With the safety in the up (ARMED) position, pressing and holding the Arc switch displays a Warning Arc
discharge across the front of the TASER 7 energy weapon.
With a Warning Arc display, the user may deter an attacker without having to deploy a cartridge. A
Warning Arc can be accomplished with the TASER 7 without removing the live cartridges. Pressing the
Arc switch does not deploy the TASER 7 Cartridges even if the TASER 7 energy weapon is loaded.
If no cartridges have been deployed, the Warning Arc does not run for a predetermined time. When
you release the Arc switch, the Warning Arc discharge stops. However, if you deploy a cartridge and
later press the Arc switch, the discharge will run for ve seconds, even if you release the Arc switch
right away.
Use the Arc switch, not the trigger, to employ the Warning Arc display. Pulling the trigger will
deploy a loaded cartridge.
What If I Miss?
The LASER sight is an extremely valuable aid for proper aiming. However, there is always the chance
for a missed shot, especially in a dynamic, stressful situation, and you must be prepared to take
alternative actions to protect yourself in case of a missed shot or reduced eectiveness. In the event
that you shoot and miss, you can also use your TASER 7 energy weapon as a direct contact-stun (drivestun) device, which is designed for pain compliance.
Chapter 5: Cartridges and Energy Weapon Operation
25

TASER 7 Home Defense Energy Weapon User Manual
Electrodes
The front of the TASER 7 energy weapon has four metal electrodes.
The electrodes provide the ability to use the TASER 7 energy weapon
in “drive-stun” mode as a traditional stun gun-type energy weapon.
Contact-Stun (Drive-Stun) Backup
Contact-stun (also known as drive-stun) is the use of the TASER
energy weapon as a stun gun, rather than by ring probes. You can
contact-stun either without a cartridge installed or after a cartridge
has been deployed.
When using a contact-stun, press the Arc switch and push (drive) the
front of the energy weapon rmly against the body of the attacker.
The subject is likely to recoil from the painful shock and try to get
away from the stun electrodes. If the contact-stun is not eective,
evaluate the location of the contact-stun and consider an additional
cycle to a dierent pressure point.
Chapter 5: Cartridges and Energy Weapon Operation
26

Chapter 6: Maintenance/Troubleshooting
General Concepts
The TASER 7 energy weapon product is a sensitive piece of electronic equipment and should
be handled with care. Avoid dropping a TASER 7 energy weapon. Do not use a TASER 7 energy
weapon that has a cracked handle
• Check the battery pack regularly. Replace it when the battery percentage drops below 20%. See
Battery Level Icons (Chapter 4) for more information.
• Occasionally wipe out the TASER 7 cartridge deployment bays with a dry cloth. Multiple cartridge
rings create build-up (particularly in humid environments) that should be removed.
• Perform a function test regularly.
• Check the expiration of the TASER 7 cartridges (the 5-year expiration is listed on the top of the
cartridge). Do not use an expired TASER 7 cartridge.
• Secure the TASER 7 energy weapon in the protective cover when not in use.
• Avoid exposing the TASER 7 energy weapon to excessive moisture or water.
• Avoid immersing the TASER 7 energy weapon in water or exposing the TASER 7 energy weapon to
excessive moisture or water.
Function Test
A function test should be conducted every 30–60 days. The function test is done to verify the energy
weapon’s core electronics are working properly.
A TASER 7 energy weapon can be function tested with the cartridges loaded. In fact, it is recommended
you perform the test with cartridges installed to reduce stress on the energy weapon’s components.
To perform a function test:
1 Point the energy weapon in a safe direction.
2 With the safety in the down (SAFE) position, press and release both Arc switches simultaneously.
Keepyourngersawayfromthefrontoftheenergyweapon.
The energy weapon is now in Function Test mode. The CID will display the rmware version and
the battery percentage.
27

TASER 7 Home Defense Energy Weapon User Manual
3 Shift the safety switch to the up (ARMED) position.
The colors on the CID will be reversed as shown below—the battery and loaded cartridge icons
are black, and the background is yellow.
4 Press either Arc switch or both Arc switches. The energy weapon will arc for ve seconds.
Use the Arc switch, not the trigger, to perform a spark test. Pulling the trigger will deploy
a loaded cartridge.
5 After the 5-second cycle is over, look at the CID and verify:
• there are no fault icons;
• there are two cartridges present; and
• there is adequate battery capacity.
6 View the arc from the top or side of the energy weapon.
Do not point the energy weapon at your face or have it near your face.
• Verify electricity is arcing across the electrodes on both sides of the ring bay.
7 Shift the safety switch to the down (SAFE) position.
8 If any of the above verications fail, return the unit to your agency’s energy weapon administrator
for service.
Troubleshooting
LASER Sight and Flashlight Do Not Turn On
The energy weapon may be in the stealth mode, which is activated by pressing and holding both Arc
switches for three seconds. To take the energy weapon out of the Stealth mode, shift the safety switch
to the down (SAFE) position.
The Display is Inverted
Normally, the battery pack and loaded cartridges display on the CID as solid yellow on a black
background. If these icons display as solid black on a yellow background, the energy weapon may be
in the function test mode. The function test mode may be activated if both Arc switches are pressed
and released. To take the energy weapon out of the function test mode, shift the safety switch to the
down (SAFE) position..
Product Support
If you need product support on accessories or have any other questions, please contact technical
support at:
U.S.: 1-800-978-2737
Product Returns
To return a TASER product for service, rst follow the procedures at www.axon.com.
Chapter 6: Maintenance/Troubleshooting
28

TASER 7 Home Defense Energy Weapon User Manual
Always perform a complete download from the energy weapon before returning it for RMA.
Any data will be lost during servicing work performed by Axon.
If the TASER energy weapon has been exposed to bodily uids or other biohazards, please
follow your agency guidance and if appropriate contact Axon’s Technical Support Department
at: 1-800-978-2737 for specic instructions BEFORE returning the energy weapon.
Chapter 6: Maintenance/Troubleshooting
29

Chapter 7: Additional Items
Medical Research
TASER energy weapons are among the most extensively studied force options. Many energy weapon-
related medical and eld studies have been published. Medical studies have found that modern
pacemakers and implanted cardiac debrillators withstand automated external debrillators (AEDs)
that are stronger than the TASER energy weapon conducted energy pulses. For more information go
to www.axon.com.
See the current product warnings, training materials, licensing agreements, and specication sheets
for more information about your TASER product.
Legality
The Bureau of Alcohol, Tobacco, Firearms, and Explosives has classied our TASER energy weapons as
non-rearms because they use compressed gas (inert nitrogen), rather than explosives to launch the
projectiles. Because TASER energy weapons are not rearms, they may be carried without a permit
in certain jurisdictions (check state and local laws for permit requirements in your area). Check our
website at taser.com for a list of known state and local laws concerning TASER energy weapons.
Because state and local laws may change frequently, be sure to research the applicable laws in your
area prior to using, possessing or transporting the energy weapon.
Warranty
Please see the product warranty which came with your energy weapon. Axon’s current product
warranties are also available on www.axon.com.
Warnings
See the current product warnings that came with your energy weapon, for more information about
your TASER product. Axon’s current product warnings are also available on www.axon.com.
Medical Research
Medical studies have found that modern pacemakers and implanted cardiac debrillators withstand
external electrical debrillators many orders of magnitude stronger than the TASER conducted energy
pulses.
30

TASER 7 Home Defense Conducted Energy Weapon User Manual
Radio Waves
The Axon Signal feature of the TASER 7 Battery Pack transmits in the frequency range of 2402 to 2480
MHz.
Changes or modications to the equipment not expressly approved by the manufacturer could void
the product warranty and the user’s authority to operate the equipment.
Your wireless device is a radio transmitter and receiver. It is designed and manufactured not to exceed
the emission limits for exposure to radio frequency (RF) energy set by the Federal Communications
Commission (FCC) of the U.S. Government. These limits are part of comprehensive guidelines
and establish permitted levels of RF energy for the general population. The guidelines are based
on standards that were developed by independent scientic organizations through periodic and
thorough evaluation of scientic studies. The standards include a substantial safety margin designed
to assure the safety of all persons, regardless of age and health. Before a device model is available
for sale to the public, it must be tested and certied to the FCC that it does not exceed the limit
established by the government adopted requirement for safe exposure. This equipment has been
tested and found to comply with the limits for a Class B digital device, pursuant to part 15 of the FCC
Rules. These limits are designed to provide reasonable protection against harmful interference in
a residential installation. This equipment generates, uses and can radiate radio frequency energy
and, if not installed and used in accordance with the instructions, may cause harmful interference to
radio communications. However, there is no guarantee that interference will not occur in a particular
installation. If this equipment does cause harmful interference to radio or television reception, which
can be determined by turning the equipment o and on, the user is encouraged to try to correct the
interference by one or more of the following measures:
Reorient or relocate the receiving antenna.
Increase the separation between the equipment and receiver.
Connect the equipment into an outlet on a circuit dierent from that to which the receiver is connected.
Consult Axon Technical Support for help.
FCC/IC NOTICE: This device meets the body worn human exposure limits found in OET Bulletin 65,
2001, and ANSI/IEEE C95.1, 1992. Proper operation of this equipment according to the instructions
found in this guide will result in exposure substantially below the FCC’s recommended limits. To
comply with the FCC and ANSI C95.1 RF exposure limits, this device has been tested for compliance
with FCC RF Exposure limits in the typical conguration. The radiated output power of this wireless
device is far below the FCC radio frequency exposure limits.
This device complies with part 15 of the FCC Rules. Operation is subject to the following two conditions:
(1) This device may not cause harmful interference, and (2) this device must accept any interference
received, including interference that may cause undesired operation.
Compliance Marks
Chapter 7: Additional Items
31

Product functions and specications may change without notice and the actual product may vary from the illustrations in this
manual.
a, c, Axon, Evidence.com, Evidence Sync, TASER, TASER 7, X2, X26, and d are trademarks of Axon Enterprise, Inc., some
of which are registered in the US and other countries. For more information, visit www.axon.com/legal. All rights reserved.
©2021 Axon Enterprise, Inc.
MMU0076 Rev: DRAFT
 Loading...