

Page 1
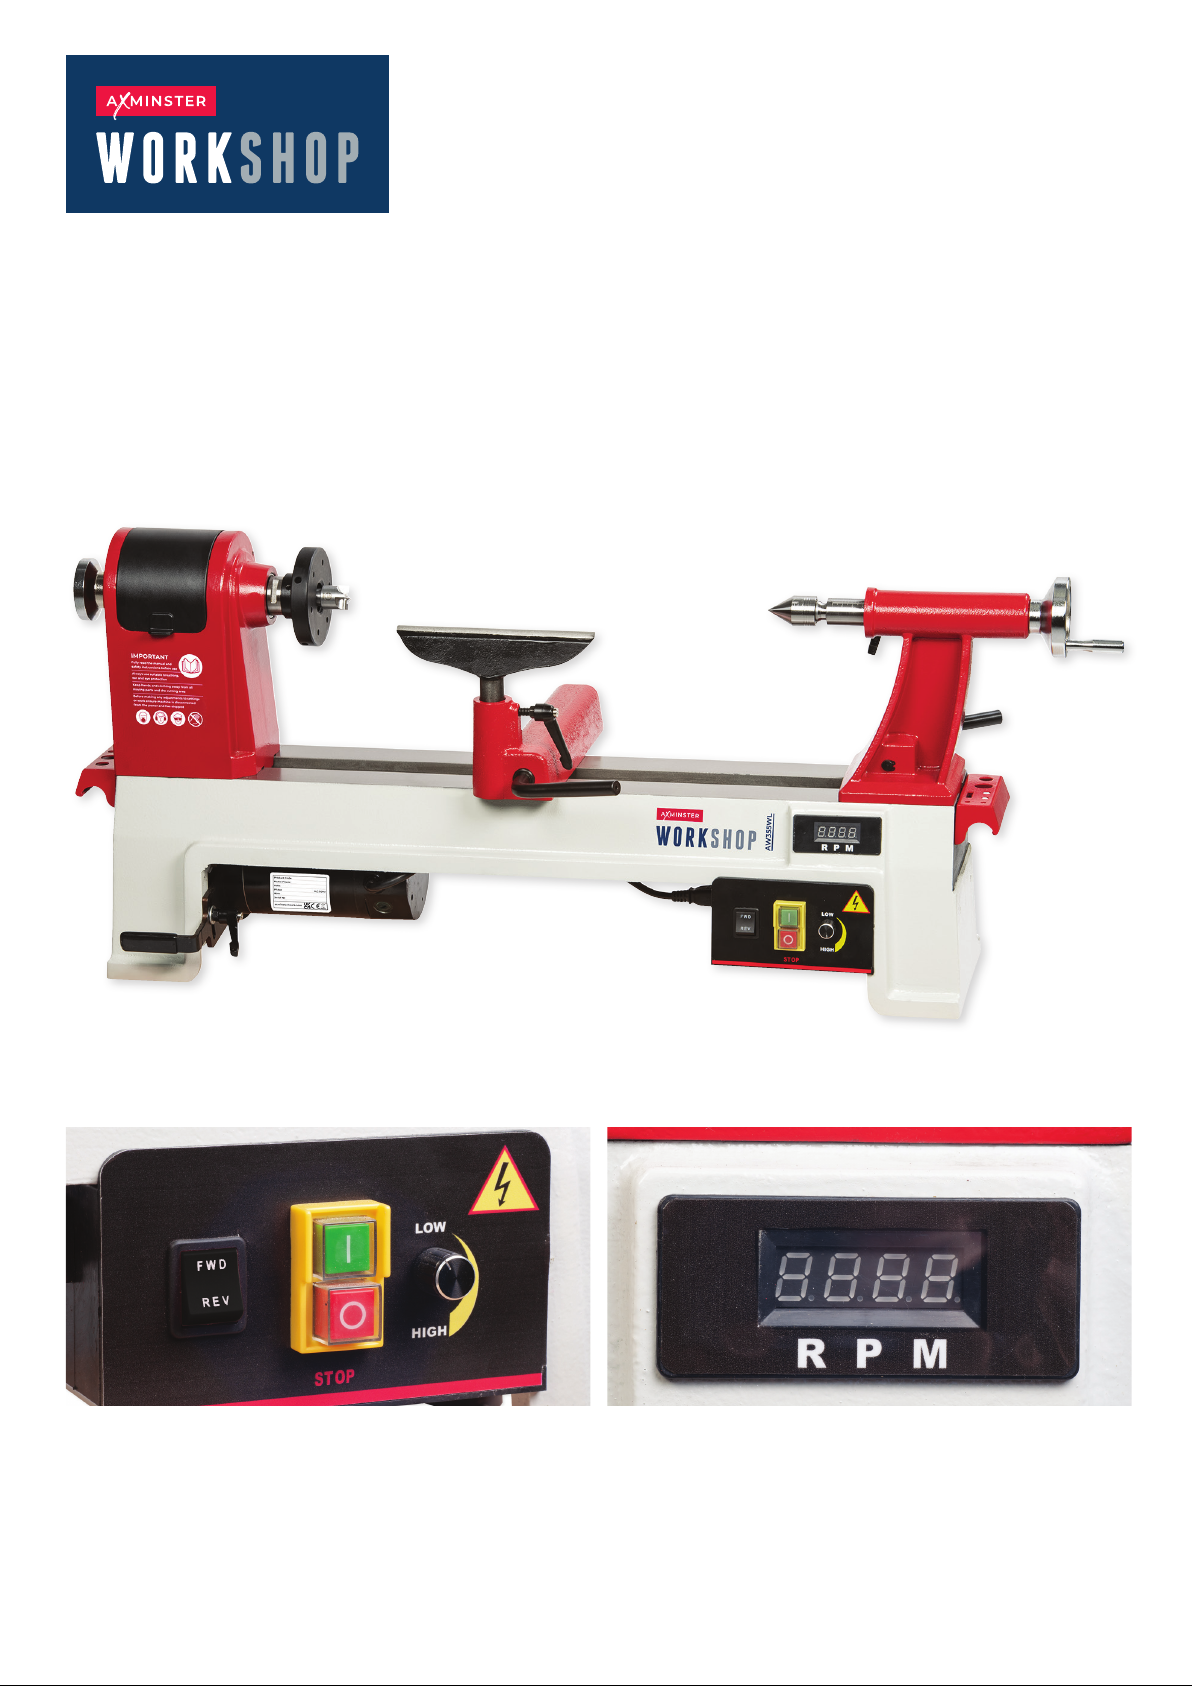
AW355WL
Woodturning Lathe
Code 107701
Original Instructions
AT: 31/07/2025
BOOK VERSION: 07
Page 2
INDEX OF CONTENTS
EU Declaration of Conformity 02
What’s Included 03
General Instructions for 230V Machines 04
Specific Safety Instructions for Woodturning Lathes 04
Specification 05
Assembly 05-06
Illustration and Parts Description 07-08-09
Operating Instructions 10-11-12-13
Optional Accessories 14
Maintenance 15
Exploded Diagrams/Lists 16-17
Wiring Diagram 18
Notes 19
EU DECLARATION OF CONFORMITY
The symbols below advise the correct safety procedures when using this machine.
Fully read manual
and safety instructions
before use
Ear protection
should be worn
Eye protection
should be worn
2
Dust mask
should be worn
HAZARD
Page 3
WHAT’S INCLUDED
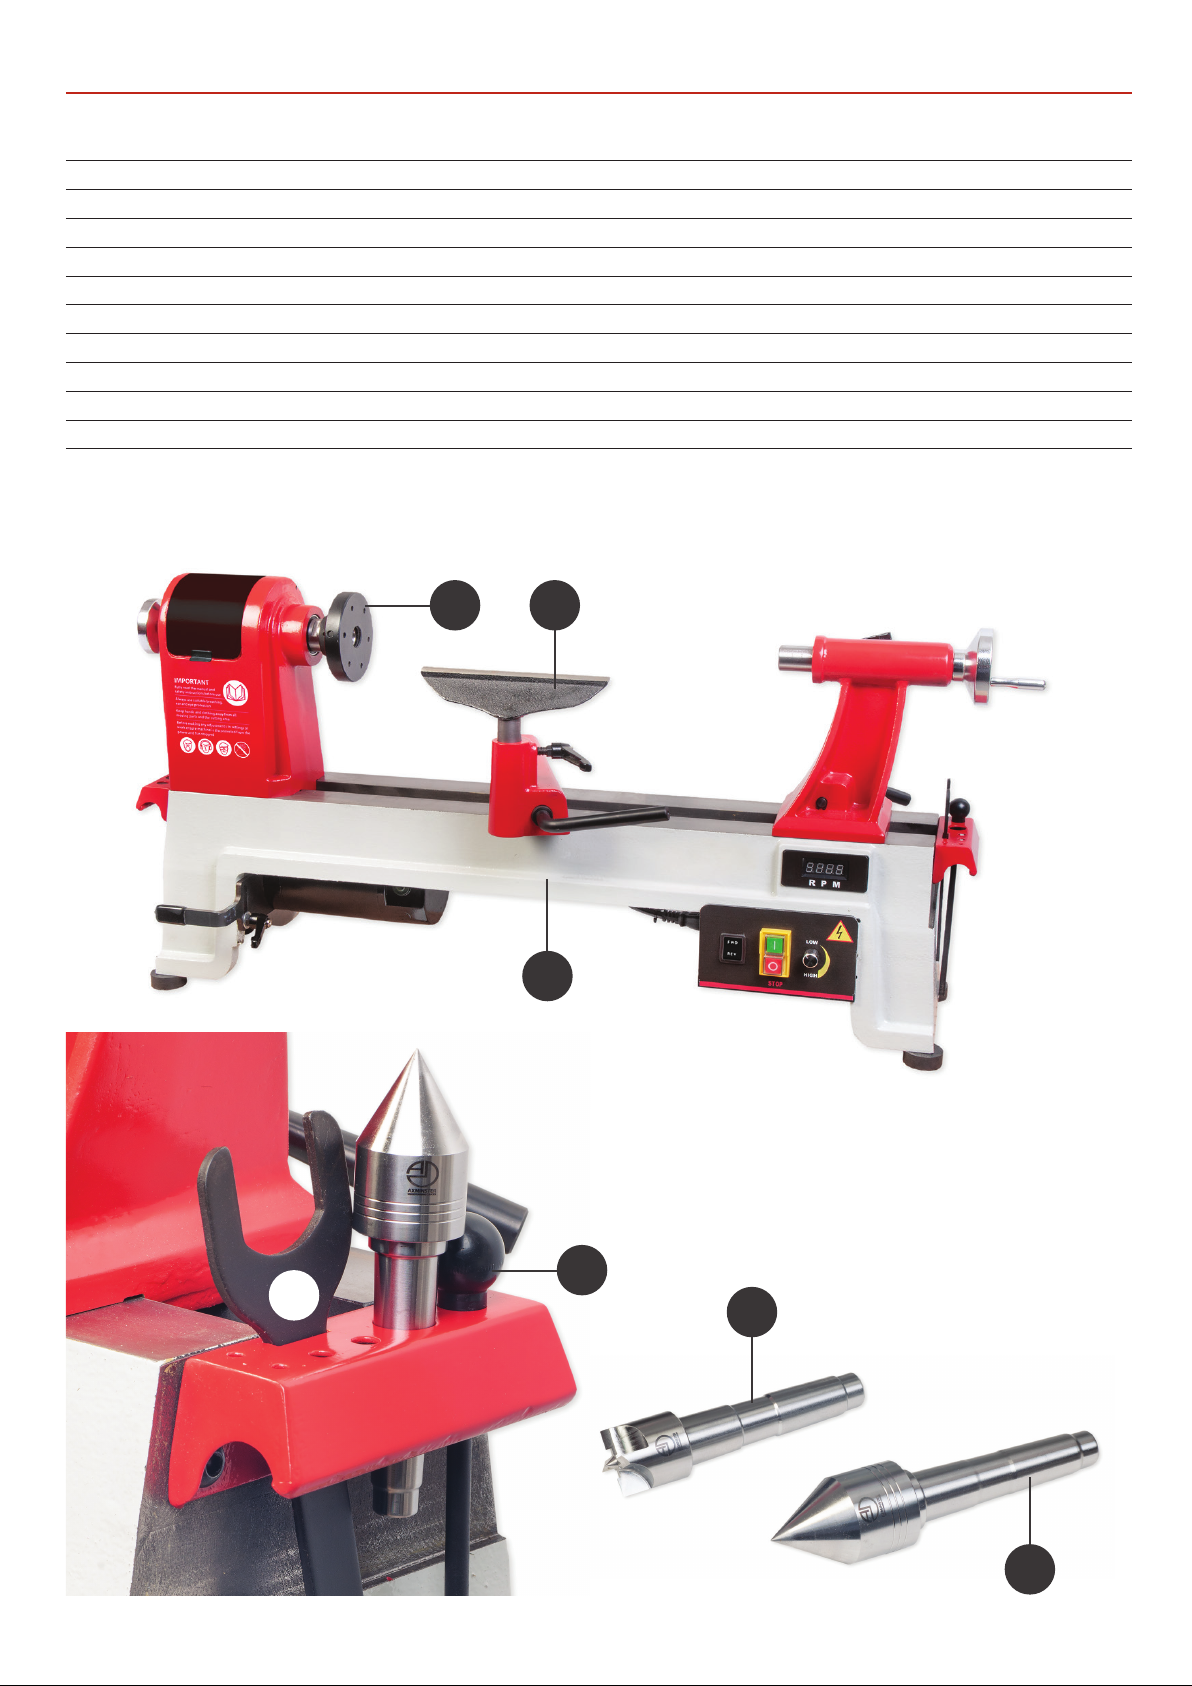
Quantity Item Part Model Number
AW355WL
1 Woodturning Lathe A
1 204mm Tool Rest B
1 100mm Faceplate C
1 Spanner D
1 Push Rod E
1 Axminster 4 Prong Drive Centre F (Code 340106)
1 Axminster Standard 60˚ Live Centre G (Code 340203)
1 Power Cable
1 Instruction Manual
BC
D
A
E
F
G
3
Page 4

GENERAL INSTRUCTIONS FOR 230V MACHINES
The following will enable you to observe good working
practices, keep yourself and fellow workers safe and maintain
your tools and equipment in good working order.
WARNING!! KEEP TOOLS AND EQUIPMENT
OUT OF REACH OF YOUNG CHILDREN
KEEP WORK AREA AS UNCLUTTERED AS IS PRACTICAL.
UNDER NO CIRCUMSTANCES SHOULD CHILDREN BE
ALLOWED IN WORK AREAS.
Mains Powered Tools
• Tools are supplied with an attached 13 Amp UK 3 pin plug,
fitted with 13 amp fuse.
• Inspect the cable and plug to ensure that neither are
damaged. Repair if necessary by a suitably qualified person.
• D
o not use when or where it is liable to get wet.
Workplace
• Do not use 230V a.c. powered tools anywhere
within a site area that is flooded.
• Keep machine clean.
•
Leave machine unplugged until work is about to commence.
• Always disconnect by pulling on the plug body and not the
cable.
• Carry out a final check e.g. check the cutting tool
is securely tightened in the machine and the correct
speed and function set.
• Ensure you are comfortable before you start work,
balanced, not reaching etc.
• Wear appropriate safety clothing, goggles, gloves,
masks etc. Wear ear defenders at all times.
• If you have long hair wear a hair net or helmet to prevent it
being caught up in the rotating parts of the machine.
• Consideration should be given to the removal of rings and
wristwatches.
• Consideration should also be given to non-slip footwear etc.
• If another person is to use the machine, ensure they are
suitably qualified to use it.
• Do not use the machine if you are tired or distracted.
• Do not use this machine within the designated safety areas
of flammable liquid stores or in areas where there may be
volatile gases.
• Check cutters are correct type and size, are undamaged
and are kept clean and sharp, this will maintain their
operating performance and lessen the loading on the
machine.
• OBSERVE…. make sure you know what is happening
around you and USE YOUR COMMON SENSE.
SPECIFIC SAFETY INSTRUCTIONS FOR WOODTURNING LATHES
1. Do not use ‘split’ work pieces.
2. Always start at the lowest speed when starting a new task.
3. Try to render a new work piece “round” (or as close as is
practical) before turning.
4. Check that the tool rest is at or slightly below the centre line
of the work piece.
5. Check the work piece is securely mounted in the lathe
before switching on the power.
6.
Rotate the work piece by hand, to check that it is:
centralised, clear of the tool rest, not ‘split’ or has loose knots.
Where lathes have the facility to be reversed; check the
7.
machine is rotating in the correct direction.
8. If your lathe has the facility to run in reverse, you must ensure
that the mounting accessories (chucks, faceplates etc.,) can
be ‘locked’ onto the lathe mandrel, and in the case of
chucks have some form of security device to prevent them
‘
unwinding’ during reverse operation.
9. Make sure your tools are stored/racked away from the
turning area of the lathe. Do not reach over a rotating work
e at any time.
piec
10. Do not ‘dig in’ or try to take too large a cut.
11. Do not leave the lathe running unattended; or leave the
machine until everything is stopped.
12. If you are turning between centres with ‘softish stuff’,
check and reposition the tailstock centre frequently.
4
Page 5
SPECIFICATION
Code 107701
Model AW355WL
Rating Home Workshop
Power 750W 230V 50Hz 1ph
Speed 250-3,550rpm
Spindle Thread T38 M33 x 3.5 mm
Taper Tailstock 2MT
Distance Between Centres 510 mm
Max Diameter over Bed 355 mm
Tool Rest Stem Diameter 25.4 mm
Overall L x W x H 1,040 mm x 370 mm x 480 mm
Weight 57 kgs
ASSEMBLY
The machine and its accessories will arrive coated with
corrosion preventative grease. This will need to be cleaned
from the machine, its components and accessories prior to it
being set up. Use proprietary de greaser. Wear overalls, coverall
and eye protection before cleaning.
95% of the machine comes fully assembled, all that remains is
to fit the four prong drive centre (F) and the 60˚ live centre (G)
and tool rest (B).
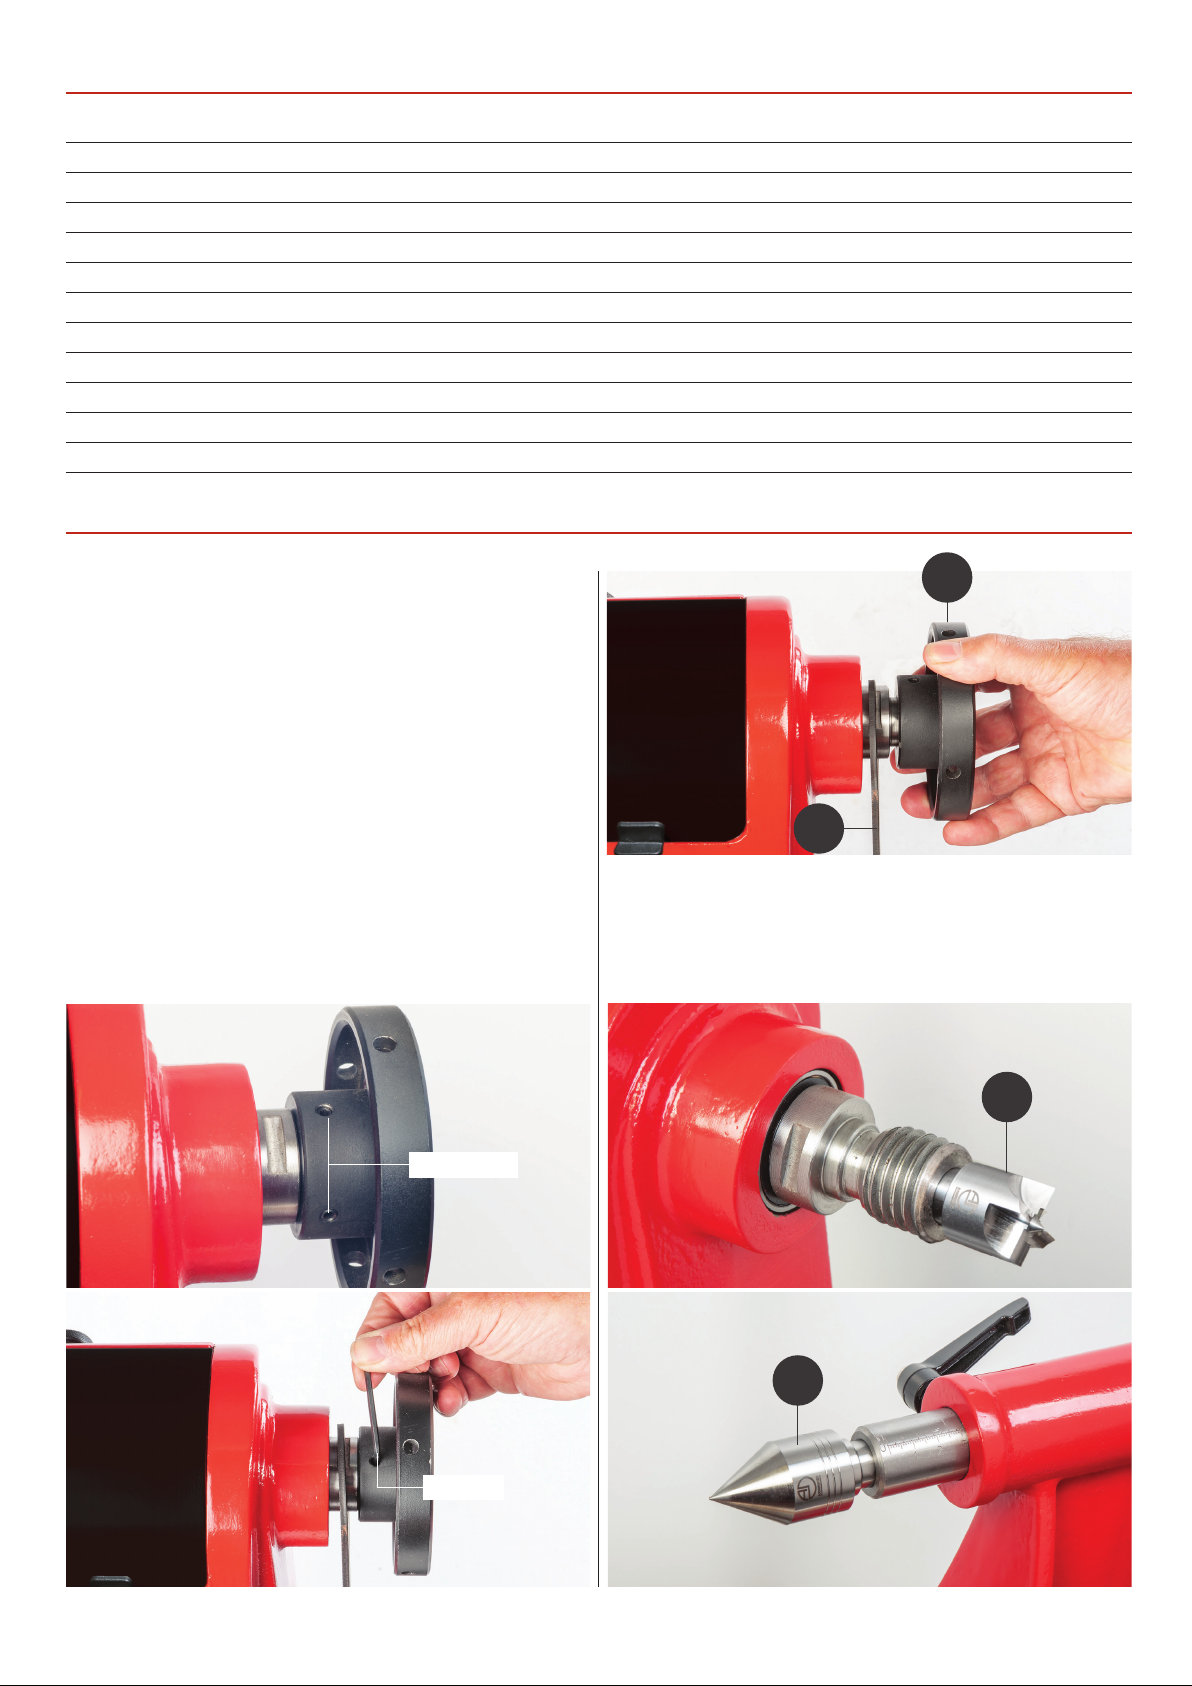
1. Locate the four prong drive centre (F) and live centre (G).
Remove the faceplate (C) by loosening the two grub screws
and using the spanner (D), unscrew the faceplate from the
spindle left handed thread and place aside, see fig 01-02-03.
Fig 01-02-03
C
D
2. Insert the drive centre (F) into the spindle and repeat for
the live centre (G) into the tailstock barrel, see fig 04-05.
Fig 04-05
F
Grub screws
Hex key
G
5
Continues over...
Page 6
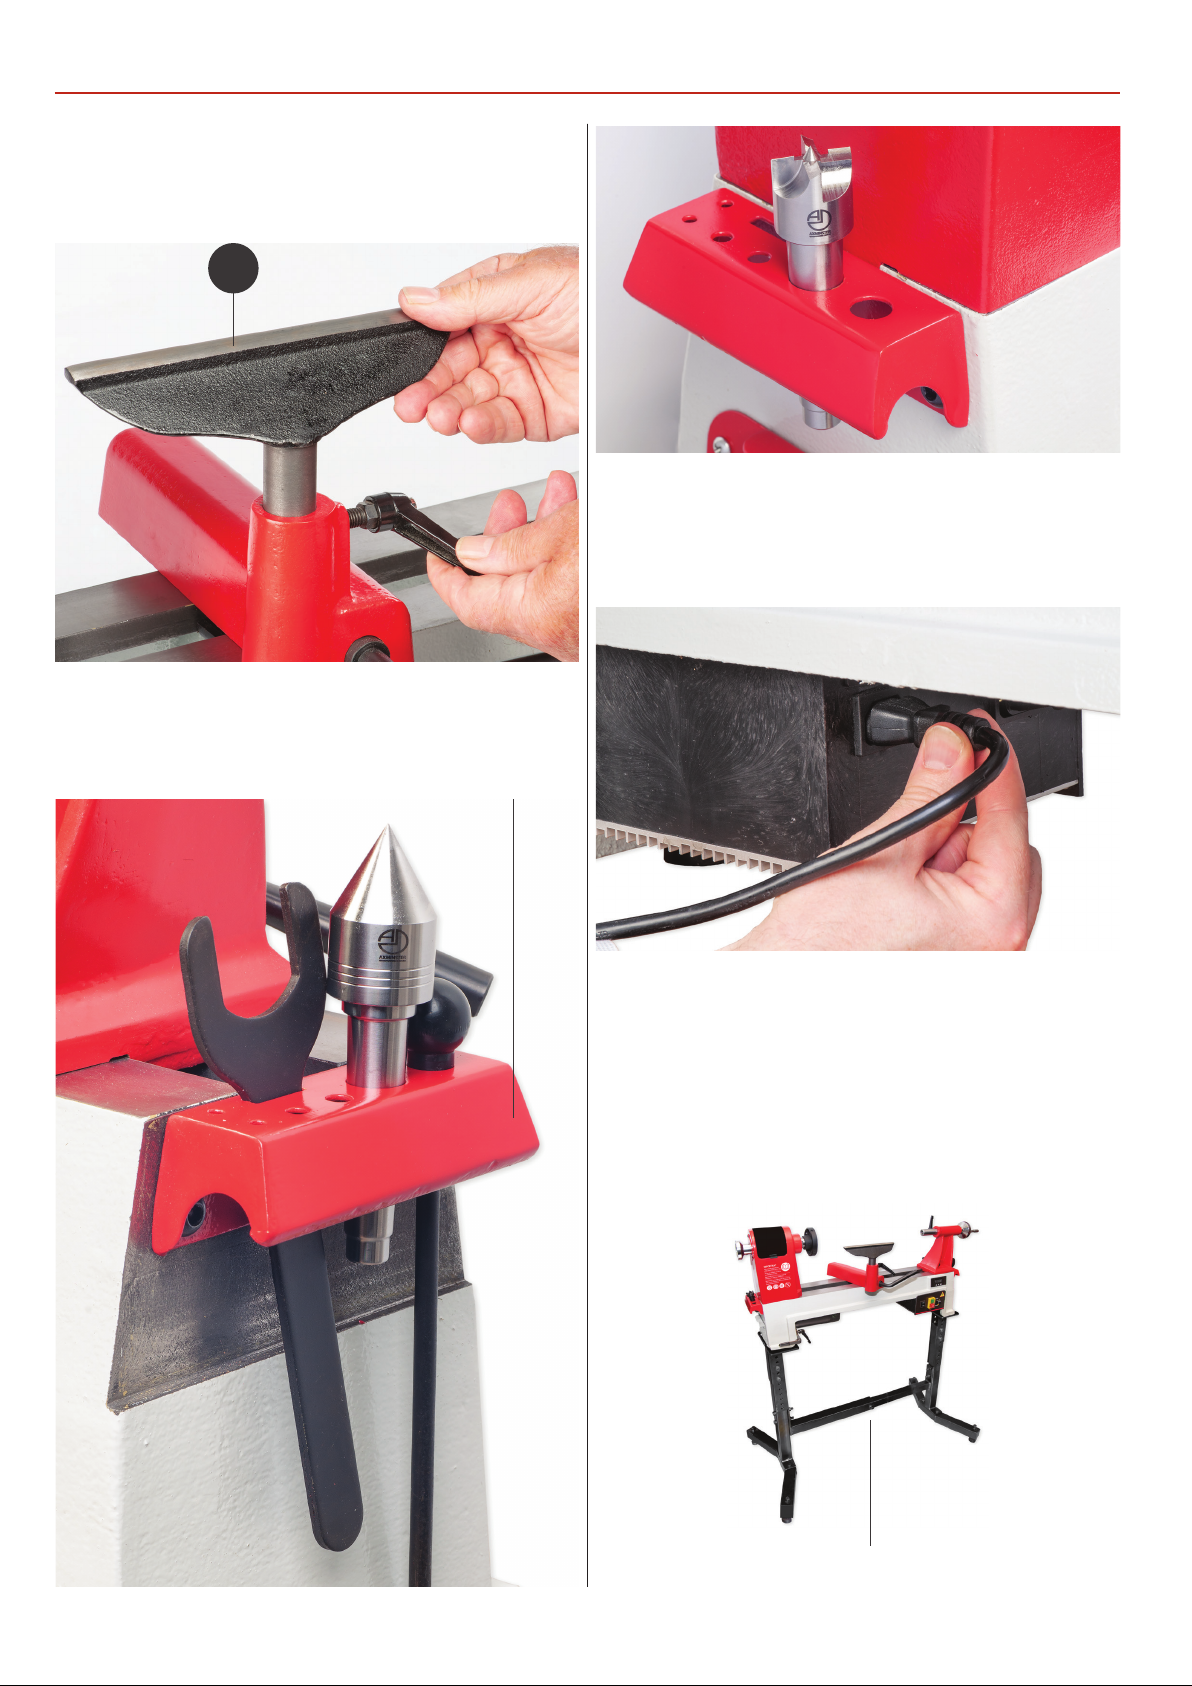
ASSEMBLY
3. Inset the tool rest (B) into the machined hole on the banjo
arm and secure using the lift and shift handle lock, see fig 06.
Fig 06
B
5. Locate the power cable and insert the connector into the
three pinned socket to the side of the control box, see fig 09.
Fig 09
4. Place all accessories into one of the two tool holders,
see fig 07-08.
Fig 07-08
Tool holder/carrying handle
6. Place the lathe on a work bench and adjust the four
feet until level.
Optional Accessories (see page 14)
Please contact our Customer Service Department for further
details or visit our website at axminster.co.uk.
Floor stand assembly
6
Page 7
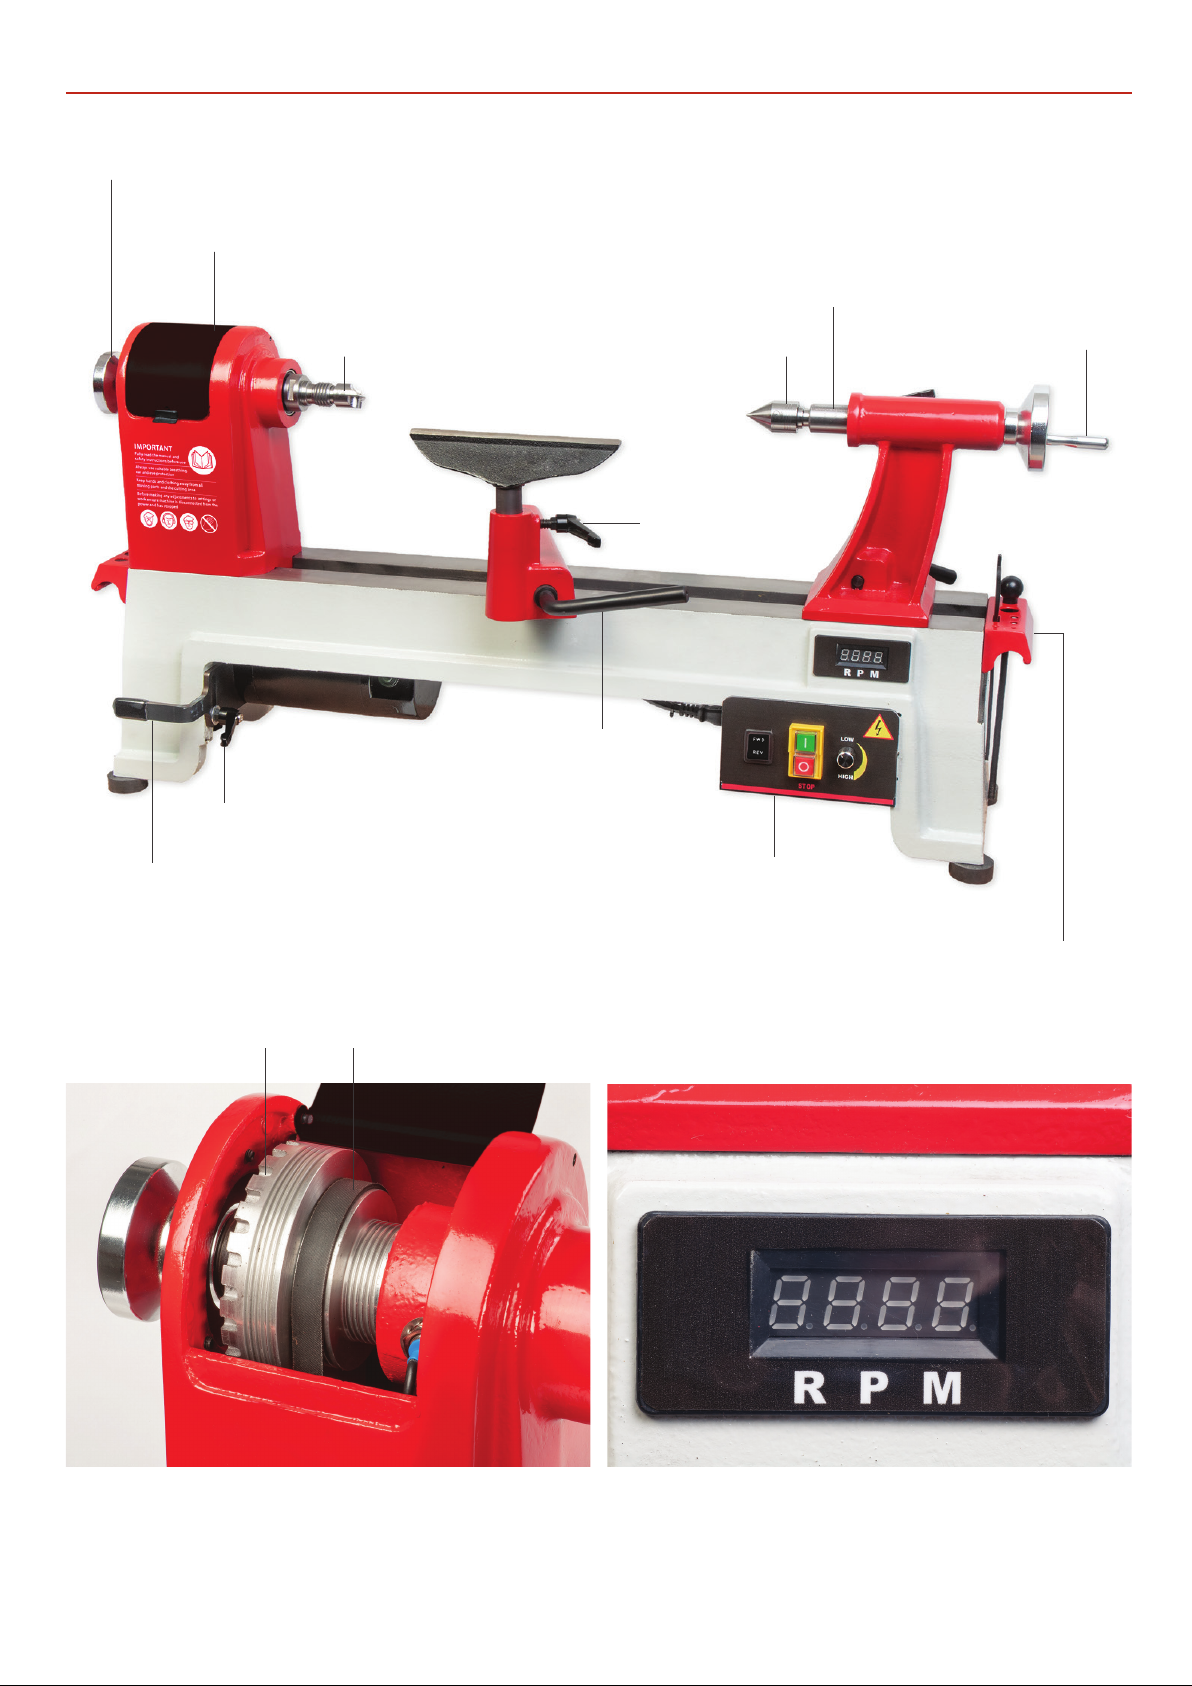
Headstock wheel
Headstock access panel
ILLUSTRATION AND PARTS DESCRIPTION
4 Prong drive centre
Motor handle lock
Lift & shift handle
Banjo arm lock
Tailstock barrel
60˚ Live centre
Tailstock
operating
handle
Motor operating handle
24 Indexing stops Drive belt
Control box
Tool holder/carrying
handle
Spindle pulley with a 24 indexing stop facility Spindle speed digital indicator
7
Page 8
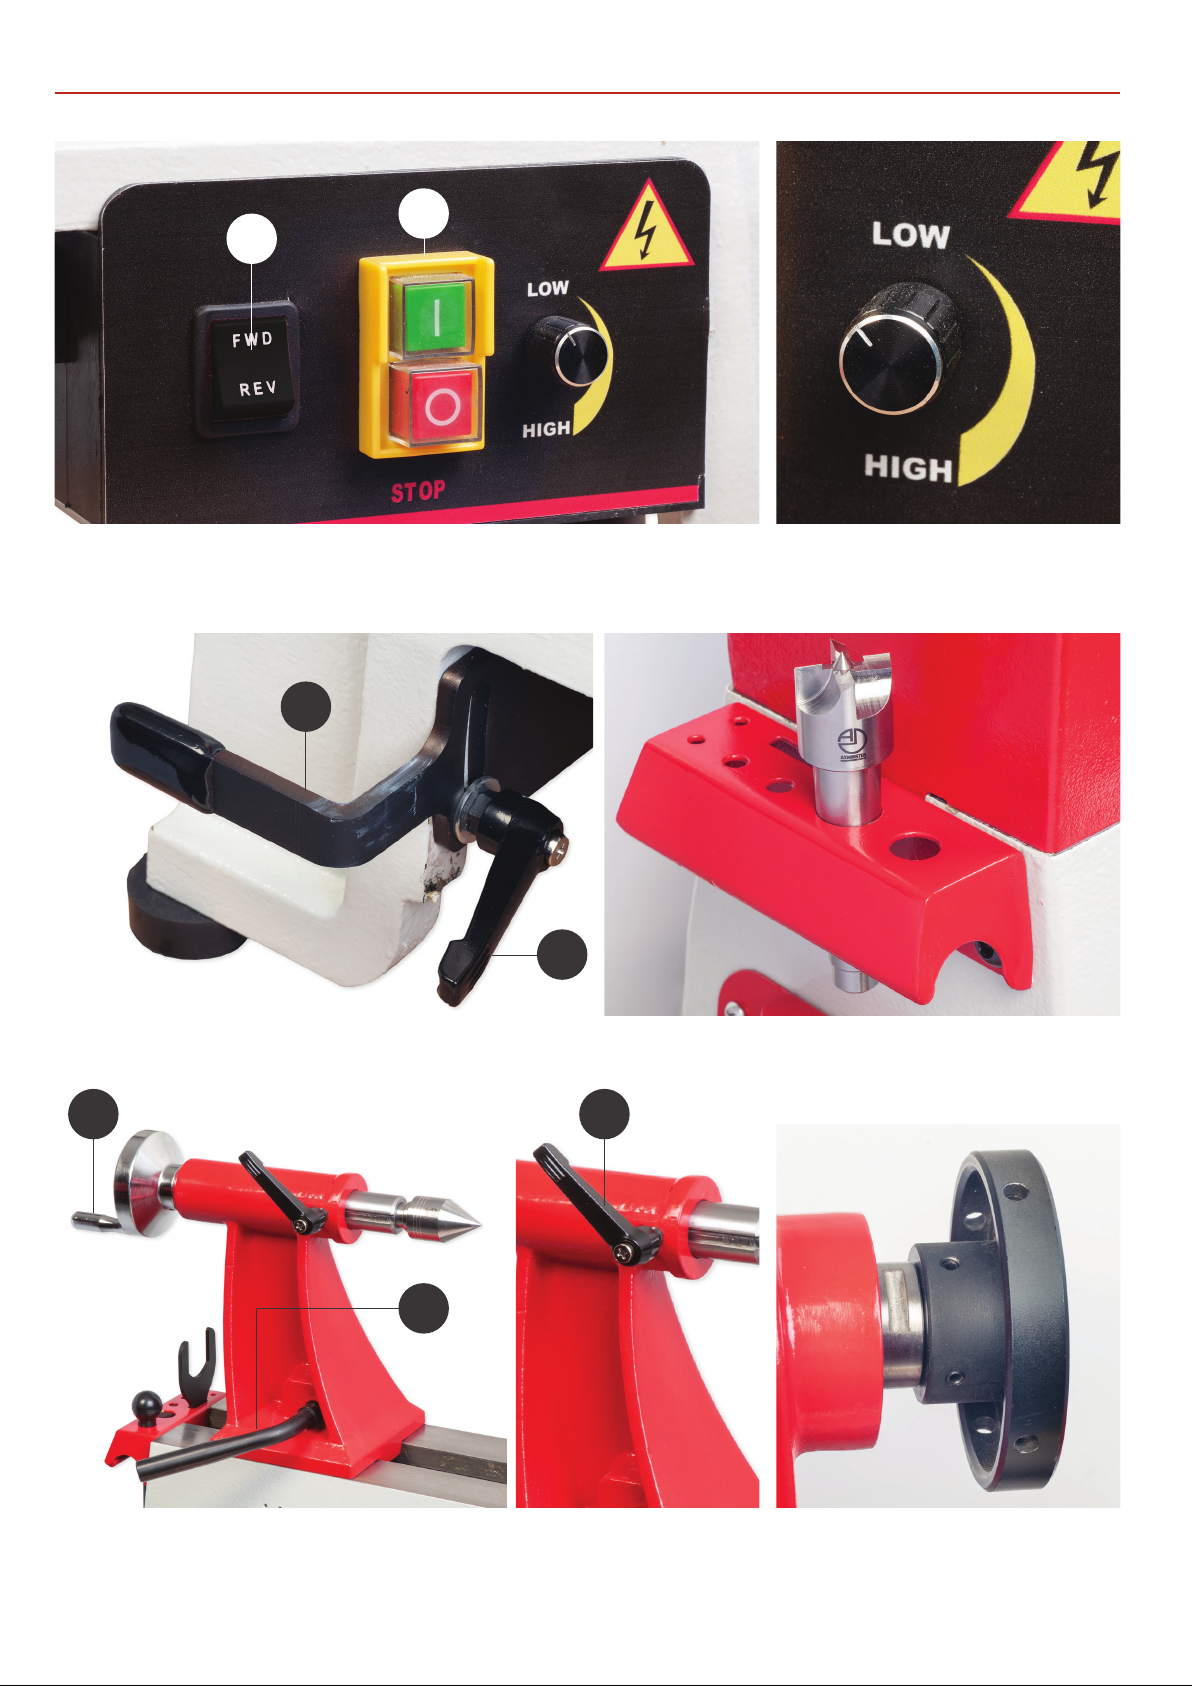
ILLUSTRATION AND PARTS DESCRIPTION
B
A
Forward/Reverse switch to change the spindle’s direction (A)
(DO NOT operate this switch while lathe is in motion)
ON/OFF NVR switch (B)
A
B
Handle (A) to raise/lower the motor for drive belt position
Motor lock (B)
A B
Variable speed control knob
250-3,550rpm
Tool holder/carrying handle
on either end of lathe bed
C
Tailstock operating handle (A, Tailstock barrel lock (B),
Tailstock handle lock (C)
8
100mm Faceplate
Page 9
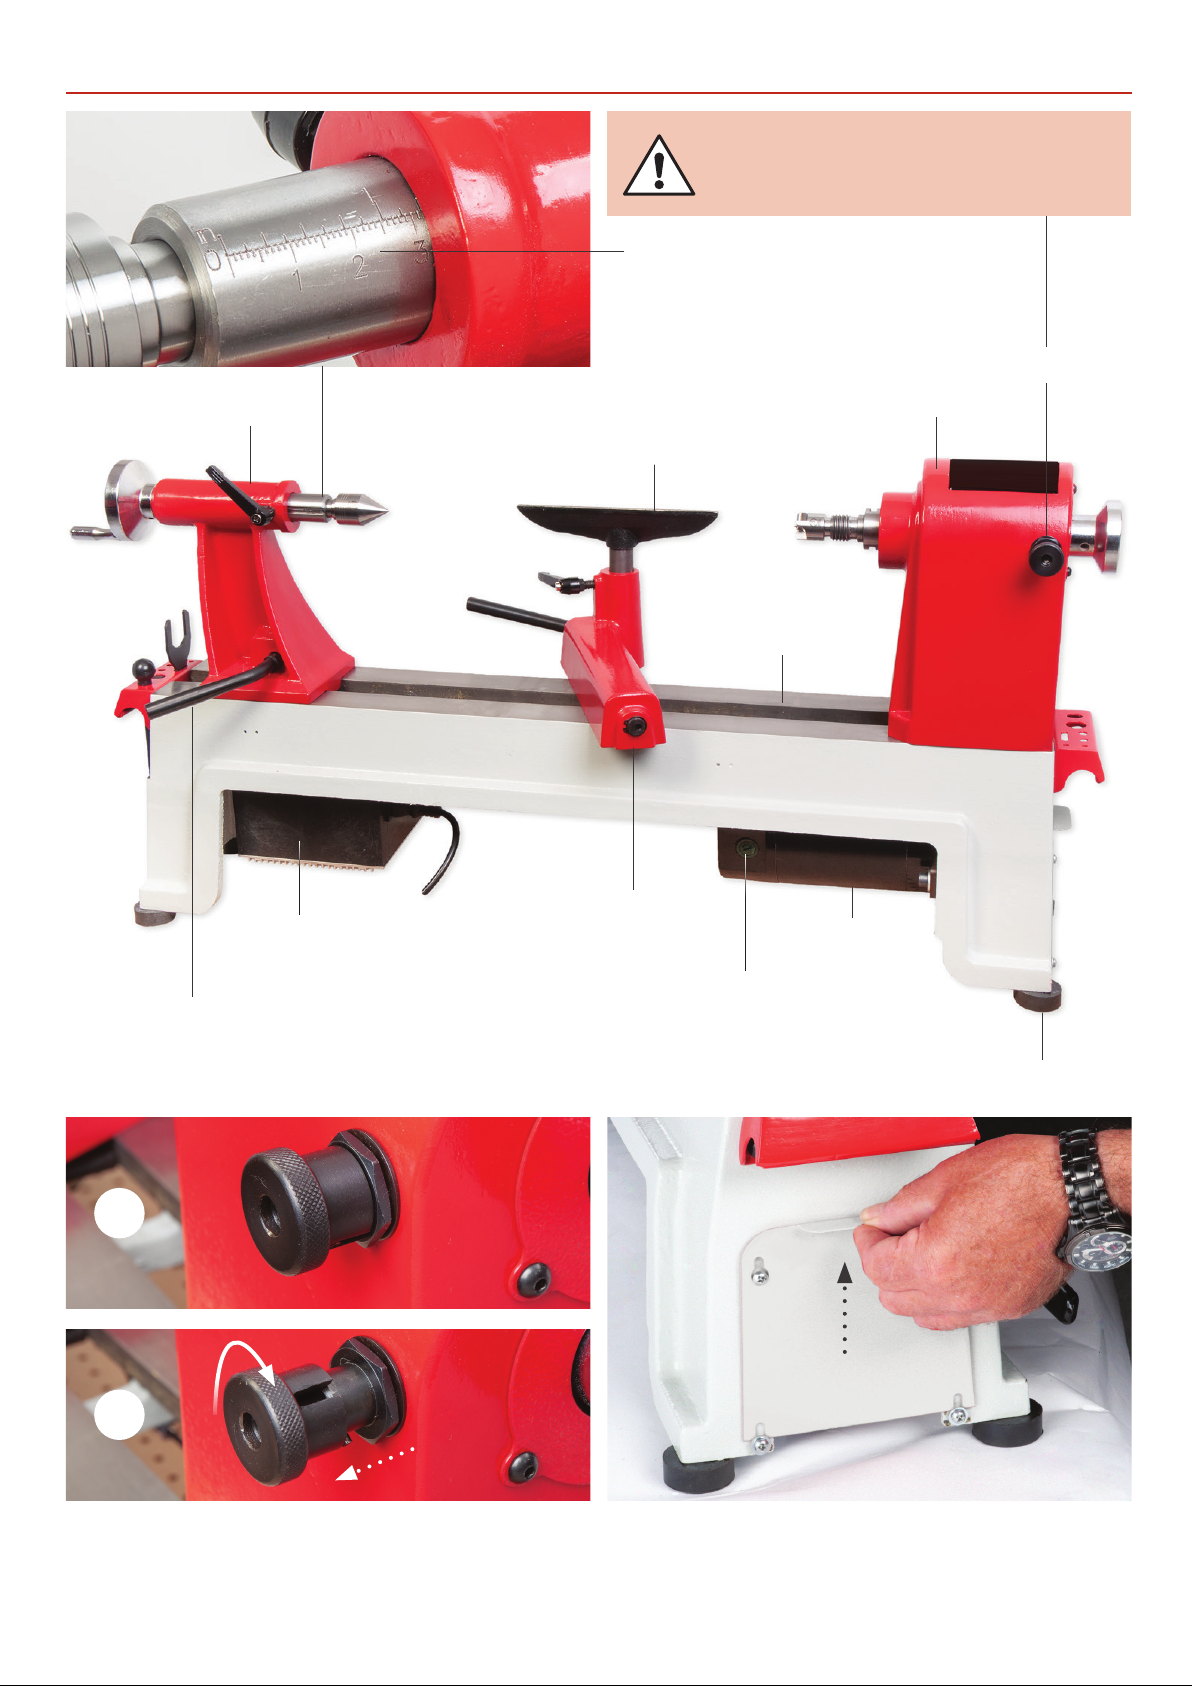
ILLUSTRATION AND PARTS DESCRIPTION
DO NOT USE THE INDEX PIN TO LOCK
THE SPINDLE WHEN REMOVING OR
MOUNTING THE FACEPLATE.
Tailstock barrel scale
Indexing pin
Tailstock
Control box with heat sink
Tailstock lock handle
Headstock
Tool rest
Lathe bed
Banjo arm
DC brush motor
Motor brush access port
A
B
Indexing pin (A) locked
Indexing pin (B) unlocked
Lathe foot
Lower motor pulley access plate
9
Page 10
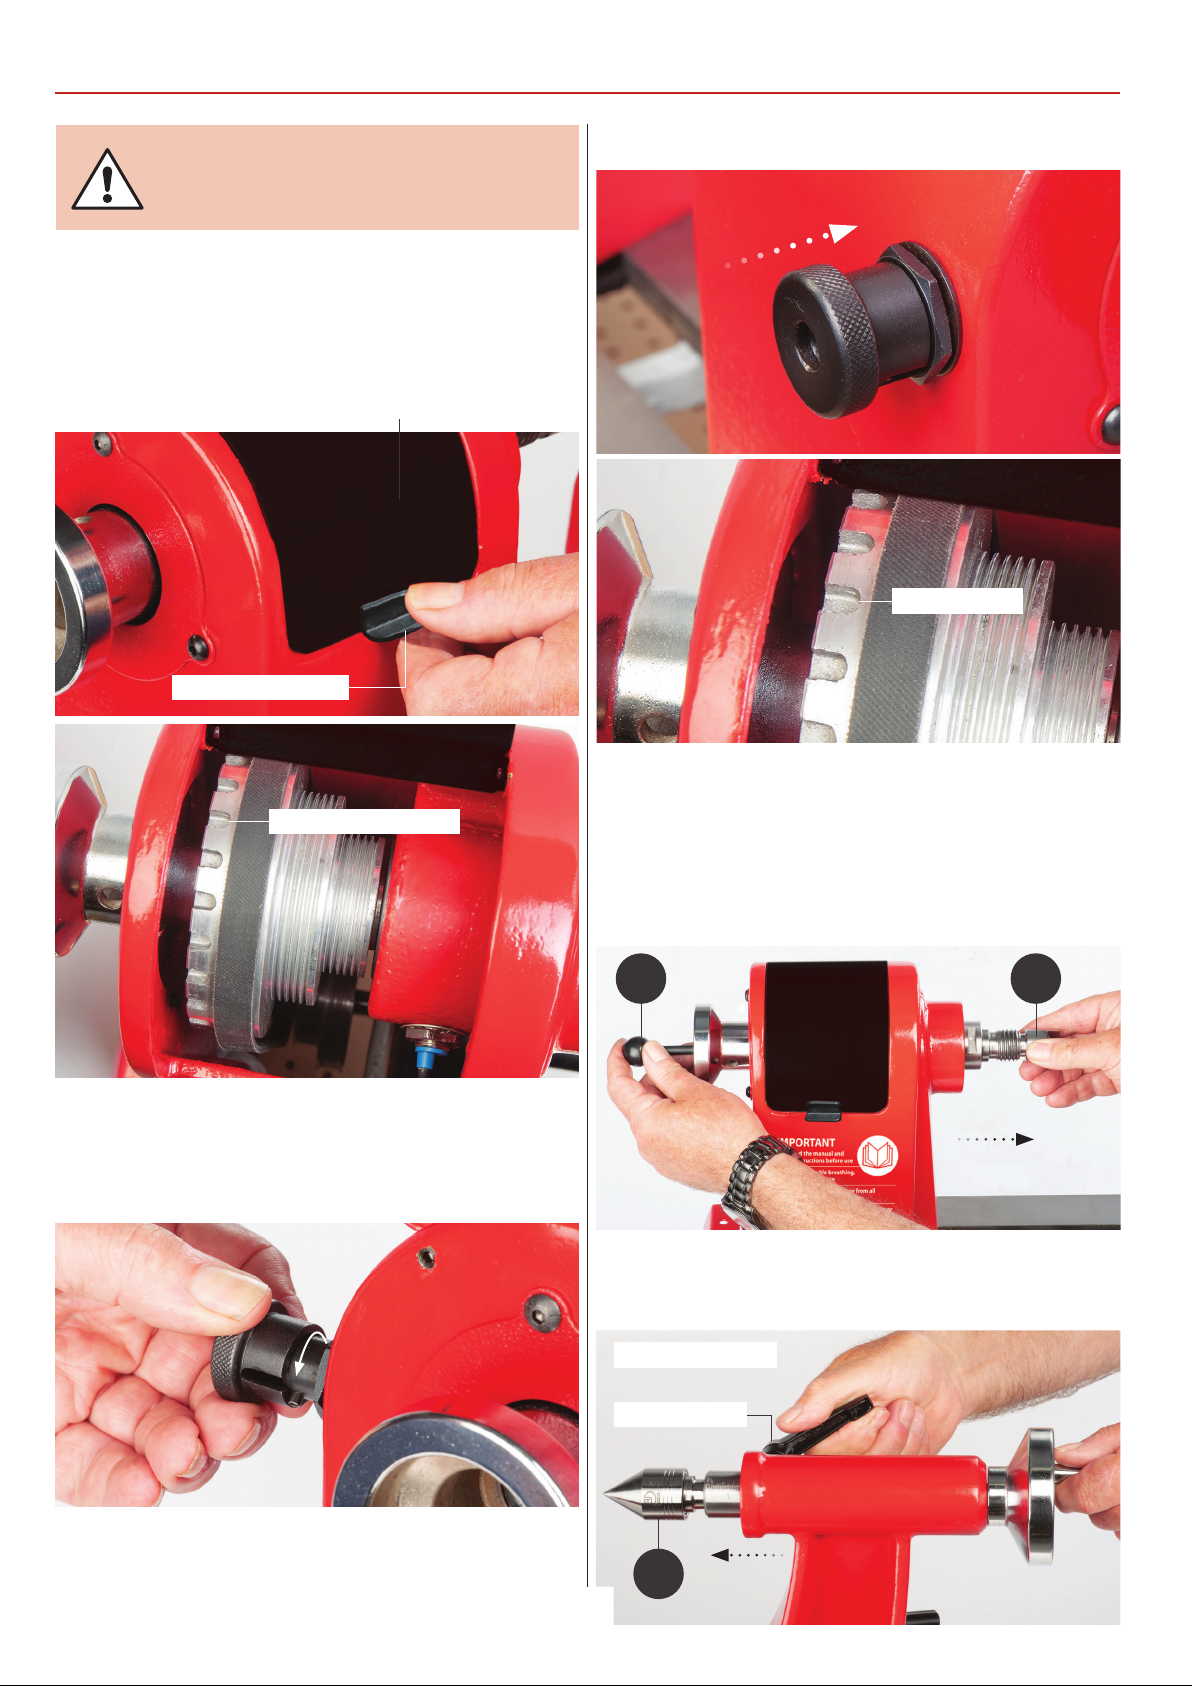
OPERATING INSTRUCTIONS
DISCONNECT THE LATHE FROM THE
MAINS BEFORE CONTINUING!
Indexing Facility
The indexing facility is useful for fluted columns, clock faces and
accurate hole positioning. The index pulley has 24 positions,
see fig 10-11.
Fig 13-14
Fig 10-11
Panel handle
24 indexing positions
Access panel
Indexing slot
Removing the Drive & Live Centres
Locate the ‘push rod’ (E), insert it through the centre of the
spindle operating wheel to push out the drive centre (F),
see fig 15. Repeat for the live centre (G)
Fig 15
E F
1. Open the headstock access panel, pull out the indexing pin
knob to the rear of headstock and turn until its in the
unlocked position, see fig 12.
Fig 12
2. Rotate the spindle by turning the headstock operating
wheel, lower the indexing pin knob until the pin engages
into one of 24 indexing slots, see fig 13-14. Replace the
access panel.
Adjusting the Tailstock
Fig 16
Barrel adjustment
Locking handle
G
10
Page 11
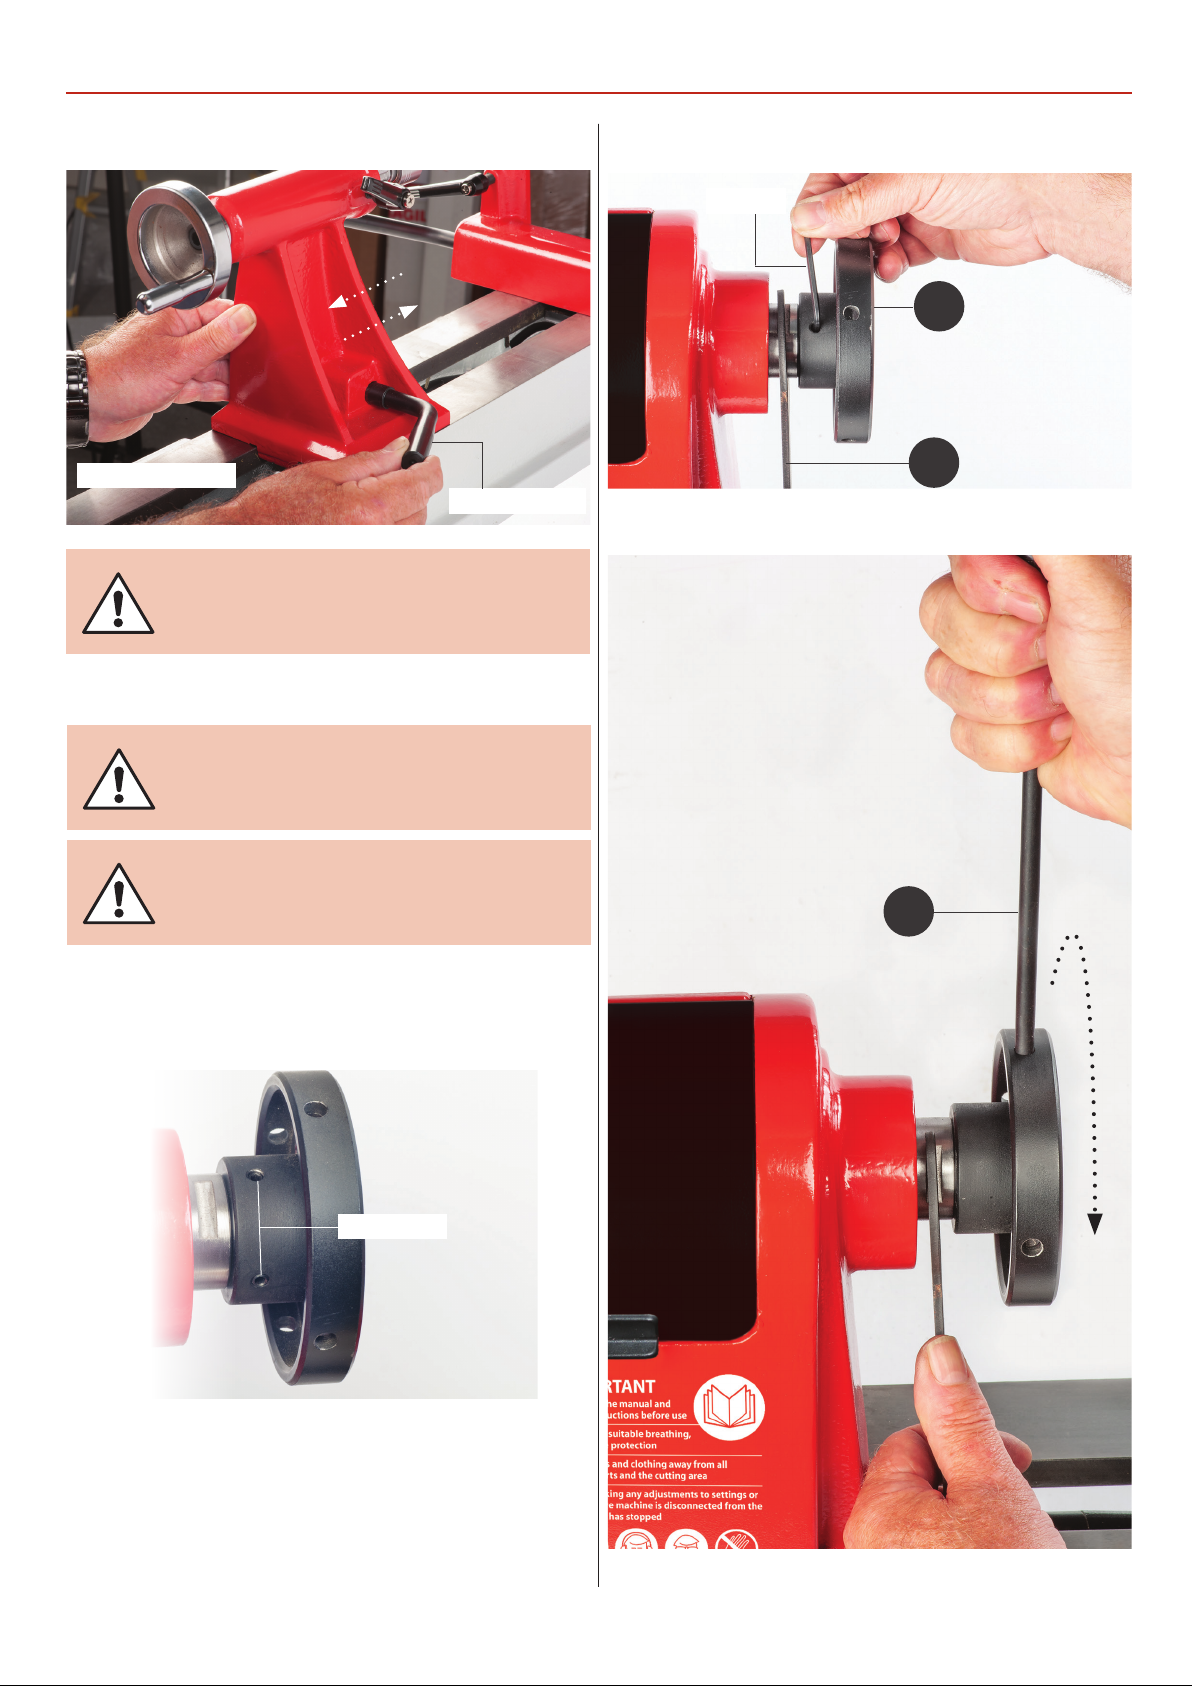
OPERATING INSTRUCTIONS
Fig 17
Tailstock travel
DISCONNECT THE LATHE FROM THE
MAINS BEFORE CONTINUING!
Mounting the Faceplate
Fig 19
Hex key
C
D
Locking handle
Fig 20
DO NOT USE THE INDEX PIN TO LOCK
THE SPINDLE WHEN REMOVING OR
MOUNTING THE FACEPLATE.
NOTE: LOOSEN THE TWO GRUBSCREWS
SUFFICIENTLY WHEN MOUNTING OR
REMOVING THE FACEPLATE.
1. Loosen the two grabs screws sufficiently to prevent it
snagging on the spindle, see fig 18.
Fig 18
Grub screws
E
2.
Screw the ‘faceplate’ (C) on the spindle, remember right
hand thread. Using the spanner (D) to hold the spindle,
ten the grab screws to secure the faceplate, see fig 19.
tigh
3. Note: The faceplate will be tight after use. To remove
follow steps 1-2, insert the push stick rod (E) into one of the
machined holes in the faceplate. Hold the spanner (D) in
place and pull the push stick (E) towards you, see fig 20.
11
Continues over...
Page 12
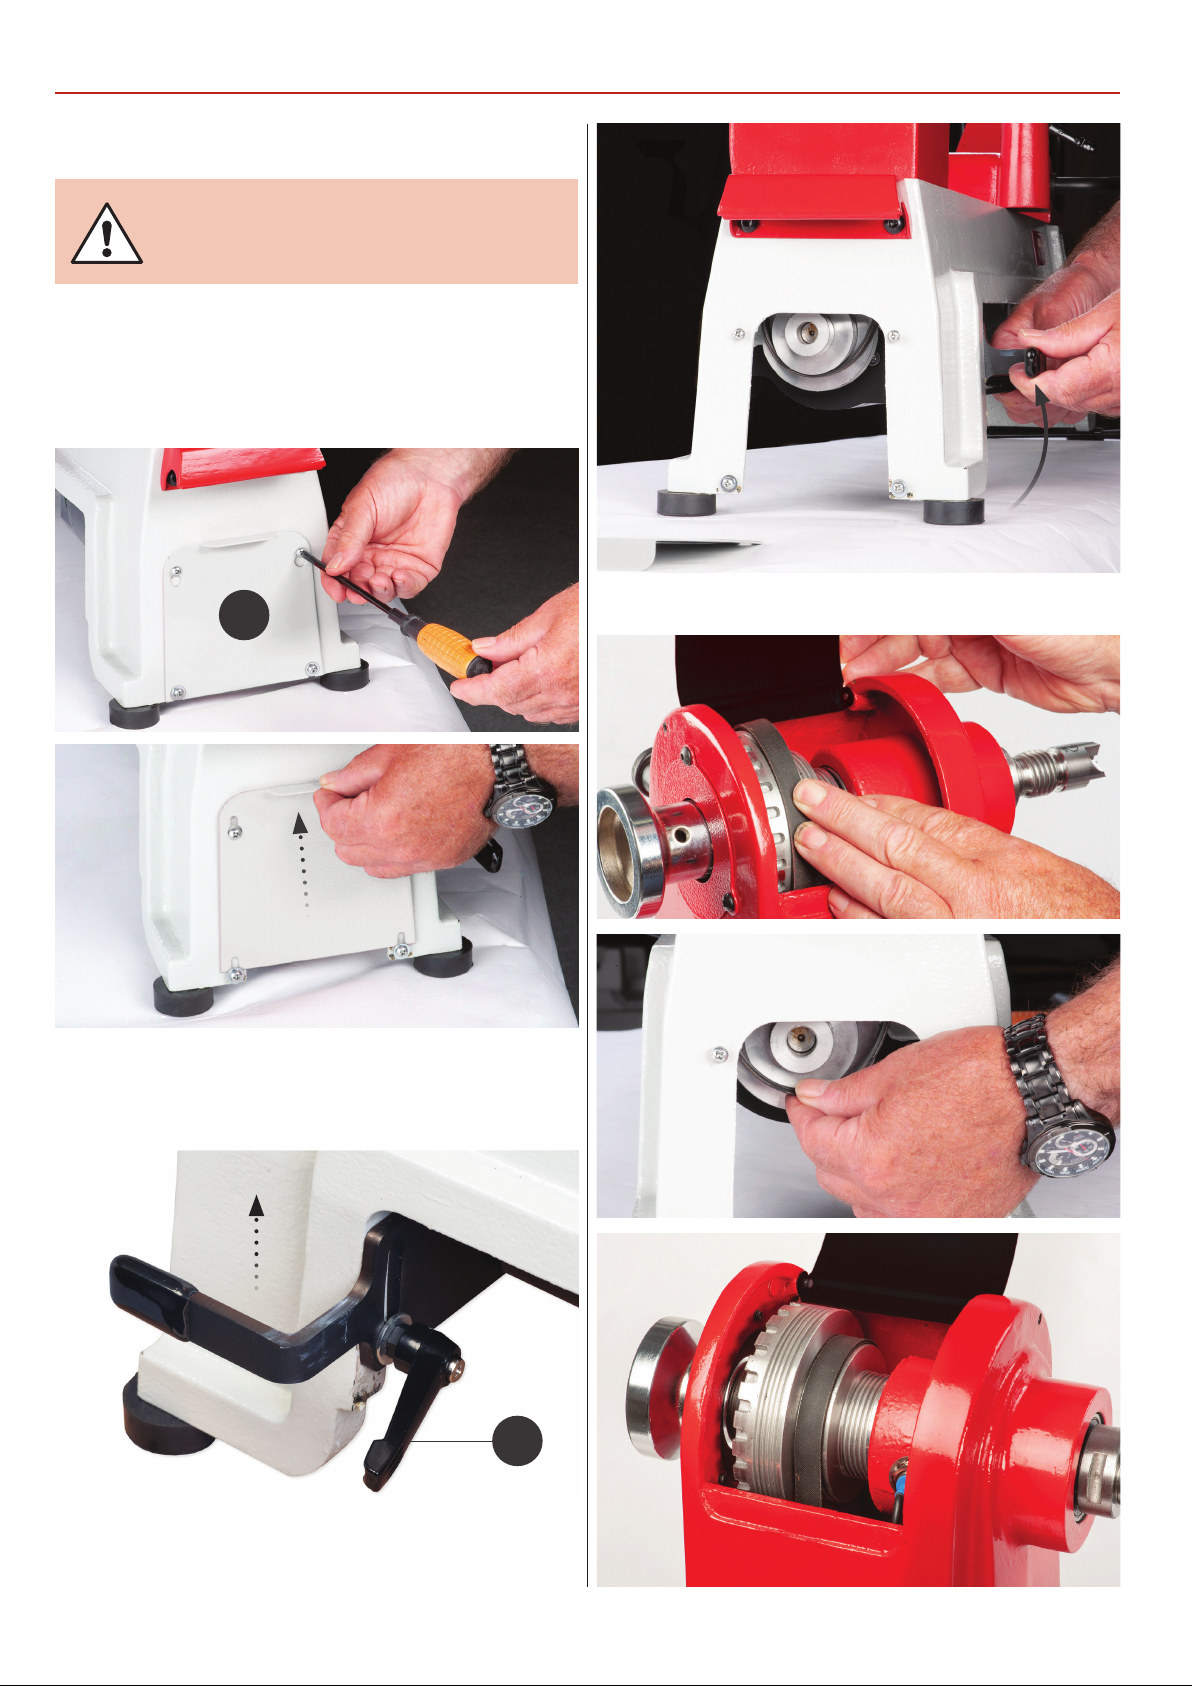
OPERATING INSTRUCTIONS
Changing the Lathe Speed
DISCONNECT THE LATHE FROM THE
MAINS BEFORE CONTINUING!
1. Open the access panel, see fig 10-11. Loosen the four screws
holding the motor pulley access plate (A) and remove, see fig
21-22.
Fig 21-22
A
2. Release the motor locking handle (B) and lift up the motor,
retighten the locking handle, see fig 23-24.
Fig 23-24
Fig 25-26-27
B
3. Reposition the drive belt to one of the three positions, see fig
25-26-27. Note: The speed chart shows approximate speeds.
12
Page 13
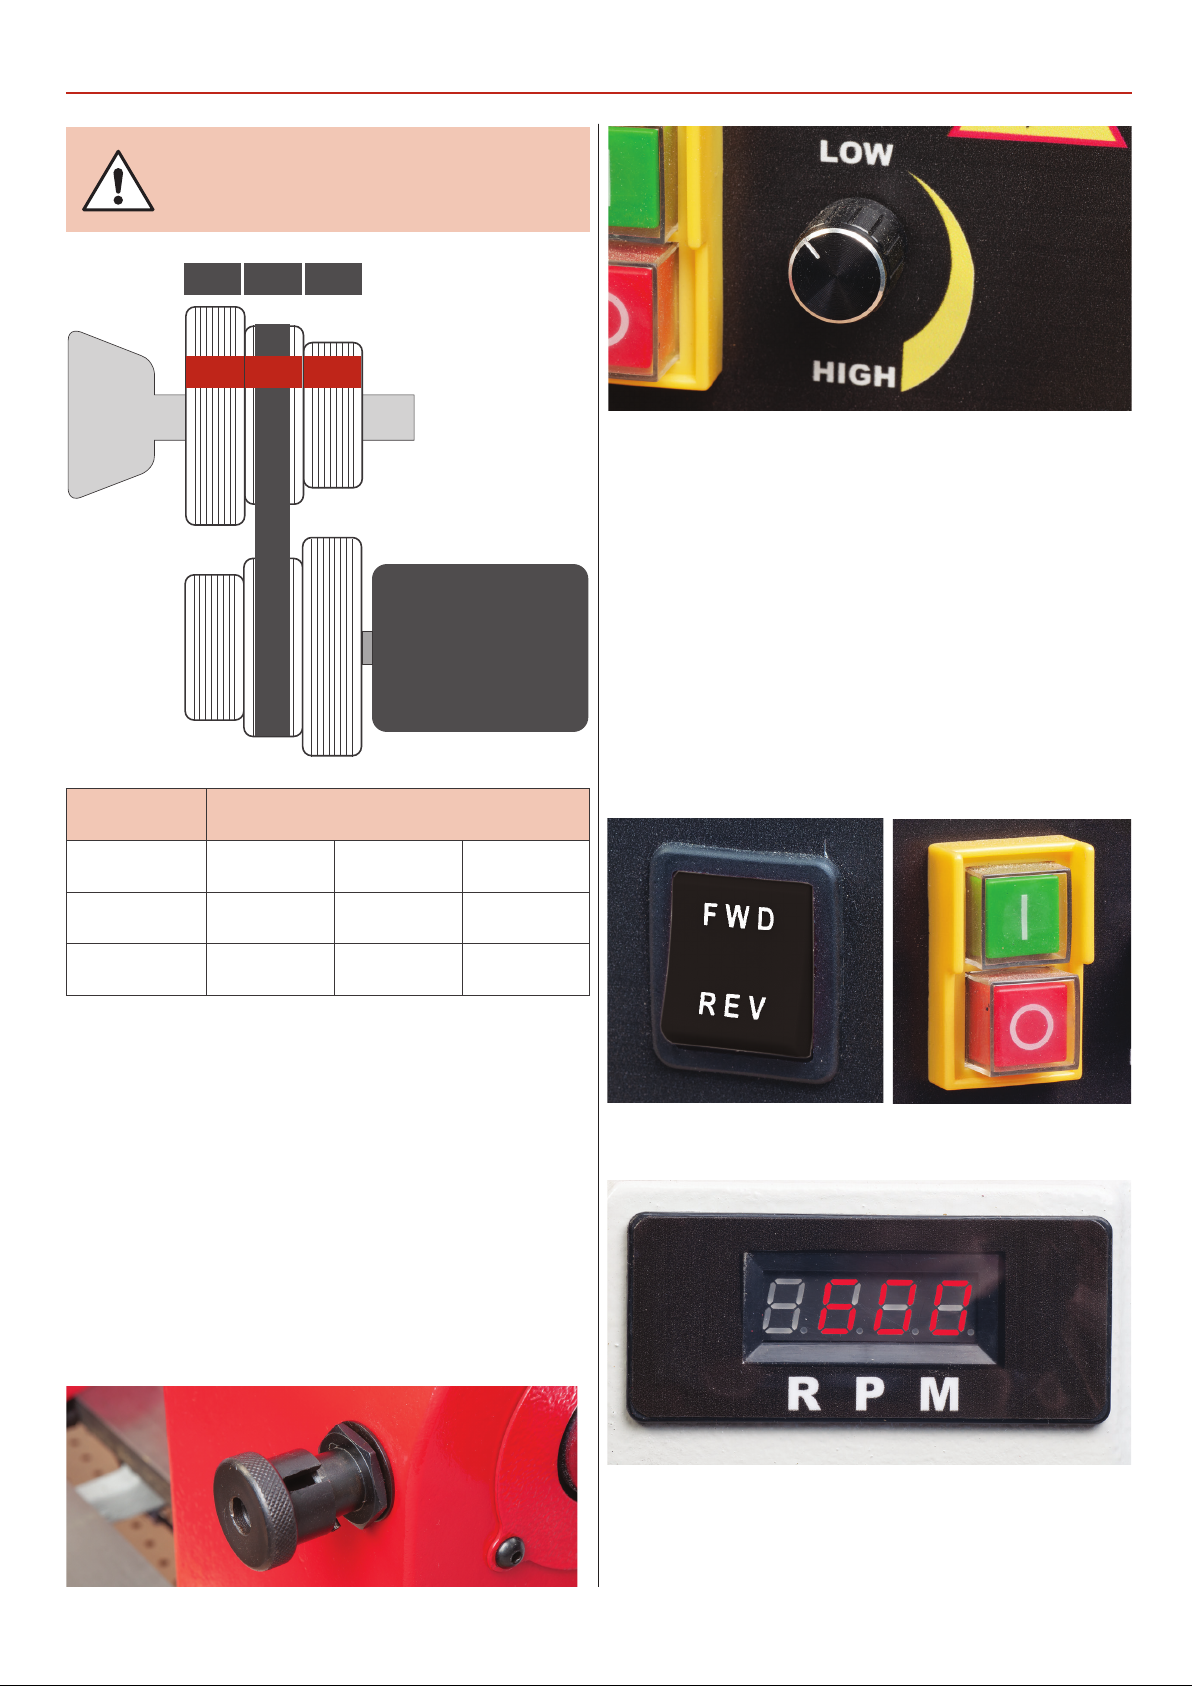
MAKE SURE THE BELT IS INSERTED
CORRECTLY INTO THE PULLEY
GROOVES!
SPINDLE
OPERATING INSTRUCTIONS
321
HML
2. Select ‘Forward or Reverse’ on the selector switch, DO
NOT change direction while in operation, see fig 30.
3
. Make sure the work piece is secure and all tools are clear of
the work area. Switch on the mains supply and press the NVR
‘GREEN’ button to start the lathe, see fig 31.
POLY V-BELT
POLY V-BELT
Increase the spindle speed, the reading will be displayed on
MOTOR
4.
the digital readout indicator, see fig 32. When operation is
completed reduce the speed down to ‘LOW’ and press the
NVR ‘RED’ button to stop the lathe, see fig 31. Switch off the
mains supply.
Position Spindle Speed Chart RPM
1 LOW
2 MEDIUM
3 HIGH
4. Release the clamping handle and press down the motor
to retention the belt, secure in place.
5. Replace the motor pulley access plate and close the
headstock access panel.
Control Box
1. The control box comprises a Forward/Reverse switch,
ON/OFF NVR buttons and a variable speed control dial. Before
switching on make sure the indexing pin is disengaged and
the speed control dial is turned down to low, see fig 28-29.
250 720
600 1,700
1,200 3,550
Fig 28-29
Fig 30-31
Fig 32
13
Page 14
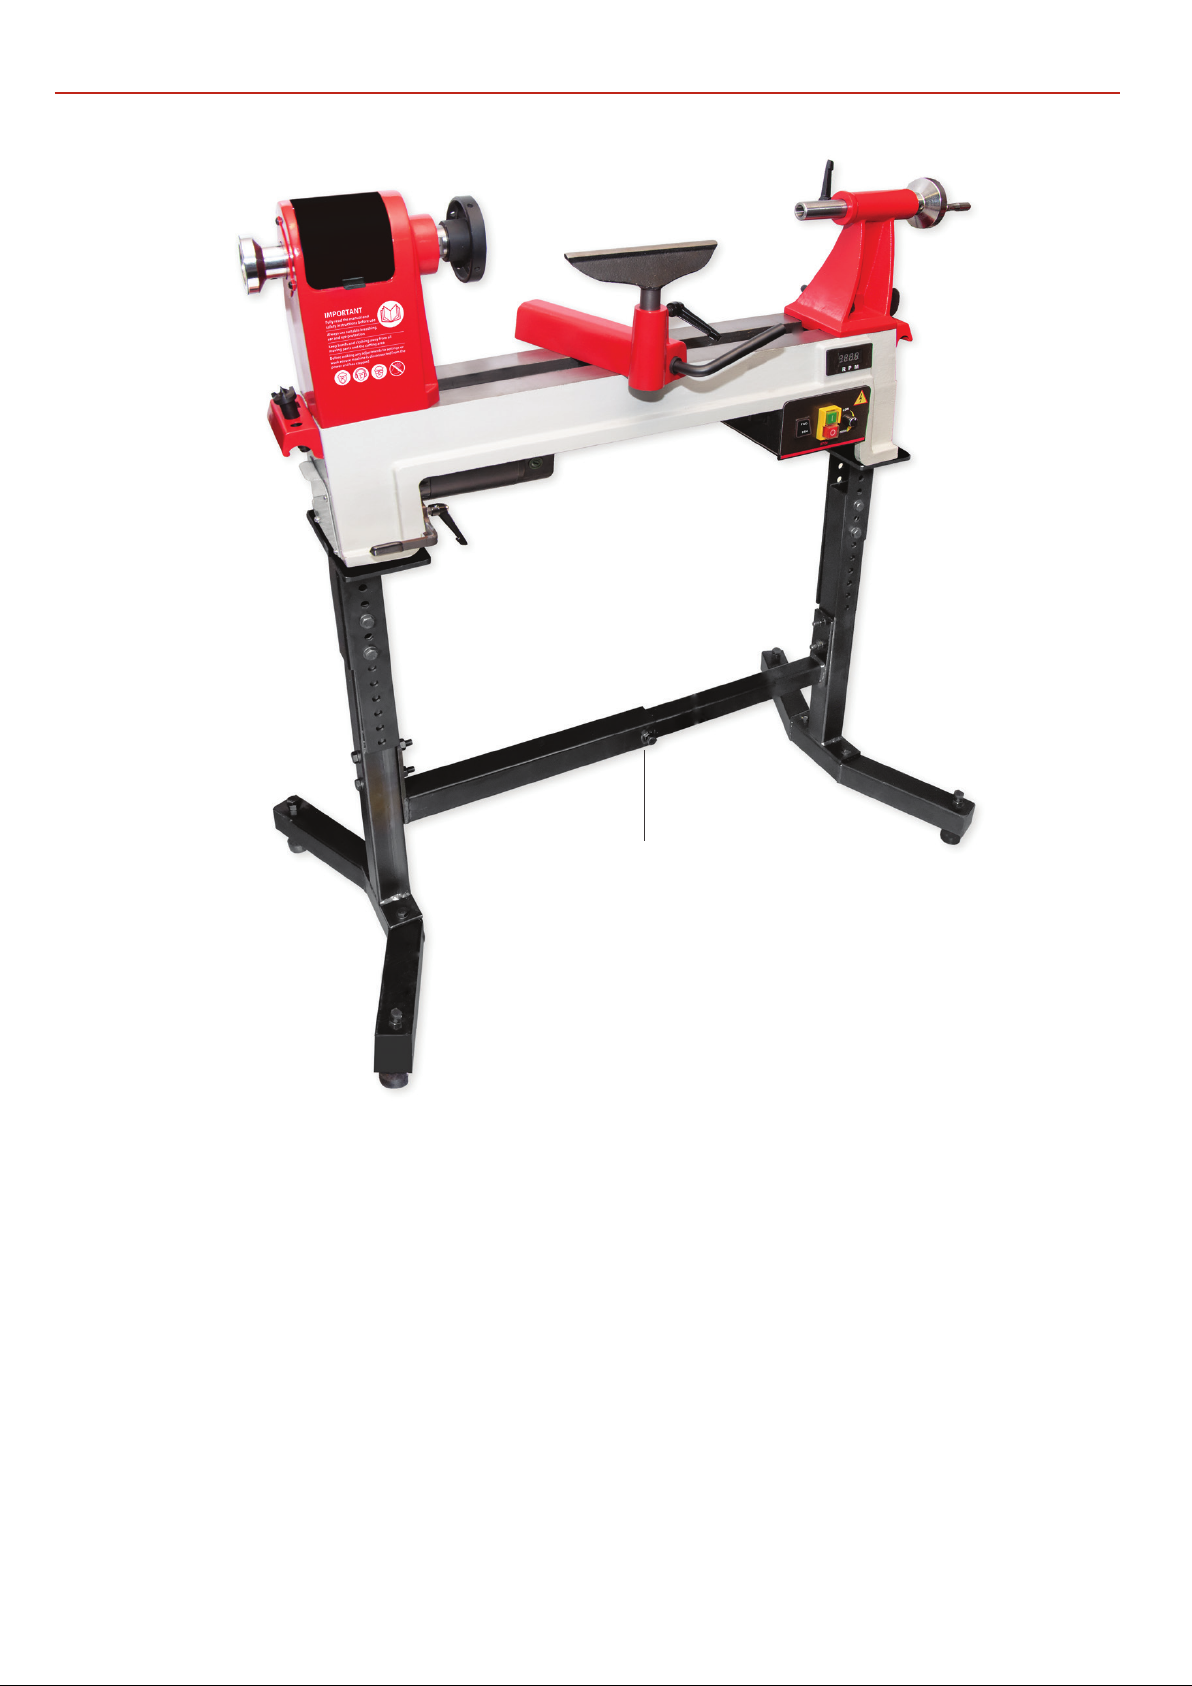
OPTIONAL ACCESSORIES
Code 104794 Floor stand assembly
The floor stand for the Axminster Craft AC355WL wood turning
lathe is made from box section steel and simple to assemble
and sturdy enough to hold the lathe securely. It is adjustable in
height from 610mm-875mm to create a comfortable working
height. The feet are splayed back to give plenty of foot space,
and are also fitted with rubber feet which are adjustable to
accommodate an uneven workshop floor. Unscrew the lathe
feet, line up the holes on top of the stand assembly and secure
with bolts washer/nuts.
14
Page 15
MAINTENANCE
NO
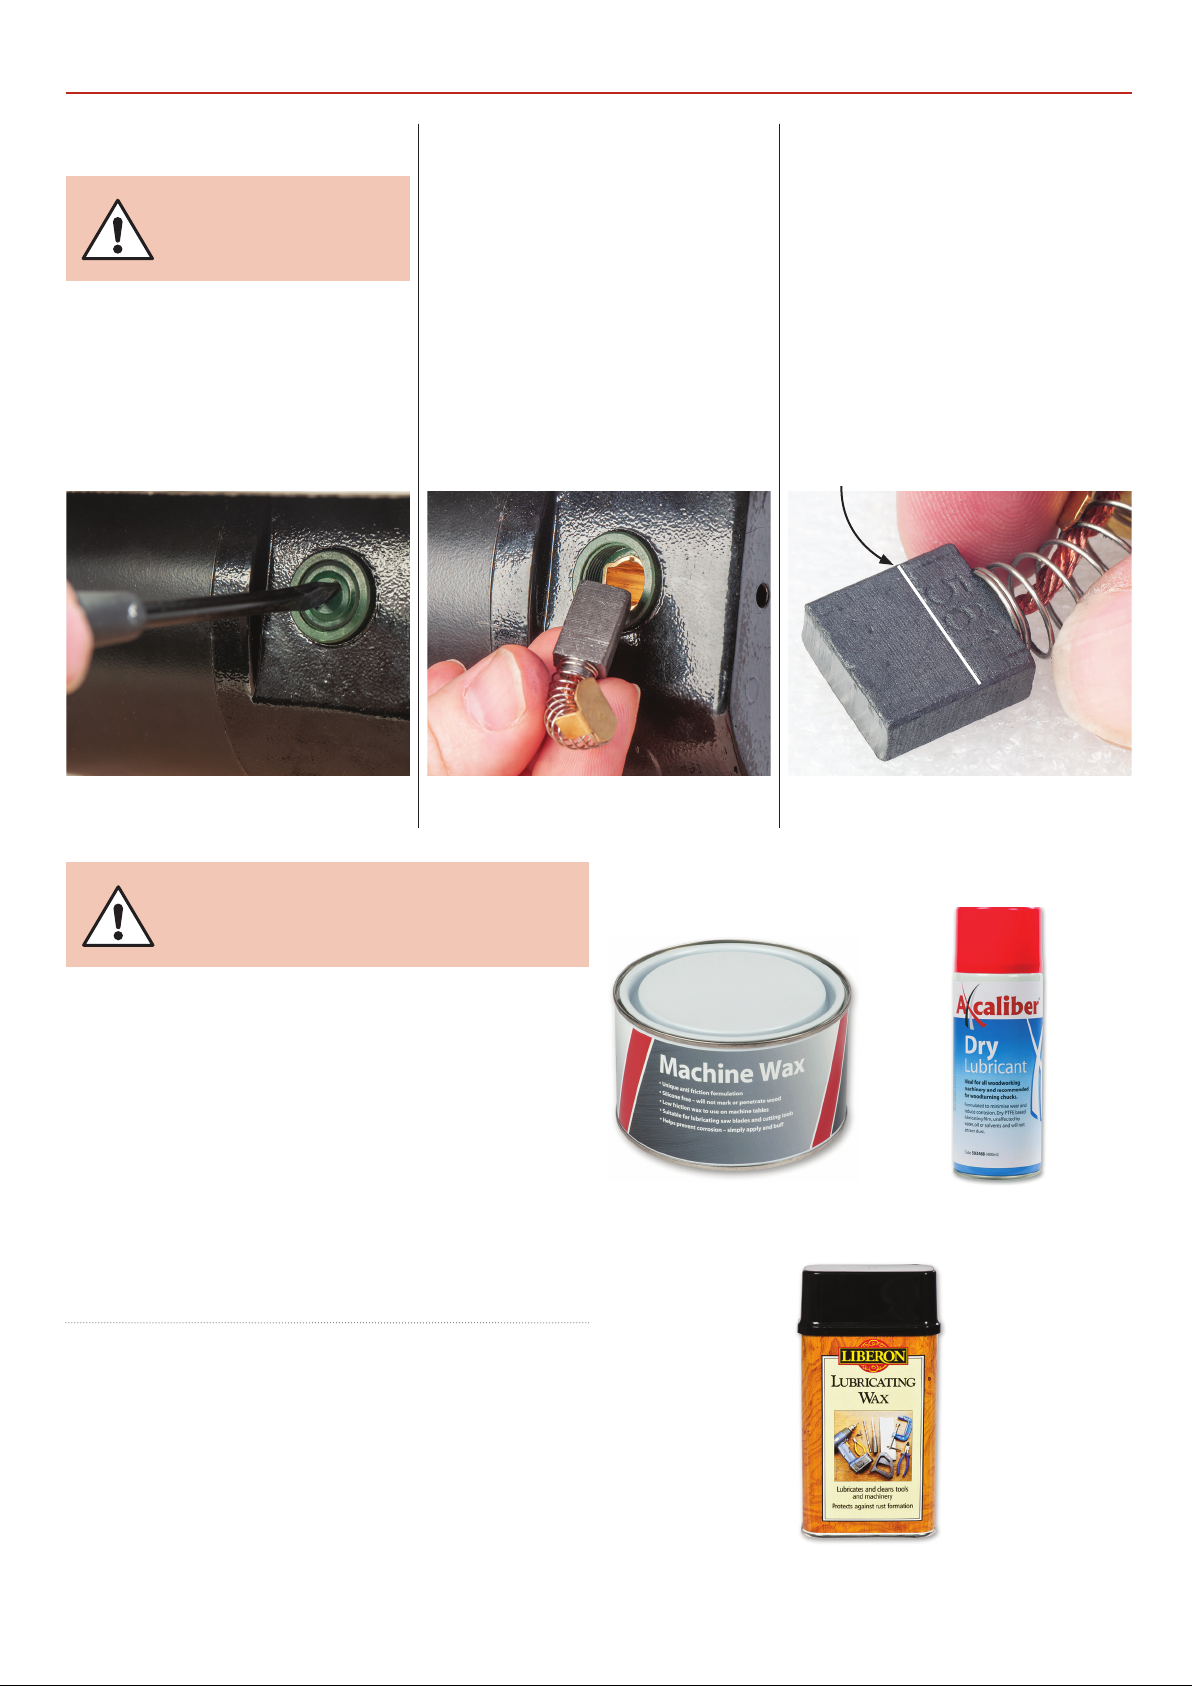
Motor Brushes
DISCONNECT THE LATHE
FROM THE MAINS SUPPLY!
1. After 100 hours of use, check the
condition of the motor brushes by
unscrewing each access port cap in
turn, see fig 33.
TE: Take careful note of the
orientation of the brushes, remember
that they have bedded themselves to
the profile of the commutator in that
position. If you fit them reversed, it
can cause excessive sparking and heat
until they have re-bedded themselves.
2. Remove the motor brushes and
check the condition of the brush
head,see fig 34.
Fig 33 Fig 34 Fig 35
If they are in good condition, re-fit.
3.
If they were worn to the ‘Line’ replace
with new brushes, see fig 35. For after
sales enquires, call 03332 406406.
4. Replace the new brushes and access
port cap screws, connect to mains
supply and run the machine off load for
approximately. 20 minutes to bed the
new brushes in.
Line
Remover the access port with
a flat headed screwdriver
Remove the motor brush and
check its condition
DISCONNECT THE LATHE
FROM THE MAINS SUPPLY!
Daily After Use
• Clean wood shavings away from the lathe bed and tool rest.
• Smear a light coat of wax, ‘Axminster Machine Wax’, code
105806’ , see fig 36, over the lathe bed to allow the banjo and
tailstock to run more smoothly over the bed and to prevent
corrosion.
•
Spray ‘Axcaliber Dry Lubricant’, code 503468, over the tailstock
barrel/live centre and headstock spindle/chuck after use,
see fig 37.
Monthly
Axminster Machine Wax
Code: 105806
Replace the motor brush if
worn down to the ‘Line’
Fig 36-37
Axcaliber Dry Lubricant
Code: 503468
• Check the tension of the belt and adjust, see page 12
for Changing the Belt Speed.
•
Check any build up of wood shavings on the motor
and spindle pulleys and clean if necessary.
• Use an ‘M’ class vacuum cleaner to clean the heat sink air
vents on the NVR control box assembly.
Liberon Lubricating Wax
Code: 600221
15
Page 16
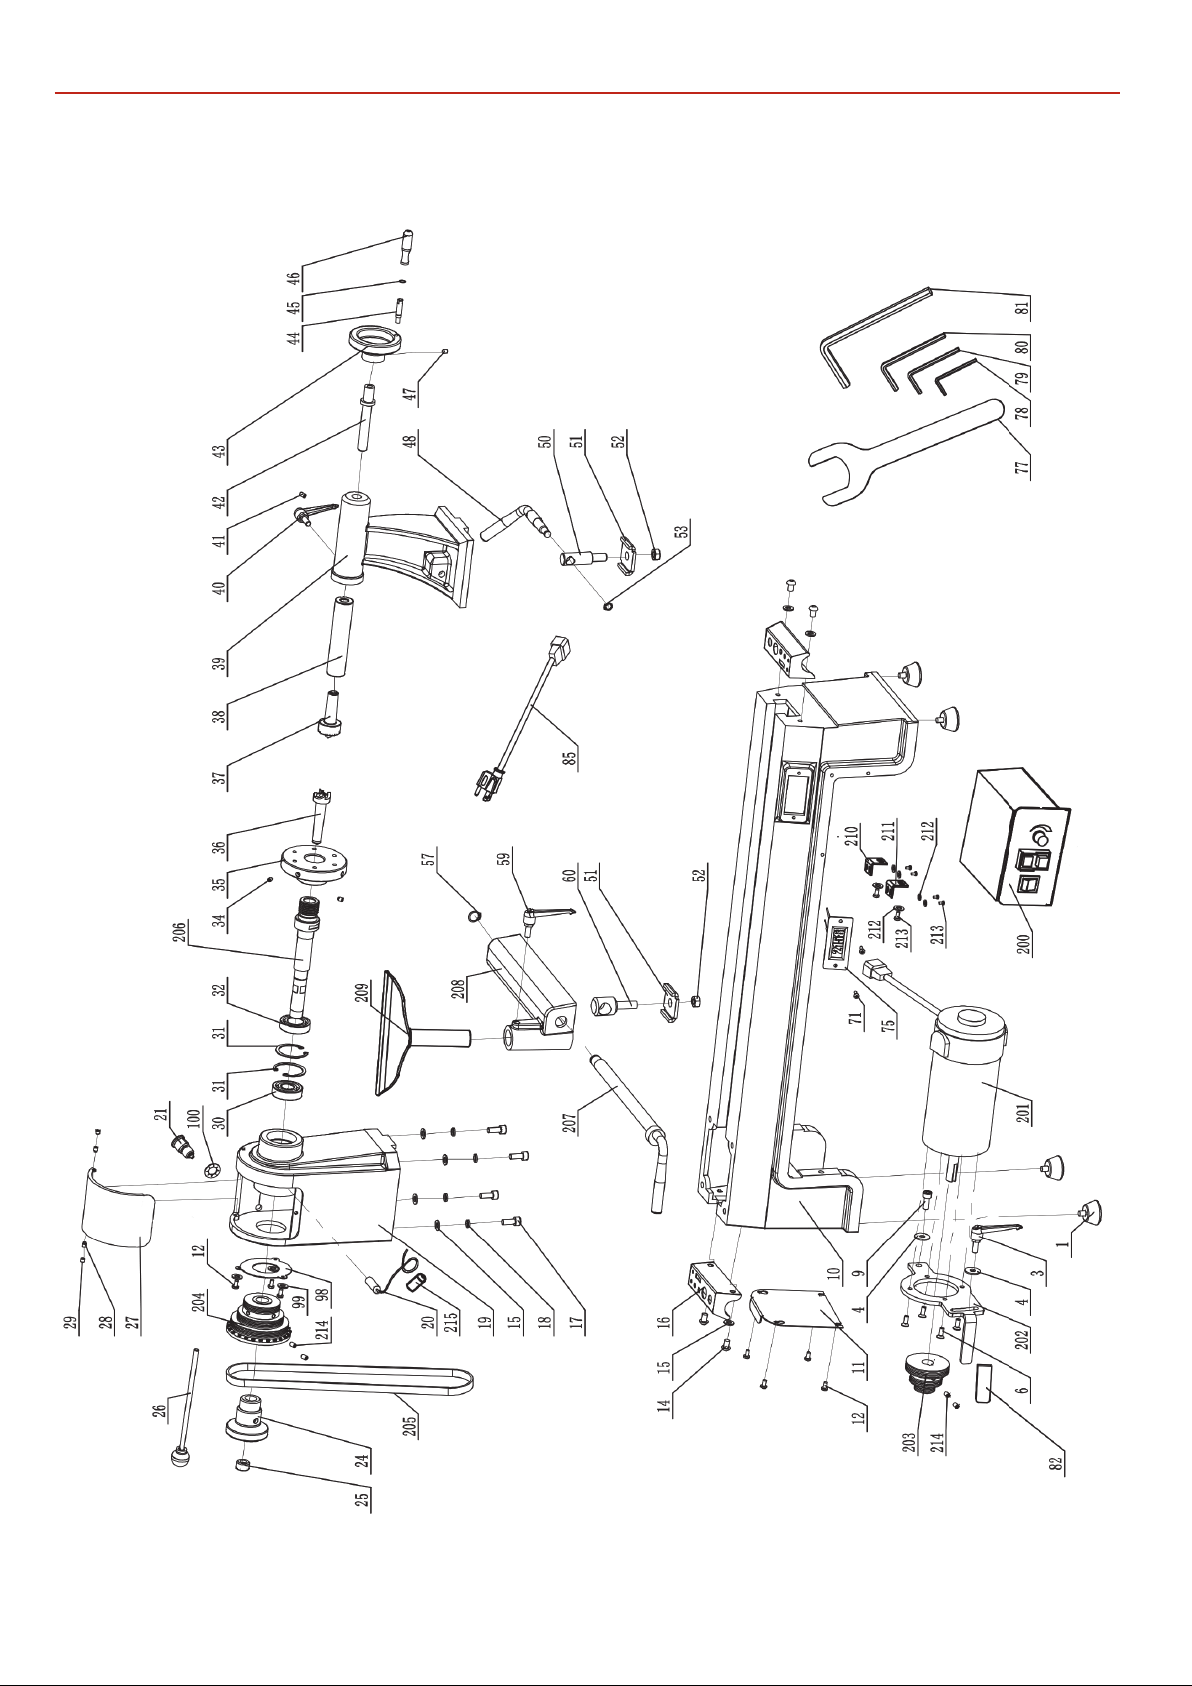
EXPLODED DIAGRAMS/LISTS
16
Page 17

EXPLODED DIAGRAMS/LISTS
PART NO DISCRIPTION QTY
1 FOOT 4
3 BELT TENSION LOCK LEVER 1
4 FLAT WASHER 2
6 HDCAP SCREW M6X16 4
9 CAP SCREW M8X16 1
10 BED 1
11 BELT DOOR 1
12 HEX HEAD SCREW M5X10 7
14 HD SCREW M8X12 4
15 FLAT 8MM 8
16 HANDLE 2
17 CAP SCREW M8X20 4
18 SPRING WASHER M8 4
19 HEADSTOCK 1
20 DIGITAL READOUT SENSOR 1
21 LOCATION PIN ASSEMBLY 1
24 HEADSTOCK WHEEL 1
25 LOCKING NUT 1
26 KNOCKOUT ROD ASSEMBLY 1
27 COVER FOR MOTOR PULLEY 1
28 CAP SCREW M5X10 2
29 SET SCREW M5X6 2
30 BEARING 6204 1
31 RING 2
32 BEARING 6005 1
34 CAP SCREW M6X8 2
35 FACE PLATE 1
36 SPUR CENTRE 1
37 LIVE CENTRE 1
38 QUILL 1
39 TAILSTOCK 1
40 QUILL LOCK HANDLE 1
41 HEX HEAD BOLT M8X10 1
42 LEADSCREW 1
43 TAILSTOCK WHEEL 1
44 HANDWHEEL AXLE 1
45 C-RING 8 1
46 HANDWHEEL HANDLE 1
47 SET SCREW M8X10 1
48 TAILSTOCK LOCK LEVER 1
50 TAILSTOCK CLAMP BOLT 1
51 TAILSTOCK CLAMP 2
52 NUT M12 2
53 C-RING 1
57 C-RING 2
59 ADJUSTING HANDLE 1
60 TOOL REST CLAMP BOLT 1
71 PHLP HD SCREW M4X8 2
75 DIGITAL READOUT 1
77 WRENCH 1
78 HEX WRENCH 03 1
79 HEX WRENCH 04 1
80 HEX WRENCH 05 1
81 HEX WRENCH 012 1
82 KNOB 1
85 US/CSA PLUG CORD
(WITH USB INTERFACE)
98 HEADSTOCK REAR PLATE 1
99 WASHER M5 3
100 INTERNAL TOOTH LOCK WASHER
M16
200 US DRIVE ASSEMBLY(110V) 1
201 DC-MOTOR 1
202 MOTOR CONNECT PLATE-1 1
203 MOTOR PULLEY-1 1
204 SPINDLE PULLEY-1 1
205 POLY V-BELT 1
206 SPINDLE 1
207 LOCKING BAR FOR TOOL REST 1
208 TOOL REST BASE 1
209 8” TOOL REST 1
210 CONNECT PLATE-2 1
211 CONNECT PLATE-1 1
212 WASHER 6
213 SOCKET HEX HEAD BOLT M5X10 6
214 SOCKET HEX HEAD BOLT M8X10 4
1
1
17
Page 18
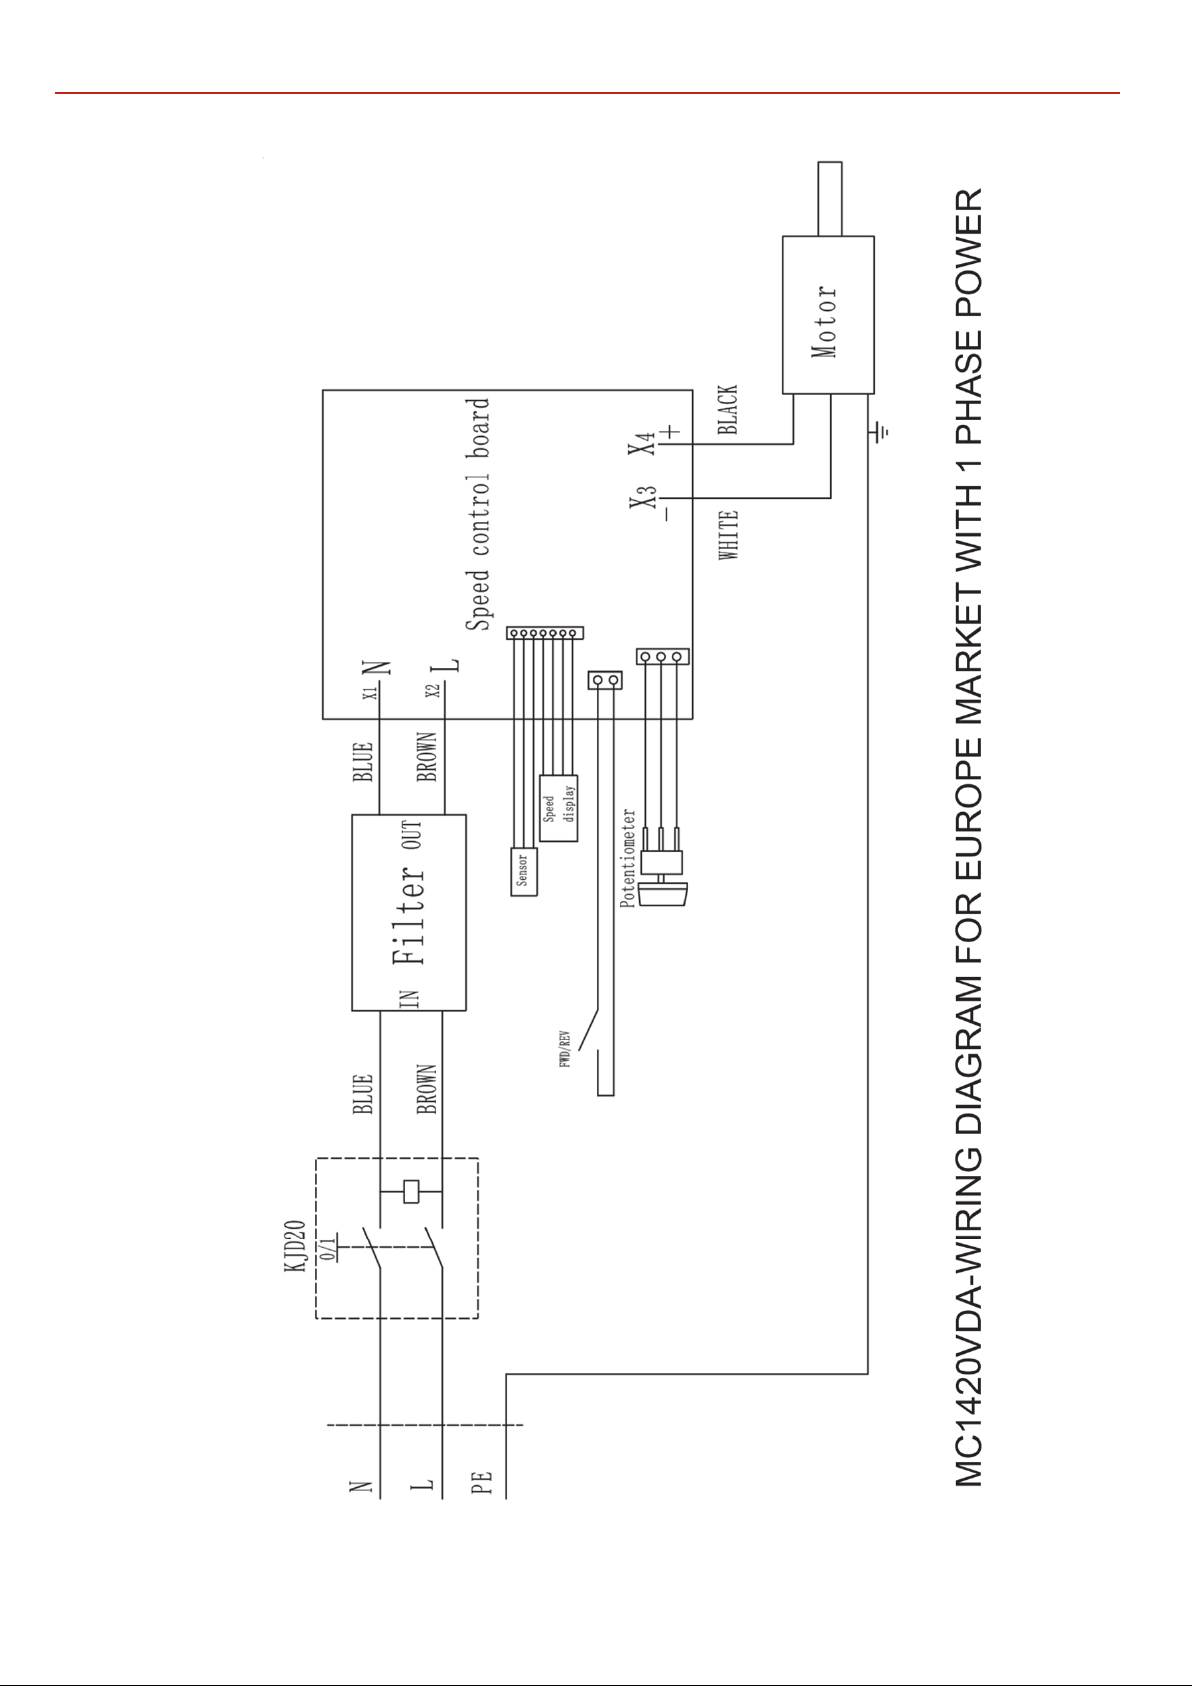
WIRING DIAGRAM
18
Page 19

NOTES
19
Page 20

Axminster Tools, Axminster Devon EX13 5PH
axminstertools.com
The packaging is suitable for recycling.
Please dispose of it in a responsible manner.
Do not dispose of electric tools together with household waste material.
By law they must be collected and recycled separately.
EU Countries Only
 Loading...