

Page 1
Code 107674
Original Instructions
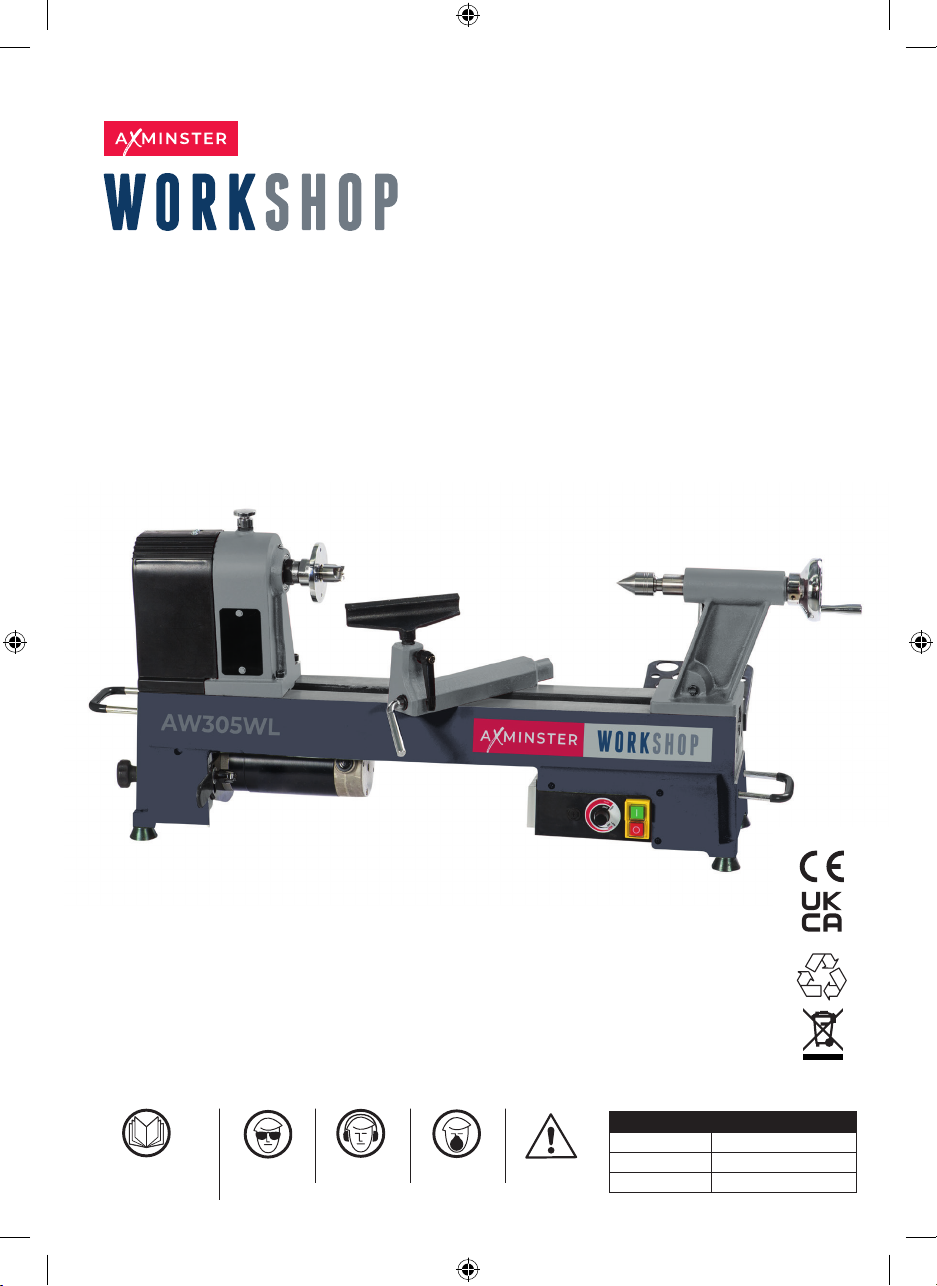
AW305WL
Woodturning Lathe
Fully read manual and safety
instructions before use.
Save this manual for future
reference.
Eye protection
should be worn
The symbols above advise the correct safety procedures when using this machine.
Ear protection
should be worn
Dust mask
should be worn
Hazard
The packaging is suitable for recycling.
Please dispose of it in a responsible manner.
Do not dispose of electric tools together with
household waste material. By law they must be
Code 107674
Version 1
Published Date 14/10/2025
EU Countries Only
collected and recycled separately.
Original Instructions
Page 2

INDEX OF CONTENTS
EU Declaration of Conformity 02
What’s Included 03
General Instructions for 230V Machines 04
Specic Safety Instructions for Woodturning Lathes 04
Specication 05
Assembly 05-06-07
Optional Bed Extension 08
Illustration and Parts Description 09-10
Operating Instructions 11-12-13
Removing the Faceplate 13
Removing Drive/Live Centres 14
Maintenance 14
Exploded Diagrams/Lists 15-16-17
Wiring Diagram 18
Notes 19
EU DECLARATION OF CONFORMITY
2
Page 3
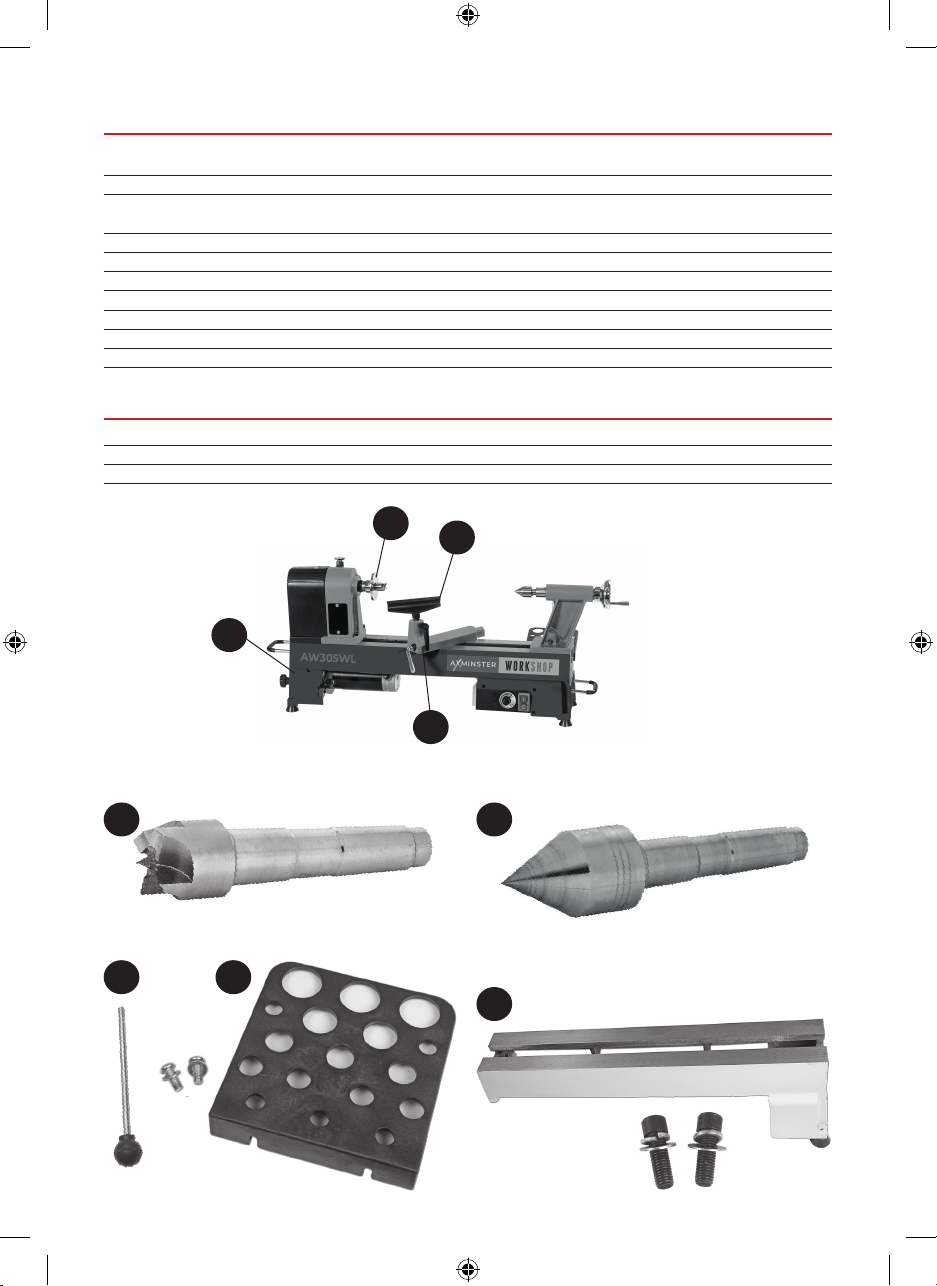
WHAT’S INCLUDED
Quantity Item Part Model Number
1 Wood Lathe (Index Lock not tted to the lathe) B AW305WL
1 Banjo arm (tted) C
1 150mm Tool rest (tted to banjo arm) D
1 75mm Faceplate (tted to headstock) E
1 Axminster 4 Prong Drive Centre (25mm) F
1 Axminster Standard 60˚ Live Centre G
1 Push Rod H
1 Tool Holder and two Phillips screws/washers I
1 Tailstock handle J
OPTIONAL ACCESSORIES
Quantity Item Part
1 Bed Extension with Hex screws, washers K (code 504511)
H
E
D
B
C
AW305WL Wood Lathe
F
4 Prong Drive Centre Standard 60˚ Live Centre
G
I
K
3
Page 4
GENERAL INSTRUCTIONS FOR 230V MACHINES
The following will enable you to observe good
working practices, keep yourself and fellow workers
safe and maintain your tools and equipment in good
working order.
WARNING! KEEP TOOLS AND
EQUIPMENT OUT OF THE REACH
OF YOUNG CHILDREN
KEEP THE WORK AREA AS
UNCLUTTERED AS IS
PRACTICAL, THIS INCLUDES
PERSONNEL AS WELL AS
MATERIAL. UNDER NO
CIRCUMSTANCES SHOULD CHIL
DREN BE ALLOWED IN WORK
AREAS.
Mains Powered Tools
• Tools are supplied with anattached 13 Amp UK 3 pin
plug, tted with 13 amp fuse.
• Inspect the cable and plug to ensuree that neither
are damaged. Repair if necessary by a suitably
qualied person.
• Do not use when or where it is liable to get wet.
Workplace
• Do not use 230V a.c. powered tools anywhere
within a site area that is ooded.
• Keep machine clean.
• Leave machine unplugged until work is about to
commence.
• Always disconnect by pulling on the plug body and
not the cable.
• Carry out a nal check e.g. check the cutting tool
is securely tightened in the machine and the correct
speed and function set.
• Ensure you are comfortable before you start work,
balanced, not reaching etc.
• Wear appropriate safety clothing, goggles, gloves,
masks etc. Wear ear defenders at all times.
• If you have long hair wear a hair net or helmet to
prevent it being caught up in the rotating parts of
the machine.
• Consideration should be given to the removal of
rings and wristwatches.
• Consideration should also be given to non-slip
footwear etc.
• If another person is to use the machine, ensure they
are suitably qualied to use it.
• Do not use the machine if you are tired or distracted
• Do not use this machine within the designated
safety areas
of ammable liquid stores or in areas where there
may be volatile gases.
• Check cutters are correct type and size, are
undamaged
and are kept clean and sharp, this will maintain their
operating performance and lessen the loading on
the machine.
•
OBSERVE….
around you and
make sure you know what is happening
USE YOUR COMMON SENSE.
SPECIFIC SAFETY INSTRUCTIONS FOR WOODTURNING LATHES
1. Do not use ‘split’ work pieces.
2. Always start at the lowest speed when starting a
new task.
3. Try to render a new work piece “round” (or as close
as is practical) before turning.
4. Check that the tool rest is at or slightly below the
centre line of the work piece.
5. Check the work piece is securely mounted in the
lathe before switching on the power.
6. Rotate the work piece by hand, to check that it is:centralised, clear of the tool rest, not ‘split’ or has
loose knots.
7. Where lathes have the facility to be reversed; check
the machine is rotating in the correct direction.
8. If your lathe has the facility to run in reverse,
you must ensure that the mounting accessories
(chucks, faceplates etc.,) can be ‘locked’ onto the
lathe mandrel, and in the case of chucks have
some form of security device to prevent them
‘unwinding’ during reverse operation.
9. Make sure your tools are stored/racked away from
the turning area of the lathe. Do not reach over a
rotating work piece at any time.
10. Do not ‘dig in’ or try to take too large a cut.
11. Do not leave the lathe running unattended; or
leave the machine until everything is stopped.
12. If you are turning between centres with ‘softish
stu’, check and reposition the tailstock centre
frequently.
4
Page 5
SPECIFICATION
Code 107674
Model AW305WL
Rating Home Workshop
Power 550W, 230V
Speed (2) 500-2,040 and 1,000-4,080
Spindle Taper MT2
Spindle Thread 1” x 8tpi (Ref T04M)
Taper Tailstock 2 MT
Distance Between Centres 457 mm
Max Diameter over Bed 305 mm
Tool Rest Stem Diameter 16 mm
Overall L x W x H 820 x 440 x 280 mm
Weight 40 kg
ASSEMBLY
Please take some time to read the section entitled
“Illustration & Parts Description” to identify the
various parts of your machine so that you are familiar
with the terminology we will use to enable you
to set up and operate your table lathe safely and
correctly.
The machine and its accessories will arrive coated
with corrosion preventative grease. This will need to
be cleaned from the machine, its components and
accessories prior to it being set up. Use coal oil,
paran or a proprietary de greaser to remove the
barrier grease.
Be warned, it will stain if you splash it on clothing
etc., wear overalls, coverall et al., rubber gloves are
also a good idea, as is eye protection if your cleaning
process tends to be a little bit enthusiastic.
After cleaning, lightly coat the machine with a thin
layer of light machine oil. N.B If you used paran/
kerosene make sure you apply this thin lm sooner
rather than later.
95% of the machine comes fully assembled, all that
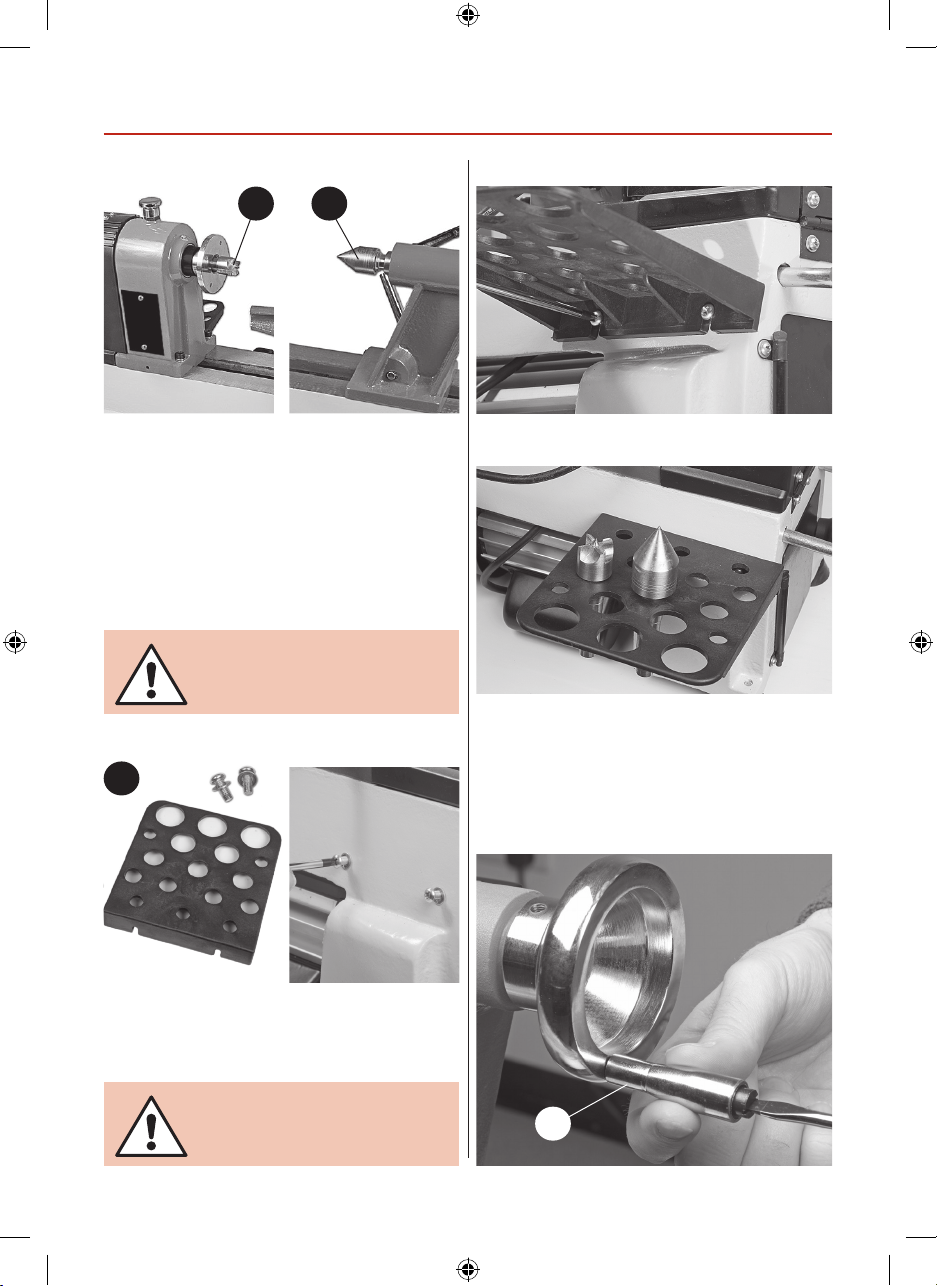
remains is to t the four prong drive centre (F) the
60˚ live centre (G) and the tool holder (I).
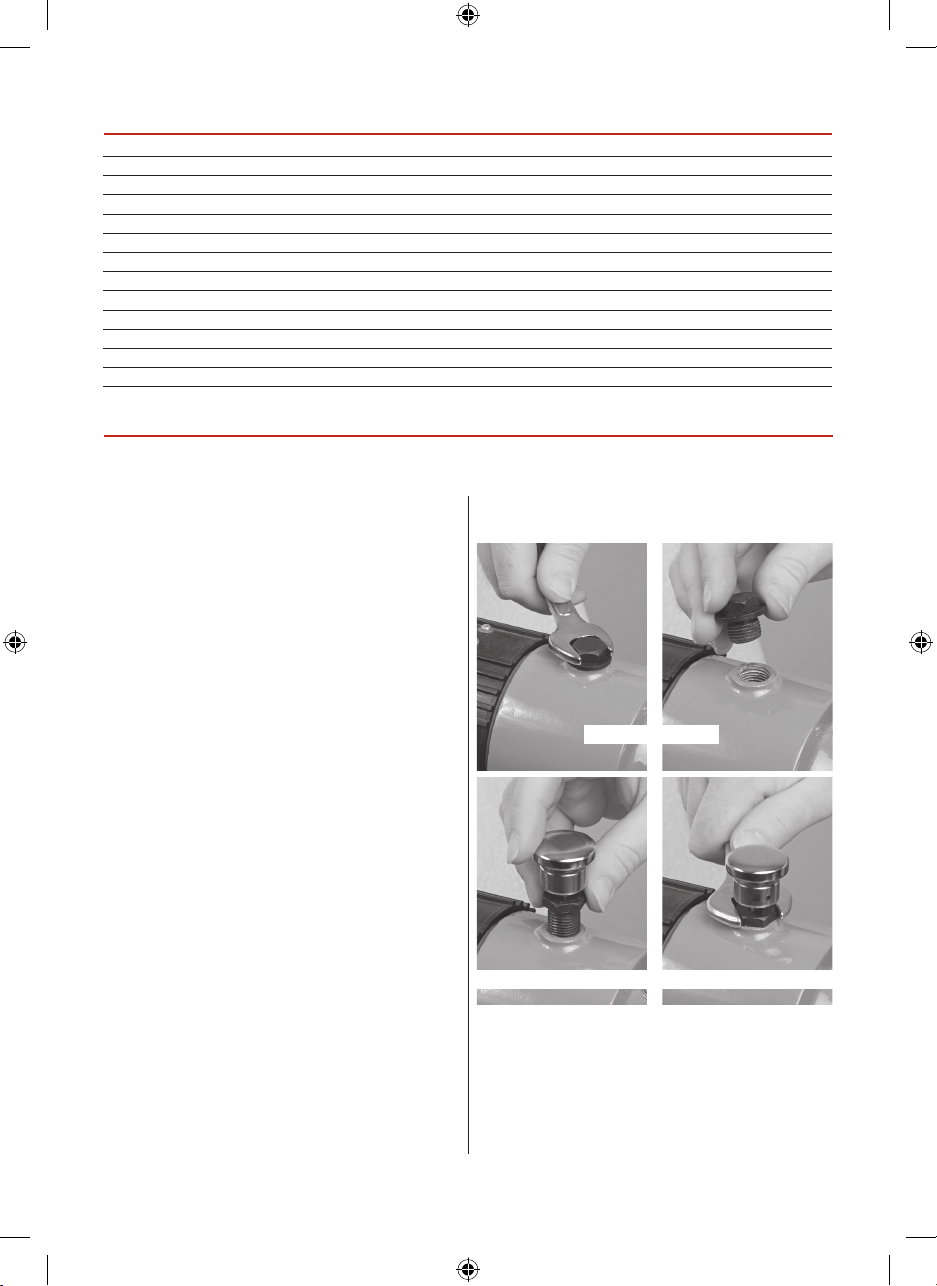
Indexing Lock
The indexing lock is know supplied separately in
the accessory pack and not tted to the lathe. We
recommend to t the index lock only if you plan to
use the index facility in the future.
NOTE: DO NOT USE THE INDEX LOCK AS A SPINDLE
LOCK AS YOU WILL DAMAGE LOCKING PIN.
Please see gures A-B-C-D for tting instructions for
the indexing lock.
Fig A-B-C-D
Removing the plug
Fitting the indexing lock Securely tighten
Drive Centre/Faceplate
Locate the four prong drive centre (F) and slide
it through the centre of the faceplate into the
headstock spindle, see g 1.
Locate the live centre (G) and slide it into the tailstock
barrel, see g 2.
5
Continues Over...
Page 6
ASSEMBLY
Fig 01-02
F
Tool Holder
Locate the tool holder (I) the two Phillips screws and
washers, see g 3. Place a washer over the screws
and screw them into the two pre-drilled holes below
the headstock, see g 4.
NOTE: There are also two pre-drilled holes under the
tailstock if you wish to mount the tool holder there.
NOTE GIVE ADEQUATE GAP
BETWEEN THE SCREW HEAD AND
LATHE CASTING!
G
Fig 03-04
I
Fig 05
Fig 06
Tailstock Handle
Locate the tailstock handle and screw it into the
threaded hole in the tailstock wheel, see g A.
Line up the machined slots in the tool holder (I)
and slide the holder down over Phillips screws then
lightly tighten the screws to clamp the holder in
place, see gs 5-6.
DON’T OVERTIGHTEN THE
PHILLIPS SCREWS AS THE
HOLDER IS ONLY PLASTIC!
Fig A
J
6
Page 7
Motor & Power Cable Connections
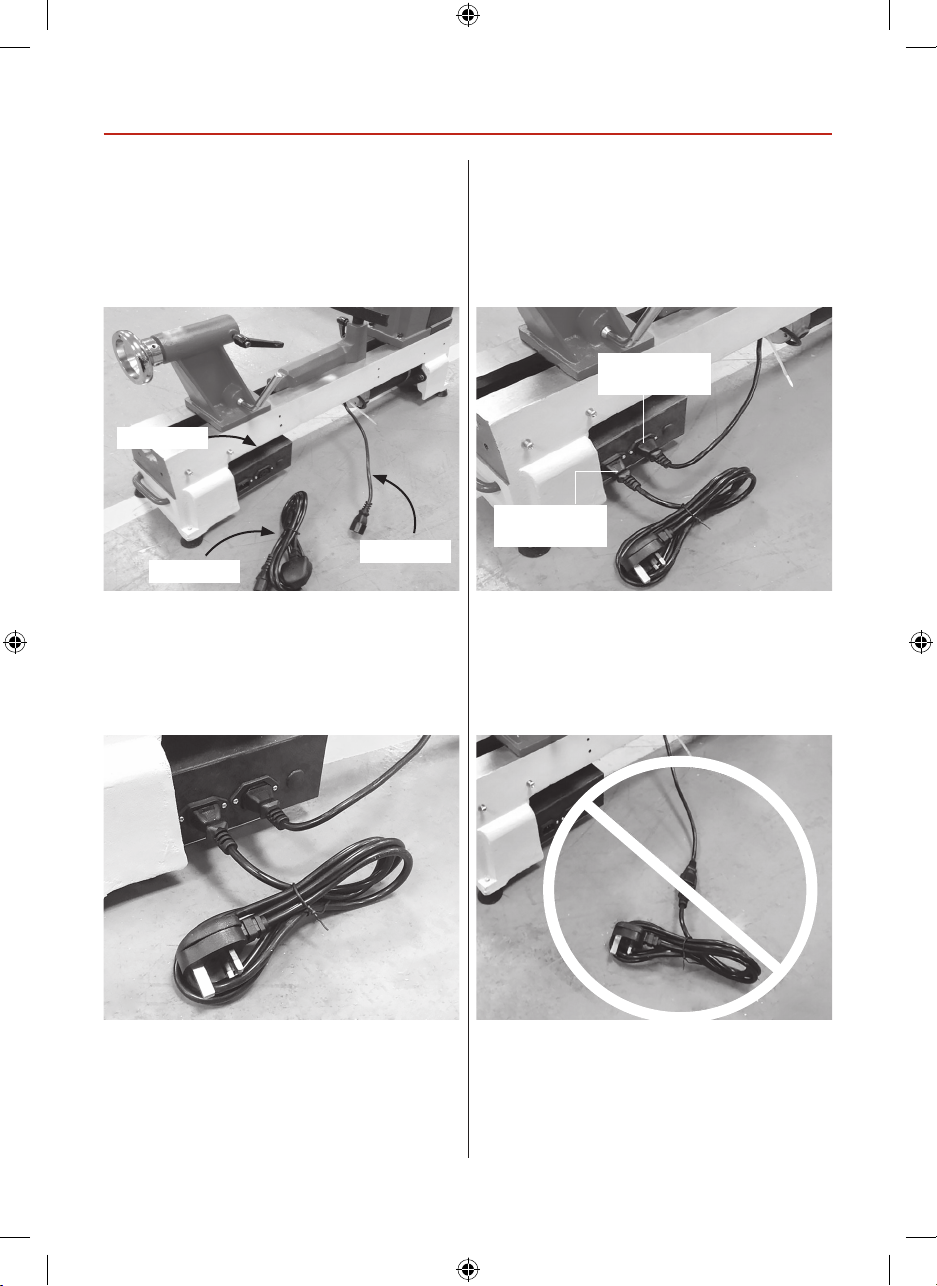
1. The lathe may be delivered with the motor and
power cables unplugged. Follow the steps for correct
connection.
ASSEMBLY
2. The motor cable is plugged into the right-hand
socket to the rear of the control box and the main
power cable is plugged into the left-hand socket.
Step 1
Control box
Motor cable
Power cable
3. Below is a close up view showing the cables in the
correct sockets to the rear of the control box. Place
the lathe on a level surface, clear away any tools and
connect the 3 pin plug to the mains supply.
Step 2
Power cable in
left socket
4. PLEASE NOTE NEVER plug the motor cable directly
into the power cable as shown below as it will cause
serious damage to the DC motor.
Step 3 Step 4
Motor cable in
right socket
7
7
Page 8
OPTIONAL BED EXTENSION
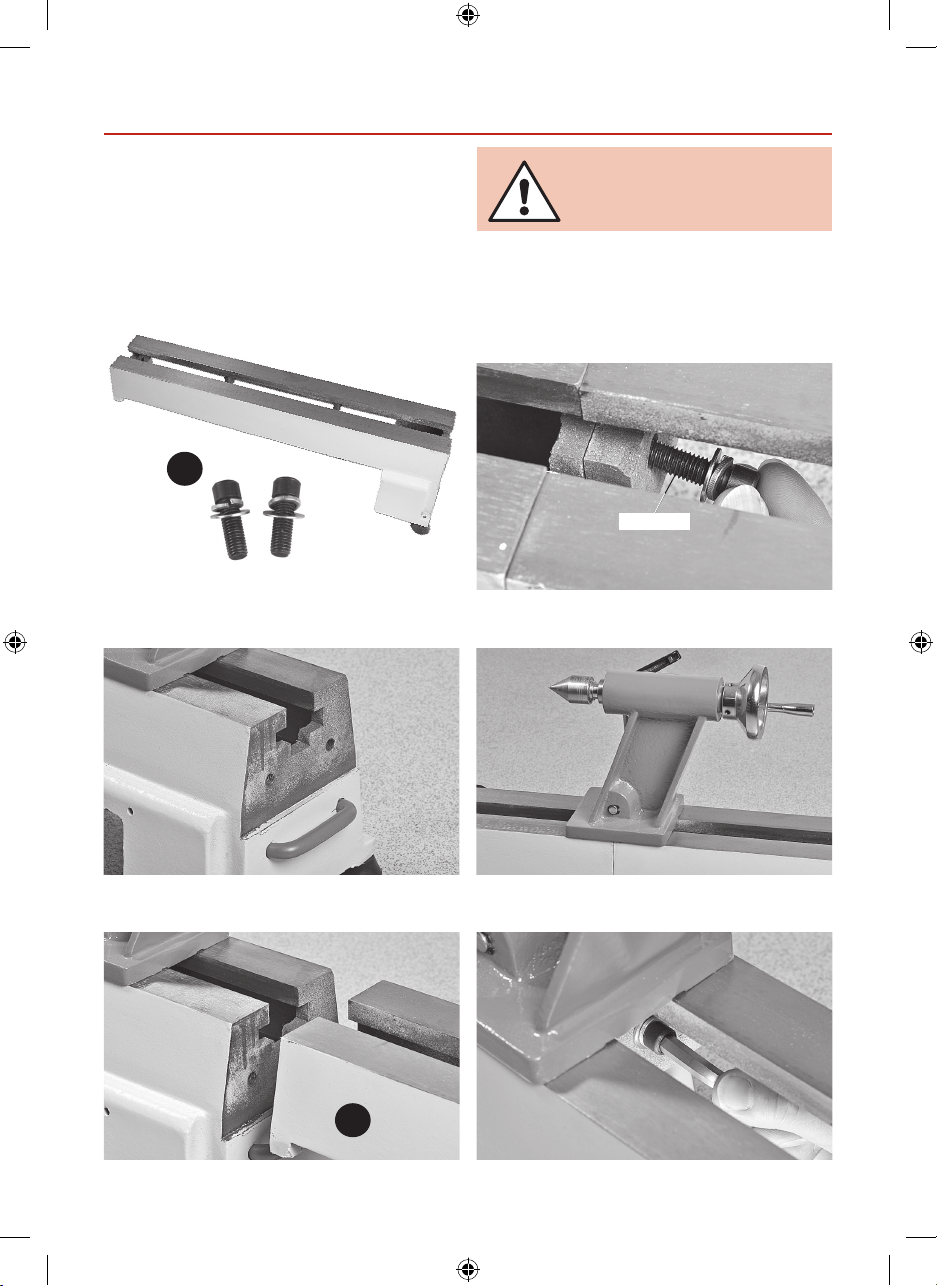
Locate the bed extension (K) and the two Hex screws
and spring/washers, (see g 7) position the bed
extension against the end of the lathe and line up
the pre-drilled holes, see gs 8-9. Place a washer and
spring washer over the Hex screws and lightly screw
them into the threaded holes, see g 10.
Fig 07
K
NOTE: DON’T TIGHTEN THE
SCREWS AT THIS POINT!
Release the tailstock clamping lever and position the
tailstock across the join to align both beds, re clamp
the tailstock in position and tighten both Hex screws,
see gs 11-12. Both beds are now aligned.
Fig 10
Hex screw
Fig 08
Fig 09
Fig 11
Fig 12
K
8
Page 9
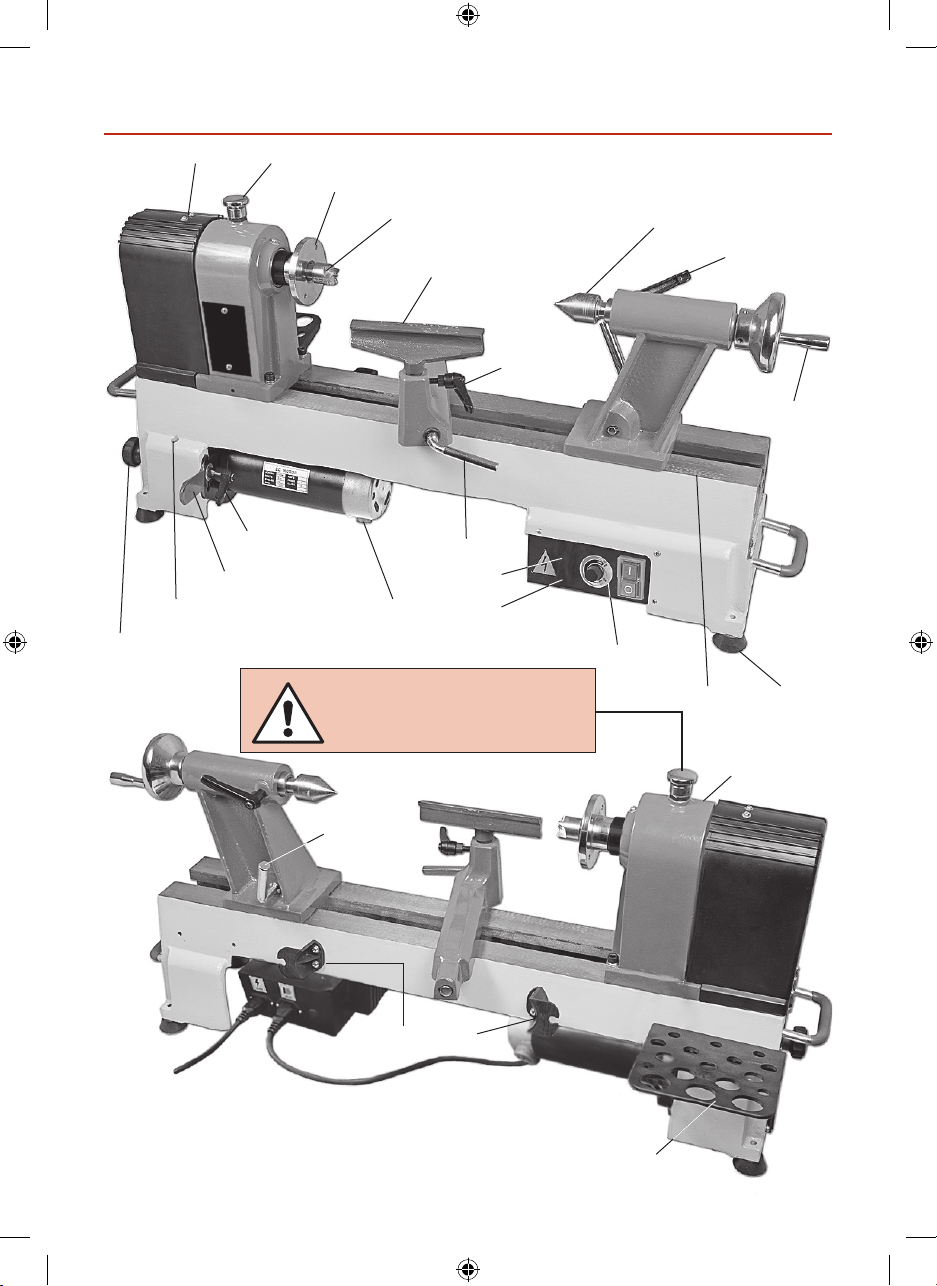
ILLUSTRATION AND PARTS DESCRIPTION
Headstock cover
Push rod tool holder
Lower pulley
door lock
Index lock pin
Faceplate
Motor handle lock
Motor handle
4 Prong drive centre
150mm Tool rest
Tool rest lock
Banjo arm lock
(ON)
Motor
(OFF)
Variable speed control
WARNING! MAKE SURE THE INDEX
LOCK PIN IS IN THE UP POSITION
BEFORE SWITCHING ON.
60˚Live centre
Tailstock handle
Lathe bed
Tailstock barrel lock
Rubber foot
Tailstock lock
Power cable hooks
Headstock
Tool holder
9
Page 10
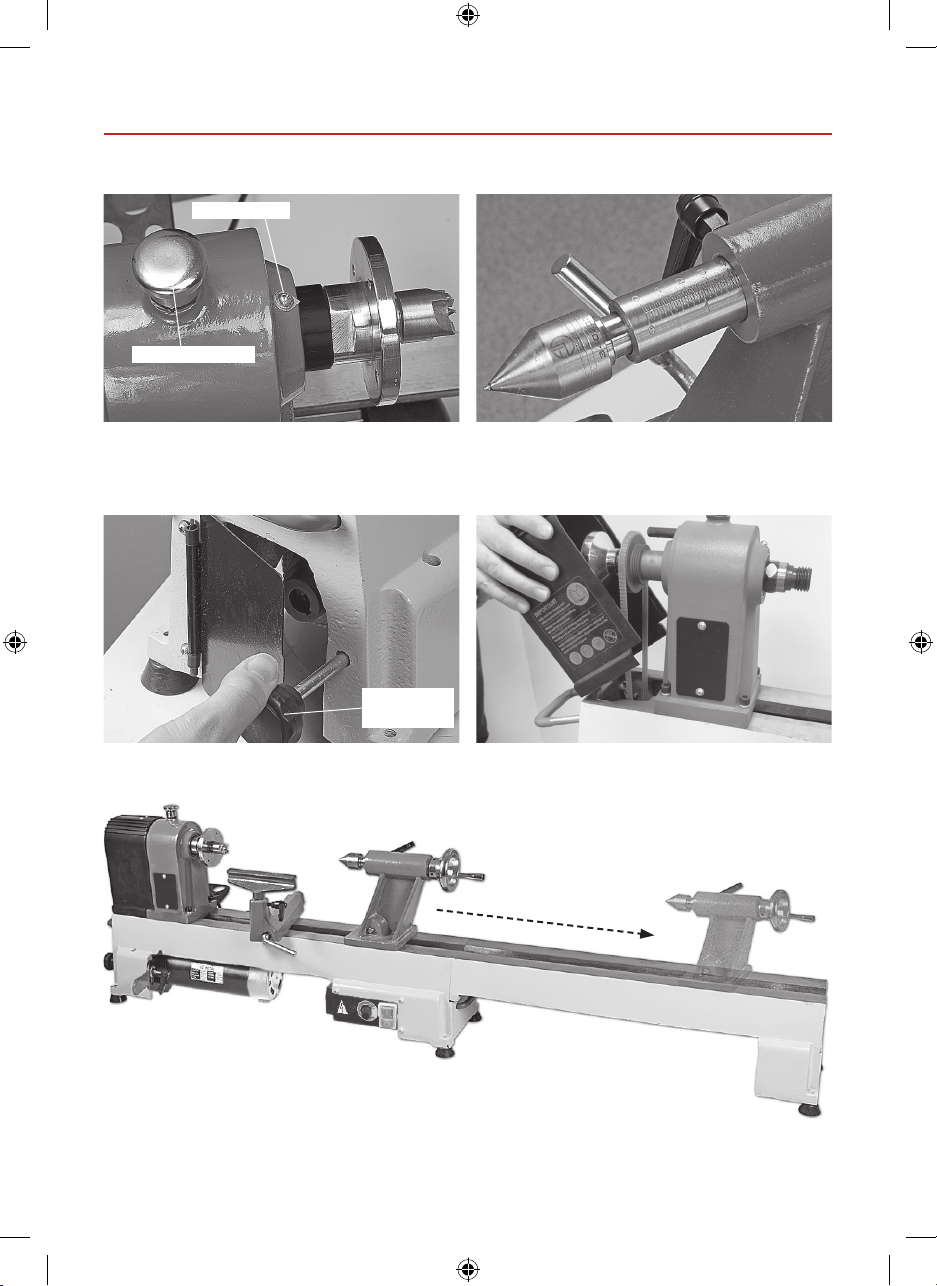
ILLUSTRATION AND PARTS DESCRIPTION
Fig 13
Index locking pin
Fig 15
Index pointer
Indexing assembly facility
Fig 14
Tailstock barrel with scale
Fig 16
Door knob
spring lock
Motor pulley access door
Optional bed extension attached giving a maximum of 965mm between centres
Lower the headstock cover to reveal the pulley
system
10
Page 11
OPERATING INSTRUCTIONS
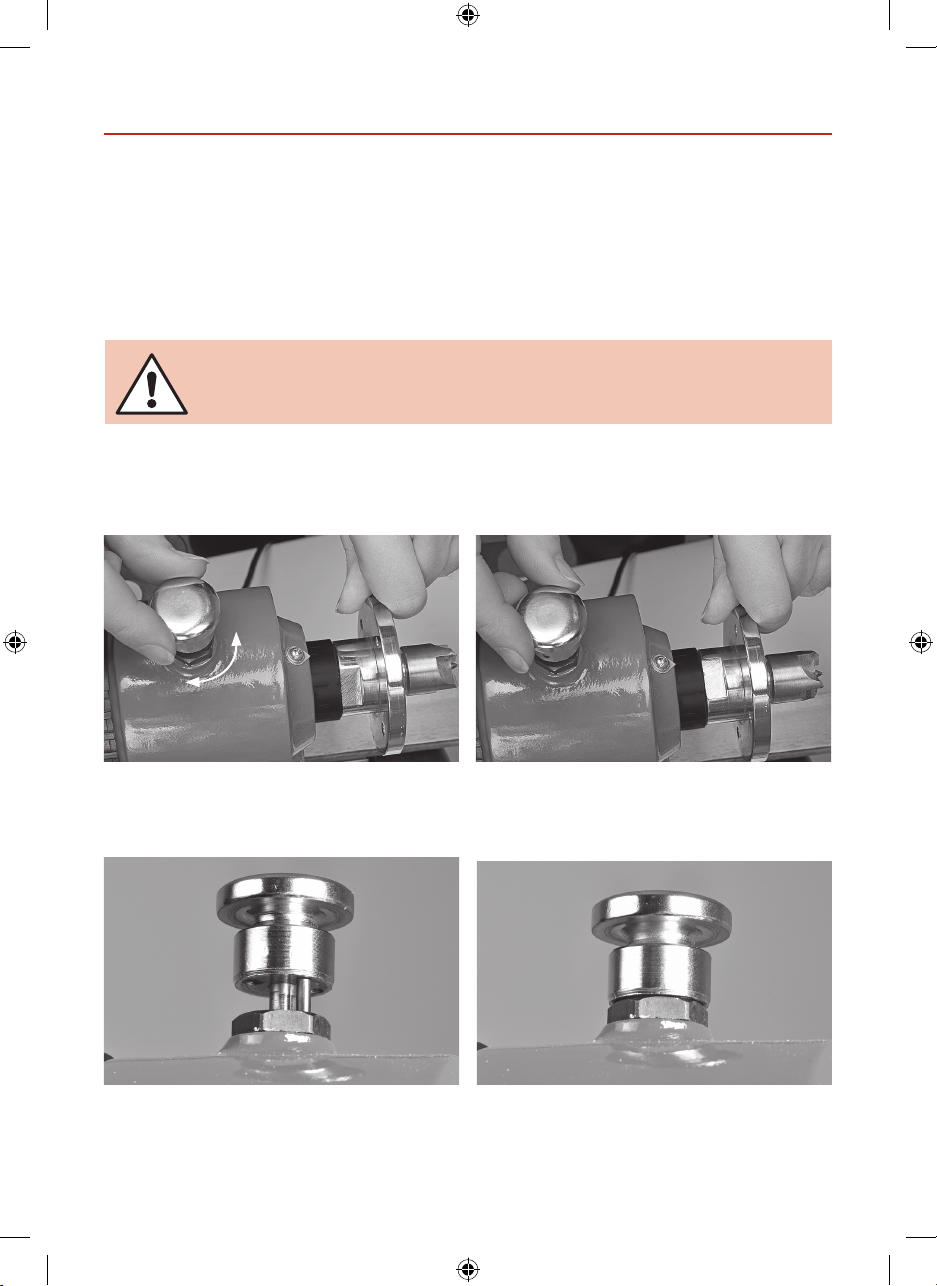
Indexing Facility
The indexing facility is useful for uted columns, clock faces and accurate hole positioning.
Lift and Rotate the index locking pin knob to unlock the headstock spindle, turn the faceplate and line
up one of the positions then lower the indexing pin to lock the spindle in position, see gs 17-18-19-20.
WARNING! DO NOT USE THE INDEX PIN WHEN REMOVING THE
FACEPLATE OR CHUCK OTHERWISE THE PIN COULD BRAKE!
Fig 17
Turn the faceplate to select the required position then lower the index pin knob to lock the spindle
Fig 19
Fig 18
Fig 20
Indexing pin in the up position (spindle unlocked) Indexing pin in the locked down position
11
Page 12
OPERATING INSTRUCTIONS
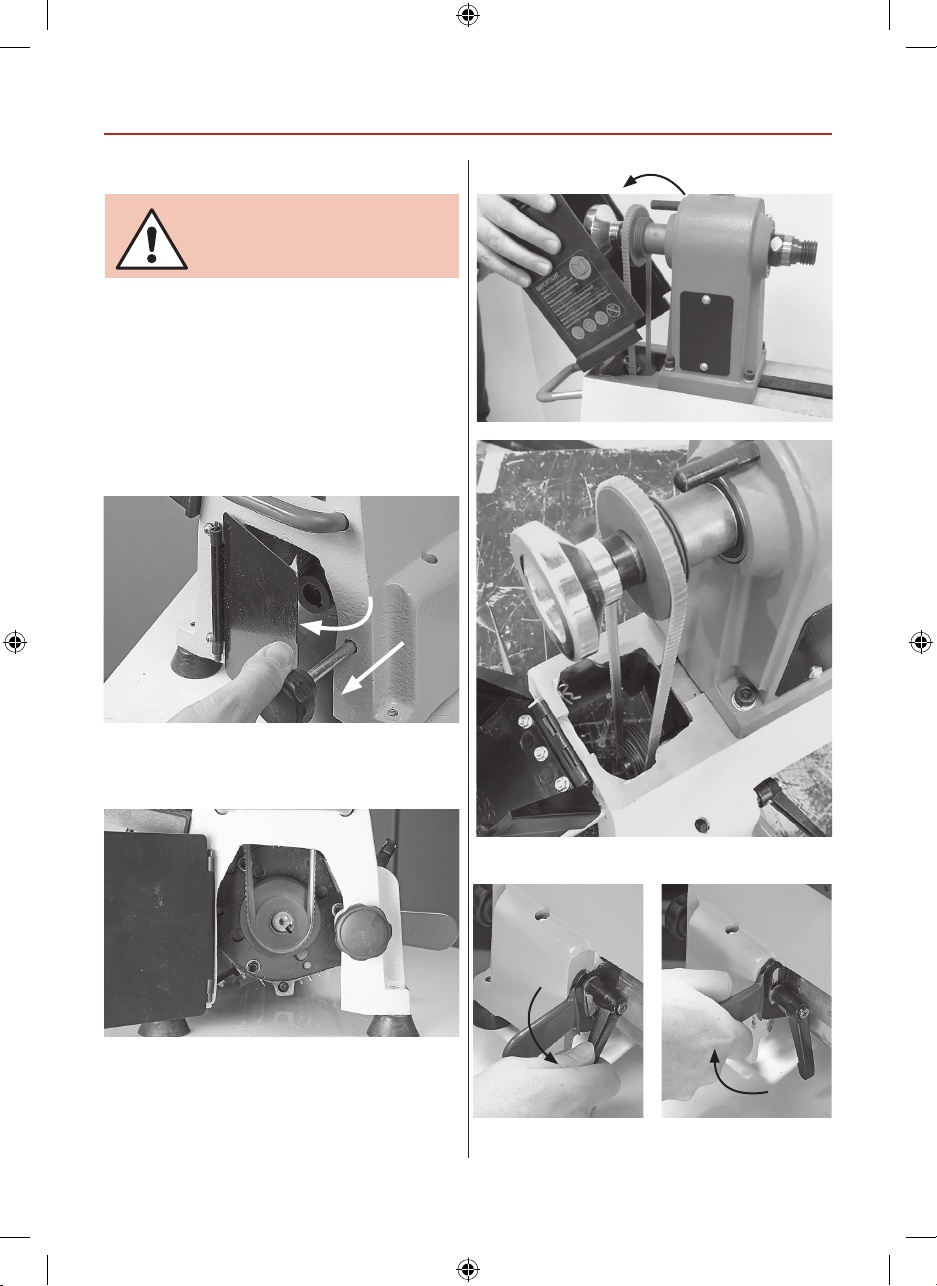
Changing the Lathe Speed
DISCONNECT THE LATHE FROM
THE MAINS SUPPLY BEFORE
CONTINUING!
1. Open the motor pulley access door by pulling the
door knob back, see gs 21-22. Lower the headstock
cover to access the pulleys, (see g 23).
2. Release the motor handle lock and lift the motor
up, tighten the handle to lock the motor in position,
this releases the tension on the pulleys, see gs
24-25.
Fig 21
Open the motor pulley access door by pulling back
the sprung door knob.
Fig 23
Fig 22
Fig 24-25
Motor pulley
Release the motor handle lock, lift the motor up
and retighten to lock the motor in position
12
Page 13
OPERATING INSTRUCTIONS
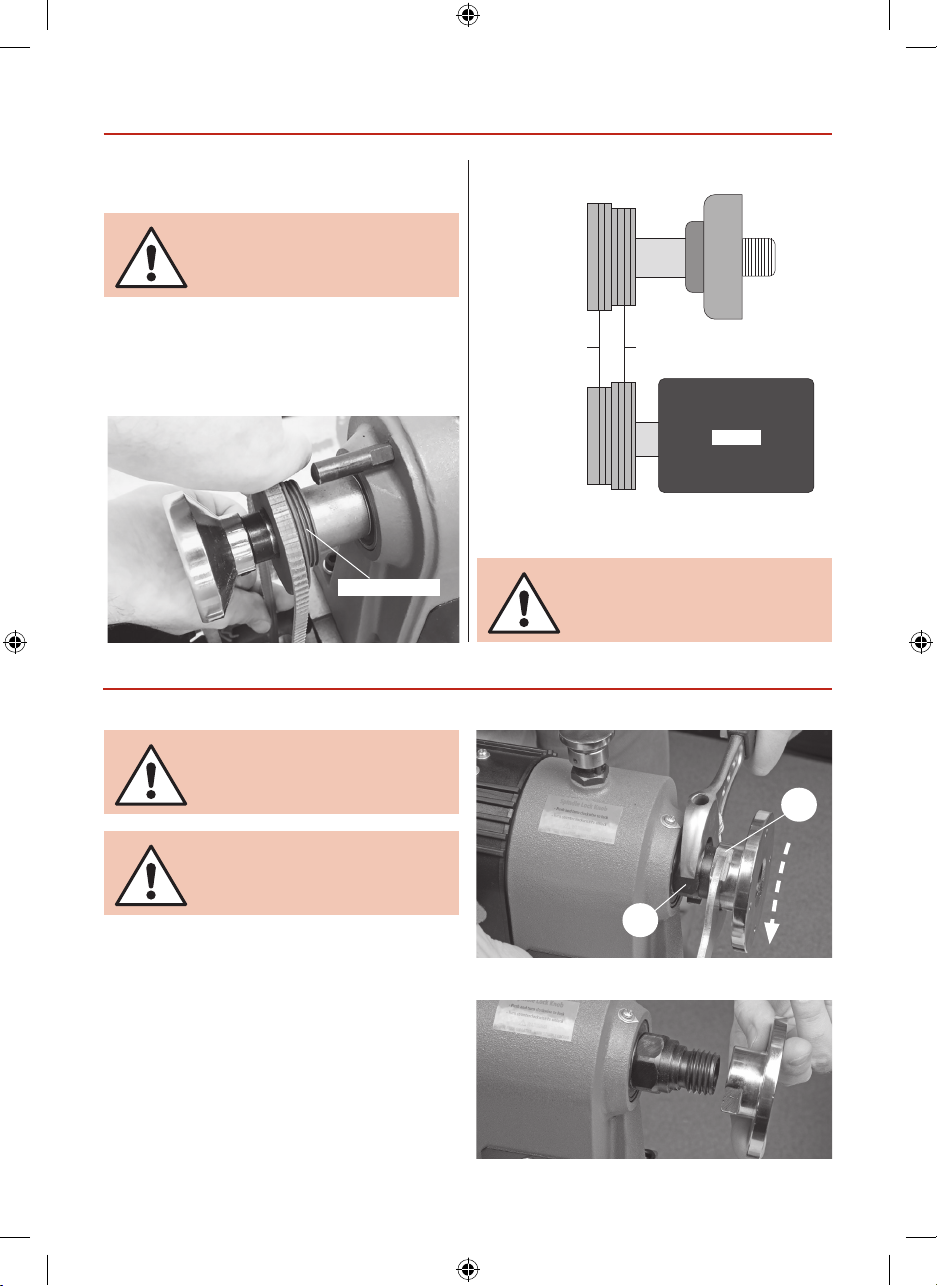
3. Reposition the belt to one of the ve positions on
MAKE SURE THE BELT IS INSERTED
CORRECTLY INTO
THE PULLEY GROOVES!
the pulleys, see gs 26.
4. Lower the motor to put tension back on the pulleys
and lock in position. Raise the headstock cover and
Fig 26
Pulley grooves
Lathe Pulley Speed Chart
Spindle
1000-
4080 rpm500 -2400 rpm
Motor
Low High
AW305WL
NOTE: The speed chart above
shows approximate speeds with
the lathe o load.
REMOVING THE FACEPLATE
Fig A
DISCONNECT THE LATHE FROM
THE MAINS SUPPLY BEFORE
CONTINUING!
MAKESURE THE LOCKING PIN
IS IN THE UP POSITION BEFORE
CONTINUING!
You will require two spanners.
Place the rst spanner onto the lathe spindle (a)
and the other on the faceplate (b), see g A. While
holding the rst spanner in position, turn the other
anti-clockwise (remember left handed thread) and
remove the faceplate, see g B.
b
a
Fig B
13
Page 14
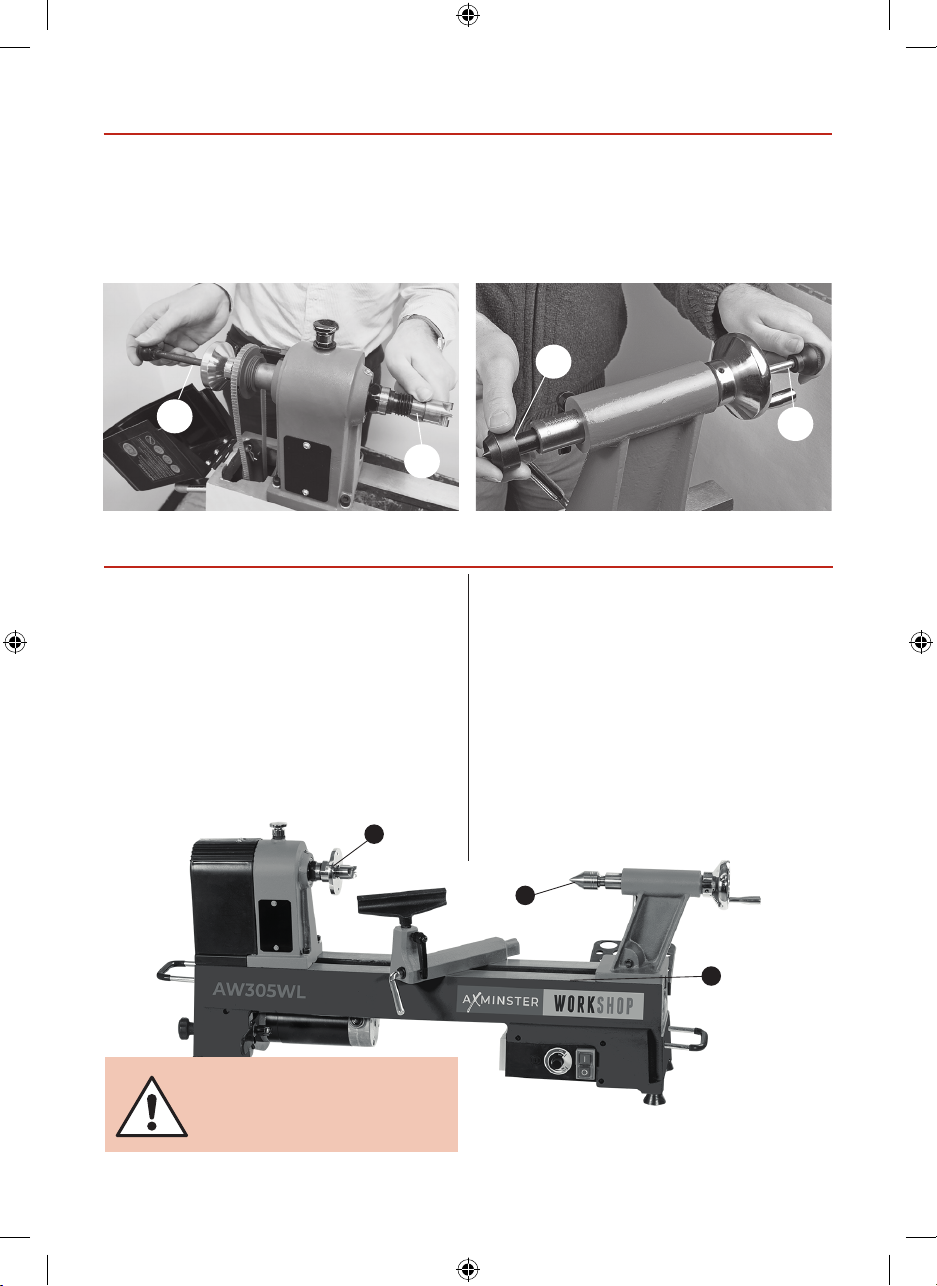
REMOVING DRIVE/LIVE CENTRES
To remove the Drive Centre (F), locate the push rod (H), while holding the Drive Centre insert the push rod (H)
through the centre hole of the headstock wheel and push the Drive Centre (F) out, see g 27.
Repeat the procedure for the Live Centre (G) in the tailstock, see g 28.
Fig 27 Fig 28
G
H
F
MAINTENANCE
Daily after use Monthly
• Clean wood shavings away from the lathe bed and
tool rest.
• Spray a light coat of Camellia Oil or Axcaliber Dry
Lubricant, (see our cataloge for details) over the lathe
bed, to allow the Banjo and Tailstock to run more
smoothly over the bed, also spray the headstock and
tailstock to prevent corrosion.
•Check the tension of the belt and adjust if required,
(See Changing the Belt Speed). Also check the
condition of the belt for signs of wear and change
if required, (contact our technical department on
03332 406406)
•Check any build up of wood shaving on the motor
and spindle pulleys and clean if necessary.
• Using an airline, blow out the motor’s air vent.
• Also blow out the air vents on top of the control
box.
H
Note: If the lathe is not going to be used
for a period of time, spray a light coat of
oil over the bed and place a dust sheet
over the lathe.
14
Page 15
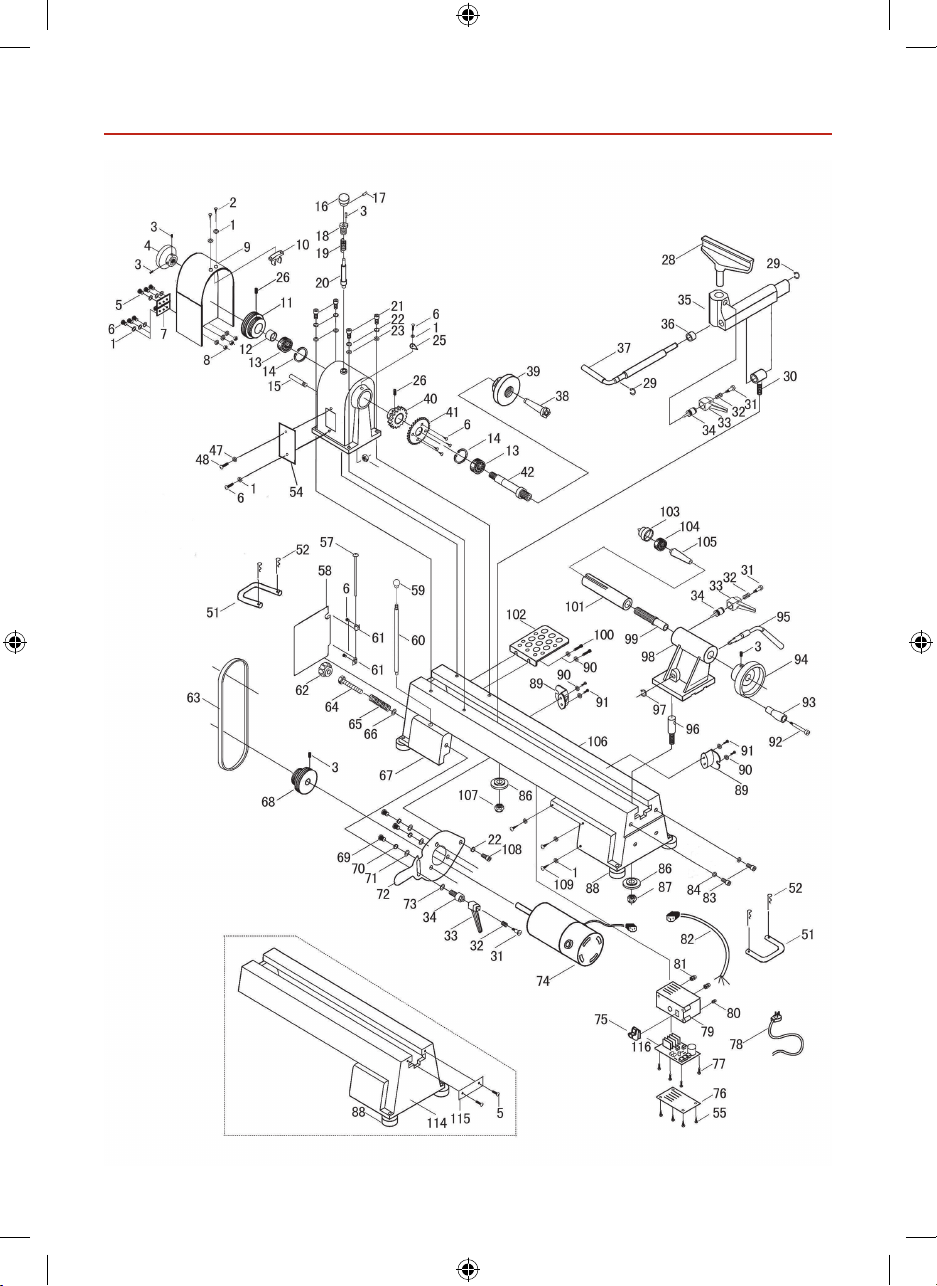
EXPLODED DIAGRAMS/LISTS
15
Page 16
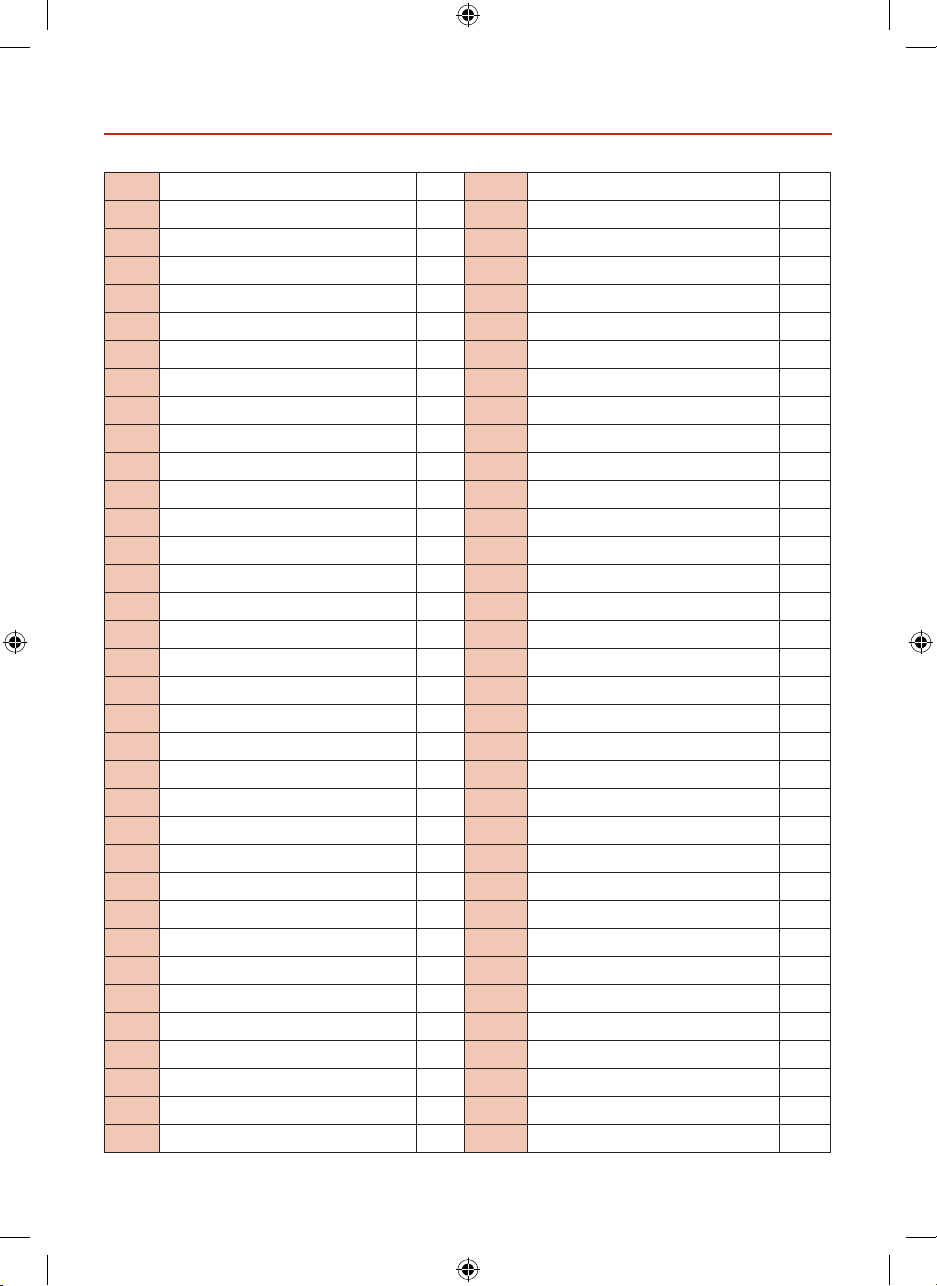
EXPLODED DIAGRAMS/LISTS
1218VDA (AW305WL)
No. Description Qty No. Description Qty
1 Washer ø4 7 36 Bush 1
2 Semi-circle head screwM4X8 2 37 Lock handle for tool rest base 1
3 Hex socket screw M6×12 3 38 Headstock spur center 1
4 Hand wheel 1 39 Face plate 1
5 Semi-circle head screwM6×24 6 40 Gear 1
6 Semi-circle head screwM4X6 2 41 Round plate 1
7 Hinge 1 42 Headstock spindle 1
8 Hex nut M6 3 47 Washer 1
9 Side protection guard 1 48 Semi-circle head screw M3×12 1
10 Lock piece 1 51 Handling hand 2
11 Cam follower tailstock 1 52 Clip 4
12 Main shaft sleeve 1 54 The box cover 1
13 Ball bearing 80105 2 57 Pin hinge 1
14 Retaining ring 47 2 58 Mounting plate 1
15 shaft 1 59 Ball 1
16 Cap 1 60 Knock-out rod 1
17 Screw 1 61 Hinge 2
18 Bush 1 62 Door latch 1
19 Spring 1 63 Drive belt 1
20 Index pin 1 64 Connecting rod 1
21 Hex socket screw M8×30 4 65 Spring t 1
22 Spring washer 4 66 Washer 1
23 Washer ø8 4 67 The main body 1
24 Nut M10 1 68 Motor pulley 1
25 Indicator 1 69 Hex socket screw M6×16 3
26 Hex socket screw M6×12 1 70 Spring washer 3
28 Tool rest 1 71 Washer ø6 3
29 Retaining ring 10 1 72 Motor plate with notch 1
30 Tool rest cam follower 1 73 Tapping screw 1
31 Bolt 1 74 Moto 1
32 Spring 1 75 Switch 1
33 Handle 1 76 Box plate 1
34 Lock bolt 1 77 Tapping screw 4
35 Tool rest bas 1 78 Plug line 1
16
Page 17
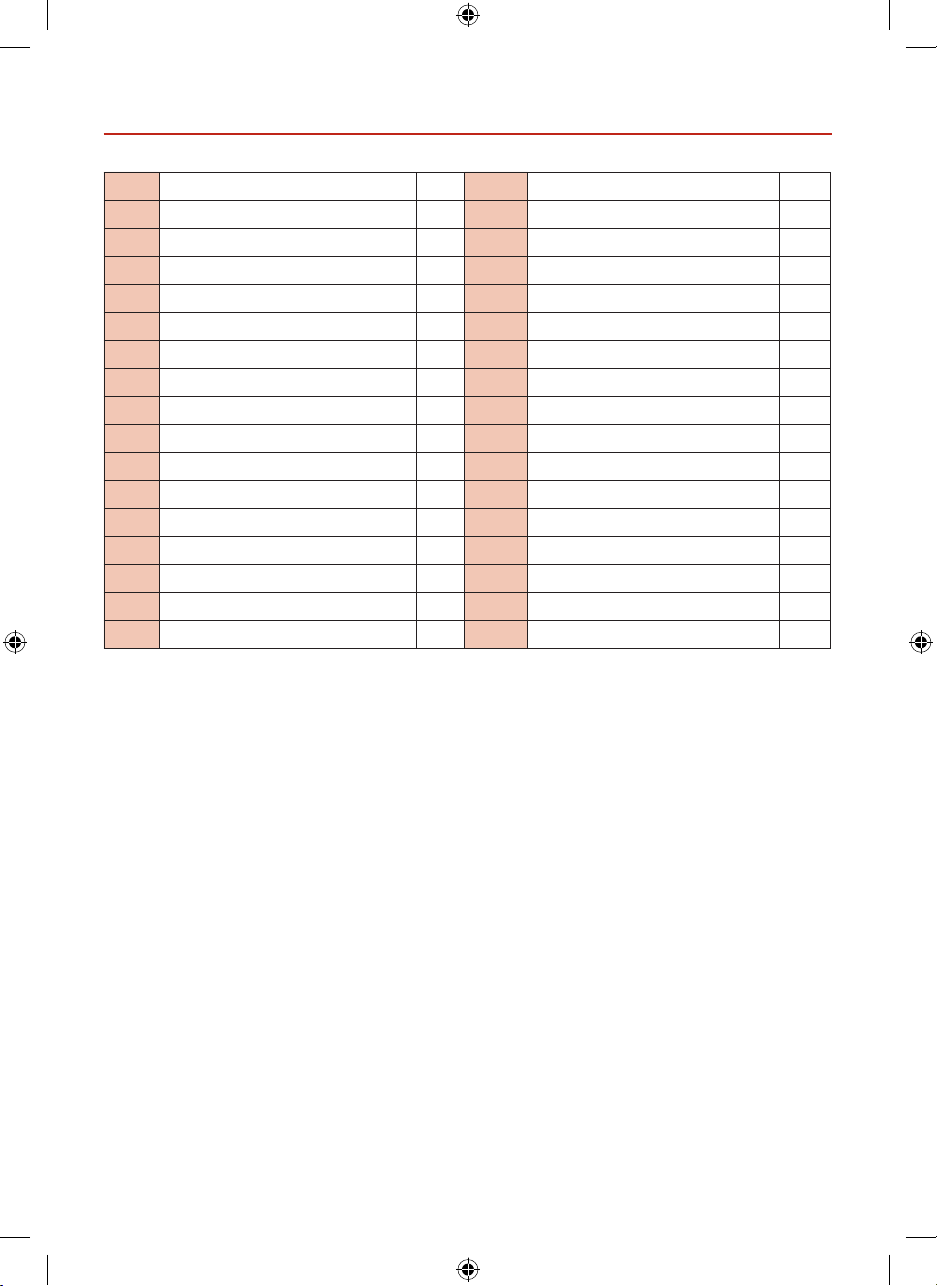
EXPLODED DIAGRAMS/LISTS
79 Switch-box 1 96 Cam follower tailstock 1
80 Strain relief 1 97 Retaining ring 10 1
81 Strain relief 2 98 Tailstock 1
82 Cable 1 99 Tailstock quill 1
83 Hex socket screw M10×25 2 100 Semi-circle head screw M5×12 2
84 Washer ø10 2 101 Tailstock axis 1
102 Tool rack 2
86 Lock nut 2 103 Cup center 1
87 Nut M10 1 104 Ball bearing 1
88 Rubber washer 6 105 Taper rod 1
89 Support 1 106 Bed 1
90 Semi-circle head screw M5×12 4 107 Nut M10 1
91 Washer ø5 2 108 Hex socket screw M8×16 1
92 Screw 1 111 Motor pulley 1
93 Bush 1 114 Extension bed 1
94 Quill adjusting wheel 1 115 Small plate 1
95 Eccentric axis 1 116 Variable plate 1
17
Page 18
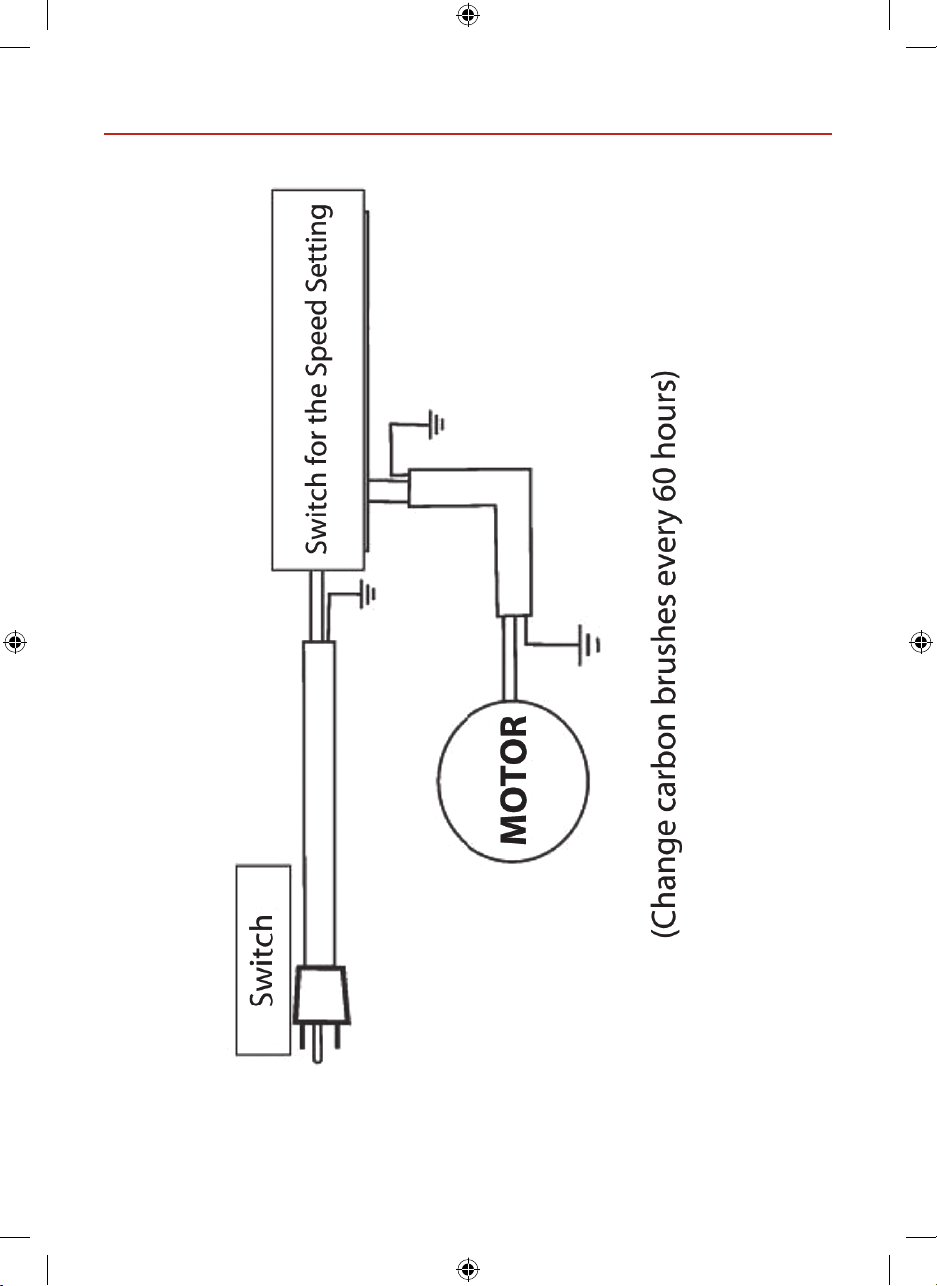
WIRING DIAGRAM
18
Page 19

NOTES
19
19
Page 20
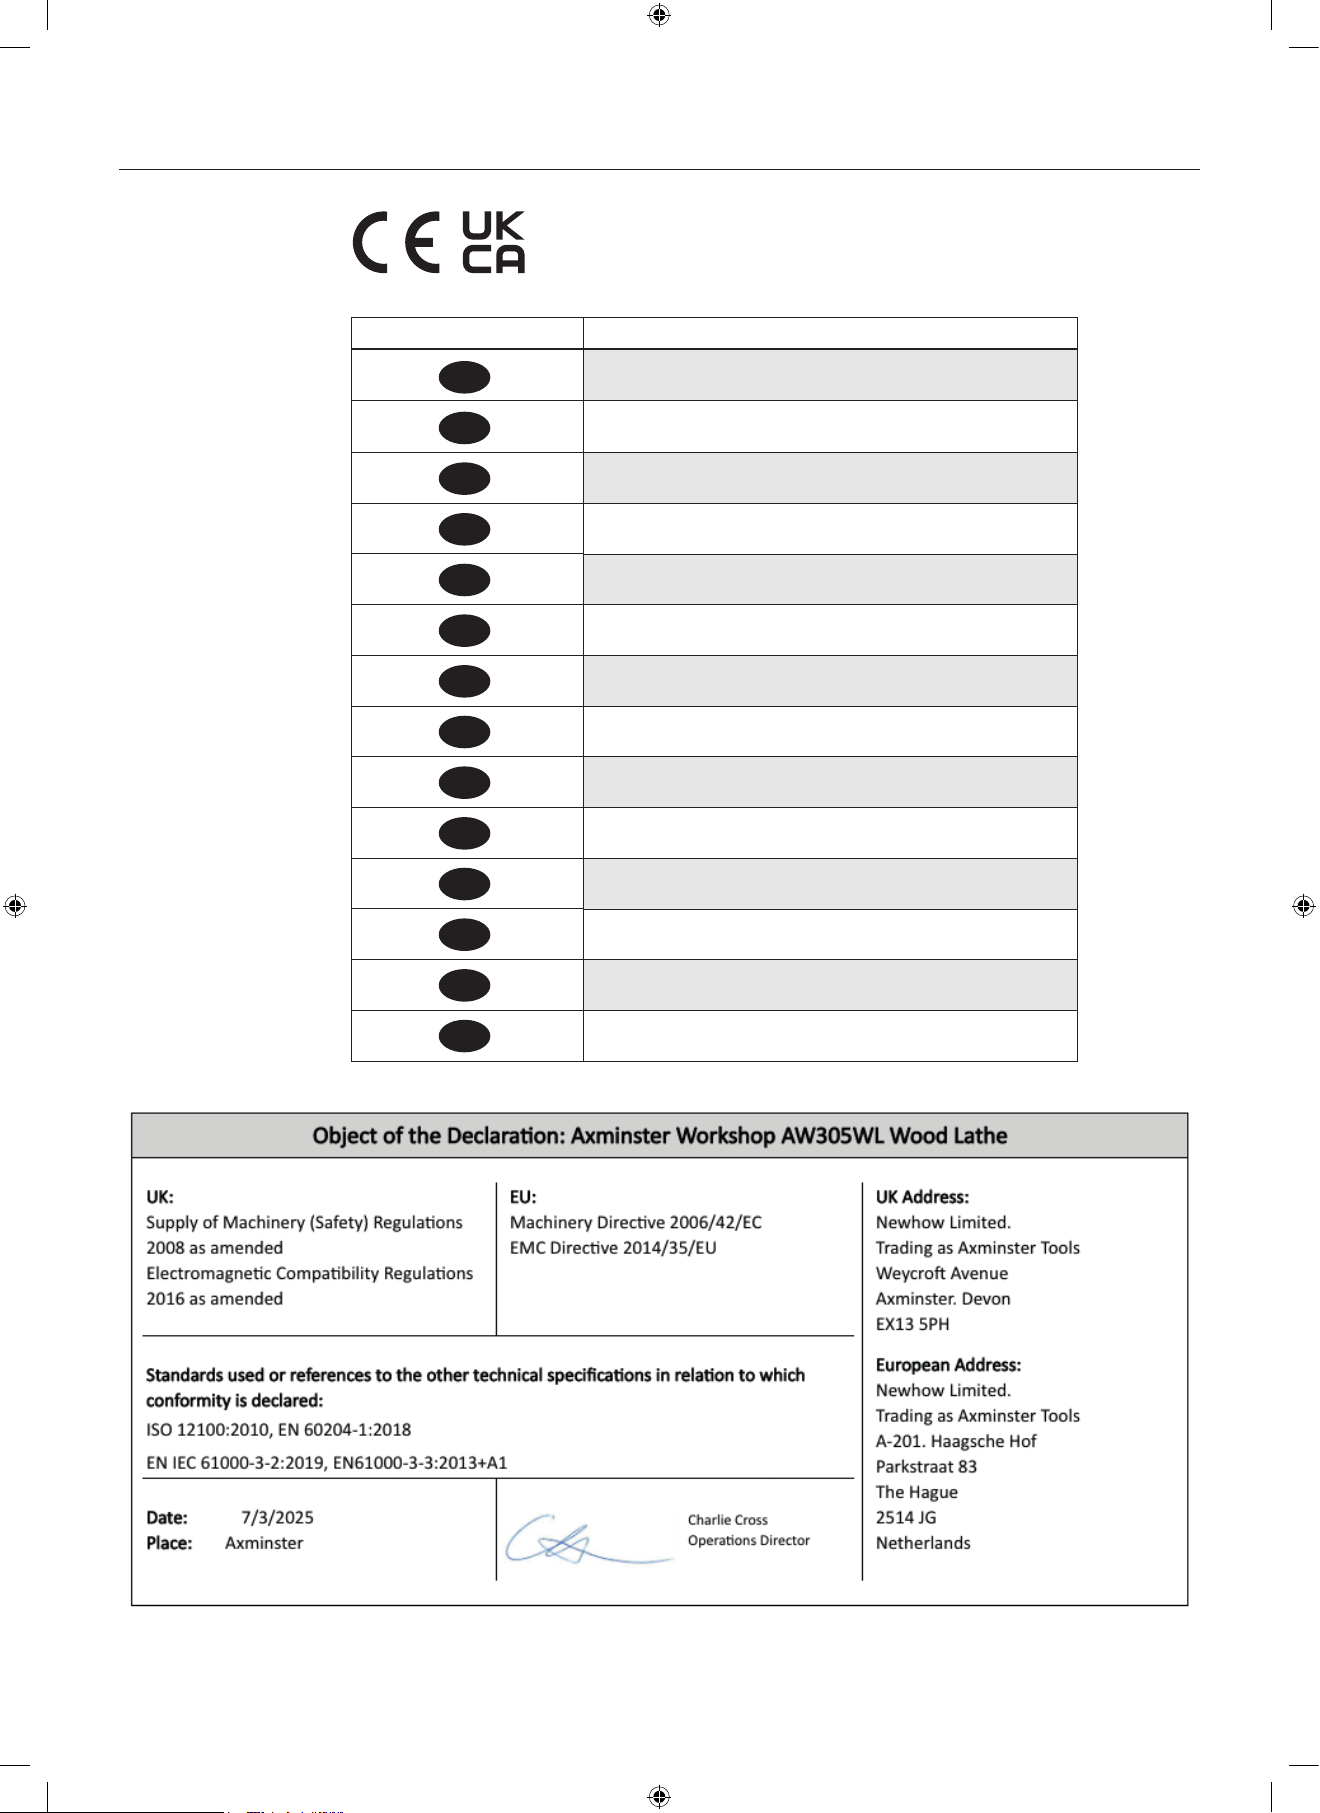
Declaration of Conformity
Nationality
GB
DE
FR
IT
ES
NL
DK
SE
CZ
PL
POR
NOR
FI
IS
The object of the declaration described is in conformity
with the relevant GB/EU legislation.
Der Gegenstand der beschriebenen Erklärung stimmt mit
den einschlägigen GB/EU-Rechtsvorschriften überein.
L’objet de la déclaration décrite est conforme à la législation
GB/UE pertinente.
L’oggetto della dichiarazione descritta è conforme alla
legislazione GB/UE pertinente.
El objeto de la declaración descrita está en conformidad
con la legislación GB/UE pertinente.
Het voorwerp van de beschreven verklaring is in
overeenstemming met de relevante GB/EU-wetgeving.
Genstanden for den beskrevne erklæring er i
overensstemmelse med den relevante GB/EU-lovgivning.
Föremålet för den beskrivna deklarationen
överensstämmer med den relevanta GB/EU-lagstiftningen.
Předmět popsaného prohlášení je v souladu s příslušnými
právními předpisy GB/EU.
Przedmiot opisanej deklaracji jest zgodny z odpowiednimi
przepisami GB/UE.
O objeto da declaração descrita está em conformidade
com a legislação GB/UE relevante.
Gjenstanden for den beskrevne erklæringen er i samsvar
med den relevante GB/EU-lovgivningen.
Määritellyn ilmoituksen kohde on asiaankuuluvan IsonBritannian/EU: n lainsäädännön mukainen.
Hluturinn í lýsingunni er í samræmi við viðeigandi lög
GB/ESB.
Axminster Tools, Axminster Devon EX13 5PH
axminstertools.com
 Loading...