

Page 1
Code 107683
Original Instructions
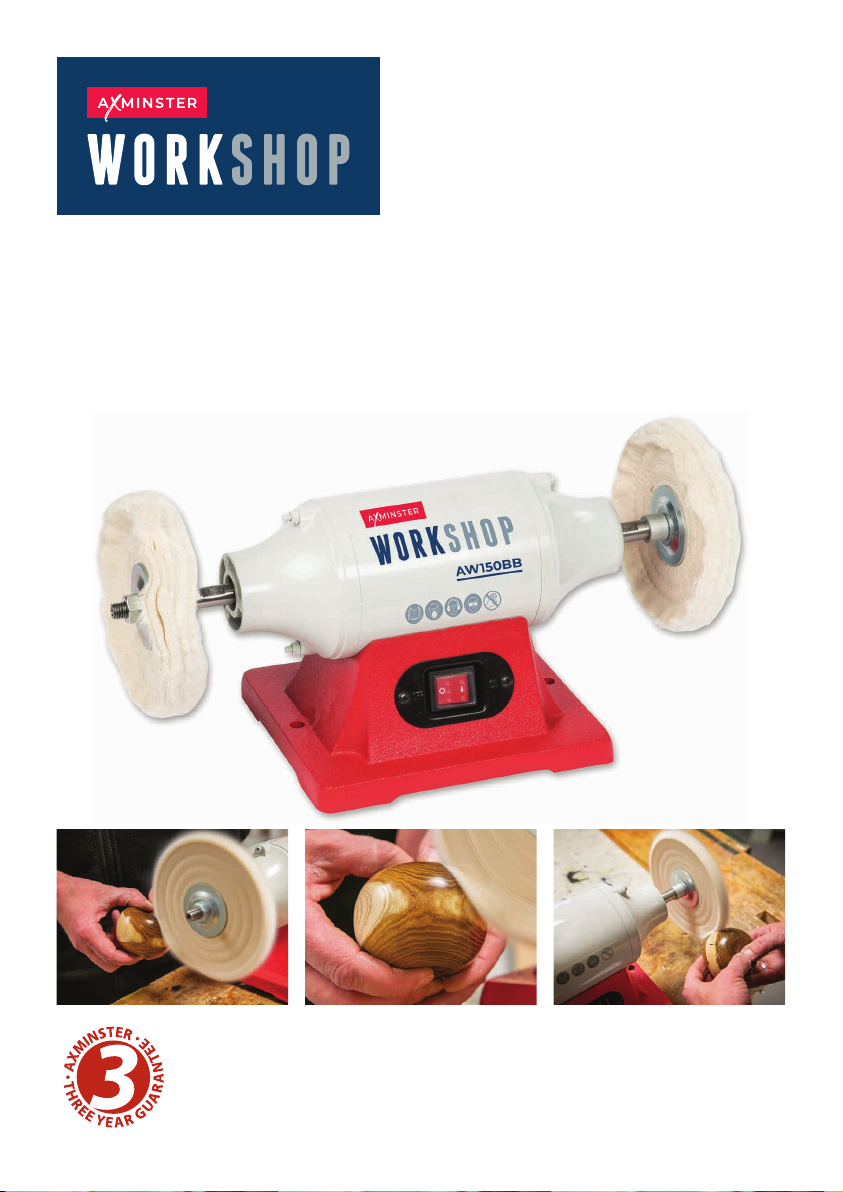
AW150BB 150mm
Buffing Machine
AT: 10/02/2022
BOOK VERSION: 03
Page 2
INDEX OF CONTENTS
EU Declaration of Conformity 02
What’s Included 03
General Instructions for 230V Machines 04
Specification 05
Assembly 05
Illustration and Parts Description 06
Changing the Buffing Mop 07
Optional Accessories 08-09
Maintenance 10
Exploded Diagrams/Lists 10-11
Wiring Diagram 10
EU DECLARATION OF CONFORMITY
Cert No: TLG-150BGB
Axminster Tool Centre Ltd
Axminster Devon
EX13 5PH UK
axminstertools.com
declares that the machinery described:-
Type Buffing Machine
Model AW150BB
Signed
Andrew Parkhouse
Operations Director
Da te: 19/10/2021
EU Declaration of Conformity
This machine complies with the following directives:
2006/42/EC
2014/30EU
EN 55014-1: 2017
EN IEC 61000-3-2: 2019
and conforms to the machinery example for which the
EC Type-Examination Certificate No SHEM201000845601, SHES200801665601
has been issued by Wendeng Allwin Motors Manufacturing Co., Ltd.
at: No. 15 Sichan Road Wendeng, Shandong, China 264400
and complies with the relevant essential health and safety requirements.
EN 61000-3-3: 2013+A1: 2019
EN 55014-2: 2015
EN 62841-1: 2015
EN 62841-3-4: 2016+A11: 2017+A12: 2020
The symbols below advise the correct safety procedures when using this machine.
Fully read manual
and safety instructions
before use
Ear protection
should be worn
Eye protection
should be worn
Dust mask
should be worn
HAZARD
Motor gets hot
2
Page 3
WHAT’S INCLUDED
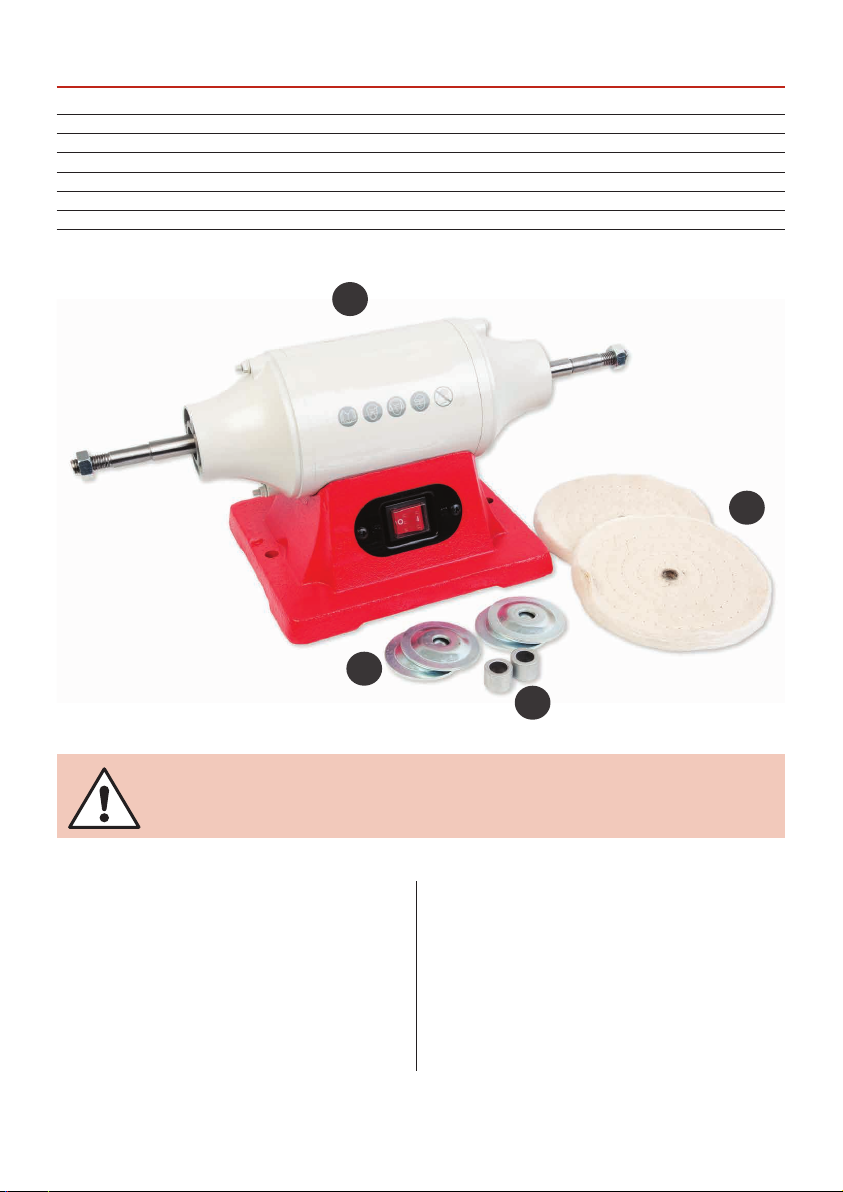
Quantity Item Part Model Number
AW150BB
1 150mm Buffing Machine A
4 Plate Washers B
2 Bushing Spacers C
2 12.7mm (1/2 inch) Bore Buffing Mops D
1 Instruction Manual
A
D
B
Fitted with a 3 pin UK plug
HAVING UNPACKED YOUR BUFFING MACHINE, PLEASE DISPOSE OF ANY UNWANTED
PACKAGING PROPERLY. THE PACKAGING IS BIODEGRADABLE.
This is a simple, long shaft polisher/buffing machine that
mounts 150mm mops. Substantial and heavy for vibration
free running, with a cast iron base with bolt hole locations
for secure bench mounting.
The 1/2” (12.7mm) bore mops are mounted with retaining
nuts rather than the usual “pig tail” spiral. Both a stitched
and open mop are provided. Use with an appropriate
compound to bring a real shine to your work.
C
• A simple, sturdy polishing and buffing machine
• Twin 150mm mops mounted on long spindles
• Heavy cast iron base for stability and smooth running
• Uses 1/2” bore mops, more secure and safer to use
• Many compounds and pastes available to create the
finish you need
3
Page 4
GENERAL INSTRUCTIONS FOR 230V MACHINES
The following will enable you to observe good working
practices, keep yourself and fellow workers safe and maintain your tools and equipment in good working order.
WARNING!! KEEP TOOLS AND
EQUIPMENT OUT OF REACH OF
YOUNG CHILDREN.
KEEP WORK AREA AS
UNCLUTTERED AS IS PRACTICAL.
UNDER NO CIRCUMSTANCES
SHOULD CHILDREN BE ALLOWED
IN WORK AREAS.
Mains Powered Tools
• Tools are supplied with an attached 13 Amp UK 3 pin
plug, fitted with 5 amp fuse.
• Inspect the cable and plug to ensure that neither are
damaged. Repair if necessary by a suitably qualified
person.
• Do not use when or where it is liable to get wet.
Workplace
• Do not use 230V a.c. powered tools anywhere
within a site area that is flooded.
• Keep machine clean.
• Leave machine unplugged until work is about to
commence.
• Always disconnect by pulling on the plug body
and not the cable.
• Carry out a final check e.g. check the cutting tool
is securely tightened in the machine and the
correct speed and function set.
• Ensure you are comfortable before you start work,
balanced, not reaching etc.
• Wear appropriate safety clothing, goggles, gloves,
masks etc. Wear ear defenders at all times.
• If you have long hair wear a hair net or helmet to prevent
it being caught up in the rotating parts of the machine.
• Consideration should be given to the removal of rings
and wristwatches.
• Consideration should also be given to non-slip
footwear etc.
• If another person is to use the machine, ensure they are
suitably qualified to use it.
• Do not use the machine if you are tired or distracted.
• Do not use this machine within the designated safety
areas of flammable liquid stores or in areas where there
may be volatile gases.
• Check cutters are correct type and size, are
undamaged and are kept clean and sharp, this will
maintain their operating performance and lessen the
loading on the machine.
• OBSERVE…. make sure you know what is
happening around you and USE YOUR COMMON SENSE.
4
Page 5
SPECIFICATION
Code 107683
Model AW150BB
Rating Workshop
Power 370W 230V 50Hz
Duty Cycle S1 250W
Spindle Speed 2,980 rpm
Weight 11 kg
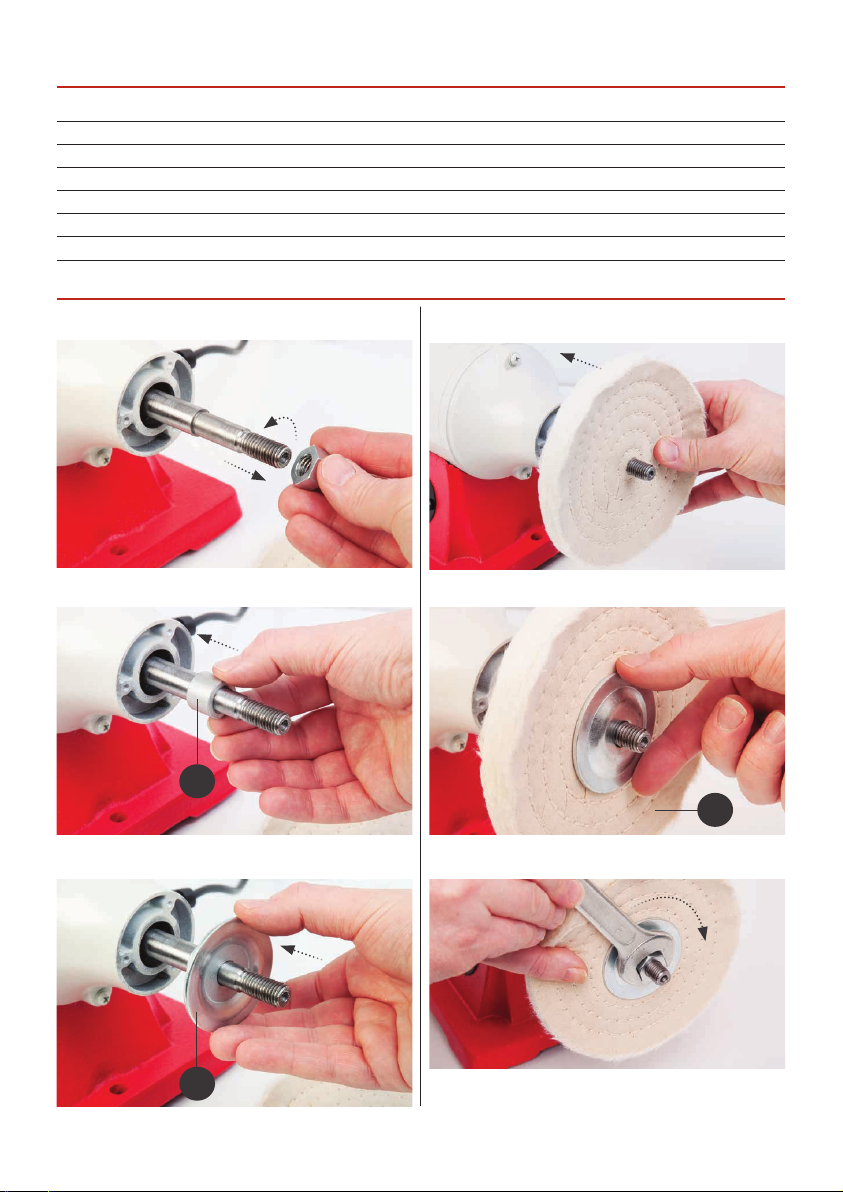
ASSEMBLY
Step 1
Step 2
Step 3
Step 4
Step 5
C
D
Step 6
B
Replace the nut, remember left handed thread and tighten
against the rotation of the buffing mop wheel.
5
Page 6
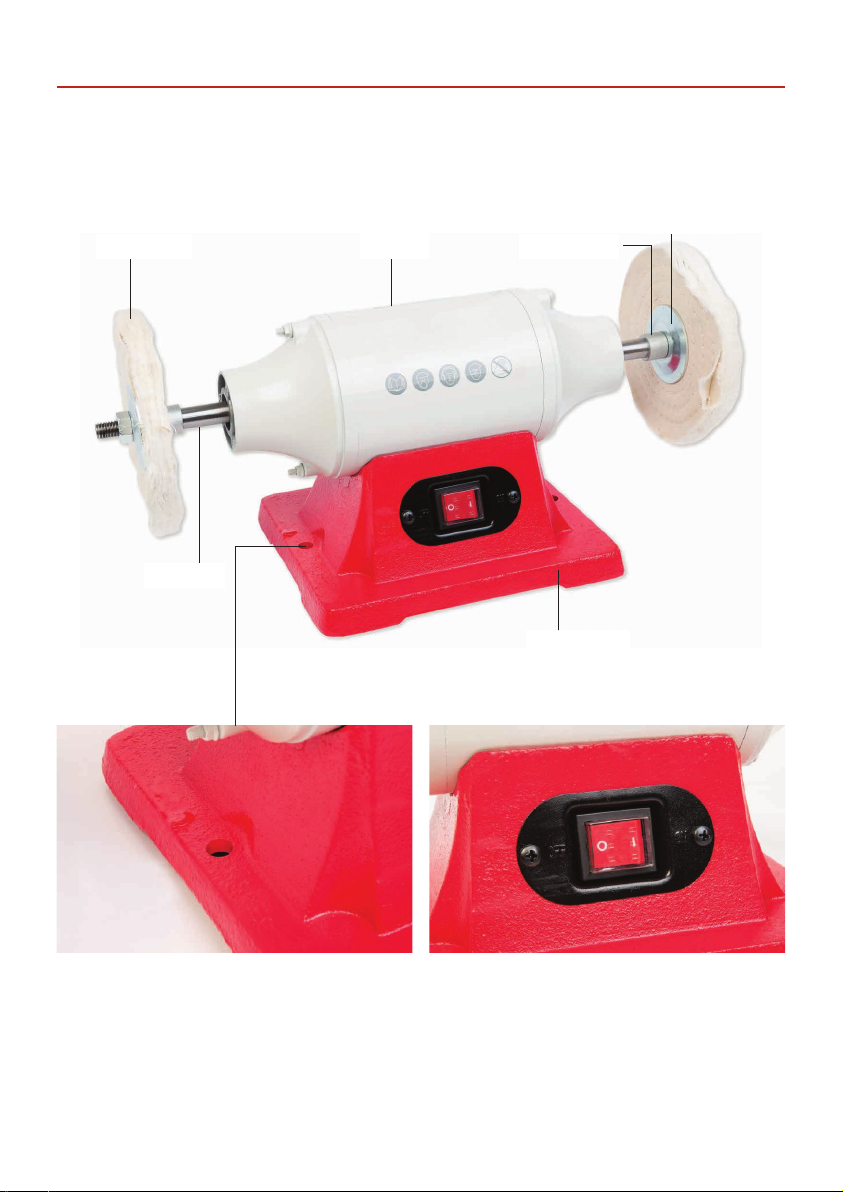
ILLUSTRATION AND PARTS DESCRIPTION
Buffing mop
Drive shaft
Motor
Bushing spacer
Plate washer
Cast iron base
ON/OFF switchWork bench securing holes
6
Page 7
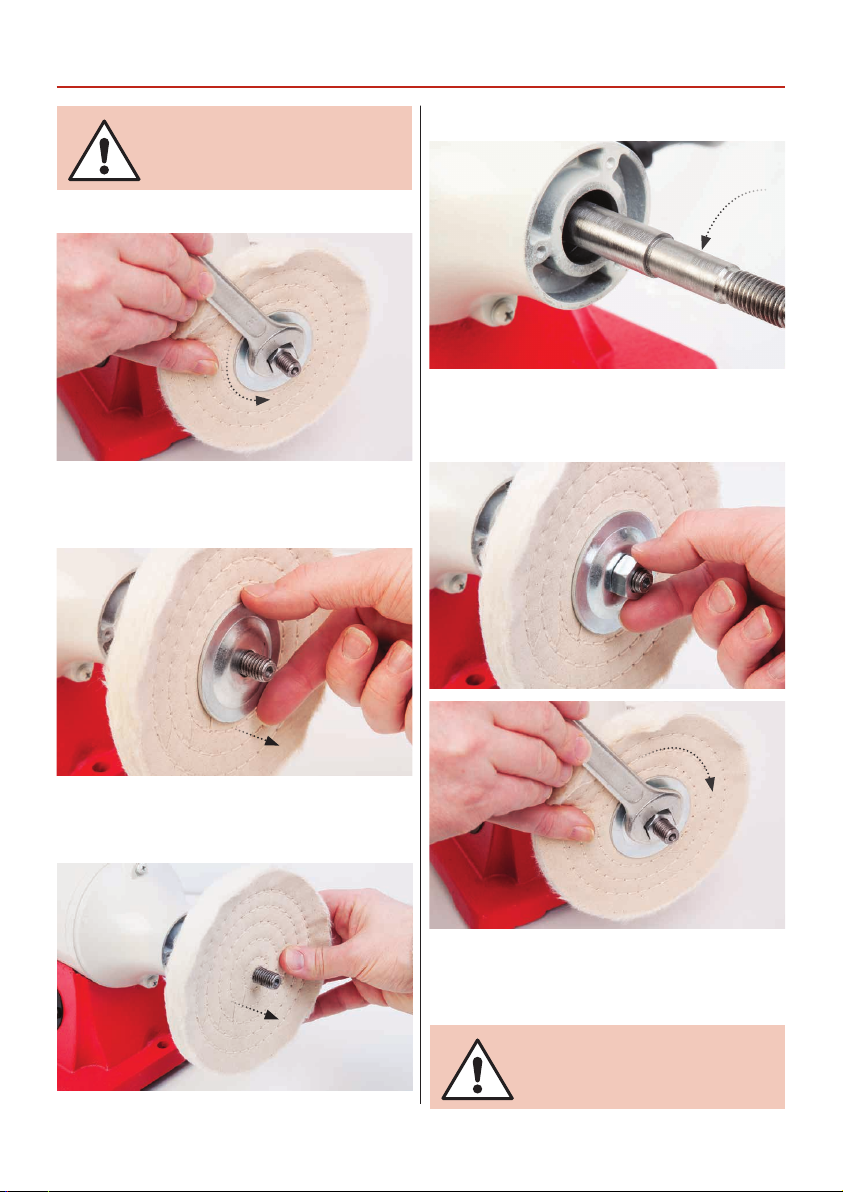
CHANGING THE BUFFING MOP
DISCONNECT THE BUFFING
MACHINE FROM THE MAINS
SUPPLY.
Step 1
Hold the mop in place and undo and remove the nut in the
direction of the buffing mop.
Step 2
Step 4
Remove any build up of debris around the drive shaft to
leave a clean surface.
Step 4
Remove the plate washer and place safely aside.
Step 3
Remove the buffing mop and place safely aside.
Replace the inner plate washer, insert the mop onto the
drive shaft so it is up against the inner pate washer and
replace the outer plate washer/nut. Tighten the nut
against the rotation of the buffing mop.
RECONNECT THE BUFFING
MACHINE TO THE MAINS SUPPLY
AND CONTINUE OPERATION.
7
Page 8
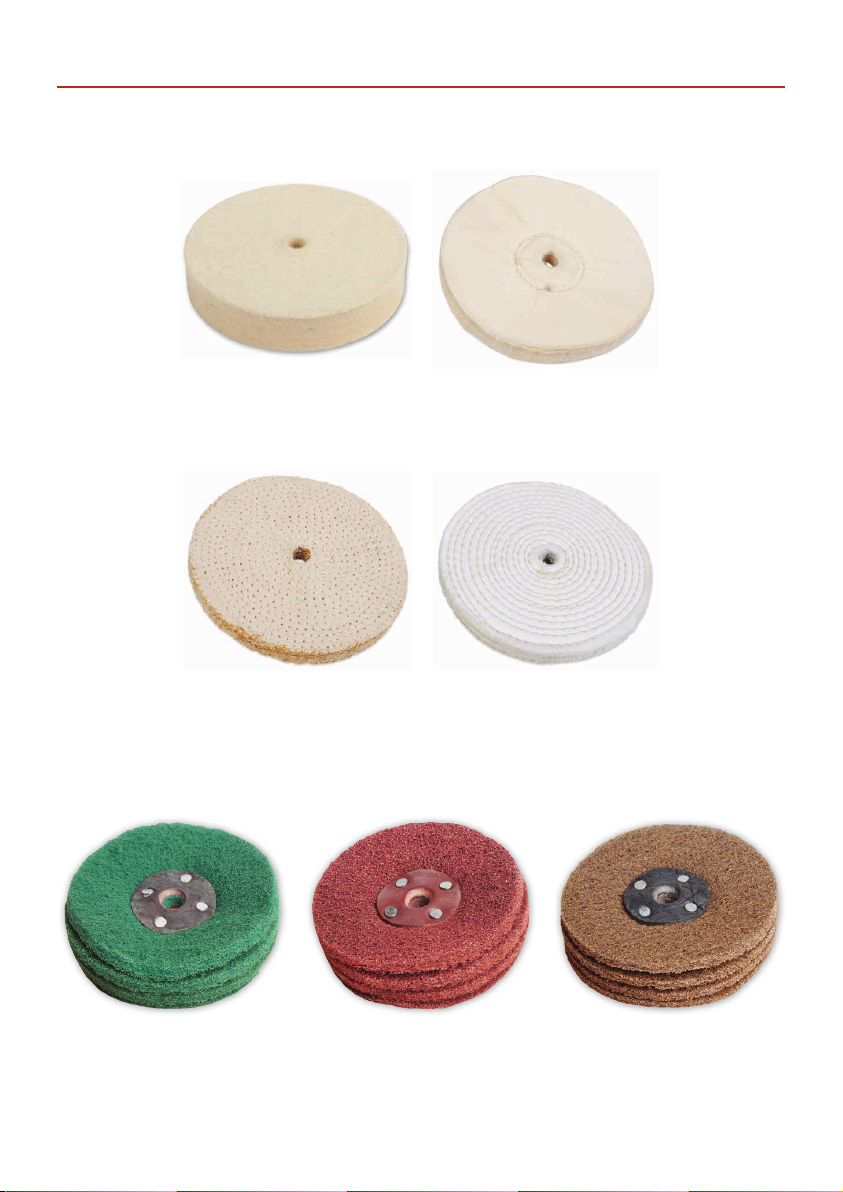
OPTIONAL ACCESSORIES
Axminster Craft Flat Wheels
Flat Hard Wheel
Code 105857
Polishing Mop Sisal
Code 105866
Axminster Craft Nylon Abrasive Wheels
Polishing Mop Loose
Code 105868
Polishing Mop Stitched
Code 105867
Nylon Fine Wheel
Code 105859
Nylon Medium Wheel
Code 105862
8
Nylon Coarse Wheel
Code 105863
Page 9
OPTIONAL ACCESSORIES
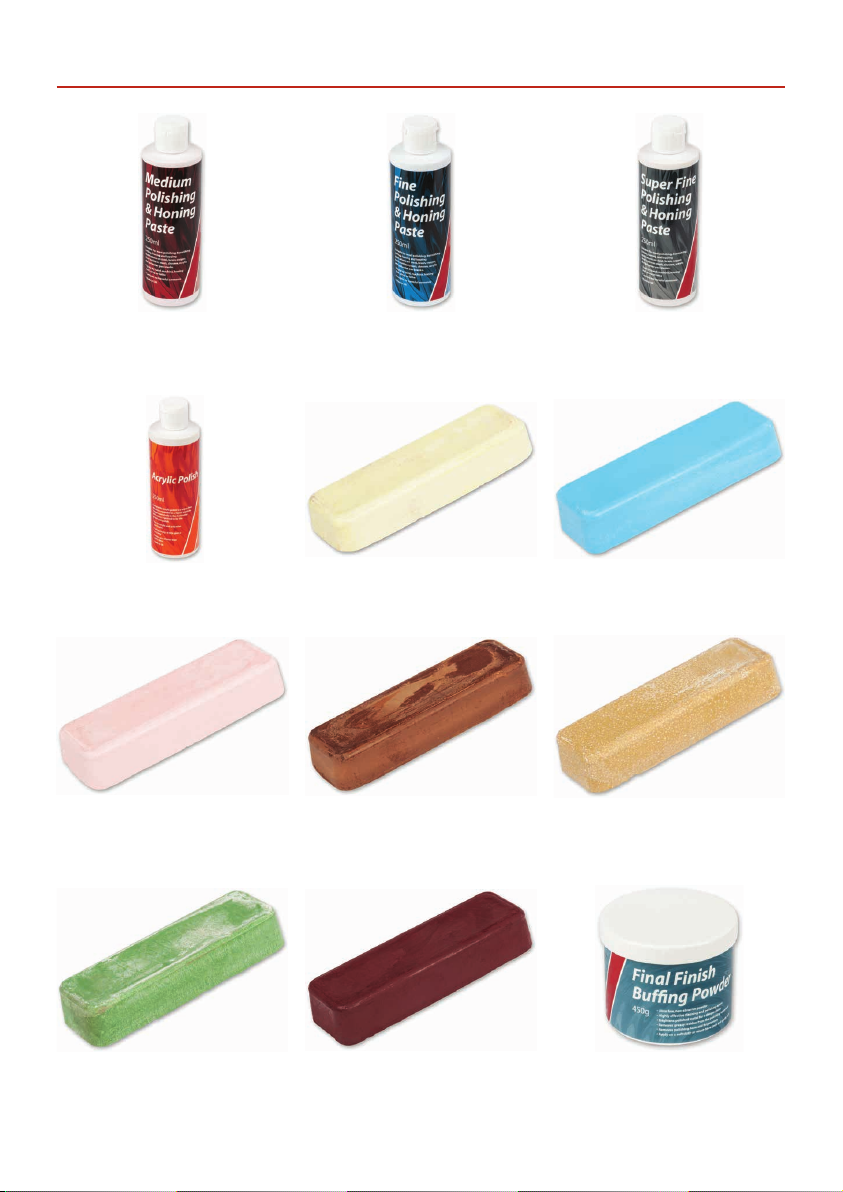
Medium Polishing &
Honing Paste 250g
Code 103703
Axminster Acrylic Polish
Code 105761
Axminster Pink Polishing Compound
Code 105926
Fine Polishing &
Honing Paste 250g
Code 103715
Axminster Yellow Polishing
Compound
Code 105921
Axminster Brown Polishing
Compound
Code 105927
Super Fine Polishing &
Honing Paste 250g
Code 103716
Axminster Blue Polishing Compound
Code 105924
Axminster Buff Polishing Compound
Code 105928
Axminster Green Polishing Compound
Code 105929
Axminster Red Polishing Compound
Code 105930
9
Axminster Trade Final Finish
Buffing Powder
Code 105763
Page 10
MAINTENANCE
There is very little maintenance needed just keep an eye on the condition of polishing mops e.g. no torn or frayed edges
that can cause the wheels to become unbalanced. Clean the buffing machine after use.
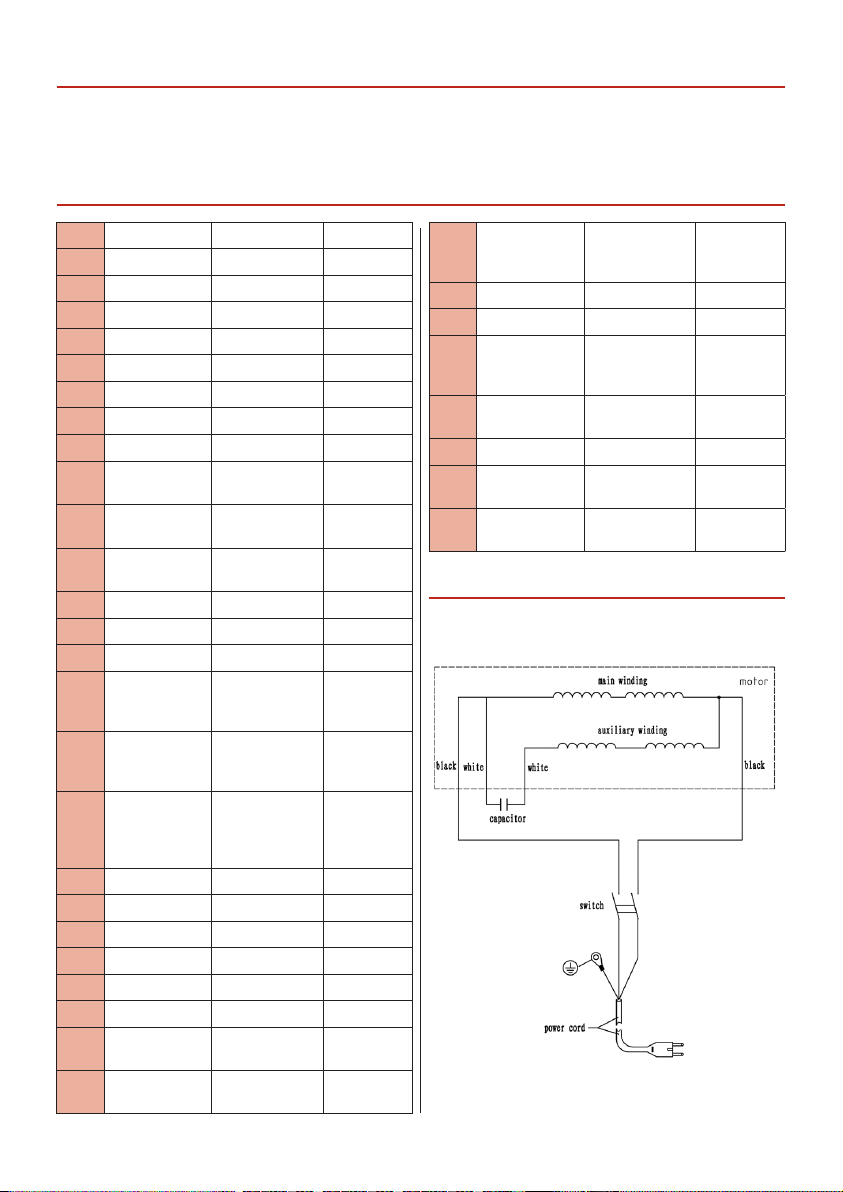
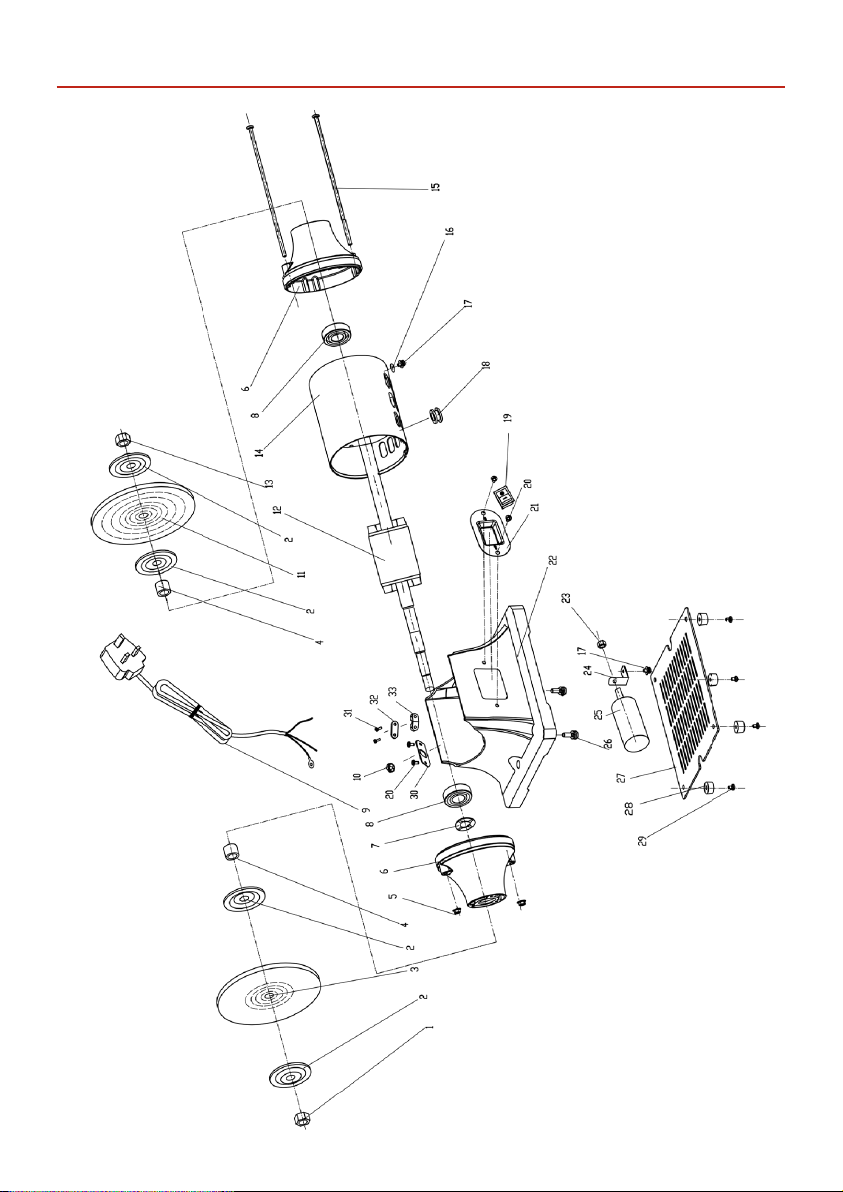
EXPLODED DIAGRAMSLISTS
No Description Specification Qty
1 Hex Nut M12 Left 1
2 Wheel Flange 4
3 Buffing Wheel 150x10 x12.7 1
4 Spacer 2
5 Hex Nut M5 2
6 End cap 2
7 Wave Washer D35 1
8 Ball Bearing 6202 2
9 Power cord
with plug
10 Power cord
clip
11 Stitched
buffing wheel
12 Rotor 1
13 Hex Nut M12 1
14 Stator 1
15 Phillips Screw
+ flat washer
assy
16 Outer Toothed
Locking
Washer
17 Phillips Screw
+spring
washer+flat
washer assy
18 Cord bushing 1
19 Switch 1
20 Phillips Screw M5X8 2
21 Switch Plate 1
22 Base 1
23 Hex Nut M8 1
24 Capacitor
support
25 Anti-explosion
Capacitor
150x10 x12.7 1
M5x200 2
D4 1
M4x8 2
26 Phillips Screw
+ spring
washer assy
27 Base cover 1
28 Rubber foot 4
29 Phillips Screw
+ flat washer
assy
30 Power cord
clip subplate
31 Phillips Screw M4X16 2
1
1
32 Strain Relief
subplate
33 Strain Relief
plate
M6x20 2
M4x12 4
1
1
1
WIRING DIAGRAM
1
1
10
Page 11
EXPLODED DIAGRAMSLISTS
11
Page 12
The Axminster guarantee
Buy with confidence from Axminster!
So sure are we of the quality, we cover all parts and labour f ree of charge for three years!
For more information visit axminstertools.com/3years
The packaging is suitable for recycling.
Please dispose of it in a responsible manner.
EU Countries Only
Do not dispose of electric tools together with household waste material.
By law they must be collected and recycled separately.
Axminster Tools, Axminster Devon EX13 5PH
axminstertools.com
 Loading...