

Page 1
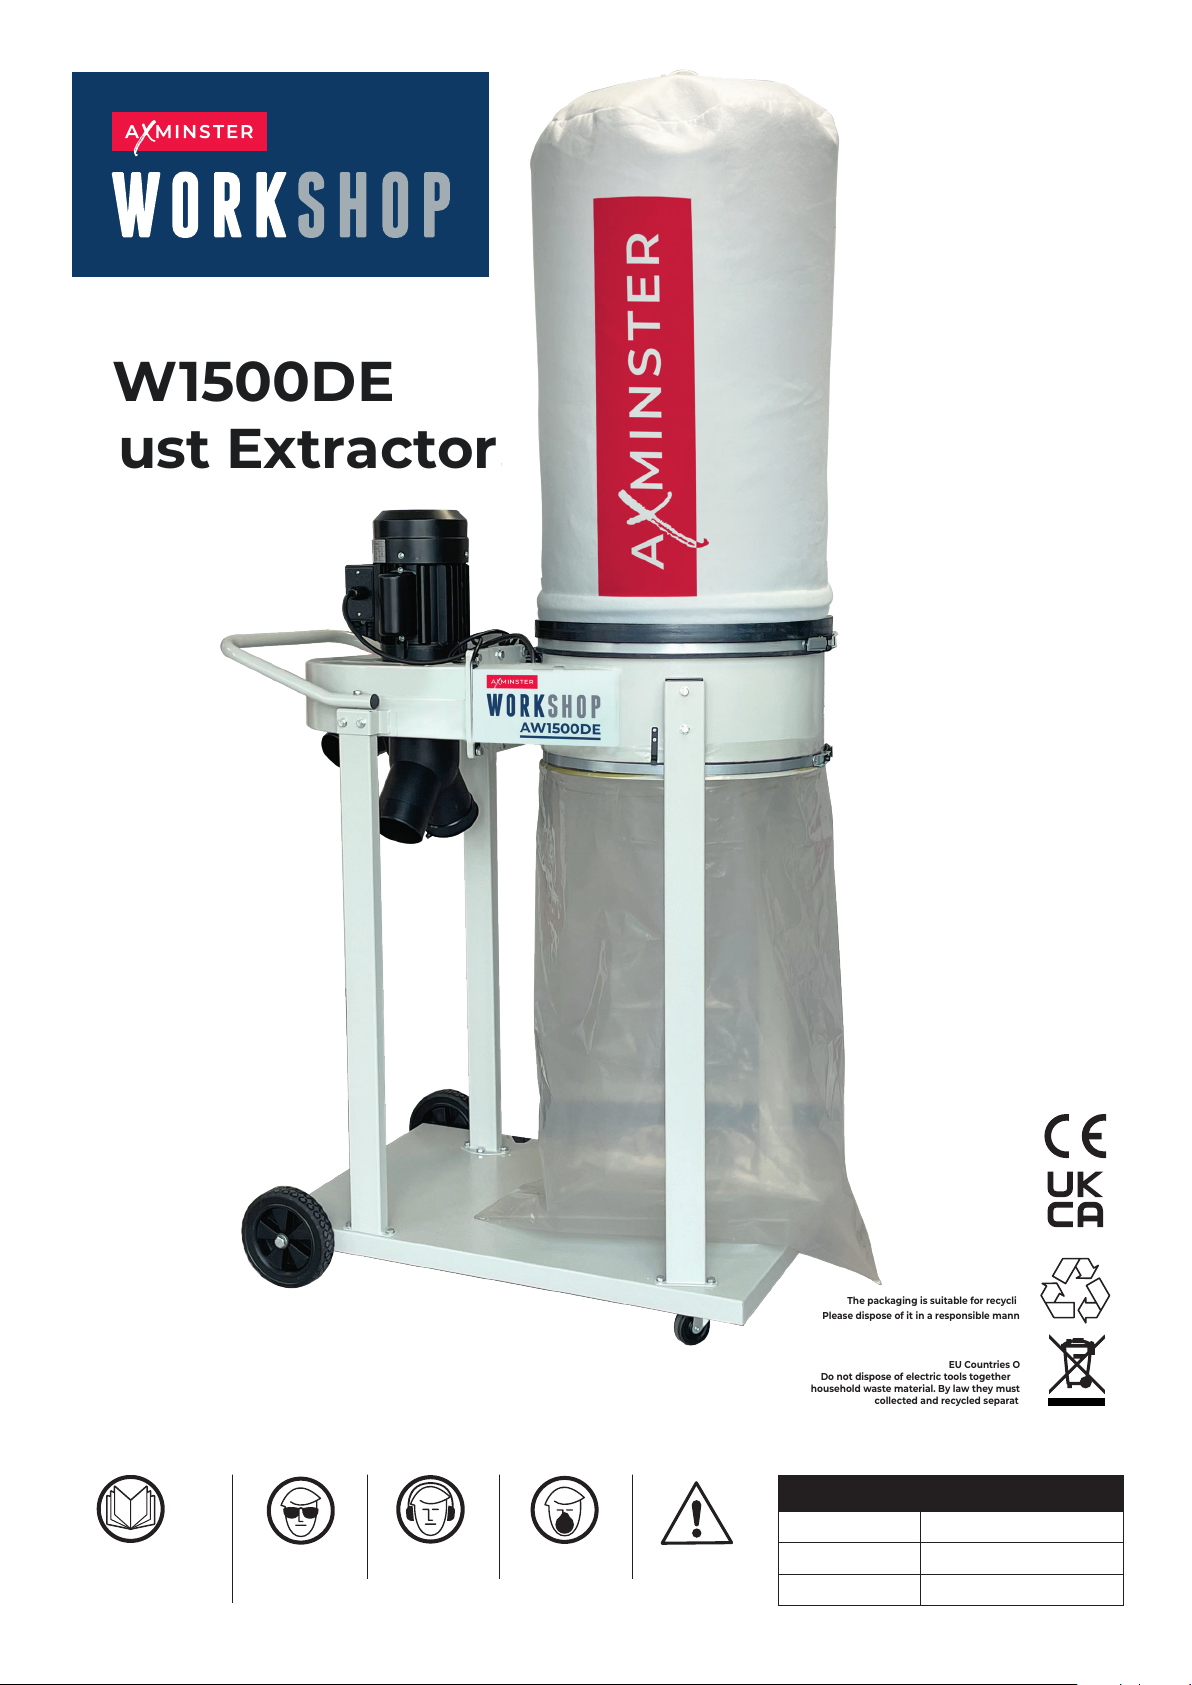
AW1500DE
Dust Extractor
Fully read manual and safety
instructions before use.
Save this manual for future
reference.
Eye protection
should be worn
The symbols above advise the correct safety procedures when using this machine.
Ear protection
should be worn
Dust mask
should be worn
Hazard
The packaging is suitable for recycling.
Please dispose of it in a responsible manner.
Do not dispose of electric tools together with
household waste material. By law they must be
collected and recycled separately.
EU Countries Only
Original Instructions
Code 113336
Version 1
Published Date 15/12/2025
Page 2
1. Safety
This operating instructions
▲explains the meaning and use of the warning notes included in the operating instructions
▲points out the dangers that might arise for you or others if these instructions are not
observed.
▲informs you how to avoid dangers.
In addition to these operation instructions, please observe
▲the applicable laws and regulations
▲the statutory provisions for accident prevention
▲the prohibition, warning and mandatory signs as well as the warning notes on the machine.
If required, the relevant measures to comply with the country-specific regulations must be taken
before commissioning the machine.
Always keep this documentation close to the machine.
1.1 Safety instructions for general machinery
The purpose of safety symbols is to attract your attention to possible hazardous conditions. This
manual uses a series of symbols and signal words intended to convey the level of importance of the
safety messages. The progression of symbols is described below. Remember that safety messages
by themselves do not eliminate danger and are not a substitute for proper accident prevention
measures.
WARNING
Some dust created by power sanding, sawing, grinding, drilling, and other construction activities
may contain chemicals, including lead, birth defects, or other reproductive harm. Wash hands after
handling. Some examples of these chemicals are:
• Lead from lead-based paints.
• Crystalline silica from bricks, cement, and other masonry products.
• Arsenic and chromium from chemically treated lumber.
Your risk from these exposures varies depending on how often you do this type of work. To reduce
your exposure to these chemicals, work in a well-ventilated area with approved safety equipment
such as dust masks specially designed to filter out microscopic particles.
1
Page 3
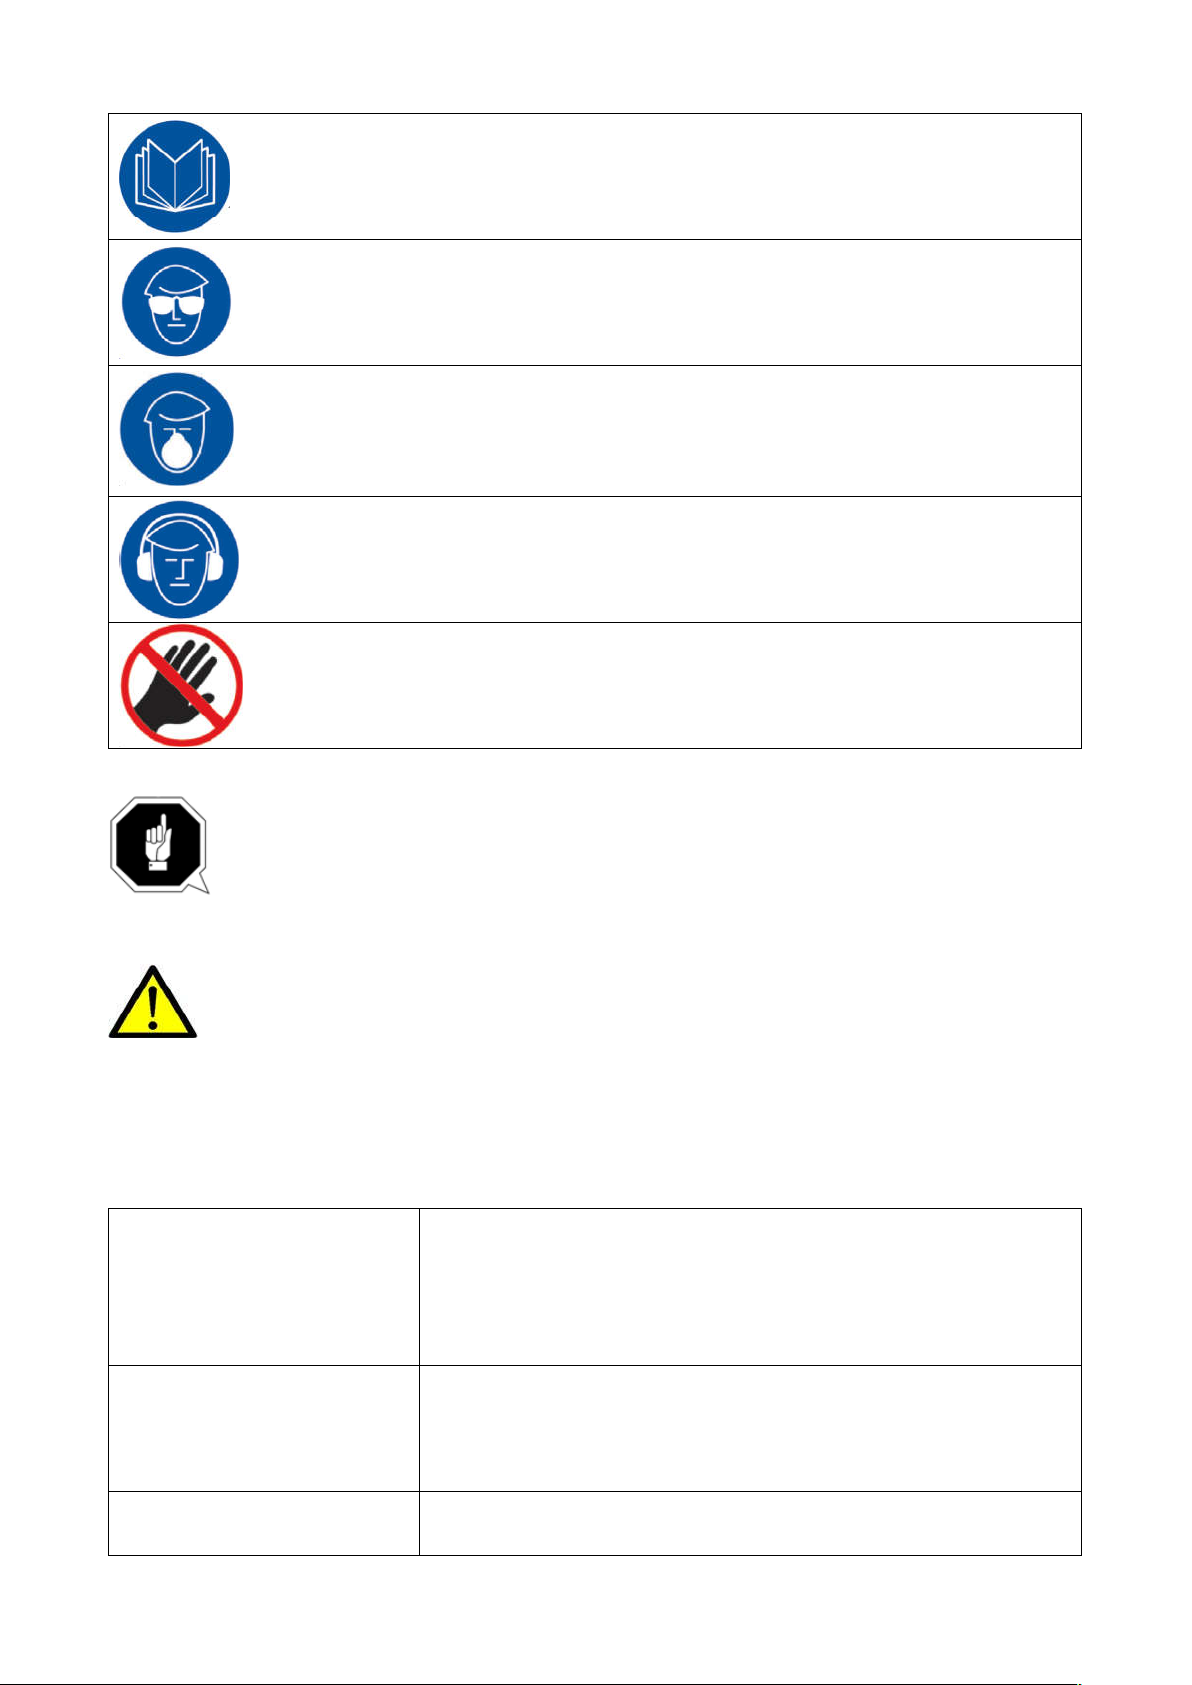
For your own safety, read instruction manual before operating the machine. Learn
the machine’s application and limitations as well as the specific hazards peculiar.
Always wear approved safety glasses or a face shield when operating or observing
machinery to reduce the risk of eye injury or blindness from flying particles everyday.
Eyeglasses are not approved safety glasses.
Dust created while using machinery may cause cancer, birth defects, or long-term
respiratory damage. Be aware of dust hazards associated with each workpiece
material, and always wear an approved respirator to reduce your risk.
Always wear hearing protection when operating or observing loud machinery.
Extended exposure to this noise without hearing protection can cause permanent
hearing loss.
Keep hands and clothing away from moving parts. Always tie back or cover long hair.
Wear non-slip footwear to avoid accidental slips which could cause a loss of
workpiece control.
Dirty or contaminated personal protective equipment can cause illness. Clean your
personal protective equipment after each use and once a week.
1.2 Safety instructions for dust collector
Long-term respiratory damage can occur from using dust collectors without proper
use of a respirator. Fire or explosions can result in smoke inhalation, serious burns,
or death—if machine is used to collect incorrect materials, is operated near
potential explosion sources, or ducting is improperly grounded. Entanglement, amputation, or
death can occur if hair, clothing, or fingers are pulled into the inlet. To reduce the risk of these
hazards, operator and bystanders MUST completely heed the hazards and warnings below.
INTENDED USE
HAZARDOUS DUST
DUST ALLERGIES
This dust collector is only intended for collecting wood dust and
chips from woodworking machines. Do not use this dust collector
to collect metal, dirt, pebbles, drywall, asbestos, lead paint, silica,
liquids, aerosols, or any flammable, combustible, or hazardous
materials.
Dust created while using machinery may cause cancer, birth
defects, or long-term respiratory damage. Be aware of dust
hazards associated with each work piece material, and always
wear a NIOSH-approved respirator to reduce your risk.
Dust from certain woods may cause an allergic reaction in people
and animals.
2
Page 4
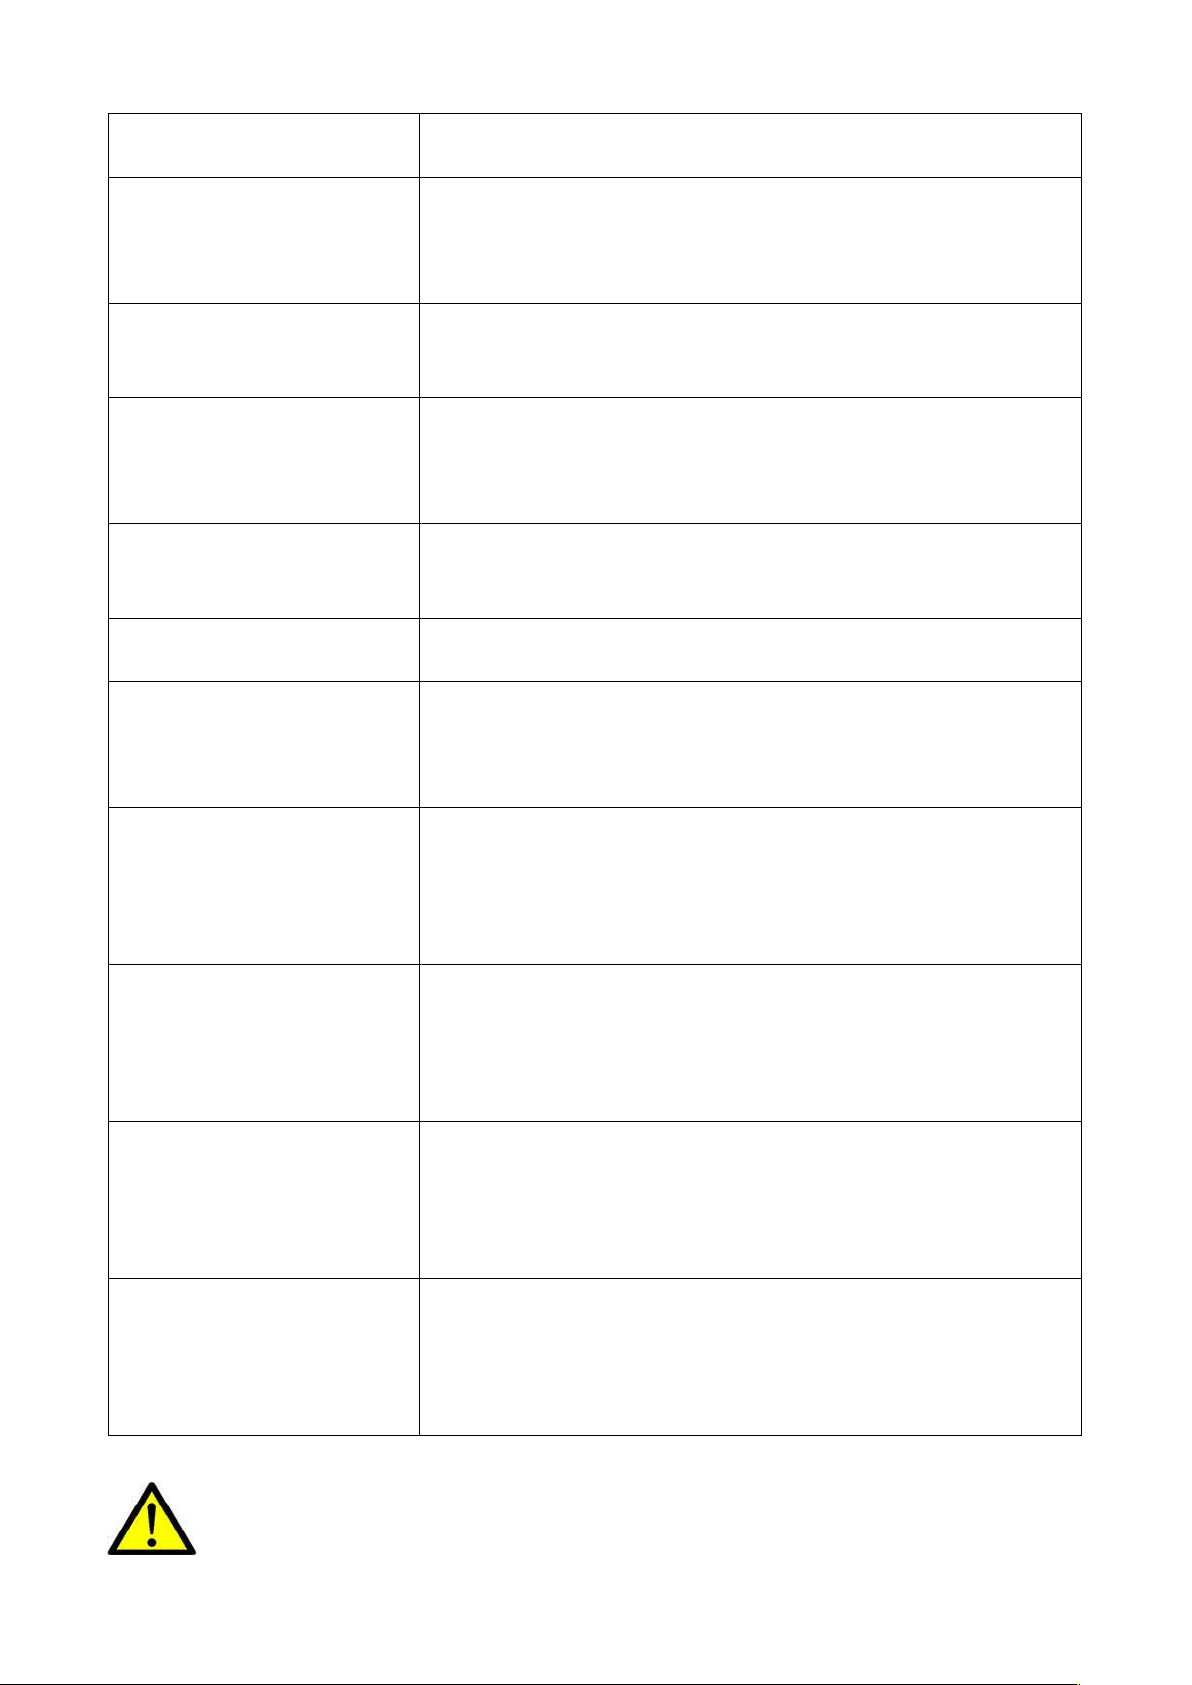
WEAR RESPIRATOR
EMPTYING DUST
DISCONNECTING POWER
SUPPLY
SUSPENDED DUST
PARTICLES AND IGNITION
SOURCES
FIRE SUPPRESSION
IMPELLER HAZARDS
AVOIDING SPARKS
OPERATING LOCATION
STATIC ELECTRICITY
REGULAR CLEANING
No list of safety guidelines can be complete. Every shop environment is different.
Accidents are frequently caused by lack of familiarity or failure to pay attention. Use
this machine with respect and caution to lessen the possibility of operator injury. If
Make sure you know what type of wood dust you will be exposed
to in case there is a possibility of an allergic reaction.
Fine dust that is too small to be caught in the filter will be blown
into the ambient air during operation. Always wear a NIOSHapproved respirator during operation and for a short time after to
reduce your risk of permanent respiratory damage.
When emptying dust from the collection container, wear a
respirator and safety glasses. Empty dust away from ignition
sources and into an approved container.
Turn the switch off, disconnect the dust collector from the power
supply, and allow the impeller to come to a complete stop before
leaving the machine unattended or doing any service, cleaning,
maintenance, or adjustments.
Do not operate the dust collector in areas were explosion risks are
high. Areas of high risk include, but are not limited to, areas near
pilot lights, open flames, or other ignition sources.
Only operate the dust collector in locations that contain a fire
suppression system or have a fire extinguisher nearby.
Do not place your hands or tools near the open inlet during
operation for any reason. The powerful suction could easily cause
accidental contact with the impeller, which will cause serious
personal injury or damage to the machine.
Do not allow steel or rocks to strike the impeller—this may produce
sparks. Sparks can smolder in wood dust for a long time before a
fire is detected. If you accidentally cut into wood containing tramp
metal (nails, staples, spikes, etc.), immediately turn off the dust
collector, disconnect it from power, and wait for the impeller to stop.
To reduce respiratory exposure to fine dust, locate permanently
installed dust collectors away from the working area, or in another
room that is equipped with a smoke detector. Do not operate the
dust collector in rainy or wet locations—exposure to water may
create a shock hazard or decrease the life of the machine.
Plastic dust lines generate high amounts of static electricity as dust
chips pass through them. Although rare, sparks caused by static
electricity can cause explosions or fire. To reduce this risk, make
sure all dust lines are thoroughly grounded by Using a grounding
wire.
Regularly check/empty the collection bags or drum to avoid the
buildup of fine dust that can increase the risk of fire. Make sure to
regularly clean the surrounding area where the machine is
operated—excessive dust buildup on overhead lights, heaters,
electrical panels, or other heat sources will increase the risk of fire.
3
Page 5
normal safety precautions are overlooked or ignored, serious personal injury may occur.
FAILURE TO FOLLOW THESE RULES MAY RESULT IN SERIOUS PERSONAL INJURY.
FOR YOUR OWN SAFETY, READ AND UNDERSTAND THE INSTRUCTION MANUAL
BEFORE OPERATING THE MACHINE.
KEEP WORK AREA CLEAN. Cluttered areas and benches invite accidents.
DON’T USE IN DANGEROUS ENVIRONMENT. Don’t use this unit in damp or wet
locations, or expose it to rain. Keep work area well-lighted.
KEEP CHILDREN AND VISITORS AWAY. All children and visitors should be kept
a safe distance from work area.
DISCONNECT UNIT before servicing.
CHECK DAMAGED PARTS. Before further use of the unit, properly repair or
replace any part that is damaged.
2. Technical Specification
2.1 Specification
MODEL NO.
Motor 1500W
Motor Speed
mote Control NO
Re
Fan diameter 305mm
Inlet di
Nu
Cartridge filtration area --Ca
Filter bag size 500x850mm
Filter bag area 1.65 m²
Co
Co
Ne
Air
No
Ov
ameter 125mm
mber of intake holes 2x100mm
rtridge filtration rate ---
llect bag size 500x850mm
llect bag volume 0.17 m³
gative pressure value
flow
ise level 83dB
erall size 1035X653X1963mm
AW1500DE
50Hz:2850r/min
60Hz:3420 r/min
50Hz: 2kpa
60Hz: 2.7kpa
50Hz: 1360 m³/h
60Hz: 1632 m³/h
Pa
cking size 992X582X625mm
N/G w
eight 41.5/47.5KG
4
Page 6
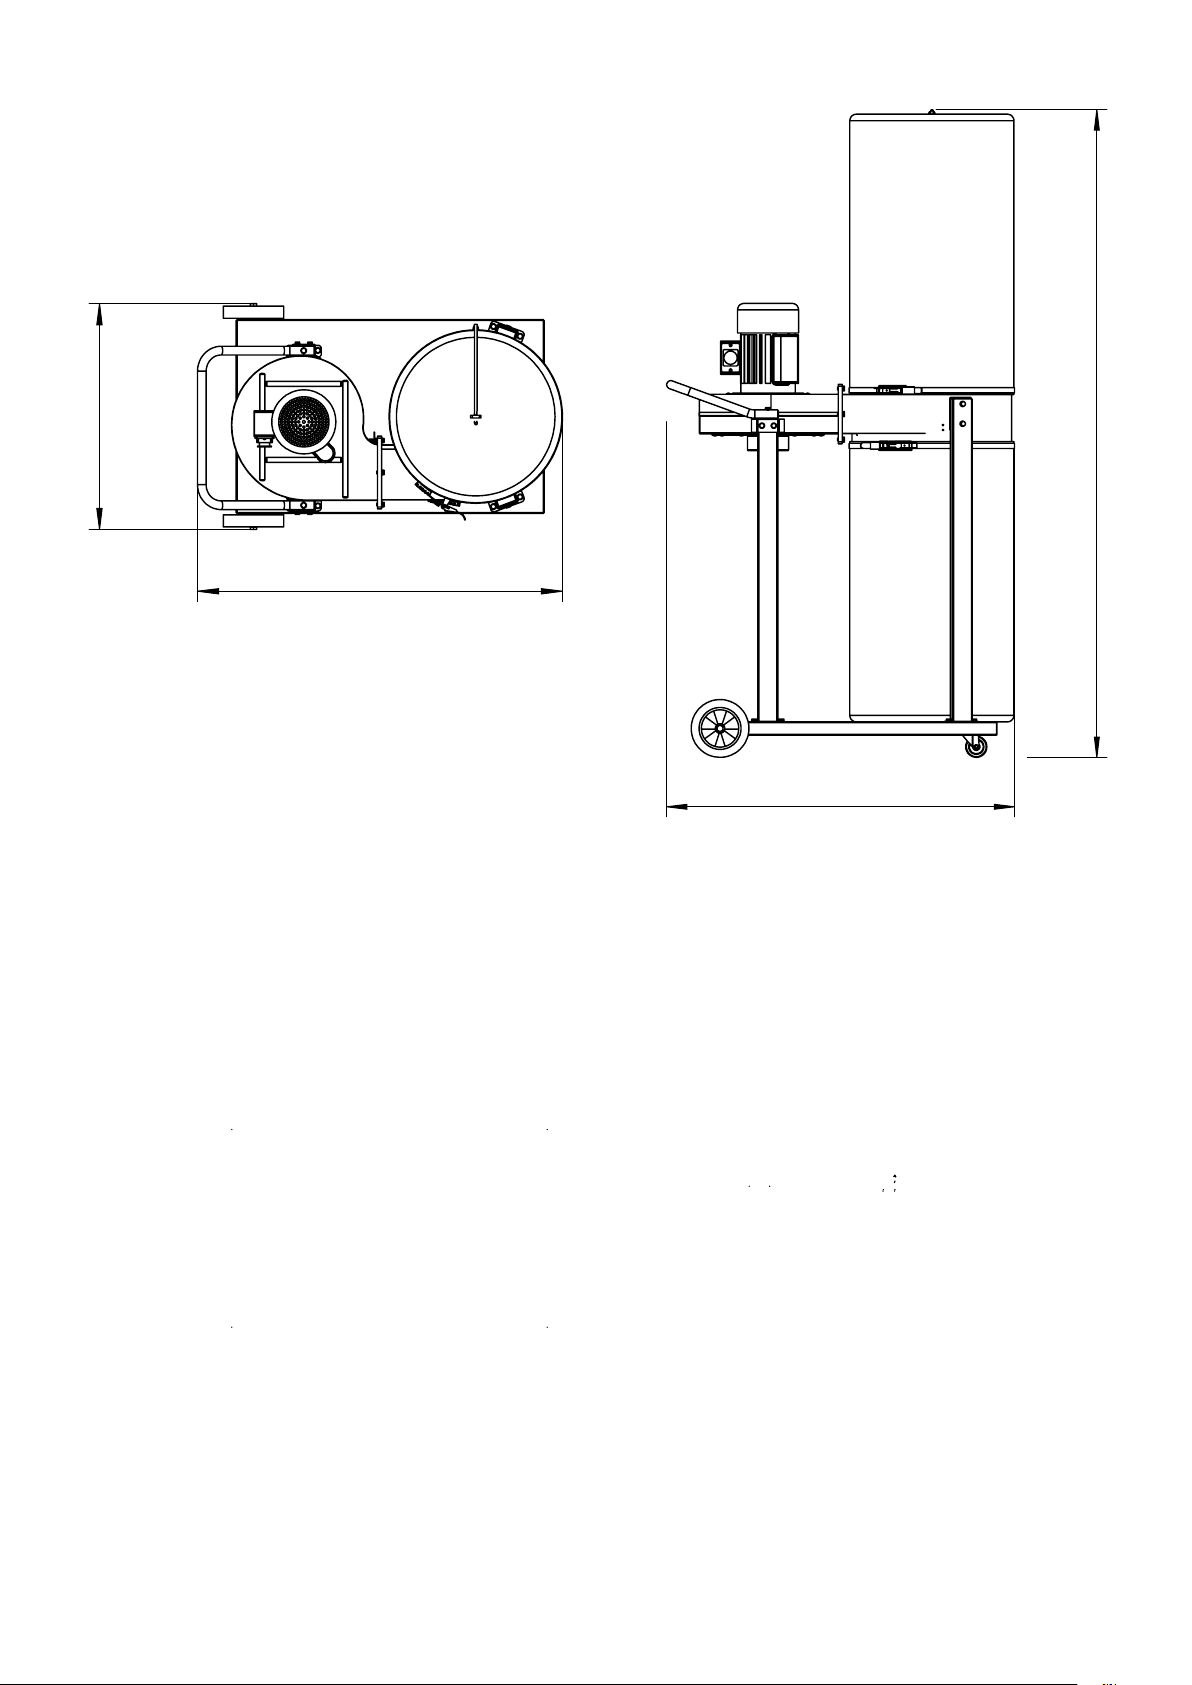
2.2 Dimensions
AW1500DE
653
1963
1055
1055
5
Page 7
3. Assembly
The dust collector is delivered not pre-assembled. After unpacking, the machine must be installed.
Transport the dust collector in its packing crate to a place near its final installation site
before unpacking it. If the packaging shows signs of possible transport damage, take the
necessary precautions not to damage the machine when unpacking. If any damage is
discovered, the carrier and/or shipper must be notified of this fact immediately to
establish any claim which might arise.
3.1 Unpacking
The machine is packed in one carton. Before beginning setup, lay these items out and inventory
them. The following is a list of items shipped with your machine. Before beginning setup, lay these
items out and inventory them.
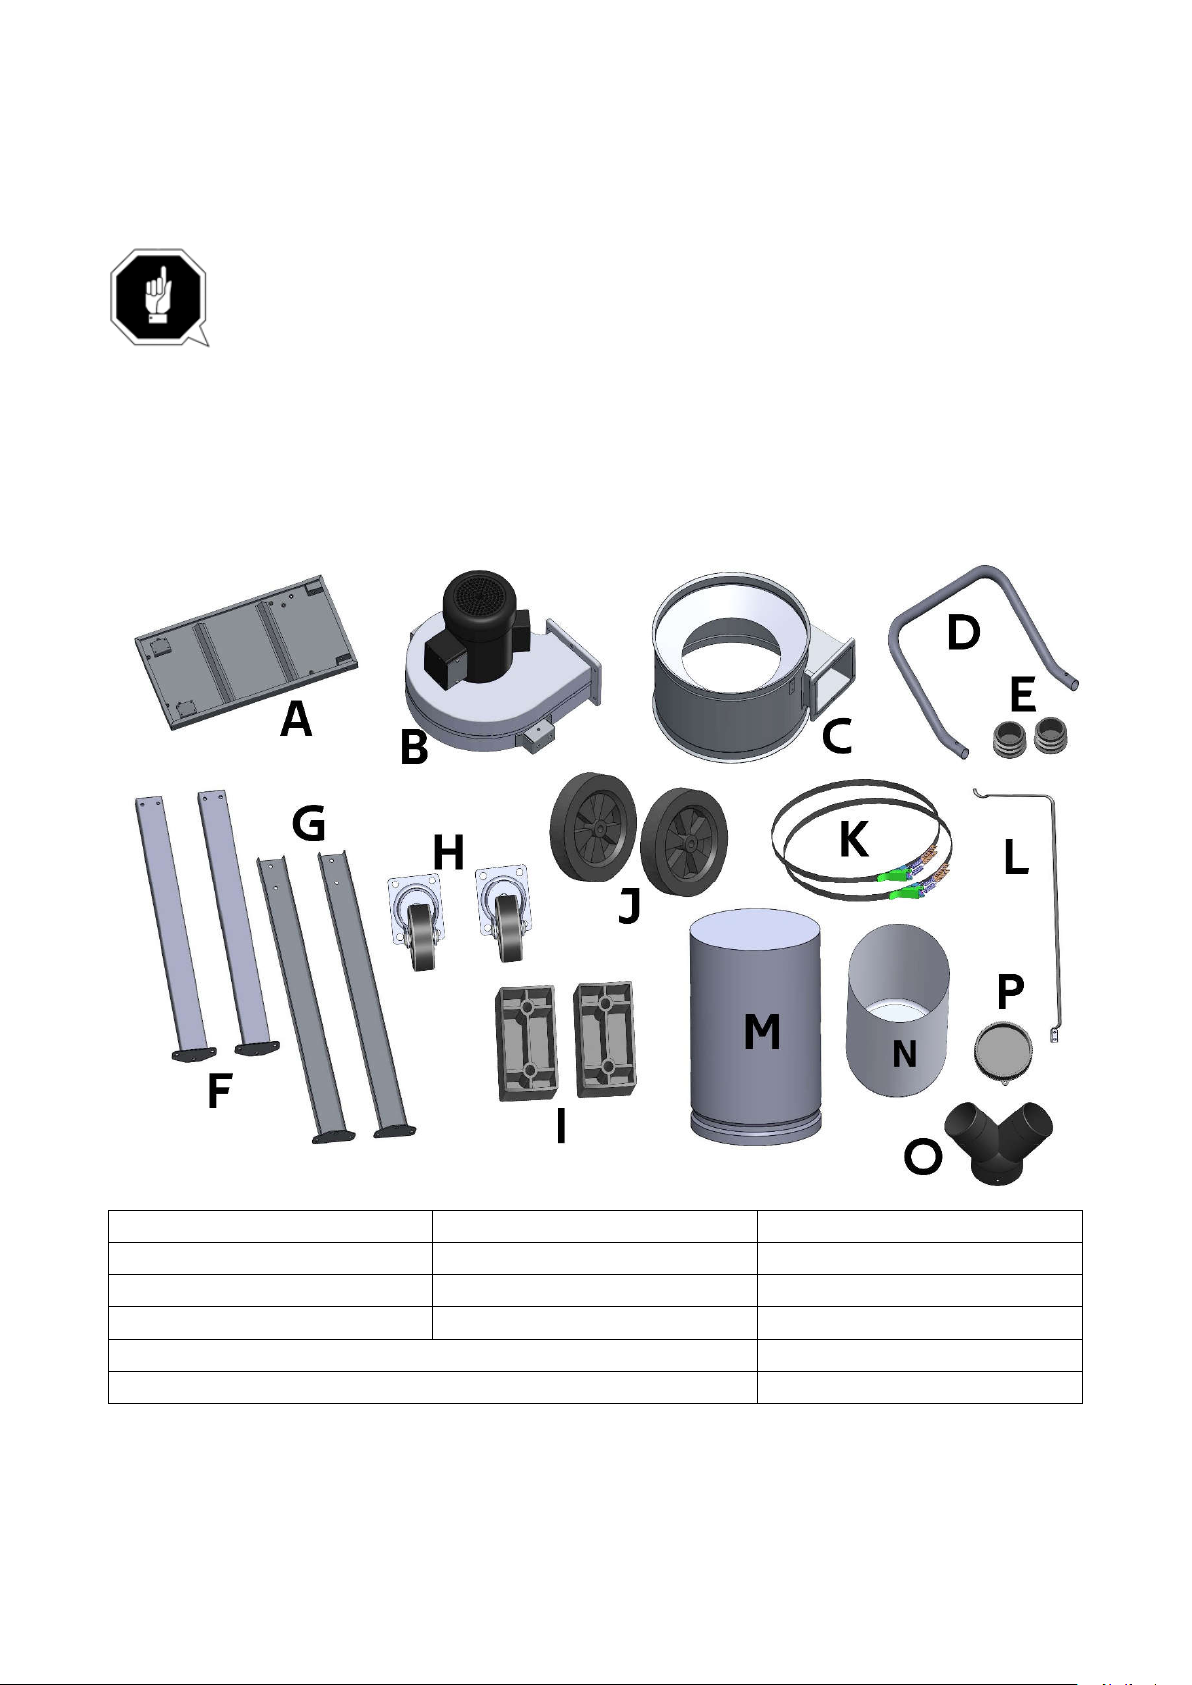
A. Base B. Fan housing assembly C. Dust collect
D. Pu
ll handle
pport legs for dust collect
G. Su
J. 7” caster wheels K. Bag clamps L. Bag support for AW1500DE
M. Upper bag for AW1500DE
O: I
nlet Adaptor 2x100mm
E. En
d cap for handle
” caster wheels
H. 2.5
F. Su
pport legs for fan housing
acer pad
I. Sp
N. Dust collect bag
P. End c
6
ap for Inlet Adaptor
Page 8
If
you cannot find an item on this list, carefully check around/inside the machine
and packaging materials. Often, these items get lost in packaging materials while
unpacking or they are pre-installed at the factory.
3.2 Assembly
he machine must be fully assembled before it can be operated. Before beginning the assembly
T
process, gather all listed items. To ensure the assembly process goes smoothly, first clean any parts
that are covered or coated in heavy-duty rust preventative (if applicable).
o assemble machine
T
1. M
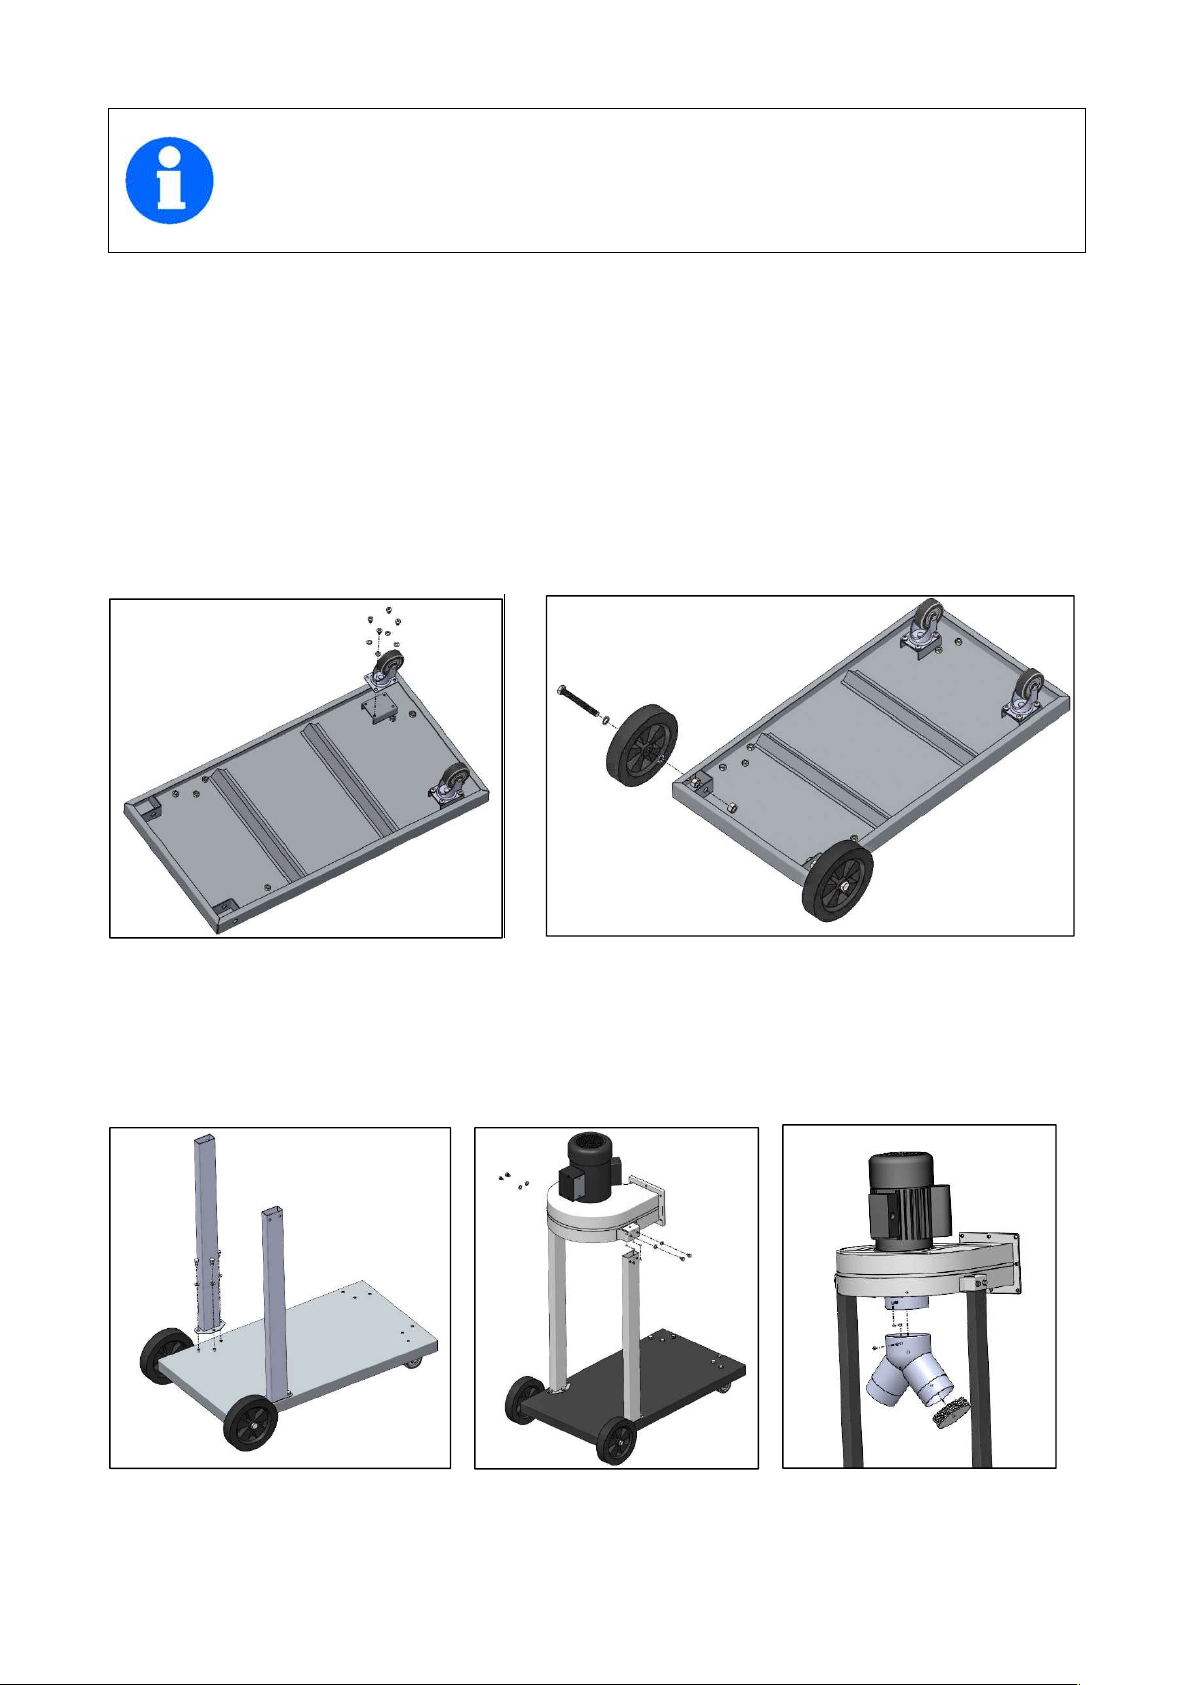
ount the two 2.5” caster wheels onto the base plate by Hexagonal head screws M6X10 and Flat washer 6. (Pic.1)
Pic.1 Pic.2
2. M
ount the two 7” caster wheels onto the base plate by bolt M2x120, Nut and Flat washer 12. (Pic.2)
3. Mount th
4. Install the motor fan housing assembly on the support legs by bolt M8X16 and washer 8. (Pic.4)
5. Install the inlet adaptor and end cap on the dust collector. (Pic.5)
e two support leg for the fan housing on the base by screw M5X8 and washer. (Pic.3)
Pic.3 Pic.4 Pic.5
7
Page 9
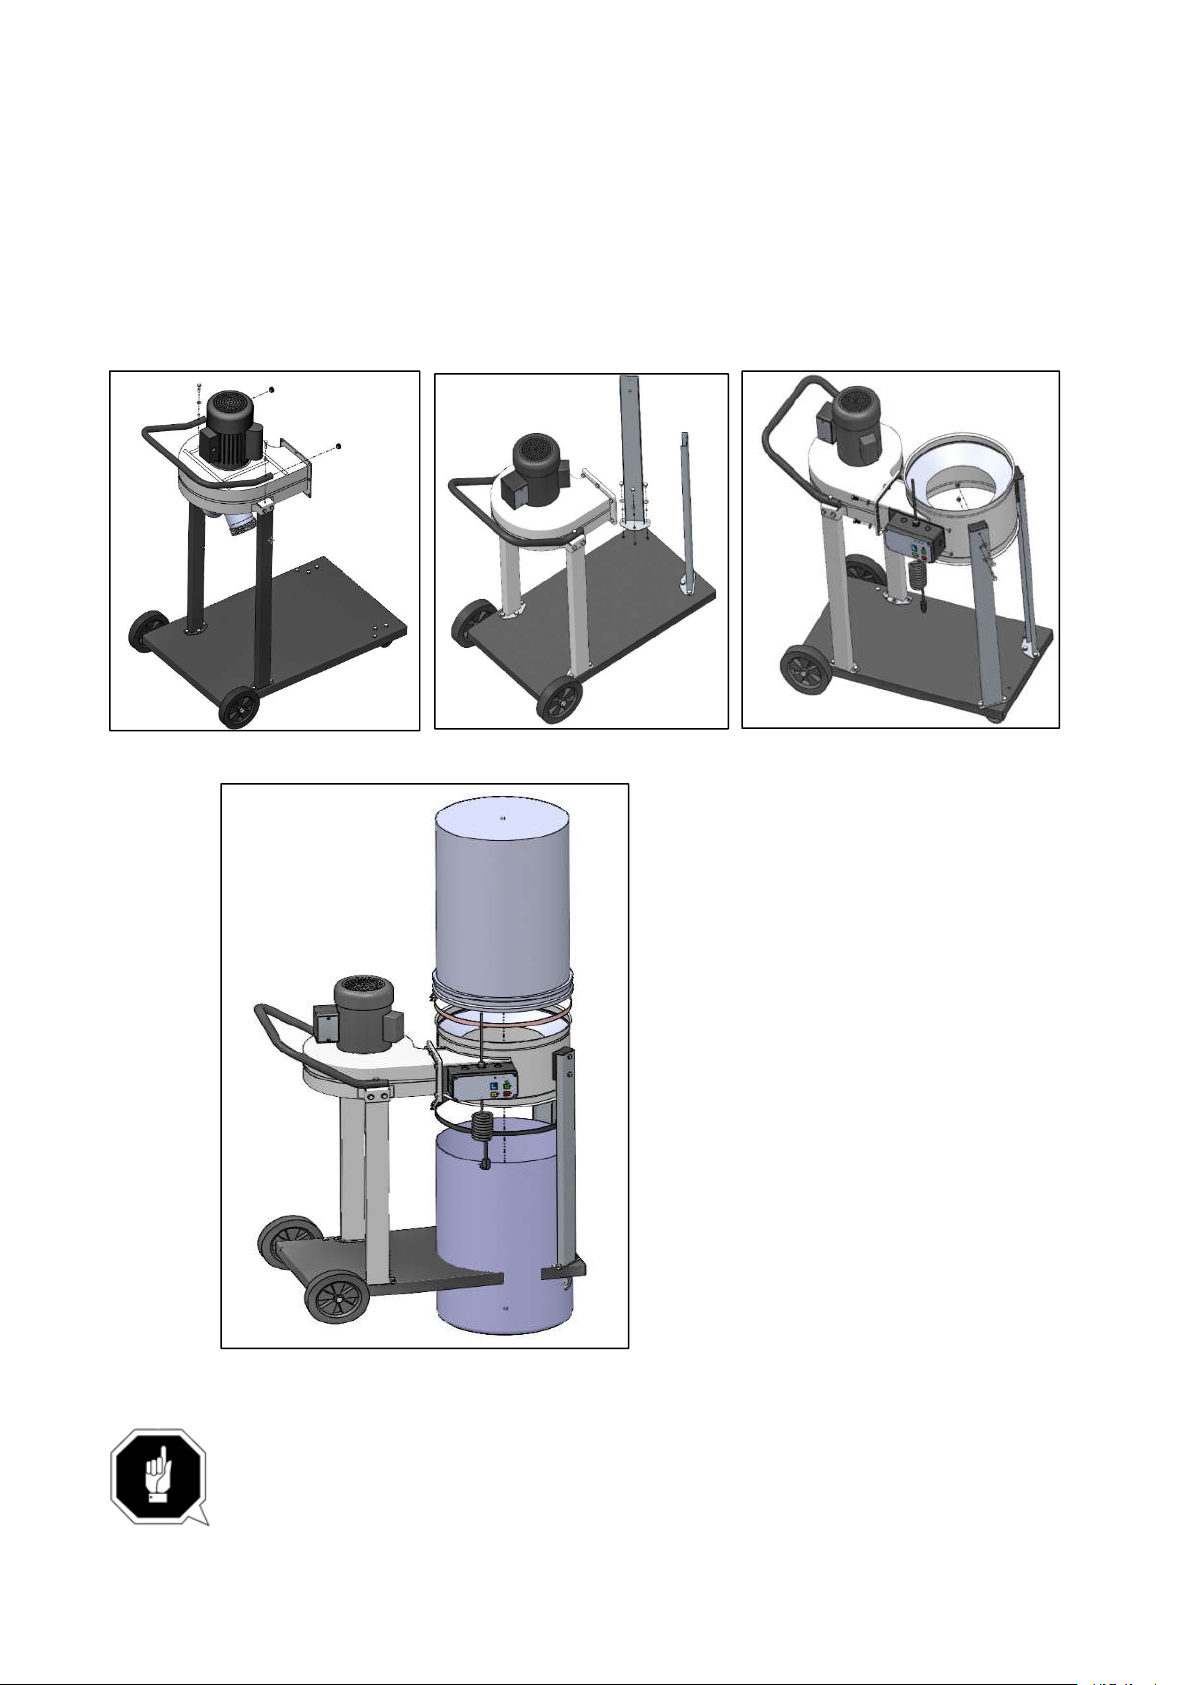
6. Install the handle on the fan housing by bolt M8X35 and washer 8. Press the two end caps in to the
handle. (Pic.6)
7. Mount the two collector support legs on the base plate by bolt M8X16 and washer 8. (Pic.7)
8. Install the dust collect on the support leg and then connect the dust collect and fan housing together.
(Pic.8)
9. Install the dust collect bag and clamp it by the bag clamp. Install the filter bag and then fasten it by the bag
clamp. Use the bag support to support the filter bag (For AW1500DE). (Pic.9)
Pic.6 Pic.7 Pic.8
Pic.9
Now, the assembly work is basically finished. Before using the machine, please make a test
firstly: Press the ‘GREEN’ button to switch on. Check that everything is working correctly then
switch off by pressing the ‘RED’ button. Disconnect the machine from the mains supply.
8
Page 10
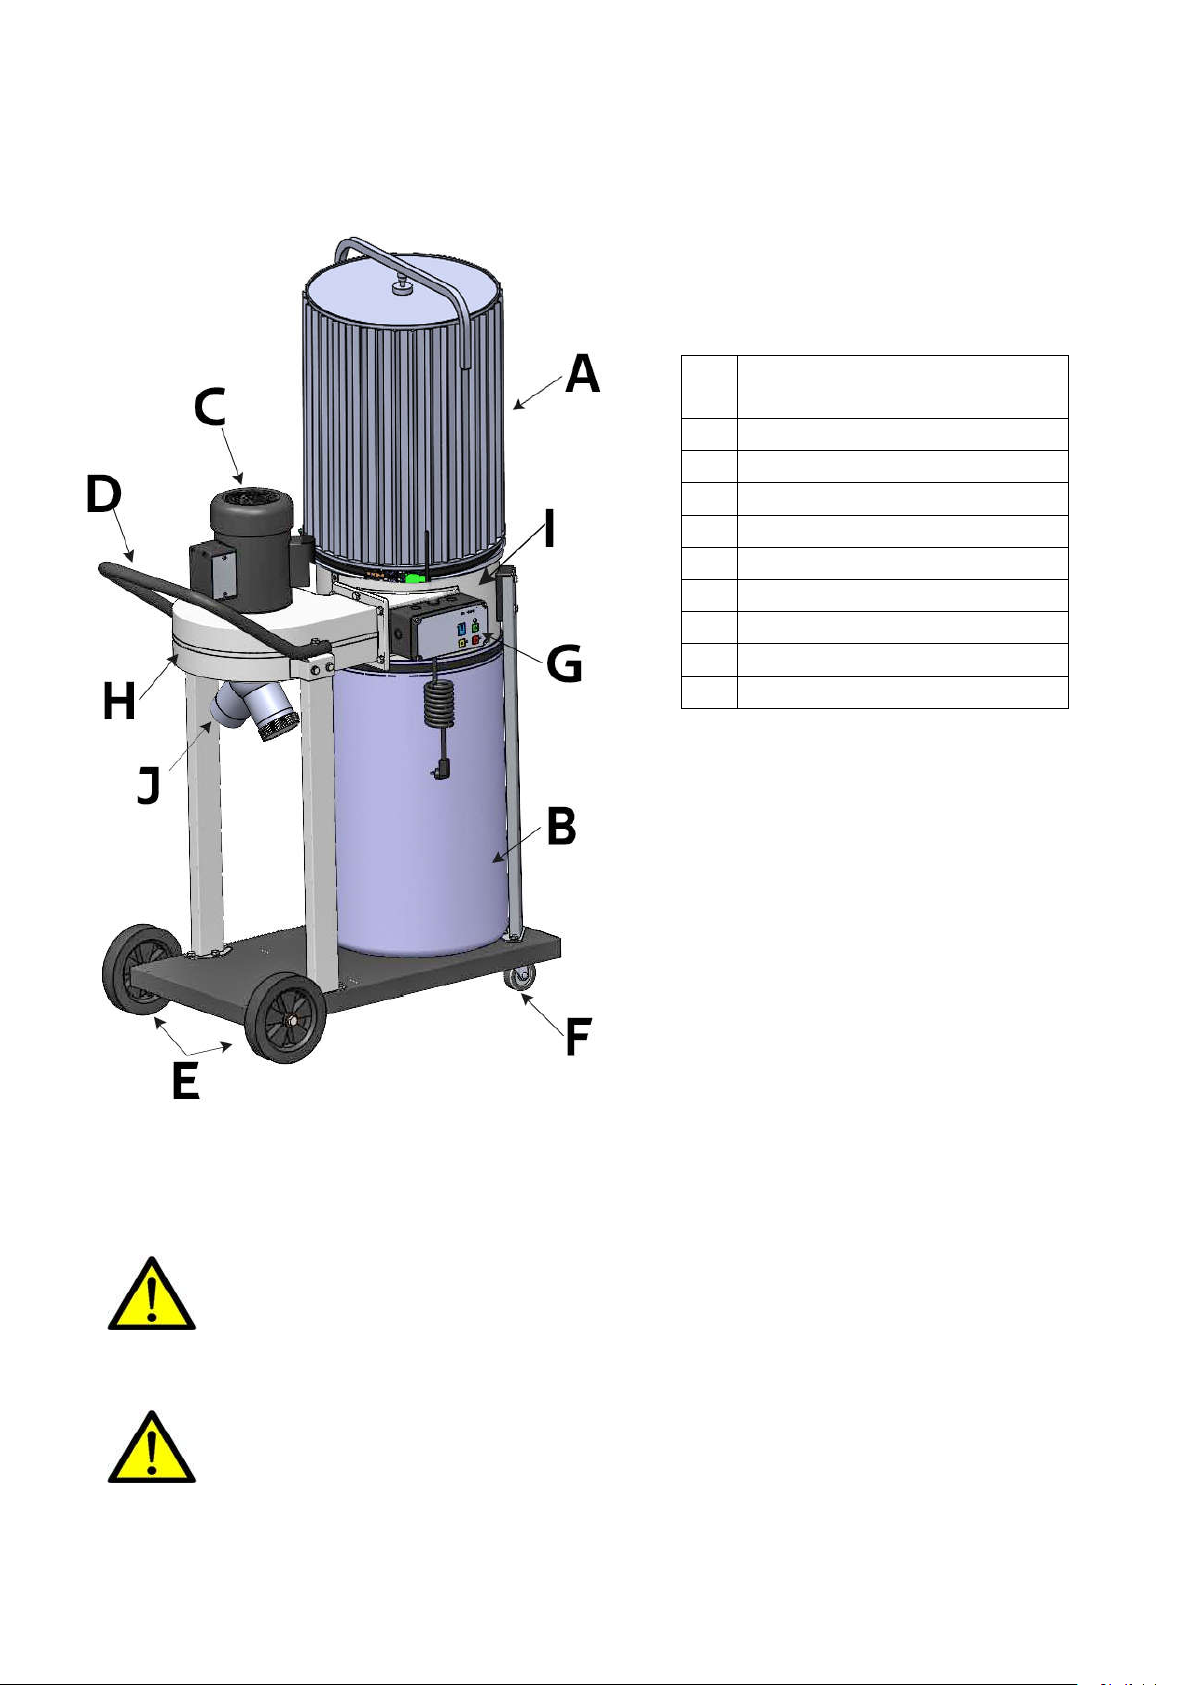
3.3 Know your machine
Upper Filter bag for
A
AW1500DE
B Dust collect bag
C M
D Pu
E 7”
F 2.5” Ca
G
H Fan housing assembly
I Du
J 2X100
otor
ll handle
Caster wheels
ster wheels
Control box N/A
st collect assembly
mm inlet adaptor
4. Op
ALWAYS ensure it is switched off and isolated from the mains by removing the plug from the
socket.
A sui
The collector can also be connected directly to the woodworking machine being used, using the
eration
OT OPERATE WITHOUT ALL PARTS IN PLACE!
DO N
Do not attempt to clean, remove/attach dust bags or carry out any servicing to the unit
whilst it is in operation.
CAUTION: THE BLOWER HOUSING CONTAINS A HIGH SPEED FAN BLADE THAT COULD
AMPUTATE FINGERS, GRAB LOOSE CLOTHING AND NECKTIES ETC, AND PROPEL DUST AT VERY
HIGH VELOCITIES.
table length of flexible hose can be fitted to the collector inlet using the adapter supplied.
9
Page 11
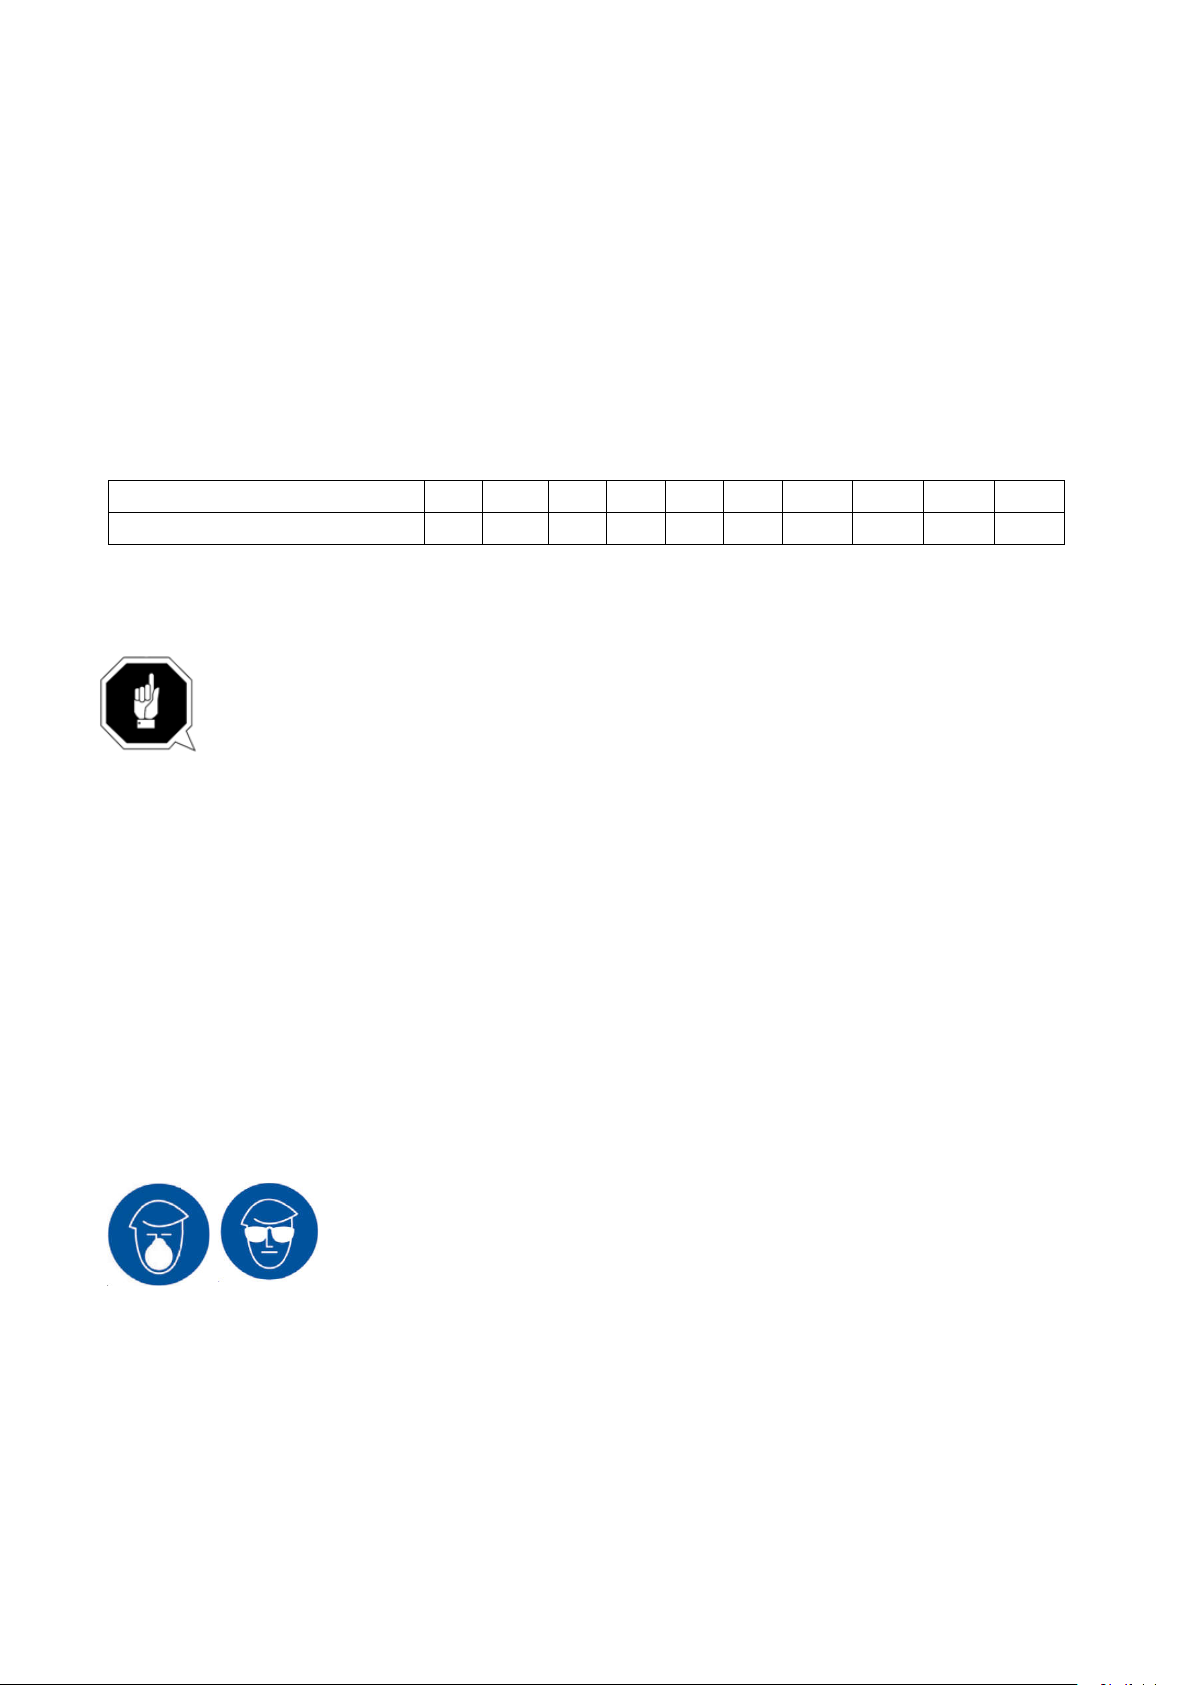
appropria
Take care never to suck in foreign objects such as screws, nails, large pieces of plastic or wood.
te hose and adapters which can be purchased separately.
4.1 Required CFMs
Si
nce each machine produces a different amount of sawdust, the requirements for the minimum
amount of CFM to move that sawdust is unique to the machine (for example, a planer produces more
sawdust than a table saw).
Refer to the figure below for a close estimation of the airflow each machine requires. Keep in mind
that machines that generate the most sawdust should be placed closest to the dust collector. If the
machine has multiple dust ports, the total CFM required is the sum of all ports.
Machine dust port Size
Approximate Required CFM
2" 2.5"
100 150 250 400 600 850 1200 1600 2000 2500
3" 4" 5" 6" 7" 8" 9" 10"
5. Mainte
Daily
• Empty the collection bag before it overflows; wear a dust mask whilst removing and
emptying the bag.
Weekly
• Check the inlet and outlet duct and remove any accumulated sawdust.
• Check the inlet hoses for splits and cracks; repair as necessary.
• Check the dust collection bag for wear and tear, especially around the neck of the
retaining clip. If wear or fraying is occurring, replace the bag.
• Check the motor for dust, sawdust, shavings etc, build up. If this has occurred, clean with
a vacuum cleaner.
CAUTION:
nance
ONNECT THE EXTRACTOR FROM THE MAINS SUPPLY BEFORE
DISC
CONTINUING.
Dust exposure created while using machinery may cause cancer, birth
defects, or long-term respiratory damage. Always wear goggles and a
NIOSH approved respirator when working with the dust collection bags
or canisters.
10
Page 12
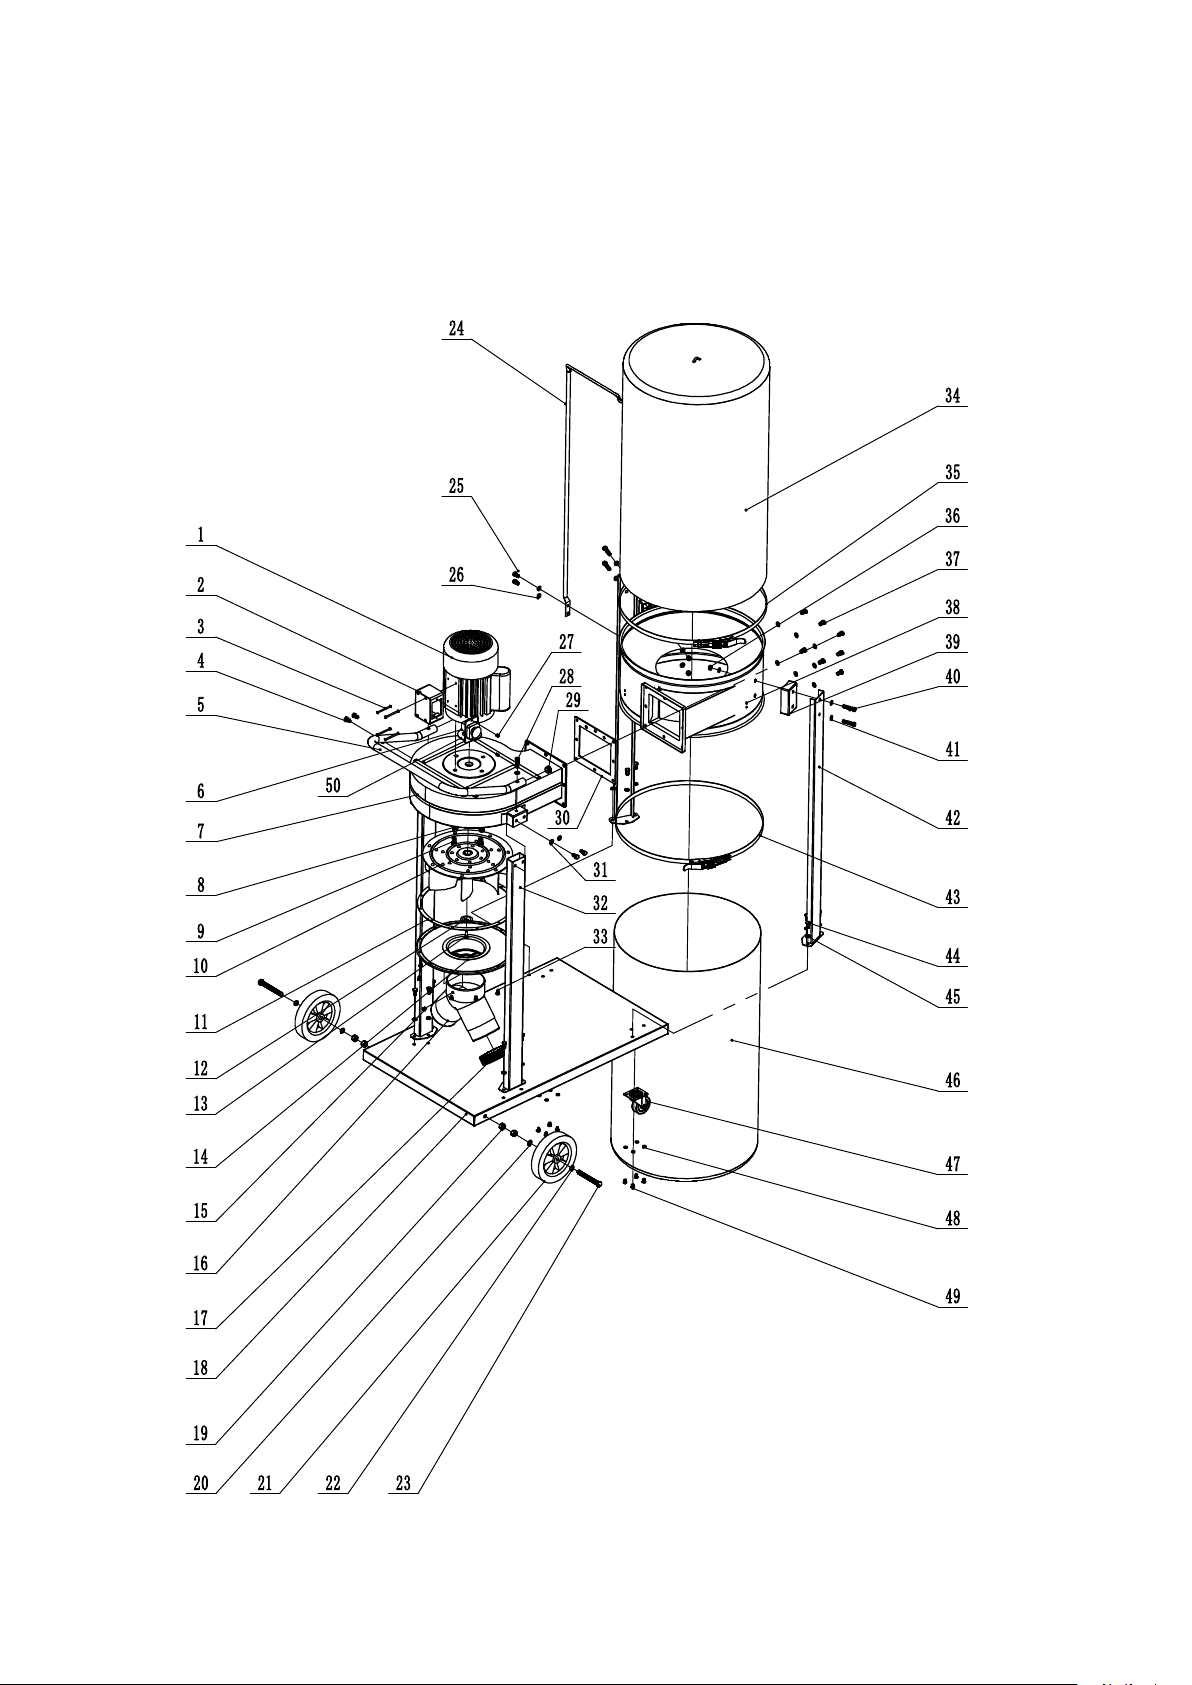
Diagram and part list
6.
6.1 AW1500DE
11
Page 13
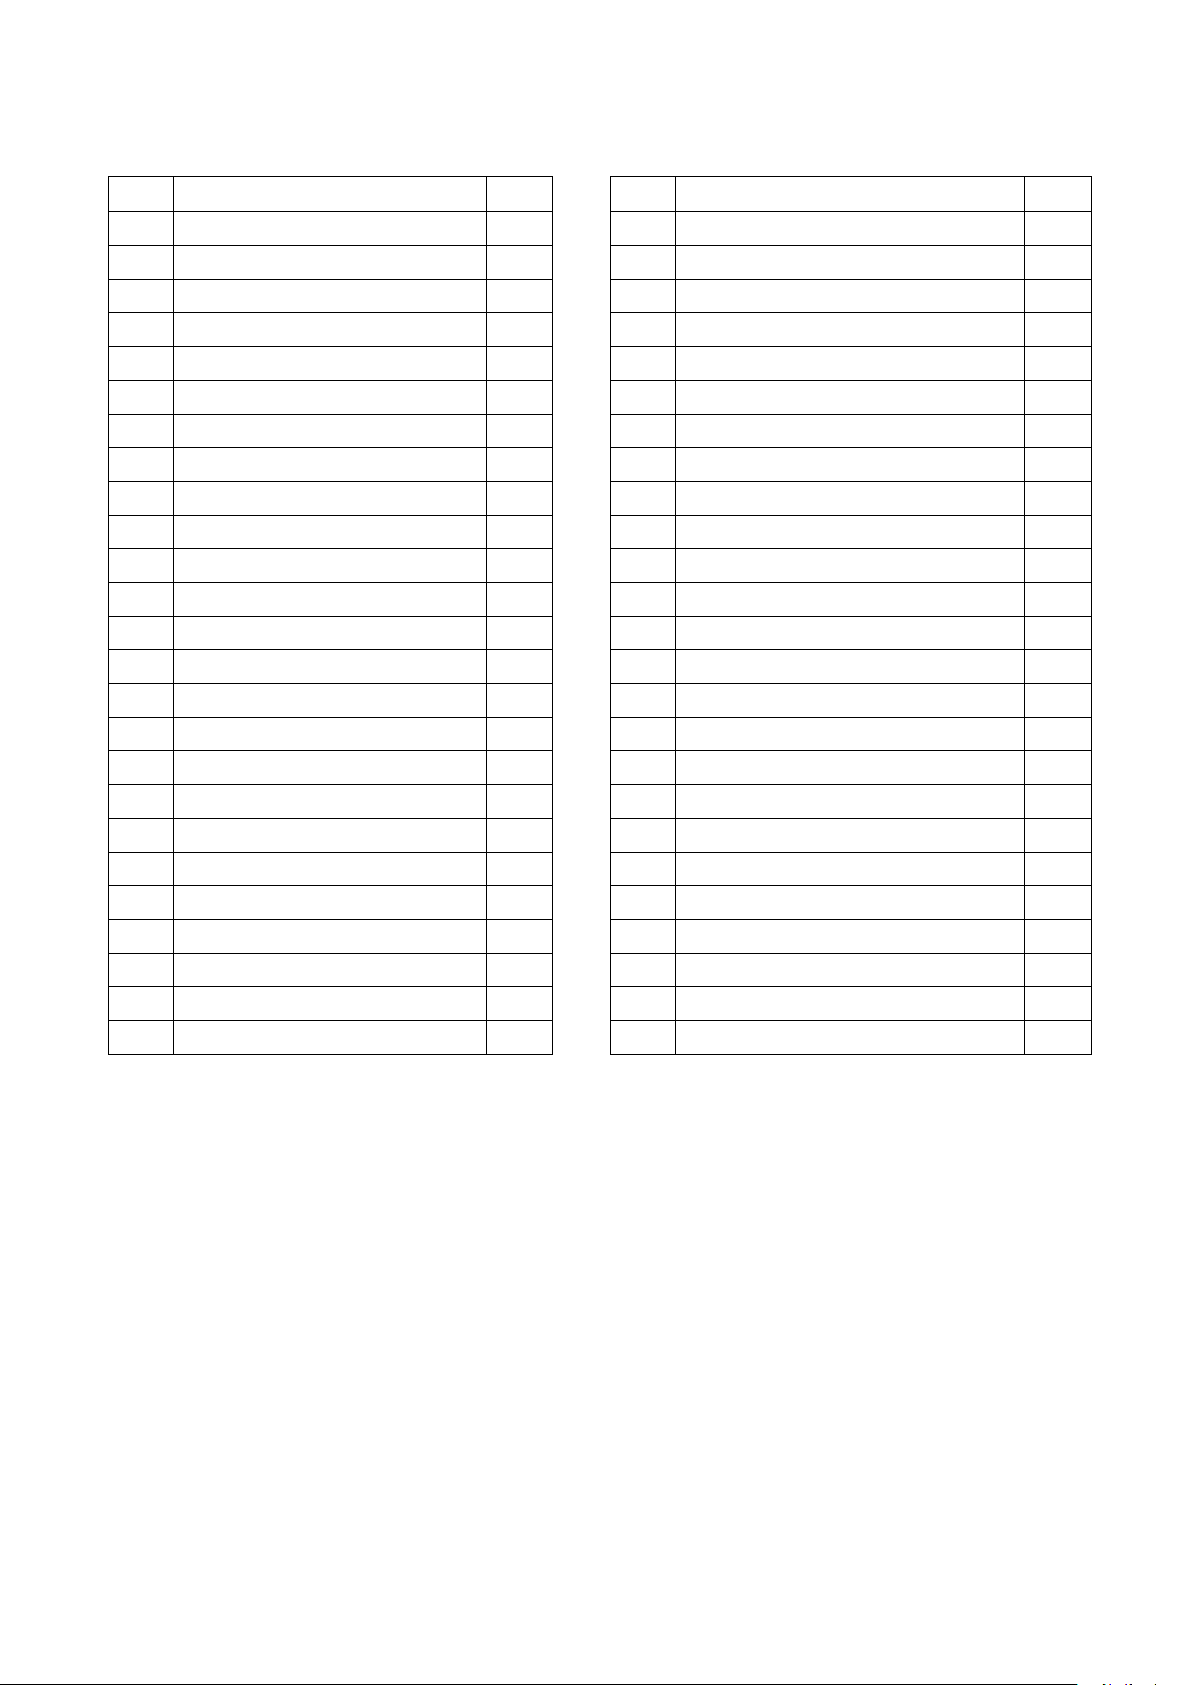
No
. Description Qty
1 M
2 Sw
otor 1 26 Flat washer 8 2
itch box 1 27 Self-tapping screw ST4X12 2
No. Description Qty
3 Screw M4X60 4 28 Hexagonal bolt M8X35 2
4 Bolt M
8X16 4 29 End Cap 2
5 Handle 1 30 Sealing gasket 1
6 Sw
7 Im
8 Sp
9 He
itch 1 31 Flat washer 8 4
peller housing 1 32 Support leg 2
ring washer 10 4 33 Screw M6X10 12
xagonal Bolt M10X20 4 34 Filter bag 1
10 Impeller 1 35 Upper bag clamp 1
11 Se
12 Re
13 He
14 Inlet
15 Screw
16 Inlet
aling ring 1 36 Nut M8 4
taining ring 1 37 Hexagonal bolt M8X16 8
xagonal Bolt M6X20 1 38 Dust collect 1
port 1 39 Spacer pad 2
M5X8 1 40 Hexagonal head bolt M8X45 4
Adaptor 1 41 Flat washer 8 4
17 End Cap 1 42 Support leg 2
18 Ba
19 Nu
20 W
21 7-in
se 1 43 Lower bag clamp 1
t M12 4 44 Hexagonal bolt M8X16 12
asher 12 2 45 Flat washer 8 12
ch casters 2 46 Dust collect bag 1
22 Flat washer 12 2 47 2.5-inch casters 2
23 He
xagonal bolt M12X120 2 48 Flat washer 6 8
24 Bag support rod 1 49 Screw M6X10 8
25 He
xagonal bolt M8X16 2 50 Motor rubber pad 1
12
Page 14
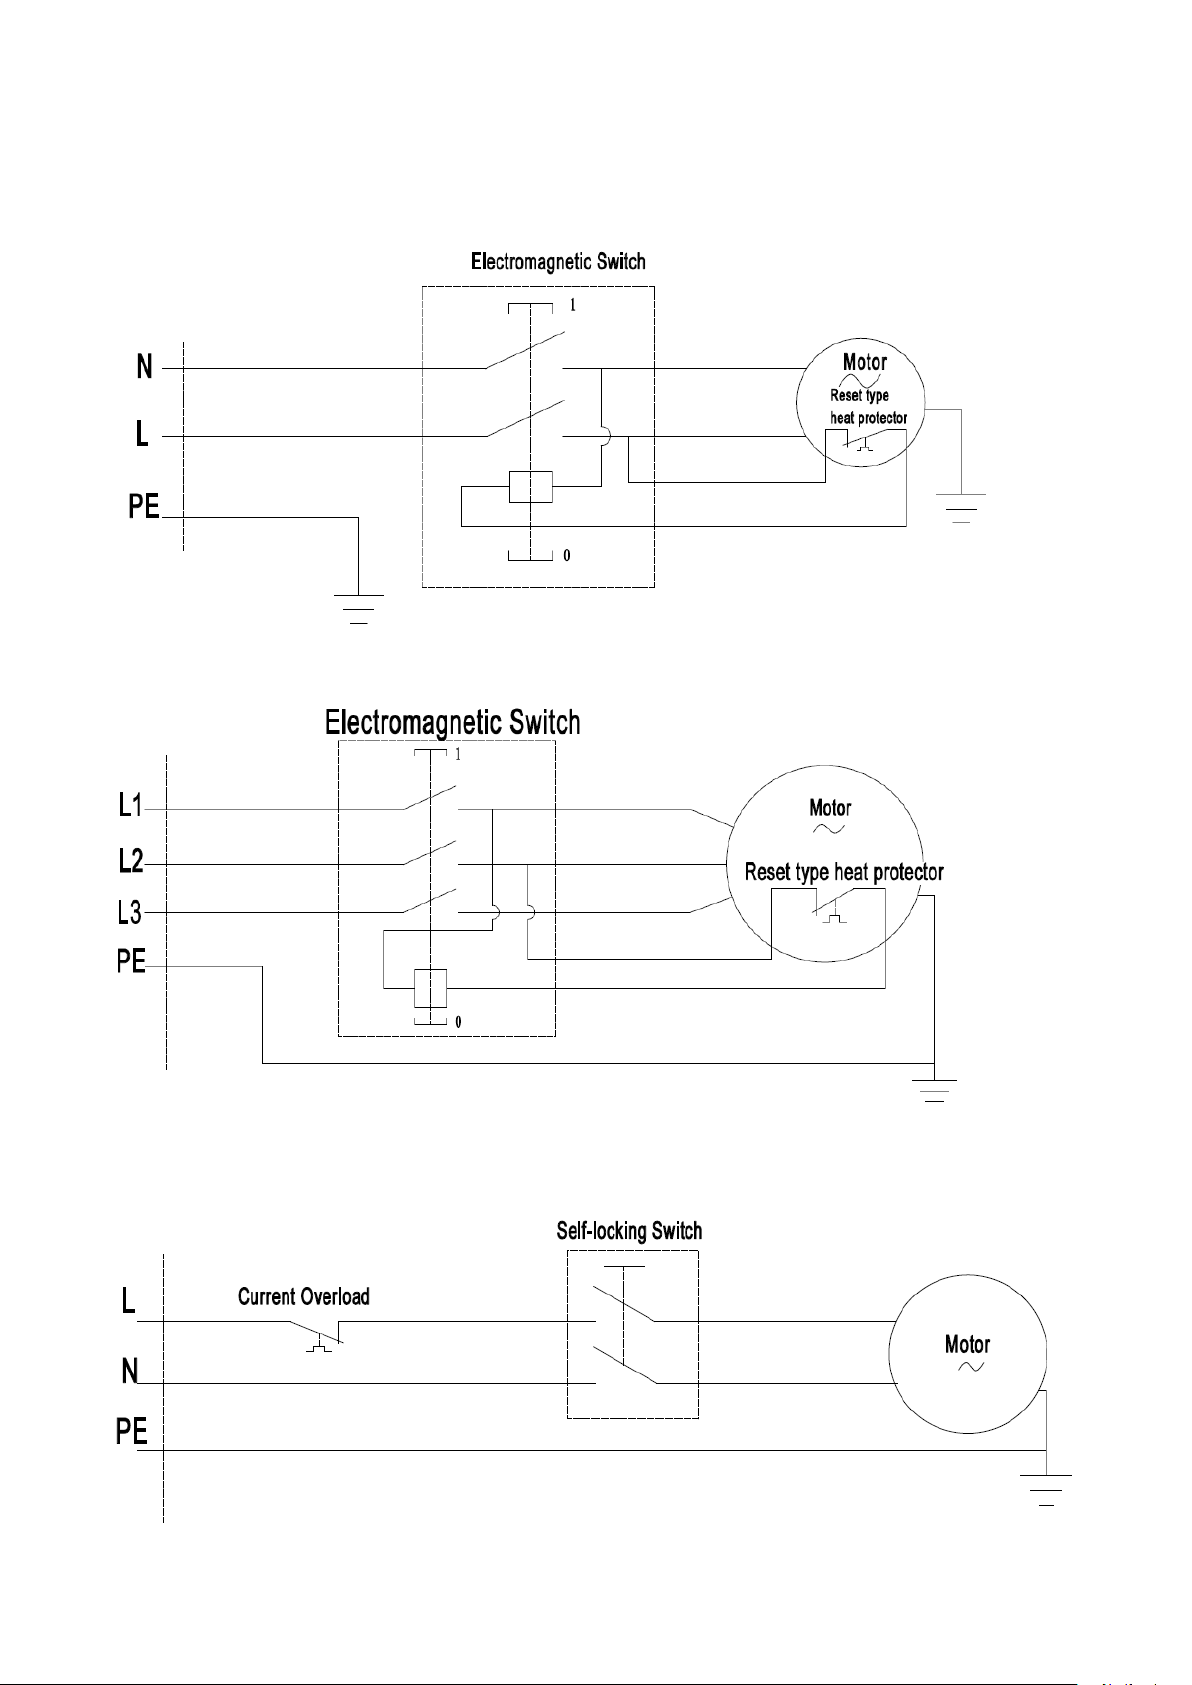
6.3 Wiring diagram
AW1500DE:
230V 50HZ 1PH
380V 50HZ 3PH
220V 60HZ 1PH
15
Page 15
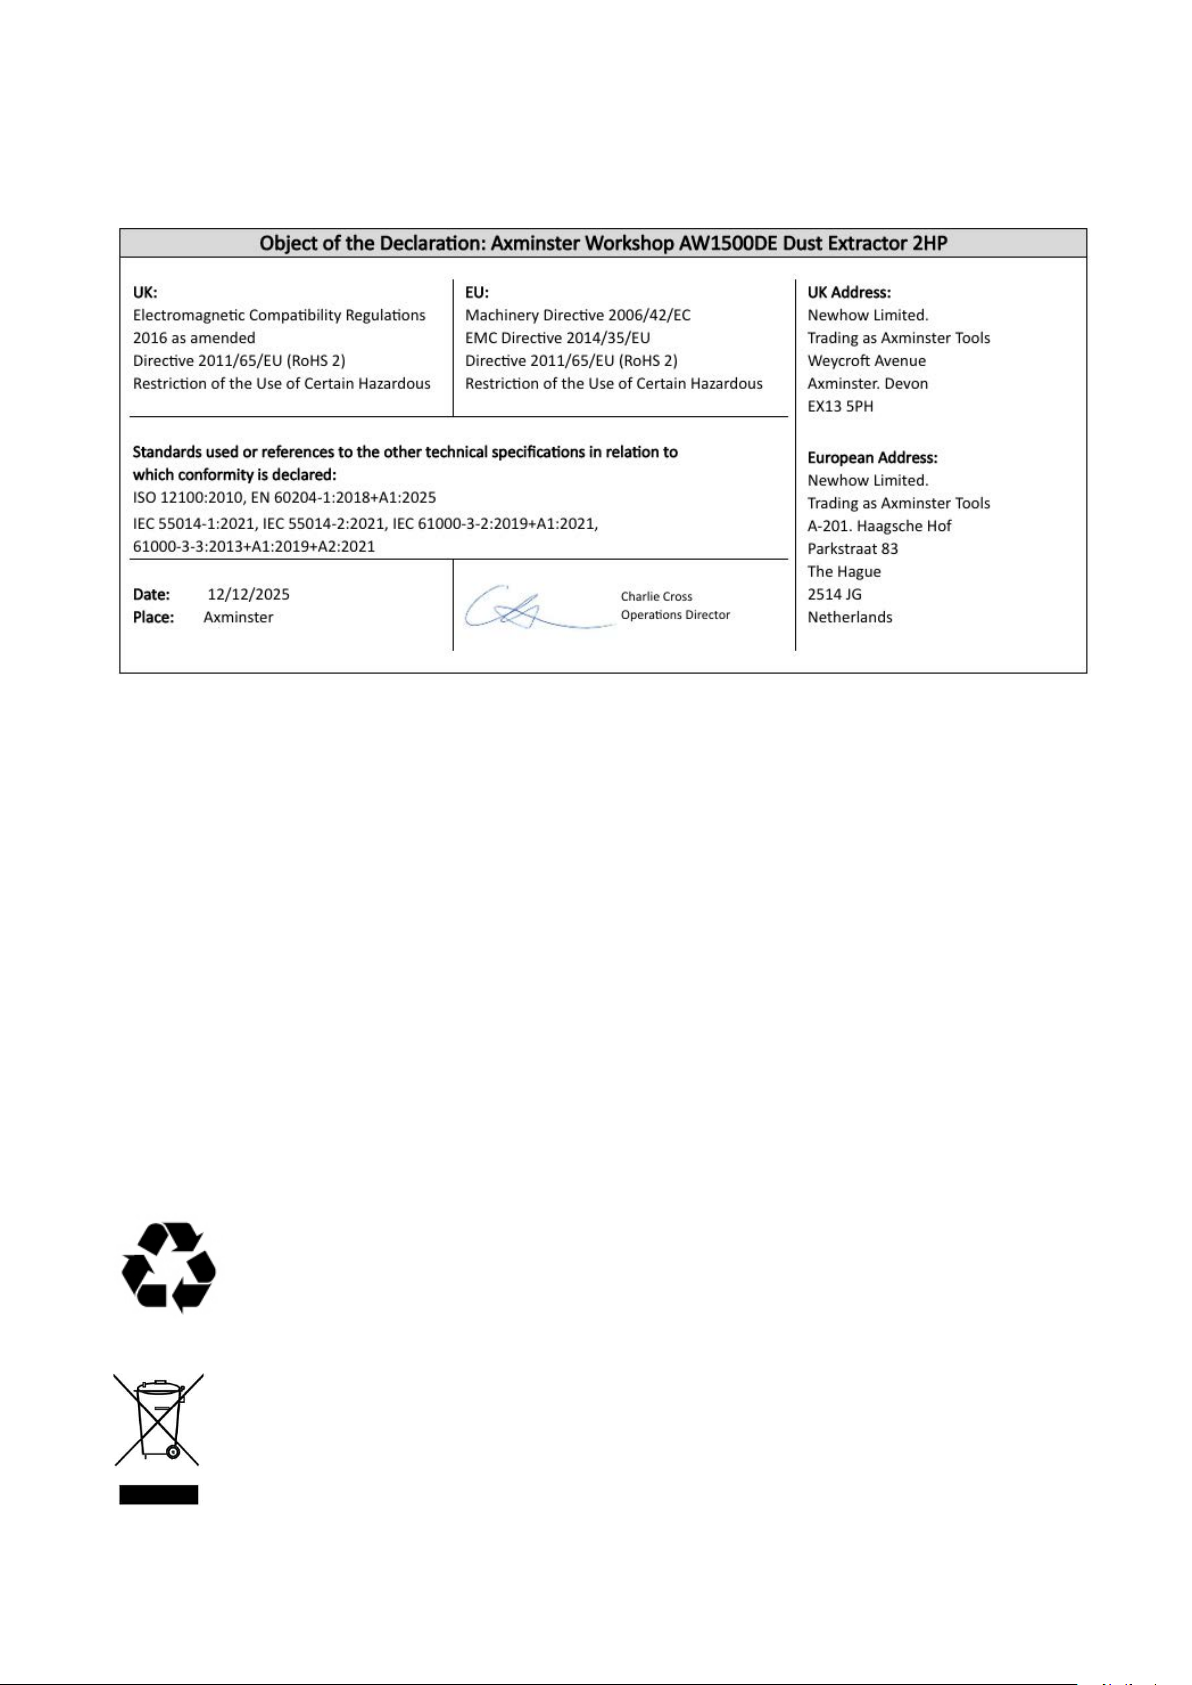
Please
dispose of packaging for the product in a responsible manner. It is
suitable for recycling. Help to protect the environment, take the packaging to the
local amenity tip and place into the appropriate recycling bin.
Only for EU countries
Do not dispose of electric tools together with household waste material!
In observance of European Directive 2002/96/EC on waste electrical and electronic
equipment and its implementation in accordance with national law, electric tools
that have reached the end of their life must be collected separately and returned to
an environmentally compatible recycling facility.
16
Page 16

 Loading...