

Page 1
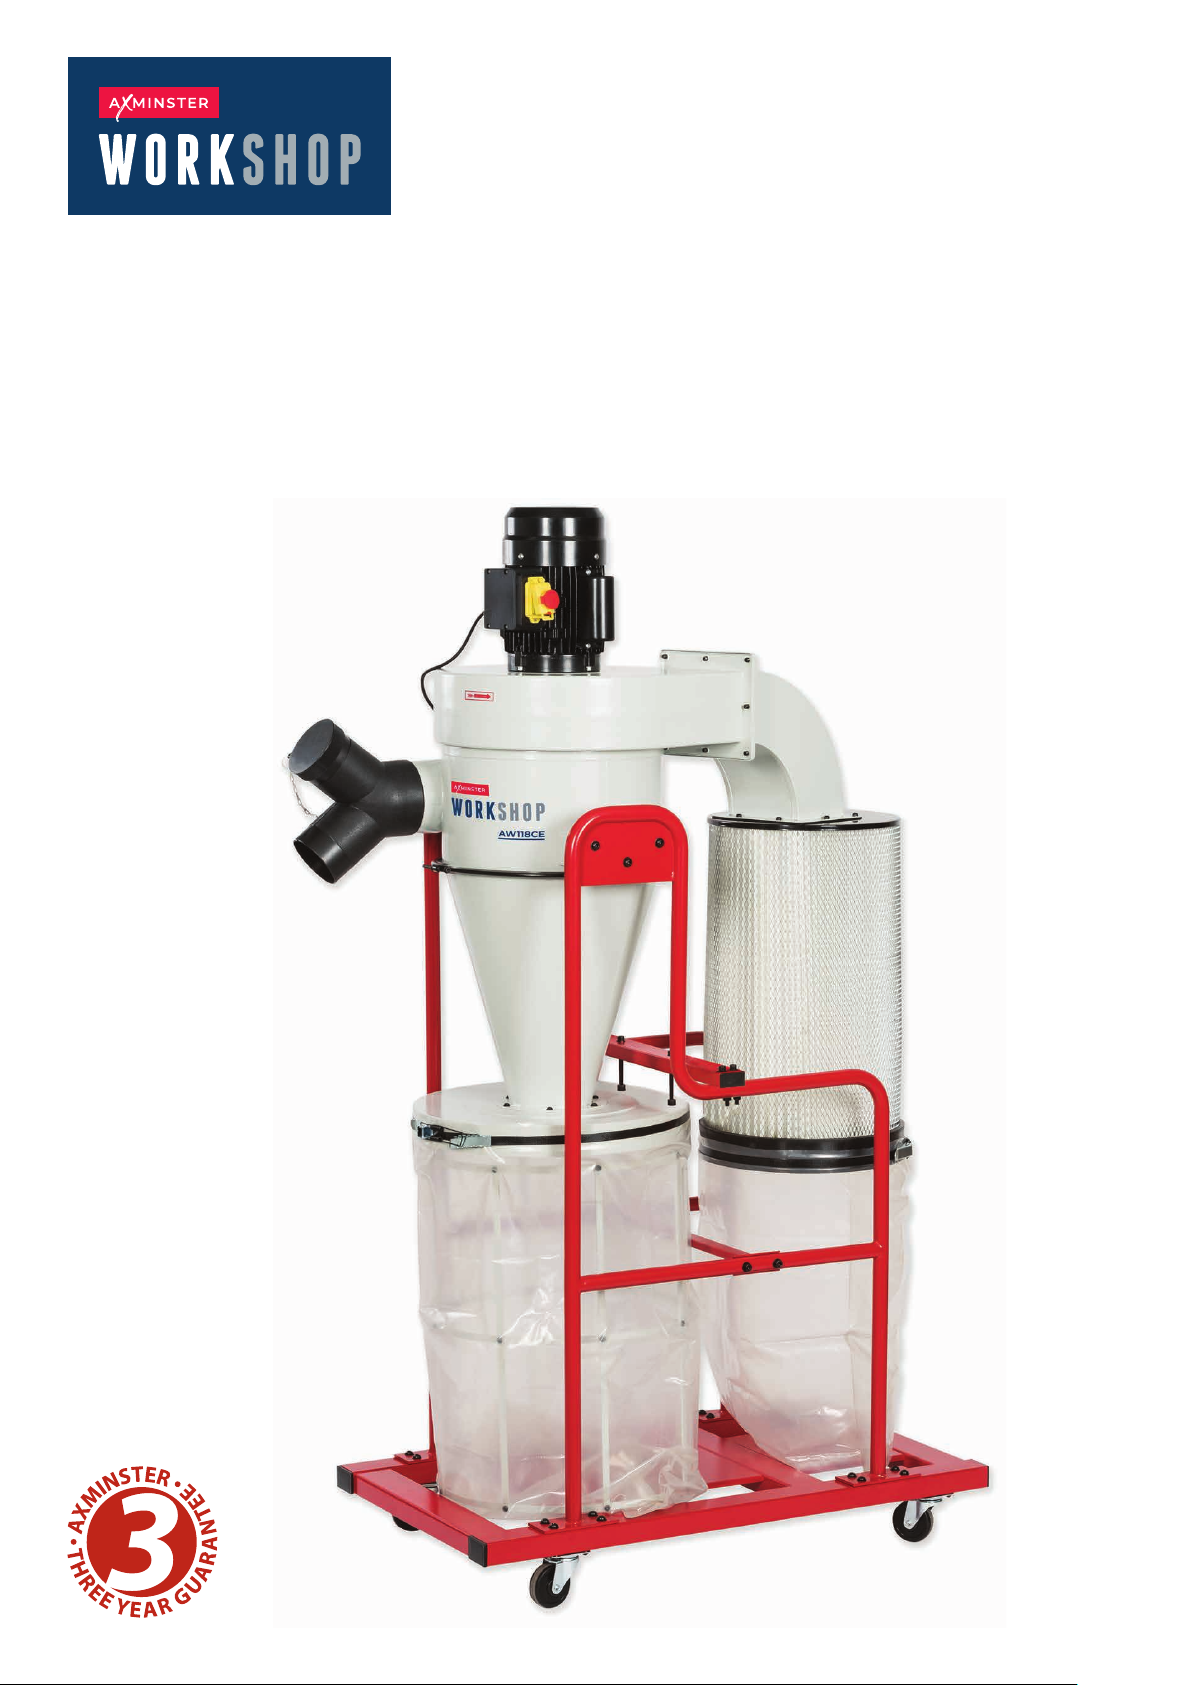
AW118CE
Cyclone Extractor
Code 107698
Original Instructions
AT: 15/12/2025
BOOK VERSION: 6
Page 2
Cert No: FM300, FM300C
EU Declaration of Conformity
Axminster Tool Centre Ltd
Axminster Devon
EX13 5PH UK
axminstertools.com
declares that the machinery described:-
Type Cyclone Extractor
Model AW118CE
Signed
Andrew Parkhouse
Operations Director
Da te : 08/08/2016
This machine complies with the following directives:
2006/42/EC
06/42/EC - Annex I/05.2006
EN 62233:2008
EN 60335-2-69:2012
EN 60335-1:2012+A11
2014/30EU
and conforms to the machinery example for which the
EC Type-Examination Certificate No AM 50352808, AE 50398634
has been issued by Laizhou Planet Machinery Co., Ltd.
at: Yutai West Street Laizhou, Shandong 261400 China (Mainland)
and complies with the relevant essential health and safety requirements.
EN 55014-1:2017
EN 55014-2:2015
EN 61000-3-2:2014
EN 55014-1:2006+A1+A2
EN 55014-2:1997+A1+A2
EN 61000-3-11:2000
Page 3
Page 4

Preface
Before commissioning the machine, please read these operating instructions thoroughly
and get familiar with the machine. Please also make sure that all persons operating the
machine have read and understood the operating instructions beforehand.
Keep these operating instructions in a safety place nearby the machine.
Information
The operating instructions include indications for safety-relevant and proper
installation, operation and maintenance of the machine. The continuous observance
of all notes included in this manual guarantee the safety of persons and of the machine.
The manual determines the intended use of the machine and includes all necessary information for
its economic operation as well as its long service life.
The illustration and information included in the present manual can possibly deviate from the current
state of construction of your machine. Being the manufacturer we are continuously seeking for
improvements and renewal of the products. Therefore, changes might be performed without prior
notice. The illustrations of the machine may be different from the illustrations in these instructions with
regard to a few details. However, this does not have any influence on the operability of the machine.
Therefore, no claims may be derived from the indications and descriptions.
Your suggestion with regard to these operating instructions are an important contribution to optimising
our work which we offer to our customers. For any questions or suggestions for improvement, please
do not hesitate to contact our service department.
WARNING
Failure to read, understand and follow the instructions in this manual may result
in fire or serious personal injury—including amputation, electrocution.
The owner of this machine/tool is solely responsible for its safe use. This
responsibility includes but is not limited to proper installation in a safe environment, personnel
training and usage authorization, proper inspection and maintenance, manual availability and
comprehension, application of safety devices, cutting/sanding/grinding toolb integrity, and the
usage of personal protective equipment.
The manufacturer will not be held liable for injury or property damage from negligence,
improper training, machine modifications or misuse.
1
Page 5
1. Safety
This operating instructions
explains the meaning and use of the warning notes included in the operating instructions
▲
▲points out the dangers that might arise for you or others if these instructions are not
observed.
▲informs you how to avoid dangers.
In addition to these operation instructions, please observe
the applicable laws and regulations
▲
▲the statutory provisions for accident prevention
▲the prohibition, warning and mandatory signs as well as the warning notes on the machine.
If required, the relevant measures to comply with the country-specific regulations must be taken
before commissioning the machine.
Always keep this documentation close to the machine.
1.1 Safety instructions for general machinery
The purpose of safety symbols is to attract your attention to possible hazardous conditions. This
manual uses a series of symbols and signal words intended to convey the level of importance of the
safety messages. The progression of symbols is described below. Remember that safety messages
by themselves do not eliminate danger and are not a substitute for proper accident prevention
measures.
WARNING
Some dust created by power sanding, sawing, grinding, drilling, and other construction activities
may contain chemicals, including lead, birth defects, or other reproductive harm. W
handling. Some examples of these chemicals are:
Lead from lead-based paints.
•
• Crystalline silica from bricks, cement, and other masonry products.
•
Arsenic and chromium from chemically treated lumber
Y
our risk from these exposures varies depending on how often you do this type of work. To
your exposure to these chemicals, work in a well-ventilated area with approved safety equipment
such as dust masks specially designed to filter out microscopic particles.
.
ash hands after
reduce
2
Page 6
For your own safety
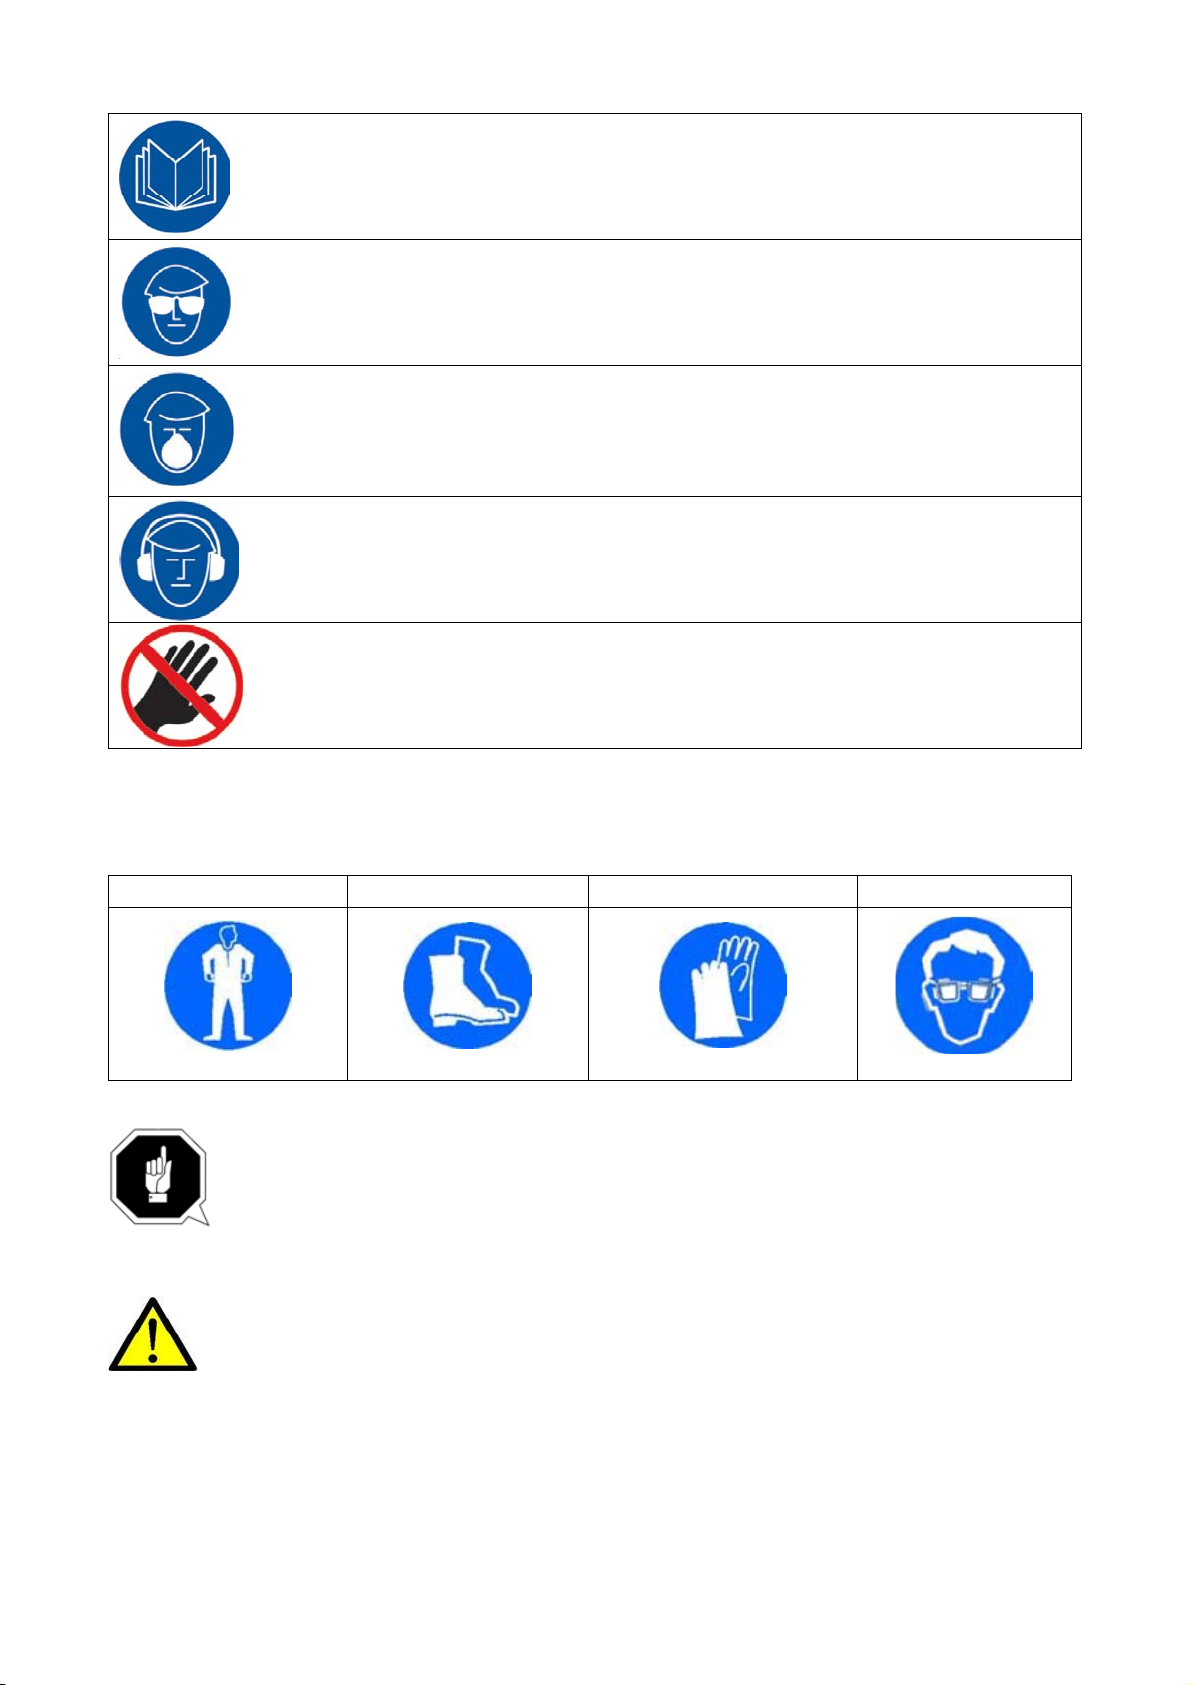
, read instruction manual before operating the machine. Learn
the machine’s application and limitations as well as the specific hazards peculiar.
Always wear approved safety glasses or a face shield when operating or observing
machinery to reduce the risk of eye injury or blindness from flying particles everyday
.
Eyeglasses are not approved safety glasses.
Dust created while usingmachinery may cause cancer, birth defects, or long-term
respiratory damage. Be aware of dust hazards associated with each workpiece
material, and always wear an approved respirator to reduce your risk.
Always wear hearing protection when operating or observing loud machinery.
Extended exposure to this noise without hearing protection can cause permanent
hearing loss.
Keep hands and clothing away from moving parts. Always tie back or cover long hair.
Wear non-slip footwear to avoid accidental slips which could cause a loss of
workpiece control.
1.11 Personal protective equipment
protective suit safety shoes protective gloves protective glasses
Dirty or contaminated personal protective equipment can cause illness. Clean your
personal protective equipment after each use and once a week.
1.2 Safety instructions for dust collector
Long-term respiratory damage can occur from using dust collectors without proper
use of a respirator. Fire or explosions can result in smoke inhalation, serious burns,
or death—if machine is used to collect incorrect materials, is operated near
potential explosion sources, or ducting is improperly grounded. Entanglement, amputation, or
death can occur if hair, clothing, or fingers are pulled into the inlet. To reduce the risk of these
hazards, operator and bystanders MUST completely heed the hazards and warnings below.
3
Page 7

INTENDED USE
HAZARDOUS DUST
DUST ALLERGIES
WEAR RESPIRATOR
EMPTYING DUST
DISCONNECTING POWER
SUPPLY
SUSPENDED DUST
PARTICLES AND IGNITION
SOURCES
FIRE SUPPRESSION
IMPELLER HAZARDS
AVOIDING SPARKS
OPERATING LOCATION
This dust collector is only intended for collecting wood dust and
chips from woodworking machines. Do not use this dust collector
to collect metal, dirt, pebbles, drywall, asbestos, lead paint, silica,
liquids, aerosols, or any flammable, combustible, or hazardous
materials.
Dust created while using machinery may cause cancer, birth
defects, or long-term respiratory damage. Be aware of dust
hazards associated with each work piece material, and always
wear a NIOSH-approved respirator to reduce your risk.
Dust from certain woods may cause an allergic reaction in people
and animals.
Make sure you know what type of wood dust you will be exposed
to in case there is a possibility of an allergic reaction.
Fine dust that is too small to be caught in the filter will be blown
into the ambient air during operation. Always wear a NIOSHapproved respirator during operation and for a short time after to
reduce your risk of permanent respiratory damage.
When emptying dust from the collection container, wear a
respirator and safety glasses. Empty dust away from ignition
sources and into an approved container.
Turn the switch off, disconnect the dust collector from the power
supply, and allow the impeller to come to a complete stop before
leaving the machine unattended or doing any service, cleaning,
maintenance, or adjustments.
Do not operate the dust collector in areas were explosion risks are
high. Areas of high risk include, but are not limited to, areas near
pilot lights, open flames, or other ignition sources.
Only operate the dust collector in locations that contain a fire
suppression system or have a fire extinguisher nearby.
Do not place your hands or tools near the open inlet during
operation for any reason. The powerful suction could easily cause
accidental contact with the impeller, which will cause serious
personal injury or damage to the machine. Always keep small
animals and children away from open dust collection inlets.
Do not allow steel or rocks to strike the impeller—this may produce
sparks. Sparks can smolder in wood dust for a long time before a
fire is detected. If you accidentally cut into wood containing tramp
metal (nails, staples, spikes, etc.), immediately turn off the dust
collector, disconnect it from power, and wait for the impeller to
stop—then empty the collection container into an approved airtight
metal container.
To reduce respiratory exposure to fine dust, locate permanently
installed dust collectors away from the working area, or in another
room that is equipped with a smoke detector. Do not operate the
dust collector in rainy or wet locations—exposure to water may
create a shock hazard or decrease the life of the machine.
4
Page 8
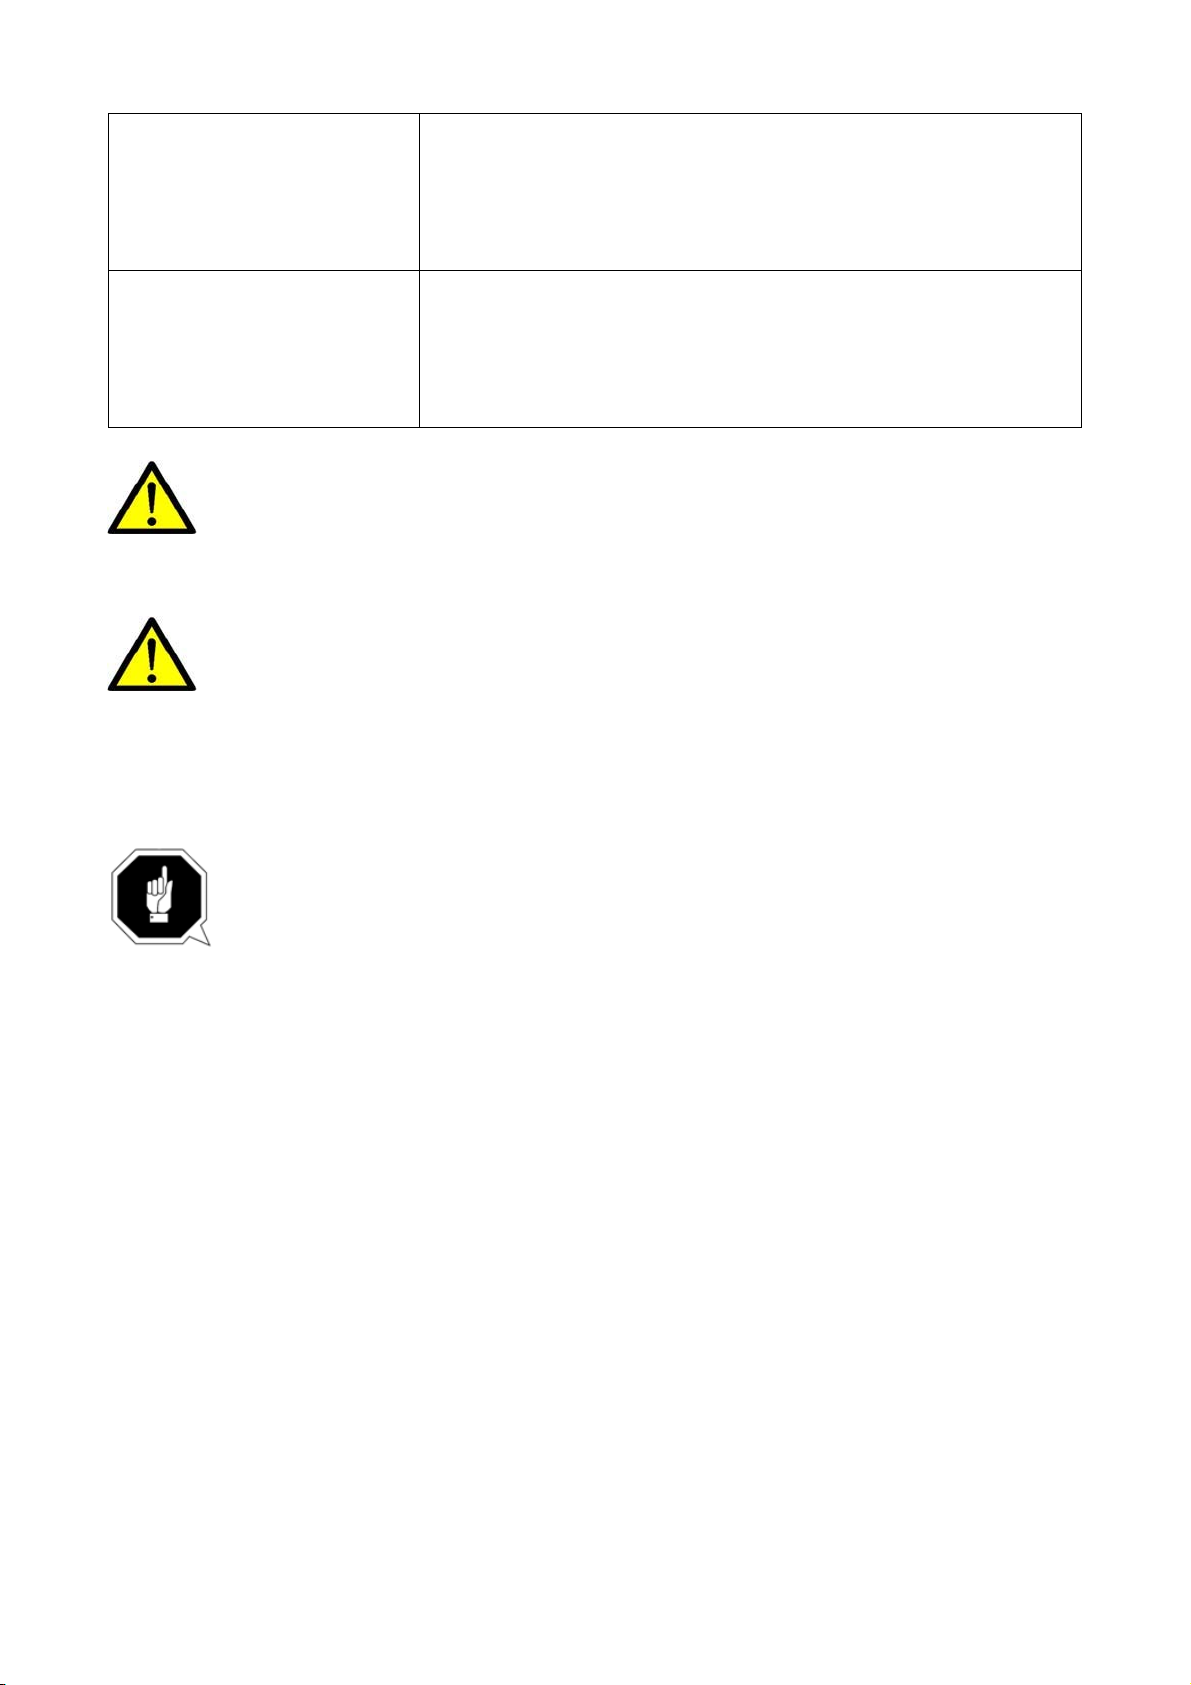
Plastic dust lines generate high amounts of static electricity as dust
chips pass through them. Although rare, sparks caused by static
ST
ATIC ELECTRICITY
electricity can cause explosions or fire. To reduce this risk, make
sure all dust lines are thoroughly grounded by Using a grounding
wire.
Regularly check/empty the collection bags or drum to avoid the
buildup of fine dust that can increase the risk of fire. Make sure to
REGULAR CLEANING
regularly clean the surrounding area where the machine is
operated—excessive dust buildup on overhead lights, heaters,
electrical panels, or other heat sources will increase the risk of fire.
No list of safety guidelines can be complete. Every shop environment is different.
Accidents are frequently caused by lack of familiarity or failure to pay attention. Use
this machine with respect and caution to lessen the possibility of operator injury
normal safety precautions are overlooked or ignored, serious personal injury may occur.
FAILURE TO FOLLOW THESE RULES MAY RESULT IN SERIOUS PERSONAL INJURY.
FOR YOUR OWN SAFETY, READ AND UNDERSTAND THE INSTRUCTION MANUAL
BEFORE OPERATING THE MACHINE.
. If
KEEP WORK AREA CLEAN. Cluttered areas and benches invite accidents.
DON’T USE IN DANGEROUS ENVIRONMENT. Don’t use this unit in damp or wet
locations, or expose it to rain. Keep work area well-lighted.
KEEP CHILDREN AND VISITORS AWAY. All children and visitors should be kept
a safe distance from work area.
DISCONNECT UNIT before servicing.
CHECK DAMAGED PARTS. Before further use of the unit, properly repair or
replace any part that is damaged.
5
Page 9
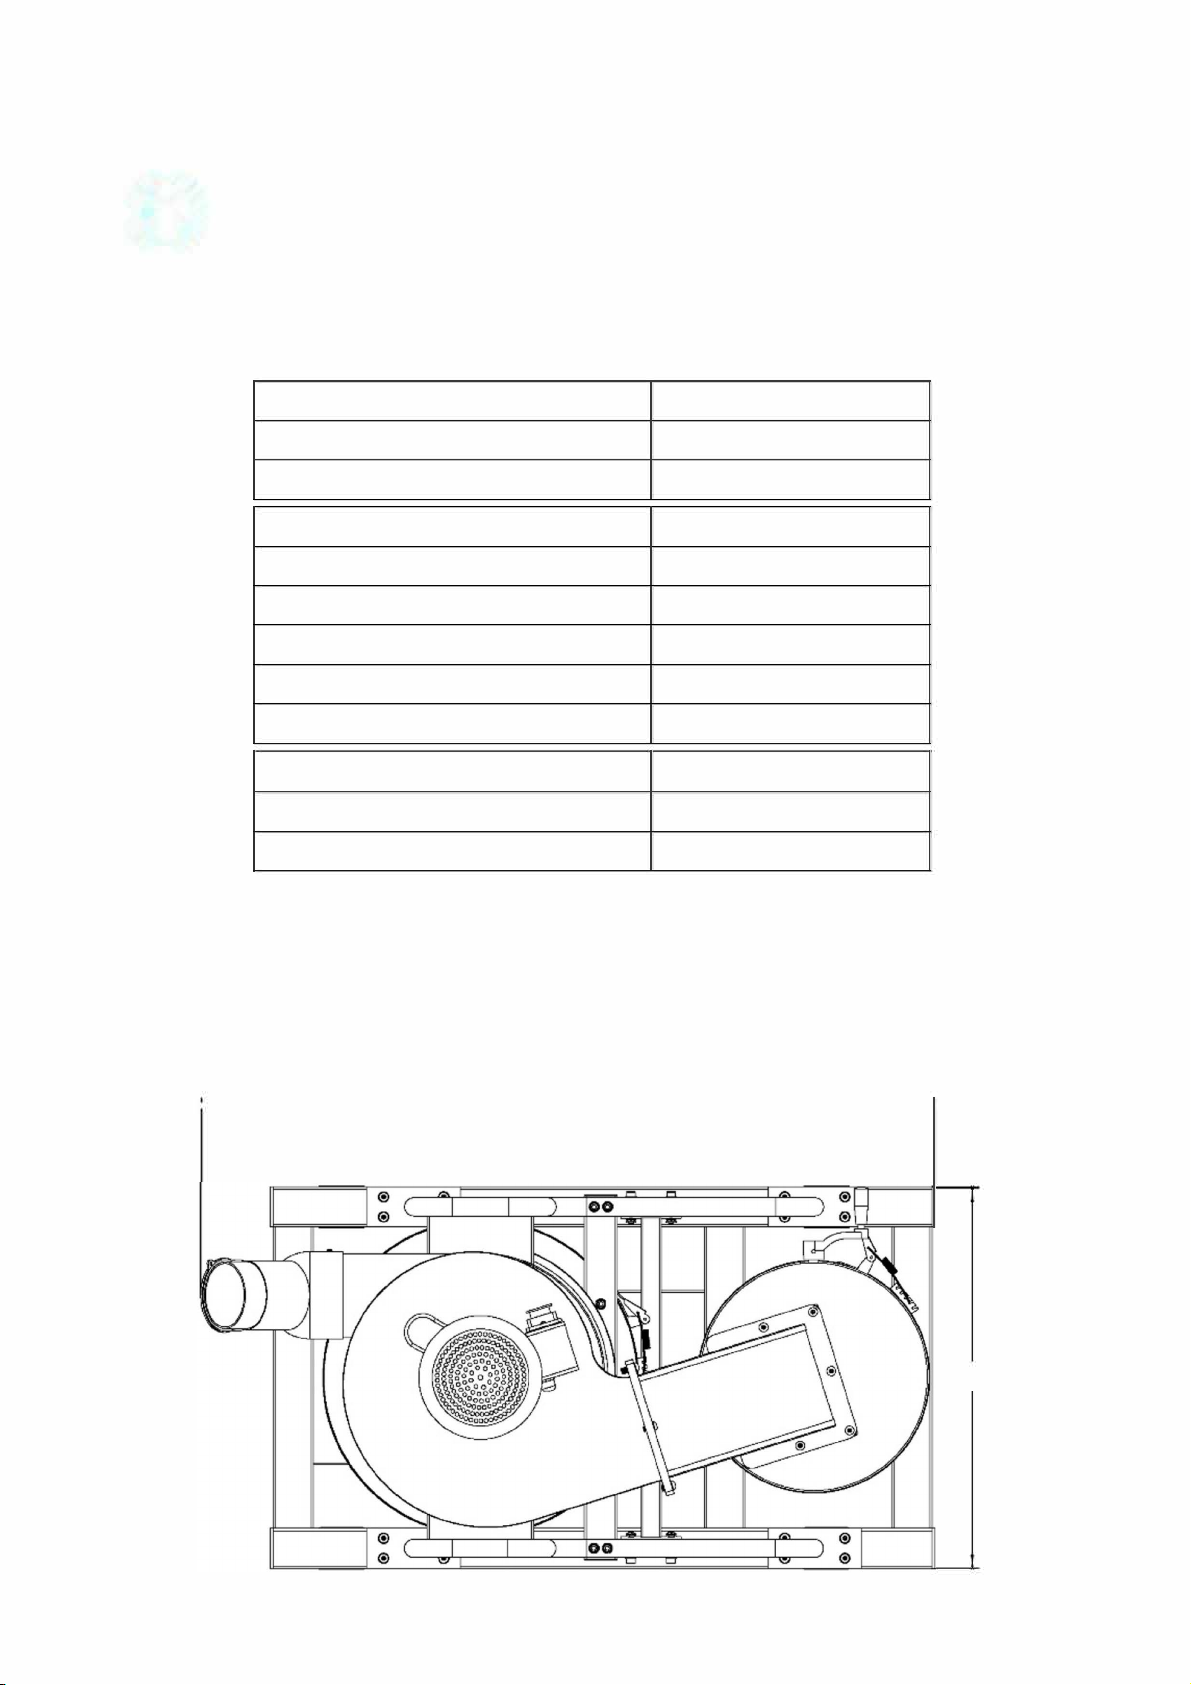
2. Technical Specification
0 The following information represents the dimensions and weight information and the
manufacturer's approved machine data.
MODEL NO.
2
AW118CE
3
)
3
MODEL NO.
W
Page 10
3. Assembly
The cyclone dust collector is delivered pre-assembled. After unpacking, the machine must be installed.
Transport the dust collector in its packing crate to a place near its final installation site
before unpacking it. If the packaging shows signs of possible transport damage, take the
necessary precautions not to damage the machine when unpacking. If any damage is
discovered, the carrier and/or shipper must be notified of this fact immediately to
establish any claim which might arise.
3.1 Grounding instructions
The appliance must be grounded, if it should malfunction or breakdown, grounding provides a path of
least resistance for electric current to reduce the risk of electric shock. This appliance is equipped
with a cord having equipment-ground conductor and grounding plug. The plug must be inserted into
an appropriate outlet that is properly installed and grounded in accordance with all local codes and
ordinances.
For grounded, cord-connected appliances: Make sure that the appliance is connected to an outlet
having the same configuration as the plug. No adaptor should be used with this appliance. If the
appliance must be reconnected for use on a different type of electric circuit, qualified service personnel
should make the reconnection.
For a permanently connected appliance: This appliance must be connected to a grounded metal,
permanent wiring system; or an equipment-grounding conductor must be run with the circuit
conductors and connected to the equipment grounding terminal or lead on the appliance.
Inspect the machine completely and carefully, making sure that all materials, such as shipping
documents, instructions and accessories supplied with the machine have been received.
3.2 Unpacking
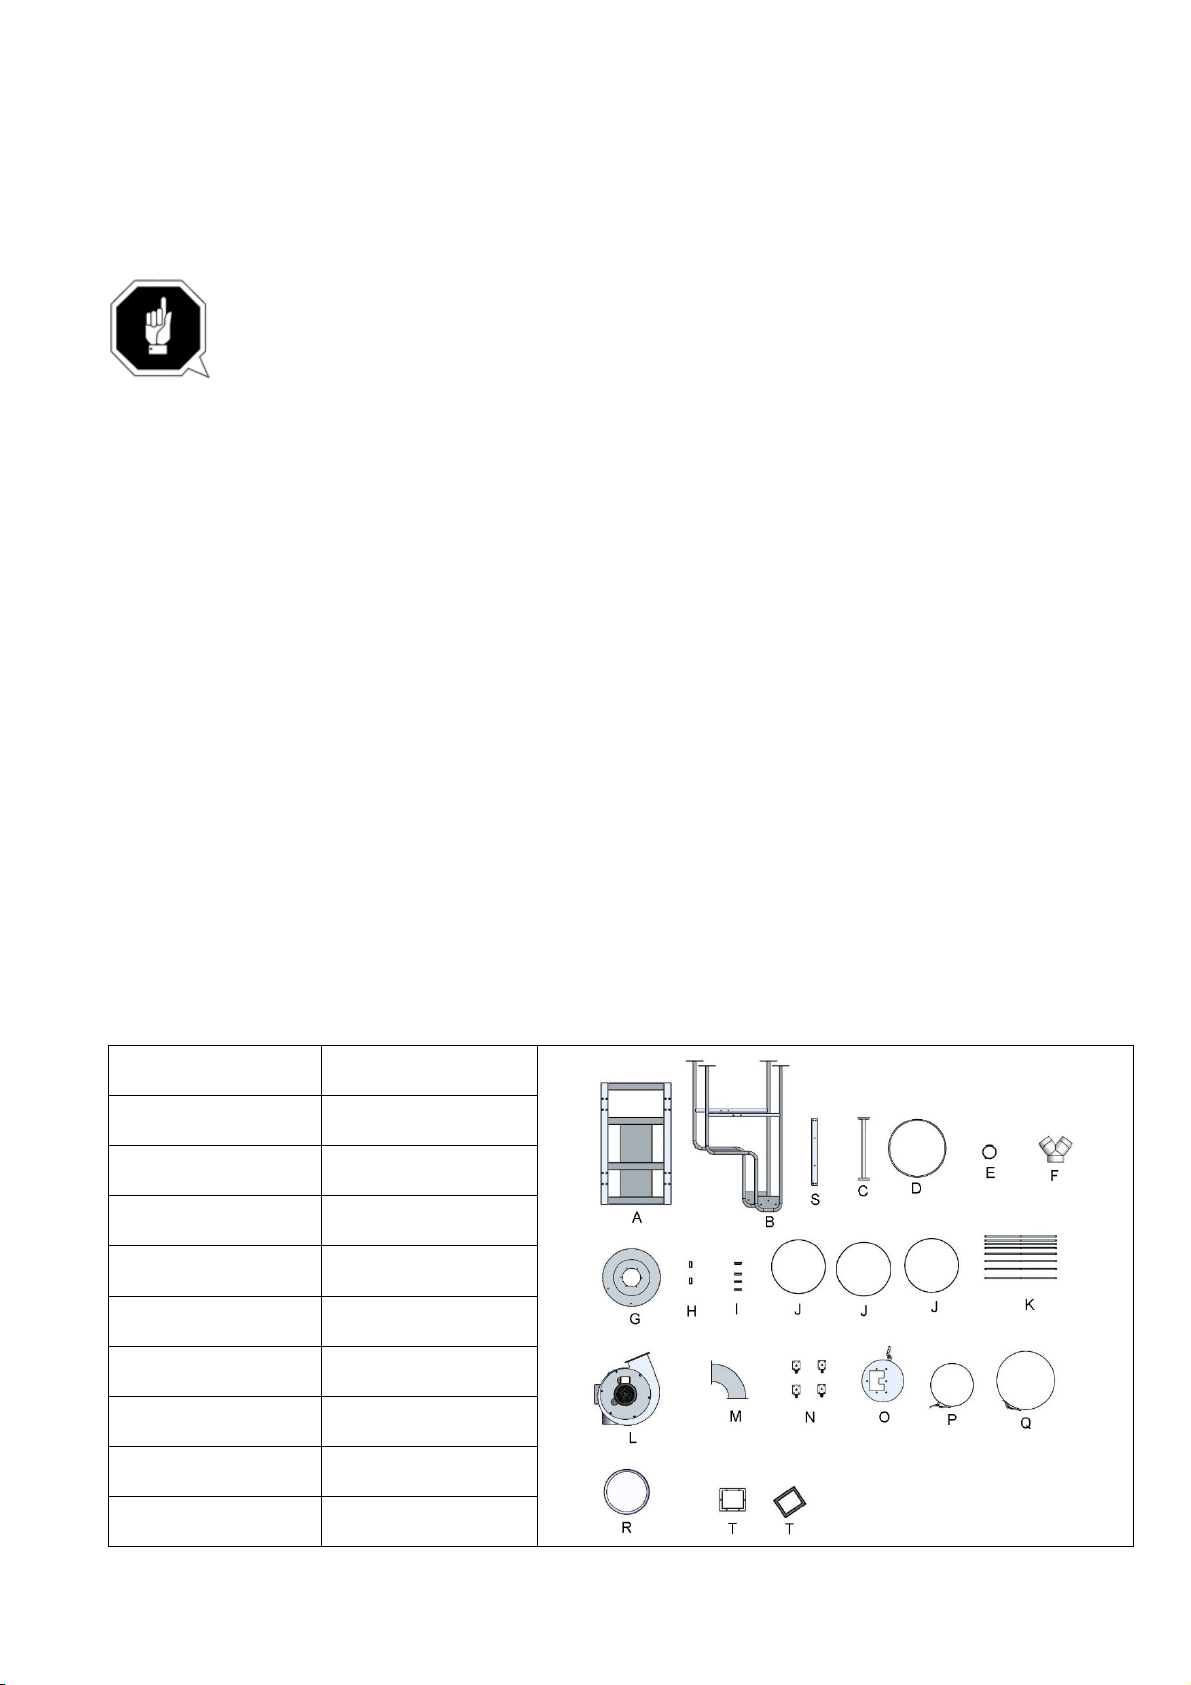
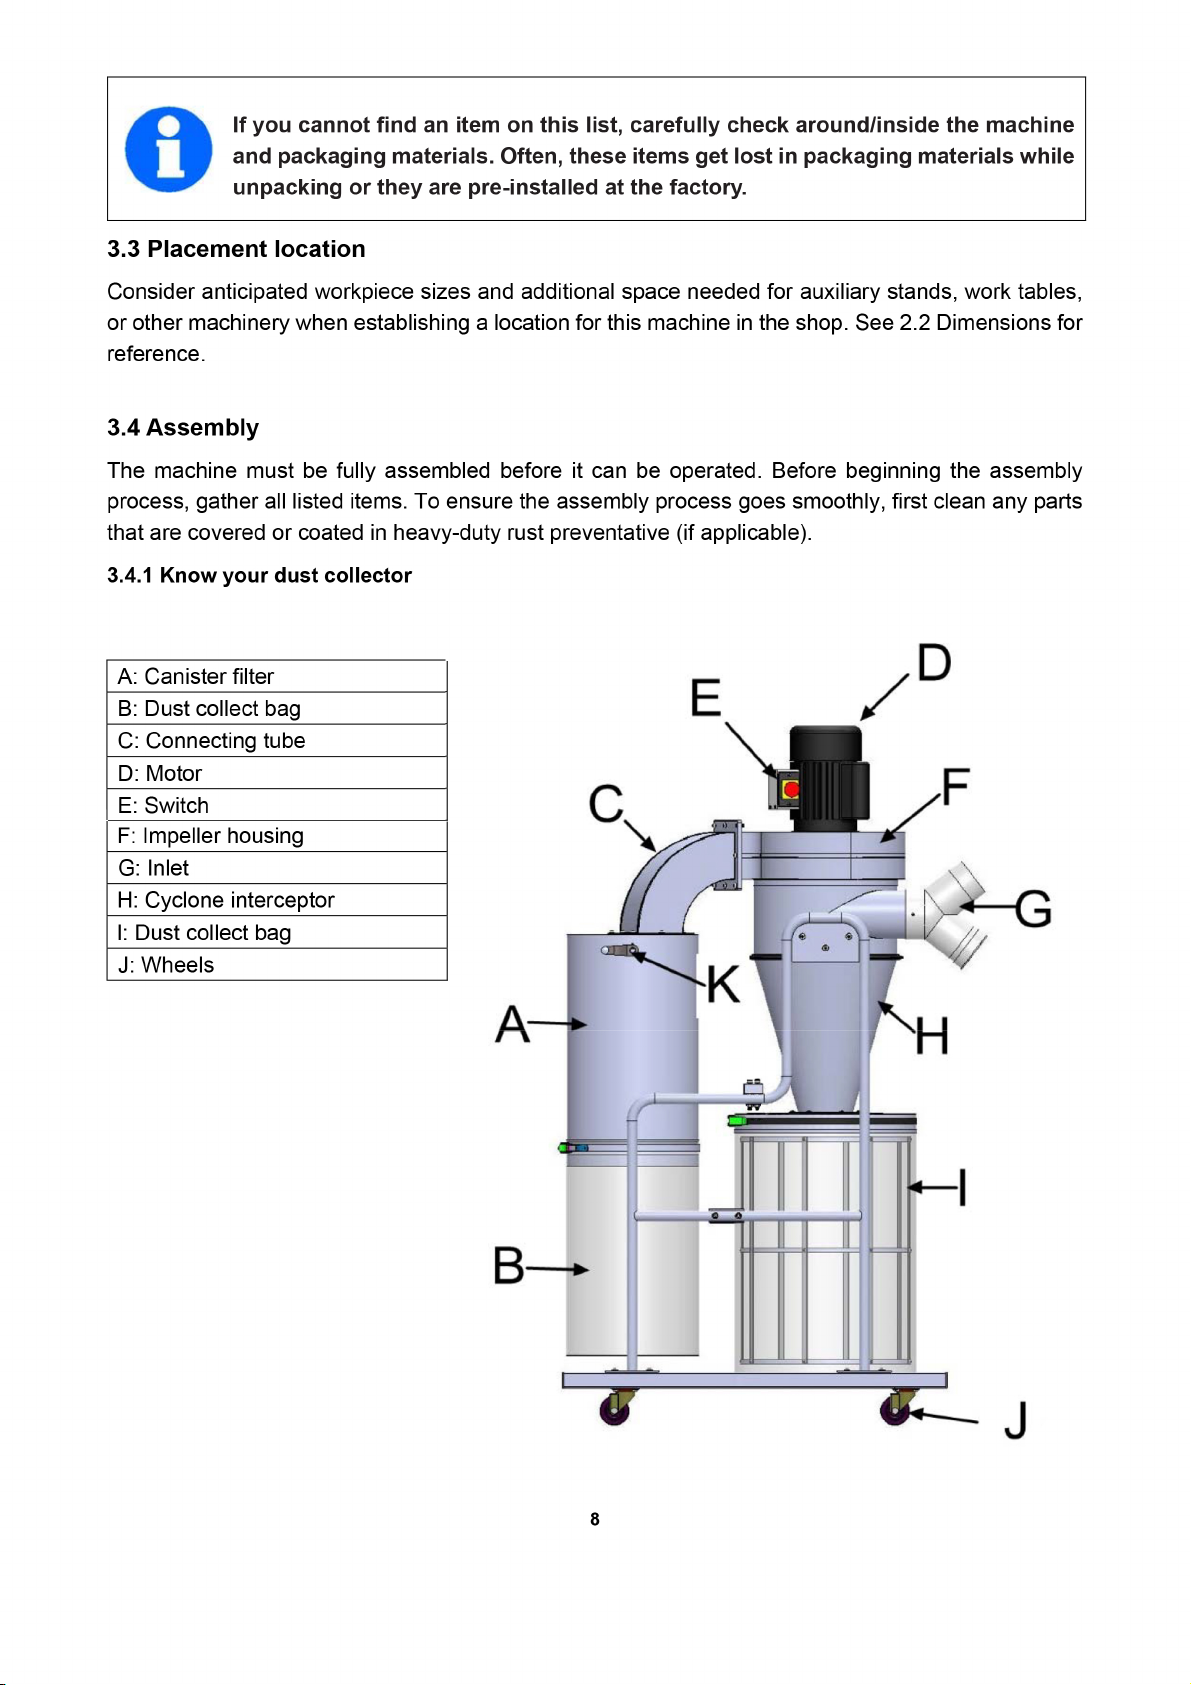
The following is a list of items shipped with your machine. Before beginning setup, lay these items out
and inventory them.
A. Base K. Support connect bar
B. Bracket L. Main house
C. Transom M. Connecting tube
D. Big collector bag N. Wheel
E. Close cover O. Canister filter
F. Inlet P. Drum clamp
G. Drum lip Q. Bag clamp
H. Big block R. Small collector bag
I. Small block S. Connecting tube
J. Support connect ring T. Seal pad
7
Page 11
Page 12
Page 13
Page 14
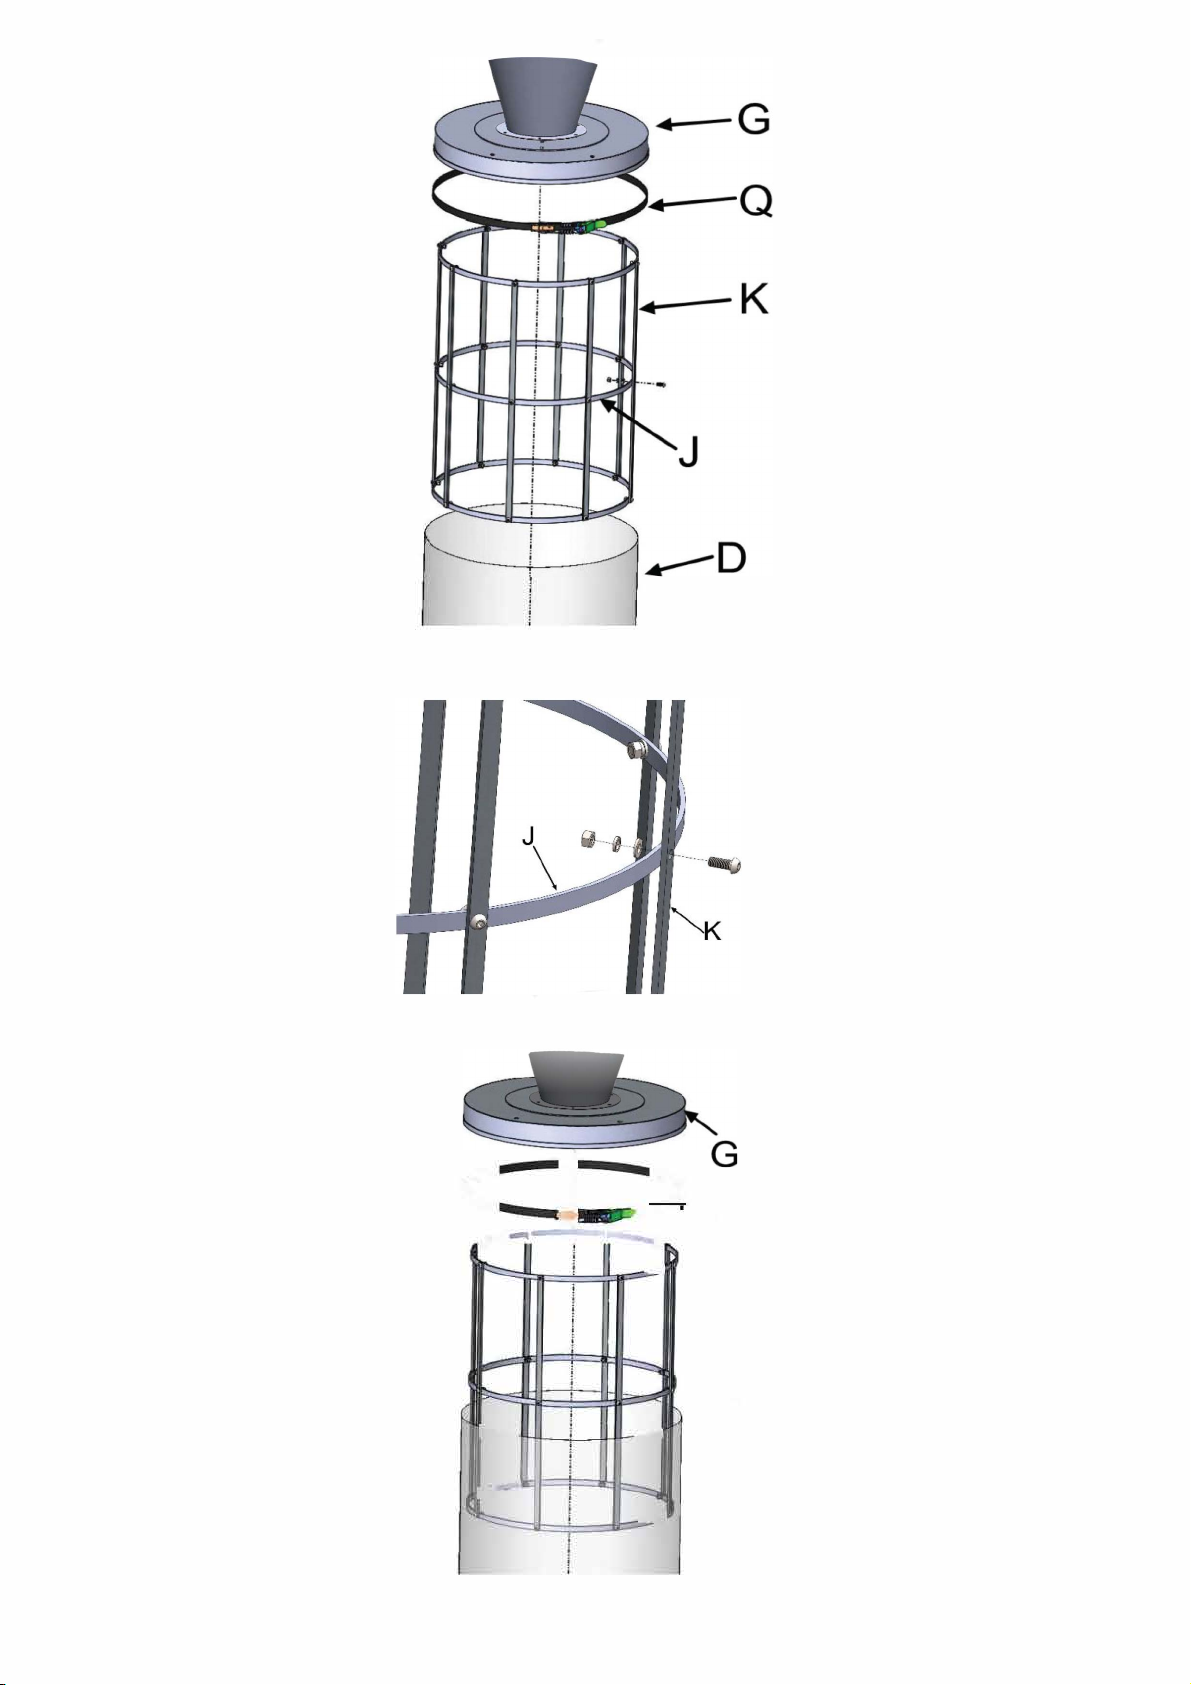
STEP-2 Install the collection drum. Please refer to the following picture.
C
=
j
-
-
11
D
I
Page 15
Page 16
Page 17
Page 18

3.5 Initial commissioning
Once assembly is complete, test run the machine to ensure it is properly connected to power and
safety components are functioning correctly.
If you find an unusual problem during the test run, immediately stop the machine, disconnect it from
power, and fix the problem BEFORE operating the machine again.
DO NOT start machine until all preceding setup instructions have been performed.
Operating an improperly set up machine may result in malfunction or unexpected results
that can lead to serious injury, death, or machine/property damage.
To test run machine:
1. Clear all setup tools away from machine.
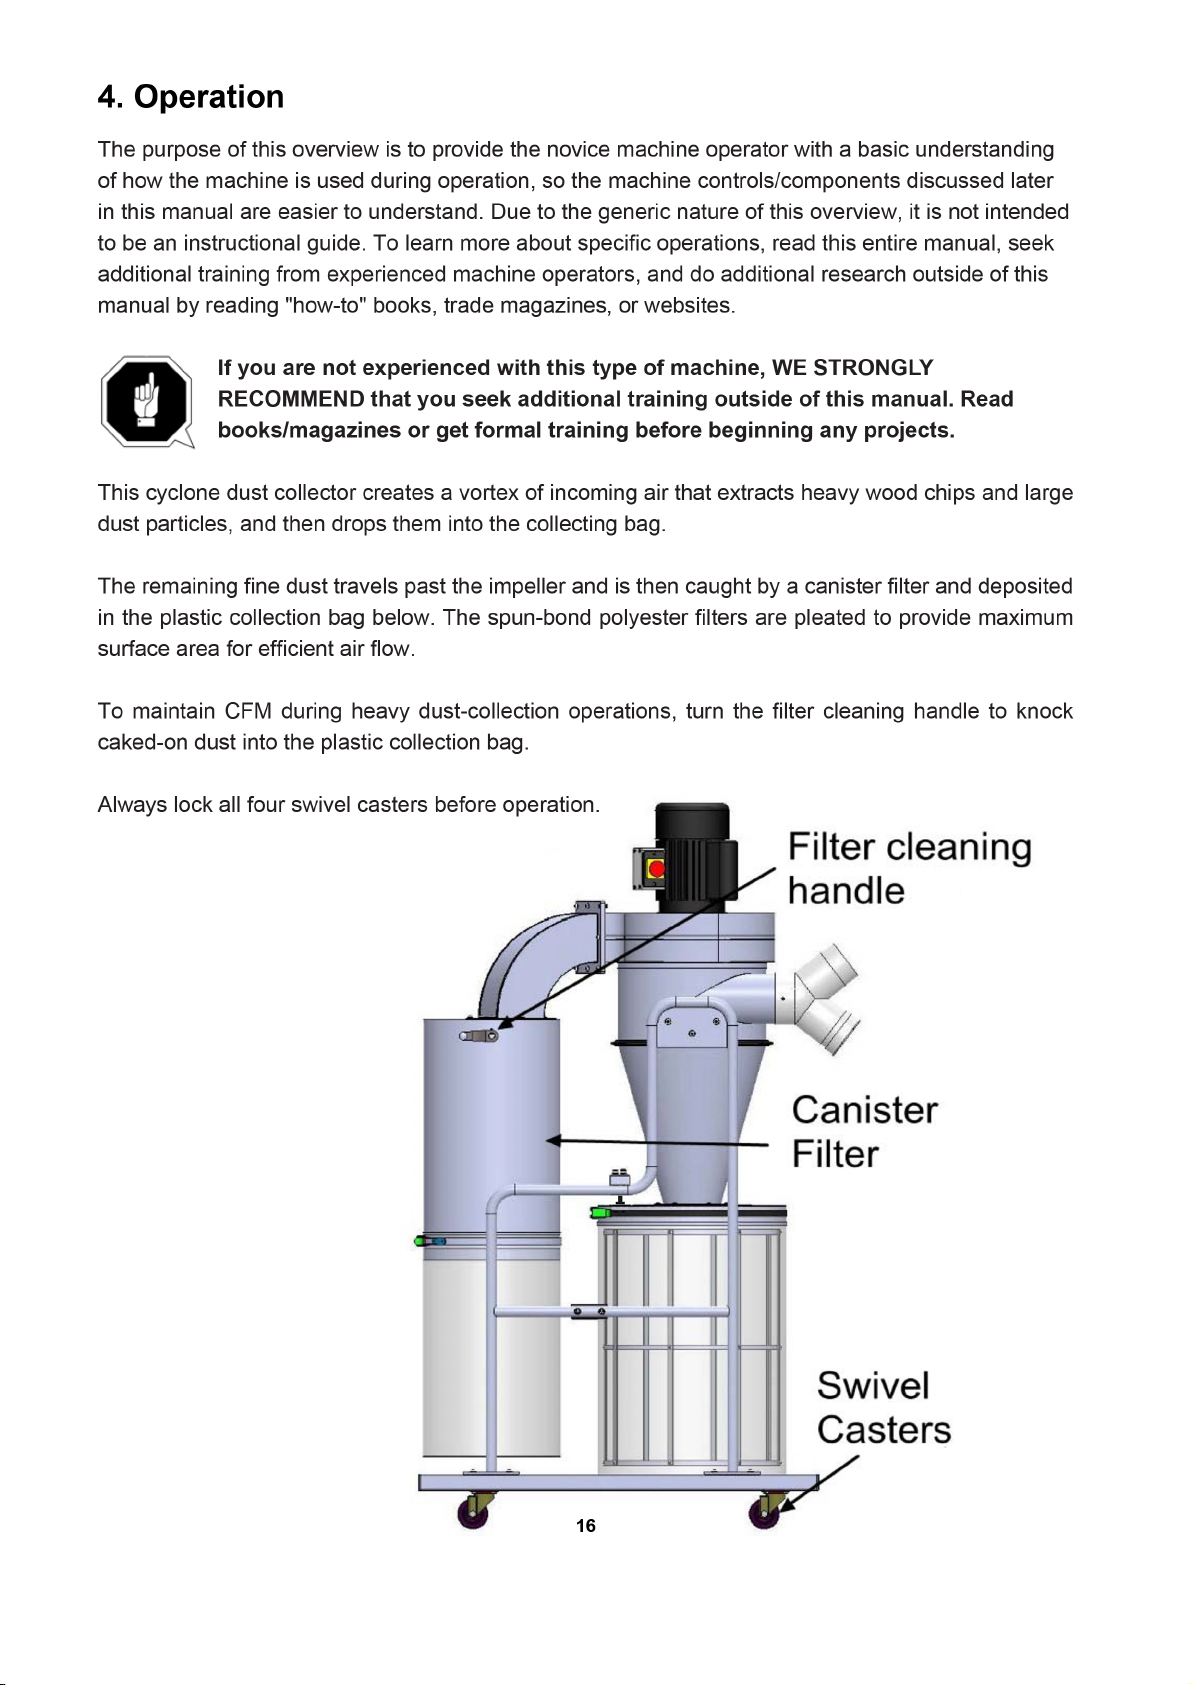
2. Lock all swivel casters on base stand.
3. Connect machine to dust-collection system or place covers over inlet adapter ports.
DO NOT operate the dust collector without first connecting it to a dust-collection
system or covering an inlet adapter port. Otherwise, the lack of airflow resistance
will cause the motor to operate at full amperage load, which could trip your circuit
breaker or blow a fuse.
4. Press Emergency Stop button in.
5. Connect machine to power.
6. Standing away from intake port, press green "I" button to turn machine ON. Verify motor starts up
and runs smoothly without any problems or unusual noises.
8. Press Emergency Stop button to turn machine OFF.
15
Page 19
Page 20
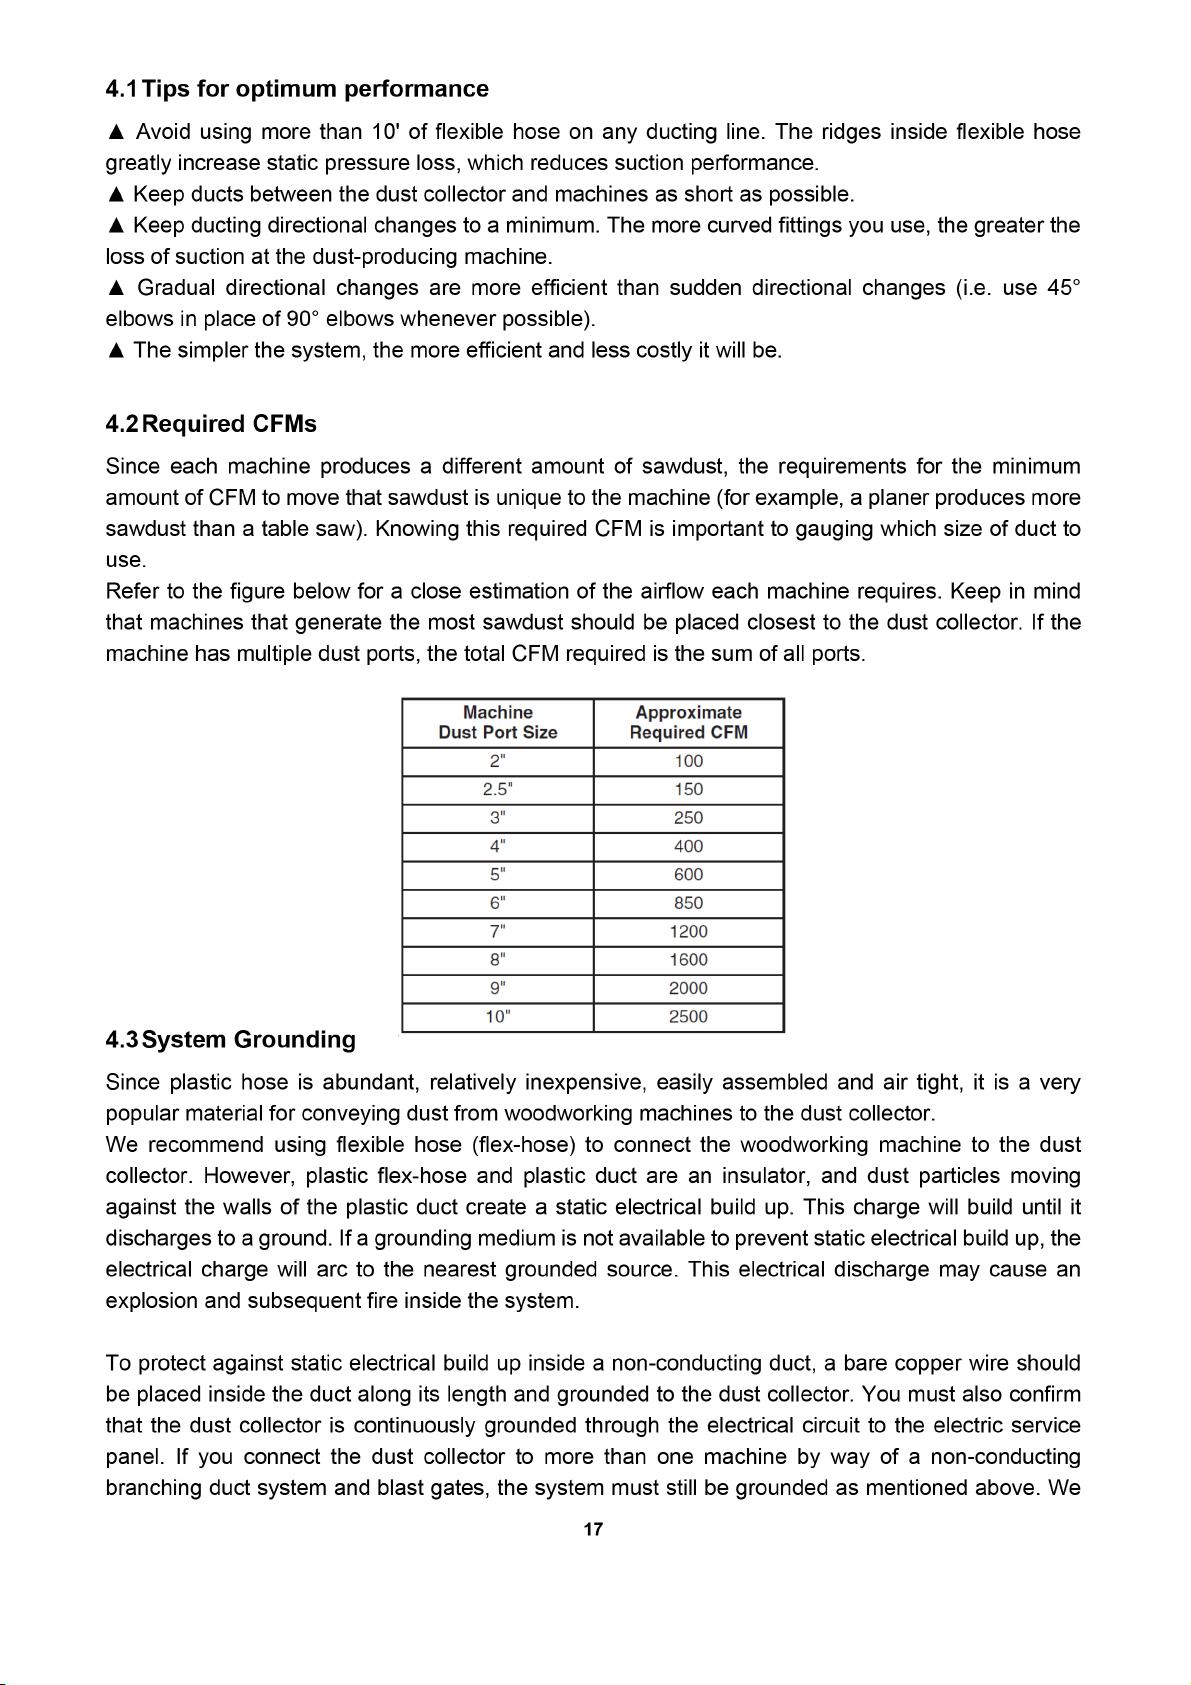
Page 21
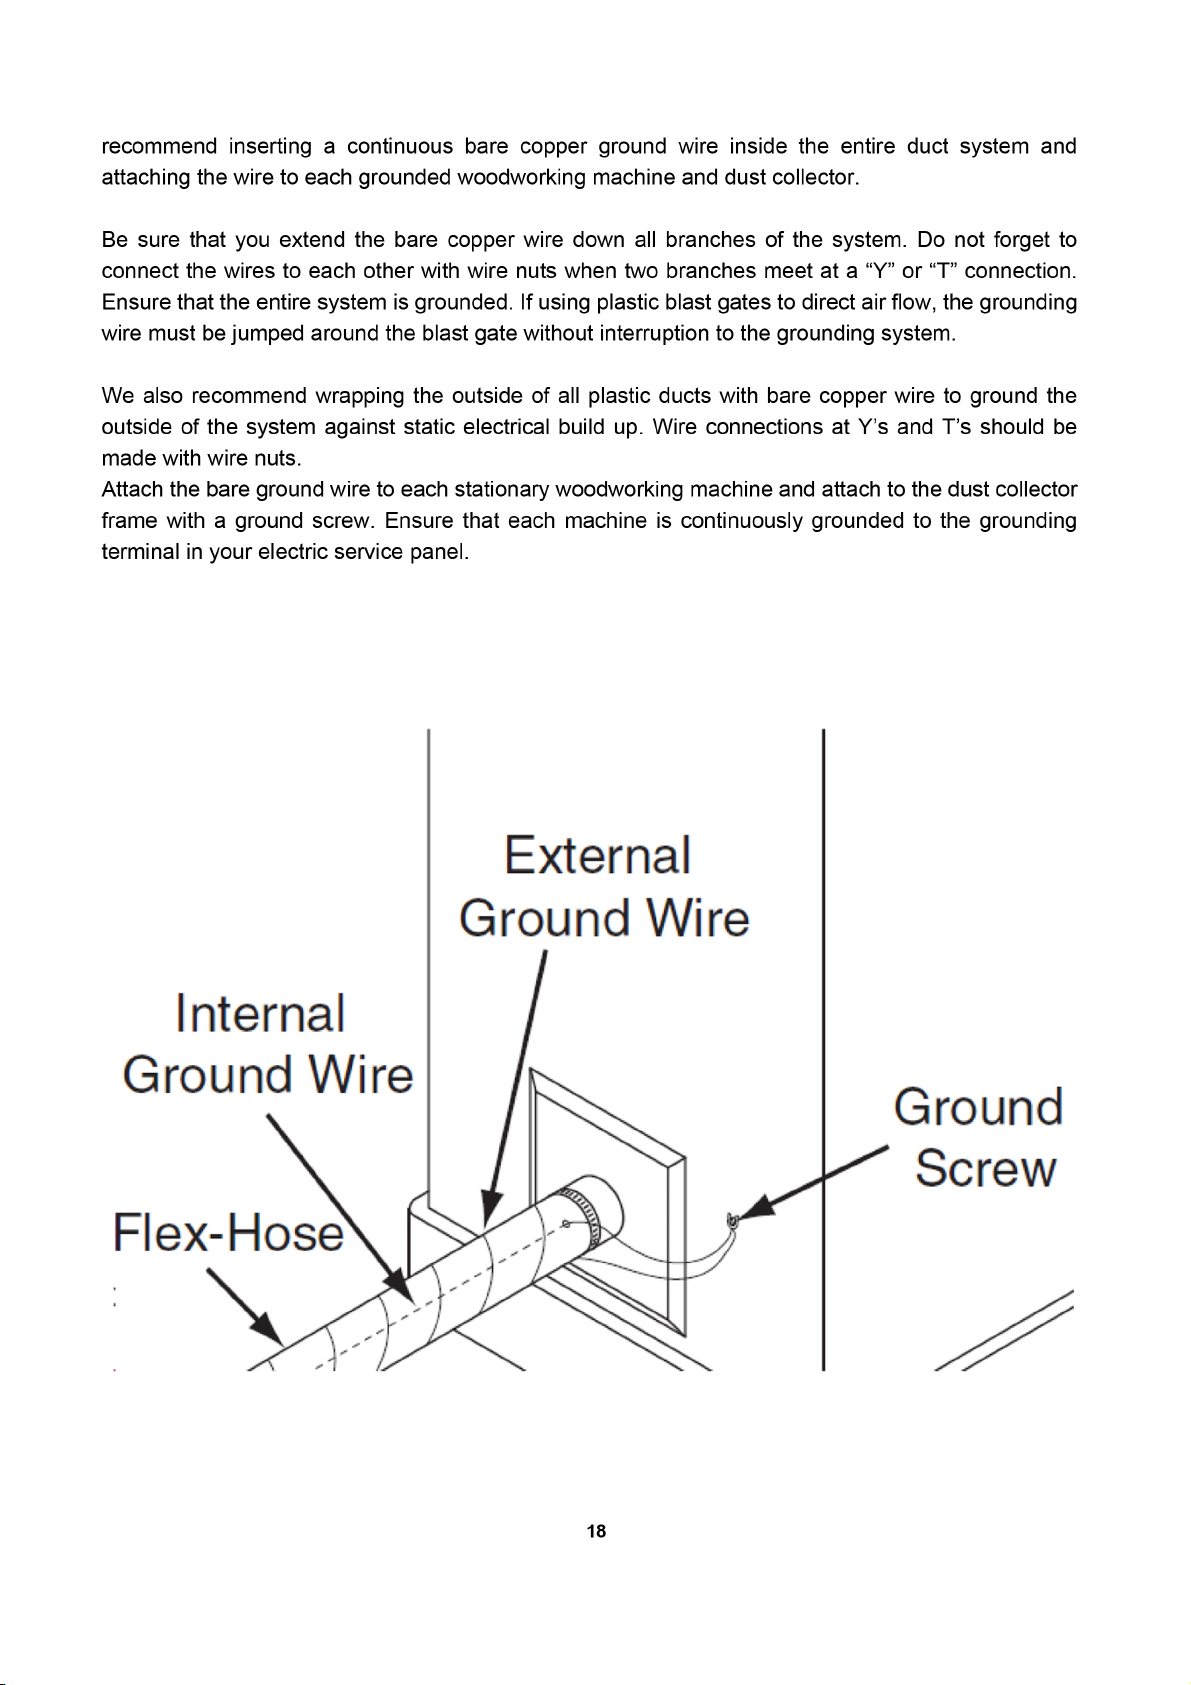
Page 22
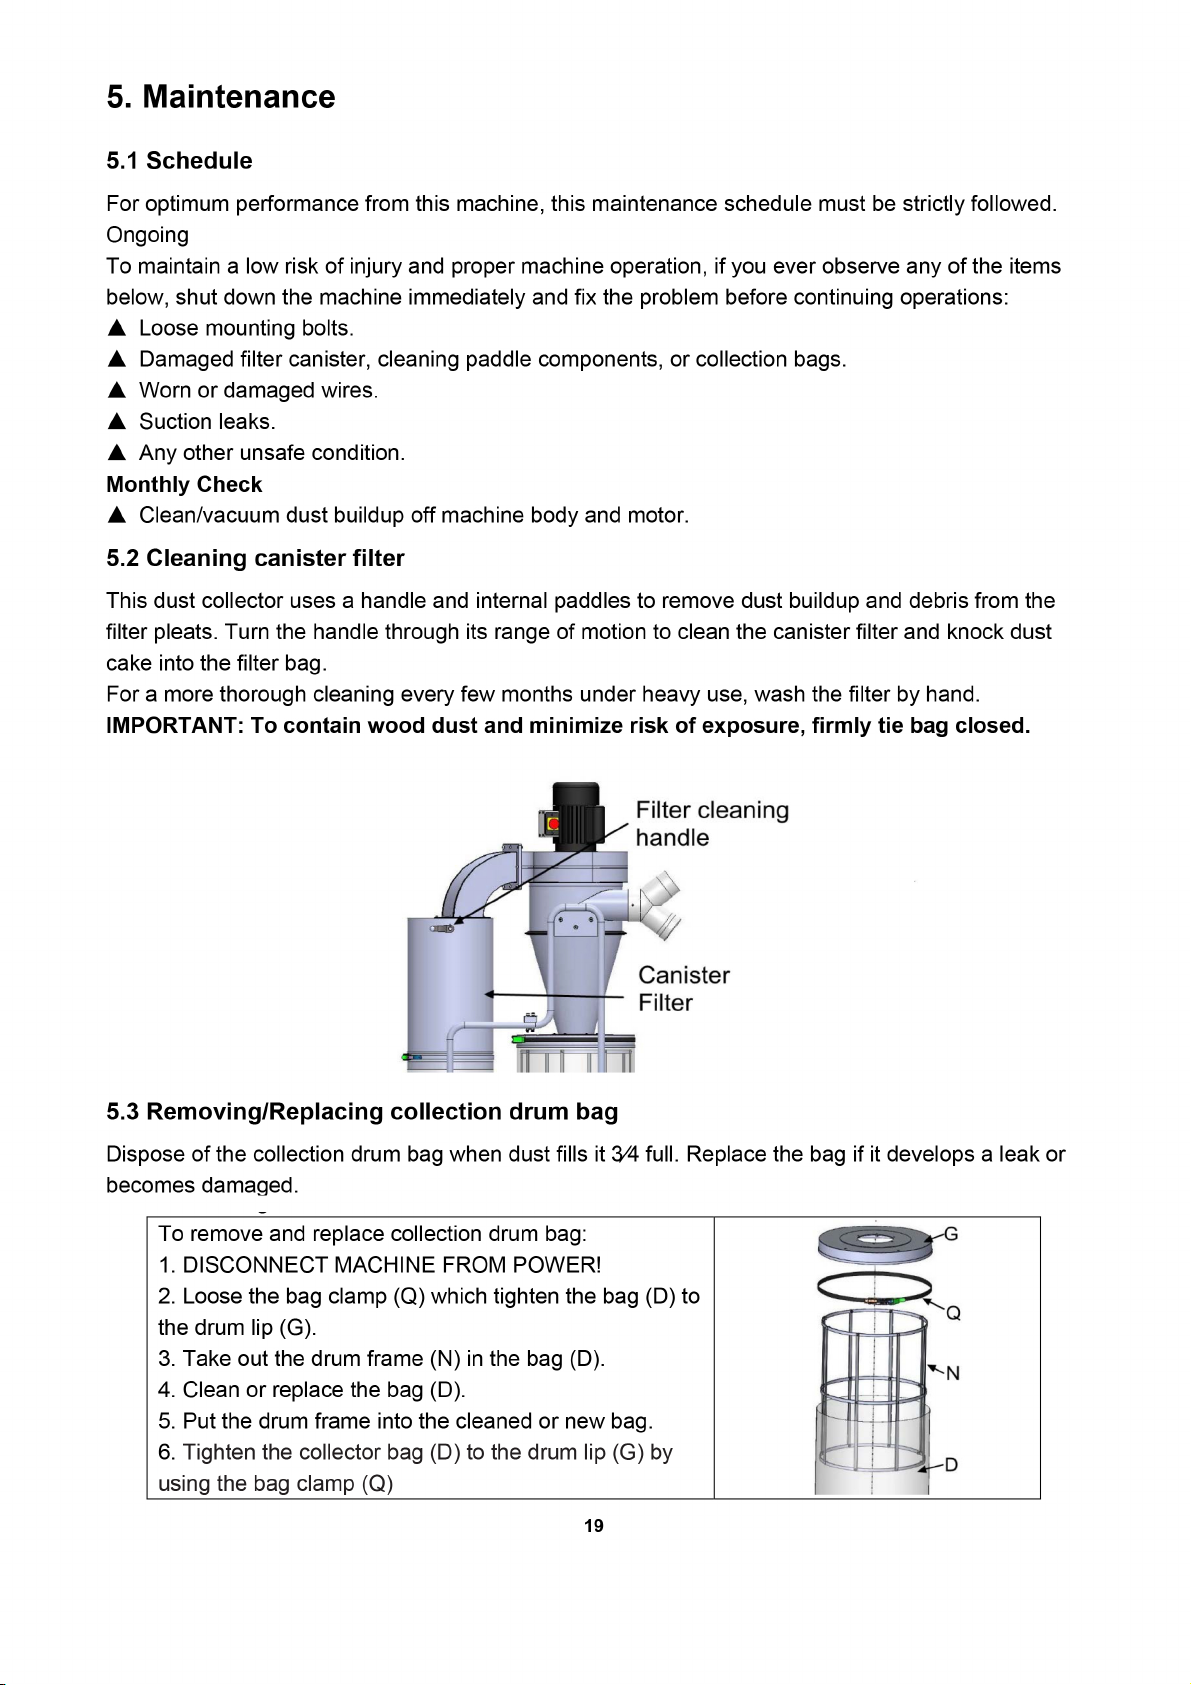
Page 23
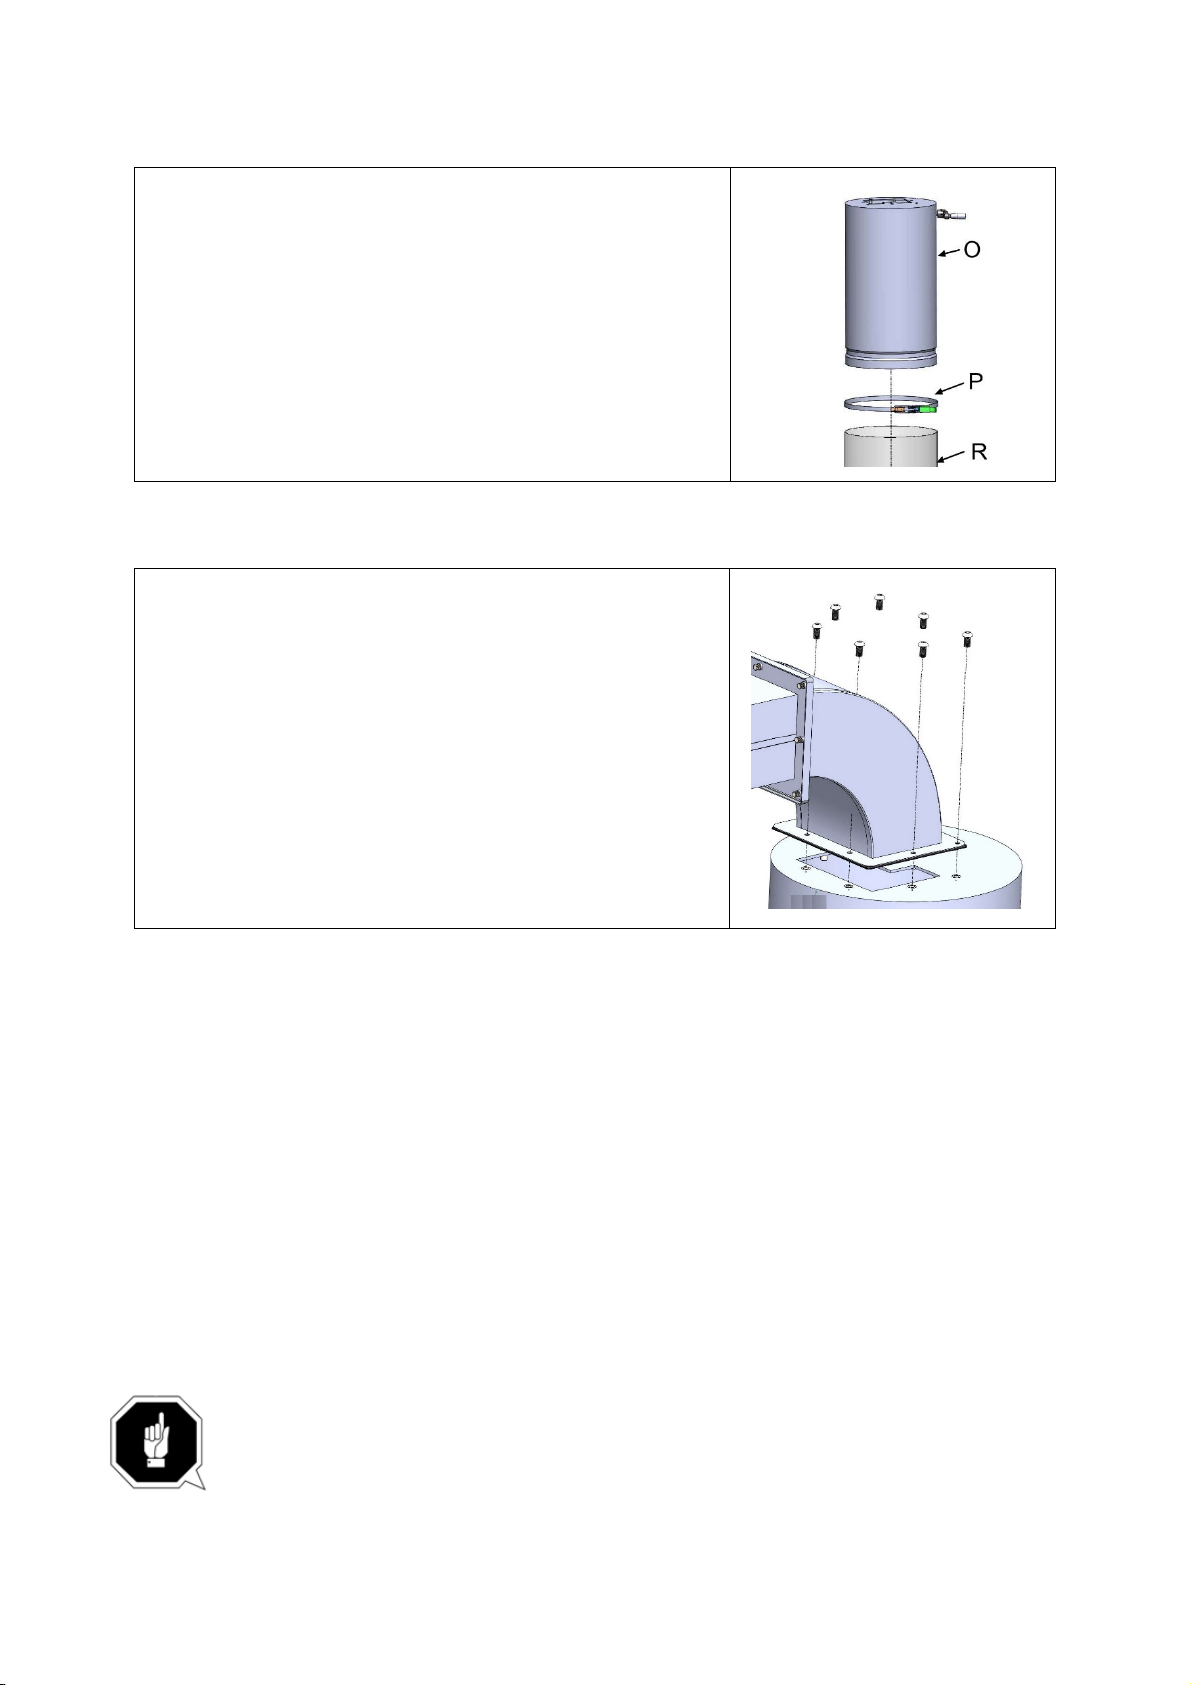
5.4 Removing/Replacing filter bag
Remove and replace the filter bag when it is about 1⁄2 full.
To remove & replace filter bag or bags:
1. DISCONNECT MACHINE FROM POWER!
2. Release clamp around bottom of canister filter, then
remove filter bag.
3. Attach new filter bag around bottom of canister filter and
secure with clamp.
5.5 Removing/Replacing canister filter
If the canister filter is clogged or dirty and cleaning or
washing it does not improve dust-collection performance,
the canister filter must be replaced.
To remove and replace canister filter:
1. DISCONNECT MACHINE FROM POWER!
2. Loose the hexagon socket button screw M6X15 which
fixed the seal pad and canister filter to the main housing
assembly.
3. Fix the seal pad and new canister filter to the main
housing assembly by the screw M6X15.
5.6 Washing canister filter
For a more thorough cleaning every few months under heavy use, wash the filter by hand.
To wash canister filter by hand:
▲ DISCONNECT MACHINE FROM POWER!
▲ Remove canister filter (see Removing/ Replacing Canister Filter on this page).
▲ Rinse filter outside under warm water.
IMPORTANT: DO NOT use a pressure washer to clean the filter, or compressed air to dry it.
High pressure will damage filter fibers.
▲ Allow filter to air dry only.
Note: Do not leave filter in the sun to dry or apply heat to speed the process; heat exposure
can damage your filter.
▲ Re-install canister filter.
▲
Dust exposure created while using machinery may cause cancer, birth defects, or
long-term respiratory damage. Always wear goggles and a NIOSH approved
respirator when working with the dust collection bags or canisters.
20
Page 24

Page 25

7. Troubleshooting
Review the troubleshooting procedures in this section if a problem develops with your machine. If you
need replacement parts or additional help with a procedure, callb us.
Note: Please gather the serial number and manufacture date of your machine before calling.
Symptom Possible Cause Possible Solution
Machine does not
start, or powersupply
fuse/breaker trips
immediately after
startup.
Machine seems
underpowered.
Machine has vibration
or noisy operation.
Loud, repetitious
noise, or excessive
vibration coming from
dust collector (non-
motor related).
1. Dust collector not properly connected to
ducting.
2. E-Stop Button depressed/at fault.
3. Incorrect power supply voltage or circuit
size.
4. Power supply circuit breaker tripped or
fuse blown.
5. Motor overheated.
6. Machine circuit breaker has tripped.
7. Wiring open/has high resistance.
8. Power switch/circuit breaker at fault.
9. Start capacitor at fault.
10. Motor at fault.
1. Motor overheated.
2. Dust-collection ducting problem.
3. Canister filter clogged/at fault.
4. Dust collector too far from machine or
undersized for dust-collection system.
5. Run capacitor at fault.
6. Motor bearings at fault.
1. Motor or component loose.
2. Motor fan rubbing on fan cover.
3. Motor mount loose/broken.
4. Impeller damaged, unbalanced, or loose.
5. Motor bearings at fault.
6. Motor shaft bent.
1. Dust collector not on a flat surface and
wobbles.
2. Impeller damaged and unbalanced.
3. Impeller loose on the motor shaft.
22
1. Connect dust collector to ducting.
2. Rotate E-Stop Button to reset. Replace if at fault.
3. Ensure correct power supply voltage and circuit
size.
4. Ensure circuit is sized correctly and free of shorts.
Reset circuit breaker or replace fuse.
5. Allow motor to cool, reset overload if necessary.
6. Reset circuit breaker on switch.
7. Check/fix broken, disconnected, or corroded
wires.
8. Test/replace.
9. Replace.
10. Test/repair/replace.
1. Allow motor to cool, reset overload if necessary.
2. Clear blockages, seal leaks, use smooth-wall
duct, eliminate bends, close other branches.
3. Clean canister filter; replace canister filter.
4. Move closer to machine/redesign ducting layout/
upgrade dust collector.
5. Test/repair/replace.
6. Test by rotating shaft; rotational grinding/loose
shaft requires bearing replacement.
1. Inspect/replace damaged bolts/nuts, and
retighten with thread-locking fluid.
2. Fix/replace fan cover; replace loose/damaged
fan.
3. Tighten/replace.
4. Inspect/tighten/replace.
5. Test by rotating shaft; rotational grinding/loose
shaft requires bearing replacement.
6. Test with dial indicator. Replace motor if
damaged.
1. Stabilize dust collector; lock casters.
2. Inspect/replace.
3. Secure impeller; replace motor and impeller as a
set if motor shaft and impeller hub are damaged.
Page 26

Symptom Possible Cause Possible Solution
Dust collector does
not adequately collect
dust or chips; poor
performance.
Dust collector blows
sawdust into the air.
1. Collection bag full.
2. Canister filter clogged/at fault.
3. Ducting blocked/restricted.
4. Dust collector too far away from point of
suction; duct clamps not properly secured;
too many sharp bends in ducting.
5. Lumber is wet and dust is not flowing
smoothly through ducting.
6. Ducting has one or more leaks, or too
many open ports.
7. Not enough open branch lines at one
time, causing velocity drop in main line.
8. Ducting and ports are incorrectly sized.
9. The machine dust-collection design
inadequate.
10. Dust collector undersized.
1. Duct clamps or filter bag(s) are not
properly clamped and secured; ducting
loose/ damaged.
2. Cylinder or funnel seals are loose or
damaged.
1. Empty collection bag.
2. Clean canister filter; replace canister filter.
3. Remove ducting from dust collector inlet and
unblock restriction. A plumbing snake may be
necessary.
4. Relocate dust collector closer to point of suction;
re-secure ducts; remove sharp bends.
5. Only process lumber with less than 20% moisture
content.
6. Seal/eliminate all ducting leaks; close dust ports
for lines not being used. Refer to Designing the
System in manual.
7. Open 1 or 2 more blast gates to different branch
lines to increase main line velocity.
8. Install correctly sized ducts and fittings
9. Use dust-collection hood on stand.
10. Install larger dust collector.
1. Re-secure ducts and filter bag, making sure duct
and bag clamp are tight; tighten/replace ducting.
2. Retighten all mounting and sealing points;
replace damaged seals/gaskets.
23
Page 27
Page 28
Page 29
Page 30

Page 31

Page 32

The Axminster guarantee
Buy with confidence from Axminster!
So sure are we of the quality, we cover all parts and labour free of charge for three years!
For more information visit axminstertools.com/3years
The packaging is suitable for recycling.
Please dispose of it in a responsible manner.
EU Countries Only
Do not dispose of electric tools together with household waste material.
By law they must be collected and recycled separately.
Axminster Tools, Axminster Devon EX13 5PH
axminstertools.com
 Loading...