

Page 1

AP460DS Drum Sander
Fully read manual and safety
instructions before use.
Save this manual for future
reference.
Eye protection
should be worn
The symbols above advise the correct safety procedures when using this machine.
Ear protection
should be worn
Dust mask
should be worn
Hazard
The packaging is suitable for recycling.
Please dispose of it in a responsible manner.
Do not dispose of electric tools together with
household waste material. By law they must be
collected and recycled separately.
EU Countries Only
Original Instructions
Code 113350
Version 2
Published Date 24/9/2025
Page 2

2
Contents
Product identification
1. Introduction
1.1
Copyright
1.2 Limitation of liability
2. Safety
2.1
General power tool safety warnings
2.2 Explanation symbols
2.3 Correct use
2.4 Responsibility user
2.5 Qualification of staff
2.6 Personal protective equipment
2.7 Safety characteristics on machine
2.8 Safety indications on the machine
3. Technical data
Original Instructions
4. Transport, packing, storage
4.1
Delivery and transport
4.2 Packing
4.3 Storage
5. Description machine
6. Mounting and Set-up
6.1
Mounting
6.2 Set up
6.3 Checking
6.4 operation
7. Maintenance, repair
7.1
Cleaning and lubrication
7.2 Changing of the grinding belt and adjustment of the belt running
7.3 Malfunctioning, possible causes and measures
8. Removal, reuse of old equipment
8.1
Taking out of service
8.2 Removal of electrical app
8.3 Removal of lubricates
9. Spare parts
9.1 Diagram spare parts
10. Wiring diagram
11. Declaration of Conformity
Page 3

3
1. Introduction
Please carefully read the
operation manual before you
start working with the
machine.
Original Instructions
1.1 Limitation of liability
All indications and instructions in this
manual were composed with regard of the
valid standards and regulations, the level
of technique as well as our many years of
experience.
It will inform you about correct
start-up procedure, the correct use
as well as the safe and efficient
operation and maintenance of the
machine.
The operation manual is part of the
machine. It always has to be kept
with the machine. Moreover the local
accident prevention rules and
general safety regulations for the
use of the machine are applicable.
Pictures in this operation manual are
there to give you more
understanding and can deviate from
the real job.
1.1 Copyright
The contents of this manual are
protected by copyright. There
application is allowed within the
frame of the use of the machine.
All other use which deviates from
this is not allowed without written
consent of the manufacturer.
In the following cases the manufacturer is
not liable for
-No observation of manual.
-No correct use.
-Use of unqualified staff.
-Self-made changes.
-Technical modifications.
-Use of unpermitted spare parts.
The factual delivery can, in case of special
models, deviate from the pictures and
descriptions if additional orders are being
placed. The obligations agreed upon in the
contract, the general terms and conditions
as well as the terms and condi tions of the
manufacturer and the legal regulations
valid on the moment of conclusion of the
contract are applicable.
2.Safety
This chapter shows all important safety packages for the protection of persons as
well as for the safe and sound operation. All other safety instructions regarding
certain tasks have been mentioned in the separate chapters.
Page 4

4
Original Instructions
2.1 General power tool safety warnings
WARNING Read all safety warnings, instructions, illustrations and specifications provided
with this power tool. Failure to follow all instructions listed below may result in electric shock, fire
and/or serious injury.
Save all warnings and instructions for future reference.
1) Work area safety
a) Keep work area clean and well lit. Cluttered or dark areas invite accidents.
b) Do not operate power tools in explosive atmospheres, such as in the presence of flammable
liquids, gases or dust. Power tools create sparks which may ignite the dust or fumes.
c) Keep children and bystanders away while operating a power tool. Distractions can cause you to
lose control.
2) Electrical safety
a) Power tool plugs must match the outlet. Never modify the plug in any way. Do not use any
adapter plugs with earthed (grounded) power tools. Unmodified plugs and matching outlets will reduce
risk of electric shock.
b) Avoid body contact with earthed or grounded surfaces, such as pipes, radiators, ranges and
refrigerators. There is an increased risk of electric shock if your body is earthed or grounded.
c) Do not expose power tools to rain or wet conditions. Water entering a power tool will increase the
risk of electric shock.
d) Do not abuse the cord. Never use the cord for carrying, pulling or unplugging the power tool.
Keep cord away from heat, oil, sharp edges or moving parts. Damaged or entangled cords increase
the risk of electric shock.
e) When operating a power tool outdoors, use an extension cord suitable for outdoor use. Use of a
cord suitable for outdoor use reduces the risk of electric shock.
f) If operating a power tool in a damp location is unavoidable, use a residual current device (RCD)
protected supply. Use of an RCD reduces the risk of electric shock. NOTE The term “residual current device
(RCD)” can be replaced by the term “ground fault circuit interrupter (GFCI)” or “earth leakage circuit breaker (ELCB)”.
3) Personal safety
a) Stay alert, watch what you are doing and use common sense when operating a power tool. Do
not use a power tool while you are tired or under the influence of drugs, alcohol or medication. A
moment of inattention while operating power tools may result in serious personal injury.
b) Use personal protective equipment. Always wear eye protection. Protective equipment such as a
dust mask, non-skid safety shoes, hard hat or hearing protection used for appropriate conditions will
reduce personal injuries.
c) Prevent unintentional starting. Ensure the switch is in the off-position before connecting to
power source and/or battery pack, picking up or carrying the tool. Carrying power tools with your
finger on the switch or energising power tools that have the switch on invites accidents.
d) Remove any adjusting key or wrench before turning the power tool on. A wrench or a key left
attached to a rotating part of the power tool may result in personal injury.
e) Do not overreach. Keep proper footing and balance at all times. This enables better control of the
power tool in unexpected situations.
f) Dress properly. Do not wear loose clothing or jewellery. Keep your hair and clothing away from
moving parts. Loose clothes, jewellery or long hair can be caught in moving parts.
g) If devices are provided for the connection of dust extraction and collection facilities, ensure
these are connected and properly used. Use of dust collection can reduce dust-related hazards.
h) Do not let familiarity gained from frequent use of tools allow you to become complacent and
ignore tool safety principles. A careless action can cause severe injury within a fraction of a second.
4) Power tool use and care
a) Do not force the power tool. Use the correct power tool for your application. The correct power
tool will do the job better and safer at the rate for which it was designed.
b) Do not use the power tool if the switch does not turn it on and off. Any power tool that cannot be
controlled with the switch is dangerous and must be repaired.
c) Disconnect the plug from the power source and/or remove the battery pack, if detachable, from
the power tool before making any adjustments, changing accessories, or storing power tools.
Such preventive safety measures reduce the risk of starting the power tool accidentally.
d) Store idle power tools out of the reach of children and do not allow persons unfamiliar with the
power tool or these instructions to operate the power tool. Power tools are dangerous in the hands of
untrained users.
e) Maintain power tools and accessories. Check for misalignment or binding of moving parts,
Page 5
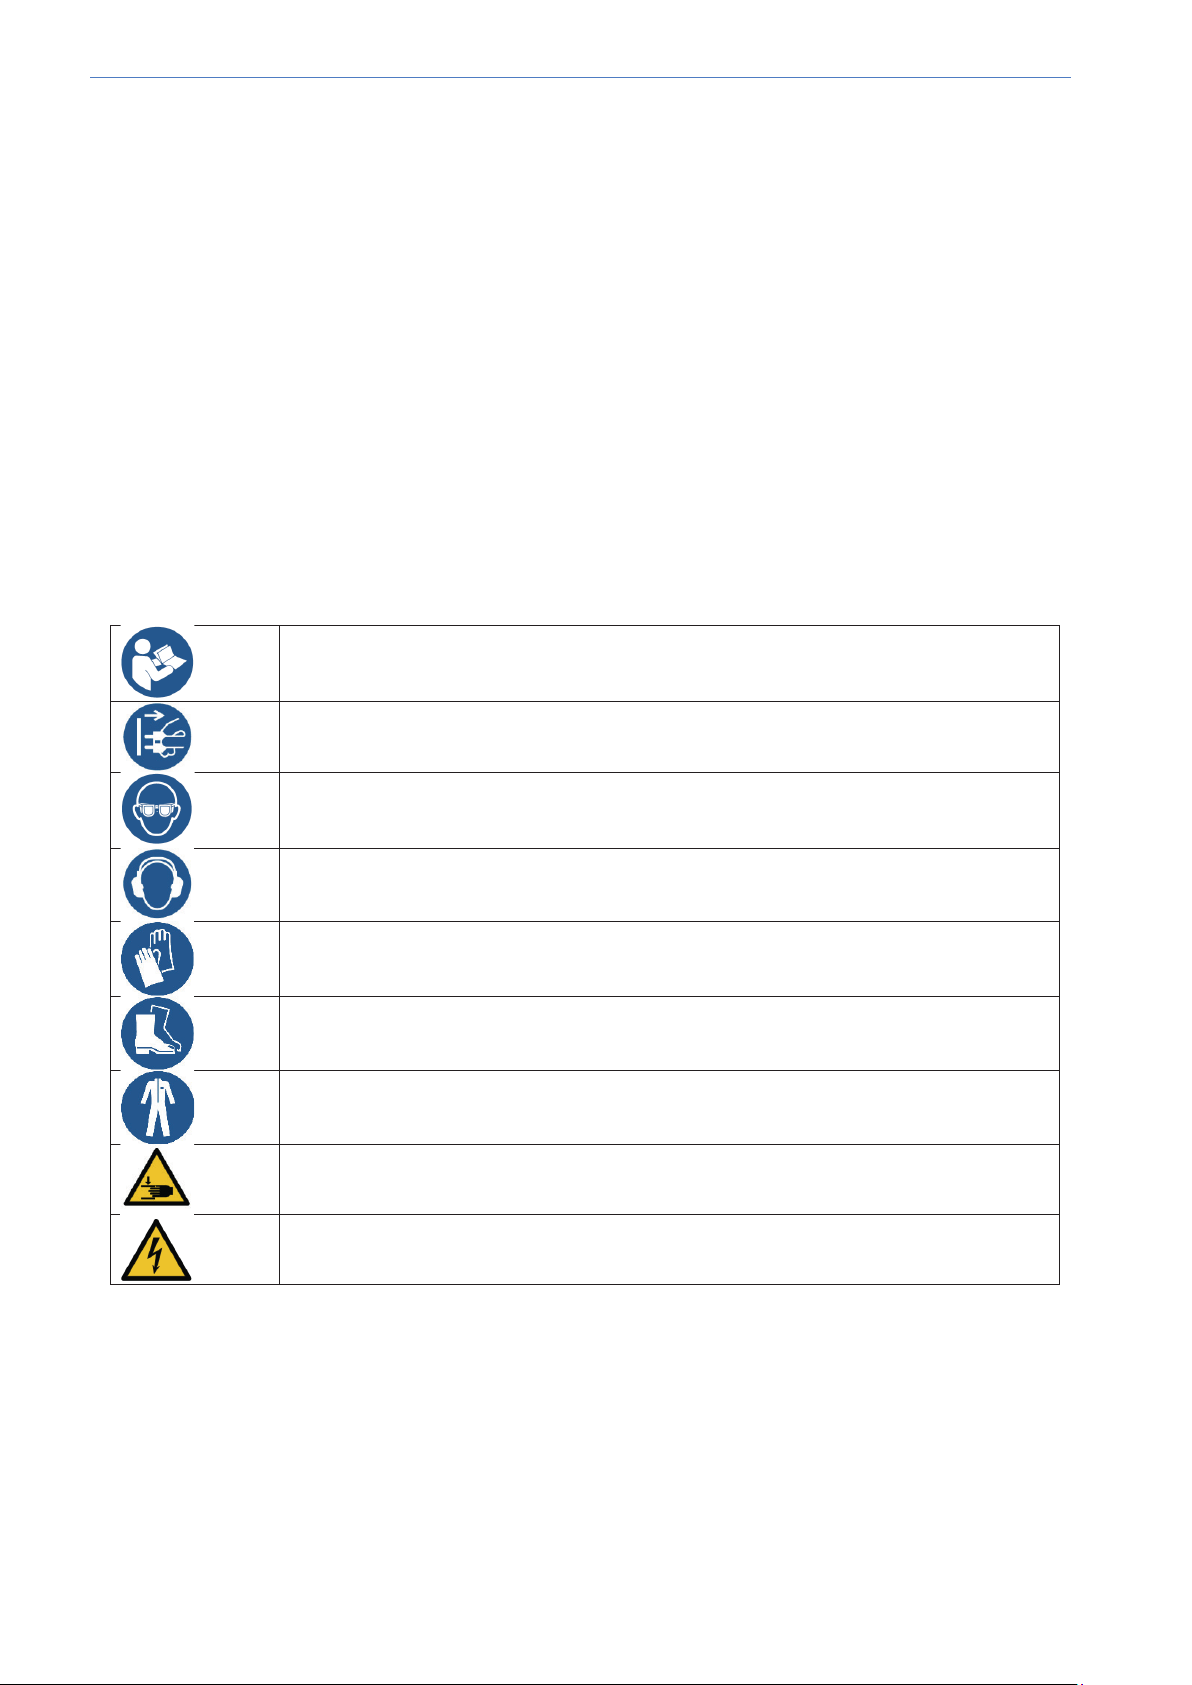
5
Original Instructions
Refer to instruction manual
Disconnect mains plug from electric outlet
Wear eye protection
Wear ear protection
Wear protective gloves
Wear safety footwear
Wear protective clothing
Warning: Crushing of hands
Warning: electricity
breakage of parts and any other condition that may affect the power tool’s operation. If damaged,
have the power tool repaired before use. Many accidents are caused by poorly maintained power tools.
f) Keep cutting tools sharp and clean. Properly maintained cutting tools with sharp cutting edges are
less likely to bind and are easier to control.
g) Use the power tool, accessories and tool bits etc. in accordance with these instructions, taking
into account the working conditions and the work to be performed. Use of the power tool for
operations different from those intended could result in a hazardous situation.
h) Keep handles and grasping surfaces dry, clean and free from oil and grease. Slippery handles
and grasping surfaces do not allow for safe handling and control of the tool in unexpected situations.
5) Service
a) Have your power tool serviced by a qualified repair person using only identical replacement
parts. This will ensure that the safety of the power tool is maintained.
2.2 Explanation of symbols
Safety instructions
Safety instructions are indicated in this manual by symbols. The safety symbols have
been introduced by safety words, which have to explain the gravity of the danger.
DANGER!
This combination of symbol and word indicates an immediate dangerous situation, which
might cause death or serious injury if it will not be prevented.
WARNING
Danger in case of wrong use!
Page 6

6
Original Instructions
CAREFUL!
INFORMATION AND ADVICES
A wrong use of the machine can cause dangerous situations:
- The machine has only to be used for the work mentioned in the technical data.
- Never by-pass the safety devices or put them out of order.
- The machine has to be operated in a perfect condition.
This combination of symbol and word indicates an immediate dangerous
situation, which might cause little or light injury, if it will not be prevented.
For constructive and technical changes on the machine, the manufacturer does not
accept any liability claims of any kind whatsoever, due to damage caused by wrong
use are excluded.
INDICATION!
This combination of symbol and word indicates an immediate dangerous situation, which
might cause damage to material or environment, if it will not be prevented.
Information and advices
2.3 Correct use
The machine has exclusively been developed for grinding and notching the metal pipe
ends.
For a correct use, it is necessary to observe all instructions in this operation manual. All
other use deviating from this manual, or other kind of use, is considered as wrong.
2.4 Responsibility of user.
The owner is that person, who uses the machine himself for economical purposes
or leaves it to third parties to use it, and remains responsible for the protection of
the user, staff or third parties during operation.
This symbol gives information and advices for a more efficient and sound operation.
In order to prevent the risk of personal or material damage, you are obliged to observe the
safety instructions as laid down in this manual.
Obligations owner.
The owner will be responsible to observe the legal stipulations for the safeguarding of
persons at work. Therefore safety instructions in this manual as well as the accident
prevention-, safety-, environmental stipulations have to be observed. The following is very
important:
-The owner has to inform himself about valid labour protection regulations. In
dangerous situations he has to make a judgement, which might result from the special
labour circumstances at the working place of the machine. He will have to turn these
into instructions for the operation of the machine.
Page 7

7
Original Instructions
-The owner has to check, during the whole working time with the machine, whether
the instructions laid down by him come up to the actual state of affairs in control
engineering, and, eventually to adjust them.
-The owner has to lay down clearly all authorizations regarding installations,
operation, trouble-shooting and maintenance and cleaning.
-The owner has to see to it, that all persons who work with the machine, have read this
manual and have understood it. Moreover he will have to instruct his staff at regular
intervals and to inform them about the risks.
-The owner will have to put the necessary protective equipment at the disposal of the
staff and he will have to make carrying of the needed protective equipment obligatory.
Furthermore the owner will always be responsible for a perfect condition of the machine.
Therefore the following applies:
-The owner will have to take care of it, that the maintenance intervals described in this
manual will be observed.
-dito a regular check up of a correct functioning and completeness of all safety
devices.
2.5 Qualification of staff
The various tasks described here, demand different qualifications of persons, who are
being charged with the job.
Electrician
The electrician is by virtue of his professional training, experience as well as knowledge of
actual standards and stipulations capable of carrying out work on electrical installations
and to recognize possible dangerous situations and to prevent them.
Qualified staff:
The qualified staff is by virtue of their professional training, knowledge, experience as well
as knowledge of standards and stipulations capable or carrying out work and to recognize
possible dangerous situations and to prevent them.
Producer
Certain tasks may only be done by qualified staff of producer. Other staff is not authorized
to carry out these tasks.
Operator:
The operator has recieved the necessary instructions from the owner with regard to certain
tasks charged to him as well as the eventual risks. Tasks which deviate from the normal
operation, the operator may only carry out if such is mentioned in the manual and if he
explicitly has been charged with it.
Danger in case of insufficient qualified staff!
Page 8
8
Original Instructions
Insufficient qualified staff cannot estimate the risks during working with the machine and
might expose themselves or others to danger with death or serious injury as a
consequence.
- All tasks may only be done by qualified staff.
-Insufficient qualified staff should be kept at a distance.
For all work, only persons are allowed, from whom you may expect, that they are capable
of carrying out these tasks correctly. Persons, whose reaction power has been influenced
by drugs, alcohol or medicines, are not allowed to get near to the machine.
In this manual, the following indicated qualifications of staff are mentioned for various
tasks;
2.6 Personal Protective equipment
The personal protective equipment is meant to protect persons against dangers resulting
from work and which may jeopardize their health and safety. His staff is obliged to wear
protective equipment during working with the machine.
2.7 Safety indications on the machine.
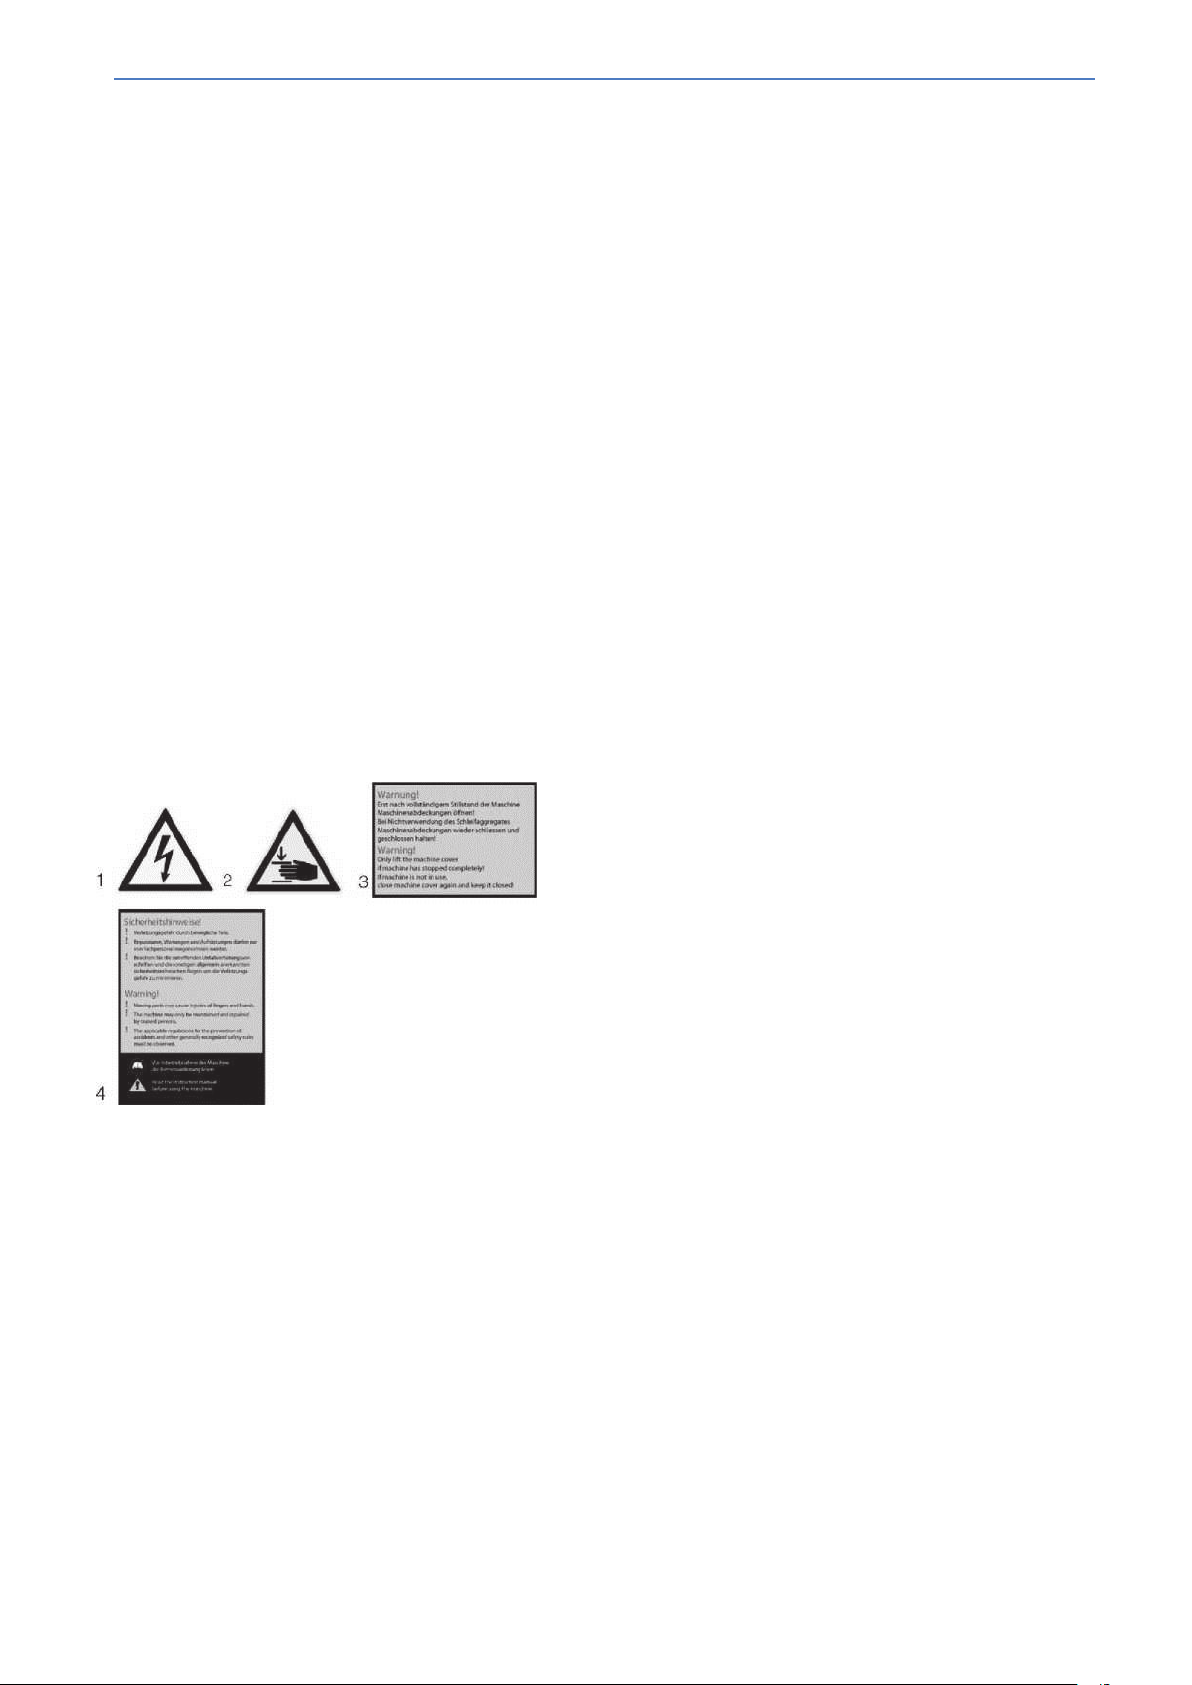
On the machine several safety indications can be found (ill 1) which need to be observed.
Safety indications:
1. Warning against dangerous electrical tension
2. Careful: risk of jamming
3. Warning agains covering
4. Safety instructions
Damaged or missing safety symbols on the machine can result in wrong actions with
persons and cause damage to people and material. The safety symbols put on the
machine may not be removed. Damaged safety symbols need to be renewed
immediately.
As of the moment, on which the symbols cannot be recognized or understood
anymore, the machine should be taken out of production till the symbols have
been renewed.
Page 9

9
Technical data
Motor kW (230V/50Hz) 1P
Motor kW (400V/50Hz) 3P
Belt speed(rpm)
R
Conveyor belt
B
Dusting mouth
F
Max
Mini
Max workpiece height (mm)
460
Two max workpiece widths(mm)
920
Max draft(mm)
0.5
Roller size(mm)
100x465
Feed motor W(110V)
60
Dimensions LxWxH(mm )
Wright(KG)
1.5
1.5
2800
oller belt(mm) 2100x75
(mm) 1120x450
ed dimension(mm) 460x465
(mm) φ62
eed velocity(m/min) 0~4
workpiece height (mm) 100
workpiece height (mm) 5
Original Instructions
φ
880x540x1230
134
3. Technical data:
NOISE DECLARATION
The sound power level: 98 dB(A); The sound pressure level: 87 dB(A).
Uncertainty K: 3dB
The Noise was measured according to EN 62841-1:2015.
The figures quoted are emission levels and are not necessarily safe working levels. Whilst
there is a correlation between the emission and exposure levels, this cannot be used reliably
to determine whether or not further precautions are required. Factors that influence the actual
level of exposure of the workforce include characteristics of the work room, the other sources
of noise, etc, i.e. the number of machines and other adjacent processes. Also the permissible
exposure level can vary from country to country, this information, however, will enable the user
of the machine to make a better evaluation of the hazard and risk.
Page 10

10
Original Instructions
4. Transport, packing and storage
4.1 Delivery and transport Delivery
The machine has to be checked after delivery for any transport damage. In case the
machine has some clear damage, this should be reported to the transporter or the
dealer.
Transport
WARNING!
Danger as a consequence of falling cargo!
If during transport or during elevating the weight of the machine or the maximum
bearing capacity is not being observed, the machine might tip over or fall down.
During transport and elevating the weight or the machine and also the maximum
bearing capacity should be observed. Protect the machine against humidity.
The combined universal attachment and belt grinder may only be transport in a
standing position and with disconnected engine
.
Transport with a fork lift truck:
The machine must be mounted on a pallet in order to carry it with a fork lift truck.
Transport with a crane:
The machine has a special transport eye. For the transport and assembling always use
a crane and put the elevating devices always in the transport eye.
4.2 packing
All used packing material and packing auxiliaries of the machine can be recycled and
have to be given to the recycling channel.
Packing elements made of card board need to be made small and given to the
collection channel for old paper.
The foils are made of polyethylene (PE) and the filling material of polystyrol (PS). These
materials need to be given to a collection point or to the local garbage company.
4.3 Storage
The machine has to be cleaned thoroughly, before you store it in a dry, clean and
frost-free environment.
Page 11
11
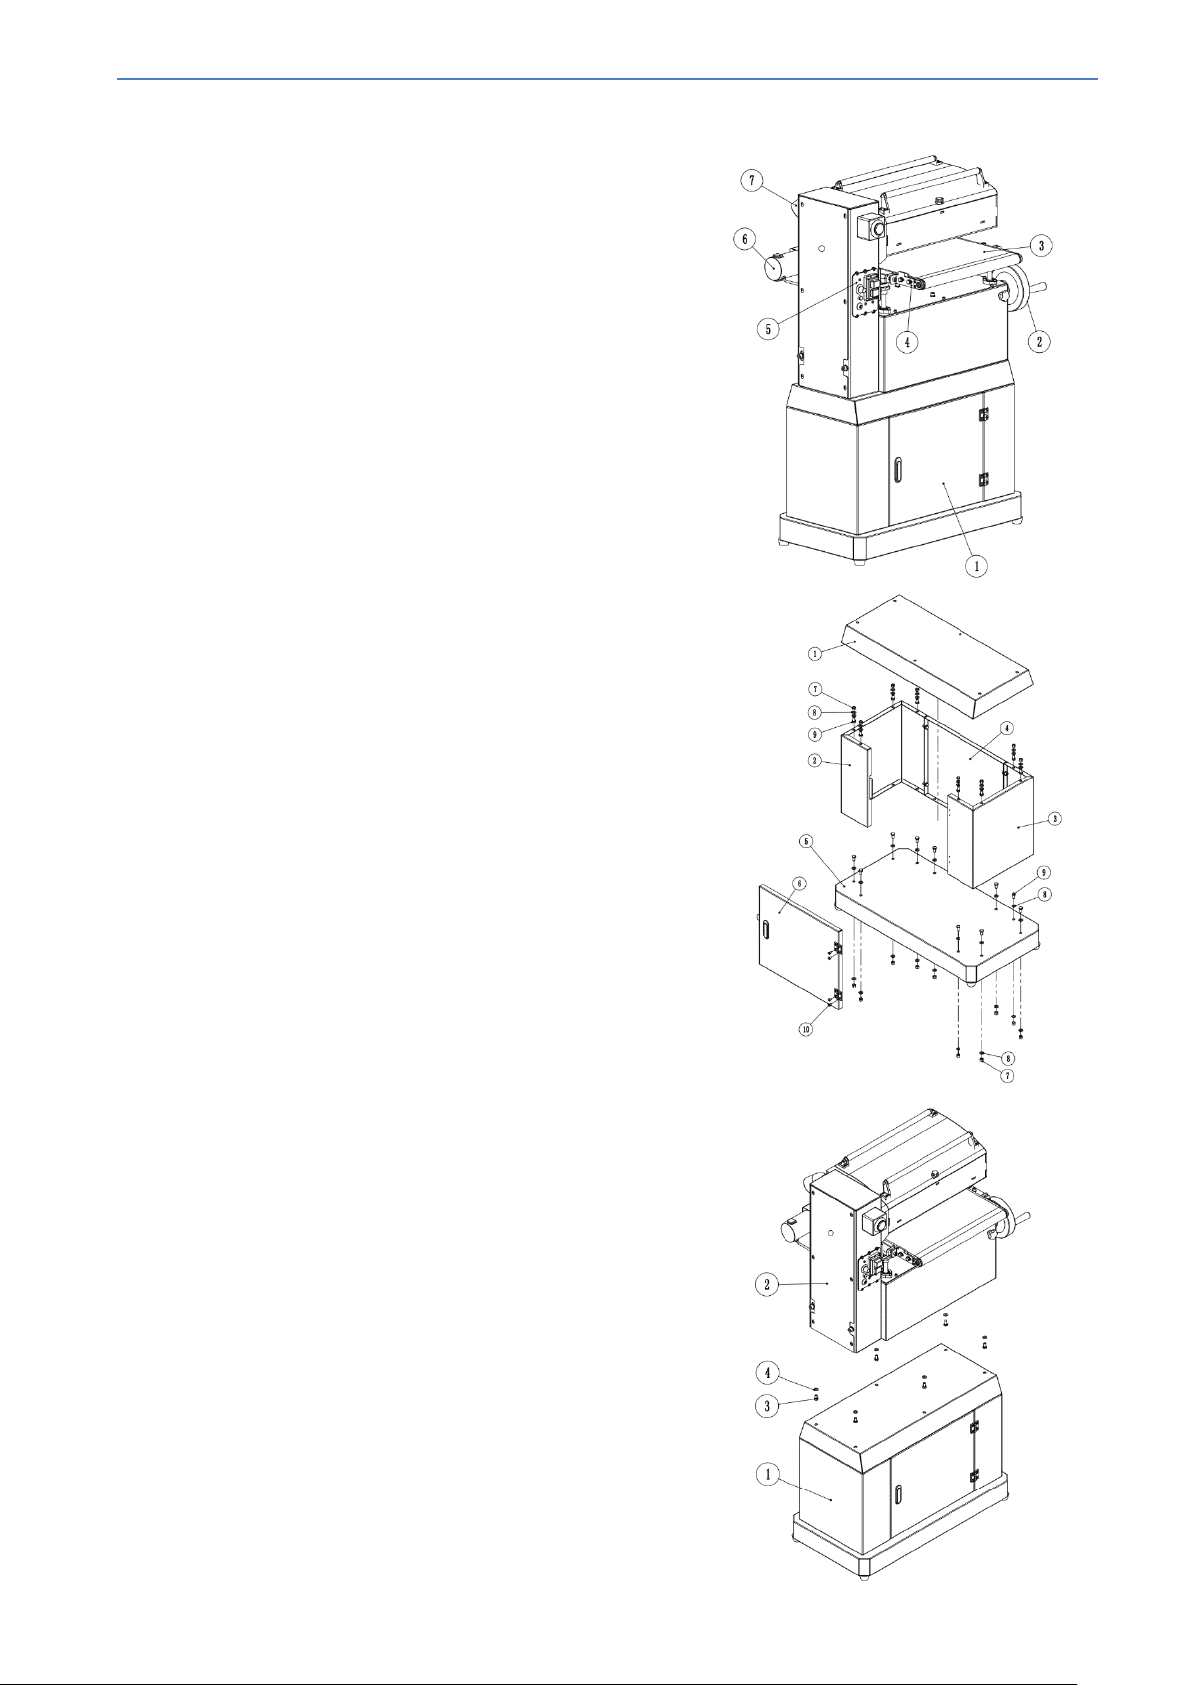
5. Description of machine
Pictures in this manual are there to give you
the necessary understanding and may deviate
from the reality.
①Pedestal
②Lift the handwheel
③Transmission parts
④Abrasive belt adjustment
⑤Disc parts
⑥Conveyor motor
⑦Dusting mouth
6. Mounting and start-up
Original Instructions
Install the base
Step 1: Put the ① in the plane
Step 2: Put ②③④use ⑦⑧⑨ install in ①
Step 3: Use ⑦⑧⑨Install ⑤
Step 4:
Use ⑩Install ⑥
Installation of the overall
Step 1: Put the ① in the plane
Step 2:
Step 3:
removal mouth
Put ②use ③④ install in ①
Install the dust collecting bag on the dust
Page 12

12
Original Instructions
6.1 mounting
Before you erect the machine, you have to check the bearing capacity of the floor. The
place where the machine will be placed has to be able to carry the weight of the machine
and the materials to be grinded.
In order to get a good working capacity of the machine as well as to reach a long working
life, the place of working should come up to the following demands:
-The machine may only be placed and operated in a dry, venti lated space.
-Do not place the machine in the neighbourhood of dust- and chips producing machines.
-The place of erection should be free of vibrations, so away from presses, planers etc.
-The floor has to be suitable for the work. Pay attention to bearing capacity and levelness of
the floor
-Protruding parts, like f.i. stop plate, grips, etc need to be made safe in such away that
people are not jeopardized.
-There should be enough place for operation staff and transport of material.
-Think also of the accessibility for adjustment and maintenance work.
-Take care of sufficient light (minimal 300 Lux)
-make sure the machine must be fixed to the support table or floor when operating.
-Test the machine after making sure the safety condition is good.
6.2 Set up
The four mounting points of the machine should be marked and bore holes should be made
for anchorages. The machine should be mounted with steel bolts to the support table or
floor.
WARNING:
After the erection take away the lubrication of the white metal parts, which has been put
there for reasons of protection.
-Use for this the usual solvents
-No water, no nitro solvents etc.!
6.3 Checking
After connecting the plug to the power source, you have to check the running direction of
the belt and disc.
Page 13
13
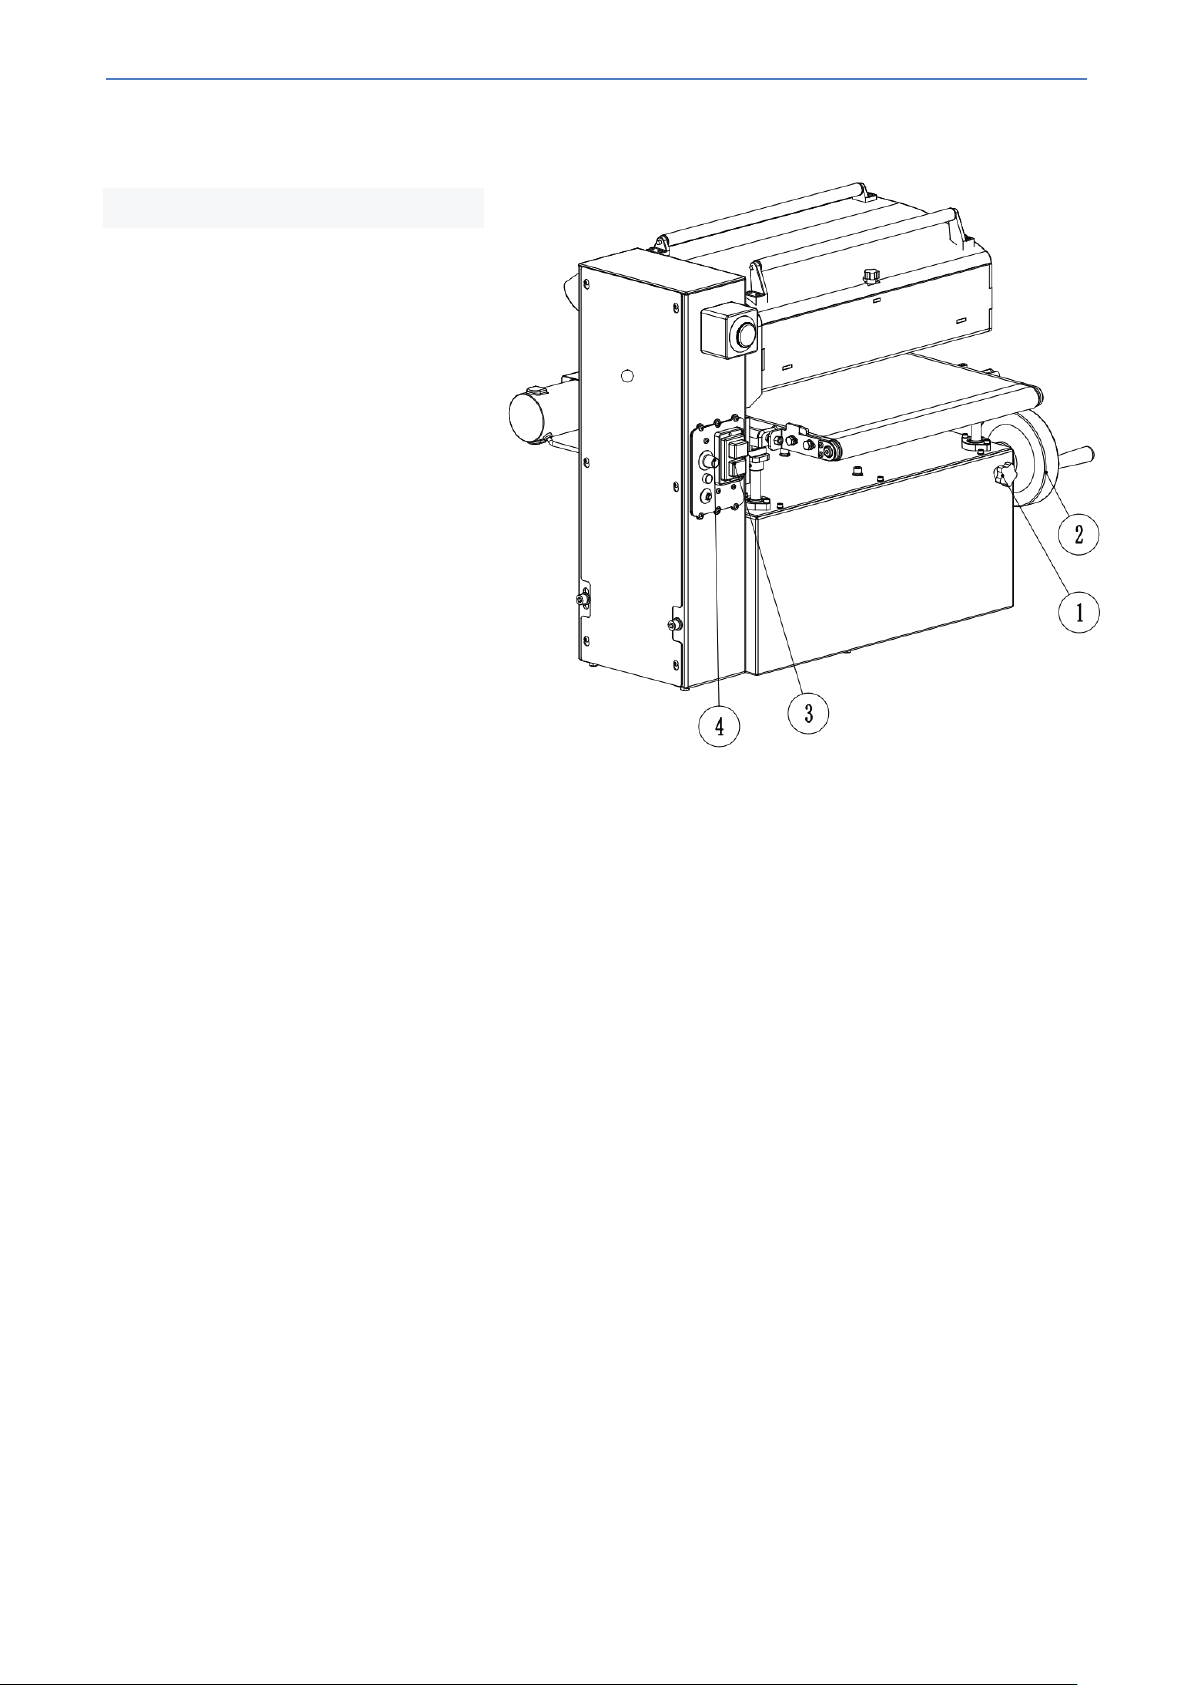
6.4 Operating instruction
Step 1: Loosen the locking screw①
Step 2: Turn handwheel ② to
appropriate height
Original Instructions
Step 3:
lock screw①
Step 4: Press the start button ③ to
start the machine
Step 5: Turn speed control knob ④
to adjust proper speed
Step 6 :
conveyor belt and start grinding
Place the workpiece on the
Step 7: Turn off the machine and
cut off the power
7. Maintenance and repair
Information and advices
In order to keep the machine always in an excellent condition, you will have to carry out
maintenance on a regular basis.
WARNING!
Danger in case of unqualified persons!
Insufficient qualified persons cannot estimate the risks during repair work and might
expose themselves and others to serious or lethal injury.
All maintenance work may only be done by qualified persons.
DANGER!
Life at risk by voltage!
Making contact with electrical parts, is dangerous.
- Before starting with cleaning work, always unplug the machine.
- Connections and repair work on electrical equipment may only be done by qualified
personal.
- Check after maintenance and repair work if all covering plates and safety devices have
been put back correctly and that no tool has been left inside.
- Damaged safety devices and machine parts have to be changed or repaired by a
certified work shop.
Page 14

14
Original Instructions
7.1 Cleaning and lubrication of machine.
ATTENTION!
- Before starting with cleaning or lubricating, always switch off the machine and pull out
the plug.
- Never use solvents to clean artificial parts or painted surfaces. The surfaces might
dissolve or loosen up and cause a lot of damage.
Clean the pipe notcher and belt grinder regularly.
Empty the chip container regularly and check if the inside of the grinder should be cleaned.
"fake off dust with a broomstick or piece of cloth of all open machine parts.
All painted surfaces should be cleaned with a wet piece of cloth.
Clear metallic working surfaces have to be treated with a rust inhibitor spray.
Lubricate all bearings once a month.
7.2 Changing of the grinding belt and adjustment of the belt running.
ATTENTION!
Use only belts with the dimension 1120 mm x 450 mm.
Check before installation for your own safety the dimensions of the belt and check it for evt.
Structural faults. Always select that belt which suits to the material to be grinded.
Choose grinding belts with a weld where the opposite ends are glued together. Grinding
belts with the ends glued together on top, can break when changing the belt direction.
Page 15
15
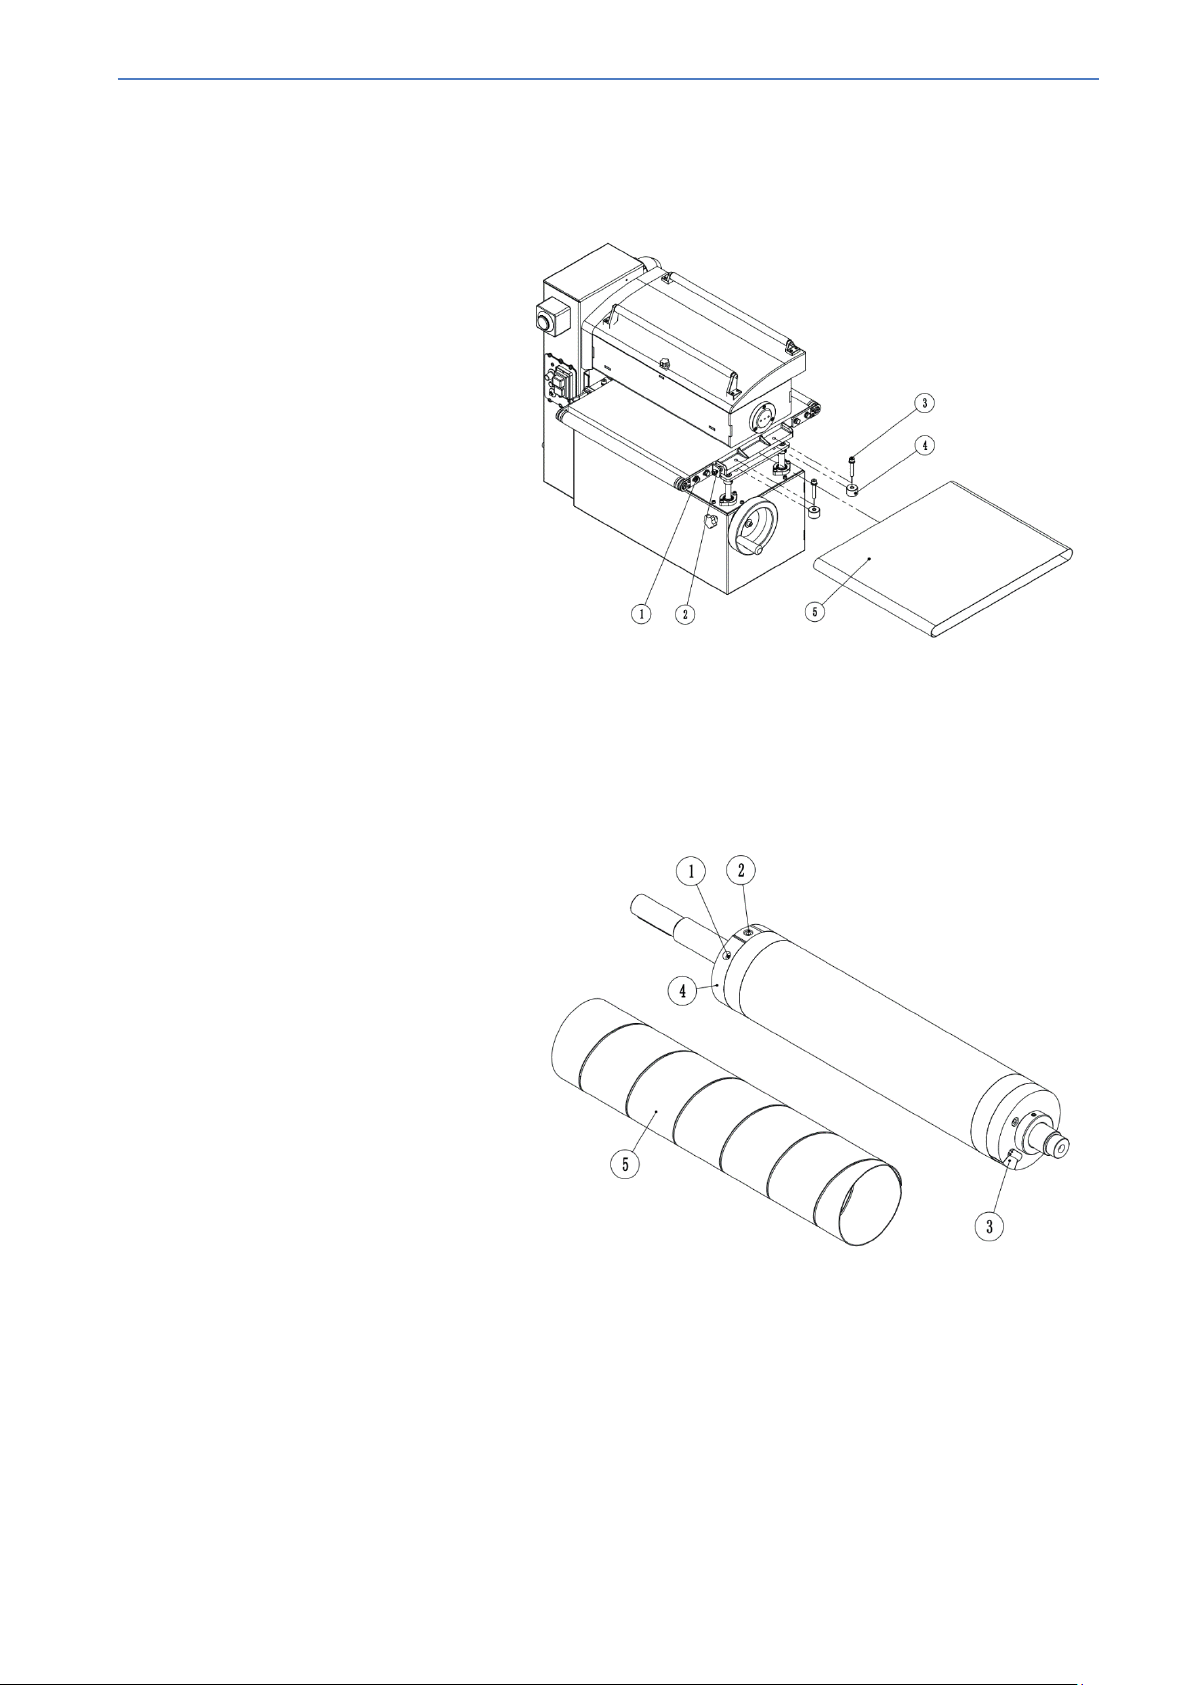
Conveyor belt replacement
Step 1: Loosen bolt ① on both sides
Step 2: Adjust both side bolts ②
Step 3: Remove hexagon socket
screw ③
Step 4: Remove pad ④
Original Instructions
Step 5:
Remove the conveyor belt ⑤
and replace it with a new one
Step 6: Install pad ④
Step 7:
Install hexagon socket screw
③
Step 8: Adjust bolt ② to sand belt
tensioning, lock bolt ①
Step 9:
Open the machine and adjust bolt ② to sand belt in a reasonable position
Replace the sand belt of roller
Select a sand strip of 75mm width
Step 1:
sand belt
Loosen screw ②③ remove
Step 2: Turn ④ so that the internal
spring to the tightest position, locking
screw ① to hold it
Step 3: Start winding the new sand
belt from position ③
Step 4:
Loosen screw ① after pressing sand belt to make it tensioned automatically
Step 5: After installation, start up test
Page 16

16
Belt does not run in the
the contact surfaces near the roller
Original Instructions
7.3Mai functioning, possible causes and solutions
ATTENTION!
If one of the following faults takes place, stop the machine at once. Before searching for
the mistakes, switch off and unplug the machine. All repairs and changes may only be
done by qualified and trained staff.
Fault Possible cause Solution
Machine does not
work
Material is not being
clamped properly
center
Bad grinding result
Grinding roller starts
crawling
1. Plug not in
2. Cables defect
3. Switch defect
4. Engine defect
1.High speed stretcher not
correctly adjusted
2. Piece of work is very long
and heavy
1. Belt running not correctly
adjusted
2. Damage to bearings in
grinding roller
1.Wrong belt
2. Belt worn out
1. Roller holder is not
completely closed
1. Put in the plug
2. Call a service-engineer
3. Call a service-engineer
4. Call a service-engineer
1, Adjust high speed stretcher
2. Use a material support
1.Adjust belt running
2. Replace grinding roller
1. Put in the correct belt
2. Change the belt
1. Stop the machine at once. Clean
holder. Tighten the fixing screws
on the grinding roller.
INDICATION!
Shouldn't you be able to solve the problems with your machine yourself, then kindly go to
your RVD dealer.
Please write down first the following data of your machine or copy them from the machine
manual, in order to enable the dealer to help you.
-Model of machine
-Serial number of machine
-Year of construction
-Exact description of the problem
8. Reuse of old equipment
In the interest of the environment, it is necessary to deposit old parts of machines to the
waste incineration plants.
Page 17

17
Original Instructions
8.1 Put out of order
Old equipment has to be put out of order immediately in order to prevent later abuse with
jeopardizing the environment or damage to people as a consequence.
- All environmental jeopardizing fluids from the old machine have to be deposited at a
waste incineration plant.
- The machine has to be demounted in small manageable parts and groups.
- The machine components and fluids have to be deposited at a waste incineration plant.
8.2 Depositing electrical equipment
Electrical equipment contain a lot reusable materials as well as environmental harmful
components. These parts have to be deposited separated and correctly. In case of doubt,
you can ask your garbage collection authorities.
For the preparation you may think of asking help of a specialist in waste treatment affairs.
8.3 Deposit of lubricants
The indications for depositing used lubricants can be obtained at the supplier of lubricants.
If needed, you may ask for product specific information sheets.
9. Spart parts
Loss of guarantee
In case of use of not permitted spare parts producer's guarantee will be cancelled.
The spare parts can be obtained through your dealer or directly from the producer.
The following data are very important if you want to order spare parts:
-Type of machine
-Serial number
-Quantity
-Indication
-Desired way of shipment (postal parcel, freight, Sea, Airmail, Express delivery)
-Delivery address
Spare parts orders which do not show the information needed as shown above cannot be
taken into consideration. If no information has been given regarding the way of shipment,
this will be arranged within the possibilities of the producer.
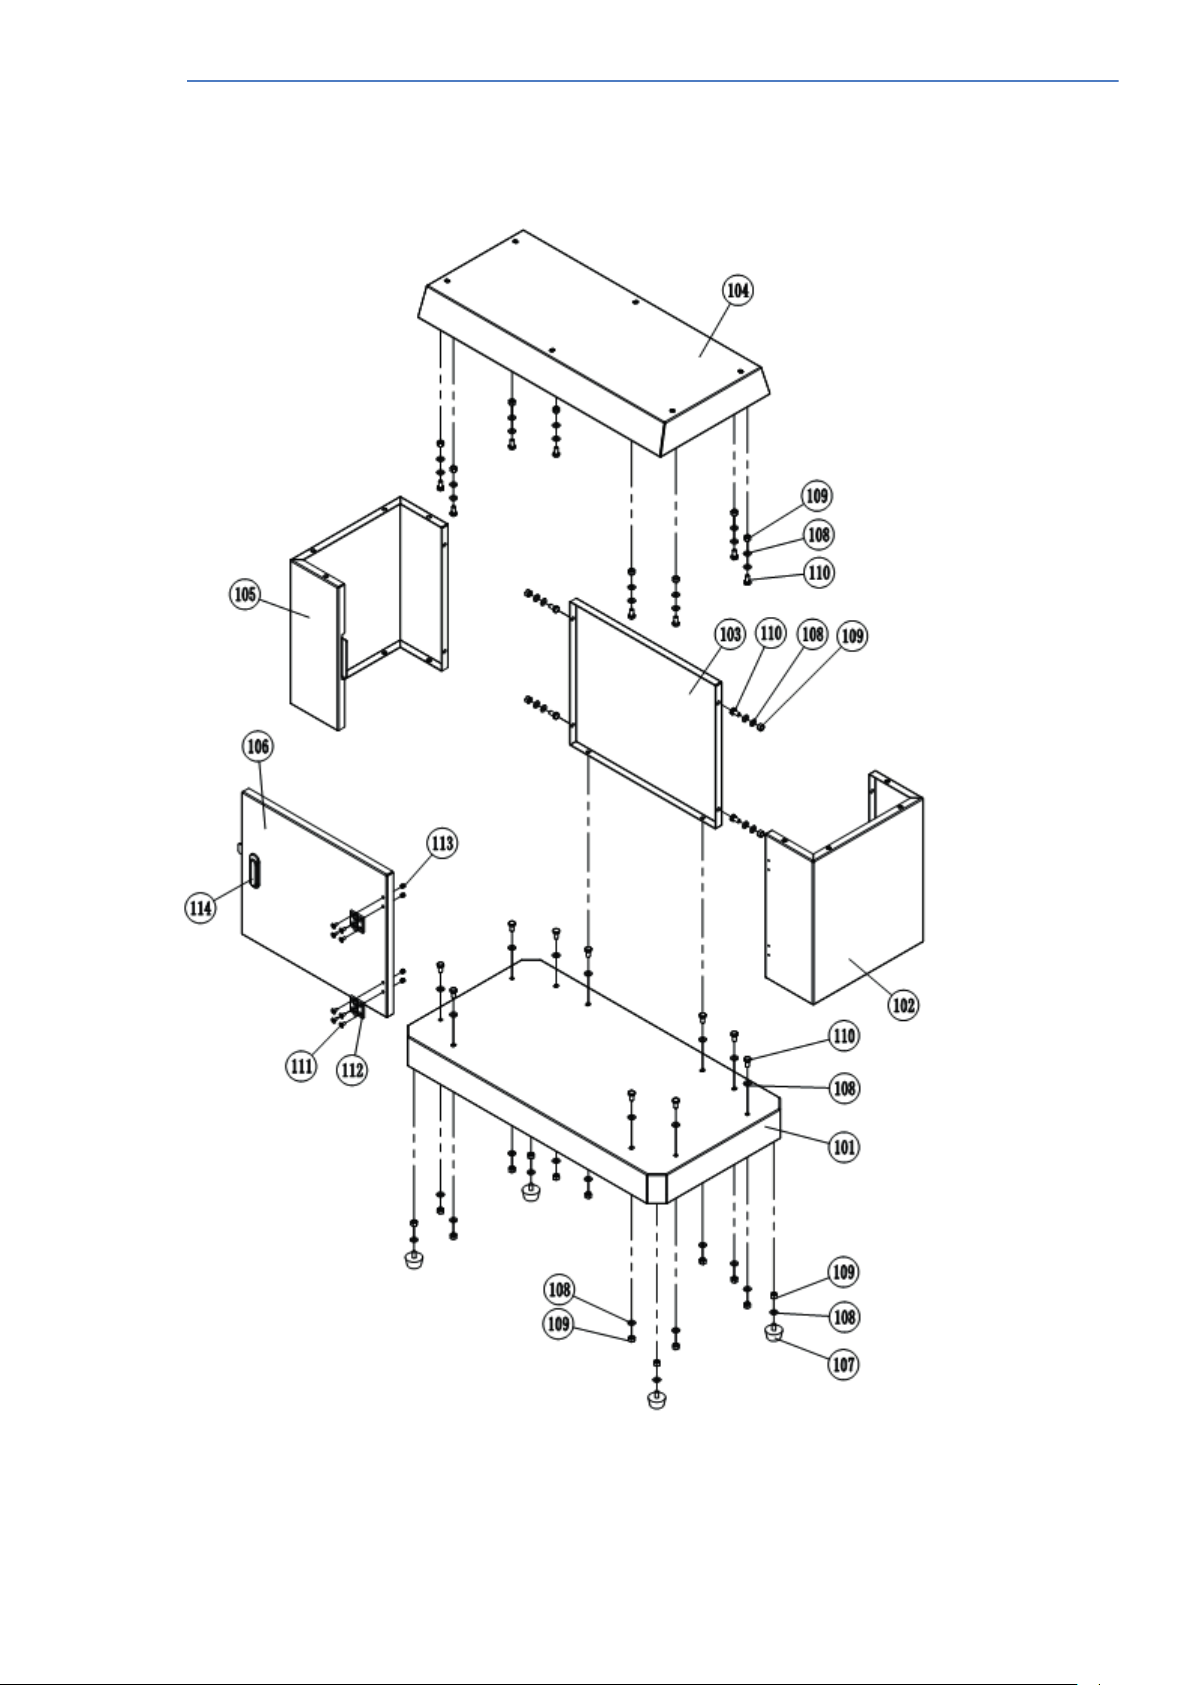
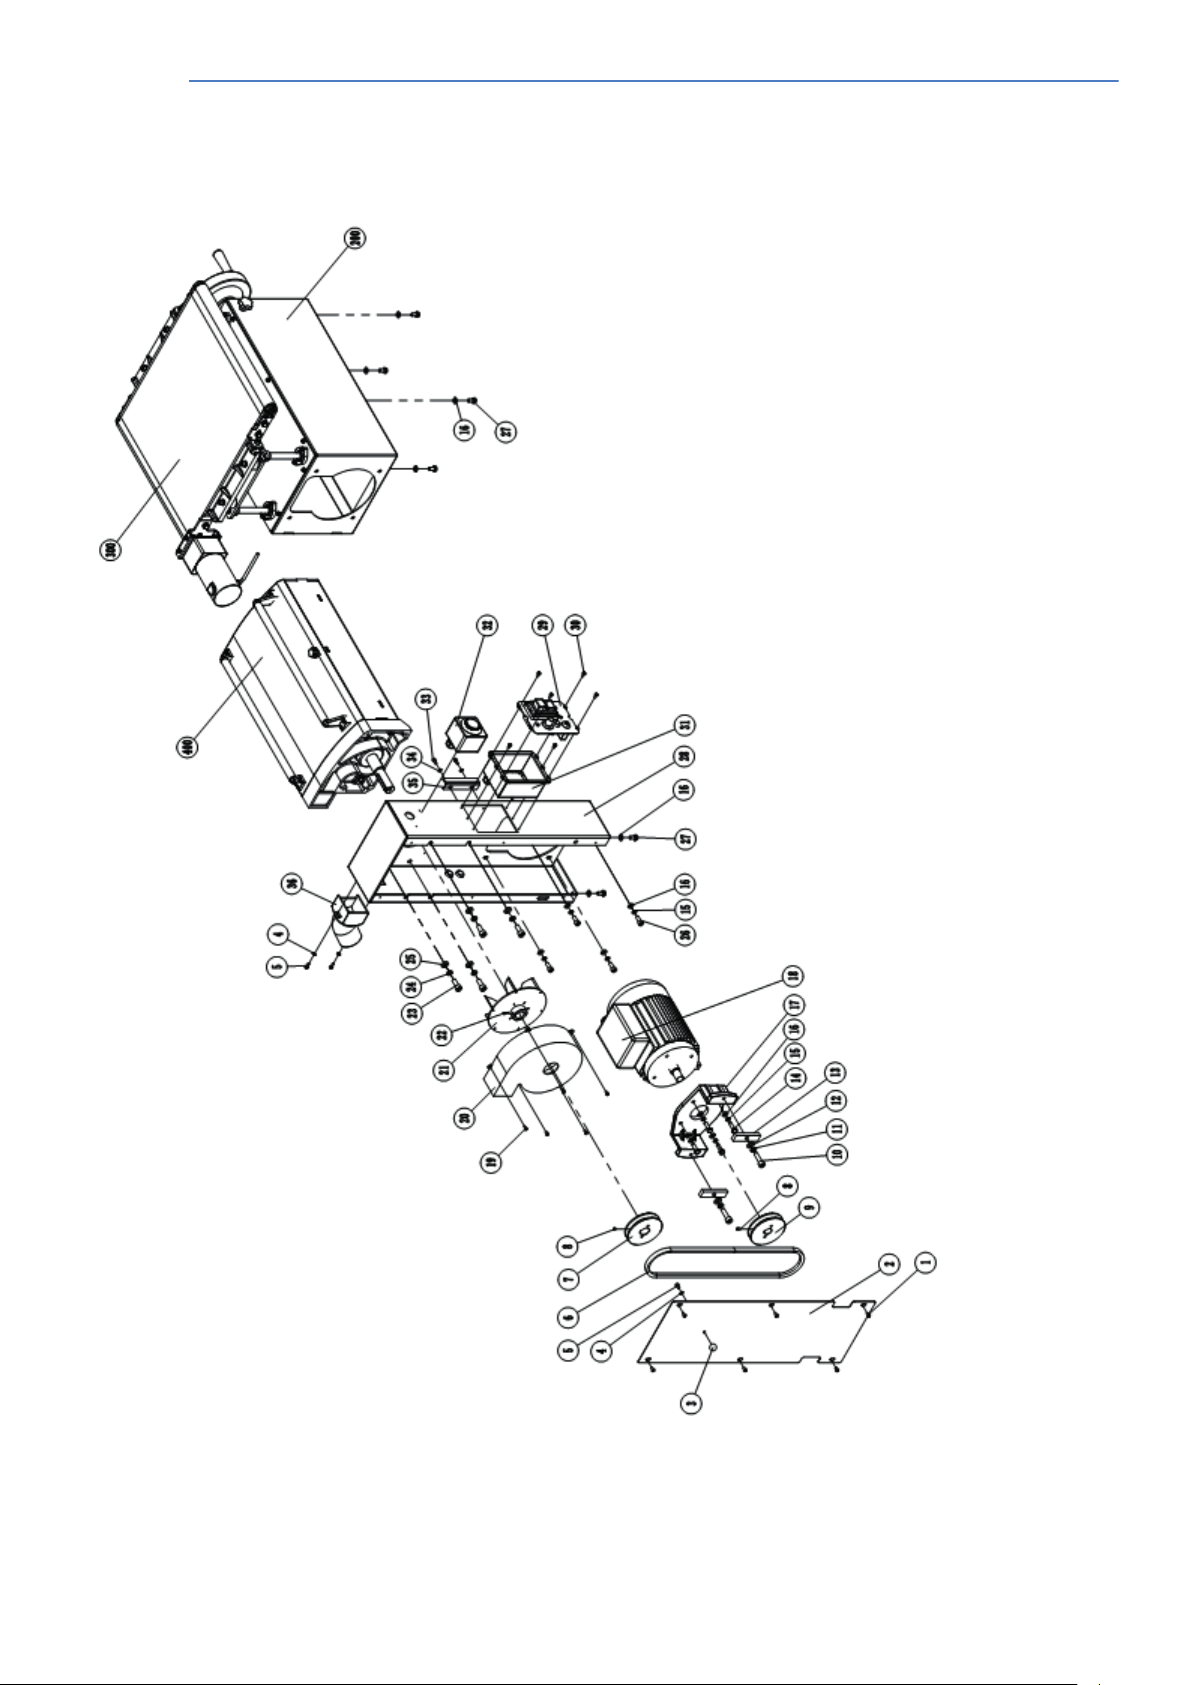
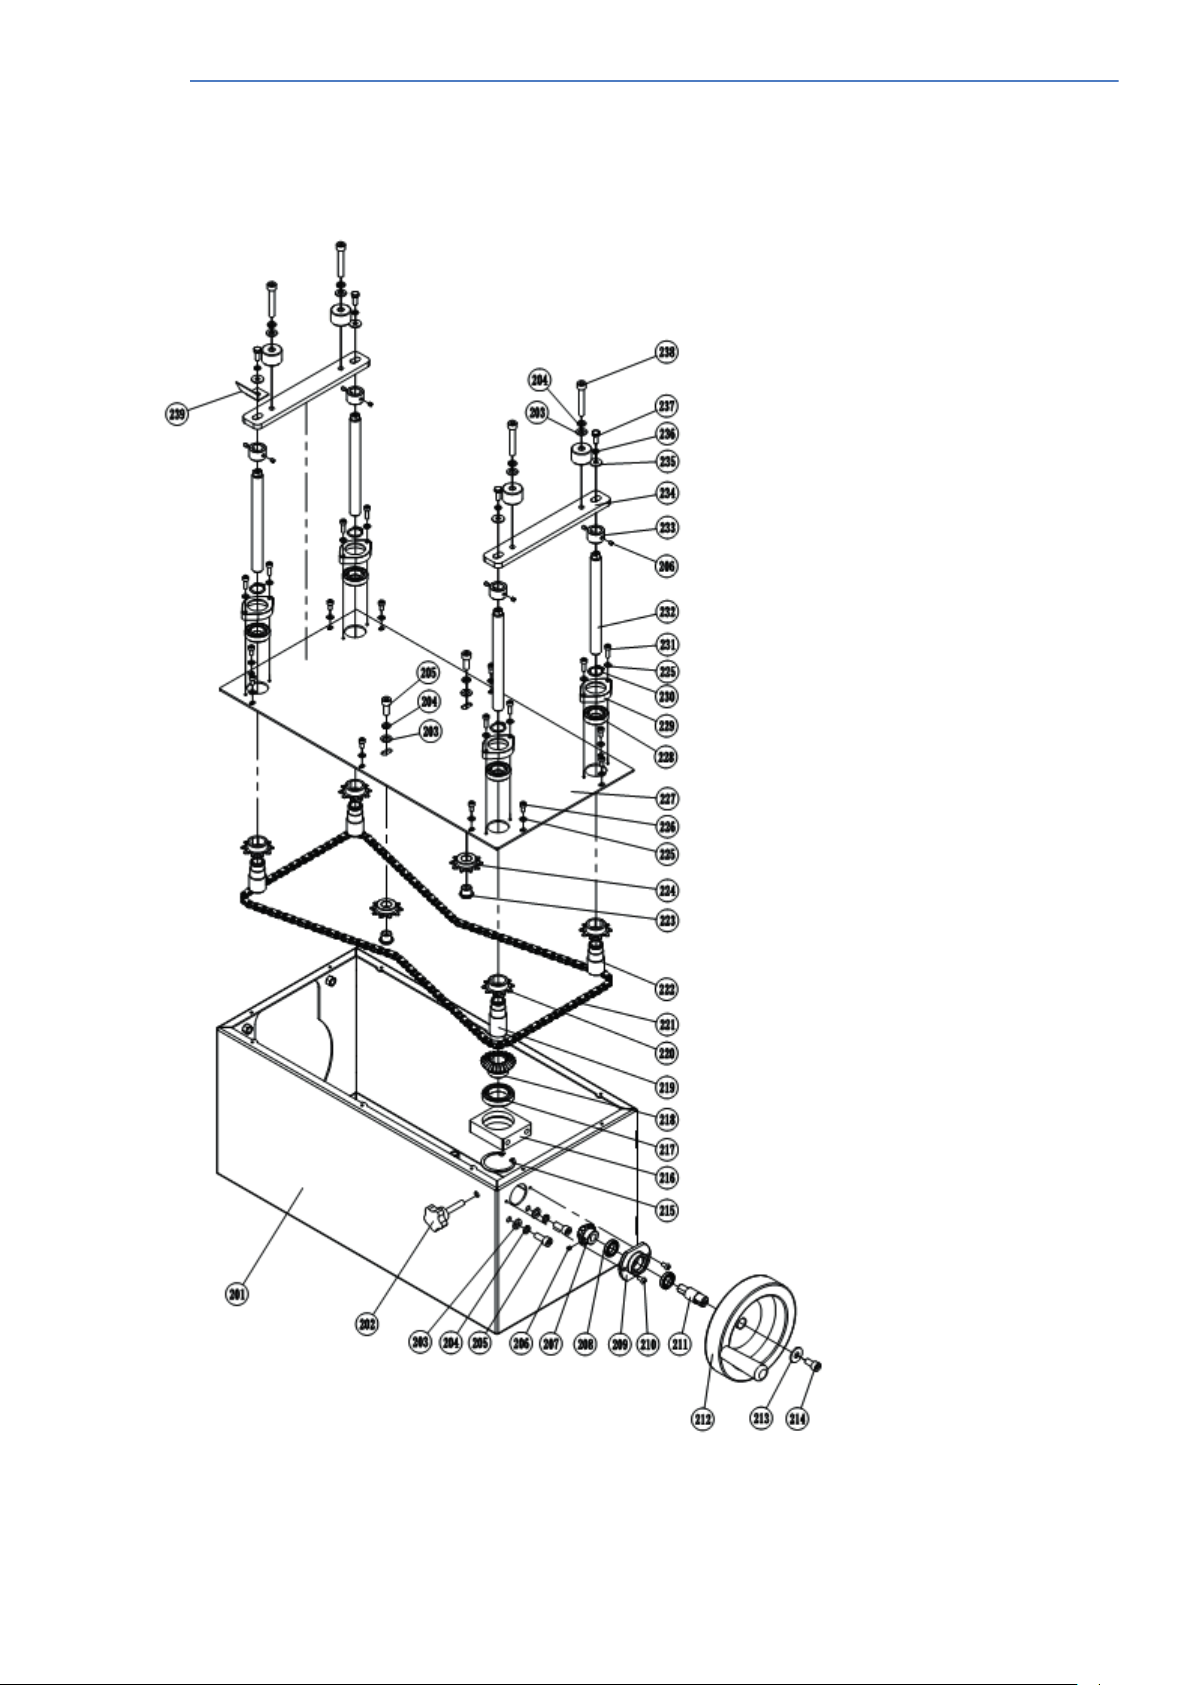
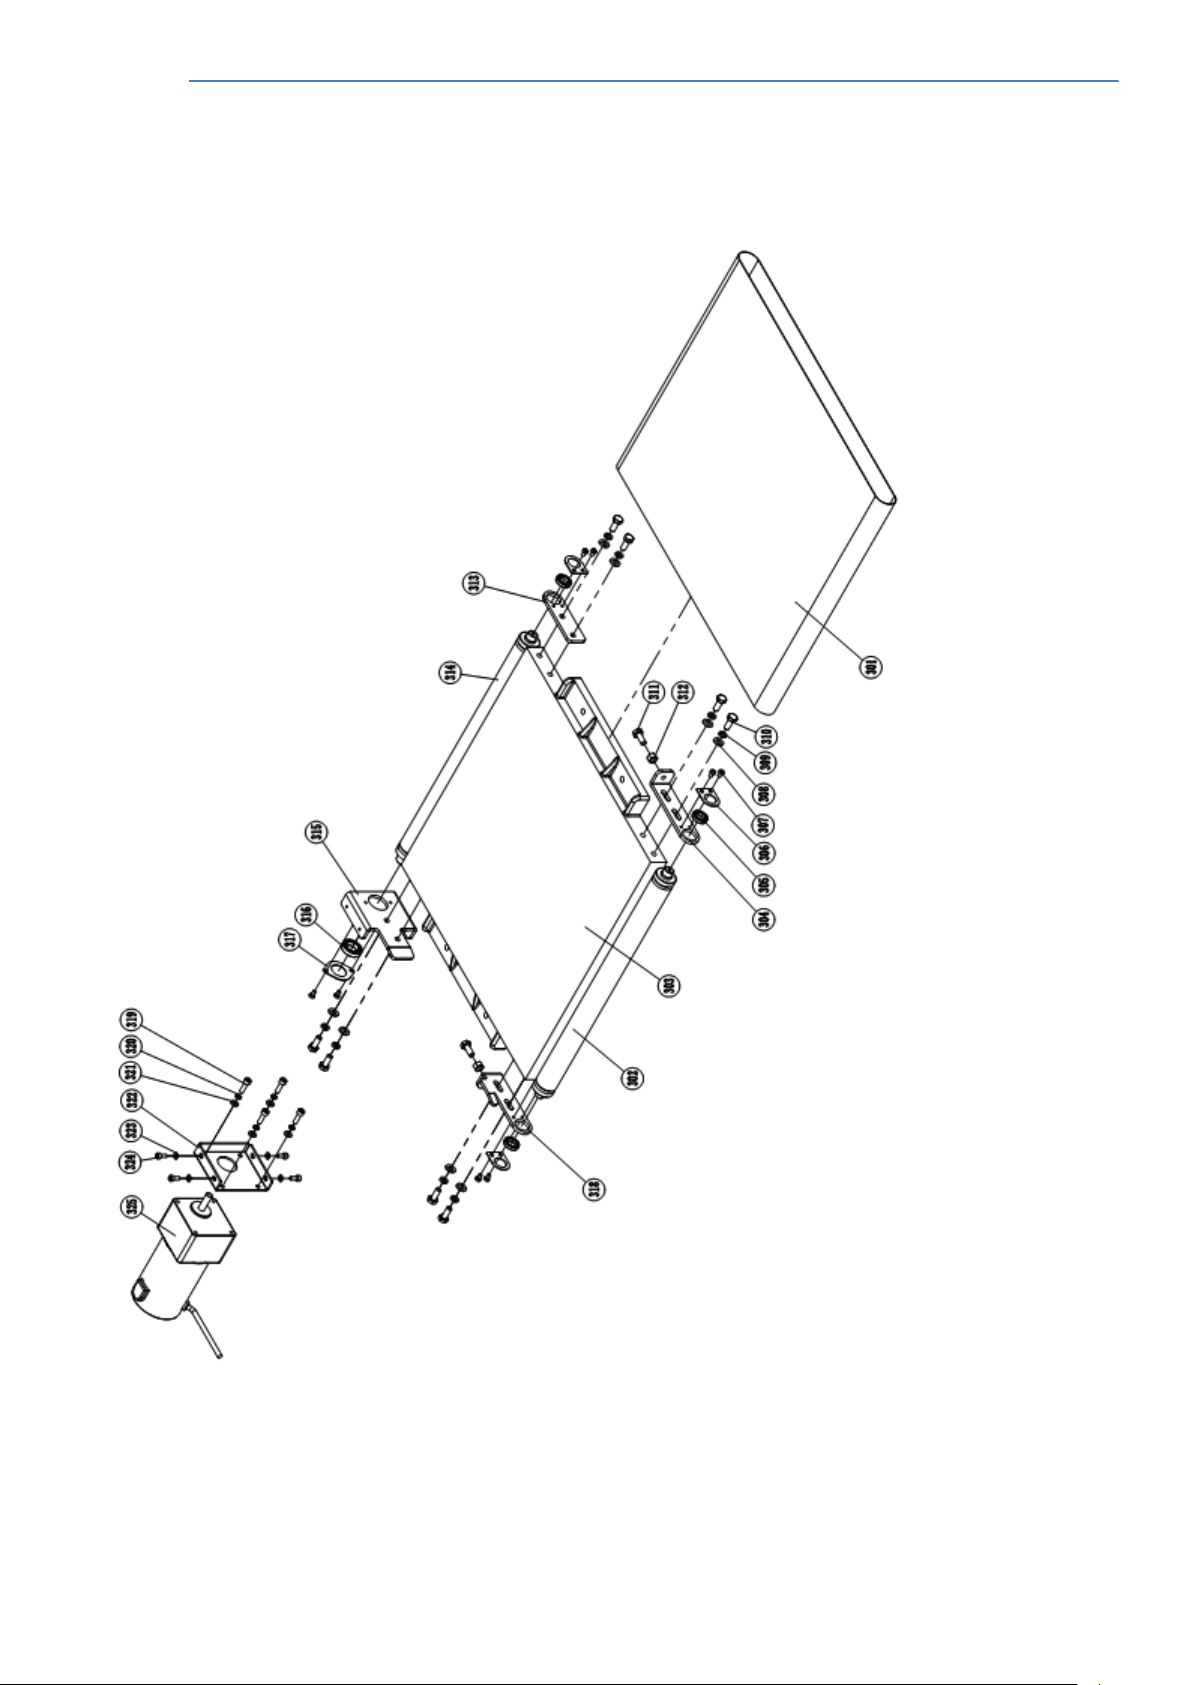
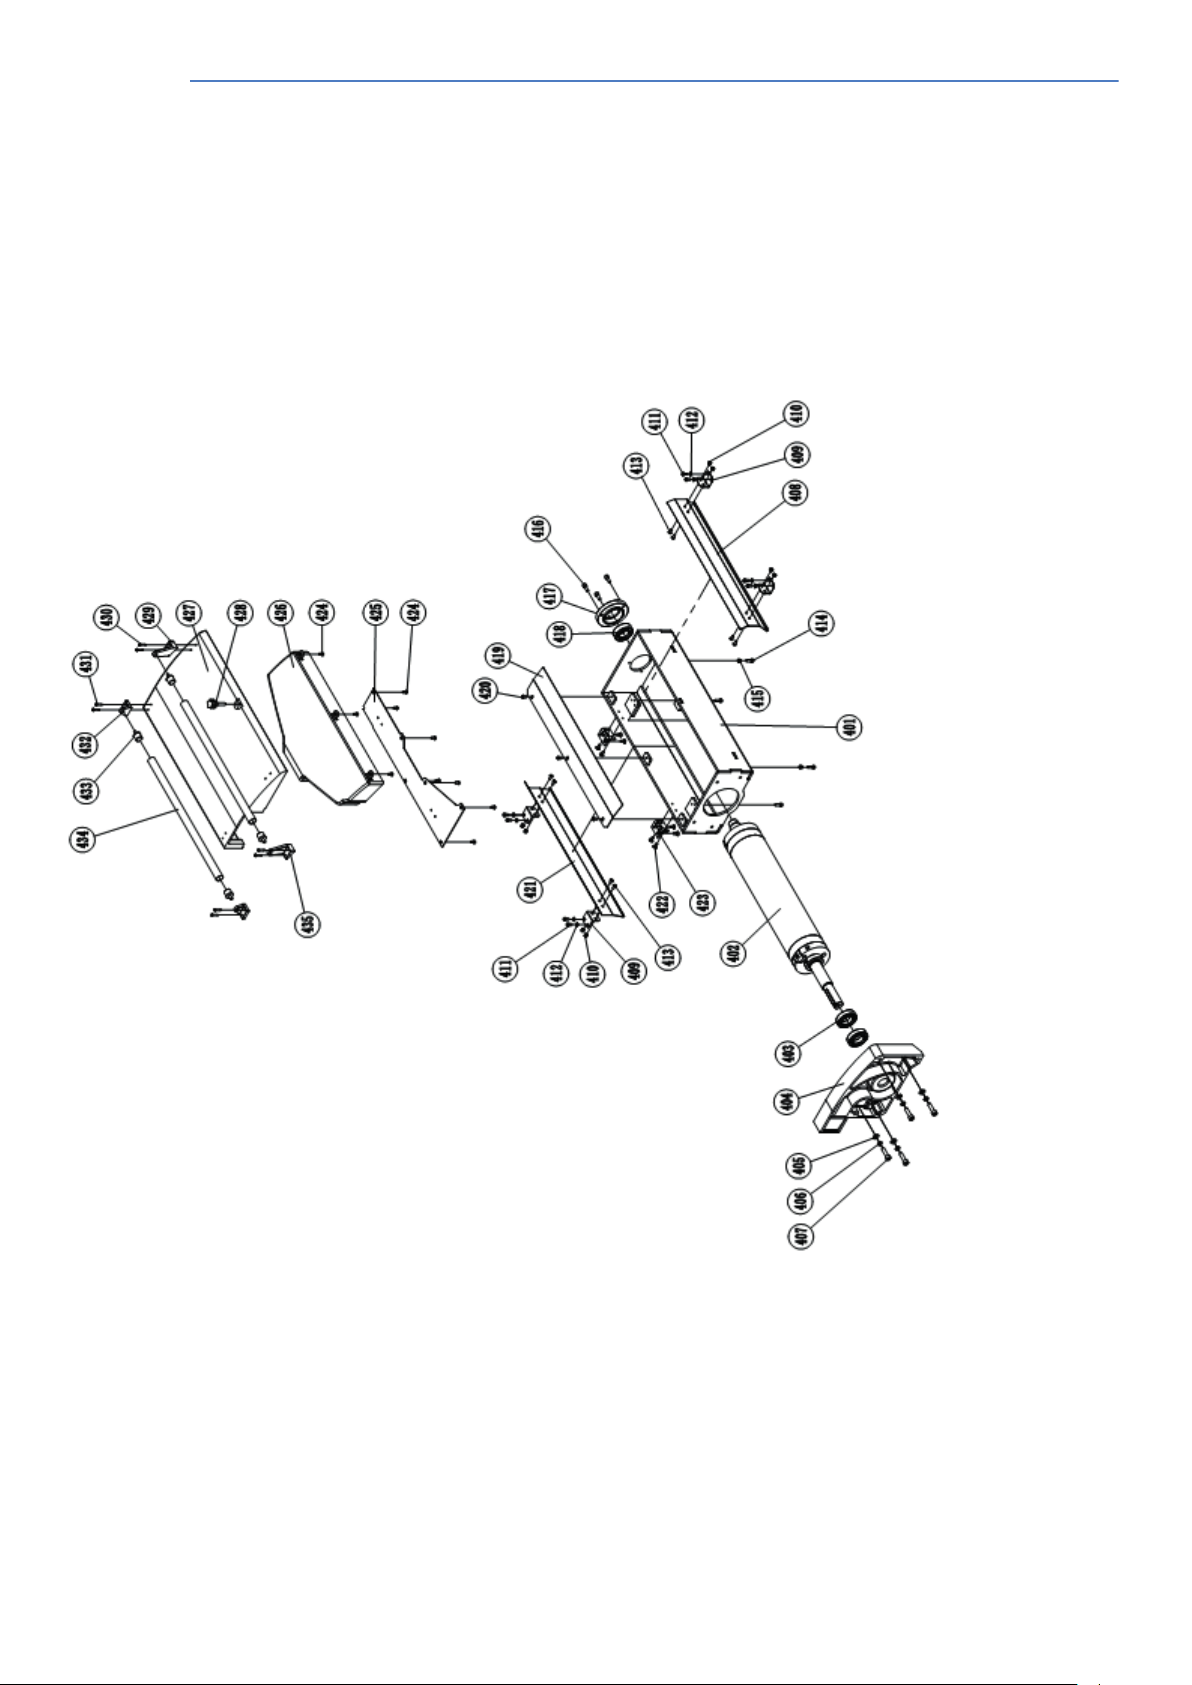
9.1 Spare parts diagram
The following diagrams are there to help you, to identify the needed
spare parts. If needed, you can make a copy of the diagram with the
indicated spare parts and send it to your dealer.
Page 18
18
Original Instructions
Page 19
19
Original Instructions
Page 20
20
Original Instructions
Page 21
21
Original Instructions
Page 22
22
Original Instructions
Page 23
23
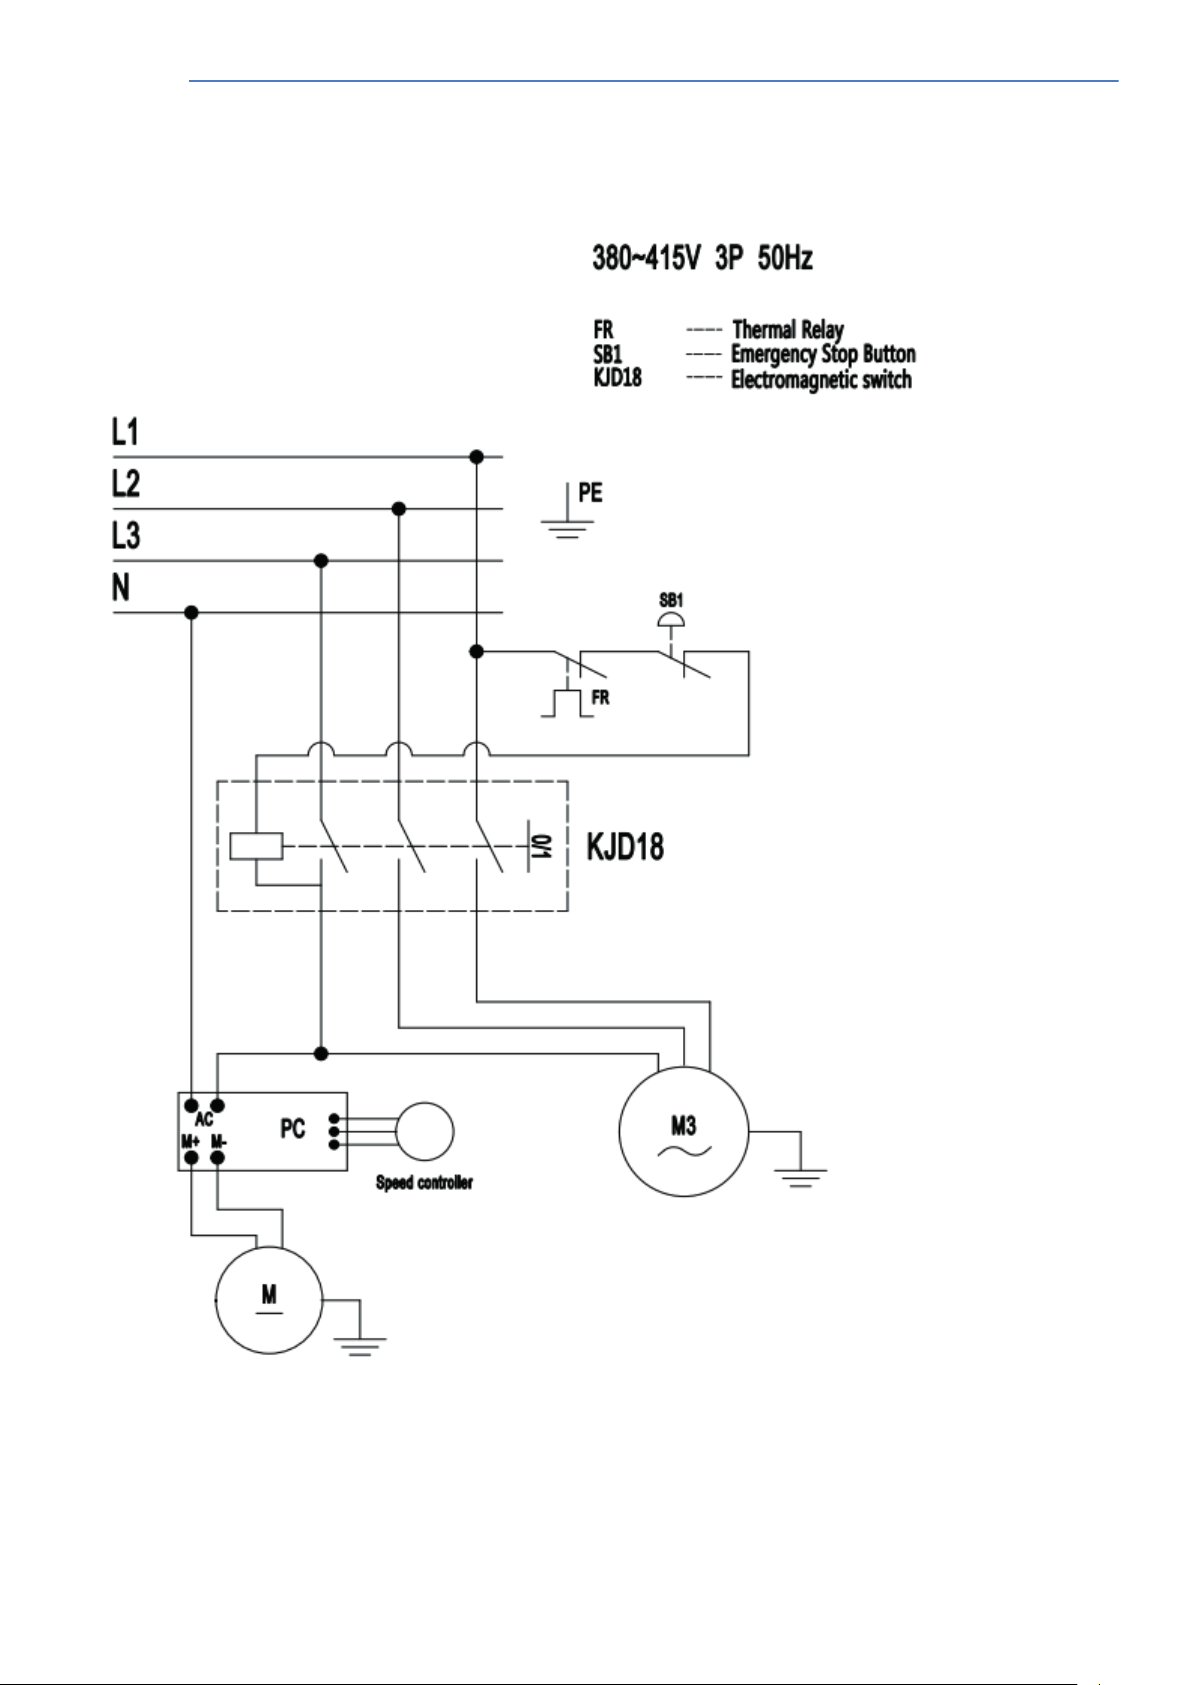
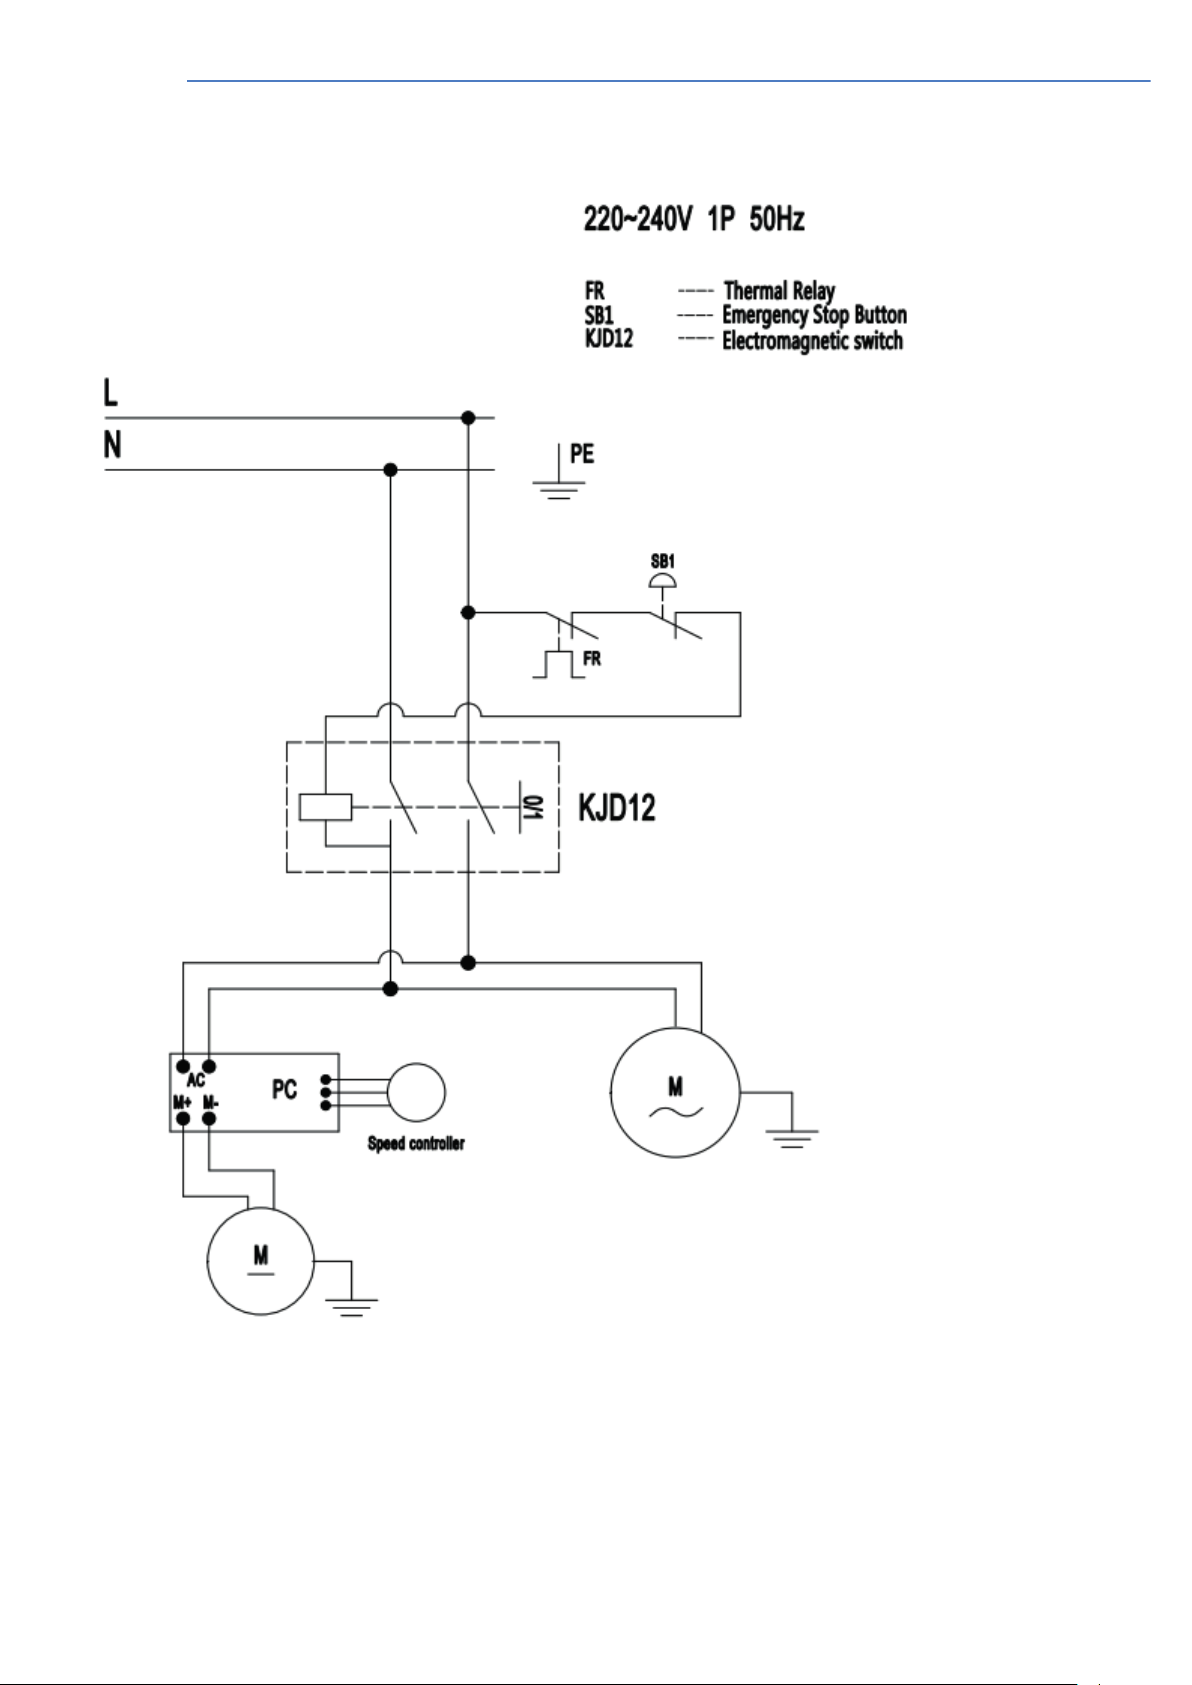
10. Wiring diagram
Original Instructions
Page 24
24
Original Instructions
Page 25

Page 26

Page 27

Page 28
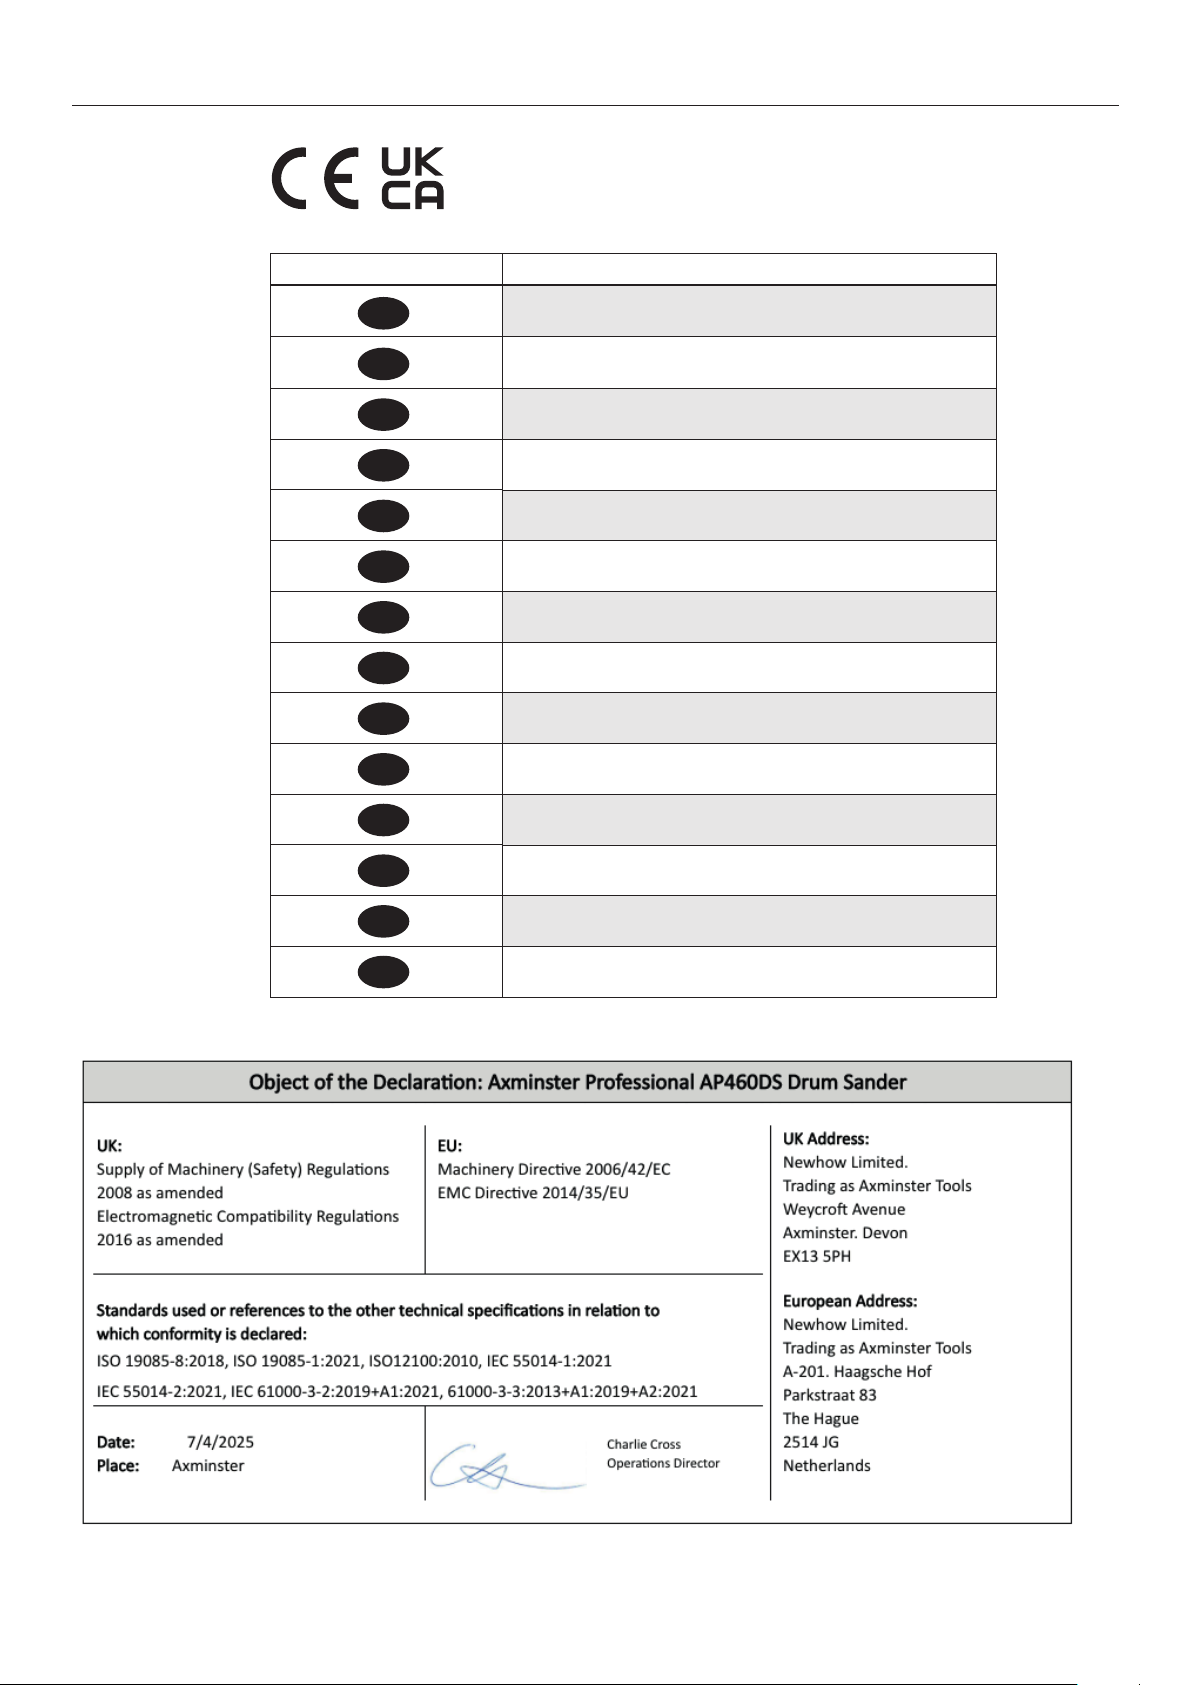
Declaration of Conformity
Nationality
GB
DE
FR
IT
ES
NL
DK
SE
CZ
PL
POR
NOR
FI
IS
The object of the declaration described is in conformity
with the relevant GB/EU legislation.
Der Gegenstand der beschriebenen Erklärung stimmt mit
den einschlägigen GB/EU-Rechtsvorschriften überein.
L’objet de la déclaration décrite est conforme à la législation
GB/UE pertinente.
L’oggetto della dichiarazione descritta è conforme alla
legislazione GB/UE pertinente.
El objeto de la declaración descrita está en conformidad
con la legislación GB/UE pertinente.
Het voorwerp van de beschreven verklaring is in
overeenstemming met de relevante GB/EU-wetgeving.
Genstanden for den beskrevne erklæring er i
overensstemmelse med den relevante GB/EU-lovgivning.
Föremålet för den beskrivna deklarationen
överensstämmer med den relevanta GB/EU-lagstiftningen.
Předmět popsaného prohlášení je v souladu s příslušnými
právními předpisy GB/EU.
Przedmiot opisanej deklaracji jest zgodny z odpowiednimi
przepisami GB/UE.
O objeto da declaração descrita está em conformidade
com a legislação GB/UE relevante.
Gjenstanden for den beskrevne erklæringen er i samsvar
med den relevante GB/EU-lovgivningen.
Määritellyn ilmoituksen kohde on asiaankuuluvan IsonBritannian/EU: n lainsäädännön mukainen.
Hluturinn í lýsingunni er í samræmi við viðeigandi lög
GB/ESB.
Axminster Tools, Axminster Devon EX13 5PH
axminstertools.com
 Loading...