

Page 1
AP250FSG
Flex Shaft Grinder
Code 112167
Original Instructions
AT: 01/11/2024
VERSION: 1
Page 2

INDEX
2
AP250FSG Safety Instructions
Warning: For your own safety, please read the following safety warning
and safety instruction thoroughly.
To understand the usage, restriction and possible dangers.
Note: To ensure the safety of motor, please send it to professional
maintenance engineers from the manufacture or dealer if the
motor needs to be repaired.
DO NOT disassemble the motor and repair by yourself.
1. Keeptheworkplacetidyandclean.Amessyworkplacewillleadtoworkaccidents.
2. Avoidoperatinginadangerousenvironment,such asammableliquids, gases,chemicals,
oradustyenvironment.Sparksmaybegeneratedduringthepolishingprocesswhich may
ignitethedustorgas.
3. Keepasafedistance.Whenoperatethetools,pleasekeepchildrenandbystandersinasafe
distance.Inordertoavoidoperatorfromdistractionandinuencetheoperationsafety.
4. Keepin adryplaceandoutofreachofchildren.Thetoolmustbeproperlystored and
placedinadryenvironmentandoutofreachofchildrenwhennotinuse.
5. Sucientlighting. Operatethe toolcorrectly,safelyandattentivelyinawell-litand bright
workingenvironment.
6. Stayvigilantanddonot operatethetoolwhenfatiguedor underthe influenceofdrugs,
alcohol,ormedicaltreatment.
7. Wearpropersafetydevices.Please weargoggles,masks,safetyface masks,protective
earmuffs,head-mountedprotectiveovers (toavoidlonghairgettinginvolved.),non-slip
safetyshoes,andothersafetyequipmentthatcanreducepersonalinjuries.
8. Alwaysdisconnectthepowercordbeforemovingthetools.Makesurethep
owerswitch is
oanddisconnectthepowercordtoavoidactivatingaccidentally.
9. Alwaysmakesurethepoweriso whenattachingordetachingthe accessoryandchange
thehandpiecetoavoidactivatingaccidentally.
10.Alwaysuseproperextensionpowercord.Usenon-compliancepowercordmaydamagethe
motor.
11.Usepropergroundingandmatchingplugandsocket.Donot modifythe plug.Thetool
needstoberoundedandcannotusewithotherconversionplugsinordertoreduceelectric
shock.
12.Donot damagethe wiresand avoidwire, motorand plugcontactingheat,sharp metal
edges,oilstains,andmoisture.Abnormalpowercordpullwillexposethewireanddamage
thecircuitwhichwillcauseanelectricshock.
13.Toavoidelectricshock,keepthebodyawayfromthegroundedmetalwhen operating.
Toolsmustusepropergroundingproceduresanddonotremovethegroundingsocketpin.
Donotoperateinrainorahumidenvironment.Avoidmoisturegettingintothemotor.
AP250FSG Safety Instructions
AP250FSG Safety Instructions
Warning: For your own safety, please read the following safety warning
and safety instruction thoroughly.
To understand the usage, restriction and possible dangers.
AP250FSG Safety Instructions
Warning: For your own safety, please read the following safety warning
and safety instruction thoroughly.
To understand the usage, restriction and possible dangers.
1. Keeptheworkplacetidyandclean.Amessyworkplacewillleadtoworkaccidents.
2. Avoidoperatinginadangerousenvironment,such asammableliquids,gases,chemicals,
oradustyenvironment.Sparksmaybegeneratedduringthepolishingprocesswhich may
ignitethedustorgas.
3. Keepasafedistance.Whenoperatethetools,pleasekeepchildrenandbystandersinasafe
distance.Inordertoavoidoperatorfromdistractionandinuencetheoperationsafety.
4. Keepin adry placeandout of reachof children.The toolmustbeproperlystoredand
placedinadryenvironmentandoutofreachofchildrenwhennotinuse.
5. Sucientlighting. Operatethe toolcorrectly,safelyandattentivelyinawell-litand bright
workingenvironment.
6. Stayvigilantanddonot operatethetoolwhenfatiguedor under the influenceofdrugs,
alcohol,ormedicaltreatment.
7. Wearpropersafetydevices.Please weargoggles,masks,safetyface masks, protective
earmuffs,head-mountedprotective overs (toavoidlonghairgettinginvolved.),non-slip
safetyshoes,andothersafetyequipmentthatcanreducepersonalinjuries.
8. Alwaysdisconnectthepowercord beforemovingthe tools.Makesurethep
owerswitch is
oanddisconnectthepowercordtoavoidactivatingaccidentally.
9. Alwaysmakesurethepoweriso when attachingordetachingthe accessoryandchange
thehandpiecetoavoidactivatingaccidentally.
10.Alwaysuseproperextensionpowercord.Usenon-compliancepowercordmaydamagethe
motor.
11.Usepropergroundingandmatchingplugandsocket.Donot modify the plug.Thetool
needstoberoundedandcannotusewithotherconversionplugsinordertoreduceelectric
shock.
12.Donot damage the wires and avoidwire,motor and plug contactingheat,sharp metal
edges,oilstains,andmoisture.Abnormalpowercordpullwillexposethewireanddamage
thecircuitwhichwillcauseanelectricshock.
13.Toavoidelectricshock,keepthebodyawayfromthegroundedmetalwhen operating.
Toolsmustusepropergroundingproceduresanddonotremovethegroundingsocketpin.
Donotoperateinrainorahumidenvironment.Avoidmoisturegettingintothemotor.
AP250FSG Safety Instructions
Warning: For your own safety, please read the following safety warning
and safety instruction thoroughly.
To understand the usage, restriction and possible dangers.
Note: To ensure the safety of motor, please send it to professional
maintenance engineers from the manufacture or dealer if the
motor needs to be repaired.
DO NOT disassemble the motor and repair by yourself.
1. Keeptheworkplacetidyandclean.Amessyworkplacewillleadtoworkaccidents.
2. Avoidoperatinginadangerousenvironment,such asammableliquids,gases,chemicals,
oradustyenvironment.Sparksmaybegeneratedduringthepolishingprocesswhich may
ignitethedustorgas.
3. Keepasafedistance.Whenoperatethetools,pleasekeepchildrenandbystandersinasafe
distance.Inordertoavoidoperatorfromdistractionandinuencetheoperationsafety.
4. Keepin adry placeandout of reachof children.The toolmustbeproperlystoredand
placedinadryenvironmentandoutofreachofchildrenwhennotinuse.
5. Sucientlighting. Operatethe toolcorrectly,safelyandattentivelyinawell-litand bright
workingenvironment.
6. Stayvigilantanddonot operatethetoolwhenfatiguedor under the influenceofdrugs,
alcohol,ormedicaltreatment.
7. Wearpropersafetydevices.Please weargoggles,masks,safetyface masks, protective
earmuffs,head-mountedprotective overs (toavoidlonghairgettinginvolved.),non-slip
safetyshoes,andothersafetyequipmentthatcanreducepersonalinjuries.
8. Alwaysdisconnectthepowercord beforemovingthe tools.Makesurethep
owerswitch is
oanddisconnectthepowercordtoavoidactivatingaccidentally.
9. Alwaysmakesurethepoweriso when attachingordetachingthe accessoryandchange
thehandpiecetoavoidactivatingaccidentally.
10.Alwaysuseproperextensionpowercord.Usenon-compliancepowercordmaydamagethe
motor.
11.Usepropergroundingandmatchingplugandsocket.Donot modify the plug.Thetool
needstoberoundedandcannotusewithotherconversionplugsinordertoreduceelectric
shock.
12.Donot damage the wires and avoidwire,motor and plug contactingheat,sharp metal
edges,oilstains,andmoisture.Abnormalpowercordpullwillexposethewireanddamage
thecircuitwhichwillcauseanelectricshock.
13.Toavoidelectricshock,keepthebodyawayfromthegroundedmetalwhen operating.
Toolsmustusepropergroundingproceduresanddonotremovethegroundingsocketpin.
Donotoperateinrainorahumidenvironment.Avoidmoisturegettingintothemotor.
AP250FSG Safety Instructions
Owner’s Manual
For Your Own Safety
• PleasereadthismanualbeforeoperateBravoprodigypowertool.
• Alwaysweareyeprotection,glovesandworkapronwhileusingthistool.
• Longerhairmustputinabunandmakesurenoloosenhairwhileusingthistool.
容
Product specications.......................................................................... • 1
AP250FSG Safety Instructions .................................................................... •2
Wiring Diagram .............................................................................................•3
GM150 Accessories and Function Description ............................................•4
Handpiece Assembly Installation Steps ...................................................... •5
HC-110 Chuck Style Handpiece Installation Instructions ........................... •6
HC-120 Chisel Style Handpiece Installation Instructions ...........................•7
HC-130 Collet Style Handpiece Installation Instructions ...........................•8
Steps for Replacing the Flexible Shaft .........................................................•9
The startup steps for AP250 ....................................................................... •11
Foot Switch Mode Switching Steps ...........................................................•12
Other precautions ...................................................................................... •13
Exploded Diagram ......................................................................................•14
Product Certication........................................................................... • 17
Parts List ..................................................................................................... •14
Product specications
Model
Dimensions
Weight
Spindle motor
n
0
Voltage
Compatible material
for carving
*Rated no load speed (
AP250FSG
120×215×150 mm (excluding exible shaft)
1.9 KG
DC Brushless Motor, Rated 24V DC, 250W
22000/min
100-240 V / 50-60 Hz / 0,9~0,45 A
Wood, glass, various metals, shells, leather, jade, emerald,
gemstones, plastics, ceramics, silverware, steel, etc.
)=22000 RPM
n
0
Page 3

2
AP250FSG Safety Instructions
Warning: For your own safety, please read the following safety warning
and safety instruction thoroughly.
To understand the usage, restriction and possible dangers.
Note: To ensure the safety of motor, please send it to professional
maintenance engineers from the manufacture or dealer if the
motor needs to be repaired.
DO NOT disassemble the motor and repair by yourself.
1. Keeptheworkplacetidyandclean.Amessyworkplacewillleadtoworkaccidents.
2. Avoidoperatinginadangerousenvironment,such asammableliquids, gases,chemicals,
oradustyenvironment.Sparksmaybegeneratedduringthepolishingprocesswhich may
ignitethedustorgas.
3. Keepasafedistance.Whenoperatethetools,pleasekeepchildrenandbystandersinasafe
distance.Inordertoavoidoperatorfromdistractionandinuencetheoperationsafety.
4. Keepin adry placeandoutof reachofchildren.Thetoolmustbeproperlystored and
placedinadryenvironmentandoutofreachofchildrenwhennotinuse.
5. Sucientlighting. Operatethe toolcorrectly,safelyandattentivelyinawell-litand bright
workingenvironment.
6. Stayvigilantanddonot operatethetoolwhenfatiguedor under the influenceofdrugs,
alcohol,ormedicaltreatment.
7. Wearpropersafetydevices.Please weargoggles,masks,safetyface masks, protective
earmuffs,head-mountedprotective overs (toavoidlonghairgettinginvolved.),non-slip
safetyshoes,andothersafetyequipmentthatcanreducepersonalinjuries.
8. Alwaysdisconnectthepowercord beforemovingthe tools.Makesurethep
owerswitch is
oanddisconnectthepowercordtoavoidactivatingaccidentally.
9. Alwaysmakesurethepoweriso when attachingordetachingthe accessoryandchange
thehandpiecetoavoidactivatingaccidentally.
10.Alwaysuseproperextensionpowercord.Usenon-compliancepowercordmaydamagethe
motor.
11.Usepropergroundingandmatchingplugandsocket.Donot modify the plug.Thetool
needstoberoundedandcannotusewithotherconversionplugsinordertoreduceelectric
shock.
12.Donot damage the wires and avoidwire,motor and plug contactingheat,sharp metal
edges,oilstains,andmoisture.Abnormalpowercordpullwillexposethewireanddamage
thecircuitwhichwillcauseanelectricshock.
13.Toavoidelectricshock,keepthebodyawayfromthegroundedmetalwhen operating.
Toolsmustusepropergroundingproceduresanddonotremovethegroundingsocketpin.
Donotoperateinrainorahumidenvironment.Avoidmoisturegettingintothemotor.
AP250FSG Safety Instructions
AP250FSG Safety Instructions
Warning: For your own safety, please read the following safety warning
and safety instruction thoroughly.
To understand the usage, restriction and possible dangers.
AP250FSG Safety Instructions
Warning: For your own safety, please read the following safety warning
and safety instruction thoroughly.
To understand the usage, restriction and possible dangers.
1. Keeptheworkplacetidyandclean.Amessyworkplacewillleadtoworkaccidents.
2. Avoidoperatinginadangerousenvironment,such asammableliquids,gases,chemicals,
oradustyenvironment.Sparksmaybegeneratedduringthepolishingprocesswhich may
ignitethedustorgas.
3. Keepasafedistance.Whenoperatethetools,pleasekeepchildrenandbystandersinasafe
distance.Inordertoavoidoperatorfromdistractionandinuencetheoperationsafety.
4. Keepin adry placeandout of reachof children.The toolmustbeproperlystoredand
placedinadryenvironmentandoutofreachofchildrenwhennotinuse.
5. Sucientlighting. Operatethe toolcorrectly,safelyandattentivelyinawell-litand bright
workingenvironment.
6. Stayvigilantanddonot operatethetoolwhenfatiguedor under the influenceofdrugs,
alcohol,ormedicaltreatment.
7. Wearpropersafetydevices.Please weargoggles,masks,safetyface masks, protective
earmuffs,head-mountedprotective overs (toavoidlonghairgettinginvolved.),non-slip
safetyshoes,andothersafetyequipmentthatcanreducepersonalinjuries.
8. Alwaysdisconnectthepowercord beforemovingthe tools.Makesurethep
owerswitch is
oanddisconnectthepowercordtoavoidactivatingaccidentally.
9. Alwaysmakesurethepoweriso when attachingordetachingthe accessoryandchange
thehandpiecetoavoidactivatingaccidentally.
10.Alwaysuseproperextensionpowercord.Usenon-compliancepowercordmaydamagethe
motor.
11.Usepropergroundingandmatchingplugandsocket.Donot modify the plug.Thetool
needstoberoundedandcannotusewithotherconversionplugsinordertoreduceelectric
shock.
12.Donot damage the wires and avoidwire,motor and plug contactingheat,sharp metal
edges,oilstains,andmoisture.Abnormalpowercordpullwillexposethewireanddamage
thecircuitwhichwillcauseanelectricshock.
13.Toavoidelectricshock,keepthebodyawayfromthegroundedmetalwhen operating.
Toolsmustusepropergroundingproceduresanddonotremovethegroundingsocketpin.
Donotoperateinrainorahumidenvironment.Avoidmoisturegettingintothemotor.
AP250FSG Safety Instructions
Warning: For your own safety, please read the following safety warning
and safety instruction thoroughly.
To understand the usage, restriction and possible dangers.
Note: To ensure the safety of motor, please send it to professional
maintenance engineers from the manufacture or dealer if the
motor needs to be repaired.
DO NOT disassemble the motor and repair by yourself.
1. Keeptheworkplacetidyandclean.Amessyworkplacewillleadtoworkaccidents.
2. Avoidoperatinginadangerousenvironment,such asammableliquids,gases,chemicals,
oradustyenvironment.Sparksmaybegeneratedduringthepolishingprocesswhich may
ignitethedustorgas.
3. Keepasafedistance.Whenoperatethetools,pleasekeepchildrenandbystandersinasafe
distance.Inordertoavoidoperatorfromdistractionandinuencetheoperationsafety.
4. Keepin adry placeandout of reachof children.The toolmustbeproperlystoredand
placedinadryenvironmentandoutofreachofchildrenwhennotinuse.
5. Sucientlighting. Operatethe toolcorrectly,safelyandattentivelyinawell-litand bright
workingenvironment.
6. Stayvigilantanddonot operatethetoolwhenfatiguedor under the influenceofdrugs,
alcohol,ormedicaltreatment.
7. Wearpropersafetydevices.Please weargoggles,masks,safetyface masks, protective
earmuffs,head-mountedprotective overs (toavoidlonghairgettinginvolved.),non-slip
safetyshoes,andothersafetyequipmentthatcanreducepersonalinjuries.
8. Alwaysdisconnectthepowercord beforemovingthe tools.Makesurethep
owerswitch is
oanddisconnectthepowercordtoavoidactivatingaccidentally.
9. Alwaysmakesurethepoweriso when attachingordetachingthe accessoryandchange
thehandpiecetoavoidactivatingaccidentally.
10.Alwaysuseproperextensionpowercord.Usenon-compliancepowercordmaydamagethe
motor.
11.Usepropergroundingandmatchingplugandsocket.Donot modify the plug.Thetool
needstoberoundedandcannotusewithotherconversionplugsinordertoreduceelectric
shock.
12.Donot damage the wires and avoidwire,motor and plug contactingheat,sharp metal
edges,oilstains,andmoisture.Abnormalpowercordpullwillexposethewireanddamage
thecircuitwhichwillcauseanelectricshock.
13.Toavoidelectricshock,keepthebodyawayfromthegroundedmetalwhen operating.
Toolsmustusepropergroundingproceduresanddonotremovethegroundingsocketpin.
Donotoperateinrainorahumidenvironment.Avoidmoisturegettingintothemotor.
AP250FSG Safety Instructions
Owner’s Manual
For Your Own Safety
• PleasereadthismanualbeforeoperateBravoprodigypowertool.
• Alwaysweareyeprotection,glovesandworkapronwhileusingthistool.
• Longerhairmustputinabunandmakesurenoloosenhairwhileusingthistool.
Page 4
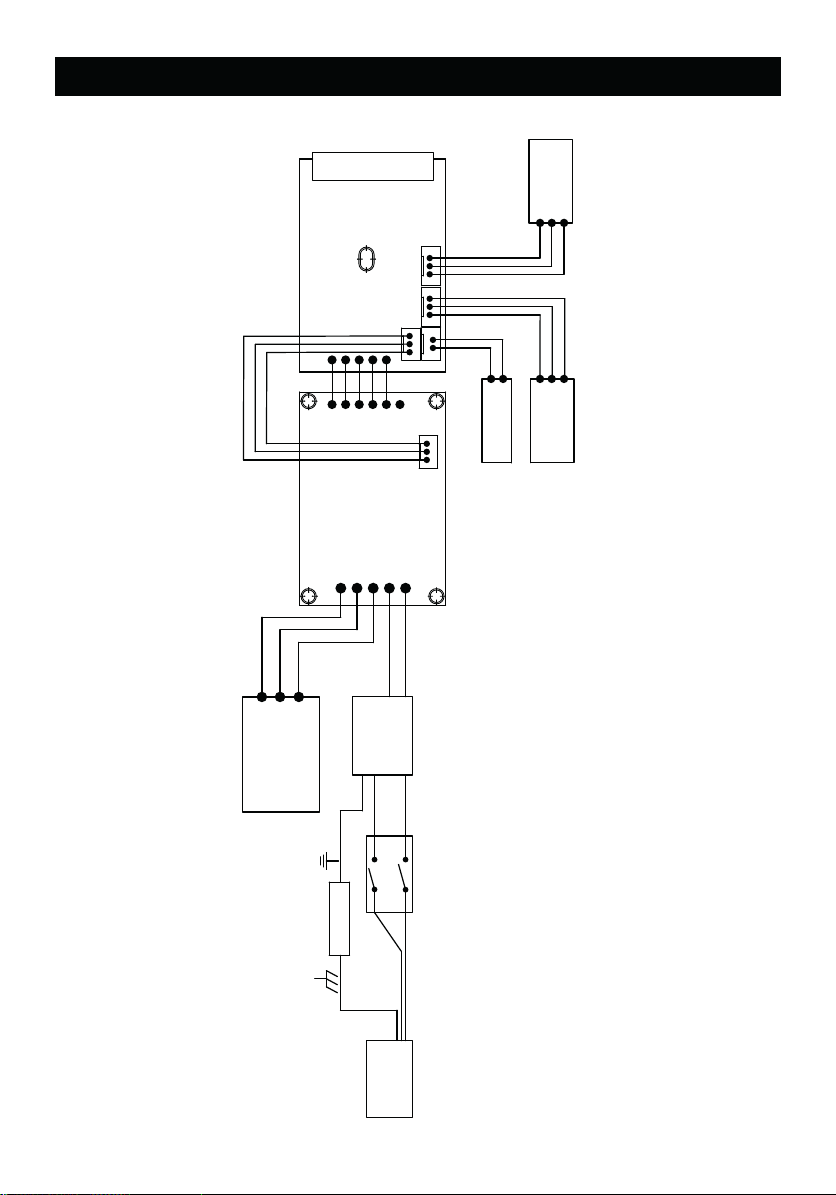
Wiring Diagram
4
AP250FSG Accessories and Function Description
No. FunctionDescription
1 Displays the current rpm.
2 Flexible Shaft: Used for transmitting the handpiece's motion.
3-1
HC-110 Chuck Style Handpiece Set
-optional:
Using tools clamped by a drill chuck.
3-2
HC-120 Chsiel Style Handpiece Set
-optional:
Engraving with a chisel in a reciprocating motion.
3-3
HC-130 Collet Style Handpiece Set
-optional:
Using tools clamped by a collet.
4 Foot Switch Slot: Can be used to connect a foot switch for operation.
5 Variable Speed Controller Dial: Adjusts the motor's speed.
6
ON/OFF Foot Switch:
After connecting to the machine, it can be used as a start and brake switch.
7
Handle:
Facilitates moving the machine and provides a place to store the handpiece.
8
Reverse Switch:
Switches the direction of rotation between forward and reverse.
9
Power Cord:
Please install with the correct voltage according to the product specications.
10
Hanger:
The motor can be hung for use.
11
Power Switch:
Turns on/o of the machine.
Front View
Rear View
RPM TACHOMETER
Variable Speed
Controller Dial
ON/OFF
FOOT SWITCH
Reverse Switch
Driver Board
Brushless Motor
W
U
DC +
DC -
V
SPINDLE WIRE
U
V
DC MOTOR
BRUSHLESS
W
POWER
BROW
GREEN
MECHANISM
POWER
RED
BLACK
SUPPLY
BLUE
SWITCH
BROW
BLUE
SOURCE
3
Page 5
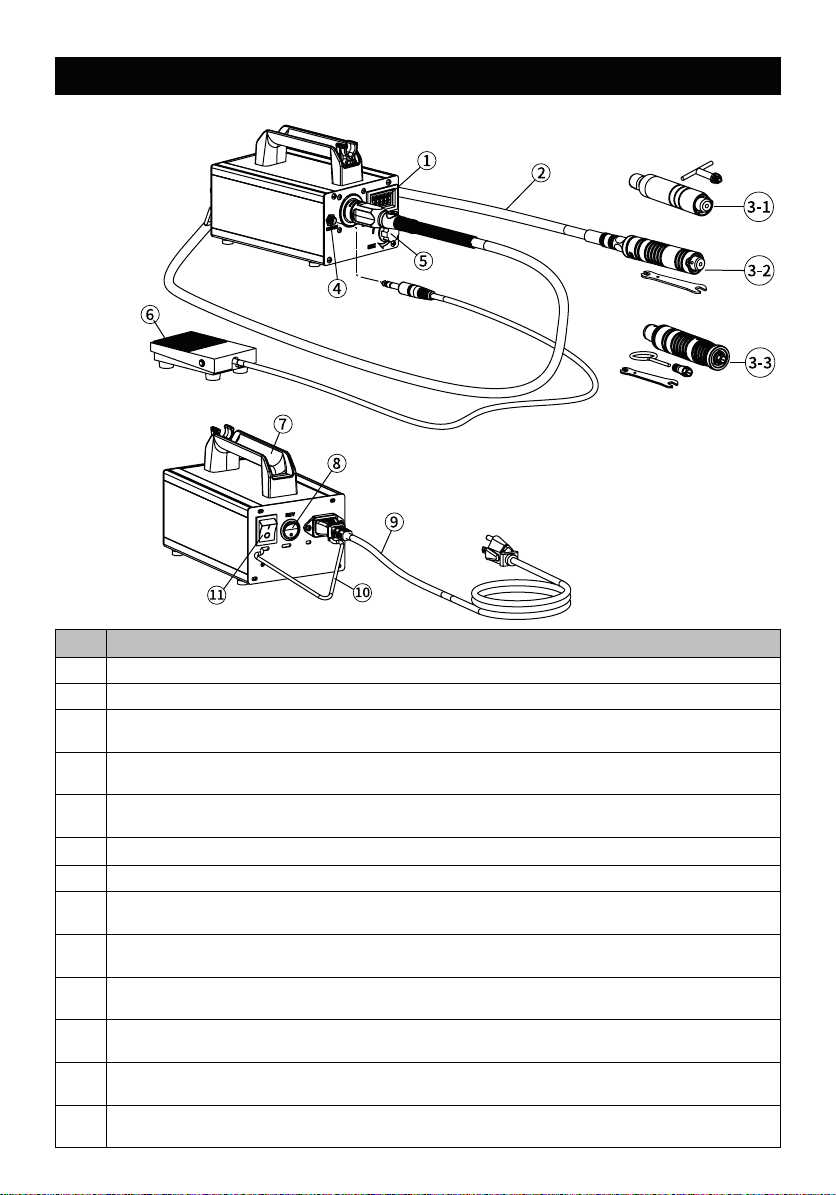
AP250FSG Accessories and Function Description
Front View
Rear View
No. FunctionDescription
1 Displays the current rpm.
2 Flexible Shaft: Used for transmitting the handpiece's motion.
HC-110 Chuck Style Handpiece Set
3-1
Using tools clamped by a drill chuck.
HC-120 Chsiel Style Handpiece Set
3-2
Engraving with a chisel in a reciprocating motion.
HC-130 Collet Style Handpiece Set
3-3
Using tools clamped by a collet.
4 Foot Switch Slot: Can be used to connect a foot switch for operation.
5 Variable Speed Controller Dial: Adjusts the motor's speed.
ON/OFF Foot Switch:
6
After connecting to the machine, it can be used as a start and brake switch.
Handle:
7
Facilitates moving the machine and provides a place to store the handpiece.
Reverse Switch:
8
Switches the direction of rotation between forward and reverse.
Power Cord:
9
Please install with the correct voltage according to the product specications.
Hanger:
10
The motor can be hung for use.
Power Switch:
11
Turns on/o of the machine.
-optional:
-optional:
-optional:
4
Page 6
5
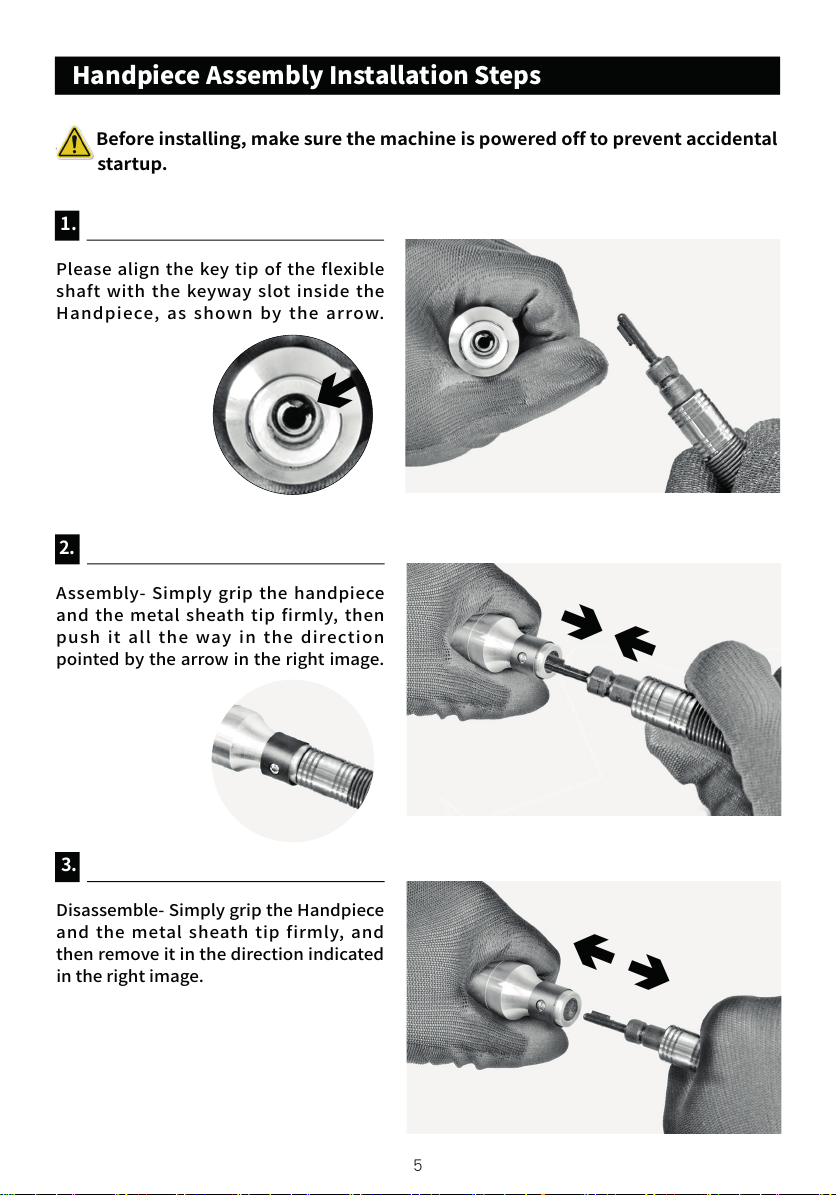
Handpiece Assembly Installation Steps
1.
2.
3.
Before installing, make sure the machine is powered off to prevent accidental
startup.
Pleasealignthekey tip of the flexible
shaftwith the keyway slotinside the
Handpiece,as shown by the arrow.
Assembly-Simply grip the handpiece
and the metalsheathtip firmly,then
push it all the way in the direction
pointedbythearrowintherightimage.
Disassemble-SimplygriptheHandpiece
andthe metal sheath tip firmly, and
thenremoveitinthedirectionindicated
intherightimage.
6
連接軟軸組
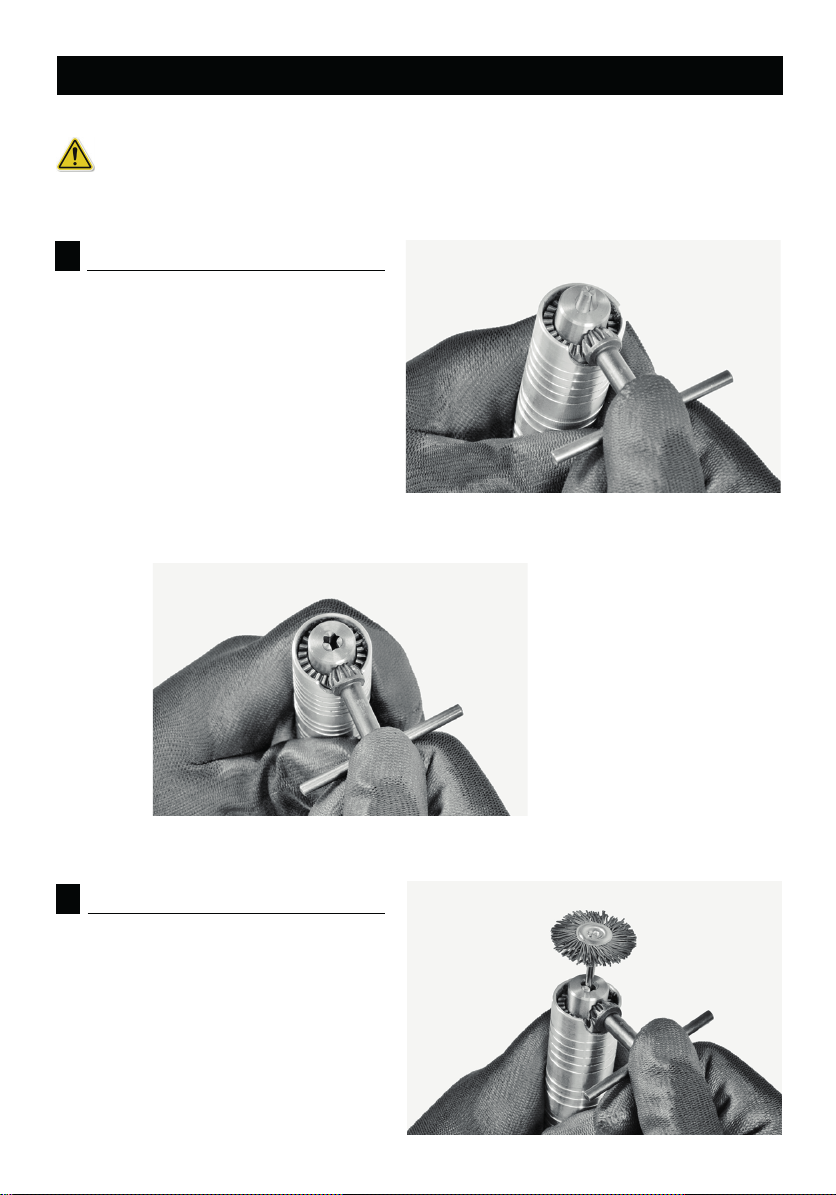
1.
2.
Usetheprovidedchuckkeytoinsertit
intothepilotholeandrotatethewrench
counterclockwiseto loosenthe 3-jaw
chuck.
Afterinsertingthetools fullyinto the
chuck,use the chuck keyandrotate it
clockwisetosecureandcenterit.
HC-110 Chuck Style Handpiece Installation Instructions
Before installing, make sure the machine is powered off to
prevent accidental startup.
Page 7
連接軟軸組
HC-110 Chuck Style Handpiece Installation Instructions
Before installing, make sure the machine is powered off to
⚠
prevent accidental startup.
1.
Usetheprovidedchuckkeytoinsertit
intothepilotholeandrotatethewrench
counterclockwiseto loosenthe 3-jaw
chuck.
2.
Afterinsertingthetools fullyinto the
chuck,use the chuck keyandrotate it
clockwisetosecureandcenterit.
6
Page 8
7
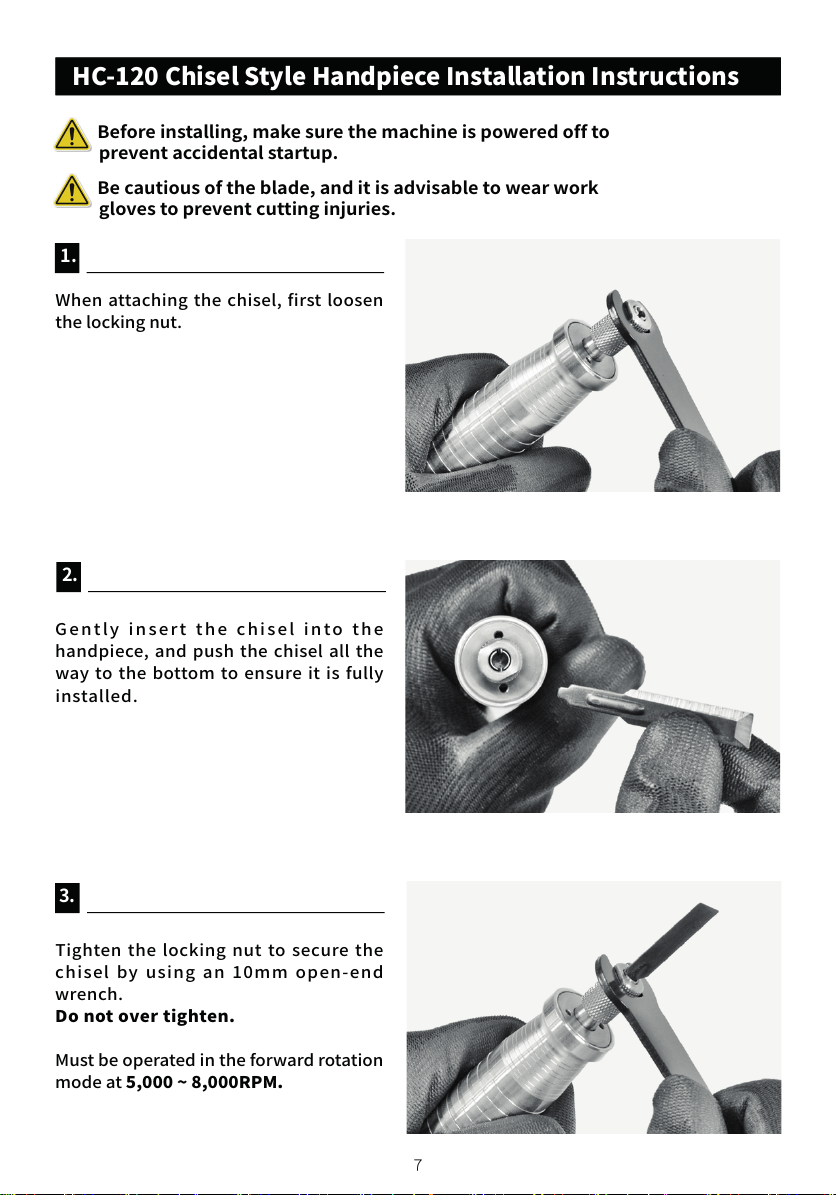
1.
3.
2.
Tightenthelocking nut to secure the
chisel b y using an 10mm open-end
wrench.
Do not over tighten.
Mustbeoperatedintheforwardrotation
modeat5,000 ~ 8,000RPM.
Gently i nsert the c hisel i nto the
handpiece,and pushthechisel all the
wayto thebottom toensure itisfully
installed.
Whenattachingthe chisel, firstloosen
thelockingnut.
HC-120 Chisel Style Handpiece Installation Instructions
Before installing, make sure the machine is powered off to
prevent accidental startup.
Be cautious of the blade, and it is advisable to wear work
gloves to prevent cutting injuries.
8
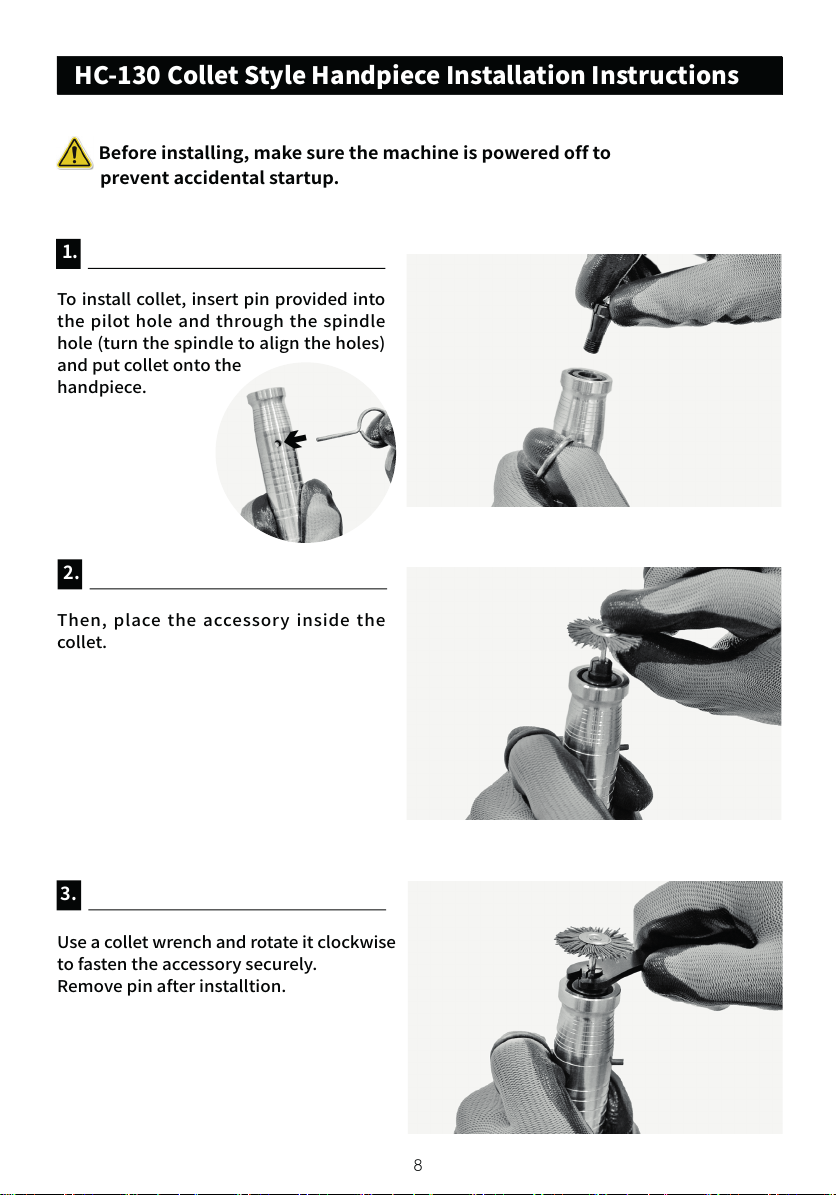
To installcollet,insertpinprovidedinto
thepilotholeandthrough the spindle
hole(turnthespindletoaligntheholes)
andputcolletontothe
handpiece.
Useacolletwrenchandrotateitclockwise
tofastentheaccessorysecurely.
Removepinafterinstalltion.
Then,place the accessory insidethe
collet.
1.
3.
2.
連接軟軸組
HC-130 Collet Style Handpiece Installation Instructions
Before installing, make sure the machine is powered off to
prevent accidental startup.
Page 9
8
To installcollet,insertpinprovidedinto
thepilotholeandthrough the spindle
hole(turnthespindletoaligntheholes)
andputcolletontothe
handpiece.
Useacolletwrenchandrotateitclockwise
tofastentheaccessorysecurely.
Removepinafterinstalltion.
Then,place the accessory insidethe
collet.
1.
3.
2.
連接軟軸組
HC-130 Collet Style Handpiece Installation Instructions
Before installing, make sure the machine is powered off to
prevent accidental startup.
Page 10
9
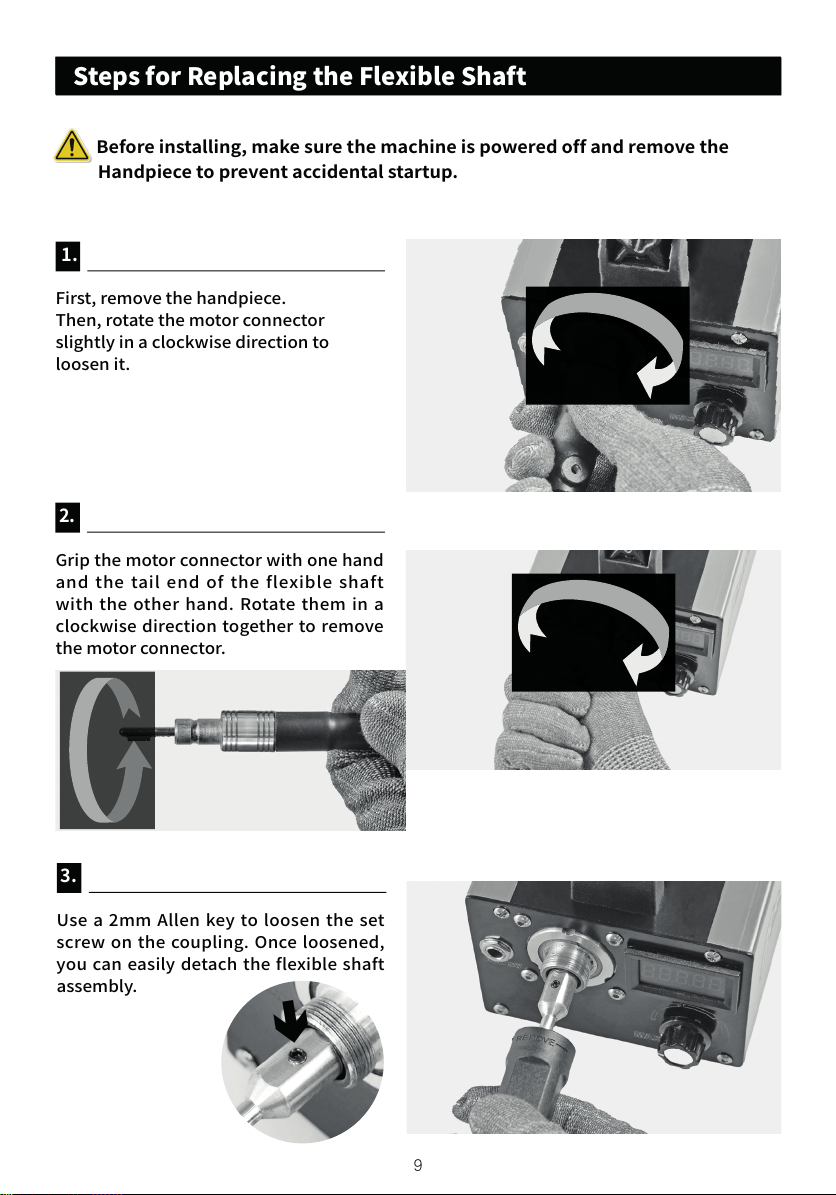
Usea 2mm Allen keyto loosen theset
screwon thecoupling.Onceloosened,
youcaneasilydetachthe flexibleshaft
assembly.
1.
2.
First,removethehandpiece.
Then,rotatethemotorconnector
slightlyinaclockwisedirectionto
loosenit.
Gripthemotorconnectorwithonehand
andthe tail end of the flexible shaft
withtheother hand. Rotatethem in a
clockwisedirectiontogethertoremove
themotorconnector.
連接軟軸組
Steps for Replacing the Flexible Shaft
Before installing, make sure the machine is powered off and remove the
Handpiece to prevent accidental startup.
3.
10
4.
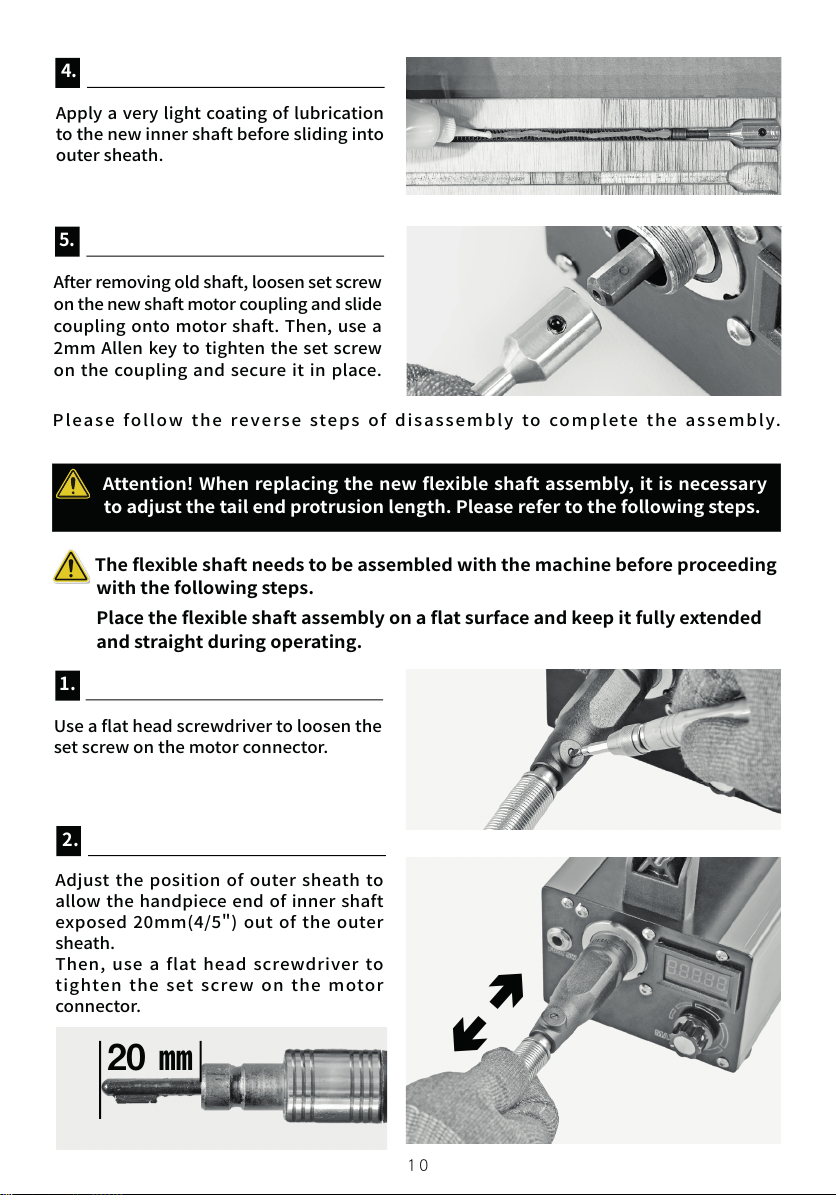
Applyaverylightcoatingoflubrication
tothenewinnershaftbeforeslidinginto
outersheath.
2.
Adjustthepositionofoutersheath to
allowthehandpieceendof inner shaft
exposed20mm(4/5") outofthe outer
sheath.
Then,use a flat head screwdriver to
tightenthe set screw on the motor
connector.
The flexible shaft needs to be assembled with the machine before proceeding
with the following steps.
Place the flexible shaft assembly on a flat surface and keep it fully extended
and straight during operating.
連接軟軸組
1.
5.
Useaatheadscrewdrivertoloosenthe
setscrewonthemotorconnector.
Afterremovingoldshaft,loosensetscrew
onthenewshaftmotorcouplingandslide
couplingonto motorshaft.Then,usea
2mmAllenkeytotightenthe set screw
onthe couplingandsecure itinplace.
Attention! When replacing the new exible shaft assembly, it is necessary
to adjust the tail end protrusion length. Please refer to the following steps.
20 ㎜
Please f ollow the reverse steps of disassembly t o complete the assembly.
Page 11
10
4.
Applyaverylightcoatingoflubrication
tothenewinnershaftbeforeslidinginto
outersheath.
2.
Adjustthepositionofoutersheath to
allowthehandpieceendof inner shaft
exposed20mm(4/5") outofthe outer
sheath.
Then,use a flat head screwdriver to
tightenthe set screw on the motor
connector.
The flexible shaft needs to be assembled with the machine before proceeding
with the following steps.
Place the flexible shaft assembly on a flat surface and keep it fully extended
and straight during operating.
連接軟軸組
1.
5.
Useaatheadscrewdrivertoloosenthe
setscrewonthemotorconnector.
Afterremovingoldshaft,loosensetscrew
onthenewshaftmotorcouplingandslide
couplingonto motorshaft.Then,usea
2mmAllenkeytotightenthe set screw
onthe couplingandsecure itinplace.
Attention! When replacing the new exible shaft assembly, it is necessary
to adjust the tail end protrusion length. Please refer to the following steps.
20 ㎜
Please f ollow the reverse steps of disassembly t o complete the assembly.
Page 12
11
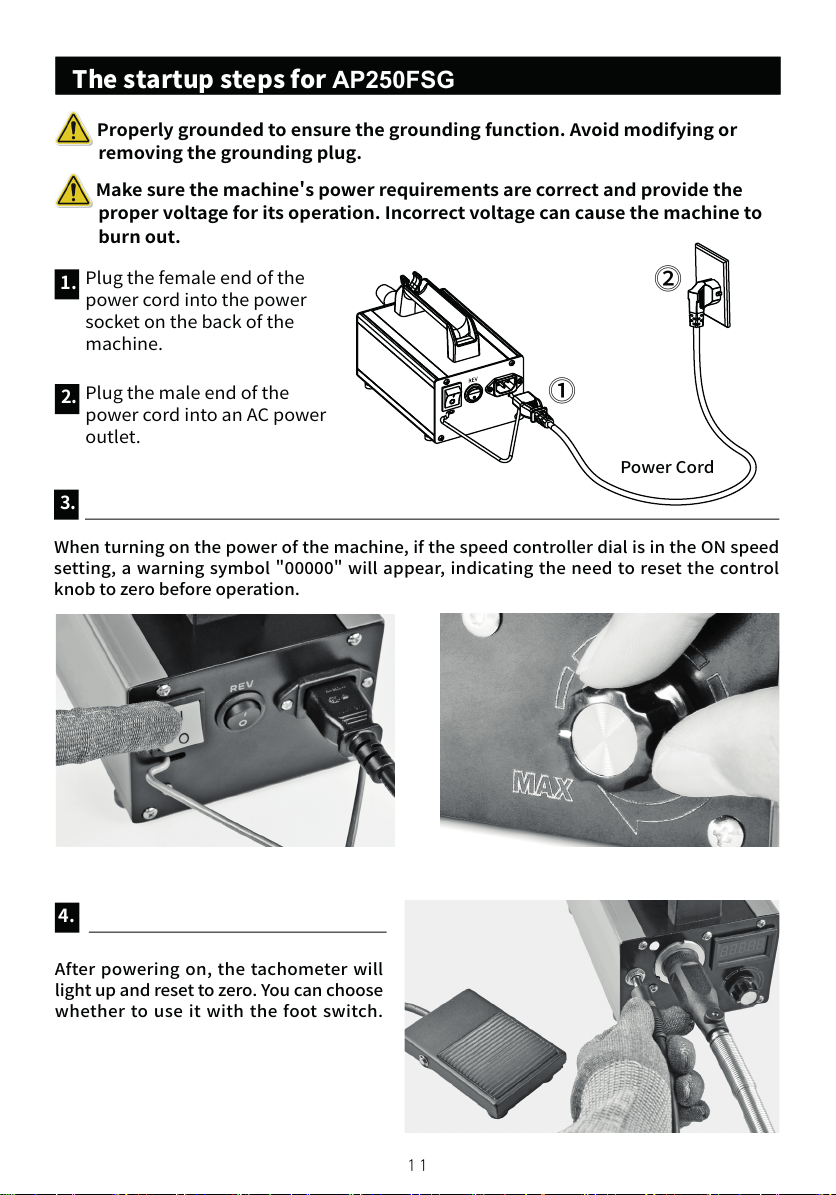
Properly grounded to ensure the grounding function. Avoid modifying or
removing the grounding plug.
Make sure the machine's power requirements are correct and provide the
proper voltage for its operation. Incorrect voltage can cause the machine to
burn out.
The startup steps for AP250FSG
1.
3.
2.
Plug the female end of the
power cord into the power
socket on the back of the
machine.
Plug the male end of the
power cord into an AC power
outlet.
4.
Afterpoweringon, the tachometerwill
lightupandresettozero.Youcanchoose
whethertouseit with the foot switch.
⓵
⓶
PowerCord
Whenturningonthepowerofthemachine,ifthespeedcontrollerdialisintheONspeed
setting,a warningsymbol"00000"willappear,indicatingthe need to reset the control
knobtozerobeforeoperation.
12
Foot Switch Mode Switching Steps
1.
2.
3.
Press and hold the "Reverse Switch" button.
At the same time, turn on the machine's power switch.
Continue holding the "Reverse Switch" for three seconds to switch between Mode
1 and Mode 2.
(The default mode is Mode 1.)
(Pleasepayattentiontothechangesinthedecimalpoint)
Themachinewillonlyrunwhenthefootswitchispressed;
releasingthefootSwitchstopsthemotor.
Tap thefootswitchonce,andthemachinestartsrunning;tapit
again,andthemotorstopsrunning.
Mode 1 Icon
Mode 2 Icon
Page 13
Foot Switch Mode Switching Steps
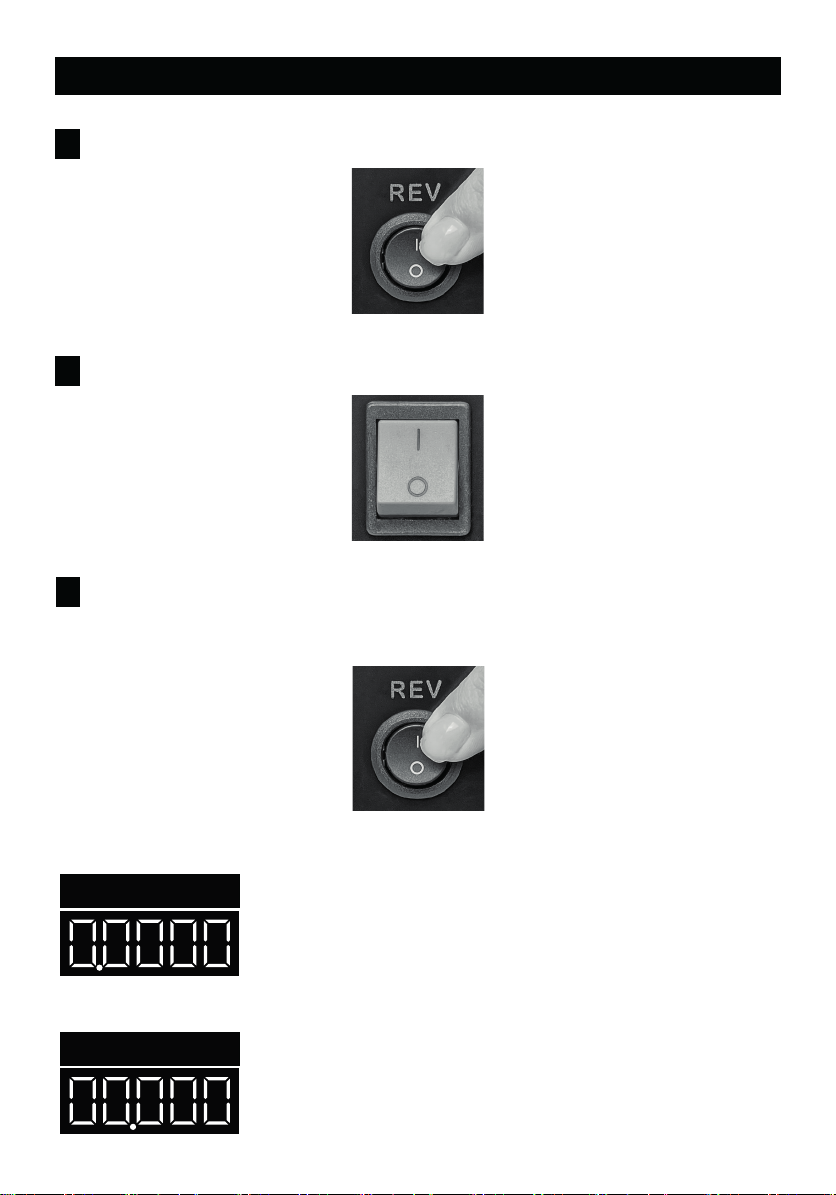
1.
Press and hold the "Reverse Switch" button.
2.
At the same time, turn on the machine's power switch.
3.
Continue holding the "Reverse Switch" for three seconds to switch between Mode
1 and Mode 2.
(The default mode is Mode 1.)
Mode 1 Icon
Mode 2 Icon
(Pleasepayattentiontothechangesinthedecimalpoint)
Themachinewillonlyrunwhenthefootswitchispressed;
releasingthefootSwitchstopsthemotor.
Tap thefootswitchonce,andthemachinestartsrunning;tapit
again,andthemotorstopsrunning.
12
Page 14
13
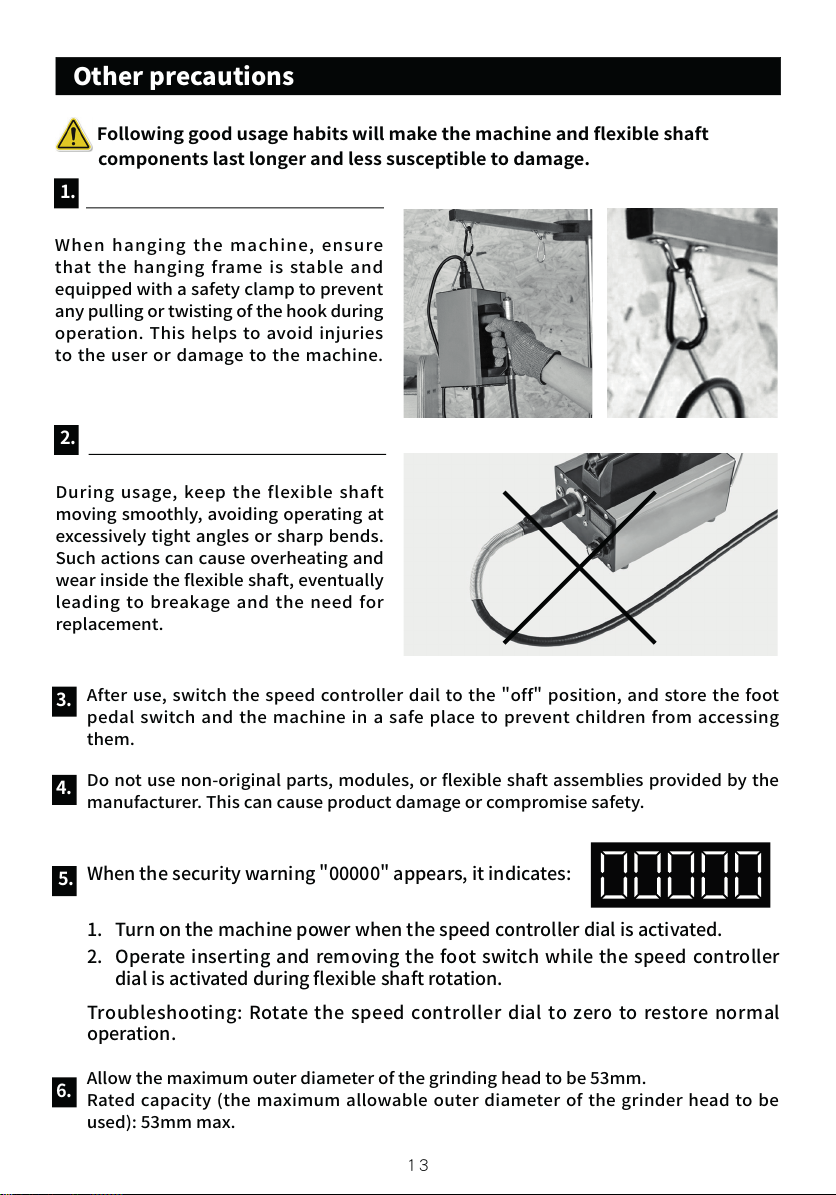
Other precautions
Whenthesecuritywarning"00000"appears,itindicates:
1. Turnonthemachinepowerwhenthespeedcontrollerdialisactivated.
2. Operateinsertingandremoving the foot switch while thespeedcontroller
dialisactivatedduringexibleshaftrotation.
Troubleshooting:Rotate thespeed controllerdialto zero to restorenormal
operation.
1.
3.
4.
2.
5.
When hanging the machine, ensure
that the hanging frame isstableand
equippedwithasafetyclamptoprevent
anypullingortwistingofthehookduring
operation.Thishelps toavoidinjuries
totheuseror damage tothemachine.
Afteruse, switch the speed controllerdail tothe"off"position,andstore the foot
pedalswitchandthemachinein asafe place topreventchildrenfromaccessing
them.
Donotusenon-originalparts,modules,orexibleshaftassembliesprovidedbythe
manufacturer.Thiscancauseproductdamageorcompromisesafety.
Duringusage, keep the flexible shaft
movingsmoothly,avoidingoperatingat
excessivelytightanglesorsharpbends.
Suchactionscancauseoverheatingand
wearinsidetheexibleshaft,eventually
leadingto breakageandthe need for
replacement.
Following good usage habits will make the machine and flexible shaft
components last longer and less susceptible to damage.
6.
Allowthemaximumouterdiameterofthegrindingheadtobe53mm.
Ratedcapacity(the maximum allowable outer diameterof the grinder head tobe
used):53mmmax.
14
Exploded Diagram
6-4
6-5
6-3-16-3-26-3-36-3-46-3-5
6-3-6
6-3
6-2-16-2-2
6-2
6-1
6-1-1
6-1-2
1
2
3
4
7
5
5-1
5-2
6
8
10
9
11
12
13
141617 15
Page 15
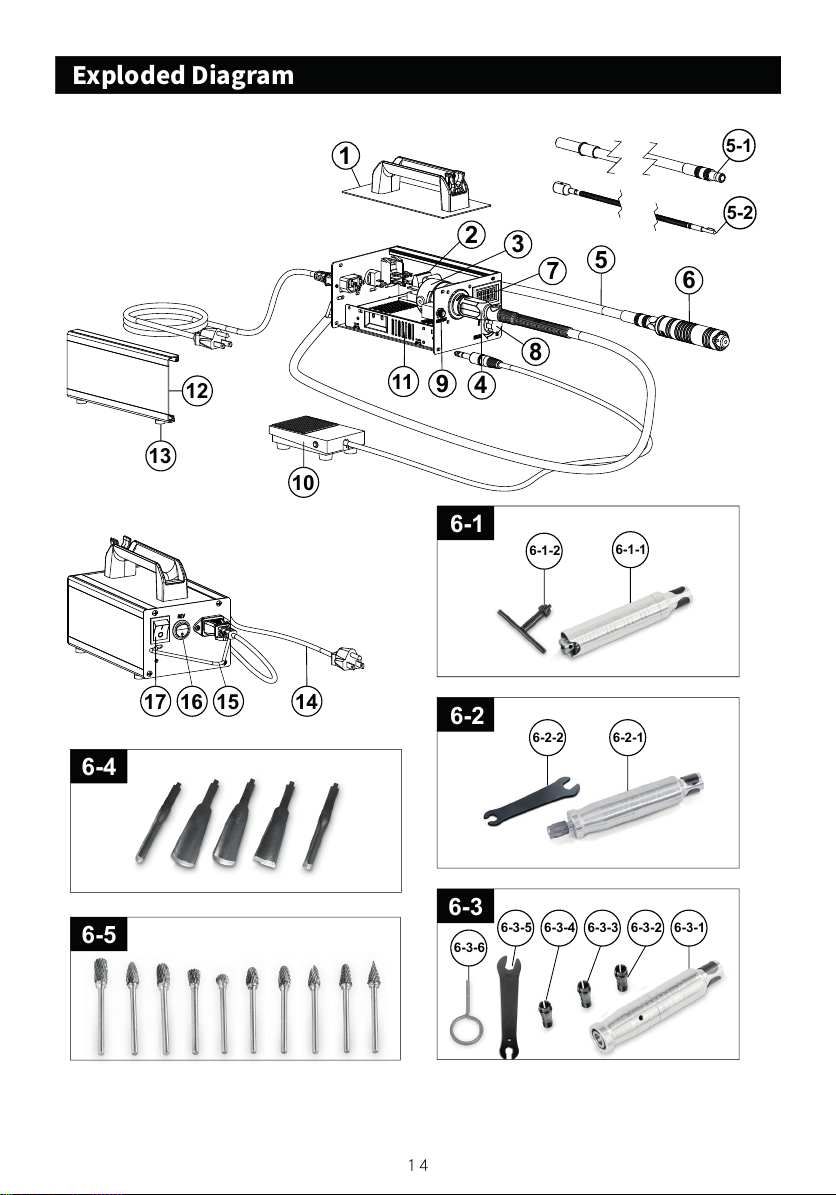
14
Exploded Diagram
6-4
6-5
6-3-16-3-26-3-36-3-46-3-5
6-3-6
6-3
6-2-16-2-2
6-2
6-1
6-1-1
6-1-2
1
2
3
4
7
5
5-1
5-2
6
8
10
9
11
12
13
141617 15
Page 16

Parts List
No. Description
1 Handle 1
2 Brushless Motor Driver Board 1
3 Brushless DC Motor 1
4 Motor Connector 1
5 Fle
5-1 Outer Sheath 1
5-2 Inner Shaft 1
6 Handpiece Set -
6-1 HC-110 Chuck Style Handpiece Set
6-1-1 Chuck Style, Handpiece 1
6-1-2 Chuck Key 1
6-2 HC-120 Chsiel Style Handpiece Set
6-2-1 Chsiel Style, Handpiece 1
6-2-2 Wrench 1
6-3 HC-130 Collet Style Handpiece Set - optional 1
6-3-1 Collect Style, Handpiece 1
6-3-2 Collet -1 1
6-3-3 Collet -2 1
6-3-4 Collet -3 1
6-3-5 Wrench 1
6-3-6 Pin 1
6-4 Chisel -
6-5 Carbide Rotary File -
7 GM Control Circuit Board 1
8 Variable Speed Controller Dial 1
9 6.35 mm Jack Adapter 1
10 ON/OFF Foot Switch 1
11 Power Supplier Set 1
12 Aluminum Extrusion Panel 1
13 Foot Pad 1
14 Power Cord 1
15 Hanger 1
16 Reverse Switch 1
17 Power Switch 1
xible Shaft 1
- optional
- optional
Q ’t y
1
1
15
Page 17

16
Page 18

EU DECLARATION OF CONFORMITY
Page 19

Page 20

The packaging is suitable for recycling.
Please dispose of it in a responsible manner.
EU Countries Only
Do not dispose of electric tools together with household waste material.
By law they must be collected and recycled separately.
Axminster Tools, Axminster Devon EX13 5PH
axminstertools.com
 Loading...