

Page 1
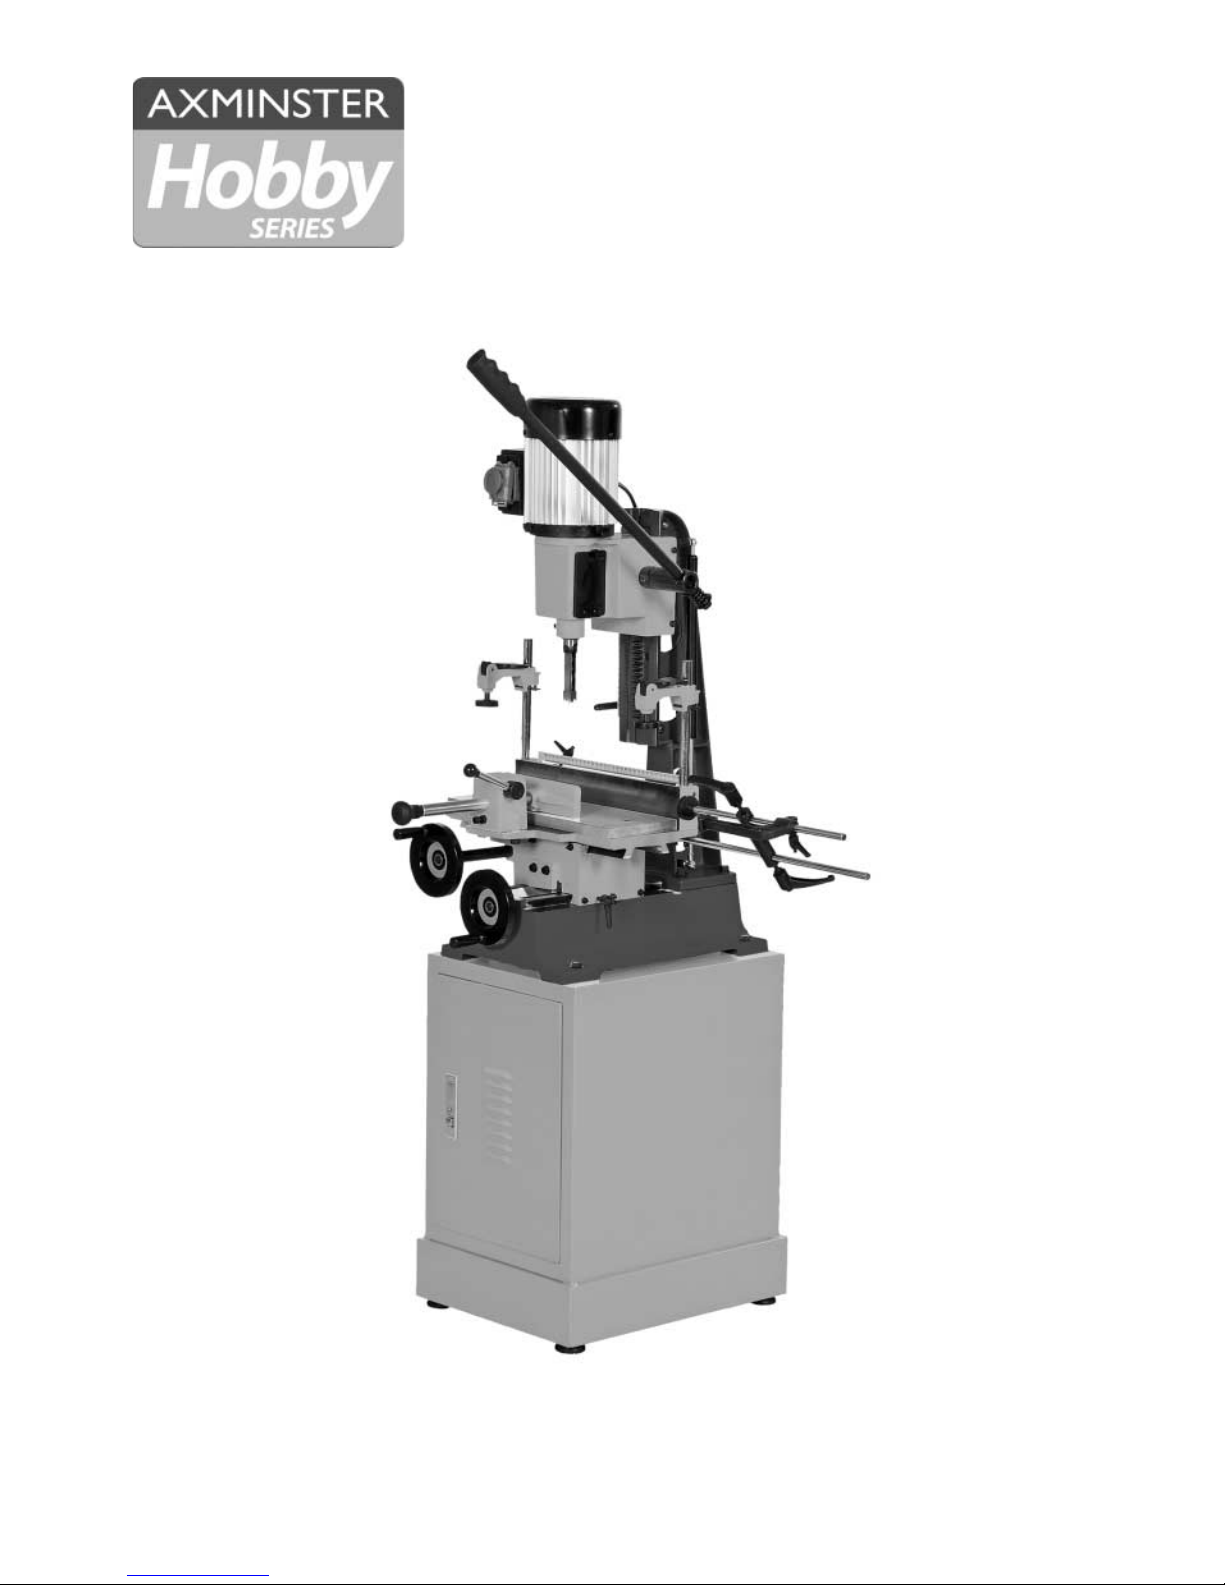
AW19FM Floor
Standing
Morticer
Axminster Tool Centre,
Unit 10 Weycroft Avenue, Axminster, Devon EX13 5PH
www.axminster.co.uk
Code: 501253
Page 2
Index of Contents
Page No.
02
Declaration of Conformity
Index of Contents 02
Declaration of Conformity 02
What’s in the Box 03
General Instructions for 230V Machines 03-04
Specific Safety Instructions for Morticers 04
Unpacking and Assembly 05
Specifications 05
Illustration and Parts Description 06-07-08-09
Installing the Chisel and Bit 10
Operating Instructions 11
Maintenance 12
Parts Breakdown/List 13-14-15-16-17
Notes 18-19
Copied from CE Certificate
The undersigned,
K. Bodenstein
authorised by
Laizhou Tongtai Machinery Co.,Ltd.
Shilipu Chenggang Road, Laizhou, Shandong
261400 P.R. China declares that this product:
Model number
MS3840, MS3840T Morticer
manufactured by Laizhou Tongtai Machinery Co. in
compliance with the following standards or
standardisation documents in accordance with
Council Directives
98/37/EC
Warning
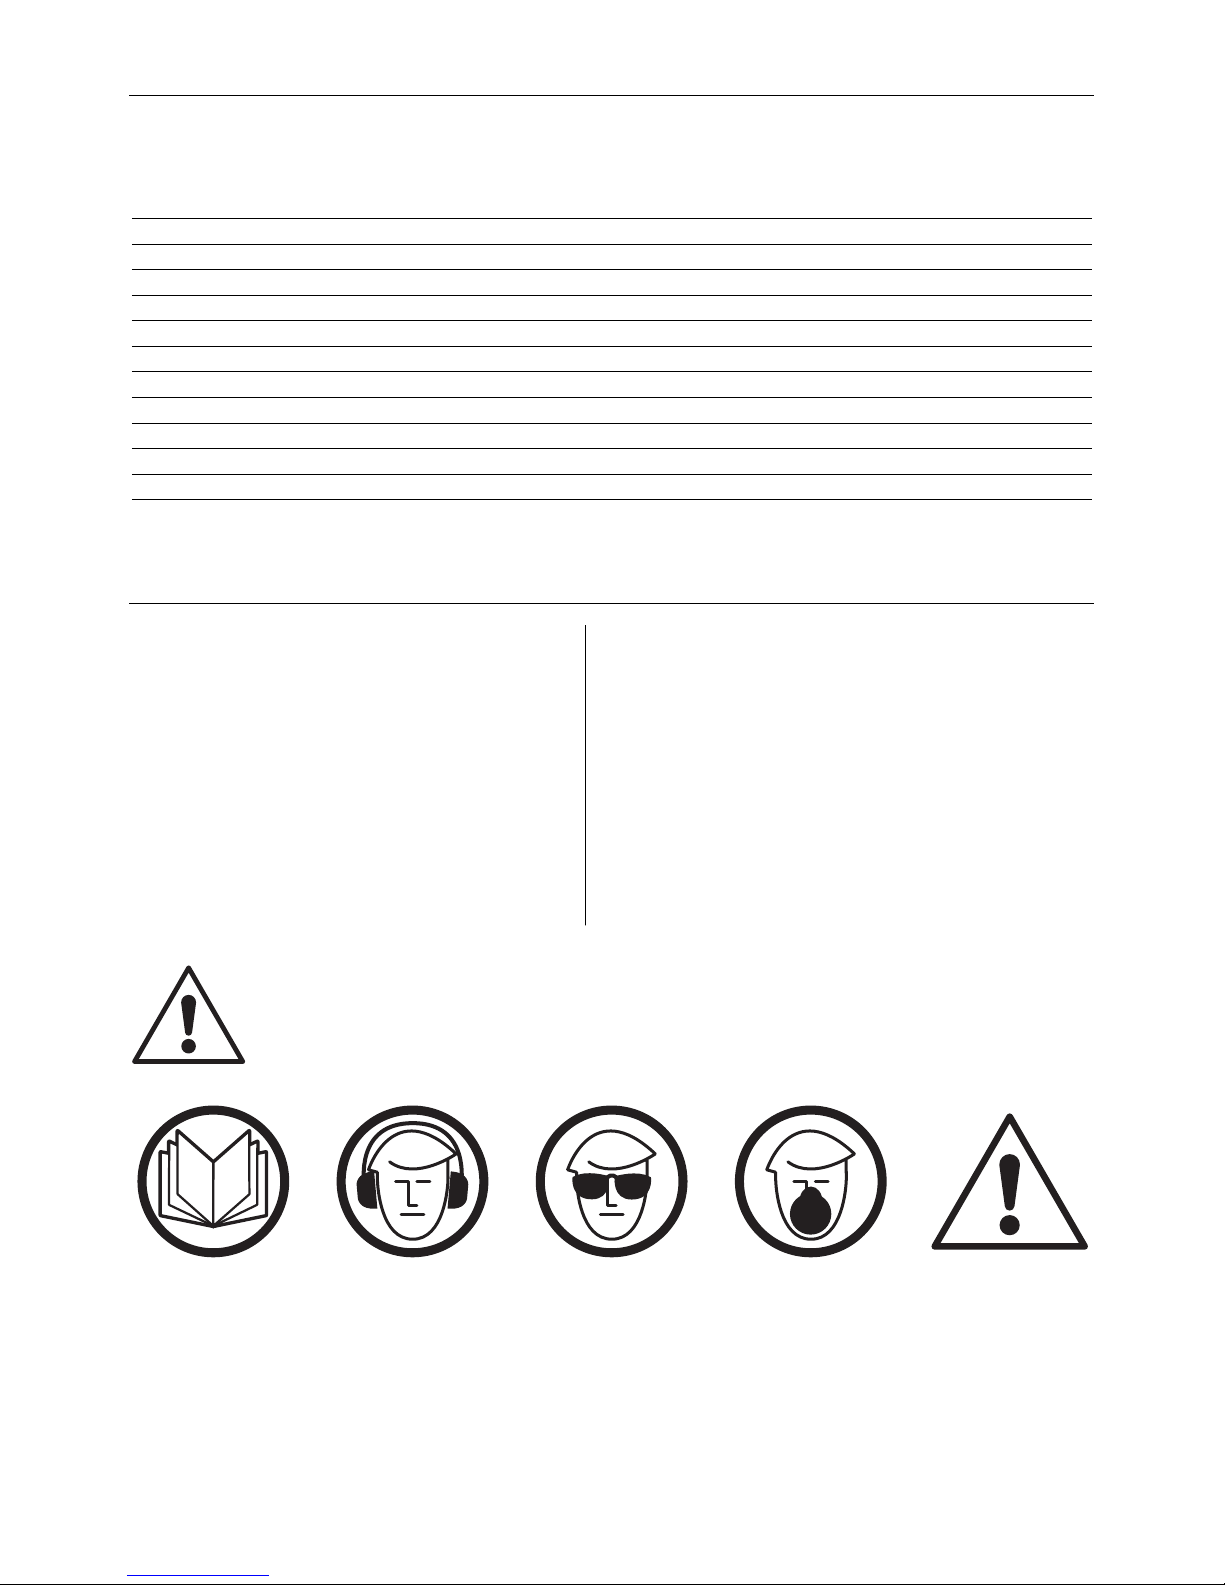
The symbols below advise that you follow the correct
safety procedures when using this machine.
Dust mask
should be worn
Ear protection
should be worn
Eye protection
should be worn
Fully read manual
and safety instructions
before use
HAZARD
Motor gets hot
Page 3

03
What’s in the Box
• Check that the mains power supply is earthed
• Regularly check the mains lead and plug for damage
• Ensure that a fuse of the correct amperage is fitted to the plug
• Ensure that any extension lead used is correctly rated to suit the machine or power tool
• Ensure that the power lead and any extension lead is kept clear of the blades or other sharp obstacles
• Do not use electrical machines or power tools in wet or damp areas or locations
• If a replacement mains plug is fitted at any time this must be of the appropriate size and fitted with the
correct size of fuse.
General Safety
• Mount the machine on a flat level bench or surface. Secure the machine to the surface where applicable.
• Always use machines or power tools in an uncluttered area. To reduce the risk of accidents, avoid
leaving materials or other items within the working area and allow clear access to all machine parts
and controls.
Quantity Item Model Number
1 No. AW19FM Morticer MS3840
1 No. Cabinet Stand with Shelf and Lockable Drawer
4 No. M12 x 120 Hex Head Bolts and Washers
1 No.
5
/8" Chisel and Bit
1 No.
3
/4" Chisel Bushing
1 No.
13
/16" Chisel Bushing
3 No. Hexagon Keys
1 No. Chuck Key
1 No. Instruction Leaflet
1 No. Guarantee Card
General Instructions for 230V Machines
The following suggestions will enable you to observe good working practices, keep yourself and
fellow workers safe and maintain your tools and equipment in good working order.
Good Working Practices/Safety
Electrical Safety
WARNING!!
!
KEEP TOOLS AND EQUIPMENT OUT
OF THE REACH OF YOUNG CHILDREN
Page 4

04
General Instructions for 230V Machines
• Clean machines by wiping with a damp soapy cloth. Do not use solvents or cleaners that may
damage plastic parts or painted/coated surfaces. Keep water and solvents away from all electrical
components, leads and plugs.
• When storing or leaving tools for any length of time, spray bare metal surfaces with a protective spray to
minimise surface corrosion.
• Always isolate machines and power tools from the power supply when not in use or when changing parts,
cutters and blades or when making any adjustments.
• Before using any machine or power tool, ensure that all locking-nuts, chucks etc, are tightened and
secure. Check that all loose keys, spanners and other tools have been removed.
• Always ensure that long hair is tied back or retained by a band, hat or safety helmet. Remove all loose
jewellery to prevent it from catching in rotating parts of the machine.
• Always check that the correct machining or cutting speed has been selected.
• Do not operate machinery or power tools when tired or under the influence of alcohol, drugs or certain
medicines.
• WHEN USING MACHINES ALWAYS WEAR SUITABLE EYE PROTECTION, EAR DEFENDERS
AND DUST OR FUME INHALATION PROTECTION.
• WARNING!! KEEP TOOLS AND EQUIPMENT OUT OF THE REACH OF CHILDREN, UNLESS
THEY ARE UNDER SUPERVISION.
• Ensure that the morticer is firmly fixed to its base as the force exerted through the
operating handle could be enough to over balance the machine.
• Ensure that the operating handle is returned to the upright position after cutting a mortice.
• Mortice chisels have very sharp ends, handle them with great care.
• Make sure that the timber is held firmly down against the table, either with the vice or the hold
down clamps. This prevents the possibility of the timber being pulled upwards as the mortice
chisel is withdrawn from the hole.
Specific Safety Instruction for Morticers
Page 5

05
Unpacking and Assembly
Remove the morticer and stand from the shipping cartons. Report any shortages or damage to
Axminster Power Tools Customer Services Department. (03332 406406)
Read the manual thoroughly, familiarising yourself with the correct safety, operating and
maintenance procedures before proceeding further.
The machine and stand are both supplied fully assembled so the initial assembly work is
limited to positioning the morticer on the stand and securing with four M12 x 120mm long
hexagon head bolts.
Fit the adjustable length stop if required using the two screws and washers supplied .
To avoid the possibility of injury it is essential to use the appropriate lifting
equipment when positioning the machine on the stand.
When positioning the machine in the workshop, ensure that there is adequate room on either
side for the size of timber you plan to use.
!
Specifications
Model AW19FM
Produt Code 501253
Rating Trad e
Power 750W (230V, 1ph)
Chisel Stroke 220mm
Centre of Chisel to Back Fence 140mm
Max Height of Timber with 12.7mm Chisel and Bit 220mm
Max Chisel Size Softwood 19mm
Max Chisel Size Hardwood 16mm
Overall L x W x H 560 x 400 x 1,540mm
Weight 130kg
Page 6
06
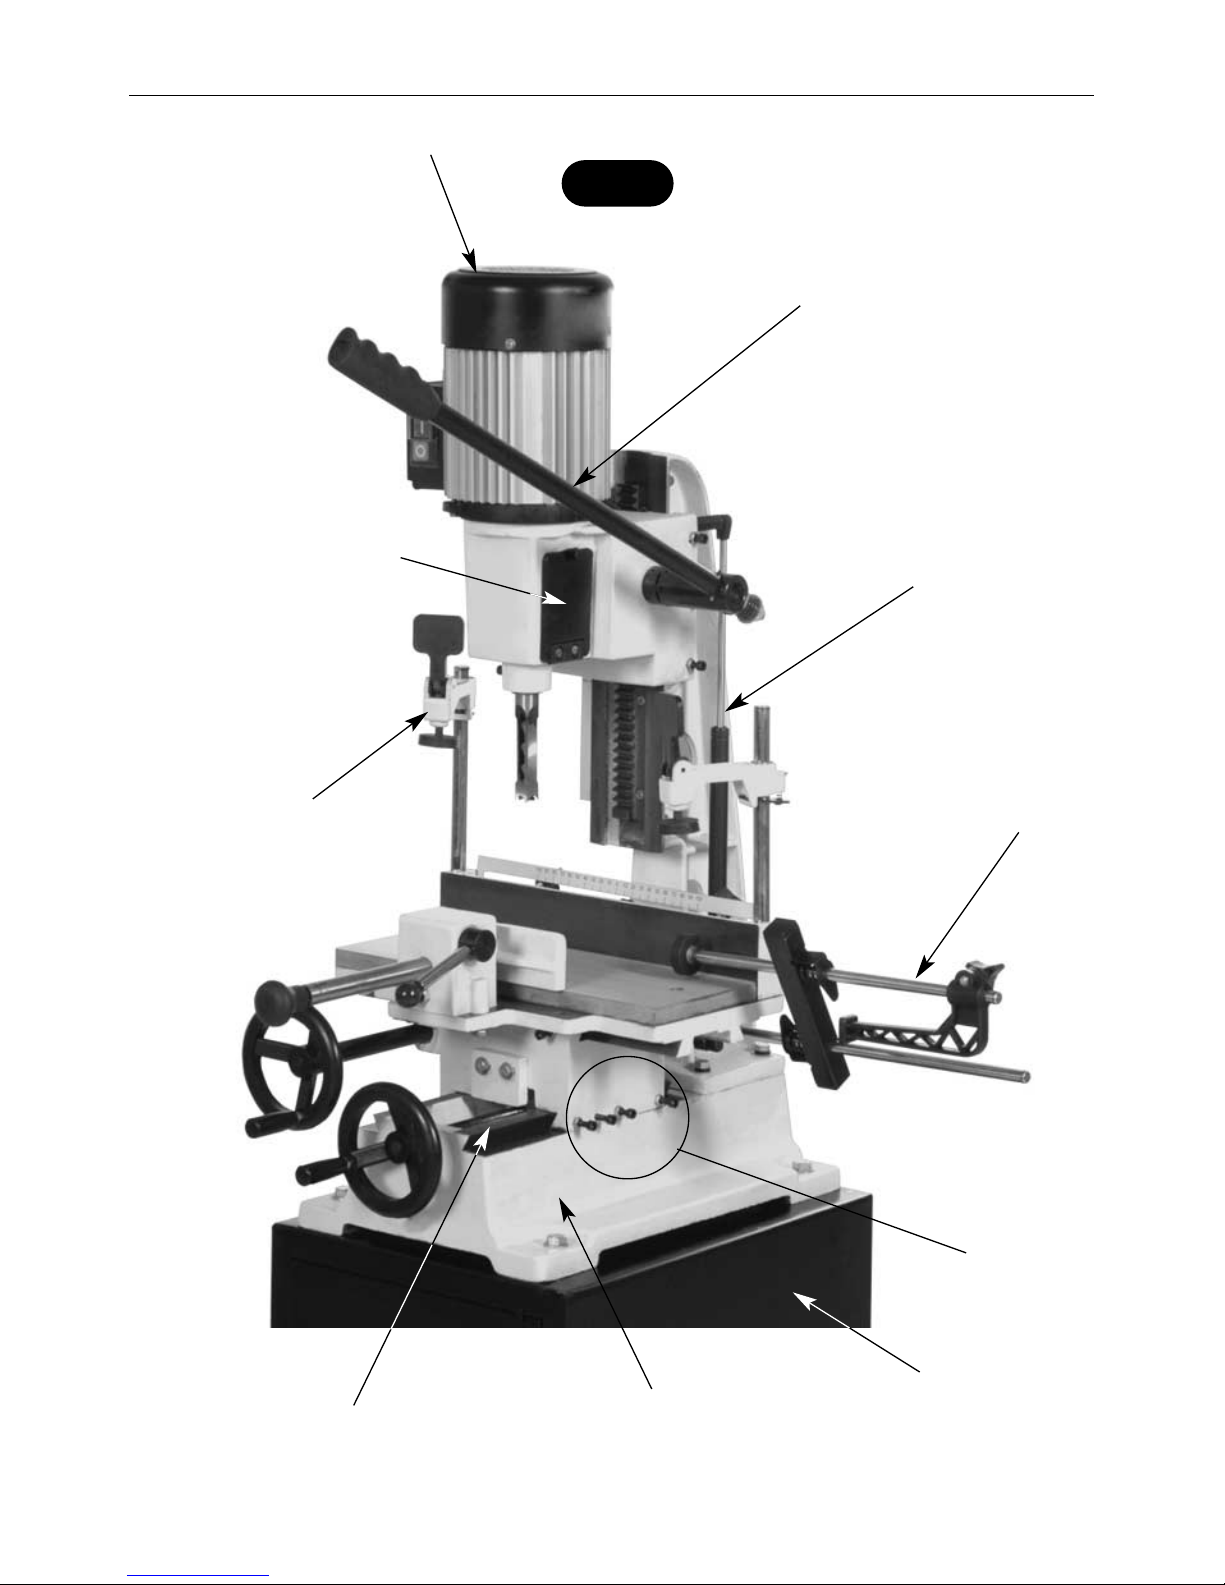
Illustration and Parts Description
Gas powered head
return spring
Operating
handle
Quick action hold
down clamp
Chuck access door
Workstop
assembly
Worktable
gib strip
adjusters
Base casting
Traverse slide
Motor
Stand
Fig A
Page 7
07
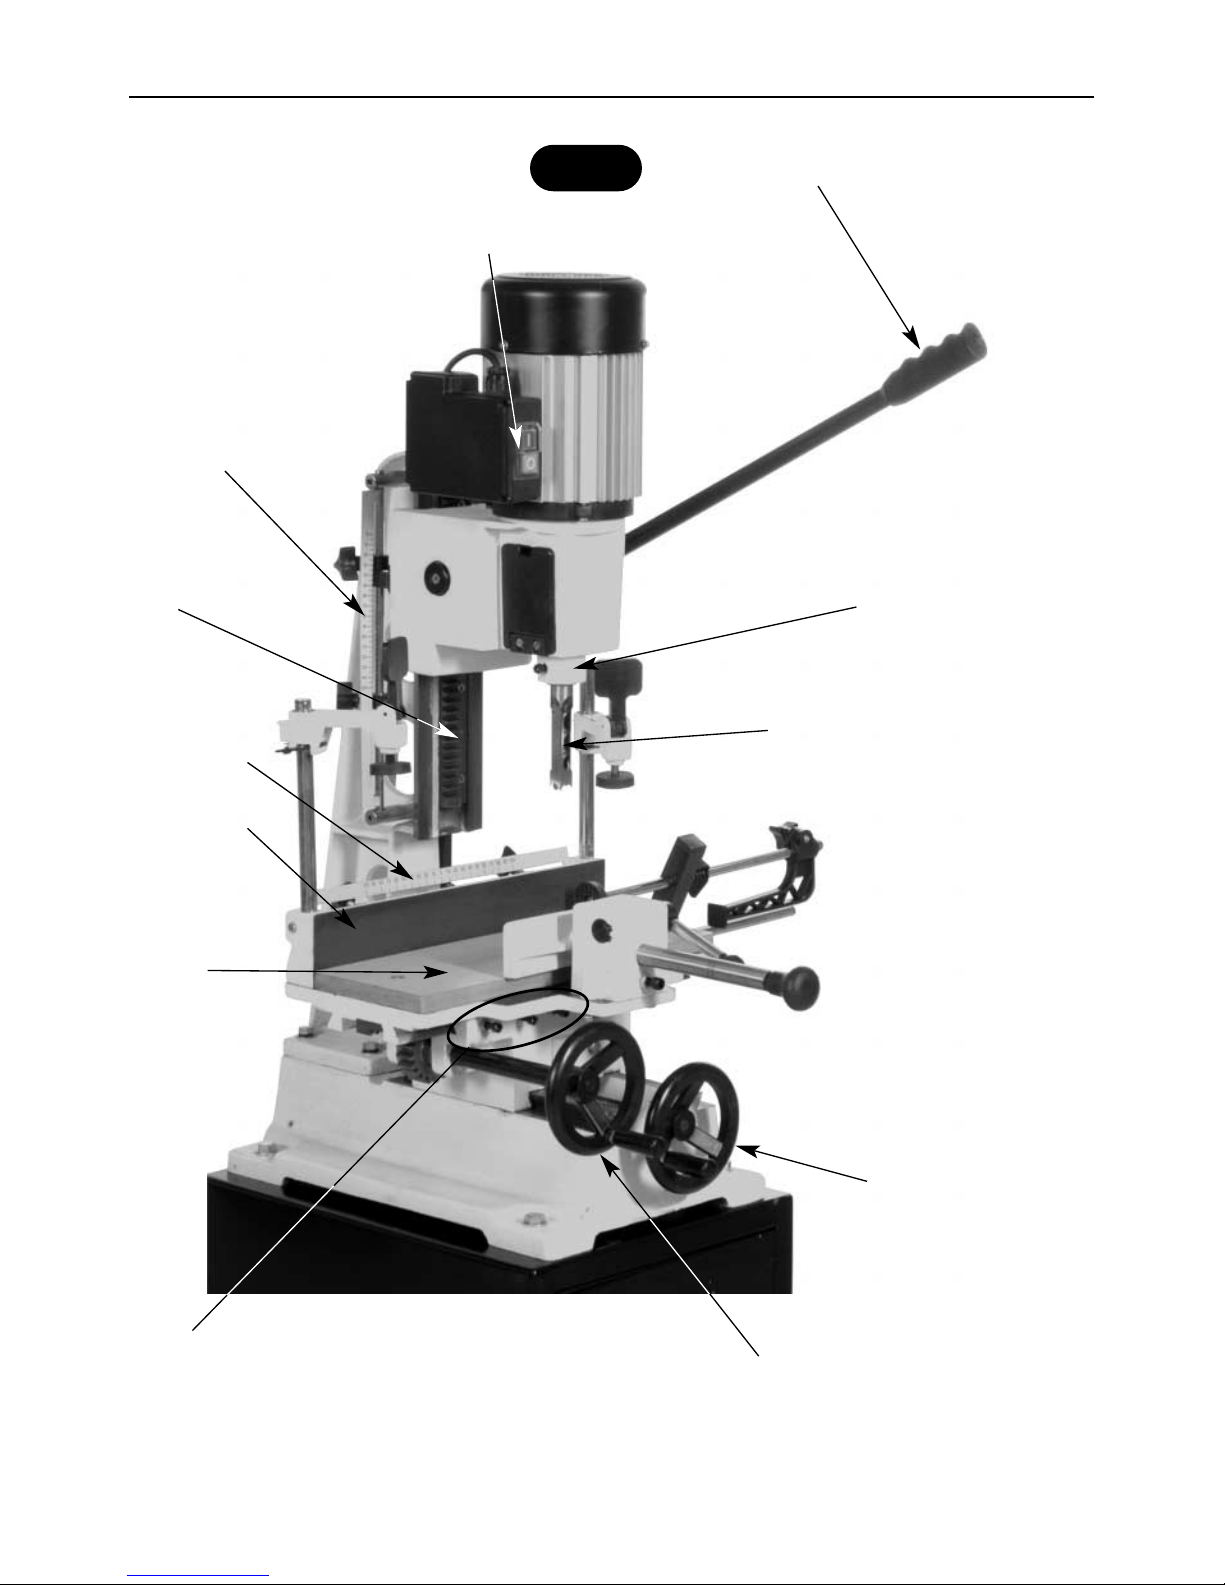
Illustration and Parts Description
Crossways table
control wheel
Lengthways table
control wheel
On/Off switch
Grip sleeve
Depth stop
scale
Back fence
Worktable
gib strip
adjusters
Table length
stop scale
Chisel
mounting
flange
Chisel and bit
Morticing
table
Rack
Fig B
Page 8
08
Illustration and Parts Description
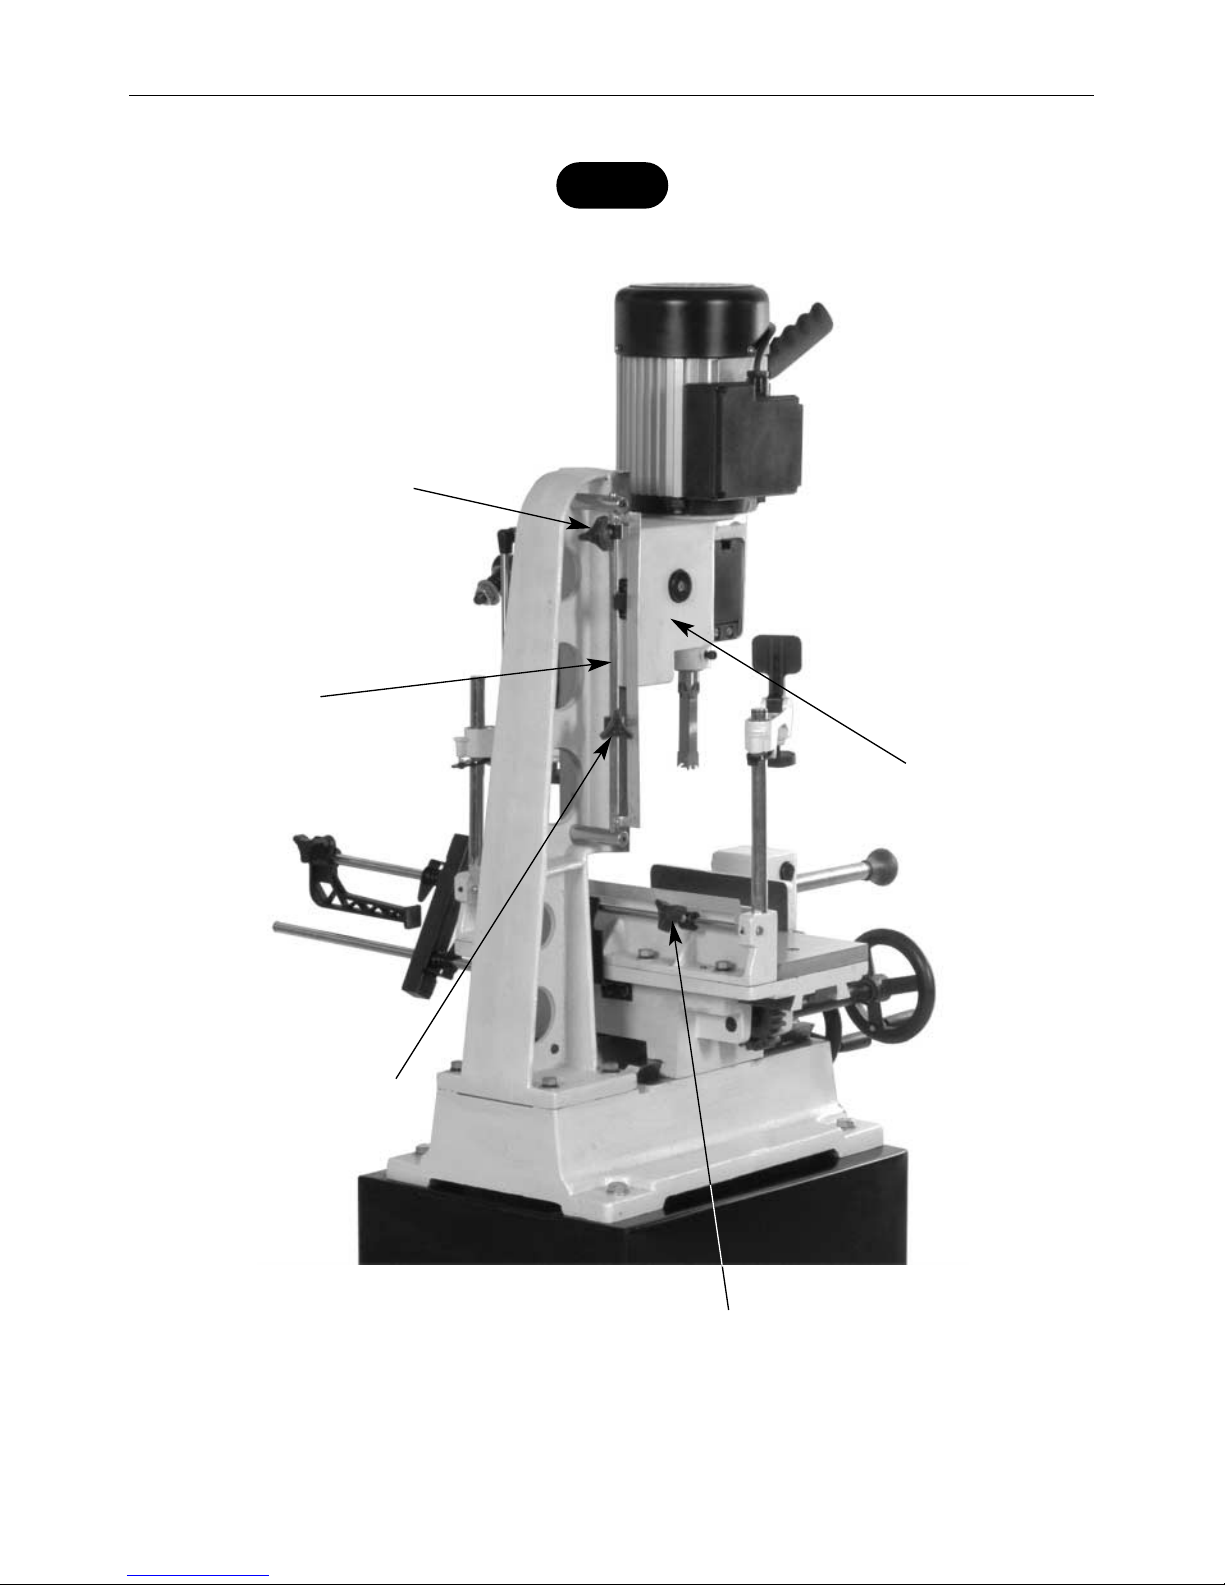
Head depth stop
Mortice depth stop
Table length stop
Head casting
Depth stop
assembly
Fig C
Page 9
09
Illustration and Parts Description
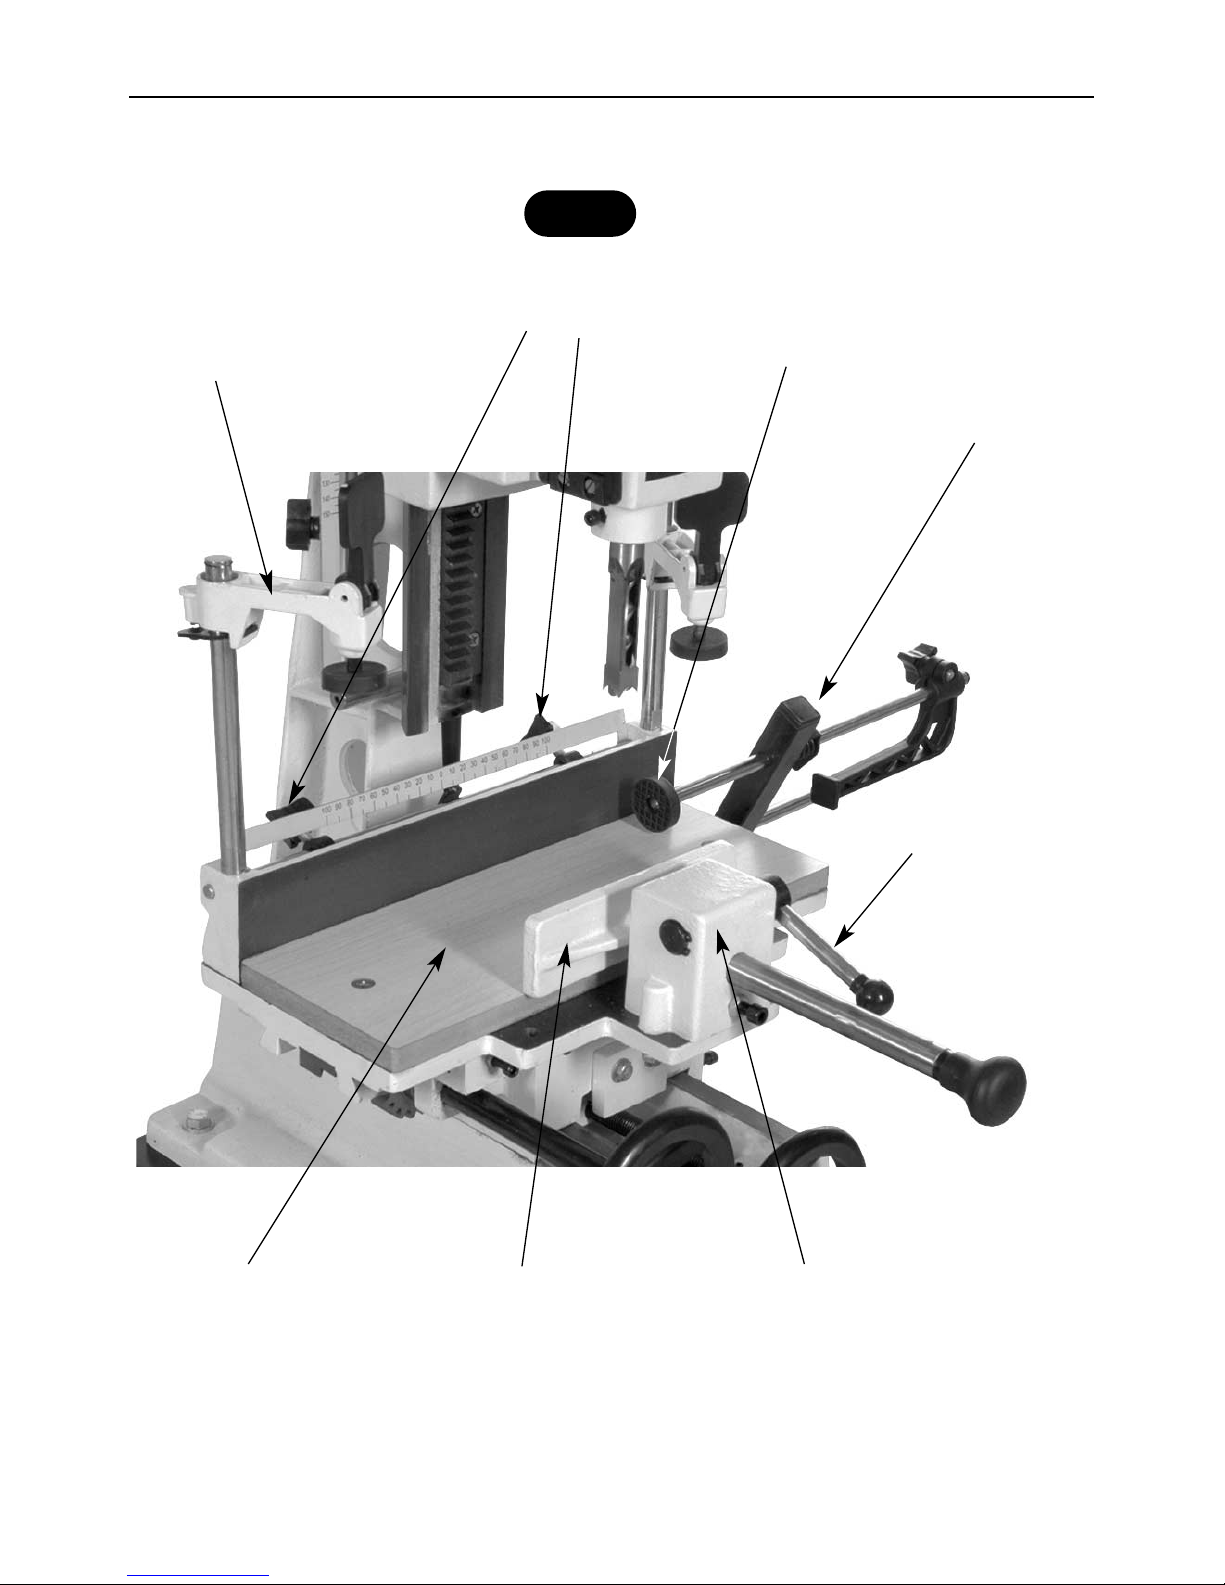
Quick action hold
down clamp
Table length stops
Timber clamping face
Morticing table
Timber clamp
assembly
Timber clamp
handle
Work stop
assembly
Work stop
Fig D
Page 10
10
Installing the Chisel and Bit
1. Select the size of mounting bush to suit the chisel being used and fit into the morticing
head.
2. Insert the chisel into the bush and tighten the screw just enough to hold the chisel in
place. Rotate the chisel so that the slot in the side of the chisel is positioned either to the
left or right, not the front or back; this will allow the chips to escape freely when cutting.
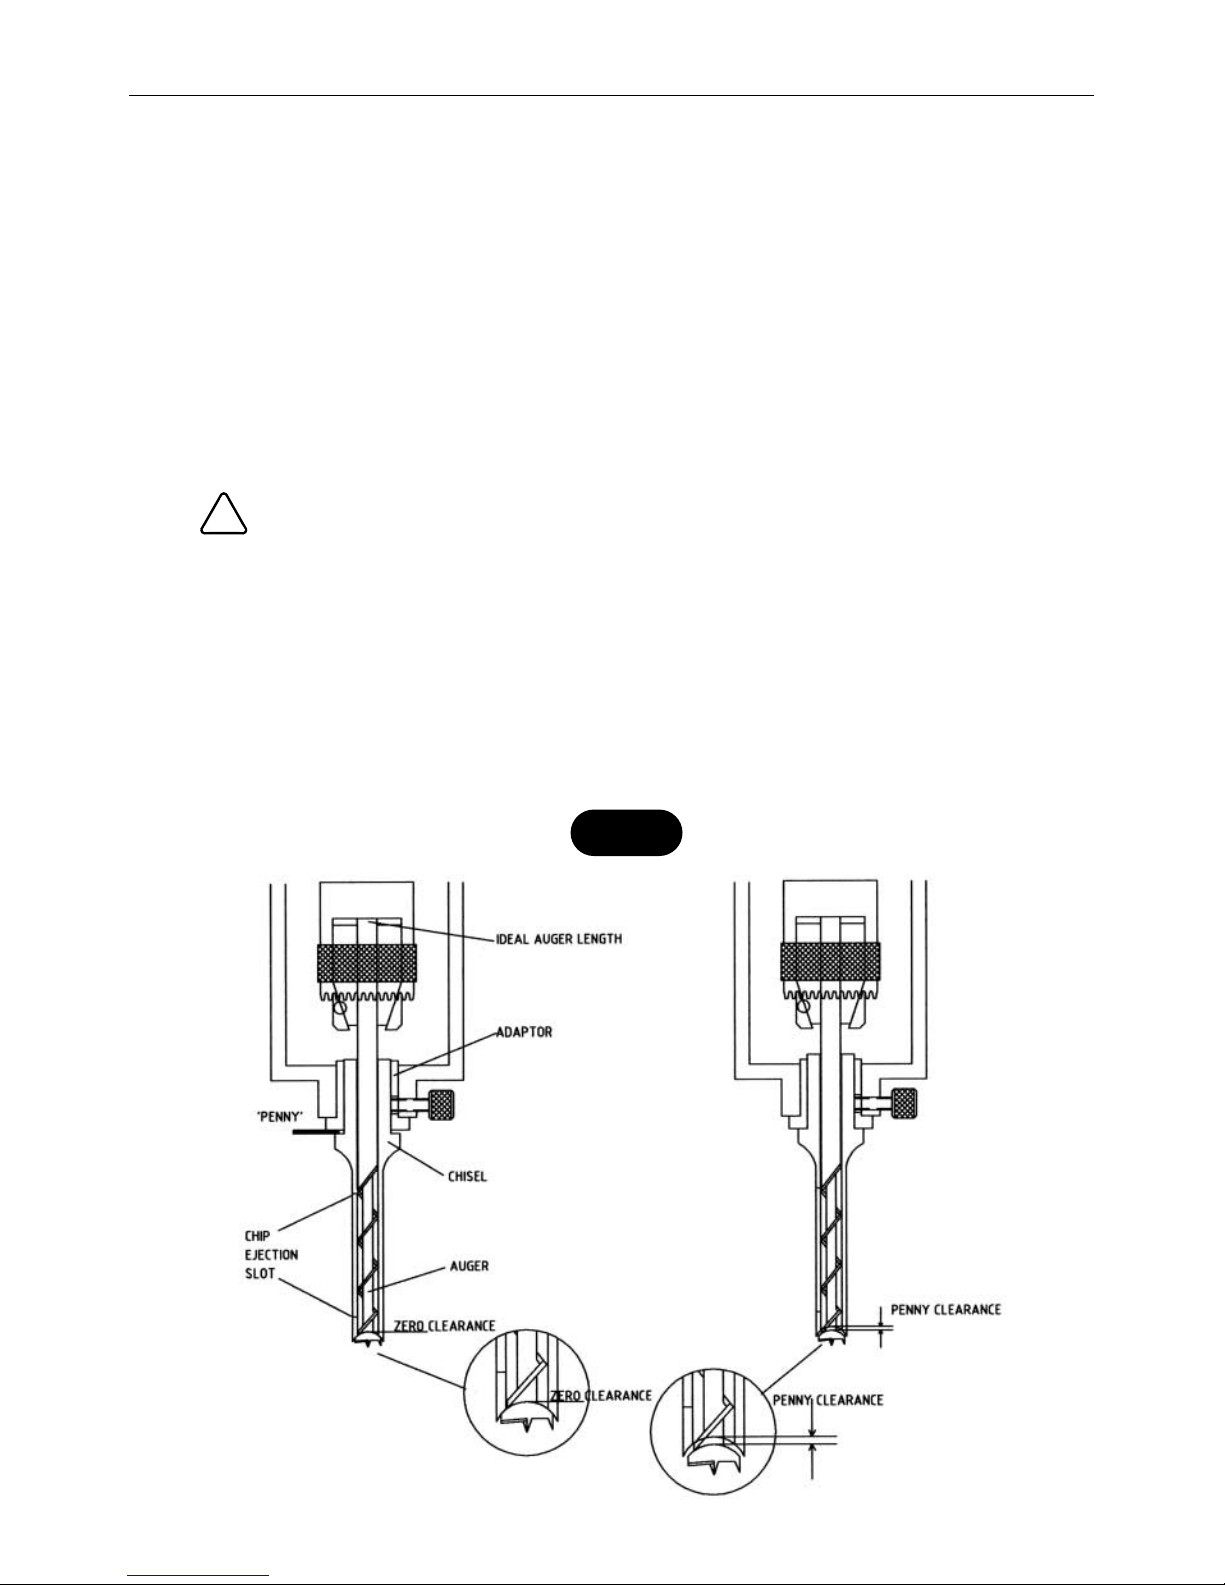
3. Push the chisel fully into the bush and then retract it by about 1.5 mm, using a spacer
such as a coin as shown in Fig E to establish the correct position. Tighten up the locking
screw.
4. Insert the auger into the chisel and push it fully up so that it contacts the recess in the
end of the chisel and then fully secure the shank of the auger in the chuck.
Be careful when handling morticing chisels as the ends are very sharp.
5. Now slacken off the chisel clamping screw, remove the spacer, push the chisel fully home
and re-tighten the screw. This procedure will ensure that there is a small clearance between
the end of the auger and the chisel, essential in order to avoid waste jamming and
overheating the chisel.
6. The final operation is to check that the chisel is perfectly square to the table; this is best
done by bringing the table forward until the vertical face just touches the back face of the
chisel and using this as a datum for aligning the chisel. Ensure that the chisel is securely
clamped in position before starting work.
!
Fig E
Page 11

11
Operating Instructions
1. Set the depth of the mortice with the lower of the two depth stops (Fig C) on page 8.
The upward travel of the head can be limited by adjusting the upper stop; this prevents
unnecessary movement of the operating handle when cutting shallow mortices.
2. Place the workpiece on the table and clamp in position with the vice or the hold down
clamps. Use the left handwheel to move the table forwards and backwards in order to
position the mortice in the required position across the timber.
3. Adjust the two table stops shown in Fig D on page 9 to give the required length of
mortice and tighten up the two thumbscrews.
4. Turn the machine on and feed the chisel and bit steadily into the work by pulling down on
the operating handle. The handle can be re-positioned on its spindle so that it is in the most
convenient position.
5. After making the first cut, the table is moved along with the left hand wheel for successive
cuts until the mortice is complete. The direction of movement of the table will depend on
which side of the chisel the clearance slot is located - movement should be away from the
slot so that the chippings can clear freely.
6. The rate of feed of the chisel should be fast enough to prevent burning of the tip of the
chisel but not so fast as to risk breaking the auger. The ideal speed for any combination of
chisel size and timber type will be learned through experience.
7. Deep mortices are best cut in a series of shallower cuts to allow the chippings to clear
and prevent blocking of the chisel.
Page 12
12
Maintenance
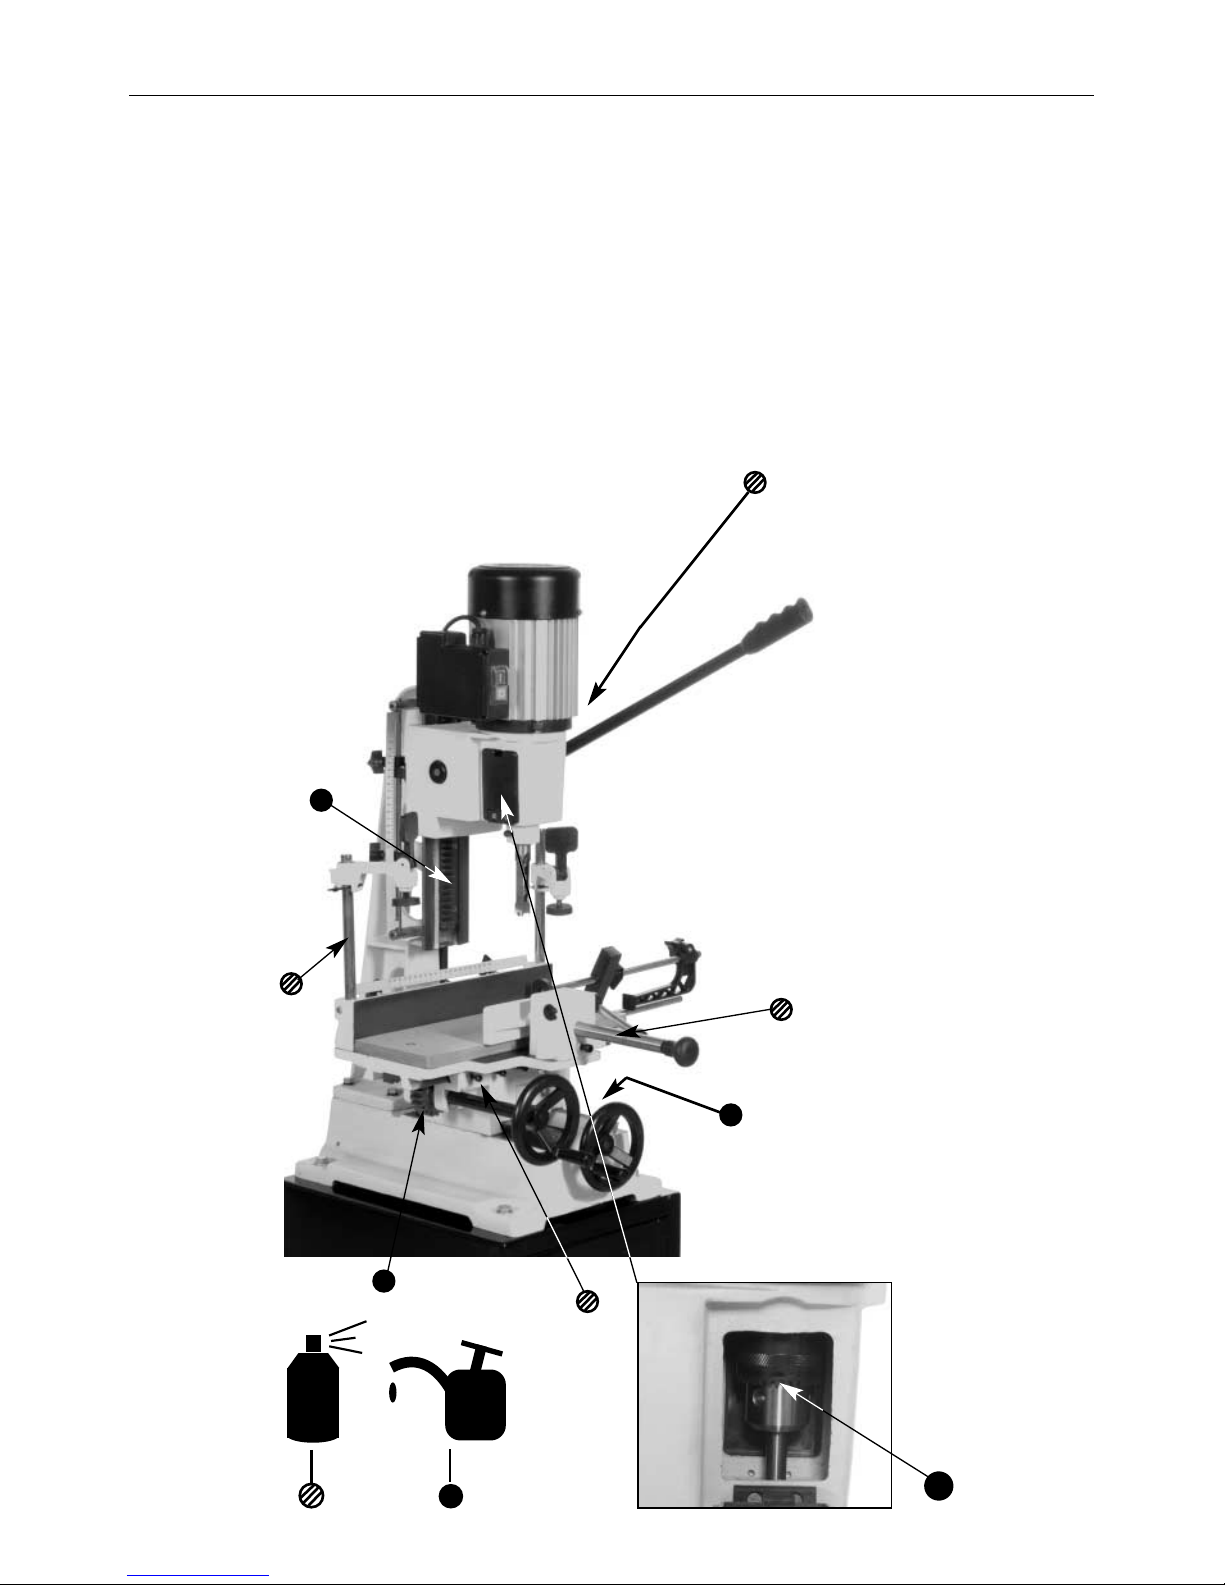
The morticer requires only minor maintenance such as routine cleaning and lubrication. Keep the
machine clean and use a light application of thin oil to the moving parts.
Chisels and bits should be kept sharp for best performance, a discoloured tip is usually a sign of
excessive heat caused by a blunt auger and/or chisel. Bits are best sharpened with a small file
and chisels with the special mortice chisel sharpeners available through Axminster Power Tool
Centre (03332 406406).
Burrs can be removed from the sides of the chisel on a fine oilstone or waterstone but great care
must be taken not to taper the chisel as this will cause the chisel to jam in the timber.
Oil
OIL
Lever handle mechanism
Page 13
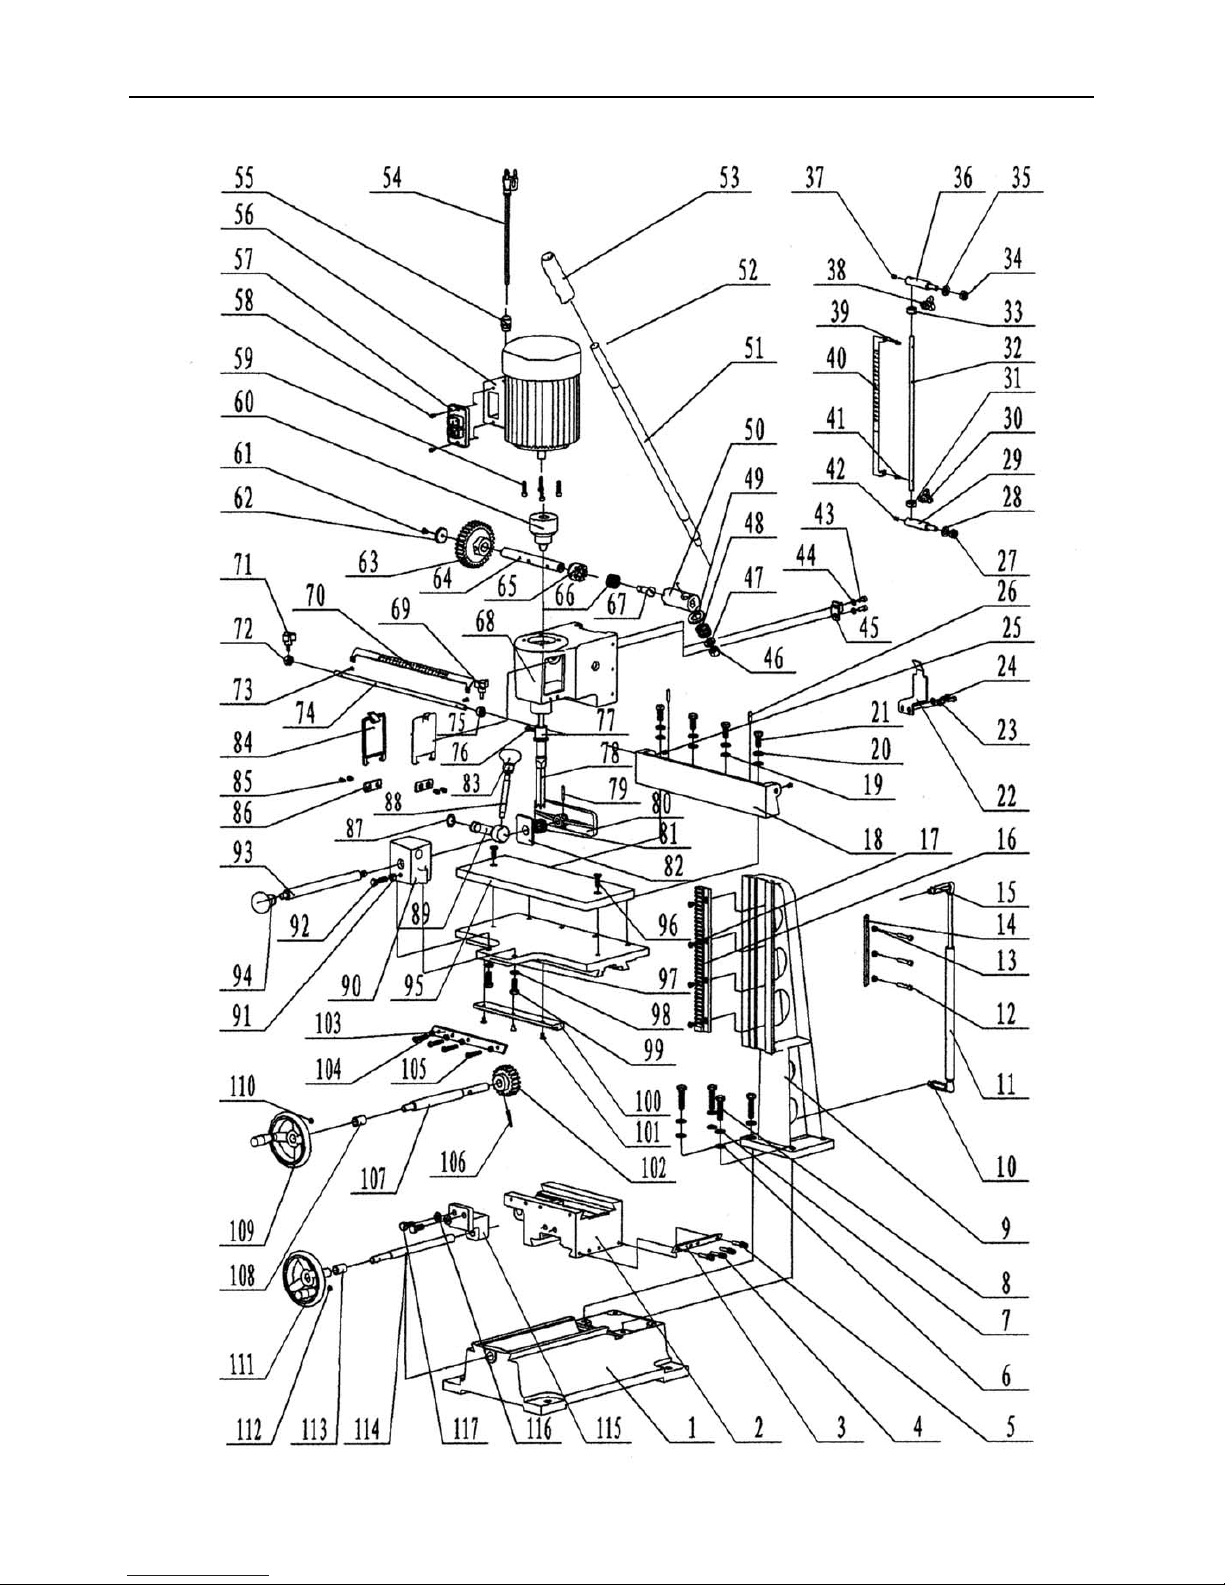
13
Parts Breakdown/List
Page 14
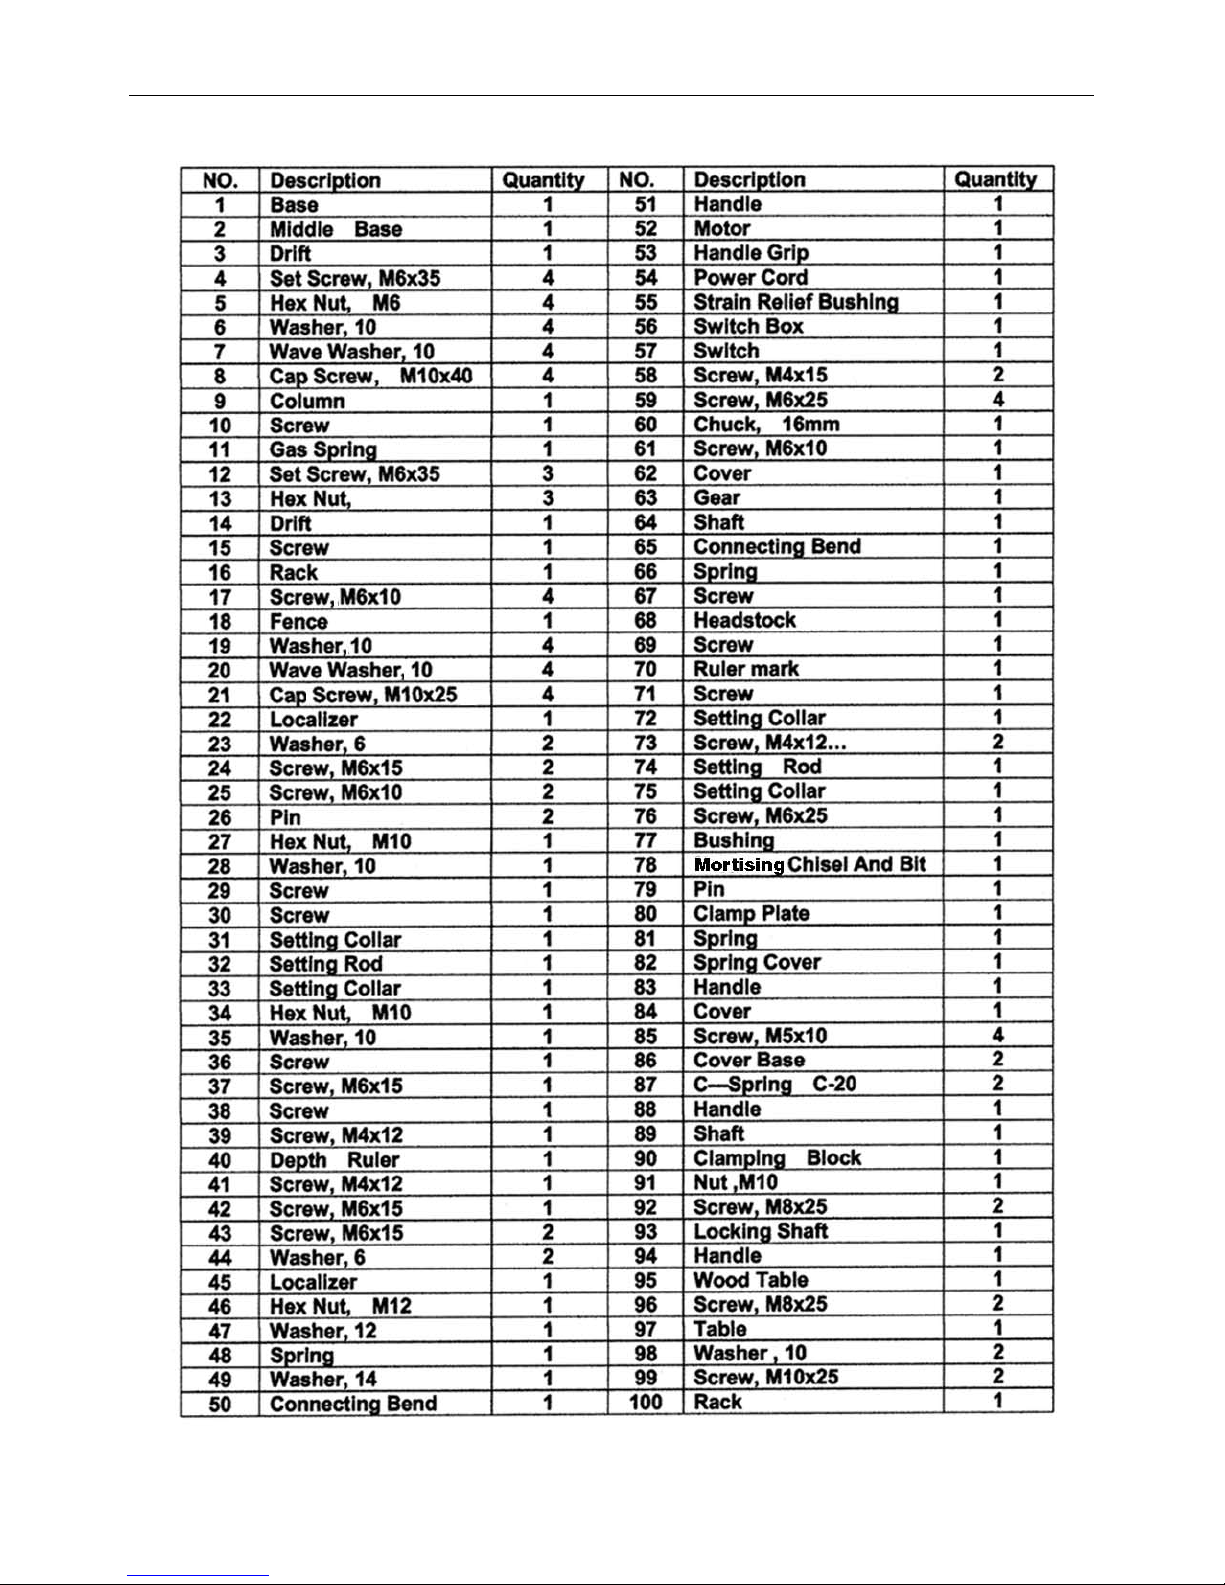
14
Parts Breakdown/List
Page 15
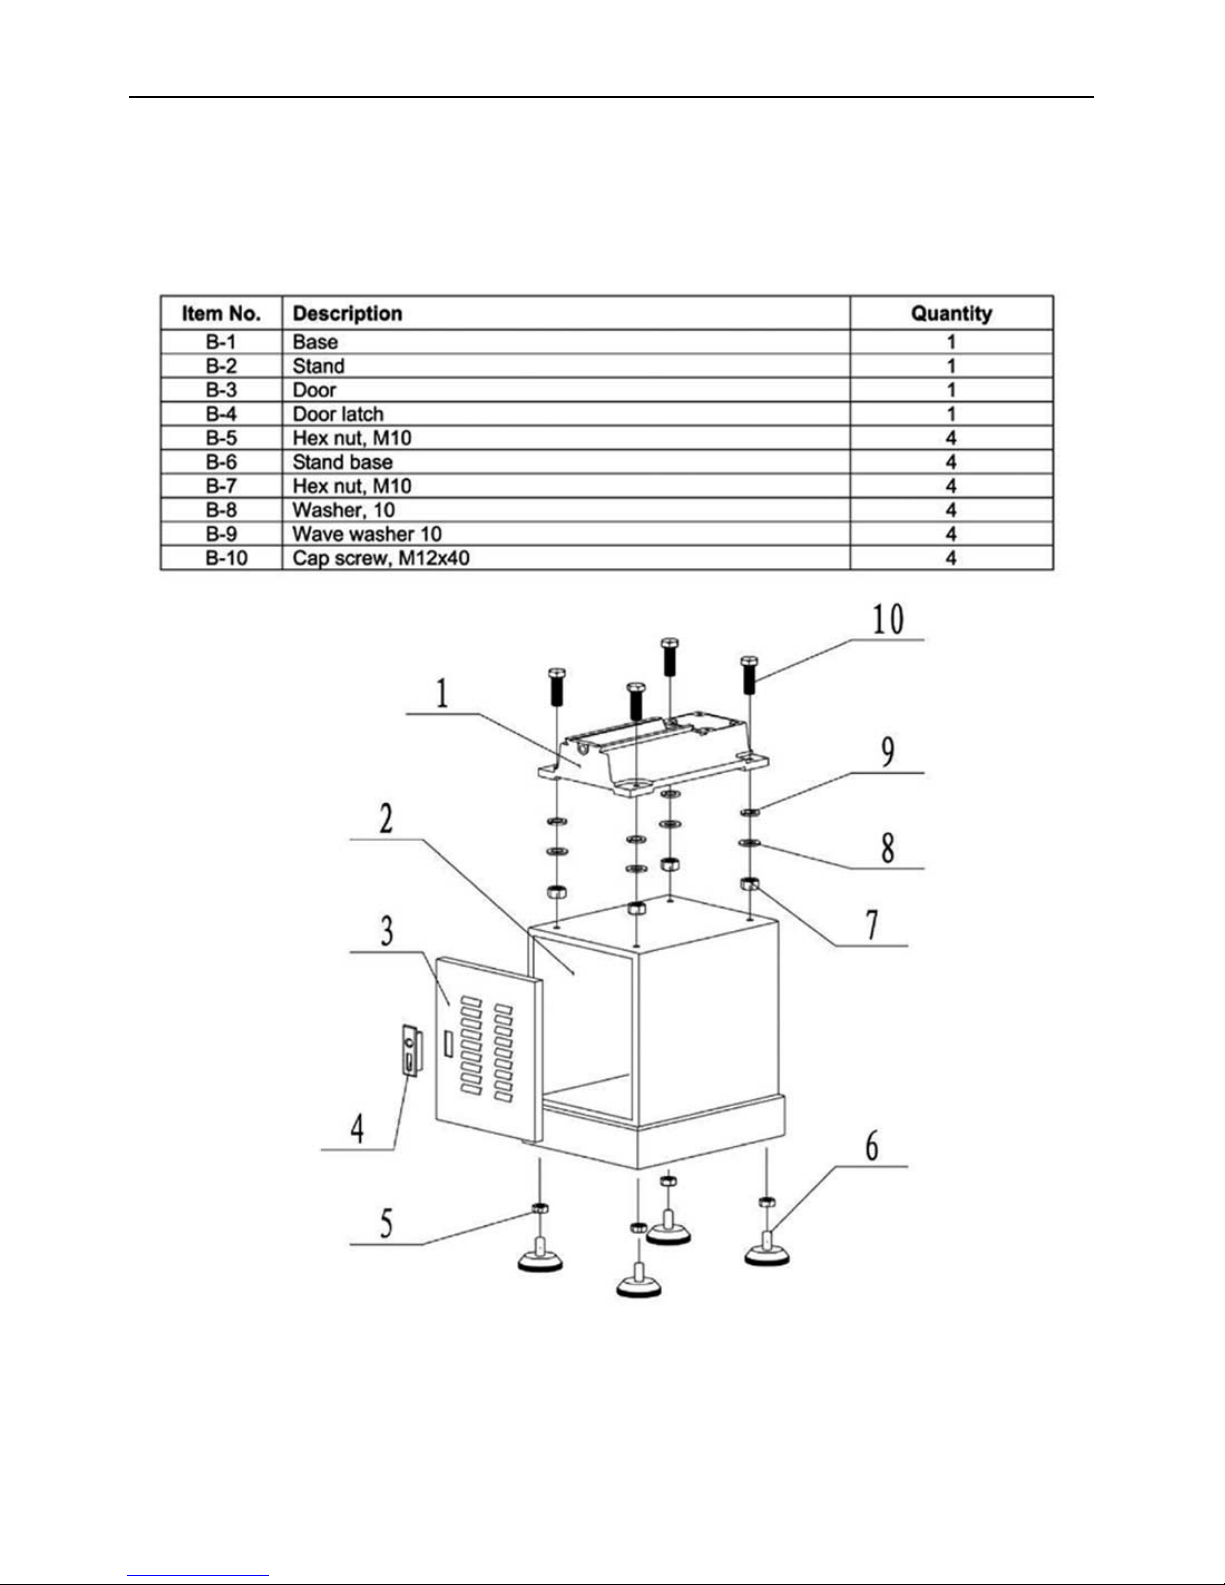
15
Parts Breakdown/List
Cabinet Assembly
Page 16
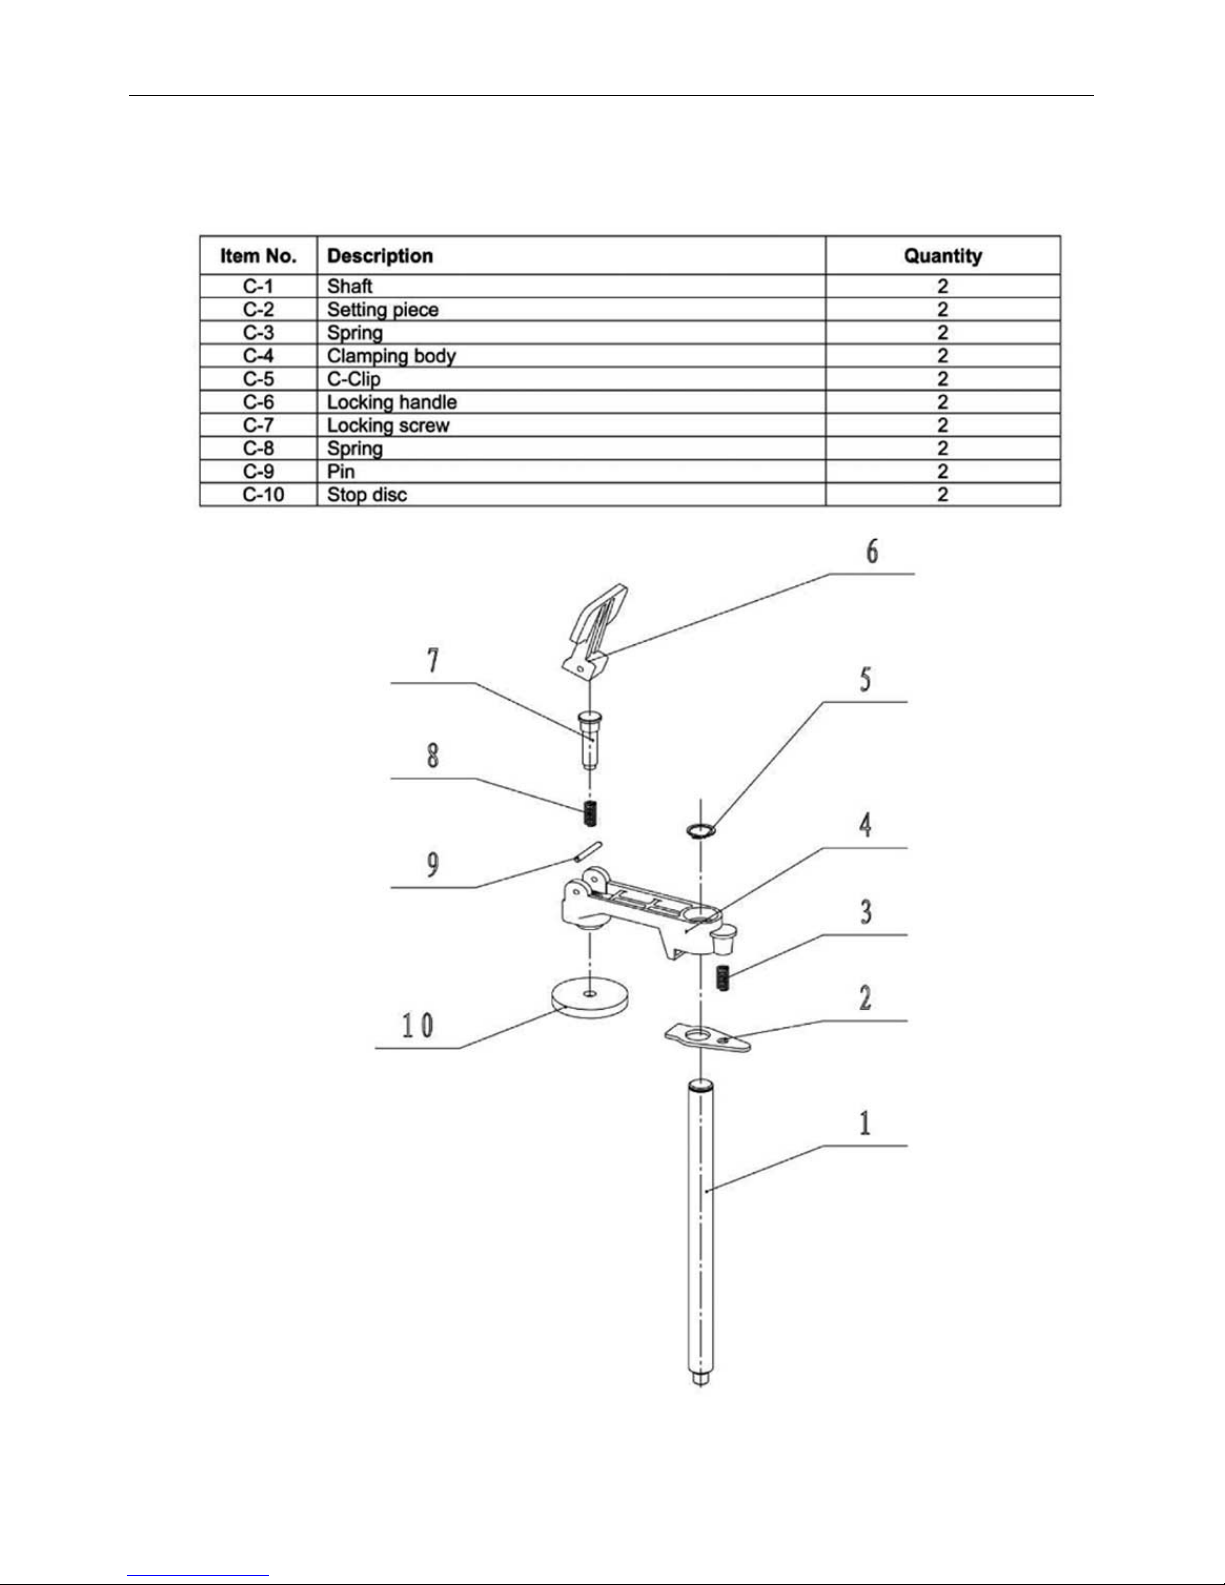
16
Parts Breakdown/List
Clamping Bar Assembly
Page 17
17
Parts Breakdown/List
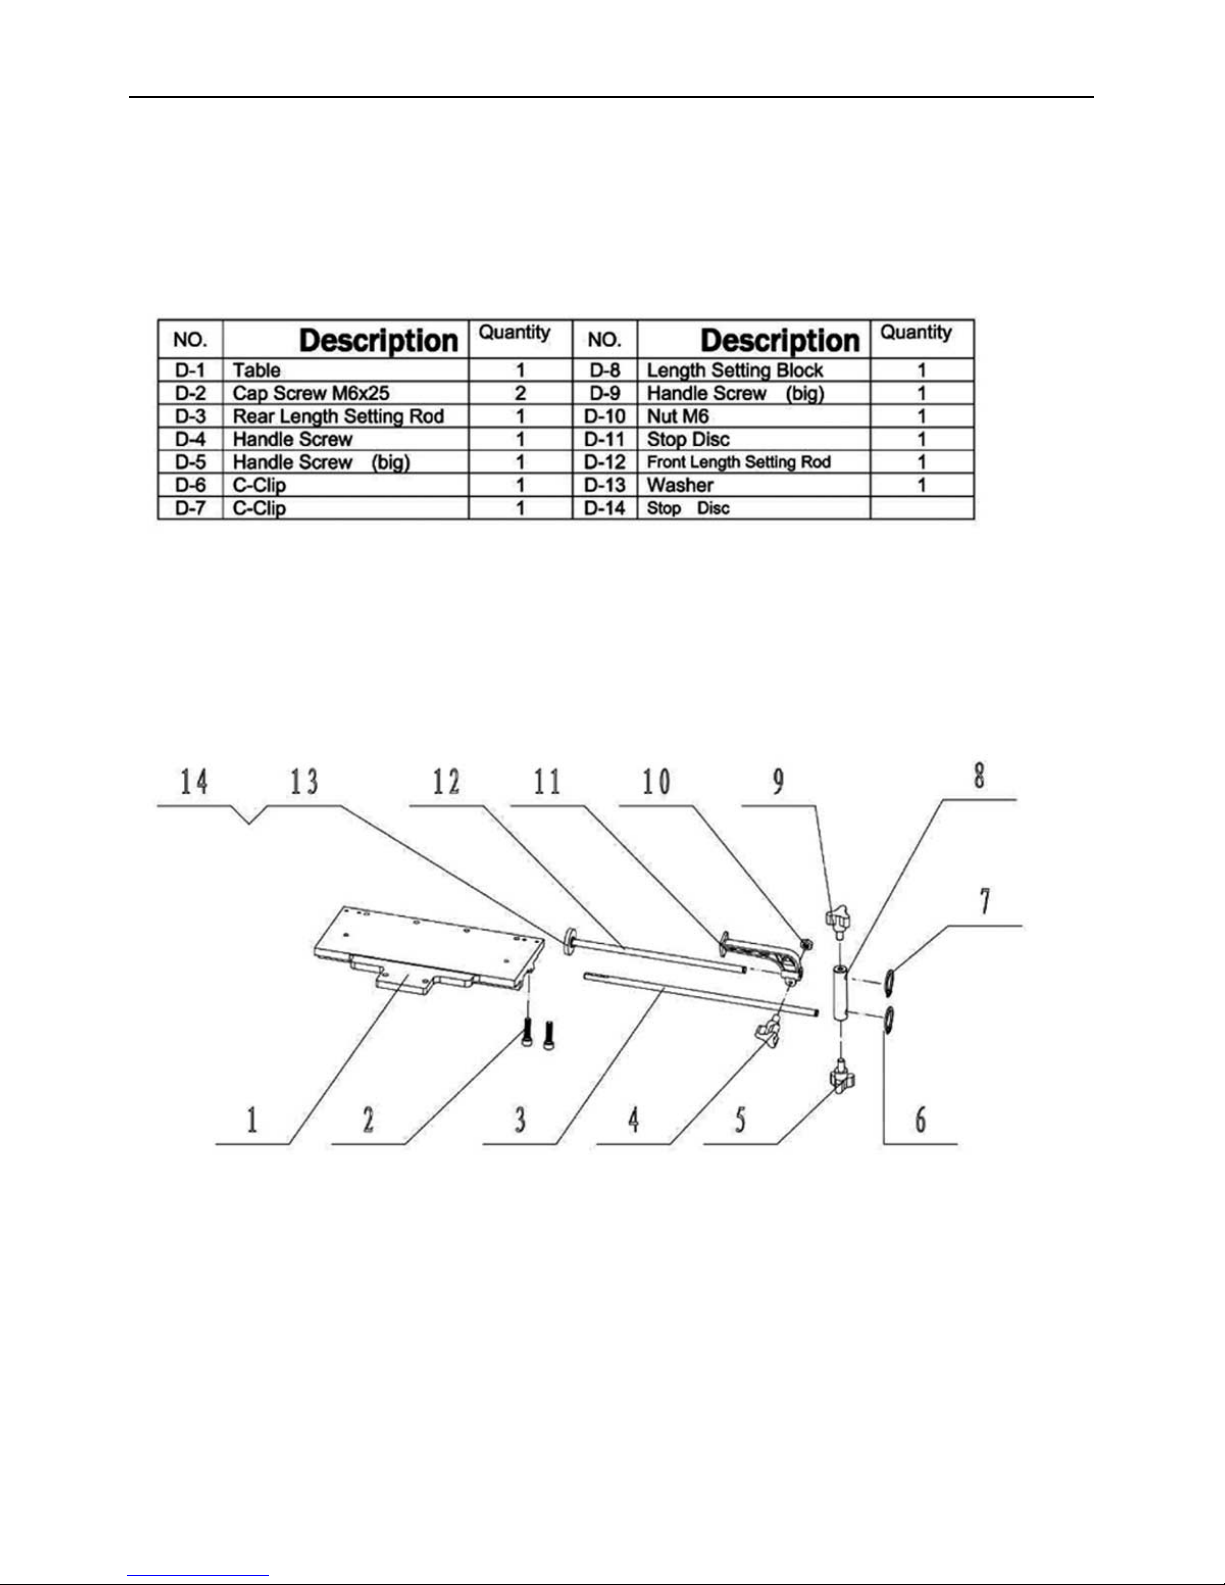
Work Stop Assembly
Page 18

18
Notes
Page 19

19
Notes
Page 20

Please dispose of packaging for the product in a responsible manner. It is suitable for recycling.
Help to protect the environment, take the packaging to the local recycling centre and place into
the appropriate recycling bin.
Do not dispose of electric tools together with household waste material. In observance of
European Directive 2002/96/EC on waste electrical and electronic equipment and its
implementation in accordance with national law, electric tools that have reached the end of
their life must be collected separately and returned to an environmentally compatible recycling
facility.
Only for EU countries
 Loading...