


0-13kg
3-9
EN
11-17
SE
19-25
CZ
27-33
PL
Axkid Babyx
ECE R44/04
Axkid AB, Odinslundsgatan 17, 412 66 Göteborg, Sweden ● www.axkid.com ● info@axkid.com ● +46 511 760 620
B
C
G
H
F
L
I
D
E
M
N
P
O
A
K
J
1
i
ii
2
3
4
1
2
4
3
5
M
5 6
8
10
L
F
7
K
9

11
13
12
14
15
H
16
19
18
1cm
17
1
N
i
N
20
i
P
J
21
P

3
EN
Read this instruction manual carefully before installing the Babyx child restraint. If in doubt, contact
your retailer who can demonstrate a correct installation. An incorrect installation could endanger
your child.
Do not use a child restraint in a seating position where an active airbag is tted. If you still wish to
install the Babyx in this location the airbag must be disconnected at an authorised service centre.
Some vehicles may be equipped with a switch which allows you to manually switch the airbag o. It
is important to always check if the vehicle’s indicator light shows that the airbag is turned o.
This product must only be used with a 3-point vehicle seat belt that has been approved to ECE R16
or equivalent. NEVER use a 2-point seat belt.
Should you have an accident, no matter how small, your child restraint should be replaced. It may
have damage that is undetectable and could seriously jeopardize your child’s safety. For this reason
Axkid do not recommend purchasing second hand child restraints.
Do not dismantle, modify or add to any part of the Babyx baby seat. Any alterations or
modications could endanger your child or a passenger and will invalidate the warranty.
Never leave your child unattended in the car.
Ensure the Babyx baby seat does not become trapped by any moveable seats or doors within the
vehicle.
Ensure that the Babyx baby seat is secured to a car seat at all times - even when not in use.
Ensure any luggage or loose objects are secured in your vehicle as they may cause injuries to
passengers in the event of a collision.
Read this instruction manual before installing the Babyx baby seat in your vehicle. For
more information and tting videos visit www.axkid.com.
Thank you for choosing an Axkid baby seat. Our team has over 30 years combined experience within child
safety, and we have done our utmost to make the Babyx baby seat as safe as possible. The Babyx baby
seat is approved according to ECE R44/04, the latest European standards for child safety. To maximise
your child’s safety it is important that you keep the following in mind;
Important Information
Babyx Baby Seat
Instruction Manual
Rear-facing 0-13 kg with vehicle seat belt
V3

4
Contents
The Babyx group 0+ car seat is suitable for use from birth up to 13kg and can be installed rearward
facing using the vehicle’s seat belt or using the optional Babyx ISOFIX base (sold separately).
Parts 5
Allowed and disallowed positioning of the child car seat 5
Adjusting the carry handle 6
Adjusting the harness height 6
Securing your child in the seat 7
Placing the seat in the vehicle 7-8
Care and maintenance 9
Warranty 9
Notices
1. The child car seat must only be used in vehicles which are tted with a three point seat belt system that has been
approved by regulation ECE-16 or similar.
2. A correct t is likely if the vehicle manufacturer has declared in the vehicle hand book that the vehicle is capable of
accepting a ‘Universal ’child restraint for this group.
3. The child car seat is a ‘Universal’ child restraint; it conforms to regulation ECE-R44/04 for general use in vehicles. It
will t most, but not all vehicle seats.
4. This child car seat has been declared ‘Universal’ under more stringent conditions than those applied to earlier
designs, which do not carry the ‘Universal’ mark.
5. Child car seats can mark vehicle seat upholstery. The manufacturer cannot be held responsible for damage or
marking to vehicle seats.
6. Never use a rearward facing child car seat on a passenger seat with a frontal airbag.
7. Always refer to your vehicle owner’s manual to check information on side air bags and infant restraint installation for
the rear of the car.
8. If in any doubt, contact the manufacturer/dealership for clarication.
Never install a child restraint in a passenger seat
where an active airbag is tted.

5
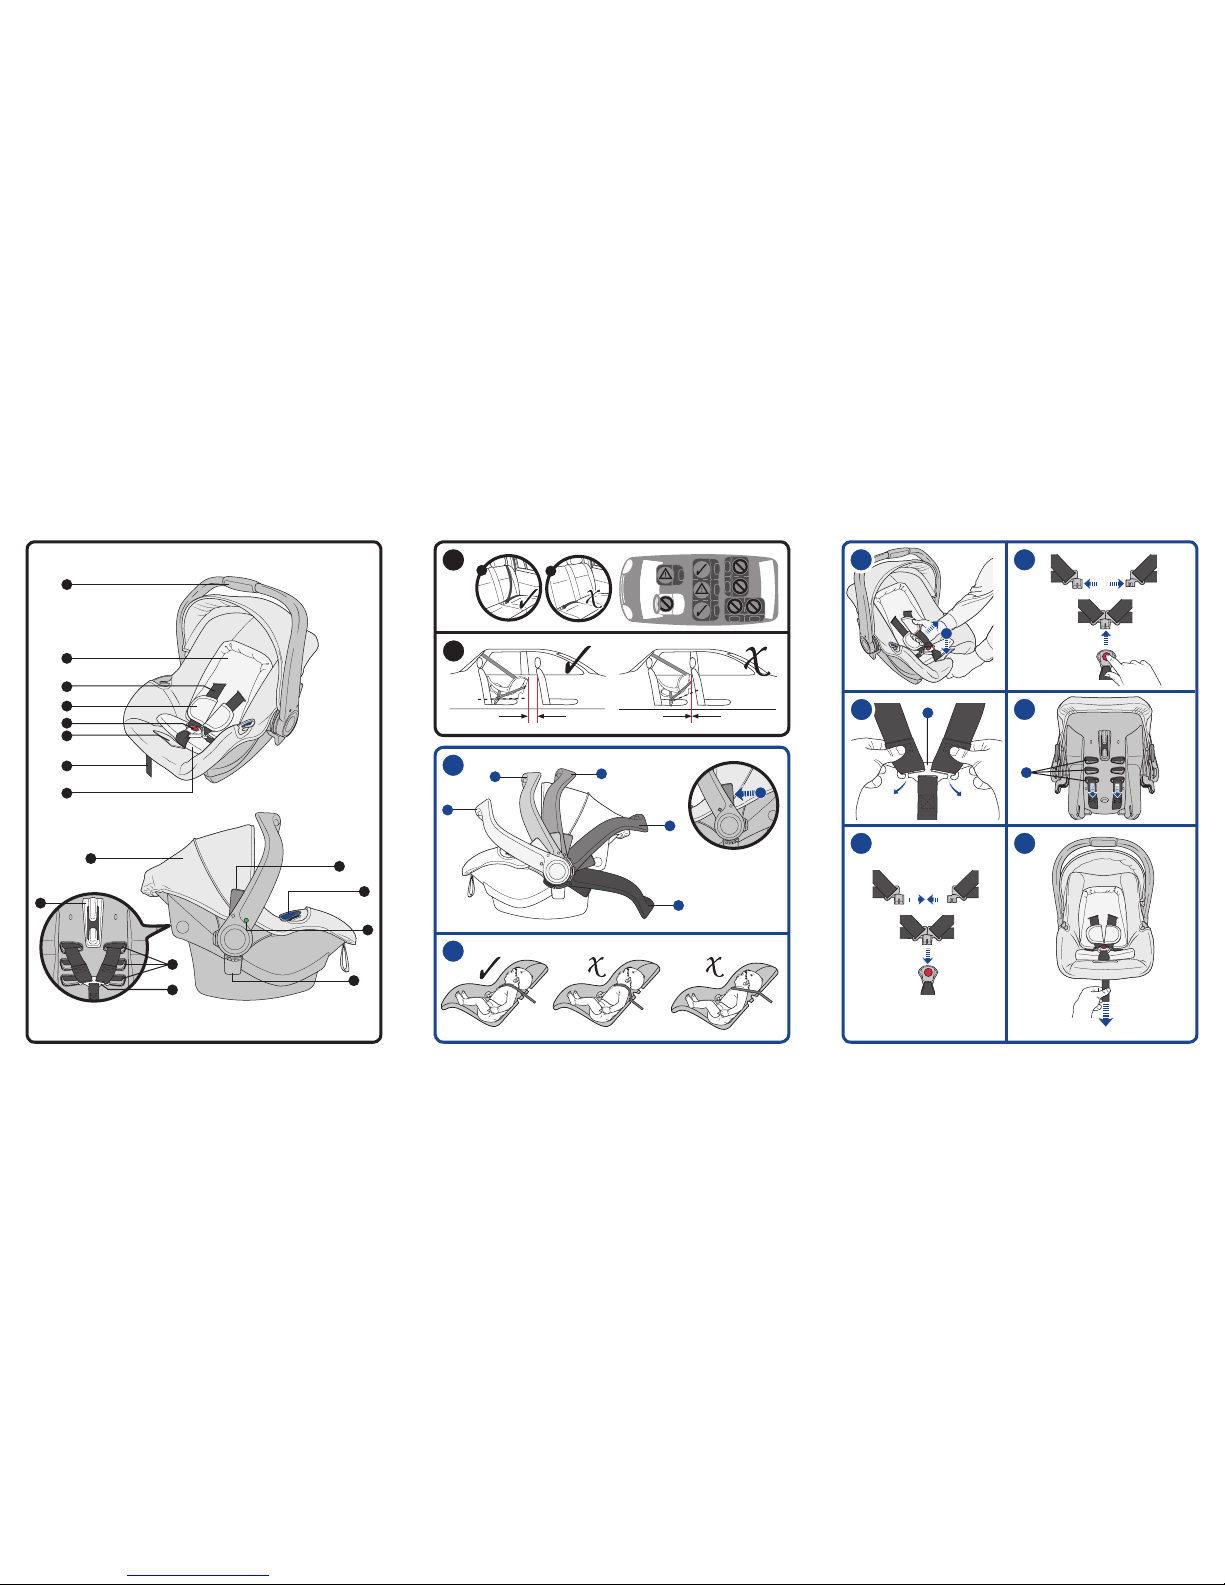
Parts
A Carry handle I Hood
B Head hugger cushion J Diagonal seat belt guide
C Harness K Harness height slots
D Shoulder pads L Harness connector
E Harness buckle M Carry handle adjuster button
F Harness adjuster button(under ap) N Lap belt guides
G Harness adjuster strap O Carry handle lock indicator
H Insert cushion P Stroller adaptors
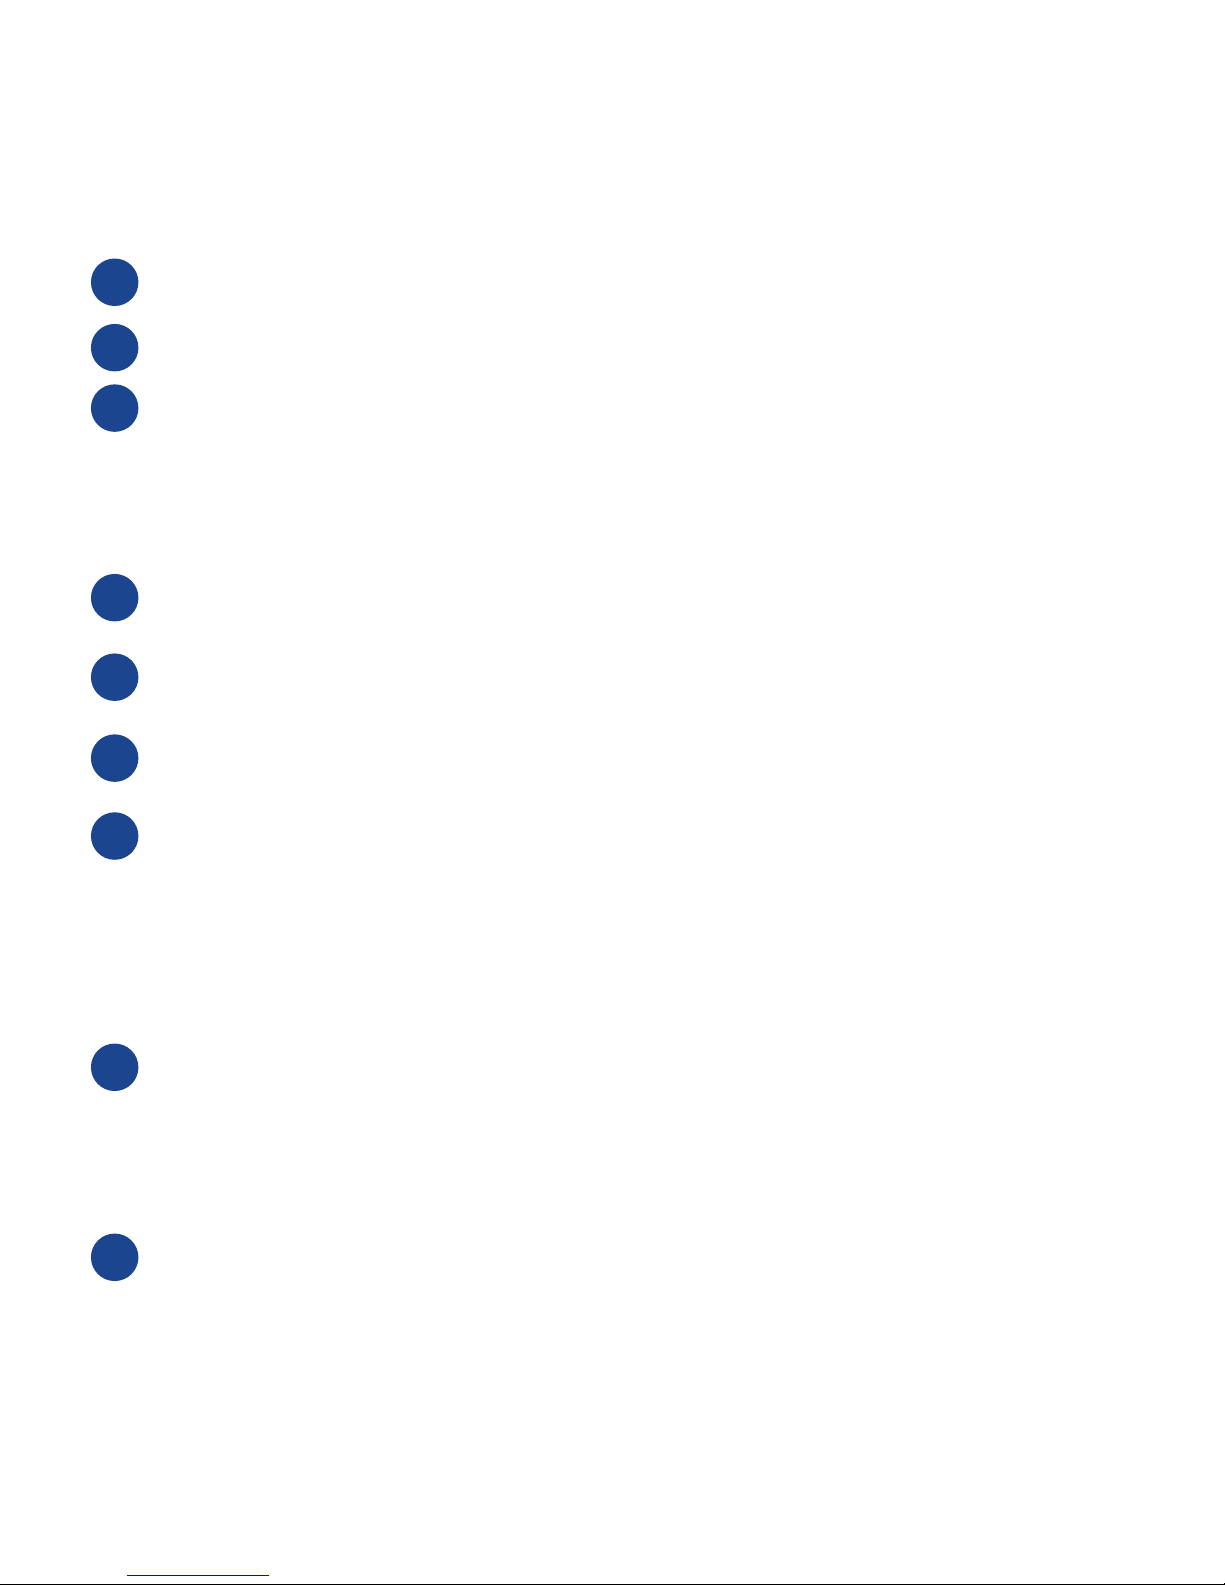
The Babyx baby seat can be used on any forward facing passenger seat which has a 3-point seat
belt (i), so long as there is no active airbag in place. The child restraint CANNOT be used with a 2-point
lap belt (ii).
IMPORTANT: If you wish to install your Babyx baby seat in a location where an airbag is tted, then the
airbag must be disconnected at an authorized service centre. Some vehicles may be equipped with a switch
which allows you to manually switch the airbag o. It is important to always check if the vehicle’s indicator light
shows that the airbag is turned o.
WARNING: Never use on a seat with an active airbag
WARNING: Never use on rearward or side facing vehicle seats
WARNING: Air bags are designed for adults and can seriously harm your child in a crash
Allowed and disallowed positioning of the Babyx baby seat.
The child car seat must not touch the front passenger seat.
1
2
Front passenger seat (no active airbag) Ye s
Front passenger seat (active airbag) NO
Forward facing seat with 3-point seat belt Ye s
Seat with 2-point seat belt NO
Side facing seats NO
Rear facing seats NO
Allowed And Disallowed Positioning Of The Child
Car Seat
Never use this baby seat in a car that is not equipped with an
ECE Reg 16 approved three-point belt.

6
To adjust the handle: Press both buttons (M) and rotate the handle to the desired position.
The carry handle has 5 positions.
1. Fitting position
2. Carrying position: Make sure handle is locked before lifting and child is harnessed in.
3. Carrying position: Make sure handle is locked before lifting and child is harnessed in.
4. Rocking position or mounted on a compatible stroller.
5. Feeding/non-rocking position.
Positions 2 and 3 can be used whilst tted in a vehicle if you need to gain better access to your child,
but always return the handle to position 1 as soon as possible.
Positions 4 and 5 should NEVER be used whilst tted in a vehicle
WARNING: ALWAYS ensure your child is harnessed in the baby seat before lifting it.
The harness should exit the child car seat at the same height as the child’s shoulder and should
not exit higher or lower than the child’s shoulder.
WARNING: You should not attempt to adjust the harness height with a child seated in the
child car seat.
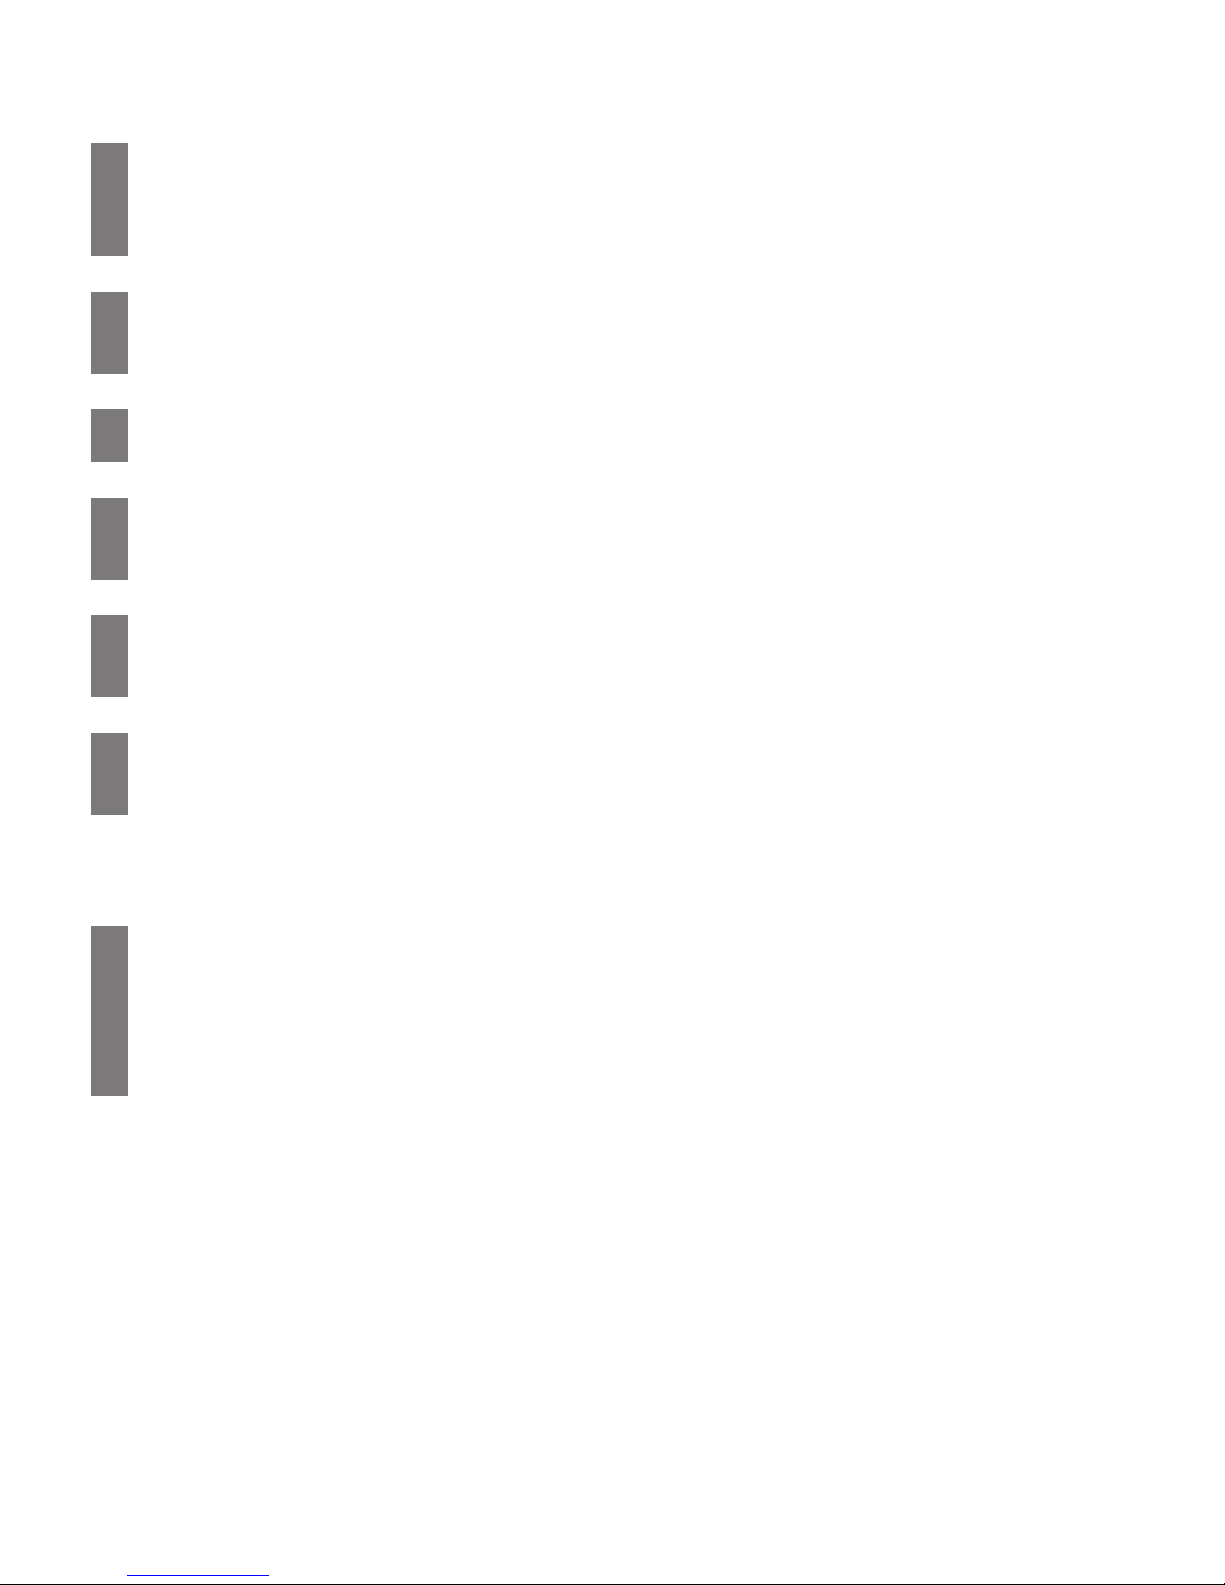
Press the belt adjuster button (F) and pull on the shoulder harness straps to create slack.
Press the red release button, unbuckle the harness, move the shoulder straps apart and
remove the shoulder pads.
Unhook the shoulder straps at the rear of the seat shell by sliding the straps through the slits in
the harness connector (L). Remove the straps, pulling them out from the front of the seat.
Pass the shoulder straps back through at one of the three desired heights (K) and reconnect
them to the harness connector.
Buckle up the harness. Connect the two shoulder strap connectors and insert into the buckle.
Ensure harness buckle is rmly clicked into place.
Pull the harness adjuster strap tight and check straps are not twisted.
Adjusting The Carry Handle
Adjusting The Harness Height
3
10
4
5
6
7
8
9
7
Choose a suitable seat for tting the child car seat to. See page ‘Positioning the child car seat’.
Place the child car seat rearward-facing on the vehicle seat.
IMPORTANT: Ensure the handle is in the FITTING position (1) as shown.
Place the vehicle lap belt across the child car seat and slide the lap belt into the slots (N) on
both sides of the child car seat.
Buckle up the vehicle seat belt (i).
Ensure you place the Babyx baby seat on a at, level and stable surface before securing your child in
the seat. Do not place your child in a sleeping bag, blanket or other bulky wrapping whilst in the child
car seat. The shoulder straps will not t snugly and the child will not be safe.
Press the belt adjuster button and pull on the shoulder harness straps to create slack.
Press the red release button, unbuckle the harness and move the shoulder straps apart.
Place the child in the child car seat and ensure there are no spaces under the child.
Note: a new born baby may need extra support around the head and body. Ensure you use the
supplied insert cushion (H) if you are going to use the seat for a newborn or small baby less than 2
months old (9kg or less). Also ensure that the shoulder harness is at the lowest height setting.
Place the shoulder harness over the shoulders.
Buckle up the harness. Connect the two shoulder strap connectors and insert into the buckle.
Ensure harness buckle is rmly clicked into place.
Pull the harness adjuster strap to secure the harness around the child.
The harness should allow 1 nger-width (1cm) of space at the top of the shoulders. This is the
ideal tightness.
Note: Check that the buckle is secured by tugging the shoulder and waist straps.
Securing Your Child In The Seat
Placing The Seat In The Vehicle
12
13
14
15
16
17
11
18
19

8
Take the diagonal belt around the back of the child car seat and slot it into the diagonal seat belt
guide (J). Ensure that the section of belt which runs from the seat buckle to the diagonal seat
belt guide (J) is threaded between the shell and the stroller adaptor (P).
Once the seat belts are in their correct mounting points make sure the seat belt buckle is secure and
there are no twists in the belt and that all slack is removed from the lap and diagonal sections.
Ensure the seat belt buckle is positioned low, away from the top edge of the baby seat and that
the diagonal section of the seat belt passes behind the stroller adaptor (P).
If the vehicle seat belt buckle is above the top edge of the baby seat then this car seat is not suitable
for the vehicle (this is called ‘buckle crunch’ and can cause the vehicle seat belt to come undone in an
accident).
20
21
Never install a child restraint in a passenger seat
where an active airbag is tted.
Never use this baby seat in a car that is not equipped with an
ECE Reg 16 approved three-point belt.
9
Care And Maintenance
The seat cover can be removed and washed in a washing machine at 30º C on the “Gentle
Cycle” programme. Do not put the cover in a dryer as this can damage the cover and the
padding may separate from the fabric.
Visit www.axkid.com to nd videos explaining how to remove and attach the cover.
Any plastic parts of the Babyx can be cleaned with mild detergent and water. Do not use
aggressive chemicals containing solvents etc, as this can cause damage to the plastic and
compromise the safety of the child restraint.
All materials used in the Babyx child restraint are recyclable and should be recycled as per
your local legislation. Ask your local recycling centre for advice when recycling this product.
Do not make any modications or alterations to the Babyx child restraint other than those
described in this instruction manual. Follow the instructions in this manual carefully. Any repairs
must be carried out by the manufacturer or agent.
If the seat cover needs replacing ensure only original products from Axon Kids are used. If
other products are used the Babyx safety system may be compromised and could lead to
severe injury or death in case of an accident.
All materials used have a very high UV-resistance rating. However, UV-light is very aggressive
and will ultimately lead to fading of the seat cover. This is not covered by our warranty as it is
considered normal wear and tear.
Warranty
The Babyx child restraint is covered by a 24 month warranty from date of purchase. Ensure
you save your receipt and bring it to your place of purchase should you have any warranty
issues. The warranty does not cover:
* Normal wear and tear
* Damage due to incorrect use, neglect or accident
* If repairs have been carried out by a third party

10
 Loading...