


PackshotCreator 3D
User guide
© 2011 PackshotCreator - Sysnext
All rights reserved.


Table of contents
Chapter 1 : Getting started
User interface
Animation creation interface
Options
Image management
Annotation tools
Calibrating the machine
Chapter 2 : Taking pictures
Chapter 3 : Creating 360° animations
Capturing 360° images
Annotating images
Editing images
Exporting images
Sending images
Generating Flash animations
Generating HTML5 + Javascript animations
Generating animated Gifs
Chapter 4 : Creating 3D animations
Capturing images
Generating Flash animations
Generating HTML5 + Javascript animations
Chapter 5 : Retouching images
Command bar
Editing features
Chapter 6 : Creating custom sequences
Chapter 7 : Continuous rotation
Chapter 8 : Image import
Chapter 9 : Authoring 360
Chapter 10 : Care and maintenance
Chapter 11 : Product registration and warranty
4
4
7
8
11
15
18
19
20
20
23
23
24
25
26
27
27
28
28
34
35
36
36
36
39
42
43
44
46
47

4
Chapter 1 : Getting started
The PackshotCreator solutions allow any collaborator in a company to create in-house professional, shadow-free
and color-accurate pictures and animations of their products. These pictures and animations can then be used for
all print and web supports.
Gives you the possibility to turn the lightbox and the digital camera on and off.
This feature allows you to preview each camera position by controlling the 90° camera shooting rail,
the camera tilt and the 360° turntable.
When the Preview button is pushed, the camera switches to Preview Mode and objects inside of the
lightbox appear in real-time in the Viewing Window of your screen.
The Preview mode enables you to move your product, zoom in / out, crop or rotate the picture to
meet your needs.
Note: Pressing the Preview button in Preview mode re-focuses the camera.
This feature allows you to control the camera’s optical zoom to zoom in or zoom out on items inside
the box.
Quick Zoom out/in allows you to go at the maximum or minimum zoom level.
This feature is used to remove unwanted portions of a picture, cut images to a desired size or to
enlarge a portion of the image.
To crop an image, press the Crop button and resize or move the cropping frame that appears in the
Preview Window. Cropping does not take effect until clicking Snap.
User interface
Shooting functionalities
ON/OFF button
3D animation
creation
Options
Thumbnail
window
Viewing
window
Image
editing tools
Program
link
Image
retouching
Save for web
3D positioning
Real-time preview
Zoom +/-
Image cropping
Capture
On/Off
Position
Preview
Camera settings
Zoom
Crop
5
Viewing window
Thumbnail window
Automatic and advanced modes
Saving Custom
Camera Settings
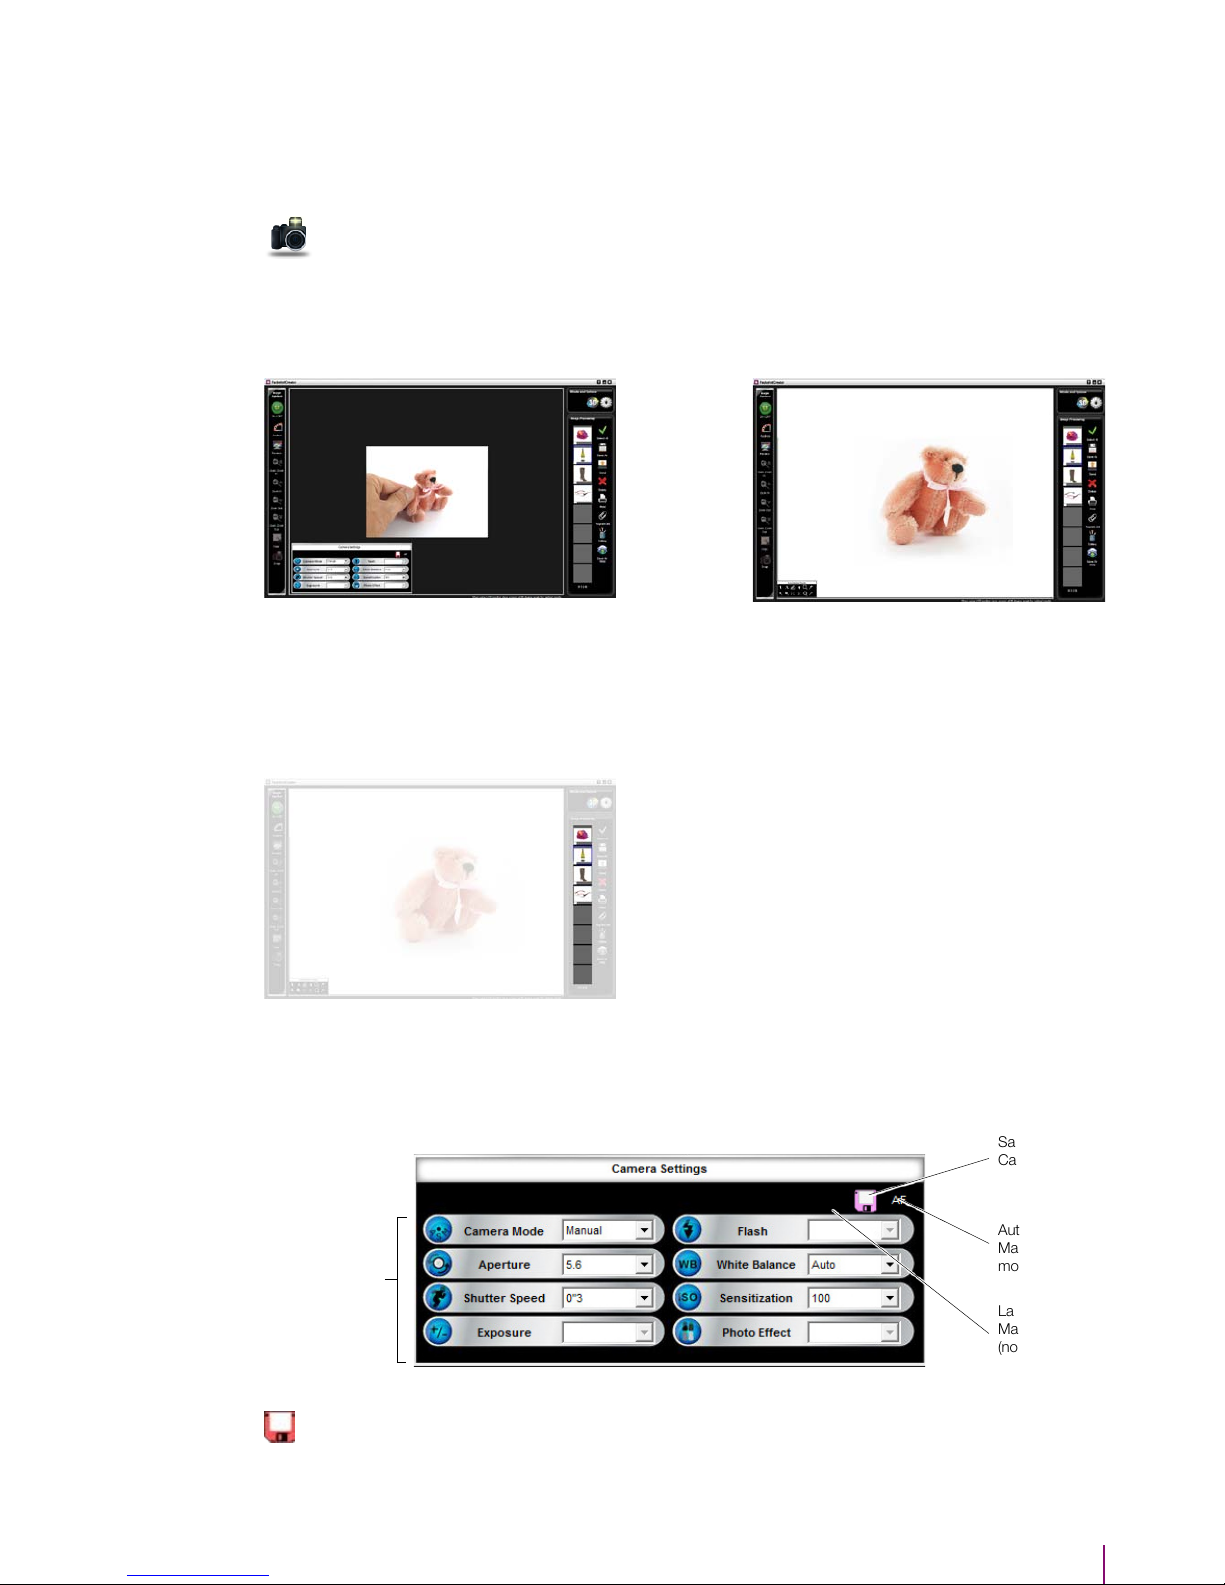
Camera settings
Automatic or
Manual Focus
mode
Landscape and
Macro mode
(not for SLR
option)
Pressing this button is the same as pressing the shutter button on your camera.
The picture will be taken and the original image will automatically be saved in the PackshotCreator
temp folder for viewing and processing.
When clicking on the Preview button,
the product in the lightbox will appear
in real-time in the software viewing
window.
The Thumbnail Window displays thumbnails of all the original
pictures previously taken with the PackshotCreator.
To view an image, simply click on the thumbnail you want.
Note: A maximum of 100 images can be stored in the Thumbnail
Window. If the image number exceeds 100, a warning message
will appear and you will have to save/delete an image before a
new picture can be created.
When the user clicks on the Preview button in Advanced Mode, the Camera Settings window will
appear:
After clicking on Snap, the product
picture will appear on the screen.
Photo
Chapter 1 : Getting started
Manual camera settings can be saved and imported for re-use.
To import or save a set of camera settings, click on the Save Tools icon on the Camera Settings
interface. The following screen will appear:
Saving Custom
Camera
Settings

6
Pressing Save allows you to name and save the settings in a file.
Once saved, the filename will appear in the pull down menu.
To load previously saved camera settings
Simply select them from the pull down menu.
To export saved camera settings
Click the Export button and select the settings you wish to export.
Exported camera setting files can be saved anywhere on your computer and will have a .csi file
extension – ‘csi’ stands for ‘Camera Settings Information’.
To import saved camera settings
Importing previously exported camera settings is simple. Click the Import button and select the
camera setting file you wish to import.
The following window will appear:
You can chose either the Automatic Focus mode (AF) or Manual Focus mode (MF).
On Manual Focus, the software will ask you to determine the main focus spot on the image. It can
be determined for the whole serie of pictures or picture by picture.
Focus
AF
Chapter 1 : Getting started

7
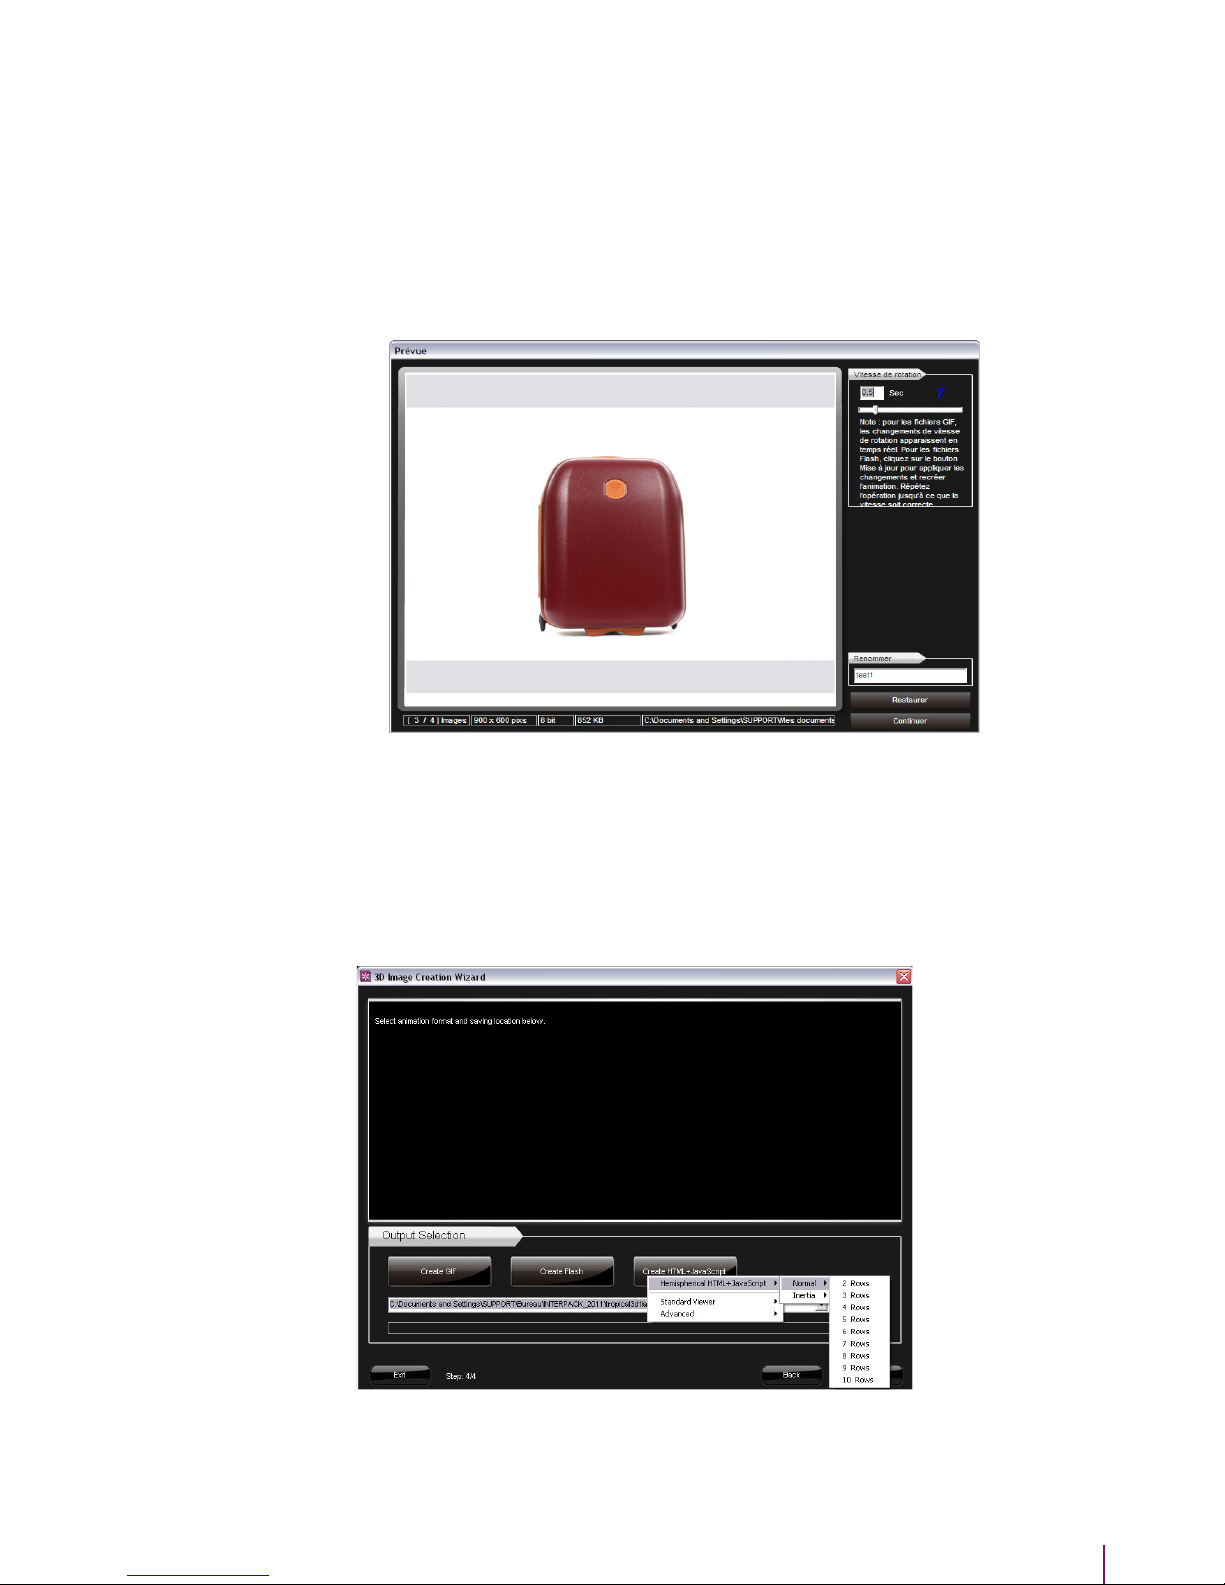
The 3D function allows the user to create interactive 360° or 3D Flash, HTML5 and Gif animations.
The software guides the user to establish the image capture settings (file size, resolution, speed and
rotation direction) and to automatically take a specific number of images as an object rotates.
To get started, click on the 3D button. The 3D Creator screen will appear:
3D
Animation creation interface
Image
capture
commands
The image viewing window
The
thumbnail
and image
management area
Image capture commands:
The user chooses whether to start creating an animation, start creating a custom sequence animation, have the
turntable rotate, import images from their computer to create animations or prepare images for the PackshotViewer
software (contact us for more information).
The image viewing window:
Created animations are displayed in this window.
Viewing functions include: stop, play, zoom, fit to screen or actual size display as well as controlling the speed at
which the animation swaps frames.
For Flash and HTML5 files, depending on how the animation was created, the user can control the animation with his
mouse or with the standard file player buttons.
The thumbnail and image management area:
Area where animation files created with the software are temporarily stored. They can be selected for viewing, sent to
others via email, deleted, saved and copied to other locations on the computer or network.
Chapter 1 : Getting started

8
This function allows the user to define the settings for several software features.
Options
Light info
The light information feature keeps track of how long
the light bulbs in the lightbox have been on. When you
switch bulbs you can reset the counter to zero.
Image quality option
The Image Quality window allows you to generate Jpg
or Raw files.
You can also chose the level of compression of the jpg
file and its resolution (Large, Medium, Small).
Creating a watermark
A watermark protects your images from being copied
or stolen. This feature digitally superimposes your logo
or another image over the main object in the picture.
All watermarks are images.
To create a watermark:
Select Create Watermark in the Options menu.
Press the Load Image button to the load the image
you want to use as the watermark.
Note: the image you intend to use as a watermark
must be a 24-bit bitmap (.bmp) file and at least 700
pixels wide or tall.
Determine the transparency of the overall watermark
image. A higher degree of transparency means the
watermark will be less obvious.
Note : your watermark must be on a white
background.
1
2
3
4
5
6
Select the watermark location.
Click Preview to see what the watermark will look like on a real image.
Save the watermark and give it a file name.
To apply a watermark on an image:
Apply your selected watermark by checking the Apply Watermark box when saving your file, sending, or direct
image exporting.
Chapter 1 : Getting started

9
Auto power off
The Auto Power Off dialog allows you to control the
PackshotCreator automatic power off function.
This function is enabled by default and will shut the
system down after 10 minutes of non-use. I
Send option
This feature is used to choose the file format in which
images will be sent from the PackshotCreator software
through the Send button.
Two sending options exist: EBX image files or JPG
image files.
The EBX format is PackshotCreator’s proprietary
format and can be opened only with a PackshotCreator
compatible system. We recommend you use the JPG
format only.
Program link
The PackshotCreator software integrates image editing tools. However, if you want to use advanced tools for image
editing or if you are used to working with a specific software, the program link function allows the user to link the
PackshotCreator software with another application.
Select the image from the image bank and click on the Program Link button.
To set the application to be linked to the PackshotCreator software, click on the Information button and select
Program Link.
The following screen will appear.
Direct image export
The Direct Image Export feature allows users to quickly take pictures and have them automatically saved to a specific
folder.
When Direct Image Export is turned on, all pictures taken with the PackshotCreator software will be automatically
saved according to the settings specified in the Direct Image Export option.
Chapter 1 : Getting started

10
This feature allows the user to select
how he views and crops items in
Preview Mode.
Two types of grids are available:
• The crosshair grid points the center
of the viewing area.
• The hatch grid can assist users to
create images that are exactly the same
size.
Two crop shapes are available:
• The rectangle is the default shape
and allows you to create any shape
you like by dragging the crop markers.
Grabbing the corners allows you to
adjust the crop markers faster.
• The Square crop option allows you
to always crop/take pictures that are
perfect squares.
• Custom ratio allows you to define a
fixed width and height for all your image
croppings.
The rotation angle when you preview
the rotation can also be determined.
Preview options
Note: the images will only briefly show on your monitor screen and will
not be stored in the thumbnail tray of the PackshotCreator software. You
will need to view the images through a different image viewing software
program.
To setup the direct image export feature:
Click on Direct Image Export.
To determine the size of the image to be saved:
Select Resize or click on the Resize button. You will enter either the desired
width or height of the image(s) to be saved. You can resize images by either
Pixels or Document size (in points, inches or centimeters).
To chose a name for a serie of pictures:
Simply click on the Rename button and type an image name and a naming
index (number extension) that will be used when batch saving.
To set the image resolution:
Click on the Resolution button and select either: 72dpi (typically used for
web), 150dpi or 300dpi (ideal for printing high-quality images).
You can also chose the destinatino folder. Click on Browse and select the
file where you want your pictures to be saved.
Chapter 1 : Getting started

11
Setting the integrated FTP client allows
the user to directly transfer pictures to a
network location.
Once set, you will have to check the
Transfer to FTP checkbox when you
save pictures or animations.
FTP settings
This section of the user interface is used for file management and it contains the following functions:
Image management
Allows user to quickly select or deselect all images in the Thumbnail Window by placing a check
mark in the thumbnail checkbox.
Images must be selected before they can be printed, sent, saved, deleted or sent to the Save for
web area.
The Save As feature can be used to save one
or several images at the same time.
To save images to the hard drive, select them
in the Thumbnail Window and press Save
As.
Images can be saved in EBX, JPG or Tiff.
When saving images in the JPG file format,
you can choose the quality of the picture
and either you want to apply a watermark or
transfer the file to a FTP server.
Renaming: To save multiple JPG images,
PackshotCreator will automatically assign a
number for the image. The number index will
start from 1 if no other number is defined.
Users can change the file name and number
by clicking Rename. The following window
will appear:
Select all/
Deselect all
Save as
Chapter 1 : Getting started

12
Resizing: You can also save one or several JPG images at a specific
size by assigning a width or height. To do so, click on Resize.
PackshotCreator will automatically resize the JPG files by scale.
Image quality options : the user can select a low, medium or high
image quality for his JPG files.
Apply watermark: by selecting Apply watermark, if there is an active
watermark in the Options/Create Watermark area, a watermark will be
added to the image or images being saved.
Chapter 1 : Getting started

13
To delete an image from in the Thumbnail Window, select it and press Delete.
To delete all of the images in the Thumbnail Window, press Select All then Delete.
After pressing Delete, a confirmation window will appear.
To print an image you have captured, select the image(s) in the Thumbnail Window and press Print.
Pressing Print brings out the Print Dialog Window where you can select different printing settings.
The Program Link function allows you to automatically send images taken with the PackshotCreator
to your favorite image editing application.
Select an image(s) from the Thumbnail View then click the Program Link icon. PackshotCreator
software automatically sends and opens the selected images inside the application associated with
the button.
You can choose the the application to be linked in the Option setting section.
This feature offers you the ability to perform editing tasks on the pictures you take. Select the
picture(s) and click on the Editing button to display the Editing interface screen.
The following screen will appear:
For more information about the editing features of the software, please see p. 28.
Delete
Print
Program Link
Editing
Command bar Viewing window
Editing toolsThumbnails
Chapter 1 : Getting started

14
The Save for web function enables users to easily edit and save images for web use.
To optimize the pictures for web, choose the image(s) in the Thumbnail Window then press the Save
for web button.
The folllowing window will appear:
Save for web
Brightness and contrast
This function allows you to adjust image brightness and contrast.
Use the Brightness and Contrast sliders to increase or decrease image values.
Crop
This function allows you to cut certain elements out of an image. When you click the Crop button, a frame will appear
within the image.
Simply click and drag the frame to the size you require then click Apply to confirm. To crop a perfect square, hold
the SHIFT key down and drag the crop markers.
Color Saturation
This function allows you to adjust color saturation. Use the slider to increase or decrease image color saturation.
Image Size
This function allows you to adjust the dimensions of an image in pixels or inches. You can change the size of an image
using pixels, inches or percentages.
Simply enter a value for height and/or width. The image will be automatically rescaled.
Rename
This function allows you to rename one or more images.
Chapter 1 : Getting started

15
Save
Clicking the Save button calls the JPG option window to the screen. Saving files in the Save for web section
automatically set JPG images at 72dpi. You can also adjust the image quality as well as resize and rename the
images currently being saved.
Check the Radio buttons to determine JPG image quality.
Checking Apply Watermark will add the watermark
currently active in the Options or will Create Watermark
area of the program to the image or images being saved.
Checking Also Transfer to FTP allows you to transfer the
file directly through the integrated FTP client.
Click Resize All, to save multiple JPG images at a specific
size.
Click Rename All to rename all of the images currently
being saved.
Browse
Use the Browse button to save the file in at specific folder.
When more than one image has been selected, the PackshotCreator software will automatically put a number behind
the name.
Note: Images saved using Save As and Save for web will differ. The Save for web feature can be used only to save
JPG images at 72dpi. Save As gives the full range of saving options and features.
Annotation tools allow you to add texts and forms directly on your image.
Annotation tools
Once an annotation has been made with the
Pen or Text function, the pointer is used to
select, move or delete the annotations.
To select an object, click on it with your
mouse.
When an object is selected, it will be
highlighted as shown below. To move a
selected object, simply click and drag.
To delete an object, select it then press the
Delete key on your keyboard.
Pointer
Chapter 1 : Getting started

16
Pressing Draw gives you the ability to make lines, boxes, circles, etc., on the image displayed in the
Viewing Window.
Users can select desired pen sizes and colors by right clicking on the Draw icon and selecting
Properties.
Pressing the Text button allows you to write on or annotate the image in the Viewing window.
To select font type or text size, right click on the Text button and select Properties. This will call the
Windows font selection window to the screen.
If you zoom in on an image and only a portion of the image is shown in the viewing area, you can use
the Hand tool to drag the image and view other areas that are not currently visible.
Allows you to magnify or reduce the image view shown on your screen.
Clicking the 1:1 button allows you to view the image at actual size.
Draw
Text
Hand
Zoom in/out
1:1
Chapter 1 : Getting started

17
Clicking Fit to Screen button scales the image in the PackshotCreator Viewer to fit the window size.
Rectangle:
Clicking the Rectangle tool allows you to draw formal rectangles on the image. Please note that if
you hold down the Shift key while the rectangle tool is selected, you can draw a perfect square.
Circle:
Clicking the Circle tool allows you to draw circles and ovals on the image. Please note that if you hold
down the Shift key while the circle tool is selected, you can draw perfect circles.
Arrow:
Clicking the Arrow tool allows you to draw straight arrows with the desired color and thickness on
the image in the viewing window.
Line:
Clicking the Line tool allows you to draw straight lines with the desired color and thickness on the
image in the viewing window.
Fit on the
screen
Forms
Chapter 1 : Getting started

18
When you first use the PackshotCreator 3D, you have to set the camera lens so that it always point to the center of
the 360° turntable.
Such operation is quite simple but should be made with care. You can of course redo this operation later if needed.
On the preview screen, make sure the camera point at the center of the turntable, whatever its position on the
shooting rail is. If necessary, adjust the camera angle through the software.
Chapter 1 : Getting started
Calibrating the machine

19
Chapter 2 : Taking pictures
Place the object to be shot inside the lightbox.
Use the PackshotCreator software interface to Preview, Zoom In/Out, Crop or
Rotate the image.
Click on Position to select the angle of shooting. You can control the turntable
position, the row position and the camera tilt. Click on the circle to select the
position or use the arrows to adjust the position.
The camera will automatically go to the select position and will allow you to preview
the image.
Re-click on Position to close the small Position window.
You can manually control the camera’s shutter speed, aperture and flash.
1
2
3
5
4
Press Snap to take the picture.
The image will automatically be sent to the PC and appear in the Image Viewing window where it can be annotated
and processed .
When previewing and capturing pictures in Manual Mode
(MF), the software will ask you to define the focus spot
on your picture.
You can also control the camera’s optical zoom manually.
Determine the focus spot using the arrows then click on
Preview/Photo.
You can apply these parameters to one single shot or to
the whole serie of images.

20
Chapter 3 : Creating 360° animations
Click on the 3D button. The 3D Creator screen will appear.
Click on the Create 3D Animations.
Capturing 360° animations
Press the Rotate 360 button and watch the item spin 360° to confirm that it does not wobble around its center nor
goes over the cropping. If it does, change its position and press Rotate 360 again to confirm.
1
2
3
Click on Advanced to check the preview of each rotation
angle.
You can also define the sense of rotation, the number of
frames composing the animation and the angle of preview.
Click on OK to confirm.
Then click on Next.

21
You can then define the animation name and
dimensions.
Note: in order to create an animation with a
magnifier, you must create a HD animation with
a minimum dimension of 900 pixels.
Choose the resolution (in dpi) of your animation.
Note: animation files can quickly get huge.
Unless you have a specific purpose for highresolution images, we advise you to keep the
resolution and size as small as possible to avoid
slowing down the loading of your webpage.
Click on Next.
Determine the number of pictures to take for
one animation (from 4 to 200 images) and the
rotation speed.
You can also create a 90°, 120°, 180° or 360°
animation according to your needs.
Note: The more pictures you take during one
rotation, the smoother the animation will appear,
but the size of the resulting file will also be larger.
Click on Next.
4
5
Chapter 3 : Creating 360° animations
In the next step, select whether you want the
program to take Continuous Shots or to Time
Lapse.
In Time Lapse mode, the rotation will stop after
each shot and you will be able to manipulate the
item during each pause. For instance, this mode
is very useful for animating a flip phone where
you can see the clamshell opening and closing
while rotating.
Choose the sense of rotation of the turntable
and the rotation speed on the final animation (if
you opt for a continuous rotation).
The less time you set, the quicker the animation
will rotate; the more time you set, the slower the
animation will rotate.
6

22
7
Once the pictures have been captured, the following screen will appear. Check the quality of each frame.
If a photo needs to be retaken, select that frame and click on Re-take: the software will automatically reposition the
turntable on the right position and replace the picture in the photo serie.
Click on 1:1 to view the image in real size.
Click on Next to generate the final animation.
Chapter 3 : Creating 360° animations
After capturing the serie of pictures, you can also edit the pictures through the following features.
Rotation speed determines the time during which each picture will appear. For instance, if you take 40 pictures with
a rotation speed of 0.1 per second, you will generate an animation that shows one loop in 4 seconds.
Click on the Play button to start shooting.

23
Each captured image taken can be annotated with text or drawings. The images are listed as thumbnails on the right
hand side of the screen.
Select the image you wish to annotate then use the Annotation Tools at the bottom left corner to draw or write on
the image.
Once the annotations are completed, click on Exit to go to the previous screen.
Annotating pictures
Chapter 3 : Creating 360° animations
To edit the images, click on the Edit button. You will be redirected to the Image editing interface where you can adjust
brightness, contrast, saturation and to mask the images.
Please refer to Retouching pictures section, p.36 of this document.
Note: after changing Brightness, Contrast or Saturation, the images can be adjusted one by one or in a batch
process. Press Apply and choose between batch processing (Apply to all) and single image processing (Apply).
Save the retouched pictures before going to the previous screen or else all retouches will be lost.
Click on Save to continue.
Editing pictures

24
Pressing Export Images (JPG) allows you to save the original, processed, annotated or edited images to your hard
drive or the network. Simply select how you want to export the images and complete the saving process.
Exporting images
Chapter 3 : Creating 360° animations
Click on Export and choose the export option.
The software will ask you to rename the serie of pictures to be exported like this: file01, file02, etc.
To export the files through FTP, choose this option and follow the instructions.

25
Click on Send images (Jpg) to send original, retouched or annotated images.
You can also send your emails by email or print them through this interface. The software will automatically detect
your default printer and email application if one is installed.
Select the images to be sent by checking the thumbnail box and then click on Send or Print.
Sending pictures
Chapter 3 : Creating 360° animations
Output formats
• Gif animation (.gif)
• Flash animation (.swf)
• HTML5 + Javascript animation
Now that you have edited your pictures, you can generate the animation. Several output formats are available:

26
For Flash animations, several styles are available:
• Animation with a player (4 types available)
Style 1 Style 2
Style 4Style 3
Generating Flash animations
Chapter 3 : Creating 360° animations
• Animation with a magnifyer (if the dimension on the animation
is of minimum 900 pixels)
• Animation with a inertia rotation effect, for more realism
• Standard interactive animation

27
HTML5 + Javascript animations allow you to display your
animations on all mobile devices (smartphones and touch
tablets).
Options for the player style and the rotation style are the same
as for Flash animations.
Click on Create HTML + Javascript, then select the animation
properties.
Click on Continue to generate the animation file or on Restore
to set the parameters to default settings.
For each of these animation types, you can choose between:
• Automatic rotation
• Spin once
• Static animation
Click on Create an animation, then enter the desired animation parameters (name and speed of the animation)
Click on Continue to generate the animation file or on Restore to set the parameters to default settings.
Generating HTML5 + Javascript animations
1
2
1
2
Chapter 3 : Creating 360° animations
Click on Create Gif animation to generate a Gif file. You can then rename the file and define its rotation speed.
Click on Continue to generate the animation file or on Restore to set the parameters to default settings.
Generating animated Gifs

28
Chapter 4 : Creating 3D hemispherical animations
Click on the 3D button. The 3D Creator screen will appear.
Click on the Create hemispherical animation.
Capturing 3D animations
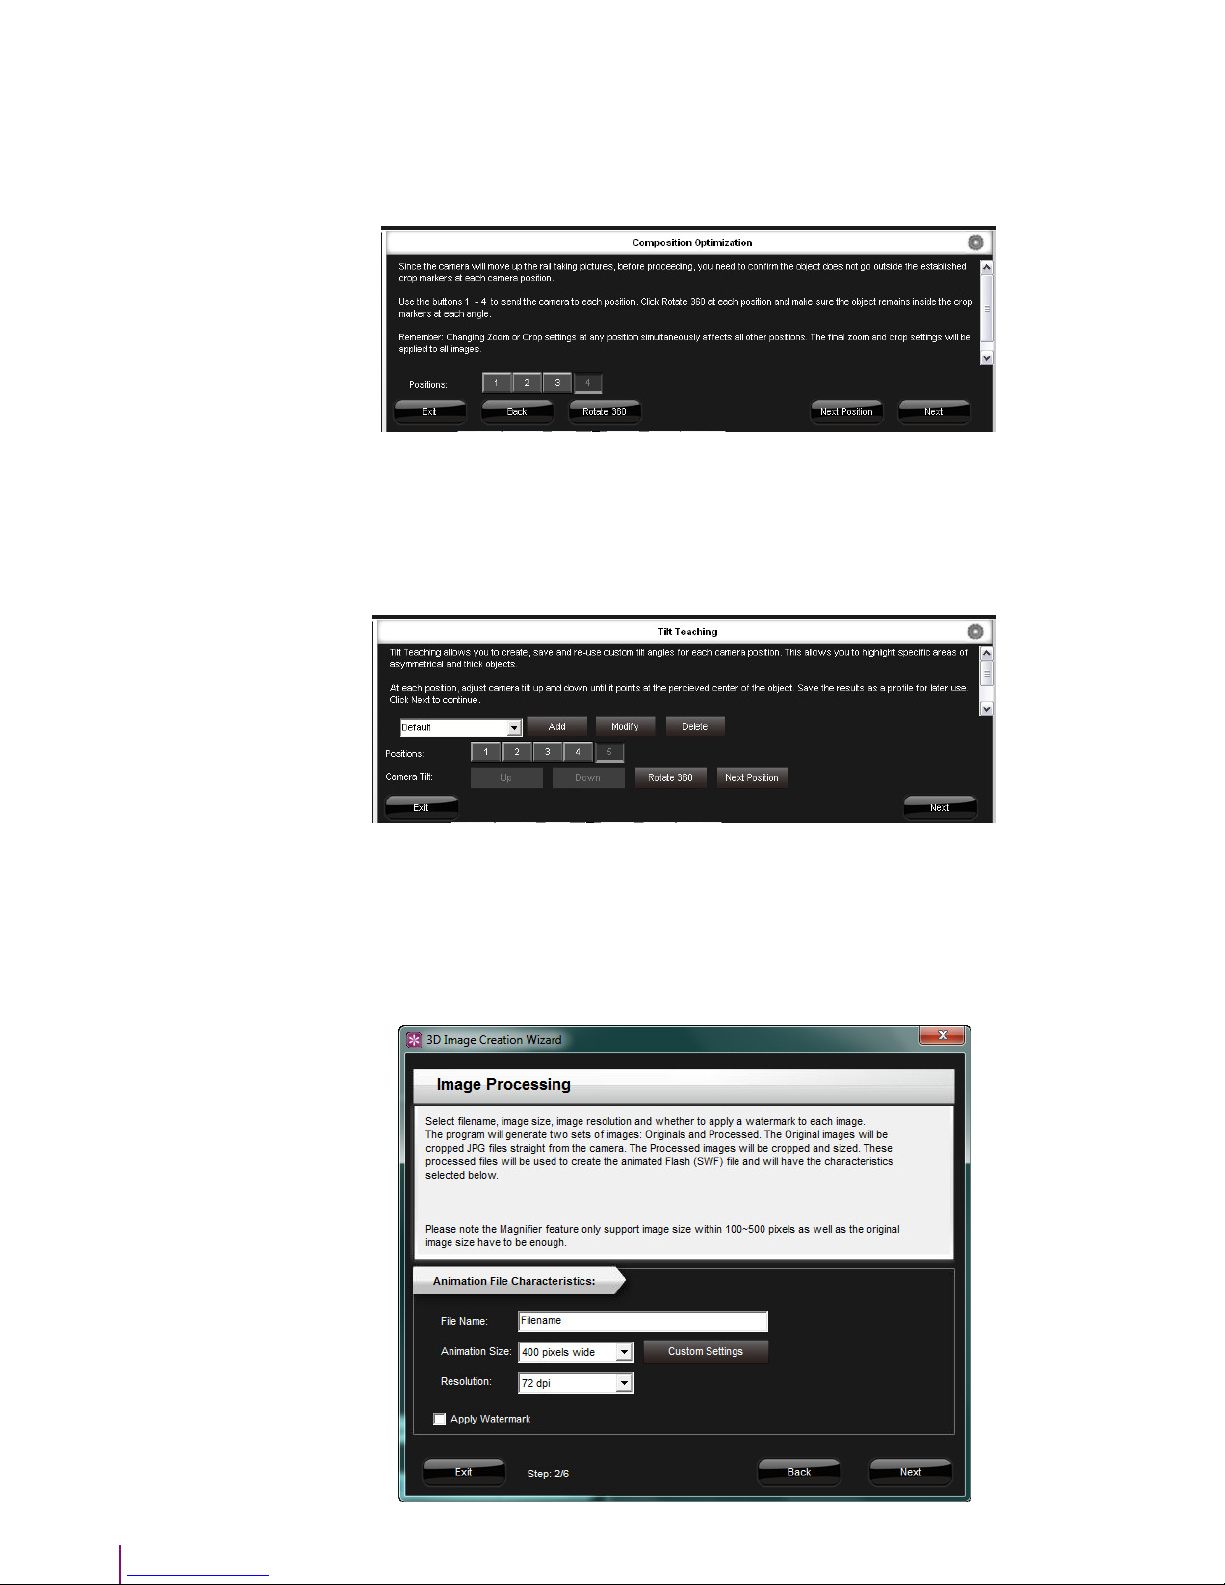
Press the Rotate 360 button and watch the item spin to confirm that it does not wobble around its center nor goes
over the cropping. If it does, change its position and press Rotate 360 again to confirm. Then click on Next.
A new windows will appear, asking you to determine the number of vertical row and the type of animation you want
(360, hemispherical or spherical). You can take between 1 to 5 rows. Click OK when you are done.
1
2
3
3

29
Chapter 4 : Creating 3D hemispherical animations
In order to create a realistic 3D animation of your item, you have to take into account the product’s height and form.
In all cases, make sure the camera lens is pointing at the center of the item.
You can choose between 3 types of settings to select the appropriate camera inclination, depending on your product’s
height and shape.
Quick tilt adjustment:
Ideal for higher and thin objects (a bottle, for example). With this mode, you only have to enter the item’s height (in cm
or inches) and the software will automatically tilt the camera so that it points halfway-up the product.
4
No tilt adjustment:
Ideal for items less than 5 cm high. If you choose this mode, the camera lens will automatically point at the default
center point defined when you first calibrated the machine. If you have decided to make the camera point to the
center of the 360° turntable, then this point will be the center point of your 3D animation.
On the next screen, click Rotate 360. The camera will go to the top row; check the position of the product in the
animation. Click on Side view to check the product position at the lowest row.
Click on Next when you are done.
On the next screen, click Rotate 360. The camera will go to the top row; check the position of the product in the
animation. Click on Side view to check the product position at the lowest row.
Click on Next when you are done.
30
Chapter 4 : Creating 3D hemispherical animations
Tilt teaching:
Ideal for high, asymmetrical objects. With this mode, you will have to set the camera tilt for every camera angle. This
method takes a bit more time than other ones but enables the user to adjust precisely the camera tilting.
Click on each position and set the camera tilt by clicking on Up and Down.
Click on Rotate 360 to check that the focus is still the same while the product is rotating.
Click on Next.
Here you will be able to view each camera position to check the product position.
Click on Next.
To create a good animation while keeping the file size low, you have to set 2 parameters: the number of frames
composing the animation and the animation size. The PackshotCreator 3D software will allow you to freely control
these parameters.
5

31
Chapter 4 : Creating 3D hemispherical animations
Once you have made applied those settings, click on Next to begin the shooting process.
If the camera does not focus properly, the software will ask you to control the image sharpness and apply this setting
to all the other pictures.

32
Chapter 4 : Creating 3D hemispherical animations
7
Once the pictures have been captured, the following screen will appear. Check the quality of each frame.
If a photo needs to be retaken, select that frame and click on Re-take: the software will automatically reposition the
turntable on the right position and replace the picture in the photo serie.
Here you can determine the number of shots composing the animation on the following step. A hemispherical
animation is made of 5 different 360° animations compiled together.
Each 360° animation is made of 4 to 20 images.
Hemispherical animations can thus be made of 20 to 100 pictures.
The more pictures you have, the more fluid the animation will be, but the heavier the file will be.
You can set the animation size by adjusting its height and width (in pixels). The height will automatically be adjusted
to the width chosen. You can also define the animation name and image resolution. You can also apply a customized
watermark on your animations.
Click on Next.
6

33
Click on 1:1 to view the image in real size.
Click on Next to generate the final animation.
After capturing the serie of pictures, you can also edit the pictures through the following features.
Chapter 4 : Creating 3D hemispherical animations
8
For all details about the annotation, editing, exporting, sending features, please refer to p.23 to p.25.
Output formats
• Flash animation (.swf)
• HTML5 + Javascript animation
Several output formats are available for 3D animations:

34
Chapter 4 : Creating 3D hemispherical animations
For Flash animations, several styles are available:
• Animation with a player (4 types available)
Style 1 Style 2
Style 4Style 3
• Animation with a inertia rotation effect, for more realism
• Standard interactive animation
Generating Flash animations
35
Chapter 4 : Creating 3D hemispherical animations
HTML5 + Javascript animations allow you to display your animations on all mobile devices (smartphones and touch
tablets).
Options for the player style and the rotation style are the same as for Flash animations.
Click on Create HTML + Javascript.
The software will ask you if you want to apply a inertia effect. Select the number of rows of your Flash animation.
Click on Create Hemispherical animation. The software will ask you if you want to apply a inertia effect. Select the
number of rows of your Flash animation.
Enter the desired animation parameters (name and speed of the animation)
Click on Continue to generate the animation file or on Restore to set the parameters to default settings.
Generating HTML5 + Javascript animations
1
2
1
2
Click on Continue to generate the animation file or on Restore to set the parameters to default settings.
Click on Finish when you are done. Your animation will appear on the animation image bank.

36
Save As works exactly the same way as the Save As button on the Main User Interface. It can
be used to batch save JPG and Tiff images at 300 dpi.
Save for web saves the images as 72dpi JPG files in a batch process.
Both Save As and Save for web commands are capable of resizing, watermarking and renaming
images in a batch process.
Save As / Save
for web
Command bar
These tools are used for viewing images in the Viewing Window.
Pointer - The Pointer is used to move specific items such as circles or other selected areas on
the image
Hand – The Hand tool is used to move the image by clicking and dragging.
Zoom-in / Zoom-out – These make the image appear larger or smaller in the Viewing Window.
1:1 and Fit to screen are used to control whether the image appears as actual size (100%) or if
it is fit to the size of the Viewing Window.
• Brightness, Contrast, Saturation
Adjust the brightness, contrast and saturation of the selected thumbnail.
Note: generally to obtain a proper product picture on a white background, you
only need to add some brightness and contrast.
These three tools are used to undo or redo a specific action performed to an image or to reset
the image to its original state.
These tools are used to rotate the image by 90 degrees clockwise or counterclockwise.
Viewing tools
Undo/redo action
Rotate images
Editing features
Chapter 5 : Retouching images

37
To make a selection, press the appropriate button, then click and
drag your cursor on the image.
The Selection Wand is probably the most useful Masking tool.
To use it, select it, establish a tolerance, and click on a specific
colored pixel on the image. Tolerance simply means that + or – of
a certain range from the color will be selected.
For instance, if you have a tolerance of 20 and you select the
background, all the colors in the background that are the same
color or within a tolerance of 20 from the color you clicked on will
be selected.
Once a selection has been made, it can be added to or subtracted
from the initial selection.
To add to the selection, click + in the Region Add / Subtract
area or hold down the Ctrl key and click on the image to make
more selections.
To subtract from a selection, click - in the Region Add /
Subtract area or hold down the Alt key and click specific areas
on the images.
This tool is used to Expand, Contract or Smooth an existing
selection. This can be very useful when there is not enough
color difference between the background and the product
(ie a white product on a white background).
While the item is selected, click Modify and select Expand.
This will make the selection expand into the white on the
flashlight by one or two pixels. Finally, press the Delete key
to replace the background with pure white (if pure white R =
255, G = 255, B = 255 was selected).
Sometimes smoothing the image is necessary. The Smooth
feature allows you to smooth the edges of the selected area.
Pressing Modify Selection then selecting Smooth will
make the following interface appear:
Amount determines the amount of smoothing.
Threshold is similar to tolerance and is related to pixel
selection. The lower the number the better the threshold.
You may need to smooth a selection more than once to get
the best results.
• Masking
Sometimes you may need to mask the picture with the selection tools or with the magic wand.
Selection
tools
Magic
wand
Modify
Chapter 5 : Retouching images

38
This tool is used to select specific colors that appear in the image. For example, if you want to
select a fill color that matches a color inside of the object, simply use this tool to click on the color
you want and that color will automatically be selected as the fill color.
You can also use this tool to check that the background is perfectly white; the RGB value of the
color white if 255, 255, 255. Click on the background with the color pipette and check the color
value that is displayed to make sure your background is perfectly white.
This tool fill a selection with the selected fill color.
The eraser can be used to erase portions of an image. It can also be used as a pen. Simply
select a color, an eraser head (square or round) and start clicking and dragging inside the image
to erase or replace a certain color with another.
Clicking on the colored square above allows you to change the fill color selection. This represents
the color that will be used when replacing a background or the color that will appear when
erasing.
Color Pipette
Fill
Gomme
Fill color selection
• Resize
Images can be resized in pixels, inches, centimeters and other measure units.
Once the size and units have been selected, click Apply.
• Crop
Images can be cropped free-form with the rectangle tool or they can be cropped
in a perfect square, as shown below.
Once the selection is made, click the Apply button.
Chapter 5 : Retouching images

39
The software also allows you to create animation with custom angles. You can thus predefine specific angles to shoot
and apply these parameters to the whole serie of shooting.
Create a new profile or select a new one with predefine angles.
On the following screen, the software will invite you to check the
positionning of the item on the turntable.
Click on 360° rotation to make a test rotation and make sure your
product does not go out of the camera field.
Click on Advanced to choose the rotation direction, view a specific
angle and select a preview grid.
The Rotation assistant allows you to check that the product does
not wobble around the center of the turntable while rotating.
Chapter 6 : Creating custom sequences
3
1
2
4
5
6
7
Click on the 3D button to launch the Animation creation wizard.
Click on Custom sequences.

40
Click on Next to define each angle position.
Define the turntable position (from 0 to 360°), the 90°
position and the camera tilt or click on the small icon
to choose a predefined setting.
Click on Go to the position to go to the angle
position.
If the Constant degree box is checked, the software
will automatically set the turntable so that the picture
is captured every X degree (as defined by the user)
until the turntable makes a complete 360° rotation.
If Automatic position is checked, the software will
automatically set the turntable at the specified degree
angle. Thus you will not have to click on Go to the
position each time.
If Stop at the position is checked, the turntable will
stop after each shot so that you can manipulate, if
desired, the product on the turntable.
Click on Define Position X when you wish to save a
turntable position.
Once you have determined your rotation sequence,
click on Next.
Give a name to the custom sequence. This sequence
will be added to the list of custom sequence.
8
9
10
11
12
Chapter 6 : Creating custom sequences

41
Click on the icon to start capturing pictures.
Once all images have been captured, you can export, annotate or edit each image composing the animation.
Then choose the file in which you would like to save your animation. Click on Close.
13
14
Chapter 6 : Creating custom sequences

42
Chapter 7 : Continuous rotation
You can then determine the rotation speed and rotation direction of the turntable.
Selecting Continuous Rotation allows you to make the turntable rotate. You can also determine turntable speed and
rotation direction.
This can be useful to check the proper functioning of the turntable or to show the system during demonstrations.
1
2
Click on the 3D button to launch the 3D animation wizard.
Click on Continuous rotation.

43
Chapter 8 : Importing images
This feature allows the user to import a series of JPG images to create an animated GIF or Swf file and to import
existing animated Gif, Swf or HTML5 files.
When importing images, you can then generate a 360° animation. You can determine the dimensions, the filename, a
rotation speed and a rotation direction. You can also re-organize and delete specific frames (up to 20 frames).
On the next step, choose between generating a Flash, Gif or Html5 animation. You can then chose your animation
style.
Note: for an animation with a magnifyer, select a maximum of 500 px width animation.
Click on Close to generate the animation.
Click on the 3D button to launch the 3D animation wizard.
Click on Import images.
1
2
3
4

44
Chapter 9 : Authoring 360
The Authoring 360 feature allows you to generate a serie of images that will be directly usable for PackshotViewer.
(if PackshotViewer is installed on your computer) For more information about PackshotViewer, please contact us.
1
2
3
4
Click on the 3D button to launch the 3D animation wizard.
Click on Authoring 360.
The software will guide you through the capture of a 360° animation, just like a standard 360° animation image
capture. Choose the number of rows and click on Next.
Define a name for the serie of images to be captured.
You can also chose to apply a watermark.
Click on Next.

45
Selext the number of frames and the turntable
rotation speed.
To start capturing pictures, click on the Play icon.
After the image capture, the following screen will
appear: check the quality of each image.
If you need to retake a picture, select the frame and
click on Re-take. The software will automatically
set the turntable to the specific rotation angle and
capture a new image that will replace the old one.
Click on Next.
On the following screen, choose where to save the
files.
Click on Export Images to export and rename the
serie of pictures.
All your image files will be exported in the new
folder and will be renamed so that they can be used
directly with the PackshotViewer software.
Click on Close.
If PackshotViewer is installed, the animation will
automatically appear in the standard PackshotViewer
window.
Chapter 9 : Authoring 360
5
6
7
8
9

46
Chapter 10: Care and maintenance
Maintenance
For detailed information about maintenance operations, please refer to the PackshotCreator 3D standard maintenance
guide.
Serial number
There are two labels with the same serial number in the contents of this package. One is stuck to the package and
the other is on the back of the lightbox. It is important to keep the serial numbers in a safe place.
The serial number is almost like your proof of purchase. For all contacts with PackshotCreator, especially if you lost
any of the components or need to replace something that is under warranty, you will need to tell us your serial number.

47
Chapter 11 : Product registration and warranty
In order for your PackshotCreator solution to be covered by the warranty, you must register your PackshotCreator
with Sysnext or by sending the Product Registration sheet that came inside the package within 14 days after the
purchase, otherwise the warranty period will begin the day the product was shipped. Please refer to the one-year
warranty that came inside of the package for details regarding the items covered.
Obtaining Warranty Service
Please contact Sysnext directly to obtain proper Return Material Authorization (RMA) documentation.
Check user’s manual, help file, or visit http://www.packshot-creator.com/ to find appropriate contact information.
All replacement parts will be shipped ground.
RETURNS WILL NOT BE ACCEPTED WITHOUT PRIOR PERMISSION FROM SYSNEXT. SYSNEXT IS NOT
RESPONSIBLE FOR SHIPMENTS DELAYED OR LOST IN TRANSIT.

www.packshot-creator.com
This material is not to be interpreted as a guarantee of earnings and may not be copied, reproduced, modified, published, uploaded, posted, or distributed in any way, without
PackshotCreator’s prior written consent.
 Loading...