

Page 1
AXIST93GSeries
ENGLISH
FRANÇAIS
DEUTSCH
ITALIANO
ESPANÕL
ò
ò
¨
¨
¾
¾
AXIST93G05ProtectiveHousing
InstallationGuide
Page 2
LegalConsiderations
Videoandaudiosurveillancecanberegulatedbylawsthat
varyfromcountrytocountry.Checkthelawsinyourlocal
regionbeforeusingthisproductforsurveillancepurposes.
Liability
Everycarehasbeentakeninthepreparationofthis
document.PleaseinformyourlocalAxisofceofany
inaccuraciesoromissions.AxisCommunicationsABcannot
beheldresponsibleforanytechnicalortypographicalerrors
andreservestherighttomakechangestotheproductand
manualswithoutpriornotice.AxisCommunicationsAB
makesnowarrantyofanykindwithregardtothematerial
containedwithinthisdocument,including,butnotlimited
to,theimpliedwarrantiesofmerchantabilityandtnessfor
aparticularpurpose.AxisCommunicationsABshallnot
beliablenorresponsibleforincidentalorconsequential
damagesinconnectionwiththefurnishing,performance
oruseofthismaterial.Thisproductisonlytobeusedfor
itsintendedpurpose.
IntellectualPropertyRights
AxisABhasintellectualpropertyrightsrelatingto
technologyembodiedintheproductdescribedinthis
document.Inparticular,andwithoutlimitation,these
intellectualpropertyrightsmayincludeoneormoreof
thepatentslistedatwww.axis.com/patent.htmandoneor
moreadditionalpatentsorpendingpatentapplicationsin
theUSandothercountries.
EquipmentModications
Thisequipmentmustbeinstalledandusedin
strictaccordancewiththeinstructionsgiveninthe
userdocumentation.Thisequipmentcontainsno
user-serviceablecomponents.Unauthorizedequipment
changesormodicationswillinvalidateallapplicable
regulatorycerticationsandapprovals.
TrademarkAcknowledgments
AXISCOMMUNICATIONS,AXIS,ETRAX,ARTPECandVAPIX
areregisteredtrademarksortrademarkapplicationsofAxis
ABinvariousjurisdictions.Allothercompanynamesand
productsaretrademarksorregisteredtrademarksoftheir
respectivecompanies.
RegulatoryInformation
Europe
ThisproductcomplieswiththeapplicableCEmarking
directivesandharmonizedstandards:
•LowVoltage(LVD)Directive2006/95/EC.SeeSafety
onpage2.
•RestrictionsofHazardousSubstances(RoHS)Directive
201 1/65/EU.SeeDisposalandRecyclingonpage2.
Acopyoftheoriginaldeclarationofconformitymaybe
obtainedfromAxisCommunicationsAB.SeeContact
Informationonpage2.
Safety
ThisproductcomplieswithIEC/EN/UL60950-1and
IEC/EN/UL60950-22,SafetyofInformationTechnology
Equipment.Theproductshallbegroundedeitherthrougha
shieldednetworkcable(STP)orotherappropriatemethod.
DisposalandRecycling
Whenthisproducthasreachedtheendofitsusefullife,
disposeofitaccordingtolocallawsandregulations.For
informationaboutyournearestdesignatedcollectionpoint,
contactyourlocalauthorityresponsibleforwastedisposal.
Inaccordancewithlocallegislation,penaltiesmaybe
applicableforincorrectdisposalofthiswaste.
Europe
Thissymbolmeansthattheproductshallnotbe
disposedoftogetherwithhouseholdorcommercialwaste.
Directive2012/19/EUonwasteelectricalandelectronic
equipment(WEEE)isapplicableintheEuropeanUnion
memberstates.Topreventpotentialharmtohumanhealth
andtheenvironment,theproductmustbedisposedofin
anapprovedandenvironmentallysaferecyclingprocess.
Forinformationaboutyournearestdesignatedcollection
point,contactyourlocalauthorityresponsibleforwaste
disposal.Businessesshouldcontacttheproductsupplierfor
informationabouthowtodisposeofthisproductcorrectly.
Thisproductcomplieswiththerequirementsof
Directive2011/65/EUontherestrictionoftheuseof
certainhazardoussubstancesinelectricalandelectronic
equipment(RoHS).
China
Thisproductcomplieswiththerequirementsofthe
legislativeactAdministrationontheControlofPollution
CausedbyElectronicInformationProducts(ACPEIP).
ContactInformation
AxisCommunicationsAB
Emdalavägen14
22369Lund
Sweden
Tel:+46462721800
Fax:+4646136130
www.axis.com
Support
Shouldyourequireanytechnicalassistance,pleasecontact
yourAxisreseller.Ifyourquestionscannotbeanswered
immediately,yourresellerwillforwardyourqueriesthrough
theappropriatechannelstoensurearapidresponse.Ifyou
areconnectedtotheInternet,youcan:
•downloaduserdocumentationandsoftwareupdates
•ndanswerstoresolvedproblemsintheFAQdatabase.
Searchbyproduct,category,orphrase
•reportproblemstoAxissupportstaffbylogginginto
yourprivatesupportarea
•chatwithAxissupportstaff
•visitAxisSupportatwww.axis.com/techsup/
LearnMore!
VisitAxislearningcenterwww.axis.com/academy/for
usefultrainings,webinars,tutorialsandguides.
Page 3
AXIST93GSeries
ENGLISH
SafetyInformation
ReadthroughthisInstallationGuidecarefullybeforeinstallingtheproduct.KeeptheInstallation
Guideforfuturereference.
HazardLevels
DANGER
WARNING
CAUTION
NO
TICE
NO NO
TICE TICE
Indicatesahazardoussituationwhich,ifnotavoided,willresultin
deathorseriousinjury.
Indicatesahazardoussituationwhich,ifnotavoided,couldresult
indeathorseriousinjury.
Indicatesahazardoussituationwhich,ifnotavoided,couldresult
inminorormoderateinjury.
Indicatesasituationwhich,ifnotavoided,couldresultindamage
toproperty.
OtherMessageLevels
ImportantIndicatessignicantinformationwhichisessentialfortheproduct
NoteIndicatesusefulinformationwhichhelpsingettingthemostout
tofunctioncorrectly.
oftheproduct.
3
Page 4

AXIST93GSeries
SafetyInstructions
NO
TICE
NO NO
TICE TICE
•TheAxisproductshallbeusedincompliancewithlocallawsandregulations.
•StoretheAxisproductinadryandventilatedenvironment.
•AvoidexposingtheAxisproducttoshocksorheavypressure.
•Donotinstalltheproductonunstablebrackets,surfacesorwalls.
•UseonlyapplicabletoolswheninstallingtheAxisproduct.Usingexcessiveforcewith
powertoolscouldcausedamagetotheproduct.
•Donotusechemicals,causticagents,oraerosolcleaners.
•Useacleanclothdampenedwithpurewaterforcleaning.
•Useonlyaccessoriesthatcomplywithtechnicalspecicationoftheproduct.Thesecanbe
providedbyAxisorathirdparty.
•UseonlysparepartsprovidedbyorrecommendedbyAxis.
•Donotattempttorepairtheproductbyyourself.ContactAxissupportoryourAxis
resellerforservicematters.
Transportation
NO
TICE
NO NO
TICE TICE
•WhentransportingtheAxisproduct,usetheoriginalpackagingorequivalenttoprevent
damagetotheproduct.
4
Page 5

AXIST93GSeries
ENGLISH
InstallationGuide
ThisInstallationGuideprovidesinstructionsforinstallingAXIST93G05ProtectiveHousing.
Toinstallthecameraonthenetwork,pleaseseetheInstallationGuideprovidedwiththecamera.
Forotherdetailsaboutthecamera,seetheUserManualavailableatwww.axis.com
InstallationSteps
1.Makesurethepackagecontents,toolsandothermaterialsnecessaryfortheinstallation
areinorder.Seepage5.
2.Studythehardwareoverview.Seepage6.
3.Studythespecications.Seepage7.
4.Installthehardware.Seepage9.
PackageContents
•AXIST93G05ProtectiveHousing
•AXISGasketCM20(x1)
•Desiccantbag
•TorxscrewdriverT20
•AXISConnectorGuardA(x1)
•AXIST94Q01AWallMount
-ScrewbitT30
•Printedmaterials
-InstallationGuide(thisdocument)
-InstallationGuideforAXIST94Q01AWallMount
RecommendedTools
•Drill–forinstallingthewallmount
•Screwdriverforscrewbit
OptionalAccessories
•AXISDoorSwitchA
•AXIST94R01PConduitBackBox
•Illuminators
•HousingMounts
5
Page 6
AXIST93GSeries
1
2
4
5
6
7
8
10
3
9
•Cablegasketsandcableglands
•AXIST98A16-VESurveillanceCabinet
•AXIST91A47PoleMounts
•VTCeilingBracketIntcableWCM4A
•VTCornerMountWCWA
Forinformationaboutavailableaccessories,seewww.axis.com
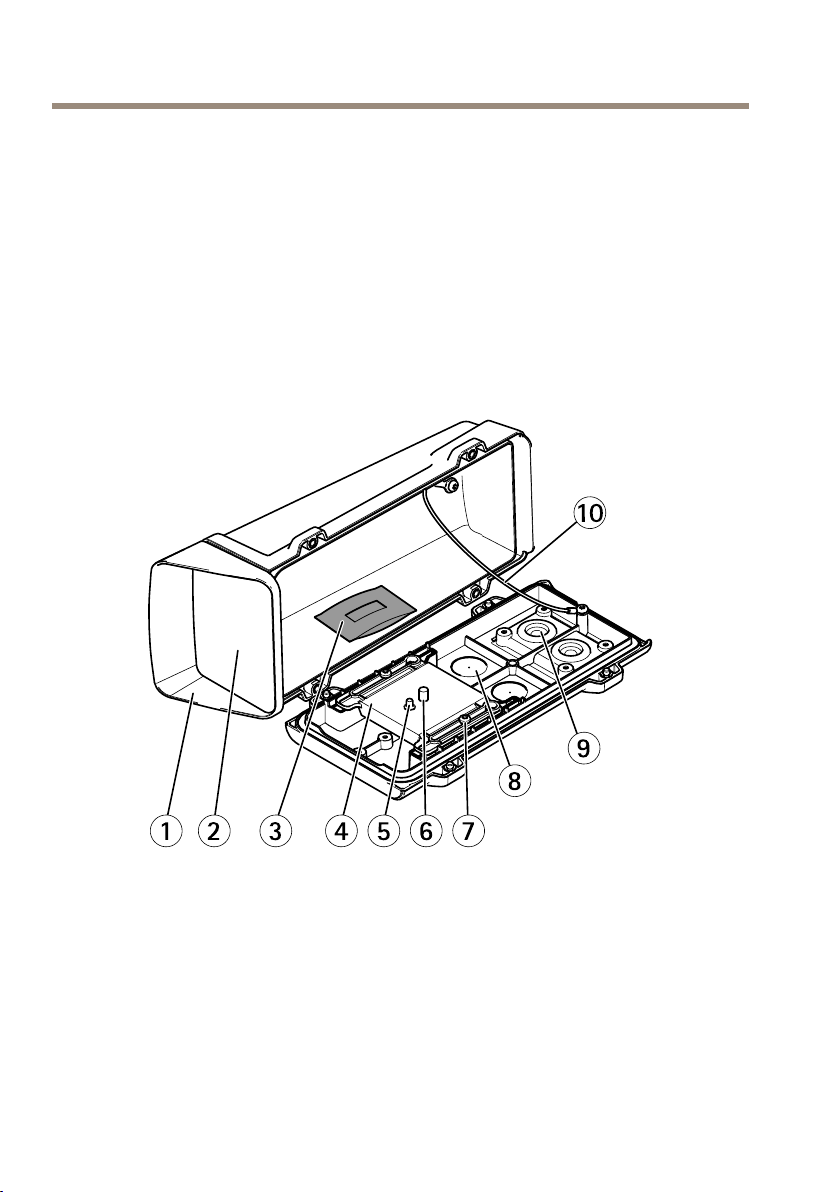
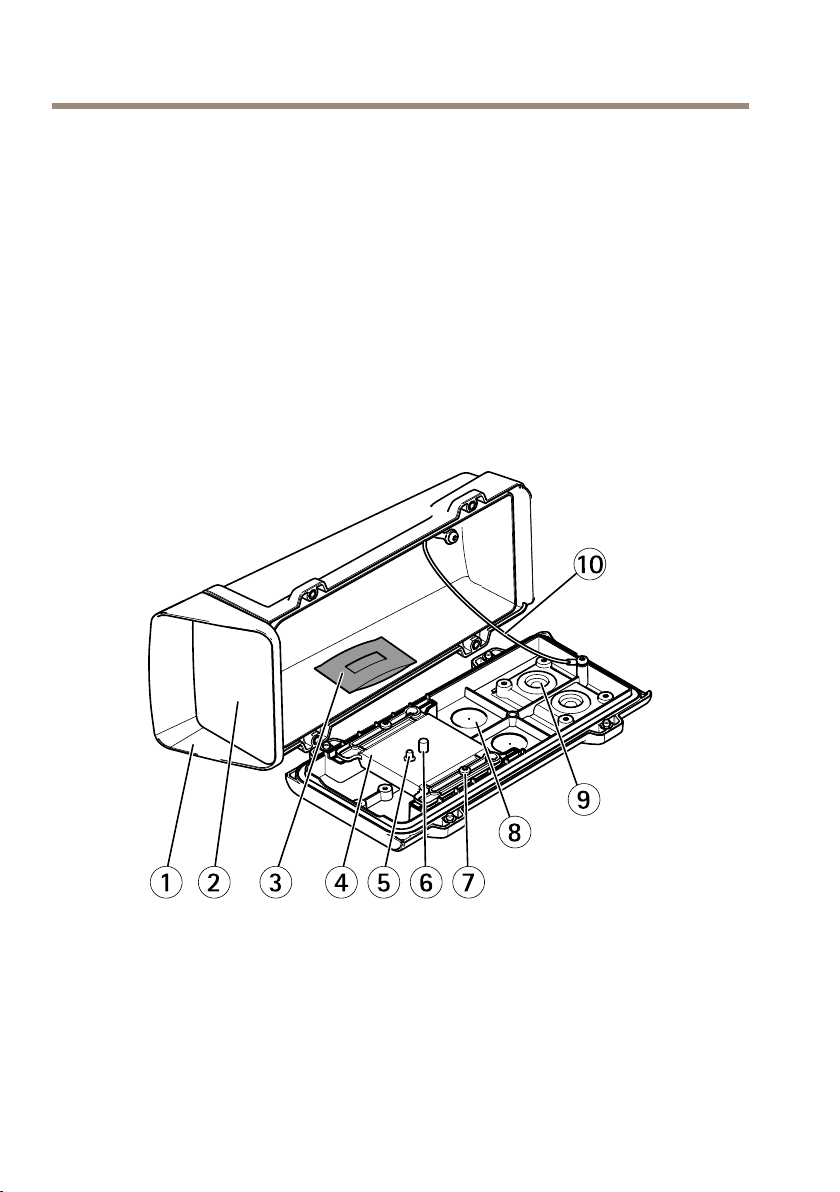
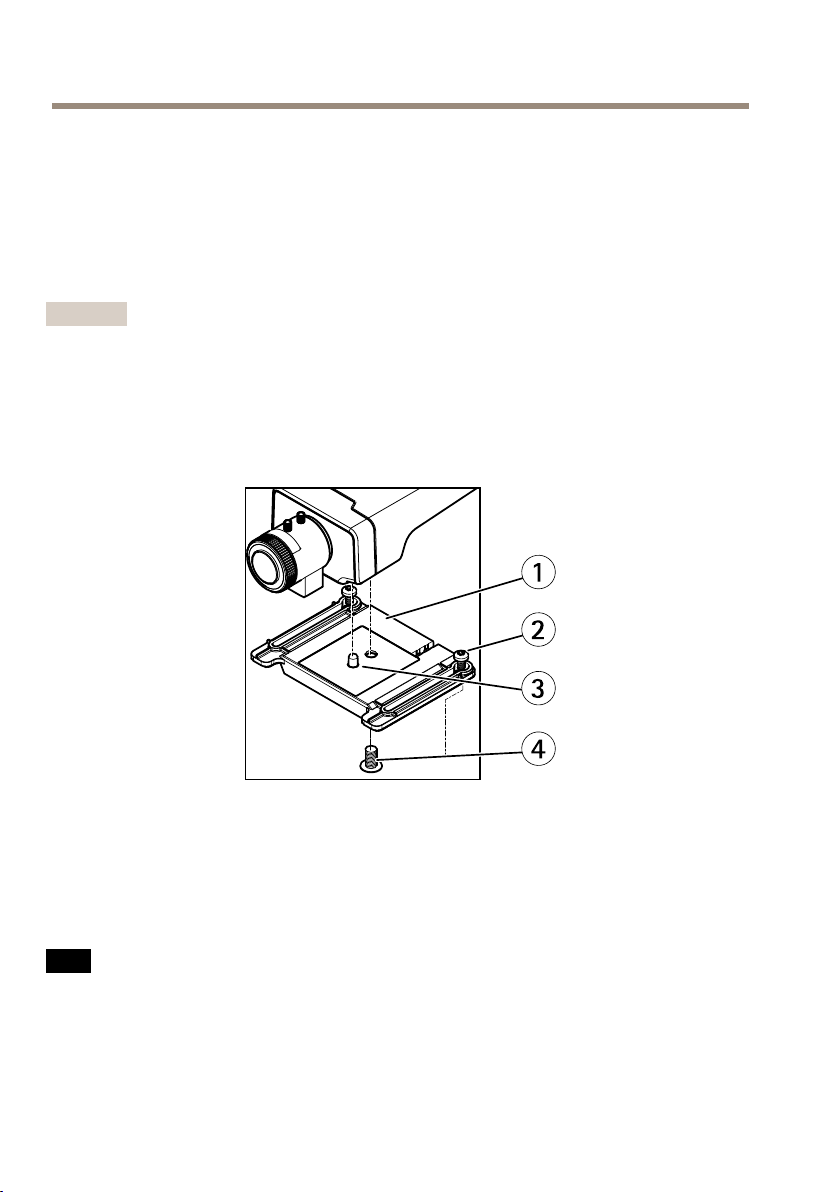
HardwareOverview
Housing
1
Topcover
2
Frontwindow
3
Dessicantbag
4
Cameraholder
5
Pin
6
CamerascrewT20
7
HolderscrewT20(2x)
8
Drill-outsforextracableholes
9
CablegasketM20(2x)
10
Safetywire
6
Page 7

AXIST93GSeries
1
3
4
5
2
ENGLISH
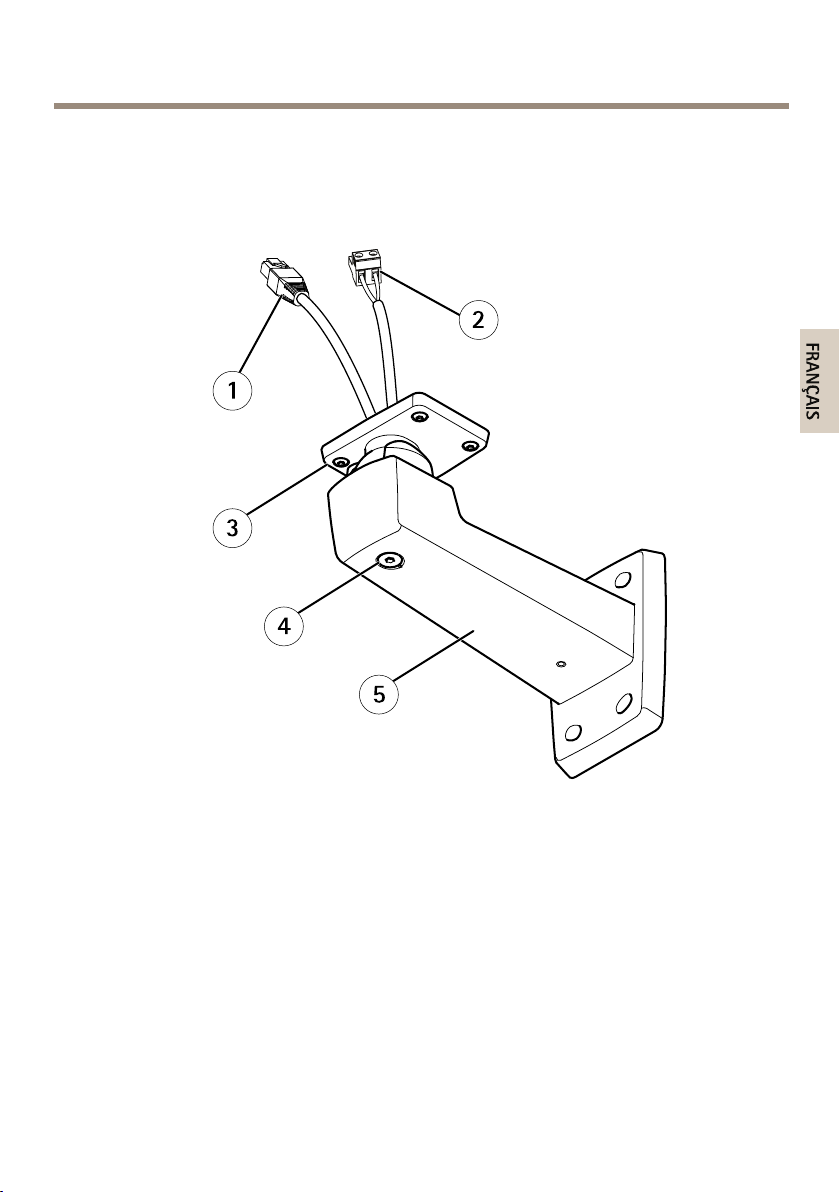
WallMount
1
2
3
4
5
Networkcable(routethroughwallbracket)
Powercable(routethroughwallbracket)(forproductsequippedwithpower
connector)
ScrewT20(4x)
BracketadjustmentscrewT30
Wallmount
Specications
OperatingConditions
TheAxisproductisintendedforindoorandoutdooruse.
7
Page 8
AXIST93GSeries
Classication
AXIST93G05IEC60721-4-4Class4M4
Note
AXIST93G05ProtectiveHousingdoesnothaveaheater.Therefore,theoperating
temperaturelimitsaredeterminedbytheoperatingtemperaturesoftheenclosedcamera.
OperatingTemperature
AXIST93G05
Humidity
AXIST93G05
StorageConditions
Temperature
AXIST93G05
IEC60529IP66
NEMA250Type4X
–20ºCto50ºC(–4ºFto122ºF)
10–100%RH(condensing)
-20ºCto50ºC(-4ºFto122ºF)
CableArea
NO
TICE
NO NO
TICE TICE
•Usecablesthatkeepwithinthespeciedcablearea.
•Selectcablesincompliancewithyourlocalregulations.
•Makesureallcableholesareproperlysealed.
•Usecablegasketsorcableglandsthatmatchboththecableholeandthecablearea.
Diameter
From5to15mm(0.197to0.591in)
Tocreateextracableholes,openthedrill-outslocatedinthebottomofthehousing.SeeHardware
Overviewonpage6.
Forinformationaboutaccessories,suchascablegasketsandcableglandsthatallowforother
cableareas,seewww.axis.com
AWG
Approximatelyfrom4to6/0
8
Page 9

AXIST93GSeries
ENGLISH
InstalltheHardware
NO
TICE
NO NO
TICE TICE
Becarefulnottoscratch,damageorleavengerprintsonthewindowbecausethiscould
decreaseimagequality.
TheAxisproductcanbeinstalledwiththecablesroutedthroughoralongthewall.
Readalltheinstructionsbeforeinstallingtheproduct:
1.Installthewallmount.Seepage9.Fordetailedinstructions,seethewallmount’s
InstallationGuide,suppliedinthepackageoravailableonwww.axis.com
2.Installthecamerainthehousing.Seepage9.
3.Attachthehousingtothewallmount.Seepage12.
InstalltheWallMount
CAUTION
Makesurethatthescrewsandplugsareappropriateforthematerial(e.g.wood,metal,
drywall,stone)andthatthematerialisstrongenoughtosupportthecombinedweight
ofthecamera,housing,andwallmount.
Note
•Seealsothewallmount’sInstallationGuidesuppliedinthepackageandavailableon
www.axis.com
•Fortechnicalspecicationsabouttheconnectors,seethecamera’sUserManualavailable
onwww.axis.com
1.Preparethewallforinstallationofthewallmount.Usethewallbracketasatemplate
andmarktheholesbeforedrillingtheholes.
2.Routethenetworkcableand,ifrequired,thepowercablethroughthewallbracket.
Leaveapproximately30cm(11.8in)ofcableforconnectingthecamera.
3.Ifconnectinganauxiliarydevice,forexampleanI/O,audio,orexternalpowerdevice,to
thecamera,repeatthestepaboveasapplicabletothespecicdevice.
4.Fastenthewallbrackettothewallbytighteningthescrews.
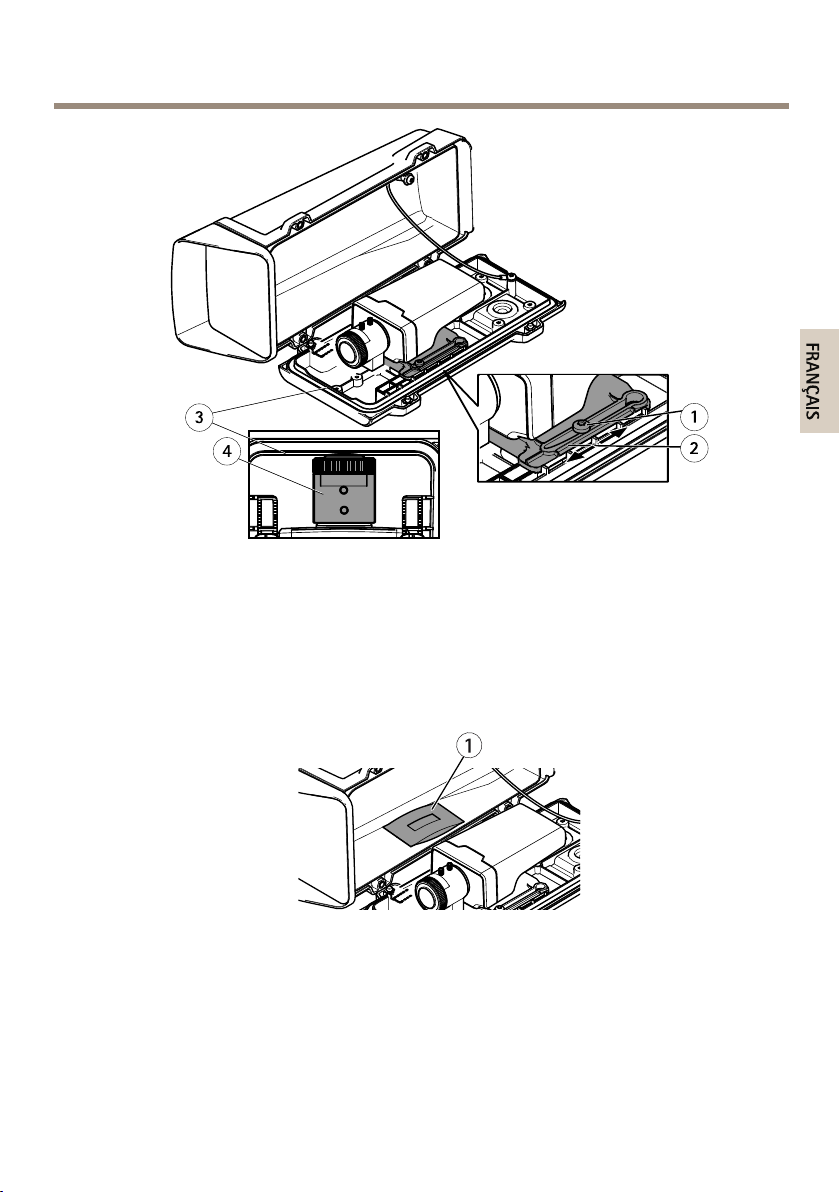
InstalltheCameraintheHousing
1.Ifconnectingexternal/inputdevicestothecamera,connectthemaccordingtothe
instructionsinthecamera’sInstallationGuidebeforeattachingthecameratotheholder.
2.IfusingamicroSDcardforlocalstorage,insertthecardintothecamera’sSDcardslot.
3.Loosentheholderscrewsandremovetheholderfromthehousing.
9
Page 10
AXIST93GSeries
3
4
2
1
1
2
3
4
Important
Makesurethecameraisattachedinthecorrectdirectionontheholder,seetheillustration
below.
4.Attachthecameratotheholder.Alignthepinandcamerascrewwiththepinholeand
screwmountonthecameraandtightenthecamerascrew(torque1Nm).Becarefulnot
toovertightenthescrew.
1
Holder
2
HolderscrewT20(2x)
3
Pin
4
CamerascrewT20
5.Adjustthepositionoftheholdercarefullyandthentightentheholderscrews(torque
0.5Nm).
NO
TICE
NO NO
TICE TICE
TofullltheIK10ratingrequirements,adjusttheholder’spositionsothatthecameralens
(4)isalignedwiththehousingedge(3),seetheillustration.
10
Page 11
1
2
4
3
1
1
ENGLISH
HolderscrewT20(2x)
2
Holder
3
Housingedge
4
Cameralens
AXIST93GSeries
6.Removetheplasticwrapperfromthedesiccantbagandputthedesiccantbagonthe
insidewallofthehousing.
1
Desiccantbag
11
Page 12
AXIST93GSeries
1
2
4
3
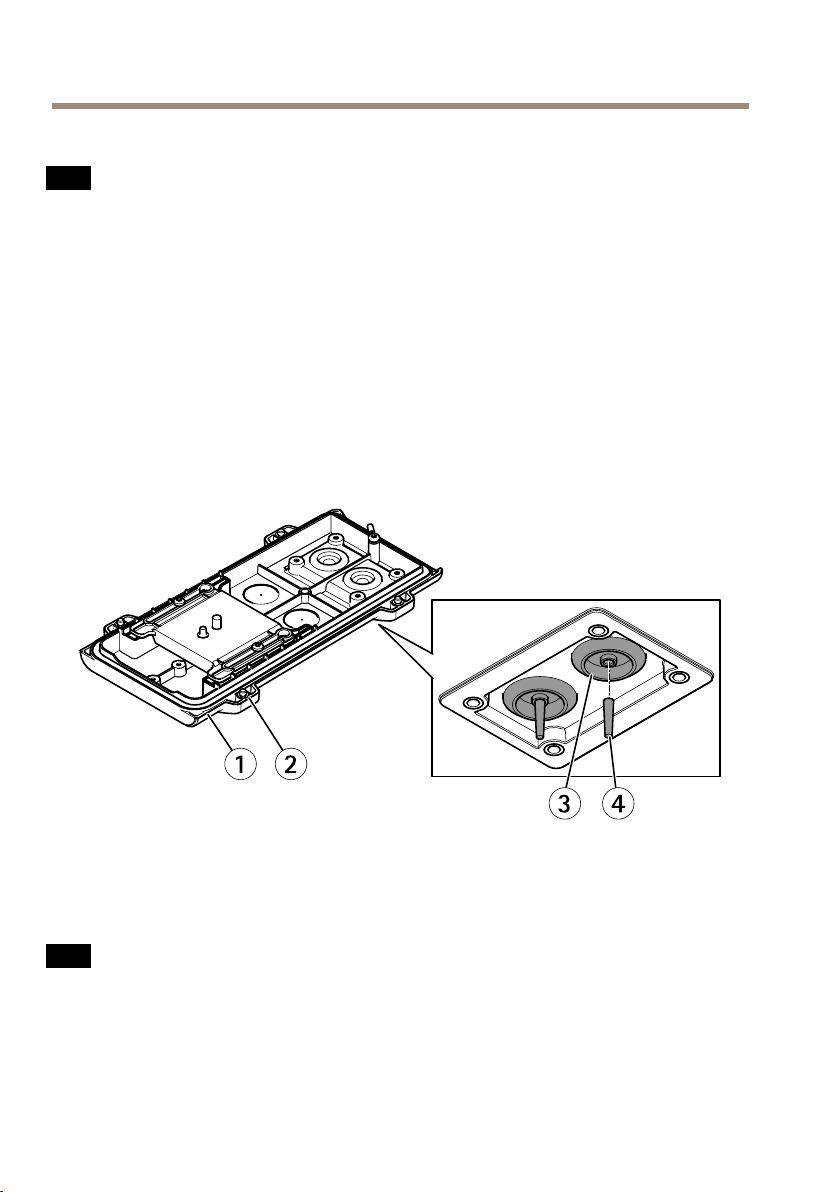
InstalltheHousingtotheWallMount
NO
TICE
NO NO
TICE TICE
•Usecablesthatkeepwithinthespeciedcablearea,seepage8.Usinganyotherthan
theprovidedcablegasketcouldcausewatertoseepinanddamagetheproduct.For
informationaboutcablegasketsandcableglandsthatallowforothercableareas,see
www.axis.com
•Ifmorethanonecableisused,eachcablemustberoutedthroughaseparatecablegasket.
•Onlyopenaholeincablegasketsthatwillbeusedandifacablegasketistorn,replaceit
withanewcablegasket.Leavingacablegasketopenorusingatorncablegasketcould
causewatertoseepinanddamagetheproduct.
1.Loosenthebottomcoverscrewsandliftthetopcover.
2.Selectwhichcablegaskettouseandpullthetabtoopenaholeforthenetworkcable.
1
Bottomcover
2
BottomcoverscrewT20(4x)
3
CablegasketM20(2x)
4
Tab
NO
TICE
NO NO
TICE TICE
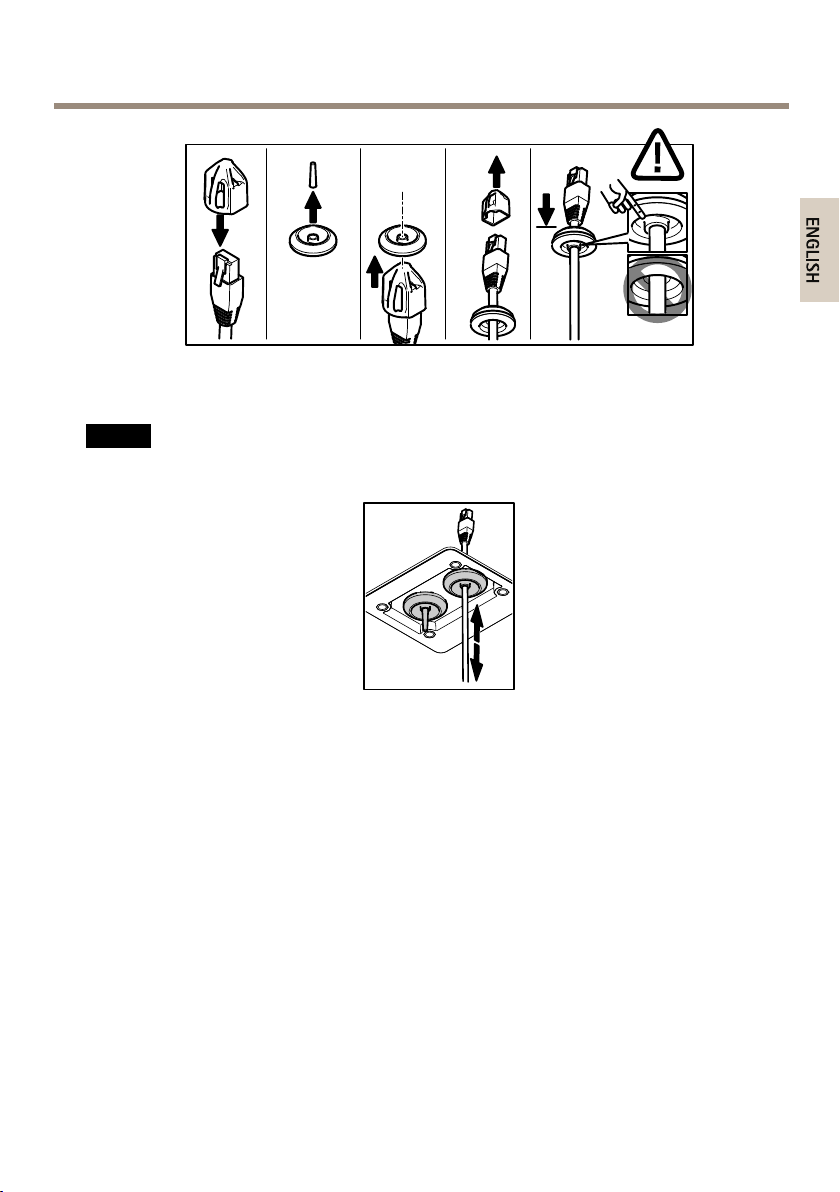
Ifthenetworkcablehasapre-mountednetworkconnector,removethecablegasketand
usethesuppliedconnectorguardtopreventtearingofthecablegasket.Avoidusing
networkcableswithcappednetworkconnectorsbecausetheycouldcausetearingofthe
cablegasketdespiteusingtheconnectorguard.
12
Page 13
AXIST93GSeries
ENGLISH
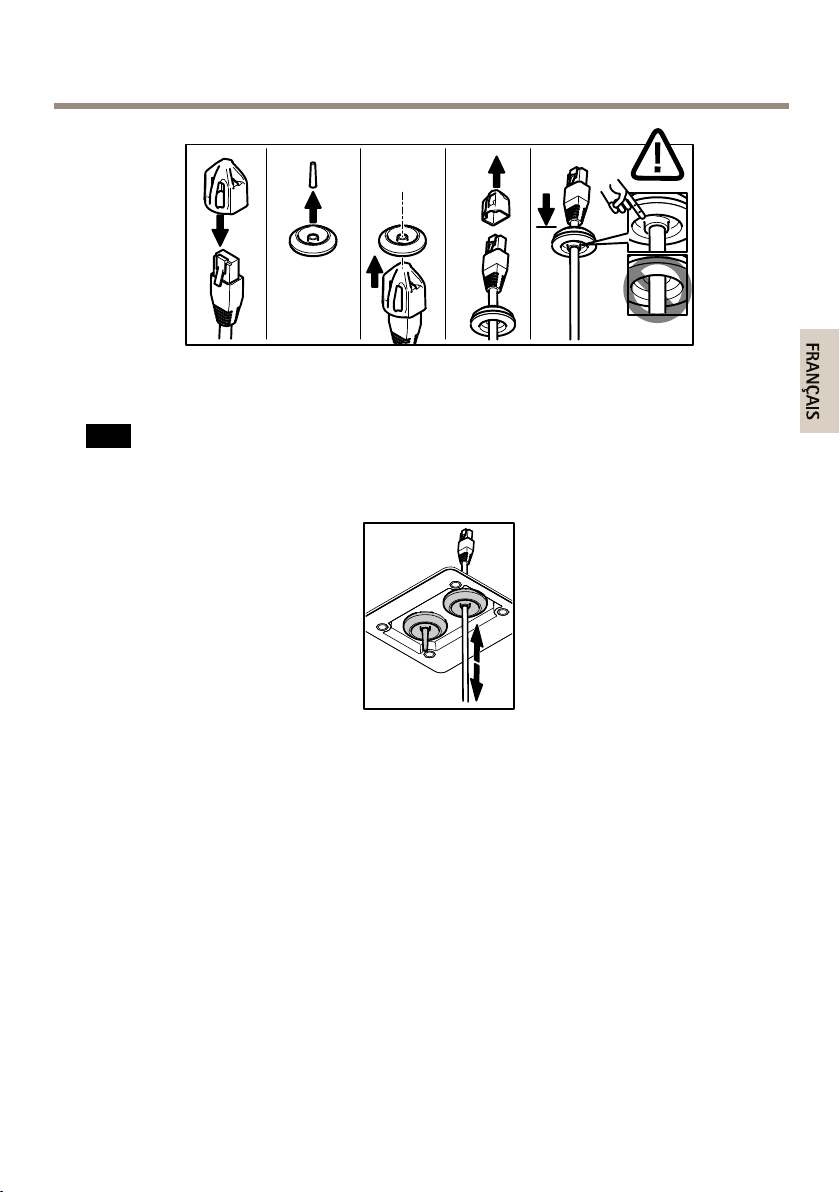
3.Pushthenetworkcablethroughthecablegasket.
4.Pullthenetworkcablebackslightlysothatthecablegasketadjustsitselfonthecable.
NO
TICE
NO NO
TICE TICE
Notpullingthecablebackcouldcausewatertoseepinanddamagetheproduct.
5.Makesurethatthecablegasketisttedproperly.
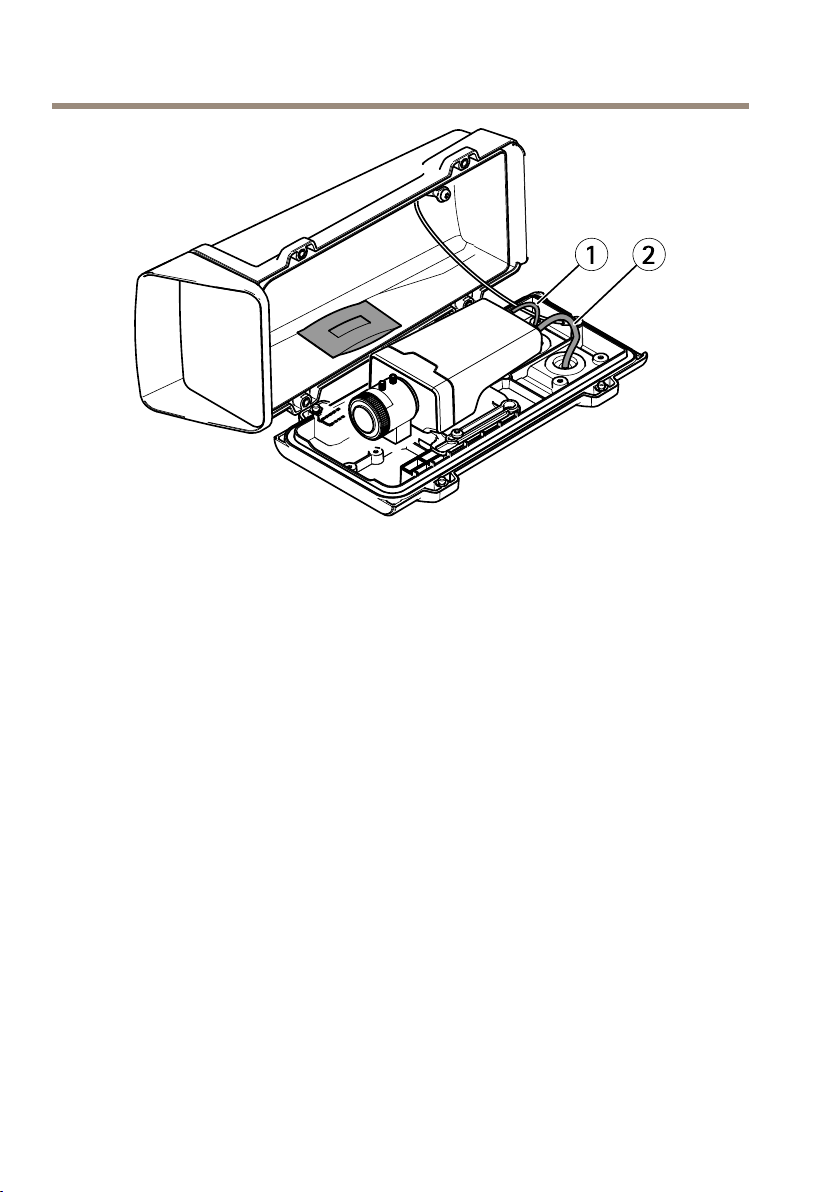
6.Connectthenetworkcabletothenetworkconnector.
7.IfconnectingapowercableoranI/Odevicetothecamera,repeatthestepsaboveas
applicabletothespecicdevice.
13
Page 14
AXIST93GSeries
1
2
1
Powercable(optional)
2
Networkcable
8.Putthebottomcoveronthewallmountandtightenthescrews(torque2Nm).
9.MakesurethatthecameraLEDsindicatethecorrectconditions.
Seethecamera’sInstallationGuide.
10.Loosenthebracketadjustmentscrewtoaimthecameratothepointofinterest.
14
Page 15

1
2
3
4
1
ENGLISH
Bottomcover
2
ScrewT20(4x)
3
Wallmount
4
BracketadjustmentscrewT30
AXIST93GSeries
11.Forinformationabouthowtoviewthevideostream,seethecamera’sInstallationGuide
orwww.axis.com/techsup
NO
TICE
NO NO
TICE TICE
Makesurenottopinchanycableswhenclosingthehousing.
12.Closethehousing.Makesuretoalternatelytightenthebottomcoverscrewsafewturns
atatimeuntiltheyaretight(torque1.5Nm).Thiswillhelpensurethatthebottom
covergasketiscompressedevenly.
FurtherInformation
VisitAxislearningcenterwww.axis.com/academyforusefultrainings,webinars,tutorialsand
guides.
15
Page 16

AXIST93GSeries
WarrantyInformation
ForinformationaboutAxis’productwarrantyandtheretorelatedinformation,see
www.axis.com/warranty/
16
Page 17
AXIST93GSeries
FRANÇAIS
Informationssurlasécurité
Lisezattentivementceguided'installationavantd'installerl'appareil.Conservezleguide
d'installationpourtouteréférenceultérieure.
Niveauxderisques
DANGER
AVERTISSEMENT
ATTENTION
VIS
A AAVIS VIS
Indiqueunesituationdangereusequi,siellen'estpasévitée,
entraîneraledécèsoudesblessuresgraves.
Indiqueunesituationdangereusequi,siellen'estpasévitée,
pourraitentraînerledécèsoudesblessuresgraves.
Indiqueunesituationdangereusequi,siellen'estpasévitée,
pourraitentraînerdesblessureslégèresoumodérées.
Indiqueunesituationqui,siellen'estpasévitée,pourrait
endommagerl'appareil.
Autresniveauxdemessage
ImportantIndiquelesinformationsimportantes,nécessairespourassurerle
NoteIndiquelesinformationsutilesquipermettrontd'obtenirle
bonfonctionnementdel'appareil.
fonctionnementoptimaldel'appareil.
17
Page 18

AXIST93GSeries
Consignesdesécurité
VIS
A AAVIS VIS
•LeproduitAxisdoitêtreutiliséconformémentauxloisetrèglementationslocalesen
vigueur.
•ConserverceproduitAxisdansunenvironnementsecetventilé.
•NepasexposerceproduitAxisauxchocsouauxfortespressions.
•Nepasinstallerceproduitsurdessupports,surfacesoumursinstables.
•Utiliseruniquementdesoutilsrecommandéspourl'installationdel'appareilAxis.
L'applicationd'uneforceexcessivesurl'appareilavecdesoutilspuissantspourrait
l'endommager.
•Nepasutiliserdeproduitschimiques,desubstancescaustiquesoudenettoyants
pressurisés.
•Utiliserunchiffonpropreimbibéd'eaupurepourlenettoyage.
•Utiliseruniquementdesaccessoiresconformesauxcaractéristiquestechniquesduproduit.
IlspeuventêtrefournisparAxisouuntiers.
•UtiliseruniquementlespiècesderechangefourniesourecommandéesparAxis.
•Nepasessayerderéparerceproduitparvous-même.Contacterl'assistancetechnique
d'AxisouvotrerevendeurAxispourdesproblèmesliésàl'entretien.
Transport
VIS
A AAVIS VIS
•LorsdutransportduproduitAxis,utilisezl'emballaged'origineouunéquivalentpour
éviterd'endommagerleproduit.
18
Page 19
AXIST93GSeries
FRANÇAIS
Guided'installation
CeGuided'installationfournitdesinstructionspourl'installationduboîtierdeprotection
AXIST93G05.
Pourinstallerlacamérasurleréseau,consultezleguided’installationfourniaveclacaméra.Pour
obtenirdeplusamplesdétailsrelatifsàlacaméra,consultezlemanueldel’utilisateur,disponible
surlesitewww.axis.com
Procéduresd’installation
1.Assurez-vousquelecontenudel’emballage,lesoutilsetautresmaterielsnecessairesà
l’installationsontbiendisponibles.Cf.page19.
2.Consultezladescriptiondumatériel.Cf.page20.
3.Étudiezlescaractéristiques.Cf.page21.
4.Installezlematériel.Cf.page23.
Contenudel’emballage
•BoîtierdeprotectionAXIST93G05
•JointAXISCM20(x1)
•Sachetdessiccatif
•TournevisTorxT20
•ProtectionduconnecteurAXISA(x1)
•MontagemuralAXIST94Q01A
-EmboutpourvisT30
•Documentsimprimés
-Guided’installation(cedocument)
-Guided'installationpourxationmuraleAXIST94Q01A
Outilsrecommandés
•Perceuse–pourinstallerlaxationmurale
•Tournevispouremboutpourvis
Accessoiresenoption
•InterrupteurdeporteAXISA
•Boîtierarrièredestinéauconduitdel'AXIST94R01P
19
Page 20
AXIST93GSeries
1
2
4
5
6
7
8
10
3
9
•Illuminateurs
•Fixationspourboîtier
•Jointsdecâbleetpresse-étoupes
•CoffretdesurveillanceAXIST98A16-VE
•FixationspourpoteauAXIST91A47
•CâbleintérieurpourxationauplafondVTWCM4A
•FixationangulaireVTWCWA
Pourplusd’informationssurlesaccessoiresdisponibles,consultezlesitewww.axis.com
Aperçudumatériel
Boîtier
1
Couverclesupérieur
2
Fenêtreavant
3
Sachetdessiccatif
4
Supportdecaméra
5
Broche
6
VisdelacaméraT20
7
VisdusupportT20(x2)
8
Perforationspourautrestrousdecâbles
20
Page 21
Fixationmurale
1
3
4
5
2
FRANÇAIS
9
JointdecâbleM20(x2)
10
Câbledesécurité
AXIST93GSeries
1
Câbleréseau(acheminéàtraverslesupportmural)
2
Câbled'alimentation(acheminéàtraverslesupportmural)(pourlesproduits
équipésd'unconnecteurd'alimentation)
3
VisT20(x4)
4
VisderéglagedusupportT30
5
Fixationmurale
Caractéristiquestechniques
Conditionsd'utilisation
LeproduitAxisestdestinéàunusageenintérieuretenextérieur.
21
Page 22
AXIST93GSeries
Classication
AXIST93G05IEC60721-4-4Classe4M4
Note
LeboîtierdeprotectionAXIST93G05nedisposepasd'unrégulateurdechauffage.Par
conséquent,leslimitesdelatempératuredefonctionnementsontdéterminéeesparles
températuresdefonctionnementdelacaméraencastrée.
Températuredefonctionnement
AXIST93G05
Humidité
AXIST93G05
Conditionsdestockage
Température
AXIST93G05
IEC60529IP66
NEMA250Type4X
De–20ºCà50ºC(–4ºFà122ºF)
Humiditérelative10–100%(condensation)
De-20ºCà50ºC(-4ºFà122ºF)
Zonedecâble
VIS
A AAVIS VIS
•Utilisezdescâblesadaptésàlazonespéciée.
•Sélectionnezdescâblesconformesàlalégislationlocale.
•Assurez-vousquelestrousdecâblessontcorrectementscellés.
•Utilisezdesjointsdecâbleetdespresse-étoupesadaptésauxtrousdecâblesetàla
zonedecâble.
Diamètre
De5à15mm(0,197à0,591po)
Pourcréerd'autrestrousdecâbles,ouvrezlesperforationssituéesdanslapartieinférieuredu
boîtier.Cf.Aperçudumatérielpage20.
AWG
Environde4à6/0
22
Page 23
AXIST93GSeries
FRANÇAIS
Pourplusd'informationssurlesaccessoires,telsquelesjointsdecâbleetlespresse-étoupes
adaptésàd'autreszonesdecâble,consultezwww.axis.com
Installationdumatériel
VIS
A AAVIS VIS
Veillezànepasrayer,endommageroulaisserd'empreintessurlafenêtre,carcelapourrait
altérerlaqualitéd'image.
LeproduitAxispeutêtreinstalléavecdescâblesacheminésàtraversoulelongdumur.
Liseztouteslesinstructionsavantl'installationdel'appareil:
1.Installezlaxationmurale.Cf.page23.Pourobtenirdesinstructionsdétaillées,
reportez-vousauguided'installationdelaxationmuraledisponibledanslaboîteou
surlesitewww.axis.com.
2.Installationdelacaméradansleboîtier.Cf.page24.
3.Placezleboîtiersurlaxationmurale.Cf.page26.
Installationdelaxationmurale
ATTENTION
Assurez-vousquelesvisetleschessontadaptéesaumatériau(bois,métal,cloisonsèche,
pierre,etc.)etquelematériauestsufsammentrésistantpoursupporterlepoidscombiné
delacaméra,duboîtieretdusupportmural.
Note
•Reportez-vouségalementauguided'installationdelaxationmuraledisponibledansla
boîteetsurlesitewww.axis.com.
•Pourplusdecaractéristiquestechniquesconcernantlesconnecteurs,reportez-vousau
manueld’utilisationdelacaméra,disponiblesurwww.axis.com
1.Préparezlemurpourl'installationdusupportmural.Utilisezlesupportmuralcomme
gabaritetmarquezlesemplacementsdestrousavantdelespercer.
2.Acheminezlecâbleréseauet,lecaséchéant,lecâbled'alimentationenlefaisantpasser
autraversdusupportmural.Laissezenviron30cm(1 1,8'')decâblepourlaconnexion
delacaméra.
3.Sivousconnectezunpériphériqueauxiliaire(parexemple,unpériphérique
d'entrée/sortie,audiooud'alimentationexterne)àlacaméra,répétezl'étapeci-dessus
pourchaquepériphérique.
4.Serrezlesvisdusupportmuralpourlexer.
23
Page 24
AXIST93GSeries
3
4
2
1
1
2
3
4
Installationdelacaméradansleboîtier
1.Sivousconnectezdespériphériquesexternes/d'entréeàlacaméra,connectez-les
conformémentauxinstructionsfourniesdansleguided'installationdelacaméraavant
dexerlacaméraausupport.
2.SivousutilisezunecartemicroSDcommeespacedestockagelocal,insérezlacartedans
lelogementprévuàceteffetsurlacaméra.
3.Desserrezlesvisdusupportetretirezlesupportduboîtier.
Important
Assurez-vousquelacaméraestxéedanslabonnedirectionsurlesupport,comme
illustréci-dessous.
4.Fixezlacaméraausupport.Alignezlabrocheetlavisdelacaméraavecletroudela
brocheetlaxationdelavissurlacaméra,puisserrezlavisdelacaméra(couple
1Nm).Veillezànepastroplaserrer.
1
Support
2
VisdusupportT20(x2)
3
Broche
4
VisdelacaméraT20
5.Ajustezprécisémentlapositiondusupport,puisserrezlesvisdecedernier
(couple0,5Nm).
VIS
A AAVIS VIS
PourrépondreauxexigencesdelacerticationIK10,ajustezlapositiondusupportdesorte
quel'objectifdelacaméra(4)soitalignésurlebordduboîtier(3),commeillustréci-contre.
24
Page 25
1
2
4
3
1
1
FRANÇAIS
VisdusupportT20(x2)
2
Support
3
Bordduboîtier
4
Objectifdelacaméra
AXIST93GSeries
6.Retirezl’emballageplastiquedusachetdessiccatifetplacezlesachetdessiccatifsurla
paroiintérieureduboîtier.
1
Sachetdessiccatif
25
Page 26
AXIST93GSeries
1
2
4
3
Installationduboîtiersurlaxationmurale
VIS
A AAVIS VIS
•Utilisezdescâblesadaptésàlazonespéciée.Reportez-vousàlasectionpage22.
L’utilisationd’unjointdecâbleautrequeceluifournirisqued’entraîneruneinltration
d’eauetd’endommagerleproduit.Pourplusd'informationssurlesjointsdecâbleetles
presse-étoupesadaptésàd'autreszonesdecâble,consultezwww.axis.com
•Sivousutilisezplusd'uncâble,chaquecâbledoitêtreacheminéautraversd'unjointde
câbledistinct.
•Ouvrezuniquementuntroudanslesjointsdecâblequiserontutilisés.Siunjointdecâble
estendommagé,remplacez-leparunnouveau.L’utilisationd’unjointdecâbleouvertou
endommagérisqued’entraîneruneinltrationd’eauetd’endommagerleproduit.
1.Desserrezlesvisducouvercleinférieuretsoulevezlecouverclesupérieur.
2.Sélectionnezlejointdecâbleàutiliserettirezsurlapattepourouvriruntrouau
niveauducâbleréseau.
1
Couvercleinférieur
2
VisducouvercleinférieurT20(x4)
3
JointdecâbleM20(x2)
4
Patte
VIS
A AAVIS VIS
Silecâbleréseaudisposed'unconnecteurréseaupré-installé,retirezlejointdecâbleet
utilisezlaprotectionduconnecteurfourniepourévitertoutendommagementdujointde
câble.Évitezd'utiliserdescâblesréseauéquipésdeconnecteursréseaurecouverts,carils
peuventendommagerlejointdecâble,etcemalgréleurprotection.
26
Page 27
3.Faitespasserlecâbleréseauàtraverslejointdecâble.
FRANÇAIS
4.Tirezlégèrementsurlecâbleréseaupourquelejoints'ajustedessus.
VIS
A AAVIS VIS
Sivousnetirezpassurlecâble,ilexisteunrisqued'inltrationd’eauetd’endommagement
duproduit.
AXIST93GSeries
5.Assurez-vousquelejointdecâbleestcorrectementinstallé.
6.Branchezlecâbleréseauauconnecteurréseau.
7.Sivousconnectezuncâbled'alimentationouunpériphériqued'entrée/sortieàlacaméra,
répétezlesétapesci-dessuspourchaquepériphérique.
27
Page 28

AXIST93GSeries
1
2
1
Câbled'alimentation(enoption)
2
Câbleréseau
8.Placezlecouvercleinférieursurlaxationmuraleetserrezlesvis(couple2Nm).
9.Vériezquelesvoyantssurlacaméraindiquentlesconditionscorrectes.
Reportez-vousauguided'installationdelacaméra.
10.Desserrezlavisderéglagedusupportand’orienterlacaméradansladirectionvoulue.
28
Page 29

1
2
3
4
1
FRANÇAIS
Couvercleinférieur
2
VisT20(x4)
3
Fixationmurale
4
VisderéglagedusupportT30
AXIST93GSeries
11.Pourplusd'informationssurlavisualisationduuxdedonnéesvidéo,reportez-vousau
guided'installationdelacaméraouconsultezwww.axis.com/techsup.
VIS
A AAVIS VIS
Assurez-vousdenepinceraucuncâbleàlafermetureduboîtier.
12.Fermezleboîtier.Assurez-vousdeserrerenalternancelesvisducouvercleinférieurde
quelquestoursàlafoisjusqu'àcequ'ellessoienttoutesbienserrées(couple1,5Nm).Cela
permettradegarantirquelejointducouvercleinférieurestcompressédefaçonrégulière.
Pourobtenirplusderenseignements
VisitezlecentredeformationenligneAxissurlesitewww.axis.com/academypourensavoirplus
surlesformations,leswebinaires,lestutorielsetlesguides.
29
Page 30

AXIST93GSeries
Informationssurlagarantie
PourobtenirdeplusamplesinformationssurlagarantieduproduitAXISetdesrenseignements
connexes,allezsurlesitewww.axis.com/warranty/
30
Page 31

AXIST93GSeries
DEUTSCH
Sicherheitsinformation
LesenSiedasInstallationshandbuchsorgfältigdurchbevorsiedasProduktinstallieren.Bewahren
SiedasInstallationshandbuchfürzukünftigeZweckeauf.
Gefährdungsstufen
GEFAHRWeistaufeinegefährlicheSituationhin,die,fallsnichtverhindert,
WARNUNGWeistaufeinegefährlicheSituationhin,welche,fallsnicht
VORSICHTWeistaufeinegefährlicheSituationhin,welche,fallsnicht
HINWEIS
HINWEIS HINWEIS
zuTododerschwerenVerletzungenführt.
verhindert,zuTododerschwerenVerletzungenführenkann.
verhindert,zugeringfügigerodermäßigerVerletzungführenkann.
WeistaufeinegefährlicheSituationhin,welche,fallsnicht
verhindert,zuSachschädenführenkann.
WeitereNachrichtenstufen
WichtigWeistaufwichtigeInformationenhin,diedenrichtigenBetrieb
BeachtenWeistaufnützlicheInformationenhin,diedieoptimale
desProduktsgewährleisten.
VerwendungdesProduktsunterstützen.
31
Page 32

AXIST93GSeries
Sicherheitsanweisungen
HINWEIS
HINWEIS HINWEIS
•DieAnwendungdesAxisProduktsmussunterBeachtungderörtlichgeltendenrechtlichen
Bestimmungenerfolgen.
•LagernSiedasAxisProduktineinertrockenenundbelüftetenUmgebung.
•AchtenSiedarauf,dassdasAxisProduktwederStößennochstarkemDruckausgesetztist.
•InstallierenSiedasProduktnichtaninstabilenHalterungen,OberächenoderWänden.
•VerwendenSiebeiderInstallationdesAxisProduktsausschließlichpassendeWerkzeuge.
EinzugroßerKraftaufwandmitelektrischenWerkzeugenkanndasProduktbeschädigen.
•VerwendenSiekeinechemischen,ätzendenoderaerosolhaltigenReinigungsmittel.
•VerwendenSiezumReinigeneinsauberes,mitlauwarmemWasserangefeuchtetesTuch.
•VerwendenSienurZubehör,dasdentechnischenDatendesProduktsentspricht.Dieses
istvonAxisoderDrittanbieternerhältlich.
•VerwendenSieausschließlichErsatzteiledievonAxisbereitgestelltoderempfohlen
werden.
•VersuchenSienicht,dasProduktselbstständigzureparieren.WendenSiesichbezüglich
ReparaturundWartungandenAxisSupportoderIhrenAxisHändler.
Transport
HINWEIS
HINWEIS HINWEIS
•BeiBedarftransportierenSiedasAxisProduktinderOriginalverpackungodereiner
entsprechendenVerpackung,sodassSchädenvermiedenwerden.
32
Page 33

AXIST93GSeries
DEUTSCH
Installationsanleitung
IndieserAnleitungwirddieInstallationdesAXIST93G05Schutzgehäusesbeschrieben.
AnweisungenzurInstallationderKameraimNetzwerkndenSieinderInstallationsanleitungder
Kamera.WeitereInformationenzurKamerandenSieimBenutzerhandbuchunterwww.axis.com.
Installationsschritte
1.StellenSiesicher,dassdiePackungsinhalte,Werkzeugeundanderenotwendige
MaterialienfürdieInstallationinOrdnungsind.SieheSeite33.
2.MachenSiesichmitderHardware-Übersichtvertraut.SieheSeite34.
3.MachenSiesichmitdentechnischenDatenvertraut.SieheSeite35.
4.InstallierenSiedieHardware.SieheSeite37.
Lieferumfang
•AXIST93G05Schutzgehäuse
•AXISDichtungCM20(1x)
•Antikondensationsbeutel
•TorxT20-Schraubendreher
•AXISAnschlussstückA(1x)
•AXIST94Q01AWandhalterung
-SchraubensetT30
•GedruckteDokumente
-Installationsanleitung(diesesDokument)
-InstallationsanleitungfürdieAXIST94Q01AWandhalterung
EmpfohleneWerkzeuge
•BohrmaschinezurMontagederWandhalterung
•SchraubendreherfürSchraubenset
OptionalesZubehör
•AXISTürschalterA
•AXIST94R01PKabelführungsdose
•Leuchten
•Gehäusehalterungen
33
Page 34

AXIST93GSeries
1
2
4
5
6
7
8
10
3
9
•KabeldichtungenundKabelverschraubungen
•AXIST98A16-VEÜberwachungsschrank
•AXIST91A47Masthalterungen
•VT-Deckenhalterung(Kabel,int.)WCM4A
•VT-EckhalterungWCWA
Unterwww.axis.comndenSieInformationenüberverfügbaresZubehör.
ÜbersichtüberdieHardware
Gehäuse
1
ObereAbdeckung
2
Frontfenster
3
Antikondensationsbeutel
4
Kamerahalter
5
Kontakt
6
SchraubeT20fürKamera
7
SchraubeT20fürHalter(2x)
8
AufbohrungenfürzusätzlicheKabellöcher
9
KabeldichtungM20(2x)
10
Sicherheitsdraht
34
Page 35

AXIST93GSeries
1
3
4
5
2
DEUTSCH
Wandmontage
1
2
3
4
5
Netzwerkkabel(durchWandhalterungführen)
Stromkabel(durchWandhalterungführen)(fürProduktemitStromanschluss)
SchraubeT20(4x)
EinstellschraubeT30fürHalterung
Wandhalterung
TechnischeDaten
Betriebsbedingungen
DasAxisProduktistfürdieVerwendungimInnen-undAußenbereichausgelegt.
35
Page 36

AXIST93GSeries
Klassikation
AXIST93G05IEC60721-4-4Klasse4M4
Beachten
DasAXIST93G05SchutzgehäuseverfügtnichtübereinHeizelement.Daherwirddie
BetriebstemperaturdurchdieBetriebstemperaturderenthaltenenKamerabestimmt.
Betriebstemperatur
AXIST93G05-20ºCbis50ºC
Luftfeuchtigkeit
AXIST93G05
Lagerbedingungen
Temperatur
AXIST93G05-20ºCbis50ºC
IEC60529IP66
NEMA250Typ4X
10bis100%rF(kondensierend)
Kabelbereich
HINWEIS
HINWEIS HINWEIS
•VerwendenSieKabelausdemangegebenenKabelbereich.
•VerwendenSieKabel,diedenörtlichenVorschriftenentsprechen.
•StellenSiesicher,dassalleKabellöcherordnungsgemäßverschlossensind.
•VerwendenSieKabeldichtungenoderKabelverschraubungen,diesowohlzur
KabeldurchführungalsauchzumKabelbereichpassen.
Durchmesser
5bis15mm
ÖffnenSiefürzusätzlicheKabellöcherdieAufbohrungeninderGehäuseunterseite.SieheÜbersicht
überdieHardwareaufSeite34.
AWG
Ca.4bis6/0
36
Page 37

AXIST93GSeries
DEUTSCH
Unterwww.axis.comndenSieInformationenüberZubehörwieKabeldichtungenund
KabelverschraubungenfürandereKabelbereiche.
InstallierenderHardware
HINWEIS
HINWEIS HINWEIS
VermeidenSieKratzer,BeschädigungenoderFingerabdrückeamFenster,dadiesdie
Bildqualitätbeeinträchtigenkann.
BeiderInstallationdesAxisProduktskönnendieKabeldurchdieWandoderanderWandentlang
geführtwerden.
LesenSiedieAnweisungen,bevorSiedasProduktinstallieren:
1.MontierenSiedieWandhalterung.SieheSeite37.AusführlicheAnweisungennden
SieinderbeiliegendenInstallationsanleitungfürdieWandhalterungoderunter
www.axis.com.
2.BauenSiedieKameraindasGehäuseein.SieheSeite38.
3.BefestigenSiedasGehäuseanderWandhalterung.SieheSeite40.
MontagederWandhalterung
VORSICHT
StellenSiesicher,dassSiediefürdasMaterial(z.B.Holz,Metall,Gipskarton,Stein)
geeignetenSchraubenundDübelverwendenunddasMaterialstabilgenugist,umdas
GesamtgewichtvonKamera,GehäuseundWandhalterungzutragen.
Beachten
•WeitereInformationenndenSieinderbeiliegendenInstallationsanleitungfürdie
Wandhalterungoderunterwww.axis.com.
•DietechnischenDatenderAnschlüssendenSieimBenutzerhandbuchderKameraunter
www.axis.com.
1.BereitenSiedieWandfürdieInstallationderWandhalterungvor.MarkierenSievordem
BohrendieBohrlöchermitderWandhalterungalsVorlage.
2.FührenSiedasNetzwerkkabelundggf.dasNetzkabeldurchdieWandhalterung.Lassen
SiezumAnschließenderKameraca.30cmKabelfrei.
3.WennSieeinzusätzlichesGerätandieKameraanschließen,z.B.einE/A-oder
Audiogerätbzw.einexternesNetzteil,wiederholenSiedieobenaufgeführtenSchritte
fürjedesGerät.
4.BefestigenSiedieWandhalterunganderWand,indemSiedieSchraubenfestziehen.
37
Page 38

AXIST93GSeries
3
4
2
1
1
2
3
4
EinbauenderKameraindasGehäuse
1.SchließenSieexternebzw.Eingabegeräteggf.anhandderAnweisungeninder
InstallationsanleitungandieKameraan,bevorSiedieseamHalteranbringen.
2.WennSieeinemicroSD-KartealslokalenSpeicherverwenden,schiebenSiedieKartein
denSD-KarteneinschubderKamera.
3.LösenSiedieHalterungsschraubenundnehmenSiedenHaltervomGehäuseab.
Wichtig
ÜberprüfenSiedieAusrichtungderKameraamHalter,siehefolgendeAbbildung.
4.BringenSiedieKameraamHalteran.RichtenSiedenKontaktunddieKameraschraube
aufdieKontakt-unddieSchraubenöffnungderKameraausundziehenSiedie
Kameraschraubefest(Drehmoment1Nm).AchtenSiedarauf,dassSiedieSchraube
nichtüberdrehen.
1
Halter
2
SchraubeT20fürHalter(2x)
3
Kontakt
4
SchraubeT20fürKamera
5.GleichenSiediePositiondesHaltersvorsichtiganundziehenSiedanndieSchrauben
desHaltersfest(Drehmoment0,5Nm).
HINWEIS
HINWEIS HINWEIS
DieAnforderungenfürdieIK10-ZertizierungkönnenSieerfüllen,indemSiediePosition
desHalterssoeinstellen,dassdasObjektiv(4)unddieKantedesGehäuses(3)wieinder
Abbildungdargestelltaneinanderausgerichtetsind.
38
Page 39

1
2
4
3
1
1
DEUTSCH
SchraubeT20fürHalter(2x)
2
Halter
3
Gehäusekante
4
Objektiv
AXIST93GSeries
6.EntfernenSiediePlastikschutzhülledesAntikondensationsbeutelsundlegenSieden
AntikondensationsbeutelinnenandieGehäusewand.
1
Antikondensationsbeutel
39
Page 40

AXIST93GSeries
1
2
4
3
AnbringendesGehäusesanderWandhalterung
HINWEIS
HINWEIS HINWEIS
•VerwendenSieKabelausdemangegebenenKabelbereich,sieheSeite36.Wenneine
andereKabeldichtungalsdiemitgelieferteverwendetwird,kannWassereindringen
unddasProduktbeschädigen.Unterwww.axis.comndenSieInformationenzu
KabeldichtungenundKabelverschraubungenfürandereKabelbereiche.
•WirdmehralseinKabelverwendet,mussjedesKabeldurcheineseparateKabeldichtung
geführtwerden.
•ÖffnenSiebeidenverwendetenKabeldichtungennureinLoch.WenneineKabeldichtung
eingerissenist,ersetzenSiediesedurcheineneue.WenneineKabeldichtunggeöffnet
bleibtodereineeingerisseneKabeldichtungverwendetwird,kannWassereindringenund
dasProduktbeschädigen.
1.LösenSiedieSchraubenanderunterenAbdeckung,undhebenSiedieobereAbdeckung
an.
2.WählenSiediezuverwendendeKabeldichtungaus,undziehenSieanderLasche,um
einLochfürdasNetzwerkkabelzuöffnen.
1
UntereAbdeckung
2
SchraubeT20füruntereAbdeckung(4x)
3
KabeldichtungM20(2x)
4
Lasche
40
Page 41

AXIST93GSeries
DEUTSCH
HINWEIS
HINWEIS HINWEIS
WenndasNetzwerkkabelübereinenvormontiertenNetzwerksteckerverfügt,entfernenSie
dieKabeldichtungundverwendenSiedasmitgelieferteAnschlussstück,umeinReißender
Kabeldichtungzuverhindern.VerwendenSiekeineNetzwerkkabel,dieNetzwerkstecker
mitDeckelnaufweisen,dadieseauchbeiVerwendungdesAnschlussstückszumReißen
derKabeldichtungführenkönnen.
3.FührenSiedasNetzwerkkabeldurchdieKabeldichtung.
4.ZiehenSiedasNetzwerkkabeleinwenigzurück,bisdieKabeldichtungbündigumdas
Kabelsitzt.
HINWEIS
HINWEIS HINWEIS
WirddasKabelnichtzurückgezogen,kannWassereindringenunddasProduktbeschädigen.
5.VergewissernSiesich,dassdieKabeldichtungordnungsgemäßsitzt.
6.SchließenSiedasNetzwerkkabelandenNetzwerkanschlussan.
7.WennSieeinNetzkabelodereinE/A-GerätandieKameraanschließen,wiederholenSie
dieobenaufgeführtenSchrittefürdasjeweiligeGerät.
41
Page 42

AXIST93GSeries
1
2
1
Netzkabel(optional)
2
Netzwerkkabel
8.SetzenSiedieuntereAbdeckungaufdieWandhalterungundziehendieSchrauben
an(Drehmoment2Nm).
9.VergewissernSiesich,dassdieKamera-LEDsdierichtigenBedingungenanzeigen.
WeitereInformationenndenSieinderInstallationsanleitungfürdieKamera.
10.LösenSiedieEinstellschraubederHalterungundrichtenSiedieKameraaufdas
gewünschteZielaus.
42
Page 43

1
2
3
4
1
DEUTSCH
UntereAbdeckung
2
SchraubeT20(4x)
3
Wandhalterung
4
EinstellschraubeT30fürHalterung
AXIST93GSeries
11.InformationenzumAnzeigendesVideostreamsndenSieinderInstallationsanleitung
derKameraoderunterwww.axis.com/techsup.
HINWEIS
HINWEIS HINWEIS
StellenSiesicher,dassbeimSchließendesGehäuseskeineKabeleingeklemmtwerden.
12.SchließenSiedasGehäuse.ZiehenSiedieSchraubenderunterenAbdeckungimWechsel
jeweilswenigeUmdrehungenan,bissiefestsitzen(Drehmoment1,5Nm).Aufdiese
Weisewirdsichergestellt,dassdieDichtungderunterenAbdeckunggleichmäßigsitzt.
WeitereInformationen
BesuchenSiedasAxis-Schulungszentrumwww.axis.com/academyfüranregendeSchulungen,
Webinare,LernprogrammeundAnleitungen.
43
Page 44

AXIST93GSeries
Gewährleistung
InformationenzurGewährleistungderAxisProdukteundhierzuverbundeneInformationen,nden
Sieunterwww.axis.com/warranty/
44
Page 45

AXIST93GSeries
ITALIANO
Informazionidisicurezza
Leggereconattenzionequestaguidaall'Installazioneprimadiinstallareildispositivo.Conservare
questodocumentoperusifuturi.
Livellidipericolo
PERICOLO
AVVERTENZAIndicaunasituazionepericolosache,senonevitata,puòprovocare
ATTENZIONE
VVISO
A AAVVISO VVISO
Indicaunasituazionepericolosache,senonevitata,provocamorte
olesionigravi.
lamorteolesionigravi.
Indicaunasituazionepericolosache,senonevitata,puòprovocare
lesionimedieominori.
Indicaunasituazioneche,senonevitata,puòdanneggiarela
proprietà.
Altrilivellidimessaggio
ImportanteIndicainformazioniimportanti,essenzialiperilcorretto
NotaIndicainformazioniutilicheaiutanoaottenereilmassimodal
funzionamentodeldispositivo.
dispositivo.
45
Page 46

AXIST93GSeries
Istruzionidisicurezza
VVISO
A AAVVISO VVISO
•IlprodottoAxisdeveessereutilizzatoinconformitàalleleggiealledisposizionilocali.
•ConservareilprodottoAxisinunambienteasciuttoeventilato.
•EvitarediesporreilprodottoAxisaurtiopressionieccessive.
•Noninstallareilprodottosusupporti,supercioparetiinstabili.
•UtilizzaresolostrumentiapplicabiliquandosiinstallaildispositivoAxis.Sesiutilizzauna
forzaeccessivaconglistrumentidell'alimentazioneèpossibilecausaredannialdispositivo.
•Nonutilizzaresostanzechimiche,agenticausticiodetergentiaerosol.
•Utilizzareunpannopulitoinumiditoinacquapuraperlapulizia.
•Utilizzaresoloaccessoricompatibiliconlespecichetecnichedelprodotto.Questi
possonoesserefornitidaAxisodaterzeparti.
•UtilizzaresolopartidiricambioforniteoconsigliatedaAxis.
•Nontentarediriparareilprodottodasoli.Contattarel'assistenzaoilrivenditoreAxis
perquestionirelativeallamanutenzione.
Trasporto
VVISO
A AAVVISO VVISO
•DuranteiltrasportodeldispositivoAxis,utilizzarel'imballaggiooriginaleoequivalente
perevitaredannialdispositivo.
46
Page 47

AXIST93GSeries
ITALIANO
Guidaall'installazione
Lapresenteguidaall'installazionefornisceleistruzioninecessarieperinstallarelacustodia
protettivaAXIST93G05.
Perinstallarelatelecamerainrete,consultarelaguidaall'installazioneindotazioneconil
dispositivo.Peraltreinformazionisull'utilizzodellatelecamera,consultarelaguidaperl'utente
sulsitowww.axis.com
Proceduradiinstallazione
1.Assicurarsicheilcontenutodellaconfezione,glistrumentiealtrimaterialinecessariper
l'installazionesianoinordine.Consultarepagina47.
2.Studiareladescrizionedell'hardware.Consultarepagina48.
3.Studiarelespeciche.Consultarepagina49.
4.Installazionedell’hardware.Consultarepagina51.
Contenutodellaconfezione
•CustodiaprotettivaAXIST93G05
•GuarnizioneCM20AXIS(x1)
•Sacchettodell'essiccante
•CacciaviteTorxT20
•ProtezionedelconnettoreAXISA(x1)
•SupportopermontaggioapareteAXIST94Q01A
-PuntadacacciaviteT30
•Materialistampati
-Guidaall'installazione(questodocumento)
-Guidaall'installazionedelsupportoperilmontaggioapareteAXIST94Q01A
Strumenticonsigliati
•Trapano(perl'installazionedelsupportoperilmontaggioaparete)
•Cacciaviteperpunta
Accessoriopzionali
•InterruttoreperportaAXISA
•ScatoladicollegamentoAXIST94R01P
47
Page 48

AXIST93GSeries
1
2
4
5
6
7
8
10
3
9
•Illuminatori
•Supportiperilmontaggiodell'alloggiamento
•Pressacavieguarnizionipercavi
•ArmadiodisorveglianzaAXIST98A16-VE
•SupportiperilmontaggiosupaloAXIST91A47
•CavointernostaffaasofttoVTWCM4A
•SupportoperilmontaggioadangoloVTWCWA
VisitareilsitoWebwww.axis.comperottenereinformazionisugliaccessoridisponibili.
Panoramicadell'hardware
Custodia
1
Coperchiosuperiore
2
Finestraanteriore
3
Sacchettodell'essiccante
4
Supportodellatelecamera
5
Pin
6
VitedellatelecameraT20
7
VitedelsupportoT20(2x)
8
Preforiperulterioriforipericavi
48
Page 49

Montaggioaparete
1
3
4
5
2
ITALIANO
9
GuarnizionecavoM20(2x)
10
Cavodisicurezza
AXIST93GSeries
1
Cavodirete(dainstradareattraversolastaffaaparete)
2
Cavodialimentazione(dainstradareattraversolastaffaaparete)(perdispositivi
dotatidiconnettoredialimentazione)
3
ViteT20(4x)
4
VitediregolazionedellastaffaT30
5
Supportopermontaggioaparete
Datitecnici
Condizionidifunzionamento
IldispositivoAxisèdestinatoall'usointernoedesterno.
49
Page 50

AXIST93GSeries
Classicazione
AXIST93G05IEC60721-4-4Classe4M4
Nota
LacustodiaprotettivaAXIST93G05nondisponediriscaldatore.Pertanto,ilimitidella
temperaturadifunzionamentosibasanosulletemperaturedellatelecameranellacustodia.
Temperaturadiesercizio
AXIST93G05
Umidità
AXIST93G05
Condizionidistoccaggio
Temperatura
AXIST93G05
IEC60529IP66
NEMA250Tipo4X
Da-20ºCa50ºC(da-4ºFa122ºF)
10-100%(umiditàrelativaconcondensa)
Da-20ºCa50ºC(da-4ºFa122ºF)
Areadeicavi
VVISO
A AAVVISO VVISO
•Utilizzarecavidilunghezzaadeguataall'areaspecicata.
•Selezionareicavinelrispettodellenormativelocali.
•Vericarecheiforideicavisianocorrettamentesigillati.
•Usareguarnizionipercaviopressacavicorrispondentialforoeall'areadeicavi.
Diametro
Da5a15mm(da0,197a0,591pollici)
Percreareulterioriforipericavi,aprireipreforicollocatinellaparteinferioredellacustodia.
ConsultarePanoramicadell'hardwareallapagina48.
Perinformazionisugliaccessoridisponibili,comeadesempioguarnizionipercaviepressacavi
adattiperaltreareedeicavi,visitareilsitoWebwww.axis.com.
AWG
Approssimativamenteda4a6/0
50
Page 51

AXIST93GSeries
ITALIANO
Installazionedell'Hardware
VVISO
A AAVVISO VVISO
Nongrafare,danneggiareolasciareimprontedigitalisullanestraperpreservarela
qualitàdell'immagine.
ÈpossibileinstallareildispositivoAxisinstradandoicaviattraversoolungolaparete.
Leggeretutteleistruzioniprimadiinstallareilprodotto:
1.Installazionedelsupportoperilmontaggioaparete.Consultarepagina51.Peristruzioni
dettagliate,consultarelaguidaall'installazionedelsupportodimontaggioaparete
presentenellaconfezioneovisitarel'indirizzowww.axis.com
2.Installarelatelecameranellacustodia.Consultarepagina51.
3.Fissarelacustodiaalsupportopermontaggioaparete.Consultarepagina54.
Installazionedelsupportoperilmontaggioaparete
ATTENZIONE
Vericarechelevitieitassellisianoadattialmaterialedellaparete(es.legno,metallo,
cartongesso,pietra)echeilmaterialesiaingradodisosteneretelecamera,custodiae
supportoperilmontaggioaparete.
Nota
•Perinformazioni,consultareanchelaguidaall'installazionedelsupportodimontaggioa
paretepresentenellaconfezioneedisponibileall'indirizzowww.axis.com
•Perlespecichetecnichedeiconnettori,consultarelaguidaperl'utentedellatelecamera
sulsitowww.axis.com
1.Prepararelapareteperl'installazionedelsupporto.Utilizzareilsupportoperilmontaggio
aparetecomeproloecontrassegnareipuntidatrapanare.
2.Inserireilcavodiretee,senecessario,ilcavodialimentazioneattraversolastaffaper
ilmontaggioaparete.Lasciarecirca30cm(1 1,8pollici)dicavoperilcollegamento
allatelecamera.
3.Incasodiconnessionediundispositivo(es.diI/O,audiooalimentazioneesterna)alla
telecamera,ripetereilpassaggioprecedente(seconsentitoperildispositivoinquestione).
4.Fissarelastaffaallapareteserrandoleviti.
Installazionedellatelecameranellacustodia
1.Incasodiconnessionediundispositivoesterno/diinputallatelecamera,rispettarele
istruzioniriportatenellaguidaall'installazionedellatelecamera,primadissarela
telecameraalsupporto.
51
Page 52

AXIST93GSeries
3
4
2
1
1
2
3
4
2.SesiutilizzaunaschedamicroSDperl'archiviazionelocale,inserirlanell'appositoslot
dellatelecamera.
3.Allentarelevitidelsupportoerimuovereilsupportodallacustodia.
Importante
Assicurarsichelatelecameravengassataalsupportoconl'orientamentocorretto,come
mostratonell'illustrazionequisotto.
4.Collegarelatelecameraalsupporto.Allineareilpernoelavitedellatelecameraconil
forodelpernoeilforolettatosullatelecamera,quindiserrarelavitedellatelecamera
(conunacoppiadi1Nm).Nonserrarelaviteinmanieraeccessiva.
1
Supporto
2
VitedelsupportoT20(2x)
3
Pin
4
VitedellatelecameraT20
5.Regolareconcuralaposizionedelsupportoeserrareleviti(conunacoppiadi0,5Nm).
VVISO
A AAVVISO VVISO
PersoddisfareirequisitidellaclassicazioneIK10,regolarelaposizionedelsupportoin
modochel'obiettivodellatelecamera(4)risultiallineatoconilbordodellacustodia(3),
comemostratonell'illustrazione.
52
Page 53

1
2
4
3
1
1
ITALIANO
VitedelsupportoT20(2x)
2
Supporto
3
Bordodellacustodia
4
Obiettivodellatelecamera
AXIST93GSeries
6.Rimuoverelabustadiplasticadelsacchettodell'essiccanteecollocareilsacchetto
dell'essiccantesullapareteinternadellacustodia.
1
Sacchettodell'essiccante
53
Page 54

AXIST93GSeries
1
2
4
3
Installazionedellacustodiasulsupportoperilmontaggioaparete
VVISO
A AAVVISO VVISO
•Utilizzarecavidilunghezzaadeguataall'areacavispecicata,vederepagina50.L'utilizzo
diunaguarnizionepercavidiversadaquellaindotazionepuòcausareinltrazionid'acqua
edannialprodotto.Perinformazionisulleguarnizionipercavieipressacaviadattiper
altreareedeicavi,visitareilsitoWebwww.axis.com.
•Utilizzandopiùdiuncavo,instradareciascuncavoattraversounaguarnizioneseparata.
•Aprireunforosolonelleguarnizioniutilizzateesostituirleincasodidanno.Una
guarnizionepercaviapertaodanneggiatapotrebbecausareinltrazionid'acquanel
prodottoegravidanni.
1.Allentarelevitidelcoperchioinferioreesollevareilcoperchiosuperiore.
2.Sceglierelaguarnizionepercavidausareetirarelalinguettaperaprireilforoper
ilcavodirete.
1
Coperchioinferiore
2
VitedelcoperchioinferioreT20(4x)
3
GuarnizionecavoM20(2x)
4
Linguetta
VVISO
A AAVVISO VVISO
Seilcavodiretedisponediunconnettorepreinstallato,rimuoverelaguarnizionepercavie
usarelaprotezionedelconnettoreindotazioneperevitaredanniallaguarnizione.Non
usarecavidiretedotatidiconnettoridiretecontappi,poichépotrebberodanneggiarela
guarnizionedelcavononostantelaprotezionedelconnettore.
54
Page 55

3.Inserireilcavodireteattraversolaguarnizionepercavi.
ITALIANO
4.Tiraredelicatamenteilcavodireteinmododaadattarelaguarnizionealcavo.
VVISO
A AAVVISO VVISO
Seilcavononvienetiratopotrebberovericarsiinltrazionid'acquaedannialdispositivo.
AXIST93GSeries
5.Vericareilcorrettomontaggiodellaguarnizionedelcavo.
6.Collegareilcavodiretealconnettoredirete.
7.IncasodiconnessionediuncavodialimentazioneodiundispositivoI/Oallatelecamera,
ripetereipassaggiprecedenti(seconsentitoperildispositivoinquestione).
55
Page 56

AXIST93GSeries
1
2
1
Cavodialimentazione(opzionale)
2
Cavodirete
8.Inserireilcoperchioinferioresulsupportoperilmontaggioapareteeserrareleviti
(conunacoppiadi2Nm).
9.VericarecheiLEDdellatelecameraindichinolecorrettecondizioni.
Consultarelaguidaall'installazionedellatelecamera.
10.Allentarelavitediregolazionedellastaffaperorientarelatelecameraversoilpunto
desiderato.
56
Page 57

1
2
3
4
1
ITALIANO
Coperchioinferiore
2
ViteT20(4x)
3
Montaggioaparete
4
VitediregolazionedellastaffaT30
AXIST93GSeries
11.Perinformazionisullavisualizzazionedelussovideo,consultarelaguidaall'installazione
dellatelecameraovisitareilsitowww.axis.com/techsup
VVISO
A AAVVISO VVISO
Vericarecheicavinonrestinoincastratidurantelachiusuradellacustodia.
12.Chiuderelacustodia.Girarelevitidelcoperchioinferioreinmanieraalternatanoa
quandononsarannotutteserrate(conunacoppiadi1,5Nm).Inquestomodoèpossibile
comprimerelaguarnizionedelcoperchioinferioreinmodouniforme.
UlterioriInformazioni
VisitareilCentrodiapprendimentoAxisallapaginawww.axis.com/academyperservizidi
formazioneutili,webinar,tutorialeguide.
57
Page 58

AXIST93GSeries
Informazionisullagaranzia
PerinformazionisullagaranziadeldispositivoAxiseinformazioniadessorelative,consultare
lapaginawww.axis.com/warranty/
58
Page 59

AXIST93GSeries
ESPANÕL
Informacióndeseguridad
LeaestaGuíadeinstalaciónconatenciónantesdeinstalarelproducto.GuardelaGuíade
instalaciónparapoderconsultarlaenotromomento.
Nivelesdepeligrosidad
PELIGRO
ADVERTENCIA
ATENCIÓN
VISO
A AAVISO VISO
Indicaunasituaciónpeligrosaque,sinoseevita,provocará
lesionesgravesolamuerte.
Indicaunasituaciónpeligrosaque,sinoseevita,puedeprovocar
lesionesgravesolamuerte.
Indicaunasituaciónpeligrosaque,sinoseevita,puedeprovocar
lesionesmoderadasoleves.
Indicaunasituaciónpeligrosaque,sinoseevita,puedeprovocar
dañosmateriales.
Otrosnivelesdemensaje
ImportanteIndicainformaciónimportantequeesfundamentalparaqueel
NotaIndicainformaciónútilqueayudaaaprovecharelproductoal
productofuncionecorrectamente.
máximo.
59
Page 60

AXIST93GSeries
Instruccionesdeseguridad
VISO
A AAVISO VISO
•ElproductodeAxisdebeutilizarsedeacuerdoconlalegislaciónylanormativalocales.
•AlmaceneelproductodeAxisenunentornosecoyventilado.
•EvitelaexposicióndelproductodeAxisachoquesoaunafuertepresión.
•Noinstaleelproductoensoportes,superciesoparedesinestables.
•UtilicesololasherramientascorrespondientescuandoinstaleelproductodeAxis.La
aplicacióndeunafuerzaexcesivaconherramientaseléctricaspuedeprovocardaños
enelproducto.
•Noutilicelimpiadoresenaerosol,agentescáusticosniproductosquímicos.
•Limpieconunpañolimpiohumedecidoconaguapura.
•Utilicesoloaccesoriosquecumplanconlasespecicacionestécnicasdelproducto.Estos
accesorioslospuedeproporcionarAxisountercero.
•UtilicesolopiezasderepuestoproporcionadasorecomendadasporAxis.
•Nointenterepararelproductoustedmismo.Póngaseencontactoconelserviciode
asistenciatécnicadeAxisoconsudistribuidordeAxisparatratarasuntosdereparación.
Transporte
VISO
A AAVISO VISO
•CuandotransporteelproductodeAxis,utiliceelembalajeoriginalounequivalentepara
evitardañosenelproducto.
60
Page 61

AXIST93GSeries
ESPANÕL
Guíadeinstalación
EstaGuíadeinstalaciónincluyelasinstruccionesnecesariasparainstalarlacarcasaprotectora
AXIST93G05.
Parainstalarlacámaraenlared,consultelaGuíadeinstalaciónproporcionadaconlacámara.
Paraconocermásdetallesacercadelacámara,consulteelManualdelusuariodisponibleen
www.axis.com.
Pasosdelainstalación
1.Asegúresedequedisponedelcontenidodelpaquete,lasherramientasylosdemás
materialesnecesariosparalainstalación.Veapágina61.
2.Estudielainformacióngeneraldelhardware.Veapágina62.
3.Estudielasespecicaciones.Veapágina63.
4.Instaleelhardware.Veapágina65.
Contenidodelpaquete
•CarcasadeprotecciónAXIST93G05
•JuntaAXISCM20(1)
•Bolsadesecante
•DestornilladorTorxT20
•ProtectordelconectorAdeAXIS(1)
•MontajeenparedAXIST94Q01A
-BrocaT30
•Materialesimpresos
-Guíadeinstalación(estedocumento)
-GuíadeinstalaciónparaelmontajeenparedAXIST94Q01A
Herramientasrecomendadas
•Taladro,parainstalarelmontajeenpared
•Destornilladorparalapuntadetornillos
Accesoriosopcionales
•InterruptordepuertaAXISA
•CajaposteriordeconexionesAXIST94R01P
61
Page 62

AXIST93GSeries
1
2
4
5
6
7
8
10
3
9
•Iluminadores
•Montajesencarcasa
•Juntasdecableyprensaestopas
•ArmariodevigilanciaAXIST98A16-VE
•MontajesenposteAXIST91A47
•CableWCM4AinteriordeescuadradetechoVT
•MontajeenesquinaVTWCWA
Paraobtenerinformaciónsobrelosaccesoriosdisponibles,visitewww.axis.com.
Informacióngeneraldelhardware
Carcasa
1
Cubiertasuperior
2
Ventanadelantera
3
Bolsadesecante
4
Soportedecámara
5
Pin
6
TornillodelacámaraT20
7
TornillosdelsoporteT20(2)
8
Oriciosperforadosparacablesadicionales
62
Page 63

Montajeenpared
1
3
4
5
2
ESPANÕL
9
JuntasdecableM20(2)
10
Cabledeseguridad
AXIST93GSeries
1
Cabledered(guiadoatravésdelaescuadradepared)
2
Cabledealimentación(guiadoatravésdelaescuadradepared)(paratodoslos
productosequipadosconconectordealimentación)
3
TornillosT20(4)
4
TornillodeajustedeescuadraT30
5
Montajeenpared
Especicaciones
Condicionesdefuncionamiento
ElproductodeAxissehacreadoparasuusoeninterioresyexteriores.
63
Page 64

AXIST93GSeries
Clasicación
AXIST93G05IEC60721-4-4Clase4M4
Nota
LacarcasadeprotecciónAXIST93G05noincluyecalentador.Porlotanto,loslímites
detemperaturadefuncionamientoestándeterminadosporlastemperaturasde
funcionamientodelacámaraempotrada.
Temperaturadefuncionamiento
AXIST93G05De-20ºCa50ºC
Humedad
AXIST93G05
Condicionesdealmacenamiento
Temperatura
AXIST93G05De-20ºCa50ºC
IEC60529IP66
NEMA250Tipo4X
Humedadrelativa
del10al100%(concondensación)
Áreadecableado
VISO
A AAVISO VISO
•Utilicecablesquepuedanpermanecerdentrodeláreadecableadoespecicada.
•Elijacablesquecumplanlanormativalocalaplicable.
•Asegúresedequetodoslosoriciosparacablesesténdebidamentesellados.
•Utilicejuntasdecableoprensaestopasqueseajustentantoaloricioparacablecomo
aláreadecableado.
Diámetro
De5a15mm
Encasodenecesitaroriciosparacablesadicionales,abralosoriciospreperforadossituadosenla
parteinferiordelacarcasa.VeaInformacióngeneraldelhardwareenlapágina62.
AWG
Aproximadamentede4a6/0
64
Page 65

AXIST93GSeries
ESPANÕL
Paraobtenerinformaciónacercadelosaccesorios,comojuntasdecableyprensaestopaspermitidos
paraotrasáreasdecableado,visitewww.axis.com.
Instalacióndelhardware
VISO
A AAVISO VISO
Presteatenciónparanoarañar,dañarnidejarlashuellasenlaventanadelacarcasa,
puestoqueestopuedeprovocarunadisminucióndelacalidaddeimagen.
ElproductodeAxispuedeinstalarseguiandoloscablesatravésdelaparedosobreesta.
Leatodaslasinstruccionesantesdeinstalarelproducto:
1.Instaleelmontajeenpared.Veapágina65.Paraobtenerinstruccionesdetalladas,
consultelaGuíadeinstalacióndelmontajeenpared,incluidaenelpaqueteodisponible
enwww.axis.com.
2.Instalacióndelacámaraenlacarcasa.Consultepágina66.
3.Fijelacarcasaalmontajeenpared.Consultepágina68.
Instalacióndelmontajeenpared
ATENCIÓN
Asegúresedequelostornillosytacosseanlosadecuadosparaelmaterial(p.ej.madera,
metal,placasdeyeso,piedra)yqueelmaterialsealosucientementeresistentepara
soportarelpesocombinadodelacámara,lacarcasayelmontajeenpared.
1.Preparelaparedparainstalarelmontajeenpared.Utilicelaescuadradeparedcomo
unaplantillaymarquelaubicacióndelosoriciosantesdeperforarlos.
2.Guíeelcablederedatravésdelaescuadradepared.Dejeunos30cmdecable
aproximadamenteparaconectarloalacámara.
3.Guíeelcabledealimentación(AXIST93F10)atravésdelaescuadradepared.Dejeunos
30cmdecableaproximadamenteparaconectarloalacámara.
4.Siseconectaundispositivoauxiliaralacámara,porejemploundispositivode
alimentaciónexterno,undispositivodeE/Sounodeaudio,repitaelpasoanterior
aplicadoacadadispositivoencuestión.
5.Fijelaescuadradeparedapretandolostornillos.
Nota
•Paraobtenerinstruccionesdetalladas,consultelaGuíadeinstalacióndelmontajeen
pared,incluidaenelpaqueteydisponibleenwww.axis.com.
•Sideseaconocermásespecicacionestécnicas,consulteelManualdelusuarioen
www.axis.com
65
Page 66

AXIST93GSeries
3
4
2
1
1
2
3
4
Instalacióndelacámaraenlacarcasa
1.Siconectaalacámaradispositivosexternos/deentrada,conéctelosdeacuerdoconlas
instruccionesdescritasenlaGuíadeinstalacióndelacámaraantesdejarlacámara
alsoporte.
2.EncasodeutilizarunatarjetamicroSDcomounidaddealmacenamientolocal,insertela
tarjetaenlaranuraparatarjetasSDdelacámara.
3.Aojelostornillosdelsoporteyextráigalodelacarcasa.
Importante
Asegúresedejarlacámaraalsoporteconlaorientacióncorrecta,vealailustracióna
continuación.
4.Fijelacámaraalsoporte.Alineeelpinyeltornillodelacámaraconeloricioyel
receptáculodetornilloqueseencuentranenlacámarayaprieteeltornillodelacámara
(pardetorsiónde1Nm).Asegúresedenoapretareltornilloenexceso.
1
Soporte
2
TornillosdelsoporteT20(2)
3
Pin
4
TornillodelacámaraT20
5.Ajusteconcuidadolaposicióndelsoportey,acontinuación,aprietelostornillosdel
soporte(pardetorsiónde0,5Nm).
VISO
A AAVISO VISO
AndecumplirlosrequisitosdelaclasicaciónIK10,ajustelaposicióndelsoportede
modoqueelobjetivodelacámara(4)quedealineadoconelbordedelacarcasa(3),vea
lailustración.
66
Page 67

1
2
4
3
1
1
ESPANÕL
TornillosdelsoporteT20(2)
2
Soporte
3
Bordedelacarcasa
4
Objetivodelacámara
AXIST93GSeries
6.Retireelenvoltoriodeplásticodelabolsadesecanteycolóquelaenlaparedinterior
delacarcasa.
1
Bolsadesecante
67
Page 68

AXIST93GSeries
1
2
4
3
Instalacióndelacarcasaenelmontajeenpared
VISO
A AAVISO VISO
•Utiliceloscablesquepermanecendentrodeláreadecableadoespecicada,veapágina
64.Siutilizaotrajuntadecabledistintadelaproporcionada,elaguapodríaltrarsey
dañarelproducto.Paraobtenermásinformaciónacercadelasjuntasdecableydelos
prensaestopaspermitidosparaotrasáreasdecableado,visitewww.axis.com.
•Siseutilizamásdeuncable,deberápasarsecadacableatravésdeunajuntadistinta.
•Soloabraunoricioenlasjuntasdecablequesevayanautilizarysialgunajuntaestá
desgastada,reemplácelaconunanueva.Sidejalajuntadecableabiertaoutilizauna
desgastada,elaguapodríaltrarseydañarelproducto.
1.Aojelostornillosdelacubiertainferiorylevantelacubiertasuperior.
2.Seleccionelajuntadecablequevayaautilizarytiredelalengüetaparaabrirunoricio
paraelcabledered.
1
Cubiertainferior
2
TornillosT20decubiertainferior(4)
3
JuntasdecableM20(2)
4
Lengüeta
VISO
A AAVISO VISO
Sielcablederedincluyeunconectorderedpremontado,retirelajuntadecableyutilice
elprotectordelconectorsuministradoparaevitarquelajuntadecableserompa.Evite
utilizarcablesderedconconectoresderedrecubiertosyaquepodríanrasgarlajuntade
cableapesardeutilizarelprotector.
68
Page 69

AXIST93GSeries
ESPANÕL
3.Empujeelcablederedatravésdelajuntadecable.
4.Tiredelcablederedhaciaatrássuavementedemaneraquelajuntadecableseajusteen
elcable.
VISO
A AAVISO VISO
Sinosetiradelcablehaciaatrás,podríaltrarseaguaydañarelproducto.
5.Asegúresedequelajuntadecableencajecorrectamente.
6.Conecteelcablederedalconectordered.
7.SiseconectauncabledealimentaciónoundispositivodeE/Salacámara,repitalos
pasosanterioresaplicadosacadadispositivoencuestión.
69
Page 70

AXIST93GSeries
1
2
1
Cabledealimentación(opcional)
2
Cabledered
8.Coloquelacubiertainferiorsobreelmontajeenparedyaprietelostornillos(parde
torsiónde2Nm).
9.AsegúresedequelosindicadoresLEDdelacámaraindicanlascondicionescorrectas.
VealaGuíadeinstalacióndelacámara.
10.Aojeeltornillodeajustedelaescuadraparaorientarlacámarahaciaelpuntode
interés.
70
Page 71

1
2
3
4
1
ESPANÕL
Cubiertainferior
2
TornillosT20(4)
3
Montajeenpared
4
TornillodeajustedeescuadraT30
AXIST93GSeries
11.Paraobtenerinformaciónsobrecómoverlatransmisióndevídeo,consultelaGuíade
instalacióndelacámaraovisitewww.axis.com/techsup.
VISO
A AAVISO VISO
Asegúresedenopillarningúncablealcerrarlacarcasa.
12.Cierrelacarcasa.Asegúresedeapretarlostornillosdelacubiertainferiorpocoapoco,
deformaalterna,hastaqueesténbienapretados(pardetorsiónde1,5Nm).Deeste
modocontribuiráagarantizarquelajuntadelacubiertainferiorsehacomprimido
uniformemente.
Másinformación
Visiteelcentrodeaprendizajedewww.axis.com/academyparaconsultarguías,tutoriales,
seminarioswebycursosquepuedenresultarleútiles.
71
Page 72

AXIST93GSeries
Informacióndegarantía
ParaobtenermásdetallessobrelagarantíadelproductoAxisylainformaciónrelacionadaconella,
consultewww.axis.com/warranty/
72
Page 73

AXIST93GSeries
ò
ò
¨
¨
¾
¾
安
全
情
安 安
本製品を設置する前に、このインストールガイドをよくお読みください。インス
トールガイドは、後で参照できるように保管しておいてください。
危
危 危
危 危危険 険
警 警警告 告
注 注注意 意
注 注注記 記
そ
そ そ
報
全 全
情 情
報 報
険
レ
ベ
険 険
険
告
意
記
の
の の
ル
レ レ
ベ ベ
ル ル
回避しない場合、死亡または重傷につながる危険な状
態を示します。
回避しない場合、死亡または重傷につながるおそれのあ
る危険な状態を示します。
回避しない場合、軽傷または中程度の怪我につながるお
それのある危険な状態を示します。
回避しない場合、器物の破損につながるおそれのある状
態を示します。
他
の
メ
ッ
セ
ー
ジ
レ
ベ
他 他
の の
メ メ
ッ ッ
セ セ
ー ー
ジ ジ
ル
レ レ
ベ ベ
ル ル
重要
注意製品を最大限に活用するために役立つ有用な情報を示
製品を正しく機能させるために不可欠な重要情報を示
します。
します。
73
Page 74

AXIST93GSeries
安
全
手
安 安
記
注 注注記 記
輸
輸 輸
記
注 注注記 記
順
全 全
手 手
順 順
•本製品は、お使いになる地域の法律や規制に準拠して使用してください。
•本製品は乾燥した換気のよい環境に保管してください。
•本製品に衝撃または強い圧力を加えないでください。
•本製品を不安定なブラケット、表面、または壁に設置しないでください。
•本製品を設置する際には、適切な工具のみを使用してください。電動工具を
使用して過剰な力をかけると、製品が損傷することがあります。
•化学薬品、腐食剤、噴霧式クリーナーは使用しないでください。
•清掃には、きれいな水に浸した清潔な布を使用してください。
•製品の技術仕様に準拠したアクセサリーのみを使用してください。これらの
アクセサリーは、Axisまたはサードパーティから入手できます。
•Axisが提供または推奨する交換部品のみを使用してください。
•製品を自分で修理しないでください。修理については、Axisサポートまたは
販売代理店にお問い合わせください。
送
送 送
•本製品を運搬する際は、製品が損傷しないよう、元の梱包か同等の梱包を
使用してください。
74
Page 75

AXIST93GSeries
ò
ò
¨
¨
¾
¾
イ
ン
ス
ト
ー
ル
ガ
イ
イ イ
ン ン
ス ス
ト ト
ー ー
ル ル
このインストールガイドでは、AXIST93G05プロテクティブハウジングをインス
トールする手順について説明します。
カメラをネットワークにインストールする手順については、カメラに付属するインス
トールガイドを参照してください。カメラのその他の情報については、Axisのホーム
ページ(
設
設 設
パ
パ パ
www .axis.com
置
手
順
置 置
手 手
順 順
1.パッケージの内容、ツールなど、設置に必要な物がそろっているかを確認
します。
2.ハードウェアの概要を確認します。
3.仕様を確認します。
4.ハードウェアを設置します。
ッ
ケ
ー
ッ ッ
ケ ケ
ー ー
•AXIST93G05プロテクティブハウジング
•AXISガスケットCM20x1
•乾燥剤
•トルクスT20ドライバー
•AXISコネクタガードAx1
•AXIST94Q01A壁面取付ブラケット
•印刷物
75 ペ ー ジ
ジ
の
ジ ジ
の の
‑スクリュービットT30
‑インストールガイド(本書)
‑AXIST94Q01A壁面取付ブラケットのインストールガイド
ド
ガ ガ
イ イ
ド ド
)でユーザーズマニュアルを参照してください。
を参照してください。
76 ペ ー ジ
78 ペ ー ジ
内
容
内 内
容 容
を参照してください。
79 ペ ー ジ
を参照してください。
を参照してください。
推
奨
ツ
ー
推 推
奨 奨
•ドリル–壁面取付ブラケットの取り付けに使用
•スクリュービット用ドライバー
オ
プ
オ オ
プ プ
•AXISドアスイッチA
•AXIST94R01Pコンジットバックボックス
ル
ツ ツ
ー ー
ル ル
シ
ョ
ン
ア
ク
セ
サ
リ
シ シ
ョ ョ
ン ン
ア ア
ク ク
セ セ
ー
サ サ
リ リ
ー ー
75
Page 76

AXIST93GSeries
1
2
4
5
6
7
8
10
3
9
•イルミネーター
•ハウジング取付金具
•ケーブルガスケットとケーブルグランド
•AXIST98A16‑VEサーベイランスキャビネット
•AXIST91A47ポール取付金具
•VT天井ブラケット内部ケーブルWCM4A
•VTコーナー取付金具WCWA
利用可能なアクセサリーについては、
ハ
ー
ド
ウ
ェ
ア
の
概
ハ ハ
ー ー
ド ド
ウ ウ
ェ ェ
ア ア
ハ
ウ
ジ
ン
ハ ハ
ウ ウ
グ
ジ ジ
ン ン
グ グ
要
の の
概 概
要 要
www .axis.com
を参照してください。
1
上 蓋
2
正 面 ウ ィ ン ド ウ
3
乾 燥 剤
4
カ メ ラ ホ ル ダ ー
5
ピ ン
6
カ メ ラ ネ ジ T20
7
ホ ル ダ ー ネ ジ T20 x2
76
Page 77

AXIST93GSeries
1
3
4
5
2
ò
ò
¨
¨
¾
¾
8
追 加 の ケ ー ブ ル 孔 用 ド リ ル ア ウ ト
9
ケ ー ブ ル ガ ス ケ ッ ト M20 x2
10
安 全 ワ イ ヤ ー
壁
面
取
付
ブ
ラ
ケ
ッ
壁 壁
面 面
取 取
付 付
ブ ブ
ラ ラ
ト
ケ ケ
ッ ッ
ト ト
1
ネ ッ ト ワ ー ク ケ ー ブ ル ( 壁 面 ブ ラ ケ ッ ト に 通 す )
2
電 源 ケ ー ブ ル ( 壁 面 ブ ラ ケ ッ ト に 通 す ) ( 電 源 コ ネ ク タ を 搭 載 し た
製 品 用 )
3
ネ ジ T20 x4
4
ブ ラ ケ ッ ト 調 節 ネ ジ T30
5
壁 面 取 付 ブ ラ ケ ッ ト
77
Page 78

AXIST93GSeries
仕
様
仕 仕
様 様
動
作
条
動 動
本製品は屋内および屋外対応モデルです。
等 等等級 級
AXIST93G05
注意
動 動動作 作作温 温温度 度
AXIST93G05–20ºC~50ºC
湿 湿湿度 度
AXIST93G05
件
作 作
条 条
件 件
級
IEC60721‑4‑4Class4M4
IEC60529IP66
NEMA250Type4X
AXIST93G05プロテクティブハウジングはヒーターを搭載していないため、動
作温度範囲は収納するカメラの動作温度によって決まります。
度
度
10~100%RH(結露可)
保
管
条
保 保
温 温温度 度
AXIST93G05‑20ºC~50ºC
ケ
ケ ケ
注 注注記 記
件
管 管
条 条
件 件
度
ー
ブ
ル
エ
リ
ー ー
ブ ブ
ル ル
記
•指定のケーブルエリアに収まるケーブルを使用してください。
•地域の規制に適合したケーブルを選択してください。
•すべてのケーブル孔が適切に密封されていることを確認してください。
•ケーブル孔とケーブルエリアの両方に適合するケーブルガスケットまたは
ケーブルグランドを使用してください。
ア
エ エ
リ リ
ア ア
78
Page 79

AXIST93GSeries
ò
ò
¨
¨
¾
¾
WG
径
直 直直径 径
5~15mm
ケーブル孔を追加する場合は、ハウジングの下部にあるドリルアウトを開けてくださ
い。
76 ペ ー ジ の 、 ハ ー ド ウ ェ ア の 概 要
他のケーブルエリアに対応するケーブルガスケット、ケーブルグランドなどのアクセ
サリーについては、
ハ
ー
ド
ハ ハ
記
注 注注記 記
本製品は、ケーブルを壁に沿わせたり、壁の中を通して配線して、設置すること
ができます。
製品を取り付ける前に、すべての説明に目を通してください。
ウ
ー ー
ド ド
ウ ウ
画質低下の原因になるため、ウィンドウに傷や指紋を付けたり、損傷しない
ように注意してください。
www .axis.com
ェ
ア
の
ェ ェ
設
ア ア
の の
設 設
を参照してください。
置
置 置
A AAWG WG
約4~6/0
を参照してください。
1.壁面取付ブラケットの取り付け。
り付け手順については、壁面取付ブラケットに同梱のインストールガイ
ド、またはwww.axis.comを参照してください。
2.カメラのハウジングへの収納。
3.ハウジングの壁面取付ブラケットへの取り付け。
ください。
壁
面
取
付
ブ
ラ
ケ
ッ
ト
の
取
り
壁 壁
面 面
取 取
付 付
ブ ブ
ラ ラ
ケ ケ
ッ ッ
ト ト
の の
意
注 注注意 意
ネジやプラグ類が、壁の材質(木、金属、乾式壁、石)に適しているか確認し
てください。また、壁の材質が、カメラ、ハウジング、壁面取付ブラケット
の合計重量を十分に支えられることを確認してください。
注意
•または、壁面取付ブラケットに同梱のインストールガイド、およ
び
www .axis.com
•コネクタの技術仕様については、Axisのホームページ(
ラのユーザーズマニュアルを参照してください
を参照してください。
付
取 取
り り
付 付
79 ペ ー ジ
80 ペ ー ジ
け
け け
を参照してください。詳しい取
を参照してください。
82 ペ ー ジ
を参照して
www .axis.com
)でカメ
79
Page 80

AXIST93GSeries
3
4
2
1
1
2
3
4
1.壁面取付ブラケットを取り付ける壁面の準備を行います。壁面ブラケット
を壁に合わせ、穴を開ける位置に印を付けます。
2.ネットワークケーブル(必要に応じて電源ケーブル)を壁面ブラケットに通
します。カメラとの接続用に30cmほどケーブルを残します。
3.I/O、音声、外部電源デバイスなどの補助デバイスをカメラに接続する場
合、それぞれのデバイスについて同じ手順を繰り返します。
4.ネジを締め、壁面ブラケットを壁面に固定します。
カ
メ
ラ
の
ハ
ウ
ジ
ン
グ
へ
の
収
カ カ
メ メ
ラ ラ
の の
ハ ハ
ウ ウ
ジ ジ
ン ン
グ グ
へ へ
1.外部/入力デバイスをカメラに接続する場合は、カメラをホルダーに取
り付ける前に、カメラのインストールガイドに記載された手順に従って
接続してください。
2.microSDカードをローカルストレージとして使用する場合は、カメラのSD
カードスロットにSDカードを挿入します。
3.ホルダーネジをゆるめ、ハウジングからホルダーを外します。
重要
カメラが正しい方向に取り付けられていることを確認します。下の図を
参照してください。
4.カメラをホルダーに取り付けます。ピンとカメラ固定ネジをピン穴とスク
リューマウントに合わせ、カメラネジを締めます(トルク1Nm)。ネジを締
めすぎないように注意してください。
納
の の
収 収
納 納
1
ホ ル ダ ー
2
ホ ル ダ ー ネ ジ T20 x2
3
ピ ン
4
カ メ ラ ネ ジ T20
80
Page 81

AXIST93GSeries
1
2
4
3
1
ò
ò
¨
¨
¾
¾
5.ホルダーの位置を慎重に調整し、ホルダーネジを締めます(トルク0.5Nm)。
記
注 注注記 記
IK10準拠の要件を満たすには、ホルダーの位置を調整して、カメラのレンズ
(4)をハウジングの縁(3)に合わせます。
1
ホ ル ダ ー ネ ジ T20 x2
2
ホ ル ダ ー
3
ハ ウ ジ ン グ の 縁
4
カ メ ラ レ ン ズ
6.乾燥剤のビニール包装を取り外し、ハウジングの内壁に乾燥剤を置きます。
1
乾 燥 剤
81
Page 82

AXIST93GSeries
1
2
4
3
ハ
ウ
ジ
ン
グ
の
壁
面
取
付
ブ
ラ
ケ
ッ
ト
へ
の
取
り
付
ハ ハ
ウ ウ
ジ ジ
ン ン
グ グ
の の
壁 壁
面 面
取 取
付 付
ブ ブ
ラ ラ
ケ ケ
ッ ッ
ト ト
へ へ
の の
取 取
記
注 注注記 記
•指定のケーブルエリアに収まるケーブルを使用してください(
照)。付属のケーブルガスケット以外は使用しないでください。浸水し、製品
が破損するおそれがあります。他のケーブルエリアに対応するケーブルガス
ケット、ケーブルグランドについては、
•複数のケーブルを使用する場合、各ケーブルをそれぞれ別のケーブルガ
スケットに通す必要があります。
•使用するケーブルガスケットのみ穴を開けます。ケーブルガスケットが破損
した場合には、新品のケーブルガスケットに交換してください。ケーブルガ
スケットに穴を開けたままにしたり、破損したケーブルガスケットを使用し
たりすると、浸水し、製品が破損するおそれがあります。
1.裏蓋ネジを緩め、上蓋を持ち上げます。
2.使用するケーブルガスケットを選び、タブを引いてネットワークケーブル
用の穴を開けます。
www .axis.com
け
り り
付 付
け け
を参照してください。
78 ペ ー ジ
を参
1
裏 蓋
2
裏 蓋 ネ ジ T20 x4
3
ケ ー ブ ル ガ ス ケ ッ ト M20 x2
4
タ ブ
82
Page 83

AXIST93GSeries
ò
ò
¨
¨
¾
¾
記
注 注注記 記
ネットワークケーブルにネットワークコネクタが付いている場合、ケーブル
ガスケットを取り外し、付属のコネクタガードを使用して、ケーブルガス
ケットの破損を防止します。キャップ付きネットワークコネクタの付いた
ネットワークケーブルは使用しないでください。コネクタガードを使用して
もケーブルガスケットが破損するおそれがあります。
3.ネットワークケーブルをケーブルガスケットに通します。
4.ネットワークケーブルを少し手前に引き、ケーブルガスケットをケーブル
にぴったりと合わせます。
記
注 注注記 記
ケーブルを引いて手前に戻さないと、浸水して製品が損傷するおそれが
あります。
5.ケーブルガスケットが正しく取り付けられていることを確認します。
6.ネットワークケーブルをネットワークコネクタに接続します。
7.電源ケーブルやI/Oデバイスをカメラに接続する場合、それぞれのデバイス
について同じ手順を繰り返します。
83
Page 84

AXIST93GSeries
1
2
1
電 源 ケ ー ブ ル ( オ プ シ ョ ン )
2
ネ ッ ト ワ ー ク ケ ー ブ ル
8.裏蓋を壁面取付ブラケットに取り付け、ネジを締めます(トルク2Nm)。
9.カメラのLEDが正しい状態を示しているかを確認します。
カメラのインストールガイドを参照してください。
10.ブラケット調整ネジを緩め、カメラを撮影方向に向けます。
84
Page 85

1
2
3
4
1
ò
ò
¨
¨
¾
¾
裏 蓋
2
ネ ジ T20 x4
3
壁 面 取 付 ブ ラ ケ ッ ト
4
ブ ラ ケ ッ ト 調 節 ネ ジ T30
AXIST93GSeries
11.ビデオストリームを表示する方法については、カメラのインストールガイ
ドまたは
記
注 注注記 記
ハウジングを閉じるときに、ケーブルを挟まないよう注意してください。
12.ハウジングを閉じます。裏蓋ネジを数回ずつ回し、すべてのネジが締ま
るまでこれを繰り返します(トルク1.5Nm)。これにより、裏蓋のガス
ケットに均等に力が掛かります。
関
連
情
関 関
Axisラーニングセンター(
つトレーニング、ウェブセミナー、チュートリアル、ガイドをご用意しています。
報
連 連
情 情
報 報
www .axis.com/techsup
www .axis.com/academy
を参照してください。
)にアクセスしてください。役に立
85
Page 86

AXIST93GSeries
保
証
保 保
証 証
情
報
情 情
報 報
Axisの製品保証と関連情報については、
www .axis.com/warranty/
をご覧ください
86
Page 87

87
Page 88

InstallationGuide
AXIST93GSeries
©AxisCommunicationsAB,2015
Ver.M2.2
Date:April2015
PartNo.62115
 Loading...