

Page 1

AXIST93FHousingSeries
AXIST93F05OutdoorHousing
AXIST93F10OutdoorHousing
AXIST93F20OutdoorHousing
RepaintingInstructions
Page 2

AXIST93FHousingSeries
Impactonwarranty
Impactonwarranty
ThisproductisapprovedforrepaintbyAxis,providedthatyoufollowtheinstructionsinthisdocumentandat
www.axis.com/warranty-implication-when-repainting
Riskswithrepainting
ThereareseveralriskswhendisassemblingorassemblinganAxisproduct.Thereisalwaysacertainyieldlossduringassembly.Training
ofoperatorsandtheuseofcorrecttoolsmediatessomeoftheproblemsbuttheycanneverbefullyavoided.Someoftherisksinclude:
ESDDamage-AlwayshandletheproductinanESDsafeenvironment.EvenifprecautionsaretakenthereisalwaysariskofESD
damage.Thedamagecanremainundetectedandcauseproblemsduringthelifetimeoftheequipment.
Dustcontamination-Openingacameramayexposethelensandsensortodustorpaint.Dustwillaffecttheopticalperformance.
Lensesneedtobedisassembledinadust-freeenvironment,preferablyacleanroom.
Paintoverspray-Maskingthedifferentcomponentsoftheequipmentiscritical.Failuretomasksensitiveareascancauseproblems
withassemblingtheequipment.Anyareasthatarenotpaintedatfactoryorhaveadifferentsurfacetreatmentthantherestofthe
parts(threads,groundandelectricalcontactsurfaces)mustalsobemaskedtoensurefunction.
2
Page 3
AXIST93FHousingSeries
Howtorepainttheproduct
Howtorepainttheproduct
Disassembly
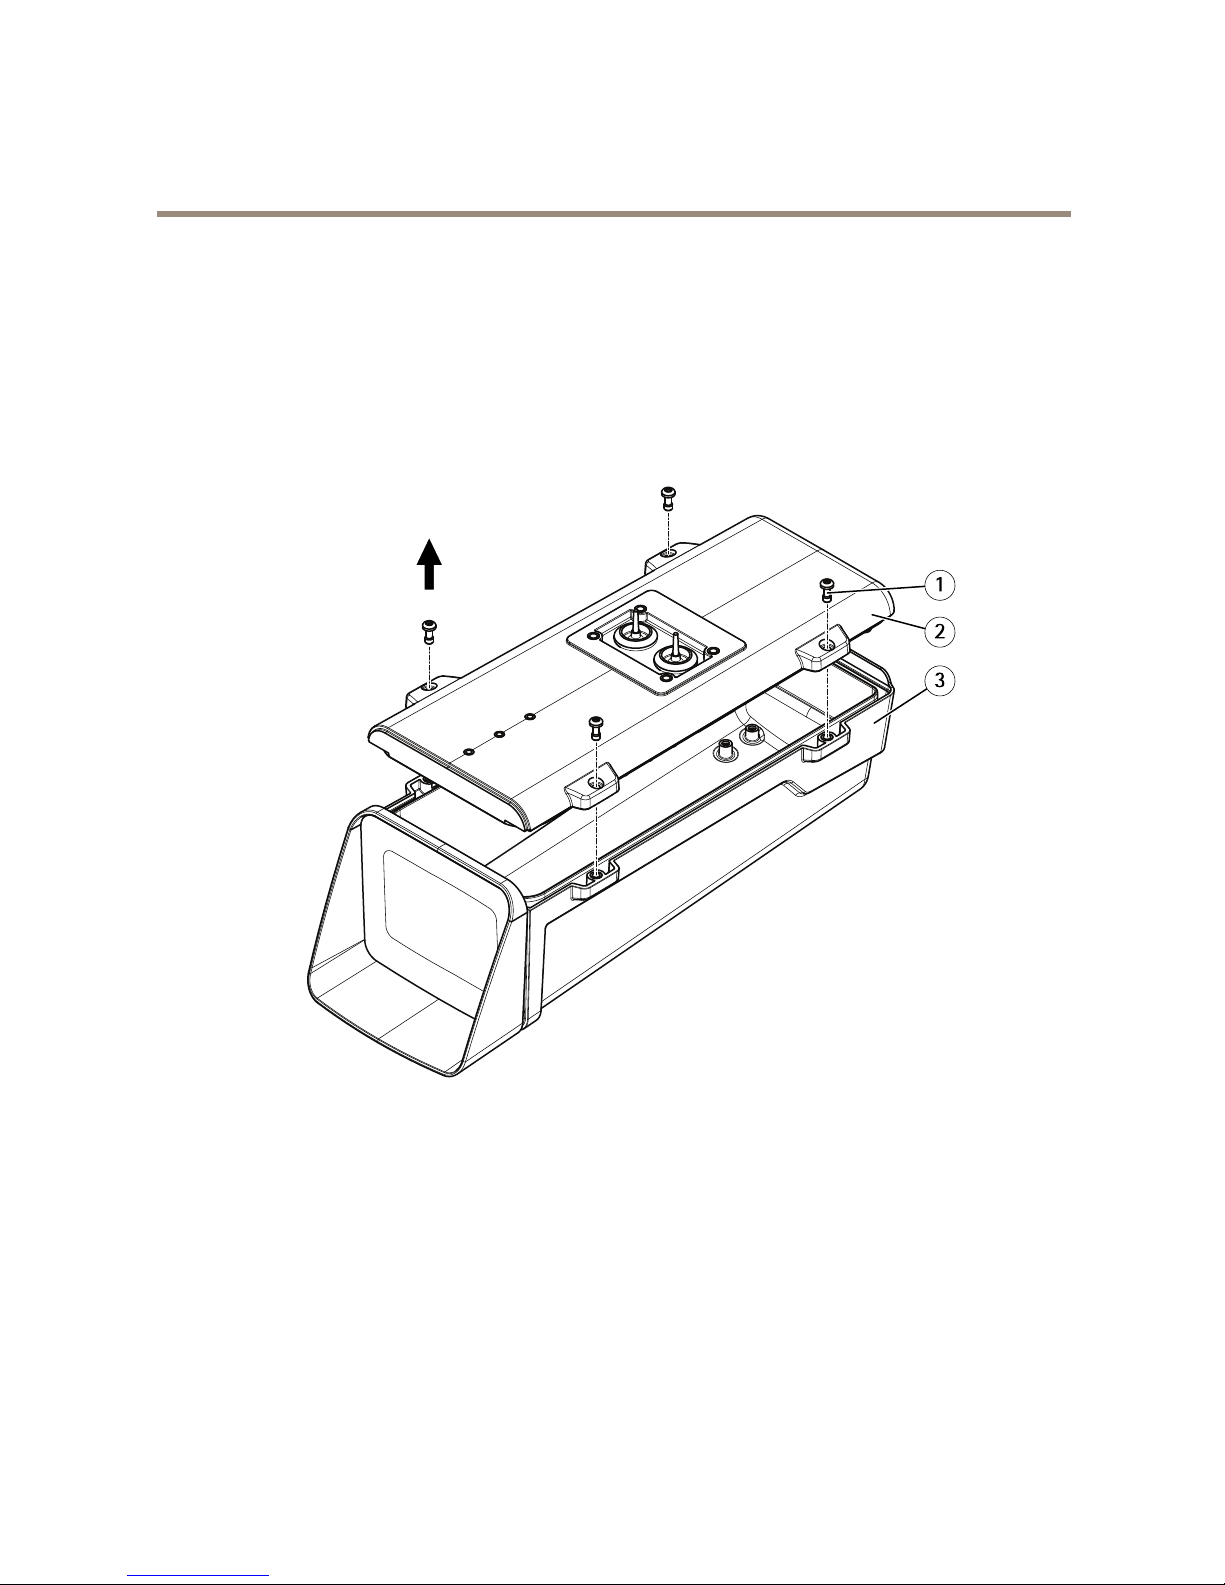
Disassemblethehousing
1.Loosenthefourscrewstoseparatethetopcoverfromthebottomchassis.
2.Removethefourscrewsfromthebottomchassis.
1
Screw(4x)
2
Bottomchassis
3
Topcover
Disassemblethewallmountbracket
1.Removethetorxscrewatthebottomofthearm.
2.Separatethesocketandthesuqarenut.
3.Removethefourscrewsfromtheballjoint.
3
Page 4

AXIST93FHousingSeries
Howtorepainttheproduct
1
Screw
2
Arm
3
Socket
4
Squarenut
5
Screw(4x)
6
Balljoint
Preparations
•Ifapplicable,theequipmentmustbedisassembledaccordingtotheinstructionsinthisdocument.
•Eachpartshouldbestrippedfromcomponentsandcrucialpartsmaskedtoensuresuccessfulreassembly.
•Allpartstoberepaintedshouldbestrippedofgaskets,screws,electricalcomponents,connectorsandplugs,windows
anddomes.
•Allpartstoberepaintedmustbethoroughlycleanedtoremovegrease,dustoroil.
•Toensurereassemblyandfunctionalityoftheproduct,openingsforscrews,LEDindicators,ormicrophonesmust
bemaskedbeforepainting.
Pretreatmentofparts
Dependingonthepartmaterialandtypeofpaintappliedatfactory,differentpretreatmentsshouldbedoneforthenewpaintto
adhereaswellaspossible.Forallvariantsthough,propercleaningtoremoveoil,greaseanddustisstronglyrecommended.
Formoreinformationonthematerialsusedintheproduct,seeitsdatasheetatwww.axis.com
Powdercoatedparts-Usingnesandpaper ,removetheoriginalpowdercoatingdowntothestainlesssteelsurfaceandcleanthe
partsbeforepainting,oruseaprimer.
Anodisedandchromatedparts-Useaprimer.
Uncoatedstainlesssteel-Nospecialpretreatmentisneeded,butmakesurethatthesurfaceiscleanbeforepainting.
Plastic-Useaprimer.
4
Page 5

AXIST93FHousingSeries
Howtorepainttheproduct
Masking
Maskingthetopcover
Maskthefollowingitemsonthetopcover:
1.Thefrontwindow.
2.Thefourthreadedholes.
3.Thelabel.
1
Frontwindow
2
Threadedhole(4x)
3
Label
Maskingthebottomchassis
Maskthefollowingpartsofthebottomchassis:
1.Thecableglandsandscrewholesforthebracket.
2.Theaccessoryscrewholes.
3.Thefourscrewholes.
4.Everythingonthetopsideofthebottomchassis,includingthegasketandthefourscrewholes.
5
Page 6

AXIST93FHousingSeries
Howtorepainttheproduct
1
Screwholes(4x)
2
Accessoryscrewholes(3x)
3
Mountbracketscrewholes(4x)
4
Cableglands(2x)
5
Gasket
Maskingthewallmountbracket
Maskthefollowingparts:
1.Thefourscrewholes
2.Theballjoint.
3.Thesocketteeth.
4.Theslotforthesquarenut.
1
Screwhole(4x)
2
Balljoint
3
Socketteeth
4
Slot
6
Page 7

AXIST93FHousingSeries
Howtorepainttheproduct
Repainting
1.Applyathinandevenlayerofspraypaintaccordingtotheinstructionsofthepaintmanufacturer .
2.Letthepaintdry.
3.Togetabettercoverageandclearercolor,applyasecondlayerofspraypaint.
4.Whenthepaintisdry,removethemaskingandreassembletheproduct.
Reassembly
Reassembletheproduct.
Formoreinformation,seetheInstallationGuideavailableataxis.com
7
Page 8

RepaintingInstructionsVer.M1.8
AXIST93FHousingSeriesDate:September2017
©AxisCommunicationsAB,2017
PartNo.1751434
 Loading...