

Page 1

AXIST93FSeries
ENGLISH
FRANÇAIS
DEUTSCH
ITALIANO
ESPANÕL
ò
ò
¨
¨
¾
¾
AXIST93F05ProtectiveHousing
AXIST93F10OutdoorHousing
AXIST93F20OutdoorHousing
InstallationGuide
Page 2
LegalConsiderations
Videoandaudiosurveillancecanberegulatedbylawsthat
varyfromcountrytocountry.Checkthelawsinyourlocal
regionbeforeusingthisproductforsurveillancepurposes.
Liability
Everycarehasbeentakeninthepreparationofthis
document.PleaseinformyourlocalAxisofceofany
inaccuraciesoromissions.AxisCommunicationsABcannot
beheldresponsibleforanytechnicalortypographicalerrors
andreservestherighttomakechangestotheproductand
manualswithoutpriornotice.AxisCommunicationsAB
makesnowarrantyofanykindwithregardtothematerial
containedwithinthisdocument,including,butnotlimited
to,theimpliedwarrantiesofmerchantabilityandtnessfor
aparticularpurpose.AxisCommunicationsABshallnot
beliablenorresponsibleforincidentalorconsequential
damagesinconnectionwiththefurnishing,performance
oruseofthismaterial.Thisproductisonlytobeusedfor
itsintendedpurpose.
IntellectualPropertyRights
AxisABhasintellectualpropertyrightsrelatingto
technologyembodiedintheproductdescribedinthis
document.Inparticular,andwithoutlimitation,these
intellectualpropertyrightsmayincludeoneormoreof
thepatentslistedatwww.axis.com/patent.htmandoneor
moreadditionalpatentsorpendingpatentapplicationsin
theUSandothercountries.
EquipmentModications
Thisequipmentmustbeinstalledandusedin
strictaccordancewiththeinstructionsgiveninthe
userdocumentation.Thisequipmentcontainsno
user-serviceablecomponents.Unauthorizedequipment
changesormodicationswillinvalidateallapplicable
regulatorycerticationsandapprovals.
TrademarkAcknowledgments
AXISCOMMUNICATIONS,AXIS,ETRAX,ARTPECandVAPIX
areregisteredtrademarksortrademarkapplicationsofAxis
ABinvariousjurisdictions.Allothercompanynamesand
productsaretrademarksorregisteredtrademarksoftheir
respectivecompanies.
RegulatoryInformation
Europe
ThisproductcomplieswiththeapplicableCEmarking
directivesandharmonizedstandards:
•(AXIST93F10,AXIST93F20)Electromagnetic
Compatibility(EMC)Directive2004/108/EC.See
ElectromagneticCompatibility(EMC)onpage2.
•LowVoltage(LVD)Directive2006/95/EC.SeeSafety
onpage3.
•RestrictionsofHazardousSubstances(RoHS)Directive
201 1/65/EU.SeeDisposalandRecyclingonpage3.
Acopyoftheoriginaldeclarationofconformitymaybe
obtainedfromAxisCommunicationsAB.SeeContact
Informationonpage3.
ElectromagneticCompatibility(EMC)
Thisequipmenthasbeendesignedandtestedtofulll
applicablestandardsfor:
•Radiofrequencyemissionwheninstalledaccordingto
theinstructionsandusedinitsintendedenvironment.
•Immunitytoelectricalandelectromagneticphenomena
wheninstalledaccordingtotheinstructionsandused
initsintendedenvironment.
USA
AXIST93F10:Thisequipmenthasbeentestedusingan
unshieldednetworkcable(UTP)andfoundtocomplywith
thelimitsforaClassAdigitaldevice,pursuanttopart15of
theFCCrules.Thisequipmenthasalsobeentestedusinga
shieldednetworkcable(STP)andfoundtocomplywiththe
limitsforaClassAdigitaldevice,pursuanttopart15ofthe
FCCrules.Theselimitsaredesignedtoprovidereasonable
protectionagainstharmfulinterferencewhenthe
equipmentisoperatedinacommercialenvironment.This
equipmentgenerates,uses,andcanradiateradiofrequency
energyand,ifnotinstalledandusedinaccordancewith
theinstructionmanual,maycauseharmfulinterference
toradiocommunications.Operationofthisequipmentin
aresidentialareaislikelytocauseharmfulinterference
inwhichcasetheuserwillberequiredtocorrectthe
interferenceathisownexpense.
USA
AXIST93F20:Usinganunshieldednetworkcable(UTP)
–Thisequipmenthasbeentestedusinganunshielded
networkcable(UTP)andfoundtocomplywiththelimits
foraClassAdigitaldevice,pursuanttopart15oftheFCC
Rules.Theselimitsaredesignedtoprovidereasonable
protectionagainstharmfulinterferencewhenthe
equipmentisoperatedinacommercialenvironment.This
equipmentgenerates,uses,andcanradiateradiofrequency
energyand,ifnotinstalledandusedinaccordancewith
theinstructionmanual,maycauseharmfulinterference
toradiocommunications.Operationofthisequipmentin
aresidentialareaislikelytocauseharmfulinterference
inwhichcasetheuserwillberequiredtocorrectthe
interferenceathisownexpense.
AXIST93F20:Usingashieldednetworkcable(STP)
–Thisequipmenthasalsobeentestedusingashielded
networkcable(STP)andfoundtocomplywiththelimits
foraClassBdigitaldevice,pursuanttopart15oftheFCC
Rules.Theselimitsaredesignedtoprovidereasonable
protectionagainstharmfulinterferenceinaresidential
installation.Thisequipmentgenerates,usesandcan
radiateradiofrequencyenergyand,ifnotinstalledand
usedinaccordancewiththeinstructions,maycause
harmfulinterferencetoradiocommunications.However,
thereisnoguaranteethatinterferencewillnotoccurin
aparticularinstallation.Ifthisequipmentdoescause
harmfulinterferencetoradioortelevisionreception,which
canbedeterminedbyturningtheequipmentoffandon,
theuserisencouragedtotrytocorrecttheinterferenceby
oneormoreofthefollowingmeasures:
•Reorientorrelocatethereceivingantenna.
•Increasetheseparationbetweentheequipmentand
receiver.
•Connecttheequipmentintoanoutletonacircuit
differentfromthattowhichthereceiverisconnected.
•Consultthedealeroranexperiencedradio/TV
technicianforhelp.
Tobeusedinaresidentialareaorademandingelectrical
environment,theproductshallbeconnectedusinga
shieldednetworkcable(STP)thatisproperlygrounded.
Canada
AXIST93F10:Thisdigitalapparatuscomplieswith
CANICES-3(ClassA).Theproductshallbeconnectedusing
ashieldednetworkcable(STP)thatisproperlygrounded.
Cetappareilnumériqueestconformeàlanorme
NMBICES-3(classeA).Leproduitdoitêtreconnectéà
l'aided'uncâbleréseaublindé(STP)quiestcorrectement
misàlaterre.
Canada
AXIST93F20:Thisdigitalapparatuscomplieswith
CANICES-3(ClassB).Theproductshallbeconnectedusing
Page 3
ashieldednetworkcable(STP)thatisproperlygrounded.
Cetappareilnumériqueestconformeàlanorme
CANNMB-3(classeB).Leproduitdoitêtreconnectéà
l'aided'uncâbleréseaublindé(STP)quiestcorrectement
misàlaterre.
Europe
AXIST93F10:Thisdigitalequipmentfulllsthe
requirementsforRFemissionaccordingtotheClassAlimit
ofEN55022.Theproductshallbeconnectedusinga
shieldednetworkcable(STP)thatisproperlygrounded.
Notice!ThisisaClassAproduct.Inadomesticenvironment
thisproductmaycauseRFinterference,inwhichcasethe
usermayberequiredtotakeadequatemeasures.
Europe
AXIST93F20:Thisdigitalequipmentfulllsthe
requirementsforRFemissionaccordingtotheClassBlimit
ofEN55022.Theproductshallbeconnectedusinga
shieldednetworkcable(STP)thatisproperlygrounded.
Thisproductfulllstherequirementsforemissionand
immunityaccordingtoEN50121-4andIEC62236-4railway
applications.
Thisproductfulllstherequirementsforimmunity
accordingtoEN61000-6-1residential,commercialand
light-industrialenvironments.
Thisproductfulllstherequirementsforimmunity
accordingtoEN61000-6-2industrialenvironments.
Thisproductfulllstherequirementsforimmunity
accordingtoEN55024ofceandcommercialenvironments
Australia/NewZealand
AXIST93F10:Thisdigitalequipmentfulllsthe
requirementsforRFemissionaccordingtotheClassAlimit
ofAS/NZSCISPR22.Theproductshallbeconnectedusing
ashieldednetworkcable(STP)thatisproperlygrounded.
Notice!ThisisaClassAproduct.Inadomesticenvironment
thisproductmaycauseRFinterference,inwhichcasethe
usermayberequiredtotakeadequatemeasures.
Australia/NewZealand
AXIST93F20:Thisdigitalequipmentfulllsthe
requirementsforRFemissionaccordingtotheClassBlimit
ofAS/NZSCISPR22.Theproductshallbeconnectedusing
ashieldednetworkcable(STP)thatisproperlygrounded.
Japan
AXIST93F10:この装置は、クラスA情報技術装置で
す。この装置を家庭環境で使用すると電波妨害を
引き起こすことがあります。この場合には使用者
が適切な対策を講ずるよう要求されることがあり
ます。本製品は、シールドネットワークケーブル
(STP)を使用して接続してください。また適切に接
地してください。
Japan
AXIST93F20:この装置は、クラスB情報技術装置で
す。この装置は、家庭環境で使用することを目的
としていますが、この装置がラジオやテレビジョ
ン受信機に近接して使用されると、受信障害を引
き起こすことがあります。取扱説明書に従って正
しい取り扱いをして下さい。本製品は、シールド
ネットワークケーブル(STP)を使用して接続してく
ださい。また適切に接地してください。
Korea
AXIST93F20/AXIST93F20:이기기는가정용(B급)
전자파적합기기로서주로가정에서사용하는것을
목적으로하며,모든지역에서사용할수있습니
다.적절히접지된STP(shieldedtwistedpair)케
이블을사용하여제품을연결하십시오.
Safety
Thisproductcomplieswith
IEC/EN/UL60950-1andIEC/EN/UL60950-22,Safetyof
InformationTechnologyEquipment.Theproductshallbe
groundedeitherthroughashieldednetworkcable(STP)or
otherappropriatemethod.
DisposalandRecycling
Whenthisproducthasreachedtheendofitsusefullife,
disposeofitaccordingtolocallawsandregulations.For
informationaboutyournearestdesignatedcollectionpoint,
contactyourlocalauthorityresponsibleforwastedisposal.
Inaccordancewithlocallegislation,penaltiesmaybe
applicableforincorrectdisposalofthiswaste.
Europe
Thissymbolmeansthattheproductshallnotbe
disposedoftogetherwithhouseholdorcommercialwaste.
Directive2012/19/EUonwasteelectricalandelectronic
equipment(WEEE)isapplicableintheEuropeanUnion
memberstates.Topreventpotentialharmtohumanhealth
andtheenvironment,theproductmustbedisposedofin
anapprovedandenvironmentallysaferecyclingprocess.
Forinformationaboutyournearestdesignatedcollection
point,contactyourlocalauthorityresponsibleforwaste
disposal.Businessesshouldcontacttheproductsupplierfor
informationabouthowtodisposeofthisproductcorrectly.
Thisproductcomplieswiththerequirementsof
Directive2011/65/EUontherestrictionoftheuseof
certainhazardoussubstancesinelectricalandelectronic
equipment(RoHS).
China
Thisproductcomplieswiththerequirementsofthe
legislativeactAdministrationontheControlofPollution
CausedbyElectronicInformationProducts(ACPEIP).
ContactInformation
AxisCommunicationsAB
Emdalavägen14
22369Lund
Sweden
Tel:+46462721800
Fax:+4646136130
www.axis.com
Support
Shouldyourequireanytechnicalassistance,pleasecontact
yourAxisreseller.Ifyourquestionscannotbeanswered
immediately,yourresellerwillforwardyourqueriesthrough
theappropriatechannelstoensurearapidresponse.Ifyou
areconnectedtotheInternet,youcan:
•downloaduserdocumentationandsoftwareupdates
•ndanswerstoresolvedproblemsintheFAQdatabase.
Searchbyproduct,category,orphrase
•reportproblemstoAxissupportstaffbylogginginto
yourprivatesupportarea
•chatwithAxissupportstaff(selectedcountriesonly)
•visitAxisSupportatwww.axis.com/techsup/
LearnMore!
VisitAxislearningcenterwww.axis.com/academy/for
usefultrainings,webinars,tutorialsandguides.
Page 4

Page 5
AXIST93FSeries
ENGLISH
SafetyInformation
ReadthroughthisInstallationGuidecarefullybeforeinstallingtheproduct.KeeptheInstallation
Guideforfuturereference.
HazardLevels
DANGER
WARNING
CAUTION
NO
TICE
NO NO
TICE TICE
Indicatesahazardoussituationwhich,ifnotavoided,willresultin
deathorseriousinjury.
Indicatesahazardoussituationwhich,ifnotavoided,couldresult
indeathorseriousinjury.
Indicatesahazardoussituationwhich,ifnotavoided,couldresult
inminorormoderateinjury.
Indicatesasituationwhich,ifnotavoided,couldresultindamage
toproperty.
OtherMessageLevels
ImportantIndicatessignicantinformationwhichisessentialfortheproduct
NoteIndicatesusefulinformationwhichhelpsingettingthemostout
tofunctioncorrectly.
oftheproduct.
5
Page 6

AXIST93FSeries
SafetyInstructions
NO
TICE
NO NO
TICE TICE
•TheAxisproductshallbeusedincompliancewithlocallawsandregulations.
•StoretheAxisproductinadryandventilatedenvironment.
•AvoidexposingtheAxisproducttoshocksorheavypressure.
•Donotinstalltheproductonunstablebrackets,surfacesorwalls.
•UseonlyapplicabletoolswheninstallingtheAxisproduct.Excessiveforcecouldcause
damagetotheproduct.
•Donotusechemicals,causticagents,oraerosolcleaners.
•Useacleanclothdampenedwithpurewaterforcleaning.
•Useonlyaccessoriesthatcomplywithtechnicalspecicationoftheproduct.Thesecanbe
providedbyAxisorathirdparty.
•UseonlysparepartsprovidedbyorrecommendedbyAxis.
•Donotattempttorepairtheproductbyyourself.ContactAxissupportoryourAxis
resellerforservicematters.
Transportation
NO
TICE
NO NO
TICE TICE
•WhentransportingtheAxisproduct,usetheoriginalpackagingorequivalenttoprevent
damagetotheproduct.
6
Page 7

AXIST93FSeries
ENGLISH
InstallationGuide
ThisInstallationGuideprovidesinstructionsforinstallingAXIST93F05ProtectiveHousing,
AXIST93F10OutdoorHousingandAXIST93F20OutdoorHousing.
Toinstallthecameraonthenetwork,pleaseseetheInstallationGuideprovidedwiththecamera.
Forotherdetailsaboutthecamera,seetheUserManualavailableatwww.axis.com
InstallationSteps
1.Makesurethepackagecontents,toolsandothermaterialsnecessaryfortheinstallation
areinorder.Seepage7.
2.Studythehardwareoverview.Seepage9.
3.Studythespecications.Seepage13.
4.Installthehardware.Seepage15.
PackageContents
•Housing
-AXIST93F05ProtectiveHousing,or
-AXIST93F10OutdoorHousing(AC/DC),or
-AXIST93F20OutdoorHousing(PoE)
•AXIST94Q01AWallMountwithinternalcablechannel
•ScrewbitT30
•AXISConnectorGuardA
•2pinplugconnectorforAC/DCpowercable(AXIST93F10)
•Cable
-Powercable–forconnectingthecameratothehousing(AXIST93F10),or
-Networkcable–forconnectingthecameratothehousing(AXIST93F20)
•AXISCableGasketsM20
•Desiccantbag
•Printedmaterials
-InstallationGuide(thisdocument)
-InstallationGuideforAXIST94Q01AWallMount
RecommendedTools
•Drill–forinstallingthewallmount
•TorxscrewdriverT20(includedinallcompatiblecamerapackages)
7
Page 8

AXIST93FSeries
OptionalAccessories
•AXISSunshieldA
•AXISCorridorFormatBracketA(AXIST93F20)
•AXISCorridorFormatBracketB(AXIST93F10)
•AXISDoorSwitchA
•AXIST94R01PConduitBackBox
•Illuminators
•HousingMounts
•Cablegasketsandcableglands
•AXIST98A16-VESurveillanceCabinet
•AXIST91A47PoleMounts
•VTCeilingBracketIntcableWCM4A
•VTCornerMountWCWA
Forinformationaboutavailableaccessories,seewww.axis.com
8
Page 9
AXIST93FSeries
10 9
8 7 6 5
4
3
2
1
ENGLISH
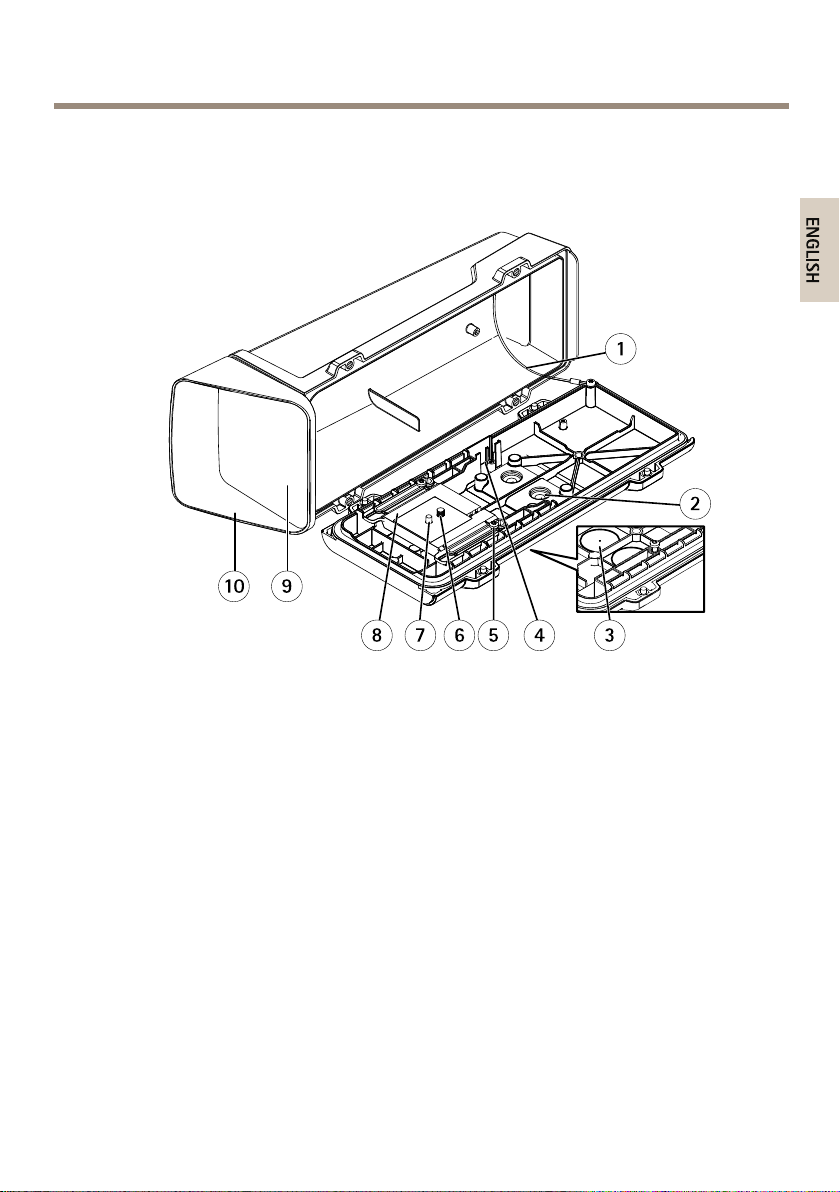
HardwareOverview
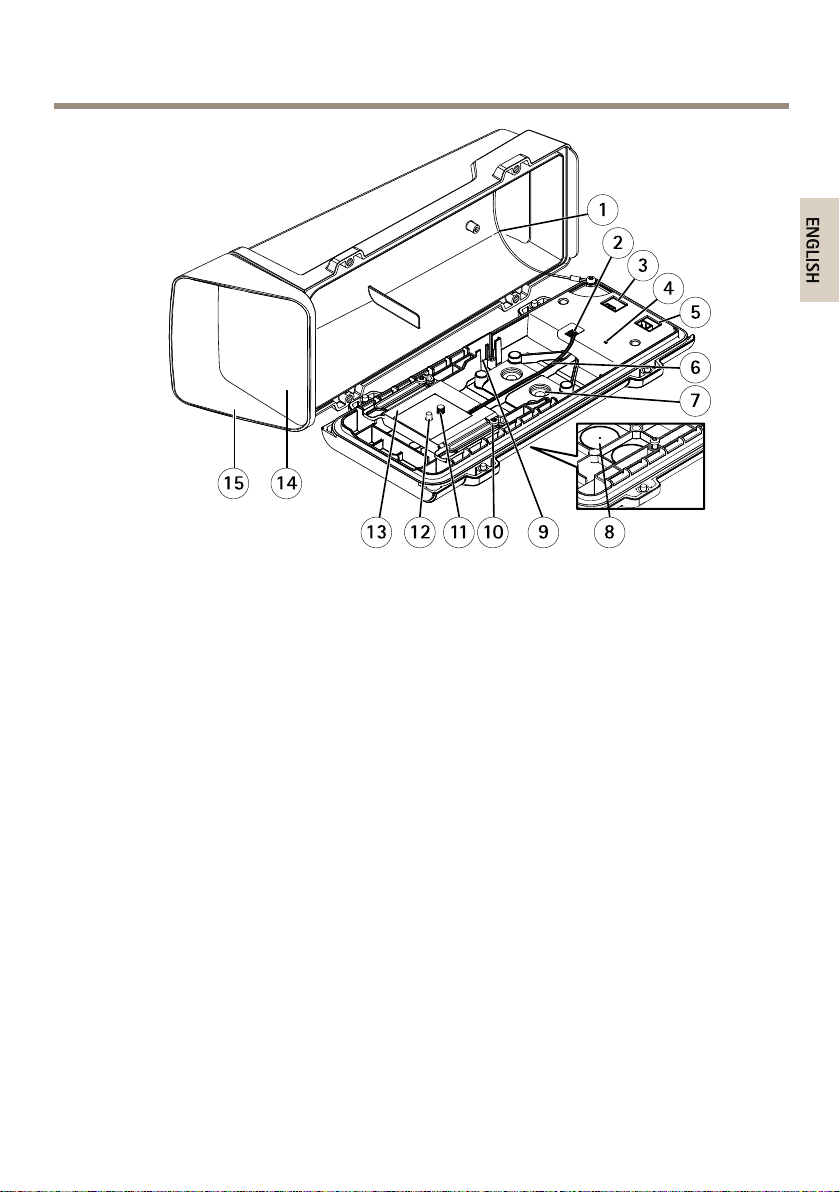
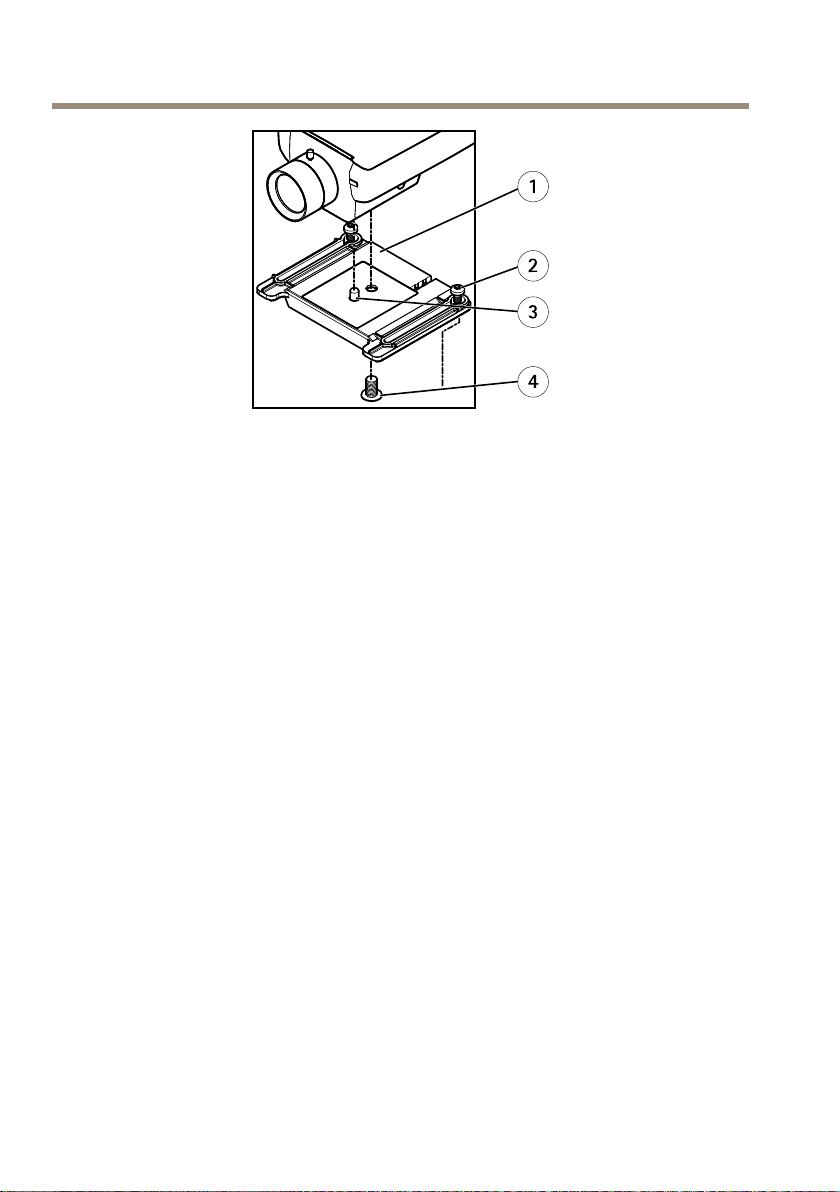
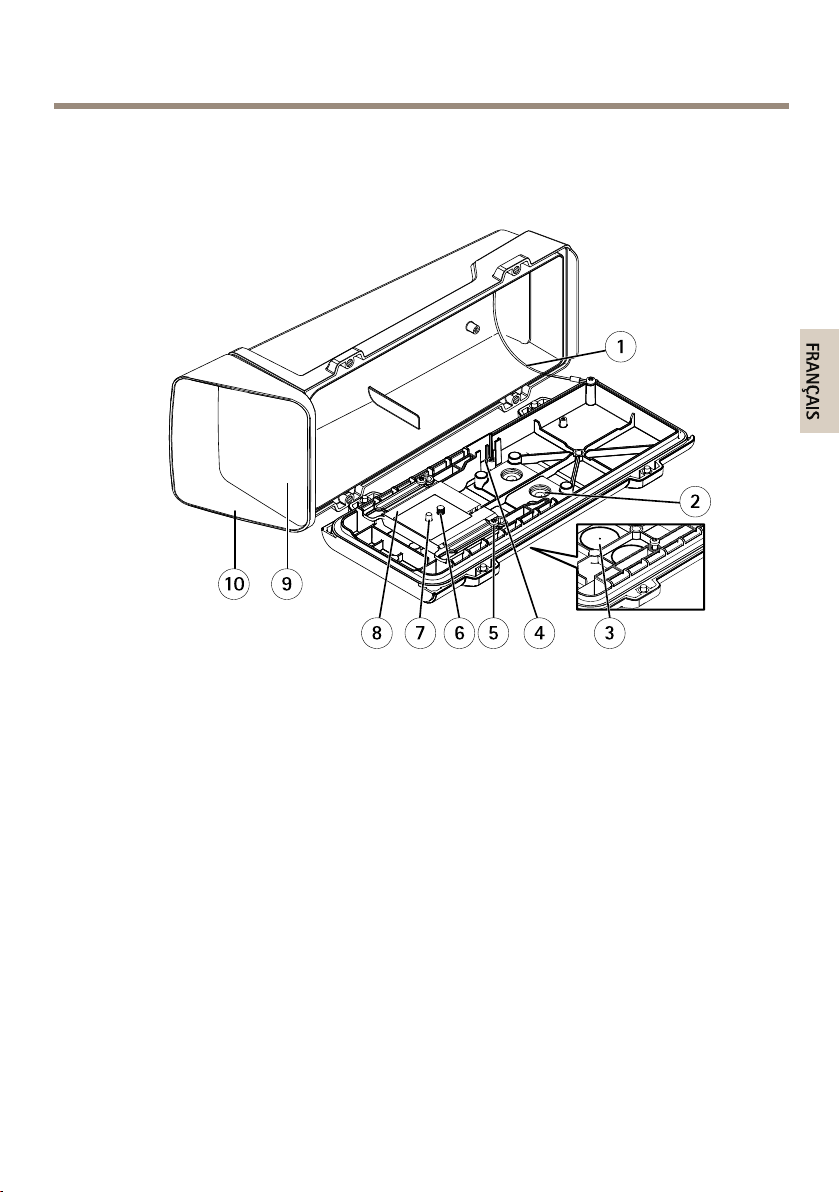
Housing
AXIST93F05ProtectiveHousing
1
Safetywire
2
CablegasketM20(2x)
3
Drill-out(2x)
4
Slotforintrusionalarmswitch–supportsAXISDoorSwitchA(soldseparately)
5
HolderscrewT20(2x)
6
CamerascrewT20
7
Pin
8
Holder
9
Window
10
Topcover
9
Page 10

AXIST93FSeries
15 14
13 12 11 10 9
5
4
3
6
8
7
2
1
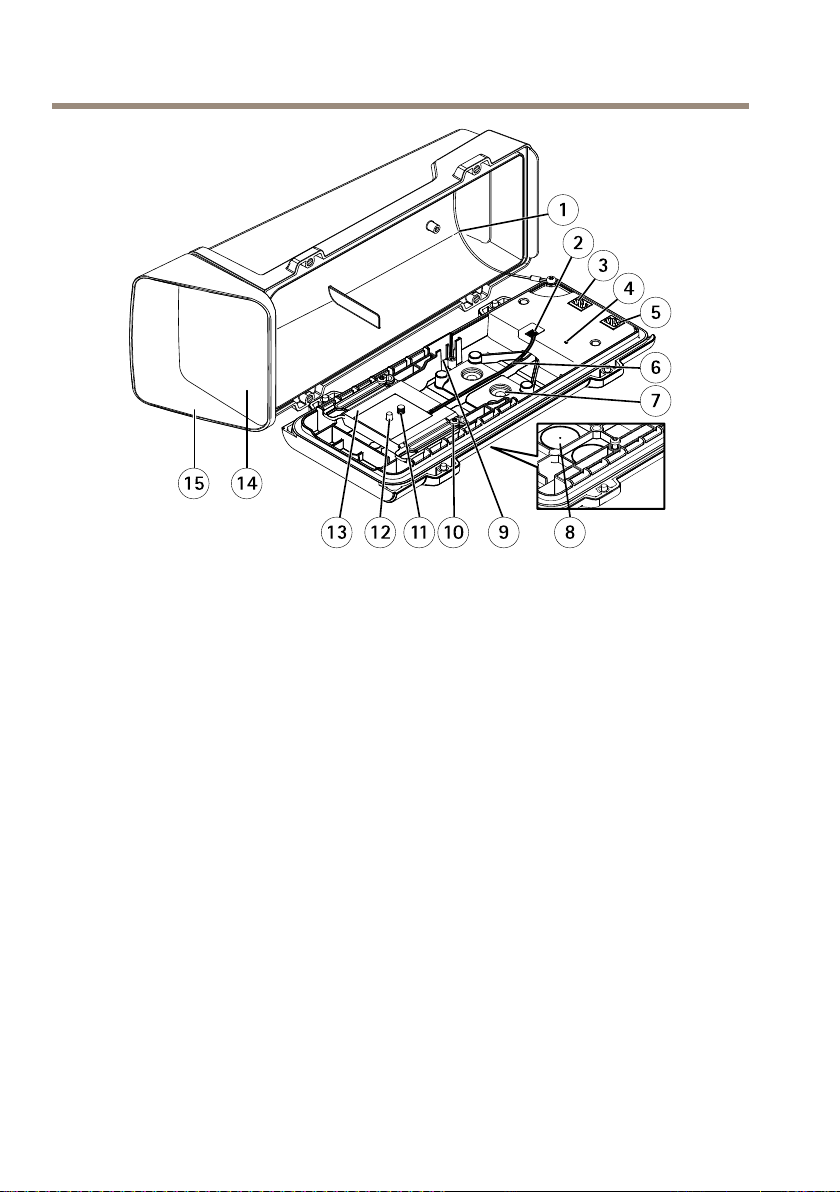
AXIST93F20OutdoorHousing
1
Safetywire
2
Heaterconnector
3
Networkconnector(PoEOUT)
4
StatusLEDindicator
5
Networkconnector(PoEIN)
6
Heatercable
7
CablegasketM20(2x)
8
Drill-out(2x)
9
Slotforintrusionalarmswitch–supportsAXISDoorSwitchA(soldseparately)
10
HolderscrewT20(2x)
11
12
13
14
15
CamerascrewT20
Pin
Holder
Window
Topcover
10
Page 11
15 14
13 12 11 10 9
5
4
3
6
8
7
2
1
AXIST93F10OutdoorHousing
ENGLISH
1
Safetywire
2
Heaterconnector
3
Powerconnector(POWEROUT)
4
StatusLEDindicator
5
Powerconnector(POWERIN)
6
Heatercable
7
CablegasketM20(2x)
8
Drill-out(2x)
9
Slotforintrusionalarmswitch–supportsAXISDoorSwitchA(soldseparately)
10
HolderscrewT20(2x)
11
12
13
14
15
CamerascrewT20
Pin
Holder
Window
Topcover
AXIST93FSeries
11
Page 12
AXIST93FSeries
1
3
4
5
2
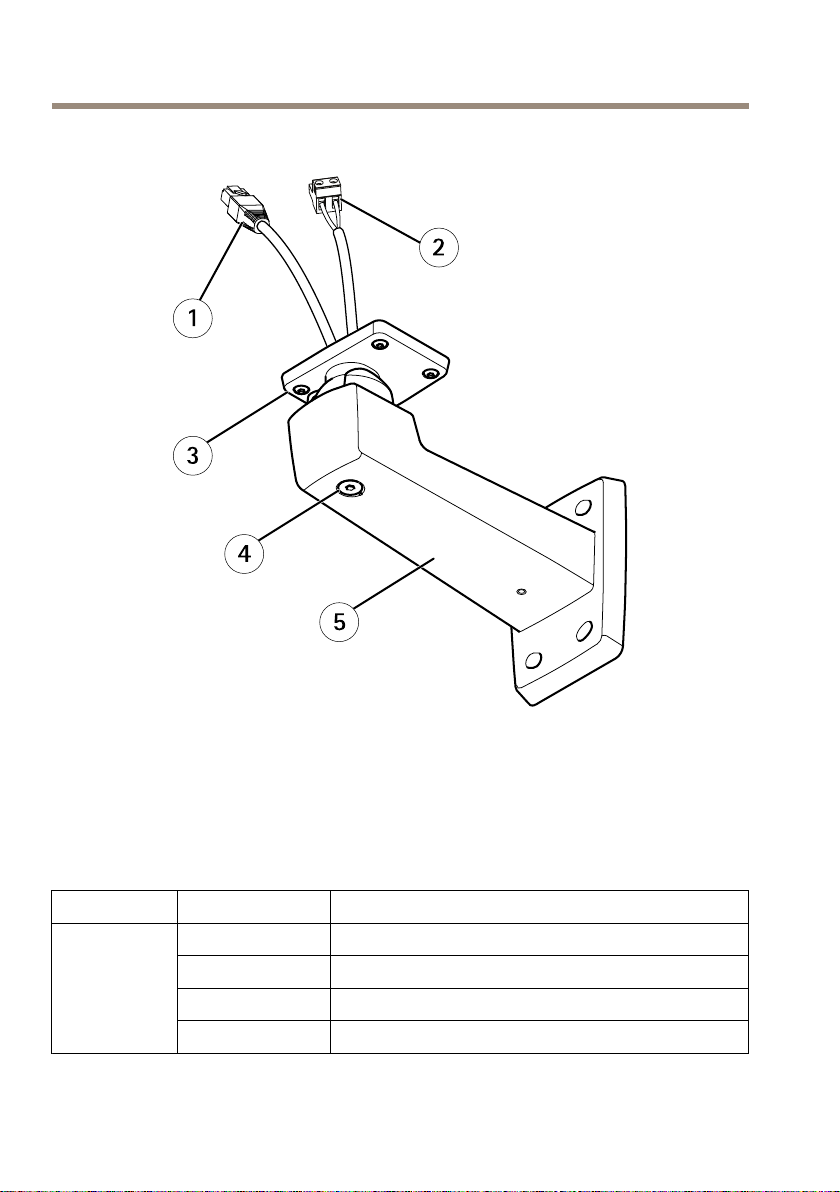
WallMount
1
Networkcable(routethroughwallbracket)
2
Powercable(routethroughwallbracket)(AXIST93F10)
3
ScrewT20(4x)
4
BracketadjustmentscrewT30
5
Wallbracket
LEDIndicators(AXIST93F10,AXIST93F20)
LED
Status
Color
Green
Green,singleash
Green,doubleashSelftest
Green,tripleashGeneralerror
Indication
Normaloperation
Heatererror
12
Page 13
AXIST93FSeries
ENGLISH
ConnectorsandButtons
Forspecicationsandoperatingconditions,seepage13.
NetworkConnector(AXIST93F20)
RJ45Ethernetconnector.SupportsPoweroverEthernet(PoE).
•PoEIN–SuppliesthehousingwithpowerandEthernet.Connecttonetworkthrough
aPoE-enablednetworkswitch.
•PoEOUT–SuppliesthecamerawithpowerandEthernet.Connectbetweenthehousing
andthecamera.
NO
TICE
NO NO
TICE TICE
Duetolocalregulationsortheenvironmentalandelectricalconditionsinwhichtheproduct
istobeused,ashieldednetworkcable(STP)maybeappropriateorrequired.Allcables
connectingtheproducttothenetworkandthatareroutedoutdoorsorindemanding
electricalenvironmentsshallbeintendedfortheirspecicuse.Makesurethatthenetwork
devicesareinstalledinaccordancewiththemanufacturer’sinstructions.Forinformation
aboutregulatoryrequirements,seeRegulatoryInformationonpage2.
HeaterConnector(AXIST93F10,AXIST93F20)
4-pinterminalblockusedtopowertheholder’sbuilt-inheaterandtemperaturesensor.
PowerConnectors(AXIST93F10)
TerminalconnectorsforAC/DCpower.
•POWERIN—Supplieshousingwithpower.ConnecttoexternalAC/DCpowersupply.The
connectorispolarityindependent.
•POWEROUT—Suppliescamerawithpower.Connectbetweenthehousingandthe
camera.
Specications
OperatingConditions
TheAxisproductisintendedforindoorandoutdooruse.
Classication
AXIST93F05/AXIST93F10/AXIST93F20
IEC60721-4-3Class4M4
IEC60529IP66
NEMA250Type4X
13
Page 14
AXIST93FSeries
Temperature
AXIST93F05
AXIST93F05
AXIST93F10
AXIST93F20
Important
Humidity
AXIST93F05/AXIST93F10/AXIST93F20
StorageConditions
1
/AXIST93F10/AXIST93F20
1
AXISP13Series
AXISQ1604/Q1614
AXISQ1615
AXISP13Series
AXISQ1604/Q1614
AXISQ1615/Q1635
(AXIST93F10,AXIST93F20)Whentheambienttemperatureisbelow0ºC(32ºF),start-up
couldtakeupto60minutes.Thecolderitis,thelongerthestart-up.
-40ºCto60ºC(-40ºFto140ºF)
0ºCto45ºC(32ºFto1 13ºF)
0ºCto45ºC(32ºFto1 13ºF)
0ºCto50ºC(32ºFto122ºF)
-40ºCto45ºC(-40ºFto1 13ºF)
-40ºCto45ºC(-40ºFto1 13ºF)
-40ºCto50ºC(-40ºFto122ºF)
15–100%RH(condensing)
Temperature
AXIST93F05/AXIST93F10/AXIST93F20
PowerConsumption
ProductPowersupply
AXIST93F05
AXIST93F1012–28VDC,max25W
AXIST93F20
n/an/a
20–24VAC,max29VA
PoweroverEthernetIEEE802.3af/802.3atType1Class3,max15.4W
-40ºCto75ºC(-40ºFto167ºF)
Poweroutput(tocamera)
12VDC,max1.5A
14
Page 15
CableArea
ENGLISH
NO
TICE
NO NO
TICE TICE
•Usecablesthatkeepwithinthespeciedcablearea.
•Selectcablesincompliancewithyourlocalregulations.
•Makesureallcableholesareproperlysealed.
AXIST93FSeries
Diameter
5–15mm(0.197–0.591in)
Tocreateextracableholes,openthedrill-outslocatedbelowtheholder.SeeHardwareOverview
onpage9.
NO
TICE
NO NO
TICE TICE
Usecablegasketsorcableglandsthatmatchboththecableholeandthecablearea.
Forinformationaboutaccessories,suchascablegasketsandcableglandsthatallowforother
cableareas,seewww.axis.com
AWG
Approximately4–6/0
InstalltheHardware
NO
TICE
NO NO
TICE TICE
•Duetolocalregulationsortheenvironmentalandelectricalconditionsinwhichthe
productistobeused,ashieldednetworkcable(STP)maybeappropriateorrequired.
Allcablesconnectingtheproducttothenetworkandthatareroutedoutdoorsorin
demandingelectricalenvironmentsshallbeintendedfortheirspecicuse.Makesurethat
thenetworkdevicesareinstalledinaccordancewiththemanufacturer’sinstructions.
(AXIST93F05)Forinformationaboutregulatoryrequirements,seethecamera’s
InstallationGuide.
(AXIST93F10,AXIST93F20)Forinformationaboutregulatoryrequirements,see
RegulatoryInformationonpage2
•Becarefulnottoscratch,damageorleavengerprintsonthewindowbecausethiscould
decreaseimagequality.
TheAxisproductcanbeinstalledwiththecablesroutedthroughoralongthewall.
Readalltheinstructionsbeforeinstallingtheproduct:
1.Installthewallmount.Seepage16.Fordetailedinstructions,seethewallmount’s
InstallationGuide,suppliedinthepackageoravailableonwww.axis.com
15
Page 16

AXIST93FSeries
2.Attachthehousingtothewallmount.Seepage16.
3.Installthecamerainthehousing.Seepage19.
InstalltheWallMount
CAUTION
Makesurethatthescrewsandplugsareappropriateforthematerial(e.g.wood,metal,
drywall,stone)andthatthematerialisstrongenoughtosupportthecombinedweight
ofthecamera,housing,andwallmount.
1.Preparethewallforinstallationofthewallmount.Usethewallbracketasatemplate
andmarktheholesbeforedrillingtheholes.
2.Routethenetworkcablethroughthewallbracket.Leaveapproximately30cm(1 1.8in)of
cableforconnectingthecamera.
3.Routethepowercable(AXIST93F10)throughthewallbracket.Leaveapproximately
30cm(1 1.8in)ofcableforconnectingthecamera.
4.Ifconnectinganauxiliarydevice,forexampleanI/O,audio,orexternalpowerdevice,to
thecamera,repeatthestepaboveasapplicabletothespecicdevice.
5.Fastenthewallbrackettothewallbytighteningthescrews.
Note
•Fordetailedinstructions,seethewallmount’sInstallationGuidesuppliedinthepackage
andavailableonwww.axis.com
•Formoretechnicalspecications,seethecamera’sUserManualavailableon
www.axis.com
AttachtheHousingtotheWallMount
NO
TICE
NO NO
TICE TICE
•Usecablesthatkeepwithinthespeciedcablearea,seepage15.Usinganyotherthan
theprovidedcablegasketcouldcausewatertoseepinanddamagetheproduct.For
informationaboutcablegasketsandcableglandsthatallowforothercableareas,see
www.axis.com
•Ifmorethanonecableisused,eachcablemustberoutedthroughaseparatecablegasket.
•Onlyopenaholeincablegasketsthatwillbeusedandifacablegasketistorn,replaceit
withanewcablegasket.Leavingacablegasketopenorusingatorncablegasketcould
causewatertoseepinanddamagetheproduct.
1.Loosenthebottomcoverscrewsandliftthetopcover.
2.Selectwhichcablegaskettouseandpullthetabtoopenaholeforthenetworkcable.
16
Page 17
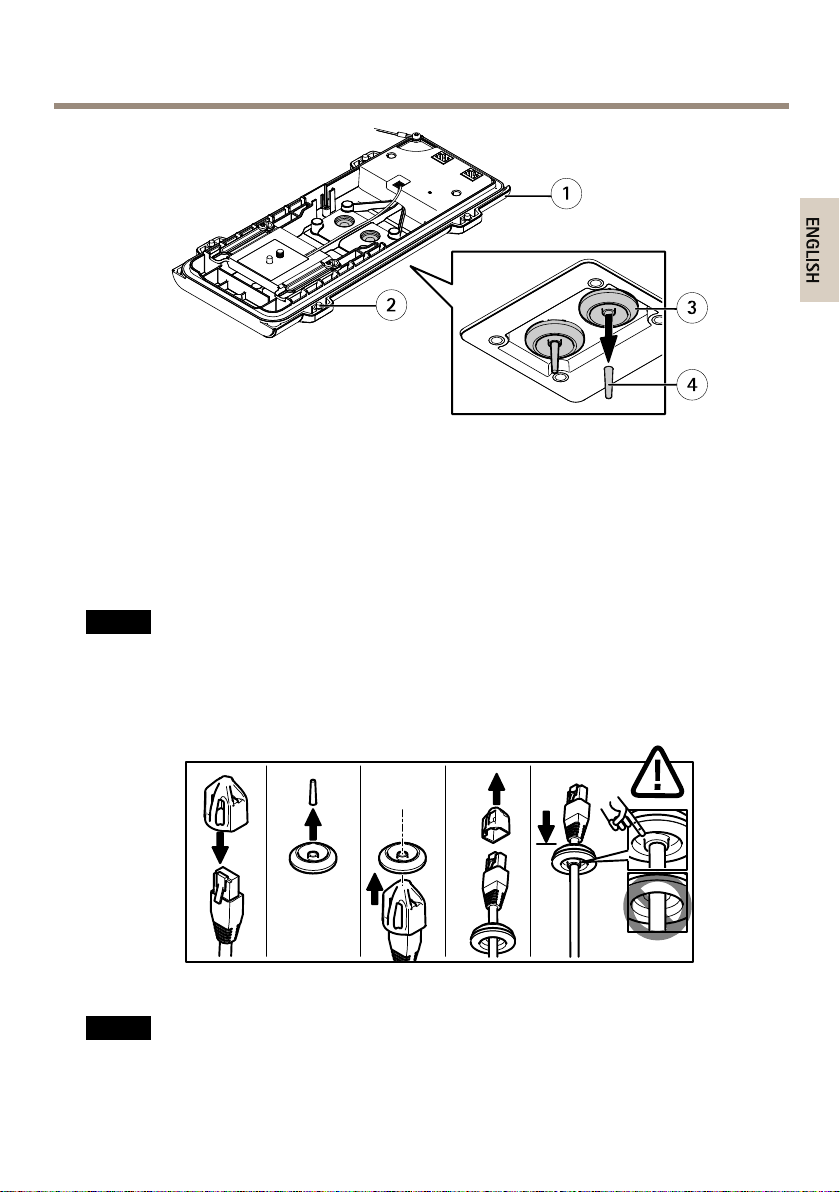
AXIST93FSeries
3
1
2
4
ENGLISH
Exampleimage:AXIST93F20
1
Bottomcover
2
BottomcoverscrewT20(4x)
3
CablegasketM20(2x)
4
Tab
3.Pushthenetworkcablethroughthecablegasket.
NO
TICE
NO NO
TICE TICE
Ifthenetworkcablehasapremountednetworkconnector,removethecablegasketand
usetheconnectorguardtopreventtearingofthecablegasket.Avoidusingnetwork
cableswithcappednetworkconnectorsbecausetheycouldcausetearingofthecable
gasketdespiteusingtheconnectorguard.
4.Pullthenetworkcablebackslightlysothatthecablegasketadjustsitselfonthecable.
NO
TICE
NO NO
TICE TICE
Notpullingthecablebackcouldcausewatertoseepinanddamagetheproduct.
17
Page 18
AXIST93FSeries
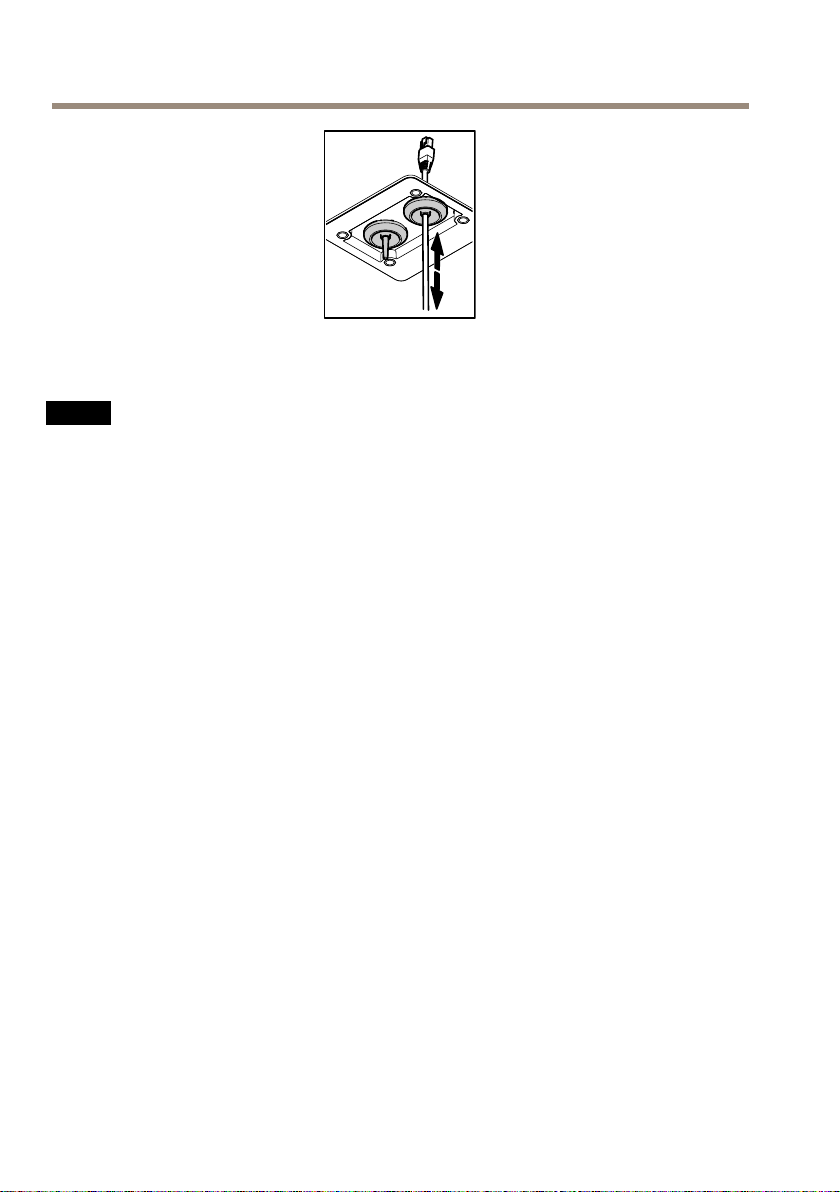
5.Makesurethatthecablegasketisttedproperly.
6.Usetheothercablegasketforthepowercable(AXIST93F10).Repeatthestepsabove.
NO
TICE
NO NO
TICE TICE
Mountthepowerconnectorafterthepowercableispushedthroughthecablegasket.
7.Ifconnectinganauxiliarydevice,forexampleanI/O,audio,orexternalpowerdevice,to
thecamera,repeatthestepsaboveasapplicabletothespecicdevice.
8.Putthebottomcoveronthewallmountandtightenthescrews(torque2Nm).
18
Page 19
AXIST93FSeries
1
3
4
2
ENGLISH
Exampleimage:AXIST93F20andAXISP13Series
1
Bottomcover
2
ScrewT20(4x)
3
Wallbracket
4
BracketadjustmentscrewT30
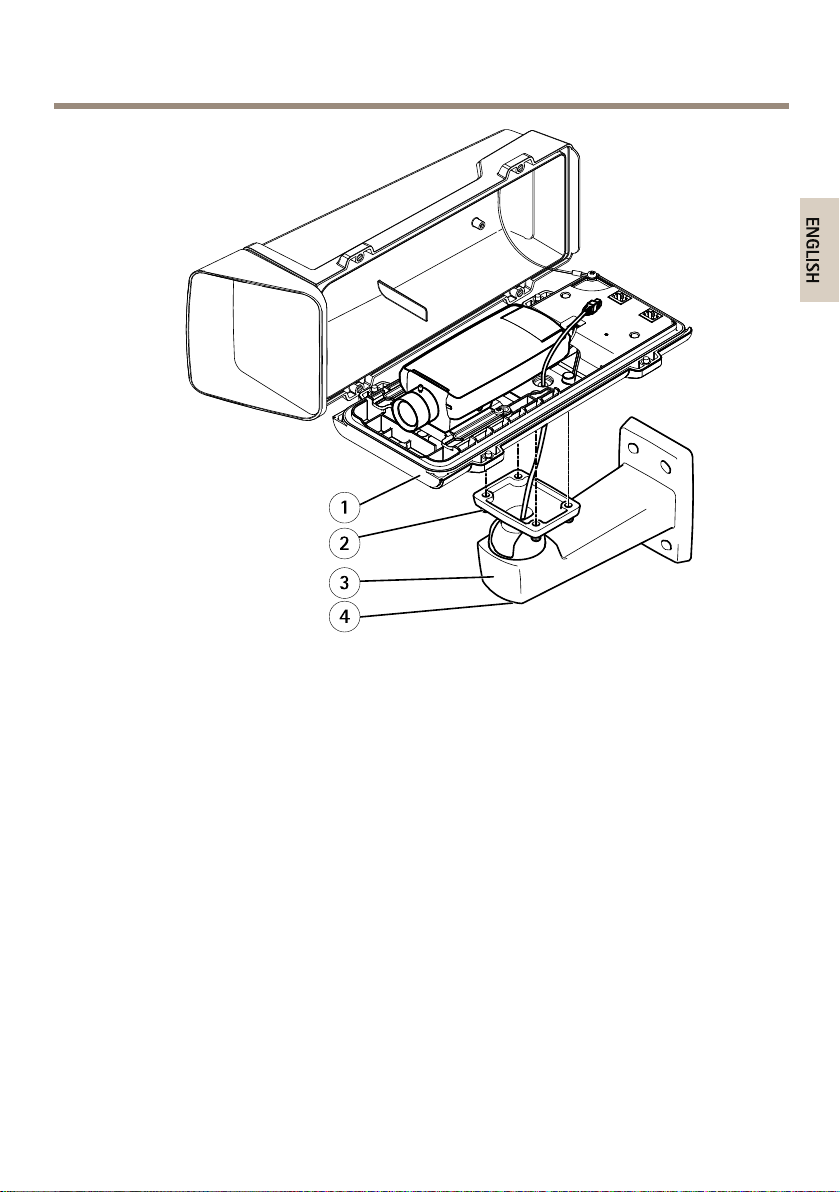
InstalltheCameraintheHousing
1.Loosentheholderscrews,thenslideandlifttheholder,seeillustrationbelow.
2.Attachtheholdertothecamera.Alignthepinandcamerascrewwiththepinholeand
screwmountonthecameraandtightenthecamerascrew(torque1Nm).Becarefulnot
toovertightenthescrew.
19
Page 20
AXIST93FSeries
3
4
2
1
1
Holder
2
HolderscrewT20(2x)
3
Pin
4
CamerascrewT20
3.Ifconnectingexternal/inputdevices,audiodevices,orexternalpowertothecamera,
connectthemaccordingtotheinstructionsinthecamera’sInstallationGuide.
4.Attachtheholdertothebottomcover.Adjustthepositionoftheholdercarefullyand
tightentheholderscrews(torque0.5Nm).
20
Page 21
1
2
3
4
Exampleimage:AXIST93F20andAXISP13Series
ENGLISH
1
HolderscrewT20(2x)
2
Holder
3
PositionA(overlap):+3.7mm(+0.15in)
4
PositionB(gap):-6mmto-4mm(-0.24into-0.16in)
AXIST93FSeries
NO
TICE
NO NO
TICE TICE
•PositionA:Toavoidreectionsintheimage,adjusttheholder’spositionsothatthe
cameralensedgeoverlapsthebottomcoveredgeby+3.7mm(+0.15in).Notethat
thispositionvoidstheIK10rating.
•PositionB:TofulllltheIK10ratingrequirements,adjusttheholder’spositionso
thatthegapbetweenthecameralensandbottomcoveredgesisbetween-6mmand
-4mm(-0.24inand-0.16in).
5.(AXIST93F10,AXIST93F20)Connecttheheatercabletotheheaterconnectorinthe
bottomcover.
6.IfusinganSDcardforlocalstorage,insertthecardintothecamera’sSDcardslot.
7.Connectthenetworkcables.
-(AXIST93F05,AXIST93F10)Connectthecameratothenetwork.
21
Page 22
AXIST93FSeries
2
3
4
5
1
-(AXIST93F20)Connectthehousingtothenetwork(PoEIN)andthecamerato
thehousing(PoEOUT).
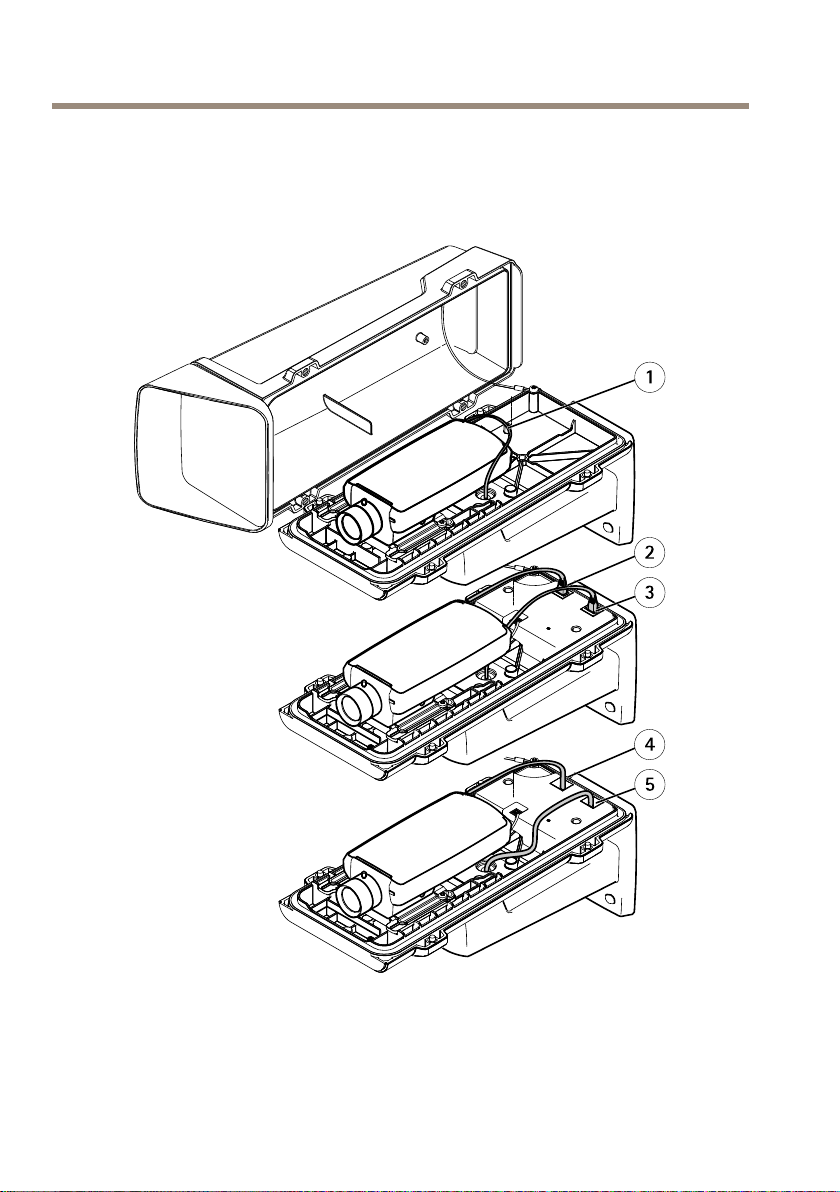
8.Connectthepowercables(AXIST93F10).Connectthehousingtoexternalpower(POWER
IN)andthecameratothehousing(POWEROUT).
Exampleimages:AXIST93F05(top),AXIST93F20(middle),AXIST93F10(bottom)andAXISP13Series
1
Networkcable
2
Networkconnector(PoEOUT)
22
Page 23
AXIST93FSeries
1
ENGLISH
3
Networkconnector(PoEIN)
4
Powerconnector(POWEROUT)
5
Powerconnector(POWERIN)
9.(AXIST93F20,AXIST93F10)Makesurethatthehousing’sstatusLEDindicatesthecorrect
condition.SeeLEDIndicators(AXIST93F10,AXIST93F20)onpage12.
10.MakesurethatthecameraLEDsindicatethecorrectconditions.Seethecamera’s
InstallationGuide.
11.Loosenthebracketadjustmentscrewtoaimthecameratothepointofinterest.For
informationabouthowtoviewthevideostream,seethecamera’sInstallationGuide
orwww.axis.com/techsup
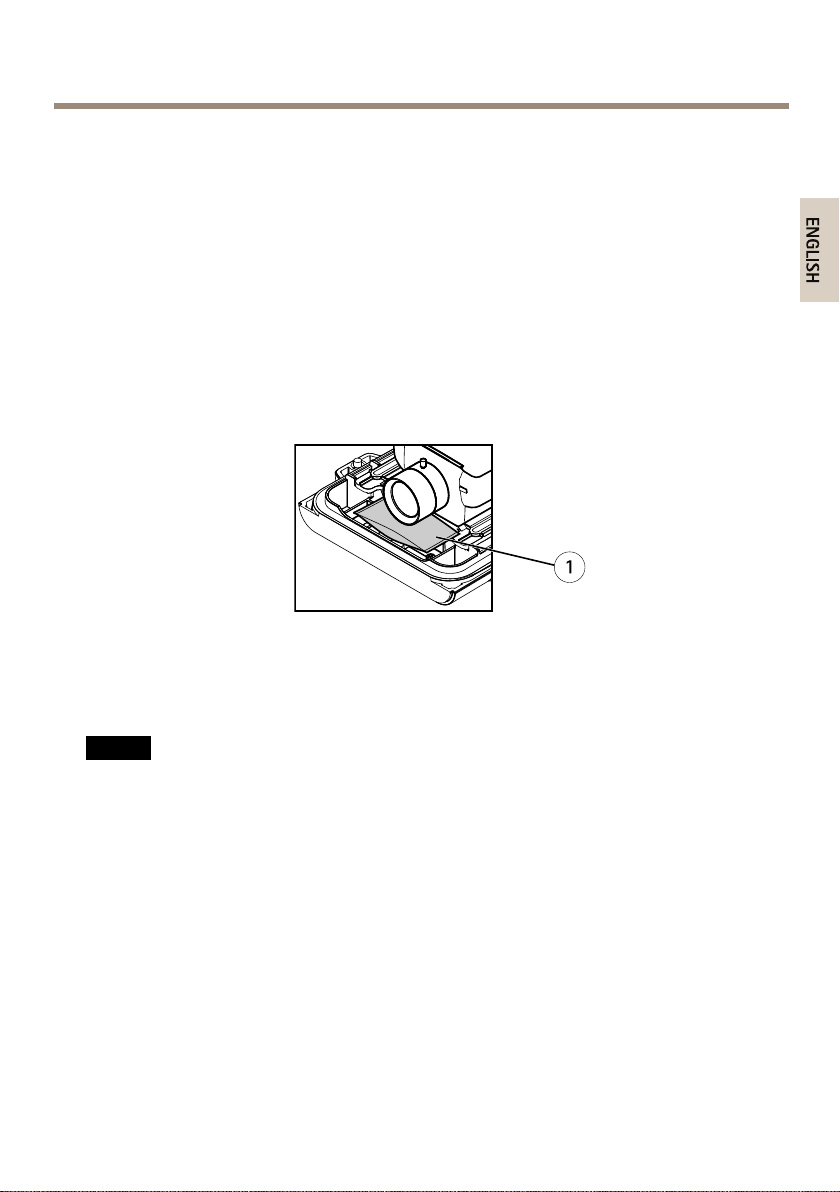
12.Removetheplasticwrapperfromthedesiccantbagandputthedesiccantbagbelow
thelens.
1
Desiccantbag
13.Closethehousing.Makesuretoalternatelytightenthebottomcoverscrewsafewturns
atatimeuntiltheyaretight(torque1.5Nm).Thiswillhelpensurethatthebottom
covergasketiscompressedevenly.
NO
TICE
NO NO
TICE TICE
Makesurenottopinchanycableswhenclosingthehousing.
14.Ifusingasunshield(soldseparately),placeitoverthetopcover,adjustitsposition
andtightenthescrews.
FurtherInformation
VisitAxislearningcenterwww.axis.com/academyforusefultrainings,webinars,tutorialsand
guides.
23
Page 24

AXIST93FSeries
WarrantyInformation
ForinformationaboutAxis’productwarrantyandtheretorelatedinformation,see
www.axis.com/warranty/
24
Page 25
AXIST93FSeries
FRANÇAIS
Informationssurlasécurité
Lisezattentivementceguided'installationavantd'installerl'appareil.Conservezleguide
d'installationpourtouteréférenceultérieure.
Niveauxderisques
DANGER
AVERTISSEMENT
ATTENTION
VIS
A AAVIS VIS
Indiqueunesituationdangereusequi,siellen'estpasévitée,
entraîneraledécèsoudesblessuresgraves.
Indiqueunesituationdangereusequi,siellen'estpasévitée,
pourraitentraînerledécèsoudesblessuresgraves.
Indiqueunesituationdangereusequi,siellen'estpasévitée,
pourraitentraînerdesblessureslégèresoumodérées.
Indiqueunesituationqui,siellen'estpasévitée,pourrait
endommagerl'appareil.
Autresniveauxdemessage
ImportantIndiquelesinformationsimportantes,nécessairespourassurerle
NoteIndiquelesinformationsutilesquipermettrontd’obtenirle
bonfonctionnementdel’appareil.
fonctionnementoptimaldel’appareil.
25
Page 26

AXIST93FSeries
Consignesdesécurité
VIS
A AAVIS VIS
•LeproduitAxisdoitêtreutiliséconformémentauxloisetrèglementationslocalesen
vigueur.
•ConserverceproduitAxisdansunenvironnementsecetventilé.
•NepasexposerceproduitAxisauxchocsouauxfortespressions.
•Nepasinstallerceproduitsurdessupports,surfacesoumursinstables.
•Utiliseruniquementdesoutilsrecommandéspourl'installationdel'appareilAxis.Une
forceexcessiveappliquéesurl'appareilpourraitl'endommager.
•Nepasutiliserdeproduitschimiques,desubstancescaustiquesoudenettoyants
pressurisés.
•Utiliserunchiffonpropreimbibéd'eaupurepourlenettoyage.
•Utiliseruniquementdesaccessoiresconformesauxcaractéristiquestechniquesduproduit.
IlspeuventêtrefournisparAxisouuntiers.
•UtiliseruniquementlespiècesderechangefourniesourecommandéesparAxis.
•Nepasessayerderéparerceproduitparvous-même.Contacterl'assistancetechnique
d'AxisouvotrerevendeurAxispourdesproblèmesliésàl'entretien.
Transport
VIS
A AAVIS VIS
•LorsdutransportduproduitAxis,utilisezl'emballaged'origineouunéquivalentpour
éviterd'endommagerleproduit.
26
Page 27
AXIST93FSeries
FRANÇAIS
Guided'installation
Ceguided'installationexpliquecommentinstallerleboîtierdeprotectionAXIST93F05,leboîtier
d'extérieurAXIST93F10etleboîtierd'extérieurAXIST93F20.
Pourinstallerlacamérasurleréseau,consultezleguided’installationfourniaveclacaméra.Pour
obtenirdeplusamplesdétailsrelatifsàlacaméra,consultezlemanueldel’utilisateur,disponible
surlesitewww.axis.com
Procéduresd’installation
1.Assurez-vousquelesoutilsetautresmatérielsnécessairesàl'installationsontinclus
dansl'emballage.Cf.page27.
2.Consultezladescriptiondumatériel.Cf.page29.
3.Étudiezlescaractéristiques.Cf.page34.
4.Installezlematériel.Cf.page36.
Contenudel’emballage
•Boîtier
-BoîtierdeprotectionAXIST93F05ou
-Boîtierd’extérieurAXIST93F10(CA/CC)ou
-Boîtierd’extérieurAXIST93F20(PoE)
•FixationmuraleAXIST94Q01Aavecchemindecâbleinterne
•EmboutpourvisT30
•ProtectionduconnecteurAXISA
•Connecteurà2brochespourcâbled’alimentationCA/CC(AXIST93F10)
•Câble
-Câbled'alimentation–pourconnecterlacaméraauboîtier(AXIST93F10)ou
-Câbleréseau–pourconnecterlacaméraauboîtier(AXIST93F20)
•JointsdecâbleAXISM20
•Sachetdessiccatif
•Documentsimprimés
-Guided'installation(cedocument)
-Guided'installationpourxationmuraleAXIST94Q01A
Outilsrecommandés
•Perceuse–pourinstallerlaxationmurale
27
Page 28

AXIST93FSeries
•TournevisTorxT20(inclusdanstouslespacksdecaméracompatibles)
Accessoiresenoption
•Pare-soleilAXISA
•SupportformatCorridorAAXIS(AXIST93F20)
•SupportformatCorridorBAXIS(AXIST93F10)
•InterrupteurdeporteAXISA
•Boîtierarrièredestinéauconduitdel'AXIST94R01P
•Illuminateurs
•Fixationspourboîtier
•Jointsdecâbleetpresse-étoupes
•CoffretdesurveillanceAXIST98A16-VE
•FixationspourpoteauAXIST91A47
•CâbleintérieurpourxationauplafondVTWCM4A
•FixationangulaireVTWCWA
Pourplusd’informationssurlesaccessoiresdisponibles,consultezlesitewww.axis.com
28
Page 29
Aperçudumatériel
10 9
8 7 6 5
4
3
2
1
FRANÇAIS
Boîtier
AXIST93FSeries
BoîtierdeprotectionAXIST93F05
1
Câbledesécurité
2
JointdecâbleM20(x2)
3
Perforation(x2)
4
Logementpourcommutateurd'alarmed'intrusion–prendencharge
l'interrupteurdeporteAXISA(venduséparément)
5
VisdusupportT20(x2)
6
VisdelacaméraT20
7
Broche
8
Support
9
Fenêtre
10
Couverclesupérieur
29
Page 30
AXIST93FSeries
15 14
13 12 11 10 9
5
4
3
6
8
7
2
1
Boîtierd’extérieurAXIST93F20
1
Câbledesécurité
2
Connecteurderégulateurdechauffage
3
Connecteurréseau(PoEOUT)
4
Voyantd’état
5
Connecteurréseau(PoEIN)
6
Câblederégulateurdechauffage
7
JointdecâbleM20(x2)
8
Perforation(x2)
9
Logementpourcommutateurd'alarmed'intrusion–prendencharge
l'interrupteurdeporteAXISA(venduséparément)
10
VisdusupportT20(x2)
11
VisdelacaméraT20
12
Broche
13
Support
14
Fenêtre
15
Couverclesupérieur
30
Page 31

15 14
13 12 11 10 9
5
4
3
6
8
7
2
1
Boîtierd’extérieurAXIST93F10
FRANÇAIS
1
Câbledesécurité
2
Connecteurderégulateurdechauffage
3
Connecteurd'alimentation(ALIMENTATIONDESORTIE)
4
Voyantd’état
5
Connecteurd'alimentation(ALIMENTATIOND'ENTRÉE)
6
Câblederégulateurdechauffage
7
JointdecâbleM20(x2)
8
Perforation(x2)
9
Logementpourcommutateurd'alarmed'intrusion–prendencharge
l'interrupteurdeporteAXISA(venduséparément)
10
VisdusupportT20(x2)
11
VisdelacaméraT20
12
Broche
13
Support
14
Fenêtre
15
Couverclesupérieur
AXIST93FSeries
31
Page 32

AXIST93FSeries
1
3
4
5
2
Fixationmurale
1
Câbleréseau(cheminàtraverslesupportmural)
2
Câbled'alimentation(cheminàtraverslesupportmural)(AXIST93F10)
3
VisT20(x4)
4
VisderéglagedusupportT30
5
Supportmural
32
Page 33

Voyantsd'état(AXIST93F10,AXIST93F20)
FRANÇAIS
AXIST93FSeries
Voyant
État
Couleur
VertFonctionnementnormal
Clignoteuneseule
foisenvert
Clignotedeuxfois
envert
Clignotetroisfois
envert
Indication
Erreurauniveaudurégulateurdechauffage
Auto-test
Erreurgénérale
Connecteursetboutons
Pourlescaractéristiquesetlesconditionsd'utilisation,consultezpage34.
Connecteurréseau(AXIST93F20)
ConnecteurEthernetRJ45.Prendenchargel'alimentationparEthernet(PoE).
•PoEIN–Fournitauboîtierl'alimentationetEthernet.Connectez-vousauréseauviaun
commutateurréseauPoE.
•PoEOUT–Fournitàlacaméral'alimentationetEthernet.Connectezleboîtieràla
caméra.
VIS
A AAVIS VIS
Lesréglementationslocalesoulesconditionsenvironnementalesetélectriquesdans
lesquellesleproduitestutilisépeuventnécessiterl'utilisationd'uncâbleréseaublindé
(STP).Touslescâblesréseauquisontacheminésàl'extérieuroudansdesenvironnements
électriquesexigeantsdoiventêtredestinésàleurusagespécique.Assurez-vousqueles
périphériquesréseausontinstallésconformémentauxinstructionsdufabricant.Pour
plusd’informationssurlesexigencesréglementaires,consultezRegulatoryInformation
onpage2.
Connecteurderégulateurdechauffage(AXIST93F10,AXIST93F20)
Blocterminalà4brochesutilisépouralimenterlecapteurdetempératureetdechauffageintégré
dusupport.
Connecteursd’alimentation(AXIST93F10)
ConnecteursdeterminalpouralimentationCA/CC.
33
Page 34

AXIST93FSeries
•ALIMENTATIOND'ENTRÉE—Alimenteleboîtier.Connectezàl'alimentationCA/CC
externe.Leconnecteurestindépendantdelapolarité.
•ALIMENTATIONDESORTIE—Alimentelacaméra.Connectezleboîtieràlacaméra.
Caractéristiquestechniques
Conditionsd'utilisation
L'appareilAxisestdestinéàunusageenintérieurouenextérieur.
Classication
AXIST93F05/AXIST93F10/AXIST93F20
Température
AXIST93F05
AXIST93F05
AXIST93F10
AXIST93F20
1
/AXIST93F10/AXIST93F20
1
SérieAXISP13
AXISQ1604/Q1614
AXISQ1615
SérieAXISP13
AXISQ1604/Q1614
AXISQ1615/Q1635
IEC60721-4-3Classe4M4
IEC60529IP66
NEMA250Type4X
De-40ºCà60ºC(de-40ºFà140ºF)
De0ºCà45ºC(de32ºFà1 13ºF)
De0ºCà45ºC(de32ºFà1 13ºF)
De0ºCà50ºC(de32ºFà122ºF)
De-40ºCà45ºC(de-40ºFà113ºF)
De-40ºCà45ºC(de-40ºFà113ºF)
De-40°Cà50°C(-40°Fà122°F)
Important
(AXIST93F10,AXIST93F20)Lorsquelatempératureambianteestinférieureà0ºC(32ºF),
ledémarragepeutprendrejusqu'à60minutes.Pluslatempératureestbasse,plusle
démarrageestlong.
Humidité
AXIST93F05/AXIST93F10/AXIST93F20
Humiditérelativede15–100%(condensation)
34
Page 35

Conditionsdestockage
FRANÇAIS
Température
AXIST93F05/AXIST93F10/AXIST93F20
Consommationélectrique
AXIST93FSeries
De-40ºCà75ºC(de-40ºFà167ºF)
ProduitAlimentation
AXIST93F05SansobjetSansobjet
AXIST93F1012–28VCC,max25W
AXIST93F20
20–24VCA,max29VA
PoweroverEthernetIEEE802.3af/802.3atType1Classe3,max15,4W
Sortied'alimentation(verslacaméra)
12VCC,1,5Amax
Zonedecâble
VIS
A AAVIS VIS
•Utilisezdescâblesadaptésàlazonespéciée.
•Sélectionnezdescâblesconformesàlalégislationlocale.
•Assurez-vousquelestrousdecâblessontcorrectementscellés.
Diamètre
5–15mm(0,197–0,591'')
Pourcréerd'autrestrousdecâbles,ouvrezlesperforationssituéessouslesupport.Cf.Aperçu
dumatérielpage29.
VIS
A AAVIS VIS
Utilisezdesjointsdecâbleetdespresse-étoupesadaptésauxtrousdecâblesetàlazone
decâble.
AWG
Environ4–6/0
Pourplusd'informationssurlesaccessoires,telsquelesjointsdecâbleetlespresse-étoupes
adaptésàd'autreszonesdecâble,consultezwww.axis.com
35
Page 36

AXIST93FSeries
Installationdumatériel
VIS
A AAVIS VIS
•Lesréglementationslocalesoulesconditionsenvironnementalesetélectriquesdans
lesquellesleproduitestutilisépeuventnécessiterl'utilisationd'uncâbleréseaublindé
(STP).Touslescâblesréseauquisontacheminésàl'extérieuroudansdesenvironnements
électriquesexigeantsdoiventêtredestinésàleurusagespécique.Assurez-vousqueles
périphériquesréseausontinstallésconformémentauxinstructionsdufabricant.
(AXIST93F05)Pourplusd’informationssurlesexigencesréglementaires,reportez-vous
auguided'installationdelacaméra.
(AXIST93F10,AXIST93F20)Pourplusd’informationssurlesexigencesréglementaires,
consultezRegulatoryInformationonpage2.
•Veillezànepasrayer,endommageroulaisserd'empreintessurlafenêtre,carcelapourrait
altérerlaqualitéd'image.
LeproduitAxispeutêtreinstalléavecdescâblesacheminésàtraversoulelongdumur.
Liseztouteslesinstructionsavantl'installationdel'appareil:
1.Installezlaxationmurale.Cf.page36.Pourobtenirdesinstructionsdétaillées,
reportez-vousauguided'installationdelaxationmuraledisponibledanslaboîteou
surlesitewww.axis.com.
2.Placezleboîtiersurlaxationmurale.Cf.page37.
3.Installezlacaméradansleboîtier.Cf.page39.
Installationdelaxationmurale
ATTENTION
Assurez-vousquelesvisetleschessontadaptéesaumatériau(bois,métal,cloisonsèche,
pierre,etc.)etquelematériauestsufsammentrésistantpoursupporterlepoidscombiné
delacaméra,duboîtieretdusupportmural.
1.Préparezlemurpourl'installationdusupportmural.Utilisezlesupportmuralcomme
gabaritetmarquezlesemplacementsdestrousavantdelespercer.
2.Acheminezlecâbleréseauàtraverslesupportmural.Laissezenviron30cm(1 1,8'')de
câblepourlaconnexiondelacaméra.
3.Acheminezlecâbled'alimentation(AXIST93F10)àtraverslesupportmural.Laissez
environ30cm(11,8'')decâblepourlaconnexiondelacaméra.
4.Sivousconnectezunpériphériqueauxiliaire(parexemple,unpériphérique
d'entrée/sortie,audiooud'alimentationexterne)àlacaméra,répétezl'étapeci-dessus
pourchaquepériphérique.
5.Serrezlesvisdusupportmuralpourlexer.
36
Page 37

AXIST93FSeries
3
1
2
4
FRANÇAIS
Note
•Pourobtenirdesinstructionsdétaillées,reportez-vousauguided'installationdelaxation
muraledisponibledanslaboîteetsurlesitewww.axis.com.
•Pourplusdecaractéristiquestechniques,reportez-vousaumanueld’utilisationdela
caméradisponiblesurwww.axis.com
Placementduboîtiersurlaxationmurale
VIS
A AAVIS VIS
•Utilisezdescâblesadaptésàlazonespéciée.Reportez-vousàlasectionpage35.
L’utilisationd’unjointdecâbleautrequeceluifournirisqued’entraîneruneinltration
d’eauetd’endommagerleproduit.Pourplusd'informationssurlesjointsdecâbleetles
presse-étoupesadaptésàd'autreszonesdecâble,consultezwww.axis.com
•Sivousutilisezplusd'uncâble,chaquecâbledoitêtreacheminéautraversd'unjointde
câbledistinct.
•Ouvrezuniquementuntroudanslesjointsdecâblequiserontutilisés.Siunjointdecâble
estendommagé,remplacez-leparunnouveau.L’utilisationd’unjointdecâbleouvertou
endommagérisqued’entraîneruneinltrationd’eauetd’endommagerleproduit.
1.Desserrezlesvisducouvercleinférieuretsoulevezlecouverclesupérieur.
2.Sélectionnezlejointdecâbleàutiliserettirezsurlapattepourouvriruntrouau
niveauducâbleréseau.
Exempleillustré:AXIST93F20
1
Couvercleinférieur
2
VisducouvercleinférieurT20(x4)
3
JointdecâbleM20(x2)
4
Patte
37
Page 38

AXIST93FSeries
3.Faitespasserlecâbleréseauàtraverslejointdecâble.
VIS
A AAVIS VIS
Silecâbleréseaudisposed'unconnecteurréseaupré-installé,retirezlejointdecâbleet
utilisezlaprotectionduconnecteurpourévitertoutendommagementdujointdecâble.
Évitezd'utiliserdescâblesréseauéquipésdeconnecteursréseaurecouverts,carilspeuvent
endommagerlejointdecâble,etcemalgréleurprotection.
4.Tirezlégèrementsurlecâbleréseaupourquelejoints'ajustedessus.
VIS
A AAVIS VIS
Sivousnetirezpassurlecâble,ilexisteunrisqued'inltrationd’eauetd’endommagement
duproduit.
5.Assurez-vousquelejointdecâbleestcorrectementinstallé.
6.Utilisezl'autrejointdecâblepourlecâbled'alimentation(AXIST93F10).Répétezles
étapesci-dessus.
VIS
A AAVIS VIS
Installezleconnecteurd'alimentationunefoislecâbled'alimentationinsérédanslejoint
decâble.
38
Page 39

AXIST93FSeries
1
3
4
2
FRANÇAIS
7.Sivousconnectezunpériphériqueauxiliaire(parexemple,unpériphériqued'entrée/sortie,
audiooud'alimentationexterne)àlacaméra,répétezlesétapesci-dessuspourchaque
périphérique.
8.Placezlecouvercleinférieursurlaxationmuraleetserrezlesvis(couple2Nm).
Exempleillustré:SérieAXIST93F20etAXISP13
1
Couvercleinférieur
2
VisT20(x4)
3
Supportmural
4
VisderéglagedusupportT30
Installationdelacaméradansleboîtier
1.Desserrezlesvisdusupport,puisfaitesglisseretrelevezlesupport(voirillustration
ci-dessous).
2.Fixezlesupportàlacaméra.Alignezlabrocheetlavisdelacaméraavecletroudela
brocheetlaxationdelavissurlacaméra,puisserrezlavisdelacaméra(couple
1Nm).Veillezànepastroplaserrer.
39
Page 40

AXIST93FSeries
3
4
2
1
1
Support
2
VisdusupportT20(x2)
3
Broche
4
VisdelacaméraT20
3.Sivousconnectezdespériphériquesexternes/d'entrée,despériphériquesaudioouune
sourced'alimentationexterneàlacaméra,connectez-lesconformémentauxinstructions
fourniesdansleguided'installationdelacaméra.
4.Fixezlesupportaucouvercleinférieur.Ajustezprécisémentlapositiondusupport,puis
serrezlesvisdecedernier(couple0,5Nm).
40
Page 41

1
2
3
4
Exempleillustré:SérieAXIST93F20etAXISP13
FRANÇAIS
1
VisdusupportT20(x2)
2
Support
3
PositionA(chevauchement):+3,7mm(+0,15")
4
PositionB(écart):De-6mmà-4mm(de-0,24''à-0,16'')
AXIST93FSeries
VIS
A AAVIS VIS
•PositionA:Pourévitertouteréexiondel'image,ajustezlapositiondusupportdesorte
queleborddel'objectifdelacamérachevauchelebordducouvercleinférieurd'environ
+3,7mm(+0,15'').CettepositionannulelacerticationIK10.
•PositionB:PourvousconformerauxexigencesdelacerticationIK10,ajustezlaposition
dusupportdesortequel'écartentrel'objectifdelacaméraetlesbordsducouvercle
inférieursesitueentre-6mmet-4mm(-0,24''et-0,16'').
5.(AXIST93F10,AXIST93F20)Connectezlecâblederégulateurdechauffageauconnecteur
derégulateurdechauffagesurlecouvercleinférieur.
6.SivousutilisezunecarteSDentantqu'espacedestockagelocal,insérezlacartedansle
logementprévuàceteffetsurlacaméra.
7.Branchezlescâblesréseau.
41
Page 42

AXIST93FSeries
2
3
4
5
1
-(AXIST93F05,AXIST93F10)Connectezlacaméraauréseau.
-(AXIST93F20)Connectezleboîtierauréseau(PoEIN)etlacaméraauboîtier
(PoEOUT).
8.Connectezlescâblesd'alimentation(AXIST93F10).Connectezleboîtieràl'alimentation
externe(ALIMENTATIOND'ENTRÉE)etlacaméraauboîtier(ALIMENTATIONDESORTIE).
Exemplesillustrés:SériesAXIST93F05(haut),AXIST93F20(milieu),AXIST93F10(bas)etAXISP13
1
Câbleréseau
42
Page 43

AXIST93FSeries
1
FRANÇAIS
2
Connecteurréseau(PoEOUT)
3
Connecteurréseau(PoEIN)
4
Connecteurd'alimentation(ALIMENTATIONDESORTIE)
5
Connecteurd'alimentation(ALIMENTATIOND'ENTRÉE)
9.(AXIST93F20,AXIST93F10)Vériezquelevoyantd'étatsurleboîtierindiqueles
conditionscorrectes.Cf.Voyantsd'état(AXIST93F10,AXIST93F20)page33.
10.Vériezquelesvoyantssurlacaméraindiquentlesconditionscorrectes.Reportez-vous
auguided'installationdelacaméra.
11.Desserrezlavisderéglagedusupportand’orienterlacaméradansladirectionvoulue.
Pourplusd'informationssurlavisualisationduuxdedonnéesvidéo,reportez-vousau
guided'installationdelacaméraouconsultezwww.axis.com/techsup.
12.Retirezl’emballageplastiquedusachetdessiccatifetplacezlesachetdessiccatifsous
l'objectif.
1
Sachetdessiccatif
13.Fermezleboîtier.Assurez-vousdeserrerenalternancelesvisducouvercleinférieurde
quelquestoursàlafoisjusqu'àcequ'ellessoienttoutesbienserrées(couple1,5Nm).Cela
permettradegarantirquelejointducouvercleinférieurestcompressédefaçonrégulière.
VIS
A AAVIS VIS
Assurez-vousdenepinceraucuncâbleàlafermetureduboîtier.
14.Sivousutilisezunpare-soleil(venduséparément),placez-lesurlecouverclesupérieur,
ajustezsapositionetserrezlesvis.
Pourobtenirplusderenseignements
Visitezlecentred’apprentissageenligneAxissurlesitewww.axis.com/academypourensavoir
plussurlesformations,leswebinaires,lestutorielsetlesguides.
43
Page 44

AXIST93FSeries
Informationssurlagarantie
PourobtenirdeplusamplesinformationssurlagarantieduproduitAXISetdesrenseignements
connexes,allezsurlesitewww.axis.com/warranty/
44
Page 45

AXIST93FSeries
DEUTSCH
Sicherheitsinformation
LesenSiedasInstallationshandbuchsorgfältigdurchbevorsiedasProduktinstallieren.Bewahren
SiedasInstallationshandbuchfürzukünftigeZweckeauf.
Gefährdungsstufen
GEFAHRWeistaufeinegefährlicheSituationhin,welche,fallsnicht
WARNUNGWeistaufeinegefährlicheSituationhin,welche,fallsnicht
VORSICHTWeistaufeinegefährlicheSituationhin,welche,fallsnicht
HINWEIS
HINWEIS HINWEIS
verhindert,zuTododerschwerenVerletzungenführt.
verhindert,zuTododerschwerenVerletzungenführenkann.
verhindert,zugeringfügigerodermäßigerVerletzungführenkann.
WeistaufeinegefährlicheSituationhin,welche,fallsnicht
verhindert,zuSachschädenführenkann.
WeitereNachrichtenstufen
WichtigWeistaufwichtigeInformationenhin,diedenrichtigenBetrieb
BeachtenWeistaufnützlicheInformationenhin,diedieoptimale
desProduktsgewährleisten.
VerwendungdesProduktsunterstützen.
45
Page 46

AXIST93FSeries
Sicherheitsanweisungen
HINWEIS
HINWEIS HINWEIS
•DieAnwendungdesAxisProduktsmussunterBeachtungderörtlichgeltendenrechtlichen
Bestimmungenerfolgen.
•LagernSiedasAxisProduktineinertrockenenundbelüftetenUmgebung.
•AchtenSiedarauf,dassdasAxisProduktwederStößennochstarkemDruckausgesetztist.
•InstallierenSiedasProduktnichtaninstabilenHalterungen,OberächenoderWänden.
•VerwendenSiebeiderInstallationdesAxisProduktsausschließlichpassendeWerkzeuge.
EinzugroßerKraftaufwandkanndasProduktbeschädigen.
•VerwendenSiekeinechemischen,ätzendenoderaerosolhaltigenReinigungsmittel.
•VerwendenSiezumReinigeneinsauberes,mitlauwarmemWasserangefeuchtetesTuch.
•VerwendenSienurZubehör,dasdentechnischenDatendesProduktsentspricht.Dieses
istvonAxisoderDrittanbieternerhältlich.
•VerwendenSieausschließlichErsatzteiledievonAxisbereitgestelltoderempfohlen
werden.
•VersuchenSienicht,dasProduktselbstständigzureparieren.WendenSiesichbezüglich
ReparaturundWartungandenAxisSupportoderIhrenAxisHändler.
Transport
HINWEIS
HINWEIS HINWEIS
•BeiBedarftransportierenSiedasAxisProduktinderOriginalverpackungodereiner
entsprechendenVerpackung,sodassSchädenvermiedenwerden.
46
Page 47

AXIST93FSeries
DEUTSCH
Installationsanleitung
IndieserAnleitungwirddieInstallationdesAXIST93F05Schutzgehäuses,des
AXIST93F10AußengehäusesunddesAXIST93F20Außengehäusesbeschrieben.
AnweisungenzurInstallationderKameraimNetzwerkndenSieinderInstallationsanleitungzuder
Kamera.WeitereInformationenzurKamerandenSieimBenutzerhandbuchunterwww.axis.com.
Installationsschritte
1.StellenSiesicher,dassdiePackungsinhalte,Werkzeugeundanderenotwendige
MaterialienfürdieInstallationinOrdnungsind.SieheSeite47.
2.MachenSiesichmitderHardware-Übersichtvertraut.SieheSeite49.
3.MachenSiesichmitdentechnischenDatenvertraut.SieheSeite54.
4.InstallierenSiedieHardware.SieheSeite56.
Lieferumfang
•Gehäuse
-AXIST93F05Schutzgehäuseoder
-AXIST93F10Außengehäuse(AC/DC)oder
-AXIST93F20Außengehäuse(PoE)
•AXIST94Q01AWandhalterungmitinnenliegendemKabelkanal
•SchraubensetT30
•AXISAnschlussstückA
•2-poligerAnschlusssteckerfüreinNetzkabel(AXIST93F10)
•Kabel
-NetzkabelzumAnschließenderKameraandasGehäuse(AXIST93F10)oder
-NetzwerkkabelzumAnschließenderKameraandasGehäuse(AXIST93F20)
•AXISKabeldichtungenM20
•Antikondensationsbeutel
•GedruckteDokumente
-Installationsanleitung(diesesDokument)
-InstallationsanleitungfürdieAXIST94Q01AWandhalterung
EmpfohleneWerkzeuge
•BohrmaschinezurMontagederWandhalterung
47
Page 48

AXIST93FSeries
•TorxT20-Schraubendreher(imLieferumfangsämtlicherkompatiblerKamerapakete
enthalten)
OptionalesZubehör
•AXISSonnenschutzA
•AXISCorridorFormat-HalterungA(AXIST93F20)
•AXISCorridorFormat-HalterungB(AXIST93F10)
•AXISTürschalterA
•AXIST94R01PKabelführungsdose
•Beleuchtung
•Gehäusehalterungen
•KabeldichtungenundKabelverschraubungen
•AXIST98A16-VEÜberwachungsschrank
•AXIST91A47Masthalterungen
•VT-Deckenhalterung(Kabel,int.)WCM4A
•VT-EckhalterungWCWA
Unterwww.axis.comndenSieInformationenüberverfügbaresZubehör.
48
Page 49

ÜbersichtüberdieHardware
10 9
8 7 6 5
4
3
2
1
DEUTSCH
Gehäuse
AXIST93FSeries
AXIST93F05Schutzgehäuse
1
Sicherheitsdraht
2
KabeldichtungM20(2x)
3
Aufbohrung(2x)
4
EinschubfürEinbruchalarmschalter–unterstütztAXISTürschalterA(separat
erhältlich)
5
SchraubeT20fürHalter(2x)
6
SchraubeT20fürKamera
7
Kontakt
8
Halter
9
Fenster
10
ObereAbdeckung
49
Page 50

AXIST93FSeries
15 14
13 12 11 10 9
5
4
3
6
8
7
2
1
AXIST93F20Außengehäuse
1
Sicherheitsdraht
2
AnschlussfürHeizelement
3
Netzwerkanschluss(PoE-Ausgang)
4
LED-Statusanzeige
5
Netzwerkanschluss(PoE-Eingang)
6
KabelfürHeizelement
7
KabeldichtungM20(2x)
8
Aufbohrung(2x)
9
EinschubfürEinbruchalarmschalter–unterstütztAXISTürschalterA(separat
erhältlich)
10
SchraubeT20fürHalter(2x)
11
SchraubeT20fürKamera
12
Kontakt
13
Halter
14
Fenster
15
ObereAbdeckung
50
Page 51

AXIST93FSeries
15 14
13 12 11 10 9
5
4
3
6
8
7
2
1
DEUTSCH
AXIST93F10Außengehäuse
1
Sicherheitsdraht
2
AnschlussfürHeizelement
3
Netzanschluss(POWEROUT)
4
LED-Statusanzeige
5
Netzanschluss(POWERIN)
6
KabelfürHeizelement
7
KabeldichtungM20(2x)
8
Aufbohrung(2x)
9
EinschubfürEinbruchalarmschalter–unterstütztAXISTürschalterA(separat
erhältlich)
10
SchraubeT20fürHalter(2x)
11
SchraubeT20fürKamera
12
Kontakt
13
Halter
14
Fenster
15
ObereAbdeckung
51
Page 52

AXIST93FSeries
1
3
4
5
2
Wandmontage
1
Netzwerkkabel(durchWandhalterungführen)
2
Netzkabel(durchWandhalterungführen)(AXIST93F10)
3
SchraubeT20(4x)
4
EinstellschraubeT30fürHalterung
5
Wandhalterung
52
Page 53

LEDs(AXIST93F10,AXIST93F20)
DEUTSCH
LEDFarbeBedeutung
Status
Grün
Grünes,einmaliges
Blinken
Grünes,doppeltes
Blinken
Grünes,dreifaches
Blinken
NormalerBetrieb
ProblememitdemHeizelement
Selbsttest
AllgemeinerFehler
AnschlüsseundTasten
FürdietechnischenDatenundBetriebsbedingungensieheSeite54.
Netzwerkanschluss(AXIST93F20)
RJ45-Ethernetanschluss.UnterstütztPoweroverEthernet(PoE).
•PoE-Eingang–zurStromversorgungdesGehäusesundEthernet.Netzwerkanschluss
übereinenPoE-fähigenNetzwerkswitch.
•PoE-Ausgang–zurStromversorgungderKameraundEthernet.Verbindungzwischen
GehäuseundKamera.
HINWEIS
HINWEIS HINWEIS
AufgrundörtlicherVorschriftenoderderUmgebungsbedingungenundelektrischen
Bedingungen,unterdenendasProduktverwendetwird,kanneinabgeschirmtes
Netzwerkkabel(STP)empfehlenswertodernotwendigsein.AlleNetzwerkkabeldes
Produkts,dieimAußenbereichoderinschwierigenelektrischenUmgebungenverlegt
werden,müssenhierfürausgelegtsein.StellenSiesicher,dassdieNetzwerkgerätegemäß
denAnweisungendesHerstellersinstalliertwurden.Informationenzugesetzlichen
BestimmungenndenSieunterRegulatoryInformationonpage2.
AXIST93FSeries
AnschlussfürHeizelement(AXIST93F10,AXIST93F20)
4-poligerAnschlussblockfürdieStromversorgungdesHeizelementsunddesTemperatursensors,die
indenHalterintegriertsind.
Stromanschlüsse(AXIST93F10)
KlemmenanschlussfürGleich-/Wechselstrom.
53
Page 54

AXIST93FSeries
•NetzanschlusszurStromversorgungdesGehäuses.ZumAnschließeneinesexternen
Netzteils(Wechselstrom/Gleichstrom).DerAnschlussistpolaritätsunabhängig.
•NetzanschlusszurStromversorgungderKamera.VerbindungzwischenGehäuseund
Kamera.
TechnischeDaten
Betriebsbedingungen
DasAxisProduktistfürdieVerwendungimInnen-undAußenbereichausgelegt.
Klassikation
AXIST93F05/AXIST93F10/AXIST93F20
Temperatur
AXIST93F05
AXIST93F05
AXIST93F10
AXIST93F20
1
/AXIST93F10/AXIST93F20
1
AXISP13Serie0ºCbis45ºC
AXISQ1604/Q1614
AXISQ16150ºCbis50ºC
AXISP13Serie-40ºCbis45ºC
AXISQ1604/Q1614
AXISQ1615/Q1635
IEC60721-4-3Klasse4M4
IEC60529IP66
NEMA250Typ4X
-40ºCbis60ºC
0ºCbis45ºC
-40ºCbis45ºC
-40ºCbis50ºC
Wichtig
(AXIST93F10,AXIST93F20)LiegtdieUmgebungstemperaturunter0ºC,kanndie
Inbetriebnahmebiszu60Minutendauern.JekälterdieTemperatur,destolängerdauert
dieInbetriebnahme.
Luftfeuchtigkeit
AXIST93F05/AXIST93F10/AXIST93F20
15bis100%relativeLuftfeuchtigkeit(kondensierend)
54
Page 55

Lagerbedingungen
DEUTSCH
Temperatur
AXIST93F05/AXIST93F10/AXIST93F20
Stromverbrauch
AXIST93FSeries
-40ºCbis75ºC
ProduktNetzteil
AXIST93F05
AXIST93F1012bis28VDC,max.25W
AXIST93F20
KeineAngabeKeineAngabe
20bis24VAC,max.29VA
PoweroverEthernetIEEE802.3af/802.3atTyp1Klasse3,max.15,4W
Stromausgang(zurKamera)
12VDC,max.1,5A
Kabelbereich
HINWEIS
HINWEIS HINWEIS
•VerwendenSieKabelausdemangegebenenKabelbereich.
•VerwendenSieKabel,diedenörtlichenVorschriftenentsprechen.
•StellenSiesicher,dassalleKabellöcherordnungsgemäßverschlossensind.
Durchmesser
5–15mm
ÖffnenSiefürzusätzlicheKabellöcherdieAufbohrungenunterdemHalter.SieheHardware
Overviewonpage9.
HINWEIS
HINWEIS HINWEIS
VerwendenSieKabeldichtungenoderKabelverschraubungen,diesowohlzur
KabeldurchführungalsauchzumKabelbereichpassen.
AWG
ca.4–6/0
Unterwww.axis.comndenSieInformationenüberZubehörwieKabeldichtungenund
KabelverschraubungenfürandereKabelbereiche.
55
Page 56

AXIST93FSeries
InstallierenderHardware
HINWEIS
HINWEIS HINWEIS
•AufgrundörtlicherVorschriftenoderderUmgebungsbedingungenundelektrischen
Bedingungen,unterdenendasProduktverwendetwird,kanneinabgeschirmtes
Netzwerkkabel(STP)empfehlenswertodernotwendigsein.AlleNetzwerkkabeldes
Produkts,dieimAußenbereichoderinschwierigenelektrischenUmgebungenverlegt
werden,müssenhierfürausgelegtsein.StellenSiesicher,dassdieNetzwerkgerätegemäß
denAnweisungendesHerstellersinstalliertwurden.
(AXIST93F05)InformationenzugesetzlichenBestimmungenndenSieinder
InstallationsanleitungderKamera.
(AXIST93F10,AXIST93F20)InformationenzugesetzlichenBestimmungenndenSie
unterRegulatoryInformationonpage2.
•VermeidenSieKratzer,BeschädigungenoderFingerabdrückeamFenster,dadiesdie
Bildqualitätbeeinträchtigenkann.
BeiderInstallationdesAxisProduktskönnendieKabeldurchdieWandoderanderWandentlang
geführtwerden.
LesenSiedieAnweisungen,bevorSiedasProduktinstallieren:
1.MontierenSiedieWandhalterung.SieheSeite56.AusführlicheAnweisungennden
SieinderbeiliegendenInstallationsanleitungfürdieWandhalterungoderunter
www.axis.com.
2.BefestigenSiedasGehäuseanderWandhalterung.SieheSeite57.
3.BauenSiedieKameraindasGehäuseein.SieheSeite60.
MontagederWandhalterung
VORSICHT
StellenSiesicher,dassSiediefürdasMaterial(z.B.Holz,Metall,Gipskarton,Stein)
geeignetenSchraubenundDübelverwendenunddasMaterialstabilgenugist,umdas
GesamtgewichtvonKamera,GehäuseundWandhalterungzutragen.
1.BereitenSiedieWandfürdieInstallationderWandhalterungvor.MarkierenSievordem
BohrendieBohrlöchermitderWandhalterungalsVorlage.
2.FührenSiedasNetzwerkkabeldurchdieWandhalterung.LassenSiezumAnschließen
derKameraca.30cmKabelfrei.
3.FührenSiedasNetzkabel(AXIST93F10)durchdieWandhalterung.LassenSiezum
AnschließenderKameraca.30cmKabelfrei.
4.WennSieeinzusätzlichesGerätandieKameraanschließen,z.B.einE/A-oder
Audiogerätbzw.einexternesNetzteil,wiederholenSiedieobenaufgeführtenSchritte
fürjedesGerät.
56
Page 57

AXIST93FSeries
3
1
2
4
DEUTSCH
5.BefestigenSiedieWandhalterunganderWand,indemSiedieSchraubenfestziehen.
Beachten
•AusführlicheAnweisungenndenSieinderbeiliegendenInstallationsanleitungfürdie
Wandhalterungoderunterwww.axis.com.
•WeiteretechnischeDatenndenSieimBenutzerhandbuchderKameraunter
www.axis.com
BefestigendesGehäusesanderWandhalterung
HINWEIS
HINWEIS HINWEIS
•VerwendenSieKabelausdemangegebenenKabelbereich,sieheSeite55.Wenneine
andereKabeldichtungalsdiemitgelieferteverwendetwird,kannWassereindringen
unddasProduktbeschädigen.Unterwww.axis.comndenSieInformationenzu
KabeldichtungenundKabelverschraubungenfürandereKabelbereiche.
•WirdmehralseinKabelverwendet,mussjedesKabeldurcheineseparateKabeldichtung
geführtwerden.
•ÖffnenSiebeidenverwendetenKabeldichtungennureinLoch.WenneineKabeldichtung
eingerissenist,ersetzenSiediesedurcheineneue.WenneineKabeldichtunggeöffnet
bleibtodereineeingerisseneKabeldichtungverwendetwird,kannWassereindringenund
dasProduktbeschädigen.
1.LösenSiedieSchraubenanderunterenAbdeckung,undhebenSiedieobereAbdeckung
an.
2.WählenSiediezuverwendendeKabeldichtungaus,undziehenSieanderLasche,um
einLochfürdasNetzwerkkabelzuöffnen.
Beispielbild:AXIST93F20
1
UntereAbdeckung
57
Page 58

AXIST93FSeries
2
SchraubeT20füruntereAbdeckung(4x)
3
KabeldichtungM20(2x)
4
Lasche
3.FührenSiedasNetzwerkkabeldurchdieKabeldichtung.
HINWEIS
HINWEIS HINWEIS
WenndasNetzwerkkabelübereinenvormontiertenNetzwerksteckerverfügt,entfernen
SiedieKabeldichtung,undverwendenSiedasAnschlussstück,umeinReißender
Kabeldichtungzuverhindern.VerwendenSiekeineNetzwerkkabel,dieNetzwerkstecker
mitDeckelnaufweisen,dadieseauchbeiVerwendungdesAnschlussstückszumReißen
derKabeldichtungführenkönnen.
4.ZiehenSiedasNetzwerkkabeleinwenigzurück,bisdieKabeldichtungbündigumdas
Kabelsitzt.
HINWEIS
HINWEIS HINWEIS
WirddasKabelnichtzurückgezogen,kannWassereindringenunddasProduktbeschädigen.
5.VergewissernSiesich,dassdieKabeldichtungordnungsgemäßsitzt.
6.VerwendenSiedieandereKabeldichtungfürdasNetzkabel(AXIST93F10).Wiederholen
SiedievorherigenSchritte.
58
Page 59

HINWEIS
1
3
4
2
DEUTSCH
HINWEIS HINWEIS
BringenSiedenNetzsteckeran,nachdemdasKabeldurchdieKabeldichtunggeführtwurde.
7.WennSieeinzusätzlichesGerätandieKameraanschließen,z.B.einE/A-oder
Audiogerätbzw.einexternesNetzteil,wiederholenSiedieobenaufgeführtenSchritte
fürjedesGerät.
8.SetzenSiedieuntereAbdeckungaufdieWandhalterung,undziehendieSchrauben
an(Drehmoment2Nm).
AXIST93FSeries
Beispielbild:AXIST93F20undAXISP13-Serie
1
UntereAbdeckung
2
SchraubeT20(4x)
3
Wandhalterung
4
EinstellschraubeT30fürHalterung
59
Page 60

AXIST93FSeries
3
4
2
1
EinbauenderKameraindasGehäuse
1.LösenSiedieSchraubendesHalters,undschiebenSieanschließenddenHalter,während
Siediesenanheben(sieheAbbildungunten).
2.BringenSiedenHalteranderKameraan.RichtenSiedenKontaktunddie
KameraschraubeaufdieKontakt-unddieSchraubenöffnungderKameraaus,und
ziehenSiedieKameraschraubefest(Drehmoment1Nm).AchtenSiedarauf,dassSie
dieSchraubenichtüberdrehen.
1
Halter
2
SchraubeT20fürHalter(2x)
3
Kontakt
4
SchraubeT20fürKamera
3.WennSieexternebzw.Eingabegeräte,AudiogeräteodereineexternesNetzteilan
dieKameraanschließen,gehenSiedabeientsprechendderAnweisungeninder
InstallationsanleitungderKameravor.
4.BringenSiedenHalteranderunterenAbdeckungan.GleichenSiediePositiondesHalters
vorsichtigan,undziehenSiedieSchraubendesHaltersfest(Drehmoment0,5Nm).
60
Page 61

1
2
3
4
Beispielbild:AXIST93F20undAXISP13-Serie
DEUTSCH
1
SchraubeT20fürHalter(2x)
2
Halter
3
PositionA(überlappend):+3,7mm
4
PositionB(Lücke):-6mmbis-4mm
AXIST93FSeries
HINWEIS
HINWEIS HINWEIS
•PositionA:SiekönnenReexionenimBildvermeiden,indemSiediePositiondesHalters
soeinstellen,dassderRanddesKameraobjektivsmitdemRandderunterenAbdeckung
um+3,7mmüberlappt.BeachtenSie,dassdiesePositionnichtderIK10-Zertizierung
entspricht.
•PositionB:DieAnforderungenfürdieIK10-ZertizierungkönnenSieerfüllen,indemSie
diePositiondesHalterssoeinstellen,dassdieLückezwischenKameraobjektivunddem
RandderunterenAbdeckungzwischen-6mmund-4mmliegt.
5.(AXIST93F10,AXIST93F20)SchließenSiedasKabeldesHeizelementsanden
HeizelementanschlussinderunterenAbdeckungan.
6.WennSieeineSD-KartealslokalenSpeicherverwenden,schiebenSiedieKarteinden
SD-KarteneinschubderKamera.
7.SchließenSiedieNetzwerkkabelan.
61
Page 62

AXIST93FSeries
2
3
4
5
1
-(AXIST93F05,AXIST93F10)SchließenSiedieKameraandasNetzwerkan.
-(AXIST93F20)SchließenSiedasGehäuseandasNetzwerk(PoE-Eingang)und
dieKameraamGehäuse(PoE-Ausgang)an.
8.SchließenSiedieStromkabelan(AXIST93F10).SchließenSiedasGehäuseanein
externesNetzteil(POWERIN)unddieKameraamGehäuse(POWEROUT)an.
Beispielbilder:AXIST93F05(oben),AXIST93F20(mittig),AXIST93F10(unten)undAXISP13Serie
1
Netzwerkkabel
62
Page 63

AXIST93FSeries
1
DEUTSCH
2
Netzwerkanschluss(PoE-Ausgang)
3
Netzwerkanschluss(PoE-Eingang)
4
Netzanschluss(POWEROUT)
5
Netzanschluss(POWERIN)
9.(AXIST93F20,AXIST93F10)StellenSiesicher,dassdieStatus-LEDsamGehäuseden
Betriebszustandordnungsgemäßangibt.SieheLEDs(AXIST93F10,AXIST93F20)auf
Seite53.
10.VergewissernSiesich,dassdieKamera-LEDsdierichtigenBedingungenanzeigen.
WeitereInformationenndenSieinderInstallationsanleitungfürdieKamera.
11.LösenSiedieEinstellschraubederHalterung,undrichtenSiedieKameraaufdas
gewünschteZielaus.InformationenzumAnzeigendesVideostreamsndenSieinder
InstallationsanleitungderKameraoderunterwww.axis.com/techsup.
12.EntfernenSiediePlastikschutzhülledesAntikondensationsbeutels,undlegenSieden
AntikondensationsbeutelunterdasObjektiv.
1
Antikondensationsbeutel
13.SchließenSiedasGehäuse.ZiehenSiedieSchraubenderunterenAbdeckungimWechsel
jeweilswenigeUmdrehungenan,bissiefestsitzen(Drehmoment1,5Nm).Aufdiese
Weisewirdsichergestellt,dassdieDichtungderunterenAbdeckunggleichmäßigsitzt.
HINWEIS
HINWEIS HINWEIS
StellenSiesicher,dassbeimSchließendesGehäuseskeineKabeleingeklemmtwerden.
14.WennSieeinenSonnenschutzverwenden(separaterhältlich),platzierenSiediesenüber
deroberenAbdeckung,passenSiediePositionan,undziehenSiedieSchraubenfest.
WeitereInformationen
BesuchenSiedasAxis-Schulungszentrumwww.axis.com/academyfüranregendeSchulungen,
Webinare,LernprogrammeundAnleitungen.
63
Page 64

AXIST93FSeries
Gewährleistung
InformationenzurGewährleistungderAxisProdukteundhierzuverbundeneInformationen,nden
Sieunterwww.axis.com/warranty/
64
Page 65

AXIST93FSeries
ITALIANO
Informazionidisicurezza
LeggereconattenzionequestaGuidaall'Installazioneprimadiinstallareildispositivo.Conservare
laGuidaall'Installazioneperusifuturi.
Livellidipericolo
PERICOLO
AVVERTENZAIndicaunasituazionepericolosache,senonevitata,puòprovocare
ATTENZIONE
VVISO
A AAVVISO VVISO
Indicaunasituazionepericolosache,senonevitata,provocamorte
olesionigravi.
lamorteolesionigravi.
Indicaunasituazionepericolosache,senonevitata,puòprovocare
lesionimedieominori.
Indicaunasituazioneche,senonevitata,puòdanneggiarela
proprietà.
Altrilivellid'informazione
ImportanteIndicainformazioniimportanti,essenzialiperilcorretto
NotaIndicainformazioniutilicheaiutanoaottenereilmassimodal
funzionamentodelprodotto.
prodotto.
65
Page 66

AXIST93FSeries
Istruzionidisicurezza
VVISO
A AAVVISO VVISO
•IlprodottoAxisdeveessereutilizzatoinconformitàalleleggiealledisposizionilocali.
•ConservareilprodottoAxisinunambienteasciuttoeventilato.
•EvitarediesporreilprodottoAxisaurtiopressionieccessive.
•Noninstallareilprodottosusupporti,supercioparetiinstabili.
•UtilizzaresolostrumentiapplicabiliquandosiinstallailprodottoAxis.Unaforzaeccessiva
puòcausaredannialprodotto.
•Nonutilizzaresostanzechimiche,agenticausticiodetergentiaerosol.
•Utilizzareunpannopulitoinumiditoinacquapuraperlapulizia.
•Utilizzaresoloaccessoricompatibiliconlespecichetecnichedelprodotto.Questi
possonoesserefornitidaAxisodaterzeparti.
•UtilizzaresolopartidiricambioforniteoconsigliatedaAxis.
•Nontentarediriparareilprodottodasoli.Contattarel'assistenzaoilrivenditoreAxis
perquestionirelativeallamanutenzione.
Trasporti
VVISO
A AAVVISO VVISO
•DuranteiltrasportodelprodottoAxis,utilizzarel'imballaggiooriginaleoequivalenteper
evitaredannialprodotto.
66
Page 67

AXIST93FSeries
ITALIANO
Guidaall'installazione
QuestaguidadiinstallazioneconsentediinstallarelacustodiaprotettivaAXIST93F05l'alloggiamentoperesterniAXIST93F10eAXIST93F20.
Perinstallarelatelecamerainrete,consultarelaguidaall'installazioneindotazionealdispositivo.
Peraltreinformazionisull'utilizzodellatelecamera,consultarelaguidaperl'utentesulsito
www.axis.com
Procedurediinstallazione
1.Assicurarsicheilcontenutodellaconfezione,glistrumentiealtrimaterialinecessariper
l'installazionesianoinordine.Consultarepagina67.
2.Studiareladescrizionedell'hardware.Consultarepagina69.
3.Studiarelespeciche.Consultarepagina74.
4.Installazionedell’hardware.Consultarepagina76.
Contenutodellaconfezione
•Alloggiamento
-AlloggiamentoprotettivoAXIST93F05o
-AlloggiamentoperesterniAXIST93F10(AC/DC),o
-AlloggiamentoperesterniAXIST93F20(PoE)
•AXIST94Q01ASupportoapareteecanalinainternapercavi
•PuntadacacciaviteT30
•ProtezionedelconnettoreAXISA
•Connettoreaspinaa2pinperilcavodell'alimentatoreCA/CC(AXIST93F10)
•Cavo
-Cavodialimentazione–perlaconnessionedellatelecameraall'alloggiamento
(AXIST93F10),o
-Cavodirete–perlaconnessionedellatelecameraall'alloggiamento(AXIS
T93F20)
•GuarnizionipercaviAXISM20
•Sacchettodell'essiccante
•Materialistampati
-Guidaall’installazione(questodocumento)
-Guidaall'installazionedelsupportoapareteAXIST94Q01A
67
Page 68

AXIST93FSeries
Strumenticonsigliati
•Trapanoperl'installazionedelsupportoaparete
•CacciaviteTorxT20(inclusointuttiipacchettiditelecamerecompatibili)
Accessoriopzionali
•ParasoleAXISA
•StaffaAXISCorridorFormatA(AXIST93F20)
•StaffaAXISCorridorFormatB(AXIST93F10)
•InterruttoreperportaAXISA
•AXIST94R01PScatoladiancoraggio
•Illuminatori
•Supportiperilmontaggiodell'alloggiamento
•Pressacavieguarnizionipercavi
•ArmadiodisorveglianzaAXIST98A16-VE
•SupportiperilmontaggiosupaloAXIST91A47
•CavointernostaffaasofttoVTWCM4A
•SupportoperilmontaggioadangoloVTWCWA
VisitareilsitoWebwww.axis.comperottenereinformazionisugliaccessoridisponibili.
68
Page 69

AXIST93FSeries
10 9
8 7 6 5
4
3
2
1
ITALIANO
Panoramicadell'hardware
Alloggiamento
AlloggiamentoprotettivoAXIST93F05
1
Cavodisicurezza
2
GuarnizionecavoM20(2x)
3
Preforo(2x)
4
Loslotperl'interruttoredell'allarmeantiintrusioneècompatibilecon
l'interruttoreperportaAXISA(vendutoseparatamente)
5
VitedelsupportoT20(2x)
6
VitedellatelecameraT20
7
Perno
8
Supporto
9
Finestra
10
Coperchiosuperiore
69
Page 70

AXIST93FSeries
15 14
13 12 11 10 9
5
4
3
6
8
7
2
1
AlloggiamentoperesterniAXIST93F20
1
Cavodisicurezza
2
Morsettieradelriscaldatore
3
Connettoredirete(PoEOUT)
4
IndicatoreLEDdistato
5
Connettoredirete(PoEIN)
6
Cavodelriscaldatore
7
GuarnizionecavoM20(2x)
8
Preforo(2x)
9
Loslotperl'interruttoredell'allarmeantiintrusioneècompatibilecon
l'interruttoreperportaAXISA(vendutoseparatamente)
10
VitedelsupportoT20(2x)
11
VitedellatelecameraT20
12
Pin
13
Supporto
14
Finestra
15
Coperchiosuperiore
70
Page 71

15 14
13 12 11 10 9
5
4
3
6
8
7
2
1
AlloggiamentoperesterniAXIST93F10
ITALIANO
1
Cavodisicurezza
2
Morsettieradelriscaldatore
3
Connettoredialimentazione(ALIMENTAZIONEINUSCITA)
4
IndicatoreLEDdistato
5
Connettoredialimentazione(ALIMENTAZIONEINENTRATA)
6
Cavodelriscaldatore
7
GuarnizionecavoM20(2x)
8
Preforo(2x)
9
Loslotperl'interruttoredell'allarmeantiintrusioneècompatibilecon
l'interruttoreperportaAXISA(vendutoseparatamente)
10
VitedelsupportoT20(2x)
11
VitedellatelecameraT20
12
Perno
13
Supporto
14
Finestra
15
Coperchiosuperiore
AXIST93FSeries
71
Page 72

AXIST93FSeries
1
3
4
5
2
Montaggioaparete
1
Cavodirete(dainstradareattraversolastaffaaparete)
2
Cavodialimentazione(dainstradareattraversolastaffaaparete)(AXIST93F10)
3
ViteT20(4x)
4
VitediregolazionedellastaffaT30
5
Staffaaparete
72
Page 73

IndicatoriLED(AXIST93F10,AXIST93F20)
ITALIANO
AXIST93FSeries
LED
LEDdistato
Colore
VerdeUtilizzonormale
Verde,lampeggio
singolo
Verde,lampeggio
doppio
Verde,lampeggio
triplo
Indicazione
Erroreriscaldatore
Vericaautomatica
Erroregenerale
Connettoriepulsanti
Perlespecicheelecondizionidifunzionamento,consultarepagina74.
Connettoredirete(AXIST93F20)
ConnettoreEthernetRJ45.SupportaPoweroverEthernet(PoE).
•PoEIN:forniscealimentazioneeconnessioneEthernetall'alloggiamento.Connessione
allaretetramiteswitchdiretePoE.
•PoEOUT:forniscealimentazioneeconnessioneEthernetallatelecamera.Connessione
fraalloggiamentoetelecamera.
VVISO
A AAVVISO VVISO
Acausadellenormativelocaliocondizioniambientaliedelettriche,èconsigliabile
utilizzareuncavodireteschermato(STP).Tuttiicavidiretedelprodottoposizionati
all'apertooinambientielettriciincondizionidifcilisonodestinatiallorousospecico.
Vericarecheidispositividiretesianoinstallatisecondoleistruzionidelproduttore.Per
ulterioriinformazionisuirequisitinormativi,consultareRegulatoryInformationonpage2.
Morsettieradelriscaldatore(AXIST93F10,AXIST93F20)
Morsettieraa4pinperalimentareilriscaldatoreeilsensoretemperaturaintegratinelsupporto.
Connettoridialimentazione(AXIST93F10)
ConnettoripermorsettiperalimentazioneCA/CC.
•ALIMENTAZIONEINENTRATA—Forniscealimentazioneall'alloggiamento.Collegare
all'alimentatoreCA/CCesterno.Ilconnettorenondipendedallapolarità
•ALIMENTAZIONEINUSCITA—Forniscealimentazioneallatelecamera.Connessione
fraalloggiamentoetelecamera.
73
Page 74

AXIST93FSeries
Datitecnici
Condizionidifunzionamento
IldispositivoAxisèdestinatoall'usointernoedesterno.
Classicazione
AXIST93F05/AXIST93F10/AXIST93F20
Temperatura
AXIST93F05
AXIST93F05
AXIST93F10
AXIST93F20
1
/AXIST93F10/AXIST93F20
1
SerieAXISP13
AXISQ1604/Q1614
AXISQ1615
SerieAXISP13
AXISQ1604/Q1614
AXISQ1615/Q1635
IEC60721-4-3classe4M4
IEC60529IP66
NEMA250Tipo4X
Da-40ºCa60ºC(da-40ºFa140ºF)
Da0ºCa45ºC(da32ºFa1 13ºF)
Da0ºCa45ºC(da32ºFa1 13ºF)
Da0ºCa50ºC(da32ºFa122ºF)
Da-40ºCa45ºC(da-40ºFa113ºF)
Da-40ºCa45ºC(da-40ºFa113ºF)
Da-40ºCa50ºC(da-40ºFa122ºF)
Importante
(AXIST93F10,AXIST93F20)Conunatemperaturaambientaleinferiorea0ºC(32ºF),l'avvio
potrebberichiederenoa60minuti.Latemperaturaèinversamenteproporzionalealla
duratadell'avvio(climapiùfreddo,avviopiùlungo).
Umidità
AXIST93F05/AXIST93F10/AXIST93F20
Da15a100%RH(umiditàrelativaconcondensa)
Condizionidistoccaggio
Temperatura
AXIST93F05/AXIST93F10/AXIST93F20
Da-40ºCa75ºC(da-40ºFa167ºF)
74
Page 75

AXIST93FSeries
ITALIANO
Consumoenergetico
DispositivoAlimentatore
AXIST93F05
AXIST93F1012–28VCC,max25W
AXIST93F20
n/dn/d
20–24VCA,max.29VA
PoweroverEthernetIEEE802.3af/802.3attipo1classe3,max15,4W
Uscitaalimentazione(allatelecamera)
12VCC,max.1,5A
Areadeicavi
VVISO
A AAVVISO VVISO
•Utilizzarecavidilunghezzaadeguataall'areaspecicata.
•Selezionareicavinelrispettodellenormativelocali.
•Vericarecheiforideicavisianocorrettamentesigillati.
Diametro
5–15mm(0,197–0,591pollici)
Percreareulterioriforipericavi,aprireipreforicollocatisottoilsupporto.ConsultarePanoramica
dell'hardwareallapagina69.
VVISO
A AAVVISO VVISO
Usareguarnizionipercaviopressacavicorrispondentialforoeall'areadeicavi.
AWG
Circa4–6/0
Perinformazionisugliaccessoridisponibili,comeadesempioguarnizionipercaviepressacavi
adattiperaltreareedeicavi,visitareilsitoWebwww.axis.com.
75
Page 76

AXIST93FSeries
Installazionedell'Hardware
VVISO
A AAVVISO VVISO
•Acausadellenormativelocaliocondizioniambientaliedelettriche,èconsigliabile
utilizzareuncavodireteschermato(STP).Tuttiicavidiretedelprodottoposizionati
all'apertooinambientielettriciincondizionidifcilisonodestinatiallorousospecico.
Vericarecheidispositividiretesianoinstallatisecondoleistruzionidelproduttore.
(AXIST93F05)Permaggioriinformazionisuirequisitinormativi,consultarelaguida
all'installazionedellatelecamera.
(AXIST93F10,AXIST93F20)Permaggioriinformazionisuirequisitinormativi,consultare
RegulatoryInformationonpage2
•Nongrafare,danneggiareolasciareimprontedigitalisullanestraperpreservare
laqualitàdell'immagine.
ÈpossibileinstallareildispositivoAxisinstradandoicaviattraversoolungolaparete.
Leggeretutteleistruzioniprimadiinstallareilprodotto:
1.Installazionedelsupportoperilmontaggioaparete.Consultarepagina76.Peristruzioni
dettagliate,consultarelaguidaall'installazionedelsupportodimontaggioaparete
presentenellaconfezioneovisitarel'indirizzowww.axis.com
2.Montarel'alloggiamentoalsupportoaparete.Consultarepagina77.
3.Installarelatelecameranell'alloggiamento.Consultarepagina79.
Installazionedelsupportoperilmontaggioaparete
ATTENZIONE
Vericarechelevitieitassellisianoadattialmaterialedellaparete(es.legno,metallo,
cartongesso,pietra)echeilmaterialesiaingradodisosteneretelecamera,alloggiamentoe
supportoperilmontaggioaparete.
1.Prepararelapareteperl'installazionedelsupporto.Utilizzareilsupportoperilmontaggio
aparetecomeproloecontrassegnareipuntidatrapanare.
2.Farpassareilcavodireteattraversolastaffaaparete.Lasciarecirca30cm(1 1,8pollici)di
cavoperilcollegamentoallatelecamera.
3.Farpassareilcavodialimentazione(AXIST93F10)attraversolastaffaaparete.Lasciare
circa30cm(1 1,8pollici)dicavoperilcollegamentoallatelecamera.
4.Incasodiconnessionediundispositivo(es.diI/O,audiooalimentazioneesterna)alla
telecamera,ripetereilpassaggioprecedente(seconsentitoperildispositivoinquestione).
5.Fissarelastaffaallapareteserrandoleviti.
76
Page 77

AXIST93FSeries
3
1
2
4
ITALIANO
Nota
•Peristruzionidettagliate,consultarelaguidaall'installazionedelsupportodimontaggioa
paretepresentenellaconfezioneedisponibileall'indirizzowww.axis.com
•Perulteriorispecichetecniche,consultarelaguidaperl'utentedellatelecamerasul
sitowww.axis.com
Montarel'alloggiamentoalsupportoaparete
VVISO
A AAVVISO VVISO
•Utilizzarecavidilunghezzaadeguataall'areacavispecicata,vederepagina75.L'utilizzo
diunaguarnizionepercavidiversadaquellaindotazionepuòcausareinltrazionid'acqua
edannialprodotto.Perinformazionisulleguarnizionipercavieipressacaviadattiper
altreareedeicavi,visitareilsitoWebwww.axis.com.
•Utilizzandopiùdiuncavo,instradareciascuncavoattraversounaguarnizioneseparata.
•Aprireunforosolonelleguarnizioniutilizzateesostituirleincasodidanno.Una
guarnizionepercaviapertaodanneggiatapotrebbecausareinltrazionid'acquanel
prodottoegravidanni.
1.Allentarelevitidelcoperchioinferioreesollevareilcoperchiosuperiore.
2.Sceglierelaguarnizionepercavidausareetirarelalinguettaperaprireilforoper
ilcavodirete.
Immaginediesempio:AXIST93F20
1
Coperchioinferiore
2
VitedelcoperchioinferioreT20(4x)
3
GuarnizionecavoM20(2x)
4
Linguetta
77
Page 78

AXIST93FSeries
3.Inserireilcavodireteattraversolaguarnizionepercavi.
VVISO
A AAVVISO VVISO
Seilcavodiretedisponediunconnettorepreinstallato,rimuoverelaguarnizionepercavie
usarelaprotezionedelconnettoreperevitaredanniallaguarnizione.Nonusarecavidirete
dotatidiconnettoridiretecontappi,poichépotrebberodanneggiarelaguarnizionedel
cavononostantelaprotezionedelconnettore.
4.Tiraredelicatamenteilcavodireteinmododaadattarelaguarnizionealcavo.
VVISO
A AAVVISO VVISO
Seilcavononvienetiratopotrebberovericarsiinltrazionid'acquaedannialdispositivo.
5.Vericareilcorrettomontaggiodellaguarnizionedelcavo.
6.Utilizzarel'altraguarnizionedelcavoperilcavodialimentazione(AXIST93F10).
Ripetereipassisoprariportati.
VVISO
A AAVVISO VVISO
Montarelamorsettieradialimentazionedopoaverspintoilcavoattraversolaguarnizione
delcavo.
7.Incasodiconnessionediundispositivo(es.diI/O,audiooalimentazioneesterna)alla
telecamera,ripetereipassaggiprecedenti(seconsentitoperildispositivoinquestione).
78
Page 79

AXIST93FSeries
1
3
4
2
ITALIANO
8.Inserireilcoperchiosuperioresulsupportoapareteeserrareleviti(torsionedi2Nm).
Immaginediesempio:SerieAXIST93F20eAXISP3301/-V
1
Coperchioinferiore
2
ViteT20(4x)
3
Staffaaparete
4
VitediregolazionedellastaffaT30
Installarelatelecameranell'alloggiamento
1.Allentarelevitidelsupporto,farloscorrereesollevarlo,vederel'immagineriportata
diseguito.
2.Collegareilsupportoallatelecamera.Allineareilpernoelavitedellatelecameracon
ilforodelpernoeilsupportodellevitisullatelecamera,quindiserrarelavitedella
telecamera(torsionedi1Nm).Nonserrarelaviteinmanieraeccessiva.
79
Page 80

AXIST93FSeries
3
4
2
1
1
Supporto
2
VitedelsupportoT20(2x)
3
Pin
4
VitedellatelecameraT20
3.Incasodiconnessionediundispositivo(es.diinputoesterno,audiooalimentazione
esterna)allatelecamera,rispettareleistruzioniindicatenellaguidaall'installazione
dellatelecamera.
4.Fissareilsupportoalcoperchioinferiore.Regolareconcuralaposizionedelsupportoe
serrareleviti(torsionedi0,5Nm).
80
Page 81

1
2
3
4
Immaginediesempio:SerieAXIST93F20eAXISP3301/-V
ITALIANO
1
VitedelsupportoT20(2x)
2
Supporto
3
PosizioneA(sovrapposizione):+3,7mm(+0,15in)
4
PosizionedimessaafuocoB(divario):Da-6mma-4mm(da-0,24ina
-0,16pollici)
AXIST93FSeries
VVISO
A AAVVISO VVISO
•PosizioneA:Perevitareriessinell'immagine,regolarelaposizionedelsupportoinmodo
cheilbordodell'obiettivodellatelecamerasisovrappongadi3,7mm(0,15pollici)aquello
delcoperchio.Nota:questaposizioneinvalidalaclassicazioneIK10.
•PosizioneB(30W):PersoddisfareirequisitidellaclassicazioneIK10,regolarelaposizione
delsupportoconundivariofral'obiettivodellatelecameraeibordidelcoperchioinferiore
compresofra-6mme-4mm(-0,24ine-0,16pollici).
5.(AXIST93F10,AXIST93F20)Collegareilcavodelriscaldatorealconnettoredelcoperchio
inferiore.
6.SesiutilizzaunaschedaSDperl'archiviazionelocale,inserirlanell'appositoslotdella
telecamera.
7.Collegareicavidirete.
81
Page 82

AXIST93FSeries
-(AXIST93F05,AXIST93F10)Collegarelatelecameraallarete.
-(AXIST93F20)Collegarel'alloggiamentoallarete(PoEIN)elatelecamera
all'alloggiamento(PoEOUT).
8.Collegareicavidialimentazione(AXIST93F10).Collegarel'alloggiamento
all'alimentazioneesterna(ALIMENTAZIONEINENTRATA)elatelecamera
all'alloggiamento(ALIMENTAZIONEINUSCITA).
82
Page 83

AXIST93FSeries
2
3
4
5
1
ITALIANO
Immaginidiesempio:SerieAXIST93F05(sopra),AXIST93F20(inmezzo),AXIST93F10(infondo)e
AXISP13
1
Cavodirete
2
Connettoredirete(PoEOUT)
3
Connettoredirete(PoEIN)
4
Connettoredialimentazione(ALIMENTAZIONEINUSCITA)
5
Connettoredialimentazione(ALIMENTAZIONEINENTRATA)
83
Page 84

AXIST93FSeries
1
9.(AXIST93F20,AXIST93F10)VericarecheilLEDdistatodell'alloggiamentoindichila
correttacondizionedifunzionamento.ConsultareIndicatoriLED(AXIST93F10,AXIS
T93F20)allapagina73.
10.VericarecheiLEDdellatelecameraindichinolecorrettecondizioni.Consultarela
guidaall'installazionedellatelecamera.
11.Allentarelavitediregolazionedellastaffaperorientarelatelecameraversoilpunto
desiderato.Peristruzioniutiliavisualizzareilussovideo,consultarelaguida
all'installazioneovisitareilsitowww.axis.com/techsup
12.Rimuoverelabustadiplasticadelsacchettodell'essiccanteecollocarlosottol'obiettivo.
1
Sacchettodell'essiccante
13.Chiuderel'alloggiamento.Girarelevitidelcoperchioinferioreinmanieraalternatanoa
quandononsarannotutteserrate(torsionedi1,5Nm).Inquestomodoèpossibile
comprimerelaguarnizionedelcoperchioinferioreinmodouniforme.
VVISO
A AAVVISO VVISO
Vericarecheicavinonrestinoincastratidurantelachiusuradell'alloggiamento.
14.Sesiutilizzaunparasole(vendutoseparatamente),posizionarlosulcoperchiosuperiore,
regolarnelaposizioneeserrareleviti.
UlterioriInformazioni
VisitareilCentrodiapprendimentoAxisallapaginawww.axis.com/academyperservizidi
formazioneutili,webinar,tutorialeguide.
Informazionisullagaranzia
PerinformazionisullagaranziadelprodottoAxiseinformazioniadessorelative,consultare
lapaginawww.axis.com/warranty/
84
Page 85

AXIST93FSeries
ESPANÕL
Informacióndeseguridad
LeaestaGuíadeinstalaciónconatenciónantesdeinstalarelproducto.GuardelaGuíade
instalaciónparapoderconsultarlaenotromomento.
Nivelesdepeligrosidad
PELIGRO
ADVERTENCIA
ATENCIÓN
VISO
A AAVISO VISO
Indicaunasituaciónpeligrosaque,sinoseevita,provocará
lesionesgravesolamuerte.
Indicaunasituaciónpeligrosaque,sinoseevita,puedeprovocar
lesionesgravesolamuerte.
Indicaunasituaciónpeligrosaque,sinoseevita,puedeprovocar
lesionesmoderadasoleves.
Indicaunasituaciónpeligrosaque,sinoseevita,puedeprovocar
dañosmateriales.
Otrosnivelesdemensaje
ImportanteIndicainformaciónimportantequeesfundamentalparaqueel
NotaIndicainformaciónútilqueayudaaaprovecharelproductoal
productofuncionecorrectamente.
máximo.
85
Page 86

AXIST93FSeries
Instruccionesdeseguridad
VISO
A AAVISO VISO
•ElproductodeAxisdebeutilizarsedeacuerdoconlasleyesynormaslocales.
•AlmaceneelproductodeAxisenunentornosecoyventilado.
•EvitelaexposicióndelproductodeAxisachoquesoaunafuertepresión.
•Noinstaleelproductoensoportes,superciesoparedesinestables.
•UtilicesololasherramientascorrespondientescuandoinstaleelproductodeAxis.La
aplicacióndeunafuerzaexcesivapuedeprovocardañosenelproducto.
•Noutilicelimpiadoresenaerosol,agentescáusticosniproductosquímicos.
•Limpieconuntrapolimpiohumedecidoconaguapura.
•Utilicesoloaccesoriosquecumplanconlasespecicacionestécnicasdelproducto.Estos
accesorioslospuedeproporcionarAxisountercero.
•UtilicesolopiezasderepuestoproporcionadasorecomendadasporAxis.
•Nointenterepararelproductoustedmismo.Póngaseencontactoconelserviciode
asistenciatécnicadeAxisoconsudistribuidordeAxisparatratarasuntosdereparación.
Transporte
VISO
A AAVISO VISO
•CuandotransporteelproductodeAxis,utiliceelembalajeoriginalounequivalentepara
evitardañosenelproducto.
86
Page 87

AXIST93FSeries
ESPANÕL
Guíadeinstalación
EstaGuíadeinstalaciónofreceinstruccionesparalainstalacióndelacarcasadeprotección
AXIST93F05,lacarcasaparaexterioresAXIST93F10ylacarcasaparaexterioresAXIST93F20.
Parainstalarlacámaraenlared,consultelaGuíadeinstalaciónproporcionadaconlacámara.
Paraconocermásdetallesacercadelacámara,consulteelManualdelusuariodisponibleen
www.axis.com.
Pasosdelainstalación
1.Asegúresedequedisponedelcontenidodelpaquete,lasherramientasylosdemás
materialesnecesariosparalainstalación.Veapágina87.
2.Estudielainformacióngeneraldelhardware.Veapágina89.
3.Estudielasespecicaciones.Veapágina94.
4.Instaleelhardware.Veapágina96.
Contenidodelpaquete
•Carcasa
-CarcasadeprotecciónAXIST93F05o
-CarcasaparaexterioresAXIST93F10(CA/CC)o
-CarcasaparaexterioresAXIST93F20(PoE)
•MontajeenparedAXIST94Q01Aconcanalparacableinterno
•BrocaT30
•ProtectordelconectorAdeAXIS
•Conectorconenchufede2pinesparaelcabledealimentaciónCA/CC(AXIST93F10).
•Cable
-Cabledealimentación,paraconectarlacámaraalacarcasa(AXIST93F10)o
-Cabledered,paraconectarlacámaraalacarcasa(AXIST93F20)
•JuntasdecableAXISM20
•Bolsadesecante
•Materialesimpresos
-Guíadeinstalación(estedocumento)
-GuíadeinstalaciónparaelmontajeenparedAXIST94Q01A
Herramientasrecomendadas
•Taladro,parainstalarelmontajeenpared
87
Page 88

AXIST93FSeries
•DestornilladorTorxT20(incluidoentodoslospaquetesdecámarascompatibles)
Accesoriosopcionales
•ParasolAdeAXIS
•EscuadraparaformatoCorridorFormatA(AXIST93F20)
•EscuadraparaformatoCorridorFormatB(AXIST93F10)
•InterruptordepuertaAdeAXIS
•CajaposteriordeconexionesAXIST94R01P
•Iluminadores
•Montajesencarcasa
•Juntasdecableyprensaestopas
•ArmariodevigilanciaAXIST98A16-VE
•MontajesenposteAXIST91A47
•CableWCM4AinteriordeescuadradetechoVT
•MontajeenesquinaVTWCWA
Paraobtenerinformaciónsobrelosaccesoriosdisponibles,visitewww.axis.com.
88
Page 89

Informacióngeneraldelhardware
10 9
8 7 6 5
4
3
2
1
ESPANÕL
Carcasa
AXIST93FSeries
CarcasadeprotecciónAXIST93F05
1
Cabledeseguridad
2
JuntadecableM20(2x)
3
Oriciopreperforado(2x)
4
Ranuraparainterruptordealarmacontraintrusiones;compatibleconel
interruptordepuertaAdeAXIS(sevendeporseparado)
5
TornillodelsoporteT20(2x)
6
TornillodelacámaraT20
7
Pin
8
Soporte
9
Ventana
10
Cubiertasuperior
89
Page 90

AXIST93FSeries
15 14
13 12 11 10 9
5
4
3
6
8
7
2
1
CarcasaparaexterioresAXIST93F20
1
Cabledeseguridad
2
Conectordelcalentador
3
Conectordered(PoEOUT)
4
IndicadorLEDdeestado
5
Conectordered(PoEIN)
6
Cabledelcalentador
7
JuntadecableM20(2x)
8
Oriciopreperforado(2x)
9
Ranuraparainterruptordealarmacontraintrusiones;compatibleconel
interruptordepuertaAdeAXIS(sevendeporseparado)
10
TornillodelsoporteT20(2x)
11
TornillodelacámaraT20
12
Pin
13
Soporte
14
Ventana
15
Cubiertasuperior
90
Page 91

15 14
13 12 11 10 9
5
4
3
6
8
7
2
1
CarcasaparaexterioresAXIST93F10
ESPANÕL
1
Cabledeseguridad
2
Conectordelcalentador
3
Conectordealimentación(POWEROUT)
4
IndicadorLEDdeestado
5
Conectordealimentación(POWERIN)
6
Cabledelcalentador
7
JuntadecableM20(2x)
8
Oriciopreperforado(2x)
9
Ranuraparainterruptordealarmacontraintrusiones;compatibleconel
interruptordepuertaAdeAXIS(sevendeporseparado)
10
TornillodelsoporteT20(2x)
11
TornillodelacámaraT20
12
Pin
13
Soporte
14
Ventana
15
Cubiertasuperior
AXIST93FSeries
91
Page 92

AXIST93FSeries
1
3
4
5
2
Montajeenpared
1
Cabledered(guiadoatravésdelaescuadradepared)
2
Cabledealimentación(guiadoatravésdelaescuadradepared)(AXIST93F10)
3
TornilloT20(4x)
4
TornillodeajustedeescuadraT30
5
Escuadradepared
92
Page 93

IndicadoresLED(AXIST93F10,AXIST93F20)
ESPANÕL
AXIST93FSeries
LED
Estado
Color
VerdeFuncionamientonormal
Verde,unparpadeoerrordelcalefactor
Verde,doble
parpadeo
Verde,triple
parpadeo
Indicación
autocomprobación
errorgeneral
Conectoresybotones
Paraconocerlasespecicacionesylascondicionesdefuncionamiento,veapágina94.
Conectordered(AXIST93F20)
ConectorEthernetRJ45.AdmitealimentaciónatravésdeEthernet(PoE).
•PoEIN:SuministraalimentaciónyEthernetalacarcasa.Conéctesealaredatravés
deunswitchderedhabilitadoparaPoE.
•PoEOUT:SuministraalimentaciónyEthernetalacámara.Realizalaconexiónentre
lacarcasaylacámara.
VISO
A AAVISO VISO
Debidoalanormativalocaloalascondicionesambientalesyeléctricasenlasquese
vayaautilizarelproducto,puedequeseaadecuadouobligatorioelusodeuncablede
redblindado(STP).Todosloscablesqueconectanelproductoalaredyqueseutilicenen
exterioresoenentornoseléctricosexigentesdeberánestarblindadosydiseñadosparasu
usoespecíco.Asegúresedequelosdispositivosderedesténinstaladosdeconformidad
conlasinstruccionesdelfabricante.Paraobtenerinformaciónsobrelosrequisitos
normativos,veaRegulatoryInformationonpage2.
Conectordelcalefactor(AXIST93F10,AXIST93F20)
Bloquedeterminalesde4pinesutilizadoparaalimentarelcalefactoryelsensordetemperatura
integradosenelsoporte.
Conectoresdealimentación(AXIST93F10)
ConectoresdelterminaldealimentaciónCA/CC.
•POWERIN:proporcionaalimentaciónalacarcasa.Conectealafuentedealimentación
CA/CCexterna.Elconectoresdepolaridadindependiente.
93
Page 94

AXIST93FSeries
•POWEROUT:proporcionaalimentaciónalacámara.Realizalaconexiónentrelacarcasa
ylacámara.
Especicaciones
Condicionesdefuncionamiento
ElproductodeAxissehacreadoparasuusoeninterioresyexteriores.
Clasicación
AXIST93F05/AXIST93F10/AXIST93F20
Temperatura
AXIST93F05
AXIST93F05
AXIST93F10
AXIST93F20
1
/AXIST93F10/AXIST93F20
1
SerieAXISP13De0ºCa45ºC
AXISQ1604/Q1614
AXISQ1615De0ºCa50ºC
SerieAXISP13De-40ºCa45ºC
AXISQ1604/Q1614
AXISQ1615/Q1635
IEC60721-4-3clase4M4
IEC60529IP66
NEMA250tipo4X
De-40ºCa60ºC
De0ºCa45ºC
De-40ºCa45ºC
De-40ºCa50ºC
Importante
(AXIST93F10,AXIST93F20)Cuandolatemperaturaambienteesinferiora0ºC,lacámara
podríatardar60minutosenarrancar.Cuantomásfríohaga,mástardaráenarrancar.
Humedad
AXIST93F05/AXIST93F10/AXIST93F20
15–100%dehumedadrelativa(concondensación)
Condicionesdealmacenamiento
Temperatura
AXIST93F05/AXIST93F10/AXIST93F20
De-40ºCa75ºC
94
Page 95

AXIST93FSeries
ESPANÕL
Consumo
Producto
AXIST93F05
AXIST93F1012–28VCC,25Wmáx.
AXIST93F20
Fuentedealimentación
n/an/a
20–24VCA,29VAmáx.
AlimentaciónatravésdeEthernetIEEE802.3af/802.3attipo1clase3,
15,4Wmáx.
Salida(alacámara)
12VCC,1,5Amáx.
Áreadecableado
VISO
A AAVISO VISO
•Utilicecablesquepuedanpermanecerdentrodeláreadecableadoespecicada.
•Elijacablesquecumplanlanormativalocalaplicable.
•Asegúresedequetodoslosoriciosparacablesesténdebidamentesellados.
Diámetro
5–15mm
Encasodenecesitaroriciosparacablesadicionales,abralosoriciospreperforadossituados
debajodelsoporte.VeaInformacióngeneraldelhardwareenlapágina89.
VISO
A AAVISO VISO
Utilicejuntasdecableoprensaestopasqueseajustentantoaloricioparacablecomo
aláreadecableado.
AWG
Aproximadamente4–6/0
Paraobtenerinformaciónacercadelasaccesorios,comojuntasdecableyprensaestopaspermitidos
paraotrasáreasdecableado,visitewww.axis.com.
95
Page 96

AXIST93FSeries
Instalacióndelhardware
VISO
A AAVISO VISO
•Debidoalanormativalocaloalascondicionesambientalesyeléctricasenlasquesevaya
autilizarelproducto,puedequeseaadecuadouobligatorioelusodeuncabledered
blindado(STP).Todosloscablesqueconectanelproductoalaredyqueseutilicenen
exterioresoenentornoseléctricosexigentesdeberánestarblindadosydiseñadosparasu
usoespecíco.Asegúresedequelosdispositivosderedesténinstaladosdeconformidad
conlasinstruccionesdelfabricante.
(AXIST93F05)Paraobtenerinformaciónsobrelosrequisitosnormativos,consultela
Guíadeinstalacióndelacámara.
(AXIST93F10,AXIST93F20)Paraobtenerinformaciónsobrelosrequisitosnormativos,
consulteRegulatoryInformationonpage2
•Presteatenciónparanoarañar,dañarnidejarlashuellasenlaventanadelacarcasa,
puestoqueestopuedeprovocarunadisminucióndelacalidaddeimagen.
ElproductodeAxispuedeinstalarseguiandoloscablesatravésdelaparedosobreesta.
Leatodaslasinstruccionesantesdeinstalarelproducto:
1.Instaleelmontajeenpared.Veapágina96.Paraobtenerinstruccionesdetalladas,
consultelaGuíadeinstalacióndelmontajeenpared,incluidaenelpaqueteodisponible
enwww.axis.com.
2.Fijelacarcasaalmontajeenpared.Veapágina97.
3.Instalelacámaraenlacarcasa.Veapágina99.
Instalacióndelmontajeenpared
ATENCIÓN
Asegúresedequelostornillosytaponesseanlosadecuadosparaelmaterial(p.ej.madera,
metal,placasdeyeso,piedra)yqueelmaterialsealosucientementeresistentepara
soportarelpesocombinadodelacámara,lacarcasayelmontajeenpared.
1.Preparelaparedparainstalarelmontajeenpared.Utilicelaescuadradeparedcomo
unaplantillaymarquelaubicacióndelosoriciosantesdeperforarlos.
2.Guíeelcablederedatravésdelaescuadradepared.Dejeunos30cmdecable
aproximadamenteparaconectarloalacámara.
3.Guíeelcabledealimentación(AXIST93F10)atravésdelaescuadradepared.Dejeunos
30cmdecableaproximadamenteparaconectarloalacámara.
4.Siseconectaundispositivoauxiliaralacámara,porejemploundispositivode
alimentaciónexterno,undispositivodeE/Sounodeaudio,repitaelpasoanterior
aplicadoacadadispositivoencuestión.
5.Fijelaescuadradeparedapretandolostornillos.
96
Page 97

AXIST93FSeries
3
1
2
4
ESPANÕL
Nota
•Paraobtenerinstruccionesdetalladas,consultelaGuíadeinstalacióndelmontajeen
pared,incluidaenelpaqueteydisponibleenwww.axis.com.
•Sideseaconocermásespecicacionestécnicas,consulteelManualdelusuarioen
www.axis.com
Fijacióndelacarcasaalmontajeenpared
VISO
A AAVISO VISO
•Utiliceloscablesquepermanecendentrodeláreadecableadoespecicada,veapágina
95.Siutilizaotrajuntadecabledistintadelaproporcionada,elaguapodríaltrarsey
dañarelproducto.Paraobtenermásinformaciónacercadelasjuntasdecableydelos
prensaestopaspermitidosparaotrasáreasdecableado,visitewww.axis.com.
•Siseutilizamásdeuncable,deberápasarsecadacableatravésdeunajuntadistinta.
•Soloabraunoricioenlasjuntasdecablequesevayanautilizarysialgunajuntaestá
desgastada,reemplácelaconunanueva.Sidejalajuntadecableabiertaoutilizauna
desgastada,elaguapodríaltrarseydañarelproducto.
1.Aojelostornillosdelacubiertainferiorylevantelacubiertasuperior.
2.Seleccionelajuntadecablequevayaautilizarytiredelalengüetaparaabrirunoricio
paraelcabledered.
Imagendeejemplo:AXIST93F20
1
Cubiertainferior
2
TornilloT20decubiertainferior(4x)
3
JuntadecableM20(2x)
4
Lengüeta
97
Page 98

AXIST93FSeries
3.Empujeelcablederedatravésdelajuntadecable.
VISO
A AAVISO VISO
Sielcablederedincluyeunconectorderedpremontado,retirelajuntadecableyutiliceel
protectordelconectorparaevitarquelajuntadecableserompa.Eviteutilizarcablesde
redconconectoresderedrecubiertosyaquepodríanrasgarlajuntadecableapesarde
utilizarelprotector.
4.Tiredelcablederedhaciaatrássuavementedemaneraquelajuntadecableseajusteen
elcable.
VISO
A AAVISO VISO
Sinosetiradelcablehaciaatrás,podríaltrarseaguaydañarelproducto.
5.Asegúresedequelajuntadecableencajecorrectamente.
6.Utiliceotrajuntadecableparaelcabledealimentación(AXIST93F10).Repitalospasos
anteriores.
VISO
A AAVISO VISO
Monteelconectordealimentacióndespuésdehaberencajadoelcabledealimentación
enlajuntadecable.
98
Page 99

AXIST93FSeries
1
3
4
2
ESPANÕL
7.Siseconectaundispositivoauxiliaralacámara,porejemploundispositivode
alimentaciónexterno,undispositivodeE/Sounodeaudio,repitalospasosanteriores
aplicadosacadadispositivoencuestión.
8.Coloquelacubiertainferiorsobreelmontajeenparedyaprietelostornillos(parde
torsiónde2Nm).
Imagendeejemplo:SeriesAXIST93F20yAXISP13
1
Cubiertainferior
2
TornilloT20(4x)
3
Escuadradepared
4
TornillodeajustedeescuadraT30
Instalacióndelacámaraenlacarcasa
1.Aojelostornillosdelsoportey,acontinuación,desliceylevanteelsoporte.Consulte
lasiguienteilustración.
2.Fijeelsoportealacámara.Alineeelpinyeltornillodelacámaraconeloricioyel
receptáculodetornilloqueseencuentranenlacámarayaprieteeltornillodelacámara
(pardetorsiónde1Nm).Asegúresedenoapretareltornilloenexceso.
99
Page 100

AXIST93FSeries
3
4
2
1
1
Soporte
2
TornillodelsoporteT20(2x)
3
Pin
4
TornillodelacámaraT20
3.Encasodeconexiónalacámaradedispositivosexternos/deentrada,dispositivosde
audioounafuentedealimentaciónexterna,conéctelosdeacuerdoconlasinstrucciones
descritasenlaGuíadeinstalacióndelacámara.
4.Fijeelsoportealacubiertainferior.Ajusteconcuidadolaposicióndelsoporteyapriete
lostornillosdelsoporte(pardetorsiónde0,5Nm).
100
 Loading...