

Page 1

AXIST92EHousingSeries
AXIST92E05
AXIST92E20
InstallationGuide
Page 2

Page 3

English
EN
France:Français
Deutschland:Deutsch
Italia:Italiano
España:Español
日本:日本語
中文:简体中文
FR
DE
IT
ES
JA
ZH
Page 4

Legalconsiderations
Videoandaudiosurveillancecanberegulatedbylaws
thatvaryfromcountrytocountry.Checkthelaws
inyourlocalregionbeforeusingthisproductfor
surveillancepurposes.
Liability
Everycarehasbeentakeninthepreparationofthis
document.PleaseinformyourlocalAxisofceof
anyinaccuraciesoromissions.AxisCommunications
ABcannotbeheldresponsibleforanytechnicalor
typographicalerrorsandreservestherighttomake
changestotheproductandmanualswithoutprior
notice.AxisCommunicationsABmakesnowarranty
ofanykindwithregardtothematerialcontained
withinthisdocument,including,butnotlimitedto,
theimpliedwarrantiesofmerchantabilityandtness
foraparticularpurpose.AxisCommunicationsAB
shallnotbeliablenorresponsibleforincidental
orconsequentialdamagesinconnectionwiththe
furnishing,performanceoruseofthismaterial.This
productisonlytobeusedforitsintendedpurpose.
Intellectualpropertyrights
AxisABhasintellectualpropertyrightsrelatingto
technologyembodiedintheproductdescribedinthis
document.Inparticular,andwithoutlimitation,these
intellectualpropertyrightsmayincludeoneormoreof
thepatentslistedataxis.com/patentandoneormore
additionalpatentsorpendingpatentapplicationsin
theUSandothercountries.
Equipmentmodications
Thisequipmentmustbeinstalledandusedin
strictaccordancewiththeinstructionsgivenin
theuserdocumentation.Thisequipmentcontains
nouser-serviceablecomponents.Unauthorized
equipmentchangesormodicationswillinvalidateall
applicableregulatorycerticationsandapprovals.
Trademarkacknowledgements
AXISCOMMUNICATIONS,AXIS,ARTPECandVAPIX
areregisteredtrademarksofAxisABinvarious
jurisdictions.Allothertrademarksaretheproperty
oftheirrespectiveowners.
Regulatoryinformation
Europe
ThisproductcomplieswiththeapplicableCEmarking
directivesandharmonizedstandards:
•ElectromagneticCompatibility(EMC)Directive
2014/30/EU.SeeElectromagneticcompatibility
(EMC)onpage4.
•LowVoltageDirective(LVD)2014/35/EU.See
Safetyonpage5.
•RestrictionofHazardousSubstances(RoHS)
Directive2011/65/EUand2015/863,including
anyamendments,updatesorreplacements.See
Disposalandrecyclingonpage5.
Acopyoftheoriginaldeclarationofconformity
maybeobtainedfromAxisCommunicationsAB.See
Contactinformationonpage5.
Electromagneticcompatibility(EMC)
Thisequipmenthasbeendesignedandtestedtofulll
applicablestandardsfor:
•Radiofrequencyemissionwheninstalled
accordingtotheinstructionsandusedinits
intendedenvironment.
•Immunitytoelectricalandelectromagnetic
phenomenawheninstalledaccordingtothe
instructionsandusedinitsintendedenvironment.
USA
Thisdevicecomplieswithpart15oftheFCCRules.
Operationissubjecttothefollowingtwoconditions:
1.Thisdevicemaynotcauseharmfulinterference,
and
2.thisdevicemustacceptanyinterferencereceived,
includinginterferencethatmaycauseundesired
operation.
Thisequipmenthasbeentestedusingashielded
networkcable(STP)andfoundtocomplywiththe
limitsforaClassBdigitaldevice,pursuanttopart15
oftheFCCRules.Theselimitsaredesignedtoprovide
reasonableprotectionagainstharmfulinterferencein
aresidentialinstallation.Thisequipmentgenerates,
usesandcanradiateradiofrequencyenergyand,
ifnotinstalledandusedinaccordancewiththe
instructions,maycauseharmfulinterferencetoradio
communications.However,thereisnoguaranteethat
interferencewillnotoccurinaparticularinstallation.
Ifthisequipmentdoescauseharmfulinterferenceto
radioortelevisionreception,whichcanbedetermined
byturningtheequipmentoffandon,theuseris
encouragedtotrytocorrecttheinterferencebyone
ormoreofthefollowingmeasures:
•Reorientorrelocatethereceivingantenna.
•Increasetheseparationbetweentheequipment
andreceiver.
•Connecttheequipmentintoanoutletona
circuitdifferentfromthattowhichthereceiver
isconnected.
•Consultthedealeroranexperiencedradio/TV
technicianforhelp.
Theproductshallbeconnectedusingashielded
networkcable(STP)thatisproperlygrounded.
Contactinformation
AxisCommunicationsInc.
300ApolloDrive
Chelmsford,MA01824
UnitedStatesofAmerica
Tel:+19786142000
Canada
Thisdigitalapparatuscomplieswith
CANICES-3(ClassB).Theproductshallbe
connectedusingashieldednetworkcable(STP)that
isproperlygrounded.Cetappareilnumériqueest
conformeàlanormeCANNMB-3(classeB).Leproduit
doitêtreconnectéàl'aided'uncâbleréseaublindé
(STP)quiestcorrectementmisàlaterre.
Europe
ThisdigitalequipmentfulllstherequirementsforRF
emissionaccordingtotheClassBlimitofEN55022.
Theproductshallbeconnectedusingashielded
networkcable(STP)thatisproperlygrounded.
Australia/NewZealand
Thisdigitalequipmentfulllstherequirements
forRFemissionaccordingtotheClassBlimitof
AS/NZSCISPR22.Theproductshallbeconnected
usingashieldednetworkcable(STP)thatisproperly
grounded.
Page 5

Japan
この装置は、クラスB機器です。この装置は、
住宅環境で使⽤することを⽬的としています
が、この装置がラジオやテレビジョン受信機
に近接して使⽤されると、受信障害を引き起
こすことがあります。取扱説明書に従って正
しい取り扱いをして下さい。VCCI‒B
本製品は、シールドネットワークケーブル
(STP)を使⽤して接続してください。また適切
に接地してください。
本製品は電気通信事業者(移動通信会社、固
定通信会社、インターネットプロバイダ等)
の通信回線(公衆無線LANを含む)に直接接
続することができません。本製品をインター
ネットに接続する場合は、必ずルータ等を経
由し接続してください。
Korea
이기기는가정용(B급)전자파적합기기로서주
로가정에서사용하는것을목적으로하며,모
든지역에서사용할수있습니다.적절히접지
된STP(shieldedtwistedpair)케이블을사용하
여제품을연결하십시오.
Safety
Thisproductcomplieswith
IEC/EN/UL60950-1andIEC/EN/UL60950-22,Safety
ofInformationTechnologyEquipment.Theproduct
shallbegroundedeitherthroughashieldednetwork
cable(STP)orotherappropriatemethod.
Disposalandrecycling
Whenthisproducthasreachedtheendofits
usefullife,disposeofitaccordingtolocallawsand
regulations.Forinformationaboutyournearest
designatedcollectionpoint,contactyourlocal
authorityresponsibleforwastedisposal.Inaccordance
withlocallegislation,penaltiesmaybeapplicablefor
incorrectdisposalofthiswaste.
Europe
Thissymbolmeansthattheproductshallnotbe
disposedoftogetherwithhouseholdorcommercial
waste.Directive2012/19/EUonwasteelectrical
andelectronicequipment(WEEE)isapplicablein
theEuropeanUnionmemberstates.Toprevent
potentialharmtohumanhealthandtheenvironment,
theproductmustbedisposedofinanapproved
andenvironmentallysaferecyclingprocess.For
informationaboutyournearestdesignatedcollection
point,contactyourlocalauthorityresponsiblefor
wastedisposal.Businessesshouldcontacttheproduct
supplierforinformationabouthowtodisposeofthis
productcorrectly.
Thisproductcomplieswiththerequirementsof
Directive201 1/65/EUand2015/863ontherestriction
oftheuseofcertainhazardoussubstancesinelectrical
andelectronicequipment(RoHS).
China
有毒有害物质或元素
部
件
名
称
电
气
实
装
部
分
0:表示该有毒有害物质在该部件均质材料
中的含量均在GB/T26572标准规定的限量要
求以下。
X:表示该有毒有害物质至少在该部件的某一
均质材料中的含量超出GB/T26572标准规定的
限量要求。
Contactinformation
AxisCommunicationsAB
Gränden1
22369Lund
Sweden
Tel:+46462721800
Fax:+4646136130
axis.com
汞
铅
(Hg)
(Pb)
00000
X
六
镉
(Cd)
多
价
铬
(Cr(VI))
溴
溴
二
联
苯
苯
醚
(PB-
(PB-
B)
DE)
Support
Shouldyourequireanytechnicalassistance,please
contactyourAxisreseller.Ifyourquestionscannotbe
answeredimmediately,yourresellerwillforwardyour
queriesthroughtheappropriatechannelstoensurea
rapidresponse.IfyouareconnectedtotheInternet,
youcan:
•downloaduserdocumentationandsoftware
updates
•ndanswerstoresolvedproblemsintheFAQ
database,searchbyproduct,category,orphrase
•reportproblemstoAxissupportstaffbylogging
intoyourprivatesupportarea
•chatwithAxissupportstaff
•visitAxisSupportataxis.com/support
Learnmore!
VisitAxislearningcenteraxis.com/learningforuseful
trainings,webinars,tutorialsandguides.
多
Thisproductcomplieswiththerequirements
ofSJ/T1 1364-2014,Markingfortherestrictionof
hazardoussubstancesinelectricalandelectronic
products.
Page 6

Page 7

AXIST92EHousingSeries
Safetyinformation
Hazardlevels
DANGER
Indicatesahazardoussituationwhich,ifnotavoided,willresultindeathorseriousinjury.
WARNING
Indicatesahazardoussituationwhich,ifnotavoided,couldresultindeathorseriousinjury.
CAUTION
Indicatesahazardoussituationwhich,ifnotavoided,couldresultinminorormoderate
injury.
NO
TICE
NO NO
TICE TICE
Indicatesasituationwhich,ifnotavoided,couldresultindamagetoproperty.
Othermessagelevels
Important
Indicatessignicantinformationwhichisessentialfortheproducttofunctioncorrectly.
Note
Indicatesusefulinformationwhichhelpsingettingthemostoutoftheproduct.
EN
7
Page 8

AXIST92EHousingSeries
Safetyinstructions
NO
TICE
NO NO
TICE TICE
•TheAxisproductshallbeusedincompliancewithlocallawsandregulations.
•StoretheAxisproductinadryandventilatedenvironment.
•AvoidexposingtheAxisproducttoshocksorheavypressure.
•Donotinstalltheproductonunstablepoles,brackets,surfacesorwalls.
•UseonlyapplicabletoolswheninstallingtheAxisproduct.Usingexcessiveforcewith
powertoolscouldcausedamagetotheproduct.
•Donotusechemicals,causticagents,oraerosolcleaners.
•Useacleanclothdampenedwithpurewaterforcleaning.
•Useonlyaccessoriesthatcomplywiththetechnicalspecicationofyourproduct.These
canbeprovidedbyAxisorathirdparty.AxisrecommendsusingAxispowersource
equipmentcompatiblewithyourproduct.
•UseonlysparepartsprovidedbyorrecommendedbyAxis.
•Donotattempttorepairtheproductyourself.ContactAxissupportoryourAxisreseller
forservicematters.
Transportation
NO
TICE
NO NO
TICE TICE
•WhentransportingtheAxisproduct,usetheoriginalpackagingorequivalenttoprevent
damagetotheproduct.
8
Page 9

AXIST92EHousingSeries
InstallationGuide
ThisInstallationGuideprovidesinstructionsforinstallingAXIST92E05ProtectiveHousingandAXIS
T92E20OutdoorHousing.
Toinstallthecameraonthenetwork,pleaseseetheInstallationGuideprovidedwiththecamera.
Forotherdetailsaboutthecamera,seetheUserManualavailableonwww.axis.com
InstallationSteps
1.Makesurethepackagecontents,toolsandothermaterialsnecessaryfortheinstallation
areinorder.Seepage9.
2.Studythehardwareoverview.Seepage10.
3.Studythespecications.Seepage12.
4.Installthehardware.Seepage13.
Packagecontents
•AXIST92E05/T92E20Housing
•AXIST94Q01AWallMount
•NetworkCable(AXIST92E20only)
•Torxscrewdriver(T20)orAllenkey(T20)
•Torxscrewbit(T30)
•Holdermountingkit
•InstallationGuide(thisdocument)
EN
RecommendedTools
•Drill–ifusingthehardceilingmount
•Knife–ifusingthedropceilingmount
•TorxscrewdriverT30–ifusingacompatiblebracketfromAXIST91AMounting
Accessories
Optionalaccessories
Foracompletelistofavailableaccessoriesforthisproduct,gototheproduct’spageon
axis.comandselectSoftware&Accessories.
9
Page 10

AXIST92EHousingSeries
Hardwareoverview
Housing
AXIST92E20ProtectiveHousing
1
Sunshield
10
Page 11

AXIST92EHousingSeries
2
Sunshieldadjustmentscrew(2x)
3
Holder
4
Holderscrews(2x)andwasheranges(2x)
5
Stabilizingscrew
6
Camerascrewandwasher
7
Alarmoutput
8
Networkcable
9
Cablehole
10
Safetywiretab
11
Cableholes(2x)
12
Bottomcover
13
Networkconnector(PoEIN)
14
StatusLED
15
Coldstartswitch
16
Bracketadapter
WallMount
EN
1
Networkcable(routethroughwallbracket)
2
Powercable(routethroughwallbracket)(forproductsequippedwithpower
connector)
3
Groundingcable(routethroughwallbracket)(forcamerahousingsequipped
withgroundingscrew)
4
ScrewT20(4x)
5
BracketadjustmentscrewT30
6
Wallmount
11
Page 12

AXIST92EHousingSeries
HousingLEDindicators
Note
ThehousingLEDreferredtointhetablebelowislocatedinthehousing.
Alarmeventswillbetriggeredthroughthecamera’sinputport.
HousingLED
(fanandheater)
Green
Flashinggreen
ContactyourAxisresellerforinformationaboutsparepartsandtroubleshooting.
Indication
Normaloperation.
Singleash:Heatererror
Doubleash:Fanerror
Tripleash:Generalerror
Specications
Function/group
General
Item
Models
Casing
Operatingconditions
Approvals
Specication
AXIST92E05ProtectiveHousing
AXIST92E20OutdoorHousing
Aluminiumcasing,polycarbonate
sunshieldandcablecover.IP66-and
NEMA4X-rated,IK10impact-resistant
aluminumenclosure
AXIST92E05:-20°Cto55°C(-4°F
to131°F)
Humidity15–100%(condensing)
AXIST92E20:-40°Cto50°C(-40°F
to122°F)
Humidity15–100%(condensing)
AXIST92E05:IEC60068-2-6,IEC
60068-2-27AXIST92E20:EN
55022ClassB,EN61000-3-2,EN
61000-3-3,EN55024,EN61000-6-1,
EN61000-6-2,EN60950-22,IEC
60068-2-6,IEC60068-2-27,FCCPart
15,SubpartB,ClassB,VCCI,ClassB
ITE,C-tickAS/NZSCISPR22,ICES-003,
ClassB,KCCClassB
1
1
12
Page 13

AXIST92EHousingSeries
Dimensions(HxWxD)
Weight
1.Operatingtemperaturesmayvarydependingoncamera,seetheUser’sManual,availablefrom
www.axis.com
120x161x404mm(4.7"x6.4"x15.9")
AXIST92E05:2.4kg(5.1lb.)
AXIST92E20:2.5kg(5.5lb.)
Installthehardware
NO
TICE
NO NO
TICE TICE
•Duetolocalregulationsortheenvironmentalandelectricalconditionsinwhichthe
productistobeused,ashieldednetworkcable(STP)maybeappropriateorrequired.
Allcablesconnectingtheproducttothenetworkandthatareroutedoutdoorsorin
demandingelectricalenvironmentsshallbeintendedfortheirspecicuse.Makesurethat
thenetworkdevicesareinstalledinaccordancewiththemanufacturer’sinstructions.
(AXIST92E05)Forinformationaboutregulatoryrequirements,seethecamera’s
InstallationGuide.
AXIST92E20)Forinformationaboutregulatoryrequirements,seeRegulatory
informationonpage4
•Becarefulnottoscratch,damageorleavengerprintsonthewindowbecausethiscould
decreaseimagequality.
TheAxisproductcanbeinstalledwiththecablesroutedthroughoralongthewall.
Readalltheinstructionsbeforeinstallingtheproduct:
1.Installthewallmount.SeeInstalltheWallMountonpage13.Fordetailedinstructions,
seethewallmount’sInstallationGuide,suppliedinthepackageoravailableon
www.axis.com
2.Attachthehousingtothewallmount.SeeAttachtheHousingtotheWallMounton
page14.
3.Installthecamerainthehousing.SeeInstalltheCameraintheHousingonpage16.
EN
InstalltheWallMount
CAUTION
Makesurethatthescrewsandplugsareappropriateforthematerial(e.g.wood,metal,
drywall,stone)andthatthematerialisstrongenoughtosupportthecombinedweight
ofthecamera,housing,andwallmount.
Note
•Seealsothewallmount’sInstallationGuidesuppliedinthepackageandavailableon
www.axis.com
•Fortechnicalspecicationsabouttheconnectors,seethecamera’sUserManualavailable
onwww.axis.com
13
Page 14

AXIST92EHousingSeries
1.Preparethewallforinstallationofthewallmount.Usethewallbracketasatemplate
andmarktheholesbeforedrillingtheholes.
2.Routethenetworkcableand,ifrequired,thepowercablethroughthewallbracket.
Leaveapproximately30cm(1 1.8in)ofcableforconnectingthecamera.
3.Ifthecamerahousinghasagroundingscrew,routeagroundingcablethroughthewall
bracket.Leaveapproximately15cm(5.9in)ofcableforconnectingthehousing.
4.Ifconnectinganauxiliarydevice,forexampleanI/O,audio,orexternalpowerdevice,to
thecamera,repeatthestepaboveasapplicabletothespecicdevice.
5.Fastenthewallbrackettothewallbytighteningthescrews.
AttachtheHousingtotheWallMount
NO
TICE
NO NO
TICE TICE
•Usinganyotherthantheprovidedcablegasketcouldcausewatertoseepinanddamage
theproduct.Forinformationaboutcablegasketsandcableglandsthatallowforother
cableareas,seewww.axis.com
•Ifmorethanonecableisused,eachcablemustberoutedthroughaseparatecablegasket.
•Onlyopenaholeincablegasketsthatwillbeusedandifacablegasketistorn,replaceit
withanewcablegasket.Leavingacablegasketopenorusingatorncablegasketcould
causewatertoseepinanddamagetheproduct.
1.Loosenthebottomcoverscrewsandliftthetopcover.
2.Loosenthecablecoverscrews;detachthecablecoverfromthebottomcover.
3.Removethecap,theplugandthegasketfromthecableglandthatistobeused.
4.Removethegroundingscrew,washerandgroundingshoering.
5.Fastentheshoeringmountedgroundingwireandwasherwiththegroundingscrew.
14
Page 15

AXIST92EHousingSeries
1.Routethenetworkcablethroughthecap.
2.Slidethenetworkcablethroughtheslitonthegaskettoattachthegaskettothe
networkcable.
3.Routethenetworkcablethroughthecablegland.
EN
1
Cap
2
Gasket
3
Cablegland
4
Plug(discard)
4.Pressthegasketintothecableglandandscrewthecaponrmly.
NO
TICE
NO NO
TICE TICE
Ifacableotherthantheprovidedcableisused,youneedtoprepareashieldednetwork
cablewithagasket.Gentlyforcethecablethroughthegasketprovidedandattacha
networkconnector.Itmaybenecessarytopierceaholeinthegasketwiththesupplied
screwdriver.
NO
TICE
NO NO
TICE TICE
Mountthepowerconnectorafterthepowercableispushedthroughthecablegasket.
15
Page 16

AXIST92EHousingSeries
5.Ifconnectinganauxiliarydevice,forexampleanI/O,audio,orexternalpowerdevice,to
thecamera,repeatthestepsaboveasapplicabletothespecicdevice.
6.Putthebottomcoveronthewallmountandtightenthescrews(torque2Nm).
InstalltheCameraintheHousing
1.Loosentheholderscrewsandwasherstoremovetheholder.
2.Securethecameratotheholderwiththescrewsaccordingtotheillustrationsandtable
below.Tightenthestabilizingscrewjustlightlyandtightenthecamerascrewto2Nm.
Becarefulnottoovertightenthescrews
AXIST92E05/AXIST92E20
Holderpositionandfasteners
AXIST92E20 Cameramodel
I/Ocable
No
Yes
ColdStartupDelay
Off(0)
Off(0)
16
Page 17

AXIST92EHousingSeries
Yes
Off(I)
EN
Yes
Off(I)
3.Ifconnectingexternal/inputdevices,audiodevices,orexternalpowertothecamera,
connectthemaccordingtotheinstructionsinthecamera’sInstallationGuide.
4.Ifapplicable,connecttheinternalnetworkcableandI/Ocable,whicharepre-installedin
theoutdoorhousing,tothecamera.
5.Attachtheholdertothebottomcover.Adjustthepositionoftheholdercarefullyand
tightentheholderscrewsincludingthewashers(torque0.5Nm).Allowjustenough
distance,approximately5–10mm(0.2–0.4in.),betweenthecameralensandthefront
endoftheplasticinnerhousingtotthetopcoverwithoutthewindowscratching
thelens.
6.IfusinganSDcardforlocalstorage,insertthecardintothecamera’sSDcardslot.
7.ConnecttheexternalnetworkcabletoPoEIN.
8.Ifapplicable,settheColdStartupDelayswitchtothecorrectposition,seetableonpage
page16andColdStartupDelaySwitchonpage18
17
Page 18

AXIST92EHousingSeries
9.Ifapplicable,checkthatthehousing’sstatusLEDsindicatethecorrectconditions.See
HousingLEDindicatorsonpage12.
10.MakesurethatthecameraLEDsindicatethecorrectconditions.Seethecamera’s
InstallationGuide.
11.Loosenthebracketadjustmentscrewtoaimthecameratothepointofinterest.For
informationabouthowtoviewthevideostream,seethecamera’sInstallationGuide
orwww.axis.com/techsup
12.Attachthetopcoversafetywiretothetabonthebottomcover.
13.Closethehousing.Makesuretoalternatelytightenthebottomcoverscrewsafewturns
atatimeuntiltheyaretight(torque1.5Nm).Thiswillhelpensurethatthebottom
covergasketiscompressedevenly.
14.Loosenthesunshieldadjustmentscrewsandadjustthesunshieldtothedesiredposition.
NO
TICE
NO NO
TICE TICE
Makesurenottopinchanycableswhenclosingthehousing.
ColdStartupDelaySwitch
AXIST92E20featuresArcticTemperatureControl,whichisenabledbysettingtheColdStartup
DelayswitchtoI(ON).Whenenabled,thisfunctioncontrolswhenthecamerarestartsaftera
powercut,whentemperaturesarebelow0°C(32°F);thecameraisrstheatedtoapproximately
0°C(32°F)beforeitinitializes.Thispreventsdamagetocameramodelsthatincludemovingparts.
Note
Theswitchshouldbedisabledforcameraswithoutmovingparts,sincetheydonotrequire
thisfunction,seeInstalltheCameraintheHousingonpage16
Cleaninginstructions
NO
TICE
NO NO
TICE TICE
•Avoidtheuseofabrasivecleaners,squeegeesand/orothercleaningimplementsthat
mayscratchorgougethecoating.
•Donotcleanwithadryclothorsponge.
•Donotuserazorbladesorothersharptools,abrasiveorstronglyalkalinedetergents,
solvents,leadedbenzeneandcarbontetrachloride.
1.Gentlywashthesheettoloosendirtandgrime,seetablebelow.
Howtoremove:
DustordirtLukewarmwaterornon-abrasivedetergent
Greaterbuild-upofdirtorgreasestains
Useamicroberclothoraspongewith:
Benzene-freepurepetroleumspirit(cleaner’s
naphthaorlightgasoline)
18
Page 19

AXIST92EHousingSeries
Splashesofdye,greaseorresidualsealing
Rustmarks10%solutionofoxalicacid
2.Rinsecarefullyafterwardswithcleanwater.
3.Topreventwaterstains,drythoroughlywithachamoisoracellulosesponge.
Ethylalcohol,isopropylalcoholorpetroleumether
andgentlerubbingpriortocuring
Furtherinformation
•Forthelatestversionofthisdocument,seeaxis.com
•Forusefulonlinetrainingsandwebinars,seeaxis.com/academy
Warrantyinformation
ForinformationaboutAxis’productwarrantyandtheretorelatedinformation,goto
axis.com/warranty.
EN
19
Page 20

20
Page 21

AXIST92EHousingSeries
Informationssurlasécurité
Niveauxderisques
DANGER
Indiqueunesituationdangereusequi,siellen'estpasévitée,entraîneraledécèsoudes
blessuresgraves.
AVERTISSEMENT
Indiqueunesituationdangereusequi,siellen'estpasévitée,pourraitentraînerledécès
oudesblessuresgraves.
ATTENTION
Indiqueunesituationdangereusequi,siellen'estpasévitée,pourraitentraînerdes
blessureslégèresoumodérées.
VIS
A AAVIS VIS
Indiqueunesituationqui,siellen'estpasévitée,pourraitendommagerl'appareil.
Autresniveauxdemessage
Important
Indiquelesinformationsimportantes,nécessairespourassurerlebonfonctionnementde
l’appareil.
Note
Indiquelesinformationsutilesquipermettrontd’obtenirlefonctionnementoptimalde
l’appareil.
FR
21
Page 22

AXIST92EHousingSeries
Consignesdesécurité
VIS
A AAVIS VIS
•LeproduitAxisdoitêtreutiliséconformémentauxloisetrèglementslocaux.
•ConserverceproduitAxisdansunenvironnementsecetventilé.
•NepasexposerceproduitAxisauxchocsouauxfortespressions.
•Nepasinstallerceproduitsurdespoteaux,supports,surfacesoumursinstables.
•Utiliseruniquementdesoutilsrecommandéspourl'installationdel'appareilAxis.
L'applicationd'uneforceexcessivesurl'appareilavecdesoutilspuissantspourrait
l'endommager.
•Nepasutiliserdeproduitschimiques,desubstancescaustiquesoudenettoyants
pressurisés.
•Utiliserunchiffonpropreimbibéd'eaupurepourlenettoyage.
•Utiliseruniquementdesaccessoiresconformesauxcaractéristiquestechniquesdevotre
produit.IlspeuventêtrefournisparAxisouuntiers.Axisrecommanded'utiliserun
équipementd'alimentationAxiscompatibleavecvotreproduit.
•UtiliseruniquementlespiècesderechangefourniesourecommandéesparAxis.
•Nepasessayerderéparervous-mêmeceproduit.Contacterl'assistancetechniqued'Axis
ouvotrerevendeurAxispourdesproblèmesliésàl'entretien.
Transport
VIS
A AAVIS VIS
•LorsdutransportduproduitAxis,utilisezl'emballaged'origineouunéquivalentpour
éviterd'endommagerleproduit.
22
Page 23

AXIST92EHousingSeries
Guided’installation
Ceguided’installationexpliquecommentinstallerleboîtierdeprotectionAXIST92E05etleboîtier
d’extérieurAXIST92E20.
Pourinstallerlacamérasurleréseau,consultezleguided’installationfourniaveclacaméra.Pour
obtenirdeplusamplesdétailsrelatifsàlacaméra,consultezlemanueldel’utilisateur,disponible
surlesitewww.axis.com
Procéduresd’installation
1.Assurez-vousquelesoutilsetautresmatérielsnécessairesàl'installationsontinclus
dansl'emballage.Cf.page23.
2.Consultezladescriptiondumatériel.Cf.page24.
3.Étudiezlescaractéristiques.Cf.page26.
4.Installezlematériel.Cf.page27.
Contenudel’emballage
•BoîtierAXIST92E05/T92E20
•SupportmuralAXIST94Q01A
•Câbleréseau(AXIST92E20uniquement)
•TournevisTorx(T20)ouclefAllen(T20)
•EmboutpourvisTorx(T30)
•Kitdemontagedusupport
•Guided’installation(cedocument)
FR
Outilsrecommandés
•Perçage:encasd'utilisationdelaxationauplafond
•Lame:encasd'utilisationdelaxationpourfaux-plafond
•TournevisT30Torx:encasd'utilisationd'unsupportcompatibletirédesaccessoires
demontageAXIST91A
Accessoiresenoption
Pourunelistecomplètedesaccessoiresdisponiblespourceproduit,accédezàlapageduproduit
suraxis.cometsélectionnezLogicieletaccessoires.
23
Page 24

AXIST92EHousingSeries
Aperçudumatériel
Boîtier
BoîtierdeprotectionAXIST92E20
1
Pare-soleil
24
Page 25

Fixationmurale
2
Visderéglagedupare-soleil(x2)
3
Support
4
Visdusupport(2x)etrondelles(2x)
5
Visdestabilisation
6
Visetrondelledelacaméra
7
Sortied’alarme
8
Câbleréseau
9
Troudecâble
10
Pattedeldesécurité
11
Trouspourcâbles(2x)
12
Couvercleinférieur
13
Connecteurréseau(PoEIN)
14
Voyantd’état
15
Commutateurdedémarrageàfroid
16
Adaptateurdesupport
AXIST92EHousingSeries
FR
1
Câbleréseau(acheminéàtraverslesupportmural)
2
Câbled’alimentation(acheminéàtraverslesupportmural)(pourlesproduits
équipésd’unconnecteurd’alimentation)
3
Câbledemiseàlaterre(acheminéàtraverslesupportmural)(pourlesboîtiersde
caméraéquipésd’unevisdemiseàlaterre)
4
VisT20(x4)
5
VisderéglagedusupportT30
6
Fixationmurale
25
Page 26

AXIST92EHousingSeries
VoyantsDELduboîtier
Note
Levoyantduboîtiergurantdansletableauci-dessousestsituédansleboîtier.
Lesévénementsd’alarmessontdéclenchésparlebiaisduportd’entréedelacaméra.
Voyantboîtier
(ventilateuret
régulateurdechaleur)
VertFonctionnementnormal.
ClignoteenvertClignoteuneseulefois:erreurauniveaudurégulateurdechauffage.
ContactezvotrerevendeurAxispourobtenirdeplusamplesinformationssurlespiècesderechange
etlesservicesdedépannage.
Indication
Clignotedeuxfois:erreurauniveauduventilateur.
Clignotetroisfois:erreurgénérale.
Caractéristiquestechniques
Fonction/
groupe
Généralités
Article
Modèles
Boîtier
Conditionsd’utilisation
Agréments
Caractéristiquestechniques
BoîtierdeprotectionAXIST92E05
Boîtierd’extérieurAXIST92E20
Boîtierenaluminium,pare-soleilet
couvercledecâbleenpolycarbonate.
CaissonIK10enaluminiumrésistant
auxchocs,conformeauxnormesIP66
etNEMA4X
AXIST92E05:-20°Cà55°C(-4°Fà
1
131°F)
Humidité15-100%(condensation)
AXIST92E20:-40°Cà50°C(-40°F
à122°F)
Humidité15-100%(condensation)
AXIST92E05:IEC60068-2-6,IEC
60068-2-27AXIST92E20:EN
55022ClasseB,EN61000-3-2,EN
61000-3-3,EN55024,EN61000-6-1,
EN61000-6-2,EN60950-22,IEC
60068-2-6,IEC60068-2-27,FCCPartie
1
26
Page 27

AXIST92EHousingSeries
15,Sous-partieB,ClasseB,VCCI,
ClasseBITE,C-tickAS/NZSCISPR22,
ICES-003,ClasseB,KCCClasseB
Dimensions(HxlxP)
Poids
1.Lestempératuresdefonctionnementpeuventvarierd’unecaméraàl’autre,consultezlemanuelde
l’utilisateur,disponiblesurleCDfourniaveclacaméraousurlesitewww.axis.com.
120x161x404mm(4,7"x6,4"x15,9")
AXIST92E05:2,4kg(5,1lb)
AXIST92E20:2,5kg(5,5lb)
Installationdumatériel
VIS
A AAVIS VIS
•Lesréglementationslocalesoulesconditionsenvironnementalesetélectriquesdans
lesquellesleproduitestutilisépeuventnécessiterl'utilisationd'uncâbleréseaublindé
(STP).Touslescâblesréseauquisontacheminésàl'extérieuroudansdesenvironnements
électriquesexigeantsdoiventêtredestinésàleurusagespécique.Assurez-vousqueles
périphériquesréseausontinstallésconformémentauxinstructionsdufabricant.
(AXIST92E05)Pourplusd’informationssurlesexigencesréglementaires,reportez-vous
auguided’installationdelacaméra.
(AXIST92E20)Pourplusd’informationssurlesexigencesréglementaires,consultez.
•Veillezànepasrayer,endommageroulaisserd’empreintessurlafenêtre,carcelapourrait
altérerlaqualitéd’image.
LeproduitAxispeutêtreinstalléavecdescâblesacheminésàtraversoulelongdumur.
FR
Liseztouteslesinstructionsavantl'installationdel'appareil:
1.Installezlaxationmurale.Cf.Installationdelaxationmuralepage27.Pourobtenir
desinstructionsdétaillées,reportez-vousauguided'installationdelaxationmurale
disponibledanslaboîteousurlesitewww.axis.com.
2.Placezleboîtiersurlaxationmurale.Cf.Placementduboîtiersurlaxationmurale
page28.
3.Installezlacaméradansleboîtier.Cf.Installationdelacaméradansleboîtierpage30.
Installationdelaxationmurale
ATTENTION
Assurez-vousquelesvisetleschessontadaptéesaumatériau(bois,métal,cloisonsèche,
pierre,etc.)etquelematériauestsufsammentrésistantpoursupporterlepoidscombiné
delacaméra,duboîtieretdusupportmural.
Note
•Reportez-vouségalementauguided'installationdelaxationmuraledisponibledansla
boîteetsurlesitewww.axis.com.
27
Page 28

AXIST92EHousingSeries
•Pourplusdecaractéristiquestechniquesconcernantlesconnecteurs,reportez-vousau
manueld’utilisationdelacaméra,disponiblesurwww.axis.com
1.Préparezlemurpourl'installationdusupportmural.Utilisezlesupportmuralcomme
gabaritetmarquezlesemplacementsdestrousavantdelespercer.
2.Acheminezlecâbleréseauet,lecaséchéant,lecâbled'alimentationenlefaisantpasser
autraversdusupportmural.Laissezenviron30cm(11,8’’)decâblepourlaconnexion
delacaméra.
3.Sileboîtierdelacaméraestéquipéd’unevisdemiseàlaterre,acheminezuncâble
àtraverslesupportmural.Laissezenviron15cm(5,9’’)decâblepourlaconnexion
duboîtier.
4.Sivousconnectezunpériphériqueauxiliaire(parexemple,unpériphérique
d’entrée/sortie,audiooud’alimentationexterne)àlacaméra,répétezl’étapeci-dessus
pourchaquepériphérique.
5.Serrezlesvisdusupportmuralpourlexer.
Placementduboîtiersurlaxationmurale
VIS
A AAVIS VIS
•L’utilisationd’unjointdecâbleautrequeceluifournirisqued’entraîneruneinltration
d’eauetd’endommagerleproduit.Pourplusd’informationssurlesjointsdecâbleetles
presse-étoupesadaptésàd’autreszonesdecâble,consultezwww.axis.com
•Sivousutilisezplusd’uncâble,chaquecâbledoitêtreacheminéautraversd’unjointde
câbledistinct.
•Ouvrezuniquementuntroudanslesjointsdecâblequiserontutilisés.Siunjointdecâble
estendommagé,remplacez-leparunnouveau.L’utilisationd’unjointdecâbleouvertou
endommagérisqued’entraîneruneinltrationd’eauetd’endommagerleproduit.
1.Desserrezlesvisducouvercleinférieuretsoulevezlecouverclesupérieur.
2.Desserrezlesvisducouvercledecâblepourpouvoirledétacherducouvercleinférieur.
28
Page 29

AXIST92EHousingSeries
3.Retirezlecapuchon,lebouchonetlejointdupresse-étoupeàutiliser.
4.Retirezlavisdemiseàlaterre,larondelleetl’anneaudelacossedemiseàlaterre.
5.Fixezlecâbledemiseàlaterremontésurl’anneaudelacosseetlarondelleàl’aidede
lavisedemiseàlaterre.
FR
1.Acheminezlecâbleréseaudanslecapuchon.
2.Insérezlecâbleréseaudanslafentedujointandexerlejointaucâbleréseau.
3.Acheminezlecâbleréseauàtraverslepresse-étoupe.
29
Page 30

AXIST92EHousingSeries
1
Capuchon
2
Joint
3
Presse-étoupe
4
Bouchon(rebut)
4.Enfoncezlejointdanslepresse-étoupeetvissezlecapuchonfermement.
VIS
A AAVIS VIS
Sivousutilisezuncâbleautrequeceluifourni,ilestnécessairedeprépareruncâble
réseaublindéavecunjoint.Faitespasserdélicatementlecâbleàtraverslejointfourniet
complétez-leparunconnecteurréseau.Ilpeutêtrenécessairedeperceruntroudansle
jointàl’aidedutournevisfourni.
VIS
A AAVIS VIS
Installezleconnecteurd’alimentationunefoislecâbled’alimentationinsérédanslejoint
decâble.
5.Sivousconnectezunpériphériqueauxiliaire(parexemple,unpériphériqued'entrée/sortie,
audiooud'alimentationexterne)àlacaméra,répétezlesétapesci-dessuspourchaque
périphérique.
6.Placezlecouvercleinférieursurlaxationmuraleetserrezlesvis(couple2Nm).
Installationdelacaméradansleboîtier
1.Desserrezlesvisdusupportetlesrondellespourretirerlesupport.
2.Fixezlacaméraausupportàl’aidedesvis,conformémentauxillustrationsetautableau
ci-dessous.Serrezlavisdestabilisationlégèrementetserrezlavisdelacaméraavec
uncouplede2Nm.Veillezànepastropserrerlesvis.
Modèledecaméra
AXIST92E05/AXIST92E20
Positiondusupportetdes
élémentsdexation
AXIST92E20
Câbled’E/S
30
Reportdedémarrage
àfroid
Page 31

AXIST92EHousingSeries
Non
Éteint(0)
FR
Oui
Oui
Oui
Éteint(0)
Désactivé(1)
Désactivé(1)
31
Page 32

AXIST92EHousingSeries
3.Sivousconnectezdespériphériquesexternes/d’entrée,despériphériquesaudioouune
sourced’alimentationexterneàlacaméra,connectez-lesconformémentauxinstructions
fourniesdansleguided’installationdelacaméra.
4.Lecaséchéant,branchezlecâbleréseauinterneetlecâbled’E/S,quisontpréinstallés
dansleboîtierd’extérieur,àlacaméra.
5.Fixezlesupportaucouvercleinférieur.Ajustezprécisémentlapositiondusupport,puis
serrezlesvisdecedernieraveclesrondelles(couple0,5Nm).Prévoyezunedistance
sufsante,d’environ5à10mm,entrel’objectifdelacaméraetl’extrémitéavantdu
boîtierintérieurenplastiquepourpositionnerlecouverclesupérieursansquelafenêtre
nerayel’objectif.
6.SivousutilisezunecarteSDentantqu’espacedestockagelocal,insérezlacartedansle
logementprévuàceteffetsurlacaméra.
7.ConnectezlecâbleréseauexterneàPoEIN.
8.Lecaséchéant,mettezlecommutateurdereportdedémarrageàfroidsurlaposition
appropriée;reportez-vousautableauàlapage30etCommutateurdereportde
démarrageàfroidpage33
9.Lecaséchéant,vériezsilesvoyantsd’étatduboîtierindiquentlesconditionscorrectes.
Cf.VoyantsDELduboîtierpage26.
10.Vériezquelesvoyantssurlacaméraindiquentlesconditionscorrectes.Reportez-vous
auguided’installationdelacaméra.
11.Desserrezlavisderéglagedusupportand’orienterlacaméradansladirectionvoulue.
Pourplusd’informationssurlavisualisationduuxdedonnéesvidéo,reportez-vousau
guided’installationdelacaméraouconsultezwww.axis.com/techsup.
12.Fixezlecâbledesécuritéducouverclesupérieuràlapatteducouvercleinférieur.
13.Fermezleboîtier.Assurez-vousdeserrerenalternancelesvisducouvercleinférieurde
quelquestoursàlafoisjusqu’àcequ’ellessoienttoutesbienserrées(couple1,5Nm).Cela
permettradegarantirquelejointducouvercleinférieurestcompressédefaçonrégulière.
14.Desserrezlesvisderéglagedupare-soleilpourpouvoirl’ajusteretl’orienterdansla
positionsouhaitée.
32
Page 33

AXIST92EHousingSeries
VIS
A AAVIS VIS
Assurez-vousdenepinceraucuncâbleàlafermetureduboîtier.
Commutateurdereportdedémarrageàfroid
L’AXIST92E20estdotéd’uncontrôledetempératurefroide,quiestactivéenréglantlecommutateur
dereportdedémarrageàfroidsurI(ON).Lorsqu’elleestactivée,cettefonctioncontrôlelemoment
duredémarragedelacaméraaprèsunecoupureoulorsdelabaissedestempératuresendessous
de0°C(32°F);lacaméraestd’abordchaufféeàenviron0°C(32°F)avantdedémarrer.Celaévite
d’endommagerlesmodèlesdecaméracomportantdespiècesamovibles.
Note
Lecommutateurdoitêtredésactivédanslecasdescamérassansaucunepièceamovible
puisquecettefonctionn’estpasrequise.Reportez-vousautableaudelaInstallationde
lacaméradansleboîtierpage30
Instructionsdenettoyage
VIS
A AAVIS VIS
•Évitezd’utiliserdesnettoyantsabrasifs,desracletteset/ouautresustensilesdenettoyage
quirisqueraientderayeroudegrifferlerevêtement.
•Nejamaisnettoyeràl’aided’unchiffonsecoud’uneéponge.
•Nejamaisutiliserdelamesderasoirouautresoutilscoupants,dedétergentsabrasifsou
fortementalcalins,desolvants,debenzèneauplombetdetétrachloruredecarbone.
1.Lavezdélicatementlafeuillepouréliminerlapoussièreetlasaleté,reportez-vousau
tableausuivant.
Commentsupprimer:
PoussièreetsaletéEautièdeoudétergentnonabrasif
Forteaccumulationdesaletéoutachesde
graisse
Projectionsdecolorant,degraisseou
résidusd’étanchéité
Tachesderouille
Utilisezunchiffonenmicrobresouuneéponge
avec:
Essenceminéralepuresansbenzène(naphtede
nettoyageouessencelégère)
Éthanol,alcoolisopropyliqueouétherdepétroleet
frottementdélicatavantletraitement
Solutionà10%d’acideoxalique
FR
2.Rincezensuitesoigneusementàl’eaupropre.
3.Pouréviterlestachesd’eau,séchezcomplètementàl’aided’unepeaudechamoisou
uneépongeencellulose.
33
Page 34

AXIST92EHousingSeries
Informationscomplémentaires
•Pourobtenirlaversionlaplusàjourdecedocument,voiraxis.com
•Pouraccéderàdesformationsetwebinairesenligneutiles,voiraxis.com/academy
Informationssurlagarantie
Pourplusd'informationssurlagarantieduproduitAxisetdesinformationsconnexes,rendez-vous
suraxis.com/warranty.
34
Page 35

AXIST92EHousingSeries
Sicherheitsinformationen
Gefährdungsstufen
GEFAHR
WeistaufeinegefährlicheSituationhin,welche,fallsnichtverhindert,zuTododer
schwerenVerletzungenführenkann.
WARNUNG
WeistaufeinegefährlicheSituationhin,welche,fallsnichtverhindert,zuTododer
schwerenVerletzungenführenkann.
VORSICHT
WeistaufeinegefährlicheSituationhin,welche,fallsnichtverhindert,zugeringfügiger
odermäßigerVerletzungführenkann.
HINWEIS
HINWEIS HINWEIS
WeistaufeinegefährlicheSituationhin,welche,fallsnichtverhindert,zuSachschäden
führenkann.
AndereMeldeebenen
Wichtig
WeistaufwichtigeInformationenhin,diedenrichtigenBetriebdesProduktsgewährleisten.
Beachten
WeistaufnützlicheInformationenhin,diedieoptimaleVerwendungdesProdukts
unterstützen.
DE
35
Page 36

AXIST92EHousingSeries
Sicherheitsanweisungen
HINWEIS
HINWEIS HINWEIS
•DasAxisProduktmussunterBeachtungdergeltendenGesetzeundBestimmungen
betriebenwerden.
•LagernSiedasAxisProduktineinertrockenenundbelüftetenUmgebung.
•DasAxisProduktwederStößennochstarkemDruckaussetzen.
•DasProduktnichtaninstabilenMasten,Halterungen,OberächenoderWändenanbringen.
•VerwendenSiebeiderInstallationdesAxisProduktsausschließlichpassendeWerkzeuge.
EinzugroßerKraftaufwandmitelektrischenWerkzeugenkanndasProduktbeschädigen.
•VerwendenSiekeinechemischen,ätzendenoderaerosolhaltigenReinigungsmittel.
•VerwendenSiezumReinigeneinsauberes,mitdestilliertemWasserangefeuchtetesTuch.
•VerwendenSienurZubehör,dasdentechnischenVorgabenIhresProduktsentspricht.
DiesesistvonAxisoderDrittanbieternerhältlich.AxisempehltdiemitIhremProdukt
kompatibleStromversorgungvonAxis.
•VerwendenSieausschließlichErsatzteiledievonAxisangebotenoderempfohlenwerden.
•VersuchenSienicht,diesesProduktselbsttätigzureparieren.WendenSiesichbezüglich
ReparaturundWartungandenAxisSupportoderIhrenAxisHändler.
Transport
HINWEIS
HINWEIS HINWEIS
•BeiBedarftransportierenSiedasAxisProduktinderOriginalverpackungodereiner
entsprechendenVerpackung,sodassSchädenvermiedenwerden.
36
Page 37

AXIST92EHousingSeries
Installationsanleitung
IndieserAnleitungwirddieInstallationdesAXIST92E05-SchutzgehäusesunddesAXIS
T92E20-Außengehäusesbeschrieben.
AnweisungenzurInstallationderKameraimNetzwerkndenSieinderInstallationsanleitungder
Kamera.WeitereInformationenzurKamerandenSieimBenutzerhandbuchunterwww.axis.com.
Installationsschritte
1.StellenSiesicher,dassdiePackungsinhalte,Werkzeugeundanderenotwendige
MaterialienfürdieInstallationinOrdnungsind.SieheSeite37.
2.MachenSiesichmitderHardware-Übersichtvertraut.SieheSeite38.
3.MachenSiesichmitdentechnischenDatenvertraut.SieheSeite40.
4.InstallierenSiedieHardware.SieheSeite41.
Lieferumfang
•AXIST92E05/T92E20-Gehäuse
•AXIST94Q01A-Wandhalterung
•Netzwerkkabel(nurAXIST92E20)
•TorxT20-SchraubendreheroderT20-Inbusschlüssel
•TorxT30-Schraubenset
•MontagesatzfürHalter
•Installationsanleitung(diesesDokument)
EmpfohleneWerkzeuge
•Bohrer–beiMontageanMassivdecken
•Messer–beiMontageanHängedecken
•TorxSchraubendreherT30–beiAnwendungeinerkompatiblenHalterungdesAXIS
T91AMontagezubehörs.
DE
OptionalesZubehör
EinevollständigeListelieferbarenZubehörsfürdiesesProduktndenSieaufaxis.comunter
Produkt,SoftwareundZubehör.
37
Page 38

AXIST92EHousingSeries
ÜbersichtüberdieHardware
Gehäuse
AXIST92E20-Schutzgehäuse
1
Sonnenblende
38
Page 39

AXIST92EHousingSeries
2
EinstellschraubenfürSonnenblende(2x)
3
Halter
4
Halterungsschrauben(2x)undUnterlegscheiben(2x)
5
Stabilisierungsschraube
6
SchraubeundUnterlegscheibefürKamera
7
Alarmausgang
8
Netzwerkkabel
9
Kabeldurchführung
10
Sicherheitsdrahtlasche
11
Kabeldurchführungen(2x)
12
UntereAbdeckung
13
Netzwerkanschluss(PoEIN)
14
Status-LED
15
SchalterfürKaltstart
16
Halterungsadapter
Wandmontage
DE
1
Netzwerkkabel(durchWandhalterungführen)
2
Stromkabel(durchWandhalterungführen)(fürProduktemitStromanschluss)
3
Erdungskabel(durchWandhalterungführen)(fürKameragehäusemit
Masseschraube)
4
SchraubeT20(4x)
5
EinstellschraubeT30fürHalterung
6
Wandhalterung
39
Page 40

AXIST92EHousingSeries
LED-LeuchtenamGehäuse
Beachten
DieindernachfolgendenTabellebeschriebeneGehäuse-LEDbendetsichimGehäuse.
AlarmereignissewerdendurchdenEingangsportderKameraausgelöst.
Gehäuse-LED
(Heizelementund
Lüfter)
Grün
Grünblinkend
WendenSiesichanIhrenAxisHändler,wennSieweitereInformationenzuErsatzteilenundzur
Fehlersuchebenötigen.
Bedeutung
NormalerBetrieb.
EinmaligesBlinken:FehlfunktiondesHeizelements
DoppeltesBlinken:FehlfunktiondesLüfters
DreifachesBlinken:AllgemeinerFehler
TechnischeDaten
Funktion/
Gruppe
Allgemeines
ArtikelTechnischeDaten
Modelle
GehäuseAluminiumgehäuse,Sonnenblendeund
Betriebsbedingungen
Zulassungen
AXIST92E05-Schutzgehäuse
AXIST92E20-Außengehäuse
KabelabdeckungausPolykarbonat.
SchlagfestesAluminiumgehäuse,
zertiziertgemäßIP66,NEMA4Xund
IK10
AXIST92E05:-20°Cbis55°C
Luftfeuchtigkeit15bis100%
(kondensierend)
AXIST92E20:-40°Cbis50°C
Luftfeuchtigkeit15bis100%
(kondensierend)
AXIST92E05:IEC60068-2-6,IEC
60068-2-27AXIST92E20:EN
55022KlasseB,EN61000-3-2,EN
61000-3-3,EN55024,EN61000-6-1,
EN61000-6-2,EN60950-22,IEC
60068-2-6,IEC60068-2-27,FCC
1
1
40
Page 41

AXIST92EHousingSeries
Abschnitt15,TeilB,KlasseB,VCCI,
KlasseBITE,C-tickAS/NZSCISPR22,
ICES-003,KlasseB,KCCKlasseB
Abmessungen(HxBxT)
GewichtAXIST92E05:2,4kg
1.DieBetriebstemperaturenkönnenjenachKameramodellvariieren.InformationenhierzundenSieim
Benutzerhandbuchunterwww.axis.com
120x161x404mm
AXIST92E20:2,5kg
DieHardwareinstallieren
HINWEIS
HINWEIS HINWEIS
•AufgrundörtlicherVorschriftenoderderUmgebungsbedingungenundelektrischen
Bedingungen,unterdenendasProduktverwendetwird,kanneinabgeschirmtes
Netzwerkkabel(STP)empfehlenswertodernotwendigsein.AlleNetzwerkkabeldes
Produkts,dieimAußenbereichoderinanspruchsvollenelektrischenUmgebungenverlegt
werden,müssenhierfürausgelegtsein.StellenSiesicher,dassdieNetzwerkgerätegemäß
denAnweisungendesHerstellersinstalliertwurden.
(AXIST92E05)InformationenzugesetzlichenBestimmungenndenSieinder
InstallationsanleitungderKamera.
AXIST92E20)InformationenzugesetzlichenBestimmungenndenSieunter.
•VermeidenSieKratzer,BeschädigungenoderFingerabdrückeamFenster,dadiesdie
Bildqualitätbeeinträchtigenkann.
BeiderInstallationdesAxisProduktskönnendieKabeldurchdieWandoderanderWandentlang
geführtwerden.
DE
LesenSiedieAnweisungen,bevorSiedasProduktinstallieren:
1.MontierenSiedieWandhalterung.SieheMontagederWandhalterungaufSeite41.
AusführlicheAnweisungenndenSieinderbeiliegendenInstallationsanleitungfürdie
Wandhalterungoderunterwww.axis.com.
2.BefestigenSiedasGehäuseanderWandhalterung.SieheBefestigendesGehäusesan
derWandhalterungaufSeite42.
3.BauenSiedieKameraindasGehäuseein.SieheEinbauenderKameraindasGehäuseauf
Seite44.
MontagederWandhalterung
VORSICHT
StellenSiesicher,dassSiediefürdasMaterial(z.B.Holz,Metall,Gipskarton,Stein)
geeignetenSchraubenundDübelverwendenunddasMaterialstabilgenugist,umdas
GesamtgewichtvonKamera,GehäuseundWandhalterungzutragen.
41
Page 42

AXIST92EHousingSeries
Beachten
•WeitereInformationenndenSieinderbeiliegendenInstallationsanleitungfürdie
Wandhalterungoderunterwww.axis.com.
•DietechnischenDatenderAnschlüssendenSieimBenutzerhandbuchderKameraunter
www.axis.com.
1.BereitenSiedieWandfürdieInstallationderWandhalterungvor.MarkierenSievordem
BohrendieBohrlöchermitderWandhalterungalsVorlage.
2.FührenSiedasNetzwerkkabelundggf.dasNetzkabeldurchdieWandhalterung.Lassen
SiezumAnschließenderKameraca.30cmKabelfrei.
3.WenndasKameragehäuseübereineMasseschraubeverfügt,führenSieeinErdungskabel
durchdieWandhalterung.LassenSiezumAnschließendesGehäusesca.15cmKabelfrei.
4.WennSieeinzusätzlichesGerätandieKameraanschließen,z.B.einE/A-oder
Audiogerätbzw.einexternesNetzteil,wiederholenSiedieobenaufgeführtenSchritte
fürjedesGerät.
5.BefestigenSiedieWandhalterunganderWand,indemSiedieSchraubenfestziehen.
BefestigendesGehäusesanderWandhalterung
HINWEIS
HINWEIS HINWEIS
•WenneineandereKabeldichtungalsdiemitgelieferteverwendetwird,kannWasser
eindringenunddasProduktbeschädigen.Unterwww .axis.comndenSieInformationen
zuKabeldichtungenundKabelverschraubungenfürandereKabelbereiche.
•WirdmehralseinKabelverwendet,mussjedesKabeldurcheineseparateKabeldichtung
geführtwerden.
•ÖffnenSiebeidenverwendetenKabeldichtungennureinLoch.WenneineKabeldichtung
eingerissenist,ersetzenSiediesedurcheineneue.WenneineKabeldichtunggeöffnet
bleibtodereineeingerisseneKabeldichtungverwendetwird,kannWassereindringenund
dasProduktbeschädigen.
1.LösenSiedieSchraubenanderunterenAbdeckungundhebenSiedieobereAbdeckung
an.
2.LösenSiedieSchraubenderKabelabdeckungundnehmenSiedieKabelabdeckungvon
derunterenAbdeckungab.
42
Page 43

AXIST92EHousingSeries
3.EntfernenSiedieKappe,denStopfenunddieDichtungausderKabelverschraubung,die
verwendetwerdensoll.
4.EntfernenSiedieMasseschraube,dieUnterlegscheibeunddenRingkabelschuh.
5.BefestigenSiedenRingkabelschuhdesErdungskabelsmithilfeeinerUnterlegscheibe
undderMasseschraube.
DE
1.FührenSiedasNetzwerkkabeldurchdieKappe.
2.FührenSiedasNetzwerkkabeldurchdenSchlitzinderDichtung,umdieDichtungam
Netzwerkkabelzuxieren.
3.FührenSiedasNetzwerkkabeldurchdieKabelverschraubung.
43
Page 44

AXIST92EHousingSeries
1
Kappe
2
Dichtung
3
Kabelverschraubung
4
Stopfen(entsorgen)
4.DrückenSiedieDichtungindieKabelverschraubungundschraubenSiedieKappefest.
HINWEIS
HINWEIS HINWEIS
FallseinanderesKabelalsdasmitgelieferteverwendetwird,müssenSieeinabgeschirmtes
NetzwerkkabelmiteinerDichtungvorbereiten.FührenSiedasKabelvorsichtigdurchdie
mitgelieferteDichtungundbringenSieeinenNetzwerksteckeramKabelan.Möglicherweise
müssenSiemitdemmitgeliefertenSchraubendrehereinLochindieDichtungstechen.
HINWEIS
HINWEIS HINWEIS
BringenSiedenNetzsteckeran,nachdemdasKabeldurchdieKabeldichtunggeführtwurde.
5.WennSieeinzusätzlichesGerätandieKameraanschließen,z.B.einE/A-oder
Audiogerätbzw.einexternesNetzteil,wiederholenSiedieobenaufgeführtenSchritte
fürjedesGerät.
6.SetzenSiedieuntereAbdeckungaufdieWandhalterungundziehenSiedieSchrauben
fest(Drehmoment2Nm).
EinbauenderKameraindasGehäuse
1.LösenSiedieSchraubenundUnterlegscheibendesHaltersundnehmenSiedenHalterab.
2.BefestigenSiedieKameramitdenSchraubenamHalter,wieindenfolgenden
AbbildungenundderTabelledargestellt.ZiehenSiedieStabilisierungsschraubenur
leichtanundziehenSiedieKameraschraubemiteinemDrehmomentvon2Nmfest.
AchtenSiedarauf,dassSiedieSchraubennichtüberdrehen.
44
Page 45

AXIST92EHousingSeries
Kameramodell
AXIST92E05/AXIST92E20
Halterpositionund
Befestigungsmittel
AXIST92E20
E/A-Kabel
Nr.
Kaltstartverzögerung
Aus(0)
DE
Ja
Ja
Aus(0)
Aus(I)
Ja
Aus(I)
45
Page 46

AXIST92EHousingSeries
3.WennSieexternebzw.Eingabegeräte,AudiogeräteodereineexternesNetzteilan
dieKameraanschließen,gehenSiedabeientsprechendderAnweisungeninder
InstallationsanleitungderKameravor.
4.SchließenSieggf.dasimAußengehäusevormontierteNetzwerk-bzw.E/A-Kabelan
dieKameraan.
5.BringenSiedenHalteranderunterenAbdeckungan.GleichenSiediePosition
desHaltersvorsichtiganundziehenSiedanndieSchraubendesHaltersmitden
Unterlegscheibenfest(Drehmoment0,5Nm).HaltenSieeinenausreichendenAbstand
(etwa5bis10mm)vomKameraobjektivzurVorderseitedesinnerenKunststoffgehäuses
ein,sodassdieobereAbdeckungpasst,ohnedasObjektivzuzerkratzen.
6.WennSieeineSD-KartealslokalenSpeicherverwenden,schiebenSiedieKarteinden
SD-KarteneinschubderKamera.
7.SchließenSiedasexterneNetzwerkkabelandenNetzwerkanschluss(PoEIN)an.
8.SchiebenSieggf.denKaltstartverzögerungsschalterindierichtigePosition.Weitere
InformationenhierzundenSieinderTabelleaufderSeiteSeite44undunterSchalter
fürKaltstartverzögerungaufSeite47.
9.ÜberprüfenSieggf.,obdieStatus-LEDsamGehäusedieBetriebszuständekorrekt
angeben.SieheLED-LeuchtenamGehäuseaufSeite40.
10.VergewissernSiesich,dassdieKamera-LEDsdierichtigenBedingungenanzeigen.
WeitereInformationenndenSieinderInstallationsanleitungfürdieKamera.
11.LösenSiedieEinstellschraubederHalterung,undrichtenSiedieKameraaufdas
gewünschteZielaus.InformationenzumAnzeigendesVideostreamsndenSieinder
InstallationsanleitungderKameraoderunterwww.axis.com/techsup.
12.BefestigenSiedenSicherheitsdrahtderoberenAbdeckunganderLascheanderunteren
Abdeckung.
13.SchließenSiedasGehäuse.ZiehenSiedieSchraubenderunterenAbdeckungimWechsel
jeweilswenigeUmdrehungenan,bissiefestsitzen(Drehmoment1,5Nm).Aufdiese
Weisewirdsichergestellt,dassdieDichtungderunterenAbdeckunggleichmäßigsitzt.
14.LösenSiedieEinstellschraubenderSonnenblendeundrichtenSiedieSonnenblendein
gewünschterPositionaus.
46
Page 47

AXIST92EHousingSeries
HINWEIS
HINWEIS HINWEIS
StellenSiesicher,dassbeimSchließendesGehäuseskeineKabeleingeklemmtwerden.
SchalterfürKaltstartverzögerung
AXIST92E20istmitderFunktion„ArcticTemperatureControl“(Steuerungbeiarktischen
Temperaturen)ausgestattet,diedurchdasEinstellendesKaltstartverzögerungsschaltersauf„I(EIN)“
aktiviertwird.WenndieseFunktionaktiviertistunddieKameranacheinerStromunterbrechung
beiTemperaturenunter0°Cneugestartetwerdenmuss,wirddieKamerazunächstaufetwa
0°Caufgeheizt,bevordieInitialisierunggestartetwird.Damitwirdverhindert,dassKameramodelle
mitbeweglichenTeilenbeschädigtwerden.
Beachten
DadieFunktionfürKameramodelleohnebeweglicheTeilenichtbenötigtwird,solltesiefür
dieseModelledeaktiviertwerden,sieheEinbauenderKameraindasGehäuseaufSeite44
Reinigungsanweisungen
HINWEIS
HINWEIS HINWEIS
•VerwendenSiekeineScheuermittel,Abstreiferund/oderandereReinigungsgeräte,diedie
Beschichtungzerkratzenoderangreifenkönnten.
•VerwendenSiezurReinigungkeintrockenesTuchundkeinentrockenenSchwamm.
•VerwendenSiekeineRasierklingenoderanderescharfkantigenGegenständesowiekeine
scheuerndenoderstarkalkalischenReinigungsmittelbzw.Lösungsmittelsowiekein
bleihaltigesBenzinundkeinenTetrachlorkohlenstoff.
1.LösenSiedenSchmutzdurchvorsichtigesAbwaschen.BeachtenSiediefolgendeTabelle.
DE
EntfernenvonVerwendenSieeinMikrofasertuchodereinen
StauboderSchmutz
GrößereSchmutz-oderFettecken
Farbspritzer,FettoderDichtungsresteEthylalkohol,IsopropylalkoholoderPetroläther;die
Rostecken
2.SpülenSieanschließendsorgfältigmitklaremWassernach.
Schwammmit
lauwarmemWasserundnicht-scheuerndem
Reinigungsmittel
benzolfreiemReinbenzin(Reinigungs-oder
Leichtbenzin)
VerschmutzungsolltevordemAntrocknendurch
sanftesAbreibenentferntwerden
10-prozentigeOxalsäure-Lösung
47
Page 48

AXIST92EHousingSeries
3.VerwendenSiebeimsorgfältigenTrockneneinFensterlederodereinenZellstoffschwamm,
umWassereckenzuvermeiden.
WeitereInformationen
•DieaktuelleVersiondiesesDokumentsndenSieaufaxis.com
•NützlichesOnlinetrainingundWebinarendenSieunteraxis.com/academy.
Gewährleistungsinformationen
InformationenzurGewährleistungfürAxis-ProdukteundandereindiesemZusammenhang
relevanteInformationenndenSieunteraxis.com/warranty.
48
Page 49

AXIST92EHousingSeries
Informazionidisicurezza
Livellidipericolo
PERICOLO
Indicaunasituazionepericolosache,senonevitata,provocamorteolesionigravi.
AVVERTENZA
Indicaunasituazionepericolosache,senonevitata,potrebbeprovocarelamorteolesioni
gravi.
ATTENZIONE
Indicaunasituazionepericolosache,senonevitata,potrebbeprovocarelesionimedie
ominori.
VVISO
A AAVVISO VVISO
Indicaunasituazioneche,senonevitata,potrebbedanneggiarelaproprietà.
Altrilivellidimessaggio
Importante
Indicainformazioniimportanti,essenzialiperilcorrettofunzionamentodeldispositivo.
Nota
Indicainformazioniutilicheaiutanoaottenereilmassimodaldispositivo.
IT
49
Page 50

AXIST92EHousingSeries
Informazionidisicurezza
VVISO
A AAVVISO VVISO
•IldispositivoAxisdeveessereutilizzatoinconformitàalleleggieallenormativelocali.
•ConservareildispositivoAxisinunambienteasciuttoeventilato.
•EvitarediesporreildispositivoAxisaurtiopressionieccessive.
•Noninstallareildispositivosusupporti,superci,paretiopaliinstabili.
•UtilizzaresolostrumentiapplicabiliquandosiinstallaildispositivoAxis.Sesiutilizzauna
forzaeccessivaconstrumentinonadattièpossibilecausaredannialdispositivo.
•Nonutilizzaresostanzechimiche,agenticausticiodetergentiaerosol.
•Utilizzareunpannopulitoinumiditoinacquapuraperlapulizia.
•Utilizzaresoloaccessoricompatibiliconlespecichetecnichedeldispositivo.Questi
possonoesserefornitidaAxisodaterzeparti.Axisconsiglial'usodell'apparecchiaturadi
alimentazioneAxiscompatibileconildispositivo.
•UtilizzaresolopartidiricambioforniteoconsigliatedaAxis.
•Nontentarediriparareildispositivodasoli.Contattarel'assistenzaoilrivenditoreAxis
perquestionirelativeallamanutenzione.
Trasporto
VVISO
A AAVVISO VVISO
•DuranteiltrasportodeldispositivoAxis,utilizzarel'imballaggiooriginaleoequivalente
perevitaredannialdispositivo.
50
Page 51

AXIST92EHousingSeries
Guidaall'installazione
Questaguidadiinstallazioneconsentediinstallarel'alloggiamentodiprotezioneAXIST92E05ela
custodiaperesterniAXIST92E20.
Perinstallarelatelecamerainrete,consultarelaguidaall'installazioneindotazionealdispositivo.
Peraltreinformazionisull'utilizzodellatelecamera,consultarelaguidaperl'utentesulsito
www.axis.com
Proceduradiinstallazione
1.Assicurarsicheilcontenutodellaconfezione,glistrumentiealtrimaterialinecessariper
l'installazionesianoinordine.Consultarepagina51.
2.Studiareladescrizionedell'hardware.Consultarepagina52.
3.Studiarelespeciche.Consultarepagina54.
4.Installazionedell’hardware.Consultarepagina55.
Contenutodellaconfezione
•CustodiaAXIST92E05/T92E20
•SupportopermontaggioapareteAXIST94Q01A
•Cavodirete(soloAXIST92E20)
•CacciaviteTorx(T20)ochiaveAllen(T20)
•PuntadacacciaviteTorx(T30)
•Kitdimontaggiodelsupporto
•Guidaall'installazione(questodocumento)
IT
Strumentiraccomandati
•Trapano–sesiutilizzailkitdimontaggioasoftto
•Coltello–sesiutilizzailkitdimontaggioacontrosoftto
•CacciaviteTorxT30–sesiutilizzaunastaffacompatibiledaaccessoridimontaggio
diAXIST91A
Accessoriopzionali
Perunelencocompletodegliaccessoridisponibiliperquestodispositivo,andareallapaginadel
dispositivoalsitoaxis.comeselezionareSoftwareeaccessori.
51
Page 52

AXIST92EHousingSeries
Panoramicadell'hardware
Custodia
CustodiaprotettivaAXIST92E20
1
Parasole
52
Page 53

Montaggioaparete
2
Vitediregolazioneerondella(2x)
3
Supporto
4
Vitidelsupporto(2x)eangedellarondella(2x)
5
Vitedistabilizzazione
6
Vitedellatelecameraerondella
7
Uscitaallarme
8
Cavodirete
9
Foroperilcavo
10
Linguettaperilcavodisicurezza
11
Forideicavi(2x)
12
Baseinferiore
13
Connettoredirete(PoEIN)
14
LEDdistato
15
Interruttoreperl'avvioafreddo
16
Adattatoreperstaffa
AXIST92EHousingSeries
IT
1
Cavodirete(dainstradareattraversolastaffaaparete)
2
Cavodialimentazione(dainstradareattraversolastaffaaparete)(perdispositivi
dotatidiconnettoredialimentazione)
3
Cavodimessaaterra(dainstradareattraversolastaffaaparete)(perlecustodie
delletelecameredotatedivitedimessaaterra)
4
ViteT20(4x)
5
VitediregolazionedellastaffaT30
6
Montaggioaparete
53
Page 54

AXIST92EHousingSeries
IndicatoriLEDdell'alloggiamento
Nota
IlLEDdell'alloggiamentoacuisifariferimentonellatabellainbassoèposizionato
nell'alloggiamento.
Glieventidiallarmevengonoattivatiattraversolaportadiinputdellatelecamera.
LEDdell'alloggiamento
(ventolaeriscaldatore)
VerdeNormaleutilizzo.
LucelampeggianteverdeLampeggiosingolo:Erroreriscaldatore
ContattareilpropriorivenditoreAxisperinformazionisupezzidiricambioerisoluzionedeiproblemi.
Indicazione
Lampeggiodoppio:Erroreventola
Lampeggiotriplo:Erroregenerale
Datitecnici
Funzione/
gruppo
Caratteristiche
generali
Elemento
Modelli
CustodiaCustodiainalluminio,parasolein
CondizionidifunzionamentoAXIST92E05:da-20°Ca55°C
Approvazioni
Specica
CustodiaprotettivaAXIST92E05
CustodiaperesterniAXIST92E20
policarbonatoecoperchiodeicavi.
Strutturaindialluminioresistenteagli
urtiIK10diclasseIP66eNEMA4X
Umidità:15-100%(concondensa)
AXIST92E20:Da-40°Ca50°C
Umidità:15-100%(concondensa)
AXIST92E05:IEC60068-2-6,IEC
60068-2-27AXIST92E20:EN
55022ClasseB,EN61000-3-2,EN
61000-3-3,EN55024,EN61000-6-1,
EN61000-6-2,EN60950-22,IEC
60068-2-6,IEC60068-2-27,FCCParte
15,SottosezioneB,ClasseB,VCCI,
ClasseBITE,C-tickAS/NZSCISPR22,
ICES-003,ClasseB,KCCClasseB
1
1
54
Page 55
AXIST92EHousingSeries
Dimensioni(AxLxP)
Peso
1.Letemperaturedifunzionamentopossonovariareinfunzionedellatelecamera,consultarelaGuidaper
l'utente,disponibilesulsitowww.axis.com
120x161x404mm
AXIST92E05:2,4kg
AXIST92E20:2,5kg
Installazionedell'hardware
VVISO
A AAVVISO VVISO
•Acausadellenormativelocaliocondizioniambientaliedelettriche,èconsigliabile
utilizzareuncavodireteschermato(STP).Tuttiicavidiretedeldispositivoposizionati
all'apertooinambientielettriciincondizionidifcilisonodestinatiallorousospecico.
Vericarecheidispositividiretesianoinstallatisecondoleistruzionidelproduttore.
(AXIST92E05)Permaggioriinformazionisuirequisitinormativi,consultarelaguida
all'installazionedellatelecamera.
(AXIST92E20)Permaggioriinformazionisuirequisitinormativi,consultare.
•Nongrafare,danneggiareolasciareimprontedigitalisullanestraperpreservare
laqualitàdell'immagine.
ÈpossibileinstallareildispositivoAxisinstradandoicaviattraversoolungolaparete.
Leggeretutteleistruzioniprimadiinstallareilprodotto:
1.Installazionedelsupportoperilmontaggioaparete.ConsultareInstallazionedel
supportoperilmontaggioapareteallapagina55.Peristruzionidettagliate,consultarela
guidaall'installazionedelsupportodimontaggioaparetepresentenellaconfezioneo
visitarel'indirizzowww.axis.com
2.Montarel'alloggiamentoalsupportoaparete.ConsultareMontarelacustodiaal
supportoapareteallapagina56.
3.Installarelatelecameranellacustodia.ConsultareInstallarelatelecameranellacustodia
allapagina58.
IT
Installazionedelsupportoperilmontaggioaparete
ATTENZIONE
Vericarechelevitieitassellisianoadattialmaterialedellaparete(es.legno,metallo,
cartongesso,pietra)echeilmaterialesiaingradodisosteneretelecamera,custodiae
supportoperilmontaggioaparete.
Nota
•Perinformazioni,consultareanchelaguidaall'installazionedelsupportodimontaggioa
paretepresentenellaconfezioneedisponibileall'indirizzowww.axis.com
•Perlespecichetecnichedeiconnettori,consultarelaguidaperl'utentedellatelecamera
sulsitowww.axis.com
55
Page 56

AXIST92EHousingSeries
1.Prepararelapareteperl'installazionedelsupporto.Utilizzareilsupportoperilmontaggio
aparetecomeproloecontrassegnareipuntidatrapanare.
2.Inserireilcavodiretee,senecessario,ilcavodialimentazioneattraversolastaffaperil
montaggioaparete.Lasciarecirca30cmdicavoperilcollegamentoallatelecamera.
3.Sel'alloggiamentodellatelecamerahaunavitedimessaaterra,passareuncavo
dimessaaterraattraversolastaffaaparete.Lasciarecirca15cmdicavoperil
collegamentoall'alloggiamento.
4.Incasodiconnessionediundispositivo(es.diI/O,audiooalimentazioneesterna)alla
telecamera,ripetereilpassaggioprecedente(seconsentitoperildispositivoinquestione).
5.Fissarelastaffaallapareteserrandoleviti.
Montarelacustodiaalsupportoaparete
VVISO
A AAVVISO VVISO
•L'utilizzodiunaguarnizionepercavidiversadaquellaindotazionepuòcausare
inltrazionid'acquaedannialprodotto.Perinformazionisulleguarnizionipercaviei
pressacaviadattiperaltreareedeicavi,visitareilsitoWebwww.axis.com.
•Utilizzandopiùdiuncavo,instradareciascuncavoattraversounaguarnizioneseparata.
•Aprireunforosolonelleguarnizioniutilizzateesostituirleincasodidanno.Una
guarnizionepercaviapertaodanneggiatapotrebbecausareinltrazionid'acquanel
prodottoegravidanni.
1.Allentarelevitidellabaseinferioreesollevarelapartesuperiore.
2.Allentarelevitidellabasedelcavo;rimuoverlodaquelloinferiore.
3.Rimuovereilcappuccio,laspinaelaguarnizionedalpressacavochedeveessere
utilizzato.
4.Rimuoverelavitedellamessaaterra,larondellael'anellodicapocordadimessaaterra.
56
Page 57

AXIST92EHousingSeries
5.Fissarelarondellaeilcavodimessaaterradell'anellodicapocordaconlavitedella
messaaterra.
1.Passareilcavodireteattraversoilcappuccio.
2.Farscorrereilcavodireteattraversolascanalaturasullaguarnizioneperattaccare
quest'ultimaalcavodirete.
3.Passareilcavodireteattraversoilpressacavo.
IT
1
Cappuccio
2
Guarnizione
3
Pressacavo
4
Tassello(dascartare)
4.Premerelaguarnizionenelpressacavoessaresaldamenteilcappuccio.
VVISO
A AAVVISO VVISO
Sesiutilizzauncavodiversodaquellofornito,sulcavodireteschermatoènecessario
montareunaguarnizione.Spingeredelicatamenteilcavonellaguarnizionefornitae
ssarloadunconnettoredirete.Puòtalvoltaesserenecessarioforarelaguarnizione
conilcacciavitefornito.
57
Page 58

AXIST92EHousingSeries
VVISO
A AAVVISO VVISO
Montarelamorsettieradialimentazionedopoaverspintoilcavoattraversolaguarnizione
delcavo.
5.Incasodiconnessionediundispositivo(es.diI/O,audiooalimentazioneesterna)alla
telecamera,ripetereipassaggiprecedenti(seconsentitoperildispositivoinquestione).
6.Inserireilcoperchioinferioresulsupportoperilmontaggioapareteeserrareleviti
(conunacoppiadi2Nm).
Installarelatelecameranellacustodia
1.Allentarelerondelleelevitidelsupportoerimuovereilsupporto.
2.Fissarelatelecameraalsupportoconleviti,comemostratonelleillustrazionienella
tabellacheseguono.Serrareleggermentelavitestabilizzatriceeserrarelavitedella
telecameraa2Nm.Nonserrarelevitiinmanieraeccessiva.
Modelloditelecamera
AXIST92E05/AXIST92E20
Posizionedelsupportoedei
ssaggi
AXIST92E20
CavodiI/O
No
Sì
Interruttorediritardo
perl'avvioafreddo
Off(0)
Off(0)
58
Page 59

AXIST92EHousingSeries
Sì
Sì
Off(I)
Off(I)
IT
3.Incasodiconnessionediundispositivo(es.diinputoesterno,audiooalimentazione
esterna)allatelecamera,rispettareleistruzioniindicatenellaguidaall'installazione
dellatelecamera.
4.Seapplicabile,connettereallatelecamerailcavodireteinternoeilcavodiI/O,
preinstallatinell'alloggiamentoperesterni.
5.Fissareilsupportoalcoperchioinferiore.Regolareconcuralaposizionedelsupportoe
serrareleviticompreselerondelle(torsionedi0,5Nm).Lasciareunadistanzasufciente,
circa5-10mm,tral'obiettivodellatelecamerael'estremitàanterioredell'alloggiamento
internoinplastica,inmodochelacoperturasuperiorepossaesseremontatasenza
grafarel'obiettivo.
6.SesiutilizzaunaschedaSDperl'archiviazionelocale,inserirlanell'appositoslotdella
telecamera.
7.CollegareilcavodireteesternoaPoEIN.
59
Page 60

AXIST92EHousingSeries
8.Seapplicabile,impostarenellaposizionecorrettal'interruttorediritardoperl'avvio
afreddo,vederelatabellaallapaginapagina58eInterruttorediritardoperl'avvio
afreddoallapagina60.
9.VericarecheiLEDdistatodellacustodiaindichinolecondizionidifunzionamento
corrette.ConsultareIndicatoriLEDdell'alloggiamentoallapagina54.
10.VericarecheiLEDdellatelecameraindichinolecorrettecondizioni.Consultarela
guidaall'installazionedellatelecamera.
11.Allentarelavitediregolazionedellastaffaperorientarelatelecameraversoilpunto
desiderato.Perinformazionisullavisualizzazionedelussovideo,consultarelaguida
all'installazionedellatelecameraovisitareilsitowww.axis.com/techsup
12.Fissareilcavodisicurezzadelcoperchiosuperioreallalinguettadelcoperchioinferiore.
13.Chiuderelacustodia.Girarelevitidelcoperchioinferioreinmanieraalternatanoa
quandononsarannotutteserrate(conunacoppiadi1,5Nm).Inquestomodoèpossibile
comprimerelaguarnizionedelcoperchioinferioreinmodouniforme.
14.Allentarelevitidiregolazionedelparasoleeregolarlonellaposizionedesiderata.
VVISO
A AAVVISO VVISO
Vericarecheicavinonrestinoincastratidurantelachiusuradellacustodia.
Interruttorediritardoperl'avvioafreddo
IlmodelloAXIST92E20èdotatodiArcticTemperatureControl,chevieneabilitatoimpostandosuI
(ON)l'interruttorediritardoperl'avvioafreddo.Quandoèabilitata,questafunzionecontrollail
riavviodellatelecameradopounamancanzadicorrente,quandoletemperaturesonoinferioria
0°C;latelecameravieneprimariscaldataacirca0°Cprimadiessereinizializzata.Questoevita
danniaimodelliditelecamerachecontengonopartiinmovimento.
Nota
L'interruttoredovrebbeesseredisabilitatoperletelecameresenzapartiinmovimento,
poichénonrichiedonoquestafunzione,vedereInstallarelatelecameranellacustodia
allapagina58
Istruzioniperlapulizia
VVISO
A AAVVISO VVISO
•Evitarel'usodidetergentiabrasivi,spazzolee/oaltristrumentidipuliziachepossono
grafareoscalreilrivestimento.
•Nonpulireconunpannoasciuttoounaspugna.
•Nonusarelamedirasoiooaltristrumentiaflati,detergentiabrasiviofortemente
alcalini,solventi,benzeneconpiombotetraclorurodicarbonio.
1.Lavaredelicatamentelaschedaperrimuoverepolvereesporcizia,veditabellainbasso.
60
Page 61

AXIST92EHousingSeries
Proceduradirimozione:
PovereosporciziaAcquatiepidaodetersivononabrasivo
Accumulodiuntoomacchiedigrasso
Schizzidicolorante,grassooresidui
Macchiediruggine
2.Sciacquareconcuraconacquatiepida.
3.Perevitarelemacchied'acqua,asciugareaccuratamenteconunpannodicamoscioo
unaspugnadicellulosa.
Usareunpannoinmicrobraounaspugnacon:
Benzinapurasenzabenzene(benzinaleggerao
naftadeldetergente)
Alcooletilico,alcoolisopropilicooeteredipetrolio
esfregamentodelicatoprimadell'indurimento
Soluzioneal10%diacidoossalico
UlterioriInformazioni
•Perlaversionepiùrecentediquestodocumento,visitareilsitoall'indirizzoaxis.com
•Perservizidiformazioneutiliewebinar,visitailsitoaxis.com/academy
Informazionisullagaranzia
PerinformazionisullagaranziadeldispositivoAxiseinformazioniadessorelative,consultarela
paginaaxis.com/warranty.
IT
61
Page 62

62
Page 63

AXIST92EHousingSeries
Informacióndeseguridad
Nivelesdepeligro
PELIGRO
Indicaunasituaciónpeligrosaque,sinoseevita,provocarálesionesgravesolamuerte.
ADVERTENCIA
Indicaunasituaciónpeligrosaque,sinoseevita,puedeprovocarlesionesgravesola
muerte.
ATENCIÓN
Indicaunasituaciónpeligrosaque,sinoseevita,puedeprovocarlesionesmoderadaso
leves.
VISO
A AAVISO VISO
Indicaunasituaciónpeligrosaque,sinoseevita,puedeprovocardañosmateriales.
Otrosnivelesdemensaje
Importante
Indicainformaciónimportantequeesfundamentalparaqueelproductofuncione
correctamente.
Nota
Indicainformaciónútilqueayudaaaprovecharelproductoalmáximo.
ES
63
Page 64

AXIST92EHousingSeries
Instruccionesdeseguridad
VISO
A AAVISO VISO
•EsteproductodeAxisdebeutilizarsedeacuerdoconlasleyesynormativaslocales.
•AlmaceneelproductodeAxisenunentornosecoyventilado.
•EvitelaexposicióndelproductodeAxisachoquesoaunafuertepresión.
•Noinstaleelproductoenpostes,soportes,superciesoparedesinestables.
•UtilicesololasherramientascorrespondientescuandoinstaleelproductodeAxis.La
aplicacióndeunafuerzaexcesivaconherramientaseléctricaspuedeprovocardaños
enelproducto.
•Noutilicelimpiadoresenaerosol,agentescáusticosniproductosquímicos.
•Limpieconunpañolimpiohumedecidoconaguapura.
•Utilicesoloaccesoriosquecumplanconlasespecicacionestécnicasdesuproducto.
EstosaccesorioslospuedeproporcionarAxisountercero.Axisrecomiendautilizarun
equipodesuministrodealimentacióndeAxiscompatibleconsuproducto.
•UtilicesolopiezasderepuestoproporcionadasorecomendadasporAxis.
•Nointenterepararelproductoustedmismo.Póngaseencontactoconelserviciode
asistenciatécnicadeAxisoconsudistribuidordeAxisparatratarasuntosdereparación.
Transporte
VISO
A AAVISO VISO
•CuandotransporteelproductodeAxis,utiliceelembalajeoriginalounequivalentepara
evitardañosenelproducto.
64
Page 65

AXIST92EHousingSeries
Guíadeinstalación
EstaGuíadeinstalaciónofreceinstruccionesparalainstalacióndelacarcasadeprotecciónAXIS
T92E05ylacarcasaparaexterioresAXIST92E20.
Parainstalarlacámaraenlared,consultelaGuíadeinstalaciónproporcionadaconlacámara.
Paraconocermásdetallesacercadelacámara,consulteelManualdelusuariodisponibleen
www.axis.com.
Pasosdelainstalación
1.Asegúresedequedisponedelcontenidodelpaquete,lasherramientasylosdemás
materialesnecesariosparalainstalación.Veapágina65.
2.Estudielainformacióngeneraldelhardware.Veapágina66.
3.Estudielasespecicaciones.Veapágina68.
4.Instaleelhardware.Veapágina69.
Contenidodelpaquete
•CarcasaAXIST92E05/T92E20
•MontajeenparedAXIST94Q01A
•Cabledered(soloAXIST92E20)
•DestornilladorTorx(T20)ollaveAllen(T20)
•BrocaTorx(T30)
•Kitdemontajedesoporte
•Guíadeinstalación(estedocumento)
ES
Herramientasrecomendadas:
•Broca–siseusaelmontajeentechoduro
•Cuchilla–siseusaelmontajeenfalsotecho
•DestornilladorTorxT30–Siseusaunaescuadracompatibledelosaccesoriosdemontaje
AXIST91A
Accesoriosopcionales
Paraconocerunalistacompletadelosaccesoriosdisponiblesparaesteproducto,vayaalapágina
axis.comyseleccioneSoftwareyaccesorios.
65
Page 66

AXIST92EHousingSeries
Informacióngeneraldelhardware
Carcasa
CarcasadeprotecciónAXIST92E20
1
Parasol
66
Page 67

AXIST92EHousingSeries
2
Tornillodeajustedelparasol(2)
3
Soporte
4
Tornillosdesoporte(2)ypestañasdearandelas(2)
5
Tornillodeestabilización
6
Tornillodecámarayarandela
7
Salidadealarma
8
Cabledered
9
Oricioparacable
10
Lengüetaparacabledeseguridad
11
Oriciosparacable(2)
12
Cubiertainferior
13
Conectordered(PoEIN)
14
LEDdeestado
15
Conmutadordearranqueenfrío
16
Adaptadordeescuadra
Montajeenpared
1
Cabledered(guiadoatravésdelaescuadradepared)
2
Cabledealimentación(guiadoatravésdelaescuadradepared)(paratodoslos
productosequipadosconconectordealimentación)
3
Cabledetierra(guiadoatravésdelaescuadradepared)(paracarcasasde
cámarasequipadascontornillodetierra)
4
TornilloT20(4)
5
TornillodeajustedeescuadraT30
6
Montajeenpared
ES
67
Page 68

AXIST92EHousingSeries
IndicadoresLEDdelacarcasa
Nota
ElLEDdecarcasaalquesehacereferenciaenlatablasiguienteseencuentraenlacarcasa.
Loseventosdealarmaseactivaránatravésdelpuertodeentradadelacámara.
LEDdecarcasa
(ventiladorycalefactor)
VerdeFuncionamientonormal.
VerdeintermitenteUnparpadeo:errordelcalefactor
PóngaseencontactoconsudistribuidordeAxisparaobtenerinformaciónsobrerepuestosy
solucióndeproblemas.
Indicación
Dobleparpadeo:errordelventilador
Tripleparpadeo:errorgeneral
Especicaciones
Función/grupo
General
Elemento
Modelos
CarcasaCarcasadealuminio,cubiertadelcable
CondicionesdefuncionamientoAXIST92E05:de-20°Ca55°C
Homologaciones
Especicaciones
CarcasadeprotecciónAXIST92E05
CarcasaparaexterioresAXIST92E20
yparasoldepolicarbonato.Carcasade
aluminioconlasclasicacionesIP66y
NEMA4Xycongradodeproteccióna
pruebadeimpactosIK10
1
Humedaddel15al100%(con
condensación)
AXIST92E20:de-40°Ca50°C
Humedaddel15al100%(con
condensación)
AXIST92E05:IEC60068-2-6,IEC
60068-2-27AXIST92E20:EN
55022ClaseB,EN61000-3-2,EN
61000-3-3,EN55024,EN61000-6-1,
EN61000-6-2,EN60950-22,IEC
60068-2-6,IEC60068-2-27,FCCParte
15,SubparteB,ClaseB,VCCI,ClaseB
1
68
Page 69

AXIST92EHousingSeries
ITE,C-tickAS/NZSCISPR22,ICES-003,
ClaseB,KCCClaseB
Dimensiones(al.xan.xpr.)
Peso
1.Lastemperaturadefuncionamientopuedevariarsegúnlacámara,consulteelManualdelusuario
disponibleenwww.axis.com
120x161x404mm
AXIST92E05:2,4kg
AXIST92E20:2,5kg
Instalacióndelhardware
VISO
A AAVISO VISO
•Debidoalanormativalocaloalascondicionesambientalesyeléctricasenlasquesevaya
autilizarelproducto,puedequeseaadecuadouobligatorioelusodeuncabledered
blindado(STP).Todosloscablesqueconectanelproductoalaredyqueseutilicenen
exterioresoenentornoseléctricosexigentesdeberánestarblindadosydiseñadosparasu
usoespecíco.Asegúresedequelosdispositivosderedesténinstaladosdeconformidad
conlasinstruccionesdelfabricante.
(AXIST92E05)Paraobtenerinformaciónsobrelosrequisitosnormativos,consultela
Guíadeinstalacióndelacámara.
AXIST92E20)Paraobtenerinformaciónsobrelosrequisitosnormativos,vea.
•Presteatenciónparanoarañar,dañarnidejarhuellasenlaventanadelacarcasa,yaque
estopodríareducirlacalidaddeimagen.
ElproductodeAxispuedeinstalarseguiandoloscablesatravésdelaparedosobreesta.
ES
Leatodaslasinstruccionesantesdeinstalarelproducto:
1.Instaleelmontajeenpared.VeaInstalacióndelmontajeenparedenlapágina69.Para
obtenerinstruccionesdetalladas,consultelaGuíadeinstalacióndelmontajeenpared,
incluidaenelpaqueteodisponibleenwww.axis.com.
2.Fijelacarcasaalmontajeenpared.VeaFijacióndelacarcasaalmontajeenpareden
lapágina70.
3.Instalelacámaraenlacarcasa.VeaInstalacióndelacámaraenlacarcasaenlapágina72.
Instalacióndelmontajeenpared
ATENCIÓN
Asegúresedequelostornillosytacosseanlosadecuadosparaelmaterial(p.ej.madera,
metal,placasdeyeso,piedra)yqueelmaterialsealosucientementeresistentepara
soportarelpesocombinadodelacámara,lacarcasayelmontajeenpared.
Nota
•ConsultetambiénlaGuíadeinstalacióndelmontajeenpared,incluidaenelpaquete
ydisponibleenwww.axis.com.
69
Page 70

AXIST92EHousingSeries
•Sideseaconocerlasespecicacionestécnicasdelosconectores,consulteelManualdel
usuarioenwww.axis.com
1.Preparelaparedparainstalarelmontajeenpared.Utilicelaescuadradeparedcomo
unaplantillaymarquelaubicacióndelosoriciosantesdeperforarlos.
2.Guíeelcablederedy,siprocede,elcabledealimentación,atravésdelaescuadrade
pared.Dejeunos30cmdecableaproximadamenteparaconectarloalacámara.
3.Silacarcasadelacámaraincluyeuntornillodetierra,guíeuncabledetierraatravésde
laescuadradepared.Dejeunos15cmdecableaproximadamenteparaconectarloa
lacarcasa.
4.Siseconectaundispositivoauxiliaralacámara,porejemploundispositivode
alimentaciónexterno,undispositivodeE/Sounodeaudio,repitaelpasoanterior
aplicadoacadadispositivoencuestión.
5.Fijelaescuadradeparedalaparedapretandolostornillos.
Fijacióndelacarcasaalmontajeenpared
VISO
A AAVISO VISO
•Siutilizaotrajuntadecabledistintadelaproporcionada,elaguapodríaltrarsey
dañarelproducto.Paraobtenermásinformaciónacercadelasjuntasdecableydelos
prensaestopaspermitidosparaotrasáreasdecableado,visitewww.axis.com.
•Siseutilizamásdeuncable,deberápasarsecadacableatravésdeunajuntadistinta.
•Soloabraunoricioenlasjuntasdecablequesevayanautilizarysialgunajuntaestá
desgastada,reemplácelaconunanueva.Sidejalajuntadecableabiertaoutilizauna
desgastada,elaguapodríaltrarseydañarelproducto.
1.Aojelostornillosdelacubiertainferiorylevantelacubiertasuperior.
2.Aojelostornillosdelacubiertadelcable,separelacubiertadelcabledelacubierta
inferior.
70
Page 71

AXIST92EHousingSeries
3.Extraigalatapa,eltapónylajuntadelprensaestopasquevayaautilizar.
4.Retireeltornillodetomadetierra,laarandelaylazapataparacabledetierra.
5.Fijelazapatamontadaenelcabledetierraylaarandelaconeltornillodetomadetierra.
1.Guíeelcablederedatravésdelatapa.
2.Desliceelcablederedatravésdelahendiduradelajuntaparaconectarlajuntaal
cabledered.
3.Guíeelcablederedatravésdelprensaestopas.
1
Tapa
2
Junta
3
Prensaestopas
4
Tapón(desechable)
4.Presionelajuntaenelprensaestopasyatornillelatapaconrmeza.
VISO
A AAVISO VISO
Siseutilizauncabledistintoalqueseproporciona,esnecesarioprepararuncabledered
blindadoconunajunta.Concuidado,hagapasarelcableatravésdelajuntaquese
ES
71
Page 72

AXIST92EHousingSeries
proporcionayacopleunconectordered.Puedequeseanecesariorealizarunoricioenla
juntaconeldestornilladorproporcionado.
VISO
A AAVISO VISO
Monteelconectordealimentacióndespuésdehaberencajadoelcabledealimentación
enlajuntadecable.
5.Siseconectaundispositivoauxiliaralacámara,porejemploundispositivode
alimentaciónexterno,undispositivodeE/Sounodeaudio,repitalospasosanteriores
aplicadosacadadispositivoencuestión.
6.Coloquelacubiertainferiorsobreelmontajeenparedyaprietelostornillos(parde
torsiónde2Nm).
Instalacióndelacámaraenlacarcasa
1.Aojelostornillosdelsoporteylasarandelasparaextraerelsoporte.
2.Fijelacámaraalsoporteconlostornillossegúnlasilustracionesylatablaincluidosa
continuación.Aprieteeltornillodeestabilizaciónligeramenteyjeeltornillodela
cámaraa2Nm.Asegúresedenoapretarlostornillosenexceso.
Modelodecámara
AXIST92E05/AXIST92E20
Posiciónyjadoresdelsoporte
AXIST92E20
Cablede
E/S
No
Sí
Arranqueretardado
enfrío
Apagado(0)
Apagado(0)
72
Page 73

AXIST92EHousingSeries
Sí
Sí
Apagado(I)
Apagado(I)
ES
3.Siseconectandispositivosexternos/deentrada,dispositivosdeaudioounafuentede
alimentaciónexternaalacámara,conéctelosdeacuerdoconlasinstruccionesdescritas
enlaGuíadeinstalacióndelacámara.
4.Siprocede,conectealacámaraelcablederedinternoyelcabledeE/S,queestán
preinstaladosenlacarcasaparaexteriores.
5.Fijeelsoportealacubiertainferior.Ajusteconcuidadolaposicióndelsoporteyapriete
lostornillosdelsoporte,incluidaslasarandelas(pardetorsiónde0,5Nm).Dejela
distanciajustasuciente(aproximadamente5–10mm)entreelobjetivodelacámara
ylapartefrontaldelacarcasainteriordeplásticoconelndeencajarlacubierta
superiorsinquelaventanaarañeelobjetivo.
6.EncasodeutilizarunatarjetaSDcomounidaddealmacenamientolocal,insertela
tarjetaenlaranuraparatarjetasSDdelacámara.
7.ConecteelcablederedexternoalatomaPoEIN.
73
Page 74

AXIST92EHousingSeries
8.Siprocede,coloqueelconmutadordearranqueretardadoenfríoenlaposicióncorrecta,
vealatabladelapáginapágina72yConmutadordearranqueretardadoenfríoenla
página74
9.Siprocede,asegúresedequelosindicadoresLEDdeestadodelacarcasaindicanlas
condicionescorrectas.VeaIndicadoresLEDdelacarcasaenlapágina68.
10.AsegúresedequelosindicadoresLEDdelacámaraindicanlascondicionescorrectas.
VealaGuíadeinstalacióndelacámara.
11.Aojeeltornillodeajustedelaescuadraparaorientarlacámarahaciaelpuntode
interés.Paraobtenerinformaciónsobrecómoverlatransmisióndevídeo,consultela
Guíadeinstalacióndelacámaraovisitewww .axis.com/techsup.
12.Conecteelcabledeseguridaddelacubiertasuperioralalengüetadelacubiertainferior.
13.Cierrelacarcasa.Asegúresedeapretarlostornillosdelacubiertainferiorpocoapoco,
deformaalterna,hastaqueesténbienapretados(pardetorsiónde1,5Nm).Deeste
modocontribuiráagarantizarquelajuntadelacubiertainferiorsehayacomprimidode
manerauniforme.
14.Aojelostornillosdeajustedelparasolyajústeloenlaposicióndeseada.
VISO
A AAVISO VISO
Asegúresedenopillarningúncablealcerrarlacarcasa.
Conmutadordearranqueretardadoenfrío
LaAXIST92E20incorporalafuncióndecontroldetemperaturaArctic,queseactivacolocandoel
conmutadordearranqueretardadoenfríoenlaposiciónI(Activado).Cuandoestáactivada,esta
funcióncontrolaelreiniciodelacámaradespuésdeuncortedealimentaciónencasodequela
temperaturaseainferiora0°C.Lacámarasecalientaprimerohastaalcanzarunatemperatura
aproximadade0°Cantesdeinicializarse.Estamedidaimpidequeseproduzcandañosenlos
modelosdecámaraqueincluyenpiezasmóviles.
Nota
Elconmutadordebedesactivarseenelcasodecámarasquenoincluyanpiezasmoviblesya
quenoprecisandeestafunción,veaInstalacióndelacámaraenlacarcasaenlapágina72
Instruccionesdelimpieza
VISO
A AAVISO VISO
•Eviteutilizarlimpiadoresabrasivos,espátulaslimpiacristalesuotrosaccesoriosde
limpiezaquepuedanarañaroperforarelrevestimiento.
•Nolimpieconuntrapoounaesponjasecos.
•Noutilicecuchillasniotrosutensiliosalados,asícomotampocodetergentesabrasivoso
altamentealcalinos,disolventes,bencenoconplomootetraclorurodecarbono.
1.Limpiesuavementelachapaparasoltarelpolvoylasuciedad(consultelasiguiente
tabla).
74
Page 75

AXIST92EHousingSeries
Paraquitar:
PolvoosuciedadAguatibiaodetergentenoabrasivo
Acumulaciónmayordepolvoomanchas
degrasa
Salpicadurasdetintes,grasaoresiduosde
sellado
Marcasdeóxido
2.Acontinuación,enjuagueconagualimpia.
3.Paraevitarquequedenmanchasdeagua,sequeconcuidadoutilizandounagamuzao
unaesponjadecelulosa.
Utiliceuntrapodemicrobraounaesponjacon:
Alcoholdepetróleopurosinbenceno(naftao
gasolinaligera)
Alcoholetílico,alcoholisopropílicooéterde
petróleoyfrotesuavementeantesdelsecado
Soluciónal10%deácidooxálico
Másinformación
•Paraconsultarlaversiónmásrecientedeestedocumento,vayaaaxis.com.
•Paraconsultarwebinarsycursosenlíneaquepuedenresultarleútiles,vayaa
axis.com/academy.
Informacióndegarantía
ParaobtenermásdetallessobrelagarantíadelproductoAxisylainformaciónrelacionadacon
ella,visiteaxis.com/warranty.
75ES76
Page 76

Page 77

AXIST92EHousingSeries
安
全
情
安 安
危
危 危
危険
警告
注意
注 記
そ
そ そ
重要
注意
報
全 全
情 情
報 報
険
レ
ベ
険 険
の
の の
ル
レ レ
ベ ベ
ル ル
回避しない場合、死亡または重傷につながる危険な状態を⽰します。
回避しない場合、死亡または重傷につながるおそれのある危険な状態を
⽰します。
回避しない場合、軽傷または中程度の怪我につながるおそれのある危険
な状態を⽰します。
回避しない場合、器物の破損につながるおそれのある状態を⽰します。
他
の
メ
ッ
セ
ー
ジ
レ
ベ
他 他
の の
メ メ
ッ ッ
セ セ
ー ー
ジ ジ
製品を正しく機能させるために不可⽋な重要情報を⽰します。
製品を最⼤限に活⽤するために役⽴つ有⽤な情報を⽰します。
ル
レ レ
ベ ベ
ル ル
JA
77
Page 78

AXIST92EHousingSeries
安
全
⼿
安 安
注 記
輸
輸 輸
注 記
順
全 全
⼿ ⼿
順 順
•本製品は、お使いになる地域の法律や規制に準拠して使⽤してください。
•本製品は乾燥した換気のよい環境に保管してください。
•本製品に衝撃または強い圧⼒を加えないでください。
•本製品を不安定なポール、ブラケット、表⾯、または壁に設置しないで
ください。
•本製品を設置する際には、適切な⼯具のみを使⽤してください。電動⼯具を
使⽤して過剰な⼒をかけると、製品が損傷することがあります。
•化学薬品、腐⾷剤、噴霧式クリーナーは使⽤しないでください。
•清掃には、きれいな⽔に浸した清潔な布を使⽤してください。
•製品の技術仕様に準拠したアクセサリーのみを使⽤してください。これらの
アクセサリーは、Axisまたはサードパーティから⼊⼿できます。Axisは、ご使
⽤の製品と互換性のあるAxis給電ネットワークスイッチの使⽤を推奨します。
•Axisが提供または推奨する交換部品のみを使⽤してください。
•製品を⾃分で修理しないでください。修理については、Axisサポートまたは
販売代理店にお問い合わせください。
送
送 送
•本製品を運搬する際は、製品が損傷しないよう、元の梱包か同等の梱包を
使⽤してください。
78
Page 79

AXIST92EHousingSeries
イ
ン
ス
ト
ー
ル
ガ
イ
イ イ
ン ン
ス ス
ト ト
ー ー
ル ル
このインストールガイドでは、AXIST92E05プロテクティブハウジングおよびAXIS
T92E20アウトドアハウジングを設置する⼿順について説明します。
カメラをネットワークにインストールする⼿順については、カメラに付属するイン
ストールガイドを参照してください。カメラのその他の情報については、Axisのホー
ムページ(
設
設 設
www .axis.com
置
⼿
順
置 置
⼿ ⼿
順 順
ド
ガ ガ
イ イ
ド ド
)でユーザーズマニュアルを参照してください。
1.パッケージの内容、ツールなど、設置に必要な物がそろっているかを確認
します。
2.ハードウェアの概要を確認します。
3.仕様を確認します。
4.ハードウェアを設置します。
パ
ッ
ケ
パ パ
推
推 推
ー
ッ ッ
ケ ケ
ー ー
•AXIST92E05/T92E20ハウジング
•AXIST94Q01A壁⾯取付ブラケット
•ネットワークケーブル(AXIST92E20のみ)
•トルクスドライバー(T20)または六⾓レンチ(T20)
•トルクススクリュービット(T30)
•ホルダー取付キット
•インストールガイド(本書)
奨
ツ
ー
奨 奨
ツ ツ
ー ー
•ドリル−天井吊り下げ取り付けキットを使⽤する場合
•ナイフ−天井埋め込み取り付けキットを使⽤する場合
•トルクスT30ドライバー−AXIST91A取付⾦具に対応したブラケットを使
⽤する場合
79 ペ ー ジ
ジ
の
ジ ジ
の の
内 内
ル
ル ル
を参照してください。
内
容
容 容
82 ペ ー ジ
80 ペ ー ジ
を参照してください。
83 ペ ー ジ
を参照してください。
を参照してください。
JA
オ
プ
シ
ョ
ン
ア
ク
セ
サ
リ
オ オ
プ プ
シ シ
ョ ョ
ン ン
ア ア
ク ク
セ セ
本製品で利⽤可能なすべてのアクセサリーについては、
開いて「ソフトウェア&アクセサリー」を参照してください。
ー
サ サ
リ リ
ー ー
axis.com
79
で本製品のページを
Page 80

AXIST92EHousingSeries
ハ
ー
ド
ウ
ェ
ハ ハ
ー ー
ド ド
ハ
ウ
ジ
ハ ハ
ン
ウ ウ
ジ ジ
ン ン
ア
ウ ウ
ェ ェ
ア ア
グ
グ グ
の
概
要
の の
概 概
要 要
1
AXIS T92E20 プ ロ テ ク テ ィ ブ ハ ウ ジ ン グ
サ ン シ ー ル ド
80
Page 81

AXIST92EHousingSeries
2
サ ン シ ー ル ド 調 節 ネ ジ (×2)
3
ホ ル ダ ー
4
ホ ル ダ ー ネ ジ (×2) と ワ ッ シ ャ フ ラ ン ジ (×2)
5
安 定 ⽤ ね じ
6
カ メ ラ ⽤ ね じ と ワ ッ シ ャ ー
7
ア ラ ー ム 出 ⼒
8
ネ ッ ト ワ ー ク ケ ー ブ ル
9
ケ ー ブ ル 孔
10
安 全 ワ イ ヤ ー タ ブ
11
ケ ー ブ ル 孔 (×2)
12
裏 蓋
13
ネ ッ ト ワ ー ク コ ネ ク タ ー (PoE ⼊ ⼒ )
14
ス テ ー タ ス LED
15
コ ー ル ド ス タ ー ト ス イ ッ チ
16
ブ ラ ケ ッ ト ア ダ プ タ ー
壁
⾯
取
付
ブ
ラ
ケ
ッ
壁 壁
⾯ ⾯
取 取
付 付
ブ ブ
ラ ラ
ト
ケ ケ
ッ ッ
ト ト
JA
1
ネ ッ ト ワ ー ク ケ ー ブ ル ( 壁 ⾯ ブ ラ ケ ッ ト に 通 す )
2
電 源 ケ ー ブ ル ( 壁 ⾯ ブ ラ ケ ッ ト に 通 す ) ( 電 源 コ ネ ク タ を 搭 載 し た
製 品 ⽤ )
3
ア ー ス 端 ⼦ ケ ー ブ ル ( 壁 ⾯ ブ ラ ケ ッ ト に 通 す ) ( ア ー ス 端 ⼦ ネ ジ を
搭 載 し た カ メ ラ 筐 体 ⽤ )
4
ネ ジ T20 (×4)
5
ブ ラ ケ ッ ト 調 節 ネ ジ T30
6
壁 ⾯ 取 付 ブ ラ ケ ッ ト
81
Page 82

AXIST92EHousingSeries
ハ
ウ
ジ
ン
グ
LED
イ
ン
ジ
ケ
ー
タ
ハ ハ
ウ ウ
ジ ジ
ン ン
グ グ
LED LED
イ イ
ン ン
ジ ジ
ケ ケ
注意
下記の表で説明しているハウジングLEDはハウジング内にあります。
アラームイベントはカメラの⼊⼒ポートを通してトリガーされます。
明
ハ ハハウ ウウジ ジジン ンング ググLED LED
( ((フ フファ ァァン ンンお おおよ よよび びびヒ ヒヒー ー
タ タター ーー) )
緑正常動作。
LED
)
説 説説明 明
ー
ー
ー ー
タ タ
ー ー
緑:点滅1回点滅:ヒーターのエラー
スペアパーツおよびトラブルシューティングについては、Axisの販売代理店までお
問い合わせください。
仕
様
仕 仕
様 様
機 機機能 能能/ /
グ ググル ルルー ーープ プ
般
⼀ ⼀⼀般 般
/
プ
ア アアイ イイテ テテム ム
モ モモデ デデル ル
ケ ケケー ーーシ シシン ンング グ
動 動動作 作作条 条条件 件
認 認認証 証証規 規規格 格
2回点滅:ファンのエラー
3回点滅:⼀般エラー
ム
ル
グ
件
格
様
仕 仕仕様 様
AXIST92E05プロテクティブハウ
ジング
AXIST92E20アウトドアハウジング
アルミニウムケース、ポリカーボ
ネートサンシールド、ケーブルカ
バー。IP66、NEMA4対応、IK10等
級の耐衝撃型アルミニウムケース
AXIST92E05:-20°C〜55°C
湿度:15〜100%(結露可)
AXIST92E20:-40°C〜50°C
湿度:15〜100%(結露可)
AXIST92E05:IEC60068-2-6、
IEC60068-2-27AXIST92E20:EN
55022ClassB、EN61000-3-2、
EN61000-3-3、EN55024、EN
61000-6-1、EN61000-6-2、
EN60950-22、IEC60068-2-6、
IEC60068-2-27、FCCPart15、
1
1
82
Page 83

法
⼨ ⼨⼨法 法
( ((⾼ ⾼⾼さ ささ× ××幅 幅幅× ××奥 奥奥⾏ ⾏⾏き きき) )
AXIST92EHousingSeries
SubpartB、ClassB、VCCI、Class
BITE、C-tickAS/NZSCISPR22、
ICES-003、ClassB、KCCClassB
120x161x404mm
)
量
重 重重量 量
1.動作温度はカメラによって異なる場合があります。Axisのホームページ(www.axiscom.co.jp)
に記載されたユーザーズマニュアルをご覧ください。
ハ
ー
ド
ウ
ェ
ア
の
イ
ン
ス
ト
ハ ハ
ー ー
ド ド
ウ ウ
ェ ェ
ア ア
の の
イ イ
ン ン
注 記
•本製品を使⽤する場所の地域条例、環境、電気的条件によっては、シールド
ネットワークケーブル(STP)の使⽤が推奨または必須になります。本製品を
ネットワークに接続して屋外または電気的に厳しい環境に配線する場合は、
⽤途に合ったネットワークケーブルを使⽤してください。ネットワーク装置
がメーカーの指⽰どおりに設置されていることを確認します。
(AXIST92E05)法的要件については、カメラのインストールガイドを参照
してください。
AXIST92E20)法的要件については、を参照してください。
•画質低下の原因になるため、ウィンドウに傷や指紋を付けたり、損傷しない
ように注意してください。
本製品は、ケーブルを壁に沿わせたり、壁の中を通して配線して、設置すること
ができます。
製品を取り付ける前に、すべての説明に⽬を通してください。
1.壁⾯取付ブラケットの取り付け。
り 付 け
ブラケットに同梱のインストールガイド、またはwww.axis.comを参照
してください。
2.ハウジングの壁⾯取付ブラケットへの取り付け。
の 壁 ⾯ 取 付 ブ ラ ケ ッ ト へ の 取 り 付 け
3.カメラのハウジングへの収納。
収 納
を参照してください。詳しい取り付け⼿順については、壁⾯取付
を参照してください。
ー
ス ス
ト ト
ー ー
AXIST92E05:2.4kg
AXIST92E20:2.5kg
ル
ル ル
83 ペ ー ジ の 、 壁 ⾯ 取 付 ブ ラ ケ ッ ト の 取
を参照してください。
86 ペ ー ジ の 、 カ メ ラ の ハ ウ ジ ン グ へ の
84 ペ ー ジ の 、 ハ ウ ジ ン グ
JA
壁
⾯
取
付
ブ
ラ
ケ
ッ
ト
の
取
り
付
壁 壁
⾯ ⾯
取 取
付 付
ブ ブ
ラ ラ
ケ ケ
ッ ッ
ト ト
の の
取 取
注意
ネジやプラグ類が、壁の材質(⽊、⾦属、乾式壁、⽯)に適しているか確認し
てください。また、壁の材質が、カメラ、ハウジング、壁⾯取付ブラケット
の合計重量を⼗分に⽀えられることを確認してください。
け
り り
付 付
け け
83
Page 84

AXIST92EHousingSeries
注意
•または、壁⾯取付ブラケットに同梱のインストールガイド、およ
び
www .axis.com
•コネクタの技術仕様については、Axisのホームページ(
ラのユーザーズマニュアルを参照してください
1.壁⾯取付ブラケットを取り付ける壁⾯の準備を⾏います。壁⾯ブラケット
を壁に合わせ、⽳を開ける位置に印を付けます。
2.ネットワークケーブル(必要に応じて電源ケーブル)を壁⾯ブラケットに通
します。カメラとの接続⽤に30cmほどケーブルを残します。
3.カメラのハウジングにアース端⼦ケーブルがある場合、アースケーブル
を壁⾯ブラケットに通します。ハウジングとの接続⽤に15cmほどケーブ
ルを残します。
4.I/O、⾳声、外部電源デバイスなどの補助デバイスをカメラに接続する場
合、それぞれのデバイスについて同じ⼿順を繰り返します。
5.ネジを締め、壁⾯ブラケットを壁⾯に固定します。
ハ
ウ
ジ
ン
グ
ハ ハ
ウ ウ
ジ ジ
注 記
•付属のケーブルガスケット以外は使⽤しないでください。浸⽔し、製品が破
•複数のケーブルを使⽤する場合、各ケーブルをそれぞれ別のケーブルガ
•使⽤するケーブルガスケットのみ⽳を開けます。ケーブルガスケットが破損
1.裏蓋ネジを緩め、上蓋を持ち上げます。
2.ケーブルカバーのネジをゆるめ、ケーブルカバーを裏蓋から取り外します。
の
ン ン
グ グ
の の
損するおそれがあります。他のケーブルエリアに対応するケーブルガスケッ
ト、ケーブルグランドについては、
スケットに通す必要があります。
した場合には、新品のケーブルガスケットに交換してください。ケーブルガ
スケットに⽳を開けたままにしたり、破損したケーブルガスケットを使⽤し
たりすると、浸⽔し、製品が破損するおそれがあります。
を参照してください。
壁
⾯
取
壁 壁
付
⾯ ⾯
取 取
付 付
www .axis.com
ブ
ラ
ケ
ッ
ト
へ
の
取
り
付
ブ ブ
ラ ラ
ケ ケ
ッ ッ
ト ト
へ へ
の の
取 取
www .axis.com
け
り り
付 付
け け
を参照してください。
)でカメ
84
Page 85

AXIST92EHousingSeries
3.使⽤するケーブルグランドからキャップ、プラグ、ガスケットを取り外
します。
4.アース端⼦ネジ、ワッシャ、アースシューリングを取り外します。
5.シューリングを取り付けたアース線およびワッシャをアース端⼦ネジに固
定します。
JA
1.ネットワークケーブルをキャップに通します。
2.ネットワークケーブルをガスケットの溝に沿ってスライドさせ、ネット
ワークケーブルにガスケットを取り付けます。
3.ネットワークケーブルをケーブルグランドに通します。
85
Page 86

AXIST92EHousingSeries
1
キ ャ ッ プ
2
ガ ス ケ ッ ト
3
ケ ー ブ ル グ ラ ン ド
4
プ ラ グ ( 破 棄 )
4.ガスケットをケーブルグランドの中まで押し込み、キャップをしっかりと
締めます。
注 記
付属のケーブル以外のケーブルを使⽤する場合は、シールドネットワーク
ケーブルにガスケットを装着する必要があります。ケーブルを付属のガス
ケットに通し、ネットワークコネクタを取り付けます。ガスケットに、付属
のドライバーを使⽤して⽳をあける必要がある場合があります。
注 記
電源ケーブルをケーブルガスケットに通した後に電源コネクタを取り付
けます。
5.I/O、⾳声、外部電源デバイスなどの補助デバイスをカメラに接続する場
合、それぞれのデバイスについて同じ⼿順を繰り返します。
6.裏蓋を壁⾯取付ブラケットに取り付け、ネジを締めます(トルク2Nm)。
カ
メ
ラ
の
ハ
ウ
ジ
ン
グ
へ
の
収
カ カ
メ メ
ラ ラ
の の
ハ ハ
ウ ウ
ジ ジ
ン ン
グ グ
へ へ
1.ホルダーネジおよびワッシャをゆるめ、ホルダーを外します。
2.以下の図と表の通りに、ねじでカメラをホルダーに固定します。安定⽤
ねじを軽く締め、カメラのねじを2Nmまで締めます。ネジを締めすぎな
いように注意してください
カメラのモデル
AXIST92E05/AXIST92E20AXIST92E20
ホルダーの位置とファスナー
納
の の
収 収
納 納
I/Oケー
ブル
86
コールドスタート
アップ遅延
Page 87

AXIST92EHousingSeries
なし
ありオフ(0)
ありオフ(I)
ありオフ(I)
オフ(0)
JA
87
Page 88

AXIST92EHousingSeries
3.外部/⼊⼒デバイス、⾳声デバイス、外部電源をカメラに接続する場合は、
カメラのインストールガイドに記載された⼿順に従って接続してください。
4.該当する場合は、屋外⽤ハウジングに設置済みの内部ネットワークケーブ
ルとI/Oケーブルをカメラに接続します。
5.裏蓋にホルダーを取り付けます。ホルダーの位置を慎重に調整し、ワッ
シャを含むホルダーネジを締めます(トルク0.5Nm)。カメラのレンズとプ
ラスチック製の内部ハウジングの前⽅の端の間に約5‒10mmの距離をおき、
ウィンドウがレンズを擦らずにトップカバーを装着できるようにします。
6.SDカードをローカルストレージとして使⽤する場合は、カメラのSDカード
スロットにSDカードを挿⼊します。
7.外部ネットワークケーブルをPoE⼊⼒に接続します。
8.該当する場合は、ColdStartupDelay(コールド起動の遅延)スイッチを正し
い位置に設定します。
遅 延 ス イ ッ チ
9.該当する場合は、ハウジングのステータスLEDが正しい状態を⽰しているこ
とを確認してください。
参照してください。
10.カメラのLEDが正しい状態を⽰しているかを確認します。カメラのインス
トールガイドを参照してください。
11.ブラケット調整ネジを緩め、カメラを撮影⽅向に向けます。ビデオス
トリームを表⽰する⽅法については、カメラのインストールガイドまた
は
www .axis.com/techsup
12.裏蓋のタブに上蓋の安全ワイヤーを取り付けます。
13.ハウジングを閉じます。裏蓋ネジを数回ずつ回し、すべてのネジが締
まるまでこれを繰り返します(トルク1.5Nm)。これにより、裏蓋のガス
ケットに均等に⼒が掛かります。
14.サンシールド調節ネジをゆるめ、サンシールドを希望する位置に調節しま
す。
ページの表を参照してください。.
注 記
ハウジングを閉じるときに、ケーブルを挟まないよう注意してください。
86 ペ ー ジ
と
89 ペ ー ジ の 、 コ ー ル ド ス タ ー ト ア ッ プ
82 ペ ー ジ の 、 ハ ウ ジ ン グ LED イ ン ジ ケ ー タ ー
を参照してください。
を
88
Page 89

AXIST92EHousingSeries
コ
ー
ル
ド
ス
タ
ー
ト
ア
ッ
プ
遅
延
ス
イ
ッ
コ コ
ー ー
ル ル
ド ド
ス ス
タ タ
ー ー
ト ト
ア ア
ッ ッ
プ プ
遅 遅
延 延
ス ス
AXIST92E20はArcticTemperatureControl(極寒コントロール)機能を搭載。Cold
StartupDelay(コールド起動の遅延)スイッチをI(オン)に設定すると有効になりま
す。有効にすると、この機能は、気温が0°C未満の場合に停電後にカメラが再起動
するとき、カメラがまず0°Cに加熱されてから初期化されるように制御します。こ
れにより、可動部分を有するモデルでの破損を防ぎます。
注意
可動部品のないカメラでは、この機能が不要であるため、スイッチを無効
にしてください。
してください。
洗
浄
⼿
洗 洗
注 記
順
浄 浄
⼿ ⼿
順 順
•コーティングを傷付けたり削り取る可能性がある、研磨剤の⼊った洗浄剤、
ワイパーなどの洗浄⽤具は使⽤しないでください。
•乾燥した布やスポンジで洗浄しないでください。
•カミソリなどの鋭利な⼯具、研磨剤の⼊っているまたは強アルカリ性の洗
剤、有鉛のベンゼン類、四塩化炭素を使⽤しないでください。
1.シートを優しく洗浄し、ほこりや汚れを浮かせます。以下の表を参照して
ください。
86 ペ ー ジ の 、 カ メ ラ の ハ ウ ジ ン グ へ の 収 納
チ
イ イ
ッ ッ
チ チ
の表を参照
JA
取 取取り りり外 外外し しし⽅ ⽅⽅法 法法: :
ほこりやチリ
ほこりがひどい場合や油しみ
染料、グリース、または残留シーリ
ングの⾶び散り
さび
2.その後、きれいな⽔でよくすすいでください。
3.⽔染みができないよう、セーム⾰またはセルローススポンジでよく乾燥さ
:
せてください。
以 以以下 下下を をを使 使使⽤ ⽤⽤し しして ててマ ママイ イイク ククロ ロロフ フファ ァァイ イイバ ババー ーー製 製製の の
布 布布や ややス ススポ ポポン ンンジ ジジで でで洗 洗洗浄 浄浄し ししま まます す
ぬるま湯または研磨剤の⼊っていない洗剤
ベンゼン⾮含有の純粋な⽯油精(洗浄剤の
ナフサまたは軽ガソリン)
エチルアルコール、イソプロピルアルコー
ル、または⽯油エーテル。硬化する前に優
しくこする
シュウ酸の10%⽔溶液
89
す
の
Page 90

AXIST92EHousingSeries
関
連
情
関 関
報
連 連
情 情
報 報
•本書の最新バージョンについては、
•役に⽴つオンライントレーニングおよびWebセミナーをご⽤意しておりま
す。
axis.com/academy
保
証
情
保 保
アクシスの製品保証と関連情報については、
報
証 証
情 情
報 報
をご覧ください。
axis.com
axis.com/warranty
にアクセスしてください。
をご覧ください。
90
Page 91

安
全
信
安 安
危
危 危
危险
警告
小心
注 意
其
其 其
重要
备注
息
全 全
信 信
息 息
险
等
级
险 险
等 等
级 级
表示如果不避免则会导致死亡或严重伤害的危险情况。
表示如果不避免则可能导致死亡或严重伤害的危险情况。
表示如果不避免则可能导致轻微或中度伤害的危险情况。
表示如果不避免则可能导致财产损失的情况。
他
消
息
等
他 他
消 消
表示产品正常工作所必需的重要信息。
表示有助于充分利用产品的有用信息。
级
息 息
等 等
级 级
AXIST92EHousingSeries
ZH
91
Page 92

AXIST92EHousingSeries
安
全
说
安 安
注 意
运
运 运
注 意
明
全 全
说 说
明 明
•使用Axis产品时应遵守当地法律和法规。
•在干燥通风的环境中存放Axis产品。
•避免将Axis产品暴露在冲击或高压环境下。
•请勿将产品安装在不稳固的立杆、支架、表面或墙壁上。
•安装Axis产品时,仅使用适用的工具。使用电动工具过度施力可能导致
产品损坏。
•请勿使用化学品、腐蚀剂或气雾剂。
•使用蘸纯净水的干净布进行清洁。
•仅使用符合产品技术规格的附件。这些附件可由Axis或第三方提供。Axis推
荐使用与产品兼容的Axis电源设备。
•仅使用Axis提供或推荐的备件。
•请勿尝试自行维修产品。有关服务事项,请联系Axis支持部门或Axis经销商。
输
输 输
•安讯士产品运输途中,应使用其原包装或等效包装,以防对产品造成损坏。
92
Page 93

AXIST92EHousingSeries
安
装
指
安 安
本安装指南说明了如何安装AXIST92E05防护罩和AXIST92E20室外护罩。
如欲在网络上安装摄像机,请参考摄像机随附的安装指南。有关该摄像机的其他详情,
请参见用户手册,网址:
安
安 安
南
装 装
指 指
南 南
www.axis.com
装
步
骤
装 装
步 步
骤 骤
1.确保安装必需的包装内容、工具和其它材料井然有序。参见
2.研究硬件概述。参见
3.研究规格。参见
4.安装硬件。参见
包
装
内
包 包
推
推 推
可
可 可
容
装 装
内 内
容 容
•AXIST92E05/T92E20护罩
•AXIST94Q01A壁式支架
•网线(仅AXIST92E20)
•六角梅花头螺丝刀(T20)或艾伦扳手(T20)
•Torx钻头(T30)
•夹具安装套件
•安装指南(本文档)
荐
的
工
荐 荐
•钻子–如果使用硬天花板安装
•刀–如果使用吊顶安装
•Torx螺丝刀T30–如果使用AXIST91A安装附件中的兼容支架
选
选 选
具
的 的
工 工
具 具
附
件
附 附
件 件
第 96 页
第 97 页
第 94 页
。
。
。
第 93 页
。
ZH
欲查看本产品可用附件的完整列表,请转到
附件”。
axis.com
93
上的产品页并选择“软件和
Page 94

AXIST92EHousingSeries
硬
件
概
硬 硬
护
护 护
览
件 件
概 概
览 览
罩
罩 罩
AXIS T92E20 防 护 罩
1
遮 阳 罩
94
Page 95

AXIST92EHousingSeries
2
遮 阳 罩 调 节 螺 丝 (2x)
3
夹 具
4
夹 具 螺 丝 (2x) 和 垫 圈 法 兰 (2x)
5
稳 定 螺 丝
6
摄 像 机 螺 丝 和 垫 圈
7
报 警 输 出
8
网 线
9
线 缆 孔
10
保 险 丝 垫 片
11
线 缆 孔 (2x)
12
底 盖
13
网 络 接 口 ( PoE 输 入 )
14
LED 状 态 指 示 灯
15
冷 启 动 开 关
16
支 架 适 配 器
壁
式
支
壁 壁
架
式 式
支 支
架 架
ZH
1
网 线 ( 穿 过 壁 式 支 架 )
2
电 源 线 ( 穿 过 壁 式 支 架 ) ( 用 于 配 备 电 源 接 口 的 产 品 )
3
接 地 线 缆 ( 穿 过 壁 式 支 架 ) ( 用 于 带 有 接 地 螺 丝 的 摄 像 机 护 罩 )
4
螺 丝 T20 (4x)
5
支 架 调 节 螺 丝 T30
6
壁 式 支 架
95
Page 96

AXIST92EHousingSeries
防
护
罩
LED
指
示
防 防
护 护
罩 罩
LED LED
备注
下表中提到的防护罩LED位于防护罩内。
警报事件将通过摄像机的输入端口触发。
灯
指 指
示 示
灯 灯
罩
防 防防护 护护罩 罩
( ((风 风风扇 扇扇和 和和加 加加热 热热器 器器) )
绿色
闪烁的绿色
有关备件和故障排除的信息,请与安讯士经销商联系。
规
规 规
功 功功能 能能/ //组 组
一 一一般 般般规 规规格 格
LED
LED LED
格
格 格
组
格
)
目
项 项项目 目
号
型 型型号 号
壳
外 外外壳 壳
工 工工作 作作条 条条件 件
证
认 认认证 证
示
指 指指示 示
工作正常。
单闪:加热器错误
双闪:风扇错误
三闪:一般错误
件
规 规规格 格
AXIST92E05防护罩
AXIST92E20室外护罩
铝制外壳、聚碳酸酯遮阳罩和线
槽。IP66级和NEMA4X级保护,
IK10抗震铝外壳
AXIST92E05:-20°C至55°C
(-4°F至131°F)
湿度15–100%(冷凝)
AXIST92E20:-40°C至50°C
(-40°F至122°F)
湿度15–100%(冷凝)
AXIST92E05:IEC60068-2-6、
IEC60068-2-27AXIST92E20:
EN55022ClassB、EN
61000-3-2、EN61000-3-3、
EN55024、EN61000-6-1、EN
61000-6-2、EN60950-22、IEC
60068-2-6、IEC60068-2-27、
FCCPart15、SubpartB、Class
B、VCCI、ClassBITE、C-tick
格
1
1
96
Page 97

AXIST92EHousingSeries
AS/NZSCISPR22、ICES-003、
ClassB、KCCClassB
尺 尺尺寸 寸寸( ((高 高高x xx宽 宽宽x xx深 深深) )
量
重 重重量 量
1.工作温度可能因摄像机不同而有所差异,请参见用户手册,网址www.axis.com
安
装
硬
安 安
注 意
可将线缆穿过或沿墙壁布置,以此安装该安讯士产品。
请在安装产品前阅读说明:
安
安 安
小心
备注
件
装 装
硬 硬
件 件
•根据当地法规或使用产品所在的环境与电力条件,可能需要使用屏蔽网线
(STP)。连接产品与网络的线缆以及伸展到户外或苛刻电力环境中的线缆必须使
用专用线缆。确保网络设备按照制造商的说明进行安装。
(AXIST92E05)有关监管要求的信息,请参见摄像机的安装指南。
(AXIST92E20)有关监管要求的信息,请参见
•切勿刮伤或损坏窗口或在窗口上留下指纹,因为这样会降低图像质量。
1.安装壁式支架。参见
式支架的安装指南,它随附在包装内,同时发布于www.axis.com
2.将护罩安装于壁式支架。参见
3.将摄像机安装在护罩中。参见
装
壁
式
支
装 装
壁 壁
请确保螺丝和插头适用于相关材料(如木材、金属、干式墙、石头),且材料
足够坚固,能够承受摄像机、护罩和壁式支架的全部重量。
•请查阅壁式支架的安装指南,它随附在包装内,同时发布于
•如欲了解关于接口的技术规范,请参见摄像机的用户手册,网址
1.为安装壁式支架对墙壁实施前期准备工作将壁式支架用作样板,标记待钻的
2.如果需要,将网线和电源线穿过壁式支架。留出近30厘米(11.8英寸)线
3.如果摄像机护罩具有接地螺丝,将接地线缆穿过壁式支架。留出近
架
式 式
支 支
架 架
孔。
缆用于连接摄像机。
15厘米(5.9英寸)线缆用于连接护罩。
)
安 装 壁 式 支 架 在 第 97 页
将 护 罩 安 装 至 壁 式 支 架 在 第 98 页
将 摄 像 机 安 装 在 护 罩 中 在 第 100 页
120x161x404毫米(4.7x6.4x
15.9英寸)
AXIST92E05:2.4千克(5.1磅)
AXIST92E20:2.5千克(5.5磅)
。如欲了解详细说明,请查阅壁
ZH
。
。
www.axis.com
www.axis.com
97
Page 98
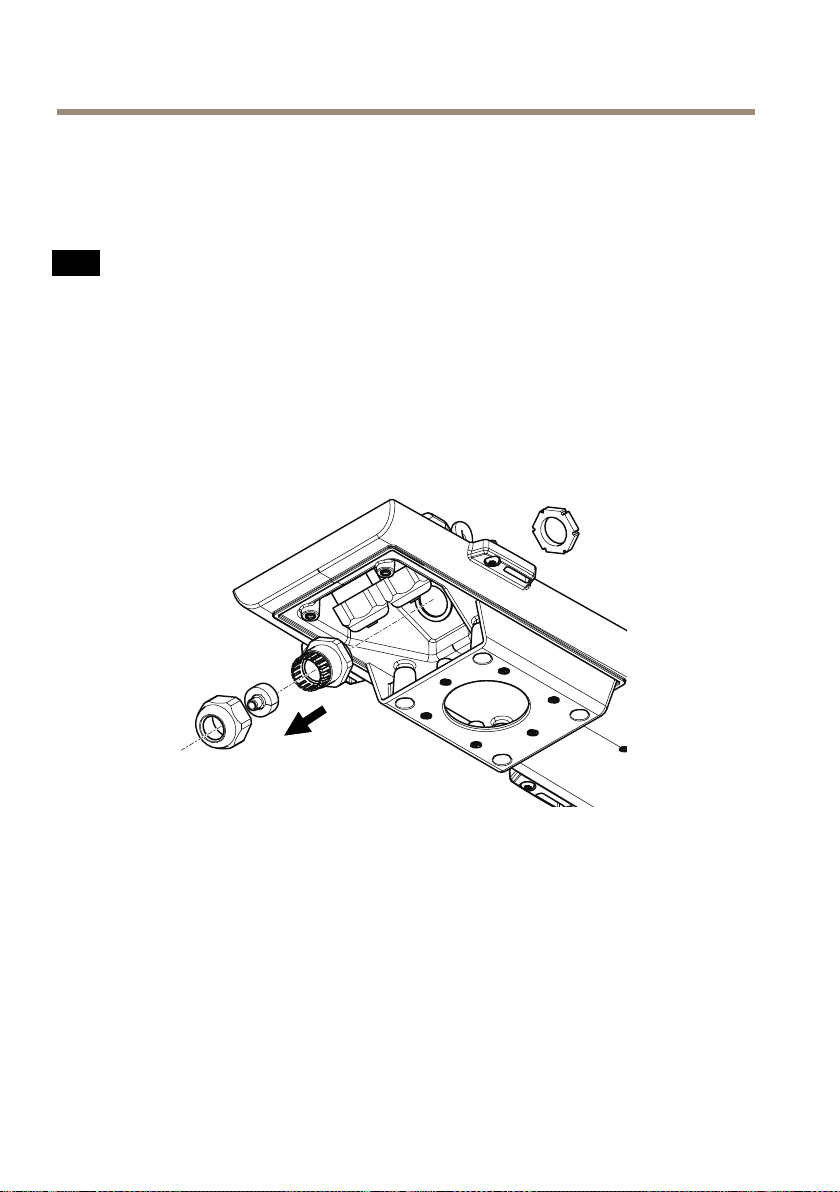
AXIST92EHousingSeries
4.如果将辅助设备(如I/O、音频或外部电源设备)连接至摄像机,请重复上
述适用于特定设备的步骤。
5.拧紧螺丝,将壁式支架紧固在墙壁上。
将
护
罩
安
装
至
壁
式
支
将 将
护 护
罩 罩
安 安
装 装
至 至
壁 壁
注 意
•使用随附线缆垫圈以外的替代品可能导致渗水,从而造成产品损坏。有关适用
其他线缆区域的线缆垫圈和线缆密封套,请访问
•如果使用一条以上的线缆,那么每条线缆必须穿过单独的线缆垫圈。
•只在将被使用的线缆垫圈中开孔,如果一个线缆垫圈划破,则使用新线缆垫
圈替换。让线缆垫圈保持开口状态或使用划破的线缆垫圈,可能导致渗水,
从而造成产品损坏。
1.松开底盖螺丝,并提起顶盖。
2.松开线槽螺丝,将线槽从底盖上移去。
架
式 式
支 支
架 架
www.axis.com
3.移除拟使用线缆密封套的密封帽、密封塞和密封垫。
4.移除接地螺丝、垫圈和接地端环(shoering)。
5.使用接地螺丝拧紧端环安装接地线和垫圈。
98
Page 99

AXIST92EHousingSeries
1.将网线穿过密封帽。
2.将网线穿过密封垫孔隙,以便将密封垫附着在网线上。
3.将网线穿过线缆密封套。
ZH
1
密 封 帽
2
垫 圈
3
线 缆 密 封 套
4
密 封 塞 ( 丢 弃 )
4.将密封垫用力塞入线缆密封套,并将密封盖拧紧。
注 意
如果不使用随附的网线而使用其它网线,您需要准备一根带有垫圈的屏蔽网
线。轻轻地将网线穿过随附的垫圈并装上一个网络接头。可能需要用一个
随附的螺丝刀在垫圈上戳一个洞。
注 意
在电源线穿过线缆垫圈后,安装电源接口。
5.如果将辅助设备(如I/O、音频或外部电源设备)连接至摄像机,请重复上
述适用于特定设备的步骤。
6.将底盖置于壁式支架上,并拧紧螺丝(扭矩2纳米)。
99
Page 100

AXIST92EHousingSeries
将
摄
像
机
安
装
在
护
罩
将 将
摄 摄
像 像
机 机
安 安
装 装
在 在
1.松开夹具螺丝和垫圈,以移除夹具。
2.按照下面的图示和表格,使用螺丝将摄像机紧固至夹具上。轻轻拧紧稳定螺
丝,并拧紧摄像机螺丝至2纳米。注意不要过于拧紧螺丝
中
护 护
罩 罩
中 中
摄像机型号
AXIST92E05/AXIST92E20AXIST92E20
夹具位置和紧固件
I/O线缆
否
是
是
冷启动延迟
关(0)
关(0)
关(I)
是
关(I)
100
 Loading...