

Page 1

AXIST90DIlluminatorSeries
AXIST90D20IR-LED
AXIST90D20PoEIR-LED
AXIST90D25W-LED
AXIST90D25PoEW-LED
AXIST90D30IR-LED
AXIST90D30PoEIR-LED
AXIST90D35W-LED
AXIST90D35PoEW-LED
AXIST90D40IR-LED
UserManual
Page 2

AXIST90DIlluminatorSeries
TableofContents
Eyesafetyinformation.......................................3
Aboutthismanual..........................................4
Productoverview...........................................5
Productoverview................................................5
Remotecontrol.................................................6
Howtocongurethewires(onlyforAC/DCversions)..................6
Setup.....................................................8
Aboutthefactorydefaultsettings..................................8
Aboutoperatingandprogrammingmode............................8
AboutusingaPIN...............................................9
Howtodisablethecontrolbuttons.................................10
Howtore-enablethecontrolbuttons...............................10
HowtocontroltheilluminatorwithanAxisnetworkcamera............10
Howtoadjustthelightintensity...................................11
Howtoadjustthephotocellsensitivity..............................12
HowtoenableordisabletheLEDindicators..........................13
Howtoresettofactorydefaultsettings.........................14
Troubleshooting............................................15
Specications..............................................16
LEDIndicators..................................................16
2
Page 3

AXIST90DIlluminatorSeries
Eyesafetyinformation
Eyesafetyinformation
CAUTION
IRvariants:
IRemittedfromthisproduct,EN62471RiskGroup2.Donotstareatthelamp.Avoidexposureoruseappropriateshielding
oreyeprotection.RiskGroup2forcornea/lensinfraredhazard.ForT90D20andT90D30variantsthehazarddistanceis
1500mm.ForT90D40thehazarddistanceis1840mm.MaxIRExposureHazardValue:69%ofRiskGroup2Limitat200
mmfromthelamp.
CAUTION
Whitelightvariants:
EN62471RiskGroup2.Possiblehazardousopticalradiationemittedfromthisproduct.Maybeharmfultoeyes.Donot
stareatthelamp.ForT90D25andT90D35variantsthehazarddistanceis1500mm.MaxwhitelightExposureHazard
Value:68%ofRiskGroup2Limitat200mmfromthelamp.
3
Page 4

AXIST90DIlluminatorSeries
Aboutthismanual
Aboutthismanual
Thisusermanualdescribesmultipleproducts.Someoftheinstructionsmaynotberelevantforyourproduct.
4
Page 5
AXIST90DIlluminatorSeries
Productoverview
Productoverview
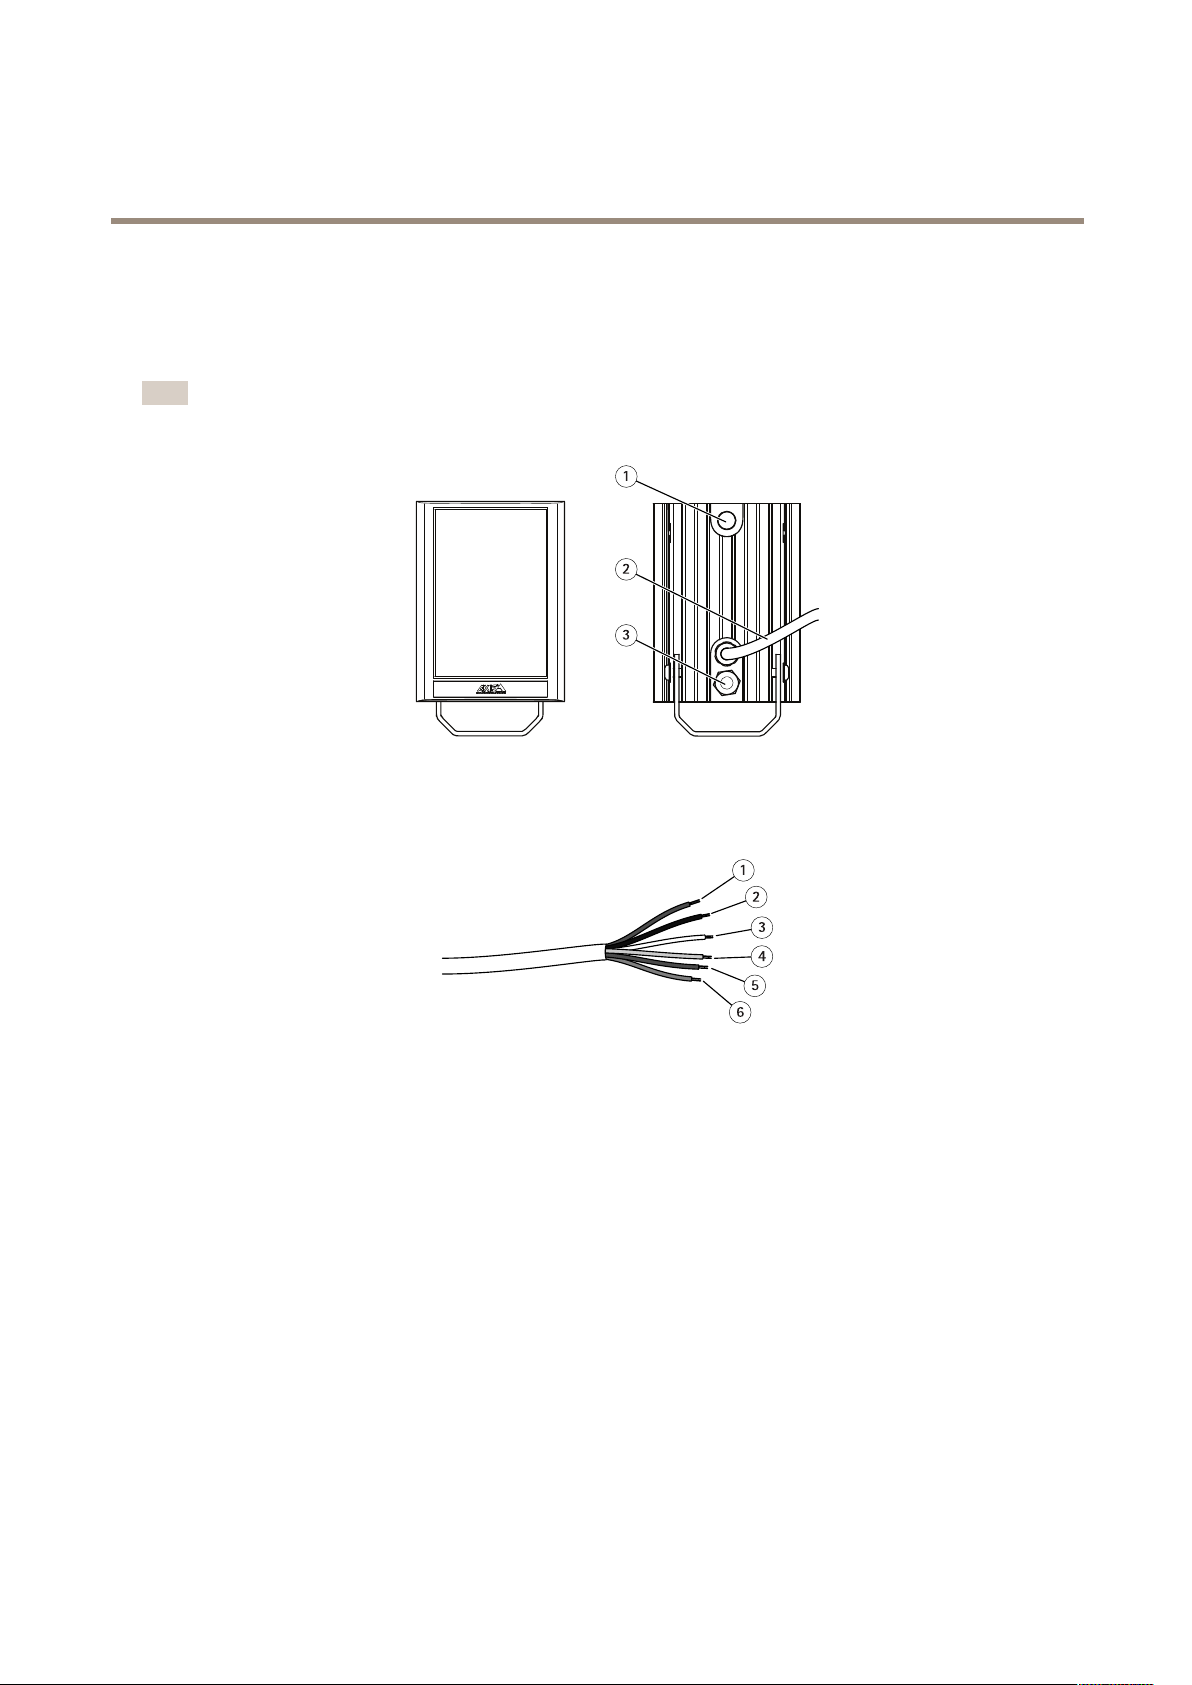
Productoverview
Note
Theappearanceofyourproductmaydifferfromthefollowingimages.
1
Photocell
2
Power,photocellandtelemetryforAC/DCversionsornetworkcableforPoEversions
3
Breathergland
Wireconguration(AC/DCversionsonly)
1
Powerwire(red)
2
Powerwire(black)
3
Photocellwire(white)
4
Photocellwire(yellow)
5
Telemetrywire(purple)
6
Telemetrywire(orange)
5
Page 6
AXIST90DIlluminatorSeries
Productoverview
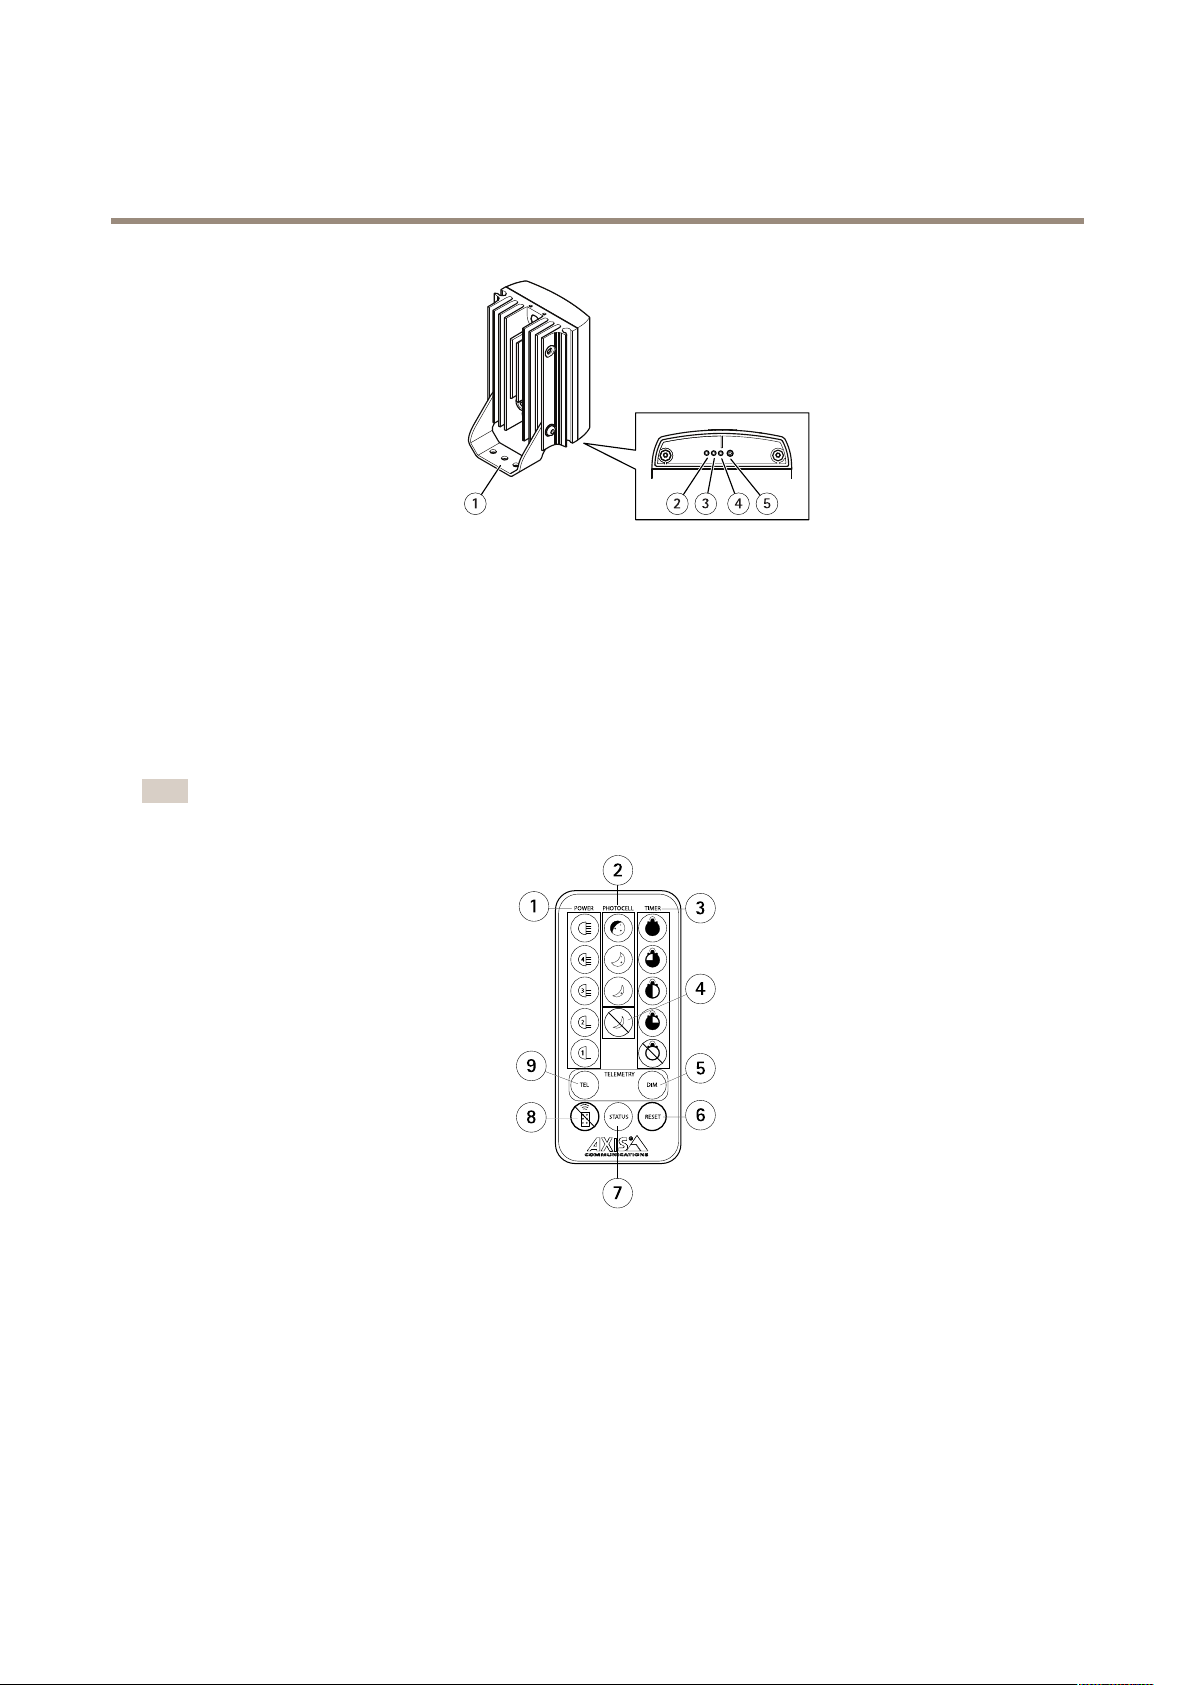
1
Mountingbracket(pre-mounted)
2
Controlbutton(left)
3
LeftHandSideLED(LHS)
4
RightHandSideLED(RHS)
5
Controlbutton(right)
Thebaseplatemustberemovedinordertoaccessthetwocontrolbuttons.
Remotecontrol
Note
Theremotecontrolisanoptionalaccessory.
1
Powerlevelbuttons
2
Photocellsensitivitybuttons
3
Timerbuttons
4
Photocelldisablebutton
5
Telemetrydimmingbutton
6
Resetbutton
7
StatusbuttonforLEDandPIN
8
Disableremotecontrolsetupbutton
9
Telemetryinputbutton
Howtocongurethewires(onlyforAC/DCversions)
Connectthepowerwires(redandblack)toapowersourceequipment.Formoreinformation,seetheInstallationGuide.
6
Page 7

AXIST90DIlluminatorSeries
Productoverview
TocontroltheproductwithanAxisnetworkcamera,connectthetelemetrywirestothecamera’sI/Oconnector.Connectthepurple
telemetrywiretopin1(DCground),andtheorangetelemetrywiretopin4(digitaloutput).Formoreinformation,seeHowto
controltheilluminatorwithanAxisnetworkcameraonpage10.
Tocontrolacamerawiththeproduct’sphotocell,connectthephotocellwires(whiteandyellow)tothecamera'sI/Oconnector.
Connectoneofthewirestopin1(DCground)andtheotheronetopin3(digitalinput).
7
Page 8

AXIST90DIlluminatorSeries
Setup
Setup
Aboutthefactorydefaultsettings
Whenyoubuytheproduct,thetelemetrywires(seeProductoverviewonpage5)aresolderedtogether.Thismakestheilluminator
turnonautomaticallywhenthephotocelldetectslow-lightconditions.
Whenyouconnecttheproductforthersttime,ithasthefollowingsettings:
•Lightintensity:100%
•Photocellsensitivity:10Luxon,30Luxoff
•LEDindicators:on
•PINset:no
•Controlbuttons:enabled
•Mode:programmingmode(changestooperatingmodesevendaysafterstart-upifyoudon’tpressanycontrolbuttons)
Aboutoperatingandprogrammingmode
Theproducthastwodifferentmodes,operatingandprogramming.Youcanaccessdifferentsettingsdependingonwhichmodethe
productisin.
Remotecontrol
SettingOperatingmode
Adjustlight
intensity
Adjustphotocell
sensitivity
Enableordisable
LEDindicators
Disablecontrol
buttons
Tominimizetheriskoftampering,werecommendyoutosettheproducttooperatingmodewhentheilluminatorhasbeensetup
andisdeliveringtherequiredoperatingperformance.
xxxx
xxx
Programmingmode
xxx
xxx
Howtochangefromoperatingtoprogrammingmode
WithapresetPIN
•EnterthePIN.SeeHowtoenteraPINonpage9.
•Doafullreset.SeeHowtoresettofactorydefaultsettingsonpage14.
Controlbuttons
Operatingmode
ProgrammingmodeMoreinformation
Seepage1 1.
Seepage12.
Seepage13.
Seepage10.
WithoutapresetPIN
•Disconnectandreconnecttheproducttopower.
•Withthecontrolbuttons:
1.Pressandholdtheleftcontrolbuttonfor4secondsuntilthelefthandsideLEDashesred.
2.PresstheleftcontrolbuttononcemoresothatthelefthandsideLEDashesgreen.
8
Page 9

AXIST90DIlluminatorSeries
Setup
3.PresstherightcontrolbuttonrepeatedlyuntiltherighthandsideLEDturnssolidgreen.
Howtochangefromprogrammingtooperatingmode
Withtheremotecontrol
1.PressandholdtheDisableremotecontrolsetupbuttonfor4seconds.
Withthecontrolbuttons
1.Pressandholdtheleftcontrolbuttonfor4secondsuntilthelefthandsideLEDashesred.
2.PresstheleftcontrolbuttononcemoresothatthelefthandsideLEDashesgreen.
3.PresstherightcontrolbuttonrepeatedlyuntiltherighthandsideLEDturnssolidred.
Ifyoudon’tpressanycontrolbuttons,theproductautomaticallychangestooperatingmodeafter7days.Ifyoudopressacontrol
button,itchangestooperatingmodeafter30minutes.
AboutusingaPIN
Ifyouhavetheoptionalremotecontrol,youcansetaPIN.UsethePINto:
•changefromoperatingtoprogrammingmode
•temporarilyre-enablethecontrolbuttonsiftheyaredisabled
IfyouforgetyourPIN,youneedtodoafullreset.SeeHowtoresettofactorydefaultsettingsonpage14.
HowtosetaPIN
1.Whentheproductisinprogrammingmode,pressandholdtheStatusbuttonfor4secondsuntilthelefthandside
LEDashesred/green.
2.Entera4–characterPINusingbuttonsA-E.
WhenyouhavesetthePIN,theproductreturnstoprogrammingmode.
HowtoenteraPIN
1.PressandholdtheStatusbuttonfor4secondsuntilthelefthandsideLEDashesred/green.
2.EnterPIN.
IfyouenterthewrongPIN,bothLEDswillashred.
9
Page 10

AXIST90DIlluminatorSeries
Setup
HowtodeleteaPIN
1.Whentheproductisinprogrammingmode,pressandholdtheStatusbuttonfor4seconds.
2.PresstheResetbuttonfourtimes.
Howtodisablethecontrolbuttons
Withtheremotecontrol
1.Within5minutesafteryouenteroperatingmode,pressandholdtheDisableremotecontrolsetupbuttonfor4seconds.
Withthecontrolbuttons
1.Pressandholdtheleftcontrolbuttonfor4secondsuntilthelefthandsideLEDashesred.
2.PresstheleftcontrolbuttontwicesothatthelefthandsideLEDashesamber.
3.PresstherightcontrolbuttonrepeatedlyuntiltherighthandsideLEDturnssolidred.
Note
Youcanreversethissettingwiththecontrolbuttonswithin30minutes:
1.Pressandholdtheleftcontrolbuttonfor4secondsuntilthelefthandsideLEDashesred.
2.PresstheleftcontrolbuttontwicesothatthelefthandsideLEDashesamber.
3.PresstherightcontrolbuttonrepeatedlyuntiltherighthandsideLEDturnssolidgreen.
Howtore-enablethecontrolbuttons
Ifthecontrolbuttonsaredisabled,youcanre-enablethethemtemporarily(for30minutes)orpermanently.
TemporarilywithapresetPIN
•EnterthePIN.SeeHowtoenteraPINonpage9.
TemporarilywithoutapresetPIN
•Disconnectandreconnecttheproducttopower.
PermanentlywithorwithoutapresetPIN
•Doafullreset.SeeHowtoresettofactorydefaultsettingsonpage14.
HowtocontroltheilluminatorwithanAxisnetworkcamera
Thisusecaseexplainshowto:
•connecttheilluminatortotheI/OconnectorofanAxisnetworkcamera
•setupthecameratomaketheilluminatorturnonwhenthecameradetectsmotion
ConnecttheilluminatortoanAxisnetworkcamera:
1.Sniptheendofthetelemetrywires(purpleandorange)toseparatethem.
2.Connectthepurplewiretopin1(DCground)ofthecamera’sI/Oconnector.Ifyouneedmoreinformationaboutthe
camera’sI/Oconnector,seethecamera’sUserManual.
3.Connecttheorangewiretopin4(digitaloutput)ofthecamera’sI/Oconnector.
ConguretheI/Oportinthecamera’swebpage:
10
Page 11

AXIST90DIlluminatorSeries
Setup
1.GotoSettings>System>I/Oports.
2.SelectOutputinthePort2drop-downlist.
3.Givetheoutputmoduleadescriptivename,forexample“Illuminator”.
4.Tomaketheilluminatorturnonwhenthecameradetectsmotion,selectOpencircuitinthedrop-downlist.
Verifyinthecamera’swebpagethattheAXISVideoMotionDetectionapplicationisrunning:
1.GotoSettings>Apps>AXISVideoMotionDetection.
2.Starttheapplicationifitisnotalreadyrunning.
3.Makesureyouhavesetuptheapplicationaccordingtoyourneeds.
Createanactionruleinthecamera’swebpage,tomaketheilluminatorturnonwhenthecameradetectsmotion:
1.GotoSettings>System>Events>Actionrulesandaddanactionrule.
2.Givetheactionruleadescriptivename,forexample“Turnonilluminator”.
3.Fromthelistoftriggers,selectApplicationsandthenselectthemotiondetectionapplication.
4.Fromthelistofactions,selectOutputportandthenselectOutput2.
5.ClickOK.
Theilluminatorwillnowturnonwheneverthecameradetectsmotion.
Howtoadjustthelightintensity
Therearevepredenedlevelsoflightintensity.
Withtheremotecontrol
Usethepowerlevelbuttonstoselecttherequiredlightintensity.
11
Page 12

AXIST90DIlluminatorSeries
Setup
1
20%ofmaximum
2
40%ofmaximum
3
60%ofmaximum
4
80%ofmaximum
5
100%ofmaximum
Withthecontrolbuttons
1.PresstheleftcontrolbuttononcesothatthelefthandsideLEDturnssolidred.
2.Presstherightcontrolbuttonrepeatedly.TherighthandsideLEDindicatesthelightintensitylevel:
-onegreenash:20%ofmaximum.
-twogreenashes:40%ofmaximum.
-threegreenashes:60%ofmaximum.
-fourgreenashes:80%ofmaximum.
-vegreenashes:100%ofmaximum.
Howtoadjustthephotocellsensitivity
Thephotocellsensitivityleveldecidesatwhichluxlevelthresholdstheilluminatorturnsonandoff.Therearethreepredenedlevels.
Note
Ifyoudisablethephotocell,theilluminatorturnsonandofffromatelemetryinputregardlessofambientlightingconditions.
Withtheremotecontrol
Usethephotocellsensitivitybuttonstoselecttherequiredsensitivitylevel.
12
Page 13

AXIST90DIlluminatorSeries
Setup
1
Photocelldisabled
2
5luxon,15luxoff
3
10luxon,30luxoff
4
25luxon,50luxoff
Withthecontrolbuttons
1.PresstheleftcontrolbuttontwicesothatthelefthandsideLEDturnssolidgreen.
2.Presstherightcontrolbuttonrepeatedly.TherighthandsideLEDindicatesthesensitivitylevel:
-onegreenash:5luxon,15luxoff.
-twogreenashes:10luxon,30luxoff.
-threegreenashes:25luxon,50luxoff.
-solidred:photocelldisabled.
HowtoenableordisabletheLEDindicators
Withtheremotecontrol
1.PresstheStatusbuttontoenableordisabletheLEDindicators.
Withthecontrolbuttons
1.PresstheleftcontrolbuttonthreetimessothatthelefthandsideLEDturnssolidamber.
2.Presstherightcontrolbuttonrepeatedly.TherighthandsideLEDindicateswhethertheLEDindicatorsareenabled
ordisabled:
-solidgreen:LEDindicatorsareenabled.
-solidred:LEDindicatorsaredisabled.
13
Page 14

AXIST90DIlluminatorSeries
Howtoresettofactorydefaultsettings
Howtoresettofactorydefaultsettings
Youcanchoosetomakeafullresetorasettingsreset.ThefullresetrestoresfactorydefaultsettingsandremovesthePINifone
hasbeenset.ThesettingsresetrestoresfactorydefaultsettingsbutkeepsthePIN,andreturnstheilluminatortothemodeitwas
inbeforethereset.
Settingsresetwithremotecontrol
1.Whentheproductisinprogrammingmode,pressandholdtheresetbuttonfor4seconds.
Settingsresetwithcontrolbuttons
1.Pressandholdtheleftcontrolbuttonfor4secondsuntilthelefthandsideLEDturnsashingred.
2.Pressandholdtherightcontrolbuttonfor4seconds.TherighthandsideLEDstayssolidredduringthattime.After4
seconds,bothLEDsashamber.
Fullresetwithcontrolbuttons
1.Pressandholdbothcontrolbuttonswhiledisconnectingandreconnectingpower.
14
Page 15

AXIST90DIlluminatorSeries
Troubleshooting
Troubleshooting
Ensurealltestsareundertakenbyaqualied,trainedengineer.
Ensuresafeworkingpracticesarefollowedatalltimes.
•Basics
-ChecktheLEDindicators.SeeLEDIndicatorsonpage16.
-Checkthepolarityoftheilluminatorconnection:red=+ve,black=-ve.
-Ensuretheilluminatorusesthecorrectpowerrange.
-Ensurethepowersupplyissuitablyratedfortheproduct.
-Ensurethetelemetrywiresareshort–circuitedorvalidtelemetryinputisappliedandcorrectlywired.
-Checkthatthephotocellisworking.Ifyoucoverthephotocellfully,lightshouldturnon.Itcanbedifcultto
seeinfra-redilluminatorsworkinginhighbrightnessconditions.
•Illuminatortest
Note
Usetheappropriatemultimeterdependingonhowtheilluminatorispowered.Coverthephotocellfully(or
disablethephotocellusingtheoptionalremotecontrol)andmakesurethetelemetrywiresareshort–circuitedor
closedcontactinput(zerovolt)isapplied.
-Checkthatthecurrentisbeingdrawn.Theamountofcurrentdependsonthepowersettingoftheilluminator.
•Setupcamera,lensandillumination
-Makesurethepowerissettomaximum.
-Checktheorientationofilluminatorandmakesureitispointinginthecorrectdirection
-Checktheangleofthediverginglens.Atoonarrowanglemaycausehotspotsandtheapertureofthecamera
lenstoclosedown.Atoowideanglemaycauseinsufcientlightonthescene.
•RemoteControl(optionalaccessory)
-PresstheStatusbuttontocheckthestatusoftheremotecontrol,seeHowtoenableordisabletheLED
indicatorsonpage13.
-Theilluminatormightbeinoperatingmode.SeeAboutoperatingandprogrammingmodeonpage8.
-Inbrightsunlight,thedistancebetweentheremotecontrolandtheilluminatormayneedtobereduced.
-Checkthebatteryontheremotecontrol(CR2025)andreplaceifnecessary.
-Makesurenootherstronginfra-redsourceispointingattheremotereceiver .
-Makesurethereisaclearlineofsightbetweentheilluminatorandtheremotecontrol.
15
Page 16

AXIST90DIlluminatorSeries
Specifications
Specifications
Tondthelatestversionoftheproduct’sdatasheet,gototheproductpageonaxis.comandlocateSupport&Documentation.
LEDIndicators
TherearetwocoloredLEDindicatorsonthebaseoftheilluminatorwhichprovideoperatingandstatusinformation.
LefthandsideLED
Green
AmberFlashesamberwhenilluminatorisinprogrammingmode.
RighthandsideLEDIndication
Red
RedFlashesredwhenvoltagesupplyproblemdetected.
Indication
Poweron.
Steadyredwhenilluminatorfaultdetected.
16
Page 17

UserManualVer.M1.10
AXIST90DIlluminatorSeries
©AxisCommunicationsAB,2017
Date:December2017
PartNo.T101 16700
 Loading...