

Page 1

AXIST86MediaConverterSwitchSeries
AXIST8606MediaConverterSwitch
AXIST8607MediaConverterSwitch
InstallationGuide
Page 2

Page 3

English
EN
France:Français
Deutschland:Deutsch
Italia:Italiano
España:Español
日本:日本語
中文:简体中文
FR
DE
IT
ES
JA
ZH
Page 4

Legalconsiderations
Videoandaudiosurveillancecanberegulatedbylawsthat
varyfromcountrytocountry.Checkthelawsinyourlocal
regionbeforeusingthisproductforsurveillancepurposes.
Liability
Everycarehasbeentakeninthepreparationofthis
document.PleaseinformyourlocalAxisofceofany
inaccuraciesoromissions.AxisCommunicationsABcannot
beheldresponsibleforanytechnicalortypographicalerrors
andreservestherighttomakechangestotheproductand
manualswithoutpriornotice.AxisCommunicationsAB
makesnowarrantyofanykindwithregardtothematerial
containedwithinthisdocument,including,butnotlimited
to,theimpliedwarrantiesofmerchantabilityandtnessfor
aparticularpurpose.AxisCommunicationsABshallnot
beliablenorresponsibleforincidentalorconsequential
damagesinconnectionwiththefurnishing,performance
oruseofthismaterial.Thisproductisonlytobeusedfor
itsintendedpurpose.
Intellectualpropertyrights
AxisABhasintellectualpropertyrightsrelatingto
technologyembodiedintheproductdescribedinthis
document.Inparticular,andwithoutlimitation,these
intellectualpropertyrightsmayincludeoneormoreof
thepatentslistedataxis.com/patentandoneormore
additionalpatentsorpendingpatentapplicationsinthe
USandothercountries.
Equipmentmodications
Thisequipmentmustbeinstalledandusedin
strictaccordancewiththeinstructionsgiveninthe
userdocumentation.Thisequipmentcontainsno
user-serviceablecomponents.Unauthorizedequipment
changesormodicationswillinvalidateallapplicable
regulatorycerticationsandapprovals.
Trademarkacknowledgements
AXISCOMMUNICATIONS,AXISandVAPIXareregistered
trademarksortrademarkapplicationsofAxisABinvarious
jurisdictions.Allothercompanynamesandproductsare
trademarksorregisteredtrademarksoftheirrespective
companies.
Regulatoryinformation
Europe
ThisproductcomplieswiththeapplicableCEmarking
directivesandharmonizedstandards:
•ElectromagneticCompatibility(EMC)Directive
2014/30/EU.SeeElectromagneticcompatibility(EMC)
onpage4.
•LowVoltageDirective(LVD)2014/35/EU.SeeSafety
onpage5.
•RestrictionofHazardousSubstances(RoHS)Directive
201 1/65/EU,includinganyamendments,updatesor
replacements.SeeDisposalandrecyclingonpage5.
Acopyoftheoriginaldeclarationofconformitymaybe
obtainedfromAxisCommunicationsAB.SeeContact
informationonpage5.
Electromagneticcompatibility(EMC)
Thisequipmenthasbeendesignedandtestedtofulll
applicablestandardsfor:
•Radiofrequencyemissionwheninstalledaccordingto
theinstructionsandusedinitsintendedenvironment.
•Immunitytoelectricalandelectromagneticphenomena
wheninstalledaccordingtotheinstructionsandused
initsintendedenvironment.
USA
Thisdevicecomplieswithpart15oftheFCCRules.
Operationissubjecttothefollowingtwoconditions:
1.Thisdevicemaynotcauseharmfulinterference,and
2.thisdevicemustacceptanyinterferencereceived,
includinginterferencethatmaycauseundesired
operation.
Thisequipmenthasbeentestedusingashieldednetwork
cable(STP)andfoundtocomplywiththelimitsfora
ClassAdigitaldevice,pursuanttopart15oftheFCCRules.
Theselimitsaredesignedtoprovidereasonableprotection
againstharmfulinterferencewhentheequipmentis
operatedinacommercialenvironment.Thisequipment
generates,uses,andcanradiateradiofrequencyenergy
and,ifnotinstalledandusedinaccordancewiththe
instructionmanual,maycauseharmfulinterferenceto
radiocommunications.Operationofthisequipmentin
aresidentialareaislikelytocauseharmfulinterference
inwhichcasetheuserwillberequiredtocorrectthe
interferenceathisownexpense.Theproductshallbe
connectedusingashieldednetworkcable(STP)thatis
properlygrounded.
Contactinformation
AxisCommunicationsInc.
300ApolloDrive
Chelmsford,MA01824
UnitedStatesofAmerica
Tel:+19786142000
Canada
ThisdigitalapparatuscomplieswithCANICES-3(ClassA).
Theproductshallbeconnectedusingashieldednetwork
cable(STP)thatisproperlygrounded.Cetappareil
numériqueestconformeàlanormeCANNMB-3(classeA).
Leproduitdoitêtreconnectéàl'aided'uncâbleréseau
blindé(STP)quiestcorrectementmisàlaterre.
Europe
ThisdigitalequipmentfulllstherequirementsforRF
emissionaccordingtotheClassAlimitofEN55032.The
productshallbeconnectedusingashieldednetworkcable
(STP)thatisproperlygrounded.Notice!ThisisaClassA
product.Inadomesticenvironmentthisproductmaycause
RFinterference,inwhichcasetheusermayberequired
totakeadequatemeasures.
Australia/NewZealand
ThisdigitalequipmentfulllstherequirementsforRF
emissionaccordingtotheClassAlimitofAS/NZSCISPR32.
Theproductshallbeconnectedusingashieldednetwork
cable(STP)thatisproperlygrounded.Notice!Thisisa
ClassAproduct.Inadomesticenvironmentthisproduct
maycauseRFinterference,inwhichcasetheusermaybe
requiredtotakeadequatemeasures.
Japan
この装置は、クラスA情報技術装置です。この装
置を家庭環境で使⽤すると電波妨害を引き起こす
ことがあります。この場合には使⽤者が適切な対
策を講ずるよう要求されることがあります。本
製品は、シールドネットワークケーブル(STP)を
使⽤して接続してください。また適切に接地し
てください。
Korea
이기기는업무용환경에서사용할목적으로적합
성평가를받은기기로서가정용환경에서사용하
는경우전파간섭의우려가있습니다.적절히접지
Page 5
된STP(shieldedtwistedpair)케이블을사용하여
제품을연결하십시오.
Safety
Ifitsconnectingcablesareroutedoutdoors,theproduct
shallbegroundedeitherthroughashieldednetworkcable
(STP)orotherappropriatemethod.
Inareaswherethetemperatureisabove
60°C(140°F),theproductshallbeplacedinarestricted
accesslocation.
Disposalandrecycling
Whenthisproducthasreachedtheendofitsusefullife,
disposeofitaccordingtolocallawsandregulations.For
informationaboutyournearestdesignatedcollectionpoint,
contactyourlocalauthorityresponsibleforwastedisposal.
Inaccordancewithlocallegislation,penaltiesmaybe
applicableforincorrectdisposalofthiswaste.
Europe
Thissymbolmeansthattheproductshallnotbe
disposedoftogetherwithhouseholdorcommercialwaste.
Directive2012/19/EUonwasteelectricalandelectronic
equipment(WEEE)isapplicableintheEuropeanUnion
memberstates.Topreventpotentialharmtohumanhealth
andtheenvironment,theproductmustbedisposedofin
anapprovedandenvironmentallysaferecyclingprocess.
Forinformationaboutyournearestdesignatedcollection
point,contactyourlocalauthorityresponsibleforwaste
disposal.Businessesshouldcontacttheproductsupplierfor
informationabouthowtodisposeofthisproductcorrectly.
Thisproductcomplieswiththerequirementsof
Directive2011/65/EUontherestrictionoftheuseof
certainhazardoussubstancesinelectricalandelectronic
equipment(RoHS).
China
Contactinformation
AxisCommunicationsAB
Emdalavägen14
22369Lund
Sweden
Tel:+46462721800
Fax:+4646136130
axis.com
Warrantyinformation
ForinformationaboutAxis’productwarrantyandthereto
relatedinformation,gotoaxis.com/warranty
Support
Shouldyourequireanytechnicalassistance,pleasecontact
yourAxisreseller.Ifyourquestionscannotbeanswered
immediately,yourresellerwillforwardyourqueriesthrough
theappropriatechannelstoensurearapidresponse.Ifyou
areconnectedtotheInternet,youcan:
•ndanswerstoresolvedproblemsintheFAQdatabase,
searchbyproduct,category,orphrase
•reportproblemstoAxissupportstaffbylogginginto
yourprivatesupportarea
•chatwithAxissupportstaff
•visitAxisSupportataxis.com/support
Learnmore!
VisitAxislearningcenteraxis.com/academyforuseful
trainings,webinars,tutorialsandguides.
Thisproductcomplieswiththerequirementsof
SJ/T11364-2014,Markingfortherestrictionofhazardous
substancesinelectricalandelectronicproducts.
有毒有害物质或元素
部
件
名
称
电
气
实
装
部
分
0:表示该有毒有害物质在该部件所有均质材料中
的含量均在GB/T26572标准规定的限量要求以下。
X:表示该有毒有害物质至少在该部件的某一均质
材料中的含量超出GB/T26572标准规定的限量要
求。
汞
铅
(Pb)
X
镉
(Hg)
(Cd)
00000
六价
多溴
铬
联苯
(Cr-
(PB-
(VI))
B)
多溴
二苯
醚
(PBDE)
Page 6

AXIST86MediaConverterSwitchSeries
Packagecontents
•AXIST8606/T8607MediaConverterSwitch
•Mountingkit
-ClipforDINclip
-Screw(2x)
•Printedmaterial
-InstallationGuide(thisdocument)
6
Page 7
AXIST86MediaConverterSwitchSeries
Hardwareoverview
Forspecicationsofthehardwarecomponents,seeSpecicationsonpage16.
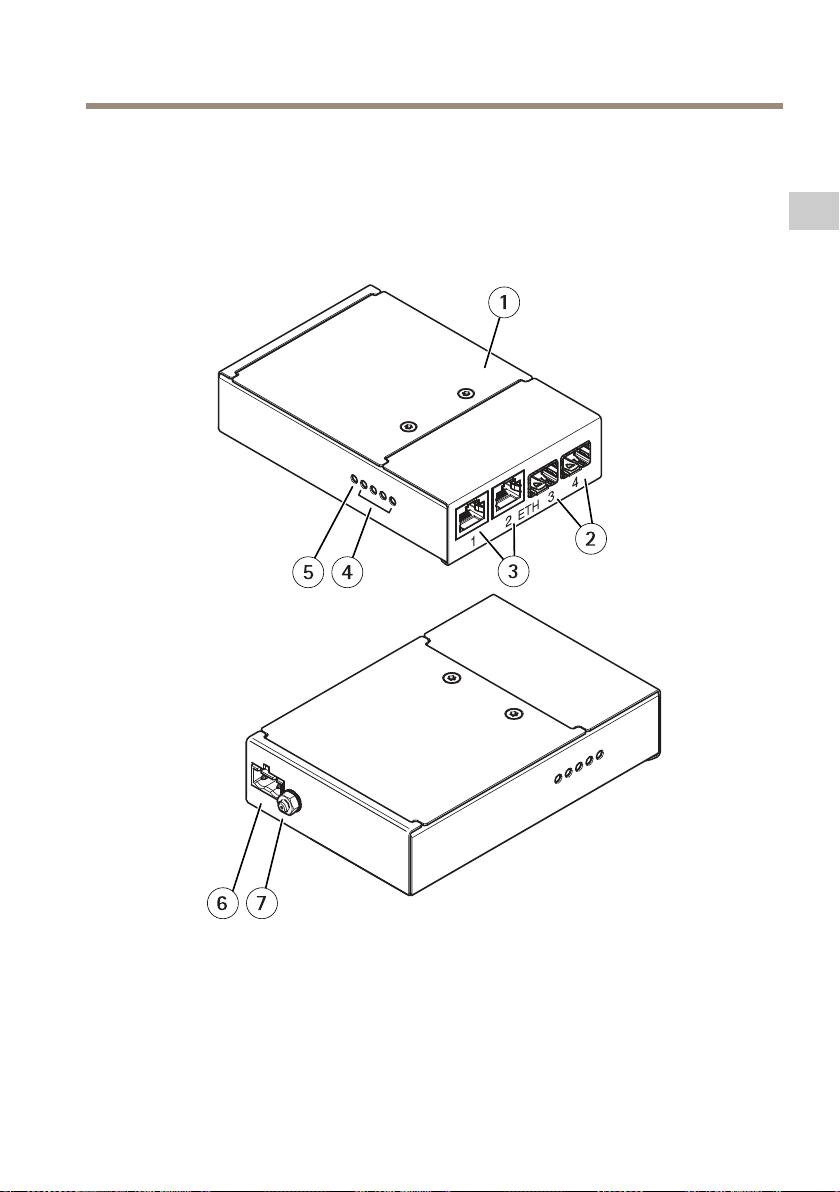
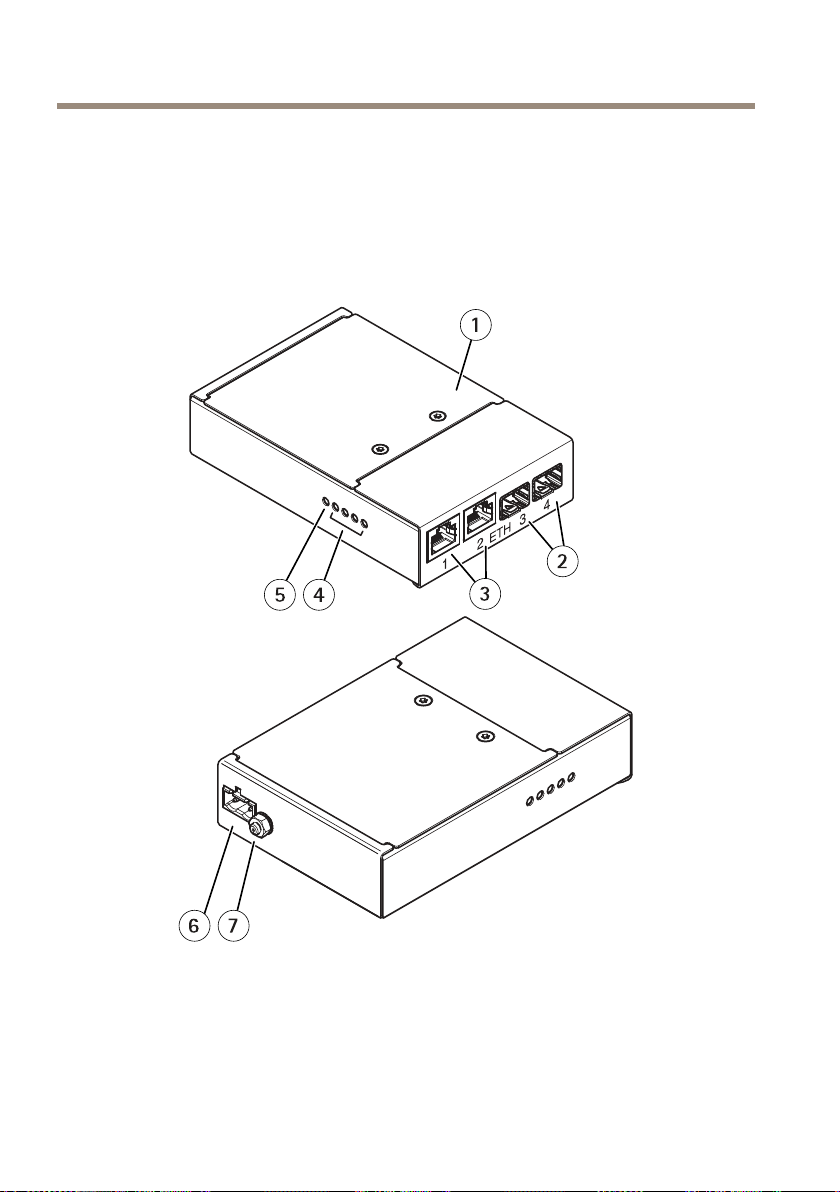
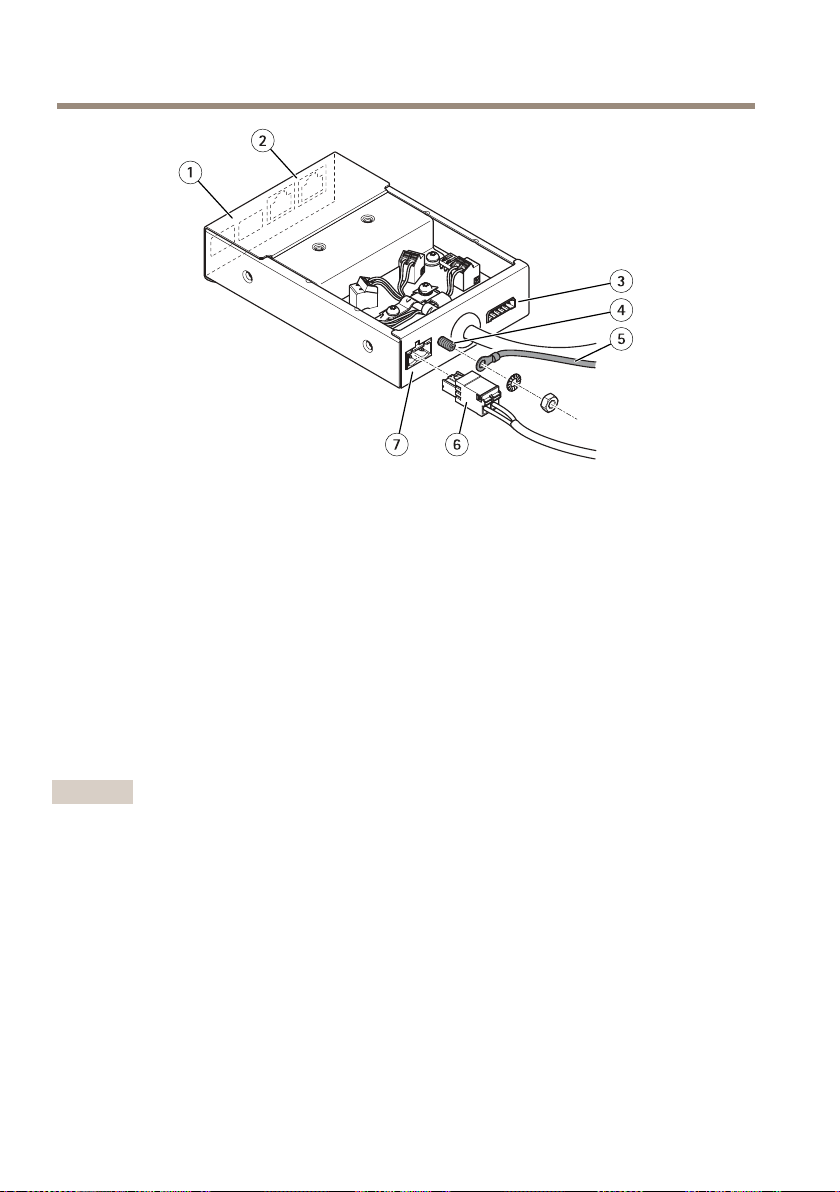
AXIST8606MediaConverterSwitch-externalview
EN
1
Cover
2
NetworkconnectorSFP(2x)
3
NetworkconnectorRJ45(2x)
4
NetworkLEDindicator(4x)
5
PowerLEDindicator
6
Powerconnector(DCoutput)
7
Groundingscrew
7
Page 8
AXIST86MediaConverterSwitchSeries
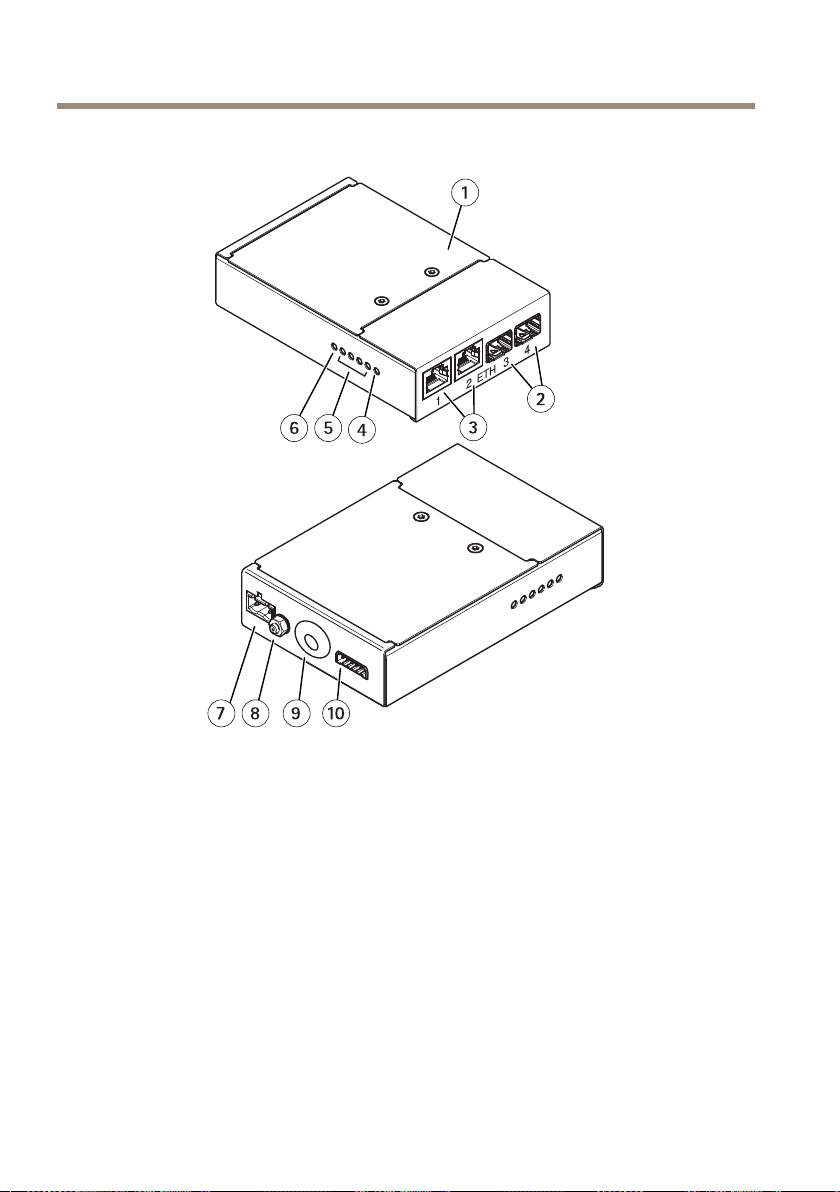
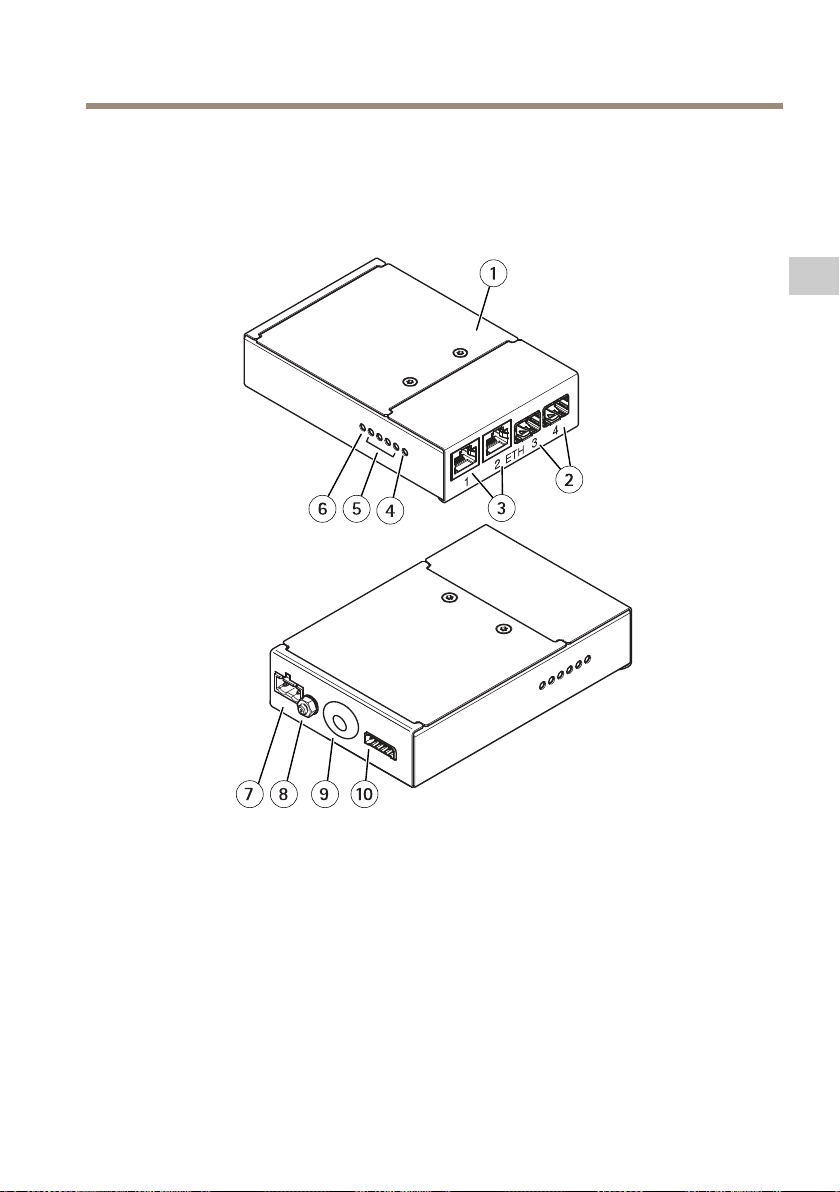
AXIST8607MediaConverterSwitch-externalview
1
Cover
2
NetworkconnectorSFP(2x)
3
NetworkconnectorRJ45(2x)
4
CameranetworkLEDindicator
5
NetworkLEDindicator(4x)
6
PowerLEDindicator
7
Powerconnector(DCoutput)
8
Groundingscrew
9
Multicableinlet
10
I/Oterminalconnector
8
Page 9

AXIST86MediaConverterSwitchSeries
Howtoinstalltheproduct
Recommendedtools
•Torx®screwdriverT10
•Cableshoepliers(forgroundingcable)
•7mmwrench(forgroundingscrew)
•Flatheadscrewdriver2.5mm
•Wirestrippingtool(forcableconnectiontoAXIST8607)
HowtoinstallAXIST8606MediaConverterSwitch
NO
TICE
NO NO
TICE TICE
•Themediaconverterswitchshallbeinstalledinanenvironmentprotectedagainstdust
andwater,forexampleindoorsorinanappropriatecabinet.
•Themediaconverterswitchshallbeconnectedusingshieldednetworkcables(STP)
intendedfortheirspecicuse.Makesurethattheswitchisproperlygrounded.For
regulatoryrequirements,seeElectromagneticcompatibility(EMC)onpage4.
Foranoverviewofthehardwarecomponents,seepage7.
1.Mountthemediaconverterswitchonthewall,orattachittoaDINrailinacabinet.
2.Connectthenetworkcablestothenetworkconnectors(RJ45,SFP)asrequired.
3.Connectthepowercabletothepowerconnector(DCinput).
4.Earththeswitchbyconnectingtothegroundingscrew.
5.MakesuretheLEDindicatorsonthemediaconverterswitchindicatethecorrect
conditions,seeMediaconverterswitchLEDindicatorsonpage16.
Note
IfyouwishtocongureasystemthatusesVLANtags,theproduct’sdipswitchesmustbe
setcorrectly.SeeNetworkconnectordipswitchesonpage19.
EN
HowtoinstallAXIST8607MediaConverterSwitch
NO
TICE
NO NO
TICE TICE
•Makesuretheconnectionstothemainssupplyandconduitshavebeeninstalledbya
trainedprofessional,accordingtothemanufacturer’sinstructionsandincompliance
withlocalregulations.
•Thepowersupply(soldseparately)andthemediaconverterswitchshallbeinstalledinan
environmentprotectedagainstdustandwater,forexampleindoorsorinanappropriate
cabinet.
1.Makesurethemainssupplyisswitchedoff.
9
Page 10
AXIST86MediaConverterSwitchSeries
2.Mountthepowersupplyandthemediaconverterswitchonthewall,orattachthemto
aDINrailinthecabinet.Ifdrillingisrequired,makesuretousedrillbits,screws,and
plugsthatareappropriateforthematerial.
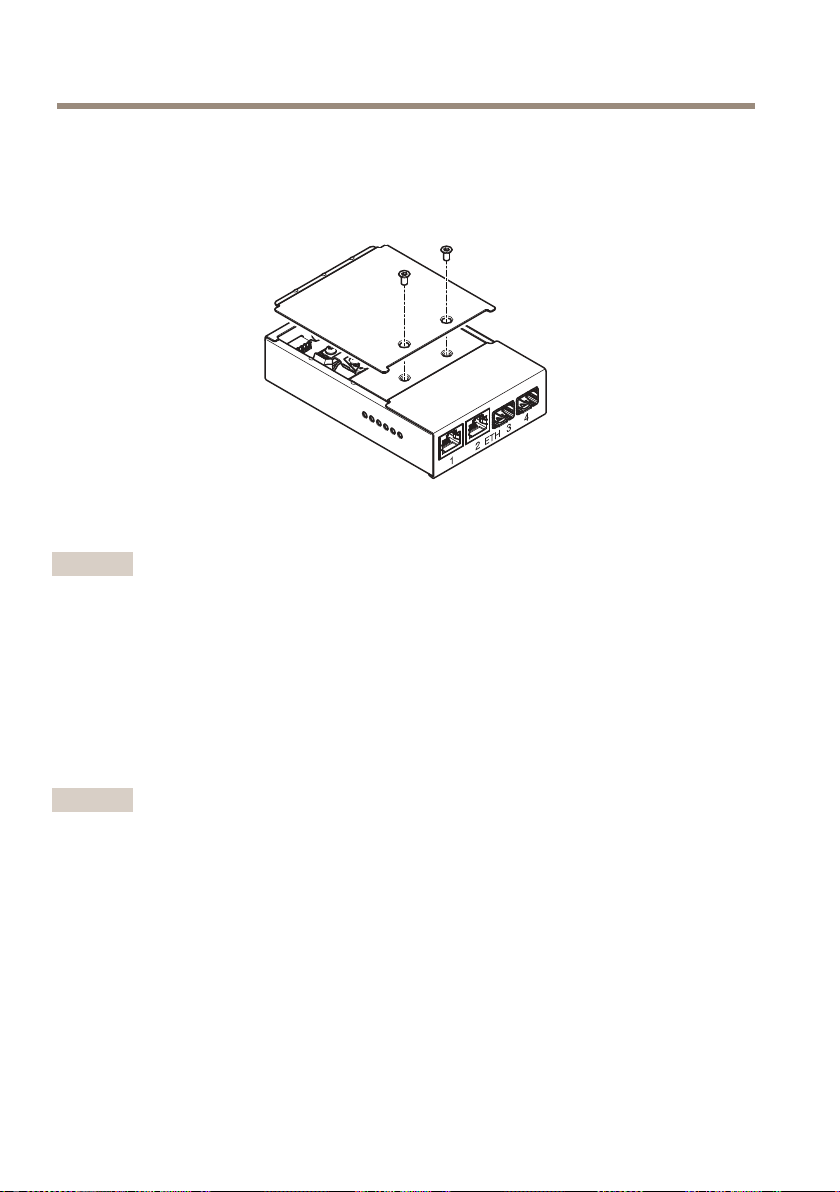
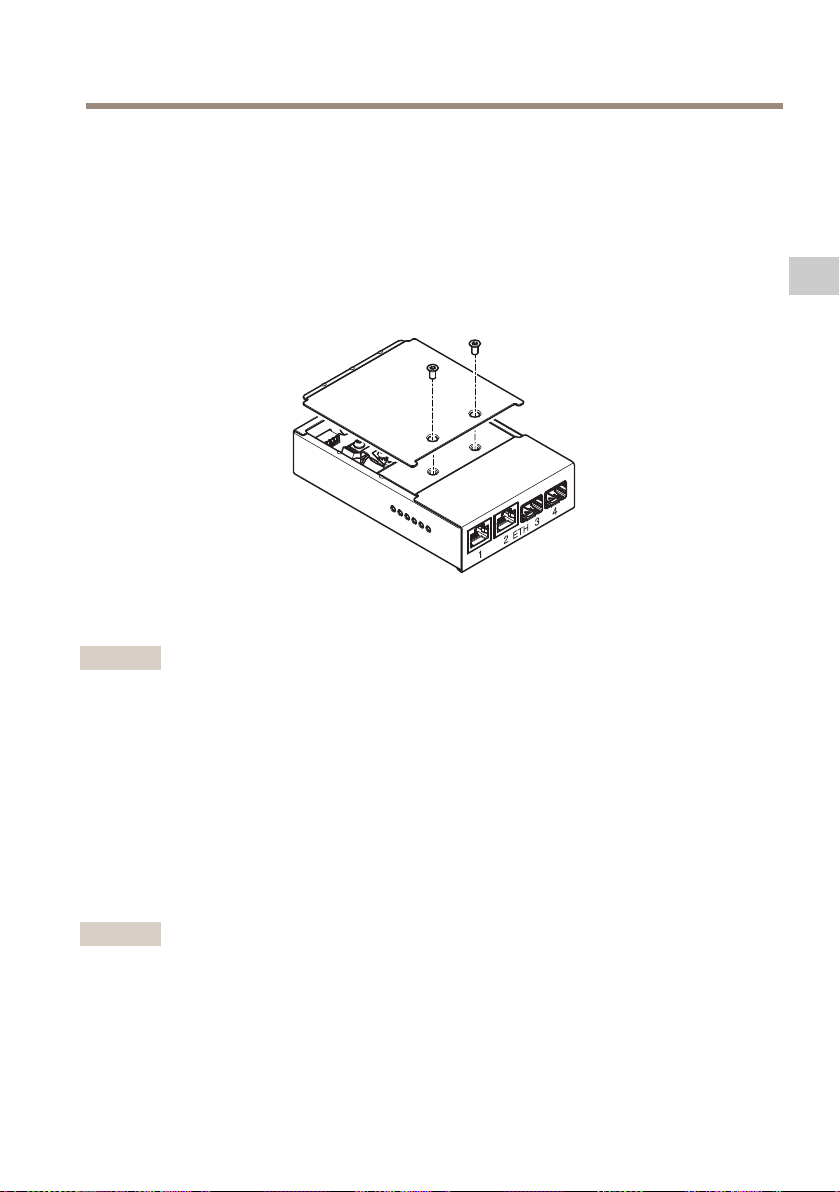
3.Loosenthescrewsandremovethecoverfromthemediaconverterswitch.
4.Pushtheendofthemulticablethroughthecablegasketontherearoftheunit,andpull
itthroughfarenoughsothatitwillbeeasytoworkwith.
Important
Ifyouneedtoshortenthesuppliedcable,followsteps5–10.Otherwise,proceedtostep11.
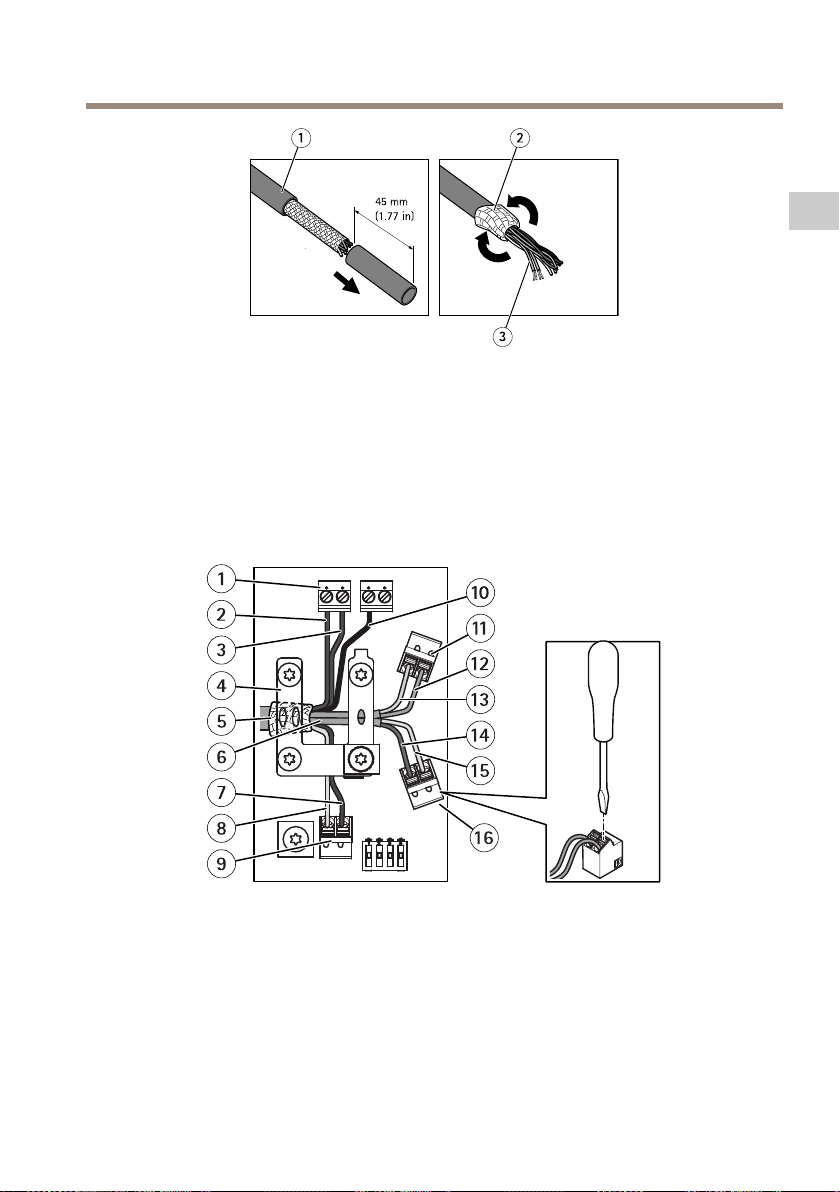
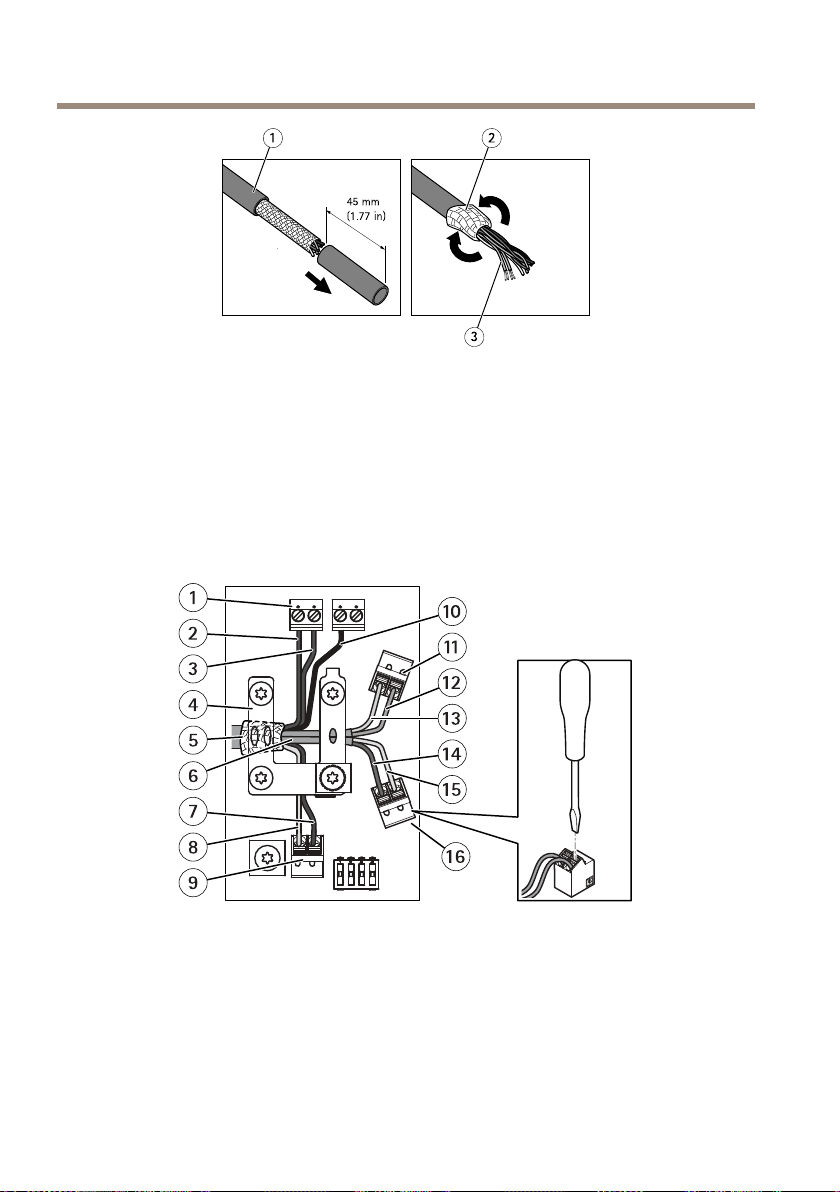
5.Stripoffabout45mm(1.77in)fromtheendofthemulticablejacket.
6.Leavethebraidedshieldintact,butfolditbacksothatitisabout20mm(0.79in)long.
7.Cutoff16mm(0.63in)fromtheEthernetwirefoilshields.
8.Stripoff8mm(0.31in)insulationfromthefourEthernetwires(green,green/white,
orangeandorange/white).
9.Stripoff8mm(0.31in)insulationfromthetwoI/Owires(blueandyellow).
10.Stripoff5mm(0.20in)insulationfromthethreepowerwires(red,redandblack).
Important
•Afterstrippingtheinsulation,thepowerandEthernetwiresmustbetinnedtoensure
properconnections.
•TheEthernetwiresmustbeofequallength,andshouldprotrudeapproximately25mm
(1.0in)fromtheendofthebraidedshield.
10
Page 11
AXIST86MediaConverterSwitchSeries
1
Multicablejacket
2
Braidedshield
3
Ethernetwirefoilshield(2x)
11.ConnectthenetworkandI/Owirestotheinternalnetworkconnectors(1 1,16)andthe
I/Oconnector(9).Opentheseconnectorsbypushingdownontheslotswithaathead
screwdriver.Insertthewireandthenrelease.
12.Connectthegroundandpowerwirestothepowerconnector(DCoutput(1).
EN
1
Powerconnector(DCoutput)
2
Powerwire(red)
3
Powerwire(red)
4
Clamp
5
Braidedshieldcoil
6
Ethernetwireshield(2x)
7
DigitalI/Owire(blue)
8
DigitalI/Owire(yellow)
11
Page 12

AXIST86MediaConverterSwitchSeries
9
I/Oconnector(internal)
10
Groundwire(black)
11
Ethernetconnector(internal)
12
Ethernetwire(green)
13
Ethernetwire(green/white)
14
Ethernetwire(orange)
15
Ethernetwire(orange/white)
16
Ethernetconnector(internal)
13.Carefullypulltheexcessmulticablebackoutthroughthegasket.
14.Makesuretheclampisinplace,insertthebraidedshieldcoilintothegroundclipand
tightenthescrews.
NO
TICE
NO NO
TICE TICE
•Theshieldsandtheclampsurfacesmustbeincompletecontactwitheachothersothat
themulticableisgrounded.
•Makesurethatthemulticablejacketisrmlysecuredbytheclamp.
•Makesureallsurfacesandcontactsarecleanandfreefromscrapshieldmaterial.
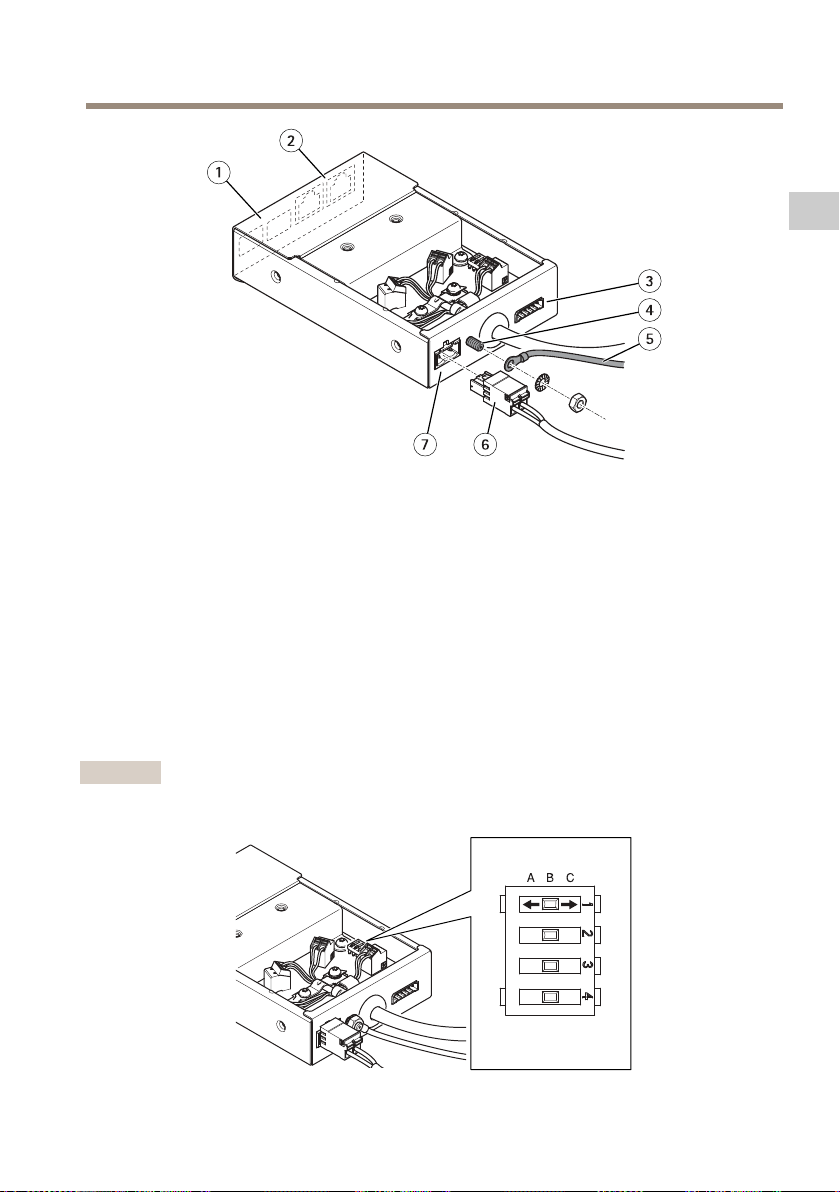
15.Connectthenetworkcablestotheexternalnetworkconnectors(RJ45,SFP)asrequired.
Note
AnSFPmodule(notincluded)mustbeusedwhenconnectinganopticalbercable.
16.Ifused,connectanI/OdevicetotheexternalI/Oconnector.
17.Connectthepowercable(DCinput)tothepowerconnector(DCinput)viatheterminal
blockplug.
18.Attachthegroundwiretothegroundscrew.
12
Page 13
AXIST86MediaConverterSwitchSeries
1
NetworkconnectorSFP(external)(2x)
2
NetworkconnectorRJ45(external)(2x)
3
I/Oconnector(external)
4
Groundscrew
5
Groundwire
6
Powercable(DCinput)
7
Powerconnector(DCinput)
EN
19.Ifconnectingseveralmediaconverterswitchesinadaisychain,youneedtosetthe
dipswitchofeachoutgoingnetworkconnectorportthatconnectstoanothermedia
converterswitchtopositionC.
Leavethedipswitchinitsdefaultposition(positionB)whenconnectingtheportdirectly
tothenetwork.Formoreinformation,seeMediaconverterswitchconnectorsonpage16.
Important
Ifthesystemisnotdened,usethedefaultdipswitchsetting(positionB).
13
Page 14
AXIST86MediaConverterSwitchSeries
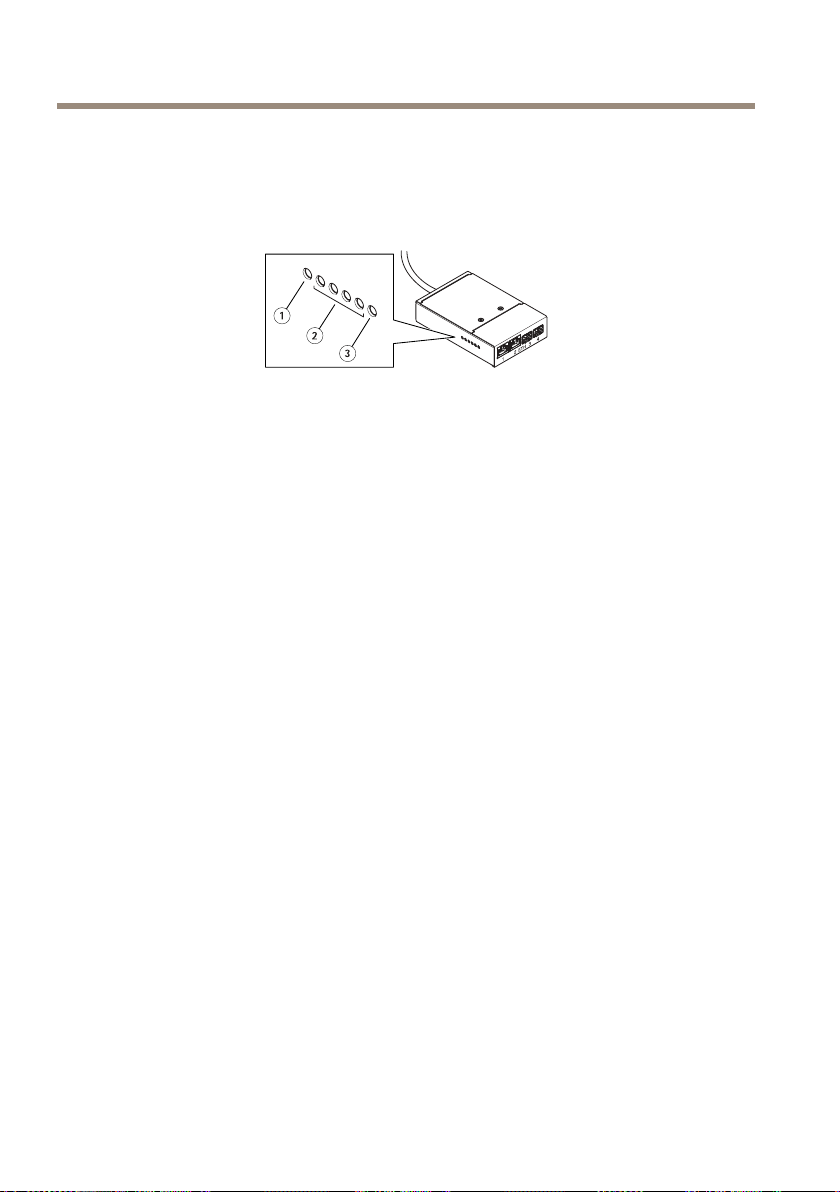
20.Replacethecoverontheswitchandfastenthescrews.
21.Switchonthepowersupply.
22.MakesuretheLEDindicatorsonthemediaconverterswitchindicatethecorrect
conditions.Formoreinformation,seeMediaconverterswitchLEDindicatorsonpage16.
1
PowerLEDindicator
2
NetworkLEDindicator(4x)ETH1/2/3/4
3
CameraLEDindicator
14
Page 15

AXIST86MediaConverterSwitchSeries
Furtherinformation
•Forthelatestversionofthisdocument,seeaxis.com
•Forusefulonlinetrainingsandwebinars,seeaxis.com/academy
Optionalaccessories
Foracompletelistofavailableaccessoriesforthisproduct,gototheproduct’spageonaxis.com
andselectSoftware&Accessories.
EN
15
Page 16
AXIST86MediaConverterSwitchSeries
Specifications
Tondthelatestversionoftheproduct’sdatasheet,gototheproductpageataxis.comand
locateSupport&Documentation.
MediaconverterswitchLEDindicators
LED
Power
Network(4x)
Cameranetwork
(AXIST8607only)
Color
Unlit
GreenDCpowerconnected.
Amber10Mbitconnection.Flashesduringactivity.
Green
Green
Indication
DCpowerunconnectedorcurrentprotectionengaged(power
overload)
100/1000Mbitconnection.Flashesduringactivity.
100Mbitconnection.Flashesduringactivity.
Connectors
Mediaconverterswitchconnectors
NO
TICE
NO NO
TICE TICE
Theproductshallbeconnectedusingashieldednetworkcable(STP).Allcablesconnecting
theproducttothenetworkshallbeintendedfortheirspecicuse.Makesurethatthe
networkdevicesareinstalledinaccordancewiththemanufacturer’sinstructions.For
informationaboutregulatoryrequirements,seeElectromagneticcompatibility(EMC)on
page4.
Important
Themediaconverterswitchdoesnotsupporthotswapping.Disconnectpowerfromthe
switchbeforeswappingcameras.Anattempttohotswapcouldcausetheswitchtofreeze,
inwhichcaseitmustberestarted.
16
Page 17
AXIST86MediaConverterSwitchSeries
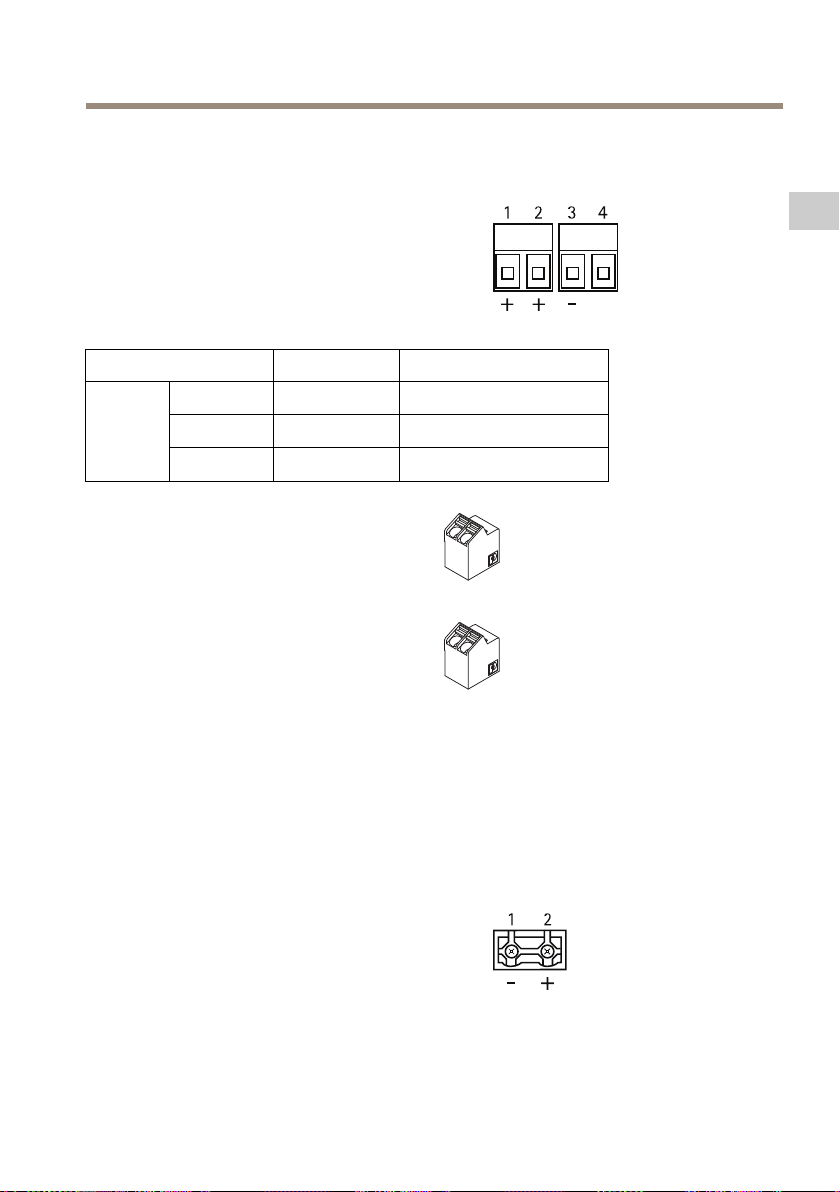
Cameraconnectors
Powerconnector
Two2-pinterminalblocksforpoweroutput(pin4
notused).
FunctionPinNotes
DC
output
Networkconnectors
2-pinEthernetterminalblock(x2).
I/Oterminalconnector
2-pinterminalblock.
24VDC
0VDC(-)
N/A
1,2
3
4
EN
Powerouttocamera
N/A
Externalconnectors
GroundscrewGroundscrewforconnectingthemediaconverter
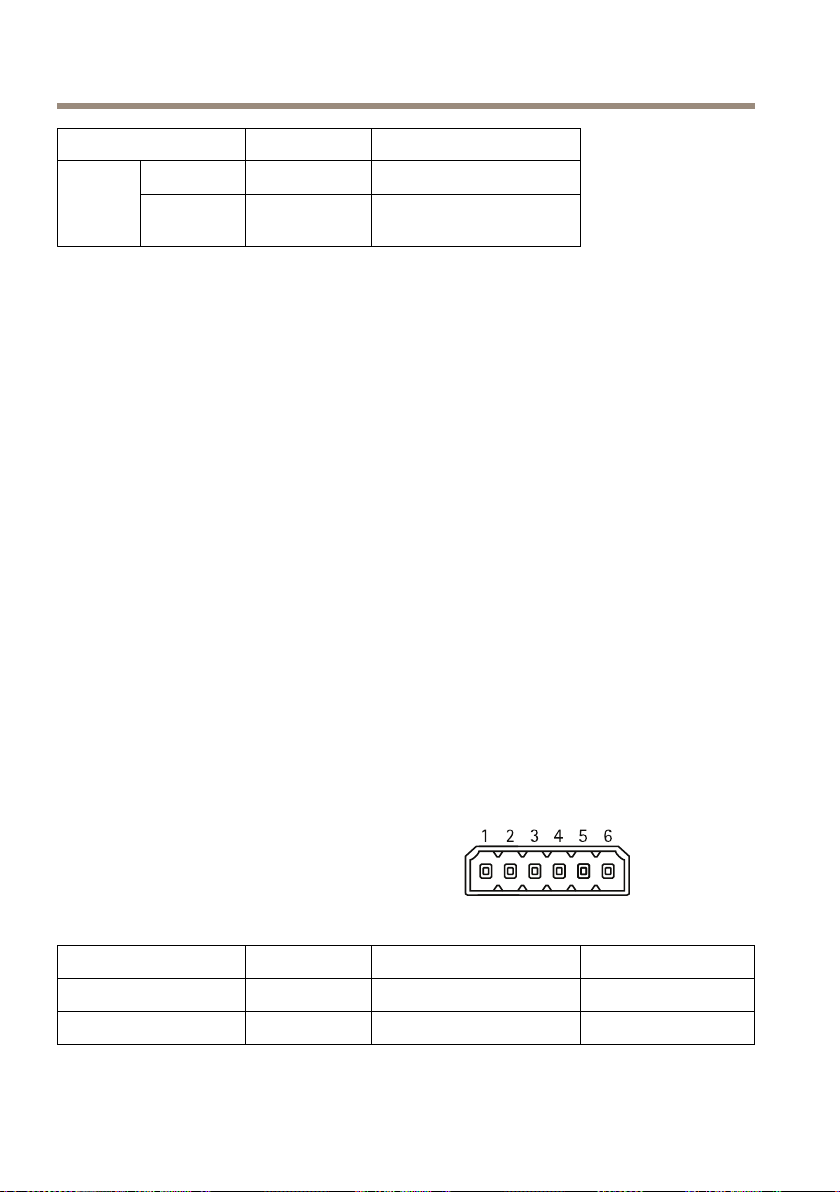
Powerconnector
2-pinterminalblockforpowerinput.
switchtoearthground.Makesurethatbothendsof
thegroundingwireareincontactwiththeirrespective
groundingsurfaces.
17
Page 18
AXIST86MediaConverterSwitchSeries
FunctionPinNotes
DCinput
0VDC(-)
24VDC
1
2
Powerinfrompower
supply(soldseparately)
NetworkconnectorRJ45
NetworkslotSFP
EachRJ45andSFPporthasitsowndipswitch.Thedipswitchescontrolhowtheportforwards
data.Formoreinformation,seepage19.
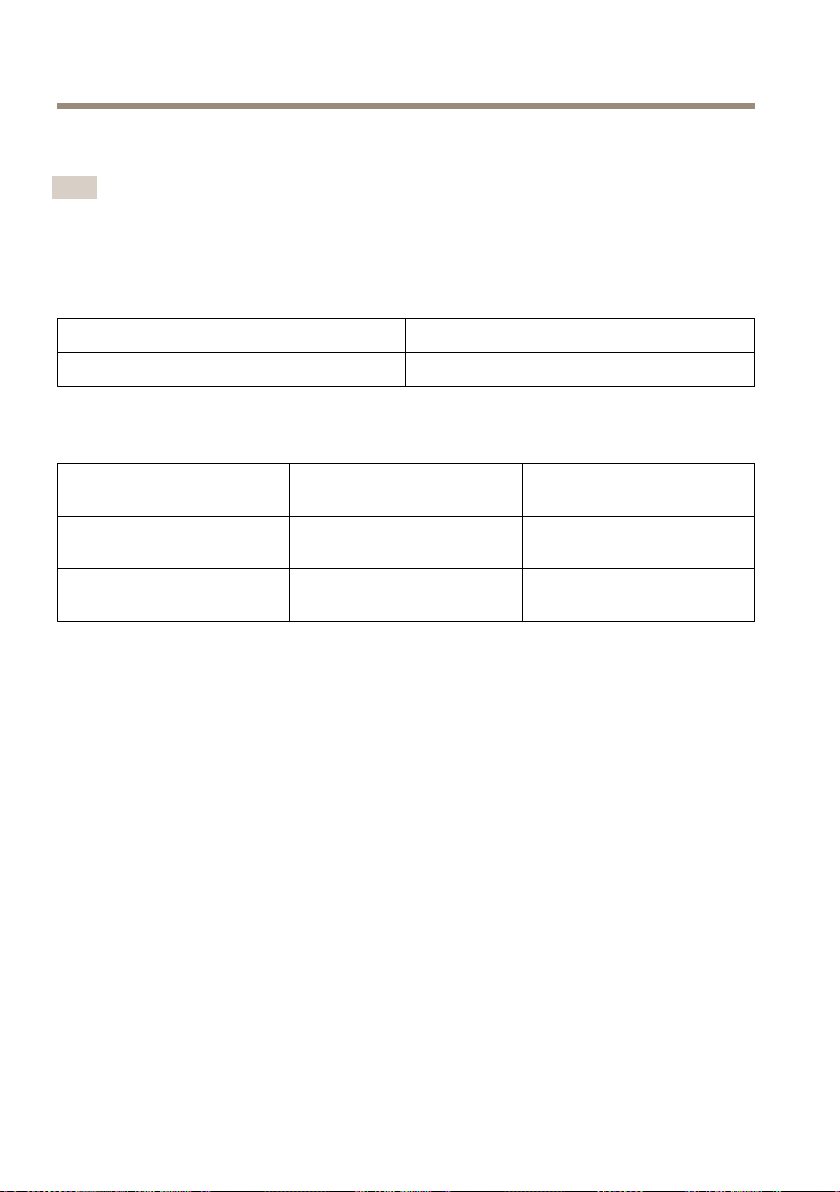
I/Oterminalconnector
6-pincongurableI/Oterminalblock,whichisconnectedtothecamerathroughthemulticable.
Usewithexternaldevicesincombinationwith,forexample,tamperingalarms,motiondetection,
eventtriggering,timelapserecordingandalarmnotications.Inadditiontothe0VDC
referencepointandpower(DCoutput),theI/Oconnectorprovidestheinterfaceto:
•Digitaloutput–ForconnectingexternaldevicessuchasrelaysandLEDs.Connected
devicescanbeactivatedbytheVAPIX®ApplicationProgrammingInterface,output
buttonsontheLiveViewpageorbyanActionRule.Theoutputwillshowasactive
(shownunderSystemOptions>Port&Devices>PortStatus)ifthealarmdevice
isactivated.
•Digitalinput–Analarminputforconnectingdevicesthatcantogglebetween
anopenandclosedcircuit,forexample:PIRs,door/windowcontacts,glassbreak
detectors,etc.Whenasignalisreceivedthestatechangesandtheinputbecomes
active(shownunderSystemOptions>Port&Devices>PortStatus).
6-pinterminalblocksfor:
TwoRJ45connectors(10/100Base-T)fornetwork.
TwoSFPslots(100Base-FX/1000Base-X)fornetwork.
•DigitalInput/Output
•Power(DCoutput)
•0VDC(-)
FunctionPinNotes
0VDC(-)
DCoutput
1,4,6
2
Powerout
Specications
0VDC
12VDC,50mA
18
Page 19
AXIST86MediaConverterSwitchSeries
3
I/O1(InputorOutput)
5
I/O2(InputorOutput)
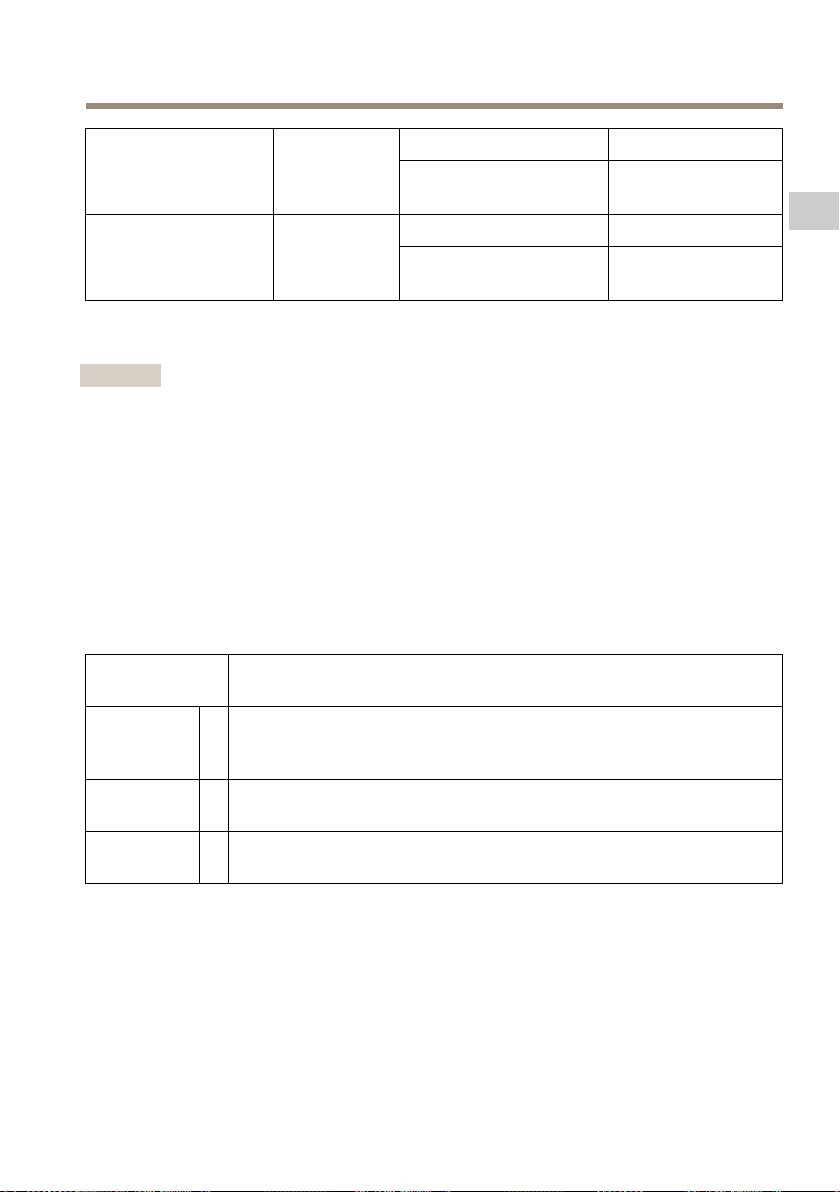
Networkconnectordipswitches
Important
Alwaysusethedefaultdipswitchsetting(positionB)iftherelationshipbetweendevicesin
thesystemisnotdened.
ThecameraattachesaparticularVLANtagtoallitsforwardedmulticastpackages.Themedia
converterswitchmanageshowthesemulticastpackagesareforwardedbetweencameras,media
converterswitchesandothernetworkdevices.Thisisespeciallyusefulwhenconnectingthecamera
andmediaconverterswitchtothenetworkinadaisychain.
Bychangingthepositionofthedipswitches,eachnetworkconnectorportinthemediaconverter
switchcanbeconguredtomanagemulticastsinthreedifferentways.
Dipswitch
position
Default
(middle)
LeftABlockmulticastpackagesthathaveaVLANtag.Usethissettingwhen
Right
Description
BRemoveVLANtagsfromforwardedmulticastpackages.Usethissetting
whenconnectingtothenetwork,directlyorthrougharouterornetwork
switch.
connectingtoadevicethatisnotintendedformulticastviewing.
ForwardmulticastpackageswithaVLANtag.Usethissettingwhen
C
connectingtoanothermediaconverterswitch.
Digitalinput
Digitaloutput(transistor–
opencollector)
Digitalinput
Digitaloutput(transistor–
opencollector)
0tomax30VDC Congurable
0tomax30VDC,
opendrain,100mA
0tomax30VDC Congurable
0tomax30VDC,
opendrain,100mA
EN
VLANtagsareusedtocreateindependentlogicalnetworks,virtuallocalareanetworks(VLANs),
withinaphysicalnetwork.Multiplemediaconverterswitchesthatareconnectedtoeachother
inadaisychainaremembersofthesameVLAN.Themediaconverterswitchestagthemulticast
packagesmovingbetweenthemsothatthenextmediaconverterswitchinlineknowsthe
destinationofthepackages.Inotherwords,theVLANtagservesasaVLANidentier.VLAN
taggingshouldonlybeusedwhenusingmultiplecamerasandmediaconverterswitchesbecause
19
Page 20
AXIST86MediaConverterSwitchSeries
forwardingmulticastpackageswithaVLANtagonlyservesapurposewhentheportisconnected
toanothermediaconverterswitch,whichmightbeconnectedtopotentialviewers.
Note
Whenconnectinganoutgoingmediaconverterswitchnetworkconnectortoanothertypeof
networkdevice,setthedipswitchtopositionAtoprotectthedevicefrommulticasttrafc.
Operatingconditions
Temperature
Humidity
Powerspecications
ProductVoltage
AXIST8606MediaConverter
Switch
AXIST8607MediaConverter
Switch
24VDC
24VDC
-40°Cto75°C(-40°Fto167°F)
10–85%RH(non-condensing)
Minimumcurrentratingfor
externalpowersupply
0.15A
3.2A
20
Page 21

AXIST86MediaConverterSwitchSeries
Safetyinformation
Hazardlevels
DANGER
Indicatesahazardoussituationwhich,ifnotavoided,willresultindeathorseriousinjury.
WARNING
Indicatesahazardoussituationwhich,ifnotavoided,couldresultindeathorseriousinjury.
CAUTION
Indicatesahazardoussituationwhich,ifnotavoided,couldresultinminorormoderate
injury.
NO
TICE
NO NO
TICE TICE
Indicatesasituationwhich,ifnotavoided,couldresultindamagetoproperty.
Othermessagelevels
Important
Indicatessignicantinformationwhichisessentialfortheproducttofunctioncorrectly.
Note
Indicatesusefulinformationwhichhelpsingettingthemostoutoftheproduct.
EN
21
Page 22

AXIST86MediaConverterSwitchSeries
Safetyinstructions
WARNING
TheAxisproductshallbeinstalledbyatrainedprofessional,andincompliancewithlocal
lawsandregulations.
NO
TICE
NO NO
TICE TICE
•TheAxisproductshallbeusedincompliancewithlocallawsandregulations.
•Axisrecommendsusingashieldednetworkcable(STP)CAT5orhigher.
•StoretheAxisproductinadryandventilatedenvironment.
•AvoidexposingtheAxisproducttoshocksorheavypressure.
•Donotinstalltheproductonunstablepoles,brackets,surfacesorwalls.
•Donotinstalltheproductonvibratingpoles,brackets,surfacesorwalls.
•UseonlyapplicabletoolswheninstallingtheAxisproduct.Usingexcessiveforcewith
powertoolscouldcausedamagetotheproduct.
•Donotusechemicals,causticagents,oraerosolcleaners.
•Useacleanclothdampenedwithpurewaterforcleaning.
•Useonlyaccessoriesthatcomplywiththetechnicalspecicationofyourproduct.These
canbeprovidedbyAxisorathirdparty.AxisrecommendsusingAxispowersource
equipmentcompatiblewithyourproduct.
•UseonlysparepartsprovidedbyorrecommendedbyAxis.
•Donotattempttorepairtheproductyourself.ContactAxissupportoryourAxisreseller
forservicematters.
•Thepowersupplyshallbepluggedintoasocketoutletinstalledneartheproductand
shallbeeasilyaccessible.
Transportation
NO
TICE
NO NO
TICE TICE
•WhentransportingtheAxisproduct,usetheoriginalpackagingorequivalenttoprevent
damagetotheproduct.
22
Page 23

AXIST86MediaConverterSwitchSeries
Contenudel’emballage
•CommutateurdeconvertisseurdemédiaAXIST8606/T8607
•Kitdemontage
-ClippourleclipDIN
-Vis(x2)
•Documentationimprimée
-Guided’installation(cedocument)
FR
23
Page 24
AXIST86MediaConverterSwitchSeries
Aperçudumatériel
Pourconnaîtrelescaractéristiquesdescomposantsmatériels,consultezCaractéristiquespage33.
CommutateurdeconvertisseurdemédiaAXIST8606-vue
extérieure
1
Couvercle
2
ConnecteurréseauSFP(x2)
3
ConnecteurréseauRJ45(x2)
4
VoyantLEDréseau(x4)
5
VoyantLEDd’alimentation
6
Connecteurd'alimentation(sortieCC)
24
Page 25
AXIST86MediaConverterSwitchSeries
7
Visdemiseàlaterre
CommutateurdeconvertisseurdemédiaAXIST8607-vue
extérieure
FR
1
Couvercle
2
ConnecteurréseauSFP(x2)
3
ConnecteurréseauRJ45(x2)
4
VoyantLEDduréseaudecaméra
5
VoyantLEDréseau(x4)
6
VoyantLEDd’alimentation
7
Connecteurd'alimentation(sortieCC)
8
Visdemiseàlaterre
9
Entréedecâblemultiple
10
ConnecteurpourterminalE/S
25
Page 26

AXIST86MediaConverterSwitchSeries
Commentinstallerleproduit
Outilsrecommandés
•TournevisTorx®T10
•Pinceàsertirpourcossesdecâble(câbledemiseàlaterre)
•Clé7mm(pourvisdemiseàlaterre)
•Tournevisplat2,5mm
•Outildedénudagedecâble(pourraccordementdecâbleàAXIST8607)
Installationducommutateurduconvertisseurdemédia
AXIST8606
VIS
A AAVIS VIS
•Lecommutateurduconvertisseurdemédiadoitêtreinstallédansunenvironnement
protégécontrelapoussièreetl'eau,parexempleenintérieuroudansunearmoire.
•Lecommutateurduconvertisseurdemédiadoitêtrebranchéauréseauàl'aidedecâbles
blindés(STP)prévusàceteffet.Assurez-vousquelecommutateurestconvenablement
misàlaterre.Pourconnaîtrelesexigencesréglementaires,reportez-vousà.
Pouruneprésentationdescomposantsmatériels,consultezpage24.
1.Fixezl'interrupteurduconvertisseurdemediasurlemurouxez-lesurunrailDIN
dansl'armoire.
2.Connectezlescâblesréseauauxconnecteursréseau(RJ45,SFP),commerequis.
3.Connectezlecâbled'alimentationauconnecteurd'alimentation(DCinput).
4.Mettezl'interrupteuràlaterreenleconnectantàlavisdemiseàlaterre.
5.Assurez-vousquelesvoyantsLEDsurlecommutateurdeconvertisseurdemédia
indiquentlesconditionscorrectes,reportez-vousàVoyantsLEDducommutateurde
convertisseurdemédiapage33.
Note
SivoussouhaitezcongurerunsystèmequiutilisedesétiquettesVLAN,les
commutateursDIPduproduitdoiventêtrerégléscorrectement.Cf.CommutateurDIPde
connecteurréseaupage36.
Installationducommutateurduconvertisseurdemédia
AXIST8607
VIS
A AAVIS VIS
•Ilfauts'assurerquelesbranchementsàl'alimentationdesecteuretconduitsontété
effectuésparunprofessionnelqualié,selonlesinstructionsdufabricantetenconformité
aveclaréglementationlocale.
26
Page 27
AXIST86MediaConverterSwitchSeries
•L'alimentation(vendueséparément)etlecommutateurdeconvertisseurdemédiadoivent
êtreinstallésdansunenvironnementàl'abridelapoussièreetdel'eau,parexempleen
intérieuroudansunearmoireappropriée.
1.Assurez-vousquel'alimentationdesecteurestarrêtée.
2.Montezl'alimentationetlecommutateurduconvertisseurdemédiasurlemurou
attachez-lesàunrailDINdansl'armoire.S’ils’avèrenécessairedepercer,vériezqueles
forets,visetchevillesàutilisersontappropriéspourlematériau.
3.Desserrezlesvisetretirezlecouvercleducommutateurdeconvertisseurdemédia.
4.Passezl'extrémitéducâblemultipledanslejointdecâblesituéàl'arrièredel'unitéet
tirezsufsammentdessusdesortequ'ilsoitfacileàmanipuler.
Important
Sivousavezbesoinderaccourcirlecâblefourni,suivezlesétapes5à10.Sinon,passezà
l'étape11.
FR
5.Enlevezenviron45mm(1,77po.)enpartantdel'extrémitédelagaineducâblemultiple.
6.Netouchezpasaublindagetressé,maisrepliez-lepourqu'ilfasseenviron20mm
(0,79po.)delong.
7.Coupez16mm(0,63po.)delafeuilledeblindageducâbleEthernet.
8.Retirez8mm(0,31po)d'isolantdesquatrecâblesEthernet(vert,vert/blanc,orangeet
orange/blanc).
9.Retirez8mm(0,31po)d'isolantdesdeuxcâblesE/S(bleuetjaune).
10.Retirez5mm(0,20po)d'isolantdestroiscâblesd'alimentation(rouge,rougetetnoir).
Important
•Unefoisl'isolantretiré,lescâblesEthernetetd'alimentationdoiventêtrerecouverts
d'étainpourassurerunebonneconnexion.
•LescâblesEthernetdoiventêtredelamêmelongueuretdoiventdépasserdel'extrémité
dublindagetresséd'environ25mm(1po).
27
Page 28
AXIST86MediaConverterSwitchSeries
1
Gainedecâblemultiple
2
Blindagetressé
3
FeuilledeblindageducâbleEthernet(x2)
11.ConnectezleslsréseauetleslsE/Sauxconnecteursderéseauinterne(11,16)etau
connecteurE/S(9).Pourouvrircesconnecteurs,abaissezlalanguetteàl'aided'un
tournevisplat.Insérezlel,puisrefermez.
12.Connectezleslsdemiseàlamasseetd'alimentationauconnecteurd'alimentation
(sortieCC(1)).
1
Connecteurd'alimentation(sortieCC)
2
Fild'alimentation(rouge)
3
Fild'alimentation(rouge)
4
Pince
5
Bobinedeblindagetressé
6
BlindageducâbleEthernet(x2)
7
FilderéseauE/Snumérique(bleu)
28
Page 29

AXIST86MediaConverterSwitchSeries
8
FilderéseauE/Snumérique(jaune)
9
ConnecteurE/S(interne)
10
Fildemiseàlamasse(noir)
11
ConnecteurEthernet(interne)
12
CâbleEthernet(vert)
13
CâbleEthernet(vert/blanc)
14
CâbleEthernet(orange)
15
CâbleEthernet(orange/blanc)
16
ConnecteurEthernet(interne)
13.Tirezavecprécautionl'excédentdecâblemultipleetfaiteslerepasserparlejoint.
14.Assurez-vousquelapinceestenplace,insérezlabobinedeblindagetressédansle
clipdemiseàlamasseetserrezlesvis.
VIS
A AAVIS VIS
•Lesblindagesetlessurfacesdelapincedoiventêtreencontacttotal,desortequele
câblemultiplesoitmisàlamasse.
•Assurez-vousquelagainedecâblemultipleestsolidementxéeparlabride.
•Assurez-vousquetouteslessurfacesetquetouslescontactssontpropresetexemptsde
résidusdematériauxdeblindage.
15.Connectezlescâblesréseauauxconnecteursréseauexternes(RJ45,SFP),sinécessaire.
Note
UnmoduleSFP(nonfourni)doitêtreutilisépourlaconnexiond'uncâbleàbresoptiques.
FR
16.Lecaséchéant,connectezundispositifE/SauconnecteurE/Sexterne.
17.Connectezlecâbled'alimentation(entréeCC)auconnecteurd'alimentation(entrée
CC)vialachedublocterminal.
18.Reliezleldemiseàlaterreàlavisdemiseàlaterre.
29
Page 30
AXIST86MediaConverterSwitchSeries
1
ConnecteurréseauSFP(externe)(x2)
2
ConnecteurréseauRJ45(externe)(x2)
3
ConnecteurE/S(externe)
4
Visdemiseàlaterre
5
Fildemiseàlaterre
6
Câbled'alimentation(entréeCC)
7
Connecteurd'alimentation(entréeCC)
19.Sivousconnectezplusieurscommutateursdeconvertisseurdemédiaencascade,vous
devezcongurerlecommutateurDIPdechaqueportduconnecteurréseausortantàun
autrecommutateurdeconvertisseurdemédiaàlapositionC.
LaissezlecommutateurDIPsursapositionpardéfaut(positionB)lorsquevous
connectezleportdirectementauréseau.Pourensavoirplus,consultezConnecteursdu
commutateurdeconvertisseurdemédiapage33.
Important
Silesystèmen'estpasdéni,utilisezlecommutateurDIPsursapositionpardéfaut
(positionB).
30
Page 31

AXIST86MediaConverterSwitchSeries
20.Replacezlecouverclesurlecommutateur,puisserrezlesvis.
21.Branchezl'alimentationélectrique.
22.Assurez-vousquelesvoyantsLEDsurlecommutateurdeconvertisseurdemédia
indiquentlesconditionsappropriées.Pourensavoirplus,consultezVoyantsLEDdu
commutateurdeconvertisseurdemédiapage33.
FR
1
VoyantLEDd’alimentation
2
VoyantDELréseau(x4)ETH1/2/3/4
3
Voyantdelacaméra
31
Page 32

AXIST86MediaConverterSwitchSeries
Informationscomplémentaires
•Pourobtenirlaversionlaplusàjourdecedocument,voiraxis.com
•Pouraccéderàdesformationsetwebinairesenligneutiles,voiraxis.com/academy
Accessoiresenoption
Pourunelistecomplètedesaccessoiresdisponiblespourceproduit,accédezàlapageduproduit
suraxis.cometsélectionnezLogicieletaccessoires.
32
Page 33

AXIST86MediaConverterSwitchSeries
Caractéristiques
Pourobtenirladernièreversiondelachetechniqueduproduit,rendez-voussurlapageduproduit
surlesiteaxis.comettrouvezl'optionSupport&Documentation(Assistanceetdocumentation).
VoyantsLEDducommutateurdeconvertisseurdemédia
LED
Alimentation
Réseau(x4)
Caméraréseau
(AXIST8607seulement)
Couleur
Éteint
Vert
OrangeConnexion10Mbit.Clignotependantl'activité.
Vert
Vert
Indication
AlimentationCCdéconnectéeoudispositifdeprotection
ampère-métriqueactivé(surcharge)
AlimentationCCconnectée.
Connexion100/1000Mbit.Clignotependantl'activité.
Connexion100Mbit.Clignotependantl'activité.
Connecteurs
Connecteursducommutateurdeconvertisseurdemédia
VIS
A AAVIS VIS
Leproduitdoitêtreconnectéàl'aided'uncâbleréseaublindé(STP).Touslescâbles
reliantleproduitaucommutateurréseaudoiventêtredestinésàleurusagespécique.
Assurez-vousquelespériphériquesréseausontinstallésconformémentauxinstructions
dufabricant.Pourplusd’informationssurlesexigencesréglementaires,consultez
Electromagneticcompatibility(EMC)onpage4.
Important
Lecommutateurdeconvertisseurdemédianepeutêtreremplacéàchaud.Déconnectez
l'alimentationducommutateuravantderemplacerlescaméras.Unremplacementàchaud
peutbloquerlecommutateur,auquelcasildoitêtreredémarré.
FR
33
Page 34

AXIST86MediaConverterSwitchSeries
Connecteursdelacaméra
Connecteurd'alimentation
Blocsterminauxà2brochespourlasortie
d'alimentation(labroche4n'estpasutilisée).
FonctionBrocheRemarques
SortieCC
Connecteursréseau
BlocterminalEthernetà2broches(x2).
ConnecteurpourterminalE/S
Blocterminalà2broches.
24VCC
0VCC(-)
Sansobjet
1,2
3
4
Sortied'alimentationvers
lacaméra
Sansobjet
Connecteursexternes
Visdemiseàlaterre
Connecteurd'alimentation
Blocterminalà2brochespourl'alimentation.
Visdemiseàlaterrepourraccorderàlaterrele
commutateurdeconvertisseurdemédia.Assurez-vous
quelesdeuxextrémitésducâbledemiseàlaterre
sontencontactaveclessurfacesdemiseàlaterre
correspondantes.
34
Page 35

AXIST86MediaConverterSwitchSeries
FonctionBrocheRemarques
Entrée
CC
0VCC(-)
24VCC
1
2
Entréedecourant
provenantde
l'alimentation(vendue
séparément)
FR
ConnecteurréseauRJ45
EmplacementréseauSFP
ChaqueportRJ45etSFPutilisesonproprecommutateurDIP.LescommutateursDIPcontrôlentla
transmissiondesdonnéesparleport.Pourensavoirplus,consultezpage36.
ConnecteurpourterminalE/S
BlocterminalE/Scongurableà6brochesquiestconnectéàlacaméraàtraverslecâble
multiple.Utilisez-leavecdespériphériquesexternesassociésauxapplicationstellesque
lesalarmesdedétérioration,ladétectiondemouvement,ledéclenchementd'événements,
l'enregistrementàintervallesetlesnoticationsd'alarme.Enplusdupointderéférence0VCC
etdel'alimentation(sortieCC),leconnecteurd'E/Sfournituneinterfaceauxélémentssuivants:
•Sortienumérique–Permetdeconnecterdesdispositifsexternes,commedesrelais
oudesvoyants.Lesappareilsconnectéspeuventêtreactivésparl'interfacede
programmationVAPIX®,desboutonsdesortiesurlapageLiveView(Vidéoendirect)
ouparunerègled'action.Lasortieestconsidéréecommeétantactive(afchéedans
SystemOptions>Port&Devices>PortStatus(Optionsdusystème>Portet
périphériques>Étatduport))siledispositifdel'alarmeestactivé.
•Entréenumérique–Entréed'alarmeutiliséepourconnecterdesdispositifspouvant
passerd'uncircuitouvertàuncircuitfermé,parexemple:détecteursinfrarouge
passifs,contactsdeporte/fenêtre,détecteursdebrisdeverre,etc.Àlaréception
d'unsignal,l'étatchangeetl'entrées'active(sousSystemOptions>Port&Devices
>PortStatus(Optionsdusystème>Portetdispositifs>Étatduport)).
Blocterminalà6brochespour:
DeuxconnecteursRJ45(10/100Base-T)pourleréseau.
DeuxemplacementsSFP(100Base-FX/1000Base-X)
pourleréseau.
•Entrée/sortie(E/S)numérique
•Alimentation(SortieCC)
•0VCC(-)
35
Page 36

AXIST86MediaConverterSwitchSeries
FonctionBrocheNotes
0VCC(-)
SortieCC
Congurable
E/S1(entréeousortie)
Congurable
E/S2(entréeousortie)
CommutateurDIPdeconnecteurréseau
Important
UtiliseztoujourslecommutateurDIPsursapositionpardéfaut(positionB)silarelation
entrelespériphériquesdusystèmen'estpasdénie.
LacamérajointuneétiquetteVLANspéciqueàtouslespackagesmulticasttransmis.Le
commutateurdeconvertisseurdemédiagèrelafaçondontlespackagesmulticastsonttransmis
entrelescaméras,lescommutateursdeconvertisseursdemédiaetd'autrepériphériquesréseau.
Cecis'avèreparticulièrementpratiquelorsdelaconnexiondelacaméraetducommutateurde
convertisseurdemédiaauréseauencascade.
SivouschangezlapositionducommutateurDIP,chaqueportdeconnecteurréseauducommutateur
deconvertisseurdemédiapeutêtrecongurépourgérerlesmulticastsdetroisfaçonsdifférentes.
1,4,6
2
3
5
Sortied'alimentation12VCC,50mA
Entréenumérique
Sortienumérique
(transistoràcollecteur
ouvert)
Entréenumérique
Sortienumérique
(transistoràcollecteur
ouvert)
Caractéristiques
0VCC
0à30VCCmax.)
0à30VCCmax.,
drainouvert,100mA
0à30VCCmax.
0à30VCCmax.,
drainouvert,100mA
Positiondu
commutateur
DIP
Défaut
(milieu)
Description
B
SupprimezlesétiquettesVLANdespackagesmulticasttransmis.Utilisezce
réglagelorsdelaconnexionauréseau,directementouàtraversunrouteur
ouuncommutateurderéseau.
36
Page 37

AXIST86MediaConverterSwitchSeries
Gauche
Droit
LesétiquettesVLANsontutiliséespourcréerdesréseauxlogiquesindépendants,desréseauxlocaux
virtuels(VLAN),dansunréseauphysique.Descommutateursdeconvertisseurdemédiamultiples
raccordésentreeuxencascadefontpartiedumêmeVLAN.Lescommutateursdeconvertisseur
demédiaaffectentuneétiquetteauxpackagesmulticastvoyageantentreeuxdesortequele
commutateurdeconvertisseurdemédiasuivantdanslaligneconnaîtladestinationdespackages.
End'autrestermes,l'étiquetteVLANsertd'identiantVLAN.LesétiquettesVLANdoiventêtre
utiliséesuniquementlorsdel'utilisationdecamérasmultiplesetdecommutateursdeconvertisseur
demédiacarlatransmissiondepackagesmulticastavecuneétiquetteVLANn'estutilequelorsque
leportestraccordéàunautrecommutateurdeconvertisseurdemédiapotentiellementraccordéà
desvisionneurséventuels.
Note
Sivousraccordezleconnecteurréseaud'uncommutateurdeconvertisseurdemédiasortant
àunautretypedepériphériqueréseau,congurezlecommutateurDIPenpositionApour
protégerlepériphériqued'untracmulticast.
ABloquezlespackagesmulticastquiontuneétiquetteVLAN.Utilisezce
réglagelorsdelaconnexionàunappareilquin'estpasréservéàla
visualisationmulticast.
TransmettezdespackagesmulticastavecuneétiquetteVLAN.Utilisezce
C
réglagelorsdelaconnexionàunautrecommutateurdeconvertisseurde
média.
Conditionsd'utilisation
Température
Humidité
-40°Cà75°C(-40°Fà167°F)
Humiditérelativede10à85%(sans
condensation)
Caractéristiquesd'alimentation
ProduitTension
Commutateurdeconvertisseur
demédiaAXIST8606
Commutateurdeconvertisseur
demédiaAXIST8607
24VCC
24VCC
Courantnominalminimum
pourunealimentation
électriqueexterne
0,15A
3,2A
37FR38
Page 38

Page 39

AXIST86MediaConverterSwitchSeries
Informationssurlasécurité
Niveauxderisques
DANGER
Indiqueunesituationdangereusequi,siellen'estpasévitée,entraîneraledécèsoudes
blessuresgraves.
AVERTISSEMENT
Indiqueunesituationdangereusequi,siellen'estpasévitée,pourraitentraînerledécès
oudesblessuresgraves.
ATTENTION
Indiqueunesituationdangereusequi,siellen'estpasévitée,pourraitentraînerdes
blessureslégèresoumodérées.
VIS
A AAVIS VIS
Indiqueunesituationqui,siellen'estpasévitée,pourraitendommagerl'appareil.
Autresniveauxdemessage
Important
Indiquelesinformationsimportantes,nécessairespourassurerlebonfonctionnementde
l’appareil.
Note
Indiquelesinformationsutilesquipermettrontd’obtenirlefonctionnementoptimalde
l’appareil.
FR
39
Page 40

AXIST86MediaConverterSwitchSeries
Consignesdesécurité
AVERTISSEMENT
LeproduitAxisdoitêtreinstalléparunprofessionnelqualiéetconformémentauxloiset
règlementationslocalesenvigueur.
VIS
A AAVIS VIS
•LeproduitAxisdoitêtreutiliséconformémentauxloisetrèglementslocaux.
•Axisrecommanded'utiliseruncâbleréseaublindé(STP)CAT5ousupérieur.
•ConserverceproduitAxisdansunenvironnementsecetventilé.
•NepasexposerceproduitAxisauxchocsouauxfortespressions.
•Nepasinstallerceproduitsurdespoteaux,supports,surfacesoumursinstables.
•Nepasinstallerceproduitsurdespoteaux,supports,surfacesoumurssoumisàdes
vibrations.
•Utiliseruniquementdesoutilsrecommandéspourl'installationdel'appareilAxis.
L'applicationd'uneforceexcessivesurl'appareilavecdesoutilspuissantspourrait
l'endommager.
•Nepasutiliserdeproduitschimiques,desubstancescaustiquesoudenettoyants
pressurisés.
•Utiliserunchiffonpropreimbibéd'eaupurepourlenettoyage.
•Utiliseruniquementdesaccessoiresconformesauxcaractéristiquestechniquesdevotre
produit.IlspeuventêtrefournisparAxisouuntiers.Axisrecommanded'utiliserun
équipementd'alimentationAxiscompatibleavecvotreproduit.
•UtiliseruniquementlespiècesderechangefourniesourecommandéesparAxis.
•Nepasessayerderéparervous-mêmeceproduit.Contacterl'assistancetechniqued'Axis
ouvotrerevendeurAxispourdesproblèmesliésàl'entretien.
•L'alimentationélectriquedoitêtrebranchéeàuneprisedecourantinstalléeprèsde
l'équipementetêtrefacilementaccessible.
Transport
VIS
A AAVIS VIS
•LorsdutransportduproduitAxis,utilisezl'emballaged'origineouunéquivalentpour
éviterd'endommagerleproduit.
40
Page 41

Lieferumfang
•AXIST8606/T8607MediaConverter-Switch
•Montageausrüstung
-HalterungfürDIN-Halterung
-Schraube(2x)
•GedruckteDokumente
-Installationsanleitung(diesesDokument)
AXIST86MediaConverterSwitchSeries
DE
41
Page 42

AXIST86MediaConverterSwitchSeries
ÜbersichtüberdieHardware
DietechnischenDatenfürHardwarekomponentenndenSieunterTechnischeDatenaufSeite51.
AXIST8606MediaConverterSwitch–Außenansicht
1
Abdeckung
2
NetzwerkanschlussSFP(2St.)
3
NetzwerkanschlussRJ45(2St.)
4
Netzwerk-LED-Anzeige(4St.)
5
LED-Betriebsanzeige
6
Netzanschluss(Gleichstromausgang)
42
Page 43

AXIST86MediaConverterSwitchSeries
7
Erdungsschraube
AXIST8607MediaConverterSwitch–Außenansicht
DE
1
Abdeckung
2
NetzwerkanschlussSFP(2St.)
3
NetzwerkanschlussRJ45(2St.)
4
LED-NetzwerkanzeigederKamera
5
Netzwerk-LED-Anzeige(4St.)
6
LED-Betriebsanzeige
7
Netzanschluss(Gleichstromausgang)
8
Erdungsschraube
9
Multikabeleingang
10
E/A-Klemmanschluss
43
Page 44

AXIST86MediaConverterSwitchSeries
InstallierendesProdukts
EmpfohleneWerkzeuge
•SchraubendreherTorx®T10
•Kabelschuhzange(fürErdungskabel)
•Schraubenschlüssel7mm(fürErdungsschraube)
•2,5mm-Schlitzschraubenzieher
•Abisolierwerkzeug(fürKabelverbindungenzuAXIST8607)
InstallierendesAXIST8606MediaConverterSwitch
HINWEIS
HINWEIS HINWEIS
•DerMediaConverterSwitchsollteineinergegenStaubundWassergeschützten
Umgebunginstalliertwerden,zumBeispielimHausoderineinempassendenSchrank.
•DerMediaConverterSwitchsolltemitgeschirmtenNetzwerkkabeln(ShieldedNetwork
Cable,STP)gemäßihrerbestimmungsgemäßenVerwendungverbundenwerden.
Sicherstellen,dassderSwitchordnungsgemäßgeerdetist.FürInformationenzu
gesetzlichenBestimmungen,siehe.
FüreineÜbersichtderHardware-Komponenten,sieheSeite42.
1.DenMediaConverterSwitchanderWandoderaneinerDIN-SchieneimSchrank
montieren.
2.DieNetzwerkkabelandieNetzwerkanschlüsse(RJ45,SFP)anschließen.
3.VerbindenSiedasNetzkabelmitdemStromanschluss(Gleichstromeingang).
4.ErdenSiedenSchalterdurcheineVerbindungmitderErdungsschraube.
5.Sicherstellen,dassdieLED-AnzeigendesMediaConverterSwitchvorgabegemäß
anzeigen.SiehedazuLED-AnzeigenamMediaConverterSwitchaufSeite51.
Beachten
FüreinSystemdasVLAN-Tagsverwendet,dieKippschalterdesProduktsgemäßVorgabe
einstellen.SieheNetzwerkanschluss-DIP-SchalteraufSeite54.
DenAXIST8607MediaConverterSwitchinstallieren
HINWEIS
HINWEIS HINWEIS
•StellenSiesicher,dassdieAnschlüssezurStromversorgungunddieLeiternachden
AnweisungendesHerstellersundentsprechenddenörtlichenVorschriftenvoneinem
Fachmanninstalliertwerden.
•DasNetzteil(separaterhältlich)undderMediaConverterSwitchmüssenineiner
Umgebunginstalliertwerden,dieSchutzgegenStaubundWasserbietet,z.B.in
geschlossenenRäumenoderineinemgeeignetenSchrank.
1.StellenSiesicher,dassdieStromzufuhrabgeschaltetist.
44
Page 45

AXIST86MediaConverterSwitchSeries
2.DieStromquelleunddenMediaConverterSwitchanderWandoderaneineDIN-Schiene
imSchrankmontieren.FallsLöchergebohrtwerdenmüssen:sicherstellen,dassdie
Bohrer,SchraubenundDübelfürdasWandmaterialgeeignetsind.
3.DieSchraubenlösenunddieAbdeckungvomMediaConverterSwitchnehmen.
4.DrückenSiedasEndedesMehrfachkabelsdurchdieKabeldurchführungaufderRückseite
desGerätsundziehenSieesweitgenugdurch,damiteseinfachzuhandhabenist.
Wichtig
FallsdasKabelgekürztwerdenmuss,befolgenSieSchritte5bis10.Andernfallsweiter
mitSchritt1 1.
5.Etwa45mmderUmmantelungvomEndedesMehrfachkabelsentfernen.
6.LassenSiedieDrahtgeechtabschirmungintakt,aberfaltenSiediesesozurück,dass
sienoch20mmlangist.
7.SchneidenSieetwa16mmderFolienabschirmungdesEthernetkabelsab.
8.EntfernenSie8mmderIsolierungvondenvierEthernetkabeln(grün,grün/weiß,orange
undorange/weiß).
9.EntfernenSie8mmderIsolierungvondenzweiEin-/Ausgangskabeln(blauundgelb).
10.EntfernenSie5mmderIsolierungvondendreiNetzkabeln(rot,rotundschwarz).
Wichtig
•NachdemEntfernenderIsolierungmüssendieNetz-undEthernetkabelverzinntwerden,
umeinevernünftigeVerbindungzugewährleisten.
•DieEthernetkabelmüssengleichlangseinundjeweilsetwa25mmausder
Drahtgeechtabschirmungherausragen.
DE
45
Page 46

AXIST86MediaConverterSwitchSeries
1
UmmantelungdesMehrfachkabels
2
Geechtschirm
3
FolienabschirmungdesEthernetkabels(2St.)
11.DieKabelfürNetzwerkundE/AandieinternenNetzwerkanschlüsse(11,16)und
denE/A-Anschluss(9)anschließen.DieseAnschlüsseöffnen,indemSieeinen
SchlitzschraubendreherindieSchlitzedrücken.DasKabeleinführenundfreigeben.
12.DieKabelfürErdungundStromandenNetzanschluss(Gleichstromausgang1)
anschließen.
1
Netzanschluss(Gleichstromausgang)
2
Stromversorgung(rot)
3
Stromversorgung(rot)
4
Schelle
5
AnschlussdesGeechtschirms
6
FolienabschirmungdesEthernetkabels(2St.)
7
DigitalesE/A-Kabel(blau)
46
Page 47

AXIST86MediaConverterSwitchSeries
8
DigitalesE/A-Kabel(gelb)
9
E/A-Anschluss(intern)
10
Erdungskabel(schwarz)
11
Ethernetanschluss(intern)
12
Ethernetkabel(grün)
13
Ethernetkabel(grün/weiß)
14
Ethernetkabel(orange)
15
Ethernetkabel(orange/weiß)
16
Ethernetanschluss(intern)
13.ÜberschüssigesMehrfachkabelvorsichtigdurchdieKabeldurchführungherausziehen.
14.Sicherstellen,dassdieSchelleangebrachtist.DenAnschlussdesGeechtschirmsindie
ErdungsklemmeeinsetzenunddieSchraubenanziehen.
HINWEIS
HINWEIS HINWEIS
•DieAbschirmungenunddieSchellenoberächenmüssenächigvollständigmiteinander
inKontaktstehen.DiesistfürdasErdendesMehrfachkabelsunerlässlich.
•StellenSiesicher,dassdieUmmantelungdesMehrfachkabelssichermitderKlemme
befestigtist.
•VergewissernSiesich,dassalleFlächenundKontaktesauberundfreivon
Abschirmungsmaterialrestensind.
15.DieNetzwerkkabelgemäßVorgabeandieexternenNetzwerkanschlüsse(RJ45,SFP)
anschließen.
Beachten
ZumAnschließenaneinGlasfaserkabelisteinSFP-Modul(nichtenthalten)erforderlich.
DE
16.Fallsverwendet,dasE/A-GerätandenexternenE/A-Anschlussanschließen.
17.DasStromkabel(Gleichstromeingang)anschließen.DazudenStecker
(Gleichstromeingang)indieBuchsederKlemmleisteeinsetzen.
18.DasErdungskabelanderErdungsschraubebefestigen.
47
Page 48

AXIST86MediaConverterSwitchSeries
1
NetzwerkanschlussSFP(extern)(2St.)
2
NetzwerkanschlussRJ45(extern)(2St.)
3
E/A-Anschluss(extern)
4
Erdungsschraube
5
Erdungsleitung
6
Stromkabel(Gleichstromeingang)
7
Netzanschluss(Gleichstromeingang)
19.WennmehrereMediaConverterSwitchesübereineDaisyChainmiteinanderverbunden
werden:DieKippschalteranallenAusgangsports,dieimNetzwerkzueinemanderen
MediaConverterSwitchleiten,aufPositionCstellen.
WennderPortdirektmitdemNetzwerkverbundenwird,belassenSiedenDIP-Schalterin
derStandardposition(PositionB).WeitereInformationenndenSieunterAnschlüssedes
MediaConverter-SwitchesaufSeite51.
Wichtig
WenndasSystemundeniertist,dieStandardposition(B)desKippschalterswählen.
48
Page 49

AXIST86MediaConverterSwitchSeries
20.DieAbdeckungaufdenSwitchsetzenunddieSchraubenanziehen.
21.DenStromeinschalten.
22.StellenSiesicher,dassdieLED-AnzeigenamSchalterdesMediaConverterSwitchdie
korrektenBedingungenanzeigen.WeitereInformationenndenSieunterLED-Anzeigen
amMediaConverterSwitchaufSeite51
DE
1
LED-Betriebsanzeige
2
Netzwerk-LED-Anzeige(4St.)ETH1/2/3/4
3
Kamera-LED-Anzeige
49
Page 50

AXIST86MediaConverterSwitchSeries
WeitereInformationen
•DieaktuelleVersiondiesesDokumentsndenSieaufaxis.com
•NützlichesOnlinetrainingundWebinarendenSieunteraxis.com/academy.
OptionalesZubehör
EinevollständigeListelieferbarenZubehörsfürdiesesProduktndenSieaufaxis.comunter
Produkt,SoftwareundZubehör.
50
Page 51

AXIST86MediaConverterSwitchSeries
TechnischeDaten
DieaktuelleVersiondestechnischenDatenblattsfürdasProduktndenSieaufaxis.comunter
SupportundDokumentation.
LED-AnzeigenamMediaConverterSwitch
LEDFarbeBedeutung
Stromversorgung
Netzwerk(4St.)
Kameranetzwerk
(nurAXIST8607)
Leuchtet
nicht
GrünGleichstromangeschlossen.
Gelb
Grün
Grün
GleichstromnichtangeschlossenoderStromschutz
eingeschaltet(Überlastung)
10-Mbit-Anschluss.BlinktbeiAktivität.
Anschluss100/1000MbitBlinktbeiAktivität
Anschluss100MbitBlinktbeiAktivität
Anschlüsse
AnschlüssedesMediaConverter-Switches
HINWEIS
HINWEIS HINWEIS
DasProduktmussmiteinemabgeschirmtenNetzwerkkabel(STP)angeschlossenwerden.
AlleKabel,diedasProduktmitdemNetzwerkswitchverbinden,müssenhierfürausgelegt
sein.StellenSiesicher,dassdieNetzwerkgerätegemäßdenAnweisungendesHerstellers
installiertwurden.InformationenzugesetzlichenBestimmungenndenSieunter
Electromagneticcompatibility(EMC)onpage4.
Wichtig
EinHot-SwapistmitdemMediaConverter-Switchnichtmöglich.TrennenSiedenSchalter
vomNetz,bevorSiedieKameraswechseln.BeimVersuchdesHot-Swapfunktioniertder
Schaltermöglicherweisenichtmehrordnungsgemäßundmussneugestartetwerden.
DE
51
Page 52

AXIST86MediaConverterSwitchSeries
Kameraanschlüsse
Netzanschluss
ZweizweipoligeKlemmenleistenfürStromausgang
(Kontakt4wirdnichtverwendet).
FunktionKontaktHinweise
Gleichstromausgang
Netzwerkanschlüsse
ZweizweipoligeEthernet-Klemmenleisten.
E/A-Klemmanschluss
2-poligeKlemmleiste.
24VGleichstrom
0V(-)Gleichstrom
k.A.
1,2
3
4
StromausgangzurKamera
k.A.
ExterneAnschlüsse
ErdungsschraubeErdungsschraubezumErdendesMedienkonverter-
Netzanschluss
2-poligeKlemmleistefürdieStromversorgung.
Switches.SorgenSiedafür,dassbeideEndendes
ErdungskabelsKontaktmitdenentsprechenden
Erdungsächenhaben.
52
Page 53

AXIST86MediaConverterSwitchSeries
FunktionKontaktHinweise
Gleichstromeingang
0V(-)Gleichstrom
24VGleichstrom
1
2
StromeingangvonStromquelle
(separaterhältlich)
NetzwerkanschlussRJ45
Netzwerksteckplatz,SFP
JederRJ45-undSFP-PortverfügtübereineneigenenDIP-Schalter.MitdenDIP-Schalternwirddie
DatenübertragungvomPortgesteuert.WeitereInformationenndenSieunterSeite54.
E/A-Klemmanschluss
6-poligekongurierbareE/A-Klemmenleiste,dieüberdasMehrfachkabelandie
Kameraangeschlossenist.ZurVerwendungmitexternenGeräteninVerbindungmit
Manipulationsalarmen,Bewegungserkennung,Ereignisauslösung,Zeitrafferaufnahmen,
Alarmbenachrichtigungenusw.Abgesehenvom0VGleichstrom-BezugspunktundeinerStrom
(Gleichstromausgang)verfügtdieE/A-KlemmenleisteübereineSchnittstellezu:
•Digitalausgang–ZumAnschlussexternerGerätewieRelaisundLEDs.
AngeschlosseneGerätekönnenüberdieVAPIX®ApplicationProgrammingInterface
(Programmierschnittstelle)überdieSchaltächenfürdenAusgangaufderSeite„Live
View”oderdurcheineAktionsregelaktiviertwerden.DerAusgangwirdalsaktiviert
(sieheSystemOptions>Ports&Devices>PortStatus[Systemoptionen>Ports&
Geräte>PortStatus])angezeigt,wenndasAlarmmeldegeräteingeschaltetist.
•Digitaleingang–AlarmeingangfürdenAnschlussvonGeräten,diezwischen
geöffnetemundgeschlossenemSchaltkreiswechselnkönnen,z.B.:PIR-Kameras,
Tür-/Fensterkontakte,Glasbruchmelderusw.BeiEmpfangeinesSignalsändertsich
derStatusundderEingangwirdaktiviert(sieheSystemOptions>Ports&Devices
>PortStatus(Systemoptionen>Ports&Geräte>PortStatus)).
6-poligeKlemmleistefür:
ZweiRJ45-Anschlüsse(10/100Base-T)für
Netzwerkverbindung.
ZweiSFP-Steckplätze(100Base-FX/1000Base-X)für
Netzwerk.
DE
•DigitaleE/A
•Stromversorgung(Gleichstromausgang)
•0V(-)Gleichstrom
FunktionKontaktHinweiseTechnischeDaten
0V(-)Gleichstrom
1,4,6
0VGleichstrom
53
Page 54

AXIST86MediaConverterSwitchSeries
Gleichstromausgang
Kongurierbar
E/A1(Eingangoder
Ausgang)
Kongurierbar
E/A2(Eingangoder
Ausgang)
Netzwerkanschluss-DIP-Schalter
Wichtig
WenndieBeziehungzwischendenGerätenimSystemnichtdeniertwurde,verwenden
SiedieStandardeinstellung(PositionB)desDIP-Schalters.
DieKamerafügteinbestimmtesVLAN-TaganalleihreweitergeleitetenMulticast-Paketean.
DerMediaConverterSwitchverwaltet,wiedieseMulticast-PaketezwischenKameras,Media
ConverterSwitchesundanderenNetzwerkgerätenweitergeleitetwerden.Diesistinsbesondere
dannnützlich,wenndieKameraundderMediaConverterSwitchineinerDaisy-Chain-Verkettung
mitdemNetzwerkverbundenwerden.
IndemSiediePositionderDIP-Schalterändern,kannjedeNetzwerkverbindungimMediaConverter
Switchsokonguriertwerden,dassMulticastsaufdreiverschiedeneArtenverwaltetwerden.
2
3
5
Stromausgang12VGleichstrom,50mA
Digitaleingang0bismax.30
Digitalausgang
(Transistor,offener
Kollektor)
Digitaleingang0bis
Digitalausgang
(Transistor,offener
Kollektor)
VGleichstrom
0bismax.30V
Gleichstrom,OpenDrain,
100mA
max.30VGleichstrom
0bismax.30V
Gleichstrom,OpenDrain,
100mA
Positiondes
DIP-Schalters
Standard
(Mitte)
LinksA
Rechts
Beschreibung
B
EntfernenSiedieVLAN-TagsvondenweitergeleitetenMulticast-Paketen.
VerwendenSiedieseEinstellungbeimAnschlussandasNetzwerk,direkt
oderübereinenRouter-oderNetzwerk-Switch.
SperrenSieMulticast-PaketemiteinemVLAN-Tag.VerwendenSiediese
EinstellungbeimAnschlussaneinGerät,dasnichtfürdieMulticast-Ansicht
gedachtist.
CLeitenSieMulticast-PaketemiteinemVLAN-Tagweiter.VerwendenSie
dieseEinstellungbeimAnschlussaneinenanderenMediaConverterSwitch.
54
Page 55

AXIST86MediaConverterSwitchSeries
MithilfevonVLAN-TagswerdenunabhängigelogischeNetzwerke,virtuellelokaleNetzwerke
(VirtualLocalAreaNetworks,VLANs),ineinemphysischenNetzwerkerstellt.MehrereineinerDaisy
ChainmiteinanderverbundeneMediaConverterSwitchessindMitgliederdesgleichenVLAN.
DieMediaConverterSwitchesmarkierendieMulticast-Pakete,diezwischenihnenübermittelt
werden,damitdernächsteMediaConverterSwitchinderReihedieRichtungderPaketekennt.
MitanderenWorten,dasVLAN-TagfungiertalsVLAN-Bezeichner.VLAN-Taggingsolltenurbeim
EinsatzmehrererKamerasundMediaConverterSwitchesverwendetwerden,dadasWeiterleiten
vonMulticast-PaketenmiteinemVLAN-Tagnurdannsinnvollist,wennderPortmiteinemanderen
MediaConverterSwitchverbundenist,dermitpotenziellenViewernverbundenwerdenkann.
Beachten
BeimAnschlusseinesausgehendenMediaConverterSwitch-Netzwerkanschlussesaneinen
anderenTypvonNetzwerkgerät,müssenSiedenDIP-SchalteraufPositionAfestlegen,
damitdasGerätvorMulticast-Trafcgeschütztist.
Betriebsbedingungen
Temperatur
Luftfeuchtigkeit
TechnischeDaten–Stromversorgung
Produkt
AXIST8606MediaConverter
Switch
AXIST8607MediaConverter
Switch
-40bis75°C
10bis85%rF(nichtkondensierend)
Spannung
24VGleichstrom
24VGleichstrom
Mindestspannungdurch
externeStromversorgung
0,15A
3,2A
55DE56
Page 56

Page 57

AXIST86MediaConverterSwitchSeries
Sicherheitsinformationen
Gefährdungsstufen
GEFAHR
WeistaufeinegefährlicheSituationhin,welche,fallsnichtverhindert,zuTododer
schwerenVerletzungenführenkann.
WARNUNG
WeistaufeinegefährlicheSituationhin,welche,fallsnichtverhindert,zuTododer
schwerenVerletzungenführenkann.
VORSICHT
WeistaufeinegefährlicheSituationhin,welche,fallsnichtverhindert,zugeringfügiger
odermäßigerVerletzungführenkann.
HINWEIS
HINWEIS HINWEIS
WeistaufeinegefährlicheSituationhin,welche,fallsnichtverhindert,zuSachschäden
führenkann.
AndereMeldeebenen
Wichtig
WeistaufwichtigeInformationenhin,diedenrichtigenBetriebdesProduktsgewährleisten.
Beachten
WeistaufnützlicheInformationenhin,diedieoptimaleVerwendungdesProdukts
unterstützen.
DE
57
Page 58

AXIST86MediaConverterSwitchSeries
Sicherheitsanweisungen
WARNUNG
DasAxisProduktmussvonfachmännischgeschultemPersonalundunterEinhaltungder
örtlichgeltendenBestimmungeninstalliertwerden.
HINWEIS
HINWEIS HINWEIS
•DasAxis-ProduktmussunterBeachtungdergeltendenGesetzeundBestimmungen
betriebenwerden.
•AxisempehltdieVerwendungeinesabgeschirmtenNetzwerkkabels(STP)derKategorie
5oderhöher.
•LagernSiedasAxisProduktineinertrockenenundbelüftetenUmgebung.
•DasAxis-ProduktwederStößennochstarkemDruckaussetzen.
•DasProduktnichtaninstabilenMasten,Halterungen,OberächenoderWändenanbringen.
•InstallierenSiedasProduktnichtanvibrierendenMasten,Halterungen,Oberächen
oderWänden.
•VerwendenSiebeiderInstallationdesAxisProduktsausschließlichpassendeWerkzeuge.
EinzugroßerKraftaufwandmitelektrischenWerkzeugenkanndasProduktbeschädigen.
•VerwendenSiekeinechemischen,ätzendenoderaerosolhaltigenReinigungsmittel.
•VerwendenSiezumReinigeneinsauberes,mitdestilliertemWasserangefeuchtetesTuch.
•VerwendenSienurZubehör,dasdentechnischenVorgabenIhresProduktsentspricht.
DiesesistvonAxisoderDrittanbieternerhältlich.AxisempehltdiemitIhremProdukt
kompatibleStromversorgungvonAxis.
•VerwendenSieausschließlichErsatzteiledievonAxisangebotenoderempfohlenwerden.
•VersuchenSienicht,diesesProduktselbsttätigzureparieren.WendenSiesichbezüglich
ReparaturundWartungandenAxisSupportoderIhrenAxisHändler.
•DasNetzteilsollteaneineSteckdoseinderNähedesProduktsangeschlossenwerden
undsollteleichtzugänglichsein.
Transport
HINWEIS
HINWEIS HINWEIS
•BeiBedarftransportierenSiedasAxisProduktinderOriginalverpackungodereiner
entsprechendenVerpackung,sodassSchädenvermiedenwerden.
58
Page 59

AXIST86MediaConverterSwitchSeries
Contenutodellaconfezione
•SwitchMediaConverterAXIST8606/T8607
•Kitdimontaggio
-ClipperclipDIN
-Vite(2x)
•Documentazionecartacea
-Guidaall'installazione(questodocumento)
IT
59
Page 60

AXIST86MediaConverterSwitchSeries
Panoramicadell'hardware
Perlespecichedeicomponentihardware,vedereSpecicheallapagina69.
SwitchmediaconverterAXIST8606-vistaesterna
1
Coperchio
2
ConnettoredireteSFP(2x)
3
ConnettoredireteRJ45(2x)
4
IndicatoreLEDdirete(4x)
5
IndicatoreLEDdialimentazione
6
Connettoredialimentazione(uscitaCC)
7
Vitedimessaaterra
60
Page 61

AXIST86MediaConverterSwitchSeries
SwitchmediaconverterAXIST8607-vistaesterna
IT
1
Coperchio
2
ConnettoredireteSFP(2x)
3
ConnettoredireteRJ45(2x)
4
IndicatoreLEDdiretedellatelecamera
5
IndicatoreLEDdirete(4x)
6
IndicatoreLEDdialimentazione
7
Connettoredialimentazione(uscitaCC)
8
Vitedimessaaterra
9
Presadialimentazionemulticavo
10
ConnettorepermorsettiI/O
61
Page 62

AXIST86MediaConverterSwitchSeries
Comeinstallareildispositivo
Strumenticonsigliati
•CacciaviteTorx®T10
•Pinzaperilcapocorda(percavodimessaaterra)
•Chiave7mm(pervitedimessaterra)
•Cacciaviteapuntapiattada2,5mm
•Spelali(perilcollegamentodeicaviadAXIST8607)
ComeinstallareAXIST8606MediaConverter
VVISO
A AAVVISO VVISO
•Loswitchmediaconverterdovràessereinstallatoinunambienteprotettodallapolveree
dall'acqua,adesempioinambientiinternioinunarmadiettoadatto.
•CollegareloswitchMediaConverterusandoicavidireteschermati(STP)destinatiall'uso
specico.Assicurarsicheloswitchsiaadeguatamenteconnessoaterra.Perirequisiti
normativi,consultare.
Perunapanoramicadeicomponentihardware,vederepagina60.
1.MontareloswitchmediaconvertersullapareteocollegarloaunaguidaDINinun
armadietto.
2.Collegareicavidireteaiconnettoridirete(RJ45,SFP)comerichiesto.
3.Collegareilcavodialimentazionealconnettoredialimentazione(ingressoCC).
4.Mettereaterraloswitchcollegandoloallaviteaterra.
5.VericarechegliindicatoriLEDdelloswitchmediaconverterindichinolecondizioni
corrette,vedereIndicatoriLEDdelloswitchMediaConverterallapagina69.
Nota
SesidesideracongurareunsistemacheusitagVLAN,idipswitchdeldispositivodevono
esserecorrettamenteimpostati.VedereDipswitchdelconnettoredireteallapagina72.
ModalitàdiinstallazionedelloswitchMediaConverterAXIS
T8607
VVISO
A AAVVISO VVISO
•Assicurarsicheleconnessioniallareteelecanalinesianostateinstallatedauntecnico
qualicato,secondoleistruzionidelproduttoreeinconformitàallenormativelocali.
•L'alimentatore(vendutoseparatamente)eloswitchMediaConvertersarannoinstallati
inunambienteprotettodapolvereeacqua,peresempioall'internooinunidoneo
armadietto.
1.Assicurarsichelaretesiascollegata.
62
Page 63

AXIST86MediaConverterSwitchSeries
2.Montarel'alimentatoreeloswitchmediaconverterallapareteossarliaunaguidaDIN
nell'armadietto.Seènecessarioforare,assicurarsidiutilizzarepunte,vitietasselli
adattialmateriale.
3.AllentarelevitierimuovereilcoperchiodalloswitchMediaConverter.
4.Spingerel'estremitàdelmulticavoattraversolaguarnizionepercavinellaparte
posterioredell'unitàetirarlaabbastanzadalavorarcifacilmente.
Importante
Seènecessarioaccorciareilcavofornito,seguireleistruzioniriportateneipuntida5a
10,altrimentiprocedereconilpunto11.
5.Accorciarecirca45mmdall'estremitàdelrivestimentomulticavo.
6.Lasciareintattoloschermointrecciatomaripiegarloinmodochesialungocirca20mm.
7.Tagliare16mmcircadaglischermiinlaminadelcavoEthernet.
8.Togliere8mmdiisolamentodaiquattrocaviEthernet(verde,verde/bianco,arancionee
arancione/bianco).
9.Togliere8mmdiisolamentodaiduecaviI/O(bluegiallo).
10.Togliere5mmdiisolamentodaitrecavidialimentazione(rosso,rossoenero).
Importante
•Dopoavertoltol'isolamento,icaviEthernetedialimentazionedevonoesserestagnatiper
garantireilcorrettocollegamento.
•IcaviEthernetdevonoaverelastessalunghezzaedevonosporgerecirca25mm
dall'estremitàdelloschermointrecciato.
IT
63
Page 64

AXIST86MediaConverterSwitchSeries
1
Rivestimentomulticavo
2
Schermointrecciato
3
SchermoinlaminadelcavoEthernet(2x)
11.CollegareicavidireteeI/Oaiconnettoridireteinterni(11,16)ealconnettoreI/O
(9).Apriretaliconnettoripremendoversoilbassosuglislotconuncacciaviteapunta
piatta.Inserireilcavo,quindirilasciare.
12.Connettereicaviditerraedialimentazionealconnettoredialimentazione(uscitaCC1).
1
Connettoredialimentazione(uscitaCC)
2
Cavodialimentazione(rosso)
3
Cavodialimentazione(rosso)
4
Morsetto
5
Bobinaschermointrecciato
6
SchermodelcavoEthernet(2x)
7
CavodigitaleI/O(blu)
8
CavodigitaleI/O(giallo)
64
Page 65

AXIST86MediaConverterSwitchSeries
9
MorsettieraI/O(interna)
10
Filodimassa(nero)
11
ConnettoreEthernet(interno)
12
CavoEthernet(verde)
13
CavoEthernet(verde/bianco)
14
CavoEthernet(arancio)
15
CavoEthernet(arancio/bianco)
16
ConnettoreEthernet(interno)
13.Ritrarredelicatamenteilmulticavoineccessoattraversolaguarnizione.
14.Assicurarsicheilmorsettosiainposizione,inserirelabobinadischermointrecciato
nellaclipdimassaeserrareleviti.
VVISO
A AAVVISO VVISO
•Glischermielesupercidelmorsettodevonoessereperfettamenteincontattol'uno
conl'altro,cosìcheilmulticavosiaaterra.
•Vericarecheilrivestimentomulticavosiassatosaldamentedalmorsetto.
•Assicurarsichetuttelesupercieicontattisianopulitieliberidamaterialediscarto
delloschermo.
15.Collegareicavidireteaiconnettoridireteesterni(RJ45,SFP)comerichiesto.
Nota
UnmoduloSFP(nonincluso)deveessereutilizzatoquandosicollegauncavoabraottica.
IT
16.Seutilizzato,collegareundispositivoI/OalconnettoreI/Oesterno.
17.Collegareilcavodialimentazione(ingressoCC)allamorsettieradialimentazione
(ingressoCC)tramiteunconnettoreabloccoterminale.
18.Fissareilcavoditerraallavitediterra.
65
Page 66

AXIST86MediaConverterSwitchSeries
1
ConnettoredireteSFP(esterno)(2x)
2
ConnettoredireteRJ45(esterno)(2x)
3
MorsettieraI/O(esterna)
4
Vitediterra
5
Filodimassa
6
Cavodialimentazione(ingressoCC)
7
Connettoredialimentazione(ingressoCC)
19.Sesicolleganodiversiswitchmediaconverterincascata,ènecessarioimpostareildip
switchdiciascunaportadelconnettoredireteinuscitainmodochesicolleghiaun
altroswitchmediaconverterinposizioneC.
Lasciareildipswitchnellaposizionepredenita(posizioneB)quandosicollegalaporta
direttamenteallarete.Perulterioriinformazioni,consultareConnettoriswitchMedia
Converterallapagina69.
Importante
Usarel'impostazionedeldipswitchpredenita(posizioneB)seilsistemanonèdenito.
66
Page 67

AXIST86MediaConverterSwitchSeries
20.Rimontareilcoperchiosulloswitcheserrareleviti.
21.Accenderel'alimentatore.
22.VericarechegliindicatoriLEDdelloswitchmediaconverterindichinolecondizioni
corrette.Perulterioriinformazioni,consultareIndicatoriLEDdelloswitchMedia
Converterallapagina69.
1
IndicatoreLEDdialimentazione
2
IndicatoreLEDdirete(4x)ETH1/2/3/4
3
IndicatoreLEDtelecamera
IT
67
Page 68

AXIST86MediaConverterSwitchSeries
UlterioriInformazioni
•Perlaversionepiùrecentediquestodocumento,visitareilsitoall'indirizzoaxis.com
•Perservizidiformazioneutiliewebinar,visitailsitoaxis.com/academy
Accessoriopzionali
Perunelencocompletodegliaccessoridisponibiliperquestodispositivo,andareallapaginadel
dispositivoalsitoaxis.comeselezionareSoftwareeaccessori.
68
Page 69

AXIST86MediaConverterSwitchSeries
Specifiche
Perlaversionepiùaggiornatadellaschedatecnicadeldispositivo,visitareilsitoWebaxis.come
trovarelasezioneSupport&Documentation(Supportoedocumentazione).
IndicatoriLEDdelloswitchMediaConverter
LED
Alimentazione
Rete(4)
Retedella
telecamera(solo
AXIST8607)
Colore
SpentoAlimentazioneCCnonconnessaoprotezionedellacorrente
Verde
GialloConnessione10Mbit.Lampeggiadurantel'attività.
Verde
Verde
Indicazione
innestata(sovraccaricodialimentazione)
Connessoall'alimentazioneCC.
Connessione100/1.000Mbit.Lampeggiadurantel'attività.
Connessione100Mbit.Lampeggiadurantel'attività.
Connettori
ConnettoriswitchMediaConverter
VVISO
A AAVVISO VVISO
Collegareildispositivoconuncavodireteschermato(STP).Tuttiicavichecolleganoil
dispositivoallaretesonodestinatiallorousospecico.Accertarsicheidispositividirete
sianoinstallatisecondoleistruzionidelproduttore.Permaggioriinformazionisuirequisiti
normativi,consultareElectromagneticcompatibility(EMC)onpage4.
Importante
LoswitchMediaConverternonsupportal'hotswapping.Scollegarel’alimentazionedallo
switchprimadelloswappingdelletelecamere.Untentativodieffettuarel'hotswapping
potrebbecausareilbloccodelloswitch,intalcasodeveessereriavviato.
IT
69
Page 70

AXIST86MediaConverterSwitchSeries
Connettoritelecamera
Connettoredialimentazione
Duemorsettierea2pinutilizzateperl'uscita
alimentazione(pin4nonutilizzato).
FunzionePinNote
Uscita
CC
Connettoridirete
Morsettieraa2-pinEthernet(x2).
ConnettorepermorsettiI/O
Morsettieraa2pin.
24VCC
0VCC(-)
N/D
1,2
3
4
Uscitaalimentazionealla
telecamera
N/D
Connettoriesterni
VitediterraViteaterraperlaconnessionedelloswitchMedia
Connettoredialimentazione
Morsettieraa2pinperingressoalimentazione.
converteraterraallamessaaterra.Assicurarsiche
entrambeleestremitàdelcavodimessaaterrasianoin
contattoconlerispettivesupercidimessaaterra.
70
Page 71

AXIST86MediaConverterSwitchSeries
FunzionePinNote
ingresso
CC
0VCC(-)
24VCC
1
2
Alimentazione
dall'alimentatore(venduto
separatamente)
ConnettoredireteRJ45
SFPslotdirete
OgniportaRJ45eSFPhailpropriodipswitch.Idipswitchcontrollanocomelaportainoltraidati.
Perulterioriinformazioni,consultarepagina72.
ConnettorepermorsettiI/O
MorsettieraI/Oa6pincongurabile,collegataallatelecameratramiteilmulticavo.Utilizzare
condispositiviesterniincombinazionecon,adesempio,allarmiantimanomissione,rilevazione
delmovimento,attivazionedieventi,registrazionetemporizzataenotichediallarme.Oltreal
puntodiriferimento0VCCeall'alimentazione(uscitaCC),ilconnettoreI/Oforniscel'interfaccia
per:
•Uscitadigitale–PercollegaredispositiviesternicomerelèoLED.Leperiferiche
collegatepossonoessereattivatetramiteVAPIX®API(interfacciaperla
programmazionediapplicazioni),tramiteipulsantidicomandodellapaginaLive
View(Immaginidalvivo)oppuretramitel'opzioneActionRule(regoladiazione).
L’uscitaverràvisualizzatacomeattiva(visualizzatainSystemOptions(Opzionidi
Sistema)>Port&Devices(Porta&Dispositivi)>PortStatus(Statoporta))
seildispositivodiallarmeèattivato.
•Ingressodigitale–Ingressoallarmeutilizzabilepercollegareleperiferiche,chepuò
passaredalcircuitochiusoalcircuitoaperto,adesempio:Sensoridimovimento
(PIR),contattiporta/nestra,rilevatoridirotturavetriecosìvia.Dopolaricezione
delsegnalelostatocambiael'ingressodiventaattivo(visualizzatoinSystem
Options>Port&Devices>PortStatus(OpzionidiSistema>PorteeDispositivi
>Statoporta))).
Morsettierea6pinper:
DueconnettoriRJ45(10/100Base-T)perlarete.
DueslotSFP(100Base-FX/1000Base-X)perrete.
IT
•Input/OutputDigitale
•Alimentazione(UscitaCC)
•0VCC(-)
71
Page 72

AXIST86MediaConverterSwitchSeries
FunzionePinNote
0VCC(-)
UscitaCC
Congurabile
I/O1(ingressoouscita)
I/O2(ingressoouscita)
Dipswitchdelconnettoredirete
Importante
Usaresemprel'impostazionedeldipswitchpredenita(posizioneB)senonèdenitala
relazionetraidispositividelsistema.
LatelecameracollegaunparticolaretagVLANatuttiipacchettimulticastinviati.LoswitchMedia
Convertergestisceilmodoincuivengonoinoltratiipacchettimulticasttraletelecamere,gliswitch
MediaConvertereglialtridispositividirete.Èutilesoprattuttoquandosicollegalatelecamerae
loswitchMediaConverterallareteincascata.
Modicandolaposizionedeidipswitch,ogniportadelconnettorediretenelloswitchMedia
Converterpuòessereconguratapergestireimulticastintremodidiversi.
1,4,6
2
3
5
Alimentazioneinuscita
Ingressodigitale
Uscitadigitale(transistor
–collettoreaperto)
Ingressodigitale
Uscitadigitale(transistor
–collettoreaperto)
Speciche
0VCC
12VCC,50mA
Da0amax30VCC
Da0amax30VCC,
open-drain,100mA
Da0amax30VCC Congurabile
Da0amax30VCC,
open-drain,100mA
Posizionedip
switch
Predenito
(medio)
Sinistra
Destra
Descrizione
BRimuovereitagVLANdaipacchettimulticastinoltrati.Utilizzarequesta
impostazionequandosieffettuailcollegamentoallarete,direttamenteo
tramiteunrouterounoswitchdirete.
ABloccareipacchettimulticastconuntagVLAN.Utilizzarequesta
impostazionequandosieffettuailcollegamentoaundispositivonon
destinatoallavisualizzazionemulticast.
InoltrareipacchettimulticastconuntagVLAN.Utilizzarequesta
C
impostazionequandosieffettuailcollegamentoaunaltroswitchMedia
Converter.
72
Page 73

AXIST86MediaConverterSwitchSeries
ItagVLANsonoutilizzatipercreareretilogicheindipendenti,retiVLAN(virtuallocalarea
networks),inunaretesica.PiùSwitchMediaConvertercollegatitraloroincascatasonomembri
dellastessaVLAN.GliswitchMediaConverterregistranoipacchettimulticastspostandolitraloro
inmodocheloswitchMediaConvertersuccessivoinlineaconoscaladestinazionedeipacchetti.
Inaltreparole,iltagVLANservecomeidenticativoVLAN.LaregistrazioneVLANdeveessere
utilizzatasolocontelecameremultipleeswitchMediaConverterpoichél'inoltrodeipacchetti
multicastconuntagVLANservonosolocomescopoquandolaportaècollegataaunaltroswitch
MediaConverterchepotrebbeesserecollegatoapossibilivisualizzatori.
Nota
QuandosicollegaunconnettorediretedelloswitchMediaConverterinuscitaaun
altrotipodidispositivodirete,impostareildipswitchsullaposizioneAperproteggereil
dispositivodaltrafcomulticast.
Condizionidifunzionamento
Temperatura
Umidità
Specichedialimentazione
DispositivoTensione
SwitchMediaConverter
AXIST8606
SwitchMediaConverter
AXIST8607
24VCC
24VCC
Da-40°Ca75°C
10-85%(umiditàrelativasenzacondensa)
Classicazionecorrente
minimaperalimentazione
esterna
0,15A
3,2A
73IT74
Page 74

Page 75

AXIST86MediaConverterSwitchSeries
Informazionidisicurezza
Livellidipericolo
PERICOLO
Indicaunasituazionepericolosache,senonevitata,provocamorteolesionigravi.
AVVERTENZA
Indicaunasituazionepericolosache,senonevitata,potrebbeprovocarelamorteolesioni
gravi.
ATTENZIONE
Indicaunasituazionepericolosache,senonevitata,potrebbeprovocarelesionimedie
ominori.
VVISO
A AAVVISO VVISO
Indicaunasituazioneche,senonevitata,potrebbedanneggiarelaproprietà.
Altrilivellidimessaggio
Importante
Indicainformazioniimportanti,essenzialiperilcorrettofunzionamentodeldispositivo.
Nota
Indicainformazioniutilicheaiutanoaottenereilmassimodaldispositivo.
IT
75
Page 76

AXIST86MediaConverterSwitchSeries
Informazionidisicurezza
AVVERTENZA
IldispositivoAxisdeveessereinstallatodaunprofessionistaqualicato,inconformità
alleleggiealledisposizionilocali.
VVISO
A AAVVISO VVISO
•IldispositivoAxisdeveessereutilizzatoinconformitàalleleggieallenormativelocali.
•Axisconsiglial'usodiuncavodireteschermato(STP)CAT5osuperiore.
•ConservareildispositivoAxisinunambienteasciuttoeventilato.
•EvitarediesporreildispositivoAxisaurtiopressionieccessive.
•Noninstallareildispositivosusupporti,superci,paretiopaliinstabili.
•Noninstallareildispositivosusupporti,superci,paretiopalichevibrano.
•UtilizzaresolostrumentiapplicabiliquandosiinstallaildispositivoAxis.Sesiutilizzauna
forzaeccessivaconstrumentinonadattièpossibilecausaredannialdispositivo.
•Nonutilizzaresostanzechimiche,agenticausticiodetergentiaerosol.
•Utilizzareunpannopulitoinumiditoinacquapuraperlapulizia.
•Utilizzaresoloaccessoricompatibiliconlespecichetecnichedeldispositivo.Questi
possonoesserefornitidaAxisodaterzeparti.Axisconsiglial'usodell'apparecchiaturadi
alimentazioneAxiscompatibileconildispositivo.
•UtilizzaresolopartidiricambioforniteoconsigliatedaAxis.
•Nontentarediriparareildispositivodasoli.Contattarel'assistenzaoilrivenditoreAxis
perquestionirelativeallamanutenzione.
•Ildispositivodovrebbeesserecollegatoadunapresadicorrentevicinaefacilmente
accessibile.
Trasporto
VVISO
A AAVVISO VVISO
•DuranteiltrasportodeldispositivoAxis,utilizzarel'imballaggiooriginaleoequivalente
perevitaredannialdispositivo.
76
Page 77

AXIST86MediaConverterSwitchSeries
Contenidodelpaquete
•SwitchconvertidordemediosAXIST8606/T8607
•Kitdemontaje
-ClipparaclipDIN
-Tornillo(2)
•Materialimpreso
-Guíadeinstalación(estedocumento)
ES
77
Page 78

AXIST86MediaConverterSwitchSeries
Informacióngeneraldelhardware
Paraconocerlasespecicacionesdeloscomponentesdelhardware,veaEspecicacionesenla
página87.
SwitchconvertidordemediosAXIST8606,vistaexterior
1
Cubierta
2
ConectoresderedSFP(2)
3
ConectoresderedRJ45(2)
4
LEDindicadoresdered(4)
5
IndicadorLEDdecorriente
6
Conectordecorriente(salidadeCC)
78
Page 79

AXIST86MediaConverterSwitchSeries
7
Tornillodetomadetierra
SwitchconvertidordemediosAXIST8607,vistaexterior
ES
1
Cubierta
2
ConectoresderedSFP(2)
3
ConectoresderedRJ45(2)
4
LEDindicadordecámaradered
5
LEDindicadoresdered(4)
6
IndicadorLEDdecorriente
7
Conectordecorriente(salidadeCC)
8
Tornillodetomadetierra
9
Entradadelmulticable
10
ConectordelterminaldeE/S
79
Page 80

AXIST86MediaConverterSwitchSeries
Cómoinstalarelproducto
Herramientasrecomendadas
•DestornilladorTorx®T10
•Alicatesdezapataparacable(paracabledetierra)
•Llavede7mm(paratornillodetierra)
•Destornilladorplanode2,5mm
•Pelacables(paraconexióndecableconAXIST8607)
CómoinstalarelswitchconvertidordemediosAXIST8606
VISO
A AAVISO VISO
•Elswitchconvertidordemediosdebeinstalarseenunentornoprotegidocontraelpolvoy
elagua,porejemploeninterioresoenunarmarioadecuado.
•Elconmutadordeconversióndemediosseconectaráutilizandocablesderedblindados
(STP)diseñadosparasuusoespecíco.Asegúresedequeelswitchtieneunaconexióna
tierraadecuada.Paraobtenerinformaciónsobrelosrequisitosnormativos,vea.
Consulteunadescripcióngeneraldeloscomponentesdelhardwareenpágina78.
1.MonteelswitchconvertidordemediosenlaparedofíjeloauncarrilDINdeunarmario.
2.Conecteloscablesderedalosconectoresdered(RJ45ySFP)segúncorresponda.
3.Conecteelcabledealimentaciónalconectordecorriente(entradadeCC).
4.Conecteatierraelswitchconvertidordemediosconectándoloaltornillodetierra.
5.AsegúresedequelosindicadoresLEDdelswitchconvertidordemediosindicanlas
condicionescorrectas,consulteLEDindicadoresdelswitchconvertidordemediosen
lapágina87.
Nota
SiquierecongurarunsistemaconetiquetasVLAN,losconmutadoresDIPdebenestar
conguradoscorrectamente.ConsulteConmutadoresDIPdelconectorderedenlapágina
90.
CómoinstalarelswitchconvertidordemediosAXIST8607
VISO
A AAVISO VISO
•Asegúresedequelaconexiónalaalimentaciónyalaredhayasidorealizadaporun
profesionalconformación,acordealasinstruccionesdelfabricanteydeacuerdoalas
normativaslocales.
•Lafuentedealimentación(sevendeporseparado)yelswitchconvertidordemedios
debeninstalarseenunentornoprotegidocontraelpolvoyelagua,porejemploen
interioresoenunarmarioadecuado.
80
Page 81

AXIST86MediaConverterSwitchSeries
1.Asegúresedequelaalimentaciónestéapagada.
2.Montelafuentedealimentaciónyelswitchconvertidordemediosenlapared,ofíjelos
aunraílDINdelacabina.Siesnecesariohaceragujeros,asegúresedeusarbrocas,
tornillosytacosapropiadosparaelmaterial.
3.Aojelostornillosyextraigalacubiertadelswitchconversordemedios.
4.Paseelextremodelmulticableporlajuntadecabledelapartetraseradelaunidad.Tire
deestelosucienteparafacilitareltrabajoconél.
Importante
Sinecesitaacortarelcablesuministrado,sigalospasos5-10.Delocontrario,vayaal
paso11.
ES
5.Peleunos45mmdesdeelextremodelacubiertadelmulticable.
6.Dejelacubiertatrenzadaintacta,perodóblelahaciaatrásdemaneraquemidaunos20
mmdelargo.
7.Corteunos16mmdelacubiertablindadadelcableEthernet.
8.Corteunos8mmdeaislamientodeloscuatrocablesEthernet(verde,verde/blanco,
naranjaynaranja/blanco).
9.Corteunos8mmdeaislamientodelosdoscablesdeE/S(azulyamarillo).
10.Corteunos5mmdeaislamientodelostrescablesdealimentación(rojo,rojoynegro).
Importante
•Despuésderecortarelaislamiento,loscablesdealimentaciónyEthernetdebenestañarse
paraasegurarunasconexionesadecuadas.
•LoscablesEthernetdebentenerlamismalongitudydebensobresalirunos25mmdel
extremodelacubiertatrenzada.
81
Page 82

AXIST86MediaConverterSwitchSeries
1
Cubiertadelmulticable
2
Cubiertatrenzada
3
CubiertablindadadelcableEthernet(2)
11.ConecteloscablesderedydeE/Salosconectoresderedinternos(1 1,16)yalconector
deE/S(9).Abralosconectoresempujandolasranurashaciaabajoconundestornillador
plano.Inserteelcabley,acontinuación,sueltelaranura.
12.Conecteloscablesdetierrayalimentaciónalconectordealimentación(salidaCC,1).
1
Conectordecorriente(salidadeCC)
2
Cabledealimentación(rojo)
3
Cabledealimentación(rojo)
4
Abrazadera
5
Bobinadecubiertatrenzada
6
CubiertablindadaEthernet(2)
7
CabledeE/Sdigital(azul)
8
CabledeE/Sdigital(amarillo)
82
Page 83

AXIST86MediaConverterSwitchSeries
9
ConectordeE/S(interno)
10
Cabledetierra(negro)
11
ConectorEthernet(interno)
12
CableEthernet(verde)
13
CableEthernet(verde/blanco)
14
CableEthernet(naranja)
15
CableEthernet(naranja/blanco)
16
ConectorEthernet(interno)
13.Concuidado,tiredelmulticableporlajuntahaciaafuera.
14.Asegúresedequelaabrazaderaestébiencolocada,insertelabobinadelacubierta
trenzadaenelclipdetierrayaprietelostornillos.
VISO
A AAVISO VISO
•Lassuperciesdelasabrazaderasylascubiertasdebenestartotalmenteencontacto
paraqueelmulticableseconecteatierra.
•Asegúresedequelacubiertadelmulticablesejaconrmezamediantelaabrazadera.
•Asegúresedequetodaslassuperciesycontactosesténlimpiosyquenocontengan
materialdedesechodelacubierta.
15.Conecteloscablesderedalosconectoresderedexternos(RJ45ySFP)comocorresponda.
Nota
SedebeutilizarunmóduloSFP,noincluido,paraconectaruncabledebraóptica.
ES
16.Siseutiliza,conecteundispositivodeE/SalconectordeE/Sexterno.
17.Conecteelcabledealimentación(entradadeCC)alconectordealimentación(entrada
deCC)mediantelaconexióndelbloquedeterminales.
18.Conecteelcabledetierraaltornillodetierra.
83
Page 84

AXIST86MediaConverterSwitchSeries
1
ConectoresderedSFP(externos,2)
2
ConectoresderedRJ45(externos,2)
3
ConectordeE/S(externo)
4
Tornillodetierra
5
Cabledetierra
6
Cabledealimentación(entradadeCC)
7
Conectordecorriente(entradadeCC)
19.Siseconectanvariosconmutadoresdeconversióndemediosenunaconexiónencadena,
esnecesarioestablecerelconmutadorDIPdecadapuertodelconectorderedsaliente
queseconectaconotroconmutadordeconversióndemediosenlaposiciónC.
DejeelconmutadorDIPenlaposiciónpredeterminada(posiciónB)cuandoconecteel
puertodirectamentealared.Paraobtenermásinformación,veaConectoresdelswitch
convertidordemediosenlapágina87.
Importante
Sinosehadenidoelsistema,useelajustedelconmutadorDIPpredeterminado(posición
B).
84
Page 85

AXIST86MediaConverterSwitchSeries
20.Vuelvaaponerlacubiertaenelswitchyaprietelostornillos.
21.Activelaalimentacióndered.
22.AsegúresedequelosindicadoresLEDdelconmutadordeconversióndemediosindican
lascondicionescorrectas.Paraobtenermásinformación,veaLEDindicadoresdelswitch
convertidordemediosenlapágina87.
ES
1
IndicadorLEDdecorriente
2
IndicadorLEDdered(4x)ETH1/2/3/4
3
IndicadorLEDdelacámara
85
Page 86

AXIST86MediaConverterSwitchSeries
Másinformación
•Paraconsultarlaversiónmásrecientedeestedocumento,vayaaaxis.com.
•Paraconsultarwebinarsycursosenlíneaquepuedenresultarleútiles,vayaa
axis.com/academy.
Accesoriosopcionales
Paraconocerunalistacompletadelosaccesoriosdisponiblesparaesteproducto,vayaalapágina
deproductosenaxis.comyseleccioneSoftwareyaccesorios.
86
Page 87

AXIST86MediaConverterSwitchSeries
Especificaciones
Paraaccederalaversiónmásrecientedelahojadedatosdelproducto,visitelapáginadelproducto
enaxis.comylocaliceSupport&Documentation(Soportetécnicoydocumentación).
LEDindicadoresdelswitchconvertidordemedios
LED
Alimentación
Red(4x)
Reddecámaras
(soloAXIST8607)
Color
Apagado
Verde
Ámbar
Verde
Verde
Indicación
AlimentaciónCCsinconectaroproteccióndecorriente
bloqueada(potenciaexcesiva)
AlimentaciónCCconectada.
Conexiónde10Mbits.Parpadeadurantelaactividad.
Conexiónde100/1000Mbits.Parpadeadurantelaactividad.
Conexiónde100Mbits.Parpadeadurantelaactividad.
Conectores
Conectoresdelswitchconvertidordemedios
VISO
A AAVISO VISO
Elproductoseconectarámedianteuncablederedblindado(STP).Todosloscablesque
conectenelproductoalareddeberánestarblindadosparasuusoespecíco.Asegúrese
dequelosdispositivosderedesténinstaladosdeconformidadconlasinstruccionesdel
fabricante.Paraobtenerinformaciónsobrelosrequisitosnormativos,veaElectromagnetic
compatibility(EMC)onpage4.
Importante
Elconmutadordeconversióndemediosnoescompatibleconelintercambioen
funcionamiento.Desenchufelacorrientedelconmutadorantesdeintercambiarlas
cámaras.Siintentaefectuarunintercambioenfuncionamiento,esposiblequeelswitchse
bloqueeyseanecesarioreiniciarlo.
ES
87
Page 88

AXIST86MediaConverterSwitchSeries
Conectoresdecámara
Conectordealimentación
Dosbloquesdeterminalesde2pinesparalasalida
dealimentación(elbloquedeterminalesde4pines
noseusa).
Función
Salidade
CC
Conectoresdered
BloquesdeterminalesEthernetde2pines(2).
ConectordelterminaldeE/S
Bloquedeterminalesde2pines.
Conectoresexternos
TornillodetierraTornillodetomadetierraparalaconexióndelswitch
Conectordecorriente
Bloquedeterminalesde2pinesparalaentradade
alimentación.
24VCC
0VCC(-)
N/D
PinNotas
1,2
3
4
Salidaalacámara
N/D
convertidordemediosatierra.Asegúresedequelosdos
extremosdelcabledetierraesténencontactoconsus
respectivassuperciesdetomadetierra.
88
Page 89

AXIST86MediaConverterSwitchSeries
Función
Entrada
deCC
ConectorderedRJ45
RanuraderedSFP
LospuertosRJ45ySFPcuentanconsuspropiosconmutadoresDIP.LosconmutadoresDIPcontrolan
laformaenlaqueelpuertoenvíalosdatos.Paraobtenermásinformación,veapágina90.
ConectordelterminaldeE/S
BloquedeterminalesdeE/Scongurablede6pinesqueseconectaalacámaraatravés
delmulticable.Seutilizacondispositivosexternoscombinados,porejemplo,conalarmas
antimanipulación,deteccióndemovimiento,activacióndeeventos,grabacióndeintervalosde
tiempoynoticacionesdealarma.Ademásdelpuntodereferenciade0VCCylapotencia
(salidadeCC),elconectordeE/Sofrecelainterfazpara:
Bloquesdeterminalesde6pinespara:
0VCC(-)
24VCC
•Salidadigital:paraconectardispositivosexternoscomorelésyLED.Losdispositivos
conectadossepuedenactivarmediantelaInterfazdeprogramacióndeaplicaciones
(API)VAPIX®,losbotonesdesalidadelapáginaLiveViewomedianteunareglade
acción.Lasalidasemostraráactiva(seindicaenSystemOptions>Port&Devices>
PortStatus[Opcionesdelsistema>Puertoydispositivos>Estadodelpuerto])si
eldispositivodealarmaestáactivado.
•Entradadigital:unaentradadealarmaparaconectardispositivosquepuedan
alternarcircuitoscerradosyabiertos,comodetectoresPIR,contactosdepuertasy
ventanas,detectoresderoturadecristales,etc.Cuandoserecibeunaseñal,elestado
cambiaylaentradasevuelveactiva(seindicaenSystemOptions>Port&Devices
>PortStatus[Opcionesdelsistema>Puertoydispositivos>Estadodelpuerto]).
PinNotas
1
2
Entradadefuentede
alimentación(sevendepor
separado)
DosconectoresRJ45(10/100Base-T)paralared.
DosranurasSFP(100Base-FX/1000Base-X)paralared.
ES
•Entrada/salidadigital
•Encendido(salidadeCC)
•0VCC(-)
89
Page 90

AXIST86MediaConverterSwitchSeries
Función
0VCC(-)
SalidadeCC
E/Scongurable
1(entradaosalida)
E/Scongurable
2(entradaosalida)
ConmutadoresDIPdelconectordered
Importante
UsesiempreelajustedelconmutadorDIPpredeterminado(posiciónB)silarelaciónentre
losdispositivosdelsistemanoestádenida.
LacámarajaunaetiquetaVLANespecícaatodoslospaquetesmulticastenviados.Elswitch
convertidordemediosgestionalaformaenquedichospaquetesmulticastseenvíanentre
lascámaras,losswitchesconvertidoresdemediosyotrosdispositivosdered.Estoresulta
especialmenteútilalconectarlacámarayelswitchconvertidordemediosaunaredencadena.
AlcambiarlaposicióndelosconmutadoresDIP,cadapuertodelconectordereddelswitch
convertidordemediossepuedecongurarparaquegestionemulticastsdetresformasdiferentes.
PinNotas
1,4,6
2
3
5
Salida12VCC,50mA
Entradadigital
Salidadigital(transistor:
colectorabierto)
Entradadigital
Salidadigital(transistor:
colectorabierto)
Especicaciones
0VCC
De0a30VCCmáx.
De0a30VCCmáx.,
colectorabierto,
100mA
De0a30VCCmáx.
De0a30VCCmáx.,
colectorabierto,
100mA
Posicióndel
conmutadorDIP
Predeterminado(parte
central)
IzquierdaAPaquetesmulticastdelbloquequetienenunaetiquetaVLAN.Useeste
Derecha
Descripción
BRetirelasetiquetasVLANdelospaquetesmulticastenviados.Useeste
ajustecuandoseconectaalared,directamenteoatravésdeunswitch
deredorouter.
ajustecuandoseconectaaunacámaraoaundispositivonocreadoparala
visualizaciónmulticast.
EnvíelospaquetesmulticastconunaetiquetaVLAN.Useesteajustecuando
C
seconectaaotroswitchconvertidordemedios.
90
Page 91

AXIST86MediaConverterSwitchSeries
LasetiquetasVLANseusanparacrearredeslógicasindependientes,redesvirtualesdeárealocales
(VLAN),dentrodeunaredfísica.Variosswitchesconvertidoresdemediosconectadosentresíen
uncadenatipomargaritapertenecenalamismaVLAN.Losswitchesconvertidoresdemedios
etiquetanlospaquetesmulticastmoviéndoseentreellos,deformaqueelsiguienteswitch
convertidordemediosdelalaconoceeldestinodelospaquetes.Esdecir,laetiquetaVLANactúa
comounidenticadorVLAN.EletiquetadoVLANdeberíausarsesolocuandoseusanvariascámaras
yswitchesconvertidoresdemedios,yaqueelenvíodepaquetesmulticastconunaetiquetaVLAN
tienesentidoúnicamentesielpuertoestáconectadoaotroswitchconvertidordemedios,que
puedequeestéconectadoaposiblesvisores.
Nota
Cuandoseconectaunconectorderedswitchconvertidordemediossalienteaotrotipo
dedispositivodered,establezcaelconmutadorDIPenlaposiciónAparaprotegerel
dispositivodeltrácomulticast.
Condicionesdefuncionamiento
Temperatura
Humedad
Especicacionesdealimentación
Producto
Switchconvertidordemedios
AXIST8606
Switchconvertidorde
mediosAXIST8607
De-40°Ca75°C
Humedadrelativadel10al85%(sin
condensación)
TensiónCorrientenominalmínima
24VCC
24VCC
parafuentedealimentación
externa
0,15A
3,2A
91ES92
Page 92

Page 93

AXIST86MediaConverterSwitchSeries
Informacióndeseguridad
Nivelesdepeligro
PELIGRO
Indicaunasituaciónpeligrosaque,sinoseevita,provocarálesionesgravesolamuerte.
ADVERTENCIA
Indicaunasituaciónpeligrosaque,sinoseevita,puedeprovocarlesionesgravesola
muerte.
ATENCIÓN
Indicaunasituaciónpeligrosaque,sinoseevita,puedeprovocarlesionesmoderadaso
leves.
VISO
A AAVISO VISO
Indicaunasituaciónpeligrosaque,sinoseevita,puedeprovocardañosmateriales.
Otrosnivelesdemensaje
Importante
Indicainformaciónimportantequeesfundamentalparaqueelproductofuncione
correctamente.
Nota
Indicainformaciónútilqueayudaaaprovecharelproductoalmáximo.
ES
93
Page 94

AXIST86MediaConverterSwitchSeries
Instruccionesdeseguridad
ADVERTENCIA
ElproductodeAxisdebeinstalarlounprofesionalformadoconformelasleyesynormativas
locales.
VISO
A AAVISO VISO
•EsteproductodeAxisdebeutilizarsedeacuerdoconlasleyesynormativaslocales.
•Axisrecomiendautilizaruncablederedblindado(STP)CAT5osuperior.
•AlmaceneelproductodeAxisenunentornosecoyventilado.
•EvitelaexposicióndelproductodeAxisachoquesoaunafuertepresión.
•Noinstaleelproductoenpostes,soportes,superciesoparedesinestables.
•Noinstaleelproductoenpostes,soportes,superciesoparedesquevibren.
•UtilicesololasherramientascorrespondientescuandoinstaleelproductodeAxis.La
aplicacióndeunafuerzaexcesivaconherramientaseléctricaspuedeprovocardaños
enelproducto.
•Noutilicelimpiadoresenaerosol,agentescáusticosniproductosquímicos.
•Limpieconunpañolimpiohumedecidoconaguapura.
•Utilicesoloaccesoriosquecumplanconlasespecicacionestécnicasdesuproducto.
EstosaccesorioslospuedeproporcionarAxisountercero.Axisrecomiendautilizarun
equipodesuministrodealimentacióndeAxiscompatibleconsuproducto.
•UtilicesolopiezasderepuestoproporcionadasorecomendadasporAxis.
•Nointenterepararelproductoustedmismo.Póngaseencontactoconelserviciode
asistenciatécnicadeAxisoconsudistribuidordeAxisparatratarasuntosdereparación.
•Lafuentedealimentaciónseenchufaráaunatomadeconectorinstaladacercadel
productoyalaquesepodráaccederfácilmente.
Transporte
VISO
A AAVISO VISO
•CuandotransporteelproductodeAxis,utiliceelembalajeoriginalounequivalentepara
evitardañosenelproducto.
94
Page 95

AXIST86MediaConverterSwitchSeries
パ
ッ
ケ
ー
ジ
の
内
パ パ
ッ ッ
ケ ケ
ー ー
ジ ジ
•AXIST8606/T8607メディアコンバータスイッチ
•取り付けキット
-DINクリップ⽤クリップ
-ネジ(×2)
•印刷物
-インストールガイド(本書)
容
の の
内 内
容 容
JA
95
Page 96

AXIST86MediaConverterSwitchSeries
ハ
ー
ド
ウ
ェ
ア
の
概
ハ ハ
ー ー
ド ド
ウ ウ
ェ ェ
ア ア
要
の の
概 概
要 要
ハードウェアコンポーネントの仕様については、
てください。
AXIS
AXIS AXIS
T8606
T8606 T8606
メ
デ
ィ
ア
コ
ン
バ
ー
メ メ
デ デ
ィ ィ
ア ア
コ コ
ン ン
タ
バ バ
ー ー
タ タ
105 ペ ー ジ の 、 仕 様
ス
イ
ッ
ス ス
イ イ
ッ ッ
を参照し
チ
外
観
チ チ
- --外 外
図
観 観
図 図
1
カ バ ー
2
ネ ッ ト ワ ー ク コ ネ ク タ (SFP) (x2)
3
ネ ッ ト ワ ー ク コ ネ ク タ (RJ45) (x2)
4
ネ ッ ト ワ ー ク LED イ ン ジ ケ ー タ ー (×4)
5
電 源 LED イ ン ジ ケ ー タ ー
96
Page 97

AXIST86MediaConverterSwitchSeries
6
電 源 コ ネ ク タ (DC 出 ⼒ )
7
ア ー ス 端 ⼦ ネ ジ
AXIS
AXIS AXIS
タ
タ タ
T8607
T8607 T8607
ス
イ
ス ス
イ イ
Media
Media Media
ッ
チ
ッ ッ
チ チ
) ))- --外 外
Converter
Converter Converter
外
観
図
観 観
図 図
Switch
Switch Switch
メ
デ
ィ
ア
コ
ン
バ
( ((メ メ
デ デ
ィ ィ
ア ア
コ コ
ー
ン ン
バ バ
ー ー
JA
1
カ バ ー
2
ネ ッ ト ワ ー ク コ ネ ク タ (SFP) (x2)
3
ネ ッ ト ワ ー ク コ ネ ク タ (RJ45) (x2)
4
カ メ ラ の ネ ッ ト ワ ー ク LED イ ン ジ ケ ー タ ー
5
ネ ッ ト ワ ー ク LED イ ン ジ ケ ー タ ー (×4)
6
電 源 LED イ ン ジ ケ ー タ ー
7
電 源 コ ネ ク タ (DC 出 ⼒ )
8
ア ー ス 端 ⼦ ネ ジ
9
マ ル チ ケ ー ブ ル 挿 ⼊ ⼝
10
I/O タ ー ミ ナ ル コ ネ ク タ
97
Page 98

AXIST86MediaConverterSwitchSeries
製
品
の
取
り
付
け
⽅
製 製
品 品
の の
取 取
り り
付 付
推
奨
ツ
ー
推 推
奨 奨
•トルクス®T10ドライバー
•ケーブルシュープライヤー(アースケーブル⽤)
•7mmレンチ(アース端⼦ネジ⽤)
•マイナスドライバー2.5mm
•電線ストリッパー(AXIST8607へのケーブル接続⽤)
ル
ツ ツ
ー ー
ル ル
法
け け
⽅ ⽅
法 法
AXIS
AXIS AXIS
ス
ス ス
注 記
ハードウェアコンポーネントの概要については、
注意
AXIS
AXIS AXIS
ス
ス ス
注 記
T8606
T8606 T8606
イ
ッ
イ イ
ッ ッ
•メディアコンバータスイッチは、屋内や適切なキャビネットなど、ほこりや
⽔から保護された環境に取り付けてください。
•メディアコンバータスイッチは、⽤途に合ったシールドネットワークケーブ
ル(STP)を使⽤して接続してください。メディアコンバータスイッチは適切
に接地してください。規制上の要件については、を参照してください。
1.メディアコンバータースイッチを壁、またはキャビネットのDINレールに
取り付けます。
2.必要に応じて、ネットワークケーブルをネットワークコネクタ(RJ45、
SFP)に接続します。
3.電源ケーブルを電源コネクタ(DC⼊⼒)に接続します。
4.スイッチをアース端⼦ネジに接続して接地します。
5.メディアコンバータスイッチのLEDインジケーターが正しい状態を⽰してい
ることを確認します。
ン ジ ケ ー タ ー
VLANタグを使⽤するシステムを設定する場合は、製品のディップスイッチを
正しく設定する必要があります。
デ ィ ッ プ ス イ ッ チ
T8607
T8607 T8607
イ
ッ
イ イ
ッ ッ
•主電源や電線管への接続は、地域条例を順守し、メーカーの指⽰に従って、
訓練を受けた専⾨技術者が⾏ってください。
Media
Media Media
チ
の
チ チ
チ
チ チ
取
) ))の の
取 取
Media
Media Media
の
取
) ))の の
取 取
Converter
Converter Converter
り
付
け
⽅
り り
付 付
を参照してください。
を参照してください。
Converter
Converter Converter
り
付
り り
付 付
法
け け
⽅ ⽅
法 法
105 ペ ー ジ の 、 メ デ ィ ア コ ン バ ー タ ス イ ッ チ の LED イ
け
⽅
法
け け
⽅ ⽅
法 法
Switch
Switch Switch
108 ペ ー ジ の 、 ネ ッ ト ワ ー ク コ ネ ク タ の
Switch
Switch Switch
96 ペ ー ジ
メ
デ
( ((メ メ
( ((メ メ
ィ
デ デ
ィ ィ
を参照してください。
メ
デ
ィ
デ デ
ィ ィ
ア
ア ア
ア
ア ア
コ
ン
バ
ー
コ コ
ン ン
コ
ン
コ コ
ン ン
タ
バ バ
ー ー
タ タ
バ
ー
タ
バ バ
ー ー
タ タ
98
Page 99

AXIST86MediaConverterSwitchSeries
•電源(別売)とメディアコンバータスイッチは、屋内や適切なキャビネットな
ど、ほこりや⽔から保護された環境に取り付けてください。
1.主電源のスイッチがオフになっていることを確認します。
2.電源とメディアコンバータスイッチを壁、またはキャビネットのDINレール
に取り付けます。ドリルによる⽳開けが必要な場合は、素材に適したドリ
ルビット、ネジ、プラグを使⽤してください。
3.カバーを固定するネジをゆるめ、メディアコンバータスイッチからカバー
を取り外します。
4.ユニットの背⾯にあるケーブルガスケットを通してマルチケーブルの端を
押し込み、処理しやすいように⼗分に引き込みます。
重要
付属のケーブルを短くする必要がある場合は、⼿順5〜10に従ってください。
必要がない場合は、⼿順11に進みます。
JA
5.マルチケーブルの被覆を端から約45mm剥きます。
6.編組シールドはそのまま残しつつ折り返して、20mmほどの⻑さにします。
7.イーサネットワイヤーのフォイルシールドを16mm切除します。
8.4つのイーサーネットワイヤー(緑、緑/⽩、オレンジおよびオレンジ/⽩)か
ら絶縁体を8mm剥ぎます。
9.2つのI/Oワイヤー(⻘および⻩)から絶縁体を8mm剥ぎます。
10.3つの電源ワイヤー(⾚、⾚および⿊)から絶縁体を5mm剥ぎます。
重要
•絶縁体を剥いだ後、適切な接続を確保できるよう、電源およびイーサーネッ
トワイヤーにスズを被せる必要があります。
•2本のイーサネットワイヤーは同じ⻑さにして、編組シールドの端から約25
mm突き出るようにしてください。
99
Page 100

AXIST86MediaConverterSwitchSeries
1
マ ル チ ケ ー ブ ル の 被 覆
2
編 組 シ ー ル ド
3
イ ー サ ネ ッ ト ワ イ ヤ ー の フ ォ イ ル シ ー ル ド (×2)
11.ネットワークワイヤーを内部ネットワークコネクタ(11、16)に、I/Oワイ
ヤーを内部I/Oコネクタ(9)に接続します。これらのコネクタは、マイナス
ドライバーでスロットを押し下げて開きます。ワイヤーを挿⼊し、ドラ
イバーを離します。
12.アース線と電源ワイヤーを電源コネクタ(DC出⼒(1))に接続します。
1
電 源 コ ネ ク タ (DC 出 ⼒ )
2
電 源 ワ イ ヤ ー ( ⾚ )
3
電 源 ワ イ ヤ ー ( ⾚ )
4
ク ラ ン プ
5
編 組 シ ー ル ド コ イ ル
6
イ ー サ ネ ッ ト ワ イ ヤ ー シ ー ル ド (×2)
7
デ ジ タ ル I/O ワ イ ヤ ー ( ⻘ )
100
 Loading...