

Page 1

AXIST8310VideoSurveillanceControlBoard
AXIST8311VideoSurveillanceJoystick
AXIST8312VideoSurveillanceKeypad
AXIST8313VideoSurveillanceJogDial
InstallationGuide
Page 2

Page 3

EN
FR
DE
IT
ES
JA
ZH
English
France:Français
Deutschland:Deutsch
Italia:Italiano
España:Español
日本:日本語
中文:简体中文
Page 4

AXIST8310VideoSurveillanceControlBoard
Readthisrst
ReadthroughthisInstallationGuidecarefullybeforeinstallingtheproduct.KeeptheInstallation
Guideforfuturereference.
Legalconsiderations
Videoandaudiosurveillancecanberegulatedbylawsthatvaryfromcountrytocountry.Checkthe
lawsinyourlocalregionbeforeusingthisproductforsurveillancepurposes.
Liability
Everycarehasbeentakeninthepreparationofthisdocument.PleaseinformyourlocalAxis
ofceofanyinaccuraciesoromissions.AxisCommunicationsABcannotbeheldresponsiblefor
anytechnicalortypographicalerrorsandreservestherighttomakechangestotheproductand
manualswithoutpriornotice.AxisCommunicationsABmakesnowarrantyofanykindwithregard
tothematerialcontainedwithinthisdocument,including,butnotlimitedto,theimpliedwarranties
ofmerchantabilityandtnessforaparticularpurpose.AxisCommunicationsABshallnotbe
liablenorresponsibleforincidentalorconsequentialdamagesinconnectionwiththefurnishing,
performanceoruseofthismaterial.Thisproductisonlytobeusedforitsintendedpurpose.
Intellectualpropertyrights
AxisABhasintellectualpropertyrightsrelatingtotechnologyembodiedintheproductdescribedin
thisdocument.Inparticular,andwithoutlimitation,theseintellectualpropertyrightsmayinclude
oneormoreofthepatentslistedataxis.com/patentandoneormoreadditionalpatentsorpending
patentapplicationsintheUSandothercountries.
Equipmentmodications
Thisequipmentmustbeinstalledandusedinstrictaccordancewiththeinstructionsgiveninthe
userdocumentation.Thisequipmentcontainsnouser-serviceablecomponents.Unauthorized
equipmentchangesormodicationswillinvalidateallapplicableregulatorycerticationsand
approvals.
Trademarkacknowledgements
AXISCOMMUNICATIONS,AXISandVAPIXareregisteredtrademarksortrademarkapplications
ofAxisABinvariousjurisdictions.Allothercompanynamesandproductsaretrademarksor
registeredtrademarksoftheirrespectivecompanies.
4
Page 5
AXIST8310VideoSurveillanceControlBoard
Regulatoryinformation
Europe
ThisproductcomplieswiththeapplicableCEmarkingdirectivesandharmonizedstandards:
•RestrictionsofHazardousSubstances(RoHS)Directive201 1/65/EU.SeeDisposaland
recycling6.
AcopyoftheoriginaldeclarationofconformitymaybeobtainedfromAxisCommunicationsAB.
SeeContactinformation7.
Regulatoryinformation
Europe
ThisproductcomplieswiththeapplicableCEmarkingdirectivesandharmonizedstandards:
•ElectromagneticCompatibility(EMC)Directive2014/30/EU.SeeElectromagnetic
compatibility(EMC)5.
•LowVoltageDirective(LVD)2014/35/EU.SeeSafety6.
•RestrictionsofHazardousSubstances(RoHS)Directive201 1/65/EU.SeeDisposaland
recycling6.
AcopyoftheoriginaldeclarationofconformitymaybeobtainedfromAxisCommunicationsAB.
SeeContactinformation7.
Electromagneticcompatibility(EMC)
Thisequipmenthasbeendesignedandtestedtofulllapplicablestandardsfor:
•Radiofrequencyemissionwheninstalledaccordingtotheinstructionsandusedinits
intendedenvironment.
•Immunitytoelectricalandelectromagneticphenomenawheninstalledaccordingtothe
instructionsandusedinitsintendedenvironment.
USA
ThisequipmenthasbeentestedandfoundtocomplywiththelimitsforaClassBdigitaldevice,
pursuanttopart15oftheFCCRules.Theselimitsaredesignedtoprovidereasonableprotection
againstharmfulinterferenceinaresidentialinstallation.Thisequipmentgenerates,usesandcan
radiateradiofrequencyenergyand,ifnotinstalledandusedinaccordancewiththeinstructions,
maycauseharmfulinterferencetoradiocommunications.However,thereisnoguaranteethat
interferencewillnotoccurinaparticularinstallation.Ifthisequipmentdoescauseharmful
interferencetoradioortelevisionreception,whichcanbedeterminedbyturningtheequipmentoff
andon,theuserisencouragedtotrytocorrecttheinterferencebyoneormoreofthefollowing
measures:
5
Page 6

AXIST8310VideoSurveillanceControlBoard
•Reorientorrelocatethereceivingantenna.
•Increasetheseparationbetweentheequipmentandreceiver.
•Connecttheequipmentintoanoutletonacircuitdifferentfromthattowhichthe
receiverisconnected.
•Consultthedealeroranexperiencedradio/TVtechnicianforhelp.
Theproductshallbeproperlygrounded.
Canada
ThisdigitalapparatuscomplieswithCANICES-3(ClassB).Theproductshallbeproperlygrounded.
CetappareilnumériqueestconformeàlanormeCANNMB-3(classeB).Leproduitdoitêtre
correctementmisàlaterre.
Europe
ThisdigitalequipmentfulllstherequirementsforRFemissionaccordingtotheClassBlimitof
EN55032.Theproductshallbeproperlygrounded.
Australia/NewZealand
ThisdigitalequipmentfulllstherequirementsforRFemissionaccordingtotheClassBlimitof
AS/NZSCISPR32.Theproductshallbeproperlygrounded.
Japan
この装置は、クラスB情報技術装置です。この装置は、家庭環境で使⽤することを⽬
的としていますが、この装置がラジオやテレビジョン受信機に近接して使⽤される
と、受信障害を引き起こすことがあります。取扱説明書に従って正しい取り扱いを
して下さい。本製品は、適切に接地してください。
Korea
이기기는가정용(B급)전자파적합기기로서주로가정에서사용하는것을목적으로하
며,모든지역에서사용할수있습니다.제품은적합하게접지되어야합니다.
Safety
ThisproductcomplieswithIEC/EN/UL62368-1,safetyofaudio/videoandITequipment.
Disposalandrecycling
Whenthisproducthasreachedtheendofitsusefullife,disposeofitaccordingtolocallawsand
regulations.Forinformationaboutyournearestdesignatedcollectionpoint,contactyourlocal
authorityresponsibleforwastedisposal.Inaccordancewithlocallegislation,penaltiesmaybe
applicableforincorrectdisposalofthiswaste.
Europe
Thissymbolmeansthattheproductshallnotbedisposedoftogetherwithhouseholdor
commercialwaste.Directive2012/19/EUonwasteelectricalandelectronicequipment(WEEE)is
6
Page 7
AXIST8310VideoSurveillanceControlBoard
applicableintheEuropeanUnionmemberstates.Topreventpotentialharmtohumanhealth
andtheenvironment,theproductmustbedisposedofinanapprovedandenvironmentallysafe
recyclingprocess.Forinformationaboutyournearestdesignatedcollectionpoint,contactyour
localauthorityresponsibleforwastedisposal.Businessesshouldcontacttheproductsupplierfor
informationabouthowtodisposeofthisproductcorrectly.
ThisproductcomplieswiththerequirementsofDirective2011/65/EUontherestrictionoftheuse
ofcertainhazardoussubstancesinelectricalandelectronicequipment(RoHS).
China
ThisproductcomplieswiththerequirementsofSJ/T11364-2014,Markingfortherestriction
ofhazardoussubstancesinelectricalandelectronicproducts.
有毒有害物质或元素
部
件
名
称
铅
(Pb)
汞
(Hg)
镉
(Cd)
六价铬
(Cr(VI))
多溴联苯
(PBB)
多溴二苯
醚
(PBDE)
电
气
实
装
部
分
X
00000
0:表示该有毒有害物质在该部件所有均质材料中的含量均在GB/T26572标准规定
的限量要求以下。
X:表示该有毒有害物质至少在该部件的某一均质材料中的含量超出GB/T26572标准
规定的限量要求。
Contactinformation
AxisCommunicationsAB
Emdalavägen14
22369Lund
Sweden
Tel:+46462721800
Fax:+4646136130
axis.com
7
Page 8

AXIST8310VideoSurveillanceControlBoard
Warrantyinformation
ForinformationaboutAxis’productwarrantyandtheretorelatedinformation,goto
axis.com/warranty
Support
Shouldyourequireanytechnicalassistance,pleasecontactyourAxisreseller.Ifyourquestions
cannotbeansweredimmediately,yourresellerwillforwardyourqueriesthroughtheappropriate
channelstoensurearapidresponse.IfyouareconnectedtotheInternet,youcan:
•ndanswerstoresolvedproblemsintheFAQdatabase,searchbyproduct,category,
orphrase
•reportproblemstoAxissupportstaffbyloggingintoyourprivatesupportarea
•chatwithAxissupportstaff
•visitAxisSupportataxis.com/support
Learnmore!
VisitAxislearningcenteraxis.com/academyforusefultrainings,webinars,tutorialsandguides.
8
Page 9
AXIST8310VideoSurveillanceControlBoard
InstallationGuide
ThisInstallationGuideprovidesinstructionsforinstallingAXIST8310VideoSurveillanceControl
Board.Forallotheraspectsofusingtheproduct,pleaseseetheAXISCameraStationhelppages.
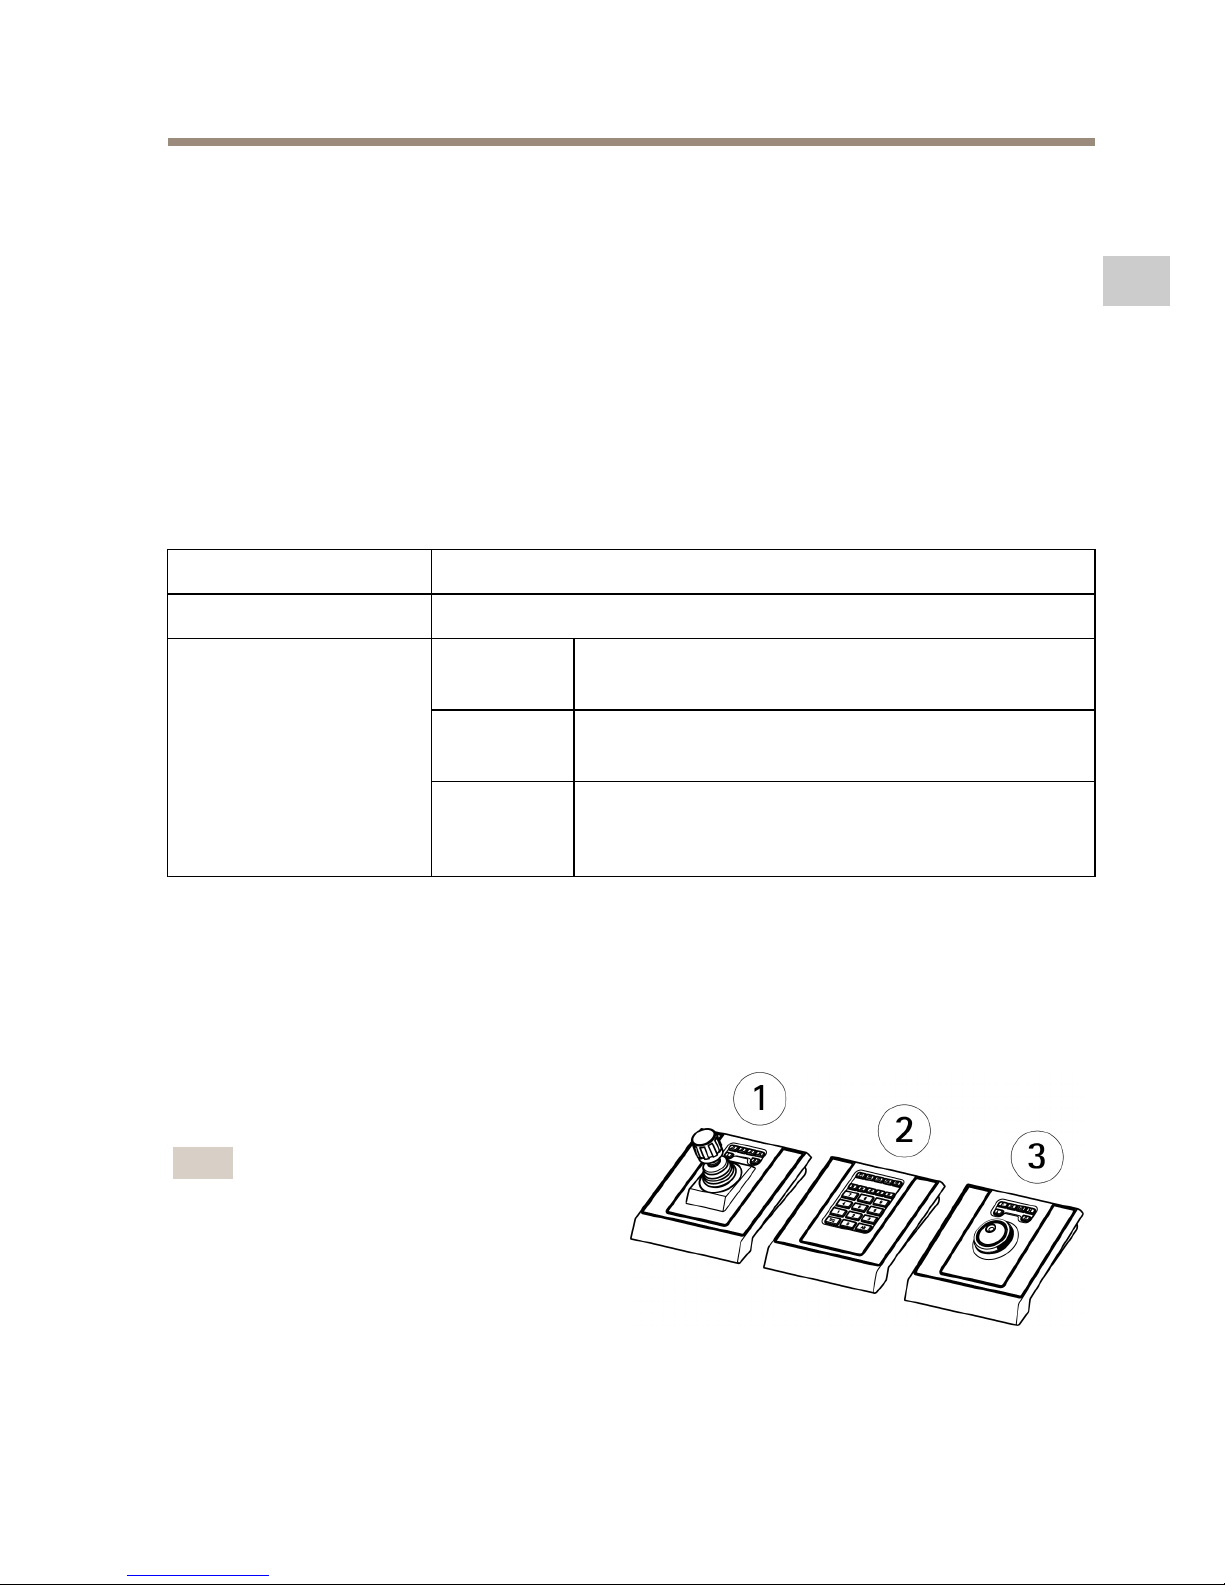
Overview
ThethreeunitsinAXIST8310VideoSurveillanceControlBoardcanbeinstalledseparatelyor
togetherasoneunit.PowerisprovidedviatheUSBconnections.
Packagecontents
Item
Models/variants/notes
Joystick/Keypad/JogdialAXIST8311/AXIST8312/AXIST8313
AXIST831 1:
1x200cm(78.7in)whensoldseparately,connects
toPConly
AXIST8312:
1x40cm(15.7in)forconnectionbetweenunits,
1x200cmforconnectiontoPC
USBcables
AXIST8313:
1x40cm
1x80cm(31.5in)forconnectionoftwounitsto
keypad
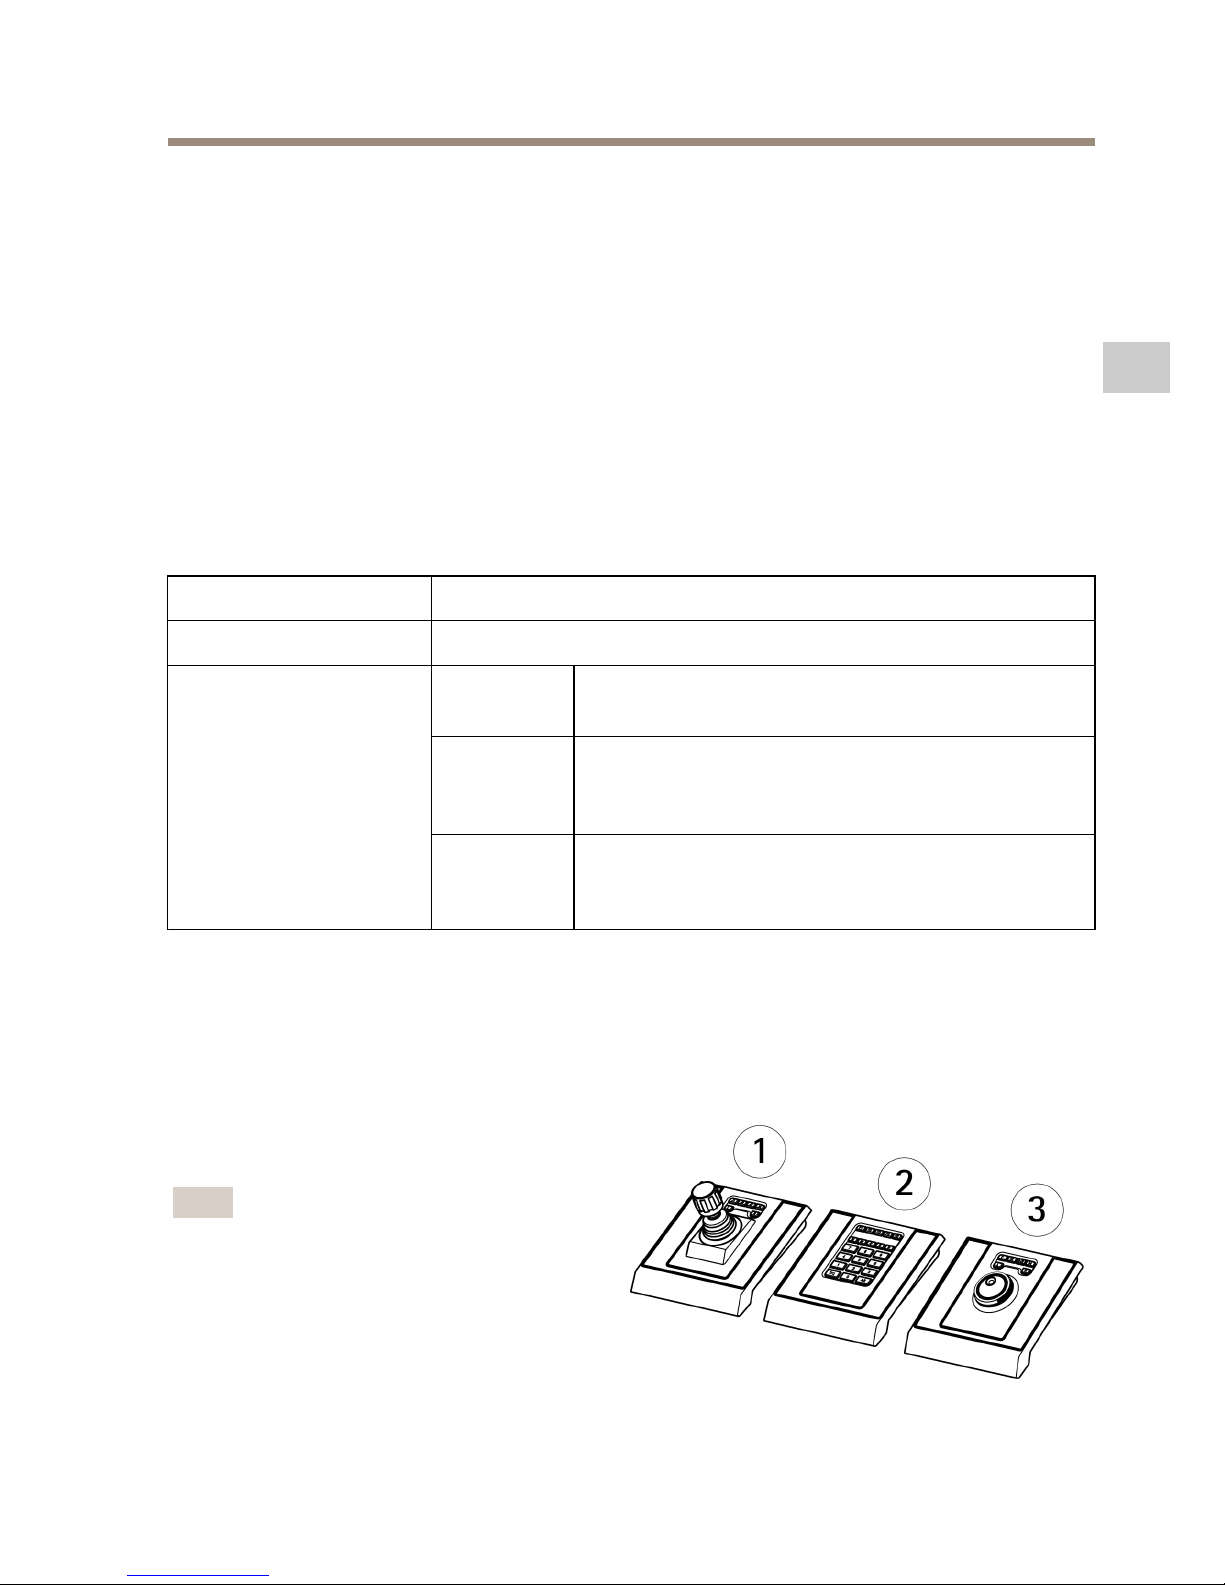
Hardwareoverview
AXIST8310VideoSurveillanceControlBoard
1:AXIST8311VideoSurveillanceJoystick
2:AXIST8312VideoSurveillanceKeypad
3:AXIST8313VideoSurveillanceJogDial
Note
Allkeysonallunitsarefully
customizablefromthesupporting
software.Somekeyshaveadefault
value,whichislistedwiththe
productoverview.
9
EN
Page 10
AXIST8310VideoSurveillanceControlBoard
AXIST831 1Joystick
1:USBport
2:6fullycustomizablekeys
3:Joystick
Keydefaultvalues:
J1–J4-Nodefaults
L-Simulateleftmousebuttonclick
R-Simulaterightmousebuttonclick
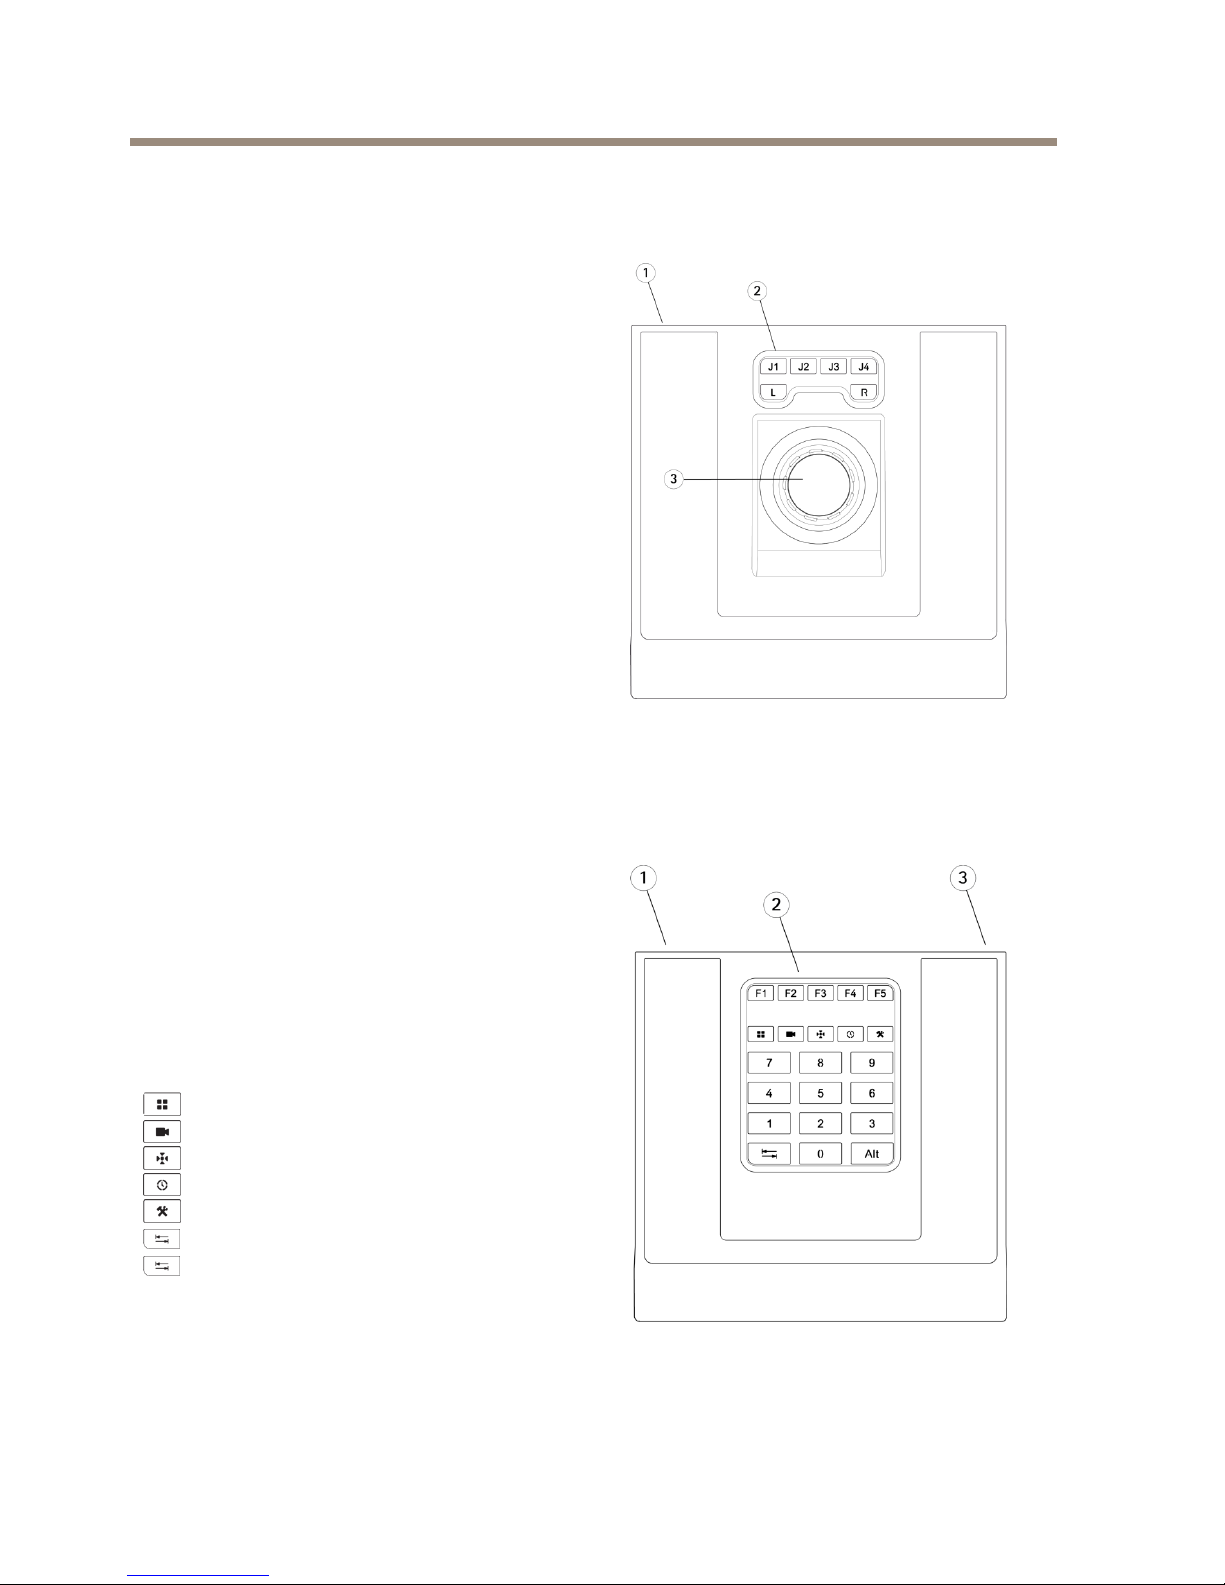
AXIST8312Keypad
1:USBport(x2)
2:22fullycustomizablekeys
3:USBport
Keydefaultvalues:
F1-Nodefault
F2-Openhotkeystab
F3-Nodefault
F4-OpenLogstab
F5-OpenCongurationtab
-Openviews
-Nextcamera/view
-Nodefault
-Nodefault
-Nodefault
–Gotorighttab
+Alt=Gotolefttab
0–9=0–9
10
Page 11

AXIST8310VideoSurveillanceControlBoard
AXIST8313Jogdial
1:USBport
2:6fullycustomizablekeys
3:Shuttlewheel
4:Jogwheel
Keydefaultvalues:
-Addbookmark
-Gotopreviousrecording
-Play/Pause
-Gotonextrecording
L-Show/hideexportmarkers
R-Switchbetweenlive/recordings
Installthehardware
AXIST831 1VideoSurveillanceJoystick,AXIST8312VideoSurveillanceKeypadandAXIST8313
VideoSurveillanceJogDialcanbeconnectedseparately,ortogetherasaunit,usingAXIST8312
VideoSurveillanceKeypadasaUSBhub.Theunitscanbeplacedinanyorder,tomeetyourown
requirements.
11
EN
Page 12

AXIST8310VideoSurveillanceControlBoard
1.ConnecttheUSBcabletoaUSBportonyourcomputer.
2.Followtheonscreeninstructions(ifapplicable)toinstallthenecessarydrivers.TheAXIS
T831 1joystickwillappearasagamecontroller/deviceinWindows.
3.Startthesupportingapplicationsoftware,e.g.AXISCameraStation,whichwill
automaticallydetectthedevicesintheAXIST8310.
Note
Thesystemmusthaveasupportingapplicationsoftware,e.g.AXISCameraStation,that
candetectthenewhardware.Seeaxis.comforinformationonsupportingsystems.
Troubleshooting
Ifyouexperienceproblemsduringtheinstallation,pleasetrythefollowing:
•Restartthesupportingapplicationsoftware,e.g.AXISCameraStation.
•DisconnecttheUSBcablefromthecomputer,wait10secondsandthenreconnect.
•MovetheUSBcabletoanotheravailableUSBportonyourcomputer.
•Verifythattheoperatingsystemhasidentiedthejoystick.Thiscanbecheckedin
Windowsdevicemanager.
12
Page 13
AXIST8310VideoSurveillanceControlBoard
Guided'installation
Ceguided'installationexpliquecommentinstallerleTableaudecontrôledevidéosurveillanceAXIS
T8310.Pourtouteslesautresinformationsrelativesàl'utilisationduproduit,reportez-vousaux
pagesdel'aideAXISCameraStation.
Vued'ensemble
LestroisunitésduTableaudecontrôledevidéosurveillanceAXIST8310peuventêtreinstallées
séparémentouensembleenuneseuleunité.L'alimentationestfournievialesconnexionsUSB.
Contenudel’emballage
Article
Modèles/variantes/remarques
Joystick/Clavier/MoletteAXIST8311/AXIST8312/AXIST8313
AXIST831 1:
1x200cm(78,7po)s'ilestvenduséparément,se
connecteuniquementauPC
AXIST8312:
1x40cm(15,7po)pourlaconnexionentredeux
unités,
1x200cmpourleraccordementauPC
CâblesUSB
AXIST8313:
1x40cm
1x80cm(31,5po)pourlaconnexiondedeuxunités
auclavier
Aperçudumatériel
TableaudecontrôledevidéosurveillanceAXIST8310
1:JoystickdevidéosurveillanceAXIST831 1
2:ClavierdevidéosurveillanceAXIST8312
3:MolettedevidéosurveillanceAXIST8313
Note
Touteslestouchessurtoutes
lesunitéssontentièrement
personnalisablesdepuislelogicielde
soutien.Certainestouchesontune
valeurpardéfaut,quiestindiquée
danslaprésentationduproduit.
13
FR
Page 14

AXIST8310VideoSurveillanceControlBoard
JoystickAXIST831 1
1:PortUSB
2:6touchesentièrementpersonnalisables
3:Joystick
Valeurpardéfautdesclés:
J1–J4-Pasdevaleurspardéfaut
L-Simuleunclicgauchedelasouris
R-Simuleunclicdroitdelasouris
ClavierAXIST8312
1:PortUSB(x2)
2:22touchesentièrementpersonnalisables
3:PortUSB
Valeurpardéfautdesclés:
F1-Pasdevaleurpardéfaut
F2-Ouvrironglettouchesderaccourci
F3-Pasdevaleurpardéfaut
F4-OuvrirongletJournaux
F5-OuvrirongletConguration
-Ouvrirvues
-Camérasuivante/vue
-Pasdevaleurpardéfaut
-Pasdevaleurpardéfaut
-Pasdevaleurpardéfaut
–Alleràl'ongletdroit
+Alt=Alleràl'ongletgauche
0–9=0–9
14
Page 15

AXIST8310VideoSurveillanceControlBoard
MoletteAXIST8313
1:PortUSB
2:6touchesentièrementpersonnalisables
3:Molettededélement
4:Rouededélement
Valeurpardéfautdesclés:
-Ajouterunsignet
-Alleràl'enregistrementprécédent
-Lecture/Pause
-Alleràl'enregistrementsuivant
L-Afcher/masquerlesmarqueurs
d'exportation
R-Passerdediffusionendirectà
enregistrements
Installationdumatériel
LejoystickdevidéosurveillanceAXIST831 1,leclavierdevidéosurveillanceAXIST8312etlamolette
devidéosurveillanceAXIST8313peuventêtreraccordésséparémentouensembleenuneseule
unité,enutilisantleclavierdevidéosurveillanceAXIST8312commeconcentrateurUSB.Pour
répondreàvosbesoins,vouspouvezplacerlesunitésdansl'ordredevotrechoix.
15
FR
Page 16

AXIST8310VideoSurveillanceControlBoard
1.ConnectezlecâbleUSBàunportUSBdevotreordinateur.
2.Suivezlesinstructionsquis'afchentàl'écran(lecaséchéant)pourinstallerlespilotes
nécessaires.LejoystickAXIST831 1apparaîtcommeuneconsoledejeu/unpériphérique
dansWindows.
3.Démarrezlelogicield'application,àsavoirAXISCameraStation,quidétectera
automatiquementlespériphériquessurl'AXIST8310.
Note
Lesystèmedoitdisposerd'unlogicield'application,àsavoirAXISCameraStation,qui
peutdétecterlenouveaumatériel.Consultezaxis.compourplusd’informationssurles
systèmesd'exploitation.
Dépannage
Sivousrencontrezunproblèmelorsdel'installation,essayezlesprocéduressuivantes:
•Redémarrezlelogicield'application,àsavoirAXISCameraStation.
•DébranchezlecâbleUSBdel'ordinateur,attendez10secondes,puisrebranchez-le.
•DéplacezlecâbleUSBversunautreportUSBdisponibledevotreordinateur.
•Vériezquelesystèmed'exploitationaidentiélejoystick.Vouspouvezlevérierdans
legestionnairedespériphériquesWindows.
16
Page 17

AXIST8310VideoSurveillanceControlBoard
Installationsanleitung
IndieserAnleitungwirddieInstallationderAXIST8310Steuerungseinheitzur
Sicherheitsüberwachungbeschrieben.AlleweiterenInformationenzurNutzungdiesesProduktes
ndenSieaufdenHilfeseitenzuAXISCameraStation.
Übersicht
DiedreiGeräteinderAXIST8310SteuerungseinheitzurSicherheitsüberwachungkönnengetrennt
odergemeinsaminstalliertwerden.DieStromversorgungerfolgtüberdieUSB-Anschlüsse.
Lieferumfang
Artikel
Modelle/Varianten/Hinweise
Joystick/Tastenfeld/Jog
Dial
AXIST8311/AXIST8312/AXIST8313
AXIST831 1:
1x200cm(beiseparatemKauf),nurfürden
AnschlussaneinenPC
AXIST8312:1x40cmfürVerbindungenzwischendenGeräten,
1x200cmfürdenAnschlussaneinenPC
USB-Kabel
AXIST8313:
1x40cm
1x80cmfürdenAnschlussvonzweiGerätenan
einTastenfeld
ÜbersichtüberdieHardware
AXIST8310SteuerungseinheitzurSicherheitsüberwachung
17
DE
Page 18

AXIST8310VideoSurveillanceControlBoard
1:AXIST8311JoystickVideoüberwachung
2:AXIST8312Funktionstastenfeld
Videoüberwachung
3:AXIST8313JogDialVideoüberwachung
Beachten
DieFunktionsämtlicherTasten
allerGerätelässtsichmithilfe
derentsprechendenSoftwarefrei
programmieren.EinigenTasten
isteinStandardwertzugewiesen.
DieseristinderProduktübersicht
aufgeführt.
AXIST831 1Joystick
1:USB-Port
2:6freiprogrammierbareTasten
3:Joystick
StandardwertederTasten:
J1–J4-KeineStandardwerte
L-Linksklicksimulieren
R-Rechtsklicksimulieren
AXIST8312Funktionstastenfeld
18
Page 19

AXIST8310VideoSurveillanceControlBoard
1:USB-Port(2x)
2:22freiprogrammierbareTasten
3:USB-Port
StandardwertederTasten:
F1-KeinStandardwert
F2-Hotkey-Registerkarteöffnen
F3-KeinStandardwert
F4-Protokollregisterkarteöffnen
F5:Kongurationsregisterkarteöffnen
-Ansichtenöffnen
-NächsteKamera/Ansicht
-KeinStandardwert
-KeinStandardwert
-KeinStandardwert
-ZurrechtenRegisterkartewechseln
+Alt=zurlinkenRegisterkartewechseln
0–9=0–9
AXIST8313JogDial
1:USB-Port
2:6freiprogrammierbareTasten
3:Auswahlrad
4:Jog-Rad
StandardwertederTasten:
-Lesezeichenhinzufügen
-ZurvorherigenAufzeichnung
-Wiedergabe/Pause
-ZurnächstenAufzeichnung
L-Exportmarkierungeneinblenden/ausblenden
R-ZwischendenOptionenLiveund
Aufzeichnungwechseln
19
DE
Page 20

AXIST8310VideoSurveillanceControlBoard
InstallierenderHardware
DieProdukteAXIST8311JoystickVideoüberwachung,AXIST8312Funktionstastenfeld
VideoüberwachungundAXIST8313JogDialVideoüberwachungkönnengetrenntodergemeinsam
alseinGerätangeschlossenwerden,wobeidasAXIST8312FunktionstastenfeldVideoüberwachung
alsUSB-Hubfungiert.DieEinheitenkönnennachBedarfinbeliebigerReihenfolgeangeordnet
werden.
1.SchließenSiedasUSB-KabelaneinenUSB-PortIhresComputersan.
2.FührenSieggf.dieAnweisungenaufdemBildschirmaus,umdieerforderlichenTreiber
zuinstallieren.DerAXIST831 1JoystickwirdinWindowsalsGamecontroller/-gerät
angezeigt.
3.StartenSiediezugehörigeAnwendungssoftware(z.B.AXISCameraStation),diedie
GeräteinderAXIST8310automatischerkennt.
Beachten
FürdasSystemisteinezugehörigeAnwendungssoftware(z.B.AXISCameraStation)
erforderlich,diedieneueHardwareerkennenkann.Unteraxis.comndenSieInformationen
zuzugehörigenSystemen.
Fehlerbehebung
VersuchenSieFolgendes,wennbeiderInstallationProblemeauftreten:
•StartenSiediezugehörigeAnwendungssoftware(z.B.AXISCameraStation)neu.
•TrennenSiedasUSB-KabelvomComputer,wartenSie10SekundenundschließenSie
dasKabelwiederan.
20
Page 21

AXIST8310VideoSurveillanceControlBoard
•SchließenSiedasUSB-KabelaneinenanderenUSB-PortIhresComputersan.
•ÜberprüfenSie,obdasBetriebssystemdenJoystickerkannthat.Dieslässtsichim
Windows-Gerätemanagerüberprüfen.
21
DE
Page 22

22
Page 23

AXIST8310VideoSurveillanceControlBoard
InstallationGuide
ThisInstallationGuideprovidesinstructionsforinstallingAXIST8310VideoSurveillanceControl
Board.Forallotheraspectsofusingtheproduct,pleaseseetheAXISCameraStationhelppages.
Panoramica
LetreunitàinAXIST8310VideoSurveillanceControlBoardpossonoessereinstallateseparatamente
oppurecomeun'unicaunità.L'alimentazioneèfornitatramiteconnessioniUSB.
Contenutodellaconfezione
Elemento
Modelli/varianti/note
Joystick/Tastierina/Jog
dial
AXIST8311/AXIST8312/AXIST8313
AXIST831 1:
1x200cmsevendutoseparatamente,sicollega
soloaPC
AXIST8312:
1x40cmperilcollegamentotraunità,
1x200cmperilcollegamentoalPC
CaviUSB
AXIST8313:
1x40cm
1x80cmperilcollegamentodidueunitàalla
tastiera
Panoramicadell'hardware
AXIST8310VideoSurveillanceControlBoard(AXIST8310VideoSurveillanceControlBoard)
1:AXIST8311VideoSurveillanceJoystick
2:AXIST8312VideoSurveillanceKeypad
3:AXIST8313VideoSurveillanceJogDial
Nota
Tuttiitastisututteleunitàsono
completamentepersonalizzabilidal
softwaredisupporto.Alcunitasti
hannounvalorepredenito,elencato
nellapanoramicadeldispositivo.
23
IT
Page 24

AXIST8310VideoSurveillanceControlBoard
AXIST831 1Joystick(JoystickAXIST831 1)
1:PortaUSB
2:6tasticompletamentepersonalizzabili
3:Joystick
Valoripredenitideitasti:
J1–J4-Nessunvalorepredenito
L-Simulailclicdelpulsantesinistrodel
mouse
R-Simulailclicdelpulsantedestrodel
mouse
AXIST8312Keypad(TastieraAXIST8312)
1:PortaUSB(x2)
2:22tasticompletamentepersonalizzabili
3:portaUSB
Valoripredenitideitasti:
F1-Nessunvalorepredenito
F2-Aprischedatastidisceltarapida
F3-Nessunvalorepredenito
F4-AprischedaRegistri
F5-AprischedaCongurazione
-Apriviste
-Telecamera/vistasuccessiva
-Nessunvalorepredenito
-Nessunvalorepredenito
-Nessunvalorepredenito
–Vaiaschedadestra
+Alt=Vaiaschedasinistra
0–9=0–9
24
Page 25

AXIST8310VideoSurveillanceControlBoard
AXIST8313Jogdial(AXIST8313Jogdial)
1:PortaUSB
2:6tasticompletamentepersonalizzabili
3:Rotellinashuttle
4:RotellinaJog
Valoripredenitideitasti:
-Aggiungisegnalibro
-Passaallaregistrazioneprecedente
-Riproduci/Pausa
-Passaallaregistrazionesuccessiva
L-Mostraonascondiindicatoridi
esportazione
R-Passaggiodalleimmaginidalvivoalle
registrazioni
Installazionedell'hardware
AXIST831 1VideoSurveillanceJoystick,AXIST8312VideoSurveillanceKeypadeAXIST8313Video
SurveillanceJogDialpossonoesserecollegatiseparatamenteocomeunicaunità,utilizzandoAXIS
T8312VideoSurveillanceKeypadcomehubUSB.Leunitàpossonoessereposizionateinqualsiasi
ordine,asecondadelleesigenze.
25
IT
Page 26

AXIST8310VideoSurveillanceControlBoard
1.CollegareilcavoUSBaunaportaUSBsulcomputer.
2.Seguireleistruzionivisualizzate(seapplicabili)perinstallareidrivernecessari.Iljoystick
AXIST831 1verràvisualizzatocomedispositivoocontrollerdigiocoinWindows.
3.Avviareilsoftwaredell'applicazionedisupporto,adesempioAXISCameraStation,che
rileveràautomaticamenteidispositiviinAXIST8310.
Nota
Ilsistemadevedisporrediunsoftwaredell'applicazionedisupporto,adesempioAXIS
CameraStation,ingradodirilevareilnuovohardware.VisitareilsitoWebaxis.comper
informazionisuisistemidisupporto.
Risoluzionediproblemi
Sesisonovericatiproblemidurantel'installazione,provareunadelleseguentisoluzioni:
•Riavviareilsoftwaredell'applicazionedisupporto,adesempioAXISCameraStation.
•ScollegareilcavoUSBdalcomputer,attendere10secondi,quindiricollegarlo.
•CollegareilcavoUSBaun'altraportaUSBdisponibilesulcomputer.
•VericarecheilsistemaoperativoabbiaidenticatoiljoystickdaGestionedispositiviin
Windows.
26
Page 27

AXIST8310VideoSurveillanceControlBoard
Guíadeinstalación
EnestaguíadeinstalaciónseproporcionanlasinstruccionesnecesariasparainstalarlaAXIST8310
VideoSurveillanceControlBoard.Paralosdemásaspectosrelacionadosconelusodelproducto,
consultelaspáginasdeayudadeAXISCameraStation.
Informacióngeneral
LastresunidadesdelaAXIST8310VideoSurveillanceControlBoardsepuedeninstalarporseparado
ojuntascomounaunidad.SesuministralacorrienteatravésdelasconexionesUSB.
Contenidodelpaquete
Artículo
Modelos/variantes/notas
Joystick/Teclado/Mando
decontrolsecuencial
AXIST8311/AXIST8312/AXIST8313
AXIST831 1:
1x200cmsisevendeporseparado,seconectasolo
alPC
AXIST8312:
1x40cmparaconexiónentreunidades,
1x200cmparaconexiónalPC
CablesUSB
AXIST8313:
1x40cm
1x80cmparaconexióndedosunidadesalteclado
Informacióngeneraldelhardware
AXIST8310VideoSurveillanceControlBoard
1:AXIST8311VideoSurveillanceJoystick
2:AXIST8312VideoSurveillanceKeypad
3:AXIST8313VideoSurveillanceJogDial
Nota
Todaslasteclasdetodaslasunidades
sepuedenpersonalizarmedianteel
softwarecompatible.Algunasteclas
yaposeenunvalorpredeterminado
asignadoquesedetallaenla
informacióngeneraldelproducto.
27
ES
Page 28

AXIST8310VideoSurveillanceControlBoard
AXIST831 1Joystick
1:PuertoUSB
2:6teclastotalmentepersonalizables
3:Joystick
Valorespredeterminadosdetecla:
J1–J4:Sinvalorespredeterminados
L:Simulaelclicenelbotónizquierdodel
ratón
R:Simulaelclicenelbotónderechodelratón
AXIST8312Keypad
1:PuertoUSB(2)
2:22teclastotalmentepersonalizables
3:PuertoUSB
Valorespredeterminadosdetecla:
F1:Sinvalorpredeterminado
F2:Abrirpestañadeteclasdeaccesodirecto
F3:Sinvalorpredeterminado
F4:Abrirpestañaderegistros
F5:Abrirpestañadeconguración
:Abrirvistas
:Siguientecámara/vista
:Sinvalorpredeterminado
:Sinvalorpredeterminado
:Sinvalorpredeterminado
:Irapestañadeladerecha
+Alt=Irapestañadelaizquierda
0–9=0–9
28
Page 29

AXIST8310VideoSurveillanceControlBoard
AXIST8313Jogdial
1:PuertoUSB
2:6teclastotalmentepersonalizables
3:Ruedadenavegación
4:Ruedadeselección
Valorespredeterminadosdetecla:
:Agregarmarcador
:Iragrabaciónanterior
:Reproducir/Pausa
:Irasiguientegrabación
L:Mostrar/ocultarmarcadoresdeexportación
R:Cambiarentrevistaenvivo/grabaciones
Instalacióndelhardware
AXIST831 1VideoSurveillanceJoystick,AXIST8312VideoSurveillanceKeypadyAXIST8313Video
SurveillanceJogDialsepuedenconectarporseparadoojuntoscomounidadutilizandoelAXIS
T8312VideoSurveillanceKeypadcomounconcentradorUSB.Lasunidadessepuedencolocarenel
ordenquenecesiteparaadaptarseasusrequisitos.
29
ES
Page 30

AXIST8310VideoSurveillanceControlBoard
1.ConecteelcableUSBaunpuertoUSBdesuequipo.
2.Sigalasinstruccionesenpantalla(siprocede)parainstalarloscontroladoresnecesarios.
ElAXIST8311Joystickaparecerácomouncontrolador/dispositivodejuegosenWindows.
3.Inicieelsoftwaredeaplicacióncompatible—porejemplo,AXISCameraStation—,que
detectaráautomáticamentelosdispositivosenelAXIST8310.
Nota
Elsistemadebecontarconunsoftwaredeaplicacióncompatible,p,ej.AXISCamera
Station,quepuedadetectarelnuevohardware.Consulteaxis.comparaobtener
informaciónsobrelossistemascompatibles.
Solucióndeproblemas
Siexperimentaproblemasdurantelainstalación,pruebearealizarlosiguiente:
•Reinicieelsoftwaredeaplicacióncompatible,p.ej.AXISCameraStation.
•DesconecteelcableUSBdelordenador,espere10segundosyvuelvaaconectar.
•MuevaelcableUSBaotropuertoUSBdisponibleensuordenador.
•Compruebequeelsistemaoperativohayaidenticadoeljoystick.Estosepuede
comprobareneladministradordedispositivosdeWindows.
30
Page 31

AXIST8310VideoSurveillanceControlBoard
イ イ
イ
ン ン
ン
ス ス
ス
ト ト
ト
ー ー
ー
ル ル
ル
ガ ガ
ガ
イ イ
イ
ド ド
ド
このインストールガイドでは、AXIST8310VideoSurveillanceControlBoard(ビデオ監
視コントロールボード)をインストールする⼿順について説明しています。製品の使
⽤の詳細については、AXISCameraStationのヘルプページを参照してください。
Overview Overview
Overview
( ((概 概
概
要 要
要
) )
)
AXIST8310VideoSurveillanceControlBoard(ビデオ監視コントロールボード)の3つの
ユニットは個別に、または1つのユニットとして同時にインストールできます。USB
接続を経由して電源が供給されます。
パ パ
パ
ッ ッ
ッ
ケ ケ
ケ
ー ー
ー
ジ ジ
ジ
の の
の
内 内
内
容 容
容
ア ア
ア
イ イ
イ
テ テ
テ
ム ム
ム
モ モ
モ
デ デ
デ
ル ル
ル
/ //型 型
型
/ //注 注
注
ジョイスティック/
キーパッド/ジョグダ
イアル
AXIST8311/AXIST8312/AXIST8313
AXIS
T8311:
別売り時は1x200cmで、PC接続のみ
AXIS
T8312:
ユニット間の接続⽤1x40cm
PC接続⽤1x200cm
USBケーブル
AXIS
T8313:
1x40cm
2ユニットのキーパッド接続⽤1x80cm
ハ ハ
ハ
ー ー
ー
ド ド
ド
ウ ウ
ウ
ェ ェ
ェ
ア ア
ア
の の
の
概 概
概
要 要
要
AXIS AXIS
AXIS
T8310 T8310
T8310
Video Video
Video
Surveillance Surveillance
Surveillance
Control Control
Control
Board Board
Board
( ((ビ ビ
ビ
デ デ
デ
オ オ
オ
監 監
監
視 視
視
コ コ
コ
ン ン
ン
ト ト
ト
ロ ロ
ロ
ー ー
ー
ル ル
ル
ボ ボ
ボ
ー ー
ー
ド ド
ド
) )
)
31
JA
Page 32

AXIST8310VideoSurveillanceControlBoard
1:AXIST8311VideoSurveillance
Joystick(ジョイスティック)
2:AXIST8312VideoSurveillanceKeypad
(キーパッド)
3:AXIST8313VideoSurveillance(ジョ
グダイアル)
注意
全ユニットの全キーは対応ソフ
トウェアからすべてカスタマイ
ズ可能です。いくつかのキー
にはデフォルト値があり、製品
の概要とともに表⽰されてい
ます。
AXIS AXIS
AXIS
T8311 T8311
T8311
Joystick Joystick
Joystick
( ((ジ ジ
ジ
ョ ョ
ョ
イ イ
イ
ス ス
ス
テ テ
テ
ィ ィ
ィ
ッ ッ
ッ
ク ク
ク
) )
)
1:USBポート
2:6つの全カスタマイズ可能なキー
3:ジョイスティック
キーのデフォルト値:
J1〜J4-デフォルトなし
L-左マウスボタンのクリックをシミュ
レート
R-右マウスボタンのクリックをシミュ
レート
AXIS AXIS
AXIS
T8312 T8312
T8312
Keypad Keypad
Keypad
( ((キ キ
キ
ー ー
ー
パ パ
パ
ッ ッ
ッ
ド ド
ド
) )
)
32
Page 33

AXIST8310VideoSurveillanceControlBoard
1:USBポート(x2)
2:22の全カスタマイズ可能なキー
3:USBポート
キーのデフォルト値:
F1-デフォルトなし
F2-[ホットキー]タブを開く
F3-デフォルトなし
F4-[ログ]タブを開く
F5-[設定]タブを開く
-ビューを開く
-次のカメラ/ビュー
-デフォルトなし
-デフォルトなし
-デフォルトなし
‒右のタブに移動する
+Alt=左のタブに移動する
0‒9=0‒9
AXIS AXIS
AXIS
T8313 T8313
T8313
Jog Jog
Jog
dial dial
dial
( ((ジ ジ
ジ
ョ ョ
ョ
グ グ
グ
ダ ダ
ダ
イ イ
イ
ア ア
ア
ル ル
ル
) )
)
1:USBポート
2:6つの全カスタマイズ可能なキー
3:シャトルホイール
4:ジョグホイール
キーのデフォルト値:
-ブックマークを追加する
-前の録画に移動する
-再⽣する/⼀時停⽌する
-次の録画に移動する
L-エクスポートマーカーを表⽰/⾮表
⽰にする
R-ライブ/録画の切り替え
33
JA
Page 34

AXIST8310VideoSurveillanceControlBoard
ハ ハ
ハ
ー ー
ー
ド ド
ド
ウ ウ
ウ
ェ ェ
ェ
ア ア
ア
の の
の
設 設
設
置 置
置
AXIST8311VideoSurveillanceJoystick(ジョイスティック)、AXIST8312Video
SurveillanceKeypad(キーパッド)およびAXIST8313VideoSurveillance(ジョグダイア
ル)は個別に、またはAXIST8312VideoSurveillanceKeypad(キーパッド)をUSBハブと
して使⽤することでユニットとして同時に接続することが可能です。ユニットは必
要に応じてどのような順番でも配置することができます。
1.USBケーブルをコンピューターのUSBポートに接続します。
2.画⾯の指⽰(該当する場合)にしたがって、必要なドライバーをインス
トールします。AXIST8311Joystick(ジョイスティック)はWindowsのゲーム
コントローラー/デバイスとして表⽰されます。
3.AXISCameraStationなどの対応アプリケーションソフトウェアを開きます。
AXIST8310のデバイスが⾃動的に読み込まれます。
注意
システムには、新しいハードウェアを検出できるAXISCameraStationなどの対
応アプリケーションソフトウェアが必要です。対応システムの情報について
は、axis.comを参照してください。
ト ト
ト
ラ ラ
ラ
ブ ブ
ブ
ル ル
ル
シ シ
シ
ュ ュ
ュ
ー ー
ー
テ テ
テ
ィ ィ
ィ
ン ン
ン
グ グ
グ
インストール中に問題が発⽣した場合は以下をお試しください。
•AXISCameraStationなどの対応アプリケーションソフトウェアを再起
動します。
34
Page 35

AXIST8310VideoSurveillanceControlBoard
•USBケーブルをコンピューターから外し、10秒待ってから再接続します。
•USBケーブルをコンピューターの使⽤可能な別USBポートに移動します。
•オペレーティングシステムがジョイスティックを認識しているか確認しま
す。Windowsデバイスマネージャーで確認することができます。
35
JA
Page 36

36
Page 37

AXIST8310VideoSurveillanceControlBoard
安 安
安
装 装
装
指 指
指
南 南
南
本安装指南提供AXIST8310视频监控控制板的安装说明。有关使用本产品的所有其他
方面内容,请参见AXISCameraStation的帮助页面。
概 概
概
述 述
述
AXIST8310视频监控控制板的三个单元可以单独安装或安装为一个单元。通过USB连
接进行供电。
包 包
包
装 装
装
内 内
内
含 含
含
物 物
物
项 项
项
目 目
目
模 模
模
型 型
型
/ //变 变
变
体 体
体
/ //说 说
说
明 明
明
操纵杆/键盘/滚轮按钮
AXIST8311/AXIST8312/AXIST8313
AXIS
T8311:
1x200cm(78.7英寸)(单独销售时),
仅与PC连接
AXIS
T8312:
1x40cm(15.7英寸)用于连接各单元,
1x200cm用于连接PC
USB数据线
AXIS
T8313:
1x40cm
1x80cm(31.5英寸)用于两个单元与键盘
之间的连接
硬 硬
硬
件 件
件
概 概
概
览 览
览
AXIS AXIS
AXIS
T8310 T8310
T8310
视 视
视
频 频
频
监 监
监
控 控
控
控 控
控
制 制
制
板 板
板
1:AXIST8311视频监控操纵杆
2:AXIST8312视频监控键盘
3:AXIST8313视频监控滚轮按钮
备注
所有单元上的所有键均可从支持
软件上完全自定义。一些键具有
与产品概述一并列出的默认值。
37
ZH
Page 38

AXIST8310VideoSurveillanceControlBoard
AXIS AXIS
AXIS
T8311 T8311
T8311
操 操
操
纵 纵
纵
杆 杆
杆
1:USB端口
2:6个完全自定义键
3:操纵杆
键默认值:
J1–J4-无默认
L-模拟鼠标左键点击
R-模拟鼠标右键点击
AXIS AXIS
AXIS
T8312 T8312
T8312
键 键
键
盘 盘
盘
1:USB端口(x2)
2:22个完全自定义键
3:USB端口
键默认值:
F1-无默认
F2-打开快捷键选项卡
F3-无默认
F4-打开日志选项卡
F5-打开设置选项卡
-打开视图
-下一个摄像机/视图
-无默认
-无默认
-无默认
–转至右边选项卡
+Alt=转至左边选项卡
0–9=0–9
38
Page 39

AXIST8310VideoSurveillanceControlBoard
AXIS AXIS
AXIS
T8313 T8313
T8313
滚 滚
滚
轮 轮
轮
按 按
按
钮 钮
钮
1:USB端口
2:6个完全自定义键
3:导航旋钮
4:调节旋钮
键默认值:
-添加书签
-转至上一条记录
-播放/暂停
-转至下一条记录
L-显示/隐藏出口标记
R-在现场/记录之间切换
安 安
安
装 装
装
硬 硬
硬
件 件
件
使用AXIST8312视频监控键盘作为USB集线器,可以将AXIST8311视频监控操纵
杆、AXIST8312视频监控键盘和AXIST8313视频监控滚轮按钮分别连接或连接为一
个单元。可以将此类单元排列成任何顺序来满足你自己的要求。
39
ZH
Page 40

AXIST8310VideoSurveillanceControlBoard
1.在你的电脑上将USB数据线连接至USB端口。
2.(如果适用)按照屏幕上的指示安装必要的驱动程序。AXIST8311操纵杆将
作为游戏控制器/设备出现在Windows中。
3.启动支持应用软件(例如AXISCameraStation),它将自动检测AXIST8310
中的设备。
备注
系统必须安装可以检测到新硬件的支持应用软件(例如AXISCameraStation)。
关于支持系统的信息,请浏览axis.com。
故 故
故
障 障
障
排 排
排
除 除
除
如果你在安装过程中遇到问题,请尝试以下方法:
•重启支持应用软件,例如AXISCameraStation。
•将USB数据线从电脑上断开,静候10秒钟,然后重新连接。
•将USB数据线移到你的电脑的另一个可用USB端口上。
•确认操作系统已识别操纵杆。可以在Windows设备管理器中就此进行检查。
40
Page 41

41
Page 42

InstallationGuide
Ver.M2.2
AXIST8310VideoSurveillanceControlBoard
Date:July2018
©AxisCommunicationsAB,2010-2018
PartNo.18681 13
 Loading...