

Page 1

INSTALLATION GUIDE
AXIS Camera Station S1016 Recorder
AXIS Camera Station S9001 Desktop Terminal
Page 2

About this Document
This document includes instructions for installing
AXIS Camera Station S1016 Recorder and AXIS Camera
Station S9001 Desktop Terminal on your network. Previous
experience of networking will be beneficial when installing
the product.
Legal Considerations
Video and audio surveillance can be regulated by laws that
vary from country to country. Check the laws in your local
region before using this product for surveillance purposes.
Liability
Every care has been taken in the preparation of this
document. Please inform your local Axis office of any
inaccuracies or omissions. Axis Communications AB cannot
be held responsible for any technical or typographical errors
and reserves the right to make changes to the product and
manuals without prior notice. Axis Communications AB
makes no warranty of any kind with regard to the material
contained within this document, including, but not limited
to, the implied warranties of merchantability and fitness for
a particular purpose. Axis Communications AB shall not be
liable nor responsible for incidental or consequential
damages in connection with the furnishing, performance or
use of this material. This product is only to be used for its
intended purpose.
Intellectual Property Rights
Axis AB has intellectual property rights relating to
technology embodied in the product described in this
document. In particular, and without limitation, these
intellectual property rights may include one or more of the
patents listed at www.axis.com/patent.htm and one or more
additional patents or pending patent applications in the US
and other countries.
Equipment Modifications
This equipment must be installed and used in strict
accordance with the instructions given in the user
documentation. This equipment contains no
user-serviceable components. Unauthorized equipment
changes or modifications will invalidate all applicable
regulatory certifications and approvals.
• download user documentation and firmware updates
• find answers to resolved problems in the FAQ database.
Search by product, category, or phrases
• report problems to Axis support by logging in to your
private support area
• chat with Axis support staff (selected countries only)
• visit Axis support at www.axis.com/techsup
Copyright
©2014 Axis Communications AB, © 2013 Dell Inc. All rights
reserved. This product is protected by U.S. and international
copyright and intellectual property laws. AXIS
COMMUNICATIONS, AXIS, ETRAX, ARTPEC and VAPIX are
registered trademarks or trademark applications of Axis AB
in various jurisdictions. All other company names and
products are trademarks or registered trademarks of their
respective companies. We reserve the right to introduce
modifications without notice.
Trademark Acknowledgments
Dell™ is a trademark of Dell Inc. Ethernet, Internet Explorer,
WWW are registered trademarks of the respective holders.
Microsoft®, Windows®, MS-DOS®, Windows Vista®, the
Windows Vista start button, and Office Outlook® are either
trademarks or registered trademarks of Microsoft
Corporation in the United States and/or other countries.
Java and all Java-based trademarks and logos are
trademarks or registered trademarks of Oracle and/or its
affiliates.
Contact Information
Axis Communications AB
Emdalavägen 14
223 69 Lund
Sweden
Tel: +46 46 272 18 00
Fax: +46 46 13 61 30
www.axis.com
Support
Should you require any technical assistance, please contact
your Axis reseller. If your questions cannot be answered
immediately, your reseller will forward your queries through
the appropriate channels to ensure a rapid response. If you
are connected to the Internet, you can:
Page 3

AXIS S1016/AXIS S9001 Installation Guide Page 3
AXIS S1016/AXIS S9001 Installation
Guide
This installation guide provides instructions for installing AXIS Camera Station S1016 Recorder and
AXIS Camera Station S9001 Desktop Terminal. For more information about how to use the product,
go to www.axis.com
Installation Steps
1. Hardware overview. See page 4.
2. Connect the cables. See page 6.
3. Set up software. See page 8.
4. Network configuration. See page 8.
5. Get Started. See page 8.
Package Content
• AXIS Camera Station S1016 Recorder or AXIS Camera Station S9001 Desktop Terminal
• Computer mouse
• Keyboard
• Power cable
• Safety and Regulatory Information document
• Installation Guide (this document)
Page 4
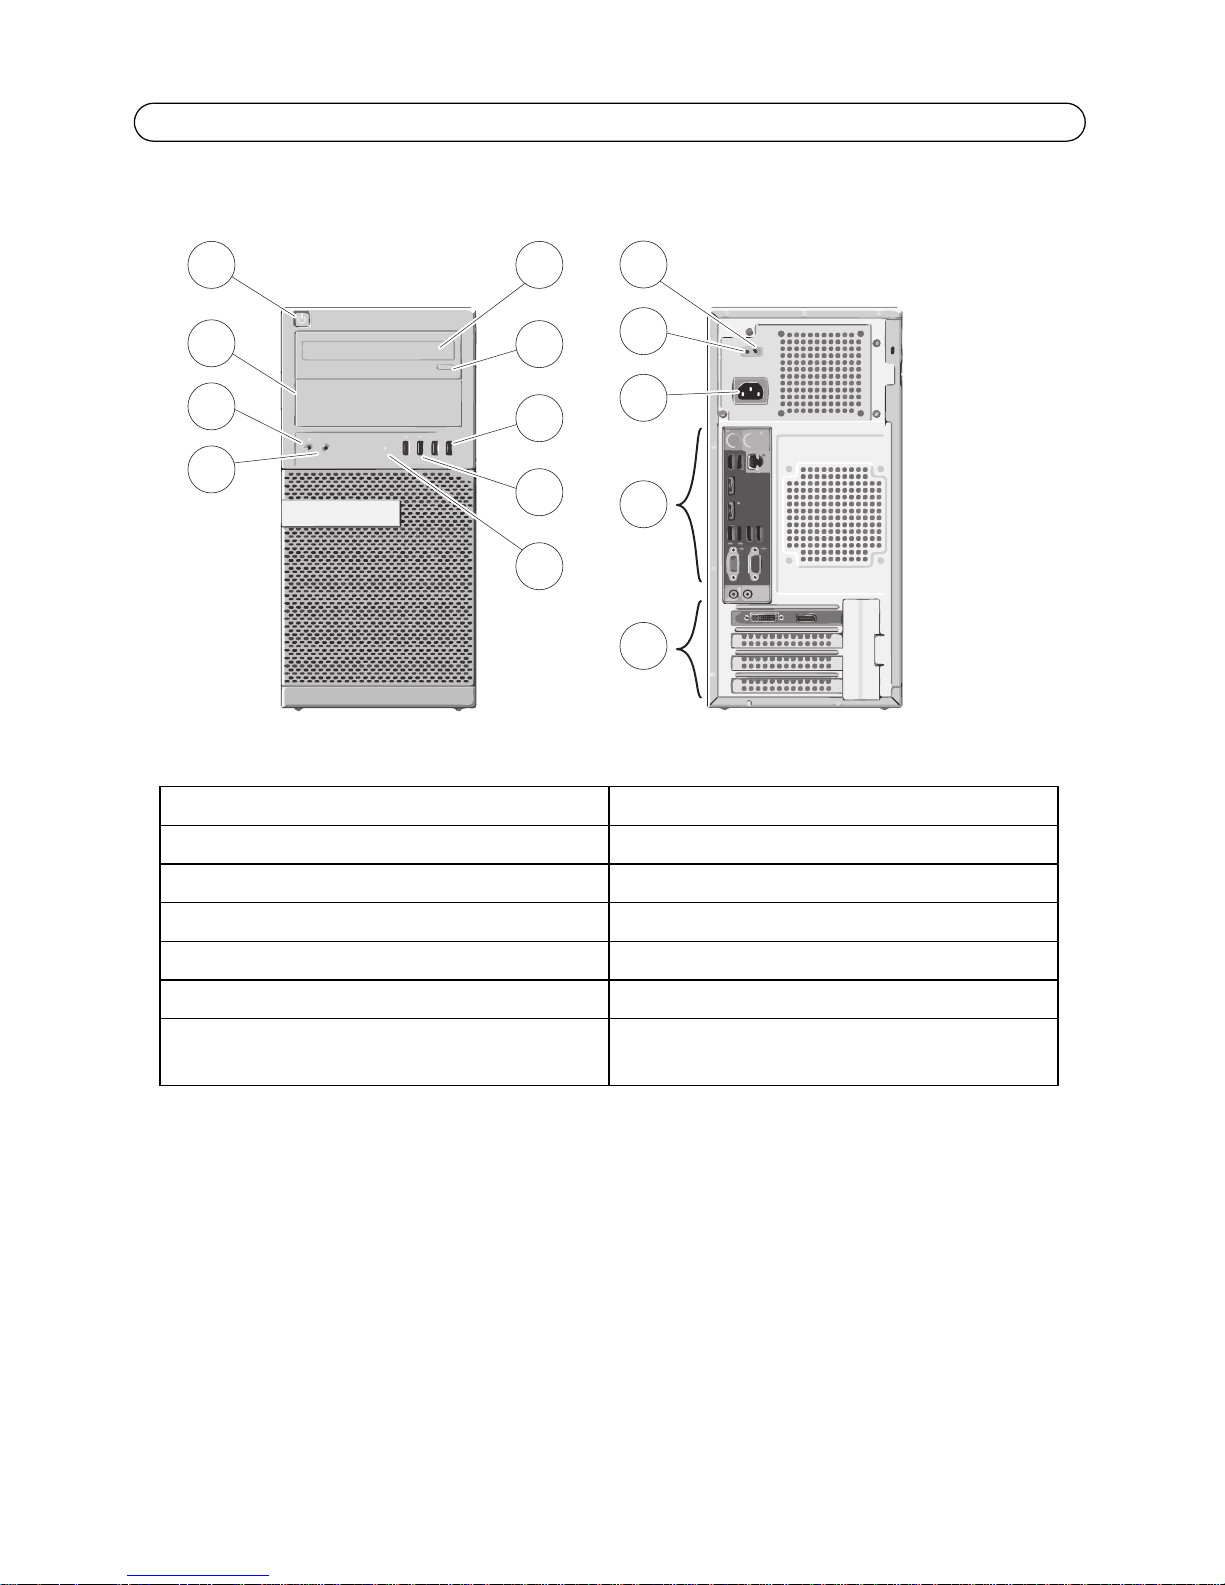
Page 4 AXIS S1016/AXIS S9001 Installation Guide
1
2
3
4
5
7
8
9
14
13
12
11
10
6
Hardware Overview - Front and Back
1 Power button, power light 8 USB 3.0 connectors (2)
2 Optical-drive bay 9 Drive activity light
3 Microphone connector 10 Power-supply diagnostic light
4 Headphone connector 11 Power-supply diagnostic button
5 Optical drive 12 Power connector
6 Optical drive eject button 13 Backpanel connectors, see page 5
7 USB 2.0 connectors (2) 14 Graphics card, see page 5
Expansion-card slots (3)
Page 5
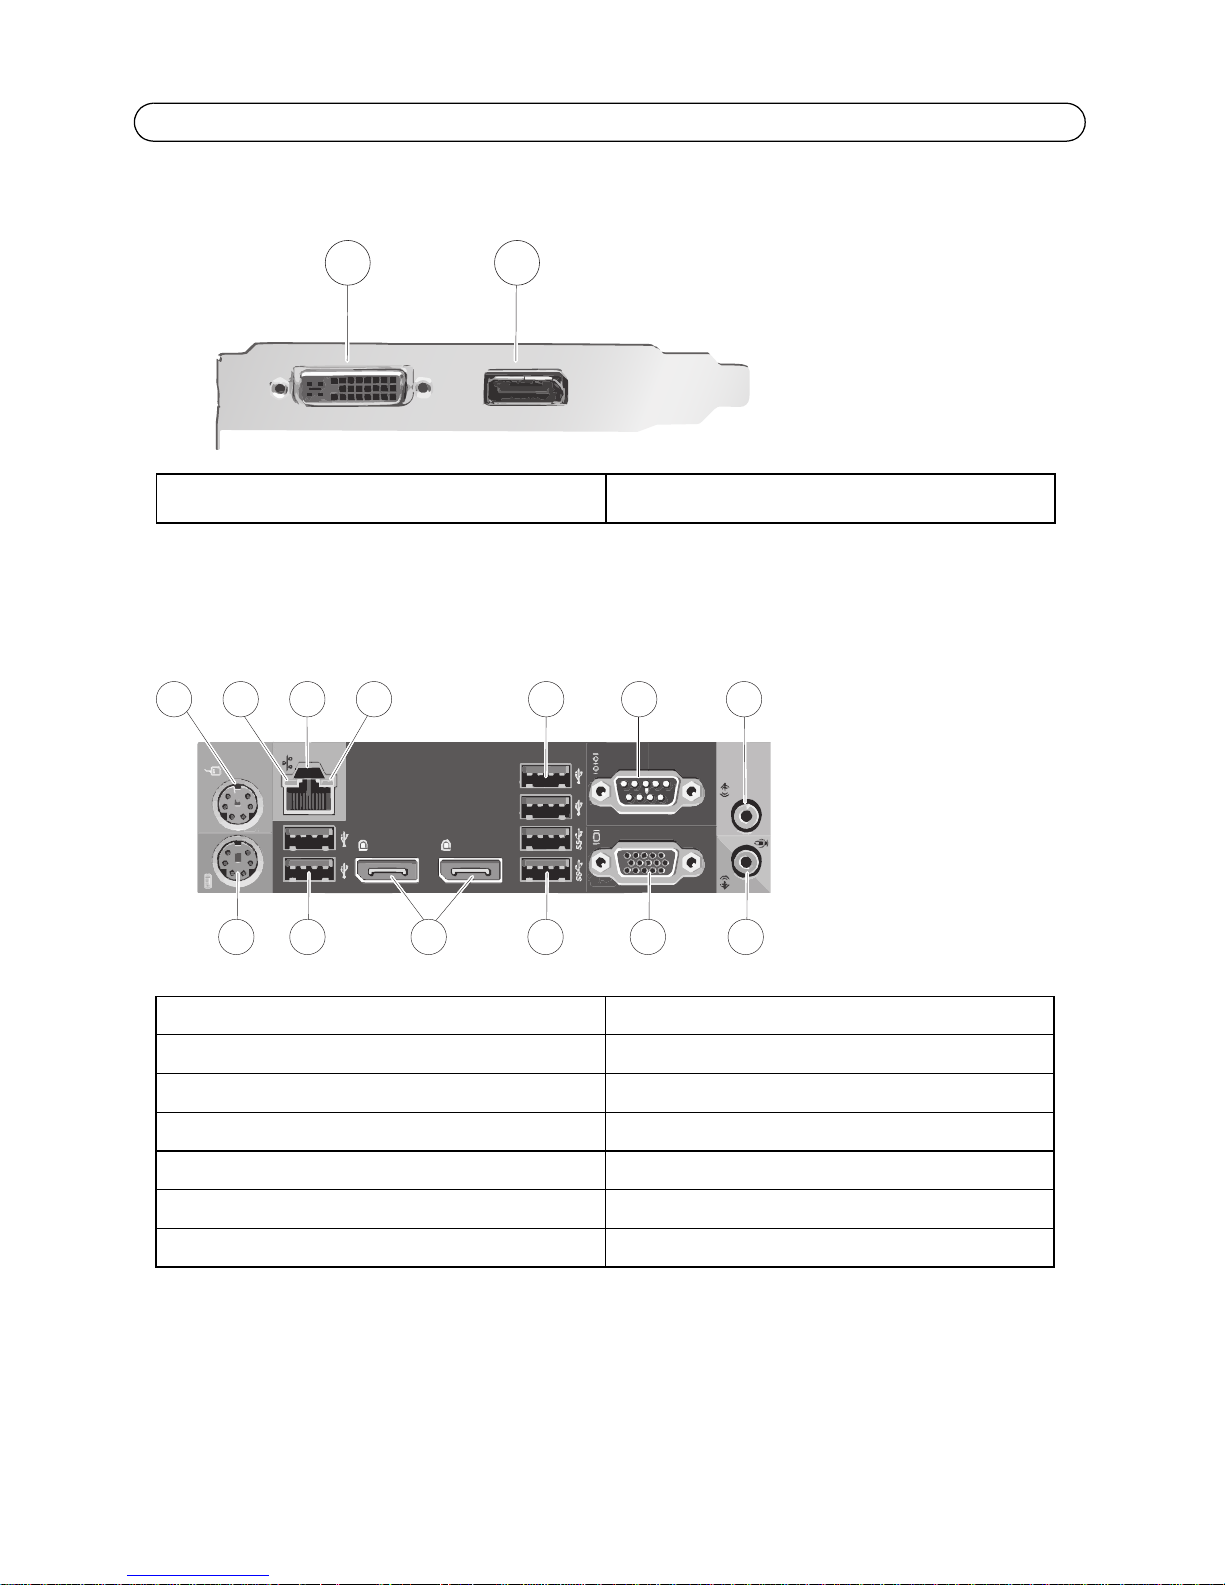
AXIS S1016/AXIS S9001 Installation Guide Page 5
1 2
1 2 3 4 5
8 9 11 12 1310
6 7
Hardware Overview - Graphics Card Panel
1 DVI-I connector 2 DisplayPort connector
Hardware overview - Back Panel
1 Mouse connector 8 Keyboard connector
2 Network link integrity light 9 USB 2.0 connectors (2)
3 Network connector 10 Do not use (DisplayPort connectors (2))
4 Network activity light 11 USB 3.0 connectors (2)
5 USB 2.0 connectors (2) 12 Do not use (VGA connector)
6 Do not use (Serial connector) 13 Line-in/microphone connector
7 Line-out/speakers connector
Page 6
Page 6 AXIS S1016/AXIS S9001 Installation Guide
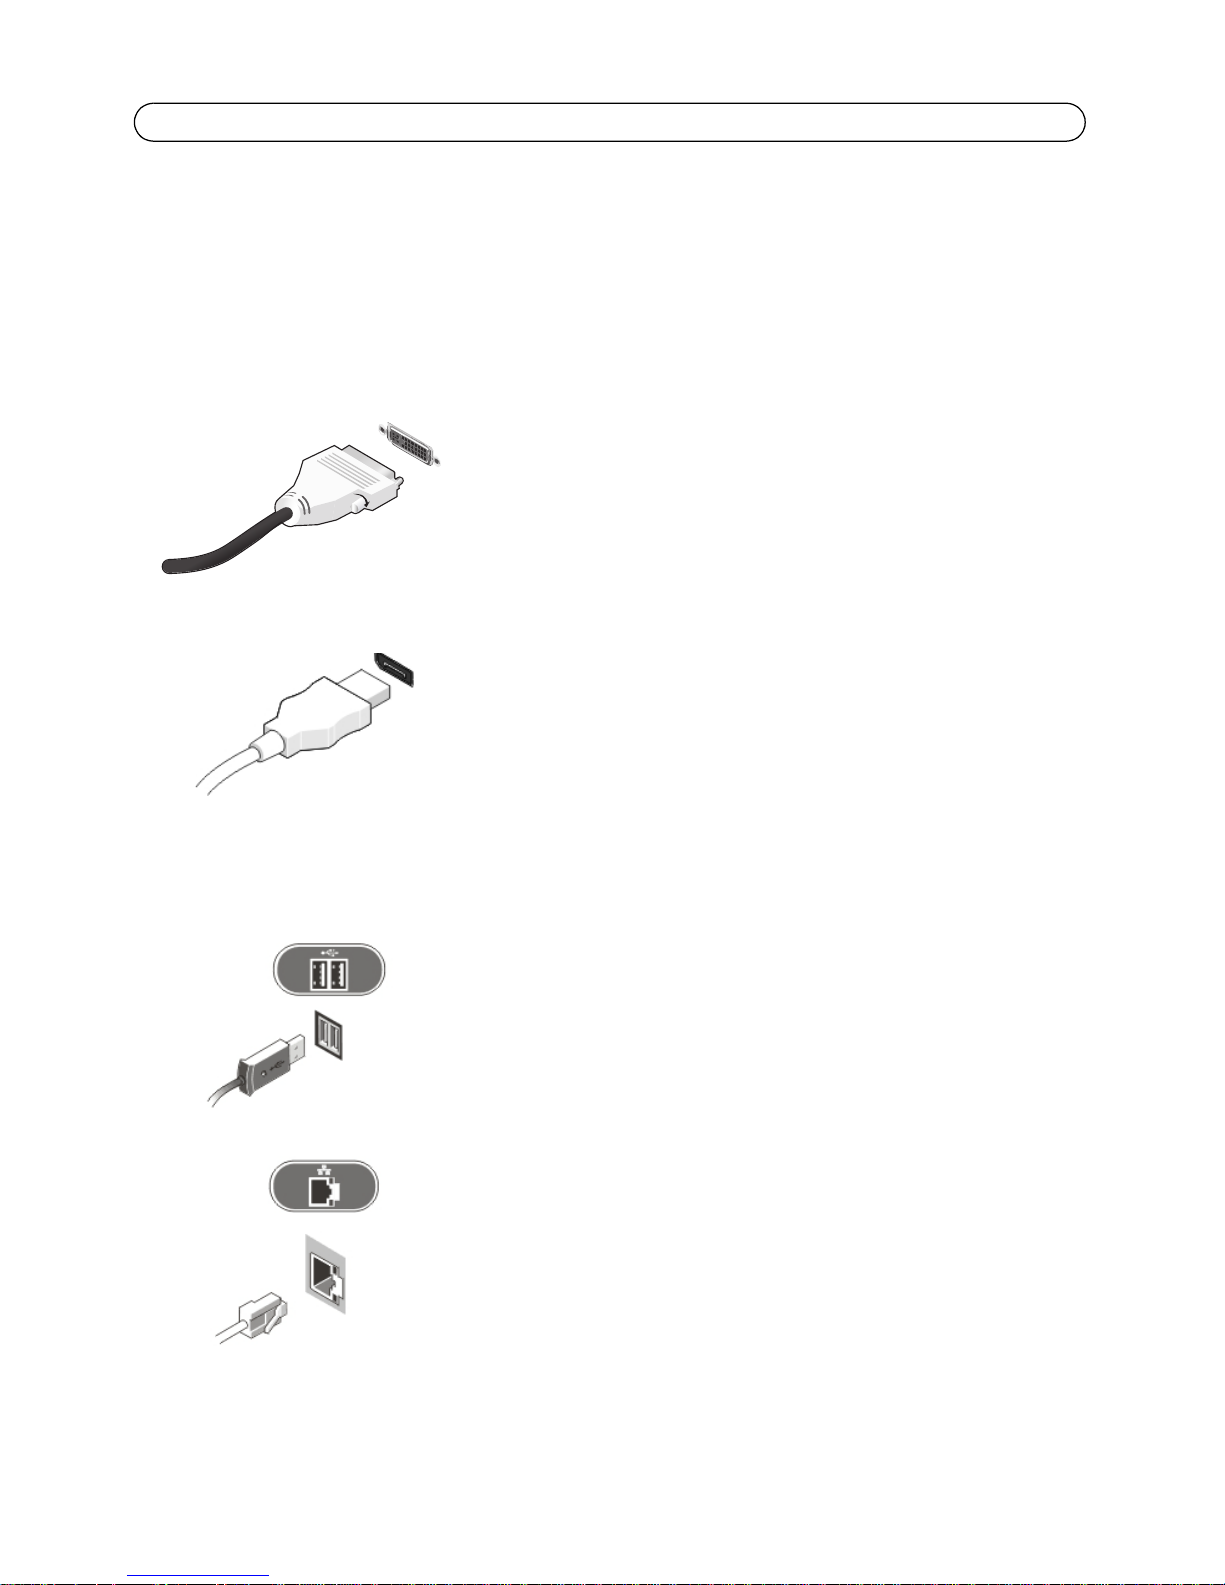
Connect the Cables
Warning: Before you begin any of the procedures in this section, read the safety information that
shipped with your computer. For additional information, see www.axis.com
NOTE: Some devices may not be included if you did not order them.
1. Connect the monitor(s) to the graphics card, see Graphics Card Panel on page 5, using the following cables:
DVI-I Cable.
DisplayPort Cable.
2. Connect the USB keyboard or mouse.
3. Connect the network cable.
Page 7
AXIS S1016/AXIS S9001 Installation Guide Page 7
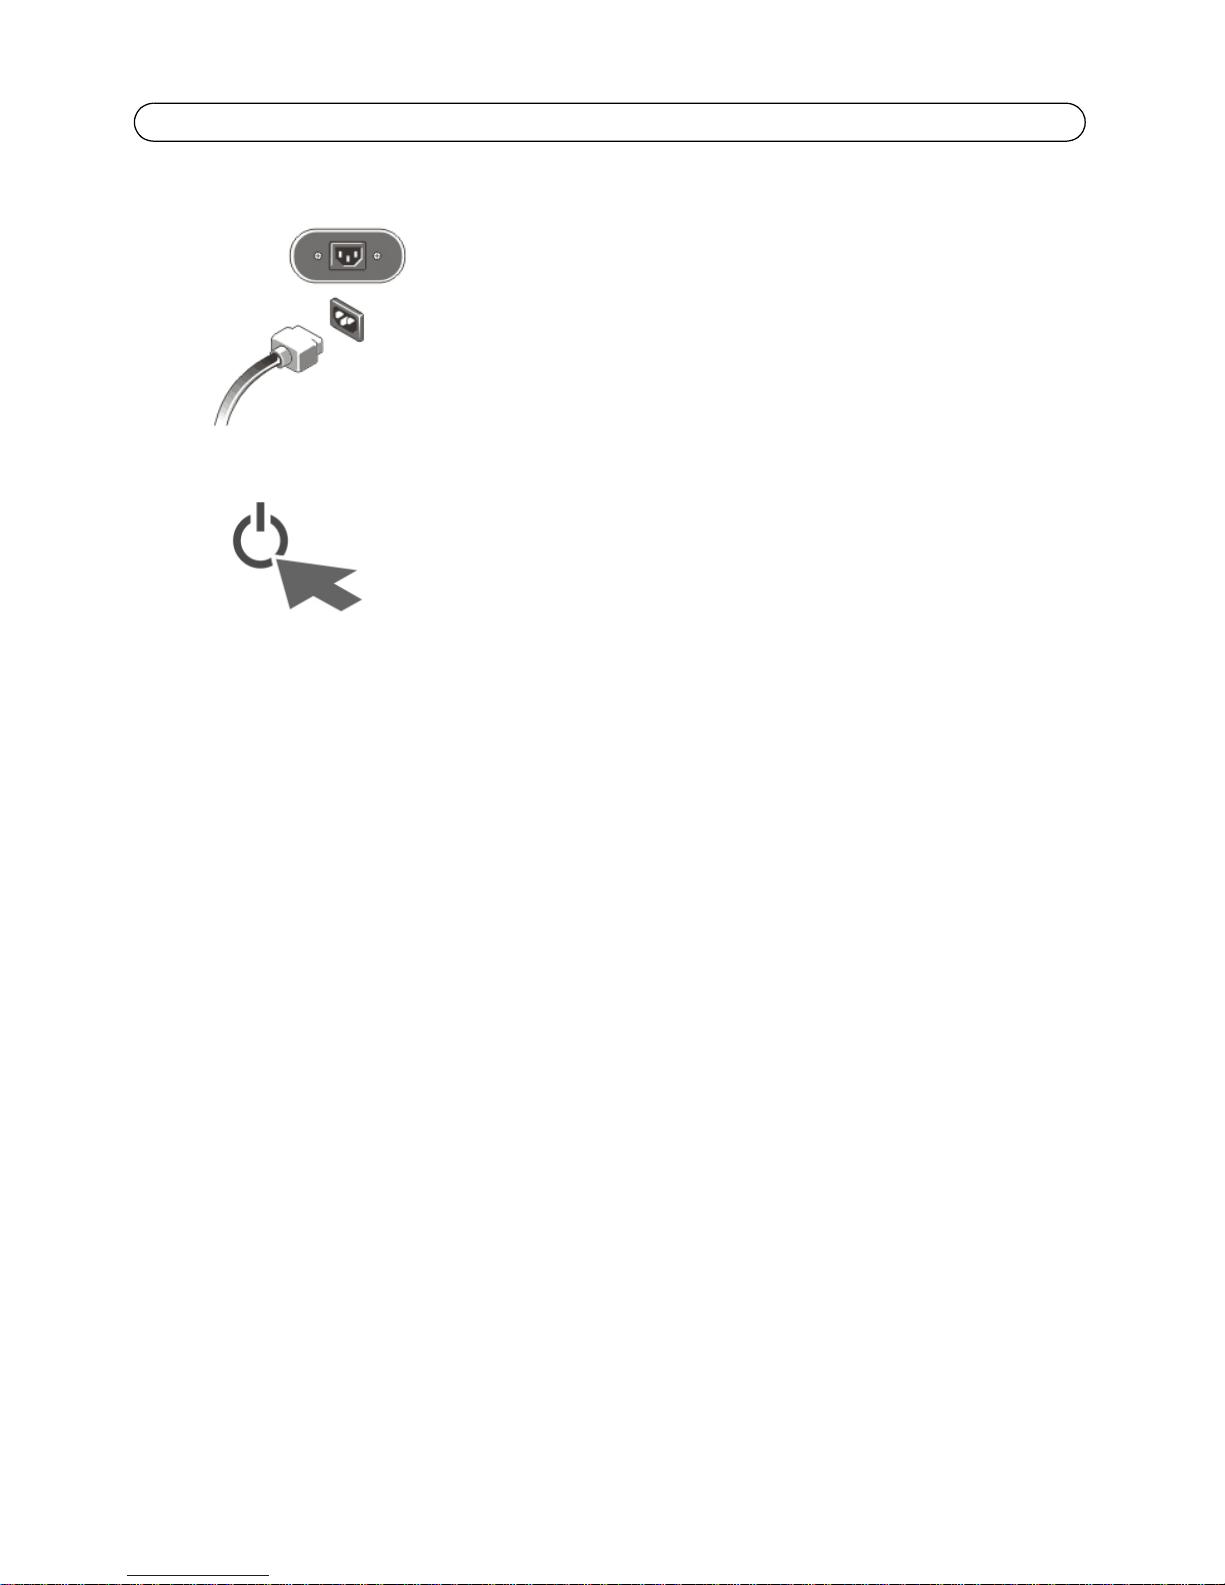
4. Connect the power cable(s).
5. Press the power button on the monitor and the computer.
Page 8

Page 8 AXIS S1016/AXIS S9001 Installation Guide
Set Up Software
When the computer has been powered on, the Windows operating system will be installed. Follow
the instructions displayed on the screen and provide the required information. When the Windows
installation is finalized, AXIS Camera Station Installer will start automatically. Follow the steps in
the installation wizard and use the default settings.
Network Configuration
AXIS Camera Station can record and play back video from cameras and video encoders that are
connected to a LAN (Local Area Network) or to a WAN (Wide Area Network). Depending on the
installation, follow the instructions under Network & Security Configuration in AXIS Camera Station
User Manual available at www.axis.com
Get Started
AXIS Camera Station Client and the wizard “Get Started with AXIS Camera Station” start
automatically when the installation is complete. “Get Started with AXIS Camera Station” provides
a quick way to add cameras and to configure and enable recording:
1. Select cameras and video encoders to add.
2. Select recording methods and where to store recordings.
3. Review settings and click Finish to add cameras and start recording.
For more information, see the built-in help and AXIS Camera Station User Manual available at
www.axis.com
Page 9
AXIS S1016/AXIS S9001 Installation Guide Page 9
Specification
Note:
Offerings may vary by region. The following specifications are only those required by law to
ship with your computer. For more information regarding the configuration of your computer, click Start > Help and Support and select the option to view information about your
computer
Power:
Voltage 100 V AC to 240 V AC
Coin-cell battery 3 V CR2032 lithium coin cell
Wattage 365 W
Maximum heat dissipation 1245 BTU/hr
Note:
Heat dissipation is calculated by using the power supply wattage rating.
Physical:
Height 360.00 mm (14.17 inches)
Width 175.00 mm (6.89 inches)
Depth 417.00 mm (16.42 inches)
Weight (computer only) 8.00 kg (17.6 lb) AXIS S9001
8.50 kg (18,7 lb) AXIS S1016
Environmental:
Operating temperature 5°C to 35°C (41°F to 95°F)
5°C to 45°C (41°F to 113°F)(limited to 65 W or
lower processor. No discrete graphic card)
Page 10

Page 10 AXIS S1016/AXIS S9001 Installation Guide
Further information
For more information about the product visit www.axis.com
Visit Axis learning center www.axis.com/academy for useful trainings, webinars, tutorials and
guides.
Warranty
For information about Axis’ product warranty and thereto related information, see
www.axis.com/warranty
Page 11

Page 12

Installation Guide
Ver.1.0
AXIS Camera Station S1016 Recorder
AXIS Camera Station S9001 Desktop Terminal
© 2014 Axis Communications AB
© 2013 Dell Inc.
Printed: August 2014
Part No. 58918
 Loading...