

Page 1
47cm / 55cm LED TV
“More information https://www.caravansplus.com.au"
with Built-in DVD Player
Model: AX-1119/AX-1122
Page 2

Contents
“More information https://www.caravansplus.com.au"
Important safety instructions 4
Usage conditions and restrictions 4
Electrical safety, power cord and plug 5
Position 5
Cleaning and maintenance 5
Accessories 7
Connections and functions 8
Remote control 9
Wall mounting instructions 13
Basic installation 14
First time installation 17
Installing The Batteries 18
Using the Remote Control 18
Selecting an Input Source 19
Operating The Menu 20
Channel Menu 20
Auto Tuning 20
ATV Manual Tuning 21
DTV Manual Tuning 22
Program Edit 22
Operating The Menu (DTV) 23
Picture menu 23
Sound menu 24
Time menu 25
Lock menu 26
Setup menu 27
Operating The Menu (ATV) 29
Component / HDMI / AV 30
Media (Multimedia) Menu 31
Photo menu 31
Page 3
Contents
“More information https://www.caravansplus.com.au"
Music menu 32
Movie menu 33
USB Multimedia Playback Format 34
PVR (Personal Video Recorder) 35
EPG (Electronic Program Guide) 38
DVD Function 39
System setup 39
Audio setup 40
Preferenace page 41
FAQs 43
42
Page 4

Important Safety Instructions
“More information https://www.caravansplus.com.au"
Read this manual thoroughly before rst use and keep it in a safe place for future reference,
along with the warranty card, purchase receipt and carton. The safety precautions enclosed
herein reduce the risk of re, electric shock and injur
Usage conditions and restrictions
To prevent any injuries, the following safety precautions should be observed in the
installation, use, servicing and maintenance of equipment. Before operating this equipment,
please read this manual completely, and keep it nearby for future reference.
t5BLFOPUJDFPGBMMUIFXBSOJOHT
t%POPUVTFUIJT57OFBSXBUFS
t$MFBOPOMZXJUIBESZDMPUI
t%POPUCMPDLBOZPGUIFWFOUJMBUJPOPQFOJOHT
t*OTUBMMJOBDDPSEBODFXJUIUIFNBOVGBDUVSFSTJOTUSVDUJPOT
t%POPUJOTUBMMOFBSBOZIFBUTPVSDFTTVDIBTSBEJBUPSTIFBUSFHJTUFSTTUPWFTPSPUIFS57T
(including ampliers) that produce heat.
t%POPUBMUFSUIFHSPVOEJOHUZQFQMVHQSPWJEFEXJUIUIF57"HSPVOEJOHUZQFQMVHIBTUXP
blades and a third grounding prong. The third prong is provided for your safety. When the
provided plug does not t into your outlet, consult an electrician for replacement of the
obsolete outlet.
t1SPUFDUUIFQPXFSDPSEGSPNCFJOHXBMLFEPOPSQJODIFEQBSUJDVMBSMZBUQMVHTDPOWFOJFODF
receptacles, and the point where they exit from the TV.
t0OMZVTFUIFBUUBDINFOUTBDDFTTPSJFTTQFDJöFECZUIFNBOVGBDUVSFS
tUse only with a cart, stand, tripod, bracket, or table specied by the manufacturer, or sold
with the TV.
t6OQMVHUIJT57EVSJOHMJHIUOJOHTUPSNTPSXIFOVOVTFEGPSMPOHQFSJPETPGUJNF
t5IFBQQMJBODFJTOPUJOUFOEFEGPSVTFCZQFSTPOTJODMVEJOHDIJMESFOXJUISFEVDFEQIZTJDBM
sensory or mental capabilities, or lack of experience and knowledge, unless they have been
given supervision or instruction concerning use of the appliance by a person responsible
for their safety.
t:PVOHDIJMESFOTIPVMECFTVQFSWJTFEUPFOTVSFUIFZEPOPUQMBZXJUIUIFBQQMJBODF
t3FGFSBMMTFSWJDJOHUPRVBMJöFETFSWJDFQFSTPOOFM4FSWJDJOHJTSFRVJSFEXIFOUIF57IBTCFFO
damaged in any way, such as power supply cord or plug is damaged, liquid has been spilled
or objects have fallen into the TV, the T V has been exposed to rain or moisture, does not
operate normally, or has been dropped.
y when correctly adhered to.
4
NOTE: The T V must not be exposed to dripping or splashing and no objects lled with
liquids, such as vases, shall be placed on the TV.
Page 5

Important Safety Instructions
“More information https://www.caravansplus.com.au"
Electrical safety, power cord and plug
t Before installing this TV set, make sure your outlet voltage corresponds to the voltage
stated on the appliance rating label.
t To reduce the risk of re or electric shock, do not expose this appliance to rain or moisture.
t Do not overload the power cord or power outlet.
t Do not let the cord hang over the edge of a table or counter, or touch any hot surface.
t Do not allow anything to rest on or roll over the power cord and signal cable.
t Protect the power cord and signal cable from being trampled.
t Do not expose the power cord and signal cable to moisture.
Position
t If a television is not positioned in a suciently stable location, it can be potentially
hazardous due to falling. Many injuries, particularly to children, can be avoided by taking
simple precautions such as:
t Securely attaching the TV to the wall mount fastened on the wall.
t Only using furniture that can safely support the television.
t Ensuring the television is not overhanging the edge of the supporting furniture.
t Educating children about the dangers of climbing on furniture to reach the TV controls.
t Not standing the TV on cloth or other materials placed between the television and
supporting furniture.
t Not placing the television on tall furniture (for example, cupboards or bookcases)
without anchoring both the furniture and the television to a suitable support.
t When deciding on where to put the TV set, make sure the place is:
t Well ventilated.
t Away from damp and cold.
t Protected from overheating and away from direct sunlight.
t Away from moisture drips or splashes.
t Protected from excessive dust.
t Do not install this equipment in a conned space such as a bookcase or similar unit.
t Do not put any objects lled with liquids, such as vases, on top of the TV set.
t Do not place any naked ame sources, such as lighted candles, on top of the TV set.
5
Cleaning and maintenance
t Dust the TV set by wiping the screen and cabinet with a soft, clean cloth.
t Do not apply excessive force to the screen when cleaning.
t Do not clean the screen with water or chemical cleaners as this may damage the LCD
screen surface.
Page 6
Important Safety Instructions
“More information https://www.caravansplus.com.au"
t Do not dismantle this product by yourself, as this may cause damage. There are no user-
serviceable parts contained in the T V set.
t If your TV set has been damaged, contact the after sales support line for advice or take
it to a local ser
damage caused by non-compliance with these instructions or any other improper use or
mishandling of appliance.
t Do not apply excessive force to the screen when cleaning.
t Do not clean the screen with water or chemical cleaners as this may damage the LCD
screen surface.
vice centre or for inspection or repair. No liability can be accepted for any
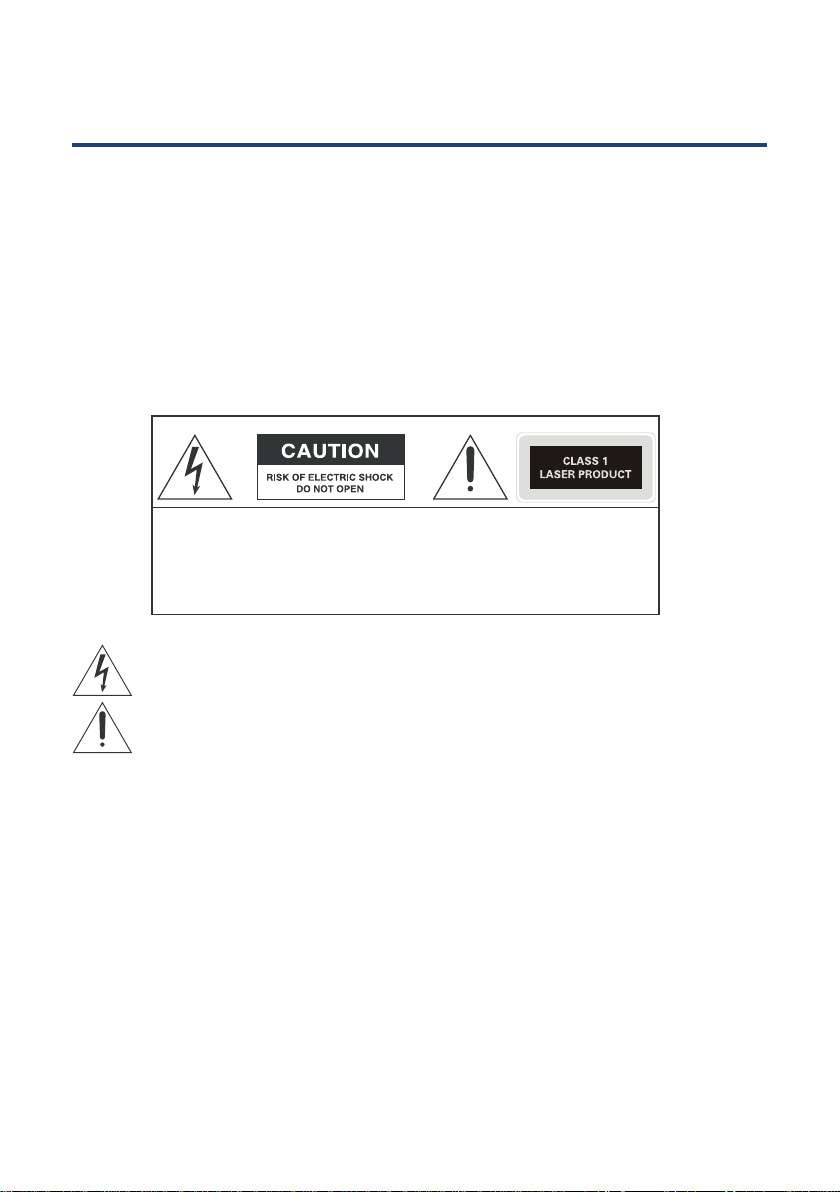
CAUTION: TO PREVENT THE RISK OF ELECTRIC
SHOCK, DO NOT REMOVE COVER (OR BACK).
NO USER SERVICEABLE PARTS INSIDE.
REFER SERVICING TO QUALIFIED SERVICE PERSONNEL
6
This symbol indicates that dangerous voltage constituting a risk of
electric shock is present within this unit.
This symbol indicates that there are important operating and
maintenance instructions in the documentation accompanying this unit.
TV with Class 1 construction shall be connected to a main socket outlet with a protective
earthing connection.
WARNING:
TO PREVENT DAMAGE WHICH MAY RESULT IN FIRE OR AN ELECTRIC SHOCK HAZARD, DO
NOT EXPOSE THIS APPLIANCE TO RAIN OR MOISTURE.
$"65*0/4tTo reduce the risk of electric shock, do not perform any servicing other than
that contained in the operating instructions unless you are qualied to do so.
t Any changes or modications not expressly approved by the party responsible
GPSDPNQMJBODFDPVMEWPJEUIFVTFSTBVUIPSJUZUPPQFSBUFUIFFRVJQNFOU
Page 7

Accessories
“More information https://www.caravansplus.com.au"
The conguration of the components may look dierent from the following
illustration.
302'( 602'(
,1)2 '9'6(783
(3*
795$',2
86%
7
Car adaptor
Page 8
Connections and functions
“More information https://www.caravansplus.com.au"
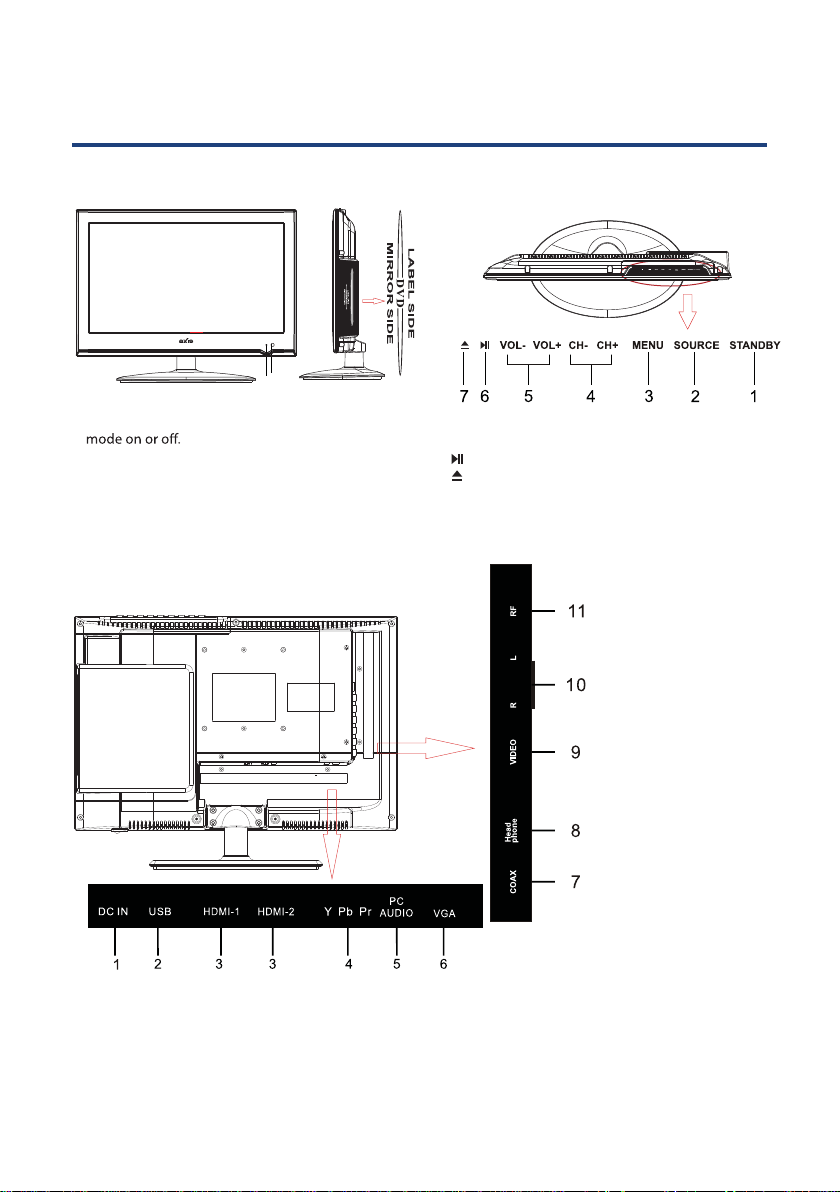
Front View
9
8
1. Press “STANDBY” button to turn standby
8
2. Press “SOURCE” to select the input source.
3. Press “MENU” to bring up the main menu
on the screen.
4. Press “CH+” or “CH-” to scan through channels.
5. Press ‘VOL+” or “VOL-” to increase or decrease
the volume.
Back View & Conrol Connection
1. DC IN: power input
2. USB: Connect to portable USB device
3. HDMI: Connect the HDMI output jack of DVD
4. YPbPr(Component) output jack of DVD
5. PC AUDIO: Connect the Audio output jack of PC
6. VGA: Connect the PC-RGB output jack of PC
6. Press ” “ button to play/pause the program in DVD mode.
7. Press ” “ button to eject the program in DVD mode.
8. POWER INDICATOR: Shows red in standby mode,
shows blue when your TV is switched on.
9. REMOTE SENSOR: Infrared sensor for the
remote control
7. Coax: Connect the SPDIF receiver
8. HEADPHONE: Connect the earphone
9. VIDEO: Connect the VIDEO output jack of DVD
10. R/L: Connect the R/L audio output jack of DVD
11. RF: Connect the antenna
Page 9
Remote ControlRemote Control
“More information https://www.caravansplus.com.au"
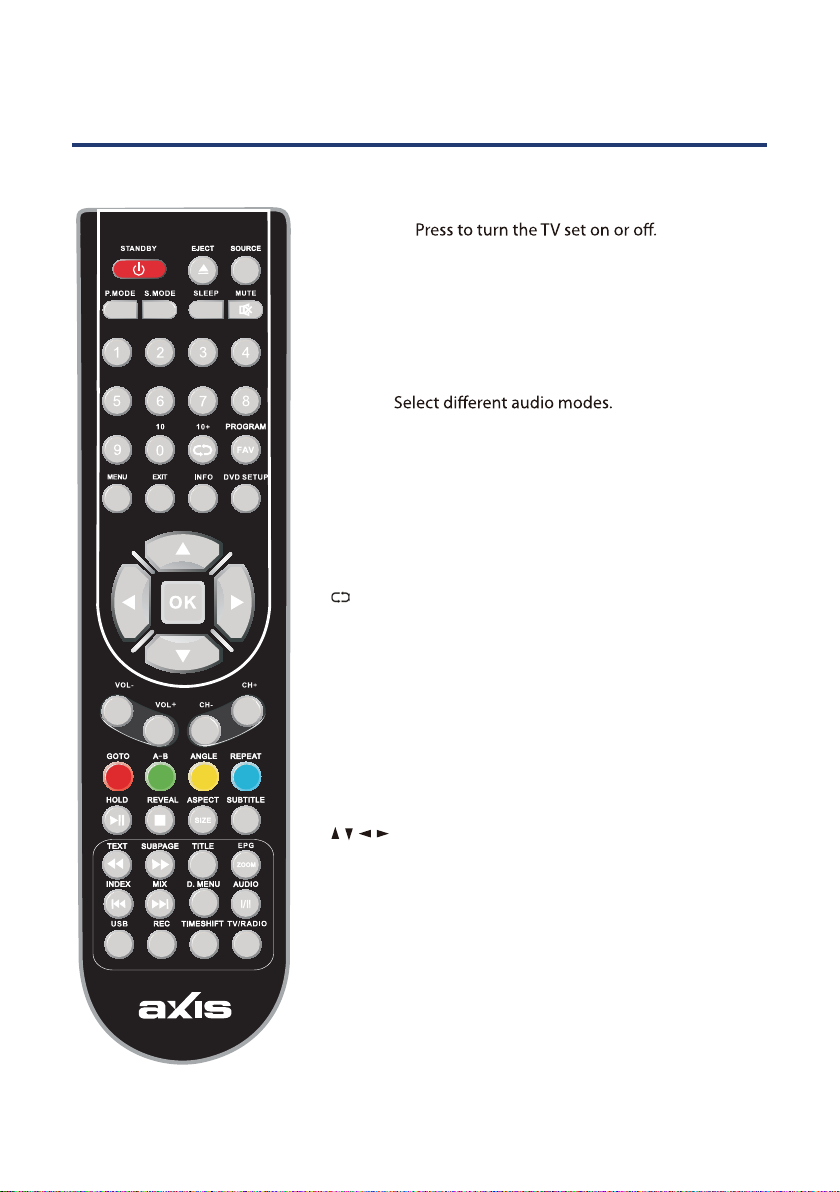
TV MODE
9
STANDBY:
SOURCE: Press to cycle through the input source.
PMODE: Select picture mode.
SMODE: Select sound mode.
AUDIO:
SLEEP: Sets the TV sleep time.
MUTE: Press to mute the sound. Press again or press V+ to
un-mute the TV.
0-9: TV channel number select.
: Return to the previous channel viewed.
FAV: Display your favourite channel list.
MENU: Brings up the main menu to the screen.
EXIT: Press to close the on-screen display.
DISPLAY: Press to display the source and channel’s
information.
/ / / /OK ENTER: Allows you to move, select and setup
the OSD options.
VOL+/-: Volume up/down.
CH+/-: Channel up/down.
Page 10
Remote Control
“More information https://www.caravansplus.com.au"
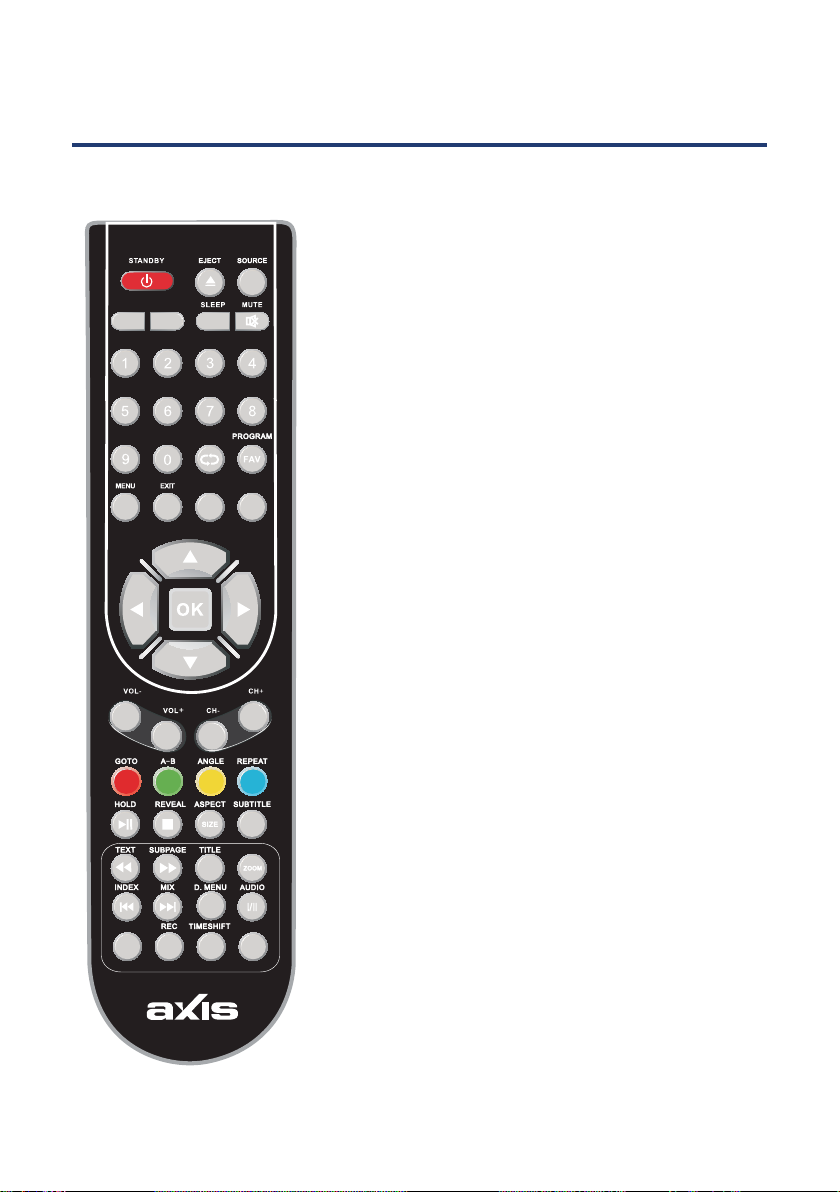
TELETEXT MODE*
P.MODE S.MODE
10
10+
10
NUMBER BUTTONS: Press 0-9 to select a teletext page.
TEXT: Press to switch between TV and Teletext mode.
COLOUR BUTTONS: Select 4 preferred teletext pages.
HOLD: Freeze the current page.
REVEAL: Reveal or hide the hidden words.
SIZE: Change the picture size.
USB
INFO DVD SETUP
EPG
TV/RADIO
SUBTITLE: Displays subtitles.
INDEX: Request index page when index is valid.
* Teletext or Austext is no longer available, nor is
there any plan for a replacement teletext service
in Australia. For more information, please visit
the websites of the Australian channel providers.
However, one teletext option, “closed captions”, is
still working on most Australian television channels.
This service allows you to activate subtitles while
watching normal television programs that provide it.
Page 11
Remote Control
“More information https://www.caravansplus.com.au"
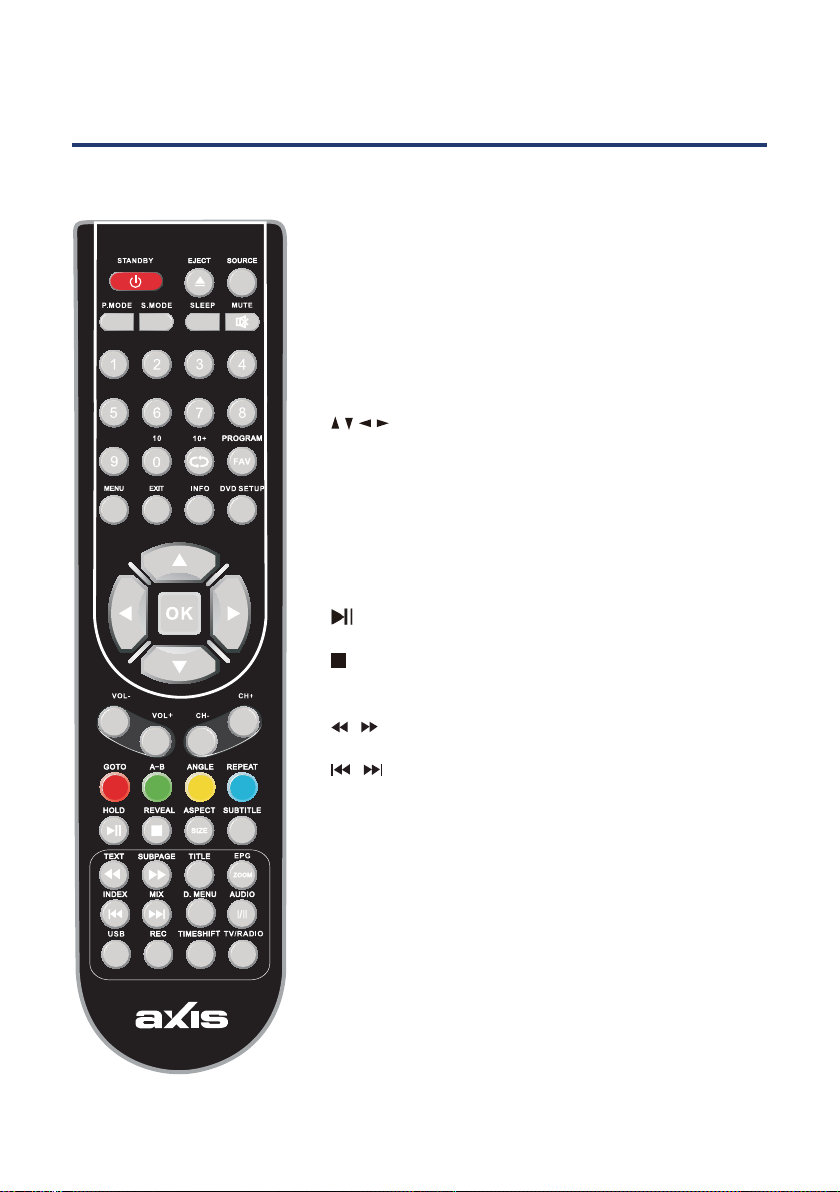
DTV MODE
11
NUMBER BUTTONS: Press 0-9 to select a teletext page.
FAV: Display your favourite channel list.
MENU: Brings up the main menu to the screen.
DISPLAY: Press to display the source and channel’s
information.
/ / / /OK ENTER: Allows you to move, select and setup
the OSD options.
CH+/-: Channel up/down.
COLOUR BUTTONS: Used in a few sub menus.
SUBTITLE: Displays subtitles.
: PLAY/PAUSE in TIMESHIFT and MEDIA mode.
: Stop in MEDIA mode or exit the REC or TIMESHIFT
mode.
/ : Fast backward and forward in MEDIA mode.
/ : Jump to previous and the next track in MEDIA
mode.
SIZE: Change the picture format.
EPG: Launched the EPG (Electronic Program Guide).
MEDIA: Press to select MEDIA mode.
TV/RADIO: Select TV or RADIO modes.
Page 12
Remote Control
“More information https://www.caravansplus.com.au"
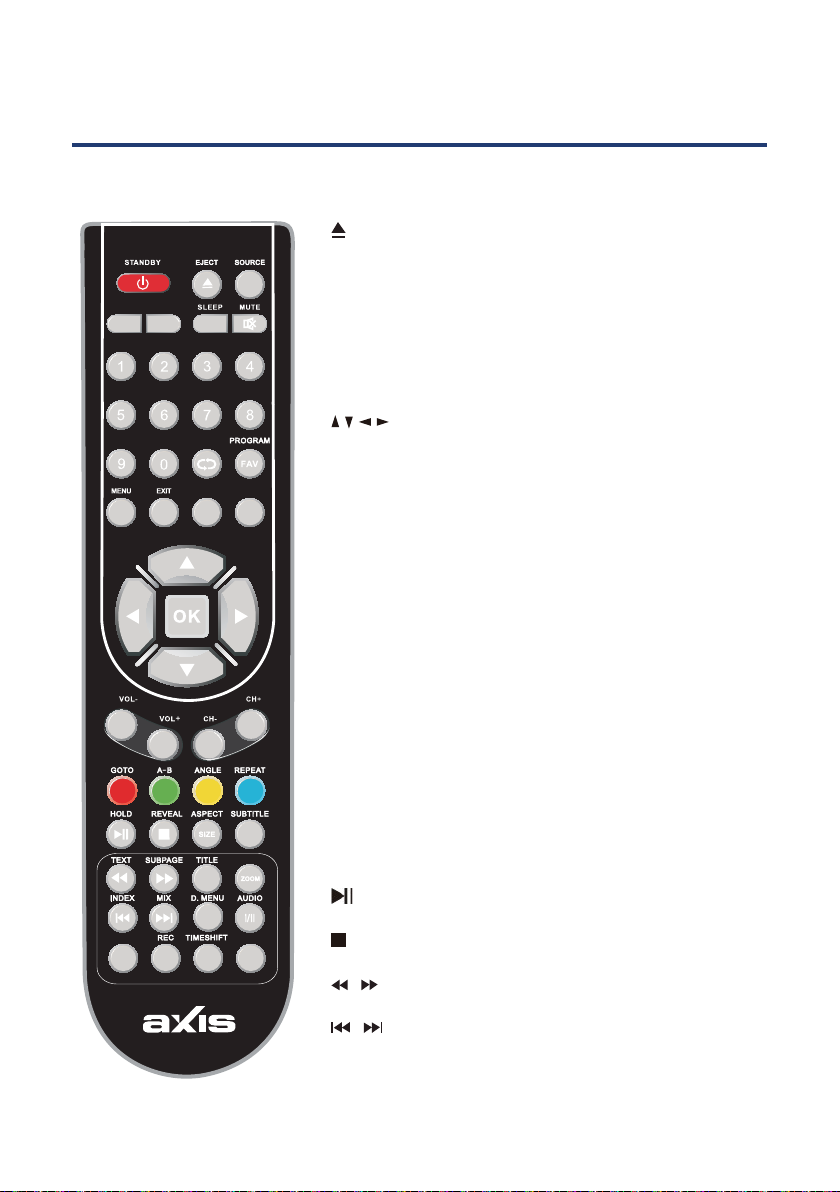
DVD MODE
302'( 602'(
12
: Press to eject the disk
NUMBER BUTTONS: Press 0-9 to select a teletext page.
DISPLAY: Press to display the DVD information of DVD.
D. SETUP: Used for selecting programs. It may also be
used to execute commands.
,1)2 '9' 6(783
/ / / /OK ENTER: Allows you to move, select and setup
the OSD options.
GOTO: Press to access the GOTO menu.
A-B: This button enables you to repeat a selected section
from the disc.
REPEAT: Press REPEAT to cycle through the repeat play
options.
SUBTITLE: Displays subtitles.
TITLE: When DVD is playing, brings up the Title Menu.
ZOOM: In play state, press ZOOM, the player will zoom in
the picture one time.
D.MENU: DVD disc menu. Access to menu
(3*
AUDIO: AUDIO selection buttons in DVD mode.
: PLAY/PAUSE in DVD mode.
86%
795$',2
: DVD Stop
/ : Fast backward and forward key
/ : Jump to previous and the next track/chapter.
Page 13
Wall Mounting Instructions
“More information https://www.caravansplus.com.au"
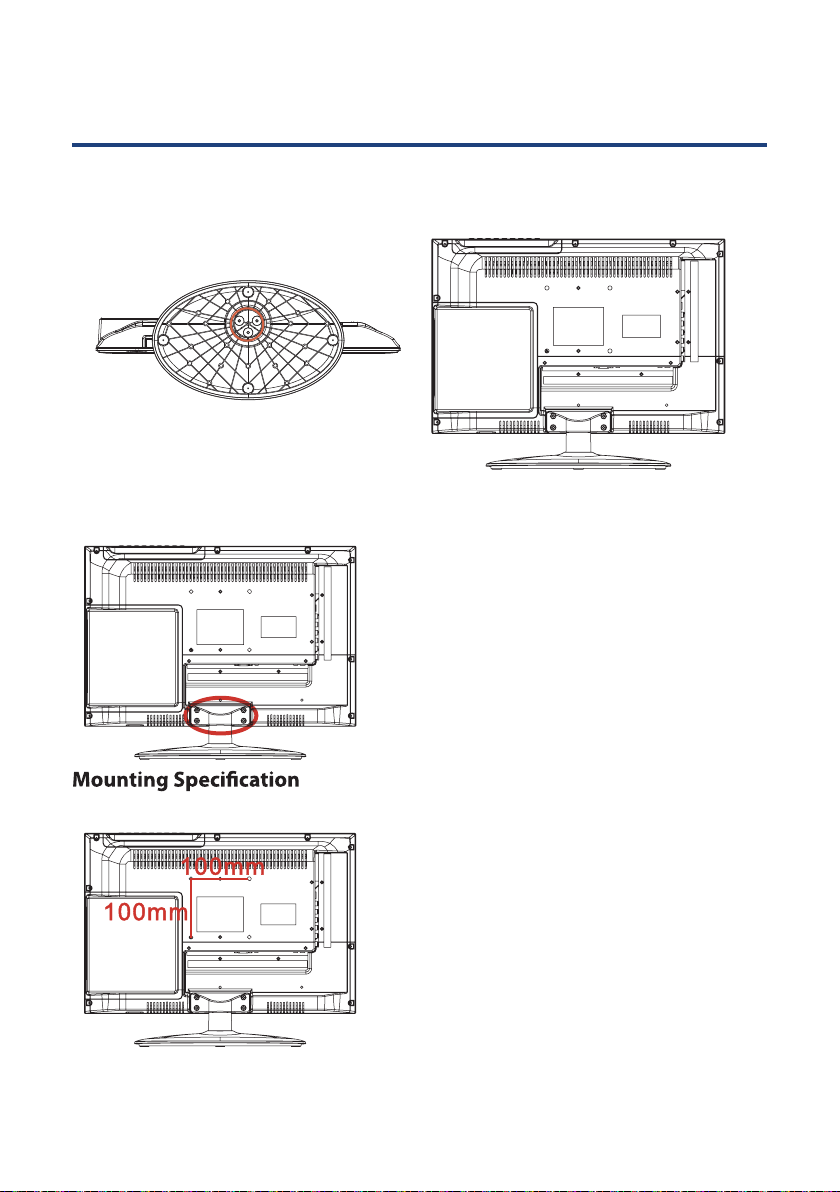
AtUBDI the stand
To attache the stand, place the stand on the neck of the TV, insert and
tighten the screws in the circled area.
Remove the stand
To remove the stand, remove the screws in the circled area and the neck will
come o.
13
The screws in the package are for securing the TV stand only. If you are
mounting the TV please consult a qualied installer for further instructions
on bracket support and wall support.
Mounting specication:
100mm x 100mm using screw size M4
(not supplied), length of screw should
not exceed 8mm.
Please note: the 8mm length of screw
refers to how deep the screw can go
inside the mounting holes. When you
are buying screws, you should add the
original 8mm to the thickness of your
mounting plate in order to get the total
screw length.
Page 14
Basic Installation
“More information https://www.caravansplus.com.au"
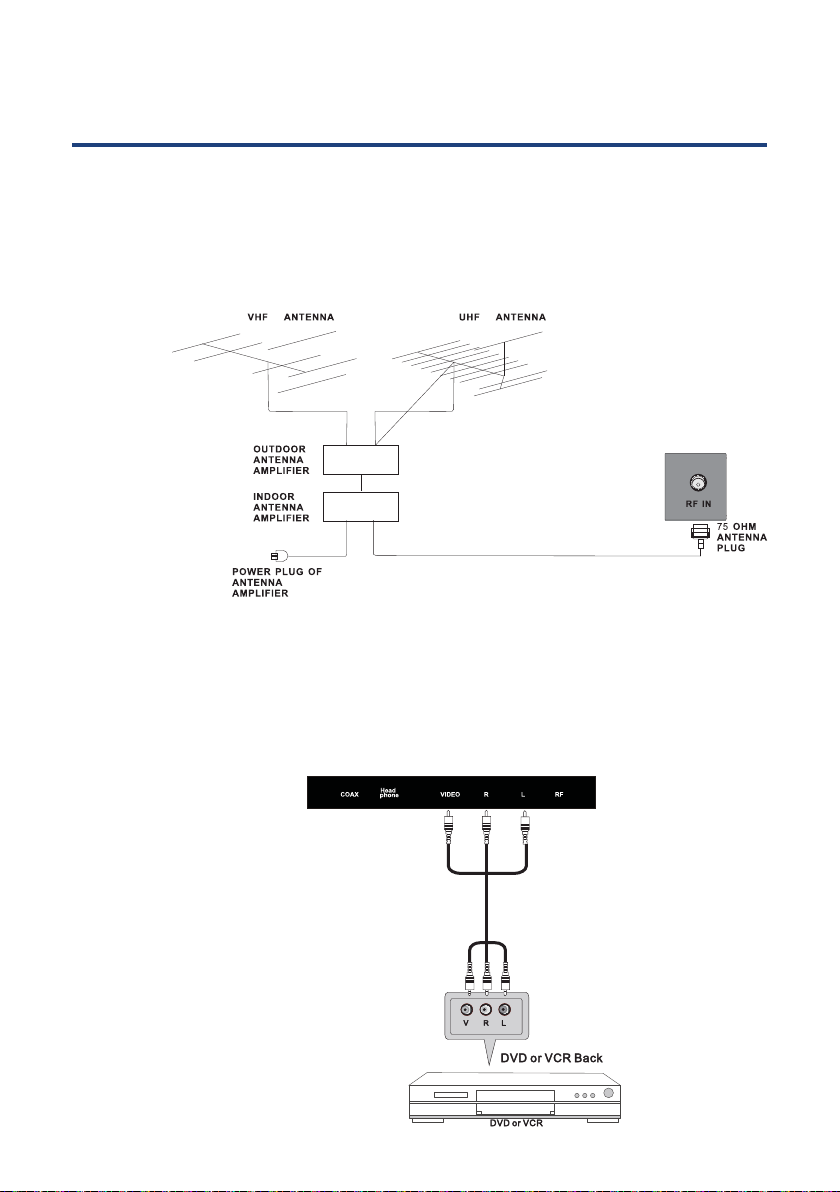
Antenna Connection
To ensure good picture and sound, a TV antenna system needs to be connected. The
antenna system as shown can be sourced from TV equipment stores, which will provide
service for the correct installation and connection. After installation, insert the 75-OHM
antenna plug into the antenna jack (RF) as shown.
TV
14
AV Connection
Connect the VIDEO and AUDIO output jack of the DVD or VCR to the AV IN jacks in the
set using an AV Cable (Yellow [video], White and Red [left & right audio]). Select the AV
input source using the SOURCE button on the remote control.
AV Cable
Page 15

Component (YPbPr) Connection
“More information https://www.caravansplus.com.au"
Connect the YPbPr output of the DVD or VCR to the YPbPr input on the set. The picture
quality is improved compared to connecting a regular VCR to the AV input. Connect the
Audio output of the DVD or VCR to the Audio input jacks on the set using the RCA cable.
Match the jack colours: Y is green, Pb is blue, Pr is red, Audio left is white and Audio right
is red, Select Component input source using the SOURCE button on the remote control.
15
VGA (PC) Connection
Connect the VGA output of the PC to the VGA jack on the set. Connect the AUDIO
output of the PC to the PC AUDIO jack on the set. Select the PC input source using the
SOURCE button on the remote control.
Page 16

HDMI Connection
“More information https://www.caravansplus.com.au"
HDMI is a digital connection for sending both Video & Sound signals
through the one cable. HDMI supports 1080p Video and Multi-channel
Digital Audio. Select HDMI 1 or HDMI 2 input source using the SOURCE
button on the remote control
MEDIA (USB) Connection
Connect portable USB storage device for use with PVR function. Select USB
input source using the SOURCE or MEDIA buttons on the remote control.
16
Power Cord Connection
- Connect the power cord and AC adaptor correctly as shown.
- Press the STANDBY switch of your TV to switch the unit on. The power
indicator on the front panel lights up in blue.
Adaptor
Page 17

17
“More information https://www.caravansplus.com.au"
First Time I nstallation
When you switch on the TV for the rst time, the First Time Installation menu
will be displayed on the screen.
- Use the
button to go to the next page.
- Use the
button to start searching for all the ATV/DTV programs in your area. This
may take a few minutes.
- When auto searching is complete, your TV will show the rst channel found.
buttons to select the country and then use the ENTER
buttons to select the language and then use ENTER
Page 18

Installing the batteries
“More information https://www.caravansplus.com.au"
1. Open the cover at the back of the remote control unit completely.
2. Insert two 1.5V AAA batteries, ensuring the polarities (+ / -) of the batteries are
correctly aligned and the batteries are properly pushed
into place so they can power the remote control unit.
3. Replae the battery cover.
Precautions when using batteries
• Do not use old and new batteries together.
• Do not use dierent types of battery (for example, Manganese and Alkaline batteries)
together.
• Note that there are chargeable and non-chargeable batteries. Do not attempt to
charge non-chargeable batteries.
• Remove the batteries from the remote control unit if you do not intend to use the unit
for a long time.
• When disposing used batteries, follow any guidelines for recycling and disposal of
batteries that apply in your local area.
18
Using the remote control
The remote control should be operated within 20 feet (5m) and 30° to the left or the
right of the IR receiver at the front of the LCD TV.
Page 19

Selecting an Input Source
“More information https://www.caravansplus.com.au"
You can select an input signal source by pressing the SOURCE button on the your
remote control or control panel of your TV. The on screen display menu shows the
diagram below on the screen, and you can either press the SOURCE button on the
control panel or the arrows buttons on your remote control to choose an input signal
source.
You can choose from the following input sources if you have your audio and video
devices connected to your TV.
When you switch on this TV for the rst time, you need to select the language and
the country to auto search for all the DTV programs in your area.
DVD
19
• Press SOURCE button to display the input source list.
• Press
• Press OK /
• Press EXIT button to quit.
On Screen Display when you change the volume
1. When you press the VOL+ to increase the volume and VOL- to reduce the volume, the
diagram below shows on your screen for 15 seconds.
2. The MUTE symbol will show on one of your screen corners when you press the MUTE
button, press the MUTE button again and the symbol will disappear.
3. You can put the sound on again either by pressing the MUTE button or the VOL+
button. The diagram below shows you the sound level in the volume indicator.
button to select the input source you want to watch
button to enter the input source.
OK
Page 20

Operating the Menus
“More information https://www.caravansplus.com.au"
1. Press the MENU button on the remote control, the on-screen menu will appear on
the screen.
2. Use the left and right navigation keys to select your main option.
The main menu items, from left to right, are:
Channel Picture Sound Time Lock Setup
Channel menu
20
1. Press button to select the option that you want to adjust in the CHANNEL menu.
2. Press ENTER button to adjust.
3.
previous menu.
Auto Tuning
Press
button to select Auto Tuning, then press ENTER button to start auto search,
OK
MENU button to save and return back to the
Page 21

ATV Manual Tuning
“More information https://www.caravansplus.com.au"
Press button to select ATV Manual Tuning, then press OK button.
BG
21
Press
Press
Press button to select search, then press OK button to start tuning.
Press OK button on your remote control to save the settings and menu button to go back to
the previous menu.
button to select channel number you want to store.
button to select the third option. Press button to select audio system.
Page 22

DTV Manual Tuning
“More information https://www.caravansplus.com.au"
Press button to select DTV Manual Tuning, then press OK button.
22
Press
button to select channel, then press OK button to search program.
Program Edit
Press
button to select Program Edit, then press OK button to enter sub menu.
This option has 5 functions in ATV mode
and 3 options in DTV mode.
1. Use Red button to delete the current channel.
2. Use Green button to rename the current
channel. (ATV mode)
3. Use Yellow button and the
to move the current channel. (ATV mode)
4. Use Blue button to skip the current channel.
5. Use FAV button to set the current channel
to your favourite channel. If the channel
is already one of your favourite channels,
pressing FAV button again will set it back to a
normal channel.
arrow button
Signal Information (DTV mode only)
Press
then press OK button to display signal details
including Channel, Quality and Strength.
button to select Signal Information,
Page 23

Operating the Menu (DTV)
“More information https://www.caravansplus.com.au"
Picture menu
Press MENU button to display the main menu.
Press button to select PICTURE in the main menu.
OK
1. Press button to select the option that you want to adjust in the PICTURE menu.
2. Press OK button to adjust.
3. MENU button to save and return back to the
previous menu.
23
Picture mode
Press
button to select (Available Picture mode: Personal, Dynamic, Standard, Mild).
You can change the value of contrast, brightness, colour and sharpness when the picture is in
PERSONAL mode. TIPS: You can press PMODE button on the remote control to change the
Picture Mode directly.
Contrast: Press
Brightness: Press
Colour: Press
Tint: Press
Sharpness: Press
Colour Temp: Press
Noise Reduction: Press
button to select Picture Mode, then press OK button to enter sub menu. Press
button to select Contrast, then press OK button to enter sub menu. Press
button to adjust. Press OK to save.
button Brightness, then press OK button to enter sub menu. Press
button to adjust. Press OK to save.
button to select Colour, then press OK button to enter sub menu. Press
button to adjust. Press OK to save.
button to select Tint, then press OK button to enter sub menu. Press
button to adjust. (0OMZBvailable in /T4$TJHOBMGPS"7TPVSDF) Press OK to save.
button to select Sharpness, then press button to adjust. Press OK
to save.
button to select Colour Temperature, then press OK button to enter
sub menu. Press button to adjust. (Normal, Cold, Warm)
button to select Noise Reduction, then press OK button to enter
sub menu. Press button to adjust.
Page 24

Sound menu
“More information https://www.caravansplus.com.au"
Press MENU button to display the main menu.
Press
1. Press button to select the option that you want to adjust in the SOUND menu.
2. Press
3. A
previous menu.
button to select SOUND in the main menu.
SPDIF Mode Auto
OK
button to adjust.
MENU button to save and return back to the
24
Picture mode
Press
You can change the value of treble and bass when the sound is in PERSONAL mode. TIPS: You
can press SMODE button on the remote control to change the Sound Mode directly.
Tre ble: Press
Bass: Press
Balance: Press
Auto Volume: Press
SPDIF Mide: Press
AD Switch: Press
button to select Sound Mode, then press ENTER button to enter sub menu. Press
button to select (Available Sound mode: Standard, Music, Movie, Sports, Personal).
button to select Treble, then press ENTER button to enter sub menu. Press
button to adjust.
button Bass, then press ENTER button to enter sub menu. Press button
to adjust.
button to select Balance, then press ENTER button to enter sub menu.
Press
button to adjust.
button to select Auto Volume, then press ENTER button to select On
button to select SPDIF Mode, then press ENTER
button to select AD Switch, then press ENTER
Page 25

Time menu
“More information https://www.caravansplus.com.au"
Press MENU button to display the main menu.
Press
button to select TIME in the main menu.
25
Time Zone
OK
1. Press button to select the option that you want to adjust in the TIME menu.
2. Press
3. MENU button to save and return back to the
previous menu.
button to adjust.
NSW/ACT
Clock
Use the / keys to select Clock, then use the / keys to set the time.
NOTE: You cannot change the time manually in DTV mode, as the time comes directly from a
signal source.
Time Zone
Press button to select Time Zone, then press OK button to enter sub menu. press /
button to select time zone. Press OK to save.
.
Sleep Timer
20, 30, 60, 90, 120, 180 or 240 minutes.
Auto Standby
When the auto standby function is set, the TV will change to standby mode automatically
after the time you have select.
OSD Timer
Use the / keys to select this option, then set your preferred duration for on-screen display
messages. Choose between 5, 10, 15, 20, 25 or 30 seconds.
Page 26

Lock menu
“More information https://www.caravansplus.com.au"
Press MENU button to display the main menu.
Press
button to select LOCK in the main menu.
OK
Lock System
Press button to select Lock System, then press OK button and enter password to make
the following 3 options valid. (Default password is ‘ 0000’)
26
Set Password
Press button to select Key Lock, then press OK button to enter sub menu to select
(Available options are: ON, OFF)
Block Program
Press button to select Set Password, then press OK button. Enter existing password,
enter new password, then enter new password a second time.
Parental Guidance
Choose from the following Parental Control levels: Block R and Above, Block AV and Above,
Block MA and Above, Block M and Above, Block PG and Above, Block G and Above, Block
ALL and No Block.
Key Lock
Press button to select Key Lock, then press OK button to enter sub menu to select
(Available options are: ON, OFF)
Page 27

Setup menu
“More information https://www.caravansplus.com.au"
Press MENU button to display the main menu.
Press
1. Press button to select the option that you want to adjust in the OPTION menu.
2. Press button to adjust.
3.
previous menu.
button to select SETUP in the main menu.
OK
MENU button to save and return back to the
27
OSD Language
Press button to select OSD Language, then press OK button to enter sub menu. Press
button to select OSD Language, default setting is English.
Teletext Language
Press button to select TT Language, then press ENTER button to enter sub menu. Press
button to select TT Language. (Teletext is no longer available in Australia)
Hearing Impaired
Press button to select Hearing impaired, then press OK button to select ON/OFF.
PVR File System
Press button to select PVR File System, then
press OK button to enter sub menu. (See page 35)
Aspect Ratio
Press button to select Aspect Ratio, then
press OK button to enter sub menu. Press
button to select aspect ratio (Auto, 4:3, 16:9
Zoom1, Zoom2).
Page 28

Blue Screen
“More information https://www.caravansplus.com.au"
Press / keys to select Blue Screen, then press OK button to select ON/OFF. Displays a blue
screen when there is no signal on the current source mode.
First Time Installation
Use the / keys to select this option select First Time Installation, then press OK key to set
relevant options including OSD language, country and tuning. (See page 12)
Restore
Use the / keys to select this option to restore factory default settings. You will need to enter
the password.
NOTE: All your picture, sound, time and option settings will be lost when restoring
factory defaults.
Software Update(USB)
(If a software update is required, this option is used to applied the new version to the TV)
Use the
/ keys to select this option, then press OK key to update software using USB.
28
Page 29

Operating the Menu (ATV )
“More information https://www.caravansplus.com.au"
Channel menu
Press MENU button to display the main menu.
Press
1. Press button to select the option that you want to adjust in the CHANNEL menu.
2. Press button to adjust.
3. MENU button to save and return back to the
previous menu.
button to select CHANNEL in the main menu.
OK
29
Auto Tuning
Press button to select Auto Tuning, then press OK button to start auto search.
ATV Manual Tuning
Press button to select Manual Tuning, then press OK button to input password to enter
sub menu. (Default password is ‘0000’)
DTV Manual Tuning
Press button to select Manual Tuning, then press OK button to input password to enter
sub menu. (Default password is ‘0000’)
Program Edit
Press button to select Program Edit, then press OK button to enter sub menu.
NOTES:
• PICTURE menu and description are the same as that for DTV mode.
• SOUND menu and description are the same as that for DTV mode.
• LOCK menu and description are the same as that for DTV mode.
• TIME menu has no clock option.
• HEARING IMPAIRED and PVR FILE SYSTEM in OPTION menu are invalid.
Page 30

Component / HDMI / AV menu
“More information https://www.caravansplus.com.au"
Component / HDMI / AV menu
NOTES:
• PICTURE menu and description are the same as that for DTV mode.
• SOUND menu and description are the same as that for DTV mode.
• LOCK menu and description are the same as that for DTV mode.
• AV/HDMI/Component mode has no CHANNEL menu.
• TIME menu has no clock option.
• HEARING IMPAIRED and PVR FILE SYSTEM in OPTION menu are invalid.
30
Page 31

31
“More information https://www.caravansplus.com.au"
Media (Multimedia) Menu
NOTE: Before operating Media menu, plug in a USB storage device, then press SOURCE button
to set the input source to MEDIA.
Press
Press
OK button to enter.
Photo menu
Press
Press EXIT button at any point to return back to the previous menu.
Press
button to select MEDIA in the Source menu, then press OK button to enter.
button to select the option you want to adjust in the Media menu, then press
button to select PHOTO in the main menu, then press OK button to enter.
button to select drive disk you want to watch, then press OK button to enter.
Page 32

Press
“More information https://www.caravansplus.com.au"
media button to display picture.
picture will be previewed in the center.
Press
press res of enter button on your remote control to enter sub menu.
32
Press
Music menu
Press button to select MUSIC in the main menu, then press OK button to enter.
Press MENU button to return back to the previous menu and EXIT menu to quit.
Page 33

Press button to select drive disk you want to watch, then press OK button to enter.
“More information https://www.caravansplus.com.au"
33
Press
music will be previewed in the center.
Press
Press button to select menu in the bottom you want to run, then press OK button to
operate. Press menu button to go back to the previous menu and exit the button to quit the
entire menu. Press button to hide the menu in the bottom.
button to select return option to go back to the previous menu.
Movie menu
Press button to select MOVIE in the main menu, then press OK button to enter.
Press MENU button to return back to the previous menu and EXIT menu to quit.
Press
Press
music will be previewed in the center.
Press media button to play the selected movie.
Press display button to select menu in the bottom you want to run, then press OK button to
operate.
Press MENU button to go back to the previous menu and EXIT button to quit the entire
menu.
button to select drive disk you want to watch, then press OK button to enter.
button to select return option to go back to the previous menu.
Page 34

USB Multimedia Playback Format
“More information https://www.caravansplus.com.au"
34
Page 35

35
“More information https://www.caravansplus.com.au"
PVR (Personal Video Recorder)
This TV features a PVR recording and playback function which lets you:
• Instantly record a TV program (via the one-touch recording button on your
remote control),
• Time-shift playback of a TV program, and
• Set a timer to record future television programs (via the EPG).
NOTE: For any type of recording with this television, you must have plugged in a USB storage
device into the appropriate USB port.
PVR File System
In DTV mode, enter the SETUP menu, then select PVR File system.
Page 36

Select Disk
“More information https://www.caravansplus.com.au"
Choose the disk for storing the content you want to record.
Check PVR File System
Select “Check PVR File System” and press OK to check your USB device.
USB Disk
If no USB device is connected, a notice will advise you accordingly.
36
Format
If your USB device is recognised, you can select Format.
Press OK to start Format (File System Size). (FAT32)
NOTE: If you select Format all data will be deleted.
Press the
the USB storage device (default: “FAT32”). The Format Disk screen below appears
keys to select PVR File System Type, then press OK to format
Page 37

Speed
“More information https://www.caravansplus.com.au"
After Check PVR File System, it shows the USB available speed and indicates if it will support
recording HD or SD signals.
Record Start/Stop
When in DTV mode you can press the REC button to start (and the button to stop)
recording directly.
If you want to stop recording, you should select the Stop Icon in the PVR operation menu
The icon will be appear when you start to record.
37
Time Shift Recording
When you are recording, you can press the play button and watch the program while still
recording. To stop, press the STOP button. This can be used when you have been interrupted
while watching your favorite program.
Note: 1. You should stop recording when you want to change the channel.
Recorded List
Display the list of recorded programs by pressing the INDEX button
when in DTV mode.
Play
Press OK to play the selected program, or press to play the
recorded program directly. The icon will appear when you
start playback.
Delete
Press the RED button to delete the selected program.
Info
Press the INFO button to bring up or close program information
Page 38

EPG (Electronic Program Guide)
“More information https://www.caravansplus.com.au"
EPG stands for Digital Electronic Program Guide. It is supplied by the program providers and
by pressing the EPG button on the remote control, the menu will appear on the screen, as
below:
38
NOTE:
no EPG information is displayed after you have brought up the EPG menu, use the
left/right buttons to navigate to the channel you wish to display the information from and
when it is highlighted, press OK on the remote control to activate it. Once you have activated
a channel, use the
right to bring up the programs to be broadcast and the / buttons to move up and down the
PVR/Record
To record a selected program, press the RED button and insert an appropriate USB device.
Display
Press the GREEN button to display the information about the DTV program.
Schedule
Press the YELLOW button to bring up a schedule of programmed recordings.
Remind
Press the BLUE button and use the / buttons to navigate between programs.
Next Day/Prev Day
Press key to select the information about next day/previous day.
buttons to go to the top row (Channel), then use the button left/
and
Page 39

DVD Function
“More information https://www.caravansplus.com.au"
System setup page
- Press the DVD SETUP key and then press
DVD mode.
- Press the key to move the highlight to select following option.
- Press the OK key to go into the following menu and then press the key to select a
menu item.
Wide
to display the general setup page when in
39
Page 40

Audio Setup Page
“More information https://www.caravansplus.com.au"
- Press the DVD SETUP key and then press
DVD mode.
- Press the key to move the highlight to select following option.
- Press the OK key to go into the following menu and then press the key to select a
menu item.
to display the audio setup page when in
40
Page 41

Preference Page
“More information https://www.caravansplus.com.au"
- Press the DVD SETUP key and then press
DVD mode.
- Press the key to move the highlight to select following option.
- Press the OK key to go into the following menu and then press the key to select a
menu item.
to display the preference page when in
41
Off
The default passwrok is “123456”.
Page 42

Specifications
“More information https://www.caravansplus.com.au"
MODEL AX-1119
Panel System 18.5”LED panel with Built-in DVD Player
Display Resolution 1366x768
Television System PAL/NTSC
Inputs/Outputs
HDMI input 2
PC 640x480/60Hz 800x600/60Hz 1024x768/60Hz
1366x768/60Hz
Audio (AV/PC) R/L 200mVrms (max3.0vp-p) 20K
Audio R/L 200mVrms (max3.0vp-p) 20K
Video Video 1.0 Vp-p 75
Audio L/R R/L 200mVmrs (max3.0Vp-p) 20K
Speaker consumption L/R 2x3W
Voltage DC12V 4A
Power consumption Max: 48W
RCA
42
MODEL AX-1122
Panel System 21.5” LED panel with Built-in DVD Player
Display Resolution 1920×1080
Television System PAL/NTSC
Inputs/Outputs
HDMI input 2
PC 640x480/60Hz 800x600/60Hz 1024x768/60Hz
1366x768/60Hz 1920x1080/60Hz
Audio (AV/PC) R/L 200mVrms (max3.0vp-p) 20K RCA
Audio R/L 200mVrms (max3.0vp-p) 20K
Video Video 1.0 Vp-p 75
Audio L/R R/L 200mVmrs (max3.0Vp-p) 20K
Speaker consumption L/R 2x3W
Voltage DC12V 5A
Power consumption Max: 60W
Page 43

FAQs
“More information https://www.caravansplus.com.au"
Problem Solution
No picture, no sound 1. Check if the house fuse or circuit breaker is working
by checking that all the fuse inside your main fuse box
are ON or test the wall outlet is working by trying with
another electrical product e.g. a desk lamp.
2. Make sure your wall socket is switched on and is
working properly (to check this, plug another electrical
device into the outlet).
3. Make sure the plug is securely inserted into the outlet.
4. Make sure all connections are secure.
No colour 1. Change the colour system.
2. Adjust the saturation.
3. Try another channel.
4. Check if the program is broadcast in black-and-white.
Remote control does not
work
No picture, normal sound 1. Adjust the brightness and contrast.
Normal picture, no sound 1. Press the Volume + button to increase the volume.
Pixelation in the picture This is usually caused by local interference from things
1. Change the batteries.
2. Check that the batteries are installed correctly.
3. Ensure the TV is connected to the mains power.
2. Broadcasting may be interrupted.
2. Press MUTE to restore sound if the volume is set to mute.
3. Change the sound system.
4. Broadcasting may be interrupted.
43
antenna to minimise the interference.
Blank screen in PC mode Perhaps the TV cannot recognise the resolution set by
the PC. Try setting it to the best resolution possible, or to
another standard Windows resolution. Set the refresh rate
to 60Hz by right clicking with your PC mouse onto your PC
Desktop, select "screen resolution" then select "advance
settings" and set your refresh rate with the "screen refresh
rate" drop down menu and press "apply".
Page 44

FAQs
“More information https://www.caravansplus.com.au"
Problem Solution
Pixelation If the antenna is located in the fringe area of a television
signal where the signal is weak, the picture may be
marred by dots. When the signal is extremely weak,
you may need to install a special antenna to improve
the reception. Other options include:
1. Adjust the position and orientation of the indoor/
outdoor antenna.
2. Check the connection of the antenna.
3. Fine tune the channel by selecting the channel into
"Channel Setting" and scroll down to "Fine Tune" to
slightly adjust the frequency.
4. Try another channel. Broadcasting may be interrupted.
Pixelation, picture
breaking up
Ghosting (analog TV only) Ghosting is caused by the television signal following two
Black spots or horizontal streaks appear, or the picture
from a car ignition system, neon lamps, electric drills or
other electrical appliances.
44
tall buildings, hills or other objects.
Changing the direction or position of the antenna may
improve the reception.
Radio frequency
interference
(Analog only)
This interference produces moving ripples or diagonal
streaks and, in some cases, loss of contrast in the picture.
Identify and remove the radio interference source.
Page 45

WARRANTY
“More information https://www.caravansplus.com.au"
Congratulations on your purchase of a quality Mobile Video System! You’re
joining thousands of satisfied customers who enjoy & experience the benefits of the products
we distribute. In the unlikely event that some technical difficulty arises with your purchase, be
assured that we are most anxious to see that the problem is quickly rectified to your
satisfaction. Please familiarise yourself with the following simple conditions of our warranty.
This warranty covers faults through component failure or failure of the product to operate in
accordance with published specifications. Product failure as a result of unreasonable
environmental conditions, accident, misuse, improper installation, unauthorised repair, vehicle
electrical or wiring faults or neglect etc, will not be covered by this warranty. Removal and
installation costs, if any, would be paid by the owner as well as any freight or postage costs of
transporting the product to AudioXtra. AudioXtra shall not be liable or responsible for any loss
of use of this product or any form of consequential loss.
CONSUMERWARRANTY
This product is warranted by AudioXtra International Pty Ltd to be free from defects in
materials and workmanship under NORMAL USE for a period of TWENTY FOUR MONTHS
from the date of purchase.
WITHIN 30 DAYS OF PURCHASE DATE: Please return the unit for replacement to our
National Service Centre or the Retailer from where you made the purchase. All accessories
must be included. Proof of purchase date must accompany the product.
AFTER30 DAYS OF PURCHASE DATE: Warranty repair and service is carried out by our
National Service Centre. Repair and service will be carried out at no cost to the owner if proof
of ownership and the date of purchase can be verified to the satisfaction of the authorised
centre concerned with this repair. This proof should take the form of either:
a) The warranty card accompanying this product, stamped and dated by the dealer.
b) A Tax Invoice or Receipt showing full details of original vendor, purchaser, model
number and serial number.
COMMERCIAL WARRANTY: A product used in or associated with a commercial
application will carry a limited SIX MONTH warranty. An abnormal commercial application is
one where usage, dust, vibration, heat/cold and other environmental conditions exist at an
extreme level.
Please complete details below in the event of warranty service being required.
Purchaser’s Name:
Purchaser’s Address:
Model Number:
Dealer Name:
Dealer Address:
Invoice/Sales Docket no:
General Hints:
To expedite service and prompt return of the equipment, please:
a) Clearly describe the fault in detail
b) Safety and security pack the unit for transport
c) Include your return address
d) Provide proof of purchase date as outlined above
National Service Centre:
10 STODDART ROAD, PROSPECT, SYDNEY NSW 2148 Australia
T elephone:(02) 8841 9000 Fax:(02) 9636 1204 email:service@audioxtra.com.au
Serial Number:
Date of Purchase: / /
www.audioxtra.com.au
 Loading...