

Page 1

BLUETOOTH/USB/SD MMC PLAYER
FM/AM TUNER
Ę;WUHPH7XQHUĘ86%6'0HPRU\&DUG3RUWV
Ę'HFNOHVVĘ)URQW3DQHO$X[,QĘ0LQL&KDVVLV
AX 1102BT
DESIGNED FOR AUSTRALASIAN CONDITIONS
Page 2

EN - 1
Safety Precautions
To ensure safe driving, please adjust the
volume to a safe & comfort level in case of
e
Never risk electrical shorts by exposing thi s unit ,
amplifier, or speakers to moisture or water.
Always replace the fuse with one of the specified amperage.
r
Please switch off this unit immediately and seek
professional assistance if one of the following
symptoms is found:
of the symptoms is found:
(a). Water or other obstacle enters the unit;
(b). Smoking;
(c). Burning smell.
Only connect the unit to a 12-volt power
supply with negative grounding.
Never install this unit in a position that affects
driver safety.
Thank you for purchas ing this product .
Pl eas e re ad thr oug h t he se instructions
so you will know how to operate your model
properly. Keep this manual in a safe place for
The graphic illustrations used in this manual
are pictorial only and may differ from the actual
unit you have purchased.
Page 3

EN - 2
WMA and MP3 Compatibility
To play back WMA and MP3 les.
About WMA
The unit can play back WMA data.
Windows Media and the Windows logo are
trade mar k s or registered trademarks of
Microsoft Corporation in the United States
and/or other countries.
This upending
on the application used to encode WMA les.
About MP3
Supply of this product only conveys a license
for private, non-commercial use and does not
convey a license nor imply any right to use
this product in any commercial broadcasting.
broadcasting. (terrestrial,
satellite, cable and/or any other media),
broad-casting/streaming via internet, intranets
and/or other networks or in other electronic
content distribution systems, such as payaudio or audi o-on-d e mand applica tions.
An inde pend ent lice nse for such u se is
required. For details, please visit http://www.
mp3licensing.com.
Features
Contents
Safety Precautions
......................................... 1
Features
......................................................... 2
Panel Controls
................................................ 3
General Operation
.......................................... 4
Tuner Operation
............................................. 5
USB/SD/MMC/MP3 Playback
........................ 5
Playing MP3/WMA Files
................................. 6
Bluetooth Operation
....................................... 7
Menu Function
................................................ 8
Device Connections
.......................................9
Installation Guide
..........................................10
Anti-Theft System
......................................... 12
Troubleshooting
............................................13
Specications
............................................... 14
Page 4
EN - 3
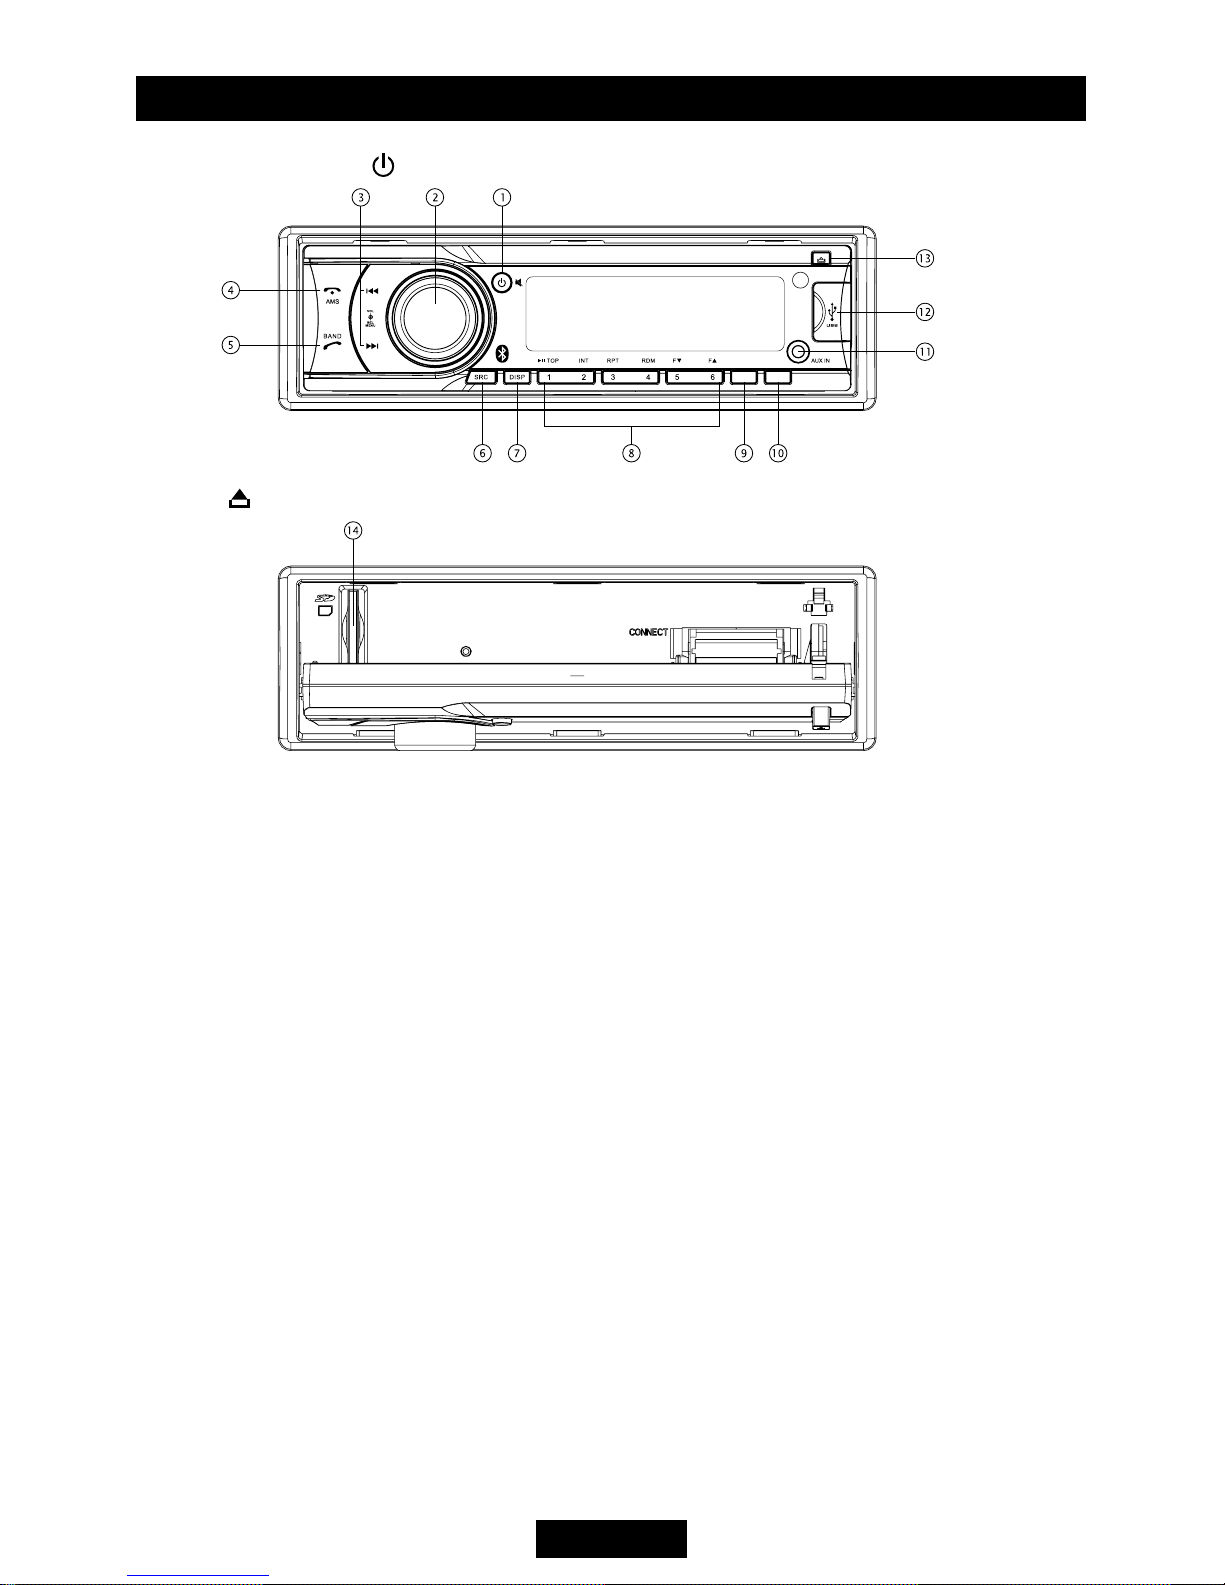
Panel Controls
Power ON: Press to turn on the unit.
Press
to ip down the panel.
1. - Power on
- Mute
- Power off (press & hold)
2. - Rotate the knob to adjust volume level.
- Press to select audio setting, and rotate
the knob to adjust level.
- Press more than 2 seconds to access
main menu.
3. - Search the previous/next station manually,
and each press to seek step by step (press
briey, in Radio mode).
- Se a rc h t he p re v io u s/ n ex t s ta t io n
automatically (press more than 2 seconds,
in Radio mode).
- Press to search the previous/next track or
chapter (playback MP3/WMA le).
- Fast backward/forward (press more than 2
seconds, playback MP3/WMA le).
4. - Band switch (in Radio mode)
- Terminate call (in BT mode)
5. - Preset scan (press briey, in Radio mode)
- Auto preset (press more than 2 seconds,
in Radio mode)
- Make a call (in BT mode)
6. - Press to select playing mode:
• Radio
• USB (when USB inserted)
• SD (when SD/MMC inserted)
• AUX (front audio input. External peripheral
devices can be connected with the unit.)
• BT MUSIC
7. - Display switch
- Set time (press & hold)
8. - MP3/WMA playback
Button 1: - Play/Pause
- Top play (press & hold)
Button 2: - Intro play (10 sec)
Button 3: - Track repeat play
Button 4: - Track random play
Button 5: - MP3 folder down
- MP3 track -10 down (press & hold)
Button 6: - MP3 folder up
- MP3 track +10 up (press & hold)
- Radio preset
Press to listen to a preset station.
Press and hold to store station.
9. - FM Stereo/Mono (in Radio mode)
- Loudness (press & hold, in Radio mode)
10. - Radio local/distant (in Radio mode)
11. - Aux-in jack
12. - USB port
13. - Panel open
14. - SD card slot
ST/LOU LOC
Page 5

EN - 4
Power On/Off Button
Press the
/
button to power the unit
when the vehicle ignition is on. Press
and hold the button to turn the unit off.
Adjust Volume level
Rotate the knob to adjust the volume level.
Rotate it clockwise to increase and anticlockwise
to decrease the volume.
Audio Mute
Press the
/
button to mute the volume
from the system. “MUTE” will appear on the
display panel and the volume will mute.
Press the
/
button again, or rotate or
press the knob to return the volume level to
the previous setting.
was activated.
Audio Controls
To adjust the bass, treble, balance and fader,
press the knob until the appropriate audio
mode appears on the display panel. Within
five seconds, rotate the knob to adjust the
audio settings for the selected function.
Mode Button (SRC)
Press the SRC button continuously to change
the following mode: Radio, USB (when USB is
inserted), Card(when SD/MMC card is in),
AUX play, etc.
Auxiliary Input
To access an auxiliary device:
1. Connect the portable audio player to the
AUX interface on the front panel.
2. Press the SRC button to select AUX mode.
3. To cancel AUX mode, press SRC again.
Display Selector (DISP)
This unit can display the clock time, radio
frequency or PTY type. Ordinarily, the radio
frequency or MP3/WMA track indication is
shown. The unit will display the time when
the DISP button is pressed. The time will
display for approximately 5 seconds then
return to previous mode.
Setting the Clock
The correct time of day can be set by pressing
and holding the DISP button.
To set the clock, perform the following steps:
1. Press the DISP button to view the clock.
2. With the clock visible on the display, press
and hold the DISP button until the time
display ashes.
3. Within 5 seconds, rotate the knob counter
clockwise to adjust the minutes to the
desired setting. To change the hour, rotate
the knob clockwise to adjust the hour to the
desired time.
4. Press DISP to conrm.
General Operation
Page 6

EN - 5
Tuner Operation USB/SD/MMC/MP3 Playback
1. Load SD/MMC Card
Press button to ip down the panel. Insert
the SD/MMC card into the slot, with the front
side to the right. Close the panel.
The unit will play the music automatically and
the LCD will show CARD.
2. Take out SD/MMC Card
Press SRC button and switch to non CARD
mode. Press to ip down the panel. Slightly
press the SD/MMC card. Remove the card when
it pops out. Close the panel.
3. Load USB Equipment
Open the USB cap to the right. Insert the
USB into the connector and the unit will
automatically play.
4. Take out USB Equipment
Press SRC button and switch to non USB
mode. Then remove the USB stick.
Close the cap.
USB/SD/MMC Notes
USB functions (ash memory type) MP3 music
play
1. SD/MMC card support
2. USB ash memory 2 in 1 (SD/MMC) support
3. FAT 12/FAT 16, FAT 32 is possible
4. Tag (id3 tag ver 2.0)
- Title/artist/album: 32 byte support
5. Multi card reader not supported
6. USB 1.1 support
USB 2.0 support
(It cannot support USB 2.0 speed.
Will play the same speed with USB 1.1)
Note:
Due to the great variety of recording formats, we
cannot guarentee that all kinds of USB & SD Card
Band
During radio play, press the BAND button to
choose between three FM and two AM bands.
Up Tuning
Press the seek up >>| button to tune stations
step-by-step. The current frequency will be
shown in digital format on the display panel.
Press and hold the seek >>| button to the next
available station.
Down Tuning
Press the see k down |<< bu tton to tu n e
stations downwards.
Press and hold the seek down |<< button for
the previous available station.
Auto Store
Press the AMS button to scan preset stations
1-6. Hold it to automatically select six strong
stations and store them in the current band.
The new stations replace stations already
stored in that band.
Page 7

EN - 6
Playing MP3/WMA Files
Display Information
During playback, ID3 tag information displays
scrolling on the sc reen: FOLDER, FILE,
ALBUM, TITLE, ARTIST and Track Number/
Elapsed Time.
Folder Up/Down
Press the 5/DN button to go to the previous
folder. Press the 6/UP button to go to the next
folder.
Direct Song/File Access
1. Press the AMS button once. Press the
control knob to enable direct track searching.
2. Rotate the knob to select a digit.
3. Press the knob to confirm entry and the
'ten' digit will ash.
4. Rotate the knob to select digit.
5. Repeat above steps to enter the 'hundred'
and 'thousand' digit, if necessary.
NOTE: The unit will only allow the selection
of digits that correspond with the number of
les on the media being searched.
6. Once the track number appears on the
screen, hold down the knob to play the
selected song/le.
Searching Folders/Files
1. Press the AMS button twice, then press the
control knob to access the le search option.
2. Rot ate the knob to sele ct the desi red
directory/song.
3. Press the knob to view the files inside the
selected directory.
4. Rotate the knob to select the song/le. Hold
down the knob to play the selected song/ file.
le.
Searching by Name (CHAR-SCH)
1. Press the AMS button three times and press
the knob to access the character search
option.
2. Rotate the knob to select the characters A-Z,
_ , - , + , and 0-9 for the rst character.
3. Press the knob to confirm entry of the
character and move to the next position.
4. Repeat for up to eight characters.
5. Press and hold the knob for 2 seconds to
begin the search.
6. If a directory is found, rotate the knob to
select the song/le in this directory/folder.
7. Press and hold the knob for 2 seconds to
play the selected song/file. “NOT FIND”
appears if there is no le beginning with the
search string entered.
MP3 Overview
MP3 is short for MPEG Audio Layer 3 and
refers to an audio compression technology
standard.
This product allows playback of MP3 files
on USB or SD/MMC card.
The unit can read MP3 files written in the
format compliant with ISO 9660. However
it may not support the MP3 data written by
the packet write method.
The unit can not read an MP3 le that has a
le extension other than “.mp3”.
If you play a non-MP3 le that has the “.mp3”
extension, you may hear background noise.
In this manual, we refer to the "MP3" file
and “folder” in PC terminology as "Track"
and “Album”, respectively.
The unit may not play tracks in the order of
track numbers.
The unit plays onl y the au dio tracks if
both audio tracks and MP3 les are found.
Page 8

EN - 7
Note:
For your safety, minimise phone conversations
as much as possible while driving.
Bluetooth is a wireless transmission over
a short distance. The built-in Bluetooth
can connect with mobile phones having
Bluetooth function.
After connection, your mobile phone can be
controlled through the unit.
Pairing
Use this function to establish a connection
between the unit and your mobile phone.
1. Turn on the unit and press SRC button to
select BT MUSIC mode.
2. Turn on Bluetooth function of your mobile
phone. Keep phone within 3 metres of
the unit and search for Bluetooth devices.
e
3. After the name of the Bluetooth module
appears on the pairing list of your mobile
phone, select it. At this time, a pairing
code is required. Enter the pairing code
“”, and the Bluetooth pairing
will process automatically. Some mobile
phones may instruct you to select connect
or disconnect. Please select connect.
Exit PairLQJ
Af te r pa iring suc ce ssf ull y, press and hold
button to disconnect bluetooth connection.
If you want to re-connect, turn unit off then on
again or turn ignition off then on again.want to re-connect, press and hold SRC
button.
Make a call
1. Switch to BT MUSIC mode using SRC button.
2. Press
button.
3. Press the buttom to scroll through the
following list:
DIAL NUM: dial number directly
DIALLED: dialed number
MISSED: missed call
RECEIVED: received call
ME PBK: Phone directory
SIM PBK: SIM directory
4. Press MENU button to conrm the selection.
To dial a number directly, select DIAL NUM.
1. Ro t ate the VOL kno b to selec t p hone
number, press MENU button to conrm.
- Press |<< button to delete a digit entered.
- Press
button to reset entered number.
2. Press
to dial out.
To use a number in call log or directory, select
the option other than DIAL NUM.
Receive
1. After pairing successfully, the unit will
automatically switch to BT mo de.
automatically.
2. Press
button to receive.
3. Press
button to hang up.
Call Transfer
During talk mode, press button to
connect audio of the unit to your mobile phone.
Note:
Some mobile phones will connect audio
automatically once the incoming call
is answered.
BT Audio
To listen to audio from a bluetooth device and
control playback from the unit.
1. Press SRC button continuously to select BT
MUSIC mode.
2. To play or pause, press 1 >|| TOP.
Music Mode
A2DP
A2DP is short for Advanced Audio Distribution
Profile. The mobile phones supporting this
function can transmit stereo audio, whereas
those not supporting this function can
transmit mono only.
AVRCP
AV RCP is short for Audio/Video Remote
Control Prole. The mobile phones supporting
this function can control the playback of a
Bluetooth audio player.
Bluetooth Operation
Page 9

EN - 8
General Notes for Bluetooth
1. For some types of mobile phones, even
after the connection seems successful, the
unit still appears to be waiting to be paired.
At this time you must nd the unit’s Bluetooth
module name on the pairing list of your
mobile phone and select connect in the
submenu. Then the unit will display CONNECT.
To play back A2DP in some mobile phones,
find the unit name in the phone menu and,
reconnect (check if your mobile phone has the
A2DP & AVRCP functions).
find the unit name in the phone
r
phone has the A2DP & AVRCP functions).
.
2. When pairing, some types of mobile phones
give specific directions to operate.
mobile phone voice dosn’t be transferred to
the unit, no voice comes out.
3. Depending on the mobile phone, if private
mode is selected, voice will be transferred to
the mobile phone. Sometime the Bluetooth may
disconnect and may need pairing again.
till the communication ends, then connects
your mobile phone to the unit automtically.
Some mobile phones maybe need pair
again.
4. For mobile phone, the Bluetooth device
name must be primary symbols or numbers.
Otherwise, so me unpre d ictable issues
may occur during the Bluetooth devices
connecting and making phone call.
5. After CONNECT, if no sound is produced,
please check that the Bluetooth stereo audio
on the phone is switched ON.
Bluetooth Operation Menu Function
Press the knob for more than 2 seconds to enter
the menu. Then each press changes the
mode as follows:
— — — — — — — — — — — — — — — — — — — —
DSP mode
Rotate the knob to choose DSP sound effect:
POP -> ROCK -> CLASSIC -> FLAT ->OFF
— — — — — — — — — — — — — — — — — — — —
BEEP ON/OFF mode
Rotate the knob to switch the beep sound
on or off.
— — — — — — — — — — — — — — — — — — — —
SEEK 1/2 mode (in Radio mode)
Rotate the knob to choose radio seek mode 1
or 2.
SEEK 1: Station search will stop when the
next station is received.
SEEK 2: Station search will stop when |<<
or >>| button is released and next station is
received.
— — — — — — — — — — — — — — — — — — — —
VOL mode
Rotate the knob to choose volume last/adjust
mode.
V-LAST: The turn-on volume level is the
volume of latest power off.
V-ADJ: Press the knob to enter Volume Adjust
mode. Rotate to set the turn-on volume level.
— — — — — — — — — — — — — — — — — — — —
12/24 HOURS mode
Rotate the knob to choose time format: 12 or
24 HOUR.
Page 10

EN - 9
Device Connections
Wiring Diagram
Microphone
Black
Fuse 15A
Antenna
e
e
e
Page 11

EN - 10
Installation Guide
Preparation
1. Disconnect battery
Before you begin, disconnect the
battery negative terminal.
Note:
If the unit is to be installed in a car equipped
with an on-board drive or navigation computer,
do not disconnect the battery cable. If the
cable is disconnected, the computer memory
may be lost. Under these conditions, use extra
caution during installation to avoid causing a
short circuit.
2. Remove unit from sleeve
Lift latches on both sides of sleeve to remove
mounting cradle from the unit.
Mounting Sleeve Installation
1. Slide the mounting sleeve off the chassis.
If it is locked into position, use the removal
tools (supplied) to disengage it.
2. Check the da shboard opening size by
sliding the mounting sleeve into it.
If the opening is too small, carefully cut or
file as necessary until the sleeve easily
slides into the opening. Do not force the
sleeve into the opening or cause it to bend
or bow. Check for sufficient space behind
the dashboard for the unit chassis.
This unit can be installed in any dashboard
with a suitable 183 mm (W) x 52 mm (H)
opening as shown above. The dashboard
should be 4.75 mm - 5.56 mm thick in order
to be able to support the unit.
3. Locate the series of bend tabs along the
top, bottom, and sides of the mounting
sleeve. With the sleeve fully inserted into
the dashboard opening, bend as many of
the tabs outward as necessary to firmly
secure the sleeve to the dashboard.
Device Connections
Notes of connection
• To avoid short ci r c u it of th e electrical
system, disconnect the negative battery
cable before installation.
• To prevent short circuit in the wiring and
damage to this unit, secure all cables with
insulated terminals or adhesive tape.
Keep the wiring away from heat and
moving parts .
• Replace a blown fuse with one of 15A rating.
Never by-pass the fuse assembly. If the proper
fuse is installed and electrical problems still
occur, please contact a professional installer.
• Please make sure all the wiring connections to
the speakers are well insulated. This will
prevent damage from short circuit.
• If no ACC available, please connect a switch
between the ACC lead and the power supply.
• To prevent damage to the built-in power
amplifier, never ground the speaker outputs.
• The mi n im um ra t in g for the sp ea k er s
connected to this unit is 45W with 4 to 8Ω
impedance.
Page 12

EN - 11
4. Place the unit in front of the dashboard
opening so the wirin g ca n be brought
through the mounting sleeve. Follow the
wiring diagram carefully and make certain
all connections are secure and insulated.
After completing the wiring connections, turn
the unit on to confirm operation (vehicle
ignition must be on). If the unit does not,
operate re-check all wiring until the problem
is corrected.perate, re-check all wiring until the
problem is corrected.
5. Carefully slide the radio into the mounting
sleeve until it is fully seated and the spring
clips lock it into place.
clips lock it into place.
6. Secure the rear of the unit to the car body
using the mounting bolt and rubber cushion.
7. T es t t he un it us ing the “ O pe ra tio n”
instructions that follow.
Kit Installation
If you r ve hic le req ui res th e use of an
installation kit to mount this unit, follow the
instructions included with the installation kit to
attach the unit to the mounting plate supplied.
with the kit.
1. Wire and test the unit as outlined in the
Mounting Sleeve Installation instructions.
2. Install the radio/mounting plate assembly
Installation Guide
to the sub-dashboard according to the
instructions in the installation kit.
3.
Replace the dashboard trim panel.
ISO Installation
This unit has threaded holes in the chassis
side panels which may be used with the
original factory mounting brackets of some
vehicles to mount the radio to the dashboard.
Please consult with your local car stereo shop
for assistance on this type of installation.
1. Remove the existing factory radio from the
dashboard or centre console mounting.
Save all hardware and brackets as they will
be used to mount the new radio.
2. Carefully unsnap the plastic frame from the
front of the new unit chassis. Remove and
discard the frame.
3. Remove the factory mounting brackets
and hardware from the existing unit and
attach them to the new unit. Do not exceed
M5 x 9mm maximum screw size. Longer
screws may damage components inside the
chassis.
4. Wir e th e ne w un it as outl ine d in th e
Mounting Sleeve Installation instructions.
5. Mo un t the ne w uni t as sem bl y to th e
dashboard or centre console using the
reverse procedure of step 1.
Page 13

EN - 12
Reset
The RESET button is located behind the front
panel and can only be accessed with the front
panel opened. Resetting the unit will erase
the time and preset memories. It should only
be activated upon initial installation after all
wiring is complete, or if there is a malfunction
of any of the switches on the unit. In these
circumstances, pressing the RESET button
will clear the system and return the unit to
default operation.
Fuse
When replacing a fuse, make sure the new
fuse is the correct type and amperage. Using
an incorrect fuse could damage the radio.
Reconnect Battery
When wiri n g is complete, reconnect the
battery negative terminal.
Installation Guide
This unit is equipped with a detachable panel which
can be removed and taken with you, helping to
deter theft.
Removing the Panel
1. Switch off the power of the unit.
2. Press button to ip down the panel.
3. At an angle hold the panel to pull it out.
4. Place the panel into the case and take it
with you when you leave the car.
Installing the Panel
1. Hold the panel and ensure the panel faces
toward you, and set the right side of the
panel in the panel bracket.
2. Press the left side of the panel until it locks.
2
1
Removing the Unit
1. Remove the panel and the trim plate.
2. Remove the trim ring by rmly grasping one
side and pulling.
3. Insert the removal keys straight back until
they lock, then slide the radio out. If the
removal keys are inserted at an angle, they
will not lock properly and will not release the
unit.
Anti-Theft System
Page 14

EN - 13
Troubleshooting
If you suspect something is wrong, immediately switch off the power and contact the dealer where
you made the purchase.
t
Problem Possible cause Solution
General
The unit will not switch
on.
Car ignition is not on.
Cable is not properly
connected.
Fuse is burnt.
Turn your car key in the ignition.
Check cable connection.
Replace fuse with a new fuse of the
same capacity.
No sound
Volume is set at minimum or
the mute function is on.
Check the volume or switch the mute
function off.
The unit or screen does
not function normally.
The unit system is unstable. Press the RESET button.
TUNER mode
U n a b l e t o r e c e i v e
stations.
The antenna is not connected
properly.
Connect the antenna properly.
Poor quality reception of
radio station.
Th e an te nn a is no t fu lly
extended or it is broken.
Fu l ly ex te nd the an te nn a an d if
broken, replace it with a new one.
Preset stations are lost.
Th e ba tt er y cab le is no t
properly connected.
Connect the permanent power on
the unit to the per m anent power
on the vehicle.
USB/SD/MMC mode
Unable to inser t USB
device or SD/MMC card.
The memo ry car d or USB
device has been inserted the
wrong way round.
Insert it the other way around.
The USB device or SD/
MMC c ar d can not be
read.
Format is not supported.
Check th a t the USB/SD/MMC file
system is in FAT or FAT32 format.
Due to different formats, some models
of US B st or ag e de vi ce s or MP 3
players may not be read.
Page 15

EN - 14
Specications
General
Power supply: 12VDC (11V-16V), Test voltage 14.4V, negative ground
Maximum power output: 45W x 4 channels
Continuous power output: 20W x 4 channels (4 10% T.H.D.)
Suitable speaker impedance: 4-8ohm
Pre-Amp output voltage: 4.0V (Play mode: 1KHz, 0dB, 10K
load)
Fuse: 15A
Dimensions (WxHxD): 178 x 50 x 166mm
Weight: 1.7kg
Aux-in level:
500mV
FM Stereo Radio
Frequency range: 87.5-108.0MHz
Usable sensitivity: 8dB
μ
Frequency response: 30Hz-15KHz
Stereo separation: 30dB(1KHz)
Image response ratio: 50dB
IF response ratio: 70dB
Signal/noise ratio: >55dB
AM(MW) Radio
Frequency range 522-1620KHz
Usable sensitivity (S/N=20dB) 30dBμ
Components
Mounting sleeve 1
Machine screws M5x6 mm 4
Mounting bolt (50 mm) 1
Wire connector 1
Removable face plate case 1
Trim plate 1
Removal key 2
Operating Instructions 1
Rubber cushion 1
External microphone 1
Note:
Specications and the design are subject to change without notice due to improvements.
Page 16

 Loading...