

Page 1

October 13, 2022
Rev. 1.0
© Axis Communications AB
HOW TO.
Configure QR code access solution in
AXIS Camera Station
Page 2

How To.
Configure QR Code access solution in AXIS Camera Station
2
Contents
Introduction 3
Step 1 – Adding/updating & setting up devices 4
To add the devices 5
To update the devices 6
To setup the devices 7
Step 2 – Configuring SMTP Server 9
To configure SMTP server 9
Step 3 – How to create/edit a schedule 10
Creating/editing a schedule to use is Secure Entry 10
Step 4 – Configuring QR identification profile 11
To create the QR identification profile 11
Step 5 – Creating a door with a barcode reader 12
To create a door/add a QR reader to existing door 12
To apply QR identification profile to door after the door is created 14
Step 6 – Configuring the AXIS Barcode ACAP 15
To configure the ACAP 15
Step 7 – Creating and sending the Static or Dynamic QR code credential 18
To create the QR Code credential 18
Step 8 – Using AXIS Mobile Credential 22
How to use the AXIS Mobile Credential 22
Considerations and limitations 23
Page 3

How To.
Configure QR Code access solution in AXIS Camera Station
3
Introduction
This how to document will show you how to set up the selected device (s) as a QR reader
and how to configure QR code as a credential within Axis Camera Station.
AXIS Camera Station Secure Entry offers reliable, convenient and cost-effective, QR code
based access solution for visitors. It allows you to provide QR code credential and access
management without the complications, or waste of purchasing, managing, and disposing of
physical cards.
It’s ideally suited to a mobile-first society: in advance of a visit, trusted guests are sent a QR
code with a specific date of validity from AXIS Camera Station Secure Entry, which they can
store on a mobile device or print. When they present the code to the camera or intercom, with
AXIS Barcode Reader ACAP installed, during the valid window, relevant data is sent to an Axis
door controller, granting access.
Please find below as the system structure of QR code access solution.
Page 4

How To.
Configure QR Code access solution in AXIS Camera Station
4
Please note that Axis doesn’t take any responsibility for how this configuration may affect your
system. If the modification fails or if you get other unexpected results, you may have to restore the
settings to default.
Prerequisites
AXIS Barcode supported Intercom or Camera
AXIS A1601 Door Controller 10.11.30.1 or later
AXIS Camera Station 5.47 or later
AXIS Barcode Reader ACAP 1.1.1 or later
AXIS Barcode Reader ACAP License
Page 5

How To.
Configure QR Code access solution in AXIS Camera Station
5
Step 1 – Adding/updating & setting up devices
Start by adding the unit(s) to Axis Camera Station and ensuring that they are running the latest
firmware. For the devices used we require the use of HTTPS for end-to-end security, these
devices should also use ACS as an NTP. Only the door controller is required to be added to Axis
Camera Station, but the intercom or camera can be added. Ensure either way that all devices
are on the latest firmware.
To add the devices
Follow these steps if you need to add the devices:
1. In Axis Camera Station open the configuration tab via the “+” symbol found at the top of
the screen.
2. From the left menu select “Devices” and under this drop-down select “Add Devices”
3. On this page if the units are in your network, you should see them, if they are missing
then you can try do a manual search via the button “Manual Search”. If they still cannot
be found, please check the units are powered and are on the same network.
4. If the units are greyed out, this means they require the password for the unit, this is
entered by clicking on the “Enter password” under status for the unit.
5. Once you see the units you wish to add, you can hold down the “ctrl” key and select the
units, then click add found on the bottom left.
6. Follow the pop-up wizard to add these devices
Page 6

How To.
Configure QR Code access solution in AXIS Camera Station
6
To update the devices
Follow these steps to update your devices:
1. In Axis Camera Station open the configuration tab via the “+” symbol found at the top of
the screen.
2. From the left menu select “Devices” and under this drop-down select “Management”
3. From this page hold “ctrl” and select the devices, once selected press the update
firmware button.
4. In the popup select the latest firmware in the list for each device (for the A1601 ensure to
select the latest Secure Entry track) and press “OK”
5. The update can be monitored via the “tasks”
Page 7

How To.
Configure QR Code access solution in AXIS Camera Station
7
To setup the devices
Follow these steps to setup your devices:
1. In Axis Camera Station open the configuration tab via the “+” symbol found at the top of
the screen.
2. From the left menu select “Devices” and under this drop-down select “Management”
3. Right click on the device and select “Security – HTTPS – Enable/Update”
4. This will create a task in the task and alarms, once this has completed, HTTPS is
enabled on this device.
Page 8

How To.
Configure QR Code access solution in AXIS Camera Station
8
5. Next to setup is the time & date on the device, we do this but right clicking on the device
in Devices – Management and selecting “Set Date and Time…”
6. In the pop-up select yes, In the next pop-up under “Time Mode” choose the first option,
“Synchronize with server computer time”
7. This will then add a task in the task and alarms, once completed the time will now be
synched with the computer server time.
Page 9

How To.
Configure QR Code access solution in AXIS Camera Station
9
Step 2 – Configuring SMTP Server
To configure SMTP server
To be able to send out the QR code credentials we need an SMTP (Simple Mail Transfer
Protocol) to be configured as this allows AXIS Camera Station to have a chosen mail address to
distribute the credentials from, please note that this is not something Axis Communications
provides.
Follow these steps to configure SMTP server:
1. In Axis Camera Station open the configuration tab via the “+” symbol found at the top of
the screen.
2. From the left menu select “Server” and under this drop-down select “Settings”
3. On this page press “Add..” under “SMTP servers” and in this pop-up fill in your SMTP
server details and press “OK”
Page 10

How To.
Configure QR Code access solution in AXIS Camera Station
10
Step 3 – How to create/edit a schedule
Creating/editing a schedule to use in Secure Entry
These schedules would be used for setting specified time periods for identification profiles and
access times for cardholders or door unlock schedules.
Follow these steps to create a schedule:
1. In Axis Camera Station open the configuration tab via the “+” symbol found at the top of
the screen.
2. From the left menu select “Recording and events” and under this drop-down select
“Schedules”
3. To edit a schedule, highlight the schedule you wish to edit, if you wish to create a new
schedule, press new.
4. To edit this schedule hold and drag the cursor along the time for each day that you want
the schedule to be running. Blue highlighted will be the active times on each day.
5. Once you are happy with your schedule you can provide it with a new name in the name
field and click apply.
Page 11

How To.
Configure QR Code access solution in AXIS Camera Station
11
Step 4 – Configuring QR identification profile
To create the QR identification profile
If you are wanting a multi-factor authentication or multiple types of credentials (card or QR) you
will need to create a new identification profile, the QR code credential can be used with any of
the other types to add another level of security.
Follow these steps to create:
1. In Axis Camera Station open the configuration tab via the “+” symbol found at the top of
the screen.
1. From the left menu select “Access control” and under this drop-down select “Identification
Profiles”
2. On this page QR as an identification alone exists, to create a new identification type
select “+ Create identification profile”
3. Give the profile a name and for each side configure the required credentials using the “+
Add” then in the drop-down tick the identification types you wish to be presented to grant
access, after select the schedule this applies too. Then select “Ok” in the bottom right.
Page 12

How To.
Configure QR Code access solution in AXIS Camera Station
12
Step 5 – Creating a door with a barcode reader
To create a door/add a QR reader to existing door
If you have a door already configured in your system and wish to add the QR reader, click on the
three dots and select “edit” once on the config screen follow from step 5
Follow these steps to create a door:
1. In Axis Camera Station open the configuration tab via the “+” symbol found at the top of
the screen.
2. From the left menu select “Access control” and under this drop-down select “Doors and
zones”
3. On this page press “+ Add door” and in the pop-up give the door a relative name and
select the A1601 door controller in the second drop down, then press “Next”
4. Proceed to configure the locks with the correct relay and door monitors (if used)
5. On the side you wish to have the barcode reader select “Add reader”
Page 13

How To.
Configure QR Code access solution in AXIS Camera Station
13
6. On the right pop-up select reader type “Axis Barcode Reader”
7. Give this reader a relative name, continue to configure any remaining readers and/or
REX and finish by selecting “Ok” bottom right.
8. Once created, open the “door settings” drop-down on the right. In this drop-down you can
change the “identification profile” to QR.
9. You can also add any additional readers/inputs you may have connected to this door
such as a card reader or REX.
Page 14
How To.
Configure QR Code access solution in AXIS Camera Station
14
To apply QR identification profile to door after the door is created
If you create a new identification profile or wish to change to another after creating the door, this
can be done from the Doors and zones page.
Follow these steps to apply:
1. In Axis Camera Station open the configuration tab via the “+” symbol found at the top of
the screen.
2. From the left menu select “Access control” and under this drop-down select “Doors and
zones
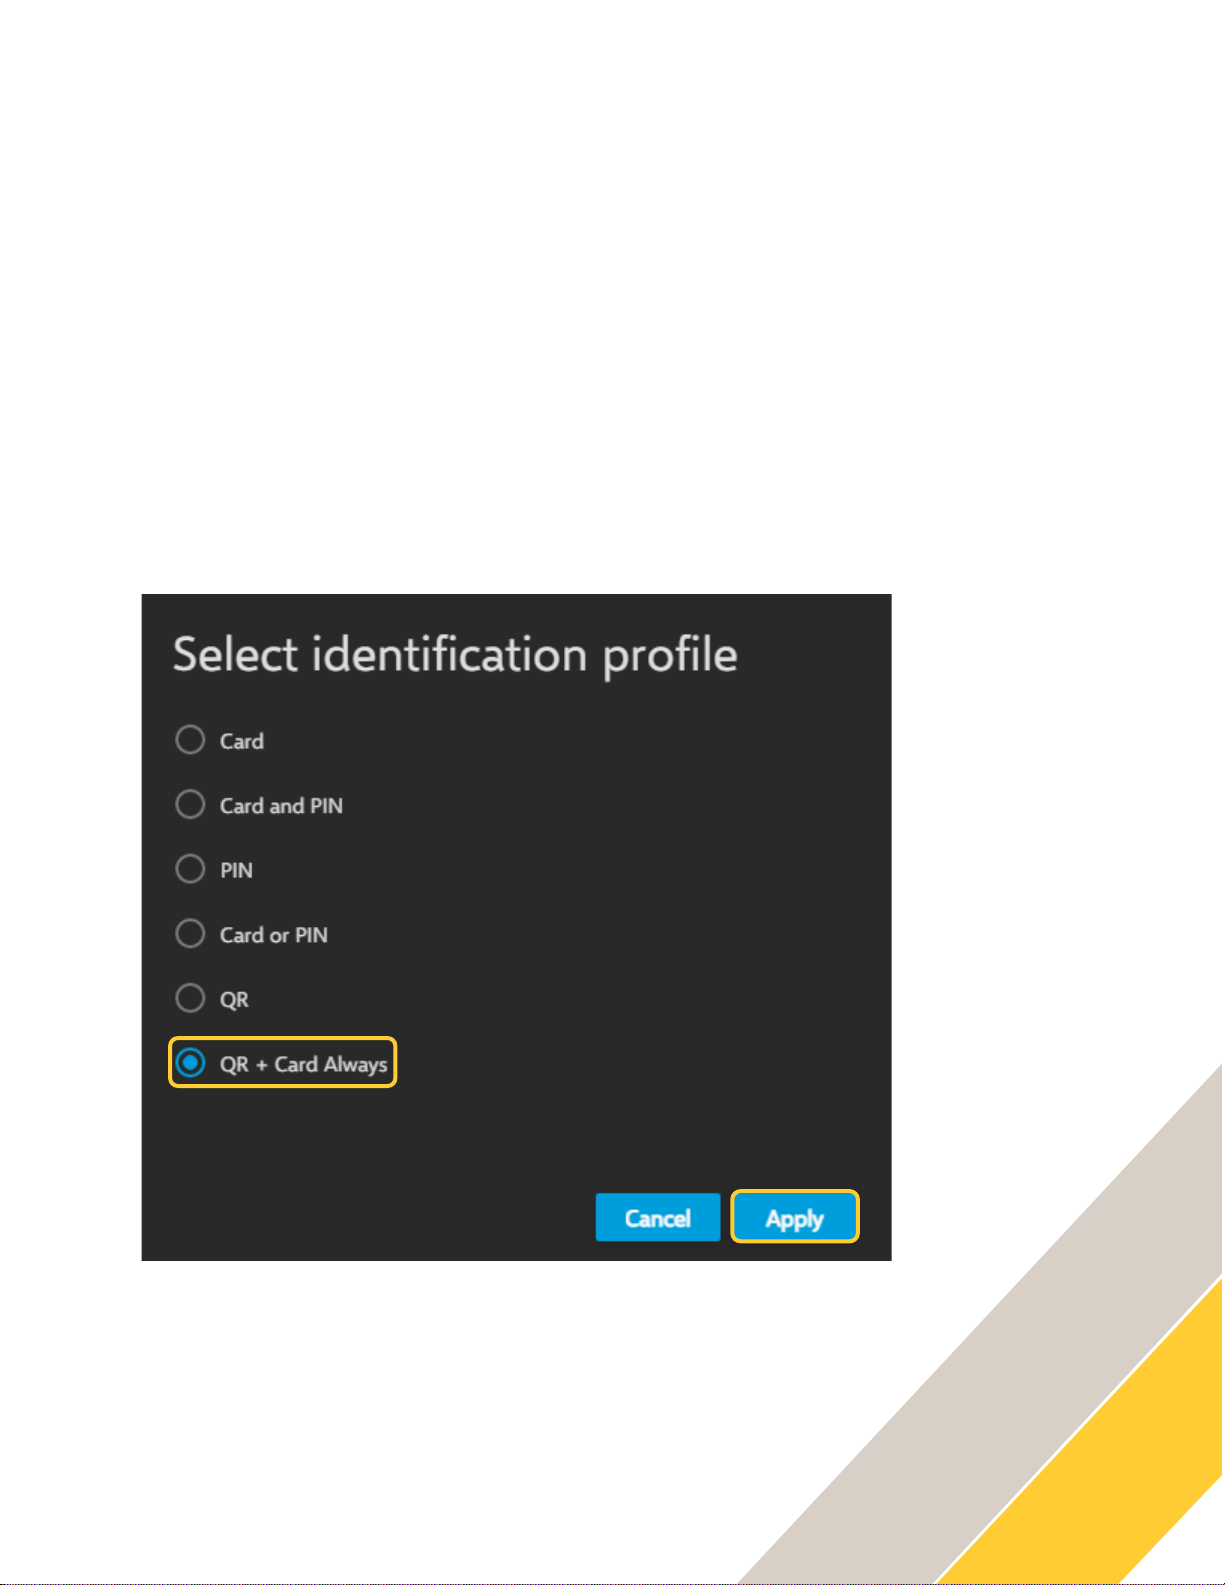
3. Highlight the specific door and click “Select identification profile”
4. In the pop-up window select the identification profile you wish to use, and click “Apply”
Page 15

How To.
Configure QR Code access solution in AXIS Camera Station
15
Step 6 – Configuring the AXIS Barcode ACAP
To configure the ACAP
Next we need to configure the ACAP (Axis Camera Application Platform) this is installed and
configured directly on the device which will be reading the QR code credentials, as this is used
to connect the created reader in AXIS Camera Station to the device allowing the QR code
access. The ACAP allows us to connect up to 5 AXIS A1601 Door Controllers to a single device
using the ACAP
The installation and licensing of the ACAP can be done via ACS or directly on the device.
Follow these steps to install via ACS:
1. In Axis Camera Station open the configuration tab via the “+” symbol found at the top of
the screen.
2. From the left menu select “Devices” and under this drop-down select “Management”
3. Highlight the device and click the install application symbol (puzzle piece with +)
4. Choose “Browse to Application” select the barcode ACAP file and press “Next”.
5. Say yes to installing licenses and press “Next”
6. Click “Browse” and select the license file, then press “Next”
7. Finally click “Finish”
Follow these steps to install via the webpage:
1. In Axis Camera Station open the configuration tab via the “+” symbol found at the top of
the screen.
2. From the left menu select “Devices” and under this drop-down select “Management”
3. Then click on the IP address of the supported device (you can access this via a browser
instead)
4. On this tab select “Services” then “+ Install app” on the next page select the AXIS
Barcode ACAP file and click “Install”
5. Once installed, from the services page select “settings” on the AXIS Barcode Reader
ACAP.
6. Click “Activate Licence” on this page select the licence file or enter in the licence key and
click “Ok”
Page 16

How To.
Configure QR Code access solution in AXIS Camera Station
16
Follow these steps to configure:
1. From the management page in ACS, click on the IP address of the device to open a new
tab displaying the web GUI, from here select “services”
2. Now you can start the AXIS Barcode ACAP and select “Open”
3. Under “Integration” toggle on “AXIS Camera Station Secure Entry” now under “Door
Controller #1” add the IP address of the AXIS A1601 Door Controller used to create the
door previously. (The IP address can be found in AXIS Camera Station under
Configuration – Devices – Management)
4. To get the Authentication key, in AXIS Camera Station under the “Configuration” tab
select “Access control” then “Encrypted communication” on this page select “show
Authentication key” under “AXIS Barcode Reader” and press “copy key”
5. Return to the ACAP tab/webpage and paste in the Authentication key, now on the right
should be the controller with the name given to the door, use the drop down to select the
barcode reader we had created previously.
Page 17

How To.
Configure QR Code access solution in AXIS Camera Station
17
NOTE
For more details on how to configure the AXIS Barcode
Reader ACAP please visit the product page on Axis.com
6. From this ACAP we can also add up to 5 door controllers using the add button, each one
added in the same way as we did with the 1st controller. This allows one ACAP to control
5 different doors.
Page 18

How To.
Configure QR Code access solution in AXIS Camera Station
18
Step 7 – Creating and sending the Static or Dynamic QR code credential
To create the QR Code credential
Now we can provide the QR code credential to either new or existing cardholders. These
credentials allow quick safe access to your premise without the need for physical credentials.
Follow these steps to create:
1. In Axis Camera Station open the configuration tab via the “+” symbol found at the top of
the screen. And select “Access management”
2. From this page you can either create a new cardholder via the plus button on the
cardholder area and select the cardholder bubble. If you wish to add a QR code to an
existing cardholder, find them in the cardholder area and click the three dots and “edit”.
3. In the cardholder, fill out the name and email address fields, (the email address is
required to be able to send QR code credentials to cardholders) then under credentials
click the “+” and select the QR symbol button.
Page 19

How To.
Configure QR Code access solution in AXIS Camera Station
19
4. Then via the toggle switch we can change if the QR code sent will be dynamic or static.
(Using dynamic requires the user to also be given a PIN credential). Once that has
been chosen, give the QR code a name and decide the expiration date. Under you can
choose if you wish the QR code to be emailed directly after adding the adding the user.
then ready click “Add” then click “Add” top left.
NOTE
To use dynamic QR code the cardholder is required to use
the AXIS Mobile Credential app.
Page 20

How To.
Configure QR Code access solution in AXIS Camera Station
20
5. If you chose not to send directly or need to re-send the QR code click on the three dots
next to the cardholder and select “Email QR code” in the pop-up confirm the details and
press “Ok”
Page 21

How To.
Configure QR Code access solution in AXIS Camera Station
21
6. If you wish to change the QR code email message template this can be edited by clicking
the settings symbol from the left bar and editing the “Email template”
Page 22

How To.
Configure QR Code access solution in AXIS Camera Station
22
Step 8 – Using AXIS Mobile Credential
How to use the AXIS Mobile Credential
If you use dynamic QR you are required to use the app, if you select static this is optional.
Follow these steps to configuration:
1. Open the email you received from the company and follow the steps in the email.
2. First you will be required to download the app from either play store (android) or app
store (apple).
3. Once installed go back to the email and click on the credential link, this will automatically
open to the installed app and insert your credential.
4. The company sending you this will send you your required PIN via their selected secure
channel.
5. To use the app, tap on the credential and enter your given PIN. This will then display
your dynamic QR code.
6. Present this to the doorstation/camera at the door you wish to enter, if you have the
correct permission this will grant access.
Page 23

How To.
Configure QR Code access solution in AXIS Camera Station
23
Considerations and limitations
1. The use of the A1601 requires HTTPS to be enabled
2. To be able to send the QR codes, SMTP must be configured in AXIS Camera Station
3. The AXIS Barcode Reader ACAP can be connected to up to 5 AXIS A1601 units
4. To use Dynamic QR Code the receiver is required to download the AXIS Mobile
Credential App.
5. To get reader LED and buzzer feedback on the AXIS A8207, you will need to
connect the A8207 as a card reader to the same door as the QR Barcode Reader
as an IP, OSDP or Wiegand connection.
6. Support up to one QR code credential per cardholder and in total 5 credentials
(including card, PIN and QR code) per cardholder.
7. Time validity of QR code credential is not supported in the first release, to be
added in later release.
8. AXIS Barcode Reader ACAP support read QR code version stores up to 4296 bytes,
depends on the image resolution and quality. It is optimized for QR code
generated by AXIS Camera Station, which contains 32 bytes of data.
9. AXIS Barcode Rader ACAP works on selected Axis Intercom including AXIS
A8105-E Network Video Door Station, AXIS A8207-VE MKII Network Video Door
Station and AXIS I8016 -LVE Network Video Intercom. More Axis intercom and
camera will be added to the supported list in later release.
10. AXIS Barcode Reader ACAP with AXIS A8207-VE MKII Network Video Door
Station supports injec ting QR code via the OSDP/Wiegand reader interface to
Axis or 3rd party door controller.
 Loading...