

Page 1

© Axis Communications AB
Page 2

2
Page 3

3
▪
▪
▪
o
o
▪
▪
o
o
o
Page 4

4
Before 2N IP Intercom can be added to AXIS Camera Station, it needs to be configured. Download
and install the 2N Network Scanner to discover your 2N IP Intercoms in the network.
Go to System > Maintenance and make sure that the required firmware is used.
Page 5

5
Under Services > Phone > Calling to ACS, select Enable ACS Call and enter Username and
Password. These credentials are later used when adding the device to AXIS Camera Station.
To trigger calls to AXIS Camera Station, it also requires that the Main Unit button or Keypad has a
user assigned to it. Go to Directory > Users. Enter a name that you prefer and enter vms:* in the
Phone Number field.
Page 6

6
Go to Hardware > Buttons > Quick Dial Buttons and add the user you have created above to the
Main Unit Buttons.
Now the device is ready to be added to AXIS Camera Station.
Page 7

7
In the example below, we add both the 2N IP Verso and 2N IP Force.
1. Go to Configuration > Devices > Add devices.
2. Select the device(s) you want to add and click Add.
3. Chose retention time, recording storage and recording method in the next step.
You can configure a specific sound to be used on an incoming call.
1. Go to Configuration > Client > Customize > Sound on incoming call.
2. Select Sound file and click Browse and navigate to a wav or mp3 file.
Page 8
8
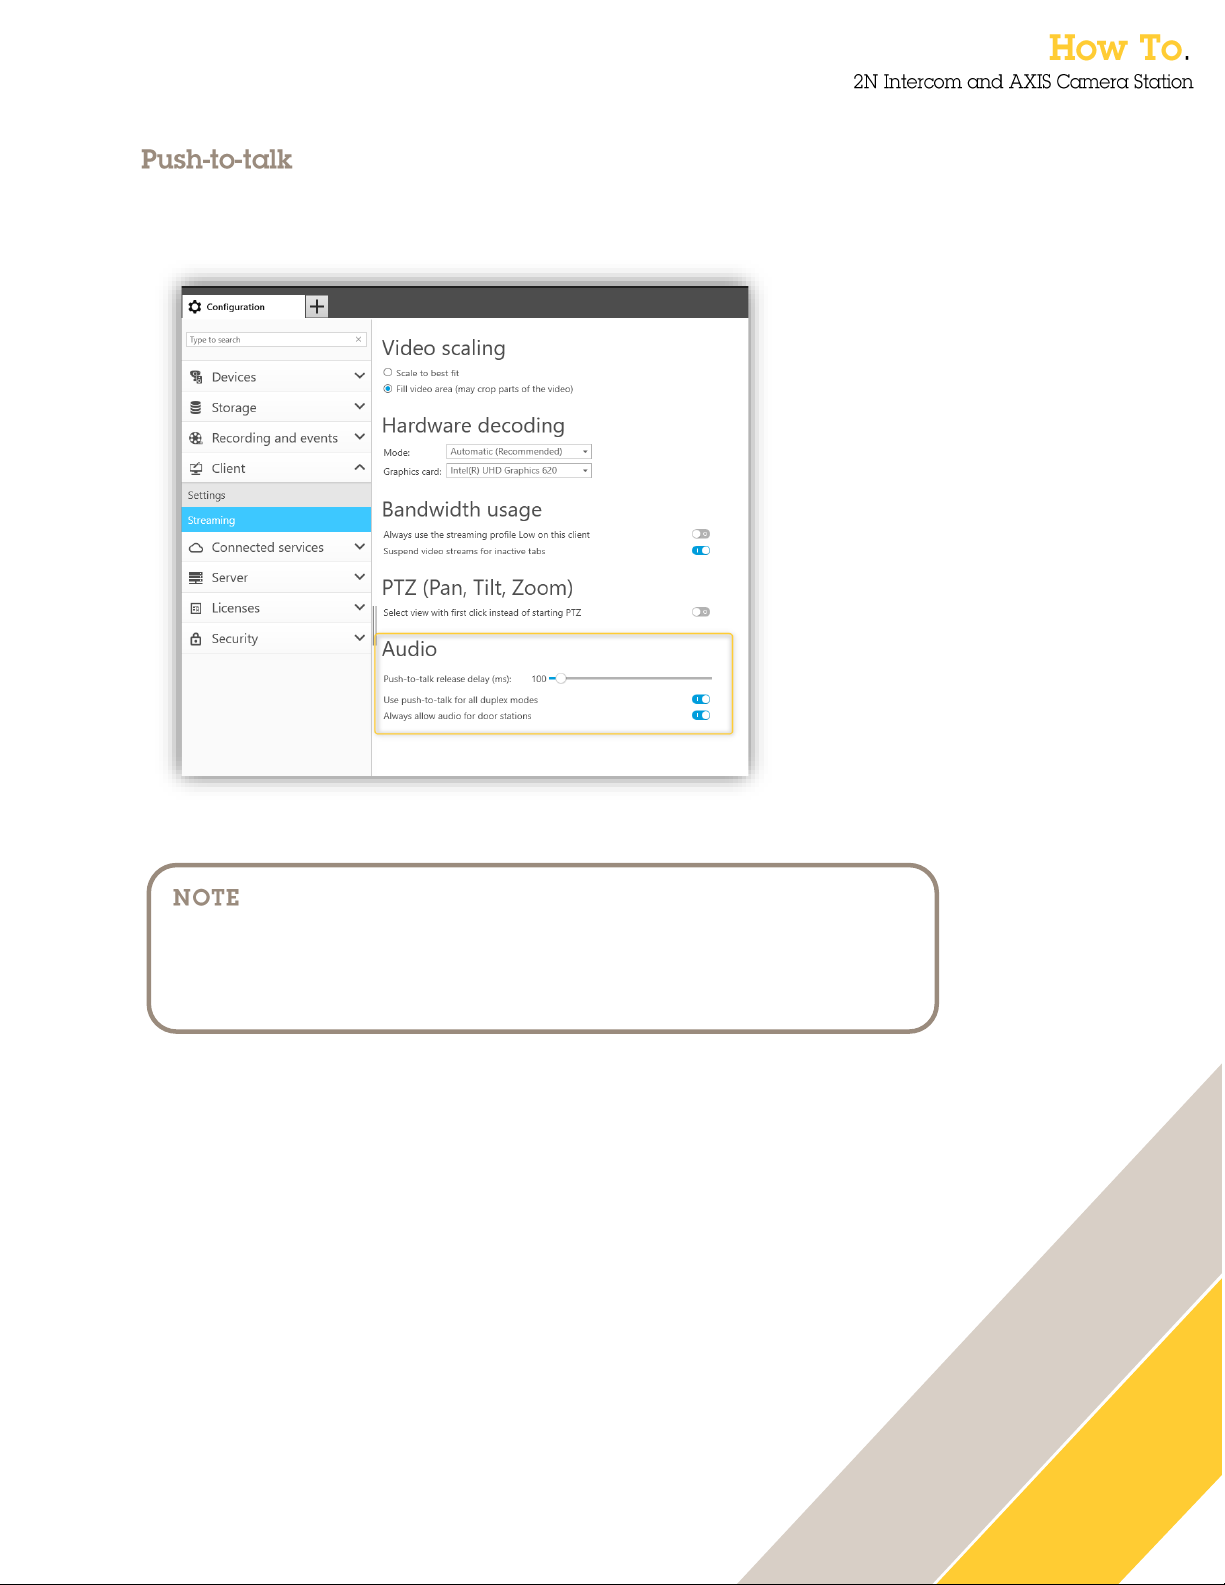
It is possible to add a push-to-talk button to all devices that support duplex.
To enable it for door stations, you need to select both Use push-to-talk for all duplex modes and
Always allow audio for door stations.
Both Sound on incoming call and Push-to-talk are
client settings and require to be done on each AXIS
Camera Station client separately.
Page 9

9
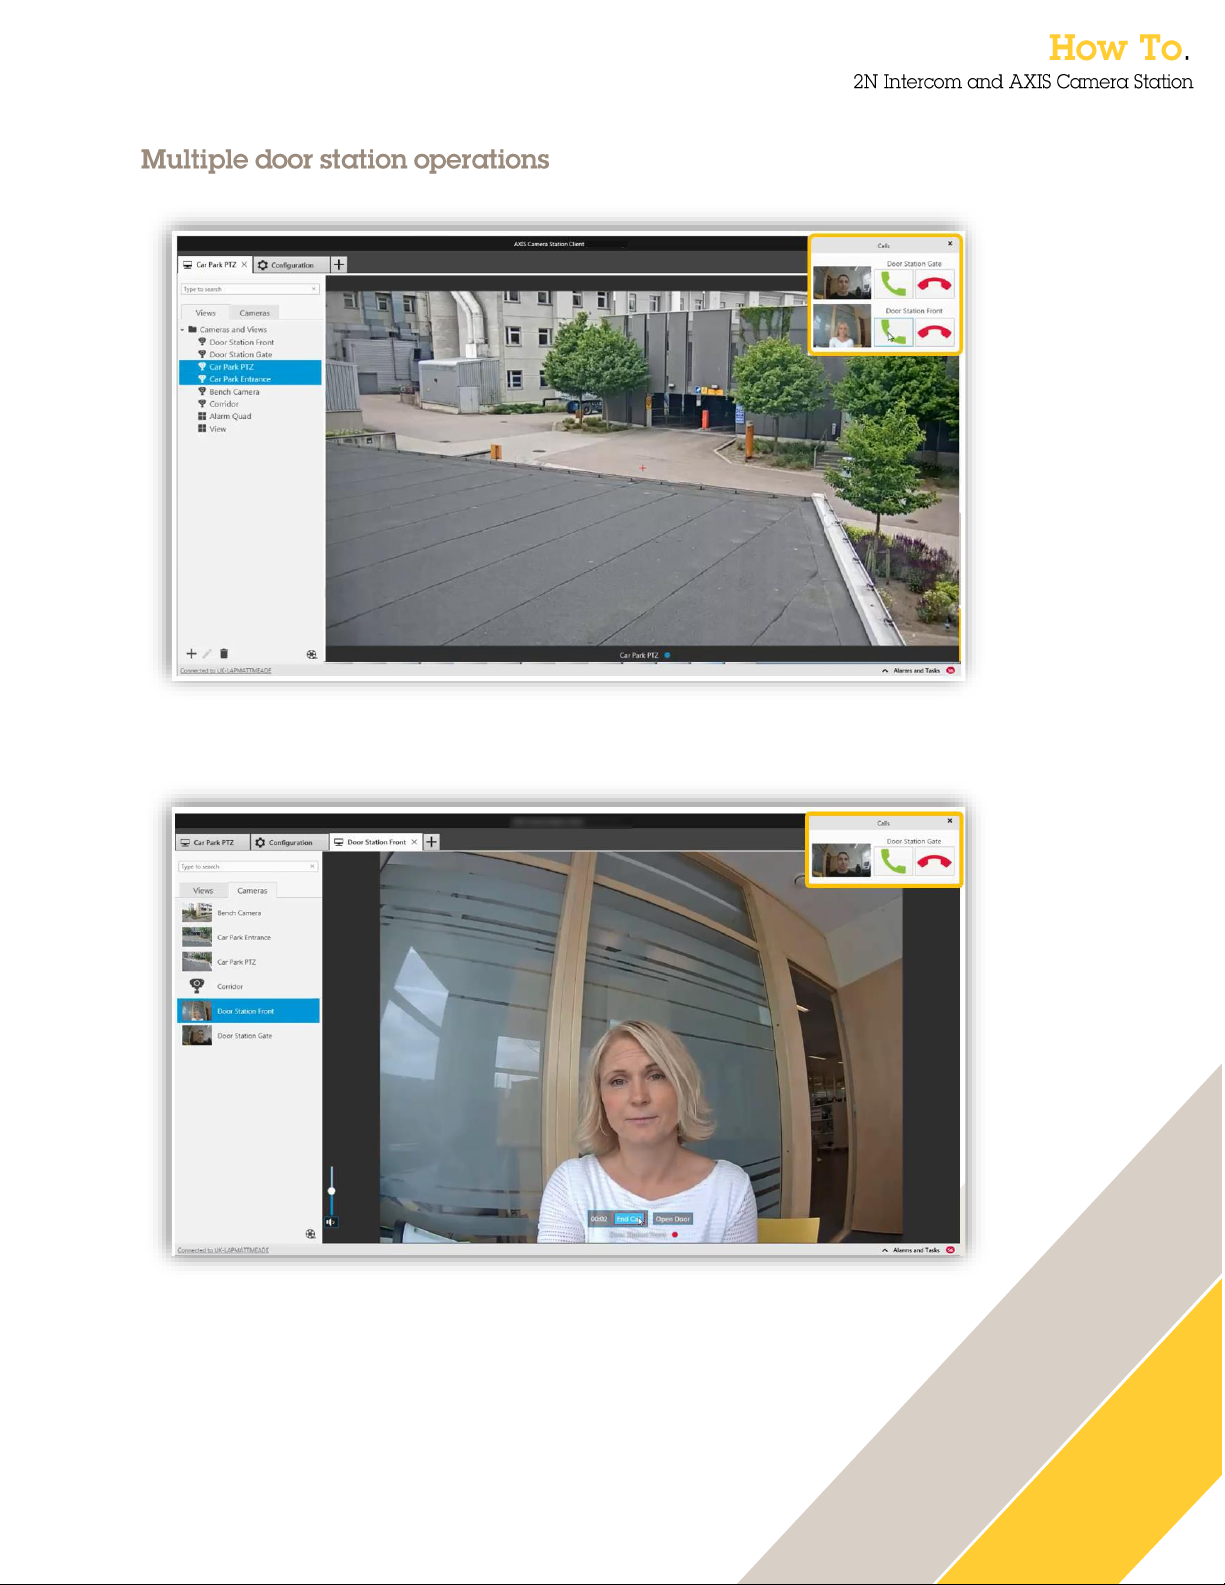
When a call is activated a pop-up window will appear in the top right corner.
You can hover your mouse on the thumb nail to see a larger image of the caller.
Press the Green icon to accept the call and the Red icon to decline the call.
If the call is accepted a new tab will be opened containing the view from the door station.
You can observe and communicate with the visitor. The Open door action button triggers the door
opening based on settings in the 2N IP intercom.
To finish the call, click the End Call icon, the door station tab will close and return you to your previous
view.
Page 10
10
If multiple calls occur, they will be stacked so that you can decide which call to take first.
You can connect to multiple calls at the same time, the video will be shown in different tabs but the
audio will be connected to all calls.
It is recommended to answer one call at a time. The additional calls will continue to be displayed until
they are answered, or they have timed out.
Page 11

11
In certain circumstances the door station pop ups are not desired. There are two methods to disable
the pop-up behavior.
• In the User permissions, remove audio from the user’s privileges.
Now the user will not receive the door station call pop ups but can access the live and
recorded video from the door station.
• In the User permissions, remove access to the device in the user’s privileges.
But note that the user will not be able to view the live or recorded video from the door station.
Page 12

12
When adding 2N Intercom to AXIS Camera Station two action rules are created. One for the Action
button that can open the door but also an action to record an ongoing call.
By default, the action is to activate the IO port in the 2N IP Intercom. This can be changed to for
example grant access on an AXIS Door Controller
The recording will be displayed as an event in the recording timeline.
In the Logs tab, you will find audit and event logs about who answered a call and if the door was
opened.
The number of seconds for Door IO port to be open needs
to be configured in 2N IP Intercom. Changing the value from
within AXIS Camera Station will have no effect.
Page 13

13
To receive door station calls to mobile app you need to enable AXIS Secure Remote Access.
Enter a valid MyAxis Account to your system and then select to enable AXIS Secure Remote Access.
Download the AXIS Camera Station mobile app from Google Play or Apple Store
Open the menu and select Remote Access and sign in with the same MyAxis account entered in
AXIS Camera Station.
Page 14

14
Once you have logged in to your system and approved microphone access the mobile app is ready to
receive calls and open door.
There are a few notification settings in the mobile app:
Door station calls.
In case you do not what to receive any call to this specific mobile phone you have the option to
disable the calls.
Missed call
Option to display if you have missed any previous calls.
When a call is answered by other device
Option to display if another user has answered the incoming call.
When an action rule is triggered to send mobile notification
Option to disable notifications for customized mobile app actions created in AXIS Camera Station
action rules.
Page 15

15
Go to Hardware > Camera > Internal Camera and select Motion Detection Enabled. Set sensitivity
thresholds and detection area (see 2N documentation for details). You can test the motion detection
function by observing the Activity Graph that shows when the motion detection event triggered.
Motion Detection requires 2N Intercom License:
Enhanced Video or Gold licenses
Page 16

16
In AXIS Camera Station you can set up different action rule events. Go to Configuration >
Recordings and Event > Action rules. To trigger on 2N devices create action rules with Device
Event as Trigger.
Select the 2N Intercom and the event VideoSource > MotionAlarm.
This event is tied to the MotionDetected event in the 2N device.
Select OK and then Next to add an action to record. You can add more than one action if you for
instance like to raise an alarm.
Page 17

17
Go to Hardware > Digital Inputs and set Assigned Input to an available tamper input.
Go to Configuration > Recordings and Event > Action rules. To trigger on 2N devices create
action rules with Device Event as Trigger.
NOTE
Note: Tamper function is available only if Tamper Switch
module is present in the device.
Page 18

18
Select the 2N Intercom device and the event Casing > CasingOpen.
This event is tied to TamperSwitchActivated event in the 2N device.
Select OK and then Next to add your action of interest. You can add more than one action if you for
instance like to raise an alarm.
Page 19

19
You can use any events from 2N Automation as triggers in AXIS Camera Station.
Go to Services > Automation and edit any available function by selecting the pencil icon.
Select the desired Event block from the Events section in the left-hand side menu.
Scroll down in the left-hand side bar and in the section Actions select SetOnvifVirtualInput block.
Configure the Action block with appropriate Port number and switching Level when the block is
triggered:
• hi for setting the input to logical 1
• lo for setting the input to logical 0
Connect the Event and Action blocks. Add and configure additional blocks as needed (see the 2N
Automation documentation if necessary).
Save the function and exit the Automation configuration. See the examples below.
Examples:
You can see a simple configuration for 10 s activation of virtual input 0 (1 in AXIS Camera Station)
when a code is entered.
You can see a simple configuration for activation of virtual input 1 (2 in AXIS Camera Station) when
noise is detected. Virtual input 1 deactivates when the noise is no longer detected.
NOTE
Automation requires 2N Intercom License:
Enhanced Integration or Gold Licenses.
2N and AXIS Camera Station use different indexing for
Virtual inputs. 0 in 2N is 1 in AXIS Camera Station
Page 20

20
Go to Configuration > Recordings and Event > Action rules. To trigger on 2N devices create
action rules with Device Event as Trigger.
Page 21

21
Select the 2N Intercom device and the event Input ports > Virtual input.
This event is tied to VirtualInput event in 2N devices.
Adjust Port number to a port that is used for your desired function (port numbers are indexed from 1
in AXIS Camera Station and from 0 in 2N devices). Adjust Active to Yes or No according to the
desired trigger activation.
Select OK and then Next to add your action of interest. You can add more than one action if you for
instance like to raise an alarm.
Page 22

22
▪
o
o
o
o
▪
▪
▪
▪
 Loading...