

Page 1

AXISA9161NetworkI/ORelayModule
UserManual
Page 2

AXISA9161NetworkI/ORelayModule
TableofContents
Safetyinformation..........................................3
Hazardlevels...................................................3
Othermessagelevels.............................................3
Hardwareoverview..........................................4
Howtoaccesstheproduct....................................5
Accessthedevice...............................................5
Howtoaccesstheproductfromtheinternet.........................5
Howtosettherootpassword.....................................5
TheDashboardPage.............................................5
Applications...............................................7
Applicationlicenses.............................................7
Howtouploadandstartanapplication.............................7
ApplicationConsiderations........................................7
Systemconguration........................................8
Conguration–StepbyStep......................................8
SelectaLanguage...............................................8
ConguretheHardware..........................................8
SettheDateandTime............................................9
ConguretheNetworkSettings....................................
MaintenanceInstructions.........................................
Scheduleconguration......................................12
EventConguration.........................................13
ViewtheEventLog..............................................13
SetUpActionRules.............................................13
Systemoptions.............................................16
Security.......................................................
Date&Time....................................................
Network.......................................................
Maintenance...................................................
Support.......................................................23
Advanced......................................................
Resettofactorydefaultsettings...................................24
Troubleshooting............................................25
Howtocheckthecurrentrmware.................................
Howtoupgradethermware.....................................25
EmergencyRecoveryProcedure....................................25
Symptoms,possiblecausesandremedialactions......................25
Specications..............................................27
LEDindicators..................................................
Buttons.......................................................
Connectors....................................................
ConnectionDiagrams............................................31
10
11
16
18
18
23
24
25
27
28
28
2
Page 3

AXISA9161NetworkI/ORelayModule
Safetyinformation
Safetyinformation
Hazardlevels
DANGER
Indicatesahazardoussituationwhich,ifnotavoided,willresultindeathorseriousinjury .
WARNING
Indicatesahazardoussituationwhich,ifnotavoided,couldresultindeathorseriousinjury.
CAUTION
Indicatesahazardoussituationwhich,ifnotavoided,couldresultinminorormoderateinjury.
NO
TICE
NO NO
TICE TICE
Indicatesasituationwhich,ifnotavoided,couldresultindamagetoproperty.
Othermessagelevels
Important
Indicatessignicantinformationwhichisessentialfortheproducttofunctioncorrectly.
Note
Indicatesusefulinformationwhichhelpsingettingthemostoutoftheproduct.
3
Page 4
AXISA9161NetworkI/ORelayModule
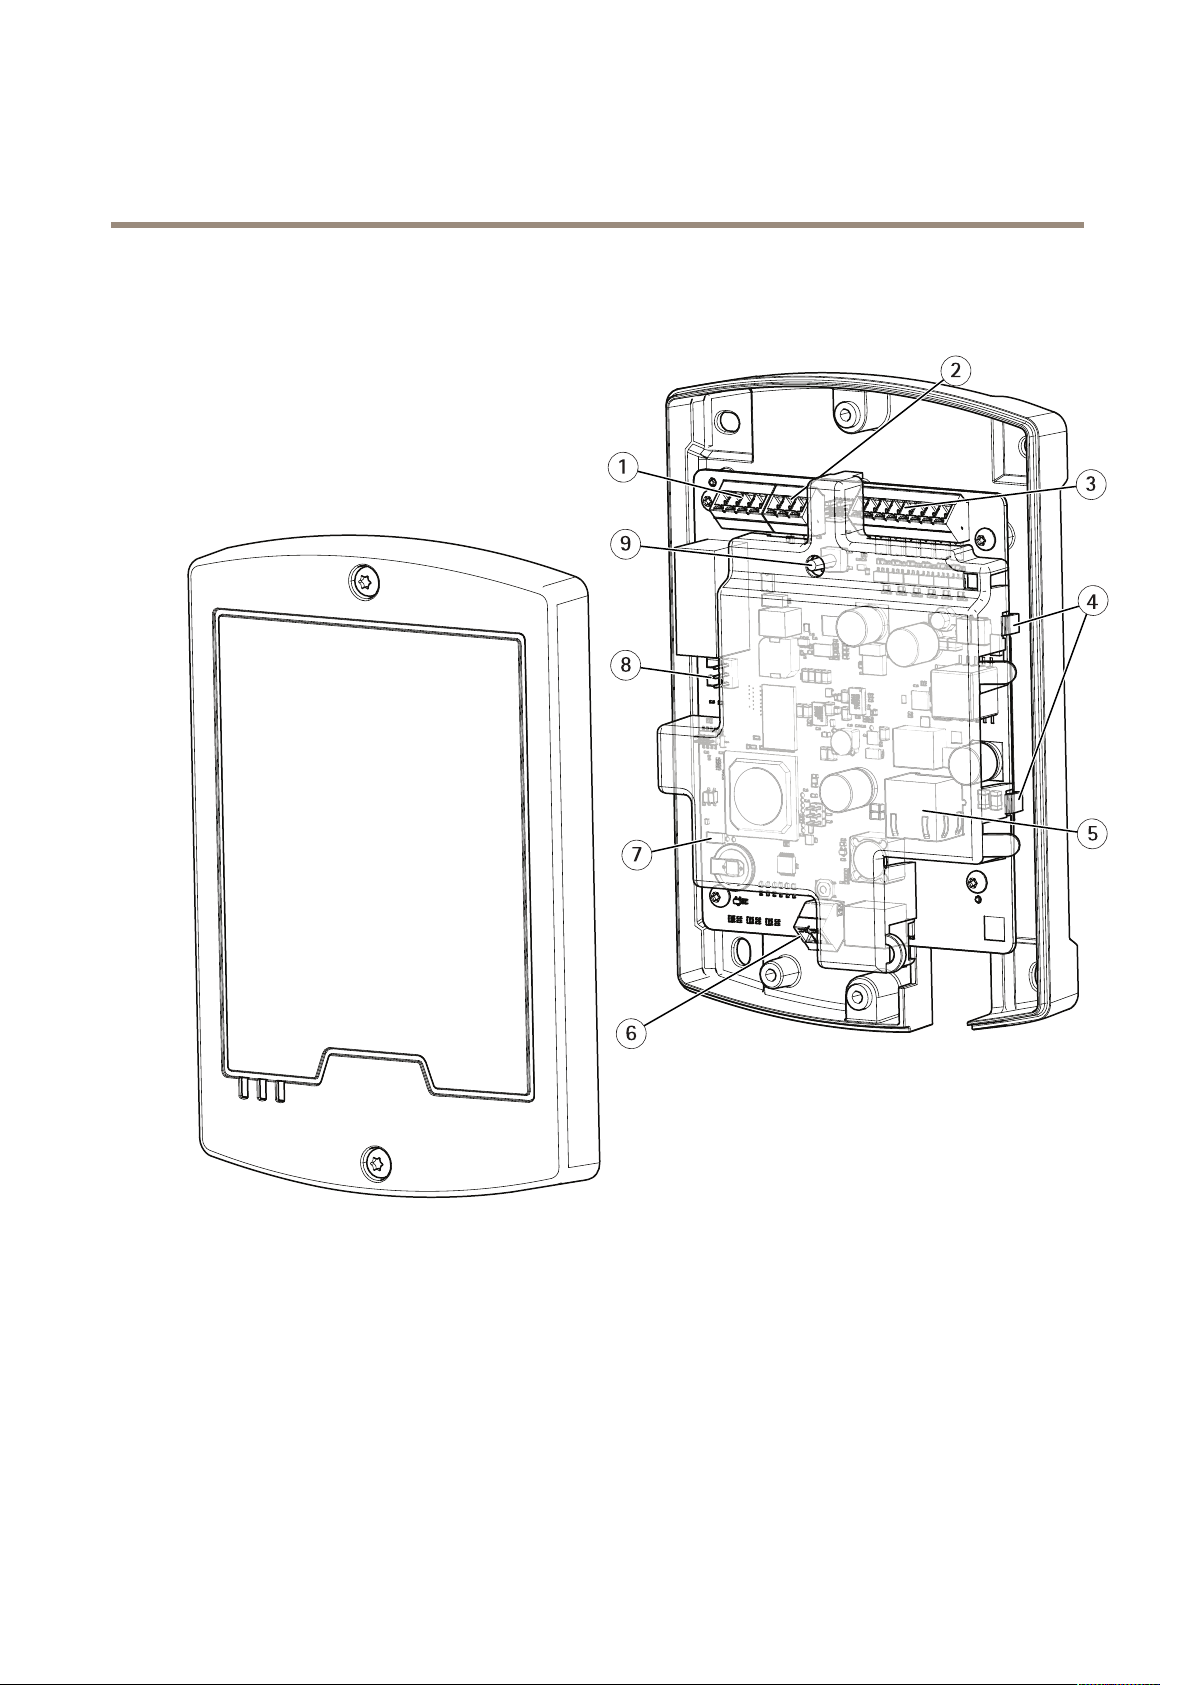
Hardwareoverview
Hardwareoverview
1
Relayconnector
2
12/24Vpowerconnector(DCOUT)
3
SupervisedI/Oandpowerconnector(DCOUT)
4
Cableclips
5
Networkconnector(PoE)
6
Powerconnector(DCIN)
7
Tamperingalarmbypassjumper
8
Relayjumper
9
Controlbutton
Forinformationabouttheproduct’sLEDindicators,seeLEDindicatorsonpage27.
4
Page 5

AXISA9161NetworkI/ORelayModule
Howtoaccesstheproduct
Howtoaccesstheproduct
ToinstalltheAxisproduct,seetheInstallationGuidesuppliedwiththeproduct.
Accessthedevice
1.OpenabrowserandentertheIPaddressorhostnameoftheAxisdevice.
2.Entertheusernameandpassword.Ifyouaccessthedeviceforthersttime,youmustsettherootpassword.SeeHowto
settherootpasswordonpage5.
3.AXISI/OManageropensinyourbrowser.ThestartpageiscalledtheDashboard.
Howtoaccesstheproductfromtheinternet
Anetworkrouterallowsproductsonaprivatenetwork(LAN)toshareasingleconnectiontotheinternet.Thisisdonebyforwarding
networktrafcfromtheprivatenetworktotheinternet.
Mostroutersarepre-conguredtostopattemptstoaccesstheprivatenetwork(LAN)fromthepublicnetwork(internet).
IftheAxisproductislocatedonanintranet(LAN)andyouwanttomakeitavailablefromtheother(WAN)sideofaNAT(Network
AddressTranslator)router,turnonNATtraversal.WithNATtraversalproperlycongured,allHTTPtrafctoanexternalHTTPport
intheNATrouterisforwardedtotheproduct.
HowtoturnontheNAT-traversalfeature
•GotoPreferences>AdditionalDeviceConguration>SystemOptions>Network>TCP/IP>Advanced.
•ClickEnable.
•ManuallycongureyourNATroutertoallowaccessfromtheinternet.
SeealsoAXISInternetDynamicDNSServiceatwww.axiscam.net
Note
•Inthiscontext,a“router”referstoanynetworkroutingdevicesuchasaNATrouter,networkrouter,internetgateway,
broadbandrouter,broadbandsharingdevice,orasoftwaresuchasarewall.
•ForNATtraversaltowork,NATtraversalmustbesupportedbytherouter.TheroutermustalsosupportUPnP
®
.
Howtosettherootpassword
ToaccesstheAxisproduct,youmustsetthepasswordforthedefaultadministratoruserroot.ThisisdoneintheCongureRoot
Passworddialog,whichopenswhentheproductisaccessedforthersttime.
Topreventnetworkeavesdropping,therootpasswordcanbesetviaanencryptedHTTPSconnection,whichrequiresanHTTPS
certicate.HTTPS(HypertextTransferProtocoloverSSL)isaprotocolusedtoencrypttrafcbetweenwebbrowsersandservers.The
HTTPScerticateensuresencryptedexchangeofinformation.SeeHTTPSonpage16.
Thedefaultadministratorusernamerootispermanentandcannotbedeleted.Ifthepasswordforrootislost,theproductmustbe
resettothefactorydefaultsettings.SeeResettofactorydefaultsettingsonpage24.
Tosetthepassword,enteritdirectlyinthedialog.
TheDashboardPage
ThedashboardpageinAXISNetworkIOmoduleisthestartscreenthatshowsinformationabouttheIOsandrelays.ClickoneachIO
orrelayrowtoexpandformoresettings.FromthispageyoucannavigatetoSchedules,EventlogandPreferences.
5
Page 6

AXISA9161NetworkI/ORelayModule
Howtoaccesstheproduct
Toreturntothedashboardpageromtheproduct’sotherwebpages,clickDashboardinthemenubar.
6
Page 7

AXISA9161NetworkI/ORelayModule
Applications
Applications
AXISCameraApplicationPlatform(ACAP)isanopenplatformthatenablesthirdpartiestodevelopanalyticsandotherapplications
forAxisproducts.Tondoutmoreaboutavailableapplications,downloads,trialsandlicenses,gotoaxis.com/applications.
TondtheusermanualsforAxisapplications,gotoaxis.com.
Applicationlicenses
Someapplicationsneedalicensetorun.Licensescanbeinstalledintwoways:
•Automaticinstallation—requiresaccesstotheInternet
•Manualinstallation—obtainthelicensekeyfromtheapplicationvendoranduploadthekeytotheAxisproduct
Torequestalicense,theAxisproductserialnumber(S/N)isrequired.Theserialnumbercanbefoundontheproductlabelandunder
Preferences>Additionaldeviceconguration>SystemOptions>Support>SupportOverview.
Howtouploadandstartanapplication
Touploadandstartanapplication:
1.GotoPreferences>Additionaldeviceconguration>Applications.
2.UnderUploadApplication,clickBrowse.LocatetheapplicationleandclickUploadPackage.
3.Installthelicense(ifapplicable).Forinstructions,seethedocumentationprovidedbytheapplicationvendor.
4.Starttheapplication.GotoApplications,selecttheapplicationinthelistofinstalledapplicationsandclickStart.
5.Conguretheapplication.Forinstructions,seethedocumentationprovidedbytheapplicationvendor.
Note
•Applicationscanbeuploadedbyproductadministrators.
•ApplicationsandlicensescanbeinstalledonmultipleproductsatthesametimeusingAXISCameraManagement,version
3.10andlater.
Togeneratealoglefortheapplication,gotoApplications.SelecttheapplicationandclickLog.
ApplicationConsiderations
Ifanapplicationisupgraded,applicationsettings,includingthelicense,willberemoved.Thelicensemustbereinstalledand
theapplicationrecongured.
IftheAxisproduct’srmwareisupgraded,uploadedapplicationsandtheirsettingswillremainunchanged,althoughthisisnot
guaranteedbyAxisCommunications.Notethattheapplicationmustbesupportedbythenewrmware.Forinformationabout
rmwareupgrades,seeHowtoupgradethermwareonpage25.
IftheAxisproductisrestarted,runningapplicationswillrestartautomatically.
IftheAxisproductisrestoredorresettofactorydefault,uploadedapplicationsandtheirsettingsareremoved.Forinformation
aboutrestoringtheAxisproduct,seeMaintenanceonpage23.Forinformationaboutfactorydefault,seeResettofactorydefault
settingsonpage24.
7
Page 8

AXISA9161NetworkI/ORelayModule
Systemconfiguration
Systemconfiguration
Toopentheproduct’sSetuppages,clickPreferences>AdditionaldevicecongurationintheDashboardpage.
TheAxisproductcanbeconguredbyadministrators.Formoreinformationaboutusersandadministrators,seepage16.
Conguration–StepbyStep
BeforeyoustartusingyourAXISNetworkIORelayModule,youshouldcompletethefollowingsetupsteps:
1.IfEnglishisnotyourrstlanguage,youmaywantAXISNetworkIORelayModuletouseadifferentlanguage.Seepage8.
2.Congurethemoduleandconnecteddevices.Seepage8.
3.Setthedateandtime.Seepage9.
4.Congurethenetworksettings.Seepage10.
Forinformationaboutmaintenancerecommendations,seepage1 1.
SelectaLanguage
ThedefaultlanguageofAXISNetworkIORelayModuleisEnglish,butyoucanswitchtoanyofthelanguagesthatareincludedinthe
product’srmware.Forinformationaboutthelatestavailablermware,seewww .axis.com
Youcanswitchlanguagesinanyoftheproduct’swebpages.
Toswitchlanguages,clickthelanguagedrop-downlist
displayedintheselectedlanguage.
Note
•Whenyouswitchlanguages,thedateformatalsochangestoaformatcommonlyusedintheselectedlanguage.The
correctformatisdisplayedinthedataelds.
•IfyouresettheproducttofactorydefaultsettingsthelanguageswitchesbacktoEnglish.
•Ifyourestoretheproduct,itwillcontinuetousetheselectedlanguage.
•Ifyourestarttheproduct,itwillcontinuetousetheselectedlanguage.
•Ifyouupgradethermware,itwillcontinuetousetheselectedlanguage.
andselectalanguage.Alltheproduct’swebpagesandhelppagesare
ConguretheHardware
Beforeyoucanmanagetheconnecteddevices,thehardwaremustbeconguredintheDashboardpage.
DevicescanbeconnectedtotheAxisproductbeforecompletingthehardwareconguration.However,theconnectionofdevices
willbeeasierifyoucompletethehardwarecongurationrst.Thisisbecausethehardwarepinchartwillbeavailablewhenthe
congurationiscomplete.Thehardwarepinchartisaguideonhowtowirethehardwareandcanbeusedasareferencesheet
formaintenance.Formaintenanceinstructions,seepage11
ConguretheIOs
IntheDashboardpageyoucanmakevariouschangesandsettingsfortheIOs.
•ClickonanIOrowtoexpandandmaketheoptionavailable.
•ClickChangestatetosettheIOActiveorInactive(foroutputonly)
•ClickSettingstochangename,type,activestateandschedulefortheIOs.
8
Page 9

AXISA9161NetworkI/ORelayModule
Systemconfiguration
-ChooseDigitaloutputorDigitalinputdependingonyoursystemsetup.
-ChooseSupervisedinputtoreportonthestatusoftheconnectionbetweenthenetworkIOmanangerconnected
devices.Iftheconnectionisinterrupted,aneventisactivated.Usingsupervisedinputrequiresexternalcircuitry,
seeSupervisedinputsonpage31.
-ChooseActivestateGroundedcircuitorOpencircuitdependingonyoursystemsetup.
-SelectascheduletousewhenDigitalOutputischosen.
Note
Youcanmakethescheduleafallbackschedule.Iftheproductnormallyusesanotherschedulethroughits
connectiontoanotherdevice(forexample,AXISA1001)butthatconnectionislost,theproductwillusethe
fallbackscheduleinstead.
•ClickSaveorCanceltonish.
ConguretheRelays
IntheDashboardpageyoucanmakevariouschangesandsettingsfortherelays
•ClickonanRelayrowtoexpandandmaketheoptionsavailable.
•ClickChangestatetosettherelayActiveorInactive
•ClickSettingstochangenameandschedulefortherelay.
-Selectascheduletouse.
Note
Youcanmakethescheduleafallbackschedule.Iftheproductnormallyusesanotherschedulethroughits
connectiontoanotherdevice(forexample,AXISA1001)butthatconnectionislost,theproductwillusethe
fallbackscheduleinstead.
•ClickSaveorCanceltonish.
Howtousesupervisedinputs
Choosesupervisedinputtomonitorstatusofthecableconnections,switchesandotherdevices.Iftheconnectionisinterrupted,
aneventisactivated.
Tousesupervisedinputs:
1.Installendoflineresistorsonalltheusedsupervisedinputs.Seetheconnectiondiagramonpage31.
2.GotoDashboard>IOs>SettingsandselectSupervisedinputs.
SettheDateandTime
TosetthedateandtimeoftheAxisproduct,fromtheDashboardgotoPreferences>Additionaldeviceconguration>System
Options>Date&Time.
Youcansetthedateandtimeinthefollowingways:
•Getthedateandtimefromanetworktimeprotocol(NTP)server.Seepage10
•Setthedateandtimemanually.Seepage10.
•Getthedateandtimefromthecomputer.Seepage10.
9
Page 10

AXISA9161NetworkI/ORelayModule
Systemconfiguration
GettheDateandTimefromaNetworkTimeProtocol(NTP)Server
1.GotoPreferences>Additionaldeviceconguration>SystemOptions>Date&Time.
2.SelectyourTimezonefromthedrop-downlist.
3.Ifdaylightsavingtimeisusedinyourregion,selectAdjustfordaylightsaving.
4.SelectSynchronizewithNTP.
5.SelectthedefaultDHCPaddressorentertheaddressofaNTPserver.
6.ClickSave.
WhensynchronizingwithanNTPserver,dateandtimeareupdatedcontinuouslybecausethedataispushedfromtheNTPserver.For
informationaboutNTPsettings,seeNTPCongurationonpage20.
IfyouuseahostnamefortheNTPserver,aDNSservermustbecongured.SeeDNSCongurationonpage20.
SettheDateandTimeManually
1.GotoPreferences>Additionaldeviceconguration>SystemOptions>Date&Time.
2.Ifdaylightsavingtimeisusedinyourregion,selectAdjustfordaylightsaving.
3.SelectSetdate&timemanually.
4.Enterthedesireddateandtime.
5.ClickSave.
Whensettingthedate&timemanually,dateandtimearesetonceandwillnotbeupdatedautomatically.Thismeansthatifthe
dateortimeneedstobeupdated,thechangesmustbemademanuallybecausethereisnoconnectiontoanexternalNTPserver.
GettheDateandTimefromtheComputer
1.GotoPreferences>Additionaldeviceconguration>BasicSetup>Date&Time.
2.Ifdaylightsavingtimeisusedinyourregion,selectAdjustfordaylightsaving.
3.SelectSetdate&timemanually.
4.ClickSyncnowandsave.
Whenusingthecomputertime,dateandtimearesynchronizedwiththecomputertimeonceandwillnotbeupdatedautomatically.
Thismeansthatifyouchangethedateortimeonthecomputeryouusetomanagethesystem,youshouldsynchronizeagain.
ConguretheNetworkSettings
Tocongurethebasicnetworksettings,gotoPreferences>Additionaldeviceconguration>SystemOptions>SystemOptions
>Network>TCP/IP>Basic.
Formoreinformationaboutnetworksettings,seeNetworkonpage18.
BasicTCP/IPSettings
TheAxisproductsupportsIPversion4(IPv4).
TheAxisproductcangetanIPv4addressinthefollowingways:
•DynamicIPaddress–ObtainIPaddressviaDHCPisselectedbydefault.ThismeansthattheAxisproductissettoget
theIPaddressautomaticallyviaDynamicHostCongurationProtocol(DHCP).
10
Page 11

AXISA9161NetworkI/ORelayModule
Systemconfiguration
DHCPallowsnetworkadministratorstocentrallymanageandautomatetheassignmentofIPaddresses.
•StaticIPaddress–TouseastaticIPaddress,selectUsethefollowingIPaddressandspecifytheIPaddress,subnetmask
anddefaultrouter.ThenclickSave.
DHCPshouldonlybeenabledwhenusingdynamicIPaddressnotication,oriftheDHCPcanupdateaDNSserverthatmakes
itpossibletoaccesstheAxisproductbyname(hostname).
IfDHCPisenabledandtheproductcannotbeaccessed,runAXISIPUtilitytosearchthenetworkforconnectedAxisproducts,or
resettheproducttothefactorydefaultsettingsandthenperformtheinstallationagain.Forinformationabouthowtoresetto
factorydefault,seepage24.
MaintenanceInstructions
TokeepthenetworkI/Omodulerunningsmoothly,AxisrecommendsregularmaintenanceofthenetworkI/Omoduleandconnected
devices.
Domaintenanceatleastonceayear.Thesuggestedmaintenanceprocedureincludes,butisnotlimitedto,thefollowingsteps:
•MakesurealltheconnectionsbetweennetworkI/Omoduleandtheexternaldevicesaresecure.
•Verifyallthehardwareconnections.Thisrequiresaccesstotheproduct’swebpages.
Iftheresultsfromanyofthestepsaboveindicatefaultsorunexpectedbehavior:
-Testthesignalsofthewiresusingappropriateequipmentandcheckifthewiresorcablesaredamaged
inanyway.
-Replacealldamagedorfaultycablesandwires.
-Oncethecablesandwireshavebeenreplaced,verifyallthehardwareconnectionsagain.Thisrequiresaccessto
theproduct’swebpages.
Forinformationaboutmaintenanceofthebattery,seeInstallationGuide.
11
Page 12

AXISA9161NetworkI/ORelayModule
Scheduleconfiguration
Scheduleconfiguration
Useschedulestocontroltheactivetimesfortherelaysanddigitaloutputports.GotoSchedulestoviewandeditexistingschedules
andcreatenewones.
Viewpredenedscheduleslistedinthedropdownmenu:
•Always
•Ofcehours
•Weekends
•Afterhours
ToeditthenameoftheviewedscheduleclickEditschedule
Toeditthestartandendtimesclickonthecalender.Chooseifyouwantweeklyrecurrence
TocreateanewscheduleclickNewschedule
•EnteranameandclickSave
•Click,holdanddraginthecalendertochooseactivestartandendtimes.
Important
Ifyouwanttodeleteaschedulethat’sinuseandwascreatedinAXISA1001NetworkDoorController,makesureyoudelete
itfromthisdevicebeforeyoudeleteitinthedoorcontroller.
12
Page 13

AXISA9161NetworkI/ORelayModule
EventConfiguration
EventConfiguration
Eventsthatoccurinthesystem,forexamplewhenanIOportorrelayisactivated,areloggedintheeventlog.Eventscanbe
conguredtotriggeralarms.
•Viewtheeventlog.Seepage13.
ViewtheEventLog
Toviewloggedevents,gotoDashboard>EventLog.
Applyinglterstotheeventlogmakesiteasiertondspecicevents.Tolterthelist,selectoneorseveraleventloglters
andusethetwodropdownmenus.
Youcannarrowthescopeoftheeventlogbyselectingoneorseveralofthefollowinglters:
•Relayoutputport–Filteroneventsthatrelatestotherelayport.Chooseaspecicrelaywiththesecondarydrop
downmenu.
•Schedulewastriggered–Filteronschedules.Chooseaspecicschedulewiththesecondarydropdownmenu.
•RecurringUserAlarmwastriggered.
•Port–FilteroneventsthatrelatestotheIOport.ChooseaspecicIOportwiththesecondarydropdownmenu.
•Digitalinputport.
•Systemready.
•Virtualport.
•Virtualinputport.
•Devicelostnetwork.
•Devicecasingopened.
•Periodheartbeatfromcontroller.
SetUpActionRules
TheEventpagesallowyoutoconguretheAxisproducttoperformactionswhendifferenteventsoccur.Forexample,theproduct
cansendanemailnoticationoractivateanoutputportwhenanalarmistriggered.Thesetofconditionsthatdeneshowand
whentheactionistriggerediscalledanactionrule.Ifmultipleconditionsaredened,allofthemmustbemettotriggertheaction.
Formoreinformationaboutavailabletriggersandactions,seeandActionsonpage14.
Thefollowingexampledescribeshowtosetupanactionruletosendanemailnoticationwhenanalarmistriggered.
1.GotoPreferences>Additionaldeviceconguration>Events>ActionRules.
2.SelectAddandenteradescriptivenamefortherule.
3.SelectEventLoggerfromtheTriggerdrop-downlist.
4.Optionally,selectaScheduleandAdditionalconditions.Seebelow.
5.UnderActions,selectSendNoticationfromtheTypedrop-downlist.
6.Selectanemailrecipientfromthedrop-downlist.SeeHowtoaddrecipientsonpage14.
Thefollowingexampledescribeshowtosetupanactionruletoactivateanoutputportwhenthedoorisforcedopen.
13
Page 14

AXISA9161NetworkI/ORelayModule
EventConfiguration
Formoreinformation,seetheonlinehelp.
Triggers
Availableactionruletriggersandconditionsinclude:
•Eventlogger
•Hardware
•Inputsignal
•Schedule
•System
•Time
Formoreinformation,seetheonlinehelp
.
Actions
Youcancongureseveralactions:
•OutputPort–ActivateanI/Oporttocontrolanexternaldevice.
•SendNotication–Sendanoticationmessagetoarecipient.
•SendSNMPTrap–SendanSNMPtrapmessagetotheoperator.MakesurethatSNMPisenabledandcongured
underSystemOptions>Network>SNMP.
•StatusLED–FlashtheLEDindicator.Thiscanforexamplebeusedtovalidatetriggerssuchasmotiondetectionduring
productinstallationandconguration.
Howtoaddrecipients
Theproductcansendmessagestonotifyrecipientsabouteventsandalarms.Butbeforetheproductcansendnoticationmessages,
youmustdeneoneormorerecipients.Forinformationaboutavailableoptions,seeRecipienttypesonpage14.
Toaddarecipient:
1.GotoSetup>AdditionalControllerConguration>Events>RecipientsandclickAdd.
2.Enteradescriptivename.
3.SelectarecipientType.
4.Entertheinformationneededfortherecipienttype.
5.ClickTesttotesttheconnectiontotherecipient.
6.ClickOK.
Recipienttypes
Thefollowingrecipienttypesareavailable:
HTTP
HTTPS
Email
14
Page 15

AXISA9161NetworkI/ORelayModule
EventConfiguration
TCP
Howtosetupemailrecipients
Emailrecipientscanbeconguredbyselectingoneofthelistedemailproviders,orbyspecifyingtheSMTPserver,portand
authenticationusedby,forexample,acorporateemailserver.
Note
Someemailprovidershavesecurityltersthatpreventusersfromreceivingorviewinglargeattachments,fromreceiving
scheduledemailsandsimilar .Checktheemailprovider’ssecuritypolicytoavoiddeliveryproblemsandlockedemailaccounts.
Tosetupanemailrecipientusingoneofthelistedproviders:
1.GotoEvents>RecipientsandclickAdd.
2.EnteraNameandselectEmailfromtheTypelist.
3.EntertheemailaddressestosendemailstointheToeld.Usecommastoseparatemultipleaddresses.
4.SelecttheemailproviderfromtheProviderlist.
5.EntertheuserIDandpasswordfortheemailaccount.
6.ClickTesttosendatestemail.
Tosetupanemailrecipientusingforexampleacorporateemailserver,followtheinstructionsabovebutselectUserdenedas
Provider.EntertheemailaddresstoappearassenderintheFromeld.SelectAdvancedsettingsandspecifytheSMTPserver
address,portandauthenticationmethod.Optionally ,selectUseencryptiontosendemailsoveranencryptedconnection.Theserver
certicatecanbevalidatedusingthecerticatesavailableintheAxisproduct.Forinformationonhowtouploadcerticates,
seeCerticatesonpage17.
Howtosetuprecurrences
Recurrencesareusedtotriggeractionrulesrepeatedly,forexampleevery5minutesoreveryhour.
Tosetuparecurrence:
1.GotoPreferences>AdditionalDeviceConguration>Events>RecurrencesandclickAdd.
2.Enteradescriptivenameandrecurrencepattern.
3.ClickOK.
Tousetherecurrenceinanactionrule,rstselectTimefromtheTriggerdrop-downlistintheActionRuleSetuppageandthen
selecttherecurrencefromtheseconddrop-downlist.
Tomodifyorremoverecurrences,selecttherecurrenceintheRecurrencesListandclickModifyorRemove.
15
Page 16

AXISA9161NetworkI/ORelayModule
Systemoptions
Systemoptions
Security
Users
UseraccesscontrolisenabledbydefaultandcanbeconguredunderPreferences>AdditionalDeviceConguration>System
Options>Security>Users.Anadministratorcansetupotherusersbygivingthemusernamesandpasswords.
Theuserlistdisplaysauthorizedusersandusergroups(accesslevels):
•Administratorshaveunrestrictedaccesstoallsettings.Theadministratorcanadd,modifyandremoveotherusers.
Note
NotethatwhentheoptionEncrypted&unencryptedisselected,thewebserverwillencryptthepassword.Thisisthedefault
optionforanewunitoraunitresettofactorydefaultsettings.
UnderHTTP/RTSPPasswordSettings,selectthetypeofpasswordtoallow.Youmayneedtoallowunencryptedpasswordsifthereare
viewingclientsthatdonotsupportencryption,orifyouupgradedthermwareandexistingclientssupportencryptionbutneed
tologinagainandbeconguredtousethisfunctionality.
ONVIF
ONVIFisanopenindustryforumthatprovidesandpromotesstandardizedinterfacesforeffectiveinteroperabilityofIP-based
physicalsecurityproducts.
BycreatingauseryouautomaticallyenableONVIFcommunication.UsetheusernameandpasswordwithallONVIFcommunication
withtheproduct.Formoreinformationseewww.onvif.org
IPAddressFilter
IPaddresslteringisenabledonthePreferences>AdditionalDeviceConguration>SystemOptions>Security>IPAddress
Filterpage.Onceenabled,thelistedIPaddressareallowedordeniedaccesstotheAxisproduct.SelectAlloworDenyfromthelist
andclickApplytoenableIPaddressltering.
Theadministratorcanaddupto256IPaddressentriestothelist(asingleentrycancontainmultipleIPaddresses).
HTTPS
HTTPS(HyperTextTransferProtocoloverSecureSocketLayer,orHTTPoverSSL)isawebprotocolprovidingencryptedbrowsing.
HTTPScanalsobeusedbyusersandclientstoverifythatthecorrectdeviceisbeingaccessed.Thesecuritylevelprovidedby
HTTPSisconsideredadequateformostcommercialexchanges.
TouseHTTPS,anHTTPScerticatemustrstbeinstalled.GotoPreferences>AdditionalDeviceConguration>SystemOptions>
Security>Certicatestoinstallandmanagecerticates.SeeCerticatesonpage17.
ToenableHTTPSontheAxisproduct:
1.GotoPreferences>AdditionalDeviceConguration>SystemOptions>Security>HTTPS
2.SelectanHTTPScerticatefromthelistofinstalledcerticates.
3.Optionally,clickCiphersandselecttheencryptionalgorithmstouseforSSL.
4.SettheHTTPSConnectionPolicyforthedifferentusergroups.
5.ClickSavetoenablethesettings.
ToaccesstheAxisproductviathedesiredprotocol,intheaddresseldinabrowser,enterhttps://fortheHTTPSprotocol
andhttp://fortheHTTPprotocol.
16
Page 17

AXISA9161NetworkI/ORelayModule
Systemoptions
TheHTTPSportcanbechangedontheSystemOptions>Network>TCP/IP>Advancedpage.
IEEE802.1X
IEEE802.1Xisastandardforport-basedNetworkAdmissionControlprovidingsecureauthenticationofwiredandwirelessnetwork
devices.IEEE802.1XisbasedonEAP(ExtensibleAuthenticationProtocol).
ToaccessanetworkprotectedbyIEEE802.1X,devicesmustbeauthenticated.Theauthenticationisperformedbyanauthentication
server,typicallyaRADIUSserver,examplesofwhichareFreeRADIUSandMicrosoftInternetAuthenticationService.
InAxisimplementation,theAxisproductandtheauthenticationserveridentifythemselveswithdigitalcerticatesusingEAP-TLS
(ExtensibleAuthenticationProtocol-TransportLayerSecurity).ThecerticatesareprovidedbyaCerticationAuthority(CA).
Youneed:
•aCAcerticatetoauthenticatetheauthenticationserver.
•aCA-signedclientcerticatetoauthenticatetheAxisproduct.
Tocreateandinstallcerticates,gotoPreferences>AdditionalDeviceConguration>SystemOptions>Security>Certicates.
SeeCerticatesonpage17.
ToallowtheproducttoaccessanetworkprotectedbyIEEE802.1X:
1.GotoPreferences>AdditionalDeviceConguration>SystemOptions>Security>IEEE802.1X.
2.SelectaCACerticateandaClientCerticatefromthelistsofinstalledcerticates.
3.UnderSettings,selecttheEAPOLversionandprovidetheEAPidentityassociatedwiththeclientcerticate.
4.ChecktheboxtoenableIEEE802.1XandclickSave.
Note
Forauthenticationtoworkproperly,thedateandtimesettingsintheAxisproductshouldbesynchronizedwithanNTP
server.SeeDate&Timeonpage18.
Certicates
Certicatesareusedtoauthenticatedevicesonanetwork.Typicalapplicationsincludeencryptedwebbrowsing(HTTPS),network
protectionviaIEEE802.1Xandnoticationmessagesforexampleviaemail.TwotypesofcerticatescanbeusedwiththeAxis
product:
Server/Clientcerticates-ToauthenticatetheAxisproduct.AServer/Clientcerticatecanbeself-signedorissuedbyaCerticate
Authority(CA).Aself-signedcerticateofferslimitedprotectionandcanbeusedbeforeaCA-issuedcerticatehasbeenobtained.
CAcerticates-Toauthenticatepeercerticates,forexamplethecerticateofanauthenticationserverincasetheAxisproductis
connectedtoanIEEE802.1Xprotectednetwork.TheAxisproductisshippedwithseveralpreinstalledCAcerticates.
Note
•Iftheproductisresettofactorydefault,allcerticates,exceptpreinstalledCAcerticates,willbedeleted.
•Iftheproductisresettofactorydefault,allpreinstalledCAcerticatesthathavebeendeletedwillbereinstalled.
Howtocreateaself-signedcerticate
1.GotoPreferences>AdditionalDeviceConguration>SystemOptions>Security>Certicates.
2.ClickCreateself-signedcerticateandprovidetherequestedinformation.
HowtocreateandinstallaCA-signedcerticate
1.Createaself-signedcerticate,seeHowtocreateaself-signedcerticateonpage17.
17
Page 18

AXISA9161NetworkI/ORelayModule
Systemoptions
2.GotoPreferences>AdditionalDeviceConguration>SystemOptions>Security>Certicates.
3.ClickCreatecerticatesigningrequestandprovidetherequestedinformation.
4.CopythePEM-formattedrequestandsendtotheCAofyourchoice.
5.Whenthesignedcerticateisreturned,clickInstallcerticateanduploadthecerticate.
HowtoinstalladditionalCAcerticates
1.GotoPreferences>AdditionalDeviceConguration>SystemOptions>Security>Certicates.
2.ClickInstallcerticateanduploadthecerticate.
Date&Time
TheAxisproduct’sdateandtimesettingsareconguredunderSystemOptions>Date&Time.
Tochangethedateandtimesettings,selectthepreferredTimemodeunderNewServerTime:
•Synchronizewithcomputertime–Setsdateandtimeaccordingtothecomputer’sclock.Withthisoption,dateand
timearesetonceandwillnotbeupdatedautomatically.
•SynchronizewithNTPServer–ObtainsdateandtimefromanNTPserver.Withthisoption,dateandtimesettingsare
updatedcontinuously.ForinformationonNTPsettings,seeNTPCongurationonpage20.
IfusingahostnamefortheNTPserver,aDNSservermustbecongured.SeeDNSCongurationonpage20.
•Setmanually–Allowsyoutomanuallysetdateandtime.
IfusinganNTPserver,selectyourTimezonefromthedrop-downlist.Ifrequired,checkAutomaticallyadjustfordaylightsaving
timechanges.
Network
BasicTCP/IPSettings
TheAxisproductsupportsIPversion4(IPv4).
TheAxisproductcangetanIPv4addressinthefollowingways:
•DynamicIPaddress–ObtainIPaddressviaDHCPisselectedbydefault.ThismeansthattheAxisproductissettoget
theIPaddressautomaticallyviaDynamicHostCongurationProtocol(DHCP).
DHCPallowsnetworkadministratorstocentrallymanageandautomatetheassignmentofIPaddresses.
•StaticIPaddress–TouseastaticIPaddress,selectUsethefollowingIPaddressandspecifytheIPaddress,subnetmask
anddefaultrouter.ThenclickSave.
DHCPshouldonlybeenabledwhenusingdynamicIPaddressnotication,oriftheDHCPcanupdateaDNSserverthatmakes
itpossibletoaccesstheAxisproductbyname(hostname).
IfDHCPisenabledandtheproductcannotbeaccessed,runAXISIPUtilitytosearchthenetworkforconnectedAxisproducts,or
resettheproducttothefactorydefaultsettingsandthenperformtheinstallationagain.Forinformationabouthowtoresetto
factorydefault,seepage24.
ARP/Ping
Theproduct’sIPaddresscanbeassignedusingARPandPing.Forinstructions,seeAssignanIPaddressusingARP/Pingonpage19.
18
Page 19

AXISA9161NetworkI/ORelayModule
Systemoptions
TheARP/Pingserviceisenabledbydefaultbutisautomaticallydisabledtwominutesaftertheproductisstarted,orassoonasanIP
addressisassigned.Tore-assignIPaddressusingARP/Ping,theproductmustberestartedtoenableARP/Pingforanadditional
twominutes.
Todisabletheservice,gotoPreferences>AdditionalDeviceConguration>SystemOptions>Network>TCP/IP>Basic
andcleartheoptionEnableARP/PingsettingofIPaddress.
Pingingtheproductisstillpossiblewhentheserviceisdisabled.
AssignanIPaddressusingARP/Ping
Thedevice’sIPaddresscanbeassignedusingARP/Ping.Thecommandmustbeissuedwithin2minutesofconnectingpower.
1.AcquireafreestaticIPaddressonthesamenetworksegmentasthecomputer.
2.Locatetheserialnumber(S/N)onthedevicelabel.
3.Openacommandpromptandenterthefollowingcommands:
Linux/Unixsyntax
arp-s<IPaddress><serialnumber>temp
ping-s408<IPaddress>
Linux/Unixexample
arp-s192.168.0.12500:40:8c:18:10:00temp
ping-s408192.168.0.125
Windowssyntax(thismayrequirethatyourunthecommandpromptasanadministrator)
arp-s<IPaddress><serialnumber>
ping-l408-t<IPaddress>
Windowsexample(thismayrequirethatyourunthecommandpromptasanadministrator)
arp-s192.168.0.12500-40-8c-18-10-00
ping-l408-t192.168.0.125
4.Restartthedevicebydisconnectingandreconnectingthenetworkconnector.
5.ClosethecommandpromptwhenthedevicerespondswithReplyfrom192.168.0.125:...orsimilar.
6.Openabrowserandtypehttp://<IPaddress>intheaddresseld.
Note
•ToopenacommandpromptinWindows,opentheStartmenuandsearchforcmd.
•TousetheARPcommandinWindows8/Windows7/WindowsVista,right-clickthecommandprompticonandselect
Runasadministrator.
•ToopenacommandpromptinMacOSX,opentheTerminalutilityfromApplication>Utilities.
AXISVideoHostingSystem(AVHS)
TheAVHSsettingsareconguredunderPreferences>AdditionalDeviceConguration>SystemOptions>Network>TCP/IP>
Basic.ThepossibilitytoconnecttoanAVHSserviceisenabledbydefault.Todisable,cleartheEnableAVHSbox.
Always-TheAxisproductwillconstantlyattempttoconnecttotheAVHSserviceovertheInternet.Onceregistered,theproductwill
stayconnectedtotheservice.Thisoptioncanbeusedwhentheproductisalreadyinstalledanditisnotconvenientorpossibleto
usetheone-clickinstallation.
19
Page 20

AXISA9161NetworkI/ORelayModule
Systemoptions
AXISInternetDynamicDNSService
AXISInternetDynamicDNSServiceassignsahostnameforeasyaccesstotheproduct.Formoreinformation,seewww.axiscam.net
ToregistertheAxisproductwithAXISInternetDynamicDNSService,gotoPreferences>AdditionalDeviceConguration>System
Options>Network>TCP/IP>Basic.UnderServices,clicktheAXISInternetDynamicDNSServiceSettingsbutton(requiresaccessto
theInternet).ThedomainnamecurrentlyregisteredatAXISInternetDynamicDNSservicefortheproductcanatanytimeberemoved.
Note
AXISInternetDynamicDNSServicerequiresIPv4.
AdvancedTCP/IPSettings
DNSConguration
DNS(DomainNameService)providesthetranslationofhostnamestoIPaddresses.TheDNSsettingsareconguredunder
Preferences>AdditionalDeviceConguration>SystemOptions>Network>TCP/IP>Advanced.
SelectObtainDNSserveraddressviaDHCPtousetheDNSsettingsprovidedbytheDHCPserver.
Tomakemanualsettings,selectUsethefollowingDNSserveraddressandspecifythefollowing:
Domainname-Enterthedomain(s)tosearchforthehostnameusedbytheAxisproduct.Multipledomainscanbeseparatedby
semicolons.Thehostnameisalwaystherstpartofafullyqualieddomainname,forexample,myserveristhehostnameinthe
fullyqualieddomainnamemyserver.mycompany.comwheremycompany.comisthedomainname.
Primary/SecondaryDNSserver-EntertheIPaddressesoftheprimaryandsecondaryDNSservers.ThesecondaryDNSserveris
optionalandwillbeusediftheprimaryisunavailable.
NTPConguration
NTP(NetworkTimeProtocol)isusedtosynchronizetheclocktimesofdevicesinanetwork.TheNTPsettingsareconguredunder
Preferences>AdditionalDeviceConguration>SystemOptions>Network>TCP/IP>Advanced.
SelectObtainNTPserveraddressviaDHCPtousetheNTPsettingsprovidedbytheDHCPserver.
Tomakemanualsettings,selectUsethefollowingNTPserveraddressandenterthehostnameorIPaddressoftheNTPserver.
HostNameConguration
TheAxisproductcanbeaccessedusingahostnameinsteadofanIPaddress.Thehostnameisusuallythesameastheassigned
DNSname.ThehostnameisconguredunderPreferences>AdditionalDeviceConguration>SystemOptions>Network>
TCP/IP>Advanced.
SelectObtainhostnameviaIPv4DHCPtousehostnameprovidedbytheDHCPserverrunningonIPv4.
SelectUsethehostnametosetthehostnamemanually.
SelectEnabledynamicDNSupdatestodynamicallyupdatelocalDNSserverswhenevertheAxisproduct’sIPaddresschanges.For
moreinformation,seetheonlinehelp.
Link-LocalIPv4Address
Link-LocalAddressisenabledbydefaultandassignstheAxisproductanadditionalIPaddresswhichcanbeusedtoaccess
theproductfromotherhostsonthesamesegmentonthelocalnetwork.TheproductcanhaveaLink-LocalIPandastatic
orDHCP-suppliedIPaddressatthesametime.
ThisfunctioncanbedisabledunderPreferences>AdditionalDeviceConguration>SystemOptions>Network>TCP/IP
>Advanced.
20
Page 21

AXISA9161NetworkI/ORelayModule
Systemoptions
HTTP
TheHTTPportusedbytheAxisproductcanbechangedunderPreferences>AdditionalDeviceConguration>SystemOptions>
Network>TCP/IP>Advanced.Inadditiontothedefaultsetting,whichis80,anyportintherange1024–65535canbeused.
HTTPS
TheHTTPSportusedbytheAxisproductcanbechangedunderPreferences>AdditionalDeviceConguration>SystemOptions>
Network>TCP/IP>Advanced.Inadditiontothedefaultsetting,whichis443,anyportintherange1024–65535canbeused.
ToenableHTTPS,gotoPreferences>AdditionalDeviceConguration>SystemOptions>Security>HTTPS.Formore
information,seeHTTPSonpage16.
NATtraversal(portmapping)forIPv4
Anetworkrouterallowsdevicesonaprivatenetwork(LAN)toshareasingleconnectiontotheinternet.Thisisdonebyforwarding
networktrafcfromtheprivatenetworktothe“outside”,thatis,theinternet.Securityontheprivatenetwork(LAN)isincreased
sincemostroutersarepre-conguredtostopattemptstoaccesstheprivatenetwork(LAN)fromthepublicnetwork(internet).
UseNATtraversalwhentheAxisproductislocatedonanintranet(LAN)andyouwishtomakeitavailablefromtheother(WAN)side
ofaNATrouter.WithNATtraversalproperlycongured,allHTTPtrafctoanexternalHTTPportintheNATrouterisforwardedto
theproduct.
NATtraversalisconguredunderPreferences>AdditionalDeviceConguration>SystemOptions>Network>TCP/IP
>Advanced.
Note
•ForNATtraversaltowork,thismustbesupportedbytherouter.TheroutermustalsosupportUPnP
•Inthiscontext,routerreferstoanynetworkroutingdevicesuchasaNATrouter,Networkrouter,InternetGateway,
Broadbandrouter,Broadbandsharingdevice,orasoftwaresuchasarewall.
Enable/Disable-Whenenabled,theAxisproductattemptstocongureportmappinginaNATrouteronyournetwork,using
UPnP.NotethatUPnPmustbeenabledintheproduct(seePreferences>AdditionalDeviceConguration>SystemOptions
>Network>UPnP).
UsemanuallyselectedNATrouter-SelectthisoptiontomanuallyselectaNATrouterandentertheIPaddressfortherouterin
theeld.Ifnorouterisspecied,theproductautomaticallysearchesforNATroutersonyournetwork.Ifmorethanonerouteris
found,thedefaultrouterisselected.
AlternativeHTTPport-SelectthisoptiontomanuallydeneanexternalHTTPport.Enteraportintherange1024–65535.Ifthe
porteldisemptyorcontainsthedefaultsetting,whichis0,aportnumberisautomaticallyselectedwhenenablingNATtraversal.
Note
•AnalternativeHTTPportcanbeusedorbeactiveevenifNATtraversalisdisabled.ThisisusefulifyourNATrouterdoesnot
supportUPnPandyouneedtomanuallycongureportforwardingintheNATrouter .
•Ifyouattempttomanuallyenteraportthatisalreadyinuse,anotheravailableportisautomaticallyselected.
•Whentheportisselectedautomaticallyitisdisplayedinthiseld.Tochangethis,enteranewportnumberandclickSave.
FTP
TheFTPserverrunningintheAxisproductenablesuploadofnewrmware,userapplications,etc.TheFTPservercanbedisabled
underPreferences>AdditionalDeviceConguration>SystemOptions>Network>TCP/IP>Advanced.
®
.
SOCKS
SOCKSisanetworkingproxyprotocol.TheAxisproductcanbeconguredtouseaSOCKSservertoreachnetworksontheother
sideofarewallorproxyserver.ThisfunctionalityisusefuliftheAxisproductislocatedonalocalnetworkbehindarewall,and
notications,uploads,alarms,etcneedtobesenttoadestinationoutsidethelocalnetwork(forexampletheInternet).
21
Page 22

AXISA9161NetworkI/ORelayModule
Systemoptions
SOCKSisconguredunderPreferences>AdditionalDeviceConguration>SystemOptions>Network>SOCKS.Formore
information,seetheonlinehelp.
QoS(QualityofService)
QoS(QualityofService)guaranteesacertainlevelofaspeciedresourcetoselectedtrafconanetwork.AQoS-awarenetwork
prioritizesnetworktrafcandprovidesagreaternetworkreliabilitybycontrollingtheamountofbandwidthanapplicationmayuse.
SNMP
TheSimpleNetworkManagementProtocol(SNMP)allowsremotemanagementofnetworkdevices.AnSNMPcommunityisthe
groupofdevicesandmanagementstationrunningSNMP.Communitynamesareusedtoidentifygroups.
AXISVideoMIB(ManagementInformationBase)forvideohardwarecanbeusedtomonitorAxis-specic,hardware-related
issuesthatmayneedadministrativeattention.FormoreinformationaboutAXISVideoMIBandtodownloadMIBles,goto
www.axis.com/support
ToenableandcongureSNMPintheAxisproduct,gotothePreferences>AdditionalDeviceConguration>SystemOptions
>Network>SNMPpage.
Dependingonthelevelofsecurityrequired,selecttheversiononSNMPtouse.
TrapsareusedbytheAxisproducttosendmessagestoamanagementsystemonimportanteventsandstatuschanges.CheckEnable
trapsandentertheIPaddresswherethetrapmessageshouldbesentandtheTrapcommunitythatshouldreceivethemessage.
Note
IfHTTPSisenabled,SNMPv1andSNMPv2cshouldbedisabled.
TrapsforSNMPv1/v2areusedbytheAxisproducttosendmessagestoamanagementsystemonimportanteventsandstatus
changes.CheckEnabletrapsandentertheIPaddresswherethetrapmessageshouldbesentandtheTrapcommunitythat
shouldreceivethemessage.
Thefollowingtrapsareavailable:
•Coldstart
•Warmstart
•Linkup
•Authenticationfailed
Note
AllAXISVideoMIBtrapsareenabledwhenSNMPv1/v2ctrapsareenabled.Itisnotpossibletoturnonoroffspecictraps.
SNMPv3providesencryptionandsecurepasswords.TousetrapswithSNMPv3,anSNMPv3managementapplicationisrequired.
TouseSNMPv3,HTTPSmustbeenabled,seeHTTPSonpage16.ToenableSNMPv3,checktheboxandprovidetheinitialuser
password.
Note
Theinitialpasswordcanonlybesetonce.Ifthepasswordislost,theAxisproductmustberesettofactorydefault,see
Resettofactorydefaultsettingsonpage24.
UPnP
TheAxisproductincludessupportforUPnP
systemsandclientsthatsupportthisprotocol.
UPnPcanbedisabledunderPreferences>AdditionalDeviceConguration>SystemOptions>Network>UPnP.
®
.UPnPisenabledbydefaultandtheproductisautomaticallydetectedbyoperating
22
Page 23

AXISA9161NetworkI/ORelayModule
Systemoptions
Bonjour
TheAxisproductincludessupportforBonjour.Bonjourisenabledbydefaultandtheproductisautomaticallydetectedbyoperating
systemsandclientsthatsupportthisprotocol.
BonjourcanbedisabledunderPreferences>AdditionalDeviceConguration>SystemOptions>Network>Bonjour.
Maintenance
TheAxisproductprovidesseveralmaintenancefunctions.TheseareavailableunderPreferences>AdditionalDeviceConguration
>SystemOptions>Maintenance.
ClickRestarttoperformacorrectrestartiftheAxisproductisnotbehavingasexpected.Thiswillnotaffectanyofthecurrent
settings.
Note
ArestartclearsallentriesintheServerReport.
ClickRestoretoresetmostsettingstothefactorydefaultvalues.Thefollowingsettingsarenotaffected:
•thebootprotocol(DHCPorstatic)
•thestaticIPaddress
•thedefaultrouter
•thesubnetmask
•thesystemtime
•theIEEE802.1Xsettings
ClickDefaulttoresetallsettings,includingtheIPaddress,tothefactorydefaultvalues.Thisbuttonshouldbeusedwithcaution.The
Axisproductcanalsoberesettofactorydefaultusingthecontrolbutton,seeResettofactorydefaultsettingsonpage24.
Forinformationaboutrmwareupgrade,seeHowtoupgradethermwareonpage25.
Support
SupportOverview
ThePreferences>Additionaldeviceconguration>SystemOptions>Support>SupportOverviewpageprovidesinformationon
troubleshootingandcontactinformation,shouldyourequiretechnicalassistance.
SeealsoTroubleshootingonpage25.
SystemOverview
Logs&Reports
ThePreferences>AdditionalDeviceConguration>SystemOptions>Support>Logs&Reportspagegenerateslogsandreports
usefulforsystemanalysisandtroubleshooting.IfcontactingAxisSupport,pleaseprovideaserverreportwithyourquery.
SystemLog-Providesinformationaboutsystemevents.
AccessLog-Listsallfailedattemptstoaccesstheproduct.Theaccesslogcanalsobeconguredtolistallconnectionstothe
product(seebelow).
ViewServerReport-Providesinformationabouttheproductstatusinapop-upwindow.Theaccesslogisautomaticallyincluded
intheserverreport.
23
Page 24

AXISA9161NetworkI/ORelayModule
Systemoptions
DownloadServerReport-Createsa.ziplethatcontainsacompleteserverreporttextleinUTF–8format.SelecttheInclude
snapshotfromLiveViewoptiontoincludeasnapshotoftheproduct’sLiveView.The.zipleshouldalwaysbeincludedwhen
contactingsupport.
ParameterList-Showstheproduct'sparametersandtheircurrentsettings.Thismayproveusefulwhentroubleshootingor
whencontactingAxisSupport.
ConnectionList-Listsallclientsthatarecurrentlyaccessingmediastreams.
CrashReport-Generatesanarchivewithdebugginginformation.Thereporttakesseveralminutestogenerate.
Advanced
Scripting
Scriptingallowsexperienceduserstocustomizeandusetheirownscripts.
NO
TICE
NO NO
TICE TICE
ImproperusemaycauseunexpectedbehaviorandlossofcontactwiththeAxisproduct.
Axisstronglyrecommendsthatyoudonotusethisfunctionunlessyouunderstandtheconsequences.AxisSupportdoesnotprovide
assistanceforproblemswithcustomizedscripts.
ToopentheScriptEditor,gotoPreferences>AdditionalDeviceConguration>SystemOptions>Advanced>Scripting.Ifa
scriptcausesproblems,resettheproducttoitsfactorydefaultsettings,seepage24.
Formoreinformation,seewww.axis.com/developer
FileUpload
Files,forexamplewebpagesandimages,canbeuploadedtotheAxisproductandusedascustomsettings.Touploadale,goto
Preferences>AdditionalDeviceConguration>SystemOptions>Advanced>FileUpload.
Resettofactorydefaultsettings
Important
Resettofactorydefaultshouldbeusedwithcaution.Aresettofactorydefaultresetsallsettings,includingtheIPaddress,to
thefactorydefaultvalues.
Toresettheproducttothefactorydefaultsettings:
1.Disconnectpowerfromtheproduct.
2.Pressandholdthecontrolbuttonandreconnectpower.
3.Keepthecontrolbuttonpressedfor25secondsuntilthestatusLEDindicatorturnsamberforthesecondtime.
4.Releasethecontrolbutton.TheprocessiscompletewhenthestatusLEDindicatorturnsgreen.Theproducthasbeenreset
tothefactorydefaultsettings.IfnoDHCPserverisavailableonthenetwork,thedefaultIPaddressis192.168.0.90
5.Usingtheinstallationandmanagementsoftwaretools,assignanIPaddress,setthepassword,andaccesstheproduct.
Itisalsopossibletoresetparameterstofactorydefaultviathewebinterface.GotoPreferences>AdditionalDeviceConguration
>SystemOptions>MaintenanceandclickDefault.
24
Page 25

AXISA9161NetworkI/ORelayModule
Troubleshooting
Troubleshooting
Ifyoucan’tndwhatyou’relookingforhere,trythetroubleshootingsectionataxis.com/support.
Howtocheckthecurrentrmware
Firmwareissoftwarethatdeterminesthefunctionalityofnetworkdevices.Oneofyourrstactionswhentroubleshootingaproblem
shouldbetocheckthecurrentrmwareversion.Thelatestversionmaycontainacorrectionthatxesyourparticularproblem.
Howtoupgradethermware
Important
•Yourdealerreservestherighttochargeforanyrepairattributabletofaultyupgradebytheuser.
•Preconguredandcustomizedsettingsaresavedwhenthermwareisupgraded(providingthefeaturesareavailableinthe
newrmware)althoughthisisnotguaranteedbyAxisCommunicationsAB.
Note
•WhenyouupgradetheAxisproductwiththelatestrmware,theproductreceivesthelatestfunctionalityavailable.Always
readtheupgradeinstructionsandreleasenotesavailablewitheachnewreleasebeforeupgradingthermware.
EmergencyRecoveryProcedure
Ifpowerornetworkconnectionislostduringtheupgrade,theprocessfailsandtheproductmaybecomeunresponsive.Flashing
redStatusindicatorindicatesafailedupgrade.Torecovertheproduct,followthestepsbelow.Theserialnumberisfoundon
theproduct’slabel.
1.InUNIX/Linux,typethefollowingfromthecommandline:
arp-s<IPaddress><serialnumber>temp
ping-l408<IPaddress>
InWindows,typethefollowingfromacommand/DOSprompt(thismayrequirethatyourunthecommandpromptas
anadministrator):
arp-s<IPaddress><serialnumber>
ping-l408-t<IPaddress>
2.Iftheproductdoesnotreplyin30seconds,restartitandwaitforareply .PressCTRL+CtostopPing.
3.Openabrowserandtypeintheproduct’sIPaddress.Inthepagethatopens,usetheBrowsebuttontoselecttheupgrade
letouse.ThenclickLoadtorestarttheupgradeprocess.
4.Aftertheupgradeiscomplete(1–10minutes),theproductautomaticallyrestartsandshowsasteadygreenonthe
Statusindicator.
5.Reinstalltheproduct,referringtotheInstallationGuide.
Iftheemergencyrecoveryproceduredoesnotgettheproductupandrunningagain,contactAxissupportatwww.axis.com/support
Symptoms,possiblecausesandremedialactions
Problemsupgradingthermware
Firmwareupgradefailure
Ifthermwareupgradefails,theproductreloadsthepreviousrmware.Checkthermware
leandtryagain.
25
Page 26

AXISA9161NetworkI/ORelayModule
Troubleshooting
ProblemssettingtheIPaddress
WhenusingARP/Ping
Theproductislocatedona
differentsubnet
TheIPaddressisbeingused
byanotherdevice
PossibleIPaddressconict
withanotherdeviceonthe
samesubnet
Theproductcannotbeaccessedfromabrowser
Cannotlogin
IftheIPaddressintendedfortheproductandtheIPaddressofthecomputerusedtoaccessthe
productarelocatedondifferentsubnets,youwillnotbeabletosettheIPaddress.Contactyour
networkadministratortoobtainanIPaddress.
DisconnecttheAxisproductfromthenetwork.RunthePingcommand(inaCommand/DOS
window,typepingandtheIPaddressoftheproduct):
•Ifyoureceive:Replyfrom<IPaddress>:bytes=32;time=10...
•Ifyoureceive:Requesttimedout,thismeansthattheIPaddressisavailable
ThestaticIPaddressintheAxisproductisusedbeforetheDHCPserversetsadynamicaddress.
ThismeansthatifthesamedefaultstaticIPaddressisalsousedbyanotherdevice,theremay
beproblemsaccessingtheproduct.
WhenHTTPSisenabled,makesurethatthecorrectprotocol(HTTPorHTTPS)isusedwhen
attemptingtologin.Youmayneedtomanuallytypehttporhttpsinthebrowser’saddresseld.
thismeansthattheIPaddressmayalreadybeinusebyanotherdeviceonthenetwork.
ObtainanewIPaddressfromthenetworkadministratorandreinstalltheproduct.
forusewiththeAxisproduct.Checkallcablingandreinstalltheproduct.
Ifthepasswordfortheuserrootislost,theproductmustberesettothefactorydefaultsettings.
SeeResettofactorydefaultsettingsonpage24.
TheIPaddresshasbeen
changedbyDHCP
Certicateerrorwhenusing
IEEE802.1X
Theproductisaccessiblelocallybutnotexternally
RoutercongurationTocongureyourroutertoallowincomingdatatrafctotheAxisproduct,enabletheNAT-traversal
Firewallprotection
StatusandNetworkindicatorLEDsareashingredrapidly
Hardwarefailure
Productdoesnotstartup
ProductdoesnotstartupIftheproductdoesnotstartupkeepthenetworkcableconnectedandre-insertthepowercable
IPaddressesobtainedfromaDHCPserveraredynamicandmaychange.IftheIPaddresshasbeen
changed,useAXISIPUtilityorAXISDeviceManagertolocatetheproductonthenetwork.Identify
theproductusingitsmodelorserialnumber,orbytheDNSname(ifthenamehasbeencongured).
Ifrequired,astaticIPaddresscanbeassignedmanually.Forinstructions,seethedocumentHowto
assignanIPaddressandaccessyourdeviceontheproductpageataxis.com
Forauthenticationtoworkproperly,thedateandtimesettingsintheAxisproductshouldbe
synchronizedwithanNTPserver.SeeDate&Timeonpage18.
featurewhichwillattempttoautomaticallyconguretheroutertoallowaccesstotheAxis
product,seeNATtraversal(portmapping)forIPv4onpage21.TheroutermustsupportUPnP
ChecktheInternetrewallwithyournetworkadministrator.
ContactyourAxisreseller.
tothemidspan.
®
.
26
Page 27

AXISA9161NetworkI/ORelayModule
Specifications
Specifications
Tondthelatestversionoftheproduct’sdatasheet,gototheproductpageataxis.comandlocateSupport&Documentation.
LEDindicators
1
I/OvoltageLEDindicator
2
RelayLEDindicator
3
I/OLEDindicators(6x)
4
PowerLEDindicator
5
StatusLEDindicator
27
Page 28

AXISA9161NetworkI/ORelayModule
Specifications
6
NetworkLEDindicator
LEDindicators
LED
Network
Status
Power
Relay
I/O
I/Ovoltage
Color
Green
Amber
UnlitNonetworkconnection.
GreenSteadygreenfornormaloperation.
Amber
Red
Green
Amber
Green
UnlitRelaycoilisunenergized
Green
Unlit
Blinking
Red
UnlitNormalstate
Indication
Steadyforconnectiontoa100MBit/snetwork.Flashesfornetworkactivity.
Steadyforconnectiontoa10MBit/snetwork.Flashesfornetworkactivity.
Steadyduringstartupandwhenrestoringsettings.
Slowashforfailedupgrade.
Normaloperation.
Flashesgreen/amberduringrmwareupgrade.
Relaycoilisenergized
I/Oisgrounded
I/Oisoating
Tampererror(wirecutoropen)
Overcurrent
Buttons
Thecontrolbuttonisusedfor:
•Resettingtheproducttofactorydefaultsettings,page24.
•ConnectingtoAXISInternetDynamicDNSService.Seewww.axis.com
Connectors
Forinformationabouttheconnectors’positions,seeHardwareoverviewonpage4.
Forconnectiondiagramsandinformationaboutthehardwarepinchartgeneratedthroughthehardwareconguration,see
ConnectionDiagramsonpage31.
Thefollowingsectiondescribestheconnectors’technicalspecications.
NetworkConnector
NO
TICE
NO NO
TICE TICE
Theproductshallbeconnectedusingashieldednetworkcable(STP).Allcablesconnectingtheproducttothenetworkshall
beintendedfortheirspecicuse.Makesurethatthenetworkdevicesareinstalledinaccordancewiththemanufacturer’s
instructions.Forinformationaboutregulatoryrequirements,see.
RJ45Ethernetconnector.UseCategory5ecablesorhigher.
28
Page 29

AXISA9161NetworkI/ORelayModule
Specifications
Function
PowerandEthernet
SupervisedI/OandPowerConnector
8-pincongurableI/Oterminalblockfor:
•Auxiliarypower(DCoutput)
•DigitalInput
•DigitalOutput
•Supervisedinput
Foranexampleconnectiondiagram,seeConnectionDiagramsonpage31.
FunctionPinNotes
0VREF
12VDCoutput
(InputorOutput)
•0VDC(-)
1
2
3–8
Specications
PoweroverEthernetIEEE802.3af/802.3atType1Class3,44–57VDC
Forpoweringauxiliaryequipment.
Note:Thispincanonlybeusedas
powerout.
Digitalinput—Connecttopin1to
activate,orleaveoating(unconnected)
todeactivate.
Digitaloutput–Connecttheload
betweenDCoutorexternalsourceand
theoutputpin.
Specications
0VREF
SeeSpecicationsonpage27
0tomax40VDC Congurable
0tomax40VDC,opendrain,100mA
Ifusedwithaninductiveload,e.g.a
relay,adiodemustbeconnectedin
parallelwiththeload,forprotections
againsttransients.
Important
Therecommendedmaximumcablelengthis100m(328ft).
Important
TheoutputcircuitsinthissectionareNECClass2powerlimited.
Important
ThetotalpowerfromallDCoutputsis3.6W(PoEType2Class3).
RelayConnector
4-pinrelayterminalblockfor:
•0VREF
•NO
•COM
•NC
FunctionPinNotes
0VREF
1
Specications
0VREF
29
Page 30

AXISA9161NetworkI/ORelayModule
Specifications
NO
COM
NC
Important
Therecommendedmaximumcablelengthis30m(98.4ft).
WARNING
Maximumconnectedloadontherelayis30VDC,1A.
RelayJumper
3-pinrelayjumperforenablingpowertoauxiliaryequipmentviatheRelayconnector .Inserting
thejumperbetween12Vor24VtoCOMcausestheinternalvoltagetobeconnectedtothe
COMterminaloftherelay.
•+12V
•RelayCOM
•+24V
FunctionPinNotes
+12V+12V
RelayCOMCOMOutputpowertoauxiliaryequipmentwhenjumper
+24V+24V
2
3
4
Forconnectingauxiliaryequipment.
Forconnectingauxiliaryequipment.
Forconnectingauxiliaryequipment.
UsejumpertoconnectpowerouttoRelayCOM+12VDC
isused
UsejumpertoconnectpowerouttoRelayCOM+24VDC
0tomax30VDC,1A
Specications
12/24VDCOutPowerConnector
3–pinterminalblockfor:
•0VREF
•12VDCOUT
•24VDCOUT
FunctionPinNotes
0VREF
12VDCOUT
24VDCOUT
Important
Therecommendedmaximumcablelengthis30m(98.4ft).
Important
TheoutputcircuitsinthissectionareNECClass2powerlimited.
1
2
3
Forpoweringauxiliaryequipment.
Forpoweringauxiliaryequipment.
Specications
0VDC
SeeSpecicationsonpage27
SeeSpecicationsonpage27
30
Page 31

AXISA9161NetworkI/ORelayModule
Specifications
DCInPowerConnector
2-pinterminalblockforDCpowerinput.UseaClass1electricalenergysource(ES1)oraSafety
ExtraLowVoltage(SELV)compliantlimitedpowersource(LPS)witheitheraratedoutputpower
limitedto≤100Woraratedoutputcurrentlimitedto≤5Aat≤100W.
FunctionPinNotes
0VREF
DCinput
1
2
ConnectionDiagrams
IOconnector
ForpoweringcontrollerwhennotusingPowerover
Ethernet.
Note:Thispincanonlybeusedaspowerin.
Specications
0VDC
8–28VDC,max26W
1
DCground*
2
DCoutput
A
I/Oconguredasinput
B
I/Oconguredasoutput
*Productspecicground
Supervisedinputs
Tousesupervisedinputs,installendoflineresistorsaccordingtoanyoftheoptionsinthediagramsbelow.
31
Page 32

AXISA9161NetworkI/ORelayModule
Specifications
iInput
ii
0VDC(-)
iii=iv
Ω
,or2kΩ,or4kΩ,or10k
1k
Ω
Note
Itisrecommendedtousetwistedandshieldedcables.Connectshieldingto0VDC.
32
Page 33

UserManualVer.M6.2
AXISA9161NetworkI/ORelayModule
©AxisCommunicationsAB,2017-2020
Date:September2020
PartNo.T10088267
 Loading...