

Page 1

AXISA82NetworkVideoDoorStationSeries
AXISA8207-VENetworkVideoDoorStation
AXISA8207-VEMkIINetworkVideoDoorStation
UserManual
Page 2

AXISA82NetworkVideoDoorStationSeries
TableofContents
Solutionoverview...........................................3
Productoverview...........................................4
Getstarted................................................6
Findthedeviceonthenetwork....................................6
Accessthedevice...............................................6
Securepasswords...............................................6
Additionalsettings..........................................7
Changetherootpassword........................................7
SetupdirectSIP(P2P)...........................................7
SetupSIPthroughaserver(PBX)..................................8
Createanorganization...........................................8
Createacontact................................................8
Congurethecallbutton.........................................9
Setupascardreader-networkconnection..........................10
Setupascardreader-wiredconnection............................10
UseDTMFtounlockthedoorforavisitor............................1 1
Transmitlivevideotoamonitor....................................12
Printacontactlist..............................................12
Learnmore................................................13
Thephonebook.................................................13
VoiceoverIP(VoIP)..............................................13
Setuprulesandalerts...........................................15
Applications....................................................15
Dailyuse..................................................16
Usethekeypad.................................................16
Troubleshooting............................................17
Resettofactorydefaultsettings...................................17
Checkthecurrentrmware.......................................
Upgradethermware............................................17
Technicalissues,cluesandsolutions................................
Performanceconsiderations.......................................
Specications..............................................20
Frontpanelindicatorsandcontrols.................................20
LEDindicators..................................................
SDcardslot....................................................
Buttons.......................................................
Connectors....................................................
Safetyinformation..........................................24
Hazardlevels...................................................
Othermessagelevels.............................................24
17
18
18
20
20
21
21
24
2
Page 3
AXISA82NetworkVideoDoorStationSeries
AXIS A9801
AXIS A9161
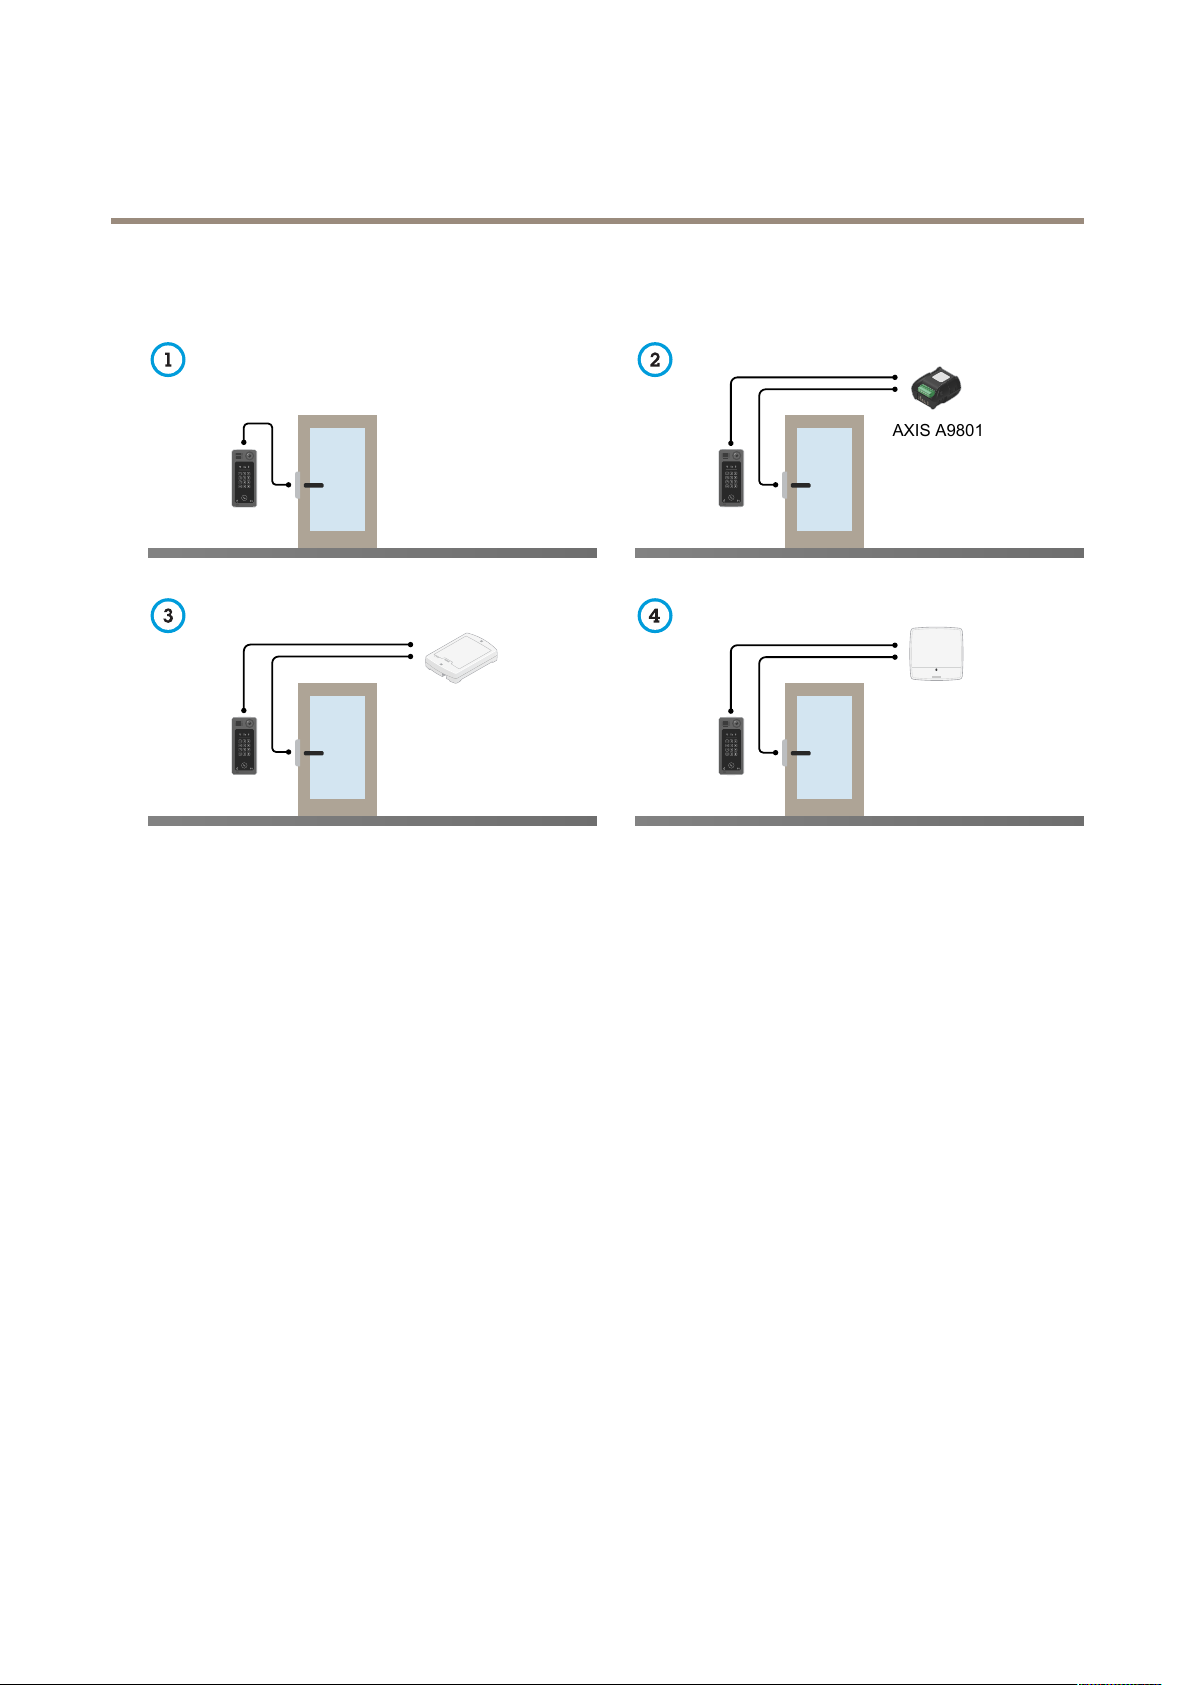
Solutionoverview
Solutionoverview
1
Doorstation
2
DoorstationcombinedwithAXISA9801
3
DoorstationcombinedwithAXISA9161
4
Doorstationcombinedwithanaccesscontrolsystem,forexampleAXISA1001orAXISA1601
3
Page 4

AXISA82NetworkVideoDoorStationSeries
1
2
3
4
5
6
7
8
8
9
10
Productoverview
Productoverview
1
Speaker
2
Camera
3
Callindicatoriconsonpage20
4
Cardreaderindicatorstripeonpage20
5
Keypad
6
Callbuttononpage20
7
Cardreadericon
8
Microphone
9
PIR-sensor
10
T-coilicon
4
Page 5
AXISA82NetworkVideoDoorStationSeries
1 2 3
4
5
6
7
8
9101112
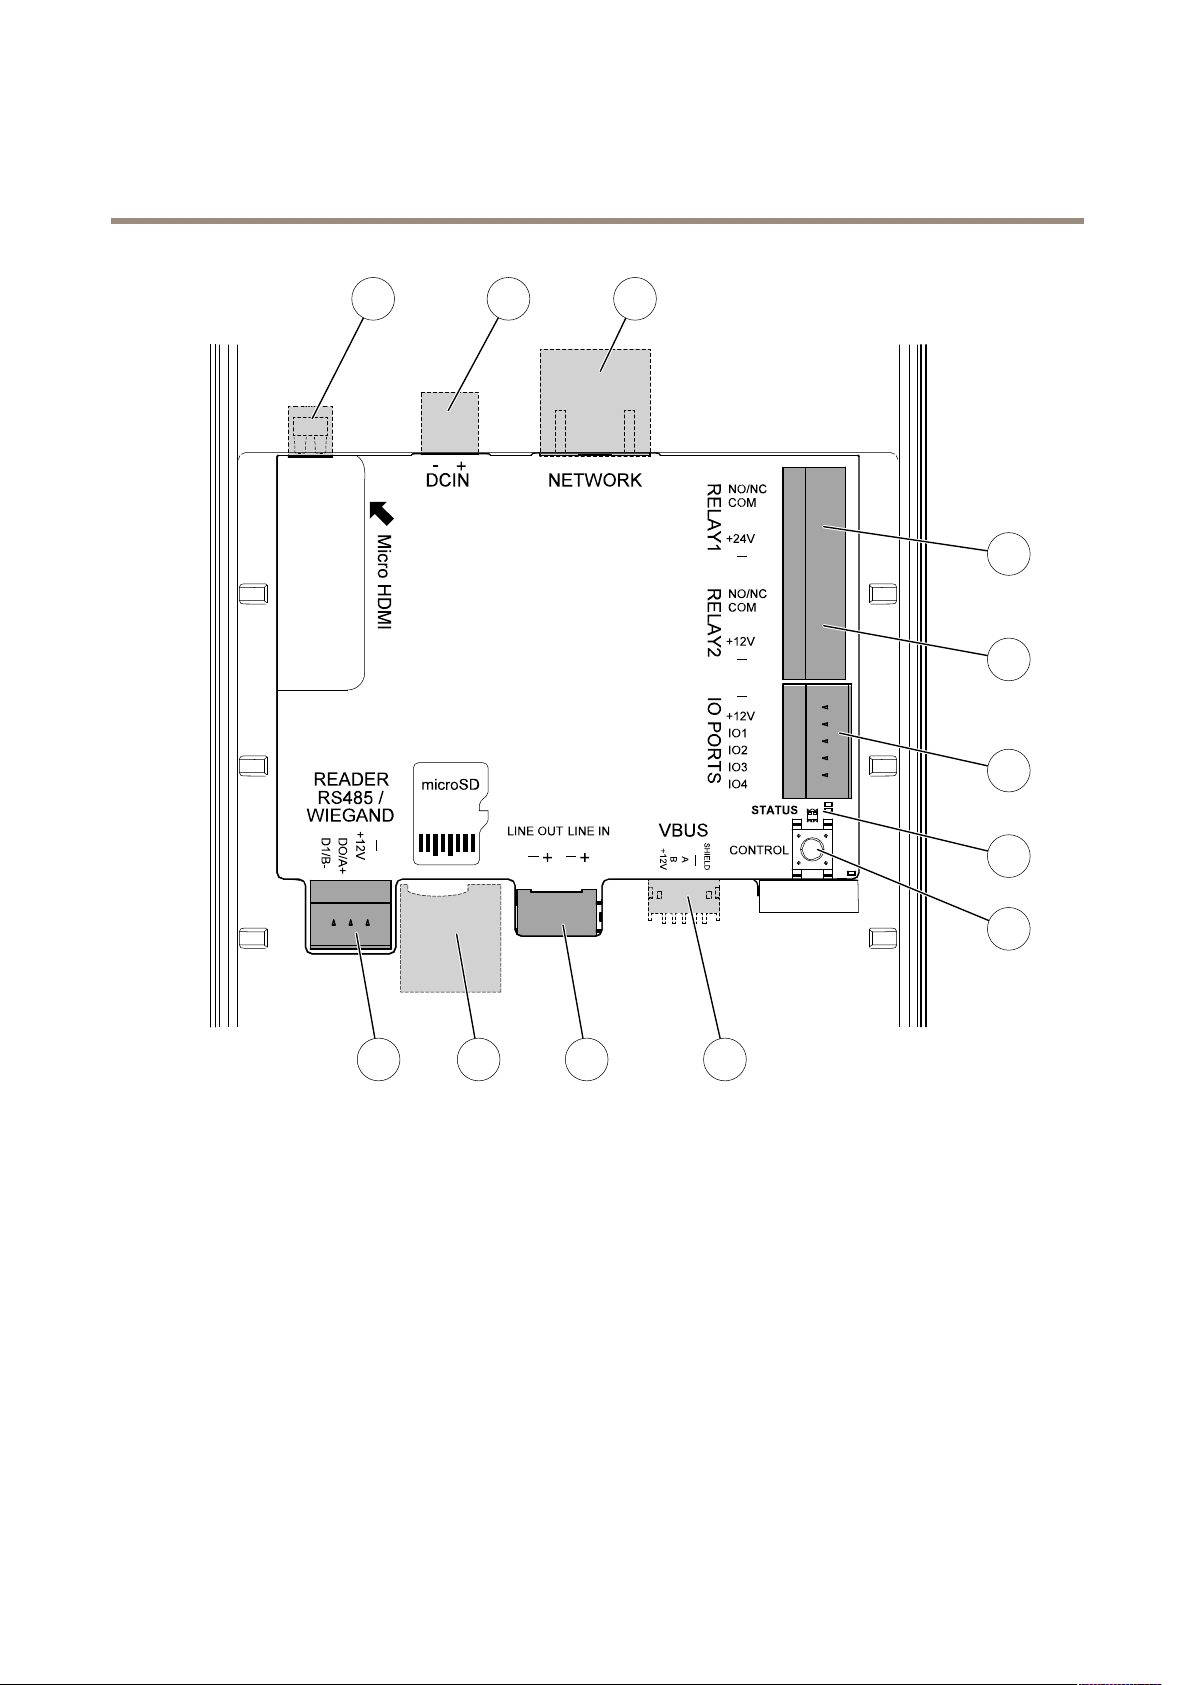
Productoverview
1
HDMIconnectoronpage21(microHDMI)
2
Powerconnectoronpage23
3
Networkconnectoronpage21(PoE+)
4
Relayconnectoronpage21
5
Relayconnectoronpage21
6
I/Oconnectoronpage22
7
StatusLED
8
Controlbuttononpage21
9
2NVBUS(notused)
10
Audioconnectoronpage21
11
SDcardslotonpage20(microSD/microSDHC/microSDXC)
12
Readerconnectoronpage22
5
Page 6

AXISA82NetworkVideoDoorStationSeries
Getstarted
Getstarted
Findthedeviceonthenetwork
TondAxisdevicesonthenetworkandassignthemIPaddressesinWindows®,useAXISIPUtilityorAXISDeviceManager.Both
applicationsarefreeandcanbedownloadedfromaxis.com/support.
FormoreinformationabouthowtondandassignIPaddresses,seethedocumentHowtoassignanIPaddressandaccessyour
deviceonthedevicepageataxis.com.
Accessthedevice
1.OpenabrowserandentertheIPaddressorhostnameoftheAxisdevice.
IfyouhaveaMaccomputer(macOS),gotoSafari,clickBonjourandselectthedevicefromthedrop-downlist.Toadd
Bonjourasabrowserbookmark,gotoSafari>Preferences.
IfyoudonotknowtheIPaddress,useAXISIPUtilityorAXISDeviceManagertondthedeviceonthenetwork.
2.Entertheusernameandpassword.Ifyouaccessthedeviceforthersttime,youmustsettherootpassword.SeeSeta
newpasswordfortherootaccountonpage6.
Securepasswords
Important
Axisdevicessendtheinitiallysetpasswordincleartextoverthenetwork.Toprotectyourdeviceaftertherstlogin,set
upasecureandencryptedHTTPSconnectionandthenchangethepassword.
Thedevicepasswordistheprimaryprotectionforyourdataandservices.Axisdevicesdonotimposeapasswordpolicyasthey
maybeusedinvarioustypesofinstallations.
Toprotectyourdatawestronglyrecommendthatyou:
•Useapasswordwithatleast8characters,preferablycreatedbyapasswordgenerator.
•Don’texposethepassword.
•Changethepasswordatarecurringinterval,atleastonceayear.
Setanewpasswordfortherootaccount
Important
Thedefaultadministratorusernameisroot.Ifthepasswordforrootislost,resetthedevicetofactorydefaultsettings.
1.Typeapassword.Followtheinstructionsaboutsecurepasswords.SeeSecurepasswordsonpage6.
2.Retypethepasswordtoconrmthespelling.
3.ClickSave.Thepasswordhasnowbeencongured.
6
Page 7

AXISA82NetworkVideoDoorStationSeries
Additionalsettings
Additionalsettings
Thissectionwillcoveralltheimportantcongurationsthataninstallerneedstodotogettheproductupandrunningafter
thehardwareinstallationhasbeencompleted.
Changetherootpassword
1.Logintotheproduct’swebpageandgotoSystem>Users.
2.Fortherootuser,clickEdit.
3.Enteranewpasswordandsave.
SetupdirectSIP(P2P)
VoIP(VoiceoverIP)isagroupoftechnologiesthatenablesvoiceandmultimediacommunicationoverIPnetworks.Formore,
seeVoiceoverIP(VoIP)onpage13.
InthisproductVoIPisenabledthroughtheSIPprotocol.FormoreinformationaboutSIP,seeSessionInitiationProtocol(SIP)on
page14
TherearetwotypesofsetupsforSIP .Peer-to-peerisoneofthem.Usepeer-to-peerwhenthecommunicationisbetweenafewuser
agentswithinthesameIPnetworkandthereisnoneedforextrafeaturesthataPBX-servercouldprovide.Forinformationon
howtosetitup,seePeer-to-peerSIP(P2PSIP)onpage14.
1.GotoVoIP>SIPsettingsandselectEnableSIP.
2.InCalltimeout,setthenumberofsecondsthatacallwilllastbeforeitendsifthereisnoanswer.
3.Toallowthedevicetoreceiveincomingcalls,selectAllowincomingcalls.
NO
TICE
NO NO
TICE TICE
Whenyouallowincomingcalls,thedeviceacceptscallsfromanydeviceconnectedtothenetwork.Ifthedeviceisaccessible
fromapublicnetworkortheinternet,werecommendyoutodisableincomingcalls.
4.Setthenumberofsecondsbeforetimeoutforincomingcalls.
5.ClickSave.
6.InPortsettings,entertheSIPportnumberandSIPTLSportnumber.
Note
•SIPport–forSIPsessions.Signallingtrafcthroughthisportisnon-encrypted.Thedefaultportnumberis5060.
•SIPTLSport–forSIPSandTLSsecuredSIPsessions.SignallingtrafcthroughthisportisencryptedwithTransportLayer
Security(TLS).Thedefaultportnumberis5061.
•RTPstartport–EntertheportusedfortherstRTPmediastreaminaSIPcall.Thedefaultstartportformediatransportis
4000.SomerewallsmightblockRTPtrafconcertainportnumbers.Aportnumbermustbebetween1024and65535.
7.ClickSave.
8.InNATtraversal,selecttheprotocolsyouwanttoenableforNATtraversal.
Note
UseNATtraversalwhenthedeviceisconnectedtothenetworkfrombehindaNATrouterorarewall.Formoreinformation
see.
7
Page 8

AXISA82NetworkVideoDoorStationSeries
Additionalsettings
SetupSIPthroughaserver(PBX)
VoIP(VoiceoverIP)isagroupoftechnologiesthatenablesvoiceandmultimediacommunicationoverIPnetworks.Formore,
seeVoiceoverIP(VoIP)onpage13.
InthisproductVoIPisenabledthroughtheSIPprotocol.FormoreinformationaboutSIP,seeSessionInitiationProtocol(SIP)on
page14
TherearetwotypesofsetupsforSIP.APBX-serverisoneofthem.UseaPBX-serverwhenthecommunicationshouldbebetweenan
innitenumberofuseragentswithinandoutsidetheIPnetwork.Additionalfeaturescouldbeaddedtothesetupdependingonthe
PBX-provider.Formoreinformationsee,PrivateBranchExchange(PBX)onpage14.
1.RequestthefollowinginformationfromyourPBXprovider:
-UserID
-Domain
-Password
-AuthenticationID
-CallerID
-Registrar
-RTPstartport
2.GotoVoIP>SIPaccounts>Createaccount.
3.EnteraNamefortheaccount.
4.SelectRegistrar.
5.Selectatransportmode.
6.AddtheaccountinformationfromthePBXprovider.
7.ClickSave.
8.SetuptheSIPsettingsthesamewayasforpeer-to-peer.SeeSetupdirectSIP(P2P)onpage7formoreinformation.
Createanorganization
Note
Everycontactinthephonebookmustbelongtoanorganization.
1.GotoVoIP>Phonebook>Contacts.
2.ClickNew.
3.Enteranameanddescriptionoftheorganization.
4.ClickSave.
Createacontact
Thisexampleexplainshowtocreateanewcontactinthephonebook.Thiscontact:
•hasaSIPaddress
•belongstoanorganization
8
Page 9

AXISA82NetworkVideoDoorStationSeries
Additionalsettings
•belongstoadepartment
Beforeyoustart
•Createtheorganizationinthephonebook.Tondouthowtocreateit,seeCreateanorganizationonpage8.
•EnableSIPinVoIP>SIPsettings.
1.GotoVoIP>Phonebook>Contacts.
2.ClickEditnexttothenameoftheorganizationtowhichthecontactbelongs.
3.ClickNew.
4.Entertherstandlastnameofthecontact.
5.Enteranavailablespeeddialnumber.
Note
Thespeeddialnumberisusedtocallthecontactfromthedoorstation.Ifyouenteraspeeddialnumberwhichisalready
assignedtoanothercontact,awarningmessageappearsandyoucannotsavethecontact.
6.UnderDepartment,selectNewandenterthenameofthedepartment.
7.InCallinformation,selectSIPaddress.
8.Enterthecontact’sSIPaddress.
Note
ForinformationaboutSIPaddresses,seeSessionInitiationProtocol(SIP)onpage14.
9.SelecttheSIPaccounttocallfrom.
10.InFallback,selectNone.
Note
Afallbackisacontact,towhomthecallisforwardediftheoriginalcontactdoesnotreply.
11.ClickSave.
Congurethecallbutton
Bydefault,thecallbuttonisconguredtomakeVMS(VideoManagementSystem)calls.Ifyouwanttokeepthisconguration,you
justneedtoaddtheAxisnetworkdoorstationtotheVMS.
Thisexampleexplainshowtosetupthesystemtocallacontactinthephonebookwhenavisitorpressesthecallbutton.
1.GotoVoIP>Phonebook>CallbuttonandclickAdd.
2.SelectacontactandclickAdd.
3.DeselectVMScall.
4.ClickSave.
Todisablethecallbutton:
1.Don’taddanyrecipients,orremovealreadyaddedrecipients.
2.DeselectVMScall.
3.ClickSave.
9
Page 10

AXISA82NetworkVideoDoorStationSeries
Additionalsettings
Setupascardreader-networkconnection
Tousethedoorstationasacardreader ,youmustconnectittoadoorcontroller.Thedoorcontrollerstoresallcredentialsand
keepstrackofwhoisallowedthroughthedoor.Inthisexampleweconnectthedevicesoverthenetwork.Wealsomodifythe
allowedcardtypes.
Important
ThenetworkconnectiononlyworkswithAxisdoorcontrollers.Toconnecttoanon-Axisdoorcontroller ,youneedto
physicallyconnectthedeviceswithwires.SeeSetupascardreader-wiredconnectiononpage10.
Beforeyoustart
Congurethedoorcontroller’shardware,usingtheWiegandprotocolforthereader.Seethedoorcontroller’susermanualfor
instructions.
Setupthedoorstationasacardreader
1.GotoHardware>Reader>Readerprotocol>ProtocolandselectVAPIXreader.
2.ClickConnecttoAxisdoorcontroller.
3.Inthepop-up,selecttheprotocolforcommunicatingwiththedoorcontroller.
4.EntertheIPaddressandcredentialsforthedoorcontroller.
5.ClickSave.
6.InSelectedreader,selectthereader.
7.ClickSave.
8.IntheCardtypestab,selectthecardtypestoallow.
Note
Youcankeepthedefaultsetofcardtypesormodifythelistaccordingtoyourneeds.
9.ClickSave.
Setupascardreader-wiredconnection
Tousethedoorstationasacardreader,youmustconnectittoadoorcontroller.Thedoorcontrollerstoresallcredentialsandkeeps
trackofwhoisallowedthroughthedoor.Inthisexample,weconnectthedeviceswithwires,weusetheWiegandprotocol,activate
thebeeperanduseoneI/OportfortheLED.Wealsomodifytheallowedcardtypes.
Important
UseI/Oportsthatarenotalreadyinuse.IfyouuseI/Oportsalreadyinuse,anyeventscreatedfortheseportswillstop
working.
Beforeyoustart
•Physicallyconnectthedoorstationtoadoorcontroller.Usetheelectricalwiringdrawingsavailableat
axis.com/products/axis-a8207-ve
•Congurethedoorcontroller’shardware,usingtheWiegandprotocolforthereader.Seethedoorcontroller’suser
manualforinstructions.
Setupthedoorstationasacardreader
1.GotoHardware>Reader>Readerprotocol>ProtocolandselectWiegand.
2.InBeeper,selectActivatebeeper.
10
Page 11

AXISA82NetworkVideoDoorStationSeries
Additionalsettings
3.UnderInputforbeeper,selectI3.
4.InInputsusedforLEDcontrol,select1.
5.UnderInputforLED1,selectI1.
6.Selectwhatcolorstouseforeachstate.
7.ClickSave.
8.IntheCardtypestab,selectthecardtypestoallow.
Note
Youcankeepthedefaultsetofcardtypesormodifythelistaccordingtoyourneeds.
9.ClickSave.
UseDTMFtounlockthedoorforavisitor
Whenavisitormakesacallfromthedoorstation,thepersonwhoanswerscanusetheDual-ToneMulti-Frequencysignaling(DTMF)
ofhisSIPdevicetounlockthedoor.Thedoorcontrollerunlocksandlocksthedoor.
Thisexampleexplainshowto:
•denetheDTMFsignalinthedoorstation
•setupthedoorstationtorequestthedoorcontrollertounlockthedoor
Youmakeallsettingsinthedoorstation’swebpage.
Beforeyoustart
•AllowSIPcallsfromthedeviceandsetupaSIPaccount.See
DenetheDTMFsignalinthedoorstation
1.GotoVoIP>DTMF.
2.ClickthepencilnexttotheSIPaccount.
3.ClickAdd.
4.IntheNameeld,enter"Unlockdoor".
5.IntheSequenceeld,enter"1".
6.ClickApplyandthenOK.
Setupthedoorstationtorequestthedoorcontrollertounlockthedoor
1.GotoEvents>Management>ActionrulesandclickAdd.
2.IntheNameeld,enter"DTMFunlockdoor".
3.Fromthelistoftriggers,selectCall,DTMFandUnlockdoor.
4.Fromthelistofactions,selectAxisDoorControl.
5.ClickNewRecipient.
6.EnterthedetailsforthedoorcontrollerandclickOK.
7.ClickRetrievedoorsandselectthedoorfromthelist.
11
Page 12

AXISA82NetworkVideoDoorStationSeries
Additionalsettings
8.UnderDooractions,selectAccessDoor.
9.ClickOK.
Transmitlivevideotoamonitor
YourdevicecantransmitalivevideostreamtoanHDMImonitorwithoutanetworkconnection.Usethemonitortoseewho
isatthedoor.
1.ConnectanexternalmonitortotheHDMIconnector.
2.AdjusttheHDMIsettingsinSystem>HDMI.
Printacontactlist
Youcanprintalistofallorsomeofthecontactsinthephonebookwiththeirspeeddialnumbers.Toprintalistofallcontacts:
1.GotoVoIP>Phonebook>ContactsandclickPrintcontactlist.
2.Enteramessage,thatwillbethetitleofthelist.
3.Enterthenameofthebuildingororganizationandtheaddress.
4.Selecttoprintallcontacts.
5.ClickPrint.
12
Page 13

AXISA82NetworkVideoDoorStationSeries
Learnmore
Learnmore
Thephonebook
Thephonebookconsistsof:
•Organizations–companiesororganizationslocatedinthebuildingwherethedoorstationisplaced.
•Contacts–personsbelongingtoanorganizationandsometimesalsoadepartment.Youassignaspeeddialnumbertoeach
contact.Foreachcontactyoucanassignafallback,towhomthecallisforwardediftheoriginalcontactdoesnotanswer .
•Departments–acontactcanbelongtoadepartment.Youcreateadepartmentwhenyoucreateacontact.
•Callgroups–consistsofseveralcontactsorSIPaddresses.Youcallallrecipientsinacallgroupsimultaneously,and
anyrecipientcananswerthecall.
Youcanprintalistofallthecontactsinthephonebooktoplacenexttothedoorstation.
Inthephonebookyoucanalsocongurethecallbutton,todecidewherethecallwillgowhenavisitorpressesit.
VoiceoverIP(VoIP)
VoiceoverIP(VoIP)isagroupoftechnologiesthatenablesvoicecommunicationandmultimediasessionsoverIPnetworks,suchas
theinternet.Intraditionalphonecalls,analogsignalsaresentthroughcircuittransmissionsoverthePublicSwitchedTelephone
Network(PSTN).InaVoIPcall,analogsignalsareturnedintodigitalsignalstomakeitpossibletosendthemindatapackets
acrosslocalIPnetworksortheinternet.
IntheAxisproduct,VoIPisenabledthroughtheSessionInitiationProtocol(SIP)andDual-ToneMulti-Frequency(DTMF)signaling.
Example
WhenyoupressthecallbuttononanAxisdoorstation,acallisinitiatedtooneormorepredenedrecipients.Whenarecipient
replies,acallisestablished.ThevoiceandvideoistransferredthroughVoIPtechnologies.
13
Page 14

AXISA82NetworkVideoDoorStationSeries
SIP
Learnmore
SessionInitiationProtocol(SIP)
TheSessionInitiationProtocol(SIP)isusedtosetup,maintainandterminateVoIPcalls.Youcanmakecallsbetweentwoormore
parties,calledSIPuseragents.TomakeaSIPcallyoucanuse,forexample,SIPphones,softphonesorSIP-enabledAxisdevices.
TheactualaudioorvideoisexchangedbetweentheSIPuseragentswithatransportprotocol,forexampleRTP(Real-Time
TransportProtocol).
Youcanmakecallsonlocalnetworksusingapeer-to-peersetup,oracrossnetworksusingaPBX.
Peer-to-peerSIP(P2PSIP)
ThemostbasictypeofSIPcommunicationtakesplacedirectlybetweentwoormoreSIPuseragents.Thisiscalledpeer-to-peerSIP
(P2PSIP).Ifittakesplaceonalocalnetwork,allthat’sneededaretheSIPaddressesoftheuseragents.AtypicalSIPaddressinthis
casewouldbesip:<local-ip>
Example
1
UseragentA-doorstation.SIPaddress:sip:192.168.1.101
2
UseragentB-SIP-enabledphone.SIPaddress:sip:192.168.1.100
YoucansetuptheAxisdoorstationtocallforexampleaSIP-enabledphoneonthesamenetworkusingapeer-to-peerSIPsetup.
PrivateBranchExchange(PBX)
WhenyoumakeSIPcallsoutsideyourlocalIPnetwork,aPrivateBranchExchange(PBX)canactasacentralhub.Themain
componentofaPBXisaSIPserver ,whichisalsoreferredtoasaSIPproxyoraregistrar.APBXworkslikeatraditionalswitchboard,
showingtheclient'scurrentstatusandallowingforexamplecalltransfers,voicemail,andredirections.
ThePBXSIPservercanbesetupasalocalentityoroffsite.Itcanbehostedonanintranetorbyathirdpartyprovider.Whenyou
makeSIPcallsbetweennetworks,callsareroutedthroughasetofPBXs,thatquerythelocationoftheSIPaddresstobereached.
EachSIPuseragentregisterswiththePBX,andcanthenreachtheothersbydialingthecorrectextension.AtypicalSIPaddressin
thiscasewouldbesip:<user>@<domain>orsip:<user>@<registrar-ip>.TheSIPaddressisindependentofitsIP
addressandthePBXmakesthedeviceaccessibleaslongasitisregisteredtothePBX.
Example
14
Page 15

AXISA82NetworkVideoDoorStationSeries
SIP
SIP
SIP
Learnmore
WhenyoupressthecallbuttononanAxisdoorstation,thecallisforwardedthroughoneormorePBXstoaSIPaddresseitheronthe
localIPnetworkorovertheinternet.
Setuprulesandalerts
Youcancreaterulestomakeyourdeviceperformanactionwhencertaineventsoccur.Aruleconsistsofconditionsandactions.
Theconditionscanbeusedtotriggertheactions.Forexample,thedevicecanstartarecordingorsendanemailwhenitdetects
motion,orshowanoverlaytextwhenitrecords.
Applications
AXISCameraApplicationPlatform(ACAP)isanopenplatformthatenablesthirdpartiestodevelopanalyticsandotherapplications
forAxisproducts.Tondoutmoreaboutavailableapplications,downloads,trialsandlicenses,gotoaxis.com/applications.
TondtheusermanualsforAxisapplications,gotoaxis.com.
15
Page 16

AXISA82NetworkVideoDoorStationSeries
Dailyuse
Dailyuse
Usethekeypad
Iwantto...Action
Callsomeonewhocanletmeintothebuilding.
Callapersoninthebuilding.
OpenthedoorwithmycardandPIN.
OpenthedoorwithmyPIN.
Openthedoorwithmycard.
Press
Entertheperson’sspeeddialnumberandpress
TapthecardandenterthePIN.
EnterthePINandpress#.
Tapthecard.
.
.
16
Page 17

AXISA82NetworkVideoDoorStationSeries
Troubleshooting
Troubleshooting
Ifyoucan’tndwhatyou’relookingforhere,trythetroubleshootingsectionataxis.com/support.
Resettofactorydefaultsettings
Important
Resettofactorydefaultshouldbeusedwithcaution.Aresettofactorydefaultresetsallsettings,includingtheIPaddress,to
thefactorydefaultvalues.
Toresettheproducttothefactorydefaultsettings:
1.Disconnectpowerfromtheproduct.
2.Pressandholdthecontrolbuttonwhilereconnectingpower.SeeProductoverviewonpage4.
3.Keepthecontrolbuttonpressedfor15–30secondsuntilthestatusLEDindicatorashesamber.
4.Releasethecontrolbutton.TheprocessiscompletewhenthestatusLEDindicatorturnsgreen.Theproducthasbeenreset
tothefactorydefaultsettings.IfnoDHCPserverisavailableonthenetwork,thedefaultIPaddressis192.168.0.90
5.UsetheinstallationandmanagementsoftwaretoolstoassignanIPaddress,setthepassword,andaccesstheproduct.
Theinstallationandmanagementsoftwaretoolsareavailablefromthesupportpagesonaxis.com/support
Itisalsopossibletoresetparameterstofactorydefaultthroughthewebinterface.GotoMaintenance>Maintenanceactionsand
clickRestoretoresettofactorydefaultvaluesbutkeeptheIPaddress,orDefaulttoresetallvaluesincludingtheIPaddress.
Checkthecurrentrmware
Firmwareisthesoftwarethatdeterminesthefunctionalityofnetworkdevices.Oneofyourrstactionswhenyoutroubleshoota
problemshouldbetocheckthecurrentrmwareversion.Thelatestversionmaycontainacorrectionthatxesyourparticular
problem.
Tocheckthecurrentrmware:
1.Inthedevice’swebpage,gotoOverview.
2.ChecktheFirmwareversion.
Upgradethermware
Important
Preconguredandcustomizedsettingsaresavedwhenthermwareisupgraded(providedthatthefeaturesareavailablein
thenewrmware),althoughthisisnotguaranteedbyAxisCommunicationsAB.
Important
Makesurethedeviceremainsconnectedtothepowersourcethroughouttheupgradeprocess.
Note
Whenyouupgradethedevicewiththelatestrmware,thedevicereceivesthelatestfunctionalityavailable.Alwaysreadthe
upgradeinstructionsandreleasenotesavailablewitheachnewreleasebeforeyouupgradethermware.Tondthelatest
rmwareandthereleasenotes,gotoaxis.com/support/rmware
1.Downloadthelatestrmwareletoyourcomputer,availablefreeofchargeataxis.com/support/rmware
17
Page 18

AXISA82NetworkVideoDoorStationSeries
Troubleshooting
2.Logintothedeviceasanadministrator.
3.GotoSystem>Maintenance>Firmwareupgradeandfollowtheinstructionsonthepage.Whentheupgradehas
nished,thedevicerestartsautomatically.
Technicalissues,cluesandsolutions
Ifyoucan’tndwhatyou’relookingforhere,trythetroubleshootingsectionataxis.com/support.
Problemsupgradingthermware
FirmwareupgradefailureIfthermwareupgradefails,thedevicereloadsthepreviousrmware.Themostcommonreason
ProblemssettingtheIPaddress
Thedeviceislocatedona
differentsubnet
TheIPaddressisbeingused
byanotherdevice
isthatthewrongrmwarelehasbeenuploaded.Checkthatthenameofthermwarele
correspondstoyourdeviceandtryagain.
IftheIPaddressintendedforthedeviceandtheIPaddressofthecomputerusedtoaccessthe
devicearelocatedondifferentsubnets,youcannotsettheIPaddress.Contactyournetwork
administratortoobtainanIPaddress.
DisconnecttheAxisdevicefromthenetwork.Runthepingcommand(inaCommand/DOSwindow ,
typepingandtheIPaddressofthedevice):
•Ifyoureceive:Replyfrom<IPaddress>:bytes=32;time=10...
thismeansthattheIPaddressmayalreadybeinusebyanotherdeviceonthenetwork.
ObtainanewIPaddressfromthenetworkadministratorandreinstallthedevice.
•Ifyoureceive:Requesttimedout,thismeansthattheIPaddressisavailable
forusewiththeAxisdevice.Checkallcablingandreinstallthedevice.
PossibleIPaddressconict
withanotherdeviceonthe
samesubnet
Thedevicecannotbeaccessedfromabrowser
Cannotlogin
TheIPaddresshasbeen
changedbyDHCP
Thedeviceisaccessiblelocallybutnotexternally
Toaccessthedeviceexternally,werecommendusingoneofthefollowingapplicationsforWindows
•AXISCompanion:freeofcharge,idealforsmallsystemswithbasicsurveillanceneeds.
•AXISCameraStation:30-daytrialversionfreeofcharge,idealforsmalltomid-sizesystems.
Forinstructionsanddownload,gotoaxis.com/vms.
ThestaticIPaddressintheAxisdeviceisusedbeforetheDHCPserversetsadynamicaddress.
ThismeansthatifthesamedefaultstaticIPaddressisalsousedbyanotherdevice,theremay
beproblemsaccessingthedevice.
WhenHTTPSisenabled,ensurethatthecorrectprotocol(HTTPorHTTPS)isusedwhenattempting
tologin.Youmayneedtomanuallytypehttporhttpsinthebrowser’saddresseld.
Ifthepasswordfortheuserrootislost,thedevicemustberesettothefactorydefaultsettings.
SeeResettofactorydefaultsettingsonpage17.
IPaddressesobtainedfromaDHCPserveraredynamicandmaychange.IftheIPaddresshasbeen
changed,useAXISIPUtilityorAXISDeviceManagertolocatethedeviceonthenetwork.Identify
thedeviceusingitsmodelorserialnumber,orbytheDNSname(ifthenamehasbeencongured).
®
:
Performanceconsiderations
Whensettingupyoursystem,itisimportanttoconsiderhowvarioussettingsandsituationsaffecttheperformance.Somefactors
affecttheamountofbandwidth(thebitrate)required,otherscanaffecttheframerate,andsomeaffectboth.Iftheloadonthe
CPUreachesitsmaximum,thisalsoaffectstheframerate.
18
Page 19

AXISA82NetworkVideoDoorStationSeries
Troubleshooting
Thefollowingfactorsarethemostimportanttoconsider:
•Highimageresolutionorlowercompressionlevelsresultinimagescontainingmoredatawhichinturnaffectsthe
bandwidth.
•AccessbylargenumbersofMotionJPEGorunicastH.264clientsaffectsthebandwidth.
•Simultaneousviewingofdifferentstreams(resolution,compression)bydifferentclientsaffectsbothframerateand
bandwidth.
Useidenticalstreamswhereverpossibletomaintainahighframerate.Streamprolescanbeusedtoensurethat
streamsareidentical.
•AccessingMotionJPEGandH.264videostreamssimultaneouslyaffectsbothframerateandbandwidth.
•Heavyusageofeventsettingsaffectstheproduct’sCPUloadwhichinturnaffectstheframerate.
•UsingHTTPSmayreduceframerate,inparticularifstreamingMotionJPEG.
•Heavynetworkutilizationduetopoorinfrastructureaffectsthebandwidth.
•Viewingonpoorlyperformingclientcomputerslowersperceivedperformanceandaffectsframerate.
•RunningmultipleAXISCameraApplicationPlatform(ACAP)applicationssimultaneouslymayaffecttheframerateand
thegeneralperformance.
19
Page 20

AXISA82NetworkVideoDoorStationSeries
Specifications
Specifications
Tondthelatestversionoftheproduct’sdatasheet,gototheproductpageataxis.comandlocateSupport&Documentation.
Frontpanelindicatorsandcontrols
Whenyouconnecttheproducttopower,theindicatoriconsandtheindicatorstriplightupforxxseconds.
Callindicatoricons
IconIndication
Steadybluewhenoutgoingcallinitiated.
Flashesbluewhenincomingcallinitiated.
Steadyamberforongoingcall.
Steadygreenwhendoorisopen.
Cardreaderindicatorstripe
Thestripeindicatesreaderfeedback.
Callbutton
Youcanusethebuilt-inlightaroundthecallbuttontolightupthefacesofvisitors.
LEDindicators
StatusLED
GreenSteadygreenfornormaloperation.
Indication
SDcardslot
NO
TICE
NO NO
TICE TICE
•RiskofdamagetoSDcard.Donotusesharptools,metalobjects,orexcessiveforcewheninsertingorremovingthe
SDcard.Useyourngerstoinsertandremovethecard.
•Riskofdatalossandcorruptedrecordings.DonotremovetheSDcardwhiletheproductisrunning.UnmounttheSDcard
fromtheproduct’swebpagebeforeremoval.
ThisproductsupportsmicroSD/microSDHC/microSDXCcards.
ForSDcardrecommendations,seeaxis.com.
trademarksorregisteredtrademarksofSD-3C,LLCintheUnitedStates,othercountriesorboth.
microSD,microSDHC,andmicroSDXCLogosaretrademarksofSD-3CLLC.microSD,microSDHC,microSDXCare
20
Page 21

AXISA82NetworkVideoDoorStationSeries
Specifications
Buttons
Controlbutton
Thecontrolbuttonisusedfor:
•Resettingtheproducttofactorydefaultsettings.SeeResettofactorydefaultsettingsonpage17.
Connectors
HDMIconnector
UsethemicroHDMI
Networkconnector
RJ45EthernetconnectorwithPoweroverEthernetPlus(PoE+).
Audioconnector
TM
connectortoconnectadisplayorpublicviewmonitor.
4-pinterminalblockforaudioinputandoutput.
FunctionPinNotes
Linein
GND
Lineout
GND
1
2
3
4
Relayconnector
8-pinterminalblockforsolidstaterelaysthatcanbeusedinthefollowingways:
•Asastandardrelaythatopensandclosesauxiliarycircuits.
•Tocontrolalockdirectly.
•Tocontrolalockthroughasafetyrelay.Usingasafetyrelayonthesecuresideofthedoorpreventshotwiring.
Linein(mono)
Audioground
Lineout
Audioground
FunctionPinNotes
NO/NC
1
Normallyopen/normallyclosed
Forconnectingrelaydevices.
Thetworelaypinsaregalvanicallyseparatedfromthe
restofthecircuitry.
21
Specications
Maxcurrent1A
Maxvoltage30VDC
Page 22

AXISA82NetworkVideoDoorStationSeries
Specifications
COM
24VDC
DCground
NO/NC
COM
12VDC
DCground
1.WhenpoweredthroughPoweroverEthernetIEEE802.3af/802.3atType1Class3.
2.WhenpoweredthroughPoweroverEthernetPlus(PoE+)IEEE802.3atType2Class4orDCpowerinput.
3.WhenpoweredthroughPoweroverEthernetIEEE802.3af/802.3atType1Class3.
4.WhenpoweredthroughPoweroverEthernetPlus(PoE+)IEEE802.3atType2Class4orDCpowerinput.
2
3
4
5
6
7
8
Common
Forpoweringauxiliaryequipment.
Note:Thispincanonlybeusedaspowerout.
Normallyopen/normallyclosed
Forconnectingrelaydevices.
Thetworelaypinsaregalvanicallyseparatedfromthe
restofthecircuitry.
Common
Forpoweringauxiliaryequipment.
Note:Thispincanonlybeusedaspowerout.
Readerconnector
4–pinterminalblockforconnectingexternalreader.
FunctionPinNotes
DCground
12VDC
D0/A+
D1/B-
1
2
3
4
Forpoweringauxiliary
equipment.
Note:Thispincanonlybe
usedaspowerout.
Wiegand:DATA0output
RS485:A+
Wiegand:DATA1output
RS485:B-
Outputvoltage24VDC
Maxcurrent50mA
Maxcurrent350mA
0VDC
Maxcurrent1A
Maxvoltage30VDC
Outputvoltage12VDC
Maxcurrent100mA
Maxcurrent700mA
0VDC
Specications
0VDC
Outputvoltage12VDC
1
2
3
4
I/Oconnector
UsetheI/Oconnectorwithexternaldevicesincombinationwith,forexample,motiondetection,eventtriggering,andalarm
notications.Inadditiontothe0VDCreferencepointandpower(DCoutput),theI/Oconnectorprovidestheinterfaceto:
Digitalinput-Forconnectingdevicesthatcantogglebetweenanopenandclosedcircuit,forexamplePIRsensors,door/window
contacts,andglassbreakdetectors.
Digitaloutput-ForconnectingexternaldevicessuchasrelaysandLEDs.ConnecteddevicescanbeactivatedbytheVAPIX®
ApplicationProgrammingInterfaceorfromtheproduct’swebpage.
FunctionPinNotes
DCground
1
Specications
0VDC
22
Page 23

AXISA82NetworkVideoDoorStationSeries
Specifications
DCoutput
(InputorOutput)
Example
2
3–6
1
DCground
2
DCoutput12V,max50mA
3
I/Oconguredasinput
4
I/Oconguredasoutput
5
CongurableI/O
6
CongurableI/O
Canbeusedtopowerauxiliaryequipment.
Note:Thispincanonlybeusedaspowerout.
Digitalinput–Connecttopin1toactivate,orleaveoating
(unconnected)todeactivate.
Digitaloutput–Internallyconnectedtopin1(DCground)when
active,andoating(unconnected)wheninactive.Ifusedwithan
inductiveload,e.g.,arelay,connectadiodeinparallelwiththeload,
toprotectagainstvoltagetransients.
12VDC
Maxload=50mA
0tomax30VDC Congurable
0tomax30VDC,opendrain,
100mA
Powerconnector
2-pinterminalblockforDCpowerinput.UseaSafetyExtraLowVoltage(SELV)compliantlimitedpowersource(LPS)witheither
aratedoutputpowerlimitedto≤100Woraratedoutputcurrentlimitedto≤5A.
FunctionPinNotes
DCground
DCinput
1
2
ForpoweringcontrollerwhennotusingPowerover
Ethernet.
Note:Thispincanonlybeusedaspowerin.
Specications
0VDC
8–28VDC,max22W
Maxloadonoutputs9W
23
Page 24

AXISA82NetworkVideoDoorStationSeries
Safetyinformation
Safetyinformation
Hazardlevels
DANGER
Indicatesahazardoussituationwhich,ifnotavoided,willresultindeathorseriousinjury .
WARNING
Indicatesahazardoussituationwhich,ifnotavoided,couldresultindeathorseriousinjury.
CAUTION
Indicatesahazardoussituationwhich,ifnotavoided,couldresultinminorormoderateinjury.
NO
TICE
NO NO
TICE TICE
Indicatesasituationwhich,ifnotavoided,couldresultindamagetoproperty.
Othermessagelevels
Important
Indicatessignicantinformationwhichisessentialfortheproducttofunctioncorrectly.
Note
Indicatesusefulinformationwhichhelpsingettingthemostoutoftheproduct.
24
Page 25

UserManualVer.M6.3
AXISA82NetworkVideoDoorStationSeries
©AxisCommunicationsAB,2019-2020
Date:January2020
PartNo.T10121755
 Loading...