

Page 1

AXISA1001NetworkDoorController&AXISEntryManager
UserManual
Page 2

AboutthisDocument
Thismanualisintendedforadministratorsandusersof
AXISA1001NetworkDoorControllerandisapplicableto
AXISEntryManagerandrmware1.25andlater.Itincludes
instructionsforusingandmanagingtheproductonyournetwork.
Previousexperienceofnetworkingwillbeofusewhenusingthis
product.SomeknowledgeofUNIXorLinux-basedsystemsmayalsobe
benecial,fordevelopingshellscriptsandapplications.Laterversions
ofthisdocumentwillbepostedtotheAxiswebsite,asrequired.See
alsotheproduct’sonlinehelp,availableviatheweb-basedinterface.
Inthismanual,AXISA1001NetworkDoorControllerisreferredtoas:
theAxisproduct,product,networkdoorcontroller ,anddoorcontroller .
Liability
Everycarehasbeentakeninthepreparationofthisdocument.Please
informyourlocalAxisofceofanyinaccuraciesoromissions.Axis
CommunicationsABcannotbeheldresponsibleforanytechnicalor
typographicalerrorsandreservestherighttomakechangestothe
productandmanualswithoutpriornotice.AxisCommunicationsAB
makesnowarrantyofanykindwithregardtothematerialcontained
withinthisdocument,including,butnotlimitedto,theimplied
warrantiesofmerchantabilityandtnessforaparticularpurpose.Axis
CommunicationsABshallnotbeliablenorresponsibleforincidentalor
consequentialdamagesinconnectionwiththefurnishing,performance
oruseofthismaterial.Thisproductisonlytobeusedforitsintended
purpose.
IntellectualPropertyRights
AxisABhasintellectualpropertyrightsrelatingtotechnologyembodied
intheproductdescribedinthisdocument.Inparticular ,andwithout
limitation,theseintellectualpropertyrightsmayincludeoneormore
ofthepatentslistedatwww.axis.com/patent.htmandoneormore
additionalpatentsorpendingpatentapplicationsintheUSandother
countries.
ThisproductcontainssourcecodecopyrightAppleComputer,
Inc.,underthetermsofApplePublicSourceLicense2.0(see
www.opensource.apple.com/apsl).Thesourcecodeisavailablefrom
https://developer.apple.com/bonjour/
EquipmentModications
Thisequipmentmustbeinstalledandusedinstrictaccordancewiththe
instructionsgivenintheuserdocumentation.Thisequipmentcontains
nouser-serviceablecomponents.Unauthorizedequipmentchangesor
modicationswillinvalidateallapplicableregulatorycertications
andapprovals.
TrademarkAcknowledgments
AXISCOMMUNICATIONS,AXIS,ETRAX,ARTPECandVAPIXare
registeredtrademarksortrademarkapplicationsofAxisABinvarious
jurisdictions.Allothercompanynamesandproductsaretrademarksor
registeredtrademarksoftheirrespectivecompanies.
NetworkTimeProtocolVersion4DistributioniscopyrightofUniversity
ofDelaware–©UniversityofDelaware1992–2011.Thefollowing
copyrightnoticeappliestoalllescollectivelycalledtheNetworkTime
ProtocolVersion4Distribution.Unlessspecicallydeclaredotherwise
inanindividualle,thisnoticeappliesasifthetextwasexplicitly
includedinthele.Permissiontouse,copy,modify,anddistributethis
softwareanditsdocumentationforanypurposewithorwithoutfeeis
herebygranted,providedthattheabovecopyrightnoticeappearsinall
copiesandthatboththecopyrightnoticeandthispermissionnotice
appearinsupportingdocumentation,andthatthenameUniversityof
Delawarenotbeusedinadvertisingorpertainingtodistributionofthe
softwarewithoutspecic,writtenpriorpermission.TheUniversityof
Delawaremakesnorepresentationsaboutthesuitabilitythissoftware
foranypurpose.Itisprovided"asis"withoutexpressorimplied
warranty.
RegulatoryInformation
Europe
ThisproductcomplieswiththeapplicableCEmarkingdirectives
andharmonizedstandards:
•ElectromagneticCompatibility(EMC)Directive2004/108/EC.See
ElectromagneticCompatibility(EMC)onpage2.
•LowVoltage(LVD)Directive2006/95/EC.SeeSafetyonpage2.
•RestrictionsofHazardousSubstances(RoHS)Directive201 1/65/EU.
SeeDisposalandRecyclingonpage3.
Acopyoftheoriginaldeclarationofconformitymaybeobtainedfrom
AxisCommunicationsAB.SeeContactInformationonpage3.
ElectromagneticCompatibility(EMC)
Thisequipmenthasbeendesignedandtestedtofulllapplicable
standardsfor:
•Radiofrequencyemissionwheninstalledaccordingtothe
instructionsandusedinitsintendedenvironment.
•Immunitytoelectricalandelectromagneticphenomenawhen
installedaccordingtotheinstructionsandusedinitsintended
environment.
USA
Thisequipmenthasbeentestedusingashieldednetworkcable(STP)
andfoundtocomplywiththelimitsforaClassBdigitaldevice,
pursuanttopart15oftheFCCRules.Theselimitsaredesigned
toprovidereasonableprotectionagainstharmfulinterferenceina
residentialinstallation.Thisequipmentgenerates,usesandcanradiate
radiofrequencyenergyand,ifnotinstalledandusedinaccordance
withtheinstructions,maycauseharmfulinterferencetoradio
communications.However,thereisnoguaranteethatinterference
willnotoccurinaparticularinstallation.Ifthisequipmentdoes
causeharmfulinterferencetoradioortelevisionreception,which
canbedeterminedbyturningtheequipmentoffandon,theuseris
encouragedtotrytocorrecttheinterferencebyoneormoreofthe
followingmeasures:
•Reorientorrelocatethereceivingantenna.
•Increasetheseparationbetweentheequipmentandreceiver .
•Connecttheequipmentintoanoutletonacircuitdifferentfrom
thattowhichthereceiverisconnected.
•Consultthedealeroranexperiencedradio/TVtechnicianforhelp.
Theproductshallbeconnectedusingashieldednetworkcable(STP)
thatisproperlygrounded.
Canada
ThisdigitalapparatuscomplieswithCANICES-3(ClassB).Theproduct
shallbeconnectedusingashieldednetworkcable(STP)thatisproperly
grounded.
CetappareilnumériqueestconformeàlanormeCANNMB-3(classeB).
Leproduitdoitêtreconnectéàl'aided'uncâbleréseaublindé(STP)qui
estcorrectementmisàlaterre.
Europe
ThisdigitalequipmentfulllstherequirementsforRFemission
accordingtotheClassBlimitofEN55022.Theproductshallbe
connectedusingashieldednetworkcable(STP)thatisproperly
grounded.
Thisproductfulllstherequirementsforimmunityaccording
toEN61000-6-1residential,commercialandlight-industrial
environments.
Thisproductfulllstherequirementsforimmunityaccordingto
EN61000-6-2industrialenvironments.
Thisproductfulllstherequirementsforimmunityaccordingto
EN55024ofceandcommercialenvironments
Thisproductfulllstherequirementsforimmunityaccordingto
EN50130-4residential,commercial,light-industrialandindustrial
environments.
Australia/NewZealand
ThisdigitalequipmentfulllstherequirementsforRFemission
accordingtotheClassBlimitofAS/NZSCISPR22.Theproductshall
beconnectedusingashieldednetworkcable(STP)thatisproperly
grounded.
Japan
この装置は、クラスB情報技術装置です。この装置は、家
庭環境で使用することを目的としていますが、この装置が
ラジオやテレビジョン受信機に近接して使用されると、受
信障害を引き起こすことがあります。取扱説明書に従って
正しい取り扱いをして下さい。本製品は、シールドネット
ワークケーブル(STP)を使用して接続してください。また
適切に接地してください。
Safety
ThisproductcomplieswithIEC/EN/UL60950-1,SafetyofInformation
TechnologyEquipment.Ifitsconnectingcablesareroutedoutdoors,
Page 3

theproductshallbegroundedeitherthroughashieldednetworkcable
(STP)orotherappropriatemethod.
Thepowersupplyusedwiththisproductshallfullltherequirements
forSafetyExtraLowVoltage(SELV)andLimitedPowerSource(LPS)
accordingtoIEC/EN/UL60950-1.
DisposalandRecycling
Whenthisproducthasreachedtheendofitsusefullife,disposeof
itaccordingtolocallawsandregulations.Forinformationabout
yournearestdesignatedcollectionpoint,contactyourlocalauthority
responsibleforwastedisposal.Inaccordancewithlocallegislation,
penaltiesmaybeapplicableforincorrectdisposalofthiswaste.
Europe
Thissymbolmeansthattheproductshallnotbedisposedof
togetherwithhouseholdorcommercialwaste.Directive2012/19/EU
onwasteelectricalandelectronicequipment(WEEE)isapplicablein
theEuropeanUnionmemberstates.Topreventpotentialharmto
humanhealthandtheenvironment,theproductmustbedisposed
ofinanapprovedandenvironmentallysaferecyclingprocess.For
informationaboutyournearestdesignatedcollectionpoint,contact
yourlocalauthorityresponsibleforwastedisposal.Businessesshould
contacttheproductsupplierforinformationabouthowtodispose
ofthisproductcorrectly .
ThisproductcomplieswiththerequirementsofDirective201 1/65/EUon
therestrictionoftheuseofcertainhazardoussubstancesinelectrical
andelectronicequipment(RoHS).
China
Thisproductcomplieswiththerequirementsofthelegislative
actAdministrationontheControlofPollutionCausedbyElectronic
InformationProducts(ACPEIP).
ContactInformation
AxisCommunicationsAB
Emdalavägen14
22369Lund
Sweden
Tel:+46462721800
Fax:+4646136130
www.axis.com
SupportedReaders
Thislistofsupportedreadersissubjecttochangewithoutnotice.
ContactyourAxisresellerforinformationaboutsupportedreaders.
ThisproductiscompatiblewithULListedWiegandaccesscontrol
readers
ThisproductiscompatiblewiththefollowingRS485accesscontrol
readers:
AXISA401 1-EReader
HIDiCLASS®RW100:6101CG40000,6101CGM0000,6101CK40000,
6101CK40002,6101CK40100,6101CK403C0,6101CKM0000,
6101CKM0002,6101CKM0203;RW300:61 1 1CG40000,61 1 1CG400C0,
61 11CGM0000,61 11CK40000,611 1CK4000Z,61 11CKM0000;
RW400:6121CG40000,6121CGM0000,6121CK40000,
6121CK40003,6121CK40007-G3.0,6121CK4000D-G3.0,
6121CKM0000;R40:6122CKP00P0,6122CKP05P0,6122CKP06P0;
RWK400:6131CG4020000,6131CK4000000,6131CK4000014,
6131CK4000300,6131CK4020000,6131CKM000000,
6131CKM000214;RK40:6132BKP00Q709-G3.0,6132CKP000009,
6132CKP00001 1,6132CKP000700-G3.0,6132CKP000709-G3.0,
6132CKP001009,6132CKP00101 1,6132CKP00P000,6132CKP00P009,
6132CKP00P709-G3.0,6132CKP00Q709-G3.0,6132CKP030014,
6132CKP060514,6132CKP06P009,6132CKP06P609,6132CKP070209;
RW150:6141CG40000,6141CGM0000,6141CK40000,6141CKM0000;
R15:6142CKP000Z,6142CKP00P0,6142CKP0100;RWKL550:
6171BK4000000,6171BK4000009,6171BK4000014,6171BK4000214,
6171BK4000500,6171BK4040Z14,6171BK4060000,617 1BK4060209,
6171BK4060Z09,6171BK4061000,6171BKM000000,6171BKM000200,
6171BKM000300,6171BKM040400;RWKLB575:6181BK4000000,
6181BK4000009,6181BK4000014,6181BK4000022,6181BK406C009;
HIDSmartid®:8031DSAP
HIDpivClass®R10-H:900LHRNAK00000,900LHRTAK00000,
900NHRNAK00000,900NHRTAK00000,900PHRNAK00000,
900PHRTAK00000,910LHRNAK00000,910LHRTAK00000,
910NHRNAK00000,910NHRTAK00000,910PHRNAK00000,
910PHRTAK00000,920LHRNAK00000,920LHRTAK00000,
920NHRNAK00000,920NHRTAK00000,920PHRNAK00000,
920PHRTAK00000,921LHRNAK00000,921LHRTAK00000,
921NHRNAK00000,921NHRTAK00000,921PHRNAK00000,
921PHRTAK00000;RPKCL40-P:923LPRNAK00000,923LPRTAK00000,
923NPRTAK00000,923PPRNAK00000,923PPRTAK00000
TM
Aptiq
:M1 1,MTK15,MTMSK15,MT15,MTMS15
ForinformationaboutwhichcompatibleRS485accesscontrolreaders
havebeenveriedbyUL,seetheInstallationGuideavailableat
www.axis.com
Support
Shouldyourequireanytechnicalassistance,pleasecontactyourAxis
reseller.Ifyourquestionscannotbeansweredimmediately ,your
resellerwillforwardyourqueriesthroughtheappropriatechannelsto
ensurearapidresponse.IfyouareconnectedtotheInternet,youcan:
•downloaduserdocumentationandsoftwareupdates
•ndanswerstoresolvedproblemsintheFAQdatabase.Search
byproduct,category ,orphrase
•reportproblemstoAxissupportstaffbyloggingintoyourprivate
supportarea
•chatwithAxissupportstaff(selectedcountriesonly)
•visitAxisSupportatwww.axis.com/techsup/
LearnMore!
VisitAxislearningcenterwww.axis.com/academy/forusefultrainings,
webinars,tutorialsandguides.
Page 4

AXISA1001NetworkDoorController&AXISEntryManager
TableofContents
HardwareOverview..........................................5
LEDIndicators..................................................7
ConnectorsandButtons..........................................8
AccesstheProduct..........................................10
AccessfromaBrowser...........................................10
AccessfromtheInternet..........................................10
SettheRootPassword...........................................10
TheOverviewPage..............................................1 1
SystemConguration........................................12
Conguration–StepbyStep......................................12
SelectaLanguage...............................................12
ConguretheHardware..........................................13
VerifytheHardwareConnections...................................17
SettheDateandTime............................................17
ConguretheNetworkSettings....................................18
CongureCardFormats..........................................19
ManageNetworkDoorControllers..................................21
MaintenanceInstructions.........................................23
AccessManagement.........................................24
AboutUsers....................................................24
TheAccessManagementPage.....................................24
ChooseaWorkow..............................................24
CreateandEditAccessSchedules..................................25
CreateandEditGroups...........................................27
ManageDoors..................................................27
CreateandEditUsers............................................29
ExampleAccessScheduleCombinations.............................31
AlarmandEventConguration................................33
ViewtheEventLog..............................................33
ViewtheAlarmLog..............................................33
ConguretheEventandAlarmLogs................................33
SetUpActionRules.............................................34
ReaderFeedback................................................39
Reports...................................................40
View,Print,andExportReports....................................40
SystemOptions.............................................41
Security.......................................................41
Date&Time....................................................43
Network.......................................................43
Ports&Devices.................................................48
Maintenance...................................................48
Support.......................................................49
Advanced......................................................50
ResettoFactoryDefaultSettings...................................50
Troubleshooting............................................51
ChecktheFirmware.............................................51
UpgradetheFirmware...........................................51
EmergencyRecoveryProcedure....................................51
Symptoms,PossibleCausesandRemedialActions.....................52
TechnicalSpecications......................................54
AXISA1001NetworkDoorController................................54
AXISEntryManager.............................................56
Connectors....................................................57
ConnectionDiagrams............................................61
4
Page 5
AXISA1001NetworkDoorController&AXISEntryManager
1
2
5
4
8
6
7
3
HardwareOverview
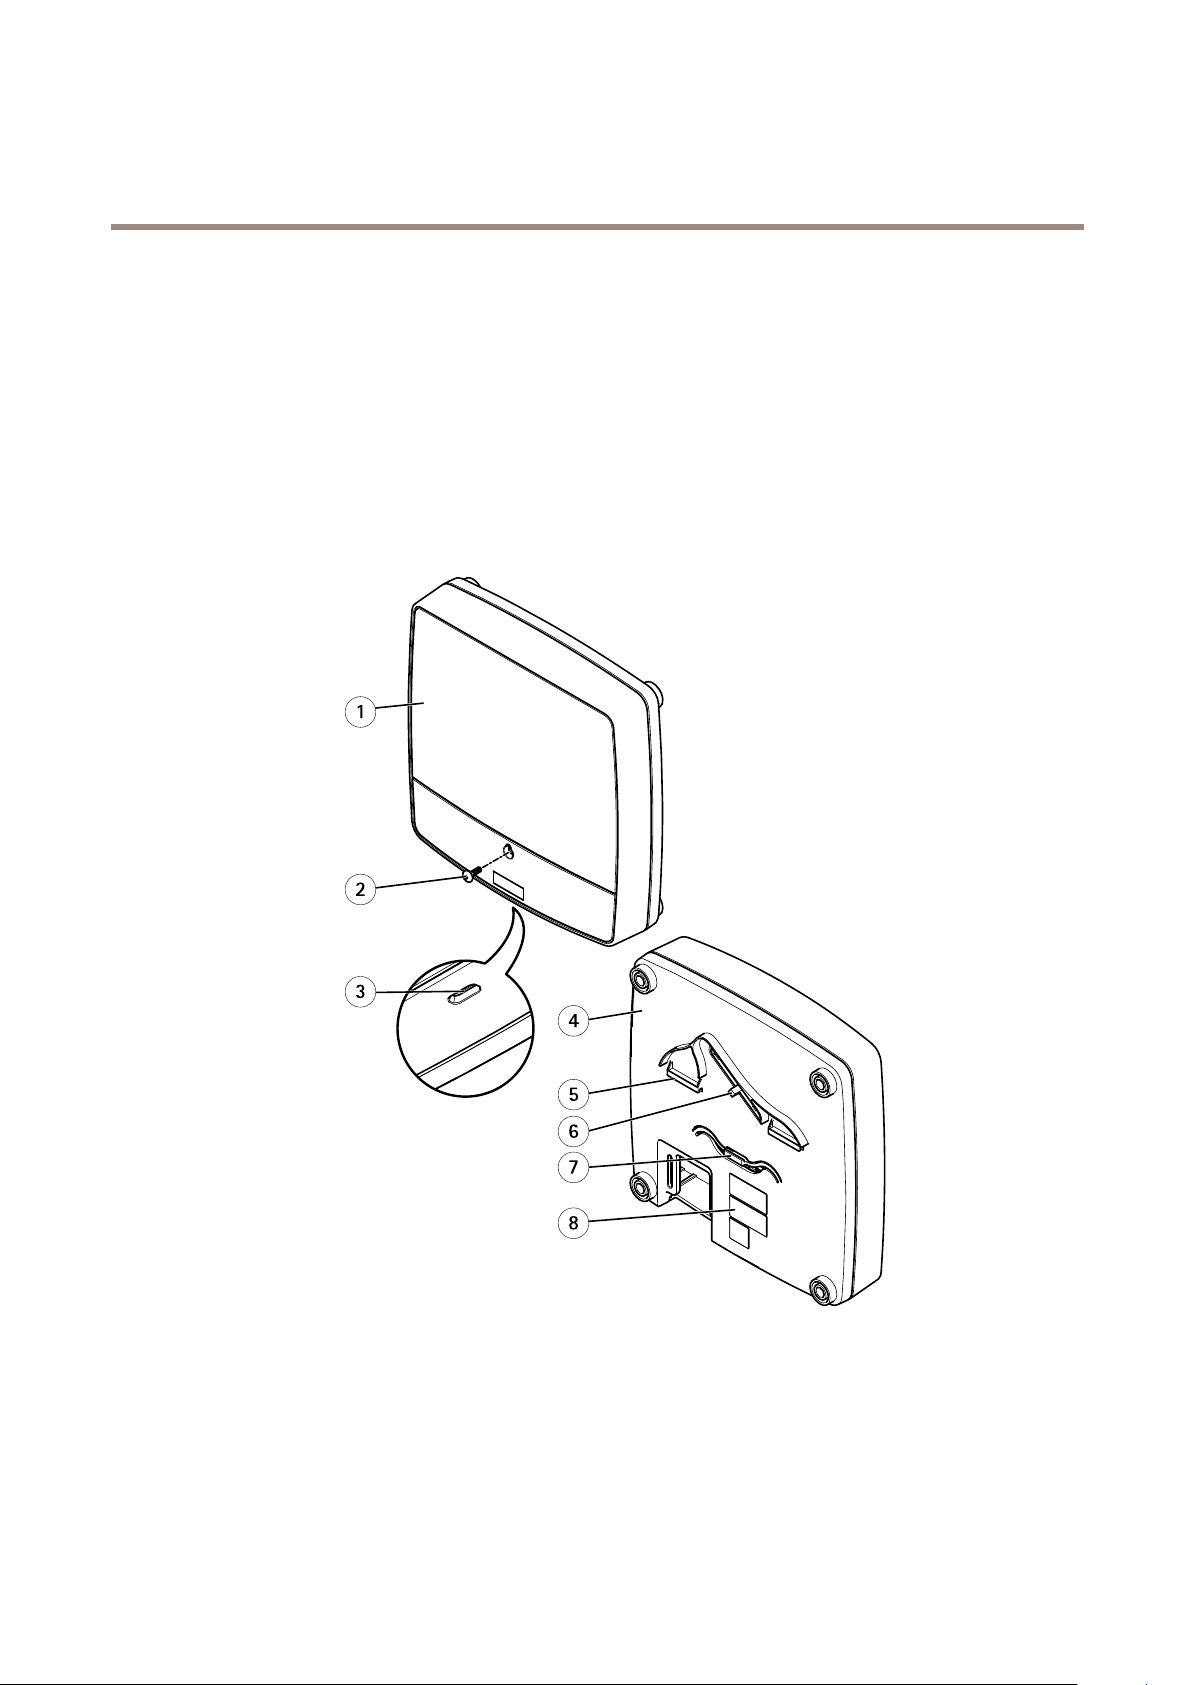
HardwareOverview
Thehardwareoverviewisdividedintothefollowingcategories:
•Frontandback.Seepage5.
•I/Ointerface.Seepage6.
•Externalpowerinputs.Seepage6.
•Poweroutputs.Seepage6.
•LEDindicators,buttonsandotherhardware.Seepage7.
Frontandback:
1
Cover
2
Coverscrew
3
Coverremovalslot
4
Base
5
DINclip–upper
6
Tamperingalarmswitch–back
7
DINclip–lower
8
Partnumber(P/N)&Serialnumber(S/N)
5
Page 6
AXISA1001NetworkDoorController&AXISEntryManager
1
2
3
4
5
6
7
8
9
10
11
12
HardwareOverview
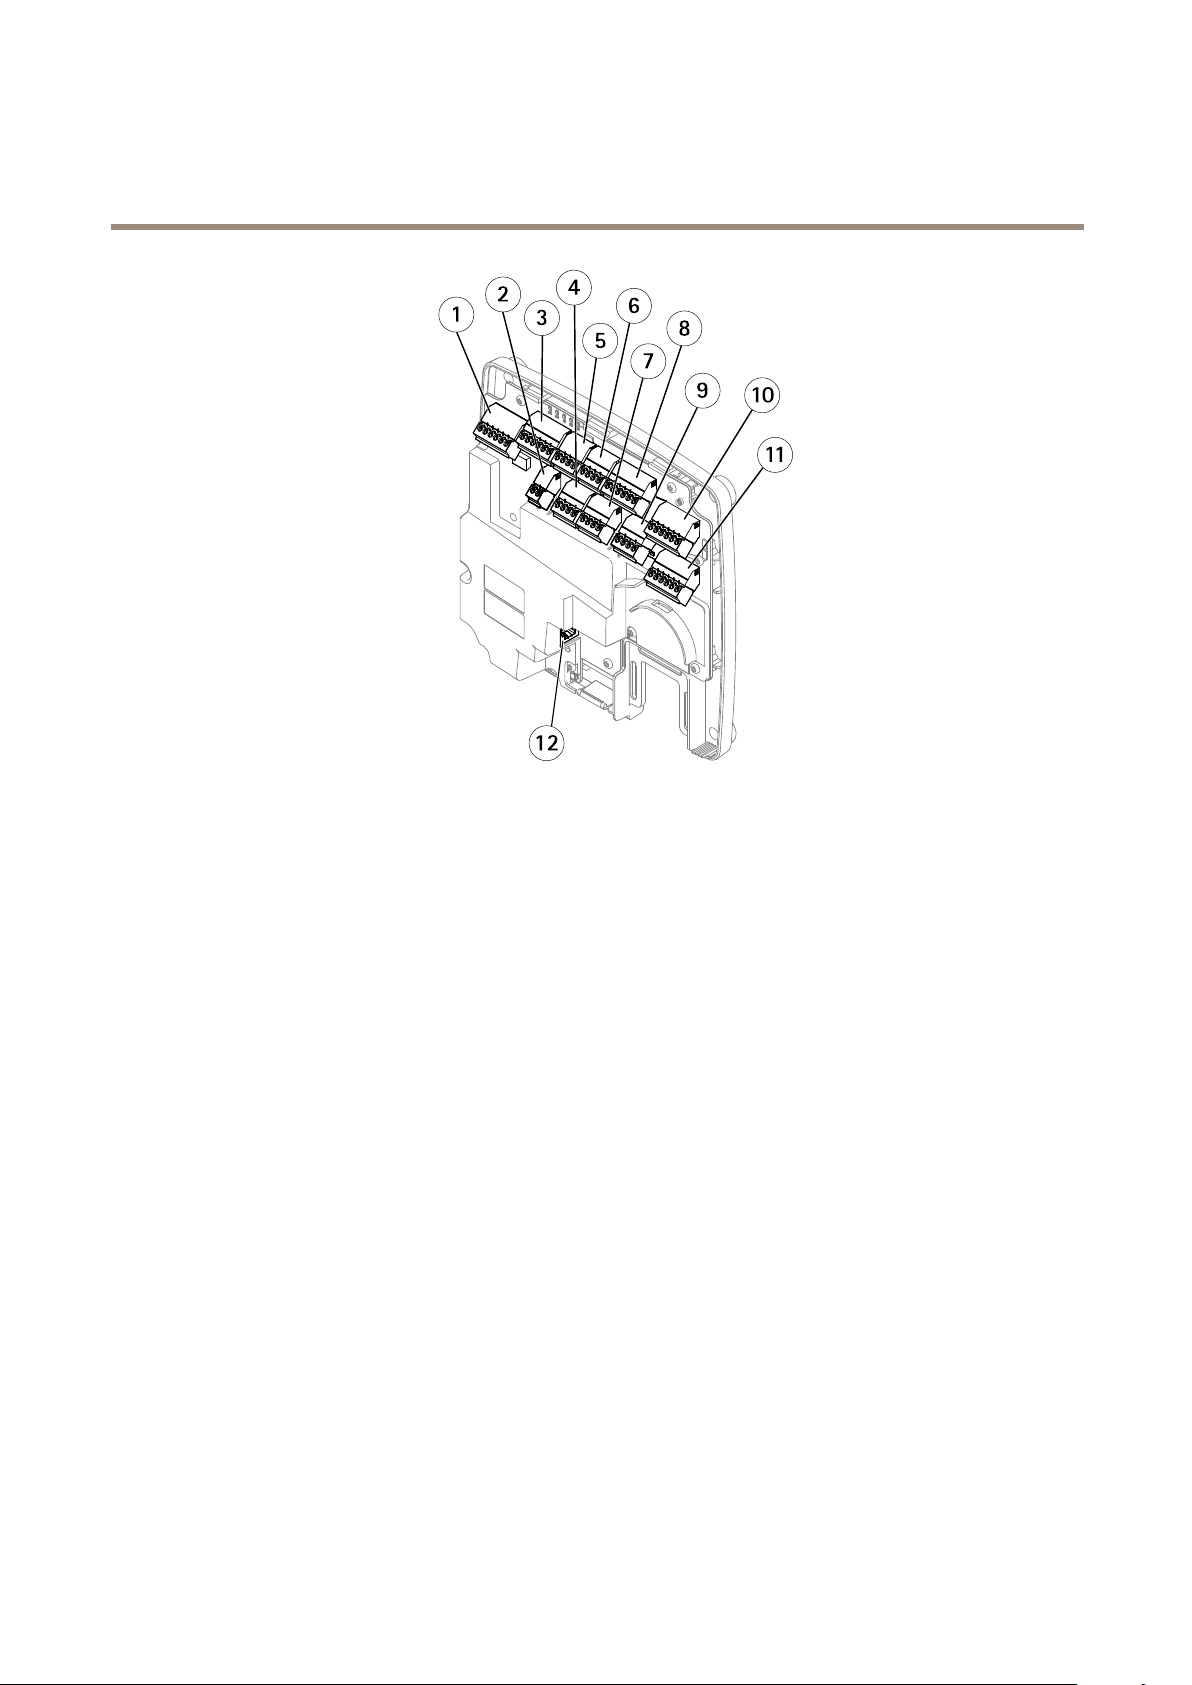
I/Ointerface:
1
Readerdataconnector(READERDATA1)
10
Readerdataconnector(READERDATA2)
3
ReaderI/Oconnector(READERI/O1)
8
ReaderI/Oconnector(READERI/O2)
4
Doorconnector(DOORIN1)
7
Doorconnector(DOORIN2)
6
Auxiliaryconnector(AUX)
5
Audioconnector(AUDIO)(notused)
Externalpowerinputs:
2
Powerconnector(DCIN)
12
Networkconnector(PoE)
Poweroutputs:
9
Powerlockconnector(LOCK)
11
Power&Relayconnector(PWR,RELAY)
6
Page 7
AXISA1001NetworkDoorController&AXISEntryManager
1
2
3
4
5
6
7
8
9
1011
12
13
HardwareOverview
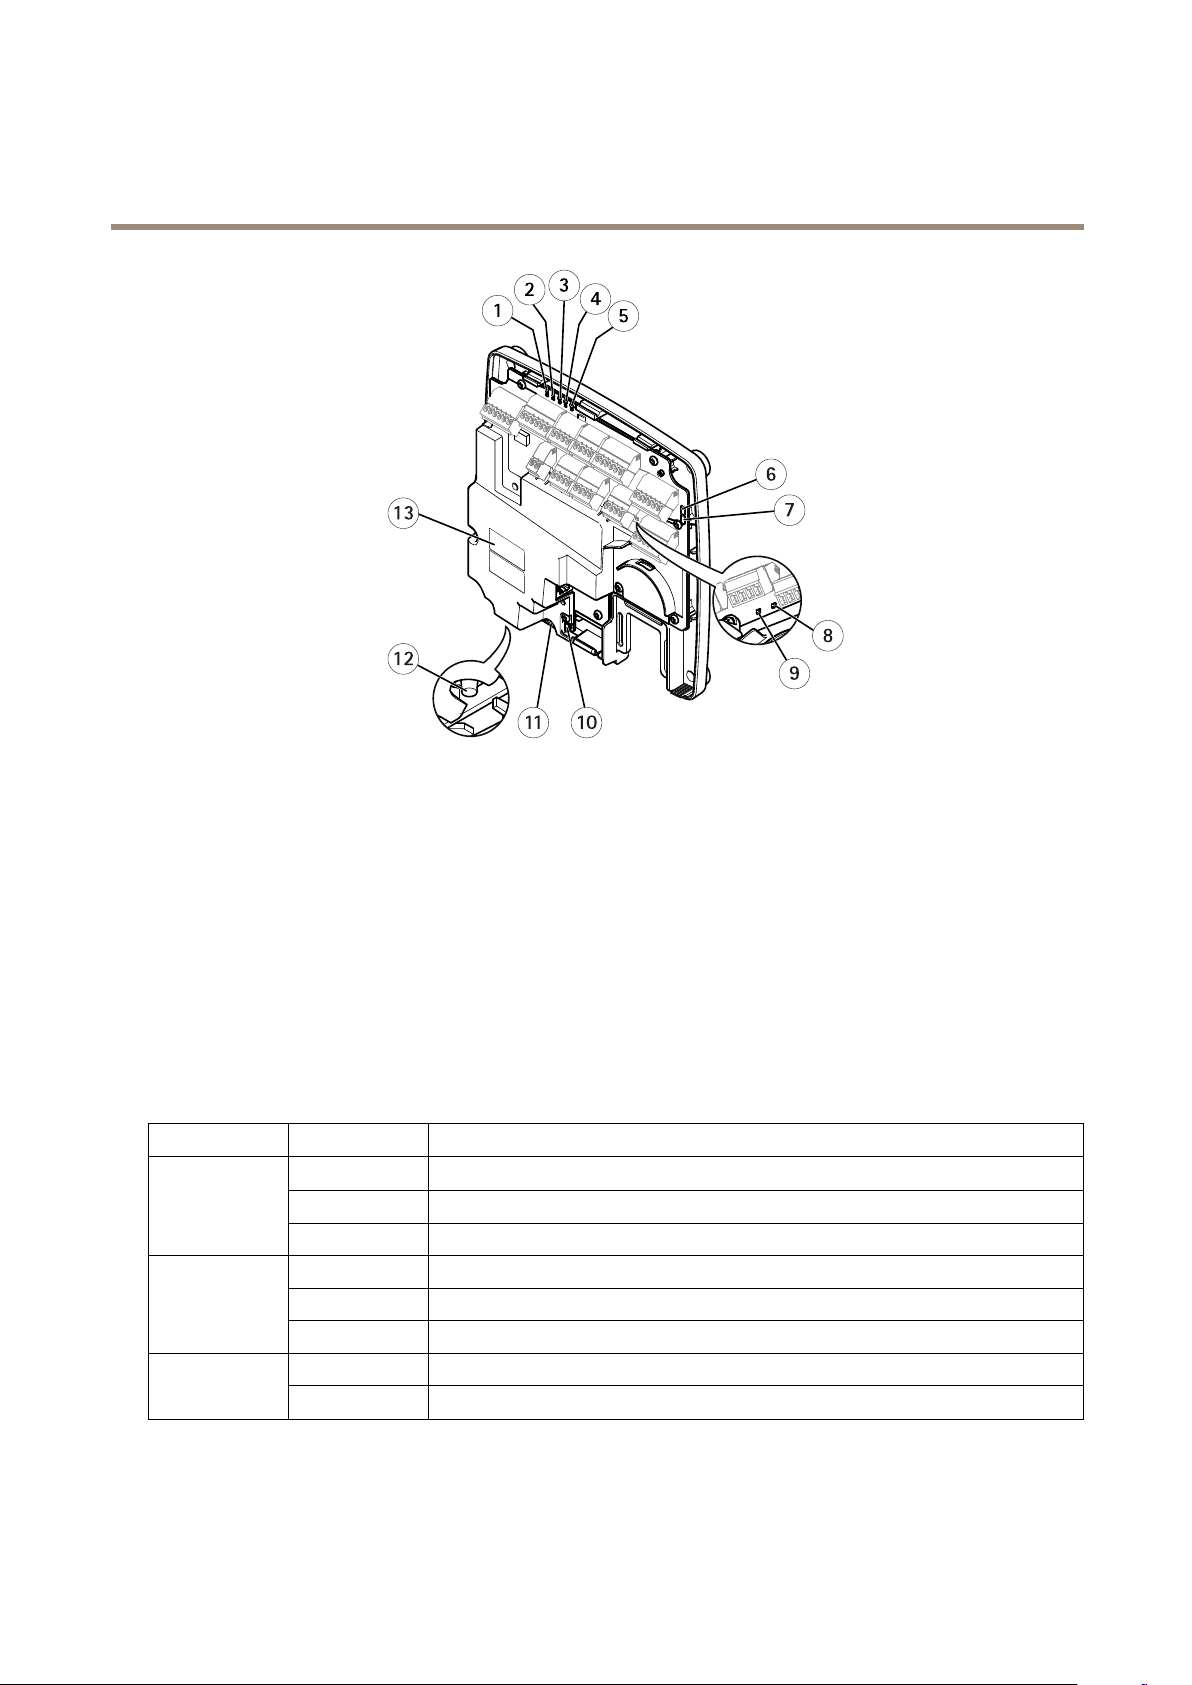
LEDindicators,buttonsandotherhardware:
1
PowerLEDindicator
2
StatusLEDindicator
3
NetworkLEDindicator
4
Reader2LEDindicator(notused)
5
Reader1LEDindicator(notused)
6
Tamperingalarmpinheader–front(TF)
7
Tamperingalarmpinheader–back(TB)
8
LockLEDindicator
9
LockLEDindicator
10
Tamperingalarmsensor–front
11
SDcardslot(microSDHC)(notused)
12
Controlbutton
13
Partnumber(P/N)&Serialnumber(S/N)
LEDIndicators
LED
Network
Status
Color
Green
Amber
UnlitNonetworkconnection.
GreenSteadygreenfornormaloperation.
Amber
Red
Green
Amber
Indication
Steadyforconnectiontoa100MBit/snetwork.Flashesfornetworkactivity.
Steadyforconnectiontoa10MBit/snetwork.Flashesfornetworkactivity.
Steadyduringstartupandwhenrestoringsettings.
Slowashforfailedupgrade.
Normaloperation. Power
Flashesgreen/amberduringrmwareupgrade.
7
Page 8

AXISA1001NetworkDoorController&AXISEntryManager
HardwareOverview
Lock
Note
•TheStatusLEDcanbeconguredtoashwhileaneventisactive.
•TheStatusLEDcanbeconguredtoashforidentifyingtheunit.GotoSetup>AdditionalControllerConguration>
SystemOptions>Maintenance.
GreenSteadywhennotenergized.
Red
UnlitFloating.
Steadywhenenergized.
ConnectorsandButtons
Fortechnicalspecications,seepage54.
I/OInterface
ReaderDataConnector
Two6-pinterminalblockssupportingRS485andWiegandprotocolsforcommunicationwiththereader.Forspecications,see
page58.
ReaderI/OConnector
Two6-pinterminalblocksforreaderinputandoutput.Inadditiontothe0VDCreferencepointandpower(DCoutput),the
readerI/Oconnectorprovidestheinterfaceto:
•Digitalinput–Forconnecting,forexample,readertamperingalarms.
•Digitaloutput–Forconnecting,forexample,readerbeepersandreaderLEDs.
Forspecications,seepage58.
DoorConnector
Two4-pinterminalblocksforconnectingdoormonitoringdevicesandrequesttoexit(REX)devices.Forspecications,seepage59.
AuxiliaryConnector
4-pincongurableI/Oterminalblock.Usewithexternaldevices,incombinationwith,forexampletamperingalarms,eventtriggering
andalarmnotications.Inadditiontothe0VDCreferencepointandpower(DCoutput),theauxiliaryconnectorprovidesthe
interfaceto:
•Digitalinput–Analarminputforconnectingdevicesthatcantogglebetweenanopenandclosedcircuit,forexamplePIR
sensorsorglassbreakdetectors.
•Digitaloutput–Forconnectingexternaldevicessuchasburglaralarms,sirensorlights.Connecteddevicescanbe
activatedbytheVAPIX®applicationprogramminginterfaceorbyanactionrule.
Forspecications,seepage59.
ExternalPowerInputs
NO
TICE
NO NO
TICE TICE
Theproductshallbeconnectedusingashieldednetworkcable(STP).Allcablesconnectingtheproducttothenetworkshall
beintendedfortheirspecicuse.Makesurethatthenetworkdevicesareinstalledinaccordancewiththemanufacturer’s
instructions.Forinformationaboutregulatoryrequirements,seeElectromagneticCompatibility(EMC)onpage2.
PowerConnector
2-pinterminalblockforDCpowerinput.UseaSafetyExtraLowVoltage(SELV)compliantlimitedpowersource(LPS)witheithera
ratedoutputpowerlimitedto≤100Woraratedoutputcurrentlimitedto≤5A.Forspecications,seepage59.
NetworkConnector
RJ45Ethernetconnector.SupportsPoweroverEthernet(PoE).Forspecications,seepage60.
8
Page 9

AXISA1001NetworkDoorController&AXISEntryManager
HardwareOverview
PowerOutputs
PowerLockConnector
4-pinterminalblockforconnectingoneortwolocks.Thelockconnectorcanalsobeusedtopowerexternaldevices.For
specications,seepage60.
Power&RelayConnector
6-pinterminalblockforconnectingpowerandthedoorcontroller’srelaytoexternaldevicessuchaslocksandsensors.For
specications,seepage60.
ButtonsandOtherHardware
TamperingAlarmPinHeader
Two2-pinheadersfordisconnectingthefrontandbacktamperingalarms.Forspecications,seepage60.
ControlButton
Thecontrolbuttonisusedfor:
•Resettingtheproducttofactorydefaultsettings.Seepage50.
•ConnectingtoanAXISVideoHostingSystemservice.Seepage45.Toconnect,pressandholdthebuttonforabout1
seconduntiltheStatusLEDashesgreen.
•ConnectingtoAXISInternetDynamicDNSService.Seepage45.Toconnect,pressandholdthebuttonforabout3seconds.
9
Page 10

AXISA1001NetworkDoorController&AXISEntryManager
AccesstheProduct
AccesstheProduct
ToinstalltheAxisproduct,refertotheInstallationGuidesuppliedwiththeproduct.
Theproductcanbeusedwithmostoperatingsystemsandbrowsers.TherecommendedbrowsersareInternetExplorerwithWindows,
SafariwithMacintoshandFirefoxwithotheroperatingsystems.SeeTechnicalSpecicationsonpage54
AccessfromaBrowser
1.Startabrowser(Chrome,InternetExplorer,Firefox,Safari).
2.EntertheIPaddressorhostnameoftheAxisproductinthebrowser’sLocation/Addresseld.Toaccesstheproductfroma
Macintoshcomputer(MacOSX),clickontheBonjourtabandselecttheproductfromthedrop-downlist.
IfyoudonotknowtheIPaddress,useAXISIPUtilitytolocatetheproductonthenetwork.Forinformationabout
howtodiscoverandassignanIPaddress,seethesupportpagesatwww.axis.com/techsuportheInstallationGuide
availableatwww .axis.com
3.Enteryourusernameandpassword.Ifthisisthersttimetheproductisaccessed,therootpasswordmustrstbe
congured.Forinstructions,seeSettheRootPasswordonpage10.
4.AXISEntryManageropensinyourbrowser.ThestartpageiscalledtheOverviewpage.
AccessfromtheInternet
Onceconnected,theAxisproductisaccessibleonyourlocalnetwork(LAN).ToaccesstheproductfromtheInternetyoumust
congureyournetworkroutertoallowincomingdatatrafctotheproduct.Todothis,enabletheNAT-traversalfeature,whichwill
attempttoautomaticallyconguretheroutertoallowaccesstotheproduct.ThisisenabledfromSetup>AdditionalController
Conguration>SystemOptions>Network>TCP/IP>Advanced.
Formoreinformation,seeNATtraversal(portmapping)forIPv4onpage46.SeealsoAXISInternetDynamicDNSServiceat
www.axiscam.net
ForTechnicalnotesonthisandothertopics,visittheAxisSupportwebatwww.axis.com/techsup
SettheRootPassword
ToaccesstheAxisproduct,youmustsetthepasswordforthedefaultadministratoruserroot.ThisisdoneintheCongureRoot
Passworddialog,whichopenswhentheproductisaccessedforthersttime.
Topreventnetworkeavesdropping,therootpasswordcanbesetviaanencryptedHTTPSconnection,whichrequiresanHTTPS
certicate.HTTPS(HypertextTransferProtocoloverSSL)isaprotocolusedtoencrypttrafcbetweenwebbrowsersandservers.The
HTTPScerticateensuresencryptedexchangeofinformation.SeeHTTPSonpage41.
Thedefaultadministratorusernamerootispermanentandcannotbedeleted.Ifthepasswordforrootislost,theproductmustbe
resettothefactorydefaultsettings.SeeResettoFactoryDefaultSettingsonpage50.
TosetthepasswordviaastandardHTTPconnection,enteritdirectlyinthedialog.
TosetthepasswordviaanencryptedHTTPSconnection,followthesesteps:
1.ClickUseHTTPS.
Atemporarycerticate(validforoneyear)iscreated,enablingencryptionofalltrafctoandfromtheproduct,andthe
passwordcannowbesetsecurely.
2.Enterapasswordandthenre-enterittoconrmthespelling.
3.ClickOK.Thepasswordhasnowbeencongured.
10
Page 11

AXISA1001NetworkDoorController&AXISEntryManager
AccesstheProduct
TheOverviewPage
TheOverviewpageinAXISEntryManagershowsinformationaboutthedoorcontroller’sname,MACaddress,IPaddress,and
rmwareversion.Italsoenablesyoutoidentifythedoorcontrolleronthenetworkorinthesystem.
ThersttimeyouaccesstheAxisproduct,theOverviewpagewillpromptyoutocongurethehardware,tosetdateandtime,to
congurethenetworksettings,andtocongurethedoorcontrolleraspartofasystemorasastandaloneunit.Formoreinformation
aboutconguringthesystem,seeConguration–StepbySteponpage12.
ToreturntotheOverviewpagefromtheproduct’sotherwebpages,clickOverviewinthemenubar.
11
Page 12

AXISA1001NetworkDoorController&AXISEntryManager
SystemConfiguration
SystemConfiguration
Toopentheproduct’sSetuppages,clickSetupinthetopright-handcorneroftheOverviewpage.
TheAxisproductcanbeconguredbyadministrators.Formoreinformationaboutusersandadministrators,seepage24,page29,
andpage41.
Conguration–StepbyStep
Beforeyoustartusingtheaccesscontrolsystem,youshouldcompletethefollowingsetupsteps:
1.IfEnglishisnotyourrstlanguage,youmaywantAXISEntryManagertouseadifferentlanguage.SeeSelectaLanguage
onpage12.
2.Congurethedoorcontrollerandconnecteddevicessuchasreaders,locksandrequesttoexit(REX)devices.SeeCongure
theHardwareonpage13.
3.VerifytheHardwareConnections.Seepage17.
4.Setthedateandtime.Seepage17.
5.Congurethenetworksettings.Seepage18.
6.Congurecardformats.Seepage19.
7.Congurethedoorcontrollersystem.SeeManageNetworkDoorControllersonpage21.
Forinformationabouthowtocongureandmanagethesystem'sdoors,schedules,usersandgroups,seeAccessManagementon
page24.
Forinformationaboutmaintenancerecommendations,seeMaintenanceInstructionsonpage23.
Note
Toaddorremovedoorcontrollers,toadd,remove,oreditusers,ortocongurethehardware,morethanhalfofthedoor
controllersinthesystemmustbeonline.Tocheckthedoorcontrollerstatus,gotoSetup>ManageNetworkDoor
ControllersinSystem.
SelectaLanguage
ThedefaultlanguageofAXISEntryManagerisEnglish,butyoucanswitchtoanyofthelanguagesthatareincludedintheproduct’s
rmware.Forinformationaboutthelatestavailablermware,seewww.axis.com
Youcanswitchlanguagesinanyoftheproduct’swebpages.
Toswitchlanguages,clickthelanguagedrop-downlist
displayedintheselectedlanguage.
Important
•Languageselectionissupportedfromrmware1.25.Ifthedoorcontrollerusesanearlierversion,youneedtoupgradethe
rmwarebeforeyoucanselectalanguage.SeeUpgradetheFirmwareonpage51.
•Languagesettingsarenotsharedbetweendoorcontrollersinthesystem.Eitherselectthelanguageinalldoorcontrollers,
oralwaysopenAxisEntryManagerfromthesamedoorcontroller.
andselectalanguage.Alltheproduct’swebpagesandhelppagesare
12
Page 13

AXISA1001NetworkDoorController&AXISEntryManager
SystemConfiguration
Note
•Whenyouswitchlanguages,thedateformatalsochangestoaformatcommonlyusedintheselectedlanguage.The
correctformatisdisplayedinthedataelds.
•Ifyouresettheproducttofactorydefaultsettings,AXISEntryManagerswitchesbacktoEnglish.
•Ifyourestoretheproduct,AXISEntryManagerwillcontinuetousetheselectedlanguage.
•Ifyourestarttheproduct,AXISEntryManagerwillcontinuetousetheselectedlanguage.
•Ifyouupgradethermware,AXISEntryManagerwillcontinuetousetheselectedlanguage.
ConguretheHardware
Beforeyoucanmanagethedoors,thehardwaremustbeconguredintheHardwareCongurationpages.
Doors,locksandotherdevicescanbeconnectedtotheAxisproductbeforecompletingthehardwareconguration.However,the
connectionofdeviceswillbeeasierifyoucompletethehardwarecongurationrst.Thisisbecausethehardwarepinchartwillbe
availablewhenthecongurationiscomplete.Thehardwarepinchartisaguideonhowtoconnectthepinsandcanbeusedasa
referencesheetformaintenance.Formaintenanceinstructions,seepage23.
Ifconguringthehardwareforthersttime,selectoneofthefollowingmethods:
•Importahardwarecongurationle.Seepage13.
•Createanewhardwareconguration.Seepage14.
ImportaHardwareCongurationFile
ThehardwarecongurationoftheAxisproductcanbecompletedfasterbyimportingahardwarecongurationle.
Byexportingthelefromoneproductandimportingittoothers,youcanmakemultiplecopiesofthesamehardwaresetupwithout
havingtorepeatthesamestepsoverandoveragain.Youcanalsostoreexportedlesasbackupsandusethemtorestoreprevious
hardwarecongurations.Formoreinformation,seeExportaHardwareCongurationFileonpage13.
Toimportahardwarecongurationle:
1.GotoSetup>HardwareConguration.
2.ClickImporthardwarecongurationor,ifthereahardwarecongurationalreadyexists,Resetandimporthardware
conguration.
3.Inthelebrowserdialogthatappears,locateandselectthehardwarecongurationle(*.json)onyourcomputer.
4.ClickOK.
ExportaHardwareCongurationFile
ThehardwarecongurationoftheAxisproductcanbeexportedtomakemultiplecopiesofthesamehardwaresetup.Youcanalso
storeexportedlesasbackupsandusethemtorestoreprevioushardwarecongurations.
Toexportahardwarecongurationle:
1.GotoSetup>HardwareConguration.
2.ClickExporthardwareconguration.
3.Dependingonthebrowser,youmayneedtogothroughadialogtocompletetheexport.
Unlessotherwisespecied,theexportedle(*.json)issavedinthedefaultdownloadfolder.Youcanselectadownload
folderinthewebbrowser’susersettings.
13
Page 14

AXISA1001NetworkDoorController&AXISEntryManager
SystemConfiguration
CreateaNewHardwareConguration
Tocreateanewhardwarecongurationfromthebeginning:
1.GotoSetup>HardwareCongurationandclickStartnewhardwareconguration.
Iftheproduct’shardwarehasnotbeenconguredbeforeorhasbeendeleted,HardwareCongurationwillbeavailablein
thenoticationpanelintheOverviewpage.
2.Selectadooroptiondependingonthenumberofdoors,one(1)ortwo(2),thatwillbeconnectedtotheAxisproduct.
3.EnteradescriptivenameforeachdoorandclickNext.Itisrecommendedtoprovidethedoorswithuniquedescriptive
namessothattheyeasilycanbeidentifedbyanyonewhowilladministratethesystem.
YoucanalsoeditthenameoftheAxisproduct.Thedefaultnameincludestheserialnumberforeasyidentication.
4.Selectthedoormonitorandlockoptionsthatmatchtherequirementsandthetypeoflockconnectionsthatwillbeused
andclickNext.Formoreinformation,seeCongureLocksandDoorMonitorsonpage14andLockOptionsonpage15.
5.SelectthetypesofreadersthatwillbeusedandclickFinish.Formoreinformation,seeCongureReadersandREXDevices
onpage16andReaderandREXDeviceOptionsonpage16.
6.Inthedialogthatappearsaftercompletingtheconguration,clickOKorclickthelinktoviewthehardwarepinchart.
Toprintthehardwarepinchart,clickPrintHardwarePinChartontheHardwarePinChartpage.
Tocancelthehardwareconguration,clickCancel.Thiscanbedoneinanyofthehardwarecongurationpages.
CongureLocksandDoorMonitors
1.Ifadoormonitorwillbeused,selectDoormonitorandthenselecttheoptionthatmatcheshowthedoormonitor
circuitswillbeconnected.
2.Ifthedoorlockshalllockimmediatelyafterthedoorhasbeenopened,selectCancelaccesstimeoncedoorisopened.
3.Specifythedoormonitortimeoptionsor,ifnodoormonitorwillbeused,thelocktimeoptions.
4.Selecttheoptionsthatmatchhowthelockcircuitswillbeconnected.
5.Ifalockmonitorwillbeused,selectLockmonitorandthenselecttheoptionsthatmatchhowthelockmonitorcircuits
willbeconnected.
6.Iftheinputconnectionsfromreaders,REXdevices,anddoormonitorsshallbesupervised,selectEnablesupervisedinputs.
Formoreinformation,seeUseSupervisedInputsonpage16.
Note
•Mostlock,doormonitor,andreaderoptionscanbechangedwithoutresettingandstartinganewhardwareconguration.
GotoSetup>HardwareReconguration.
•Youcanconnectonelockmonitorperdoorcontroller.Soifyouusedouble-lockdoors,onlyoneofthelockscanhavealock
monitor.Iftwodoorsareconnectedtothesamedoorcontroller,lockmonitorscannotbeused.
•Motorizedlocksmustbeconguredassecondarylocks.
DoorMonitorOptions
Thefollowingdoormonitoroptionsareavailable:
•Doormonitor–Selectedbydefault.Eachdoorhasitsowndoormonitorthat,forexample,willsignalwhenthedoorhas
beenforcedopenoropentoolong.Deselectifnodoormonitorwillbeused.
-Opencircuit=Closeddoor–Selectifthedoormonitorcircuitisnormallyopen.Thedoormonitorgivesthedoor
opensignalwhenthecircuitisclosed.Thedoormonitorgivesthedoorclosedsignalwhenthecircuitisopen.
14
Page 15

AXISA1001NetworkDoorController&AXISEntryManager
SystemConfiguration
-Opencircuit=Opendoor–Selectifthedoormonitorcircuitisnormallyclosed.Thedoormonitorgivesthedoor
opensignalwhenthecircuitisopen.Thedoormonitorgivesthedoorclosedsignalwhenthecircuitisclosed.
•Cancelaccesstimeoncedoorisopened–Selecttopreventtailgating,thatis,stopunauthorizedvisitorsfromaccessing
thedoor.Thedoorwilllockimmediatelyafterthedoorhasbeenopened.Whenthedoorcloses,thedoorwillbelockedand
cannotbeopeneduntilauserrequestsandisgrantedaccessagain.
Thefollowingdoormonitortimeoptionsareavailable:
•Accesstime–Setthenumberofsecondsthedoorshallremainunlockedafteraccesshasbeengranted.Thedoorremains
unlockeduntilthedoorhasbeenopenedandwilllockwhenitclosesregardlessofwhethertheaccesstimehasexpiredor
not.Ifthedoorremainsunopened,itlockswhenthesetaccesstimehasbeenreached.
•Opentoolongtime–Setthenumberofsecondsthedoorisallowedtostayopen.Ifthedoorisstillopenwhenthe
opentoolongtimehasbeenreached,thedooropentoolongalarmistriggered.Setupanactionruletocongurewhich
actiontheopentoolongeventshalltrigger.
•Pre-alarmtime–Apre-alarmisawarningsignalthatistriggeredbeforetheopentoolongtimehasbeenreached.It
tellstheadministratorand,dependingonhowtheactionrulehasbeensetup,itcanalsowarntheuser(theperson
enteringthedoor)thatthedoorneedstobeclosedortherealalarm,thedooropentoolongalarm,willgooff.Setthe
numberofsecondsbeforethedooropentoolongalarmistriggeredthesystemshallgivethepre-alarmwarningsignal.
Todisablethepre-alarm,setthepre-alarmtimeto0.
Forinformationabouthowtosetupanactionrule,seeSetUpActionRulesonpage34.
LockOptions
DeselectDoormonitortomakethefollowinglocktimeoptionsavailable:
•Doorunlockedtime–Setthenumberofsecondsthedoorshallremainunlockedafteraccesshasbeengranted.Thedoor
remainsunlockeduntilthedoorhasbeenopenedandwilllockwhenitclosesregardlessofwhetherthedoorunlockedtime
hasexpiredornot.Ifthedoorremainsunopened,itlockswhenthesetdoorunlocktimehasbeenreached.
•Pre-locksignaltime–Apre-locksignalisawarningsignalthatistriggeredbeforethedoorlocks.Ittellstheadministrator
and,dependingonhowtheactionrulehasbeensetup,itcanalsowarntheuser(thepersonenteringthedoor)that
thedoorwilllocksoon.Setthenumberofsecondsbeforethedoorlocksthesystemshallgivethepre-lockwarning
signal.Thepre-locksignaltimemustbeshorterthanthedoorunlockedtime.Todisablethepre-lockwarningsignal,
setthepre-locksignaltimeto0.
Thefollowinglockcircuitoptionsareavailable:
•12V
-Fail-secure–Selectforlocksthatremainlockedduringpoweroutages.Whenapplyingelectriccurrent,the
lockwillunlock.
-Fail-safe–Selectforlocksthatunlockduringpoweroutages.Whenapplyingelectriccurrent,thelockwilllock.
•Relay–Canonlybeusedononelockperdoorcontroller .Iftwodoorsareconnectedtothedoorcontroller ,arelaycan
onlybeusedonthelockoftheseconddoor.
-Relayopen=Locked–Selectforlocksthatremainlockedwhentherelayisopen(fail-secure).Whenthe
relaycloses,thelockwillunlock.
-Relayopen=Unlocked–Selectforlocksthatunlockduringpoweroutages(fail-safe).Whentherelaycloses,
thelockwilllock.
•None–Selectifonlyonelockwillbeused.
Thefollowinglockmonitoroptionsareavailable:
•Lockmonitor–Selecttomakethelockmonitorcontrolsavailable.Thenselectthelockthatshallbemonitored.Alock
monitorcanonlybeusedondouble-lockdoorsandcannotbeusediftwodoorsareconnectedtothedoorcontroller.
15
Page 16

AXISA1001NetworkDoorController&AXISEntryManager
SystemConfiguration
-Opencircuit=Locked–Selectifthelockmonitorcircuitisnormallyclosed.Thelockmonitorgivesthedoor
unlockedsignalwhenthecircuitisclosed.Thelockmonitorgivesthedoorlockedsignalwhenthecircuitisopen.
-Opencircuit=Unlocked–Selectifthelockmonitorcircuitisnormallyopen.Thelockmonitorgivesthedoor
unlockedsignalwhenthecircuitisopen.Thelockmonitorgivesthedoorlockedsignalwhenthecircuitisclosed.
Forinformationabouthowtosetupanactionrule,seeSetUpActionRulesonpage34.
CongureReadersandREXDevices
1.Ifareaderwillbeused,selectReaderandthenselecttheoptionsthatmatchthereader’scommunicationprotocol.
2.Ifarequesttoexit(REX)devicesuchasabutton,sensor,orpushbarwillbeused,selectREXandthenselecttheoption
thatmatcheshowtheREXdevice’scircuitswillbeconnected.
Ifthedoorshallremainlockeduntiltheusermanuallyunlocksandopensthedoor,selectREXdoesnotunlockdoor.
3.IfconnectingmorethanonereaderorREXdevicetothedoorcontroller,dotheprevioustwostepsagainuntileach
readerorREXdevicehasthecorrectsettings.
ReaderandREXDeviceOptions
Thefollowingreaderoptionsareavailable:
•Wiegand–SelectforreadersthatuseWiegandprotocols.ThenselecttheLEDcontrolthatissupportedbythereader.
ReaderswithsingleLEDcontrolusuallytogglebetweenredandgreen.ReaderswithdualLEDcontrolusedifferentwires
fortheredandgreenLEDs.ThismeansthattheLEDsarecontrolledindependentlyofeachother.WhenbothLEDsareon,
thelightappearstobeamber.Seethemanufacturer’sinformationaboutwhichLEDcontrolthereadersupports.
•RS485halfduplex–SelectforRS485readerswithhalfduplexsupport.ThenselecttheRS485protocolthatissupported
bythereader.Seethemanufacturer’sinformationaboutwhichprotocolthereadersupports.
•RS485fullduplex–SelectforRS485readerswithfullduplexsupport.ThenselecttheRS485protocolthatissupported
bythereader.Seethemanufacturer’sinformationaboutwhichprotocolthereadersupports.
ThefollowingREXdeviceoptionsareavailable:
•Activelow–SelectifactivatingtheREXdeviceclosesthecircuit.
•Activehigh–SelectifactivatingtheREXdeviceopensthecircuit.
•REXdoesnotunlockdoor–Selectifthedoorshallremainlockeduntiltheusermanuallyunlocksandopensthedoor.
Thedoorforcedopenalarmwillnotbetriggeredaslongastheuseropensthedoorwithintheaccesstime.Deselectif
thedoorshallunlockautomaticallywhentheuseractivatestheREXdevice.
Important
Ifthedoorcontrollerhasonlybeenconguredwithonedoorbeforeitisupgradedtormware1.15orlaterfromrmware
1.10,REXdoesnotunlockdoorwillbenon-selectableatrst.TomakeREXdoesnotunlockdoorselectable,gotoSetup
>HardwareCongurationandclickResetandstartanewhardwareconguration.Thensetuptherulesforthedoors
connectedtothedoorcontrollerandaddthemtogroups,seeManageDoors.
Note
Mostlock,doormonitor,andreaderoptionscanbechangedwithoutresettingandstartinganewhardwareconguration.
GotoSetup>HardwareReconguration.
UseSupervisedInputs
Supervisedinputsreportonthestatusoftheconnectionbetweenthedoorcontrollerandthereaders,REXdevices,anddoor
monitors.Iftheconnectionisinterrupted,aneventisactivated.
Tousesupervisedinputs:
16
Page 17

AXISA1001NetworkDoorController&AXISEntryManager
SystemConfiguration
1.Installendoflineresistorsonalltheusedinputs.Seetheconnectiondiagramonpage62.
2.GotoSetup>HardwareRecongurationandselectEnablesupervisedinputs.Youcanalsoenablesupervisedinputs
duringthehardwareconguration.
SupervisedInputCompatibility
Thefollowingconnectorssupportsupervisedinputs:
•ReaderI/Oconnector–tamperingsignal.Seepage58.
•Doorconnector.Seepage59.
Readersandswitchesthatcanbeusedwithsupervisedinputsinclude:
•HIDreaderswithinternal1kΩpull-upto5V.
•Readersandswitcheswithinternal1kΩpull-upto5V.
•Readersandswitcheswithoutinternalpull-up.
VerifytheHardwareConnections
Whenthehardwareinstallationandcongurationiscomplete,andanytimeduringthedoorcontroller’slifetime,youcanverifythe
functionoftheconnecteddoormonitors,locksandreaders.
Toverifythecongurationandaccessthevericationcontrols,gotoSetup>HardwareConnectionVerication.
VericationControls
•Doorstate–Verifythecurrentstateofthedoormonitor,dooralarmsandlocks.ClickGetcurrentstate.
•Lock–Manuallytriggerthelock.Bothprimarylocksandsecondarylocksifthereareanywillbeaffected.ClickLockor
Unlock.
•Lock–Manuallytriggerthelocktograntaccess.Onlyprimarylockswillbeaffected.ClickAccess.
•Reader:Feedback–Verifythereaderfeedback,forexamplesoundsandLEDsignals,fordifferentcommands.Selectthe
commandandclickTest.Whichtypesoffeedbackthatareavailabledependsonthereader.Formoreinformation,see
ReaderFeedback.Seealsothemanufacturer’sinstructions.
•Reader:Tampering–Getinformationaboutthelasttamperingattempt.Thersttamperingattemptwillberegistered
whenthereaderisinstalled.ClickGetlasttampering.
•Reader:Cardswipe–Getinformationaboutthelastswipedcardorothertypeofusertokenacceptedbythereader.
ClickGetlastcredential.
•REX–Getinformationaboutthelasttimetherequesttoexit(REX)devicewaspressed.ClickGetlastREX.
SettheDateandTime
Ifthedoorcontrollerispartofasystem,thedateandtimesettingswillbedistributedtoallthedoorcontrollers.Thismeansthatthe
settingsarepushedtotheothercontrollersinthesystem,regardlessofwhetheryousynchronizewithanNTPserver,setthedateand
timemanually ,orgetthedateandtimefromthecomputer.Ifyoucannotseethechanges,tryrefreshingthepageinyourbrowser .
Formoreinformationaboutmanagingasystemofdoorcontrollers,seeManageNetworkDoorControllersonpage21.
TosetthedateandtimeoftheAxisproduct,gotoSetup>Date&Time.
Youcansetthedateandtimeinthefollowingways:
•Getthedateandtimefromanetworktimeprotocol(NTP)server.Seepage18.
17
Page 18

AXISA1001NetworkDoorController&AXISEntryManager
SystemConfiguration
•Setthedateandtimemanually.Seepage18.
•Getthedateandtimefromthecomputer.Seepage18.
Currentcontrollertimedisplaysthedoorcontroller’scurrentdateandtime(24hclock).
ThesameoptionsfordateandtimearealsoavailableintheSystemOptionspages.GotoSetup>AdditionalController
Conguration>SystemOptions>Date&Time.
GettheDateandTimefromaNetworkTimeProtocol(NTP)Server
1.GotoSetup>Date&Time.
2.SelectyourTimezonefromthedrop-downlist.
3.Ifdaylightsavingtimeisusedinyourregion,selectAdjustfordaylightsaving.
4.SelectSynchronizewithNTP.
5.SelectthedefaultDHCPaddressorentertheaddressofaNTPserver.
6.ClickSave.
WhensynchronizingwithanNTPserver ,dateandtimeareupdatedcontinuouslybecausethedataispushedfromtheNTPserver.For
informationaboutNTPsettings,seeNTPCongurationonpage45.
IfyouuseahostnamefortheNTPserver,aDNSservermustbecongured.SeeDNSCongurationonpage45.
SettheDateandTimeManually
1.GotoSetup>Date&Time.
2.Ifdaylightsavingtimeisusedinyourregion,selectAdjustfordaylightsaving.
3.SelectSetdate&timemanually.
4.Enterthedesireddateandtime.
5.ClickSave.
Whensettingthedate&timemanually,dateandtimearesetonceandwillnotbeupdatedautomatically.Thismeansthatifthe
dateortimeneedstobeupdated,thechangesmustbemademanuallybecausethereisnoconnectiontoanexternalNTPserver.
GettheDateandTimefromtheComputer
1.GotoSetup>Date&Time.
2.Ifdaylightsavingtimeisusedinyourregion,selectAdjustfordaylightsaving.
3.SelectSetdate&timemanually.
4.ClickSyncnowandsave.
Whenusingthecomputertime,dateandtimearesynchronizedwiththecomputertimeonceandwillnotbeupdatedautomatically.
Thismeansthatifyouchangethedateortimeonthecomputeryouusetomanagethesystem,youshouldsynchronizeagain.
ConguretheNetworkSettings
Tocongurethebasicnetworksettings,gotoSetup>NetworkSettingsortoSetup>AdditionalControllerConguration>
SystemOptions>Network>TCP/IP>Basic.
Formoreinformationaboutnetworksettings,seeNetworkonpage43.
18
Page 19

AXISA1001NetworkDoorController&AXISEntryManager
SystemConfiguration
BasicTCP/IPSettings
TheAxisproductsupportsIPversion4(IPv4).
TheAxisproductcangetanIPv4addressinthefollowingways:
•DynamicIPaddress–ObtainIPaddressviaDHCPisselectedbydefault.ThismeansthattheAxisproductissettoget
theIPaddressautomaticallyviaDynamicHostCongurationProtocol(DHCP).
DHCPallowsnetworkadministratorstocentrallymanageandautomatetheassignmentofIPaddresses.
•StaticIPaddress–TouseastaticIPaddress,selectUsethefollowingIPaddressandspecifytheIPaddress,subnetmask
anddefaultrouter.ThenclickSave.
DHCPshouldonlybeenabledwhenusingdynamicIPaddressnotication,oriftheDHCPcanupdateaDNSserverthatmakes
itpossibletoaccesstheAxisproductbyname(hostname).
IfDHCPisenabledandtheproductcannotbeaccessed,runAXISIPUtilitytosearchthenetworkforconnectedAxisproducts,or
resettheproducttothefactorydefaultsettingsandthenperformtheinstallationagain.Forinformationabouthowtoresetto
factorydefault,seepage50.
CongureCardFormats
Thedoorcontrollerhasafewpredenedcommonlyusedcardformatsthatyoucanuseastheyareormodifyasrequired.Youcan
alsocreatecustomcardformats.Eachcardformathasadifferentsetofrules,eldmaps,forhowtheinformationstoredonthecard
isorganized.Bydeningacardformatyoutellthesystemhowtohowtointerprettheinformationthatthereadersgetfromcards
andothertokens.Forinformationaboutwhichcardformatsthereadersupports,seethemanufacturer’sinstructions.
Toenablecardformats:
1.GotoSetup>CongureCardFormats.
2.Selectoneormorecardformatsthatmatchthecardformatusedbytheconnectedreaders.
Tocreatenewcardformats:
1.GotoSetup>CongureCardFormats.
2.ClickAddcardformat.
3.IntheAddcardformatdialog,enteraname,adescription,andthebitlengthofthecardformat.SeeCardFormat
Descriptionsonpage20.
4.ClickAddeldmapandentertherequiredinformationintheelds.SeeFieldMapsonpage20.
5.Toaddmultipleeldmaps,repeatthepreviousstep.
ToexpandanitemintheCardformatslistandviewthecardformatdescriptionsandeldmaps,click
Toeditacardformat,clickandchangethecardformatdescriptionsandeldmapsasrequired.ThenclickSave.
TodeleteaeldmapintheEditcardformatorAddcardformatdialog,click
.
Todeleteacardformat,click.
19
Page 20

AXISA1001NetworkDoorController&AXISEntryManager
SystemConfiguration
Important
•Allchangestocardformatsapplytothewholesystemofdoorcontrollers.
•Youcanonlyenableanddisablecardformatsifatleastonedoorcontrollerinthesystemhasbeenconguredwithatleast
onereader .SeeConguretheHardwareonpage13andCongureReadersandREXDevicesonpage16.
•Twocardformatswiththesamebitlengthcannotbeactivethesametime.Forexample,ifyouhavedenedtwo32-bit
cardformats,“FormatA”and“FormatB”,andyouhaveenabled“FormatA”,youcannotenable“FormatB”without
disabling“FormatA”rst.
•Ifnocardformatshavebeenenabled,youcanusetheCardrawonlyandCardrawandPINidenticationtypestoidentify
acardandgrantaccesstousers.
CardFormatDescriptions
•Name(required)–Enteradescriptivename.
•Description–Enteradditionalinformationasdesired.ThisinformationisonlyvisibleintheEditcardformatandAdd
cardformatdialogs.
•Bitlength(required)–Enterthebitlengthofthecardformat.Thishastobeanumberbetween1and1000000000.
FieldMaps
•Name(required)–Entertheeldmapnameunspaced,forexampleOddParity.
Examplesofcommoneldmapsinclude:
-Parity–Paritybitsareusedforerrordetection.Paritybitsareusuallyaddedtothebeginningorendofa
binarycodestringandindicateifthenumberofbitsisevenorodd.
-EvenParity–Evenparitybitsmakesurethatthereisanevennumberofbitsinthestring.Thebitsthathave
thevalue1arecounted.Ifthecountisalreadyeven,theparitybitvalueissetto0.Ifthecountisodd,the
evenparitybitvalueissetto1,makingthetotalcountanevennumber.
-OddParity–Oddparitybitsmakesurethatthereisanoddnumberofbitsinthestring.Thebitsthathave
thevalue1arecounted.Ifthecountisalreadyodd,theoddparitybitvalueissetto0.Ifthecountiseven,
theparitybitvalueissetto1,makingthetotalcountanoddnumber.
-FacilityCode–Facilitycodesaresometimesusedforverifyingthatthetokenmatchesthefacility’saccess
controlsystem.Oftenalltokensissuedforasinglefacilityhavethesamefacilitycode.
-CardNr–Thecardnumberbinarydataisencodedasintegernumbersineitherlittleendianbyteorder
(BinLE2Int)orbigendianbyteorder(BinBE2Int).Seebelow.
-CardNrHex–Thecardnumberbinarydataisencodedashex-lowercasenumbersineitherlittleendianbyte
order(BinLE2hex)orbigendianbyteorder(BinBE2hex).Seebelow.
•Range(required)–Enterthebitrangeoftheeldmap,forexample1,2–17,18–33,and34.
•Encoding(required)–Selecttheencodingtypeofeacheldmap.
-BinLE2Int–Binarydataisencodedasintegernumbersinlittleendianbyteorder.Integermeansthatitneeds
tobeawholenumber(nodecimals).Littleendianbyteordermeansthatinamultiple-bytesequence,the
rstbyteisthesmallest.
-BinBE2Int–Binarydataisencodedasintegernumbersinbigendianbyteorder.Integermeansthatitneeds
tobeawholenumber(nodecimals).Bigendianbyteordermeansthatinamultiple-bytesequence,therst
byteisthebiggest.
-BinLE2Hex–Binarydataisencodedashex-lowercasenumbersinlittleendianbyteorder.Thehexadecimal
system,alsoknownasthebase-16numbersystem,consistsof16uniquesymbols:thenumbers0–9andthe
lettersa–f.Littleendianbyteordermeansthatinamultiple-bytesequence,therstbyteisthesmallest.
20
Page 21

AXISA1001NetworkDoorController&AXISEntryManager
SystemConfiguration
-BinBE2Hex–Binarydataisencodedashex-lowercasenumbersinbigendianbyteorder .Thehexadecimal
system,alsoknownasthebase-16numbersystem,consistsof16uniquesymbols:thenumbers0–9andthe
lettersa–f.Bigendianbyteordermeansthatinamultiple-bytesequence,therstbyteisthebiggest.
Forinformationaboutwhicheldmapsyourcardformatuses,seethemanufacturer’sinstructions.
ManageNetworkDoorControllers
TheManageNetworkDoorControllersinSystempageshowsinformationaboutthedoorcontroller,itssystemstatus,andwhich
otherdoorcontrollersarepartofthesystem.Italsoenablestheadministratortochangethesystemsetupbyaddingandremoving
doorcontrollers.
Tomanagedoorcontrollers,gotoSetup>ManageNetworkDoorControllersinSystem.
TheManageNetworkDoorControllersinSystempageincludesthefollowingpanels:
•Systemstatusofthiscontroller–Showsthedoorcontroller'ssystemstatusandenablesswitchingbetweensystemand
standalonemodes.Formoreinformation,seeDoorControllerSystemStatusonpage21.
•Networkdoorcontrollersinsystem–Showsinformationaboutthedoorcontrollersinthesystemandincludescontrols
foraddingandremovingacontrollerfromthesystem.Formoreinformation,seeConnectedDoorControllersinthe
Systemonpage21.
DoorControllerSystemStatus
Ifthedoorcontrollercanbepartofasystemofdoorcontrollersdependsonitssystemstatus.Thedoorcontroller’ssystemstatus
isdisplayedintheSystemstatusforthiscontrollerpanel.
Ifthedoorcontrollerisnotinstandalonemodeandyouwanttoprotectthedoorcontrollerfrombeingaddedtoasystem,click
Activatestandalonemodetoenterstandalonemode.
Ifthedoorcontrollerisinstandalonemodebutyouintendtoaddthedoorcontrollertoasystem,clickDeactivatestandalone
modetoleavethestandalonemode.
SystemModes
•Thiscontrollerisnotpartofasystemandnotinstandalonemode–Thedoorcontrollerhasnotbeenconguredas
partofasystemanditisnotinstandalonemode.Thismeansthatthedoorcontrollerisopenandcanbeaddedtoa
systembyanyotherdoorcontrollerwithinthesamenetwork.Toprotectthedoorcontrollerfrombeingaddedtoa
system,activatethestandalonemode.
•Thiscontrollerissettostandalonemode–Thedoorcontrollerisnotpartofasystem.Itcannotbeaddedtoa
systembyotherdoorcontrollersinthenetworkoraddotherdoorcontrollersitself.Standalonemodeistypicallyused
insmallsetupswithonedoorcontrollerandoneortwodoors.Toallowthedoorcontrollertobeaddedintoasystem,
deactivatethestandalonemode.
•Thiscontrollerispartofasystem–Thedoorcontrollerispartofadistributedsystem.Inthedistributedsystem,users,
groups,doors,andschedulesaresharedbetweentheconnectedcontrollers.
ConnectedDoorControllersintheSystem
TheNetworkdoorcontrollersinsystempanelprovidescontrolsforthefollowingsystemchanges:
•Addadoorcontrollertoasystem,seeAddDoorControllerstotheSystemonpage22.
•Removeadoorcontrollerfromasystem,seeRemoveDoorControllersfromtheSystemonpage22.
ConnectedDoorControllersList
TheNetworkdoorcontrollersinsystempanelalsoincludesalistthatshowsthefollowingIDandstatusinformationabout
theconnecteddoorcontrollersinthesystem:
21
Page 22

AXISA1001NetworkDoorController&AXISEntryManager
SystemConfiguration
•Name–Theuser-denednameofthedoorcontroller.Iftheadministratorhasnotsetanamewhenconguringthe
hardware,thedefaultnamewillbeshown.
•IPaddress
•MACaddress
•Status–ThedoorcontrollerfromwhichyouaccessthesystemwillshowstatusThiscontroller.Theotherdoorcontrollers
inthesystemwillshowstatusOnline.
Toopenthewebpagesofanotherdoorcontroller,clickthecontroller’sIPaddress.
Toupdatethelist,clickRefreshthelistofcontrollers.
AddDoorControllerstotheSystem
Important
Whenpairingdoorcontrollers,allaccessmanagementsettingsontheaddeddoorcontrollerwillbedeletedandoverwritten
bythesystem’saccessmanagementsettings.
Toaddadoorcontrollertothesystemfromthelistofdoorcontrollers:
1.GotoSetup>ManageNetworkDoorControllersinSystem.
2.ClickAddcontrollerstosystemfromlist.
3.Selectthedoorcontrollerthatyouwishtoadd.
4.ClickAdd.
5.Toaddmoredoorcontrollers,repeatthestepsabove.
ToaddadoorcontrollertothesystembyitsknownIPaddressorMACaddress:
1.GotoManageDevices.
2.ClickAddcontrollertosystembyIPorMACaddress.
3.EntertheIPaddressorMACaddress.
4.ClickAdd.
5.Toaddmoredoorcontrollers,repeatthestepsabove.
Whenthepairingiscompleted,allusers,doors,schedules,andgroupsaresharedbyalldoorcontrollersinthesystem.
Toupdatethelist,clickRefreshlistofcontrollers.
RemoveDoorControllersfromtheSystem
Important
•Beforeremovingadoorcontrollerfromthesystem,resetitshardwareconguration.Ifyouskipthisstep,alldoorsrelatedto
theremoveddoorcontrollerwillremaininthesystemandcannotbedeleted.
•Whenremovingadoorcontrollerfromatwo-controllersystem,bothdoorcontrollersautomaticallyswitchtostandalone
mode.
Toremoveadoorcontrollerfromthesystem:
1.AccessthesystemthroughthedoorcontrollerthatyouwanttoremoveandgotoSetup>HardwareConguration.
2.ClickResethardwareconguration.
22
Page 23

AXISA1001NetworkDoorController&AXISEntryManager
SystemConfiguration
3.Afterthehardwarecongurationhasbeenreset,gotoSetup>ManageNetworkDoorControllersinSystem.
4.IntheNetworkdoorcontrollersinsystemlist,identifythedoorcontrollerthatyouwanttoremoveandclickRemove
fromsystem.
5.Adialogopensremindingyoutoresetthedoorcontroller’shardwareconguration.ClickRemovecontrollertoconrm.
6.Adialogopenspromptingyoutoconrmthatyouwanttoremovethedoorcontroller .ClickOKtoconrm.Theremoved
doorcontrollerisnowinstandalonemode.
Note
•Whenadoorcontrollerisremovedfromthesystem,allitsaccessmanagementsettingsaredeleted.
•Onlydoorcontrollersthatareonlinecanberemoved.
MaintenanceInstructions
Tokeeptheaccesscontrolsystemrunningsmoothly,Axisrecommendsregularmaintenanceoftheaccesscontrolsystem,including
doorcontrollersandconnecteddevices.
Domaintenanceatleastonceayear.Thesuggestedmaintenanceprocedureincludes,butisnotlimitedto,thefollowingsteps:
•Makesurealltheconnectionsbetweenthedoorcontrollerandtheexternaldevicesaresecure.
•Verifyallthehardwareconnections.SeeVericationControlsonpage17.
•Verifythatthesystem,includingtheconnectedexternaldevices,functionscorrectly.
-Swipeacardandtestthereaders,doors,andlocks.
-IfthesystemincludesREXdevices,sensorsorotherdevices,testthemaswell.
-Ifactivated,testthetamperingalarms.
Iftheresultsfromanyofthestepsaboveindicatefaultsorunexpectedbehavior:
-Testthesignalsofthewiresusingappropriateequipmentandcheckifthewiresorcablesaredamaged
inanyway.
-Replacealldamagedorfaultycablesandwires.
-Oncethecablesandwireshavebeenreplaced,verifyallthehardwareconnectionsagain.SeeVerication
Controlsonpage17.
•Makesureallaccessschedules,doors,groups,andusersareuptodate.
•Ifthedoorcontrollerisnotbehavingasexpected,seeTroubleshootingonpage51andMaintenanceonpage48for
moreinformation.
23
Page 24

AXISA1001NetworkDoorController&AXISEntryManager
Jane Doe
10010
1
2
3
4
5
6
7
8
AccessManagement
AccessManagement
AboutUsers
InAXISEntryManager,usersarepeoplewhohavebeenregisteredasownersofoneormoretokens(identicationtypes).Each
personmusthaveauniqueuserproletobegrantedaccesstodoorsintheaccesscontrolsystem.Theuserproleconsistsof
credentialsthattellthesystemwhotheuserisandwhenandhowtheyaregrantedaccesstodoors.Formoreinformation,seeCreate
andEditUsersonpage29.
Usersinthiscontextshouldnotbeconfusedwithadministrators.Administratorshaveunrestrictedaccesstoallsettings.Andinthe
contextofmanagingtheaccesscontrolsystem,theproduct’swebpages(AXISEntryManager),administratorsarealsosometimes
referredtoasusers.Formoreinformation,seeUsersonpage41.
TheAccessManagementPage
TheAccessManagementpageallowsyoutocongureandmanagethesystem’susers,groups,doors,andschedules.Toopenthe
AccessManagementpage,clickAccessManagement.
Toadduserstogroupsandapplyaccessschedulesanddoors,dragtheitemstotheirrespectivedestinationintheGroupsand
Doorslists.
Note
Messagesthatrequireactionareshowninredtext.
ChooseaWorkow
Theaccessmanagementstructureisexible,allowingyoutodevelopaworkowthatsuitsyourneeds.Thefollowingisaworkow
example:
1.Createaccessschedules.Seepage25.
2.Creategroups.Seepage27.
3.Applyaccessschedulestogroups.
4.Addidenticationtypestodoors.Seepage27andpage28.
5.Applyaccessschedulestoeachidenticationtype.
6.Applydoorstogroups.
7.Createusers.Seepage29.
24
Page 25

AXISA1001NetworkDoorController&AXISEntryManager
AccessManagement
8.Adduserstogroups.
Forappliedexamplesofthisworkow ,seeExampleAccessScheduleCombinationsonpage31.
CreateandEditAccessSchedules
Accessschedulesareusedtodenegeneralrulesforwhendoorscanandcannotbeaccessed.Theyarealsousedtodenerulesfor
whengroupscanandcannotaccessthedoorsinthesystem.Formoreinformation,seeAccessScheduleTypesonpage25.
Tocreateanewaccessschedule:
1.GotoAccessManagement.
2.IntheAccessSchedulestab,clickAddnewschedule.
3.IntheAddaccessscheduledialog,entertheschedulename.
4.Tocreatearegularaccessschedule,selectAdditionSchedule.
Ortocreateasubtractionschedule,selectSubtractionSchedule.
Formoreinformation,seeAccessScheduleTypes.
5.ClickSave.
ToexpandanitemintheAccessScheduleslist,click
areshownindarkredtext.
Toviewanaccessschedule’scalendar ,click.
Toeditanaccessschedule’snameorascheduleitem,clickandmakethechanges.ThenclickSave.
Todeleteanaccessschedule,click
Note
Thedoorcontrollerhasafewpredenedcommonlyusedaccessschedulesthatcanbeusedasexamplesormodiedas
required.However,thepredenedaccessscheduleAlwayscannotbemodiedordeleted.
.
.Additionschedulesareshowningreentextandsubtractionschedules
AccessScheduleTypes
Therearetwotypesofaccessschedules:
•Additionschedule–Regularaccessschedulesthatdenewhendoorscanbeaccessed.Typicaladditionschedulesare
ofcehours,businesshours,afterhours,ornighttimehours.
•Subtractionschedule–Exceptionstoregularaccessschedules.Theyaregenerallyusedtorestrictaccessduringaspecic
timeperiodthatoccurswithinthetimeperiodofaregularschedule(additionschedule).Forexample,subtraction
schedulescanbeusedtodenyusersaccesstothebuildingduringpublicholidaysthatoccuronweekdays.
Bothtypesofaccessschedulescanbeusedattwolevels:
•Identicationtypeschedules–Determinewhenandhowreadersgrantusersaccesstoadoor.Eachidentication
typemustbeconnectedtoanaccessschedulethattellsthesystemwhentograntusersaccesswiththatparticular
identicationtype.Multipleadditionschedulesandsubtractionschedulescanbeaddedtoeachidenticationtype.
Forinformationaboutidenticationtypes,seepage28.
•Groupschedules–Determinewhen,butnothow,membersofagrouparegrantedaccesstoadoor.Eachgroupmustbe
connectedtooneormoreaccessschedulesthattellthesystemwhentograntitsmembersaccess.Multipleaddition
schedulesandsubtractionschedulescanbeaddedtoeachgroup.Forinformationaboutgroups,seepage27.
Groupschedulescanrestrictentryaccessrightsbutnotextendentryorexitaccessrightsbeyondwhattheidenticationtype
schedulesallow.Inotherwords,ifanidenticationtypeschedulerestrictsentryorexitaccessatcertaintimes,agroupschedule
25
Page 26

AXISA1001NetworkDoorController&AXISEntryManager
AccessManagement
cannotoverridethatidenticationtypeschedule.However,ifagroupscheduleismorerestrictiveaboutaccessthantheidentication
typeschedule,thegroupscheduleoverridestheidenticationtypeschedule.
Identicationtypeschedulesandgroupschedulescanbecombinedinseveralwaystoachievedifferentresults.Forexampleaccess
schedulecombinations,seepage31.
AddScheduleItems
Bothadditionschedulesandsubtractionschedulescanbeone-time(single)eventsorrecurringevents.
Toaddascheduleitemtoanaccessschedule:
1.ExpandtheaccessscheduleintheAccessScheduleslist.
2.ClickAddscheduleitem.
3.Enterthenameofthescheduleditem.
4.SelectOnetimeorRecurrence.
5.Setthedurationinthetimeelds.SeeTimeOptions.
6.Forrecurringscheduleevents,selecttheRecurrencepatternandRangeofrecurrenceparameters.SeeRecurrencePattern
OptionsandRangeofRecurrenceOptions.
7.ClickSave.
TimeOptions
Thefollowingtimeoptionsareavailable:
•Allday–Selectforeventsthatlastforall24hoursoftheday.ThenenterthedesiredStartdate.
•Start–Clickthetimeeldandselectthedesiredtime.Ifrequired,clickthedateeldandselectthedesiredmonth,day,
andyear.Youcanalsotypethedatedirectlyintheeld.
•End–Clickthetimeeldandselectthedesiredtime.Ifrequired,clickthedateeldandselectthedesiredmonth,day,
andyear.Youcanalsotypethedatedirectlyintheeld.
RecurrencePatternOptions
Thefollowingrecurrencepatternoptionsareavailable:
•Yearly–Selecttorepeateveryyear.
•Weekly–Selecttorepeateveryweek.
•RecurseveryweekonMonday,Tuesday,Wednesday,Thursday,Friday,Saturday,andSunday–Selectwhichdaystorepeat.
RangeofRecurrenceOptions
Thefollowingrangeofrecurrenceoptionsareavailable:
•Firstoccurrence–Clickthedateeldandselectthedesiredmonth,day,andyear.Youcanalsotypethedatedirectly
intheeld.
•Noenddate–Selecttorepeattheoccurrenceindenitely.
•Endby–Clickthedateeldandselectthedesiredmonth,day,andyear.Youcanalsotypethedatedirectlyintheeld.
26
Page 27

AXISA1001NetworkDoorController&AXISEntryManager
AccessManagement
CreateandEditGroups
Groupsallowyoutomanageusersandtheiraccessrightscollectivelyandefciently.Agroupconsistsofcredentialsthattellthe
systemwhichusersthegroupconsistsofandwhenandhowthegroupmembersaregrantedaccesstothedoors.
Eachusermustbelongtooneormoregroups.Toaddausertoagroup,draganddroptheusertothedesiredgroupintheGroupslist.
Formoreinformation,seeCreateandEditUsersonpage29.
Tocreateanewgroup:
1.GotoAccessManagement.
2.IntheGroupstab,clickAddnewgroup.
3.IntheAddGroupdialog,enterthegroup’scredentials.SeeGroupCredentialsonpage27.
4.ClickSave.
ToexpandanitemintheGroupslistandviewitsmembers,dooraccessrightsandschedules,click
Toeditagroup’snameorvaliditydate,clickandmakethechanges.ThenclickSave.
Toverifywhenandhowagroupcanaccesscertaindoors,click.
Todeleteagrouporgroupmembers,doorsorschedulesfromagroup,click.
.
GroupCredentials
Thefollowingcredentialsareavailableforgroups:
•Name(required)
•ValidfromandValidto–Enterthedatesbetweenwhichthegroup’scredentialsshallbevalid.Clickthedateeldand
selectthedesiredmonth,day,andyear.Youcanalsotypethedatedirectlyintheeld.
Note
Tobeabletosavetheprole,youmustenterthegroup’sName.
ManageDoors
ThegeneralrulesforeachdooraremanagedintheDoorstab.Therulesincludeaddingidenticationtypesthatdeterminehowusers
willbegrantedaccesstothedoorandaccessschedulesthatdeterminewheneachidenticationtypeisvalid.Formoreinformation,
seeIdenticationTypesonpage28andCreateandEditAccessSchedulesonpage25.
Beforeyoucanmanageadoor,youmustaddittotheaccesscontrolsystembycompletingthehardwareconguration,see
ConguretheHardwareonpage13.
Tomanageadoor:
1.GotoAccessManagementandselecttheDoorstab.
2.IntheDoorslist,click
3.Dragthedoortoatleastonegroup.IftheGroupslistisempty,createanewgroup.SeeCreateandEditGroupsonpage27.
4.ClickAddidenticationtypeandselectwhichcredentialsusersneedtopresenttothereadertobegrantedaccesstothe
door.SeeIdenticationTypesonpage28.
Addatleastoneidenticationtypetoeachdoor.
5.Toaddmultipleidenticationtypes,repeatthepreviousstep.
nexttothedooryouwanttoedit.
27
Page 28

AXISA1001NetworkDoorController&AXISEntryManager
AccessManagement
IfbothidenticationtypesCardnumberonlyandPINonlyareadded,userscanchoosetoeitherswipetheircardorenter
theirpintoaccessthedoor.Butif,instead,onlytheidenticationtypeCardnumberandPINisadded,usersmustboth
swipetheircardandentertheirPINtoaccessthedoor.
6.Todenewhenthecredentialsarevalid,dragascheduletoeachidenticationtype.
Tomanuallyunlockdoors,lockdoors,orgranttemporaryaccess,clickoneofthemanualdooractionsasrequired.SeeUseManual
DoorActionsonpage29.
ToexpandanitemintheDoorslist,click
Toeditadoororreadername,clickandmakethechanges.ThenclickSave.
Toverifythereader,identicationtype,andaccessschedulecombinations,click
Toverifythefunctionofthelocksconnectedtothedoors,clickthevericationcontrols.SeeVericationControlsonpage17.
Todeleteidenticationtypesoraccessschedules,click
.
.
.
IdenticationTypes
Identicationtypesareportablecredentialstoragedevices,piecesofmemorizedinformation,orvariouscombinationsofthetwothat
determinehowuserswillbegrantedaccesstothedoor.Commonidenticationtypesincludetokenssuchascardsorkeyfobs,
personalidenticationnumbers(PINs),andrequesttoexit(REX)devices.
Formoreinformationaboutcredentials,seeUserCredentialsonpage30.
Thefollowingidenticationtypesareavailable:
•Cardnumberonly–Theusercanaccessthedoorusingonlyacardorothertokenacceptedbythereader.Thecard
numberisauniquenumberthatisusuallyprintedonthecard.Seethecardmanufacturer’sinformationaboutwhereto
locatethecardnumber.Thecardnumbercanalsoberetrievedbythesystem.Swipethecardonaconnectedreader,
selectthereaderinthelist,andclickRetrieve.
•Cardrawonly–Theusercanaccessthedoorusingonlyacardorothertokenacceptedbythereader.Theinformationis
storedasrawdataonthecard.Thecardrawdatacanberetrievedbythesystem.Swipethecardonaconnectedreader,
selectthereaderinthelist,andclickRetrieve.Onlyusethisidenticationtypeifacardnumbercannotbelocated.
•PINonly–Theusercanaccessthedoorusingonlyafour-digitpersonalidenticationnumber(PIN).
•CardnumberandPIN–Theuserneedsboththecard,orothertokenacceptedbythereader,andaPINtoaccessthedoor.
Theusermustpresentthecredentialsinthespeciedorder(cardrst,thenPIN).
•CardrawandPIN–Theuserneedsboththecard,orothertokenacceptedbythereader,andaPINtoaccessthedoor.Only
usethisidenticationtypeifacardnumbercannotbelocated.Theusermustpresentthecredentialsinthespecied
order(cardrst,thenPIN).
•REX–Theusercanaccessthedoorbyactivatingarequesttoexit(REX)device,suchasabutton,sensor,orpushbar.
AddScheduledUnlockStates
Toautomaticallykeepadoorunlockedforaspecicdurationoftime,youcanaddaScheduledunlockstatetoadoorandapplyan
accessscheduletoit.
Forexample,tokeepadoorunlockedduringofcehours:
1.GotoAccessManagementandselecttheDoorstab.
2.ClicknexttotheDoorslistitemyouwanttoedit.
3.ClickAddscheduledunlock.
28
Page 29

AXISA1001NetworkDoorController&AXISEntryManager
AccessManagement
4.SelecttheUnlockstate(unlockedorunlockbothlocksdependingonwhetherthedoorhasoneortwolocks).
5.ClickOK.
6.ApplythepredenedOfcehoursaccessscheduletotheScheduledunlockstate.
Toverifywhenthedoorisunlocked,click.
Todeleteascheduledunlockstateoraccessschedule,click
.
UseManualDoorActions
DoorscanbeunlockedorlockedandtemporaryaccesscanbegrantedintheDoorstabthroughtheManualdooractions.Which
manualdooractionsareavailableforaspecicdoordependsonhowthedoorhasbeencongured.
Tousethemanualdooractions:
1.GotoAccessManagementandselecttheDoorstab.
2.IntheDoorslist,click
3.Clicktherequireddooraction.SeeManualDoorActionsonpage29.
Note
Tousethemanualdooractions,youneedtoopentheAccessManagementpagethroughthedoorcontrollerthespecic
doorisconnectedto.IfyouopentheAccessManagementpagethroughadifferentdoorcontroller,insteadofthemanual
dooractionstherewillbealinktotheOverviewpageofthedoorcontrollerthespecicdoorisconnectedto.Clickthe
link,gotoAccessManagement,andselecttheDoorstab.
ManualDoorActions
Thefollowingmanualdooractionsareavailable:
•Getdoorstatus–Verifythecurrentstateofthedoormonitor,dooralarms,andlocks.
•Access–Grantusersaccesstothedoor .Thegivenaccesstimeapplies.SeeCongureLocksandDoorMonitorsonpage14.
nexttothedoorthatyouwanttocontrol.
•Unlock(onelock)orUnlockbothlocks(twolocks)–Unlockthedoor.ThedoorremainsunlockeduntilyoupressLockor
Lockbothlocks,ascheduleddoorstateisactivated,orthedoorcontrollerisrestarted.
•Lock(onelock)orLockbothlocks(twolocks)–Lockthedoor.
•Unlocksecondlockandlockprimary–Thisoptionisonlyavailableifthedoorhasbeenconguredwithasecondarylock.
Unlockthedoor.ThesecondarylockremainsunlockeduntilyoupressDoublelockorascheduleddoorstateisactivated.
CreateandEditUsers
Eachpersonmusthaveauniqueuserproletobegrantedaccesstodoorsintheaccesscontrolsystem.Theuserproleconsistsof
credentialsthattellthesystemwhotheuserisandwhenandhowtheyaregrantedaccesstothedoors.
Tobeabletomanagetheuseraccessrightsefciently,eachusermustbelongtooneormoregroups.Formoreinformation,
seeCreateandEditGroups.
Tocreateanewuserprole:
1.GotoAccessManagement.
2.SelecttheUserstabandclickAddnewuser.
3.IntheAddUserdialog,entertheuser’scredentials.SeeUserCredentialsonpage30.
29
Page 30

AXISA1001NetworkDoorController&AXISEntryManager
AccessManagement
4.ClickSave.
5.DragtheusertooneormoregroupsintheGroupslist.IftheGroupslistisempty,createanewgroup.SeeCreate
andEditGroupsonpage27.
ToexpandanitemintheUserslistandviewauser’scredentials,click
Tondaspecicuser,enteralterinthelteruserseld.Toforceexactmatches,surroundtheltertextwithdoublequotation
marks,forexample“John”or“potter,virginia”.
Toeditauser’scredentials,clickandchangethecredentialsasrequired.ThenclickSave.
Todeleteauser,click.
.
UserCredentials
Thefollowingcredentialsareavailableforusers:
•Firstname(required)
•Lastname
•ValidfromandValiduntil–Enterthedatesbetweenwhichtheuser’scredentialsshallbevalid.Clickthedateeldand
selectthedesiredmonth,day,andyear.Youcanalsotypethedatedirectlyintheeld.
•Suspenduser–Selecttosuspendtheuser.Whensuspended,theusercannotaccessanydoorsinthesystem.Deselectto
givetheuseraccessagain.Suspensionisintendedtobetemporary.Iftheusershallbedeniedaccesspermanently,itis
bettertodeletetheuserprole.
•PIN(requiredifnocardnumberorcardraw)–Enterthefour-digitpersonalidenticationnumber(PIN)selectedbyor
assignedtotheuser.
•Cardnumber(requiredifnoPINorcardraw)–Enterthecardnumber.Seethecardmanufacturer’sinformationabout
wheretolocatethecardnumber.Thecardnumbercanalsoberetrievedbythesystem.Swipethecardonaconnected
reader,selectthereaderinthelist,andclickRetrieve.
•Cardraw(requiredifnoPINorcardnumber)–Enterthecardrawdata.Thedatacanberetrievedbythesystem.Swipe
thecardonaconnectedreader,selectthereaderinthelist,andclickRetrieve.Onlyusethisidenticationtypeifa
cardnumbercannotbelocated.
Note
•Tobeabletosavetheprole,youmustentertheuser’sFirstnameorLastnameandeitherthePIN,Cardnumber,
orCardrawdata.
•TheRetrievebuttonisonlyavailableifthehardwarecongurationhasbeencompletedandoneormorereadersare
connectedtothecontroller.
ImportUsers
Userscanbeaddedtothesystembyimportingatextleincomma-separatedvalue(CSV)format.Itisrecommendedtoimport
userswhenyouneedtoaddmanyusersatatime.
Beforeyoucanimportusers,youmustcreateandsaveale(*.csvor*.txt)inthecorrectCSVformat.Separatevaluesbycommas,no
spaces,andseparateeachuserwithalinebreak.
Example
virginia,potter,1212,56781234
jane,doe,1234,12345678
leia,garfunkel,8545,45673258
ororo,wolf,3548,78542654
john,doe,5435,87654321
Toimportusers:
30
Page 31

AXISA1001NetworkDoorController&AXISEntryManager
AccessManagement
1.GotoSetup>ImportUsers.
2.Locateandselectthe*.csvor*.txtlethatholdsthelistofusers.
3.Selectthecorrectcredentialoptionforeachcolumn.
4.Toimporttheuserstothesystem,clickImportusers.
5.Verifythateachcolumncontainsthecorrecttypeofcredential.
6.Ifthecolumnsarecorrect,clickStartimportingusers.Ifthecolumnsareincorrect,clickCancelandstartover.
7.Whentheimportisnished,clickOK.
Thefollowingcredentialoptionsareavailable:
•Firstname
•Lastname
•PINcode
•Cardnumber
•Unassigned–Valuesthatwillnotbeimported.Selectthisoptiontoskipaparticularcolumn.
Formoreinformationaboutcredentials,seeCreateandEditUsers.
ExportUsers
TheExportpageshowsacomma-separatedvalue(CSV)listofalltheusersinthesystem.Thelistcanbeusedtoimportthe
userstoanothersystem.
Toexporttheuserlist:
1.Openaplaintexteditorandcreateanewdocument.
2.GotoSetup>ExportUsers
3.Selectallthevaluesonthepageandcopythem.
4.Pastethevaluesintothetextdocument.
5.Savethedocumentasacomma-separatedvaluele(*csv)orasatext(*.txt)le.
ExampleAccessScheduleCombinations
Identicationtypeschedulesandgroupschedulescanbecombinedinseveralwaystoachievedifferentresults.Theexamples
belowfollowtheworkowdescribedonpage24.
Example
Tocreateaschedulecombinationthat
•grantsguardsaccesstoadooratalltimes,
-usingtheircardduringdayshifthours(Monday–Friday,6a.m.to4p.m.),while
-usingtheircardandPINbeforeandafterdayshifthours,andthat
•grantsdayshiftpersonnelaccesstothesamedoor,
-usingtheircardduringdayshifthoursonly:
1.CreateanAdditionschedulecalledDayshifthours.Seepage25.
31
Page 32

AXISA1001NetworkDoorController&AXISEntryManager
AccessManagement
2.CreateadayshifthoursScheduleitemthatrecursMonday–Friday,06:00–16:00.
3.Createtwogroups,oneGroupcalledGuardsandoneGroupcalledDayshiftpersonnel.Seepage27.
4.DragthepredenedAlwaysaccessscheduletotheGuardsgroup.
5.DragtheDayshifthoursaccessscheduletotheDayshiftpersonnelgroup.
6.AddtheCardnumberandPINandCardnumberonlyidenticationtypestothedoor’sreader.
7.DragthepredenedAlwaysaccessscheduletotheCardnumberandPINidenticationtype.
8.DragtheDayshifthoursaccessscheduletotheCardnumberonlyidenticationtype.
9.Dragthedoortobothgroups.Thenadduserstothegroupsasrequired.Seepage29.
Example
Tocreateaschedulecombinationthat
•grantsguardsaccesstoadooratalltimes,
-usingtheircardduringdayshifthours(Monday–Friday,6a.m.to4p.m.),while
-usingtheircardandPINbeforeandafterdayshifthours,andthat
•grantsdayshiftpersonnelaccesstothesamedooreverydaybetween6a.m.and4p.m.,
-usingtheircardduringdayshifthours,while
-usingtheircardandPINduringnightsandweekends:
1.CreateanAdditionschedulecalledDayshifthours.Seepage25.
2.CreateadayshifthoursScheduleitemthatrecursMonday–Friday,06:00–16:00.
3.CreateaSubtractionschedulecalledNights&weekends.
4.CreateanightsandweekendsScheduleitemthatrecursSunday–Saturday16:00–06:00.
5.DragthepredenedAlwaysscheduleandtheNights&weekendsaccessscheduletotheDayshiftpersonnelgroup.
6.Createtwogroups,oneGroupcalledGuardsandoneGroupcalledDayshiftpersonnel.Seepage27.
7.DragthepredenedAlwaysaccessscheduletotheGuardsgroupandtheDayshiftpersonnelgroup.
8.DragtheNights&weekendsaccessscheduletotheDayshiftpersonnelgroup.
9.AddtheCardnumberandPINandCardnumberonlyidenticationtypestothedoor’sreader.
10.DragthepredenedAlwaysaccessscheduletotheCardnumberandPINidenticationtype.
11.DragtheDayshifthoursaccessscheduletotheCardnumberonlyidenticationtype.
12.Dragthedoortobothgroups.Thenadduserstothegroupsasrequired.Seepage29.
32
Page 33

AXISA1001NetworkDoorController&AXISEntryManager
AlarmandEventConfiguration
AlarmandEventConfiguration
Eventsthatoccurinthesystem,forexamplewhenauserswipesacardoraREXdeviceisactivated,areloggedintheeventlog.
Loggedeventscanbeconguredtotriggeralarmsandsuchalarmsareloggedinthealarmlog.
•Viewtheeventlog.Seepage33.
•Viewthealarmlog.Seepage33.
•Conguretheeventandalarmlogs.Seepage33.
Alarmscanalsobeconguredtotriggeractionssuchasemailnotications.Formoreinformation,seeSetUpActionRulesonpage34.
ViewtheEventLog
Toviewloggedevents,gotoEventLog.Ifglobaleventsisenabled,youcanopentheeventlogfromanydoorcontrollerinthe
system.Formoreinformationaboutglobalevents,seeConguretheEventandAlarmLogsonpage33.
Toexpandanitemintheeventlogandviewtheeventdetails,click.
Applyinglterstotheeventlogmakesiteasiertondspecicevents.Tolterthelist,selectoneorseveraleventlogltersandclick
Refreshlist.Formoreinformation,seeEventLogFiltersonpage33.
Asanadministrator ,youmighthavemoreinterestinsomeeventsthanothers.Therefore,youcanchoosewhicheventsthatshallbe
logged,andforwhichcontrollers.Formoreinformation,seeEventLogOptionsonpage34.
EventLogFilters
Youcannarrowthescopeoftheeventlogbyselectingoneorseveralofthefollowinglters:
•Topic–SelecttheeventintheFilterbytopicslist.
•Doorcontroller–SelectthecontrollerintheFilterbycontrollerlist.
•Dateandtime–underFilterbydateandtime,selectBasedondateandtimeintervalandenterthedesiredtimerange.
ViewtheAlarmLog
Toviewthetriggeredalarms,gotoAlarmLog.Ifglobaleventsisenabled,youcanopenthealarmlogfromanydoorcontrollerinthe
system.Formoreinformationaboutglobalevents,seeConguretheEventandAlarmLogsonpage33.
Toexpandaniteminthealarmlogandviewthealarmdetails,forexampledooridentityandstate,click
Toremoveanalarmfromthelistafterverifyingthecauseofthealarm,clickAcknowledge.
Asanadministrator ,youmightneedsomeeventstotriggeralarms.Therefore,youcanchoosewhicheventsshalltriggeralarmsand
forwhichcontrollers.Formoreinformation,seeAlarmLogOptions.
.
ConguretheEventandAlarmLogs
TheCongureEventandAlarmLogspageallowsyoutodenewhicheventsshallbeloggedandtriggeralarms.
Toshareeventsandalarmsbetweenallconnectedcontrollers,selectGlobalevents.Whenglobaleventsisenabled,youonlyneed
toopenoneEventLogpageandoneAlarmLogpagetosimultaneouslymanagetheeventsandalarmsofalldoorcontrollersin
thesystem.Globaleventsisenabledbydefault.
Ifyoudisableglobalevents,youwillhavetoopenoneEventLogpageandoneAlarmLogpageforeachindividualdoorcontroller
andmanagetheireventsandalarmsseparately.
33
Page 34

AXISA1001NetworkDoorController&AXISEntryManager
AlarmandEventConfiguration
Important
Eachtimethatyouenableordisableglobalevents,theeventlogiscleared.Thismeansthatalleventsbeforethatmoment
areremovedandtheeventlogstartsover.
Alarmscanalsobeconguredtotriggeractionssuchasemailnotications.Formoreinformation,seeSetUpActionRulesonpage34.
EventLogOptions
Todenewhicheventsshallbeincludedintheeventlog,gotoSetup>CongureEventandAlarmLogs.
Thefollowingoptionsforloggingeventsareavailable:
•Nologging–Disableeventlogging.Theeventwillnotberegisteredorincludedintheeventlog.
•Logforallcontrollers–Enableeventlogginginalldoorcontrollers.Theeventwillberegisteredforallcontrollersand
includedintheeventlog.
•Logforselectedcontrollers–Enableeventlogginginselecteddoorcontrollers.Theeventwillberegisteredforallselected
controllersandincludedintheeventlog.Selectthisoptionforeventsthatwillbecombinedwitheitherthealarmlog
optionNoalarmsorLogalarmforselectedcontrollers.
IntheCongureeventlogginglist,clickSelectcontrollersundertheeventlogitemyouwanttoenable.TheDevice
SpecicEventLoggingdialogopens.UnderLogevent,selectthecontrollersthatshallhavealarmloggingenabled
andclickSave.
AlarmLogOptions
Todenewhicheventsshouldtriggeranalarm,gotoSetup>CongureEventandAlarmLogs.
Thefollowingoptionsfortriggeringandloggingalarmsareavailable:
•Noalarms–Disablealarmlogging.Theeventwillnottriggeranyalarmsorbeincludedinthealarmlog.
•Logalarmforallcontrollers–Enablealarmlogginginalldoorcontrollers.Theeventwilltriggeranalarmandbe
includedinthealarmlog.
•Logalarmforselectedcontrollers–Enablealarmlogginginselecteddoorcontrollers.Theeventwilltriggeranalarm
andbeincludedinthealarmlog.
IntheCongurealarmlogginglist,clickSelectcontrollersunderthealarmlogitemyouwanttoenable.TheDevice
SpecicAlarmTriggeringdialogopens.UnderTriggeralarm,selectthedoorcontrollersthatshallhavealarmlogging
enabledandclickSave.
SetUpActionRules
TheEventpagesallowyoutoconguretheAxisproducttoperformactionswhendifferenteventsoccur.Forexample,theproduct
cansendanemailnoticationoractivateanoutputportwhenanalarmistriggered.Thesetofconditionsthatdeneshowand
whentheactionistriggerediscalledanactionrule.Ifmultipleconditionsaredened,allofthemmustbemettotriggertheaction.
Formoreinformationaboutavailabletriggersandactions,seeTriggersonpage35andActionsonpage37.
Thefollowingexampledescribeshowtosetupanactionruletosendanemailnoticationwhenanyalarmistriggered.
1.Congurethealarms.SeeConguretheEventandAlarmLogsonpage33.
2.GotoSetup>AdditionalControllerConguration>Events>ActionRulesandclickAdd.
3.SelectEnableruleandenteradescriptivenamefortherule.
4.SelectEventLoggerfromtheTriggerdrop-downlist.
5.Optionally,selectaScheduleandAdditionalconditions.Seebelow.
34
Page 35

AXISA1001NetworkDoorController&AXISEntryManager
AlarmandEventConfiguration
6.UnderActions,selectSendNoticationfromtheTypedrop-downlist.
7.Selectanemailrecipientfromthedrop-downlist.SeeAddRecipientsonpage37.
Thefollowingexampledescribeshowtosetupanactionruletoactivateanoutputportwhenthedoorisforcedopen.
1.GotoSetup>AdditionalControllerConguration>SystemOptions>Ports&Devices>I/OPorts.
2.SelectOutputfromthedesiredI/OPortTypedrop-downlistandenteraName.
3.SelecttheI/Oport’sNormalstateandclickSave.
4.GotoEvents>ActionRulesandclickAdd.
5.SelectDoorfromtheTriggerdrop-downlist.
6.SelectDoorAlarmfromthedrop-downlist.
7.Selectthedesireddoorfromthedrop-downlist.
8.SelectDoorForcedOpenfromthedrop-downlist.
9.Optionally,selectaScheduleandAdditionalconditions.Seebelow.
10.UnderActions,selectOutputPortfromtheTypedrop-downlist.
11.SelectthedesiredoutputportfromthePortdrop-downlist.
12.SetstateActive.
13.SelectDurationandGotooppositestateafter.Thenenterthedesireddurationoftheaction.
14.ClickOK.
Tousemorethanonetriggerfortheactionrule,selectAdditionalconditionsandclickAddtoaddadditionaltriggers.Whenusing
additionalconditions,allconditionsmustbemettotriggertheaction.
Topreventanactionfrombeingtriggeredrepeatedly,aWaitatleasttimecanbeset.Enterthetimeinhours,minutesandseconds,
duringwhichthetriggershouldbeignoredbeforetheactionrulecanbeactivatedagain.
Formoreinformation,seetheonlinehelp
.
Triggers
Availableactionruletriggersandconditionsinclude:
•AccessPoint
-AccessPointEnabled–TriggerstheactionrulewhenanaccesspointdevicesuchasareaderorREXdeviceis
congured,forexamplewhenthehardwarecongurationiscompletedoranidenticationtypeisadded.
•Conguration
-AccessPointChanged–Triggerstheactionrulewhenthecongurationofanaccesspointdevicesuchasa
readerorREXdeviceischanged,forexamplewhenhardwareisconguredoranidenticationtypeisedited,
changingthewaysthroughwhichadoorcanbeaccessed.
-AccessPointRemoved–Triggerstheactionrulewhenthehardwarecongurationofanaccesspointdevice
suchasareaderorREXdeviceisreset.
-AreaChanged–NotsupportedbythisversionofAXISEntryManager.Mustbeconguredbyaclientsuchasan
accessmanagementsystem,throughtheVAPIX®applicationprogramminginterface,thatsupportsthisfeature
andusedevicesthatcanprovidetherequiredsignals.Triggerstheactionrulewhenanaccessareaischanged.
35
Page 36

AXISA1001NetworkDoorController&AXISEntryManager
AlarmandEventConfiguration
-AreaRemoved–NotsupportedbythisversionofAXISEntryManager.Mustbeconguredbyaclientsuch
asanaccessmanagementsystem,throughtheVAPIX®applicationprogramminginterface,thatsupportsthis
featureandusedevicesthatcanprovidetherequiredsignals.Triggerstheactionrulewhenanaccessareais
removedfromthesystem.
-DoorChanged–Triggerstheactionrulewhenthedoorcongurationsettings,forexampledoorname,are
changedorwhenadoorisaddedtothesystem.Thiscanforexamplebeusedtosendanoticationwhena
doorisinstalledandcongured.
-DoorRemoved–Triggerstheactionrulewhenadoorisremovedfromthesystem.Thiscanforexamplebe
usedtosendanoticationwhenadoorisremovedfromthesystem.
•Door
-DoorAlarm–Triggerstheactionrulewhenthedoormonitorindicatesthatthedoorhasbeenforcedopen,the
doorisopentoolong,orifthedoorisfaultyinanyway.Thiscanforexamplebeusedtosendanotication
whensomeoneisforcinganentry.
-DoorDouble-LockMonitor–Triggerstheactionruleonlywhenthesecondarylockchangesstatetoeither
lockedorunlocked.
-DoorLockMonitor–Triggerstheactionrulewhenthenormallockchangesstatetoeitherlockedorunlocked.
Forexample,afaultistriggeredwhenthedoormonitordetectsthatthedoorisopenalthoughthelockislocked.
-DoorMode–Triggerstheactionrulewhenthedoorchangesstates,forexample,whenthedoorhasbeen
accessedorblocked,orthedoorisinlockdownmode.Formoredetaileddescriptionsofthesemodes,seethe
onlinehelp.
-DoorMonitor–Triggerstheactionrulewhenthedoormonitorstatechanges.Thiscanforexamplebeusedto
sendanoticationwhenadoormonitorindicatesthatthedoorisopenedorclosed.
-DoorTamper–Triggerstheactionrulewhenthedoormonitordetectsthattheconnectionisinterrupted,for
exampleifsomeonecutsthewirestothedoormonitor.Tousethistrigger,makesurethatEnablesupervised
inputsisselectedandthatendoflineresistorsareinstalledontherelevantdoorconnectorinputports.For
moreinformation,seeUseSupervisedInputsonpage16.
-DoorWarning–Triggerstheactionrulebeforethedooropentoolongalarmgoesoff.Thiscanbeusedto,
forexample,sendawarningsignalthatthedoorcontrollerwillsendtherealalarm,thedooropentoolong
alarm,ifthedoorisnotclosedwithinthespecieddooropentoolongtime.Formoreinformationaboutdoor
opentoolongtime,seeCongureLocksandDoorMonitorsonpage14.
•EventLogger–Keepstrackofalleventsinthedoorcontroller,forexamplewhenauserswipesacardoropensadoor.If
Globaleventsisenabled,theeventloggerkeepstrackofalltheeventsineverycontrollerinthesystem.Tosetwhich
alarmsandeventsthatcantriggeranactionrule,gotoSetup>CongureEventandAlarmLogs.Theeventloggeris
sharedbythesystemandcanstoreupto30000events.Whenthelimitisreached,theeventloggerusestherstinrst
out(FIFO)rule.Thismeansthatthersteventisthersttobeoverwritten.
-Alarm–Triggerstheactionrulewhenoneofthespeciedalarmshasbeentriggered.Thesystemadministrator
cancongurewhicheventsaremoreimportantthanothersandselectwhetheraparticulareventshould
triggeranalarmornot.
-DroppedAlarms–Triggerstheactionrulewhennewalarmrecordscannotbewrittentothealarmlogs.For
exampleiftherearesomanysimultaneousalarmsthattheeventloggercannotkeepup.Whenanalarmis
dropped,anoticationcanbesenttotheoperator.
-DroppedEvents–Triggerstheactionrulewhenneweventrecordscannotbewrittentotheeventlogs.For
example,iftherearesomanysimultaneouseventsthattheeventloggercannotkeepup.Whenaneventis
dropped,anoticationcanbesenttotheoperator.
•Hardware
-CasingOpen–Triggerstheactionruleifthecoverofthedoorcontrollerisopenedorifthedoorcontrolleris
removedfromthewallorceiling.Thiscanforexamplebeusedtosendanoticationifthecasinghasbeen
openedformaintenancepurposesorwhensomeonehastamperedwiththecasing.
36
Page 37

AXISA1001NetworkDoorController&AXISEntryManager
AlarmandEventConfiguration
-Network–Triggerstheactionrulewhenthenetworkconnectionislost.SelectYestotriggertheaction
rulewhenthenetworkconnectionislost.SelectNototriggertheactionrulewhenthenetworkconnection
isrestored.
-PeerConnection–TriggerstheactionrulewhentheAxisproducthasestablishedaconnectionwithanother
doorcontroller ,ifthenetworkconnectionbetweenthedevicesislost,orifthepairingofdoorcontrollershas
failed.Thiscanforexamplebeusedtosendanoticationthatadoorcontrollerhaslostitsnetworkconnection.
•InputSignal
-DigitalInputPort–TriggertherulewhenanI/Oportreceivesasignalfromaconnecteddevice.SeeI/O
Portsonpage48.
-ManualTrigger–Triggerstheactionrulewhenthemanualtriggerisactivated.Itcanbeusedbyaclientsuch
asanaccessmanagementsystem,throughtheVAPIX®applicationprogramminginterface,tomanuallystart
orstoptheactionrule.
-VirtualInputs–Triggerstheactionrulewhenoneofthevirtualinputschangesstates.Itcanbeusedbya
clientsuchasanaccessmanagementsystem,throughtheVAPIX®applicationprogramminginterface,totrigger
actions.Virtualinputscan,forexample,beconnectedtobuttonsinthemanagementsystem'suserinterface.
•Schedule
-Interval–Triggerstheactionruleattheschedule’sstarttimeandremainsactiveuntiltheschedule’sendtime
isreached.
-Pulse–Triggerstheactionrulewhenaone-timeeventoccurs.Thatis,aneventthathappensataspecic
timeandhasnoduration.
•System
-SystemReady–Triggerstheactionrulewhenthesystemisinstateready.Forexample,theAxisproductcan
detectthesystemstateandsendanoticationwhenthesystemhasstarted.
SelectYestotriggertheactionrulewhentheproductisinstateready.Notethattherulewillonlytriggerwhen
allnecessaryservices,suchastheeventsystem,hasstarted.
•Time
-Recurrence–Triggerstheactionrulebymonitoringtherecurrencesthatyouhavecreated.Youcanusethis
triggertoinitiaterecurringactionssuchassendingnoticationseveryhour.Selectarecurrencepatternorcreate
anewone.Formoreinformationaboutsettinguparecurrencepattern,seeSetUpRecurrencesonpage39.
-UseSchedule–Triggertheruleaccordingtotheselectedschedule.SeeCreateSchedulesonpage38.
Actions
Availableactionsinclude:
•OutputPort–ActivateanI/Oporttocontrolanexternaldevice.
•SendNotications–Sendanoticationmessagetoarecipient.
•StatusLED–ThestatusLEDcanbesettoashforthedurationoftheactionruleorforasetnumberofseconds.The
statusLEDcanbeusedduringinstallationandcongurationtovisuallyvalidateifthetriggersettings,forexamplethe
dooropentoolongtrigger ,workcorrectly .TosetthestatusLEDashcolor ,selectanLEDColorfromthedrop-downlist.
AddRecipients
Theproductcansendmessagestonotifyadministratorsabouteventsandalarms.Butbeforetheproductcansendnotication
messages,youmustdeneoneormorerecipients.Forinformationaboutavailableoptions,seeRecipientTypesonpage38.
Toaddarecipient:
37
Page 38

AXISA1001NetworkDoorController&AXISEntryManager
AlarmandEventConfiguration
1.GotoSetup>AdditionalControllerConguration>Events>RecipientsandclickAdd.
2.Enteradescriptivename.
3.SelectarecipientType.
4.Entertheinformationneededfortherecipienttype.
5.ClickTesttotesttheconnectiontotherecipient.
6.ClickOK.
RecipientTypes
Thefollowingrecipientsareavailable:
•HTTP
•HTTPS
•Email
•TCP
SetUpEmailRecipients
Emailrecipientscanbeconguredbyselectingoneofthelistedemailproviders,orbyspecifyingtheSMTPserver,portand
authenticationusedby,forexample,acorporateemailserver.
Note
Someemailprovidershavesecurityltersthatpreventusersfromreceivingorviewinglargeamountofattachments,from
receivingscheduledemailsandsimilar .Checktheemailprovider’ssecuritypolicytoavoiddeliveryproblemsandlocked
emailaccounts.
Tosetupanemailrecipientusingoneofthelistedproviders:
1.GotoEvents>RecipientsandclickAdd.
2.EnteraNameandselectEmailfromtheTypelist.
3.EntertheemailaddressestosendemailstointheToeld.Usecommastoseparatemultipleaddresses.
4.SelecttheemailproviderfromtheProviderlist.
5.EntertheuserIDandpasswordfortheemailaccount.
6.ClickTesttosendatestemail.
Tosetupanemailrecipientusingforexampleacorporateemailserver,followtheinstructionsabovebutselectUserdenedas
Provider.EntertheemailaddresstoappearassenderintheFromeld.SelectAdvancedsettingsandspecifytheSMTPserver
address,portandauthenticationmethod.Optionally,selectUseencryptiontosendemailsoveranencryptedconnection.Theserver
certicatecanbevalidatedusingthecerticatesavailableintheAxisproduct.Forinformationonhowtouploadcerticates,
seeCerticatesonpage42.
CreateSchedules
Schedulescanbeusedasactionruletriggersorasadditionalconditions.Useoneofthepredenedschedulesorcreateanew
scheduleasdescribedbelow.
Tocreateanewschedule:
1.GotoSetup>AdditionalControllerConguration>Events>SchedulesandclickAdd.
38
Page 39

AXISA1001NetworkDoorController&AXISEntryManager
AlarmandEventConfiguration
2.Enteradescriptivenameandtheinformationneededforadaily,weekly,monthlyoryearlyschedule.
3.ClickOK.
Tousethescheduleinanactionrule,selecttheschedulefromtheScheduledrop-downlistintheActionRuleSetuppage.
SetUpRecurrences
Recurrencesareusedtotriggeractionrulesrepeatedly,forexampleevery5minutesoreveryhour.
Tosetuparecurrence:
1.GotoSetup>AdditonalControllerConguration>Events>RecurrencesandclickAdd.
2.Enteradescriptivenameandrecurrencepattern.
3.ClickOK.
Tousetherecurrenceinanactionrule,rstselectTimefromtheTriggerdrop-downlistintheActionRuleSetuppageandthen
selecttherecurrencefromtheseconddrop-downlist.
Tomodifyorremoverecurrences,selecttherecurrenceintheRecurrencesListandclickModifyorRemove.
ReaderFeedback
ReadersuseLEDsandbeeperstosendfeedbackmessagestotheuser(thepersonaccessingortryingtoaccessthedoor).Thedoor
controllercantriggeranumberoffeedbackmessages,someofwhicharepreconguredinthedoorcontrollerandsupportedby
mostreaders.
ReadershavedifferentLEDbehaviors,buttypicallytheyusedifferentsequencesofsteadylightsandashinglightsinred,green,and
amber.
Readerscanalsouseone-pitchbeeperstosendmessages,usingdifferentsequencesofshortandlongbeepersignals.
Thetablebelowshowstheeventsthatarepreconguredinthedoorcontrollertotriggerreaderfeedbackandtheirtypicalreader
feedbacksignals.
EventWiegand
Idle
RequirePIN
AccessGrantedGreenGreenGreenOneshortbeep
AccessDeniedRedRedRed
Feedbackmessagesotherthantheabovemustbeconguredbyaclientsuchasanaccessmanagementsystem,throughtheVAPIX®
applicationprogramminginterface,thatsupportsthisfeatureandusereadersthatcanprovidetherequiredsignals.Formore
information,seetheuserinformationsuppliedbytheaccessmanagementsystemdeveloperandreadermanufacturer.
dualLED
Off
Flashingred/greenFlashingred/greenFlashingred/green
Wiegand
singleLED
RedRed
OSDP
Beeperpattern
Silent
TwoshortbeepsPINrequired
Onelongbeep
State
Normal
Accessgranted
Accessdenied
39
Page 40

AXISA1001NetworkDoorController&AXISEntryManager
Reports
Reports
TheReportspageallowsyoutoview,print,andexportreportsthatcontaindifferenttypesofinformationaboutthesystem.For
moreinformationaboutwhichreportsthatareavailable,seeReportTypesonpage40.
View,Print,andExportReports
ToopentheReportspage,clickReports.
Toviewareport,clickViewandprint.
Toprintareport:
1.ClickViewandprint.
2.Selectthecolumnsthatshallbeincludedinthereport.Allcolumnsareselectedbydefault.
3.Ifyouwanttonarrowthescopeofthereport,enteralterintherelevantltereld.Forexample,youcanlterusersby
whichgrouptheybelongto,doorsbytheirschedules,orgroupsbythedoorstheyhaveaccessto.
Toforceexactmatches,surroundtheltertextwithdoublequotationmarks,forexample“John”.
4.Ifyouwanttosortthereportitemsinadifferentorder,click
andreverseorder,togglethesortingbuttons.
Showstheitemsinstandardorder(ascending).
Showstheitemsinreverseorder(descending).
5.ClickPrintselectedcolumns.
Toexportareport,clickExportCSVle.
Thereportwillbeexportedasaacomma-separatedvalue(CSV)leandwillincludeallpossiblecolumnsanditemsforthereport
type.Unlessotherwisespecied,theexportedle(*.csv)issavedinthedefaultdownloadfolder.Youcanselectadownloadfolder
inthewebbrowser’susersettings.
intherelevantcolumn.Tochangebetweenstandard
ReportTypes
Thefollowingreporttypesareavailable:
•Accessschedules.Formoreinformationaboutaccessscheduletypesandoptions,seepage25andpage26.
•Groups.Formoreinformationaboutgroupcredentials,seepage27.
•Doors.Formoreinformationaboutdoorsandidenticationtypes,seepage27andpage28.
•Users.Formoreinformationaboutusercredentials,seepage30.
•Doorcontrollers.FormoreinformationaboutconnectedcontrollersandtheirIDtypes,seepage21.Formoreinformation
aboutdoormonitortimeoptions,seepage15.
40
Page 41

AXISA1001NetworkDoorController&AXISEntryManager
SystemOptions
SystemOptions
Security
Users
UseraccesscontrolisenabledbydefaultandcanbeconguredunderSetup>AdditionalControllerConguration>System
Options>Security>Users.Anadministratorcansetupotherusersbygivingthemusernamesandpasswords.
Theuserlistdisplaysauthorizedusersandusergroups(accesslevels):
Administrator-Unrestrictedaccesstoallsettings;canadd,modifyandremoveotherusers.
UnderHTTP/RTSPPasswordSettings,selectthetypeofpasswordtoallow.Youmayneedtoallowunencryptedpasswordsifthereare
viewingclientsthatdonotsupportencryption,orifyouupgradedthermwareandexistingclientssupportencryptionbutneed
tologinagainandbeconguredtousethisfunctionality.
DeselecttheEnableBasicSetupoptiontohidetheBasicSetupmenu.BasicSetupprovidesquickaccesstosettingsthatshouldbe
madebeforeusingtheAxisproduct.
ONVIF
ONVIF(OpenNetworkVideoInterfaceForum)isaglobalinterfacestandardthatmakesiteasierforendusers,integrators,consultants,
andmanufacturerstotakeadvantageofthepossibilitiesofferedbynetworkvideotechnology.ONVIFenablesinteroperablitybetween
differentvendorproducts,increasedexibility ,reducedcostandfuture-proofsystems.
BycreatingauseryouautomaticallyenableONVIFcommunication.UsetheusernameandpasswordwithallONVIFcommunication
withtheproduct.Formoreinformationseewww.onvif.org
IPAddressFilter
IPaddresslteringisenabledontheSetup>AdditionalControllerConguration>SystemOptions>Security>IPAddress
Filterpage.Onceenabled,thelistedIPaddressareallowedordeniedaccesstotheAxisproduct.SelectAlloworDenyfromthelist
andclickApplytoenableIPaddressltering.
Theadministratorcanaddupto256IPaddressentriestothelist(asingleentrycancontainmultipleIPaddresses).
HTTPS
HTTPS(HyperTextTransferProtocoloverSecureSocketLayer,orHTTPoverSSL)isawebprotocolprovidingencryptedbrowsing.
HTTPScanalsobeusedbyusersandclientstoverifythatthecorrectdeviceisbeingaccessed.Thesecuritylevelprovidedby
HTTPSisconsideredadequateformostcommercialexchanges.
TheAxisproductcanbeconguredtorequireHTTPSwhenadministratorslogin.
TouseHTTPS,anHTTPScerticatemustrstbeinstalled.GotoSetup>AdditionalControllerConguration>SystemOptions>
Security>Certicatestoinstallandmanagecerticates.SeeCerticatesonpage42.
ToenableHTTPSontheAxisproduct:
1.GotoSetup>AdditionalControllerConguration>SystemOptions>Security>HTTPS
2.SelectanHTTPScerticatefromthelistofinstalledcerticates.
3.Optionally,clickCiphersandselecttheencryptionalgorithmstouseforSSL.
4.SettheHTTPSConnectionPolicyforthedifferentusergroups.
5.ClickSavetoenablethesettings.
41
Page 42

AXISA1001NetworkDoorController&AXISEntryManager
SystemOptions
ToaccesstheAxisproductviathedesiredprotocol,enterhttps://orhttp://intheaddresseldinabrowser.
TheHTTPSportcanbechangedontheSystemOptions>Network>TCP/IP>Advancedpage.
IEEE802.1X
IEEE802.1Xisastandardforport-basedNetworkAdmissionControlprovidingsecureauthenticationofwiredandwirelessnetwork
devices.IEEE802.1XisbasedonEAP(ExtensibleAuthenticationProtocol).
ToaccessanetworkprotectedbyIEEE802.1X,devicesmustbeauthenticated.Theauthenticationisperformedbyanauthentication
server,typicallyaRADIUSserver,examplesofwhichareFreeRADIUSandMicrosoftInternetAuthenticationService.
InAxisimplementation,theAxisproductandtheauthenticationserveridentifythemselveswithdigitalcerticatesusingEAP-TLS
(ExtensibleAuthenticationProtocol-TransportLayerSecurity).ThecerticatesareprovidedbyaCerticationAuthority(CA).
Youneed:
•aCAcerticatetoauthenticatetheauthenticationserver.
•aCA-signedclientcerticatetoauthenticatetheAxisproduct.
Tocreateandinstallcerticates,gotoSetup>AdditionalControllerConguration>SystemOptions>Security>Certicates.
SeeCerticatesonpage42.ManyCAcerticatesarepreinstalled.
ToallowtheproducttoaccessanetworkprotectedbyIEEE802.1X:
1.GotoSetup>AdditionalControllerConguration>SystemOptions>Security>IEEE802.1X.
2.SelectaCACerticateandaClientCerticatefromthelistsofinstalledcerticates.
3.UnderSettings,selecttheEAPOLversionandprovidetheEAPidentityassociatedwiththeclientcerticate.
4.ChecktheboxtoenableIEEE802.1XandclickSave.
Note
Forauthenticationtoworkproperly ,thedateandtimesettingsintheAxisproductshouldbesynchronizedwithanNTP
server.SeeDate&Timeonpage43.
Certicates
Certicatesareusedtoauthenticatedevicesonanetwork.Typicalapplicationsincludeencryptedwebbrowsing(HTTPS),network
protectionviaIEEE802.1Xandsecureuploadofimagesandnoticationmessagesforexampleviaemail.Twotypesofcerticates
canbeusedwiththeAxisproduct:
Server/Clientcerticates-ToauthenticatetheAxisproduct.
CAcerticates-Toauthenticatepeercerticates,forexamplethecerticateofanauthenticationserverincasetheAxisproductis
connectedtoanIEEE802.1Xprotectednetwork.
Note
Installedcerticates,exceptpreinstalledCAcerticates,willbedeletediftheproductisresettofactorydefault.Preinstalled
CAcerticatesthathavebeendeletedwillbereinstalled.
AServer/Clientcerticatecanbeself-signedorissuedbyaCerticateAuthority(CA).Aself-signedcerticateofferslimited
protectionandcanbeusedbeforeaCA-issuedcerticatehasbeenobtained.
Toinstallaself-signedcerticate:
1.GotoSetup>AdditionalControllerConguration>SystemOptions>Security>Certicates.
2.ClickCreateself-signedcerticateandprovidetherequestedinformation.
TocreateandinstallaCA-signedcerticate:
42
Page 43

AXISA1001NetworkDoorController&AXISEntryManager
SystemOptions
1.Createaself-signedcerticateasdescribedabove.
2.GotoSetup>AdditionalControllerConguration>SystemOptions>Security>Certicates.
3.ClickCreatecerticatesigningrequestandprovidetherequestedinformation.
4.CopythePEM-formattedrequestandsendtotheCAofyourchoice.
5.Whenthesignedcerticateisreturned,clickInstallcerticateanduploadthecerticate.
Server/ClientcerticatescanbeinstalledasCerticatefromsigningrequestorasCerticateandprivatekey.SelectCerticate
andprivatekeyiftheprivatekeyistobeuploadasaseparateleorifthecerticateisinPKCS#12format.
TheAxisproductisshippedwithseveralpreinstalledCAcerticates.Ifrequired,additionalCAcerticatescanbeinstalled:
1.GotoSetup>AdditionalControllerConguration>SystemOptions>Security>Certicates.
2.ClickInstallcerticateanduploadthecerticate.
Date&Time
TheAxisproduct’sdateandtimesettingsareconguredunderSetup>AdditionalControllerConguration>SystemOptions>
Date&Time.
CurrentServerTimedisplaysthecurrentdateandtime(24hclock).
Tochangethedateandtimesettings,selectthepreferredTimemodeunderNewServerTime:
•Synchronizewithcomputertime–Setsdateandtimeaccordingtothecomputer’sclock.Withthisoption,dateand
timearesetonceandwillnotbeupdatedautomatically.
•SynchronizewithNTPServer–ObtainsdateandtimefromanNTPserver.Withthisoption,dateandtimesettingsare
updatedcontinuously.ForinformationonNTPsettings,seeNTPCongurationonpage45.
IfusingahostnamefortheNTPserver,aDNSservermustbecongured.SeeDNSCongurationonpage45.
•Setmanually–Allowsyoutomanuallysetdateandtime.
IfusinganNTPserver,selectyourTimezonefromthedrop-downlist.Ifrequired,checkAutomaticallyadjustfordaylightsaving
timechanges.
Network
BasicTCP/IPSettings
TheAxisproductsupportsIPversion4(IPv4).
TheAxisproductcangetanIPv4addressinthefollowingways:
•DynamicIPaddress–ObtainIPaddressviaDHCPisselectedbydefault.ThismeansthattheAxisproductissettoget
theIPaddressautomaticallyviaDynamicHostCongurationProtocol(DHCP).
DHCPallowsnetworkadministratorstocentrallymanageandautomatetheassignmentofIPaddresses.
•StaticIPaddress–TouseastaticIPaddress,selectUsethefollowingIPaddressandspecifytheIPaddress,subnetmask
anddefaultrouter.ThenclickSave.
DHCPshouldonlybeenabledwhenusingdynamicIPaddressnotication,oriftheDHCPcanupdateaDNSserverthatmakes
itpossibletoaccesstheAxisproductbyname(hostname).
43
Page 44

AXISA1001NetworkDoorController&AXISEntryManager
SystemOptions
IfDHCPisenabledandtheproductcannotbeaccessed,runAXISIPUtilitytosearchthenetworkforconnectedAxisproducts,or
resettheproducttothefactorydefaultsettingsandthenperformtheinstallationagain.Forinformationabouthowtoresetto
factorydefault,seepage50.
ARP/Ping
Theproduct’sIPaddresscanbeassignedusingARPandPing.Forinstructions,seeAssignIPAddressUsingARP/Pingonpage44.
TheARP/Pingserviceisenabledbydefaultbutisautomaticallydisabledtwominutesaftertheproductisstarted,orassoonasanIP
addressisassigned.Tore-assignIPaddressusingARP/Ping,theproductmustberestartedtoenableARP/Pingforanadditional
twominutes.
Todisabletheservice,gotoSetup>AdditionalControllerConguration>SystemOptions>Network>TCP/IP>Basicandclear
theoptionEnableARP/PingsettingofIPaddress.
Pingingtheproductisstillpossiblewhentheserviceisdisabled.
AssignIPAddressUsingARP/Ping
Theproduct'sIPaddresscanbeassignedusingARP/Ping.Thecommandmustbeissuedwithin2minutesofconnectingpower.
1.AcquireafreestaticIPaddressonthesamenetworksegmentasthecomputer .
2.Locatetheserialnumber(S/N)ontheproductlabel.
3.Openacommandpromptandenterthefollowingcommands:
Linux/Unixsyntax
arp-s<IPaddress><serialnumber>temp
ping-s408<IPaddress>
Linux/Unixexample
arp-s192.168.0.12500:40:8c:18:10:00temp
ping-s408192.168.0.125
Windowssyntax(thismayrequirethatyourunthecommandpromptasanadministrator)
arp-s<IPaddress><serialnumber>
ping-l408-t<IPaddress>
Windowsexample(thismayrequirethatyourunthecommandpromptasanadministrator)
arp-s192.168.0.12500-40-8c-18-10-00
ping-l408-t192.168.0.125
4.Checkthatthenetworkcableisconnectedandthenrestarttheproductbydisconnectingandreconnectingpower.
5.ClosethecommandpromptwhentheproductrespondswithReplyfrom192.168.0.125:...orsimilar.
6.Openabrowserandtypehttp://<IPaddress>intheLocation/Addresseld.
ForothermethodsofassigningtheIPaddress,youmayndthedocumentAssignanIPAddressandAccesstheVideoStreamonAxis
Supportwebatwww.axis.com/techsupuseful.
Note
•ToopenacommandpromptinWindows,opentheStartmenuandtypecmdintheRun/Searcheld.
•TousetheARPcommandinWindows8/Windows7/WindowsVista,right-clickthecommandprompticonandselect
Runasadministrator.
•ToopenacommandpromptinMacOSX,opentheTerminalutilityfromApplication>Utilities.
44
Page 45

AXISA1001NetworkDoorController&AXISEntryManager
SystemOptions
AXISVideoHostingSystem(AVHS)
AVHSusedinconjunctionwithanAVHSservice,provideseasyandsecureInternetaccesstocontrollermanagementandlogs
accessiblefromanylocation.FormoreinformationandhelptondalocalAVHSServiceProvidergotowww.axis.com/hosting
TheAVHSsettingsareconguredunderSetup>AdditionalControllerConguration>SystemOptions>Network>TCPIP>
Basic.ThepossibilitytoconnecttoanAVHSserviceisenabledbydefault.Todisable,cleartheEnableAVHSbox.
One-clickenabled-Pressandholdtheproduct’scontrolbutton(seeHardwareOverviewonpage5)forabout3secondsto
connecttoanAVHSserviceovertheInternet.Onceregistered,AlwayswillbeenabledandtheAxisproductstaysconnectedto
theAVHSservice.Iftheproductisnotregisteredwithin24hoursfromwhenthebuttonispressed,theproductwilldisconnect
fromtheAVHSservice.
Always-TheAxisproductwillconstantlyattempttoconnecttotheAVHSserviceovertheInternet.Onceregisteredtheproductwill
stayconnectedtotheservice.Thisoptioncanbeusedwhentheproductisalreadyinstalledanditisnotconvenienttousethe
one-clickinstallation.
Note
AVHSsupportisdependentontheavailabilityofsubscriptionsfromserviceproviders.
AXISInternetDynamicDNSService
AXISInternetDynamicDNSServiceassignsahostnameforeasyaccesstotheproduct.Formoreinformation,seewww.axiscam.net
ToregistertheAxisproductwithAXISInternetDynamicDNSService,gotoSetup>AdditionalControllerConguration>System
Options>Network>TCP/IP>Basic.UnderServices,clicktheAXISInternetDynamicDNSServiceSettingsbutton(requiresaccessto
theInternet).ThedomainnamecurrentlyregisteredatAXISInternetDynamicDNSservicefortheproductcanatanytimeberemoved.
Note
AXISInternetDynamicDNSServicerequiresIPv4.
AdvancedTCP/IPSettings
DNSConguration
DNS(DomainNameService)providesthetranslationofhostnamestoIPaddresses.TheDNSsettingsareconguredunderSetup>
AdditionalControllerConguration>SystemOptions>Network>TCP/IP>Advanced.
SelectObtainDNSserveraddressviaDHCPtousetheDNSsettingsprovidedbytheDHCPserver.
Tomakemanualsettings,selectUsethefollowingDNSserveraddressandspecifythefollowing:
Domainname-Enterthedomain(s)tosearchforthehostnameusedbytheAxisproduct.Multipledomainscanbeseparatedby
semicolons.Thehostnameisalwaystherstpartofafullyqualieddomainname,forexample,myserveristhehostnameinthe
fullyqualieddomainnamemyserver.mycompany.comwheremycompany.comisthedomainname.
Primary/SecondaryDNSserver-EntertheIPaddressesoftheprimaryandsecondaryDNSservers.ThesecondaryDNSserveris
optionalandwillbeusediftheprimaryisunavailable.
NTPConguration
NTP(NetworkTimeProtocol)isusedtosynchronizetheclocktimesofdevicesinanetwork.TheNTPsettingsareconguredunder
Setup>AdditionalControllerConguration>SystemOptions>Network>TCP/IP>Advanced.
SelectObtainNTPserveraddressviaDHCPtousetheNTPsettingsprovidedbytheDHCPserver.
Tomakemanualsettings,selectUsethefollowingNTPserveraddressandenterthehostnameorIPaddressoftheNTPserver.
45
Page 46

AXISA1001NetworkDoorController&AXISEntryManager
SystemOptions
HostNameConguration
TheAxisproductcanbeaccessedusingahostnameinsteadofanIPaddress.Thehostnameisusuallythesameastheassigned
DNSname.ThehostnameisconguredunderSetup>AdditionalControllerConguration>SystemOptions>Network>
TCP/IP>Advanced.
SelectObtainhostnameviaIPv4DHCPtousehostnameprovidedbytheDHCPserverrunningonIPv4.
SelectUsethehostnametosetthehostnamemanually.
SelectEnabledynamicDNSupdatestodynamicallyupdatelocalDNSserverswhenevertheAxisproduct’sIPaddresschanges.
Formoreinformation,seetheonlinehelp
Link-LocalIPv4Address
Link-LocalAddressisenabledbydefaultandassignstheAxisproductanadditionalIPaddresswhichcanbeusedtoaccess
theproductfromotherhostsonthesamesegmentonthelocalnetwork.TheproductcanhaveaLink-LocalIPandastatic
orDHCP-suppliedIPaddressatthesametime.
ThisfunctioncanbedisabledunderSetup>AdditionalControllerConguration>SystemOptions>Network>TCP/IP
>Advanced.
.
HTTP
TheHTTPportusedbytheAxisproductcanbechangedunderSetup>AdditionalControllerConguration>SystemOptions>
Network>TCP/IP>Advanced.Inadditiontothedefaultsetting,whichis80,anyportintherange1024–65535canbeused.
HTTPS
TheHTTPSportusedbytheAxisproductcanbechangedunderSetup>AdditionalControllerConguration>SystemOptions>
Network>TCP/IP>Advanced.Inadditiontothedefaultsetting,whichis443,anyportintherange1024–65535canbeused.
ToenableHTTPS,gotoSetup>AdditionalControllerConguration>SystemOptions>Security>HTTPS.Formoreinformation,
seeHTTPSonpage41.
NATtraversal(portmapping)forIPv4
Anetworkrouterallowsdevicesonaprivatenetwork(LAN)toshareasingleconnectiontotheInternet.Thisisdonebyforwarding
networktrafcfromtheprivatenetworktothe“outside”,thatis,theInternet.Securityontheprivatenetwork(LAN)isincreased
sincemostroutersarepre-conguredtostopattemptstoaccesstheprivatenetwork(LAN)fromthepublicnetwork(Internet).
UseNATtraversalwhentheAxisproductislocatedonanintranet(LAN)andyouwishtomakeitavailablefromtheother(WAN)side
ofaNATrouter.WithNATtraversalproperlycongured,allHTTPtrafctoanexternalHTTPportintheNATrouterisforwardedto
theproduct.
NATtraversalisconguredunderSetup>AdditionalControllerConguration>SystemOptions>Network>TCP/IP>Advanced.
Note
•ForNATtraversaltowork,thismustbesupportedbytherouter.TheroutermustalsosupportUPnP
•Inthiscontext,routerreferstoanynetworkroutingdevicesuchasaNATrouter,Networkrouter ,InternetGateway,
Broadbandrouter,Broadbandsharingdevice,orasoftwaresuchasarewall.
TM
.
Enable/Disable-Whenenabled,theAxisproductattemptstocongureportmappinginaNATrouteronyournetwork,using
TM
UPnP
.NotethatUPnP
>Network>UPnP).
UsemanuallyselectedNATrouter-SelectthisoptiontomanuallyselectaNATrouterandentertheIPaddressfortherouterin
theeld.Ifnorouterisspecied,theproductautomaticallysearchesforNATroutersonyournetwork.Ifmorethanonerouteris
found,thedefaultrouterisselected.
TM
mustbeenabledintheproduct(seeSetup>AdditionalControllerConguration>SystemOptions
46
Page 47

AXISA1001NetworkDoorController&AXISEntryManager
SystemOptions
AlternativeHTTPport-SelectthisoptiontomanuallydeneanexternalHTTPport.Enteraportintherange1024–65535.Ifthe
porteldisemptyorcontainsthedefaultsetting,whichis0,aportnumberisautomaticallyselectedwhenenablingNATtraversal.
Note
•AnalternativeHTTPportcanbeusedorbeactiveevenifNATtraversalisdisabled.ThisisusefulifyourNATrouterdoesnot
supportUPnPandyouneedtomanuallycongureportforwardingintheNATrouter.
•Ifyouattempttomanuallyenteraportthatisalreadyinuse,anotheravailableportisautomaticallyselected.
•Whentheportisselectedautomaticallyitisdisplayedinthiseld.Tochangethis,enteranewportnumberandclickSave.
FTP
TheFTPserverrunningintheAxisproductenablesuploadofnewrmware,userapplications,etc.TheFTPservercanbedisabled
underSetup>AdditionalControllerConguration>SystemOptions>Network>TCP/IP>Advanced.
RTSP
TheRTSPserverrunningintheAxisproductallowsaconnectingclienttostartaneventstream.TheRTSPportnumbercanbechanged
underSetup>AdditionalControllerConguration>SystemOptions>Network>TCP/IP>Advanced.Thedefaultportis554.
Note
EventstreamswillnotbeavailableiftheRTSPserverisdisabled.
SOCKS
SOCKSisanetworkingproxyprotocol.TheAxisproductcanbeconguredtouseaSOCKSservertoreachnetworksontheother
sideofarewallorproxyserver.ThisfunctionalityisusefuliftheAxisproductislocatedonalocalnetworkbehindarewall,and
notications,uploads,alarms,etcneedtobesenttoadestinationoutsidethelocalnetwork(forexampletheInternet).
SOCKSisconguredunderSetup>AdditionalControllerConguration>SystemOptions>Network>SOCKS.Formore
information,seetheonlinehelp
.
QoS(QualityofService)
QoS(QualityofService)guaranteesacertainlevelofaspeciedresourcetoselectedtrafconanetwork.AQoS-awarenetwork
prioritizesnetworktrafcandprovidesagreaternetworkreliabilitybycontrollingtheamountofbandwidthanapplicationmayuse.
TheQoSsettingsareconguredunderSetup>AdditionalControllerConguration>SystemOptions>Network>QoS.Using
DSCP(DifferentiatedServicesCodepoint)values,theAxisproductcanmarkevent/alarmtrafcandmanagementtrafc.
SNMP
TheSimpleNetworkManagementProtocol(SNMP)allowsremotemanagementofnetworkdevices.AnSNMPcommunityisthe
groupofdevicesandmanagementstationrunningSNMP.Communitynamesareusedtoidentifygroups.
ToenableandcongureSNMPintheAxisproduct,gototheSetup>AdditionalControllerConguration>SystemOptions
>Network>SNMPpage.
Dependingonthelevelofsecurityrequired,selecttheversiononSNMPtouse.
TrapsareusedbytheAxisproducttosendmessagestoamanagementsystemonimportanteventsandstatuschanges.CheckEnable
trapsandentertheIPaddresswherethetrapmessageshouldbesentandtheTrapcommunitythatshouldreceivethemessage.
Note
IfHTTPSisenabled,SNMPv1andSNMPv2cshouldbedisabled.
TrapsforSNMPv1/v2areusedbytheAxisproducttosendmessagestoamanagementsystemonimportanteventsandstatus
changes.CheckEnabletrapsandentertheIPaddresswherethetrapmessageshouldbesentandtheTrapcommunitythat
shouldreceivethemessage.
47
Page 48

AXISA1001NetworkDoorController&AXISEntryManager
SystemOptions
Thefollowingtrapsareavailable:
•Coldstart
•Warmstart
•Linkup
•Authenticationfailed
SNMPv3providesencryptionandsecurepasswords.TousetrapswithSNMPv3,anSNMPv3managementapplicationisrequired.
TouseSNMPv3,HTTPSmustbeenabled,seeHTTPSonpage41.ToenableSNMPv3,checktheboxandprovidetheinitialuser
password.
Note
Theinitialpasswordcanonlybesetonce.Ifthepasswordislost,theAxisproductmustberesettofactorydefault,see
ResettoFactoryDefaultSettingsonpage50.
TM
UPnP
TheAxisproductincludessupportforUPnP
systemsandclientsthatsupportthisprotocol.
TM
UPnP
canbedisabledunderSetup>AdditionalControllerConguration>SystemOptions>Network>UPnP
TM
TM
.UPnP
isenabledbydefaultandtheproductisautomaticallydetectedbyoperating
TM
.
Bonjour
TheAxisproductincludessupportforBonjour.Bonjourisenabledbydefaultandtheproductisautomaticallydetectedbyoperating
systemsandclientsthatsupportthisprotocol.
BonjourcanbedisabledunderSetup>AdditionalControllerConguration>SystemOptions>Network>Bonjour.
Ports&Devices
I/OPorts
TheauxiliaryconnectorontheAxisproductprovidestwocongurableinputandoutputportsforconnectionofexternaldevices.For
informationabouthowtoconnectexternaldevices,seetheInstallationGuide,availableonwww.axis.com
TheI/OportsareconguredunderSetup>AdditionalControllerConguration>SystemOptions>Ports&Devices>I/OPorts.
Selecttheportdirection(InputorOutput).TheportscanbegivendescriptivenamesandtheirNormalstatescanbeconguredas
OpencircuitorGroundedcircuit.
PortStatus
ThelistontheSystemOptions>Ports&Devices>PortStatuspageshowsthestatusoftheproduct’sinputandoutputports.
Maintenance
TheAxisproductprovidesseveralmaintenancefunctions.TheseareavailableunderSetup>AdditionalControllerConguration
>SystemOptions>Maintenance.
ClickRestarttoperformacorrectrestartiftheAxisproductisnotbehavingasexpected.Thiswillnotaffectanyofthecurrent
settings.
Note
ArestartclearsallentriesintheServerReport.
48
Page 49

AXISA1001NetworkDoorController&AXISEntryManager
SystemOptions
ClickRestoretoresetmostsettingstothefactorydefaultvalues.Thefollowingsettingsarenotaffected:
•thebootprotocol(DHCPorstatic)
•thestaticIPaddress
•thedefaultrouter
•thesubnetmask
•thesystemtime
•theIEEE802.1Xsettings
ClickDefaulttoresetallsettings,includingtheIPaddress,tothefactorydefaultvalues.Thisbuttonshouldbeusedwithcaution.The
Axisproductcanalsoberesettofactorydefaultusingthecontrolbutton,seeResettoFactoryDefaultSettingsonpage50.
Forinformationaboutrmwareupgrade,seeUpgradetheFirmwareonpage51.
Support
SupportOverview
TheSetup>AdditionalControllerConguration>SystemOptions>Support>SupportOverviewpageprovidesinformationon
troubleshootingandcontactinformation,shouldyourequiretechnicalassistance.
SeealsoTroubleshootingonpage51.
SystemOverview
TogetanoverviewoftheAxisproduct’sstatusandsettings,gotoSetup>AdditionalControllerConguration>SystemOptions
>Support>SystemOverview.Informationthatcanbefoundhereincludesrmwareversion,IPaddress,networkandsecurity
settings,eventsettings,andrecentlogitems.ManyofthecaptionsarelinkstotheproperSetuppage.
Logs&Reports
TheSetup>AdditionalControllerConguration>SystemOptions>Support>Logs&Reportspagegenerateslogsandreports
usefulforsystemanalysisandtroubleshooting.IfcontactingAxisSupport,pleaseprovideavalidServerReportwithyourquery.
SystemLog-Providesinformationaboutsystemevents.
AccessLog-Listsallfailedattemptstoaccesstheproduct.TheAccessLogcanalsobeconguredtolistallconnectionstothe
product(seebelow).
ServerReport-Providesinformationabouttheproductstatusinapop-upwindow.TheAccessLogisautomaticallyincluded
intheServerReport.
ParameterList-Showstheproduct'sparametersandtheircurrentsettings.Thismayproveusefulwhentroubleshootingor
whencontactingAxisSupport.
ConnectionList-Listsallclientsthatarecurrentlyaccessingmediastreams.
CrashReport-Generatesanarchivewithdebugginginformation.Thereporttakesseveralminutestogenerate.
TheloglevelsfortheSystemLogandtheAccessLogaresetunderSetup>AdditionalControllerConguration>SystemOptions>
Support>Logs&Reports>Conguration.TheAccessLogcanbeconguredtolistallconnectionstotheproduct(select
Critical,Warnings&Info).
49
Page 50

AXISA1001NetworkDoorController&AXISEntryManager
SystemOptions
Advanced
Scripting
Scriptingallowsexperienceduserstocustomizeandusetheirownscripts.
NO
TICE
NO NO
TICE TICE
ImproperusemaycauseunexpectedbehaviorandlossofcontactwiththeAxisproduct.
Axisstronglyrecommendsthatyoudonotusethisfunctionunlessyouunderstandtheconsequences.AxisSupportdoesnotprovide
assistanceforproblemswithcustomizedscripts.
ToopentheScriptEditor,gotoSetup>AdditionalControllerConguration>SystemOptions>Advanced>Scripting.Ifa
scriptcausesproblems,resettheproducttoitsfactorydefaultsettings,seepage50.
Formoreinformation,seewww.axis.com/developer
FileUpload
Files,forexamplewebpagesandimages,canbeuploadedtotheAxisproductandusedascustomsettings.Touploadale,goto
Setup>AdditionalControllerConguration>SystemOptions>Advanced>FileUpload.
Uploadedlesareaccessedthroughhttp://<ipaddress>/local/<user>/<filename>where<user>isthe
selectedusergroup(viewer,operatororadministrator)fortheuploadedle.
ResettoFactoryDefaultSettings
Important
Resettofactorydefaultshouldbeusedwithcaution.Aresettofactorydefaultwillresetallsettings,includingtheIP
address,tothefactorydefaultvalues.
Note
Theinstallationandmanagementsoftwaretoolsareavailablefromthesupportpagesonwww.axis.com/techsup
Toresettheproducttothefactorydefaultsettings:
1.Disconnectpowerfromtheproduct.
2.Pressandholdthecontrolbuttonandreconnectpower .SeeHardwareOverviewonpage5.
3.Keepthecontrolbuttonpressedforabout25secondsuntilthestatusLEDindicatorturnsamberforthesecondtime.
4.Releasethecontrolbutton.TheprocessiscompletewhenthestatusLEDindicatorturnsgreen.Theproducthasbeenreset
tothefactorydefaultsettings.IfnoDHCPserverisavailableonthenetwork,thedefaultIPaddressis192.168.0.90
5.Usingtheinstallationandmanagementsoftwaretools,assignanIPaddress,setthepassword,andaccesstheproduct.
Itisalsopossibletoresetparameterstofactorydefaultviathewebinterface.GotoSetup>AdditionalControllerConguration>
Setup>SystemOptions>Maintenance.
50
Page 51

AXISA1001NetworkDoorController&AXISEntryManager
Troubleshooting
Troubleshooting
ChecktheFirmware
Firmwareissoftwarethatdeterminesthefunctionalityofnetworkdevices.Oneofyourrstactionswhentroubleshootingaproblem
shouldbetocheckthecurrentrmwareversion.Thelatestversionmaycontainacorrectionthatxesyourparticularproblem.The
currentrmwareversionintheAxisproductisdisplayedinthepageSetup>AdditionalControllerConguration>BasicSetupand
inSetup>AdditionalControllerConguration>About.
UpgradetheFirmware
Important
•Yourdealerreservestherighttochargeforanyrepairattributabletofaultyupgradebytheuser.
•Preconguredandcustomizedsettingsaresavedwhenthermwareisupgraded(providingthefeaturesareavailableinthe
newrmware)althoughthisisnotguaranteedbyAxisCommunicationsAB.
Note
•Aftertheupgradeprocesshascompleted,theproductwillrestartautomatically.Ifrestartingtheproductmanuallyafter
theupgrade,alwayswait5minutesevenifyoususpecttheupgradehasfailed.
•Becausethedatabaseofusers,groups,credentials,andotherdatawillbeupdatingafterarmwareupgrade,therst
start-upcouldtakeafewminutestocomplete.Thetimerequiredisdependentontheamountofdata.
•WhenyouupgradetheAxisproductwiththelatestrmwarefromAxiswebsite,theproductreceivesthelatestfunctionality
available.Alwaysreadtheupgradeinstructionsandreleasenotesavailablewitheachnewreleasebeforeupgrading
thermware.
Toupgradetheproduct’srmware:
1.Savethermwareletoyourcomputer.ThelatestversionofthermwareisavailablefreeofchargefromAxiswebsite
atwww.axis.com/techsup
2.GotoSetup>AdditionalControllerConguration>SystemOptions>Maintenanceintheproduct’swebpages.
3.UnderUpgradeServer,clickBrowseandlocatetheleonyourcomputer.ClickUpgrade.
4.Waitapproximately5minuteswhiletheproductisbeingupgradedandrestarted.Thenclearthewebbrowser'scache.
5.Accesstheproduct.
EmergencyRecoveryProcedure
Ifpowerornetworkconnectionislostduringtheupgrade,theprocessfailsandtheproductbecomesunresponsive.FlashingredStatus
indicatorindicatesafailedupgrade.Torecovertheproduct,followthestepsbelow.Theserialnumberisfoundontheproduct’slabel.
1.InUNIX/Linux,typethefollowingfromthecommandline:
arp-s<IPaddress><serialnumber>temp
ping-l408<IPaddress>
InWindows,typethefollowingfromacommand/DOSprompt(thismayrequirethatyourunthecommandpromptas
anadministrator):
arp-s<IPaddress><serialnumber>
ping-l408-t<IPaddress>
2.Iftheproductdoesnotreplyin30seconds,restartitandwaitforareply.PressCTRL+CtostopPing.
51
Page 52

AXISA1001NetworkDoorController&AXISEntryManager
Troubleshooting
3.Openabrowserandtypeintheproduct’sIPaddress.Inthepagethatopens,usetheBrowsebuttontoselecttheupgrade
letouse.ThenclickLoadtorestarttheupgradeprocess.
4.Aftertheupgradeiscomplete(1–10minutes),theproductautomaticallyrestartsandshowsasteadygreenonthe
Statusindicator.
5.Reinstalltheproduct,referringtotheInstallationGuide.
Iftheemergencyrecoveryproceduredoesnotgettheproductupandrunningagain,contactAxissupportatwww.axis.com/techsup/
Symptoms,PossibleCausesandRemedialActions
ProblemssettingtheIPaddress
WhenusingARP/Ping
Theproductislocatedona
differentsubnet
TheIPaddressisbeingused
byanotherdevice
Trytheinstallationagain.TheIPaddressmustbesetwithintwominutesafterpowerhasbeen
appliedtotheproduct.EnsurethePinglengthissetto408.Forinstructions,seeInstallation
Guideonwww .axis.com.
IftheIPaddressintendedfortheproductandtheIPaddressofthecomputerusedtoaccessthe
productarelocatedondifferentsubnets,youwillnotbeabletosettheIPaddress.Contactyour
networkadministratortoobtainanIPaddress.
DisconnecttheAxisproductfromthenetwork.RunthePingcommand(inaCommand/DOS
window,typepingandtheIPaddressoftheproduct):
•Ifyoureceive:Replyfrom<IPaddress>:bytes=32;time=10...
thismeansthattheIPaddressmayalreadybeinusebyanotherdeviceonthenetwork.
ObtainanewIPaddressfromthenetworkadministratorandreinstalltheproduct.
•Ifyoureceive:Requesttimedout,thismeansthattheIPaddressisavailable
forusewiththeAxisproduct.Checkallcablingandreinstalltheproduct.
PossibleIPaddressconict
withanotherdeviceonthe
samesubnet.
Theproductcannotbeaccessedfromabrowser
Cannotlogin
TheIPaddresshasbeen
changedbyDHCP
Certicateerrorwhenusing
IEEE802.1X
Theproductisaccessiblelocallybutnotexternally
RoutercongurationTocongureyourroutertoallowincomingdatatrafctotheAxisproduct,enabletheNAT-traversal
Firewallprotection
Defaultroutersrequired
ThestaticIPaddressintheAxisproductisusedbeforetheDHCPserversetsadynamicaddress.
ThismeansthatifthesamedefaultstaticIPaddressisalsousedbyanotherdevice,theremay
beproblemsaccessingtheproduct.
WhenHTTPSisenabled,ensurethatthecorrectprotocol(HTTPorHTTPS)isusedwhenattempting
tologin.Youmayneedtomanuallytypehttporhttpsinthebrowser’saddresseld.
Ifthepasswordfortheuserrootislost,theproductmustberesettothefactorydefaultsettings.
SeeResettoFactoryDefaultSettingsonpage50.
IPaddressesobtainedfromaDHCPserveraredynamicandmaychange.IftheIPaddresshasbeen
changed,useAXISIPUtilitytolocatetheproductonthenetwork.Identifytheproductusingits
modelorserialnumber,orbytheDNSname(ifthenamehasbeencongured).
Ifrequired,astaticIPaddresscanbeassignedmanually.Forinstructions,seeInstallationGuide
onwww.axis.com/techsup.
Forauthenticationtoworkproperly,thedateandtimesettingsintheAxisproductshouldbe
synchronizedwithanNTPserver .SeeDate&Timeonpage43.
featurewhichwillattempttoautomaticallyconguretheroutertoallowaccesstotheAxis
product,seeNATtraversal(portmapping)forIPv4onpage46.TheroutermustsupportUPnP
ChecktheInternetrewallwithyournetworkadministrator.
CheckifyouneedtoconguretheroutersettingsfromSetup>NetworkSettingsorSetup>
AdditionalControllerConguration>SystemOptions>Network>TCP/IP>Basic.
TM
.
52
Page 53

AXISA1001NetworkDoorController&AXISEntryManager
Troubleshooting
StatusandNetworkindicatorLEDsareashingredrapidly
Hardwarefailure
ContactyourAxisreseller.
53
Page 54

AXISA1001NetworkDoorController&AXISEntryManager
TechnicalSpecifications
TechnicalSpecifications
AXISA1001NetworkDoorController
Function/group
Doorcontroller
DigitalI/O
Network
System
Integration
Events&Alarms
Item
Models
Readers
Doors1–2doorspercontroller
Credentials
Eventhistory
AccessschedulesUnlimitedorthird-partysoftwaredependent
I/OinterfaceReaderI/0:DCoutput:2x12VDCoutputmax300mA;2x4congurable
I/OfunctionalityPreconguredforreadersanddoormonitors,Inputtrigger,Outputtoggle/pulse
SecurityPasswordprotection,IPaddressltering,HTTPS
SupportedprotocolsIPv4,HTTP,HTTPS
Application
ProgrammingInterface
Tamperdetection
Eventlog
Eventactions
EventtriggersAccessPoint:Accesspointenabled
Specications
AXISA1001NetworkDoorController
Upto2readerspercontroller(Wiegand,RS485(OSDP)withsupportedcardformats
1
Upto15000withthird-partyaccessmanagementsoftwaredependingonserver
capacity
30000FirstinFirstout(FIFO)percontroller
inputs/outputs,(digitalinput:0tomax40VDC,digitaloutput:0tomax40VDC,
opendrain,max100mA)
Readerdata:RS485fullduplex,RS485halfduplex,Wiegand
Auxiliary:1x3.3VDCoutput,max100mA,2xcongurableinputs/output(digital
input:0tomax40VDC,digitaloutput:0tomax40VDC,opendrain,max100mA)
Doorconnectors:2x2inputfordoormonitorsandREX(digitalinput:0to
max40VDC)
2
accesscontrol,digestauthentication,useraccesslog
2
2
,TLS
SNMPv1/v2c/v3(MIB-II),DNS,DynDNS,NTP,RTSP ,RTP ,TCP,UDP,IGMP,RTCP,ICMP,
DHCP,ARP,SOCKS
OpenAPIforsoftwareintegration,includingVAPIX®;specicationsavailableat
www.axis.com
ONVIFProleC,specicationsavailableatwww .onvif.org
SupportforaccesscontrolasaservicewithOne-ClickConnection
Removalofunitcover/tamperfront
Removalofunitfromwall/tamperback
Readertamper
Congurablebytimeandtopic,Alarmacknowledgement
Noticationviaemail,HTTPandTCP,Externaloutputport,StatusLED
Conguration:Accesspointchanged,Accesspointremoved,Areachanged,Area
removed,Doorchanged,Doorremoved
Door:Dooralarm,Doordouble-lockmonitor,Doorlockmonitor,Doormode,Door
monitor,Doorwarning
EventLogger:Alarm
Hardware:Casingopen,Network,peerconnection
InputSignalDigitalinputport,Manualtrigger,Virtualinputs
Schedule:Interval,Pulse
System:Systemready
Time:Recurrence,Useschedule
,QoSlayer3DiffServ,FTP,SMTP,Bonjour ,UPnP,
encryption,IEEE802.1Xnetwork
54
Page 55

AXISA1001NetworkDoorController&AXISEntryManager
TechnicalSpecifications
Function/group
General
1.Powerconsumptiondependent;maxloadforreadersandotherequipmentis7.5WwithPoEand14Wwith10–30VDC.
2.ThisproductincludessoftwaredevelopedbytheOpenSSLProjectforuseintheOpenSSLToolkit(http://www.openssl.org/),andcryptographic
softwarewrittenbyEricYoung(eay@cryptsoft.com)
3.InoutdoorinstallationscombiningAXISA1001andAXIST98A15-VE,theallowedmaximumvoltageis30VDC.
Item
Casing
SoftwareCongurationandbasicaccesscontrolmanagementthroughInternetExplorer,
Memory
Power
Connectors
Operatingconditions
Approvals
Dimensions(HxWxD)
Weight
Includedaccessories
Languages
WarrantyAxis3-yearwarrantywithpossibilitytoextendupto5years,see
OptionalaccessoriesAXIST8120Midspan15W
Specications
Plastic
Firefox,Chrome,orSafari
256MBRAM,4GbitFlash
Powerin:10–30VDC,max26WorPoweroverEthernet
IEEE802.3af/802.3atType1Class3
Powerout&relay:1x12VDC,max500mA1xsolidstaterelay30VDC,
max700mA
Poweroutlock:2x12VDC,max500mA
RJ4510BASE-T/100BASE-TX
Terminalblocks:DCpower,10Inputs/Outputs,RS485/Wiegand,Relay
Cablesizeforconnectors:CSA:AWG28–16,CUL/UL:AWG30–14
0°Cto50°C(32°Fto122°F)
Humidity20–85%RH(non-condensing)
EN55022ClassB,EN50130-4,EN61000-3-2,EN61000-3-3,EN55024,
EN61000-6-1,EN61000-6-2FCCPart15SubpartBClassB
ICES-003ClassB
C-tickAS/NZSCISPR22ClassB
VCCIClassB
IEC/EN/UL60950-1,UL294,UL2043,EN50581
45.5x180x180mm(1.8x7.1x7.1in)
500g(1.1lb)
Connectorkit,Cableties,InstallationGuide
English,German,French,Spanish,Italian
www.axis.com/warranty
AXIST8128PoESplitter24V(requires30Wmidspan)
AXIST8129PoEExtenderMainsadaptor24VDC
AXIST98A15-VESurveillanceCabinet
1
3
55
Page 56

AXISA1001NetworkDoorController&AXISEntryManager
TechnicalSpecifications
AXISEntryManager
Function/group
Doorcontroller
DigitalI/O
Network
Events&Alarms
Systemfeatures
Item
Models
Readers
Controllers
Credentials
Eventhistory
I/OinterfaceReaderI/0:DCoutput:2x12VDCoutputmax300mA;2x4congurable
I/OfunctionalityPreconguredforreadersanddoormonitors,Inputtrigger,Outputtoggle/pulse
SecurityPasswordprotection,IPaddressltering,HTTPS
SupportedprotocolsIPv4,HTTP,HTTPS
Tamperdetection
Eventlog
Eventactions
EventtriggersAccessPoint:Accesspointenabled
AccessschedulesUnlimited
Installation&
Conguration
AdministrationDrag-and-dropoperationwithexibleassignmentofdoorsandusergroups,
Languages
Specications
AXISA1001withbuilt-inweb-basedsoftware
Upto2readerspercontroller
1–33
Upto400
30000FirstinFirstout(FIFO)persystem
inputs/outputs,(digitalinput:0tomax40VDC,digitaloutput:0tomax40VDC,
opendrain,max100mA)
Readerdata:RS485fullduplex,RS485halfduplex,Wiegand
Auxiliary:1x3.3VDCoutput,max100mA,2xcongurableinputs/output(digital
input:0tomax40VDC,digitaloutput:0tomax40VDC,opendrain,max100mA)
Doorconnectors:2x2inputfordoormonitorsandREX(digitalinput:0to
max40VDC)
accesscontrol,digestauthentication,useraccesslog
2
SNMPv1/v2c/v3(MIB-II),DNS,DynDNS,NTP,RTSP ,RTP ,TCP,UDP,IGMP,RTCP,ICMP,
DHCP,ARP,SOCKS
Removalofunitcover/tamperfront
Removalofunitfromwall/tamperback
Readertamper
Congurablebytimeandtopic,Alarmacknowledgement
Noticationviaemail,HTTPandTCP,Externaloutputport,StatusLED
Conguration:Accesspointchanged,Accesspointremoved,Doorchanged,Door
removed
Door:Dooralarm,Doordouble-lockmonitor,Doorlockmonitor,Doormode,Door
monitor,Doorwarning
EventLogger:Alarm
Hardware:Casingopen,Network,peerconnection
InputSignalDigitalinputport,Manualtrigger,Virtualinputs
Schedule:Interval,Pulse
System:Systemready
Time:Recurrence,Useschedule
Congurationwizard,congurationverication,Color-codedconnectors,I/O
assignmentprint-out,Automaticcontrollerdiscovery,Instantfeedbackofmissing
congurationdata
Retrievecredentialsfromreader,Manualaccess/lock/unlock,Importofusers
English,German,French,Spanish,Italian
,TLS
1
(Wiegand,RS485(OSDP)withsupportedcardformats
2
encryption,IEEE802.1Xnetwork
2
,QoSlayer3DiffServ,FTP,SMTP,Bonjour ,UPnP,
56
Page 57

AXISA1001NetworkDoorController&AXISEntryManager
TechnicalSpecifications
Function/group
General
1.Powerconsumptiondependent;maxloadforreadersandotherequipmentis7.5WwithPoEand14Wwith10–30VDC.
2.ThisproductincludessoftwaredevelopedbytheOpenSSLProjectforuseintheOpenSSLToolkit(http://www.openssl.org/),andcryptographic
softwarewrittenbyEricYoung(eay@cryptsoft.com)
3.InoutdoorinstallationscombiningAXISA1001andAXIST98A15-VE,theallowedmaximumvoltageis30VDC.
Item
Casing
SoftwareCongurationandbasicaccesscontrolmanagementthroughInternetExplorer,
Memory
Power
Connectors
Operatingconditions
Approvals
Dimensions(HxWxD)
Weight
Includedaccessories
WarrantyAxis3-yearwarrantywithpossibilitytoextendupto5years,see
OptionalaccessoriesAXIST8120Midspan15W
Specications
Plastic
Firefox,Chrome,orSafari
256MBRAM,4GbitFlash
Powerin:10–30VDC,max26WorPoweroverEthernet
IEEE802.3af/802.3atType1Class3
Powerout&relay:1x12VDC,max500mA1xsolidstaterelay30VDC,
max700mA
Poweroutlock:2x12VDC,max500mA
RJ4510BASE-T/100BASE-TX
Terminalblocks:DCpower,10Inputs/Outputs,RS485/Wiegand,Relay
Cablesizeforconnectors:CSA:AWG28–16,CUL/UL:AWG30–14
0°Cto50°C(32°Fto122°F)
Humidity20–85%RH(non-condensing)
EN55022ClassB,EN50130-4,EN61000-3-2,EN61000-3-3,EN55024,
EN61000-6-1,EN61000-6-2FCCPart15SubpartBClassB
ICES-003ClassB
C-tickAS/NZSCISPR22ClassB
VCCIClassB
IEC/EN/UL60950-1,UL294,UL2043,EN50581
45.5x180x180mm(1.8x7.1x7.1in)
500g(1.1lb)
Connectorkit,Cableties,InstallationGuide
www.axis.com/warranty
AXIST8128PoESplitter24V(requires30Wmidspan)
AXIST8129PoEExtenderMainsadaptor24VDC
AXIST98A15-VESurveillanceCabinet
1
3
Connectors
Forinformationabouttheconnectors’positions,seeHardwareOverviewonpage5.
Forconnectiondiagramsandinformationaboutthehardwarepinchartgeneratedthroughthehardwareconguration,see
ConnectionDiagramsonpage61andConguretheHardwareonpage13.
Thefollowingsectiondescribestheconnectors’technicalspecications.
57
Page 58

AXISA1001NetworkDoorController&AXISEntryManager
TechnicalSpecifications
ReaderDataConnector
6-pinterminalblocksupportingRS485andWiegandprotocolsforcommunicationwiththe
reader.
TheRS485portssupport:
•Two-wireRS485halfduplex
•Four-wireRS485fullduplex
TheWiegandportssupport:
•Two-wireWiegand
FunctionPinNotes
RS485
RS485
Wiegand
A-
B+
A-
B+
D0(Data0)
D1(Data1)
1
2
3
4
5
6
ForfullduplexRS485
ForhalfduplexRS485
ForfullduplexRS485
ForhalfduplexRS485
ForWiegand
Important
Therecommendedmaximumcablelengthis30m(98.4ft).
ReaderI/OConnector
6-pinterminalblockfor:
•Auxiliarypower(DCoutput)
•DigitalInput
•DigitalOutput
Pin3onthereaderI/Oconnectorscanbesupervised.Iftheconnectionisinterrupted,anevent
isactivated.Tousesupervisedinputs,installendoflineresistors.Usetheconnectiondiagram
forsupervisedinputs.Seepage62.
FunctionPinNotes
0VDC(-)
DCoutput
Congurable(Input
orOutput)
•0VDC(-)
1
2
3–6
Forpoweringauxiliaryequipment.
Note:Thispincanonlybeusedaspowerout.
Digitalinput—Connecttopin1toactivate,orleave
oating(unconnected)todeactivate.
Digitaloutput—Connecttopin1toactivate,orleave
oating(unconnected)todeactivate.Ifusedwithan
inductiveload,e.g.arelay,adiodemustbeconnected
inparallelwiththeload,forprotectionagainstvoltage
transients.
Specications
0VDC
12VDC
Maxload=300mA
0tomax40VDC
0tomax40VDC,opendrain,
100mA
58
Page 59

AXISA1001NetworkDoorController&AXISEntryManager
TechnicalSpecifications
DoorConnector
Two4-pinterminalblocksfordoormonitoringdevices(digitalinput).
Alldoorinputpinscanbesupervised.Iftheconnectionisinterrupted,analarmistriggered.To
usesupervisedinputs,installendoflineresistors.Usetheconnectiondiagramforsupervised
inputs.Seepage62.
FunctionPinNotes
0VDC(-)
Input
1,3
2,4
Forcommunicatingwithdoormonitor.
Digitalinput—Connecttopin1or3respectivelyto
activate,orleaveoating(unconnected)todeactivate.
Note:Thispincanonlybeusedforinput.
AuxiliaryConnector
4-pincongurableI/Oterminalblockfor:
•Auxiliarypower(DCoutput)
•DigitalInput
•DigitalOutput
Foranexampleconnectiondiagram,seeConnectionDiagramsonpage61.
FunctionPinNotes
0VDC(-)
DCoutput
(InputorOutput)
•0VDC(-)
1
2
3–4
Forpoweringauxiliaryequipment.
Note:Thispincanonlybeusedaspowerout.
Digitalinput—Connecttopin1toactivate,orleave
oating(unconnected)todeactivate.
Digitaloutput—Connecttopin1toactivate,orleave
oating(unconnected)todeactivate.Ifusedwithan
inductiveload,e.g.arelay,adiodemustbeconnected
inparallelwiththeload,forprotectionagainstvoltage
transients.
Specications
0VDC
0tomax40VDC
Specications
0VDC
3.3VDC
Maxload=100mA
0tomax40VDC Congurable
0tomax40VDC,opendrain,
100mA
PowerConnector
2-pinterminalblockforDCpowerinput.UseaSafetyExtraLowVoltage(SELV)compliant
limitedpowersource(LPS)witheitheraratedoutputpowerlimitedto≤100Woraratedoutput
currentlimitedto≤5A.
FunctionPinNotes
0VDC(-)
DCinput
1
2
ForpoweringcontrollerwhennotusingPowerover
Ethernet.
Note:Thispincanonlybeusedaspowerin.
59
Specications
0VDC
10–30VDC,max26W
Maxloadonoutputs=14W
Page 60

AXISA1001NetworkDoorController&AXISEntryManager
TechnicalSpecifications
NetworkConnector
RJ45Ethernetconnector.SupportsPoweroverEthernet(PoE).UseCategory5ecablesorhigher.
Function
PowerandEthernet
Specications
PoweroverEthernetIEEE802.3af/802.3atType1Class3,44–57VDC
Maxloadonoutputs=7.5W
PowerLockConnector
4-pinterminalblockforpoweringoneortwolocks(DCoutput).Thelockconnectorcanalso
beusedtopowerexternaldevices.
Connectlocksandloadstothepinsaccordingtothehardwarepinchartgeneratedthrough
thehardwareconguration.
FunctionPinNotes
0VDC(-)
0VDC,oating,or
12VDC
1,3
2,4
Forcontrollinguptotwo12Vlocks.Usethehardware
pinchart.SeeConguretheHardwareonpage13.
Power&RelayConnector
6-pinterminalblockwithbuilt-inrelayfor:
•Externaldevices
•Auxiliarypower(DCoutput)
Connectlocksandloadstothepinsaccordingtothehardwarepinchartgeneratedthrough
thehardwareconguration.
•0VDC(-)
Specications
0VDC
12VDC
Maxtotalload=500mA
FunctionPinNotes
0VDC(-)
Relay
12VDC
24VDC
1,4
2–3
5
6
TamperingAlarmPinHeader
Two2-pinheadersforbypassing:
•Backtamperingalarm(TB)
•Fronttamperingalarm(TF)
Forconnectingrelaydevices.Usethehardwarepin
chart.SeeConguretheHardwareonpage13.
Thetworelaypinsaregalvanicallyseparatedfromthe
restofthecircuitry.
Forpoweringauxiliaryequipment.
Note:Thispincanonlybeusedaspowerout.
Notused
60
Specications
0VDC
Maxcurrent=700mA
Maxvoltage=+30VDC
Maxvoltage=+12VDC
Maxload=500mA
Page 61

AXISA1001NetworkDoorController&AXISEntryManager
1
2
A
B
TechnicalSpecifications
FunctionPinNotes
Backtamperingalarm
Fronttamperingalarm
Note
Boththefrontandbacktamperingalarmsareconnectedbydefault.Thecasingopentriggercanbeconguredtoperforman
actionifthedoorcontrollerisopenedorifthedoorcontrollerisremovedfromthewallorceiling.Forinformationabouthow
tocongurealarmsandevents,seeAlarmandEventConguration.
ConnectionDiagrams
Connectdevicesaccordingtothehardwarepinchartgeneratedthroughthehardwareconguration.Formoreinformationabout
hardwarecongurationandthehardwarepinchart,seeConguretheHardwareonpage13.
AuxiliaryConnector
1–2
1–2
Tobypassthefrontandbacktamperingalarmsimultaneously,connectjumpers
betweenTB1,TB2andTF1,TF2respectively.Bypassingthetamperingalarms
meansthatthesystemwillnotidentifyanytamperingattempts.
1
0VDC(-)
2
DCoutput:3.3V,max100mA
A
I/Oconguredasinput
B
I/Oconguredasoutput
61
Page 62

AXISA1001NetworkDoorController&AXISEntryManager
i
22kΩ
4.7kΩ
ii
TechnicalSpecifications
SupervisedInputs
Tousesupervisedinputs,installendoflineresistors.Thisappliestoallsupervisedinputs.Forinformationaboutlimitationsand
updates,seetheproduct’sreleasenotes.
iInput
ii
0VDC(-)
62
Page 63

UserManualVer.M5.7
AXISA1001NetworkDoorController&AXISEntryManager
©AxisCommunicationsAB,2013-2014
Date:November2014
PartNo.59868
 Loading...