

Axis 5900 Quick Installation Manual

AXIS 5900 1
AXIS 5900
Network Print Server
Quick Installation Guide
2
Regulatory Information AXIS 5900
Regulatory Information
Safety Notices - Take some time to read through the safety notices before installing the AXIS 5900. Please observe all
safety markings and instructions when using this product.
Important!: - must be observed to avoid operational impairment. Do not proceed any of the above notices, until you have
fully understood the implications.
Radio Transmission Regulatory information - Tested to comply with FCC Standards FOR HOME OR OFFICE USE. This
product must be installed and used in strict accordance with the instructions given in the user documentation. The AXIS
5900 comp lies with the following ra dio frequen cy and safety standards:
Europe - EU Declaration of Conformity. This device complies with the requirements of the R&TTE Directive
1999/5/EC with ess ent ial test suites as per stan d ar ds EN 60950 Safety of Informat ion Technology equipment :
ETS 300 328 Technical requirements for radi o equipment
ETS 300 826 General EMC requirements for radio equipment
USA - Federal Communications Commission FCC. This device complies with Part 15 of FCC Rules. Operation of the device is
subject to the following two conditions:
(1) This device may not cause har mful interference
(2) This device must a ccept any interference that ma y cause unde s ired operat ion.
Important! - The channel must be set according to the radio frequency requirements in your country:
Country Frequency Available Ch annels Default Channel
Europe 2.412-2.472 GHz 1-13 11
France 2.457-2.472 GHz 10-13 (indoo r use only) 11
Japan 2.484 GHz 14 14
US/Canada 2.412-2.462 GHz 1-11 11
Approvals - The AXIS 5900 is approved for use in the EU member states, Japan, Switzerland and the US.
Liability - Every care has been taken in the preparation of this manual; if you detect any inaccuracies or omissions, please
inform your local Axis office, which can be found on the cover of this document. Axis Communications AB cannot be held
responsible for any technical or typographical errors and reserves the right to make changes to the product and manuals
without prior notice. Axis Communications AB makes no warranty of any kind with regard to the material contained within
this document, including, but not limited to, the implied warranties of merchantability and fitness for a particular purpose.
Axis Communications AB shall not be liable nor responsible for incidental or consequential damages in connection with the
furnishing, performance or use of this material.
Software Ackn ow led g me nts - Copyright © 1995-2001 The Cryptix Foundation Limited. All rights reserved.
THIS SOFTWARE IS PROVIDED BY THE CRYPTIX FOUNDATION LIMITED AND CONTRIBUTORS ``AS IS'' AND ANY
EXPRESS OR IMPLIED WARRANTIES, INCLUDING, BUT NOT LIMITED TO, THE IMPLIED WARRANTIES OF
MERCHANTABILITY AND FITNESS FOR A PARTICULAR PURPOSE ARE DISCLAIMED. IN NO EVENT SHALL THE CRYPTIX
FOUNDATION LIMITED OR CONTRIBUTORS BE LIABLE FOR ANY DIRECT, INDIRECT, INCIDENTAL, SPECIAL, EXEMPLARY,
OR CONSEQUENTIAL DAMAGES (INCLUDING, BUT NOT LIMITED TO, PROCUREMENT OF SUBSTITUTE GOODS OR
SERVICES; LOSS OF USE, DATA, OR PROFITS; OR BUSINESS INTERRUPTION) HOWEVER CAUSED AND ON ANY THEORY
OF LIABILITY, WHETHER IN CONTRACT, STRICT LIA BILIT Y, OR TORT (INCLUDING NEGLIGENCE OR OTHERWISE) ARISING
IN ANY WAY OUT OF THE USE OF THIS SOFTWARE, EVEN IF ADVISED OF THE POSSIBILITY OF SUCH DAMAGE.
Axis’ Trademarks - NetPilot, ThinWizard.
Other Trademark Acknowledgments - Adobe Acrobat Reader, Apple, Bluetooth, Ethernet, EtherTalk, IBM, LAN Manager,
LAN Server, Macintosh, Microsoft, Novell NetWare, OS/2, OS/400, AS/400, TokenTalk, UNIX, Windows, are registered
tradema rks of the r es pective holders.
Support Services - Should you require technical assistance, please contact your Axis dealer. If your questions cannot be
answered immediately, your Axis dealer will forward your queries through the appropriate channels to ensure you a rapid
response. If you are connected t o the Inter net, you ca n find on-l ine manuals , techni cal support , software update s, applicati on
software, corpo rate in fo rm ation, etc. at http://www.axis.com/techsu p /
AXIS 5900 Quick Installation Guide Rev 1.0 Part No: 19091
Copyrigh t © Ax is Communications AB, 2002 Date: June 2002

AXIS 5900 Table of Contents 3
Table of Contents
Overview . . . . . . . . . . . . . . . . . . . . . . . . . . . . . . . . . . . . . . . . . . . . . . . . . . . . . . . . . . . . . 4
Hardware Inventory . . . . . . . . . . . . . . . . . . . . . . . . . . . . . . . . . . . . . . . . . . . . . . . 4
Introduction . . . . . . . . . . . . . . . . . . . . . . . . . . . . . . . . . . . . . . . . . . . . . . . . . . . . . . . . . . 5
802.11b Operating Modes . . . . . . . . . . . . . . . . . . . . . . . . . . . . . . . . . . . . . . . . . . . . . 5
ad hoc mode (default) . . . . . . . . . . . . . . . . . . . . . . . . . . . . . . . . . . . . . . . . . . . . . . 5
Infrastructure mode . . . . . . . . . . . . . . . . . . . . . . . . . . . . . . . . . . . . . . . . . . . . . . . 5
802.11b Security . . . . . . . . . . . . . . . . . . . . . . . . . . . . . . . . . . . . . . . . . . . . . . . . . . . . 5
Connecting the Hardware . . . . . . . . . . . . . . . . . . . . . . . . . . . . . . . . . . . . . . . . . . . . . . . . 6
Installation Overview . . . . . . . . . . . . . . . . . . . . . . . . . . . . . . . . . . . . . . . . . . . . . . . . . . . 7
Setting up using the Ethernet interface . . . . . . . . . . . . . . . . . . . . . . . . . . . . . . . . . . . 7
Setting up over the WLAN . . . . . . . . . . . . . . . . . . . . . . . . . . . . . . . . . . . . . . . . . . . . . 7
IP address assignment . . . . . . . . . . . . . . . . . . . . . . . . . . . . . . . . . . . . . . . . . . . . . . . . . . 8
Manual IP address assignment . . . . . . . . . . . . . . . . . . . . . . . . . . . . . . . . . . . . . . . . . . . . 9
Setting the IP address using AXIS IP JumpStarter . . . . . . . . . . . . . . . . . . . . . . . . . . . 10
Setting the IP address using arp/ping . . . . . . . . . . . . . . . . . . . . . . . . . . . . . . . . . . . . 11
Windows . . . . . . . . . . . . . . . . . . . . . . . . . . . . . . . . . . . . . . . . . . . . . . . . . . . . . . . 11
UNIX, Mac OS X . . . . . . . . . . . . . . . . . . . . . . . . . . . . . . . . . . . . . . . . . . . . . . . . . 11
Configuring the AXIS 5900 for wireless printing . . . . . . . . . . . . . . . . . . . . . . . . . . . . . . 12
WLAN Parameters . . . . . . . . . . . . . . . . . . . . . . . . . . . . . . . . . . . . . . . . . . . . . . . . . . 13
WEP Parameters . . . . . . . . . . . . . . . . . . . . . . . . . . . . . . . . . . . . . . . . . . . . . . . . . . . 14
Configuring Printers . . . . . . . . . . . . . . . . . . . . . . . . . . . . . . . . . . . . . . . . . . . . . . . . . . . 15
Installing Printers in Windows 2000/XP . . . . . . . . . . . . . . . . . . . . . . . . . . . . . . . . . . 15
Installing Printers in Windows 95/98/NT/Me . . . . . . . . . . . . . . . . . . . . . . . . . . . . . . 16
Installing Printers in UNIX . . . . . . . . . . . . . . . . . . . . . . . . . . . . . . . . . . . . . . . . . . . . 17
axinstall . . . . . . . . . . . . . . . . . . . . . . . . . . . . . . . . . . . . . . . . . . . . . . . . . . . . . . . 17
Installing Printers in Mac OS X . . . . . . . . . . . . . . . . . . . . . . . . . . . . . . . . . . . . . . . . . 18
Management and configuration . . . . . . . . . . . . . . . . . . . . . . . . . . . . . . . . . . . . . . . . . . 19
Using a Web Browser . . . . . . . . . . . . . . . . . . . . . . . . . . . . . . . . . . . . . . . . . . . . . . . . 19
Using AXIS ThinWizard . . . . . . . . . . . . . . . . . . . . . . . . . . . . . . . . . . . . . . . . . . . . . . 20
Troubleshooting . . . . . . . . . . . . . . . . . . . . . . . . . . . . . . . . . . . . . . . . . . . . . . . . . . . . . . 21
Resetting the Print Server . . . . . . . . . . . . . . . . . . . . . . . . . . . . . . . . . . . . . . . . . . . . . . . 22
Features . . . . . . . . . . . . . . . . . . . . . . . . . . . . . . . . . . . . . . . . . . . . . . . . . . . . . . . . . . . . 23

4
Overview AXIS 5900
Overview
This guide inc ludes installation instructions for the AXIS 5900 network print server in
Windows (95, 98, NT, Me, 2000, XP), UNIX and Macintosh environments over TCP/IP for
wireless and wired networks.
The instructions in this guide are based on the settings found in a new and unconfigured
AXIS 5900. To establish this status in a previously configured AXIS 5900, you can reset it
to factory default settings. See Resetting the Print Server on page 22 for instructions.
Note:
For installation instructions covering NetWare, OS/2 and Windows over NetBIOS/NetBEUI and
IPX/SPX, see the AXIS 5900 User’s Manual, available from the AXIS Network Product CD and the Axis
web site at www.axis.com.
Hardware Inventory
Unpack and check all the items using the following check list. Contact your dealer if
anything is missing or damaged. All packing materials are recyclable.
Hardware Model Part Number
Print Server
Power Supp ly
PS-F and PS-H are
interchangeable
Media Title Part Number
CD
Printed Materi al s
Optional accessories Description Part Number
Cables
Parallel Printer Cable 13360
AXIS 5900 0158-001-01
PS-F
Country
Europe 18424 19108
UK 18425 19109
Australia 18428 19111
USA / Japan 18480 19110
Korea 19112
AXIS Network Product CD version 1.1
AXIS 5900 Quick Installation Guide 19091
part no.
PS-H
part no.
Centronics to Mini-centronics Cable 16453
Ribbons
Self-adhesive velcro ribbons 13282 & 13283
AXIS Network Product CD includes AXIS Utilities Software, Product Software, White
Papers, User Documentation, etc. All documents presented on the CD are in PDF format.
You can download Acrobat Reader from the AXIS Network Product CD or from Adobe’s web site at www.adobe.com.
AXIS 5900 Introduction 5
Introduction
The AXIS 5900 is a print server that can be used for either wireless or wired printing and
can be installed either over the wireless LAN or using an Ethernet interface. When
operating wirelessly, the AXIS 5900 print server communicates either in ad-hoc mode,
where the workstation/lap top communicates d irectly with the p rint server or infrastructure
mode, where there is an 802.11b access point acting as a bridge between the
workstation/ lap top and th e pri nt serve r.
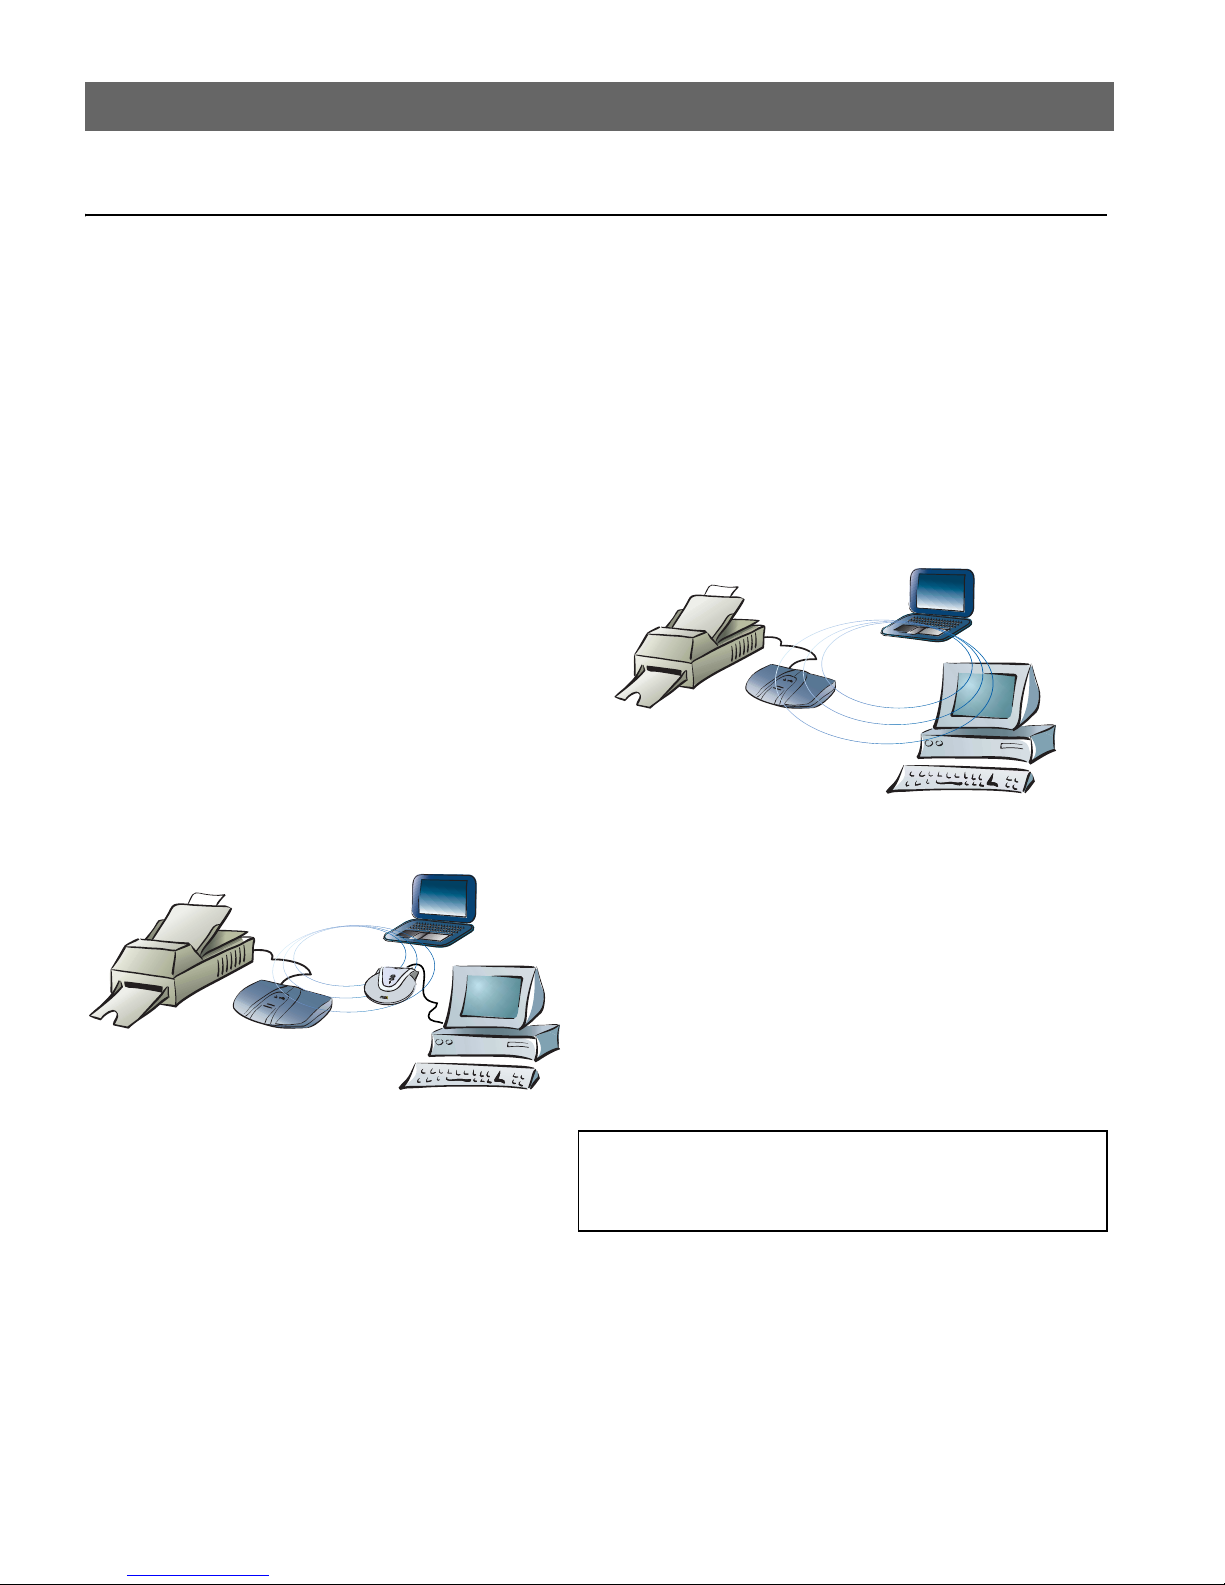
802.11b Operating Modes
ad hoc mode (default)
Workstations and laptop computers
communicate directly over the WLAN.
Infrastructure mode
Workstations and laptop computers
communicate over the WLAN and the LAN
through an access point.
Note:
In Macint osh envi ronment s, the ad hoc mode is r eferred t o
as computer to computer mode and the infrastructure
mode is referred to as Airport network
802.11b Security
Unauthorized access to the WLAN can be prevented by using WEP which is a security
protocol for encrypting data transmitted over the WLAN. When WEP is enabled, the
workstation or laptop attempti ng to acces s the WLAN must us e a WEP key to authenticate
its data transmissions.
6
Connecting the Hardware AXIS 5900
Connecting the Hardware
1. Make sure that the printer is switched off and that the power supply is disconnected from
the AXIS 5900.
2. Locate the serial number, found on the underside label of the AXIS 5900, an d write it
down. Example: Ser. No. 00 40 8c 18 16 36
3. Connect your printer(s) to the print server’s LPT1 or LPT2 port using a printer cable.
4. Connect your AXIS 5900 to your network (Ethernet Connector), using a twisted pair
category 5 cable .
Notes:
You can install the AXIS 5900 without using a network cable, simply skip step 4 in thes e instructions.
5. Switch on your printer and make sure it is ready for use.
6. Connect the power supply to the AXIS 5900. The Network Indicator will start flashing
when the print server is correctly connected to the network.
7. Wait 1 minute and press the test button once. A test page will be printed on the
connected printer, keep it handy during the installation. The test page will show the
assigned (permanent or temporary) IP address of the print server.
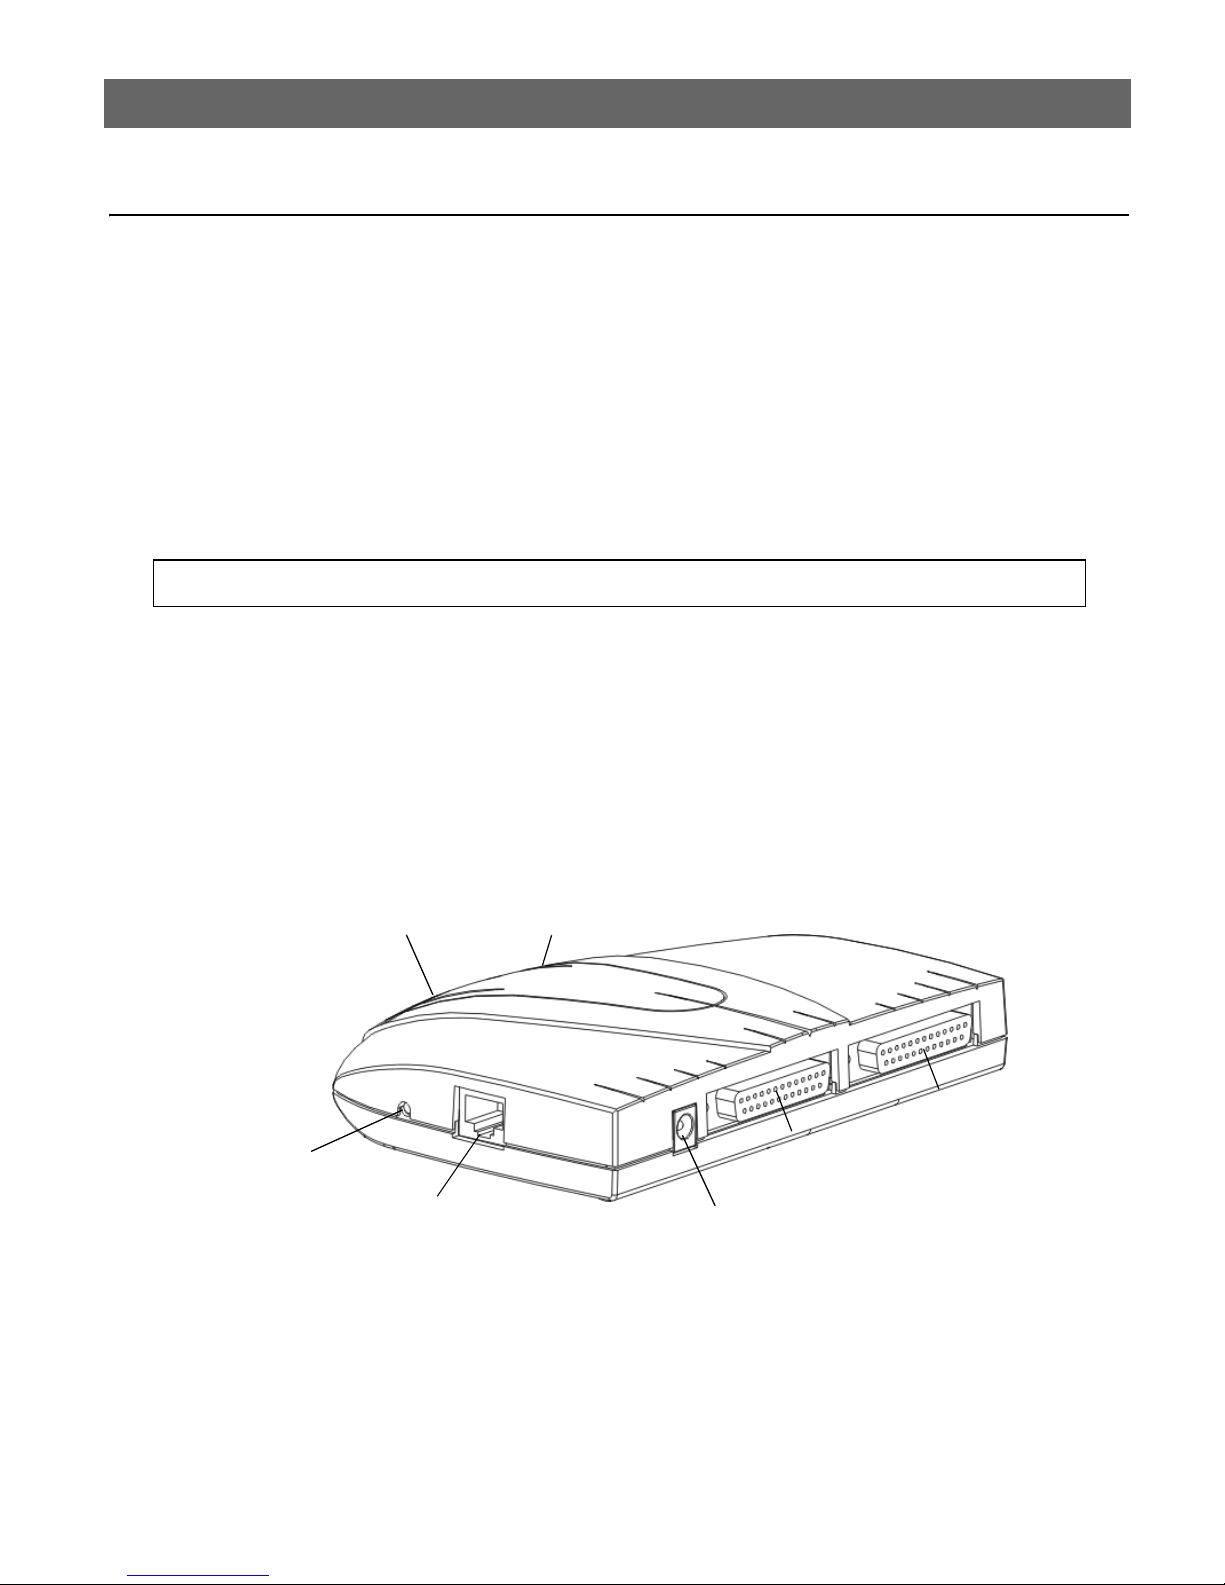
Network Indicator
Test Button
Ethernet Connector
Power Indicator
LPT1
LPT2
Power supply Connector

AXIS 5900 Installation Overview 7
Installation Overview
Select the appropriate method to establish a connection between the workstation / laptop
and the AXIS 5900. The tables below provide an overview of the installation procedures:
Setting up using the Ethernet interface
Description Action...
To establish communication with the network, an IP address must
be assigned to your AXIS 5900
Set the WLAN Network Mode and enter the SSID, WLAN
channel and WEP keys according to your network
On power up, the AXIS 5900 will automatically select WLAN
communication if there is no Ethernet cable connected
The AXIS 5900 must be restarted for the WLAN settings to take
effect
IP address assignment
Configuring the AXIS 5900 for wireless
printing
Disconnect the network cable
Disconnect and reconnect the AXIS 5900
power supply
on page 12
on page 8
Setting up over the WLAN
Before you begin, confi gur e the WLAN se tti ngs on yo ur workstation / laptop as described
below (refer to the user documentation of your WLAN network interface for instructions):
• Select ad hoc mode
• Set the SSID to AXIS followed by the last 6 digits of the serial number which is found on the underside label of
the AXIS 5900 e.g. AXIS181636. The S SI D i s cas e sensitive and must be entered exactly as stated above i.e. in
upper-case letters.
• Set the WLAN channel to 11 (channel 14 in Japan)
• Disable the WEP parameter
Proceed with the followin g:
Description Action...
To establish communication with the network, an IP address mus t
be assigned to your AXIS 5900
Once the connection has been established, set the WLAN
Network Mode and enter the SSID, WLAN channel and WEP
keys according to your network
The AXIS 5900 must be restarted for the WLAN settings to take
effect
IP address assignment
Configuring the AXIS 5900 for wireless
printing
Disconnect and reconnect the AXIS 5900
power supply
on page 12
on page 8
Note:
Once the print server’s connection to the network has been established and verified, you can reset the
workstation / laptop to its original settings i.e. the network mode, SSID, WLAN channel and WEP keys

8
IP address assignment AXIS 5900
IP address assignment
Method: Server Required: Comment:
DHCP DHCP server Dynamic assignment of IP addresses
RARP RARP server Static assignment of IP addresses
BOOTP BOOTP server Static assignment of IP addresses
Auto-IP Automatic assignment of IP addresses
All methods are enabled by default
If you are working in a Windows network with automatic IP address assignment, your
print server will obtain an IP address automatically when you connect it to the network.
Follow the instructions on this page to verify the IP address:
1. Open a web browser (e.g. Internet Explorer or Netscape Communicator).
2. In the Web br owser’s Location/Address field, enter the print serv er’s IP address, found on
the test page (see
Connecting the Hardware
on page 6) and press Enter.
3. If the Network Print Server web page appears in your Web browser, the IP address was
set automatically when you connected the AXIS 5900 to your network. Proceed to
Configuring the AXIS 5900 for wireless printing
on page 12.
4. If the Network Print Server web page does not appear, you need to set t he p rint s erver ’s
IP address manually using one of the methods described in
Manual IP address assignment
on page 9.
Notes:
• Use a Web browser with JavaScript support and Java enabled.
• The AXIS 5900 supports WINS (Windows Internet Name Service), which is recommended when set-
ting the IP address using DHCP in Windows environments.
• If you are working in a WINS/ DDNS network, you can access the print server’s web pages using its
default host name: In the Web browser’s Location/Address field, enter the default print server name
AXISxxxxxx (xxxxxx are the last six digits of the serial number, found on the print server’s underside
label). Example: If the serial number is 00 40 8c 18 16 36, type AXIS181636 and press Enter.
• DHCP, RARP an d BOOTP can be used to set the IP address in UNIX, see the AXIS 590 0 User’ s Man ual
for details.
• See the AXIS 5900 User’s Manual for installation instructions in a NetBIOS/NetBEUI environment.
The User’s Manual is available from the AXIS Network Product CD and from the Axis web site at
www.axis.com
• If you are working in a network that does not use dynamic IP address assignment, refer to Manual IP
address assignment on page 9 to assign an IP address to the print server manually.
 Loading...