

Page 1

AXISP3715-PLVENetworkCamera
UserManual
Page 2

AXISP3715-PLVENetworkCamera
TableofContents
Getstarted................................................3
Findthedeviceonthenetwork....................................3
Accessthedevice...............................................3
Webpageoverview..............................................4
Additionalsettings..........................................6
Adjusttheimage................................................6
Viewandrecordvideo............................................11
Setuprulesandalerts...........................................12
Addaudio.....................................................13
Cleaningrecommendations...................................15
Learnmore................................................16
Long-distanceconnections........................................16
Viewarea......................................................16
Remotefocusandzoom..........................................16
Privacymasks..................................................16
Overlays.......................................................16
Streamingandstorage...........................................17
Applications....................................................19
Security.......................................................
Troubleshooting............................................21
Resettofactorydefaultsettings...................................21
Removereectionsinimage.......................................21
Firmwareoptions...............................................21
Checkthecurrentrmware.......................................
Upgradethermware............................................22
Technicalissues,cluesandsolutions................................
Performanceconsiderations.......................................
Needmorehelp?................................................24
Specications..............................................25
Productoverview................................................
LEDindicators..................................................
SDcardslot....................................................
Buttons.......................................................
Connectors....................................................
20
22
22
24
25
25
25
25
25
2
Page 3

AXISP3715-PLVENetworkCamera
Getstarted
Getstarted
Findthedeviceonthenetwork
TondAxisdevicesonthenetworkandassignthemIPaddressesinWindows®,useAXISIPUtilityorAXISDeviceManager.Both
applicationsarefreeandcanbedownloadedfromaxis.com/support.
FormoreinformationabouthowtondandassignIPaddresses,seethedocumentHowtoassignanIPaddressandaccessyour
deviceonthedevicepageataxis.com.
Browsersupport
Youcanusethedevicewiththefollowingbrowsers:
TM
Chrome
Windows
OSX
Otheroperatingsystems
Ifyouneedmoreinformationaboutrecommendedbrowsers,gotoaxis.com/browser-support.
®
®
recommended
recommended
xx
®
Firefox
xx
®
Edge
Safari
x
Accessthedevice
1.OpenabrowserandentertheIPaddressorhostnameoftheAxisdevice.
IfyouhaveaMaccomputer(OSX),gotoSafari,clickBonjourandselectthedevicefromthedrop-downlist.Toadd
Bonjourasabrowserbookmark,gotoSafari>Preferences.
IfyoudonotknowtheIPaddress,useAXISIPUtilityorAXISDeviceManagertondthedeviceonthenetwork.
2.Entertheusernameandpassword.Ifyouaccessthedeviceforthersttime,youmustsettherootpassword.SeeSeta
newpasswordfortherootaccountonpage3.
3.Theliveviewpageopensinyourbrowser.
Verifythatnoonehastamperedwiththermware
TomakesurethatthedevicehasitsoriginalAxisrmware,ortotakefullcontrolofthedeviceafterasecurityattack:
1.Resettofactorydefaultsettings.SeeResettofactorydefaultsettingsonpage21.
®
Afterthereset,securebootguaranteesthestateofthedevice.
2.Congureandinstallthedevice.
Setanewpasswordfortherootaccount
Important
Thedefaultadministratorusernameisroot.Ifthepasswordforrootislost,resetthedevicetofactorydefaultsettings.
1.Typeapassword.Followtheinstructionsaboutsecurepasswords.SeeSecurepasswordsonpage4.
2.Retypethepasswordtoconrmthespelling.
3.ClickCreatelogin.Thepasswordhasnowbeencongured.
3
Page 4

AXISP3715-PLVENetworkCamera
Getstarted
Securepasswords
Important
Axisdevicessendtheinitiallysetpasswordincleartextoverthenetwork.Toprotectyourdeviceaftertherstlogin,set
upasecureandencryptedHTTPSconnectionandthenchangethepassword.
Thedevicepasswordistheprimaryprotectionforyourdataandservices.Axisdevicesdonotimposeapasswordpolicyasthey
maybeusedinvarioustypesofinstallations.
Toprotectyourdatawestronglyrecommendthatyou:
•Useapasswordwithatleast8characters,preferablycreatedbyapasswordgenerator.
•Don’texposethepassword.
•Changethepasswordatarecurringinterval,atleastonceayear.
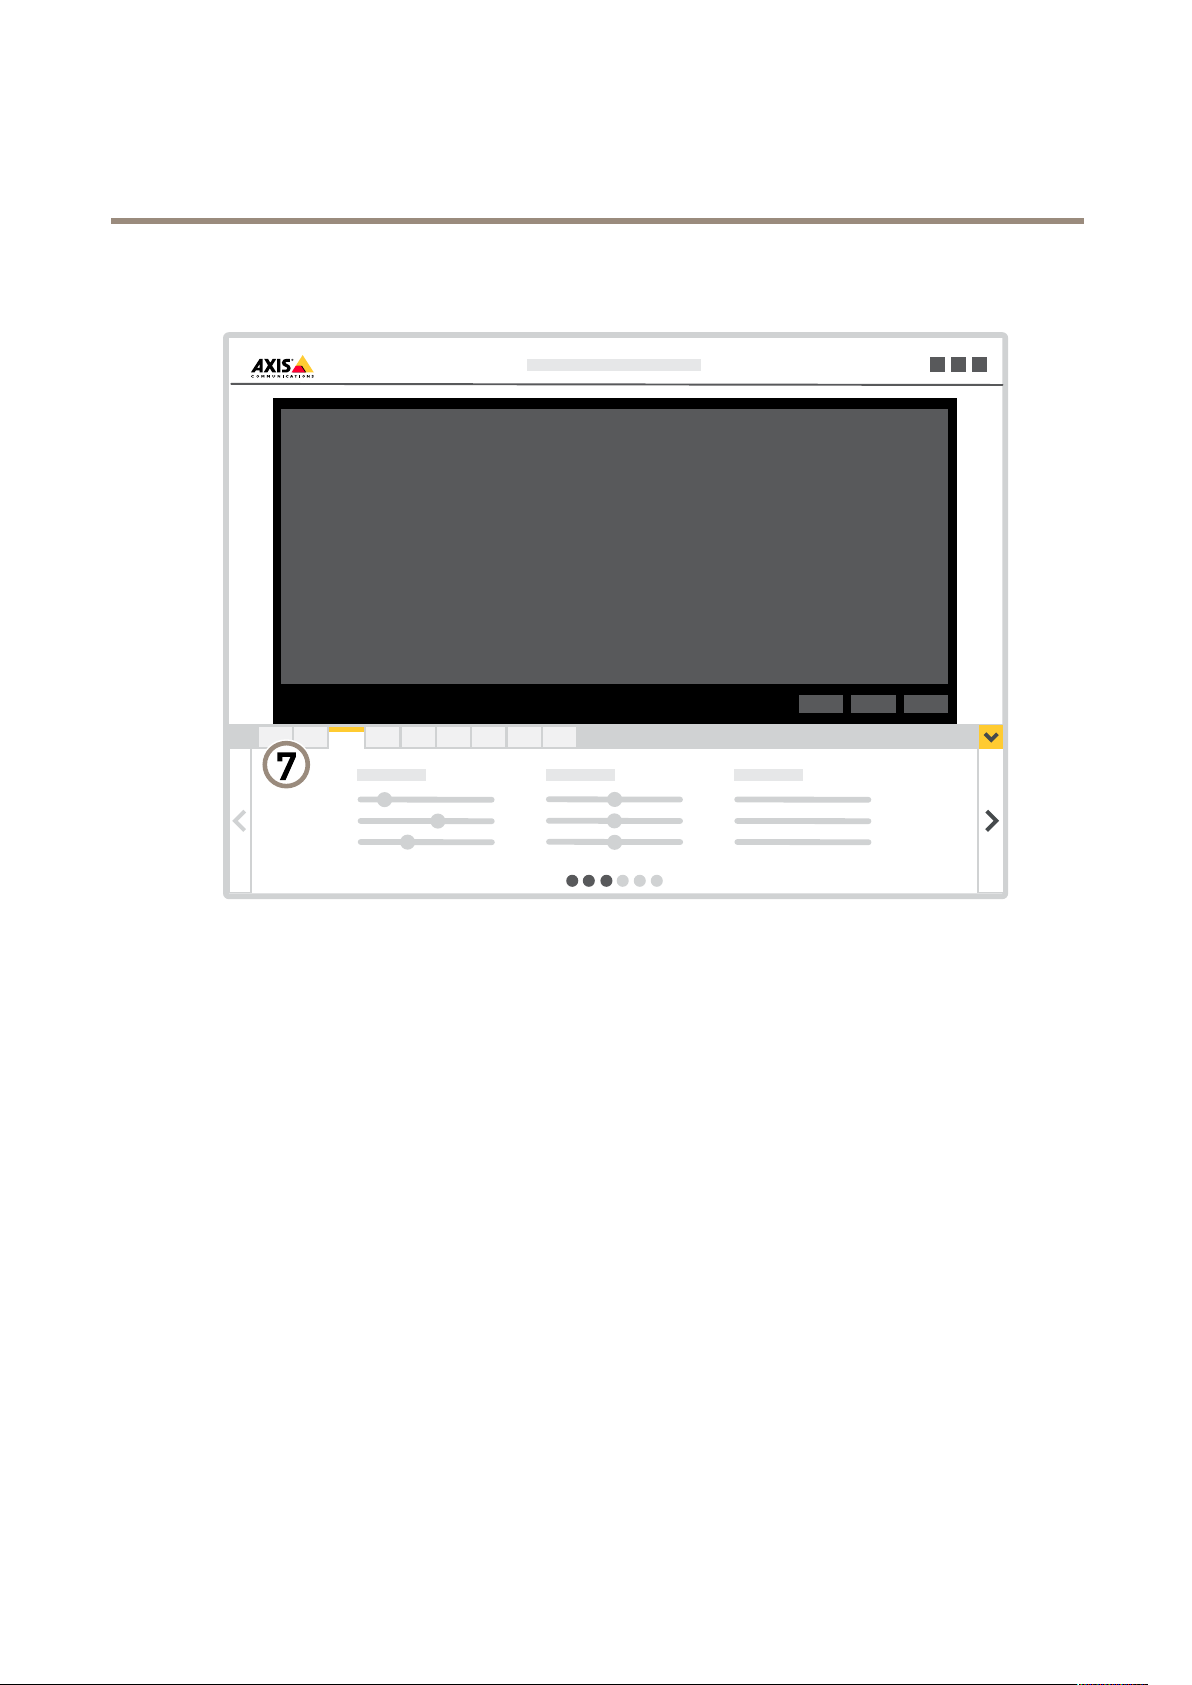
Webpageoverview
1
Liveviewcontrolbar
2
Liveview
3
Productname
4
Userinformation,colorthemes,andhelp
5
Videocontrolbar
6
Settingstoggle
4
Page 5
AXISP3715-PLVENetworkCamera
Getstarted
7
Settingstabs
5
Page 6

AXISP3715-PLVENetworkCamera
Additionalsettings
Additionalsettings
Adjusttheimage
Ifyouwanttoknowmoreaboutdifferentimagesettings,seeLearnmoreonpage16.
Levelthecamera
Toadjusttheviewinrelationtoareferenceareaorobject,usethelevelingguideincombinationwithamechanicaladjustment
ofthecamera.
1.GotoSettings>System>Orientationandclick
2.Adjustthecameramechanicallyuntilthepositionofthereferenceareaorobject,isalignedwiththelevelingguide.
.
Adjustthezoomandfocus
Toadjustthezoom:
1.GotoSettings>Image>Zoomandusetheslidertoadjustthezoom.
Toadjustthefocus:
1.GotoSettings>Image>FocusandclickShowAFarea.
2.Adjusttheautofocusareatocoverthepartoftheimagethatyouwanttobeinfocus.
Ifyoudon’tselectanautofocusarea,thecamerafocusesontheentirescene.Werecommendthatyoufocusona
staticobject.
3.ClickAutofocus.
4.Tonetunethefocus,usethefocusslider.
Selectexposuremode
Therearedifferentexposuremodeoptionsinthecamerathatadjustsaperture,shutterspeed,andgaintoimproveimagequalityfor
specicsurveillancescenes.GotoSettings>Image>Exposureandselectbetweenthefollowingexposuremodes:
•Formostusecases,selectAutomaticexposure.
OptimizeIRillumination
Dependingontheinstallationenvironmentandtheconditionsaroundthecamera,forexampleexternallightsourcesinthescene,
youcansometimesimprovetheIRilluminationifyoumanuallyadjusttheintensityoftheLED’s.
1.GotoSettings>Image>Dayandnight,andturnonAllowillumination.
2.TurnonLiveviewcontrol.
3.MinimizeSettings.
4.Intheliveviewcontrolbar,clicktheIlluminationbutton,turnonIRlightandselectManual.
5.Adjusttheintensity.
6
Page 7

AXISP3715-PLVENetworkCamera
Additionalsettings
BenetfromIRlightinlow-lightconditionsusingnightmode
Yourcamerausesvisiblelighttodelivercolorimagesduringtheday.Astheavailablelightdiminishes,youcansetthecamerato
automaticallyshifttonightmode,inwhichthecamerausesbothvisiblelightandnear-infraredlighttodeliverblack-and-white
images.Sincethecamerausesmoreoftheavailablelightitcandeliverbrighter,moredetailed,images.
1.GotoSettings>Image>Dayandnight,andmakesurethattheIRcutlterissettoAuto.
2.Todetermineatwhatlightlevelyouwantthecameratoshifttonightmode,movetheThresholdslidertowardBright
orDark.
3.EnableAllowIRilluminationandSynchronizeIRilluminationtousethecamera’sIRlightwhennightmodeisactivated.
Note
Ifyousettheshifttonightmodetooccurwhenit’sbrighter,theimageremainssharperastherewillbelesslow-light
noise.Ifyousettheshifttooccurwhenit’sdarker,theimagecolorsaremaintainedforlonger,buttherewillbemore
imageblurduetolow-lightnoise.
Reducenoiseinlow-lightconditions
Toreducenoiseinlow-lightconditions,youcanadjustoneormoreofthefollowingsettings:
•Adjustthetrade-offbetweennoiseandmotionblur.GotoSettings>Image>ExposureandmovetheBlur-noise
trade-offslidertowardLownoise.
•Settheexposuremodetoautomatic.
Note
Ahighmaxshuttervaluecanresultinmotionblur.
•Toslowdowntheshutterspeed,setmaxshuttertothehighestpossiblevalue.
•Reducesharpnessintheimage.
Note
Whenyoureducethemaxgain,theimagecanbecomedarker.
•Setthemaxgaintoalowervalue.
•Opentheaperture.
Reducemotionblurinlow-lightconditions
Toreducemotionblurinlow-lightconditions,adjustoneormoreofthefollowingsettingsinSettings>Image>Exposure:
•MovetheBlur-noisetrade-offslidertowardLowmotionblur.
Note
Whenyouincreasethegain,imagenoisealsoincreases.
•SetMaxshuttertoashortertime,andMaxgaintoahighervalue.
Ifyoustillhaveproblemswithmotionblur:
•Increasethelightlevelinthescene.
•Mountthecamerasothatobjectsmovetowarditorawayfromitratherthansideways.
7
Page 8
AXISP3715-PLVENetworkCamera
Additionalsettings
Maximizedetailsinanimage
Important
Ifyoumaximizedetailsinanimage,thebitratewillprobablyincreaseandyoumightgetareducedframerate.
•Setthecompressionaslowaspossible.
•SelectMJPEGstreaming.
•TurnoffZipstreamfunctionality.
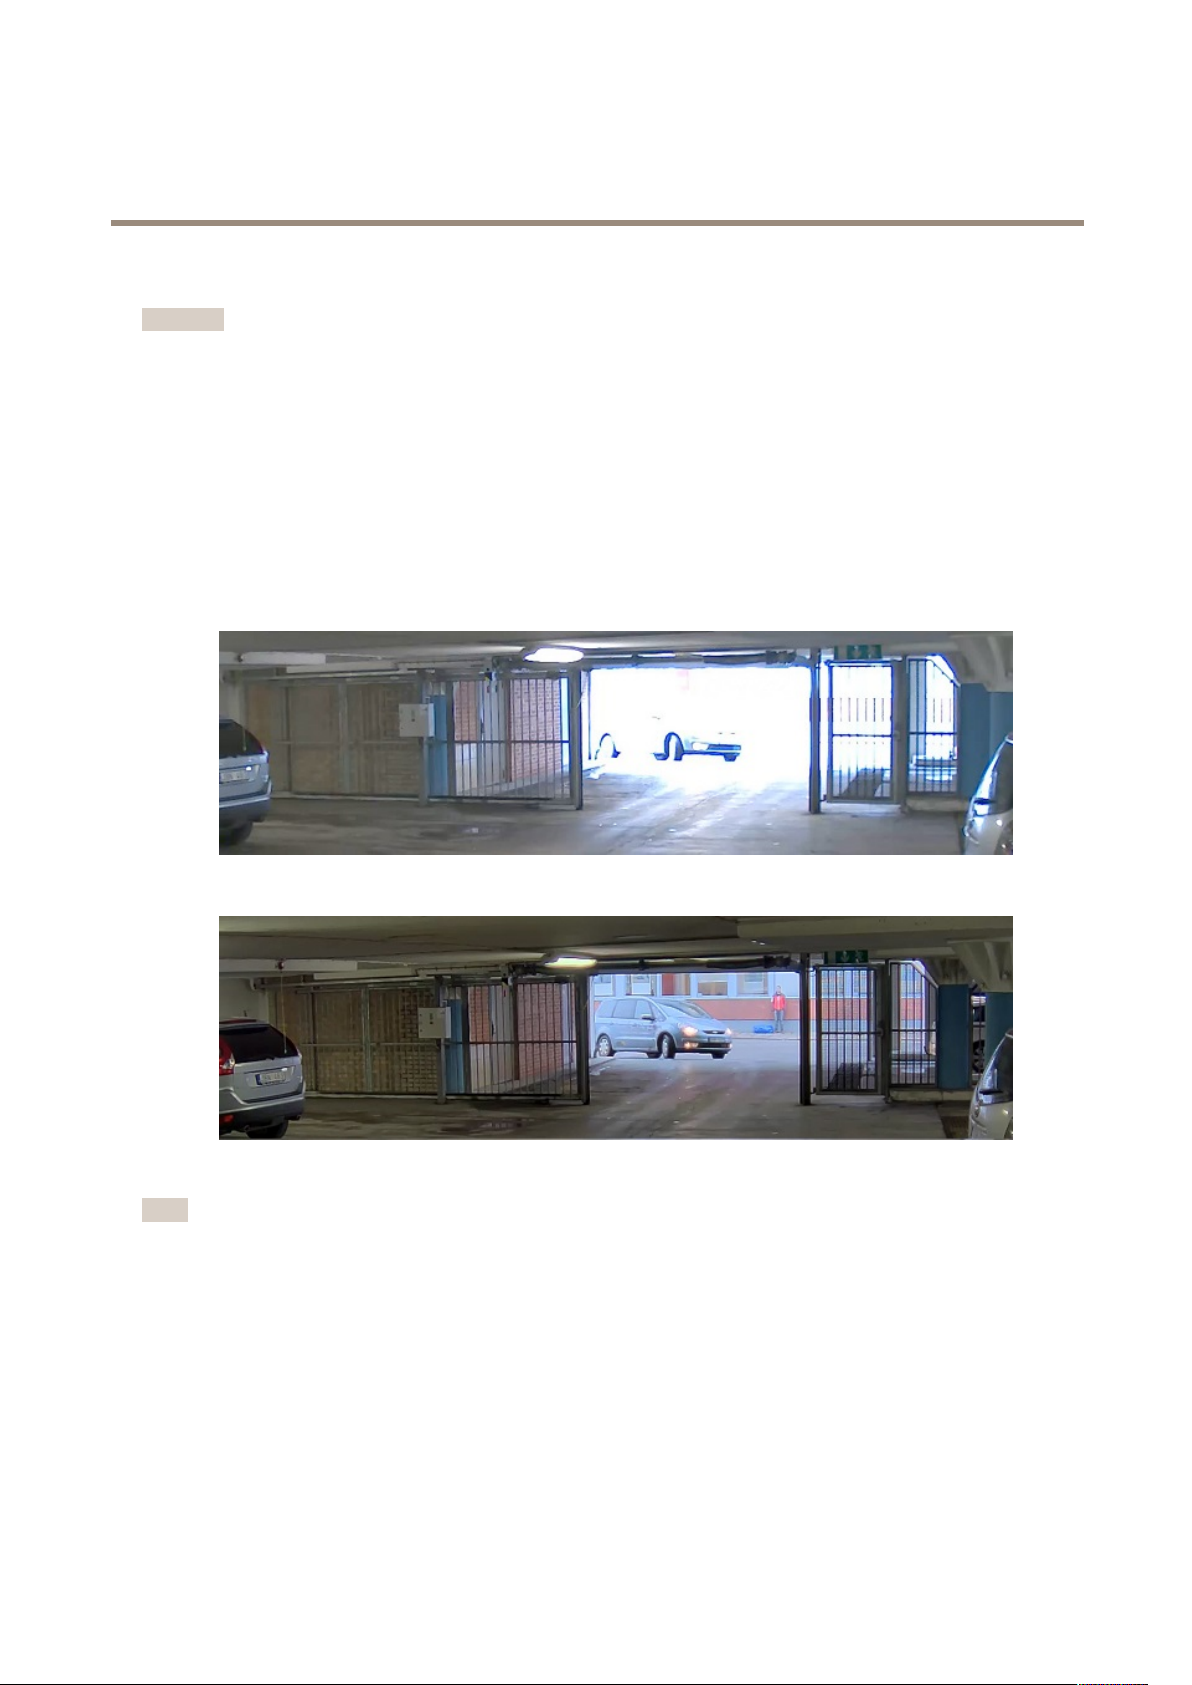
Handlesceneswithstrongbacklight
Dynamicrangeisthedifferenceinlightlevelsinanimage.Insomecasesthedifferencebetweenthedarkestandthebrightest
areascanbesignicant.Theresultisoftenanimagewhereeitherthedarkorthebrightareasarevisible.Widedynamicrange
(WDR)makesbothdarkandbrightareasoftheimagevisible.
ImagewithoutWDR.
ImagewithWDR.
Note
WDRmightcauseartifactsintheimage.
1.GotoSettings>Image>Widedynamicrange.
2.TurnonWDR.
3.UsetheLocalcontrastslidertoadjusttheamountofWDR.
4.Ifyoustillhaveproblems,gotoExposureandadjusttheExposurezonetocovertheareaofinterest.
FindoutmoreaboutWDRandhowtouseitataxis.com/web-articles/wdr.
8
Page 9

AXISP3715-PLVENetworkCamera
Additionalsettings
Monitorlongandnarrowareas
Usecorridorformattobetterutilizethefulleldofviewinalongandnarrowarea,forexampleastaircase,hallway,road,ortunnel.
1.Dependingonyourdevice,turnthecameraorthe3-axislensinthecamera90°or270°.
Note
MakesuretoaimIRLEDsawayfromwallsorweathershields.
2.Ifthedevicedoesn’thaveautomaticrotationoftheview,logintothewebpageandgotoSettings>System>Orientation.
3.Click
4.Rotatetheview90°or270°.
Findoutmoreataxis.com/axis-corridor-format.
.
Improvefacialrecognition
Tobetterrecognizethefaceofapersonpassingbythecamera,youcansettheoptimalpixelresolutionwiththecamera’spixel
counter.
1.GotoSettings>System>Orientationandclick.
9
Page 10

AXISP3715-PLVENetworkCamera
Additionalsettings
2.Inthecamera’sliveview,adjustthesizeandplacementoftherectanglearoundtheareaofinterest,forexample,where
thefacesofpassingpersonsareexpectedtoappear.Youcanthenseethenumberofpixelsrepresentedbythesidesof
therectangle.
Note
Youcanuseanobjectofaknownsizeintheviewasareferencetodecidehowmuchresolutionisneededforrecognition.
Improvelicenseplaterecognition
Tobetterrecognizethelicenseplateofacarpassingbythecamera,youcanapplyandadjustanumberofthings.
Oneoptionistousethepixelcounterinyourcameratosettheoptimalpixelresolution:
1.GotoSettings>System>Orientationandclick
2.Adjustthesizeandplacementoftherectangleinthecamera’sliveviewaroundtheareaofinterest,forexample
wherethelicenseplatesofpassingcarsareexpectedtoappear.Youcanthenseethenumberofpixelsrepresentedby
thesidesoftherectangle.
Note
Youcanuseanobjectofaknownsizeintheviewasareferencetodecidehowmuchresolutionisneededforrecognition.
Inaddition,youcantrytoadjustthefollowingtooptimizelicenseplaterecognition:
•Shutterspeed
•Gain
•Zoom
.
Hidepartsoftheimagewithprivacymasks
Youcancreateoneorseveralprivacymaskstohidepartsoftheimage.
1.GotoSettings>Privacymask.
2.ClickNew.
3.Adjustthesize,color,andnameoftheprivacymaskaccordingtoyourneeds.
Showanimageoverlay
Toaddanimageasanoverlayinthevideostream:
1.GotoSettings>Overlay.
2.ClickCreateoverlay.
3.SelectImageandclickOk.
4.SelectImportanduploadanimage.
5.Selecttheimagefromthedrop-downlist.
6.Topositiontheimageoverlay,chooseCustomoroneofthepresets.
Showatextoverlayinthevideostreamwhenthedevicedetectsmotion
Thisexampleexplainshowtodisplaythetext“Motiondetected”whenthedevicedetectsmotion:
MakesurethatAXISVideoMotionDetectionisrunning:
10
Page 11

AXISP3715-PLVENetworkCamera
Additionalsettings
1.GotoSettings>Apps>AXISVideoMotionDetection.
2.Starttheapplicationifitisnotalreadyrunning.
3.Makesureyouhavesetuptheapplicationaccordingtoyourneeds.
Addtheoverlaytext:
4.GotoSettings>Overlay.
5.SelectCreateoverlayandselectTextoverlay.
6.Enter#Dinthetexteld.
7.Choosetextsizeandappearance.
8.Topositionthetextoverlay,chooseCustomoroneofthepresets.
Createarule:
9.GotoSystem>Events>Rulesandaddarule.
10.Typeanamefortherule.
11.Inthelistofconditions,selectAXISVideoMotionDetection.
12.Inthelistofactions,selectUseoverlaytext.
13.Selectaviewarea.
14.Type“Motiondetected”.
15.Settheduration.
16.ClickSave.
Note
Ifyouupdatetheoverlaytextitwillbeautomaticallyupdatedonallvideostreamsdynamically.
Viewandrecordvideo
Tolearnmoreaboutsettingsforviewingandrecordingvideo,seeStreamingandstorageonpage17.
Reducebandwidthandstorage
Important
Ifyoureducethebandwidthitcanresultinlossofdetailsinthepicture.
1.GotoliveviewandselectH.264.
2.GotoSettings>Stream.
3.Dooneormoreofthefollowing:
-TurnontheZipstreamfunctionalityandselectthedesiredlevel.
-TurnondynamicGOPandsetahighGOPlengthvalue.
-Increasethecompression.
-TurnondynamicFPS.
11
Page 12

AXISP3715-PLVENetworkCamera
Additionalsettings
Setupnetworkstorage
Tostorerecordingsonthenetwork,youneedtosetupnetworkstorage:
1.GotoSettings>System>Storage.
2.ClickSetupunderNetworkstorage.
3.EntertheIPaddressofthehostserver .
4.Enterthenameofthesharedlocationonthehostserver.
5.Movetheswitchifthesharerequiresalogin,andenterusernameandpassword.
6.ClickConnect.
Recordandwatchvideo
Torecordvideoyoumustrstsetupnetworkstorage,seeSetupnetworkstorageonpage12,orhaveanSDcardinstalled.
Recordvideo
1.Gotothecamera’sliveview.
2.Tostartarecording,clickRecord.Clickagaintostoptherecording.
Watchvideo
1.ClickStorage>Gotorecordings.
2.Selectyourrecordinginthelistanditwillplayautomatically.
Setuprulesandalerts
Youcancreaterulestomakeyourdeviceperformanactionwhencertaineventsoccur.Aruleconsistsofconditionsandactions.
Theconditionscanbeusedtotriggertheactions.Forexample,thedevicecanstartarecordingorsendanemailwhenitdetects
motion,orshowanoverlaytextwhenitrecords.
Triggeranaction
1.GotoSettings>System>Eventstosetuparule.Theruledeneswhenthecamerawillperformcertainactions.Rules
canbesetupasscheduled,recurring,orforexample,triggeredbymotiondetection.
2.SelecttheConditionthatmustbemettotriggertheaction.Ifyouspecifymorethanoneconditionfortherule,allofthe
conditionsmustbemettotriggertheaction.
3.SelectwhichActionthecamerashouldperformwhentheconditionsaremet.
Note
Ifyoumakechangestoanactiverule,thentheruleneedstoberestartedforthechangestotakeeffect.
Recordvideowhenthecameradetectsmotion
ThisexampleexplainshowtosetupthecameratostartrecordingtotheSDcardvesecondsbeforeitdetectsmotionandto
stoponeminuteafter.
MakesurethatAXISVideoMotionDetectionisrunning:
1.GotoSettings>Apps>AXISVideoMotionDetection.
2.Starttheapplicationifitisnotalreadyrunning.
12
Page 13

AXISP3715-PLVENetworkCamera
Additionalsettings
3.Makesureyouhavesetuptheapplicationaccordingtoyourneeds.
Createarule:
1.GotoSettings>System>Eventsandaddarule.
2.Typeanamefortherule.
3.Inthelistofconditions,underApplication,selectAXISVideoMotionDetection(VMD).
4.Inthelistofactions,underRecordings,selectRecordvideowhiletheruleisactive.
5.Selectanexistingstreamproleorcreateanewone.
6.Settheprebuffertimeto5seconds.
7.Setthepostbuffertimeto60seconds.
8.Inthelistofstorageoptions,selectSDcard.
9.ClickSave.
Sendanemailautomaticallyifsomeonespraypaintsthelens
1.GotoSettings>System>Detectors.
2.TurnonTriggerondarkimages.Thiswilltriggeranalarmifthelensissprayed,covered,orrenderedseverelyoutoffocus.
3.SetadurationforTriggerafter.Thevalueindicatesthetimethatmustpassbeforeanemailissent.
Createarule:
1.GotoSettings>System>Events>Rulesandaddarule.
2.Typeanamefortherule.
3.Inthelistofconditions,selectTampering.
4.Inthelistofactions,selectSendnoticationtoemail.
5.SelectarecipientfromthelistorgotoRecipientstocreateanewrecipient.
Tocreateanewrecipient,click.Tocopyanexistingrecipient,click.
6.Typeasubjectandamessagefortheemail.
7.ClickSave.
Addaudio
Addaudiocapabilitytoyourproduct
WiththeAXIST61AudioandI/OInterfaceproducts,youcanaddaudiocapabilitytoyourproduct.Usethesetupin,forexample,
interviewrooms.YoucanplacetheAxisnetworkvideoproductonthewallorceilingtogivegoodvisualcoverage,andthe
AXIST61AudioandI/OInterfaceonorabovetheinterviewtable.
13
Page 14

AXISP3715-PLVENetworkCamera
Additionalsettings
1
Axisnetworkvideodevice
2
AXIST61AudioandI/OInterface
3
PoEswitch
InterviewroomwithAXIST61Seriessetup.
ToaddaudiocapabilitytoyourAxisnetworkvideodevice,connecttheAXIST61AudioandI/OInterfacebetweenyourdeviceand
thePoEswitchwhichprovidespower.
1.ConnecttheAxisnetworkvideodevice(1)andtheAXIST61AudioandI/OInterface(2)withaPoEcable.
2.ConnecttheAXIST61AudioandI/OInterface(2)andthePoEswitch(3)withaPoEcable.
Oncethedevicesareconnected,anaudiotabbecomesvisibleinthesettingsforyourAxisnetworkvideodevice.Gototheaudio
tabandturnonAllowaudio.
SeeT61usermanualforfurtherinstructions.
14
Page 15

AXISP3715-PLVENetworkCamera
Cleaningrecommendations
Cleaningrecommendations
NO
TICE
NO NO
TICE TICE
Neveruseharshdetergent,forexamplegasoline,benzene,oracetone.
1.Useacanofcompressedairtoremoveanydustorloosedirtfromthedevice.
2.Ifnecessary,cleanthelenswithasoftclothdampenedwithlukewarmwater.
Note
Avoidcleaningindirectsunlightoratelevatedtemperatures,asthismaycausestainswhenthewaterdropletsdry.
15
Page 16

AXISP3715-PLVENetworkCamera
Learnmore
Learnmore
Long-distanceconnections
Thisproductsupportsber-opticcableinstallationsthroughamediaconverter.Fiber-opticcableinstallationsofferanumber
ofbenetssuchas:
•Long-distanceconnection
•Highspeed
•Longlifetime
•Largecapacityofdatatransmission
•Electromagneticinterferenceimmunity
Findoutmoreaboutber-opticcableinstallationsonaxis.com/technologies/ber-optics.
ForinformationabouthowtoinstallthemediaconverterseetheInstallationGuideforthisproduct.
Viewarea
Whenyousetupaviewarea,werecommendyoutosetthevideostreamresolutiontothesamesizeasorsmallerthantheviewarea
size.Ifyousetthevideostreamresolutionlargerthantheviewareasizeitimpliesdigitallyscaledupvideoaftersensorcapture,
whichrequiresmorebandwidthwithoutaddingimageinformation.
Remotefocusandzoom
Theremotefocusandzoomfunctionalityallowsyoutomakefocusandzoomadjustmentstoyourcamerafromacomputer.Itisa
convenientwaytoensurethatthescene’sfocus,viewingangleandresolutionareoptimizedwithouthavingtovisitthecamera’s
installationlocation.
Privacymasks
Aprivacymaskisauser-denedareathatcoversapartofthemonitoredarea.Inthevideostream,privacymasksappeareitheras
blocksofsolidcolororwithamosaicpattern.
You’llseetheprivacymaskonallsnapshots,recordedvideo,andlivestreams.
YoucanusetheVAPIX®applicationprogramminginterface(API)toturnofftheprivacymasks.
Important
Ifyouusemultipleprivacymasksitmayaffecttheproduct’sperformance.
Important
Setthezoomandfocusbeforeyoucreateaprivacymask.
Note
Youcan’taddprivacymaskstothequadstream,butitwillshowallprivacymasksconguredontheindividualchannels.
Overlays
Note
Theoverlayfeatureisnotsupportedforthequadstream,onlyfortheindividualvideostreams.
16
Page 17

AXISP3715-PLVENetworkCamera
Learnmore
Overlaysaresuperimposedoverthevideostream.Theyareusedtoprovideextrainformationduringrecordings,suchasatimestamp,
orduringproductinstallationandconguration.Youcanaddeithertextoranimage.
Streamingandstorage
Videocompressionformats
Decidewhichcompressionmethodtousebasedonyourviewingrequirements,andonthepropertiesofyournetwork.The
availableoptionsare:
MotionJPEG
MotionJPEG,orMJPEG,isadigitalvideosequencethatismadeupofaseriesofindividualJPEGimages.Theseimagesarethen
displayedandupdatedataratesufcienttocreateastreamthatshowsconstantlyupdatedmotion.Fortheviewertoperceivemotion
videotheratemustbeatleast16imageframespersecond.Fullmotionvideoisperceivedat30(NTSC)or25(PAL)framespersecond.
TheMotionJPEGstreamusesconsiderableamountsofbandwidth,butprovidesexcellentimagequalityandaccesstoeveryimage
containedinthestream.
H.264orMPEG-4Part10/AVC
Note
H.264isalicensedtechnology.TheAxisproductincludesoneH.264viewingclientlicense.Toinstalladditionalunlicensed
copiesoftheclientisprohibited.Topurchaseadditionallicenses,contactyourAxisreseller.
H.264can,withoutcompromisingimagequality,reducethesizeofadigitalvideolebymorethan80%comparedtotheMotion
JPEGformatandbyasmuchas50%comparedtotheMPEG-4standard.Thismeansthatlessnetworkbandwidthandstoragespace
arerequiredforavideole.Orseenanotherway,highervideoqualitycanbeachievedforagivenbitrate.
HowdoImage,Stream,andStreamprolesettingsrelatetoeachother?
TheImagetabcontainscamerasettingsthataffectallvideostreamsfromtheproduct.Ifyouchangesomethinginthistab,it
immediatelyaffectsallvideostreamsandrecordings.
TheStreamtabcontainssettingsforvideostreams.Yougetthesesettingsifyourequestavideostreamfromtheproductanddon’t
specifyforexampleresolution,orframerate.WhenyouchangethesettingsintheStreamtab,itdoesn’taffectongoingstreams,but
itwilltakeeffectwhenyoustartanewstream.
TheStreamprolessettingsoverridethesettingsfromtheStreamtab.Ifyourequestastreamwithaspecicstreamprole,the
streamcontainsthesettingsofthatprole.Ifyourequestastreamwithoutspecifyingastreamprole,orrequestastreamprole
thatdoesn'texistintheproduct,thestreamcontainsthesettingsfromtheStreamtab.
Bitratecontrol
Withbitratecontrol,youcanmanagethebandwidthconsumptionofyourvideostream.
Variablebitrate(VBR)
Withvariablebitrate,thebandwidthconsumptionvariesbasedonthelevelofactivityinthescene.Themoreactivityinthescene,
themorebandwidthyouneed.Youareguaranteedconstantimagequalitybutitrequiresstoragemargins.
17
Page 18

AXISP3715-PLVENetworkCamera
Learnmore
Maximumbitrate(MBR)
Withmaximumbitrate,youcansetatargetbitratetohandlebitratelimitationsinyoursystem.Youmayseeadeclineinimage
qualityorframeratewhentheinstantaneousbitrateiskeptbelowthespeciedtargetbitrate.Youcanchoosetoeitherprioritize
imagequalityorframerate.Werecommendthatyoucongurethetargetbitratetoahighervaluethantheexpectedbitrate.This
givesyouamarginforadditionalcomplexitythatneedstobecaptured.
1
Targetbitrate
Averagebitrate(ABR)
Withaveragebitrate,thebitrateisautomaticallyadjustedoveralongertimescale.Thisissoyoucanmeetthespeciedtargetand
providethebestvideoqualitybasedonyouravailablestorage.Bitrateishigherinsceneswithalotofactivity,comparedtostatic
scenes.Youaremorelikelytogetbetterimagequalitywhenneededwhenusingtheaveragebitrateoption.Youcandenethetotal
storagerequiredtostorethevideostreamforaspeciedamountoftime(retentiontime)whenimagequalityisadjustedtomeetthe
speciedtargetbitrate.Specifytheaveragebitratesettingsinoneofthefollowingways:
•Tocalculatetheestimatedstorageneed,setthetargetbitrateandtheretentiontime.
•Tocalculatetheaveragebitrate,basedonavailablestorageandrequiredretentiontime,usethetargetbitratecalculator.
18
Page 19

AXISP3715-PLVENetworkCamera
kbit/s
s
1
2
kbit/s
s
1
2
Learnmore
1
Targetbitrate
2
Actualaveragebitrate
Youcanalsoturnonmaximumbitrateandspecifyatargetbitratewithintheaveragebitrateoption.
1
Targetbitrate
2
Actualaveragebitrate
Applications
AXISCameraApplicationPlatform(ACAP)isanopenplatformthatenablesthirdpartiestodevelopanalyticsandotherapplications
forAxisproducts.Tondoutmoreaboutavailableapplications,downloads,trialsandlicenses,gotoaxis.com/applications.
TondtheusermanualsforAxisapplications,gotoaxis.com.
Note
•Severalapplicationscanrunatthesametimebutsomeapplicationsmightnotbecompatiblewitheachother.Certain
combinationsofapplicationsmightrequiretoomuchprocessingpowerormemoryresourceswhenruninparallel.Verify
thattheapplicationsworktogetherbeforedeployment.
AXISPeopleCounter
AXISPeopleCounterisananalyticapplicationthatcanbeinstalledonanetworkcamera.
Thecounterisembeddedinthecamerawhichmeansyoudonotneedadedicatedcomputertoruntheapplication.
AXISPeopleCounterisintendedforretailenvironments,likestoresorshoppingmalls,orotherenvironmentswhereyouwantto
countpeople.
19
Page 20

AXISP3715-PLVENetworkCamera
Learnmore
Security
TPMmodule
TheTPM(TrustedPlatformModule)isacomponentthatprovidescryptographicfeaturestoprotectinformationfromunauthorized
access.Itisalwaysactivatedandtherearenosettingsyoucanchange.
TolearnmoreaboutTPM,gotoaxis.com/press-center/media-resources/white-papers.
20
Page 21

AXISP3715-PLVENetworkCamera
Troubleshooting
Troubleshooting
Ifyoucan’tndwhatyou’relookingforhere,trythetroubleshootingsectionataxis.com/support.
Resettofactorydefaultsettings
Important
Resettofactorydefaultshouldbeusedwithcaution.Aresettofactorydefaultresetsallsettings,includingtheIPaddress,to
thefactorydefaultvalues.
Toresettheproducttothefactorydefaultsettings:
1.Disconnectpowerfromtheproduct.
2.Pressandholdthecontrolbuttonwhilereconnectingpower.SeeProductoverviewonpage25.
3.Keepthecontrolbuttonpressedfor15–30secondsuntilthestatusLEDindicatorashesamber.
4.Releasethecontrolbutton.TheprocessiscompletewhenthestatusLEDindicatorturnsgreen.Theproducthasbeenreset
tothefactorydefaultsettings.IfnoDHCPserverisavailableonthenetwork,thedefaultIPaddressis192.168.0.90.
5.UsetheinstallationandmanagementsoftwaretoolstoassignanIPaddress,setthepassword,andaccessthevideostream.
Theinstallationandmanagementsoftwaretoolsareavailablefromthesupportpagesonaxis.com/support.
6.Refocustheproduct.
Itisalsopossibletoresetparameterstofactorydefaultthroughthewebinterface.GotoSettings>System>Maintenanceand
clickDefault.
Removereectionsinimage
Dependingonthecamerasurroundings,highintensityononeorseveralIRLEDscancausereectionsintheimage.Tomitigatethis,
reducetheIRintensityoftheLEDs.
1.GotoSettings>Image.
2.TurnonAllowillumination
3.TurnonLiveviewcontrol.
4.Minimizethesettingsmenuandclick
5.TurnonIRlight.AdjusttheintensityofoneIRLEDatatime.
Note
IftheIRLEDscontinuetodisturbtheimage,orifsurroundinglightaffectstheimage,attachtheweathershieldeven
ifthecameraisinstalledindoors.
intheliveviewcontrolbar.
Firmwareoptions
Axisoffersproductrmwaremanagementaccordingtoeithertheactivetrackorthelong-termsupport(LTS)tracks.Beingonthe
activetrackmeanscontinuouslygettingaccesstoallthelatestproductfeatures,whiletheLTStracksprovideaxedplatformwith
periodicreleasesfocusedmainlyonbugxesandsecurityupdates.
Usingrmwarefromtheactivetrackisrecommendedifyouwanttoaccessthenewestfeatures,orifyouuseAxisend-to-endsystem
offerings.TheLTStracksarerecommendedifyouusethird-partyintegrations,whicharenotcontinuouslyvalidatedagainstthelatest
21
Page 22

AXISP3715-PLVENetworkCamera
Troubleshooting
activetrack.WithLTS,theproductscanmaintaincybersecuritywithoutintroducinganysignicantfunctionalchangesoraffecting
anyexistingintegrations.FormoredetailedinformationaboutAxisproductrmwarestrategy,gotoaxis.com/support/rmware.
Checkthecurrentrmware
Firmwareisthesoftwarethatdeterminesthefunctionalityofnetworkdevices.Oneofyourrstactionswhentroubleshootinga
problemshouldbetocheckthecurrentrmwareversion.Thelatestversionmaycontainacorrectionthatxesyourparticular
problem.
Tocheckthecurrentrmware:
1.Gototheproduct’swebpage.
2.Clickonthehelpmenu
3.ClickAbout.
.
Upgradethermware
Important
Preconguredandcustomizedsettingsaresavedwhenthermwareisupgraded(providedthatthefeaturesareavailablein
thenewrmware)althoughthisisnotguaranteedbyAxisCommunicationsAB.
Important
Makesuretheproductremainsconnectedtothepowersourcethroughouttheupgradeprocess.
Note
Whenyouupgradetheproductwiththelatestrmwareintheactivetrack,theproductreceivesthelatestfunctionality
available.Alwaysreadtheupgradeinstructionsandreleasenotesavailablewitheachnewreleasebeforeupgradingthe
rmware.Tondthelatestrmwareandthereleasenotes,gotoaxis.com/support/rmware.
1.Downloadthermwareletoyourcomputer,availablefreeofchargeataxis.com/support/rmware.
2.Logintotheproductasanadministrator.
3.GotoSettings>System>Maintenance.Followtheinstructionsonthepage.Whentheupgradehasnished,the
productrestartsautomatically.
AXISDeviceManagercanbeusedformultipleupgrades.Findoutmoreataxis.com/products/axis-device-manager.
Technicalissues,cluesandsolutions
Ifyoucan’tndwhatyou’relookingforhere,trythetroubleshootingsectionataxis.com/support.
Problemsupgradingthermware
FirmwareupgradefailureIfthermwareupgradefails,thedevicereloadsthepreviousrmware.Themostcommonreason
Problemsafterrmware
upgrade
isthatthewrongrmwarelehasbeenuploaded.Checkthatthenameofthermwarele
correspondstoyourdeviceandtryagain.
Ifyouexperienceproblemsafterarmwareupgrade,rollbacktothepreviouslyinstalledversion
fromtheMaintenancepage.
22
Page 23

AXISP3715-PLVENetworkCamera
Troubleshooting
ProblemssettingtheIPaddress
Thedeviceislocatedona
differentsubnet
TheIPaddressisbeingused
byanotherdevice
PossibleIPaddressconict
withanotherdeviceonthe
samesubnet
Thedevicecannotbeaccessedfromabrowser
Cannotlogin
IftheIPaddressintendedforthedeviceandtheIPaddressofthecomputerusedtoaccessthe
devicearelocatedondifferentsubnets,youcannotsettheIPaddress.Contactyournetwork
administratortoobtainanIPaddress.
DisconnecttheAxisdevicefromthenetwork.Runthepingcommand(inaCommand/DOSwindow,
typepingandtheIPaddressofthedevice):
•Ifyoureceive:Replyfrom<IPaddress>:bytes=32;time=10...
thismeansthattheIPaddressmayalreadybeinusebyanotherdeviceonthenetwork.
ObtainanewIPaddressfromthenetworkadministratorandreinstallthedevice.
•Ifyoureceive:Requesttimedout,thismeansthattheIPaddressisavailable
forusewiththeAxisdevice.Checkallcablingandreinstallthedevice.
ThestaticIPaddressintheAxisdeviceisusedbeforetheDHCPserversetsadynamicaddress.
ThismeansthatifthesamedefaultstaticIPaddressisalsousedbyanotherdevice,theremay
beproblemsaccessingthedevice.
WhenHTTPSisenabled,ensurethatthecorrectprotocol(HTTPorHTTPS)isusedwhenattempting
tologin.Youmayneedtomanuallytypehttporhttpsinthebrowser’saddresseld.
Ifthepasswordfortheuserrootislost,thedevicemustberesettothefactorydefaultsettings.
SeeResettofactorydefaultsettingsonpage21.
TheIPaddresshasbeen
changedbyDHCP
Thedeviceisaccessiblelocallybutnotexternally
Toaccessthedeviceexternally,werecommendusingoneofthefollowingapplicationsforWindows
•AXISCompanion:freeofcharge,idealforsmallsystemswithbasicsurveillanceneeds.
•AXISCameraStation:30-daytrialversionfreeofcharge,idealforsmalltomid-sizesystems.
Forinstructionsanddownload,gotoaxis.com/vms.
Problemswithstreaming
MulticastH.264only
accessiblebylocalclients
NomulticastH.264
displayedintheclient
PoorrenderingofH.264
images
Colorsaturationisdifferent
inH.264andMotionJPEG
Lowerframeratethan
expected
IPaddressesobtainedfromaDHCPserveraredynamicandmaychange.IftheIPaddresshasbeen
changed,useAXISIPUtilityorAXISDeviceManagertolocatethedeviceonthenetwork.Identify
thedeviceusingitsmodelorserialnumber,orbytheDNSname(ifthenamehasbeencongured).
Ifrequired,astaticIPaddresscanbeassignedmanually.Forinstructions,gotoaxis.com/support.
Checkifyourroutersupportsmulticasting,oriftheroutersettingsbetweentheclientandthe
deviceneedtobecongured.TheTTL(TimeToLive)valuemayneedtobeincreased.
CheckwithyournetworkadministratorthatthemulticastaddressesusedbytheAxisdevice
arevalidforyournetwork.
Checkwithyournetworkadministratortoseeifthereisarewallpreventingviewing.
Ensurethatyourgraphicscardisusingthelatestdriver .Thelatestdriverscanusuallybe
downloadedfromthemanufacturer’swebsite.
Modifythesettingsforyourgraphicsadapter.Gototheadapter’sdocumentationformore
information.
•SeePerformanceconsiderationsonpage24.
•Reducethenumberofapplicationsrunningontheclientcomputer.
•Limitthenumberofsimultaneousviewers.
•Checkwiththenetworkadministratorthatthereisenoughbandwidthavailable.
•Lowertheimageresolution.
®
:
23
Page 24

AXISP3715-PLVENetworkCamera
Troubleshooting
Performanceconsiderations
Whensettingupyoursystem,itisimportanttoconsiderhowvarioussettingsandsituationsaffecttheperformance.Somefactors
affecttheamountofbandwidth(thebitrate)required,otherscanaffecttheframerate,andsomeaffectboth.Iftheloadonthe
CPUreachesitsmaximum,thisalsoaffectstheframerate.
Thefollowingfactorsarethemostimportanttoconsider:
•Highimageresolutionorlowercompressionlevelsresultinimagescontainingmoredatawhichinturnaffectsthe
bandwidth.
•RotatingtheimageintheGUIwillincreasetheproduct'sCPUload.
•AccessbylargenumbersofMotionJPEGorunicastH.264clientsaffectsthebandwidth.
•Simultaneousviewingofdifferentstreams(resolution,compression)bydifferentclientsaffectsbothframerateand
bandwidth.
Useidenticalstreamswhereverpossibletomaintainahighframerate.Streamprolescanbeusedtoensurethat
streamsareidentical.
•AccessingMotionJPEGandH.264videostreamssimultaneouslyaffectsbothframerateandbandwidth.
•Heavyusageofeventsettingsaffectstheproduct’sCPUloadwhichinturnaffectstheframerate.
•UsingHTTPSmayreduceframerate,inparticularifstreamingMotionJPEG.
•Heavynetworkutilizationduetopoorinfrastructureaffectsthebandwidth.
•Viewingonpoorlyperformingclientcomputerslowersperceivedperformanceandaffectsframerate.
•RunningmultipleAXISCameraApplicationPlatform(ACAP)applicationssimultaneouslymayaffecttheframerateand
thegeneralperformance.
Needmorehelp?
Usefullinks
•HowtoassignanIPaddressandaccessyourdevice
Contactsupport
Contactsupportataxis.com/support.
24
Page 25

AXISP3715-PLVENetworkCamera
Specifications
Specifications
Tondthelatestversionoftheproduct’sdatasheet,gototheproductpageataxis.comandlocateSupport&Documentation.
Productoverview
LEDindicators
StatusLED
Unlit
GreenShowssteadygreenfor10secondsfornormaloperationafterstartupcompleted.
Amber
Amber/RedFlashesamber/redifnetworkconnectionisunavailableorlost.
Indication
Connectionandnormaloperation.
Steadyduringstartup.Flashesduringrmwareupgradeorresettofactorydefault.
SDcardslot
NO
TICE
NO NO
TICE TICE
•RiskofdamagetoSDcard.Donotusesharptools,metalobjects,orexcessiveforcewheninsertingorremovingthe
SDcard.Useyourngerstoinsertandremovethecard.
•Riskofdatalossandcorruptedrecordings.DonotremovetheSDcardwhiletheproductisrunning.UnmounttheSDcard
fromtheproduct’swebpagebeforeremoval.
ThisproductsupportsSD/SDHC/SDXCcards.
ForSDcardrecommendations,seeaxis.com.
trademarksofSD-3C,LLCintheUnitedStates,othercountriesorboth.
SD,SDHC,andSDXCLogosaretrademarksofSD-3CLLC.SD,SDHCandSDXCaretrademarksorregistered
Buttons
Controlbutton
Thecontrolbuttonisusedfor:
•Resettingtheproducttofactorydefaultsettings.SeeResettofactorydefaultsettingsonpage21.
Intrusionalarmswitch
Usetheintrusionalarmswitchtogetanoticationwhensomeoneopensthedevice’shousing.Setupanactionrule,forexample
recordingornotication,toperformanactionwhentheswitchisactivated.See.
Connectors
Networkconnector
RJ45EthernetconnectorwithPoweroverEthernet(PoE).
25
Page 26

UserManualVer.M2.2
AXISP3715-PLVENetworkCamera
©AxisCommunicationsAB,2020
Date:March2020
PartNo.T10148459
 Loading...