

Page 1

AXISQ3517-SLVENetworkCamera
InstallationGuide
Page 2

Page 3

English
EN
France:Français
Deutschland:Deutsch
Italia:Italiano
España:Español
日本:日本語
中文:简体中文
FR
DE
IT
ES
JA
ZH
Page 4

Readthisrst
ReadthroughthisInstallationGuidecarefullybefore
installingtheproduct.KeeptheInstallationGuidefor
futurereference.
Legalconsiderations
Videoandaudiosurveillancecanberegulatedbylawsthat
varyfromcountrytocountry.Checkthelawsinyourlocal
regionbeforeusingthisproductforsurveillancepurposes.
Thisproductincludesthefollowinglicences:
•one(1)AACdecoderlicense
•one(1)H.264decoderlicense
Topurchasefurtherlicenses,contactyourreseller.
Liability
Everycarehasbeentakeninthepreparationofthis
document.PleaseinformyourlocalAxisofceofany
inaccuraciesoromissions.AxisCommunicationsABcannot
beheldresponsibleforanytechnicalortypographicalerrors
andreservestherighttomakechangestotheproductand
manualswithoutpriornotice.AxisCommunicationsAB
makesnowarrantyofanykindwithregardtothematerial
containedwithinthisdocument,including,butnotlimited
to,theimpliedwarrantiesofmerchantabilityandtnessfor
aparticularpurpose.AxisCommunicationsABshallnot
beliablenorresponsibleforincidentalorconsequential
damagesinconnectionwiththefurnishing,performance
oruseofthismaterial.Thisproductisonlytobeusedfor
itsintendedpurpose.
Intellectualpropertyrights
AxisABhasintellectualpropertyrightsrelatingto
technologyembodiedintheproductdescribedinthis
document.Inparticular,andwithoutlimitation,these
intellectualpropertyrightsmayincludeoneormoreof
thepatentslistedataxis.com/patent.htmandoneormore
additionalpatentsorpendingpatentapplicationsinthe
USandothercountries.
Thisproductcontainslicensedthird-partysoftware.See
themenuitem“About”intheproduct’suserinterfacefor
moreinformation.
ThisproductcontainssourcecodecopyrightApple
Computer,Inc.,underthetermsofApplePublicSource
License2.0(seeopensource.apple.com/apsl).Thesource
codeisavailablefromdeveloper.apple.com/bonjour/
Equipmentmodications
Thisequipmentmustbeinstalledandusedin
strictaccordancewiththeinstructionsgiveninthe
userdocumentation.Thisequipmentcontainsno
user-serviceablecomponents.Unauthorizedequipment
changesormodicationswillinvalidateallapplicable
regulatorycerticationsandapprovals.
Trademarkacknowledgements
AXISCOMMUNICATIONS,AXISandVAPIXareregistered
trademarksortrademarkapplicationsofAxisABinvarious
jurisdictions.Allothercompanynamesandproductsare
trademarksorregisteredtrademarksoftheirrespective
companies.
Apple,Apache,Bonjour,Ethernet,InternetExplorer,
Linux,Microsoft,Mozilla,Real,SMPTE,QuickTime,UNIX,
Windows,andWWWareregisteredtrademarksofthe
respectiveholders.JavaandallJava-basedtrademarksand
logosaretrademarksorregisteredtrademarksofOracle
and/oritsafliates.TheUPnPWordMarkandUPnPLogo
aretrademarksofOpenConnectivityFoundation,Inc.in
theUnitedStatesorothercountries.
SD,SDHCandSDXCaretrademarksorregisteredtrademarks
ofSD-3C,LLCintheUnitedStates,othercountriesorboth.
Also,miniSD,microSD,miniSDHC,microSDHC,microSDXC
arealltrademarksorregisteredtrademarksofSD-3C,LLC
intheUnitedStates,othercountriesorboth.
Regulatoryinformation
Europe
ThisproductcomplieswiththeapplicableCEmarking
directivesandharmonizedstandards:
•ElectromagneticCompatibility(EMC)Directive
2014/30/EU.SeeElectromagneticcompatibility(EMC)
4.
•LowVoltageDirective(LVD)2014/35/EU.SeeSafety5.
•RestrictionsofHazardousSubstances(RoHS)Directive
201 1/65/EU.SeeDisposalandrecycling5.
Acopyoftheoriginaldeclarationofconformitymaybe
obtainedfromAxisCommunicationsAB.SeeContact
information5.
Electromagneticcompatibility(EMC)
Thisequipmenthasbeendesignedandtestedtofulll
applicablestandardsfor:
•Radiofrequencyemissionwheninstalledaccordingto
theinstructionsandusedinitsintendedenvironment.
•Immunitytoelectricalandelectromagneticphenomena
wheninstalledaccordingtotheinstructionsandused
initsintendedenvironment.
USA
Thisequipmenthasbeentestedusingashieldednetwork
cable(STP)andfoundtocomplywiththelimitsfora
ClassAdigitaldevice,pursuanttopart15oftheFCCRules.
Theselimitsaredesignedtoprovidereasonableprotection
againstharmfulinterferencewhentheequipmentis
operatedinacommercialenvironment.Thisequipment
generates,uses,andcanradiateradiofrequencyenergy
and,ifnotinstalledandusedinaccordancewiththe
instructionmanual,maycauseharmfulinterferenceto
radiocommunications.Operationofthisequipmentin
aresidentialareaislikelytocauseharmfulinterference
inwhichcasetheuserwillberequiredtocorrectthe
interferenceathisownexpense.Theproductshallbe
connectedusingashieldednetworkcable(STP)thatis
properlygrounded.
Canada
ThisdigitalapparatuscomplieswithCANICES-3(ClassA).
Theproductshallbeconnectedusingashieldednetwork
cable(STP)thatisproperlygrounded.Cetappareil
numériqueestconformeàlanormeCANNMB-3(classeA).
Leproduitdoitêtreconnectéàl'aided'uncâbleréseau
blindé(STP)quiestcorrectementmisàlaterre.
Europe
ThisdigitalequipmentfulllstherequirementsforRF
emissionaccordingtotheClassAlimitofEN55032.The
productshallbeconnectedusingashieldednetworkcable
(STP)thatisproperlygrounded.Notice!ThisisaClassA
product.Inadomesticenvironmentthisproductmaycause
RFinterference,inwhichcasetheusermayberequired
totakeadequatemeasures.
Australia/NewZealand
ThisdigitalequipmentfulllstherequirementsforRF
emissionaccordingtotheClassAlimitofAS/NZSCISPR32.
Theproductshallbeconnectedusingashieldednetwork
cable(STP)thatisproperlygrounded.Notice!Thisisa
ClassAproduct.Inadomesticenvironmentthisproduct
Page 5
maycauseRFinterference,inwhichcasetheusermaybe
requiredtotakeadequatemeasures.
Japan
この装置は、クラスA情報技術装置です。この装
置を家庭環境で使⽤すると電波妨害を引き起こす
ことがあります。この場合には使⽤者が適切な対
策を講ずるよう要求されることがあります。本
製品は、シールドネットワークケーブル(STP)を
使⽤して接続してください。また適切に接地し
てください。
Korea
이기기는업무용환경에서사용할목적으로적합
성평가를받은기기로서가정용환경에서사용하
는경우전파간섭의우려가있습니다.적절히접지
된STP(shieldedtwistedpair)케이블을사용하여
제품을연결하십시오.
Safety
ThisproductcomplieswithIEC/EN/UL62368-1,safetyof
audio/videoandITequipment,andIEC/EN/UL60950-22,
SafetyofInformationTechnologyEquipment.
Theproductshallbegroundedeitherthroughashielded
networkcable(STP)orotherappropriatemethod.
Thepowersupplyusedwiththisproductshallhavearated
outputvoltagewithinvoltagerangeof8-28VDC,anda
maxcurrentratingof3.5A.
WhenusedwithPoweroverEthernet(PoE),thePower
SourcingEquipment(PSE)shallcomplywithIEEE802.3af
andLimitedPowerSource(LPS)accordingtoclause2.5of
IEC/EN/UL60950-1orannexQofIEC/EN/UL62368-1.
WerecommendtheuseofAxismidspansorAxisPoE
switches.
Photobiologicalsafety
Thisproductfulllstherequirementsforphotobiological
safetyaccordingtoIEC/EN62471(riskgroup1).
Disposalandrecycling
Whenthisproducthasreachedtheendofitsusefullife,
disposeofitaccordingtolocallawsandregulations.For
informationaboutyournearestdesignatedcollectionpoint,
contactyourlocalauthorityresponsibleforwastedisposal.
Inaccordancewithlocallegislation,penaltiesmaybe
applicableforincorrectdisposalofthiswaste.
Europe
Thissymbolmeansthattheproductshallnotbe
disposedoftogetherwithhouseholdorcommercialwaste.
Directive2012/19/EUonwasteelectricalandelectronic
equipment(WEEE)isapplicableintheEuropeanUnion
memberstates.Topreventpotentialharmtohumanhealth
andtheenvironment,theproductmustbedisposedofin
anapprovedandenvironmentallysaferecyclingprocess.
Forinformationaboutyournearestdesignatedcollection
point,contactyourlocalauthorityresponsibleforwaste
disposal.Businessesshouldcontacttheproductsupplierfor
informationabouthowtodisposeofthisproductcorrectly.
Thisproductcomplieswiththerequirementsof
Directive2011/65/EUontherestrictionoftheuseof
certainhazardoussubstancesinelectricalandelectronic
equipment(RoHS).
China
有毒有害物质或元素
部
件
名
称
电
气
实
装
部
分
0:表示该有毒有害物质在该部件所有均质材料中
的含量均在GB/T26572标准规定的限量要求以下。
X:表示该有毒有害物质至少在该部件的某一均质
材料中的含量超出GB/T26572标准规定的限量要
求。
Contactinformation
AxisCommunicationsAB
Emdalavägen14
22369Lund
Sweden
Tel:+46462721800
Fax:+4646136130
axis.com
汞
铅
(Pb)
X
镉
(Hg)
(Cd)
00000
六价
多溴
铬
联苯
(Cr-
(PB-
(VI))
B)
Warrantyinformation
ForinformationaboutAxis’productwarrantyandthereto
relatedinformation,gotoaxis.com/warranty
Support
Shouldyourequireanytechnicalassistance,pleasecontact
yourAxisreseller.Ifyourquestionscannotbeanswered
immediately,yourresellerwillforwardyourqueriesthrough
theappropriatechannelstoensurearapidresponse.Ifyou
areconnectedtotheInternet,youcan:
•downloaduserdocumentationandsoftwareupdates
•ndanswerstoresolvedproblemsintheFAQdatabase,
searchbyproduct,category,orphrase
•reportproblemstoAxissupportstaffbylogginginto
yourprivatesupportarea
•chatwithAxissupportstaff
•visitAxisSupportataxis.com/support
Learnmore!
VisitAxislearningcenteraxis.com/academyforuseful
trainings,webinars,tutorialsandguides.
多溴
二苯
醚
(PBDE)
Thisproductcomplieswiththerequirementsof
SJ/T11364-2014,Markingfortherestrictionofhazardous
substancesinelectricalandelectronicproducts.
Page 6

Page 7

AXISQ3517-SLVENetworkCamera
Packagecontents
•AXISQ3517-SLVENetworkCamera
•ScrewbitTR20
•I/Oconnector
•Connectorguard
•Adhesivegasket
•Extracablegaskets
-CableGasketM205mm(forcablediameter5–10mm)
-GasketkitM203mm(forcablediameter3–5mm)
•Printedmaterials
-InstallationGuide(thisdocument)
-Drilltemplate
-Extraserialnumberlabel(2x)
-AVHSAuthenticationkey
RecommendedTools
NO
TICE
NO NO
TICE TICE
Stainlesssteeliscorrosion-resistant,butextraneousrustcanappearifthematerialis
handledincorrectly.Usestainlesstoolstoavoidruststainsorpittingcorrosion.
EN
•ScrewbitTR20(included)
7
Page 8
AXISQ3517-SLVENetworkCamera
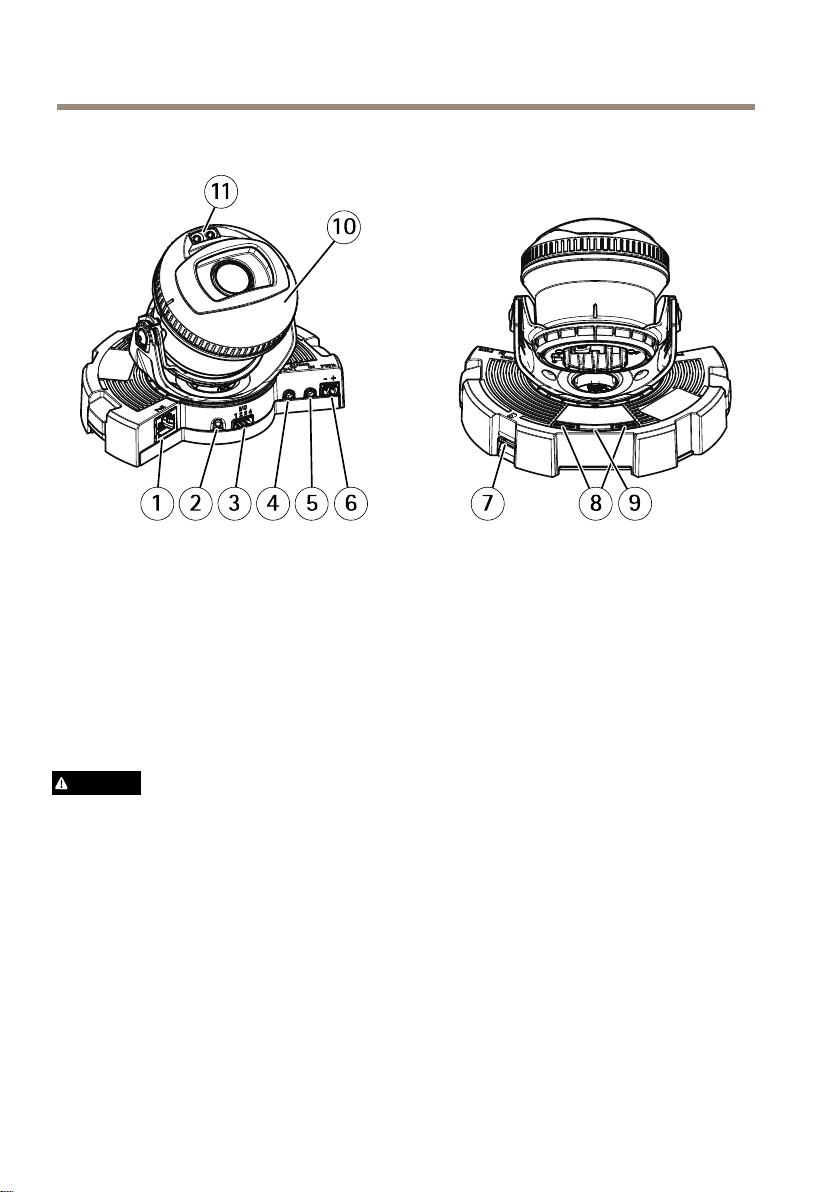
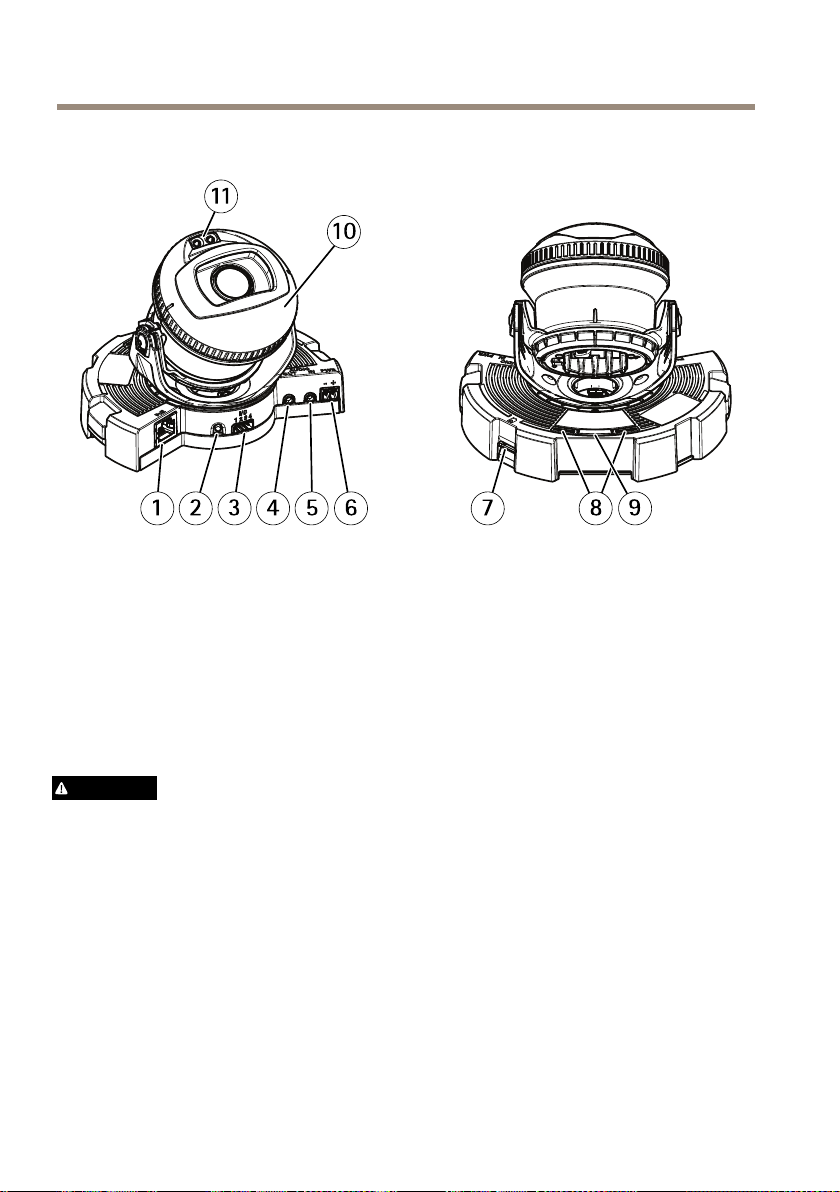
Productoverview
1
Networkconnector
2
Controlbutton
3
I/Oconnector
4
Audioout
5
Audioin
6
DCconnector
7
SDcardslot
8
StatusLED(2x)
9
Functionbutton
10
Heater
11
IRLED(2x)
CAUTION
Theheatermaybehot.
8
Page 9

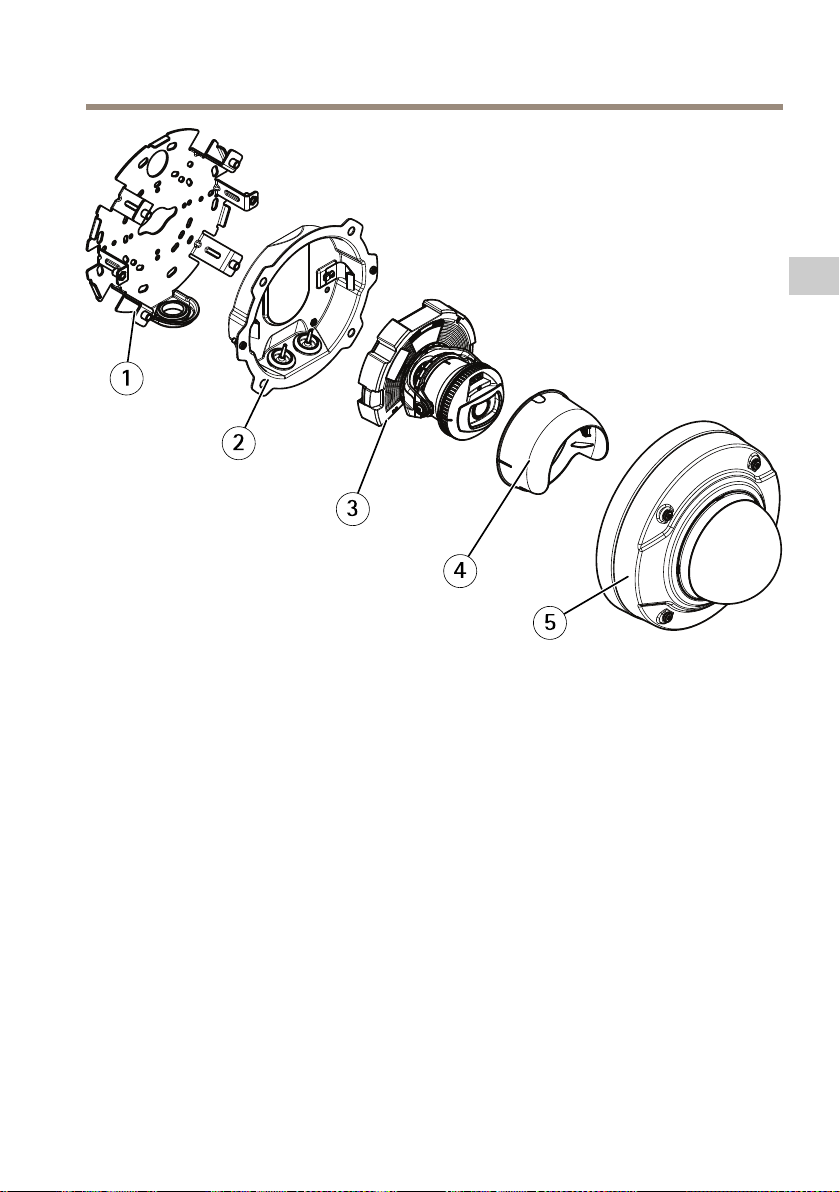
AXISQ3517-SLVENetworkCamera
EN
1
Mountingbracket
2
Unitcasing
3
Cameraunit
4
Viewprotector
5
Domecover
9
Page 10
AXISQ3517-SLVENetworkCamera
Howtoinstalltheproduct
Installthehardware
Mountingbracket
CAUTION
Becarefulofsharpmetaledges.Usecut-resistantglovesduringinstallation.
Themountingbrackethaseightholesalongtheedgethatshouldbeusedforfasteningthebracket
toawall.
Tomountthebracketonajunctionbox,therearealsoholesforthesemountingoptions:
•Standard-sizedUSdoublegangjunctionbox
•Standard-sizedUSsinglegangjunctionbox
•4"squarebox
•4"octagonbox
Dependingonwhetheryouwanttouseajunctionbox,orroutethecablesthroughoralongthe
wall,followtherelevantinstructionsbelow.
Tomountthecameraonajunctionbox:
1.Attachtheadhesivegaskettothebackofthemountingbracket.
2.Routethenetworkcable(andthemulticableifrequired)throughthejunctionboxand
throughtheholeinthemountingbracket.
3.Attachthemountingbrackettothejunctionboxwithappropriatestainlessscrews.
Toroutecablesthroughthewall:
1.Usingthedrilltemplatedrill4holesformountingthebracket,andaholeforroutingthe
cablesthroughthewall.
2.Attachtheadhesivegaskettothebackofthemountingbracket.
3.Routethenetworkcable(andthemulticableifrequired)throughthewallandthrough
theholeinthemountingbracket.
4.Attachthemountingbrackettothewallwithappropriatestainlessscrews.
10
Page 11

AXISQ3517-SLVENetworkCamera
Toroutethecablesalongthewallandthroughthesideholeonthemountingbracket:
1.Attachtheadhesivegaskettothebackofthemountingbracket.
2.Unscrewtheplugfromthesideholeonthemountingbracket.
3.Routethenetworkcable(andthemulticableifrequired)throughtheconduitand
throughtheholeinthemountingbracket.
4.Attachthemountingbrackettothewallwithappropriatestainlessscrews.
5.Attachtheconduittothemountingbracket.
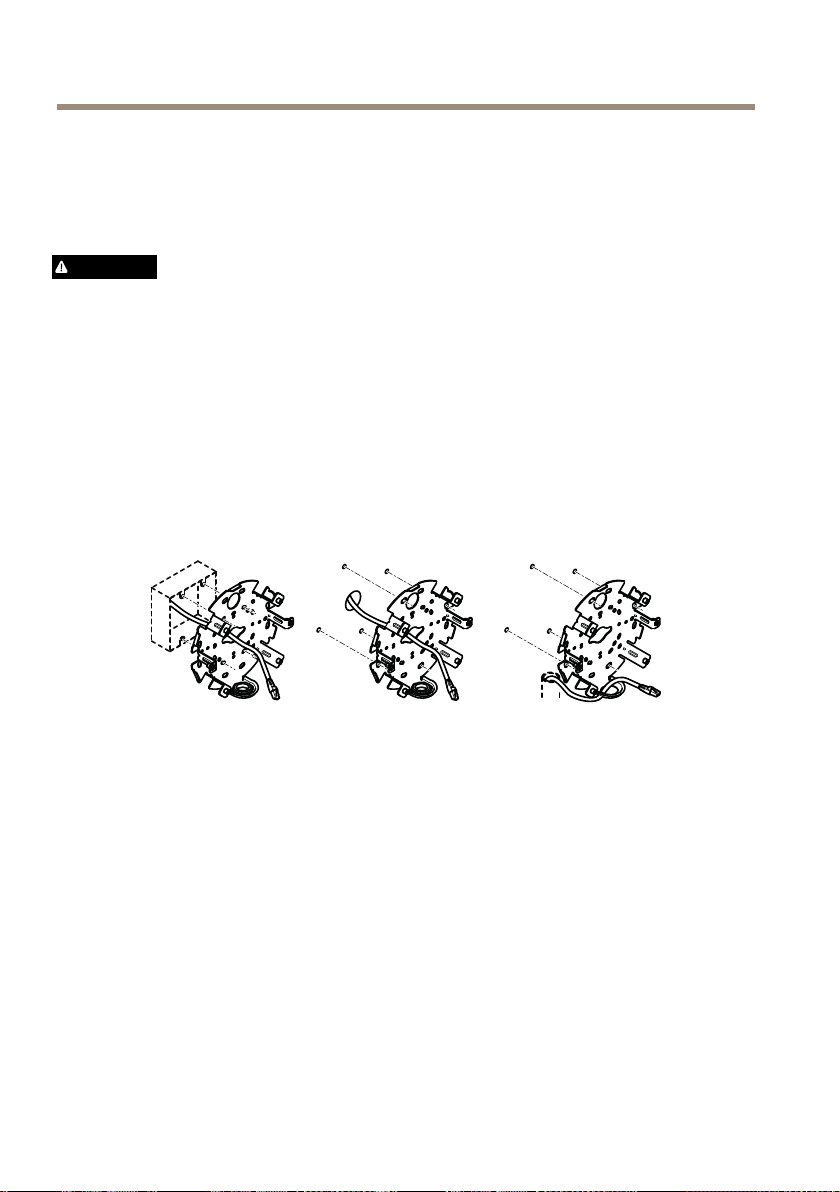
Connectthecablesandattachthecameratothemountingbracket
1.InsertthemicroSDcardinthecameraunit(optional).
2.Removethecablegasketforthenetworkcablefromtheunitcasing,seeProduct
overviewonpage8.
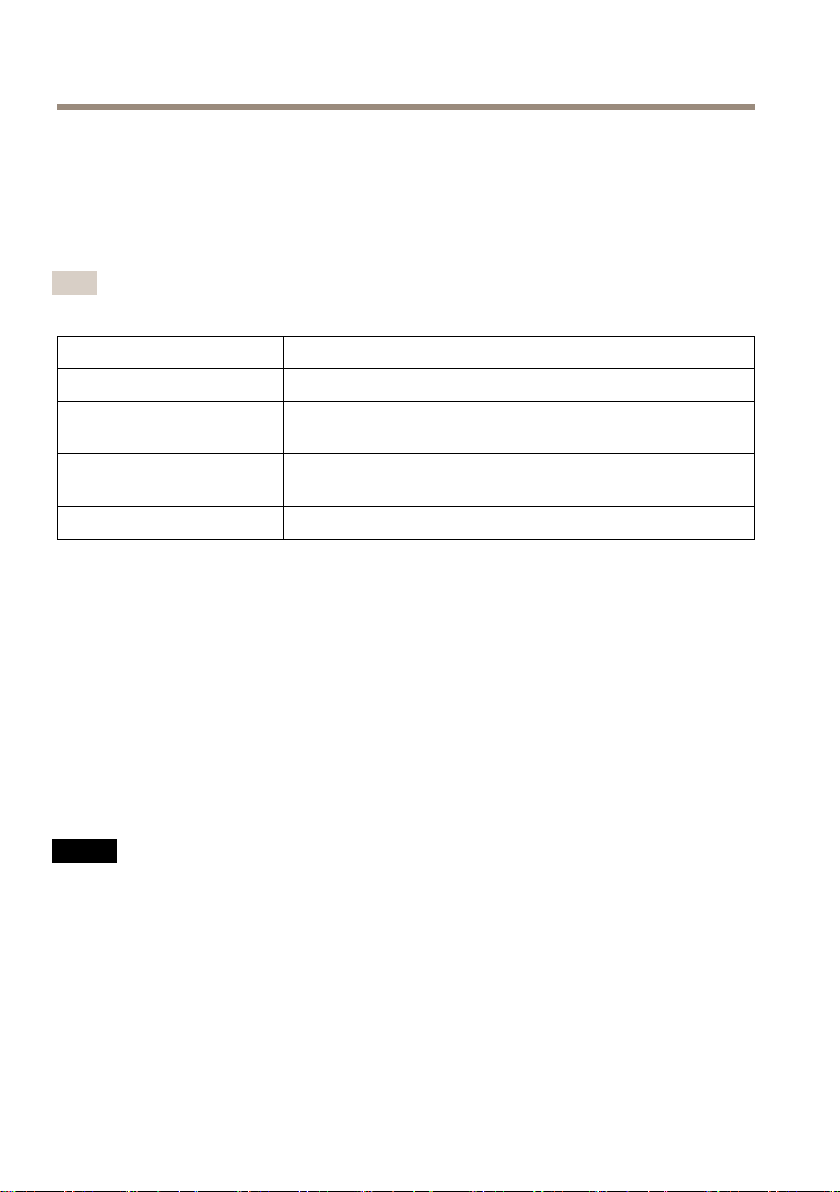
3.Pulltoremovethetabonthegasket,andusetheprovidedconnectorguardtopushthe
networkcablethroughthegasket.Pullthenetworkcablebackslightlysothatthe
cablegasketadjustsitselfonthecable.
EN
NO
TICE
NO NO
TICE TICE
Notpullingthecablebackcouldcausewatertoseepinanddamagetheproduct.
4.Ifusingamulticable,removetheothercablegasketfromtheunitcasinganddiscardit.
5.Pullthecablesthroughtheunitcasingandattachthecablegasketstotheunitcasing.
6.Connectthecablestothecameraunit.
7.Pullthespringsasideintheunitcasingandattachthecameraunittotheunitcasing,
pullingthecablesthroughthecablegasketstoshortenthemasrequired.
11
Page 12
AXISQ3517-SLVENetworkCamera
8.Windupthecableslackalongthemountingbracketandattachtheunitcasingtothe
mountingbracketwiththetwoscrews.
9.Verifythatthecablegasketsarecorrectlymountedagainsttheunitcasingandthecables.
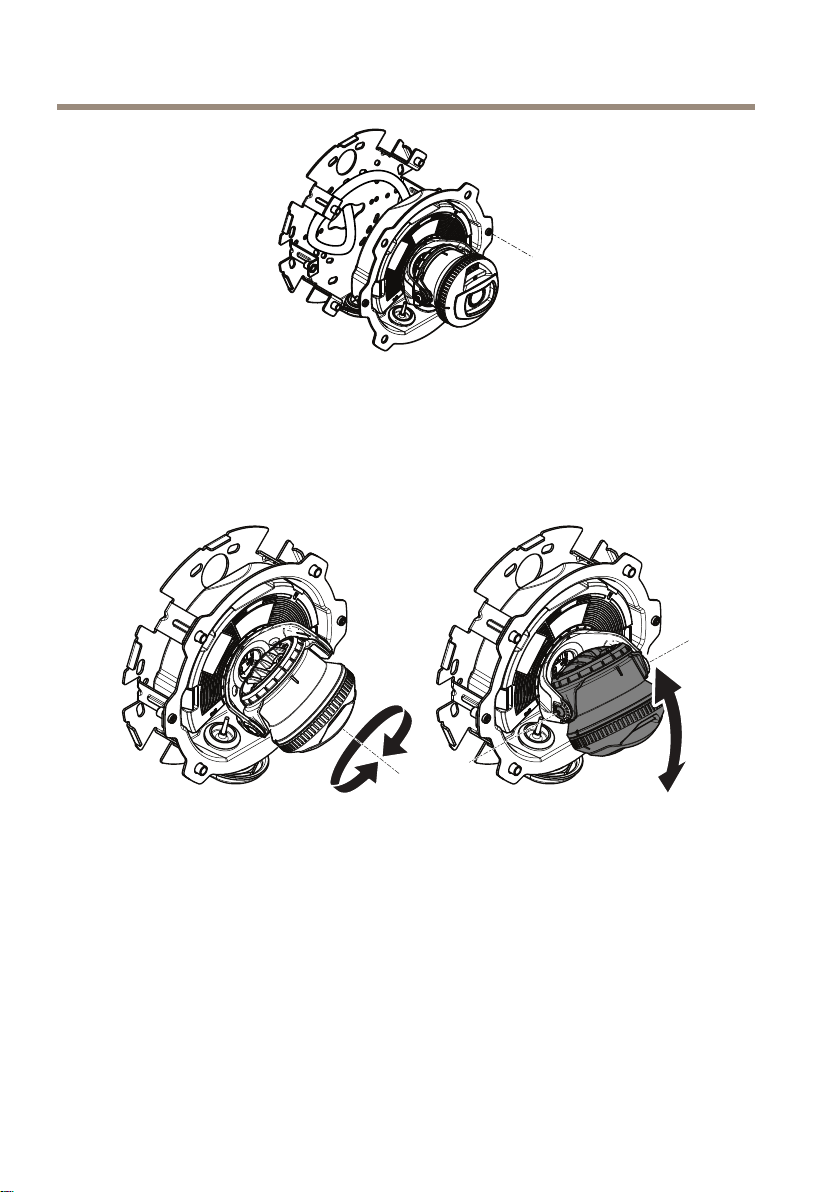
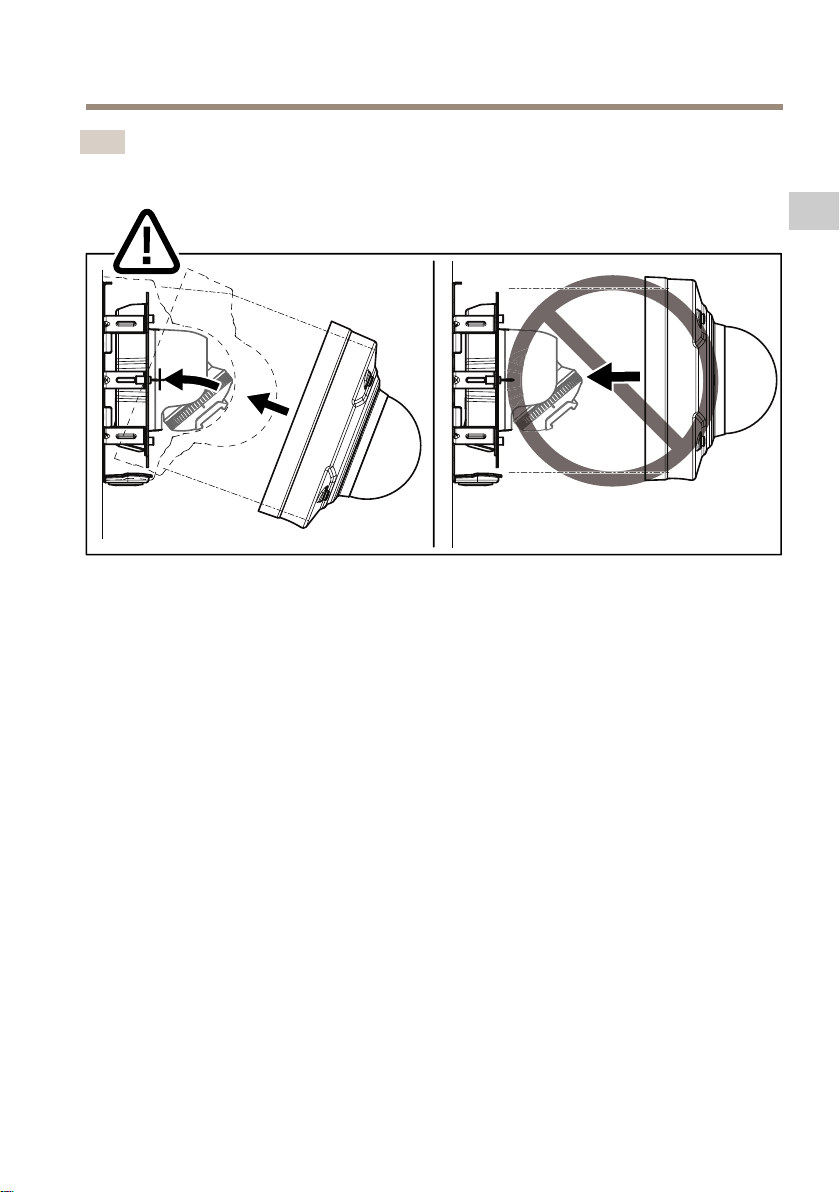
Adjustthecameraangle
1.Panandtiltthecameratoadjusttheangle.Thecameracanpan360°andtiltfrom
-80°to80°.
12
Page 13

AXISQ3517-SLVENetworkCamera
2.Rotatethecameratoadjusttheangle.Thecameracanrotate±175°.
EN
1
IRLEDscorrectlypositioned.
2
IRLEDsblockedbydomecover.
3.Putthedomecoveroverthecamerawithoutattachingthescrews.
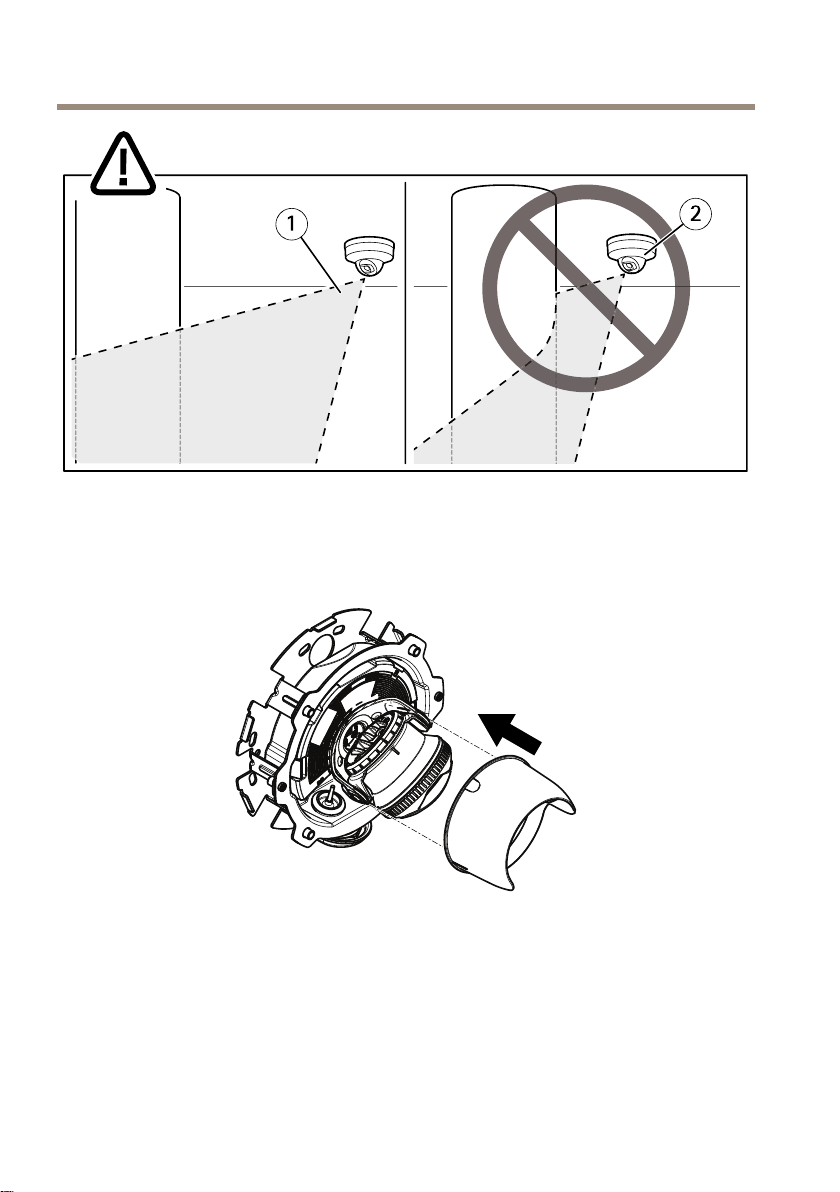
4.CheckthattheIRLEDsarenotblockedbythedomecover.
Note
ItisimportanttopositionthecameraatananglesothelightfromtheIRLEDsdoesnot
reectbacktothecamera.
13
Page 14
AXISQ3517-SLVENetworkCamera
1
IRLEDsnotilluminatingnearbyreectingsurface.
2
Camerapositionedtooclosetoreectingsurface.
Attachtheviewprotector
1.Attachtheviewprotectortothecameraunit.
Attachthedomecover
1.Attachthedomecovertotheunitcasingwiththesuppliedscrewbit.
14
Page 15
AXISQ3517-SLVENetworkCamera
Note
Attachthedomecoveratanangletokeepthepositionofthecameralens.
2.Removetheprotectivelmfromthedomecover.
EN
Howtoaccesstheproduct
AXISIPUtilityandAXISCameraManagementarerecommendedmethodsforndingAxisproducts
onthenetworkandassigningthemIPaddressesinWindows®.Bothapplicationsarefreeandcan
bedownloadedfromaxis.com/support
Theproductcanbeusedwithmostoperatingsystemsandbrowsers.Werecommendthefollowing
browsers:
•InternetExplorer
•Safari
•Chrome
Formoreinformationaboutusingtheproduct,seetheUserManualavailableataxis.com
®
withOSX
TM
®
withWindows
®
orFirefox
®
withotheroperatingsystems.
®
Howtoadjustfocusandzoom
1.GototheImagetabintheproduct'swebpage.
2.AdjustZoom.
3.ClickAutofocus.
15
Page 16

AXISQ3517-SLVENetworkCamera
Howtoresettofactorydefaultsettings
Important
Resettofactorydefaultshouldbeusedwithcaution.Aresettofactorydefaultresetsall
settings,includingtheIPaddress,tothefactorydefaultvalues.
Toresettheproducttothefactorydefaultsettings:
1.Disconnectpowerfromtheproduct.
2.Pressandholdthecontrolbuttonwhilereconnectingpower.SeeProductoverview
onpage8.
3.Keepthecontrolbuttonpressedfor15–30secondsuntilthestatusLEDindicatorashes
amber.
4.Releasethecontrolbutton.TheprocessiscompletewhenthestatusLEDindicatorturns
green.Theproducthasbeenresettothefactorydefaultsettings.IfnoDHCPserveris
availableonthenetwork,thedefaultIPaddressis192.168.0.90
5.UsetheinstallationandmanagementsoftwaretoolstoassignanIPaddress,setthe
password,andaccessthevideostream.
Theinstallationandmanagementsoftwaretoolsareavailablefromthesupportpages
onaxis.com/support
Itisalsopossibletoresetparameterstofactorydefaultviathewebinterface.GotoSettings
>System>MaintenanceandclickDefault.
16
Page 17

AXISQ3517-SLVENetworkCamera
Furtherinformation
•Forthelatestversionofthisdocument,seeaxis.com
•Theusermanualisavailableataxis.com
•Tocheckifthereisupdatedrmwareavailableforyourdevice,seeaxis.com/support
•Forusefulonlinetrainingsandwebinars,seeaxis.com/academy
Optionalaccessories
Foracompletelistofavailableaccessoriesforthisproduct,gototheproduct’spageonaxis.com
andselectSoftware&Accessories.
EN
17
Page 18
AXISQ3517-SLVENetworkCamera
Specifications
Tondthelatestversionoftheproduct’sdatasheet,gototheproductpageonaxis.comand
locateSupport&Documentation.
LEDIndicators
Note
•TheStatusLEDcanbeconguredtoashwhileaneventisactive.
StatusLED
Unlit
GreenShowssteadygreenfor10secondsfornormaloperationafter
Amber
Amber/RedFlashesamber/redifnetworkconnectionisunavailableorlost.
Indication
Connectionandnormaloperation.
startupcompleted.
Steadyduringstartup.Flashesduringrmwareupgradeorreset
tofactorydefault.
StatusLEDbehaviorandbuzzersignalforlevelingassistant
Forinformationonthefunctionbuttonusedforlevelingtheimage,seepage19.
Pressandholdthefunctionbutton(2)formorethantwosecondstolevelthecamera.
•Whenthecameraislevel,bothLEDsaresteadygreen,andthebeepiscontinuous.
•Whenthecameraisnotlevel,theLEDsashacombinationofred,greenandorange,and
thebeepoccursatslowintervals.
BothLEDsbrieyashgreentoindicatethatthelevelingisgettingbetter.
SDcardslot
NO
TICE
NO NO
TICE TICE
•RiskofdamagetoSDcard.Donotusesharptools,metalobjects,orexcessiveforcewhen
insertingorremovingtheSDcard.Useyourngerstoinsertandremovethecard.
•Riskofdatalossandcorruptedrecordings.DonotremovetheSDcardwhiletheproduct
isrunning.UnmounttheSDcardfromtheproduct’swebpagebeforeremoval.
ThisproductsupportsmicroSD/microSDHC/microSDXCcards.
ForSDcardrecommendations,seeaxis.com
18
Page 19

AXISQ3517-SLVENetworkCamera
Buttons
Controlbutton
Forlocationofthecontrolbutton,seeProductoverviewonpage8.
Thecontrolbuttonisusedfor:
•Resettingtheproducttofactorydefaultsettings.Seepage16.
•ConnectingtoanAXISVideoHostingSystemservice.Tondoutmoreaboutthis
service,seeaxis.com
FunctionButton
Thefunctionbuttonhasmultiplefunctions:
•AslevelingAssistant–Thisfunctionhelpstoensuretheimageislevel.Pressthebutton
forabout2secondstostartthelevelingassistantandpressagaintostop.ThestatusLED
(seepage18)andbuzzersignalassistlevelingoftheimage.Theimageislevelwhen
thebuzzerbeepscontinuously.
•ToviewtheStatusLED–PressthebuttononcetolightuptheStatusLEDs.Pressagain
toturnthemoff.TheLEDswillturnoffautomaticallyafter10seconds.
Connectors
EN
Networkconnector
RJ45EthernetconnectorwithPoweroverEthernet(PoE).
NO
TICE
NO NO
TICE TICE
Theproductshallbeconnectedusingashieldednetworkcable(STP).Allcablesconnecting
theproducttothenetworkshallbeintendedfortheirspecicuse.Makesurethatthe
networkdevicesareinstalledinaccordancewiththemanufacturer’sinstructions.For
informationaboutregulatoryrequirements,seeElectromagneticcompatibility(EMC)4.
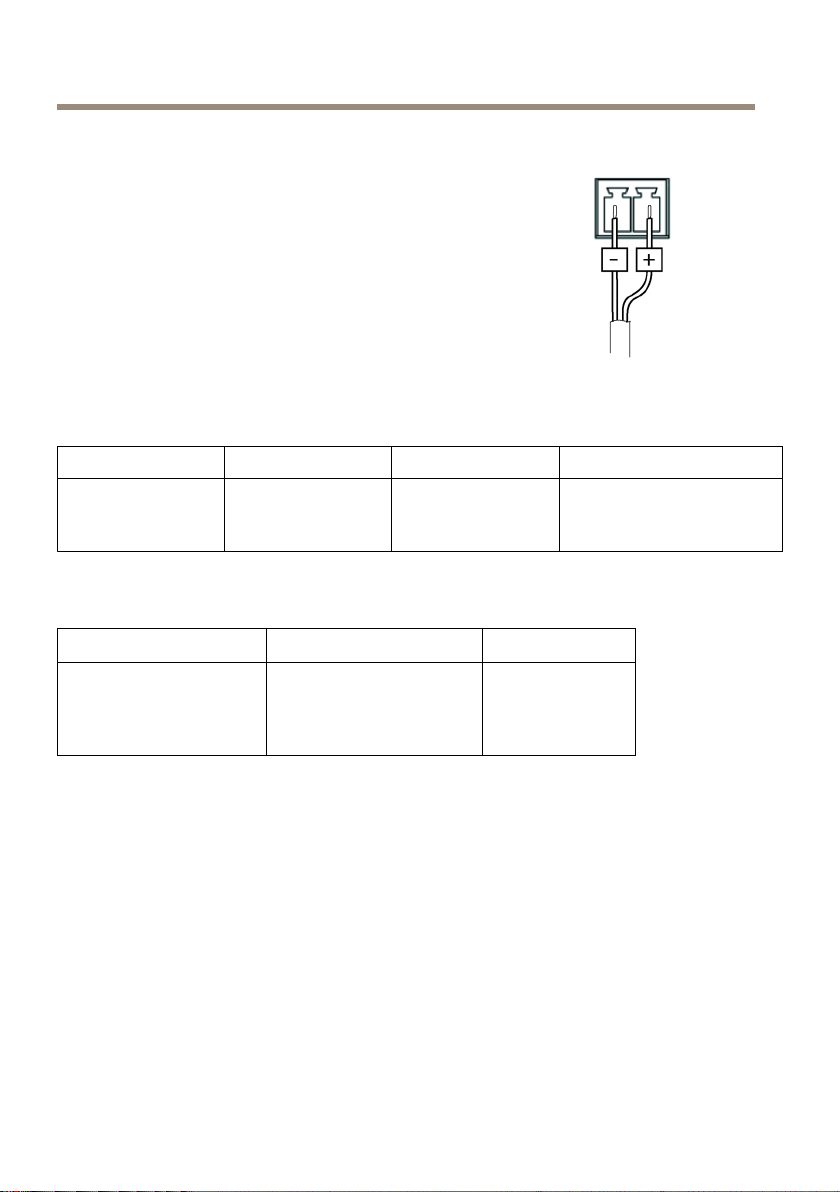
Audioconnector
TheAxisproducthasthefollowingaudioconnectors:
•Audioin(pink)–3.5mminputforamonomicrophone,oraline-inmonosignal.
•Audioout(green)–3.5mmoutputforaudio(linelevel)thatcanbeconnected
toapublicaddress(PA)systemoranactivespeakerwithabuilt-inamplier.Itis
recommendedtouseastereoconnectorforaudioout.
Foraudioin,theleftchannelisusedfromastereosignal.
19
Page 20

AXISQ3517-SLVENetworkCamera
3.5mmaudio
connectors(stereo)
1Tip2Ring
AudioInput
AudioOutput
Microphone/Linein
Lineout,monoLineout,mono
Microphonebiasvoltage
3Sleeve
Ground
Ground
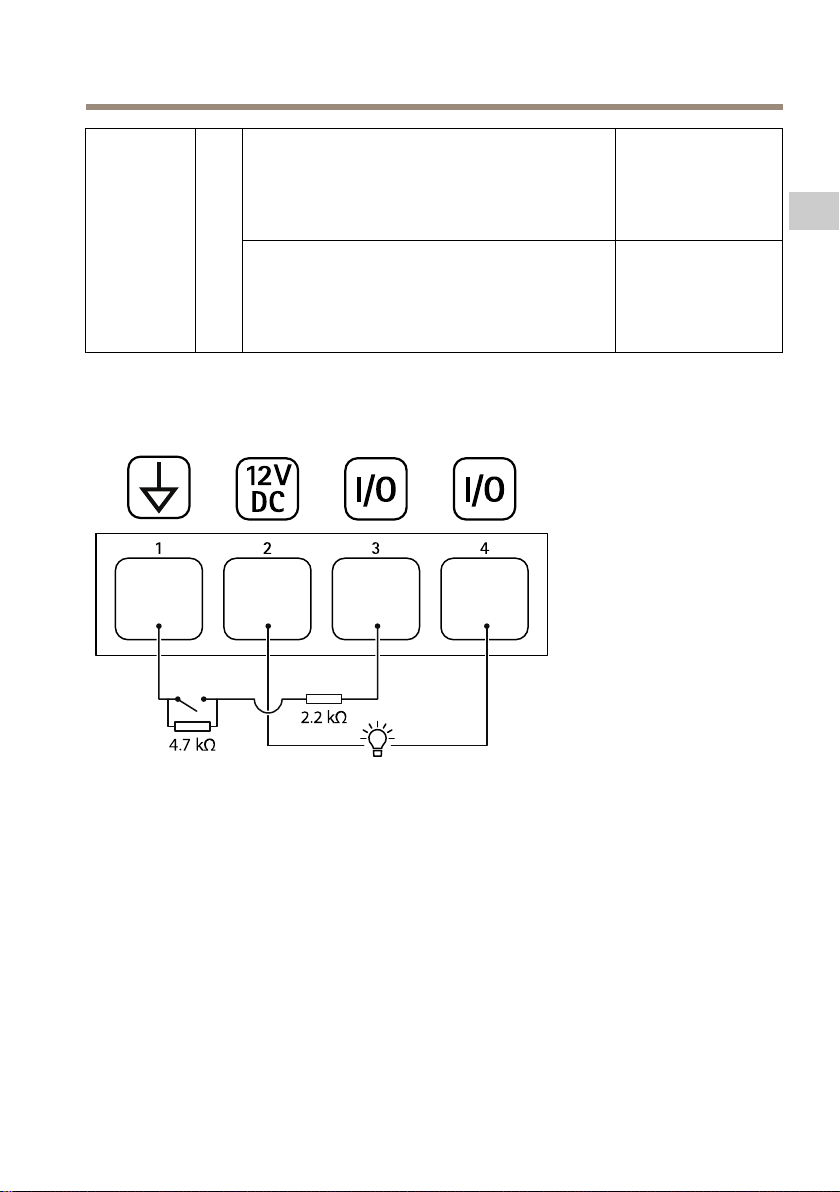
I/Oconnector
UsetheI/Oconnectorwithexternaldevicesincombinationwith,forexample,motiondetection,
eventtriggering,andalarmnotications.Inadditiontothe0VDCreferencepointandpower(DC
output),theI/Oconnectorprovidestheinterfaceto:
Digitalinput-Forconnectingdevicesthatcantogglebetweenanopenandclosedcircuit,for
examplePIRsensors,door/windowcontacts,andglassbreakdetectors.
Supervisedinput-Enablespossibilitytodetecttamperingonadigitalinput.
Digitaloutput-ForconnectingexternaldevicessuchasrelaysandLEDs.Connecteddevicescan
beactivatedbytheVAPIX®ApplicationProgrammingInterfaceorintheproduct’swebpage.
4-pinterminalblock
FunctionPinNotes
DCground
DCoutput
1
2
Canbeusedtopowerauxiliaryequipment.
Note:Thispincanonlybeusedaspowerout.
Specications
0VDC
12VDC
Maxload=50mA
20
Page 21
AXISQ3517-SLVENetworkCamera
Example
Congurable
(Inputor
Output)
3–
DigitalinputorSupervisedinput–Connectto
4
pin1toactivate,orleaveoating(unconnected)
todeactivate.Tousesupervisedinput,install
end-of-lineresistors.Seeconnectiondiagramfor
informationabouthowtoconnecttheresistors.
Digitaloutput–Connecttopin1toactivate,or
leaveoating(unconnected)todeactivate.Ifused
withaninductiveload,e.g.,arelay,connecta
diodeinparallelwiththeload,toprotectagainst
voltagetransients.
0tomax30VDC
EN
0tomax30VDC,
opendrain,100mA
1
DCground
2
DCoutput12V,max50mA
3
I/Oconguredassupervisedinput
4
I/Oconguredasoutput
21
Page 22
AXISQ3517-SLVENetworkCamera
Powerconnector
2-pinterminalblockforDCpowerinput.UseaSafetyExtraLowVoltage
(SELV)compliantlimitedpowersource(LPS)witheitheraratedoutput
powerlimitedto≤100Woraratedoutputcurrentlimitedto≤5A.
Operatingconditions
Product
AXISQ3517-SLVEIEC60529
Powerconsumption
Product
AXISQ3517-SLVE
Classication
IP66andIP67
NEMA2504X-rated
PoweroverEthernet(PoE)
IEEE802.3af/802.3atType
1,Class3
Typical6.5W
Max12.9W
TemperatureHumidity
-50°Cto60°C
(-58°Fto140°F)
10–100%RH
DC
Typical6.9W
Max14.5W
22
Page 23

AXISQ3517-SLVENetworkCamera
Safetyinformation
Hazardlevels
DANGER
Indicatesahazardoussituationwhich,ifnotavoided,willresultindeathorseriousinjury.
WARNING
Indicatesahazardoussituationwhich,ifnotavoided,couldresultindeathorseriousinjury.
CAUTION
Indicatesahazardoussituationwhich,ifnotavoided,couldresultinminorormoderate
injury.
NO
TICE
NO NO
TICE TICE
Indicatesasituationwhich,ifnotavoided,couldresultindamagetoproperty.
Othermessagelevels
Important
Indicatessignicantinformationwhichisessentialfortheproducttofunctioncorrectly.
Note
Indicatesusefulinformationwhichhelpsingettingthemostoutoftheproduct.
EN
23
Page 24

AXISQ3517-SLVENetworkCamera
Safetyinstructions
CAUTION
Becarefulofsharpmetaledges.Usecut-resistantglovesduringinstallation.
NO
TICE
NO NO
TICE TICE
•TheAxisproductshallbeusedincompliancewithlocallawsandregulations.
•StoretheAxisproductinadryandventilatedenvironment.
•Donotinstalltheproductonunstablepoles,brackets,surfacesorwalls.
•UseonlyapplicabletoolswheninstallingtheAxisproduct.Usingexcessiveforcewith
powertoolscouldcausedamagetotheproduct.
•Useonlyaccessoriesthatcomplywiththetechnicalspecicationofyourproduct.These
canbeprovidedbyAxisorathirdparty.AxisrecommendsusingAxispowersource
equipmentcompatiblewithyourproduct.
•UseonlysparepartsprovidedbyorrecommendedbyAxis.
•Donotattempttorepairtheproductyourself.ContactAxissupportoryourAxisreseller
forservicematters.
Transportation
NO
TICE
NO NO
TICE TICE
•WhentransportingtheAxisproduct,usetheoriginalpackagingorequivalenttoprevent
damagetotheproduct.
Battery
TheAxisproductusesa3.0VCR2032lithiumbatteryasthepowersupplyforitsinternalreal-time
clock(RTC).Undernormalconditionsthisbatterywilllastforaminimumofveyears.
LowbatterypoweraffectstheoperationoftheRTC,causingittoresetateverypower-up.When
thebatteryneedsreplacing,alogmessagewillappearintheproduct’sserverreport.Formore
informationabouttheserverreport,seetheproduct´swebpageorcontactAxissupport.
Lithiumcoincell3.0Vbatteriescontain1,2-dimethoxyethane;ethyleneglycoldimethylether
(EGDME),CASno.110-71-4.
WARNING
•Riskofexplosionifthebatteryisincorrectlyreplaced.
•Thebatteryshouldbereplacedwithanidenticalbatteryonly.
•Usedbatteriesshouldbedisposedofaccordingtolocalregulationsorthebattery
manufacturer'sinstructions.
24
Page 25

AXISQ3517-SLVENetworkCamera
Domecover
NO
TICE
NO NO
TICE TICE
•Becarefulnottoscratch,damageorleavengerprintsonthedomecoverbecausethis
coulddecreaseimagequality.Ifpossible,keeptheprotectiveplasticonthedomecover
untiltheinstallationiscomplete.
•Donotcleanadomecoverthatlookscleantotheeyeandneverpolishthesurface.
Excessivecleaningcoulddamagethesurface.
•Forgeneralcleaningofthedomecoveritisrecommendedtouseanon-abrasive,
solvent-freeneutralsoapordetergentmixedwithpurewaterandasoft,cleancloth.Rinse
wellwithpurelukewarmwater.Drywithasoft,cleanclothtopreventwaterspotting.
•Neveruseharshdetergents,gasoline,benzene,acetone,orsimilarchemicals.
•Avoidcleaningthedomecoverindirectsunlightoratelevatedtemperatures.
EN
25
Page 26

26
Page 27

AXISQ3517-SLVENetworkCamera
Contenudel’emballage
•CaméraréseauAXISQ3517-SLVE
•MèchedevissageTR20
•Connecteurd’E/S
•Protectionduconnecteur
•Jointadhésif
•Jointsdecâblesupplémentaires
-JointdecâbleM205mm(pourdiamètredecâble5–10mm)
-KitdejointM203mm(pourdiamètredecâble3–5mm)
•Documentsimprimés
-Guided’installation(cedocument)
-Gabaritdeperçage
-Étiquettesupplémentairedenumérodesérie(x2)
-Cléd’authenticationAVHS
Outilsrecommandés
VIS
A AAVIS VIS
L'acierinoxydablerésisteàlacorrosion,maisdelarouilleerratiquepeutapparaîtresile
matérieln'estpasmanipulécorrectement.Utilisezdesoutilsenacierinoxydablepouréviter
lestachesderouilleoulaformationdepiqûresderouille.
FR
•EmboutpourvisTR20(fourni)
27
Page 28
AXISQ3517-SLVENetworkCamera
Vued'ensembleduproduit
1
Connecteurréseau
2
Boutondecommande
3
Connecteurd’E/S
4
Sortieaudio
5
Entréeaudio
6
ConnecteurCC
7
EmplacementpourcarteSD
8
Voyantd’état(2x)
9
Boutondefonction
10
Régulateurdechaleur
11
LEDIR(2x)
ATTENTION
Lerégulateurdechaleurpeutêtrechaud.
28
Page 29
AXISQ3517-SLVENetworkCamera
FR
1
2
3
4
5
Supportdexation
Boîtierdel'unité
Caméra
Protectiond'objectif
Couverclededôme
29
Page 30
AXISQ3517-SLVENetworkCamera
Commentinstallerleproduit
Installationdumatériel
Supportdexation
ATTENTION
Faireattentionauxbordsmétalliquescoupants.Porterdesgantsdeprotection
anti-coupurespendantl'installation.
Leborddusupportdexationcomportehuittrousquidoiventêtreutiliséspourlexersurunmur.
Pourxerlesupportsurunboîtierdejonction,ilexisteégalementdestrouspourcesoptionsde
montage:
•Boîtierdejonctionaméricaindoubledetaillenormale
•Boîtierdejonctionaméricainsimpledetaillenormale
•Boîtiercarréde4po
•Boîtieroctogonalde4po
Selonquevoussouhaitezutiliserunboîtierdejonctionoufairepasserlescâbleslelongdumurou
àtraverslemur,suivezlesinstructionscorrespondantesci-dessous.
Montagedelacamérasurunboîtierdejonction:
1.Fixezlejointadhésifàl'arrièredusupportdexation.
2.Faitespasserlecâbleréseau(ainsiquelecâblemultiple,sinécessaire)àtraversleboîtier
dejonctionetdansletroudusupportdexation.
3.Fixezlesupportdexationauboîtierdejonctionenutilisantdesvisinoxydables
appropriées.
Acheminementdescâblesàtraverslemur:
1.Utilisezles4trousdugabaritdeperçagepourxerlesupportetuntroupouracheminer
lescâblesàtraverslemur.
2.Fixezlejointadhésifàl'arrièredusupportdexation.
30
Page 31

AXISQ3517-SLVENetworkCamera
3.Faitespasserlecâbleréseau(ainsiquelecâblemultiple,sinécessaire)àtraverslemuret
dansletroudusupportdexation.
4.Fixezlesupportdexationaumurenutilisantdesvisinoxydablesappropriées.
Pouracheminerlescâblesàtraverslemuretàtraversletroulatéraldusupportdexation:
1.Fixezlejointadhésifàl'arrièredusupportdexation.
2.Dévissezlecacheparletroulatéraldusupportdexation.
3.Faitespasserlecâbleréseau(ainsiquelecâblemultiple,sinécessaire)àtraversle
conduitetdansletroudusupportdexation.
4.Fixezlesupportdexationaumurenutilisantdesvisinoxydablesappropriées.
5.Fixezleconduitausupportdexation.
Connexiondescâblesetxationdelacaméraausupportdexation
1.InsérezlacartemicroSDdanslacaméra(enoption).
2.Retirezlejointducâbleréseauduboîtierdel’unité,voirVued'ensembleduproduit
page28.
3.Tirezpourretirerlapattedujoint,puisutilisezlaprotectionduconnecteurfourniepour
pousserlecâbleréseauàtraverslejoint.Tirezlégèrementsurlecâbleréseaupourque
lejoints’ajustedessus.
FR
VIS
A AAVIS VIS
Sivousnetirezpassurlecâble,ilexisteunrisqued'inltrationd’eauetd’endommagement
duproduit.
4.Sivousutilisezuncâblemultiple,retirezl'autrejointdecâbleduboîtierdel’unitéet
mettez-leaurebut.
5.Faitespasserlescâblesàtraversleboîtierdel’unitéetxezlesjointsdecâblesurce
dernier.
6.Connectezlescâblesàlacaméra.
7.Écartezlesressortsduboîtierdel’unitéetxezlacaméraauboîtier,entirantsurles
câblesàtraverslesjointsdecâbleandelesraccourcirsibesoin.
31
Page 32

AXISQ3517-SLVENetworkCamera
8.Enroulezlalongueurducâblelelongdusupportdexationetxezleboîtierdel’unité
surlesupportdexationaveclesdeuxvis.
9.Vériezquelesjointsdecâblesontcorrectementmontéssurleboîtierdel’unitéet
lescâbles.
Réglagedel'angledelacaméra
1.Faitesunpanoramiqueetinclinezlacamérapourajusterl’angle.Lacamérapeutfaireun
panoramiqueà360°ets'inclinerde-80°à80°.
32
Page 33

AXISQ3517-SLVENetworkCamera
2.Pivotezlacamérapourajusterl’angle.Lacamérapeutpivoterà±175°.
FR
1
LEDIRcorrectementpositionnées.
2
LEDIRbloquéesparlecouverclededôme.
3.Placezlecouverclededômeau-dessusdelacamérasansxerlesvis.
4.VériezquelesLEDIRnesontpasbloquéesparlecouverclededôme.
Note
Ilestimportantdepositionnerlacaméraàl'obliquedesortequelalumièrevenantdes
LEDIRnerééchissentpassurlacaméra.
33
Page 34

AXISQ3517-SLVENetworkCamera
1
LesLEDIRn'éclairentpaslasurfacerééchissanteàproximité.
2
Camérapositionnéetropprèsdelasurfacerééchissante.
Fixationdelaprotectiond'objectif
1.Fixezlaprotectiond'objectifsurlacaméra.
Fixationducouvercledudôme
1.Fixezlecouvercledudômesurleboîtierdel’unitéàl'aidedelamèchedevissagefournie.
34
Page 35

AXISQ3517-SLVENetworkCamera
Note
Fixezlecouvercledudômeàl'obliquepourgarderlapositiondel'objectifdelacaméra.
2.Retirezlelmprotecteurducouverclededôme.
FR
Commentaccéderauproduit
AXISIPUtilityetAXISCameraManagementsontrecommandéspourtrouverdesproduitsAxissur
leréseauetleurattribuerdesadressesIPWindows®.Cesapplicationssontgratuitesetpeuvent
êtretéléchargéesviaaxis.com/support
Leproduitpeutêtreutiliséaveclaplupartdessystèmesd'exploitationetnavigateurs.Nous
recommandonslesnavigateurssuivants:
•InternetExplorer
•Safari
•Chrome
Pourplusd'informationssurl'utilisationduproduit,consultezleManueldel'utilisateurdisponible
suraxis.com
®
avecOSX
TM
®
avecWindows
®
ouFirefox
®
aveclesautressystèmesd’exploitation.
®
,
Réglagedelamiseaupointetduzoom
1.Accédezàl’ongletImagedelapageWebduproduit.
2.Réglezlezoom.
3.CliquezsurAutofocus(Miseaupointautomatique).
35
Page 36

AXISQ3517-SLVENetworkCamera
Commentréinitialiserlesparamètrespardéfaut
Important
Laréinitialisationauxparamètrespardéfautdoitêtreutiliséeavecprudence.Cette
opérationreconguretouslesparamètres,ycomprisl’adresseIP,auxvaleursd’usinepar
défaut.
Pourréinitialiserl’appareilauxparamètresd’usinepardéfaut:
1.Déconnectezl’alimentationdel’appareil.
2.Maintenezleboutondecommandeenfoncéenremettantl’appareilsoustension.Cf.Vue
d'ensembleduproduitpage28.
3.Maintenezleboutondecommandeenfoncépendant15à30secondes,jusqu’àcequele
voyantd’étatclignoteenorange.
4.Relâchezleboutondecommande.Leprocessusestterminélorsquelevoyantd’étatpasse
auvert.Lesparamètresd’usinepardéfautdel’appareilontétérétablis.Enl’absenced'un
serveurDHCPsurleréseau,l’adresseIPpardéfautest192.168.0.90.
5.Utilisezlesoutilsd’installationetdegestionpourattribueruneadresseIP,congurerle
motdepasseetaccéderauuxdedonnéesvidéo.
Leslogicielsd’installationetdegestionsontdisponiblessurlespagesd’assistancedu
siteaxis.com/support.
Ilestégalementpossiblederétablirlesparamètresd’usineàpartirdel’interfaceWeb.Accédez
àSettings>System>Maintenance(Paramètres>Système>Maintenance)etcliquezsur
Default(Défaut).
36
Page 37

AXISQ3517-SLVENetworkCamera
Informationscomplémentaires
•Pourobtenirlaversionlaplusàjourdecedocument,voiraxis.com
•Lemanueld'utilisateurestdisponiblesurlesiteaxis.com
•Pourvériers'ilexisteunrmwaremisàjourpourvotreappareil,voiraxis.com/support
•Pouraccéderàdesformationsetwebinairesenligneutiles,voiraxis.com/academy
Accessoiresenoption
Pourunelistecomplètedesaccessoiresdisponiblespourceproduit,accédezàlapageduproduit
suraxis.cometsélectionnezLogicieletaccessoires.
FR
37
Page 38

AXISQ3517-SLVENetworkCamera
Caractéristiques
Pourobtenirladernièreversiondelachetechniqueduproduit,rendez-voussurlapageduproduit
surlesiteaxis.comettrouvezl'optionAssistanceetdocumentation.
Voyants
Note
•Levoyantd'étatpeutclignoterlorsqu'unévénementestactif.
Voyantd’état
Éteint
VertVertetxependant10secondespourindiquerun
OrangeFixependantledémarrage.Clignotependantlesmisesàniveau
Orange/RougeClignoteenorange/rougeencasd'indisponibilitéoudeperte
Indication
Branchementetfonctionnementnormal.
fonctionnementnormalaprèsledémarrage.
dumicroprogrammeoulerétablissementdesvaleurspardéfaut
conguréesenusine.
delaconnexionréseau.
Comportementduvoyantd'étatetdusignalsonorepourl'assistantde
nivellement
Pourplusd’informationssurleboutonfonctionutilisépourlastabilisationdel’image,consultez
page39.
MaintenezleboutonFonction(2)enfoncépendantplusdedeuxsecondespourmettrelacaméra
àniveau.
•Lorsquelacaméraestmiseàniveau,lesdeuxvoyantsDELsontvertsetxesetlesignal
sonoreestcontinu.
•Lorsquelacaméran’estpasmiseàniveau,lesvoyantsd'étatclignotentalternativement
enrouge,vertetorangeetlesignalsonoreestémisàintervalleslents.
Lesdeuxvoyantsd'étatclignotentbrièvementenvertpourindiquerquelenivellements’améliore.
FentepourcarteSD
VIS
A AAVIS VIS
•RisquededommagesàlacarteSD.N'utilisezpasd'outilstranchantsoud'objets
métalliquespourinsérerouretirerlacarteSD,etneforcezpaslorssoninsertionoude
sonretrait.Utilisezvosdoigtspourinséreretretirerlacarte.
38
Page 39

AXISQ3517-SLVENetworkCamera
•Risquedepertededonnéesetd'enregistrementscorrompus.NeretirezpaslacarteSD
pendantqueleproduitfonctionne.DémontezlacarteSDdelapageWebduproduit
avantleretrait.
CeproduitestcompatibleaveclescartesmicroSD/microSDHC/microSDXC.
PourdesrecommandationssurlescartesSD,consultezaxis.com
Boutons
Boutondecommande
Pourconnaîtrel'emplacementduboutondecommande,consultezVued'ensembleduproduit
page28.
Leboutondecommandepermetderéaliserlesopérationssuivantes:
•Réinitialisationduproduitauxparamètresd’usinepardéfaut.Cf.page36.
•ConnexionauserviceduSystèmed’hébergementvidéoAXIS.Pourensavoirplussurce
service,consultezlesiteaxis.com.
BoutonFonction
LeboutonFonctionpermetderéaliserlesopérationssuivantes:
FR
•Assistantdenivellement:cettefonctionpermetdes'assurerquel'imageeststable.
Appuyezsurleboutonpendantenviron2secondespourdémarrerl'assistantde
nivellementetappuyezunenouvellefoispourledésactiver.Levoyantd'état(cf.page
38)etlesignalsonorevousaidentlorsdelastabilisationdel'image.Lorsquel'avertisseur
émetunsignalsonorecontinu,celasigniequel'imageeststable.
•Afchagedesvoyantsd'état:appuyezsurleboutonunefoispourallumerlesvoyants
d'état.Appuyezànouveaupourleséteindre.Lesvoyantss'éteignentautomatiquement
après10secondes.
Connecteurs
Connecteurréseau
ConnecteurEthernetRJ45avecl'alimentationparEthernet(PoE).
VIS
A AAVIS VIS
Leproduitdoitêtreconnectéàl'aided'uncâbleréseaublindé(STP).Touslescâbles
reliantleproduitaucommutateurréseaudoiventêtredestinésàleurusagespécique.
Assurez-vousquelespériphériquesréseausontinstallésconformémentauxinstructions
39
Page 40

AXISQ3517-SLVENetworkCamera
dufabricant.Pourplusd’informationssurlesexigencesréglementaires,consultez
Electromagneticcompatibility(EMC)4.
Connecteuraudio
LeproduitAxisdisposedesconnecteursaudiosuivants:
•Entréeaudio(rose)–entréede3,5mmpourmicrophonemonoousignald'entréemono.
•Sortieaudio(verte):sortiede3,5mm(sortiedeligne)quipeutêtreconnectéeàun
systèmedesonorisation(PA)ouàunhaut-parleuractifavecamplicateurintégré.Ilest
recommandéd'utiliserunconnecteurstéréopourlasortieaudio.
Pourl'entréeaudio,lecanalgauched'unsignalstéréoestutilisé.
Connecteurs
audio3,5mm(stéréo)
1Pointe2Anneau3Manchon
Entréeaudio
SortieaudioSortiedeligne,monoSortiedeligne,mono
Entréemicro/ligne
Tensiondepolarisationde
microphone
Masse
Masse
Connecteurd’E/S
Utilisezleconnecteurd’E/Savecdespériphériquesexternes,associésauxapplicationstellesque
ladétectiondemouvement,ledéclenchementd'événementsetlesnoticationsd'alarme.En
plusdupointderéférence0VCCetdel'alimentation(sortieCC),leconnecteurd'E/Sfournit
uneinterfaceauxélémentssuivants:
Entréenumérique-Pourconnecterdesdispositifspouvantpasserd'uncircuitouvertàuncircuit
fermé,parexemplecapteursinfrarougepassifs,contactsdeporte/fenêtreetdétecteursdebrisde
verre.
Entréesupervisée-Permetladétectiondesabotagesuruneentréenumérique.
Sortienumérique-Permetdeconnecterdesdispositifsexternes,commedesrelaisoudesvoyants.
Lesappareilsconnectéspeuventêtreactivésparl'interfacedeprogrammationVAPIX®oudans
lespagesWebdesproduits.
Blocterminalà4broches
40
Page 41

AXISQ3517-SLVENetworkCamera
FonctionB-
MasseduCC
SortieCC
Congurable
(entréeou
sortie)
Exemple
Remarques
roche
1
2
Peutserviràalimenterlematérielauxiliaire.
Remarque:cettebrochenepeutêtreutiliséeque
commesortied’alimentation.
3–
Entréenumériqueouentréesupervisée–
4
Connectez-laàlabroche1pourl’activerou
laissez-laotter(déconnectée)pourladésactiver.
Pourutiliseruneentréesupervisée,installezdes
résistancesdendeligne.Consultezleschéma
deconnexionpourplusd'informationssurla
connexiondesrésistances.
Sortienumérique-Connectez-laàlabroche1
pourl'activeroulaissez-laotter(déconnectée)
pourladésactiver.Siutiliséavecunecharge
inductive,parexempleunrelais,connectezune
diodeenparallèleàlachargeandeprotéger
contrelestransitoiresdetension.
Caractéristiques
0VCC
12VCC
Chargemaximale=
50mA
0à30VCCmax
0à30VCCmax.,
drainouvert,100mA
FR
1
MasseduCC
2
SortieCC12V,maxi.50mA
3
Entrée/sortieconguréecommeentréesupervisée
41
Page 42

AXISQ3517-SLVENetworkCamera
4
Entrée/sortieconguréecommesortie
Connecteurd'alimentation
Blocterminalà2brochespourl'alimentationCC.Utilisezunesource
d'alimentationlimitée(LPS)conformeauxexigencesdeTrèsbasse
tensiondesécurité(TBTS)dontlapuissancedesortienominaleest
limitéeà≤100Woudontlecourantdesortienominalestlimitéà≤5A.
Conditionsd’utilisation
Produit
AXISQ3517-SLVEIEC60529
Classication
CerticationsIP66et
IP67
NEMA2504X
Consommationélectrique
ProduitAlimentationparEthernet
AXISQ3517-SLVE
(PoE)
IEEE802.3af/802.3atType1,
Classe3
6,5Wenstandard
12,9Wmax.
TempératureHumidité
-50°Cà60°C
(-58°Fà140°F)
Humiditérelativede10à
100%
CC
6,9Wenstandard
14,5Wmax.
42
Page 43

AXISQ3517-SLVENetworkCamera
Informationssurlasécurité
Niveauxderisques
DANGER
Indiqueunesituationdangereusequi,siellen'estpasévitée,entraîneraledécèsoudes
blessuresgraves.
AVERTISSEMENT
Indiqueunesituationdangereusequi,siellen'estpasévitée,pourraitentraînerledécès
oudesblessuresgraves.
ATTENTION
Indiqueunesituationdangereusequi,siellen'estpasévitée,pourraitentraînerdes
blessureslégèresoumodérées.
VIS
A AAVIS VIS
Indiqueunesituationqui,siellen'estpasévitée,pourraitendommagerl'appareil.
Autresniveauxdemessage
Important
Indiquelesinformationsimportantes,nécessairespourassurerlebonfonctionnementde
l’appareil.
Note
Indiquelesinformationsutilesquipermettrontd’obtenirlefonctionnementoptimalde
l’appareil.
FR
43
Page 44

AXISQ3517-SLVENetworkCamera
Consignesdesécurité
ATTENTION
Faireattentionauxbordsmétalliquescoupants.Porterdesgantsdeprotection
anti-coupurespendantl'installation.
VIS
A AAVIS VIS
•LeproduitAxisdoitêtreutiliséconformémentauxloisetrèglementslocaux.
•ConserverceproduitAxisdansunenvironnementsecetventilé.
•Nepasinstallerceproduitsurdespoteaux,supports,surfacesoumursinstables.
•Utiliseruniquementdesoutilsrecommandéspourl'installationdel'appareilAxis.
L'applicationd'uneforceexcessivesurl'appareilavecdesoutilspuissantspourrait
l'endommager.
•Utiliseruniquementdesaccessoiresconformesauxcaractéristiquestechniquesdevotre
produit.IlspeuventêtrefournisparAxisouuntiers.Axisrecommanded'utiliserun
équipementd'alimentationAxiscompatibleavecvotreproduit.
•UtiliseruniquementlespiècesderechangefourniesourecommandéesparAxis.
•Nepasessayerderéparervous-mêmeceproduit.Contacterl'assistancetechniqued'Axis
ouvotrerevendeurAxispourdesproblèmesliésàl'entretien.
Transport
VIS
A AAVIS VIS
•LorsdutransportduproduitAxis,utilisezl'emballaged'origineouunéquivalentpour
éviterd'endommagerleproduit.
Batterie
LeproduitAxisutiliseunebatterieaulithiumCR20323,0Vcommealimentationdesonhorloge
entempsréelinterne(RTC).Dansdesconditionsnormales,cettebatterieauneduréedevie
minimaledecinqans.
Silabatterieestfaible,lefonctionnementdel'horlogeentempsréelpeutêtreaffectéetentraîner
saréinitialisationàchaquemisesoustension.Unmessageenregistréapparaîtdanslerapportde
serveurduproduitlorsquelabatteriedoitêtreremplacée.Pourplusd'informationssurlerapport
serveur,consultezlapageWebduproduitoucontactezl'assistancetechniqued'Axis.
Lespilesboutons3,0Vaulithiumcontiennentdu1,2-diméthoxyéthane,éthylèneglycoldiméthyl
éther(EGDME),CASn°1 10-71-4.
AVERTISSEMENT
•Risqued'explosionsilabatterieestremplacéedefaçonincorrecte.
•Labatteriedoitêtreremplacéeparunebatterieidentiqueuniquement.
44
Page 45

AXISQ3517-SLVENetworkCamera
•Lesbatteriesusagéesdoiventêtremisesaurebutconformémentauxréglementations
localesouauxinstructionsdufabricantdelabatterie.
Couverclededôme
VIS
A AAVIS VIS
•Veillezànepasrayer,endommageroulaisserd'empreintessurlecouvercledudômecar
celapourraitaltérerlaqualitéd'image.Laissez,sipossible,laprotectionenplastiquesur
lecouvercledudômejusqu’àlandel’installation.
•Nenettoyezpaslecouvercledudômes'ilsemblepropreàl'œilnuetnefrottezjamaissa
surface.Unnettoyageexcessifpourraitendommagerlasurface.
•Pourlenettoyagegénéralducouvercledudôme,ilestrecommandéd'utiliserunproduit
nonabrasif,unsavonneutresanssolvantouundétergentmélangéavecdel'eaupureet
unchiffondouxpropre.Rincezbienàl'eautièdepure.Séchezavecunchiffondouxet
proprepouréviterlestâchesd'eau.
•N'utilisezjamaisdedétergentsagressifs,d'essence,debenzène,d'acétoneouautres
produitschimiquessimilaires.
•Évitezdenettoyerlecouvercledudômedanslalumièredirectedusoleiloulorsqueles
températuressontélevées.
FR
45
Page 46

46
Page 47

AXISQ3517-SLVENetworkCamera
Lieferumfang
•AXISQ3517-SLVENetzwerkkamera
•BitTR20
•E/A-Anschluss
•Verbindungsschutz
•Klebedichtung
•ZusätzlicheKabeldichtungen
-KabeldichtungM20(5mm)fürKabeldurchmesservon5bis10mm
-DichtungssatzM20(3mm)fürKabeldurchmesservon3bis5mm
•GedrucktesMaterial
-Installationsanleitung(diesesDokument)
-Bohrschablone
-ZusätzlicheEtikettenmitderSeriennummer(2x)
-AVHS-Authentizierungsschlüssel
EmpfohleneWerkzeuge
HINWEIS
HINWEIS HINWEIS
Edelstahlistkorrosionsbeständig,beiunsachgemäßerHandhabungkannjedochFremdrost
auftreten.WerkzeugausEdelstahlverwenden,umRosteckenoderLochfraßzuvermeiden.
DE
•SchraubbitTR20(enthalten)
47
Page 48

AXISQ3517-SLVENetworkCamera
Produktübersicht
1
Netzwerkanschluss
2
Steuertaste
3
E/A-Anschluss
4
Audioausgang
5
Audioeingang
6
Gleichstromanschluss
7
SD-Kartensteckplatz
8
Status-LED(2x)
9
Funktionstaste
10
Heizelement
11
IR-LED(2St.)
VORSICHT
DasHeizelementistunterUmständenheiß.
48
Page 49

AXISQ3517-SLVENetworkCamera
DE
1
Montagehalterung
2
GehäusederEinheit
3
Kameraeinheit
4
Sichtschutz
5
Kuppelabdeckung
49
Page 50

AXISQ3517-SLVENetworkCamera
InstallierendesProdukts
DieHardwareinstallieren
Montagehalterung
VORSICHT
VorsichtvorscharfenMetallkanten.WährendderInstallationSchnittschutzhandschuhe
tragen.
DieachtBohrungenandenKantensindfürdieWandmontagevorgesehen.
EssindBohrungenfürdieMontagederHalterunganfolgendenAnschlussdosenvorhanden:
•Standard-US-Doppelverteilerdose
•Standard-US-Anschlussdose
•Quadratische4"-Anschlussdose
•Achteckige4"-Anschlussdose
Jenachdem,obSieeineAnschlussdoseverwendenoderdieKabeldurchoderentlangderWand
führenmöchten,folgenSiedenuntenstehendenAnweisungen.
DieMontageaneineAnschlussdose:
1.DieKlebedichtunganderRückseitederHalterunganbringen.
2.DasNetzwerkkabel(fallserforderlichauchdasMehrfachanschlusskabel)durchdie
AnschlussdoseunddurchdieBohrunginderHalterungführen.
3.BringenSiedieHalterungmitgeeignetenSchraubenausEdelstahlanderAnschlussdose
an.
FürdieVerlegungderKabeldurchdieWand:
1.MithilfederBohrschablonevierLöcherfürdieHalterungindieWandundeinLochfür
dieKabelführungdurchdieWandbohren.
2.DieKlebedichtunganderRückseitederHalterunganbringen.
3.DasNetzwerkkabel(fallserforderlichauchdasMehrfachanschlusskabel)durchdieWand
unddurchdieBohrunginderHalterungführen.
50
Page 51

AXISQ3517-SLVENetworkCamera
4.BringenSiedieHalterungmitgeeignetenSchraubenausEdelstahlanderWandan.
VerlegenderKabelentlangderWandunddurchdieseitlicheBohrunginderHalterung:
1.DieKlebedichtunganderRückseitederHalterunganbringen.
2.DenStopfenausderseitlichenBohrungderHalterungherausschrauben.
3.FührenSiedasNetzwerkkabel(undggf.dasMehrfachanschlusskabel)durchdie
KabelführungunddurchdieBohrunginderHalterung.
4.BringenSiedieHalterungmitgeeignetenSchraubenausEdelstahlanderWandan.
5.BringenSiedieKabelführunganderHalterungan.
DieKabelanschließenunddieKameraanderHalterunganbringen.
1.DiemicroSD-KarteindieKameraeinheiteinsetzen(optional).
2.DieKabeldichtungdesNetzwerkkabelsvomKameragehäuseentfernen,siehe
ProduktübersichtaufSeite48.
3.DieLaschevonderDichtungabziehenunddasNetzwerkkabelmitdemmitgelieferten
VerbindungsschutzdurchdieKabeldichtungdrücken.DasNetzwerkkabelleicht
zurückziehen,damitsichdieKabeldichtungandasKabelanpassenkann.
DE
HINWEIS
HINWEIS HINWEIS
WirddasKabelnichtzurückgezogen,kannWassereindringenunddasProduktbeschädigen.
4.EntfernenSiebeiVerwendungeinesMehrfachanschlusskabelsdieandereKabeldichtung
vomKameragehäuse.
5.ZiehenSiedieKabeldurchdasKameragehäuseundbringenSiedieKabeldichtungen
andieseman.
6.SchließenSiedasKabelandieKameraeinheitan.
7.ZiehenSiedieFedernimKameragehäusezurSeiteundsetzenSiedieKameraeinheit
indiesesein.ZiehenSiedieKabeldurchdieKabeldichtungenundkürzenSiediese
beiBedarf.
51
Page 52

AXISQ3517-SLVENetworkCamera
8.WickelnSiedasüberstehendeKabelentlangderWandhalterungaufundbefestigenSie
dasKameragehäusemitdenbeidenSchraubenanderWandhalterung.
9.ÜberprüfenSie,obdieKabeldichtungenordnungsgemäßamKameragehäuseundden
Kabelnmontiertsind.
DieKameraausrichten
1.DieKameradurchEinstellenderSchwenk-undNeigungswinkelausrichten.DieKamera
kannum360°geschwenktundvon-80°bis80°geneigtwerden.
52
Page 53

AXISQ3517-SLVENetworkCamera
2.DieKameradrehen,umdenWinkeleinzustellen.DieKamerakannum±175°gedreht
werden.
DE
1
IR-LEDsordnungsgemäßausgerichtet
2
IR-LEDsdurchKuppelabdeckungverdeckt
3.DieKuppelabdeckungaufdieKamerasetzen,dieSchraubennochnichtanbringen.
4.Sicherstellen,dassdieKuppelabdeckungdieIR-LEDsnichtverdeckt.
Beachten
DieKamerasoausrichten,dassdasLichtderIR-LEDsnichtindieKamerazurückfällt.
53
Page 54

AXISQ3517-SLVENetworkCamera
1
IR-LEDsbeleuchtenkeinereektierendenOberächeinderNähe.
2
KamerazudichtanreektierendenOberächenpositioniert
DenSichtschutzanbringen
1.DenSichtschutzanderKameraeinheitanbringen.
DieKuppelabdeckunganbringen.
1.DieKuppelabdeckungmithilfedesBitsanderGehäuseeinheitanbringen.
54
Page 55

AXISQ3517-SLVENetworkCamera
Beachten
BringenSiedieKuppelabdeckungineinemWinkelan,umdasKameraobjektivinPosition
zuhalten.
2.DieSchutzfolievonderKuppelabdeckungentfernen.
DE
ZugriffaufdasProdukt
ZumFindenvonAxis-ProduktenimNetzwerkundZuweisenvonIP-AdressenunterWindows®
werdenAXISIPUtilityundAXISCameraManagementempfohlen.BeideAnwendungensind
kostenlosundkönnenvonaxis.com/supportheruntergeladenwerden.
DasProduktistmitdenmeistenBetriebssystemenundBrowsernkompatibel.Empfohlenwerden
folgendeBrowser:
•InternetExplorer
•Safari
•Chrome
WeitereInformationenzurNutzungdiesesProduktsndenSieimBenutzerhandbuchaufaxis.com.
®
unterOSX
TM
®
unterWindows
®
oderFirefox
®
unteranderenBetriebssystemen
®
EinstellenvonFokusundZoom
1.AufderProduktwebseitedieRegisterkarteBildaufrufen.
2.Zoomeinstellen.
3.KlickenSieaufAutofokus.
55
Page 56

AXISQ3517-SLVENetworkCamera
ZurücksetzenaufdiewerksseitigenStandardeinstellungen
Wichtig
DieFunktionzumZurücksetzenaufdiewerksseitigenStandardeinstellungensolltemit
Vorsichtverwendetwerden.MitdieserFunktionwerdenalleEinstellungeneinschließlich
derIP-AdresseaufdiewerksseitigenStandardeinstellungenzurückgesetzt.
SowirddasProduktaufdiewerksseitigenStandardeinstellungenzurückgesetzt:
1.TrennenSiedasProduktvonderStromversorgung.
2.HaltenSiedieSteuertastegedrücktundstellenSiedieStromversorgungwiederher.
SieheProduktübersichtaufSeite48.
3.HaltenSiedieSteuertasteetwa15bis30Sekundengedrückt,bisdieStatus-LEDgelb
blinkt.
4.LassenSiedieSteuertastelos.DerVorgangistabgeschlossen,wenndieStatus
LEDgrünleuchtet.DasProduktwurdeaufdieWerkseinstellungenzurückgesetzt.
WennkeinDHCP-ServerimNetzwerkverfügbarist,lautetdieStandard-IP-Adresse
192.168.0.90.
5.VerwendenSiedieSoftware-ToolsfürInstallationundVerwaltung,umeineIP-Adresse
zuzuweisen,einKennworteinzurichtenundaufdenVideostreamzuzugreifen.
DieSoftwaretoolsfürdieInstallationundVerwaltungstehenaufdenSupportseitenunter
axis.com/supportzurVerfügung.
DieParameterkönnenauchüberdieWeboberächeaufdieWerkseinstellungenzurückgesetzt
werden.Settings>System>Maintenance(Einstellungen>System>Wartung)aufrufenund
Default(Standard)anklicken.
56
Page 57

AXISQ3517-SLVENetworkCamera
WeitereInformationen
•DieaktuelleVersiondiesesDokumentsndenSieaufaxis.com
•DasBenutzerhandbuchstehtaufaxis.comzurVerfügung.
•Unteraxis.com/supportndenSiedieaktuellenFirmwareversionenfürIhrGerät.
•NützlichesOnlinetrainingundWebinarendenSieunteraxis.com/academy.
OptionalesZubehör
EinevollständigeListelieferbarenZubehörsfürdiesesProduktndenSieaufaxis.comunter
Produkt,SoftwareundZubehör.
DE
57
Page 58

AXISQ3517-SLVENetworkCamera
TechnischeDaten
DieaktuelleVersiondestechnischenDatenblattsfürdasProduktndenSieaufaxis.comunter
SupportundDokumentation.
LEDs
Beachten
•DieStatus-LEDkannsoeingestelltwerden,dasssieblinkt,wenneinEreignisaktivist.
Status-LED
LeuchtetnichtAnschlussundNormalbetrieb
GrünLeuchtetbeiNormalbetriebnachAbschlussdesStartvorgangs
GelbLeuchtetbeimStart.BlinktwährendFirmware-Aktualisierung
Gelb/rotBlinktgelb/rot,wenndieNetzwerkverbindungnichtverfügbar
Bedeutung
10Sekundenlanggrün.
undWiederherstellungderWerkseinstellungen.
istoderunterbrochenwurde.
VerhaltenderLED-StatusanzeigeundSummtonfürden
Ausrichtungsassistenten
InformationenzurVerwendungderFunktionstastebeiderAusrichtungdesBildsndenSieunter
Seite59.
HaltenSiedieFunktionstaste(2)zumAusrichtenderKameralängerals2Sekundengedrückt.
•WenndieKamerakorrektausgerichtetist,leuchtenbeideLEDsgrün,undderSummton
ertöntdurchgehend.
•WenndieKameranichtkorrektausgerichtetist,blinkendieLEDsrot,grünundorange,
undderSummtonertöntinlangenIntervallen.
BeideLEDsblinkenkurzgrünauf,umanzuzeigen,dasssichdieAusrichtungverbessert.
EinschubfürSD-Speicherkarte
HINWEIS
HINWEIS HINWEIS
•GefahrvonSchädenanderSD-Karte.BeimEinsetzenoderEntfernenderSD-Kartekeine
scharfenWerkzeugeoderGegenständeausMetallbenutzenundkeineübermäßigeKraft
anwenden.SetzenSiedieKarteperHandein.DasGleichegiltfürdasEntfernen.
•GefahrvonDatenverlustundBeschädigungvonAufzeichnungen.DieSD-Kartedarf
nichtentferntwerden,währenddasProduktinBetriebist.ErstdieSD-Karteüberdie
Produktwebseitetrennen,dannausbauen.
58
Page 59

AXISQ3517-SLVENetworkCamera
DiesesAxis-ProduktunterstütztKartendesTypsmicroSD/microSDHC/microSDXC.
EmpfehlungenzuSD-KartenndenSieaufaxis.com.
Tasten
Steuertaste
ZurLagederSteuertaste,sieheProduktübersichtaufSeite48.
DieSteuertastehatfolgendeFunktionen:
•ZurücksetzendesProduktsaufdieWerkseinstellungen.SieheSeite56.
•AnschließenaneinenAXISVideoHostingSystem-ServiceWeitereInformationenzu
diesemDienstndenSieaufaxis.com.
Funktionstaste
DieFunktionstastehatmehrereAufgaben:
•Nivellier-Assistent–DieseFunktionunterstütztdasNivellierendesBildes.DieTasteca.
2Sekundenlangbetätigen,umdenNivellier-Assistentenzustarten.DieTasteerneut
betätigen,umdenAssistentenzubeenden.DieLED-Statusanzeige(sieheSeite58)und
derSummtonunterstützendasNivellierendesBildes.DasBildistnivelliert,wennder
SummtonalsDauertonerklingt.
•KontrollederStatus-LEDs–DrückenSiedieTasteeinmal,leuchtendieStatus-LEDsauf.
DrückenSiedieTasteerneut,erlöschendieLEDs.DieLEDswerdennachzehnSekunden
automatischausgeschaltet.
Anschlüsse
Netzwerkanschluss
RJ45-EthernetanschlussmitPoweroverEthernet(PoE).
HINWEIS
HINWEIS HINWEIS
DasProduktmussmiteinemabgeschirmtenNetzwerkkabel(STP)angeschlossenwerden.
AlleKabel,diedasProduktmitdemNetzwerkswitchverbinden,müssenhierfürausgelegt
sein.StellenSiesicher,dassdieNetzwerkgerätegemäßdenAnweisungendesHerstellers
installiertwurden.InformationenzugesetzlichenBestimmungenndenSieunter
Electromagneticcompatibility(EMC)4.
DE
Audioanschlüsse
DasAxisProduktistmitdenfolgendenAudioanschlüssenausgestattet:
59
Page 60

AXISQ3517-SLVENetworkCamera
•Audioeingang(rosa)–3,5-mm-AnschlussfüreinMonomikrofonodereinMonosignal.
•Audioausgang(grün)–3,5-mm-Audioausgang(Leitungspegel)zumAnschließeneiner
Rundrufanlage(PA)odereinesAktivlautsprechersmitintegriertemVerstärker.Fürden
AudioausgangempehltsichdieVerwendungeinesStereosteckers.
BeimAudioeingangwirdderlinkeKanalvoneinemStereosignalbenutzt.
3,5-mmAudioanschlüsse
(Stereo)
1Spitze
Audioeingang
AudioausgangLeitungsausgang,MonoLeitungsausgang,MonoMasse
Mikrofon-/Leitungseingang
2Ring
Mikrofon-VorspannungMasse
E/A-Anschluss
ÜberdenE/A-AnschlusswerdenexterneGeräteinVerbindungmitManipulationsalarmen,
Bewegungserkennung,Ereignisauslösung,AlarmbenachrichtigungenundanderenFunktionen
angeschlossen.AußerdemBezugspunkt0VGleichstromundStrom(Gleichstromausgang)besitzt
derE/A-AnschlussübereineSchnittstellezum:
Digitaleingang-ZumAnschlussvonGeräten,diezwischengeöffnetemundgeschlossenem
SchaltkreiswechselnkönnenwieetwaPIR-Sensoren,Tür-undFensterkontaktesowie
Glasbruchmelder.
ÜberwachterEingang-ErmöglichtdasErfassenvonManipulationaneinemdigitalenEingang.
Digitalausgang-ZumAnschlussexternerGerätewieRelaisundLEDs.AngeschlosseneGeräte
könnenüberdasVAPIX®ApplicationProgrammingInterfaceoderüberdieProduktwebsiteaktiviert
werden.
4-poligerAnschlussblock
FunktionKon-
Erdung
Gleichstrom
takt
1
HinweiseTechnische
Angaben
0VGleichstrom
3Schaft
60
Page 61

AXISQ3517-SLVENetworkCamera
Gleichstromausgang
Kongurierbar(EinoderAusgang)
Beispiel
2
3–4
DarffürdieStromversorgungvonZusatzgeräten
verwendetwerden.
Hinweis:DieserKontaktkannnurfürden
Stromausgangverwendetwerden.
DigitalerEingangoderüberwachterEingang–
ZumAktivierenanKontakt1anschließen,zum
Deaktivierennichtanschließen.Umüberwachten
Eingangzunutzen,Abschlusswiderstände
anschließen.InformationenzumAnschließender
WiderständebietetderSchaltplan.
DigitalerAusgang–zumAktivierenanKontakt1
anschließen;zumDeaktivierennichtanschließen.
BeiVerwendungmiteinerinduktivenLast,
wieetwaeinemRelais,musszumSchutzvor
SpannungssprüngeneineDiodeparallelzurLast
geschaltetwerden.
12VGleichstrom
Max.Stromstärke
=50mA
0bismax.30V
Gleichstrom
DE
0bismax.30V
Gleichstrom,Open
Drain,100mA
1
ErdungGleichstrom
2
Gleichstromausgang12V,max.50mA
3
AlsüberwachterEingangkongurierterE/A
4
E/AalsAusgangkonguriert
61
Page 62

AXISQ3517-SLVENetworkCamera
Netzanschluss
2-poligerAnschlussblockfürdieGleichstromversorgung.Verwenden
SieeinemitdenAnforderungenfürSchutzkleinspannung(SELV)
kompatibleStromquellemitbegrenzterLeistung(LPS)miteiner
Nennausgangsleistungvon≤100Wodereinemdauerhaftauf
≤5AbegrenztenNennausgangsstrom.
Betriebsbedingungen
Produkt
AXISQ3517-SLVEIEC60529
Leistungsaufnahme
Produkt
AXISQ3517-SLVE
Klassizierung
IP66undIP67
ZertizierungNEMA
2504X
PoweroverEthernet(PoE)
IEEE802.3af/802.3atTyp1,
Klasse3
Normal6,5W
Max.12,9W
Temperatur
-50°Cbis+60°C
Luftfeuchtigkeit
RelativeLuftfeuchtigkeit10
bis100%
Gleichstrom
Normal6,9W
Max.14,5W
62
Page 63

AXISQ3517-SLVENetworkCamera
Sicherheitsinformationen
Gefährdungsstufen
GEFAHR
WeistaufeinegefährlicheSituationhin,welche,fallsnichtverhindert,zuTododer
schwerenVerletzungenführenkann.
WARNUNG
WeistaufeinegefährlicheSituationhin,welche,fallsnichtverhindert,zuTododer
schwerenVerletzungenführenkann.
VORSICHT
WeistaufeinegefährlicheSituationhin,welche,fallsnichtverhindert,zugeringfügiger
odermäßigerVerletzungführenkann.
HINWEIS
HINWEIS HINWEIS
WeistaufeinegefährlicheSituationhin,welche,fallsnichtverhindert,zuSachschäden
führenkann.
AndereMeldeebenen
Wichtig
WeistaufwichtigeInformationenhin,diedenrichtigenBetriebdesProduktsgewährleisten.
Beachten
WeistaufnützlicheInformationenhin,diedieoptimaleVerwendungdesProdukts
unterstützen.
DE
63
Page 64

AXISQ3517-SLVENetworkCamera
Sicherheitsanweisungen
VORSICHT
AchtenSieaufscharfeMetallkanten.TragenSiewährendderInstallation
Schnittschutzhandschuhe.
HINWEIS
HINWEIS HINWEIS
•DasAxis-ProduktmussunterBeachtungdergeltendenGesetzeundBestimmungen
betriebenwerden.
•LagernSiedasAxisProduktineinertrockenenundbelüftetenUmgebung.
•DasProduktnichtaninstabilenMasten,Halterungen,OberächenoderWändenanbringen.
•VerwendenSiebeiderInstallationdesAxisProduktsausschließlichpassendeWerkzeuge.
EinzugroßerKraftaufwandmitelektrischenWerkzeugenkanndasProduktbeschädigen.
•VerwendenSienurZubehör,dasdentechnischenVorgabenIhresProduktsentspricht.
DiesesistvonAxisoderDrittanbieternerhältlich.AxisempehltdiemitIhremProdukt
kompatibleStromversorgungvonAxis.
•VerwendenSieausschließlichErsatzteiledievonAxisangebotenoderempfohlenwerden.
•VersuchenSienicht,diesesProduktselbsttätigzureparieren.WendenSiesichbezüglich
ReparaturundWartungandenAxisSupportoderIhrenAxisHändler.
Transport
HINWEIS
HINWEIS HINWEIS
•BeiBedarftransportierenSiedasAxisProduktinderOriginalverpackungodereiner
entsprechendenVerpackung,sodassSchädenvermiedenwerden.
Batterie
DasAxis-Produktistmiteiner3,0V-CR2032-Lithium-Batterieausgestattet,mitderdieinterne
Echtzeituhr(RTC)versorgtwird.UnternormalenBedingungenhatdieBatterieeineLebensdauer
vonmindestensfünfJahren.
EinenichtausreichendgeladeneBatteriebeeinträchtigtdenBetriebderEchtzeituhr,diedannbei
jedemSystemstartzurückgesetztwird.SieerhalteneineProtokollnachrichtimServerberichtdes
Produkts,wenneinBatteriewechselerforderlichist.WeitereInformationenzumServerbericht
ndenSieaufdenWebseitendesProdukts,oderwendenSiesichandenAxis-Support.
Lithium-Knopfzellen(3,0V)enthalten1,2-Dimethoxyethan;Ethylenglycoldimethylether(EGDME),
CAS-Nr.1 10-71-4.
WARNUNG
•ExplosionsgefahrbeifehlerhaftemBatteriewechsel.
•DieBatteriedarfnurdurcheineidentischeBatterieersetztwerden.
64
Page 65

AXISQ3517-SLVENetworkCamera
•VerbrauchteBatteriengemäßdenörtlichenVorschriftenoderdenAnweisungendes
Herstellersentsorgen.
Kuppelabdeckung
HINWEIS
HINWEIS HINWEIS
•AchtenSiedarauf,dieKuppelabdeckungwederzuzerkratzen,zubeschädigenoderdarauf
Fingerabdrückezuhinterlassen,dadiesdieBildqualitätbeeinträchtigenkann.Falls
möglichentfernenSiedieSchutzfolieerstnachdemdieInstallationabgeschlossenist.
•SäubernSiedieKuppelabdeckungnicht,wenndiesesaubererscheint,undpolierenSie
niemalsdieOberäche.ZuhäugesSäubernkanndieOberächebeschädigen.
•FürdienormaleReinigungderKuppelabdeckungwerdeneinenicht-scheuernde,
lösungsmittelfreieneutraleSeifeodereinentsprechendesReinigungsmittelmit
destilliertemWasserundeinsauberer,weicherLappenempfohlen.SpülenSiedie
KuppelabdeckunggründlichmitlauwarmemdestilliertemWasserab.UmWasserecken
zuvermeiden,dieKuppelabdeckungmiteinemweichen,sauberenLappenreinigen.
•KeineaggressivenReinigungsmittel,Waschbenzin,Benzol,Acetonoderähnliche
Chemikalienverwenden.
•DieKuppelabdeckungnichtindirektemSonnenlichtoderbeierhöhtenTemperaturen
säubern.
65DE66
Page 66

Page 67

AXISQ3517-SLVENetworkCamera
Contenutodellaconfezione
•TelecameradireteAXISQ3517-SLVE
•PuntadacacciaviteTR20
•ConnettoreI/O
•Protezionedelconnettore
•Guarnizioneadesiva
•Guarnizionipercaviaggiuntive
-GuarnizionepercaviM20da5mm(percavoda5a10mmdidiametro)
-KitdellaguarnizionepercaviM20da3mm(percavoda3a5mmdidiametro)
•Documentazione
-Guidaall'installazione(ilpresentedocumento)
-Sagomaperlaforatura
-Etichettaaggiuntivaconnumerodiserie(2x)
-ChiavediautenticazioneAVHS
Strumenticonsigliati
VVISO
A AAVVISO VVISO
L'acciaioinossidabileèresistenteallacorrosione,maèpossibilecheappaialaruggine
estraneaseilmaterialenonvienemaneggiatocorrettamente.Utilizzarestrumentiin
acciaioinossidabileperevitaremacchiediruggineolacorrosioneperpitting.
IT
•PuntadacacciaviteTR20(inclusa)
67
Page 68

AXISQ3517-SLVENetworkCamera
Panoramicadeldispositivo
1
Connettoredirete
2
Pulsantedicomando
3
ConnettoreI/O
4
Uscitaaudio
5
Ingressoaudio
6
ConnettoreCC
7
SlotperschedadimemoriaSD
8
LEDdistato(2x)
9
TastoFunzione
10
Riscaldatore
11
LEDainfrarossi(2x)
ATTENZIONE
Ilriscaldatorepotrebbeesserecaldo.
68
Page 69

AXISQ3517-SLVENetworkCamera
IT
1
Staffadimontaggio
2
Casingdell'unità
3
Unitàtelecamera
4
Protezionevisualizzazione
5
Coperturaacupola
69
Page 70

AXISQ3517-SLVENetworkCamera
Comeinstallareildispositivo
Installazionedell'hardware
Staffadimontaggio
ATTENZIONE
Fareattenzioneaibordimetallicitaglienti.Utilizzareguantiresistentiaitaglidurante
l'installazione
Lastaffadimontaggioèdotatadiottoforilungoilbordochedevonoessereutilizzatiperil
ssaggiodellastaffaallaparete.
Permontarelastaffasuunascatoladiderivazione,sonodisponibiliiforiancheperquesteopzioni
dimontaggio:
•Scatoladigiunzioneperunitàdoppia,adimensionistandardUSA
•Scatoladigiunzioneperunitàsingola,adimensionistandardUSA
•scatolaquadratada4"
•scatolaottagonaleda4"
Attenersialleproceduredescrittediseguito,asecondasesidesiderautilizzareunascatoladi
derivazioneoinstallareicaviattraversoolungolaparete.
Permontarelatelecamerasuunascatoladiderivazione:
1.Fissarelaguarnizioneadesivaallaparteposterioredellastaffadimontaggio.
2.Inserirenellascatoladiderivazioneilcavodirete(e,senecessario,ilmulticavo)
facendolopassareattraversoilforosullastaffadimontaggio.
3.Fissarelastaffadimontaggioallascatoladiderivazioneconlevitiinacciaioinossidabile
appropriate.
Perinstallareicaviattraversolaparete:
1.Utilizzandolasagomaperlaforatura,praticare4foripermontarelastaffaeunforo
perinstallareicavinellaparete.
2.Fissarelaguarnizioneadesivaallaparteposterioredellastaffadimontaggio.
70
Page 71

AXISQ3517-SLVENetworkCamera
3.Inserirenellapareteilcavodirete(e,senecessario,ilmulticavo)facendolopassare
attraversoilforosullastaffadimontaggio.
4.Fissarelastaffadimontaggioallapareteutilizzandolevitiinacciaioinossidabile
appropriate.
Perinstallareicavilungolapareteeneiforilateralisullastaffadimontaggio:
1.Fissarelaguarnizioneadesivaallaparteposterioredellastaffadimontaggio.
2.Svitareilconnettoredalforolateralenellastaffadimontaggio.
3.Inserireneltuboprotettivoilcavodirete(e,senecessario,ilMulticable)facendolo
passareattraversoilforosullastaffadimontaggio.
4.Fissarelastaffadimontaggioallapareteutilizzandolevitiinacciaioinossidabile
appropriate.
5.Fissareiltuboprotettivoallastaffadimontaggio.
Collegamentodeicaviessaggiodellatelecameraallastaffadimontaggio
1.InserirelaschedamicroSDnell'unitàtelecamera(opzionale).
2.Rimuoverelaguarnizionedelcavodiretedalcasingdell'unità,vederePanoramicadel
dispositivoallapagina68.
3.Tirarelalinguettadellaguarnizioneperrimuoverla,spingereilcavodireteattraverso
laguarnizioneutilizzandolaprotezionedelconnettorefornita.Tiraredelicatamenteil
cavodireteinmododaadattarelaguarnizionealcavo.
IT
VVISO
A AAVVISO VVISO
Seilcavononvienetiratopotrebberovericarsiinltrazionid'acquaedannialdispositivo.
4.Sesiutilizzauncavomultiplo,rimuoverel'altraguarnizionedelcavodalcasingdell'unità
edeliminarla.
5.Tirareicaviattraversoilcasingdell'unitàessareleguarnizionideicavialcasing
dell'unità.
6.Collegareicaviall'unitàtelecamera.
7.Allontanarelemolledelcasingdell'unitàessarel'unitàtelecameraalcasingdell'unità,
tirandoicaviattraversoleguarnizioniperridurnelalunghezzasecondolenecessità.
71
Page 72

AXISQ3517-SLVENetworkCamera
8.Avvolgerelalentezzadelcavolungolastaffadimontaggioessareilcasingdell'unità
allastaffadimontaggiocondueviti.
9.Vericarecheleguarnizionideicavisianomontatecorrettamentesulcasingdell'unitàe
suicavi.
Regolazionedell'angolodellatelecamera
1.Inclinareeruotarelatelecameraperregolarnel'angolo.Latelecamerapuòruotaredi
360°epuòinclinarsida-80°a80°.
72
Page 73

AXISQ3517-SLVENetworkCamera
2.Ruotarelatelecameraperregolarnel'angolo.Latelecamerapuòruotaredi±175°.
IT
1
LEDainfrarossiposizionaticorrettamente.
2
LEDainfrarossibloccatidallacoperturaacupola.
3.Posizionarelacoperturaacupolasullatelecamerasenzacollegareleviti.
4.VericarecheiLEDainfrarossinonsianobloccatidallacoperturaacupola.
Nota
ÈimportanteposizionarelatelecameraadunangoloinmodochelalucedeiLEDa
infrarossinonsiriettasullatelecamera.
73
Page 74

AXISQ3517-SLVENetworkCamera
1
LEDainfrarossichenonilluminanonellevicinanzeriettendosullasupercie.
2
Telecameraposizionatatroppovicinoperrietterelasupercie.
Fissaggiodellaprotezionedellavisualizzazione
1.Fissarelaprotezionedellavisualizzazioneall'unitàtelecamera.
Fissaggiodellacoperturaacupola
1.Fissarelacoperturaacupolaalcasingdell'unitàconlapuntadacacciavitefornita.
74
Page 75

AXISQ3517-SLVENetworkCamera
Nota
Fissarelacoperturaacupolaadunangolopermantenerelaposizionedell'obiettivodella
telecamera.
2.Rimuoverelapellicolaprotettivadallacoperturaacupola.
IT
Comeaccederealdispositivo
AXISIPUtilityeAXISCameraManagementsonoimetodiconsigliatipertrovareidispositiviAxisin
reteeassegnarelorounindirizzoIPinWindows®.Questeapplicazionisonoentrambegratuitee
possonoesserescaricatedalsitoWebaxis.com/support
Ildispositivopuòessereutilizzatoconlamaggiorpartedeisistemioperativiedeibrowser.I
browserconsigliatisonoiseguenti:
•InternetExplorer
•Safari
•Chrome
Perulterioriinformazionisull'utilizzodeldispositivo,consultareilManualeperl'utentedisponibile
sulsitoWeball'indirizzo:axis.com
®
conOSX
TM
®
conWindows
®
oFirefox
®
conaltrisistemioperativi.
®
Modalitàdiregolazionedellamessaafuocoedellozoom
1.AndareallaschedaImage(Immagine)sullapaginaWebdeldispositivo.
2.RegolarelafunzioneZoom.
75
Page 76

AXISQ3517-SLVENetworkCamera
3.FareclicsuAutofocus(Messaafuocoautomatica).
76
Page 77

AXISQ3517-SLVENetworkCamera
Modalitàdiripristinodeivaloripredefinitidifabbrica
Importante
Ilripristinodeivaloripredenitidifabbricadeveessereutilizzatoconcautela.Tale
operazioneconsentiràdiripristinareivaloripredenitidifabbricapertutteleimpostazioni,
inclusol'indirizzoIP.
Perripristinareildispositivoaivaloripredenitidifabbrica:
1.Scollegarel'alimentazionedaldispositivo.
2.Tenerepremutoilpulsantedicomandoquandosiricollegal'alimentazione.Consultare
Panoramicadeldispositivoallapagina68.
3.Tenerepremutoilpulsantedicomandoper15-30secondinchél'indicatoreLEDdistato
nonlampeggiaingiallo.
4.Rilasciareilpulsantedicomando.Ilprocessoècompletoquandol'indicatoredelLED
distatodiventeràverde.Ildispositivoèstatoreimpostatoalleimpostazionidifabbrica
predenite.SenessunserverDHCPèdisponibileinrete,l'indirizzoIPpredenitoè
192.168.0.90
5.Utilizzareglistrumentiperl'installazioneelagestionedelsoftwareperassegnareun
indirizzoIP,impostarelapasswordeaccederealussovideo.
Glistrumentiperl'installazioneelagestionedelsoftwaresonodisponibilinellepagine
dedicateall'assistenzasulsitoWebaxis.com/support
Èanchepossibilereimpostareiparametriaivaloripredenitidifabbricamediantel'interfaccia
Web.AndareaSettings>SystemOptions>Maintenance(Impostazioni>Opzionidisistema>
Manutenzione)efareclicsuDefault(Predenito).
IT
77
Page 78

AXISQ3517-SLVENetworkCamera
UlterioriInformazioni
•Perlaversionepiùrecentediquestodocumento,visitareilsitoall'indirizzoaxis.com
•Ilmanualeperl'utenteèdisponibileall'indirizzoaxis.com
•Pervericaresesonostatipubblicatiaggiornamentidelrmwareperilproprio
dispositivo,vedereaxis.com/support
•Perservizidiformazioneutiliewebinar,visitailsitoaxis.com/academy
Accessoriopzionali
Perunelencocompletodegliaccessoridisponibiliperquestodispositivo,andareallapaginadel
dispositivoalsitoaxis.comeselezionareSoftwareeaccessori.
78
Page 79

AXISQ3517-SLVENetworkCamera
Specifiche
Perlaversionepiùaggiornatadellaschedatecnicadeldispositivo,visitareilsitoWebaxis.come
trovarelasezioneSupportoedocumentazione.
IndicatoriLED
Nota
•IlLEDdistatopuòessereconguratoperlampeggiarequandouneventoèattivo.
LEDdistatoIndicazione
SpentoConnessioneefunzionamentonormale.
VerdeUnaluceverdessaper10secondiindicailnormale
Giallo
Giallo/rossoLampeggiaingiallo/rossoseilcollegamentodiretenonè
ComportamentodelLEDdistatoedelsegnaleacusticoperl'Assistentedi
livellamento
funzionamentounavoltacompletatol'avvio.
Lucessadurantel'avvio.Lampeggiadurantel’aggiornamento
delrmwareoilripristinodelleimpostazionipredenite.
disponibileoèstatoperso.
IT
PerinformazionisultastoFunzioneutilizzatoperillivellamentodell'immagine,vederepagina80.
Perposizionareorizzontalmentelatelecamera,tenerepremutoiltastoFunzione(2)perpiùdi
duesecondi.
•Quandolatelecameraèinposizioneorizzontale,entrambigliindicatoriLEDemettono
unaluceverdessaeilsegnaleacusticoècontinuo.
•Quandolatelecameranonèinposizioneorizzontale,iLEDlampeggianoedemettono
unalucerossa,verdeearancioneeilsegnaleacusticovieneemessoaintervallibrevi.
EntrambiiLEDemettonobrevementeunaluceverdelampeggianteaindicarecheillivellamento
stamigliorando.
SlotperschedadimemoriaSD
VVISO
A AAVVISO VVISO
•RischiodidanneggiamentodellaschedadimemoriaSD.Nonutilizzarestrumentiappuntiti
oppureoggettimetallicienonesercitareeccessivaforzadurantel'inserimentoola
rimozionedellaschedadimemoria.Utilizzareleditaperinserireerimuoverelascheda.
79
Page 80

AXISQ3517-SLVENetworkCamera
•Rischiodiperditadidatiedanneggiamentodelleregistrazioni.Nonrimuoverelaschedadi
memoriamentreildispositivoèinfunzione.Smontarelaschedadimemoriadallepagine
Webdeldispositivoprimadirimuoverla.
QuestodispositivosupportaschedemicroSD/microSDHC/microSDXC.
Visitareaxis.compericonsiglisullaschedaSD
Pulsanti
Pulsantedicomando
Perl'ubicazionedelpulsantedicomando,vederePanoramicadeldispositivoallapagina68.
Ilpulsantedicomandovieneutilizzatoper:
•Ripristinodeldispositivoalleimpostazionipredenitedifabbrica.Consultarepagina77.
•CollegarsiaunservizioAXISVideoHostingSystem.Perulterioriinformazionisuquesto
servizio,vedereilsitoaxis.com
TastoFunzione
IltastoFunzionepuòessereutilizzatoperpiùnalità:
•Assistentedilivellamento–Questafunzioneconsentedigarantirechel'immaginesiain
posizioneorizzontale.Premereilpulsantepercirca2secondiperavviarel'Assistente
dilivellamento,premerlonuovamenteperinterromperelafunzione.IlLEDdistato
(consultarepagina79)eilsegnaleacusticosonodiausilionellivellamentodell'immagine.
L'immagineèinposizioneorizzontalequandoilsegnaleacusticoècontinuo.
•PervisualizzareilLEDdistato–PremereilpulsanteunavoltaperaccendereiLEDdi
stato.Premerlodinuovoperspegnerli.ILEDsispegnerannoinmodoautomaticodopo
10secondi.
Connettori
Connettoredirete
ConnettoreEthernetRJ45conPoweroverEthernet(PoE+).
VVISO
A AAVVISO VVISO
Ildispositivodeveesserecollegatotramiteuncavodireteschermato(STP).Tuttiicavi
checolleganoildispositivoallaretesonodestinatiallorousospecico.Accertarsiche
idispositividiretesianoinstallatisecondoleistruzionidelproduttore.Permaggiori
informazionisuirequisitinormativi,consultareElectromagneticcompatibility(EMC)4.
80
Page 81

AXISQ3517-SLVENetworkCamera
Connettoreaudio
IldispositivoAxisdisponedeiseguenticonnettoriaudio:
•Ingressoaudio(rosa)-Ingressoaudioda3,5mmpermicrofonoinmonoosegnale
monoline-in.
•Uscitaaudio(verde):uscitaaudioda3,5mm(livellodilinea)chepuòessereconnessa
aunsistemadiindirizzopubblico(PA)oaunaltoparlanteattivoconamplicatore
integrato.Siconsigliadiutilizzareunconnettorestereoperl'uscitaaudio.
Perl'ingressoaudio,ilcanalesinistrovieneutilizzatodaunsegnalestereo.
Connettoriaudioda
3,5mm(stereo)
IT
1Punta2Anello
Ingressoaudio
UscitaaudioUscitalinea,monoUscitalinea,monoTerra
Ingressomicrofono/linea
Tensionepolarizzazionedel
microfono
3Guaina
Terra
ConnettoreI/O
UtilizzareilconnettoreI/Ocondispositiviesterniincombinazionecon,adesempio,rilevamento
movimento,attivazionedieventienotichediallarme.Oltrealpuntodiriferimento0VCCe
all'alimentazione(uscitaCC),ilconnettoreI/Oforniscel'interfacciaper:
Ingressodigitale-Perilcollegamentodidispositivichepossonopassaredalcircuitochiusoal
circuitoaperto,adesempioisensoriPIR,icontattiporta/nestraeirilevatoridirottura.
Ingressosupervisionato-Consentedirilevarelemanomissionisuuningressodigitale.
Uscitadigitale-PerilcollegamentodidispositiviesternicomerelèeLED.Idispositivicollegati
possonoessereattivatitramitel'API(interfacciaperlaprogrammazionediapplicazioni)VAPIX®
oppurenellapaginaWebdeldispositivo.
Morsettieraa4pin
FunzionePinNote
TerraCC
1
Speciche
0VCC
81
Page 82

AXISQ3517-SLVENetworkCamera
2
UscitaCC
Congurabile(ingressoouscita)
Esempio
Puòessereutilizzatoperalimentareunaperiferica
ausiliaria.
Nota:questopinpuòessereusatosolocome
uscitaalimentazione.
3–
Ingressodigitaleoingressosupervisionato-
4
collegarloalpin1perattivarlooppurelasciarlo
isolato(scollegato)perdisattivarlo.Perutilizzare
l'ingressosupervisionato,installareresistori
terminali.Vedereildiagrammadiconnessioneper
informazionisucomecollegareiresistori.
Uscitadigitale-collegarloalpin1perattivare
oppurelasciareisolato(scollegato)perdisattivare.
Seutilizzataconuncaricoinduttivo,adesempio
unrelè,collegareundiodoinparalleloalcarico
perproteggereildispositivodasovratensioni.
12VCC
Caricomassimo=
50mA
Da0amax30VCC
Da0amax30VCC,
open-drain,100mA
1
TerraCC
2
UscitaCC12V,max50mA
3
I/Oconguratocomeingressosupervisionato
4
I/Oconguratocomeuscita
82
Page 83

AXISQ3517-SLVENetworkCamera
Connettoredialimentazione
Morsettieraa2pinperingressoalimentazioneCC.Utilizzareuna
sorgentedialimentazionelimitata(LPS)compatibileconunabassissima
tensionedisicurezza(SELV)conunapotenzadiuscitanominalelimitata
a≤100Wounacorrentenominalediuscitalimitataa≤5A.
Condizionidifunzionamento
Dispositivo
AXISQ3517-SLVEIEC60529
Consumoenergetico
Dispositivo
AXISQ3517-SLVE
Classicazione
IP66eIP67
ClasseNEMA2504X
PoweroverEthernet(PoE)
IEEE802.3af/802.3attipo1,
classe3
Tipico6,5W
Max12,9W
Temperatura
Da-50°Ca60°C
(da-58°Fa140°F)
Umidità
10–100%umiditàrelativa
CC
Tipico6,9W
Max14,5W
83IT84
Page 84

Page 85

AXISQ3517-SLVENetworkCamera
Informazionidisicurezza
Livellidipericolo
PERICOLO
Indicaunasituazionepericolosache,senonevitata,provocamorteolesionigravi.
AVVERTENZA
Indicaunasituazionepericolosache,senonevitata,potrebbeprovocarelamorteolesioni
gravi.
ATTENZIONE
Indicaunasituazionepericolosache,senonevitata,potrebbeprovocarelesionimedie
ominori.
VVISO
A AAVVISO VVISO
Indicaunasituazioneche,senonevitata,potrebbedanneggiarelaproprietà.
Altrilivellidimessaggio
Importante
Indicainformazioniimportanti,essenzialiperilcorrettofunzionamentodeldispositivo.
Nota
Indicainformazioniutilicheaiutanoaottenereilmassimodaldispositivo.
IT
85
Page 86

AXISQ3517-SLVENetworkCamera
Informazionidisicurezza
ATTENZIONE
Fareattenzioneaibordimetallicitaglienti.Utilizzareguantiresistentiaitaglidurante
l'installazione
VVISO
A AAVVISO VVISO
•IldispositivoAxisdeveessereutilizzatoinconformitàalleleggiealledisposizionilocali.
•ConservareildispositivoAxisinunambienteasciuttoeventilato.
•Noninstallareildispositivosusupporti,superci,paretiopaliinstabili.
•UtilizzaresolostrumentiapplicabiliquandosiinstallaildispositivoAxis.Sesiutilizzauna
forzaeccessivaconstrumentinonadattièpossibilecausaredannialdispositivo.
•Utilizzaresoloaccessoricompatibiliconlespecichetecnichedeldispositivo.Questi
possonoesserefornitidaAxisodaterzeparti.Axisconsiglial'usodell'apparecchiaturadi
alimentazioneAxiscompatibileconildispositivo.
•UtilizzaresolopartidiricambioforniteoconsigliatedaAxis.
•Nontentarediriparareildispositivodasoli.Contattarel'assistenzaoilrivenditoreAxis
perquestionirelativeallamanutenzione.
Trasporto
VVISO
A AAVVISO VVISO
•DuranteiltrasportodeldispositivoAxis,utilizzarel'imballaggiooriginaleoequivalente
perevitaredannialdispositivo.
Batteria
IldispositivoAxisutilizzaunabatteriaallitioda3,0VCR2032comealimentazioneperilsuo
real-timeclock(RTC)interno.Incondizioninormaliquestabatteriaavràunadurataminima
dicinqueanni.
UnabassacaricadellabatteriainuiscesulfunzionamentodelRTC,facendoloresettareaogni
accensione.Quandolabatteriadeveesseresostituita,unmessaggiodiregistrovienevisualizzato
nelreportserverdeldispositivo.Perulterioriinformazionisulreportserver,vederelapaginaWeb
deldispositivoocontattarel'assistenzaAxis.
Lebatterieabottoneallitioda3Vcontengono1,2-dimetossietano;eteredimetilicodiglicole
etilenico(EGDME),CASn.1 10-71-4.
AVVERTENZA
•Rischiodiesplosioneselabatteriavienesostituitainmodoerrato.
•Labatteriapuòesseresostituitasoloconunabatteriaidentica.
86
Page 87

AXISQ3517-SLVENetworkCamera
•Lebatteriedevonoesseresmaltiteinbaseallenormativelocalioalleistruzionidel
produttoredellabatteria.
Coperturaacupola
VVISO
A AAVVISO VVISO
•Fareattenzioneanongrafare,danneggiareolasciareimprontesullacupoladiprotezione,
perchépotrebbediminuirelaqualitàdell'immagine.Sepossibile,tenerelaprotezionein
plasticasulcoperchiodellacupolanoaquandol'installazionenonsaràcompletata.
•Nonpulireilcoperchiodellacupolaquandoallosguardosembrapulitoenonlucidarela
supercie.Unapuliziaeccessivapotrebbedanneggiarelasupercie.
•Perlapuliziageneraledelcoperchiodellacupola,siconsigliadiutilizzareunsapone
neutroodetergentenonabrasivoconacquapuraeunpannomorbidoepulito.Sciacquare
beneconacquapuratiepida.Asciugareconunpannomorbidoepulitoperevitare
macchied'acqua.
•Nonusaremaidetergentiaggressivi,benzina,benzene,acetoneosostanzechimichesimili.
•Evitaredipulireilcoperchiodellacupolaallalucedirettadelsoleoatemperatureelevate.
IT
87
Page 88

88
Page 89

AXISQ3517-SLVENetworkCamera
Contenidodelpaquete
•AXISQ3517-SLVENetworkCamera
•BrocaTR20
•ConectordeE/S
•Protectordelconector
•Juntaadhesiva
•Juntasdecableadicionales
-JuntadecableM205mm(paracablescondiámetrode5-10mm)
-KitdejuntasM203mm(paracablescondiámetrode3-5mm)
•Materialesimpresos
-Guíadeinstalación(estedocumento)
-Plantilladeperforado
-Etiquetasadicionalesconelnúmerodeserie(2)
-ClavedeautenticaciónAVHS
Herramientasrecomendadas
VISO
A AAVISO VISO
Elaceroinoxidableesresistentealacorrosión,peropuedeapareceróxidoexternosiel
materialsemanipuladeformaincorrecta.Utiliceherramientasdeaceroinoxidablepara
evitarlaaparicióndeóxidoylacorrosiónporpicadura.
ES
•BrocaTR20(incluida)
89
Page 90

AXISQ3517-SLVENetworkCamera
Informacióngeneraldelproducto
1
Conectordered
2
Botóndecontrol
3
ConectordeE/S
4
Salidadeaudio
5
Entradadeaudio
6
ConectordeCC
7
RanuraparatarjetasSD
8
LEDdeestado(2)
9
Botóndefunción
10
Calefactor
11
LEDIR(2)
ATENCIÓN
Elcalefactorpuedeestarcaliente.
90
Page 91

AXISQ3517-SLVENetworkCamera
ES
1
2
3
4
5
Soportedemontaje
Carcasadelaunidad
Unidaddecámara
Protectorvisual
Cubiertadeldomo
91
Page 92

AXISQ3517-SLVENetworkCamera
Cómoinstalarelproducto
Instalacióndelhardware
Soportedemontaje
ATENCIÓN
Tengacuidadoconlosbordesmetálicosalados.Utiliceguantesresistentesaloscortes
durantelainstalación.
Elsoportedemontajetieneochooriciosenelbordequedebenutilizarseparasujetarelsoporte
alapared.
Sivaamontarelsoporteenunacajadeconexiones,tambiénincluyeoriciosparalassiguientes
opcionesdemontaje:
•CajadeconexionesdesalidadobledetamañoestándarparaEE.UU.
•CajadeconexionesdesalidaúnicadetamañoestándarparaEE.UU.
•Cajacuadradade10,16cm
•Cajaoctogonalde10,16cm
Enfuncióndesideseautilizarunacajadeconexionesotenderloscablesatravésoalolargodela
pared,sigalasinstruccionescorrespondientesqueaparecenacontinuación.
Parainstalarlacámaraenunacajadeconexiones:
1.Fijelajuntaadhesivaalaparteposteriordelsoportedemontaje.
2.Paseelcabledered(yelmulticablesifuesenecesario)atravésdelacajadeconexiones
ydeloricioenelsoportedemontaje.
3.Fijeelsoportedemontajealacajadeconexionesconlostornillosinoxidablesadecuados.
Paracolocarloscablesatravésdelapared:
1.Utilicelaplantilladeperforadoparahacercuatrooriciosparainstalarelsoporteyuno
parapasarelcableatravésdelapared.
2.Fijelajuntaadhesivaalaparteposteriordelsoportedemontaje.
92
Page 93

AXISQ3517-SLVENetworkCamera
3.Paseelcabledered(yelmulticablesifuesenecesario)atravésdelaparedydeloricio
enelsoportedemontaje.
4.Fijeelsoportedemontajealaparedconlostornillosinoxidablesadecuados.
Paraguiarloscablesalolargodelaparedyatravésdeloriciolateraldelsoportedemontaje:
1.Fijelajuntaadhesivaalaparteposteriordelsoportedemontaje.
2.Desenrosqueeltapóndeloriciolateraldelsoportedemontaje.
3.Paseelcabledered(yelmulticablesifuesenecesario)atravésdelconductoydel
oricioenelsoportedemontaje.
4.Fijeelsoportedemontajealaparedconlostornillosinoxidablesadecuados.
5.Fijeelconductoalsoportedemontaje.
Conexióndeloscablesyjacióndelacámaraalsoportedemontaje
1.InsertelatarjetamicroSDenlaunidaddelacámara(opcional).
2.Retirelajuntadelcabledereddelacarcasadelaunidad,consulteInformacióngeneral
delproductoenlapágina90.
3.Tiredelapestañadelajuntapararetirarlayutiliceelprotectordelconectorfacilitado
paraempujarelcablederedatravésdelajunta.Tiredelcablederedhaciaatrás
suavementedemaneraquelajuntadecableseajusteenelcable.
VISO
A AAVISO VISO
Sinosetiradelcablehaciaatrás,podríaltrarseaguaydañarelproducto.
4.Conunmulticable,retirelaotrajuntadelcabledelacarcasadelaunidadydeséchela.
5.Hagapasarloscablesatravésdelacarcasadelaunidadyjelasjuntasdelcablea
lacarcasa.
6.Conecteloscablesalacámara.
7.Separelosmuellesdelacarcasadelaunidadyjelaunidaddelacámaraalacarcasa
delaunidad,tirandodeloscablesatravésdelasjuntasdecableparaacortarlossegún
seanecesario.
ES
93
Page 94

AXISQ3517-SLVENetworkCamera
8.Enrolleelcablesobranteenelsoportedemontajeyjelacarcasadelaunidadenel
soportedemontajeconlosdostornillos.
9.Compruebequelasjuntasdecablehanquedadomontadascorrectamenteconrespectoa
lacarcasadelaunidadyloscables.
Ajustedelángulodelacámara
1.Muevalacámaraenhorizontalyverticalparaajustarelángulo.Lacámarapuede
moverse360°enhorizontalyde-80°a80°envertical.
94
Page 95

AXISQ3517-SLVENetworkCamera
2.Girelacámaraparaajustarelángulo.Lacámarapuedegirar±175°.
ES
1
LEDIRcolocadoscorrectamente.
2
LEDIRbloqueadosporlacubiertadeldomo.
3.Coloquelacubiertadeldomosobrelacámarasinjarlostornillos.
4.CompruebequelosLEDIRnoesténbloqueadosporlacubiertadeldomo.
Nota
EsimportantecolocarlacámaraenunángulodemaneraquelaluzdelosLEDIRnose
reejeenlacámara.
95
Page 96

AXISQ3517-SLVENetworkCamera
1
LEDIRnoiluminandocercadelasuperciereectante.
2
Cámaracolocadademasiadocercadelasuperciereectante.
Colocacióndelprotectorvisual
1.Fijeelprotectorvisualalaunidaddelacámara.
Colocacióndelacubiertadeldomo
1.Fijelacubiertadeldomoalacarcasadelaunidadconlabrocasuministrada.
96
Page 97

AXISQ3517-SLVENetworkCamera
Nota
Fijelacubiertadeldomoenunánguloquemantengalaposicióndelobjetivodelacámara.
2.Retirelapelículaprotectoradelacubiertadeldomo.
ES
Cómoaccederalproducto
SerecomiendanAXISIPUtilityyAXISCameraManagementcomométodosparabuscarlos
productosdeAxisenlaredyasignarlesdireccionesIPenWindows®.Ambasaplicacionesson
gratuitasypuedendescargasedeaxis.com/support.
Elproductosepuedeutilizarconlamayoríadelossistemasoperativosynavegadores.Los
navegadoresrecomendadosson:
•InternetExplorer
•Safari
•Chrome
Paraobtenermásinformaciónsobreelusodelproducto,consulteelmanualdelusuario,disponible
enaxis.com.
®
conOSX
TM
®
conWindows
®
oFirefox
®
conotrossistemasoperativos.
®
Cómoajustarelenfoqueyelzoom
1.VayaalapestañaImage(Imagen)enlapáginawebdelproducto.
2.AjusteelZoom.
3.HagaclicenAutofocus(Enfoqueautomático).
97
Page 98

AXISQ3517-SLVENetworkCamera
Cómorestablecerlaconfiguraciónpredeterminada
defábrica
Importante
Esprecisotenercuidadosisevaarestablecerlaconguraciónpredeterminadade
fábrica.Todoslosvalores,incluidaladirecciónIP,serestableceránalaconguración
predeterminadadefábrica.
Pararestablecerelproductoalaconguraciónpredeterminadadefábrica:
1.Desconectelaalimentacióndelproducto.
2.Mantengapulsadoelbotóndecontrolmientrasvuelveaconectarlaalimentación.
ConsulteInformacióngeneraldelproductoenlapágina90.
3.Mantengapulsadoelbotóndecontroldurante15-30segundoshastaqueelindicador
LEDdeestadoparpadeeenámbar.
4.Suelteelbotóndecontrol.ElprocesonalizacuandoelindicadorLEDdeestadosepone
verde.Elproductoseharestablecidoalaconguraciónpredeterminadadefábrica.Si
nohayningúnservidorDHCPdisponibleenlared,ladirecciónIPpredeterminadaes
192.168.0.90.
5.Utilicelasherramientasdelsoftwaredeinstalaciónygestiónparaasignarunadirección
IP,establecerlacontraseñayaccederalatransmisióndevídeo.
Lasherramientasdesoftwaredeinstalaciónygestiónestándisponiblesenlaspáginas
deserviciotécnicodeaxis.com/support
Tambiénesposiblerestablecerlosparámetrosalosvalorespredeterminadosdefábricamediantela
interfazweb.VayaaSettings>SystemOptions>Maintenance(Conguración>Opcionesdel
sistema>Mantenimiento)yhagaclicenDefault(Predeterminado).
98
Page 99

AXISQ3517-SLVENetworkCamera
Másinformación
•Paraconsultarlaversiónmásrecientedeestedocumento,vayaaaxis.com.
•Elmanualdeusuarioseencuentradisponibleenaxis.com.
•Paracomprobarsiexisteunrmwareactualizadodisponibleparasudispositivo,vaya
aaxis.com/support.
•Paraconsultarwebinarsycursosenlíneaquepuedenresultarleútiles,vayaa
axis.com/academy.
Accesoriosopcionales
Paraconocerunalistacompletadelosaccesoriosdisponiblesparaesteproducto,vayaalapágina
deproductosenaxis.comyseleccioneSoftwareyaccesorios.
ES
99
Page 100

AXISQ3517-SLVENetworkCamera
Especificaciones
Paraaccederalaversiónmásrecientedelahojadedatosdelproducto,visitelapáginadel
productoenaxis.comylocaliceSoportetécnicoydocumentación.
IndicadoresLED
Nota
•SepuedecongurarelLEDEstadoparaqueparpadeemientrashayauneventoactivo.
LEDdeestado
Apagado
Verde
Ámbar
Ámbar/rojo
Indicación
Conexiónyfuncionamientonormal.
Semuestrajodurantediezsegundosparaindicarun
funcionamientonormaldespuésdecompletarelinicio.
Fijoduranteelinicio.Parpadeaenverdedurantelaactualización
delrmwareoelrestablecimientoalaconguración
predeterminadadefábrica.
Parpadeaenámbar/rojosilaconexiónalarednoestádisponible
osehaperdido.
ComportamientodelindicadorLEDdeestadoylaseñaldelavisadoracústico
conelAsistentedenivelación
Paraobtenerinformaciónsobreelbotóndefunciónqueseusaparanivelarlaimagen,consulte
página101.
Mantengapulsadoelbotóndefunción(2)durantemásdedossegundosparanivelarlacámara.
•Cuandolacámaraesténivelada,ambosLEDseiluminanenverdejoyelavisador
acústicoemiteunsonidocontinuo.
•Sinoestánivelada,losLEDparpadeanenrojo,verdeynaranjayelsonidoseemite
enintervaloslentos.
LosdosLEDparpadeanbrevementeenverdeparaindicarquelanivelaciónestámejorando.
RanuraparatarjetasSD
VISO
A AAVISO VISO
•RiesgodedañosenlatarjetaSD.Noempleeherramientasaladas,objetosdemetal
nidemasiadafuerzaalinsertaroextraerlatarjetaSD.Utilicelosdedosparainsertar
oextraerlatarjeta.
100
 Loading...