

Page 1

AXISQ16NetworkCameraSeries
AXISQ1645-LENetworkCamera
AXISQ1647-LENetworkCamera
InstallationGuide
Page 2

Readthisrst
ReadthroughthisInstallationGuidecarefullybefore
installingtheproduct.KeeptheInstallationGuidefor
futurereference.
Legalconsiderations
Videoandaudiosurveillancecanberegulatedbylawsthat
varyfromcountrytocountry.Checkthelawsinyourlocal
regionbeforeusingthisproductforsurveillancepurposes.
Thisproductincludesthefollowinglicences:
•one(1)AACdecoderlicense
•one(1)H.264decoderlicense
Topurchasefurtherlicenses,contactyourreseller.
Liability
Everycarehasbeentakeninthepreparationofthis
document.PleaseinformyourlocalAxisofceofany
inaccuraciesoromissions.AxisCommunicationsABcannot
beheldresponsibleforanytechnicalortypographicalerrors
andreservestherighttomakechangestotheproductand
manualswithoutpriornotice.AxisCommunicationsAB
makesnowarrantyofanykindwithregardtothematerial
containedwithinthisdocument,including,butnotlimited
to,theimpliedwarrantiesofmerchantabilityandtnessfor
aparticularpurpose.AxisCommunicationsABshallnot
beliablenorresponsibleforincidentalorconsequential
damagesinconnectionwiththefurnishing,performance
oruseofthismaterial.Thisproductisonlytobeusedfor
itsintendedpurpose.
Intellectualpropertyrights
AxisABhasintellectualpropertyrightsrelatingto
technologyembodiedintheproductdescribedinthis
document.Inparticular,andwithoutlimitation,these
intellectualpropertyrightsmayincludeoneormoreof
thepatentslistedataxis.com/patentandoneormore
additionalpatentsorpendingpatentapplicationsinthe
USandothercountries.
Thisproductcontainslicensedthird-partysoftware.See
themenuitem“About”intheproduct’suserinterfacefor
moreinformation.
ThisproductcontainssourcecodecopyrightApple
Computer,Inc.,underthetermsofApplePublicSource
License2.0(seeopensource.apple.com/apsl).Thesource
codeisavailablefromdeveloper.apple.com/bonjour/
Equipmentmodications
Thisequipmentmustbeinstalledandusedin
strictaccordancewiththeinstructionsgiveninthe
userdocumentation.Thisequipmentcontainsno
user-serviceablecomponents.Unauthorizedequipment
changesormodicationswillinvalidateallapplicable
regulatorycerticationsandapprovals.
Trademarkacknowledgements
AXISCOMMUNICATIONS,AXISandVAPIXareregistered
trademarksortrademarkapplicationsofAxisABinvarious
jurisdictions.Allothercompanynamesandproductsare
trademarksorregisteredtrademarksoftheirrespective
companies.
Apple,Apache,Bonjour,Ethernet,InternetExplorer,
Linux,Microsoft,Mozilla,Real,SMPTE,QuickTime,UNIX,
Windows,andWWWareregisteredtrademarksofthe
respectiveholders.JavaandallJava-basedtrademarksand
logosaretrademarksorregisteredtrademarksofOracle
and/oritsafliates.TheUPnPWordMarkandUPnPLogo
aretrademarksofOpenConnectivityFoundation,Inc.in
theUnitedStatesorothercountries.
SD,SDHCandSDXCaretrademarksorregisteredtrademarks
ofSD-3C,LLCintheUnitedStates,othercountriesorboth.
Also,miniSD,microSD,miniSDHC,microSDHC,microSDXC
arealltrademarksorregisteredtrademarksofSD-3C,LLC
intheUnitedStates,othercountriesorboth.
Regulatoryinformation
Europe
ThisproductcomplieswiththeapplicableCEmarking
directivesandharmonizedstandards:
•ElectromagneticCompatibility(EMC)Directive
2014/30/EU.SeeElectromagneticcompatibility(EMC)
onpage2.
•LowVoltageDirective(LVD)2014/35/EU.SeeSafety
onpage3.
•RestrictionsofHazardousSubstances(RoHS)Directive
201 1/65/EU.SeeDisposalandrecyclingonpage3.
Acopyoftheoriginaldeclarationofconformitymaybe
obtainedfromAxisCommunicationsAB.SeeContact
informationonpage3.
Electromagneticcompatibility(EMC)
Thisequipmenthasbeendesignedandtestedtofulll
applicablestandardsfor:
•Radiofrequencyemissionwheninstalledaccordingto
theinstructionsandusedinitsintendedenvironment.
•Immunitytoelectricalandelectromagneticphenomena
wheninstalledaccordingtotheinstructionsandused
initsintendedenvironment.
USA
Thisequipmenthasbeentestedusinganunshielded
networkcable(UTP)andfoundtocomplywiththelimits
foraClassAdigitaldevice,pursuanttopart15oftheFCC
rules.Thisequipmenthasalsobeentestedusingashielded
networkcable(STP)andfoundtocomplywiththelimitsfor
aClassAdigitaldevice,pursuanttopart15oftheFCCrules.
Theselimitsaredesignedtoprovidereasonableprotection
againstharmfulinterferencewhentheequipmentis
operatedinacommercialenvironment.Thisequipment
generates,uses,andcanradiateradiofrequencyenergy
and,ifnotinstalledandusedinaccordancewiththe
instructionmanual,maycauseharmfulinterferenceto
radiocommunications.Operationofthisequipmentin
aresidentialareaislikelytocauseharmfulinterference
inwhichcasetheuserwillberequiredtocorrectthe
interferenceathisownexpense.
Canada
ThisdigitalapparatuscomplieswithCANICES-3(ClassA).
Theproductshallbeconnectedusingashieldednetwork
cable(STP)thatisproperlygrounded.Cetappareil
numériqueestconformeàlanormeCANNMB-3(classeA).
Leproduitdoitêtreconnectéàl'aided'uncâbleréseau
blindé(STP)quiestcorrectementmisàlaterre.
Europe
ThisdigitalequipmentfulllstherequirementsforRF
emissionaccordingtotheClassAlimitofEN55032.The
productshallbeconnectedusingashieldednetworkcable
(STP)thatisproperlygrounded.Notice!ThisisaClassA
product.Inadomesticenvironmentthisproductmaycause
RFinterference,inwhichcasetheusermayberequired
totakeadequatemeasures.
Australia/NewZealand
ThisdigitalequipmentfulllstherequirementsforRF
emissionaccordingtotheClassAlimitofAS/NZSCISPR32.
Theproductshallbeconnectedusingashieldednetwork
Page 3
cable(STP)thatisproperlygrounded.Notice!Thisisa
ClassAproduct.Inadomesticenvironmentthisproduct
maycauseRFinterference,inwhichcasetheusermaybe
requiredtotakeadequatemeasures.
Japan
この装置は、クラスA情報技術装置です。この装
置を家庭環境で使⽤すると電波妨害を引き起こす
ことがあります。この場合には使⽤者が適切な対
策を講ずるよう要求されることがあります。本
製品は、シールドネットワークケーブル(STP)を
使⽤して接続してください。また適切に接地し
てください。
Korea
이기기는업무용환경에서사용할목적으로적합
성평가를받은기기로서가정용환경에서사용하
는경우전파간섭의우려가있습니다.적절히접지
된STP(shieldedtwistedpair)케이블을사용하여
제품을연결하십시오.
Safety
ThisproductcomplieswithIEC/EN/UL62368-1,safetyof
audio/videoandITequipment,andIEC/EN/UL60950-22,
SafetyofInformationTechnologyEquipment.Theproduct
mustbegroundedwithagroundingcable.
WhenusedwithPoweroverEthernet(PoE)thePower
sourcingequipment(PSE)shallcomplywithIEEE
802.3af/802.3atandLimitedPowerSource(LPS)according
toclause2.5ofIEC/EN/UL60950-1orannexQof
IEC/EN/UL62368-1.
AxisrecommendstheuseofAxismidspansofAxisPoE
switches.
Disposalandrecycling
Whenthisproducthasreachedtheendofitsusefullife,
disposeofitaccordingtolocallawsandregulations.For
informationaboutyournearestdesignatedcollectionpoint,
contactyourlocalauthorityresponsibleforwastedisposal.
Inaccordancewithlocallegislation,penaltiesmaybe
applicableforincorrectdisposalofthiswaste.
Europe
Thissymbolmeansthattheproductshallnotbe
disposedoftogetherwithhouseholdorcommercialwaste.
Directive2012/19/EUonwasteelectricalandelectronic
equipment(WEEE)isapplicableintheEuropeanUnion
memberstates.Topreventpotentialharmtohumanhealth
andtheenvironment,theproductmustbedisposedofin
anapprovedandenvironmentallysaferecyclingprocess.
Forinformationaboutyournearestdesignatedcollection
point,contactyourlocalauthorityresponsibleforwaste
disposal.Businessesshouldcontacttheproductsupplierfor
informationabouthowtodisposeofthisproductcorrectly.
Thisproductcomplieswiththerequirementsof
Directive201 1/65/EUontherestrictionoftheuseof
certainhazardoussubstancesinelectricalandelectronic
equipment(RoHS).
China
有毒有害物质或元素
部
件
名
称
电
气
实
装
部
分
0:表示该有毒有害物质在该部件所有均质材料中
的含量均在GB/T26572标准规定的限量要求以下。
X:表示该有毒有害物质至少在该部件的某一均质
材料中的含量超出GB/T26572标准规定的限量要
求。
Contactinformation
AxisCommunicationsAB
Emdalavägen14
22369Lund
Sweden
Tel:+46462721800
Fax:+4646136130
axis.com
汞
铅
(Pb)
X
镉
(Hg)
(Cd)
00000
六价
多溴
铬
联苯
(Cr-
(PB-
(VI))
B)
Warrantyinformation
ForinformationaboutAxis’productwarrantyandthereto
relatedinformation,gotoaxis.com/warranty
Support
Shouldyourequireanytechnicalassistance,pleasecontact
yourAxisreseller.Ifyourquestionscannotbeanswered
immediately,yourresellerwillforwardyourqueriesthrough
theappropriatechannelstoensurearapidresponse.Ifyou
areconnectedtotheInternet,youcan:
•downloaduserdocumentationandsoftwareupdates
•ndanswerstoresolvedproblemsintheFAQdatabase,
searchbyproduct,category,orphrase
•reportproblemstoAxissupportstaffbylogginginto
yourprivatesupportarea
•chatwithAxissupportstaff
•visitAxisSupportataxis.com/support
Learnmore!
VisitAxislearningcenteraxis.com/academyforuseful
trainings,webinars,tutorialsandguides.
多溴
二苯
醚
(PBDE)
Thisproductcomplieswiththerequirementsof
SJ/T11364-2014,Markingfortherestrictionofhazardous
substancesinelectricalandelectronicproducts.
Page 4

Page 5

Packagecontents
•AXISQ1645–LE/Q1647–LENetworkCamera
•Wallmount
•TorxscrewdriverT20
•TorxscrewbitT30
•Printedmaterials
-InstallationGuide(thisdocument)
-Extraserialnumberlabel(x2)
-AVHSAuthenticationkey
AXISQ16NetworkCameraSeries
5
Page 6
AXISQ16NetworkCameraSeries
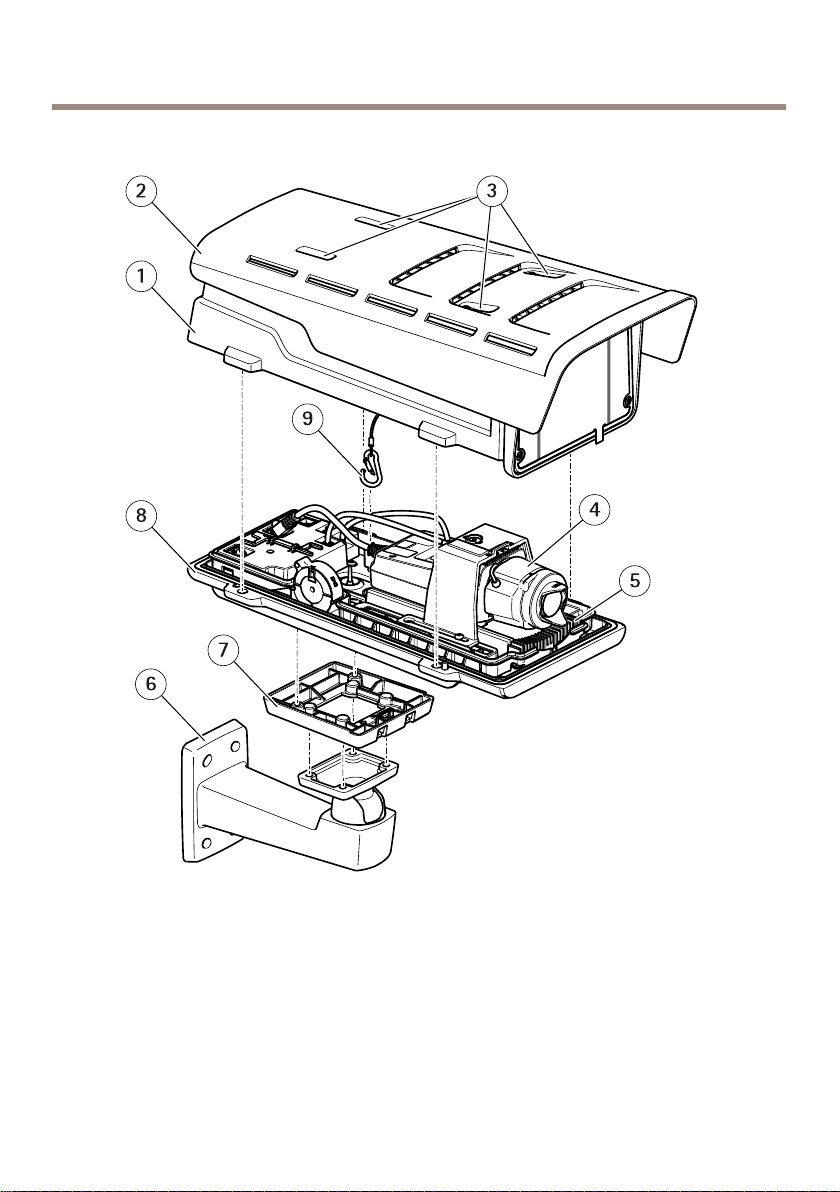
Productoverview
1
Topcover
2
Sunshield
3
Sunshieldadjustmentscrews
4
Networkcamera
5
Heater
6
Wallmount
7
Wallmountadapter
8
Bottomcover
9
Safetyhook
6
Page 7
AXISQ16NetworkCameraSeries
1
Networkconnector(PoEin)
2
PoEclassLED
3
IK10tool
4
Networkconnector(PoEout)
5
Coldstartupdelayswitch(Pos1:Startup-20°,Pos2:Startup:0°)
6
Camerahousingcommunicationcable
7
Cameraheater
8
Safetyhookanchor
9
Cablegasket(x2)
10
Fan
11
Controlbutton(1)
12
Functionbutton(2)
13
microSDCardslot
14
Audioin
15
Audioout
16
I/Oconnector
17
Irisconnector
18
Camerahousingcommunicationconnector
7
Page 8

AXISQ16NetworkCameraSeries
19
Powerconnector(Indooruseonly)
20
PowerLEDindicator
21
NetworkLEDindicator
22
RS485/RS422connector
8
Page 9

AXISQ16NetworkCameraSeries
Howtoinstalltheproduct
Installthehardware
NO
TICE
NO NO
TICE TICE
•Duetolocalregulationsortheenvironmentalandelectricalconditionsinwhichthe
productistobeused,ashieldednetworkcable(STP)maybeappropriateorrequired.
Allcablesconnectingtheproducttothenetworkandthatareroutedoutdoorsorin
demandingelectricalenvironmentsshallbeintendedfortheirspecicuse.Makesurethat
thenetworkdevicesareinstalledinaccordancewiththemanufacturer’sinstructions.
Forinformationaboutregulatoryrequirements,seeRegulatoryinformationonpage2
•Becarefulnottoscratch,damageorleavengerprintsonthewindowbecausethiscould
decreaseimagequality.
TheAxisproductcanbeinstalledwiththecablesroutedthroughoralongthewall.
Readalltheinstructionsbeforeinstallingtheproduct.
InstalltheWallMount
CAUTION
Makesurethatthescrewsandplugsareappropriateforthematerial(e.g.wood,metal,
drywall,stone)andthatthematerialisstrongenoughtosupportthecombinedweight
ofthecamera,housing,andwallmount.
1.Preparethewallforinstallationofthewallmount.Usethewallbracketasatemplate
andmarktheholesbeforedrillingtheholes.
2.Routethenetworkcablethroughthewallbracket.Leaveapproximately30cm(11.8in)of
cableforconnectingthecamera.
3.Ifconnectinganauxiliarydevice,forexampleanI/O,audio,orexternalpowerdevice,to
thecamera,repeatthestepaboveasapplicabletothespecicdevice.
4.Fastenthewallbrackettothewallbytighteningthescrews.
Note
•Fordetailedinstructions,seethewallmount’sInstallationGuidesuppliedinthepackage
andavailableonwww.axis.com
HowtopositionthelensforIK10
Note
IK10lenspositionisfactorydefault.Followinstructionstorepositionifnecessary.
9
Page 10
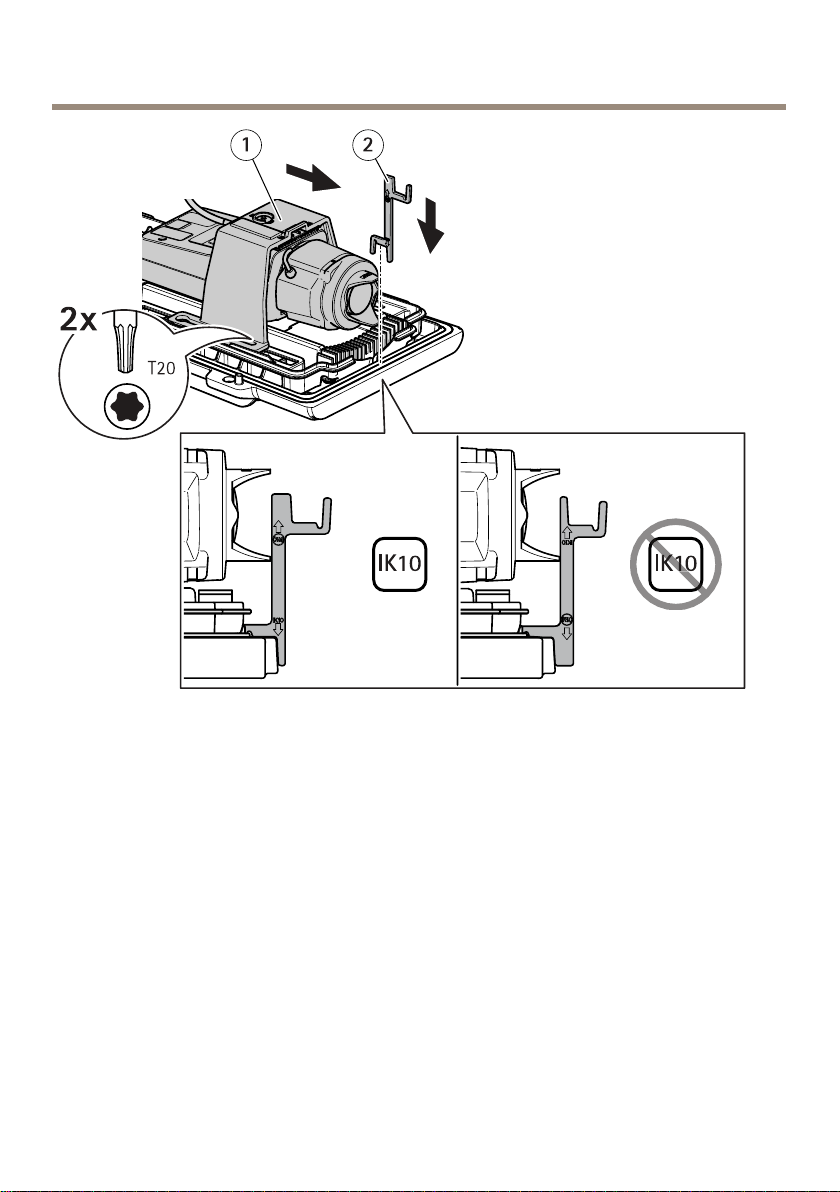
AXISQ16NetworkCameraSeries
1
Cameraunit
2
IK10tool
1.Zoomthelenstoitswidestposition.
2.AttachtheIK10tooltothebottomcover.
3.Loosenthescrewsthatholdthecameraunit.
4.Movethecameraunitsothatthelenstouchesthetool.
5.Tightenthetwoscrews(torque2Nm).
10
Page 11

Installthecamera
AXISQ16NetworkCameraSeries
1.Putthewallmountadapteronthewallmountandtightenthefourscrews(torque2Nm).
11
Page 12

AXISQ16NetworkCameraSeries
2.Placethebottomcoverlatchestothewallmountadapterandsecureitinavertical
position.
12
Page 13

AXISQ16NetworkCameraSeries
WARNING
Riskofelectricshock.Theproductshallbegroundedusingagroundingwire.Makesure
bothendsofthegroundingwireareincontactwiththeirrespectivegroundingsurfaces.
3.Pushthenetworkcablethroughthecablegasket.
13
Page 14

AXISQ16NetworkCameraSeries
NO
TICE
NO NO
TICE TICE
Ifthenetworkcameracablehasapremountednetworkconnector,removethecablegasket
andusetheconnectorguardtopreventtearingofthecablegasket.Avoidusingnetwork
cableswithcappednetworkconnectorsbecausetheycouldcausetearingofthecable
gasketdespiteusingtheconnectorguard.
4.Pullthenetworkcablebackslightlysothatthecablegasketadjustsitselfonthecable.
NO
TICE
NO NO
TICE TICE
Notpullingthecablebackcouldcausewatertoseepinanddamagetheproduct.
5.ConnectthenetworkcabletothePoEconnector.
Important
ThePoEclassLEDwillshowgreeniftheconnectionmeetrecommendedPoEClass4
requirements.PoEClass3willimpacthousingfunctionality.
14
Page 15

AXISQ16NetworkCameraSeries
6.Tiltthebottomcoverbackinhorizontalposition.
7.Fastenthebottomcovertothewallmountadapterbytighteningthetwoscrews(torque
2Nm).
15
Page 16

AXISQ16NetworkCameraSeries
8.Adjustthecamera’sverticalandhorizontalpositionandlockitbytighteningthescrew
(torque5-6Nm).
16
Page 17

AXISQ16NetworkCameraSeries
9.Attachthesafetyhooktothesafetyhookanchor.
17
Page 18

AXISQ16NetworkCameraSeries
10.Placethetopcoveronthebottomcoverandtightenthefourscrews(torque2Nm).
11.Removetheplasticlmfromthewindow.
Howtoaccesstheproduct
AXISIPUtilityandAXISDeviceManagerarerecommendedmethodsforndingAxisproductson
thenetworkandassigningthemIPaddressesinWindows®.Bothapplicationsarefreeandcanbe
downloadedfromaxis.com/support
Theproductcanbeusedwiththefollowingbrowsers:
•Windows
®
:Chrome
•OSX®:Chrome
•Otheroperatingsystems:Chrome
Tondoutmoreabouthowtousetheproduct,seetheUserManualavailableataxis.com
Ifyouneedmoreinformationaboutrecommendedbrowsers,gotoaxis.com/browser-support
TM
(recommended),Firefox
TM
(recommended)orSafari
®
®
,Edge
,orOpera
®
TM
orFirefox
®
.
®
18
Page 19

AXISQ16NetworkCameraSeries
Howtoadjustfocusandzoom
Ifthecameraismountedsothatyoucannotlookattheimageandaccessthelensatthesame
time,usetheFocusAssistant,seeHowtoadjustfocuswiththeFocusAssistantonpage20.
1.GototheImagetabintheproduct'swebpage.
2.AdjustZoom.
3.ClickAutofocus.
Howtoreplacethelens
1.Stopallrecordingsanddisconnectpowerfromtheproduct.
2.Disconnectthelenscableandremovethestandardlens.
3.Attachthenewlensandconnectthelenscable.
4.Reconnectthepower.
5.Logintotheproduct’swebpage,gototheImagetabandthenselecttheP-Irislens
youhaveinstalled.
Note
IfyouuseaDCirislens,selectGenericDCIris.
6.Forthechangestotakeeffect,youneedtorestartthedevice.GotoSystem>
MaintenanceandclickRestart.
7.Adjustthezoomandfocus.
Howtoadjustfocusandzoomforoptionallenses
Ifthecameraismountedsothatyoucannotlookattheimageandaccessthelensatthesame
time,usetheFocusAssistant,seeHowtoadjustfocuswiththeFocusAssistantonpage20.
1.GototheImagetabintheproduct'swebpage.
2.ClickAutofocus
3.Loosenthezoomandfocuspullersonthelensbyturningthemcounter-clockwise.
SeeProductoverviewonpage6.
4.Movethepullerstosetzoomandfocusandcheckthequalityoftheimageintheimage
window.
5.Re-tightenthezoomandfocuspullers.
6.ClickAutofocus.
19
Page 20

AXISQ16NetworkCameraSeries
HowtoadjustfocuswiththeFocusAssistant
Note
OnlyvalidforoptionalP-iris,DC-irisormanualirislenses.
•Theviewinfrontofthecamerashouldnotbechangedduringfocusadjustment.Ifthe
cameraismoved,orifangerorotherobjectisplacedinfrontofthelens,restartthe
procedure.
•Ifmovementsinfrontofthecameracannotbeavoided,theFocusAssistantshouldnot
beused.
1.Mountorplacethecamerasothatitcannotbemoved.
2.Loosenthezoompullerbyturningitanti-clockwise.Movethepullertosetthezoom
level.Retightenthezoompuller.
3.Setthecameratoitsextremedistant-focuspositionbylooseningthefocuspullerand
turningthefocusringfullyclockwise.
4.Pressandquicklyreleasethefunctionbutton.Whenthestatusindicatorashes,the
FocusAssistantisenabled.
5.Gentlyturnthefocusringanti-clockwiseuntilitstops.
6.Turnthefocusringslowlyclockwiseuntilthestatusindicatorashesgreen.
7.ToexittheFocusAssistant,pressthefunctionbutton.Ifyoucannotaccessthefunction
button,theFocusAssistantisswitchedoffautomaticallyafter15minutes.
8.Re-tightenthefocuspuller.
9.GototheImagetabintheproduct'swebpage.
10.ClickAutofocusandfollowtheinstructionsfromthewizard.
20
Page 21

AXISQ16NetworkCameraSeries
Howtoresettofactorydefaultsettings
Important
Resettofactorydefaultshouldbeusedwithcaution.Aresettofactorydefaultresetsall
settings,includingtheIPaddress,tothefactorydefaultvalues.
Toresettheproducttothefactorydefaultsettings:
1.Disconnectpowerfromtheproduct.
2.Pressandholdthecontrolbuttonwhilereconnectingpower.SeeProductoverviewon
page6.
3.Keepthecontrolbuttonpressedfor15–30secondsuntilthestatusLEDindicatorashes
amber.
4.Releasethecontrolbutton.TheprocessiscompletewhenthestatusLEDindicatorturns
green.Theproducthasbeenresettothefactorydefaultsettings.IfnoDHCPserveris
availableonthenetwork,thedefaultIPaddressis192.168.0.90
5.UsetheinstallationandmanagementsoftwaretoolstoassignanIPaddress,setthe
password,andaccessthevideostream.
Theinstallationandmanagementsoftwaretoolsareavailablefromthesupportpages
onaxis.com/support
Itisalsopossibletoresetparameterstofactorydefaultviathewebinterface.GotoSettings
>System>MaintenanceandclickDefault.
21
Page 22

AXISQ16NetworkCameraSeries
Furtherinformation
•Forthelatestversionofthisdocument,seeaxis.com
•Theusermanualisavailableataxis.com
•Tocheckifthereisupdatedrmwareavailableforyourdevice,seeaxis.com/support
•Forusefulonlinetrainingsandwebinars,seeaxis.com/academy
Optionalaccessories
Foracompletelistofavailableaccessoriesforthisproduct,gototheproduct’spageonaxis.com
andselectSoftware&Accessories.
22
Page 23

AXISQ16NetworkCameraSeries
Specifications
Tondthelatestversionoftheproduct’sdatasheet,gototheproductpageonaxis.comand
locateSupport&Documentation.
LEDindicators
Note
TheStatusLEDcanbeconguredtoashwhileaneventisactive.
StatusLED
GreenSteadygreenfornormaloperation.
Amber
NetworkLEDIndication
Green
Amber
UnlitNonetworkconnection.
PowerLEDIndication
Green
Amber
Indication
Steadyduringstartup.Flasheswhenrestoringsettings.
Steadyforconnectiontoa100Mbit/snetwork.Flashesfor
networkactivity.
Steadyforconnectiontoa10Mbit/snetwork.Flashesfor
networkactivity.
Normaloperation.
Flashesgreen/amberduringrmwareupgrade.
HousingLEDindicators
PoEClassLED
GreenSteadygreenforPoEClass4andfullhousingfunctionality.
Unlit
Indication
PoEClass3andlimitedhousingfunctionality.
StatusLEDbehaviorforfocusassistant
Note
OnlyvalidforoptionalP-iris,DC-irisormanualirislenses.
ThestatusLEDasheswhentheFocusAssistantisactive.
23
Page 24

AXISQ16NetworkCameraSeries
Color
RedTheimageisoutoffocus.
AmberTheimageisclosetofocus.
Green
Buzzersignalforfocusassistant
Note
OnlyvalidforoptionalP-iris,DC-irisormanualirislenses.
BuzzerLens
Fastinterval
MediumintervalLessoptimallyadjusted
Slowinterval
StatusLEDbehaviorandbuzzersignalforlevelingassistant
Forinformationonthefunctionbuttonusedforlevelingthecamera,seepage25.
Pressandholdthefunctionbutton(2)formorethantwosecondstolevelthecamera.
•Whenthecameraislevel,bothLEDsaresteadygreen,andthebeepiscontinuous.
•Whenthecameraisnotlevel,theLEDsashacombinationofred,greenandorange,and
BothLEDsbrieyashgreentoindicatethatthelevelingisgettingbetter.
Indication
Adjustthelens.
Thelensneedsnetuning.
Theimageisinfocus.
Optimallyadjusted
Poorlyadjusted
thebeepoccursatslowintervals.
SDcardslot
NO
TICE
NO NO
TICE TICE
•RiskofdamagetoSDcard.Donotusesharptools,metalobjects,orexcessiveforcewhen
insertingorremovingtheSDcard.Useyourngerstoinsertandremovethecard.
•Riskofdatalossandcorruptedrecordings.DonotremovetheSDcardwhiletheproduct
isrunning.UnmounttheSDcardfromtheproduct’swebpagebeforeremoval.
ThisproductsupportsmicroSD/microSDHC/microSDXCcards.
ForSDcardrecommendations,seeaxis.com
24
Page 25

AXISQ16NetworkCameraSeries
Buttons
Controlbutton
Forlocationofthecontrolbutton,seeProductoverviewonpage6.
Thecontrolbuttonisusedfor:
•EnablingtheFocusAssistant.Pressandveryquicklyreleasethecontrolbutton.
•Resettingtheproducttofactorydefaultsettings.Seepage21.
•ConnectingtoanAXISVideoHostingSystemservice.Tondoutmoreaboutthis
service,seeaxis.com
Functionbutton
Note
FocusassistantisonlyvalidforoptionalP-iris,DC-irisormanualirislenses.
Thefunctionbuttonhasmultiplefunctions:
•Levelingassistant–Thisfunctionhelpstoensurethecameraislevel.Pressthebutton
forabout3secondstostartthelevelingassistantandpressagaintostoptheleveling
assistant.ThestatusLEDandbuzzersignalassistlevelingofthecamera,seeStatusLED
behaviorandbuzzersignalforlevelingassistantonpage24.Thecameraislevelwhen
thebuzzerbeepscontinuously.
•Focusassistant–Thisfunctionisusedforenablingthefocusassistant.Toenablethe
focusassistant,pressandveryquicklyreleasethebutton.Pressagaintostopthefocus
assistant.
Connectors
Networkconnector
RJ45EthernetconnectorwithPoweroverEthernet(PoE).
NO
TICE
NO NO
TICE TICE
Duetolocalregulationsortheenvironmentalandelectricalconditionsinwhichtheproduct
istobeused,ashieldednetworkcable(STP)maybeappropriateorrequired.Allcables
connectingtheproducttothenetworkandthatareroutedoutdoorsorindemanding
electricalenvironmentsshallbeintendedfortheirspecicuse.Makesurethatthenetwork
devicesareinstalledinaccordancewiththemanufacturer’sinstructions.Forinformation
aboutregulatoryrequirements,seeElectromagneticcompatibility(EMC)onpage2.
25
Page 26

AXISQ16NetworkCameraSeries
Audioconnector
TheAxisproducthasthefollowingaudioconnectors:
•Audioin(pink)–3.5mminputforamonomicrophone,oraline-inmonosignal.
•Audioout(green)–3.5mmoutputforaudio(linelevel)thatcanbeconnected
toapublicaddress(PA)systemoranactivespeakerwithabuilt-inamplier.Itis
recommendedtouseastereoconnectorforaudioout.
3.5mmaudioconnectors
1Tip2Ring
AudioInputBalanced:‘Hot’signal
AudioOutput
Theinternalmicrophoneisusedbydefault;theexternalmicrophoneisusedwhenconnected.Itis
possibletodisabletheinternalmicrophonebyconnectingaplugtothemicrophoneinput.
Microphone/Linein
Unbalanced:Microphone/Line
in
Lineout,monoLineout,mono
Balanced:‘Cold’signal
Microphone/Linein
Unbalanced:Unused
3Sleeve
Ground
Ground
I/Oconnector
UsetheI/Oconnectorwithexternaldevicesincombinationwith,forexample,motiondetection,
eventtriggering,andalarmnotications.Inadditiontothe0VDCreferencepointandpower(DC
output),theI/Oconnectorprovidestheinterfaceto:
Digitalinput-Forconnectingdevicesthatcantogglebetweenanopenandclosedcircuit,for
examplePIRsensors,door/windowcontacts,andglassbreakdetectors.
Digitaloutput-ForconnectingexternaldevicessuchasrelaysandLEDs.Connecteddevicescan
beactivatedbytheVAPIX®ApplicationProgrammingInterfaceorfromtheproduct’swebpage.
6-pinterminalblock
26
Page 27

AXISQ16NetworkCameraSeries
FunctionPinNotes
DCground
DCoutput
(Inputor
Output)
Example
1
2
Canbeusedtopowerauxiliaryequipment.
Note:Thispincanonlybeusedaspowerout.
3–
Digitalinput–Connecttopin1toactivate,or
6
leaveoating(unconnected)todeactivate.
Digitaloutput–Connecttopin1toactivate,or
leaveoating(unconnected)todeactivate.Ifused
withaninductiveload,e.g.,arelay,connecta
diodeinparallelwiththeload,toprotectagainst
voltagetransients.
Specications
0VDC
12VDC
Maxload=50mA
0tomax30VDC Congurable
0tomax30VDC,
opendrain,100mA
1
DCground
2
DCoutput12V,max50mA
3
I/Oconguredasinput
4
I/Oconguredasoutput
5
CongurableI/O
6
CongurableI/O
RS485/RS422connector
Two2-pinterminalblocksforRS485/RS422serialinterfaceusedtocontrolauxiliaryequipment
suchaspan-tiltdevices.
27
Page 28

AXISQ16NetworkCameraSeries
Theserialportcanbeconguredtosupport:
•Two-wireRS485halfduplex
•Four-wireRS485fullduplex
•Two-wireRS422simplex
•Four-wireRS422fullduplexpointtopointcommunication
FunctionPinNotes
RS485Balt
RS485/422RX(B)
RS485Aalt
RS485/422RX(A)
RS485/RS422TX(B)
RS485/RS422TX(A)
1
2
3
4
RXpairforallmodes(combinedRX/TXfor2-wireRS485)
TXpairforRS422and4-wireRS485
Important
Themaximumcablelengthis30m(98ft).
28
Page 29

AXISQ16NetworkCameraSeries
Safetyinformation
Hazardlevels
DANGER
Indicatesahazardoussituationwhich,ifnotavoided,willresultindeathorseriousinjury.
WARNING
Indicatesahazardoussituationwhich,ifnotavoided,couldresultindeathorseriousinjury.
CAUTION
Indicatesahazardoussituationwhich,ifnotavoided,couldresultinminorormoderate
injury.
NO
TICE
NO NO
TICE TICE
Indicatesasituationwhich,ifnotavoided,couldresultindamagetoproperty.
Othermessagelevels
Important
Indicatessignicantinformationwhichisessentialfortheproducttofunctioncorrectly.
Note
Indicatesusefulinformationwhichhelpsingettingthemostoutoftheproduct.
29
Page 30

AXISQ16NetworkCameraSeries
Safetyinstructions
NO
TICE
NO NO
TICE TICE
•TheAxisproductshallbeusedincompliancewithlocallawsandregulations.
•Axisrecommendsusingashieldednetworkcable(STP)CAT5orhigher.
•TousetheAxisproductoutdoors,orinsimilarenvironments,itshallbeinstalledinan
approvedoutdoorhousing.
•StoretheAxisproductinadryandventilatedenvironment.
•AvoidexposingtheAxisproducttoshocksorheavypressure.
•Donotinstalltheproductonunstablepoles,brackets,surfacesorwalls.
•UseonlyapplicabletoolswheninstallingtheAxisproduct.Usingexcessiveforcewith
powertoolscouldcausedamagetotheproduct.
•Donotusechemicals,causticagents,oraerosolcleaners.
•Useacleanclothdampenedwithpurewaterforcleaning.
•Useonlyaccessoriesthatcomplywiththetechnicalspecicationofyourproduct.These
canbeprovidedbyAxisorathirdparty.AxisrecommendsusingAxispowersource
equipmentcompatiblewithyourproduct.
•UseonlysparepartsprovidedbyorrecommendedbyAxis.
•Donotattempttorepairtheproductyourself.ContactAxissupportoryourAxisreseller
forservicematters.
•Thepowersupplyshallbepluggedintoasocketoutletinstalledneartheproductand
shallbeeasilyaccessible.
•Usealimitedpowersource(LPS)witheitheraratedoutputpowerlimitedto≤100Wora
ratedoutputcurrentlimitedto≤5A.
•Useayellow/greencoloredgroundingcableofatleast0,5mm
2
or20AWG.
Transportation
NO
TICE
NO NO
TICE TICE
•WhentransportingtheAxisproduct,usetheoriginalpackagingorequivalenttoprevent
damagetotheproduct.
Battery
TheAxisproductusesa3.0VCR2032lithiumbatteryasthepowersupplyforitsinternalreal-time
clock(RTC).Undernormalconditionsthisbatterywilllastforaminimumofveyears.
30
Page 31

AXISQ16NetworkCameraSeries
LowbatterypoweraffectstheoperationoftheRTC,causingittoresetateverypower-up.When
thebatteryneedsreplacing,alogmessagewillappearintheproduct’sserverreport.Formore
informationabouttheserverreport,seetheproduct´swebpageorcontactAxissupport.
Lithiumcoincell3.0Vbatteriescontain1,2-dimethoxyethane;ethyleneglycoldimethylether
(EGDME),CASno.110-7 1-4.
WARNING
•Riskofexplosionifthebatteryisincorrectlyreplaced.
•Thebatteryshouldbereplacedwithanidenticalbatteryonly.
•Usedbatteriesshouldbedisposedofaccordingtolocalregulationsorthebattery
manufacturer'sinstructions.
31
Page 32

InstallationGuide
AXISQ16NetworkCameraSeries
©AxisCommunicationsAB,2017-2018
Ver.M2.3
Date:March2018
PartNo.1763850
 Loading...