

Page 1

AXISM30NetworkCameraSeries
AXISM3057–PLVE
AXISM3058–PLVE
UserManual
Page 2

AXISM30NetworkCameraSeries
TableofContents
Aboutthismanual..........................................3
Productoverview...........................................4
Howtoaccesstheproduct....................................5
Howtoaccesstheproductfromabrowser...........................5
Aboutsecurepasswords..........................................5
Setup.....................................................7
Productwebpageoverview........................................7
Imagequality...................................................9
Privacymasks..................................................12
Overlays.......................................................12
PTZ(PanTiltZoom)..............................................13
Streamingandstorage...........................................14
Events........................................................15
Applications....................................................17
Troubleshooting............................................19
Howtoresettofactorydefaultsettings.............................19
Howtocheckthecurrentrmware.................................19
Howtoupgradethermware.....................................19
Technicalissues,cluesandsolutions................................20
Performanceconsiderations.......................................
Specications..............................................23
LEDindicators..................................................
SDcardslot....................................................
Buttons.......................................................
Connectors....................................................
21
23
23
23
23
2
Page 3

AXISM30NetworkCameraSeries
Aboutthismanual
Aboutthismanual
Thisusermanualdescribesmultipleproducts.Someoftheinstructionsmaynotberelevantforyourproduct.
3
Page 4

AXISM30NetworkCameraSeries
Productoverview
Productoverview
1
Mountingbracket
2
Cameraunit
3
Cover
4
IRillumination
5
Lid
6
Networkconnector(PoE)
7
Partnumber(P/N)&Serialnumber(S/N)
8
StatusLEDindicator
9
I/Oconnector
10
Controlbutton
11
HDMIconnector
12
SDcardslot
4
Page 5

AXISM30NetworkCameraSeries
Howtoaccesstheproduct
Howtoaccesstheproduct
AXISIPUtilityandAXISDeviceManagerarerecommendedmethodsforndingAxisproductsonthenetworkandassigningthemIP
addressesinWindows®.Bothapplicationsarefreeandcanbedownloadedfromaxis.com/support
Theproductcanbeusedwiththefollowingbrowsers:
•Windows
•OSX®:Chrome
•Otheroperatingsystems:Chrome
Ifyouneedmoreinformationaboutrecommendedbrowsers,gotoaxis.com/browser-support
®
:Chrome
Howtoaccesstheproductfromabrowser
1.Startawebbrowser.
2.EntertheIPaddressorhostnameoftheAxisproductinthebrowser’saddresseld.
TM
(recommended),Firefox
TM
(recommended)orSafari
®
®
,Edge
,orOpera
®
TM
orFirefox
®
.
®
ToaccesstheproductfromaMaccomputer(OSX),gotoSafari,clickonBonjourandselecttheproductfromthe
drop-downlist.ToaddBonjourasabrowserbookmark,gotoSafari>Preferences.
IfyoudonotknowtheIPaddress,useAXISIPUtilitytolocatetheproductonthenetwork.Forinformationabout
howtodiscoverandassignanIPaddress,seethedocumentHowtoassignanIPaddressandaccessyourdeviceonthe
productpageataxis.com.
3.Enteryourusernameandpassword.Ifthisisthersttimetheproductisaccessed,therootpasswordmustrstbe
congured.
4.Theproduct’sliveviewpageopensinyourbrowser.
Aboutsecurepasswords
Important
Axisdevicessendtheinitiallysetpasswordincleartextoverthenetwork.Toprotectyourdeviceaftertherstlogin,set
upasecureandencryptedHTTPSconnectionandthenchangethepassword.
Thedevicepasswordistheprimaryprotectionforthedataandservices.Axisdevicesdonotimposeapasswordpolicyastheymaybe
usedinvarioustypesofinstallations.Toprotectyourdatawerecommendthatyou:
•Changethedefaultpasswordthatcomeswiththedevices.
•Useapasswordwithatleast8characters,preferablycreatedbyapasswordgenerator .
•Don’texposethepassword.
•Changepasswordatarecurringinterval,atleastonceayear.
Setasecurepasswordfortherootaccount
Important
Thedefaultadministratorusernamerootcannotbedeleted.Ifthepasswordforrootislost,thedevicemustberesetto
thefactorydefaultsettings.
1.Makesuretofollowtheinstructionsaboutsecurepasswords.SeeAboutsecurepasswordsonpage5.
2.Typeapasswordandthenretypeittoconrmthespelling.
5
Page 6

AXISM30NetworkCameraSeries
Howtoaccesstheproduct
3.ClickCreatelogin.Thepasswordhasnowbeencongured.
6
Page 7

AXISM30NetworkCameraSeries
Setup
Setup
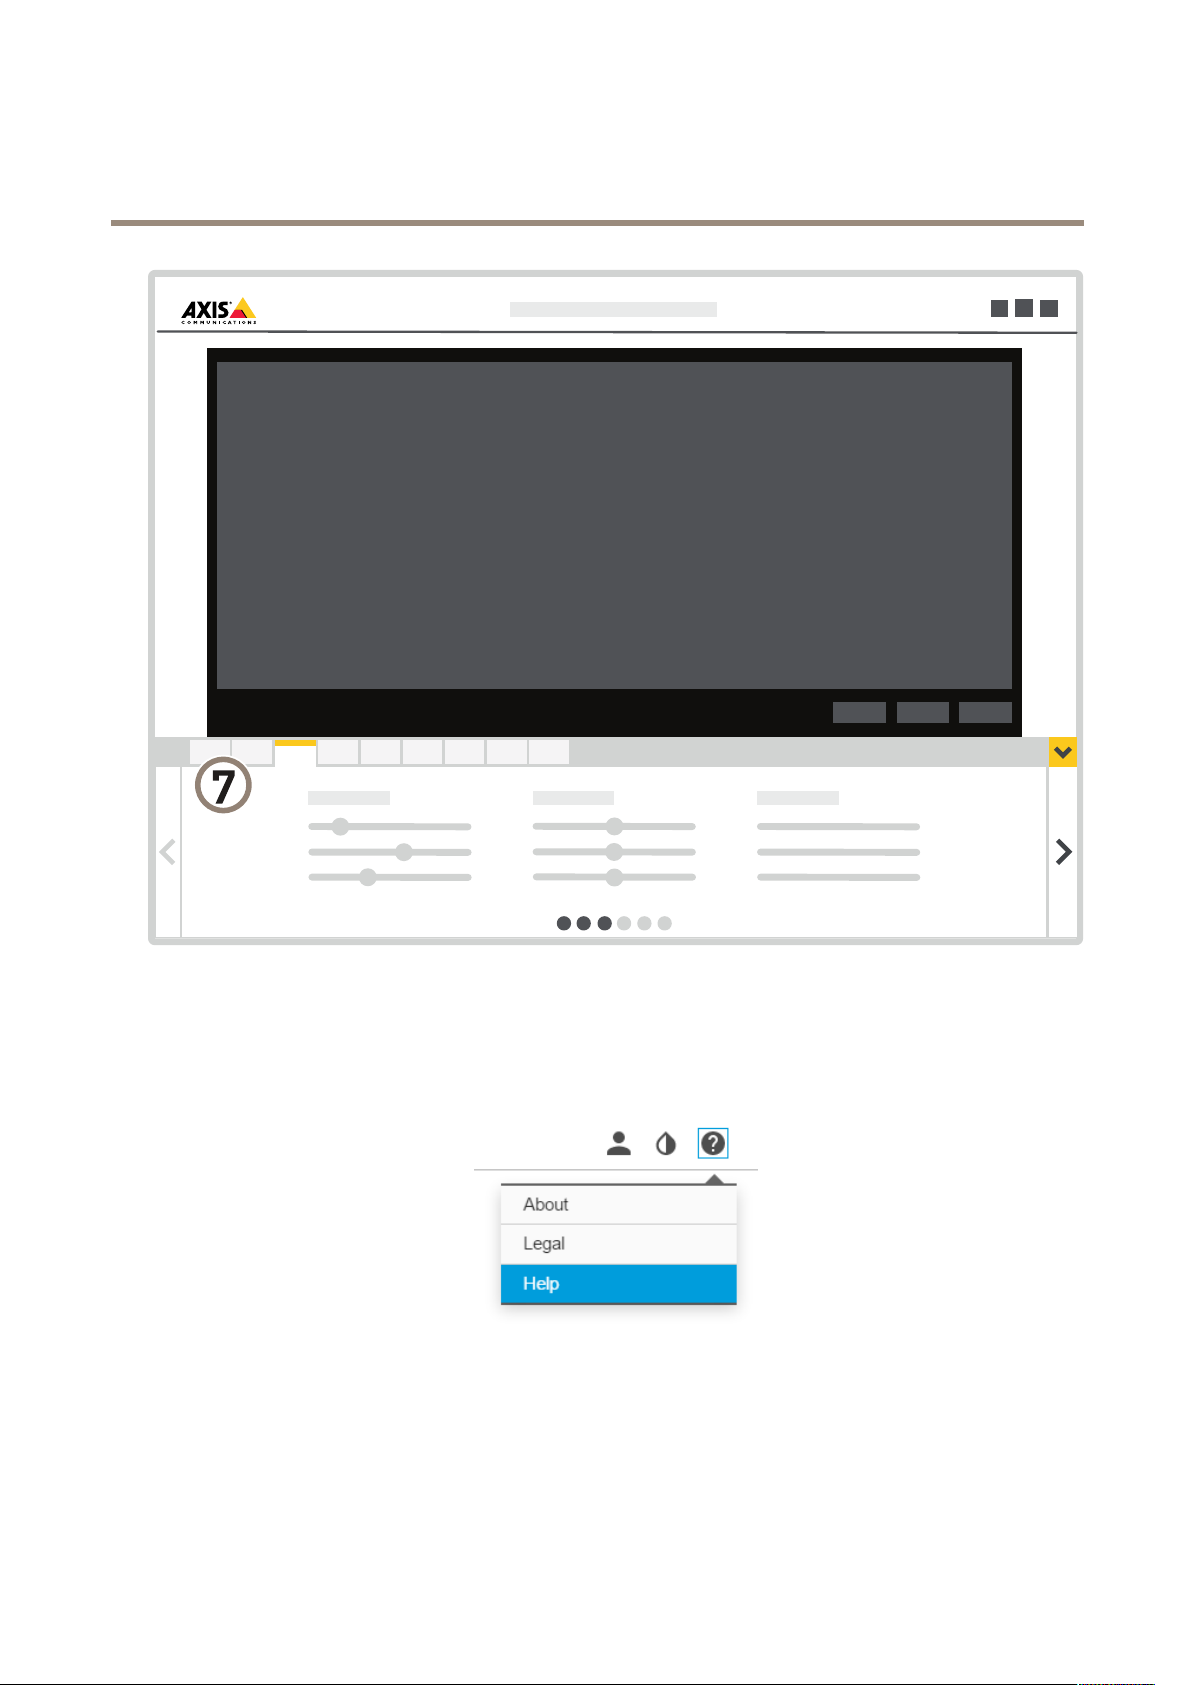
Productwebpageoverview
1
Liveviewcontrolbar
2
Liveview
3
Productname
4
Controls
5
Videocontrolbar
6
Settingstoggle
7
Page 8
AXISM30NetworkCameraSeries
Setup
7
Settingstabs
Abouttheproduct'sbuilt-inhelp
Youcanaccessthebuilt-inhelpfromtheproduct’swebpage.Thehelpprovidesmoredetailedinformationontheproduct’s
featuresandtheirsettings.
8
Page 9

AXISM30NetworkCameraSeries
Setup
Imagequality
Aboutcapturemodes
Acapturemodeisoneofthepossibleviewsforthisproductandcanbeaccessedfromthedrop-downlistintheproduct’slive
streamview.
Inthetablebelow,youcanseethehighestandlowestavailableresolutionfordifferentviewsineachcapturemode.
Note
Oneofthecapturemodesfortheseproductsonlyallowoverview.
View
Overview
Panorama
DoublePanorama
QuadView
ViewAreas1-4
PanoramaCorner
Left/Right
DoublePanorama
Corner
Corridor
Symbol
AspectratioResolutionsM3057-PLVEResolutionsM3058-PLVE
1:1
8:3
32:9
4:3
16:9
4:3
16:9
4:3
16:9
8:3
2:1
4:3
1:1
4:3
16:9
2048x2048to160x1602992x2992to160x160
2560x960to192x72
2560x720to1280x360
2560x1920to320x240
2560x1440to256x144
2560x1920to320x240
2560x1440to256x144
1920x1440to320x240
2048x1152to256x144
2304x864to192x72
2368x1184
1920x1440to320x240
2048x2048to480x480
2560x1920to320x240
2560x1440to256x144
3584x1344to192x72
3584x1008to1280x360
3584x2668to320x240
3584x2016to256x144
3584x2668to320x240
3584x2016to256x144
2048x1536to320x240
2048x1152to256x144
3200x1200to192x72
3200x1600
2560x1920to320x240
2880x2880to480x480
2560x1920to320x240
2560x1440to256x144
Howtoselectcapturemode
Whichcapturemodetochoosedependsontherequirementsofframerateandresolutionforthespecicsurveillancesetup.For
specicationsaboutavailablecapturemodes,seetheproduct’sdatasheet.Tondthelatestversionofthedatasheet,gotoaxis.com
Howtoselectexposuremode
Therearedifferentexposuremodeoptionsinthecamerathatadjustsaperture,shutterspeed,andgaintoimproveimagequalityfor
specicsurveillancescenes.GotoSettings>Image>Exposureandselectbetweenthefollowingexposuremodes:
•Formostusecases,selectAutomaticexposure.
•Forenvironmentswithcertainarticiallighting,forexampleuorescentlighting,selectFlicker-free.
Selectthesamefrequencyasthepowerlinefrequency.
•Forenvironmentswithcertainarticiallightandbrightlight,forexampleoutdoorswithuorescentlightingatnightand
sunduringdaytime,selectFlicker-reduced.
9
Page 10

AXISM30NetworkCameraSeries
Setup
Selectthesamefrequencyasthepowerlinefrequency.
•Tolockthecurrentexposuresettings,selectHoldcurrent.
HowtooptimizeIRillumination
Inmostcases,theexposureoftheimageisautomaticallyadjustedtoobtainoptimalimagequality.Sometimesifthecamerais
placedclosetoawalloracorner,itmightresultinsaturatingpartsoftheimage.Whenthishappens,theLED’sclosesttothewallor
cornerareautomaticallydimmedtoavoidsaturatingtheimage.
Dependingontheinstallationenvironmentandtheconditionsaroundthecamera,e.g.externallightsourcesinthescene,itis
sometimespossibletoachievebetterIR-illuminationbymanuallysettingtheintensityoftheLED’s.
1.GotoSettings>Image>Dayandnight,andturnonAllowIRillumination.
2.TurnonLiveviewcontrol.
3.Intheliveview,clickonIRilluminationandturnonIRlightandManualintensity.
4.AdjustLEDintensity.
HowtobenetfromIRlightinlow-lightconditionsusingnightmode
Yourcamerausesvisiblelighttodelivercolorimagesduringtheday.Aslightdiminishes,youcansetthecameratoautomatically
shifttonightmode.Innightmodethecamerausesbothvisiblelightandnear-infraredlighttodeliverblack-and-whiteimages.
Sincethecamerausesmoreoftheavailablelightitcandeliverbrighter,moredetailed,images.
1.GotoSettings>Image>Dayandnight,andmakesurethattheIRcutlterissettoAuto.
Howtoreducenoiseinlow-lightconditions
Toreducenoiseinlow-lightconditions,youcanadjustoneormoreofthefollowingsettings:
•Makesurethattheexposuremodeisautomatic.
Note
Increasingthemaxshuttervaluecanresultinmotionblur.
•Theshutterspeedshouldbeasslowaspossible,whichmeansyoushouldsetmaxshuttertothehighestpossiblevalue.
•Reducesharpnessintheimage.
Howtoreducemotionblurinlow-lightconditions
Toreducemotionblurinlow-lightconditions,youcanadjustoneormoreofthefollowingsettings:
Note
Imagenoisewillincreaseifyouincreasethegain.
•Increaseshutterspeedandgain.GotoSettings>Image>ExposureandsetMaxshuttertoalowervalue,andMaxgain
toahighervalue.
Ifyouarestillexperiencingmotionblur,youcantryoneofthefollowing:
•Increasethelightlevelinthescene.
•Mountthecamerasothatobjectsmovetowarditorawayfromitratherthansideways.
10
Page 11

AXISM30NetworkCameraSeries
Setup
Howtomaximizedetailsinanimage
Important
Ifyoumaximizedetailsinanimage,bitrateincreasesandmightleadtoreducedframerate.
•Setcompressionaslowaspossible.
•SelectMJPEGstreaming.
•TurnofftheZipstreamfunctionality.
Howtohandlesceneswithstrongbacklight
Tomakebothdarkandbrightareasoftheimagevisible,turnonWDR.
1.GotoSettings>Image.
2.TurnonWDRunderWidedynamicrange.
ImagewithoutWDR.
ImagewithWDR.
Note
IfyouuseWDR,youmayexperiencesomeWDRartifactsintheimage.
FindoutmoreaboutWDRandhowtouseitataxis.com/web-articles/wdr
Aboutviewarea
Aviewareaisacroppedpartofthefullview.Youcanstreamandstoreviewareasinsteadofthefullviewtominimizebandwidth
andstorageneeds.PTZisenabledforallviewareas.Byusingviewareasyoucancreatepresetpositionsandalsoremovepartsof
thefullview,forexample,thesky.
11
Page 12

AXISM30NetworkCameraSeries
Setup
Privacymasks
Howtohidepartsoftheimagewithprivacymasks
Whatisaprivacymask?
Aprivacymaskisauser-denedareathatpreventsusersfromviewingapartofthemonitoredarea.Inthevideostream,privacy
masksappearasblocksofsolidcolor.
Aprivacymaskisauser-denedareathatcoversapartofthemonitoredarea.Inthevideostream,privacymasksappeareitheras
blocksofsolidcolororwithamosaicpattern.
You’llseetheprivacymaskonallsnapshots,recordedvideo,andlivestreams.
YoucanusetheVAPIX®applicationprogramminginterface(API)toturnofftheprivacymasks.
Important
Usingmultipleprivacymasksmayaffecttheproduct’sperformance.
Note
Privacymasksmayappearwarpedinsomeviewmodes.
Note
IfyouviewthevideostreamoverHDMIandrestarttheproduct,theprivacymaskswilldisappear.Toshowtheprivacy
masksagain,restartthevideostream.
Howtocreateaprivacymask
Tocreateaprivacymask,gotoSettings>Privacymask.
Overlays
Aboutoverlays
Note
ImageandtextoverlaywillnotbedisplayedonvideostreamoverHDMI.
Overlaysaresuperimposedoverthevideostream.Theyareusedtoprovideextrainformationduringrecordings,suchasatimestamp,
orduringproductinstallationandconguration.
Howtoshowatextoverlaywhenthecameradetectsmotion
Thisexampleexplainshowtodisplaythetext“Motiondetected”whenthecameradetectsmotion:
MakesuretheAXISVideoMotionDetectionapplicationisrunning:
1.GotoSettings>Apps>AXISVideoMotionDetection.
2.Starttheapplicationifitisnotalreadyrunning.
3.Makesureyouhavesetuptheapplicationaccordingtoyourneeds.
Addtheoverlaytext:
4.GotoSettings>Overlay.
5.SelectCreateoverlayandconrmTextoverlay.
6.Enter#Dinthetexteld.
12
Page 13

AXISM30NetworkCameraSeries
Setup
7.Choosealignment,textsizeandappearance.
8.Includethetextoverlay.
Createanactionrule:
9.GotoSystem>Events>Actionrules.
10.CreateanactionrulewithAXISVideoMotionDetectionastrigger.
11.Fromthelistofactions,selectOverlaytext.
12.Type“Motiondetected”.
13.Settheduration.
Note
Ifyouupdatetheoverlaytextitwillbeautomaticallyupdatedonallvideostreamsdynamically.
PTZ(PanTiltZoom)
Howtolimitzoommovements
Inthisexample,thecameraissurveillingaparkinglotwithnearbyapartmentbuildings.Setzoomlimitstoensureprivacyforresidents.
Tolimitzoommovements,gotoSettings>PTZ>Limits.
Aboutguardtours
Aguardtourdisplaysthevideostreamfromdifferentpresetpositionseitherinapredeterminedorrandomorder,andforcongurable
periodsoftime.Oncestarted,aguardtourcontinuestorununtilstopped,evenwhentherearenoclients(webbrowsers)viewingthe
images.
Howtocreateaguardtourwithpresetpositions
1.GotoSettings>PTZ>Guardtours
2.Click+.
3.SelectPresetposition.
4.Toedittheguardtour’sproperties,click
5.Typeanamefortheguardtourandspecifythepauselengthinminutesbetweeneachtour.
6.Ifyouwanttheguardtourtogotothepresetpositionsinarandomorder,turnonShufe.
7.ClickDone.
8.ClickAddtoaddthepresetpositionsthatyouwantinyourguardtour.
9.ClickDonetoexittheguardtoursettings.
10.Toscheduletheguardtour,gotoSystem>Events.
13
Page 14

AXISM30NetworkCameraSeries
Setup
Streamingandstorage
Howtochoosevideocompressionformat
Decidewhichcompressionmethodtousebasedonyourviewingrequirements,andonthepropertiesofyournetwork.The
availableoptionsare:
MotionJPEG
MotionJPEGorMJPEGisadigitalvideosequencethatismadeupofaseriesofindividualJPEGimages.Theseimagesarethen
displayedandupdatedataratesufcienttocreateastreamthatshowsconstantlyupdatedmotion.Fortheviewertoperceivemotion
videotheratemustbeatleast16imageframespersecond.Fullmotionvideoisperceivedat30(NTSC)or25(PAL)framespersecond.
TheMotionJPEGstreamusesconsiderableamountsofbandwidth,butprovidesexcellentimagequalityandaccesstoeveryimage
containedinthestream.
H.264orMPEG-4Part10/AVC
Note
H.264isalicensedtechnology.TheAxisproductincludesoneH.264viewingclientlicense.Installingadditionalunlicensed
copiesoftheclientisprohibited.Topurchaseadditionallicenses,contactyourAxisreseller.
H.264can,withoutcompromisingimagequality,reducethesizeofadigitalvideolebymorethan80%comparedtotheMotion
JPEGformatandbyasmuchas50%comparedtotheMPEG-4standard.Thismeansthatlessnetworkbandwidthandstoragespace
arerequiredforavideole.Orseenanotherway,highervideoqualitycanbeachievedforagivenbitrate.
Howtoreducebandwidthandstorage
Important
Ifyoureducethebandwidthitcanresultinlossofdetailsinthepicture.
1.GotoliveviewandselectH.264.
2.GotoSettings>Stream.
3.Dooneormoreofthefollowing:
-TurnontheZipstreamfunctionalityandselectthedesiredlevel.
-TurnondynamicGOPandsetahighGOPlengthvalue.
-Increasethecompression.
-TurnondynamicFPS.
Howtoviewlivevideostreamonamonitor
YourcameracantransmitlivevideostreamtoanHDMImonitorwithoutanetworkconnection.Themonitorcanbeusedfor
surveillancepurposesorforpublicviewinge.g.inastore.
1.ConnectanexternalmonitorusingtheHDMIconnector.
2.ChangetheHDMIsettingsunderSettings>Stream>HDMI.
Howtosetupnetworkstorage
Tostorerecordingsonthenetwork,youneedtosetupnetworkstorage:
1.GotoSettings>System>Storage.
2.ClickSetupunderNetworkstorage.
14
Page 15

AXISM30NetworkCameraSeries
Setup
3.EntertheIPaddressofthehostserver.
4.Enterthenameofthesharedlocationonthehostserver.
5.Movetheswitchifthesharerequiresalogin,andenterusernameandpassword.
6.ClickConnect.
Howtorecordandwatchvideo
Torecordvideoyoumustrstsetupnetworkstorage,seeHowtosetupnetworkstorageonpage14,orhaveanSDcardinstalled.
1.Gotothecamera’sliveview.
2.ClickonRecordoncetostartrecordingandonemoretimetostoprecording.
Towatchyourrecording:
1.ClickonStorage>Gotorecordings.
2.Selectyourrecordinginthelistanditwillplayautomatically.
Events
Aboutevents
Theeventpagesallowyoutocongureyourproducttoperformactionswhendifferenteventsoccur.Forexample,theproduct
canstartarecordingorsendanemailnoticationwhenmotionisdetected.Thesetofconditionsthatdeneshowandwhen
theactionistriggerediscalledanactionrule.
Howtotriggeranaction
1.GotoSettings>System>Eventstosetupanactionrule.Theactionruledeneswhenthecamerawillperformcertain
actions.Actionrulescanbesetupasscheduled,recurring,orforexample,triggeredbymotiondetection.
2.SelectwhatTriggermustbemettotriggertheaction.Ifyouspecifymorethanonetriggerfortheactionrule,all
ofthemmustbemettotriggertheaction.
3.SelectwhichActionthecamerashouldperformwhentheconditionsaremet.
Note
Ifyoumakechangestoanactiveactionrule,theactionruleneedstoberestartedforthechangestotakeeffect.
Howtorecordvideowhenthecameradetectsmotion
ThisexampleexplainshowtosetupthecameratostartrecordingtotheSDcardvesecondsbeforeitdetectsmotionandto
stoponeminuteafter.
MakesuretheAXISVideoMotionDetectionapplicationisrunning:
1.GotoSettings>Apps>AXISVideoMotionDetection.
2.Starttheapplicationifitisnotalreadyrunning.
3.Makesureyouhavesetuptheapplicationaccordingtoyourneeds.
Createanactionrule:
4.GotoSettings>System>Eventsandaddanactionrule.
5.Typeanamefortheactionrule.
15
Page 16

AXISM30NetworkCameraSeries
Setup
6.Fromthelistoftriggers,selectApplicationsandthenselectAXISVideoMotionDetection(VMD).
7.Fromthelistofactions,selectRecordvideo.
8.Selectanexistingstreamproleorcreateanewone.
9.Setthepre-triggertimeto5seconds.
10.Setthepost-triggertimeto60seconds.
11.SelectSDcardfromthelistofstorageoptions.
12.ClickOk.
HowtorecordvideowhenaPIRdetectorsensesmotion
ThisexampleexplainshowtoconnectanAxisPIRdetectortothecamera,andsetupthecameratostartrecordingwhenthe
detectorsensesmotion.
Requiredhardware
•3–wirecable(ground,power,I/O)
•AxisPIRdetector
NO
TICE
NO NO
TICE TICE
Disconnectthecamerafrompowerbeforeconnectingthewires.Reconnecttopowerafterallconnectionsaredone.
Connectthewirestothecamera’sI/Oconnector
Note
ForinformationontheI/Oconnector,seeConnectorsonpage23
1.Connectthegroundwiretopin1(GND/-).
2.Connectthepowerwiretopin2(12VDCoutput).
3.ConnecttheI/Owiretopin3(I/Oinput).
ConnectthewirestothePIRdetector’sI/Oconnector
1.Connecttheotherendofthegroundwiretopin1(GND/-).
2.Connecttheotherendofthepowerwiretopin2(DCinput/+).
3.ConnecttheotherendoftheI/Owiretopin3(I/Ooutput).
ConguretheI/Oportinthecamera’swebpage
1.GotoSettings>System>I/Oports.
2.Givetheinputmoduleadescriptivename.
16
Page 17

AXISM30NetworkCameraSeries
Setup
3.TomakethePIRdetectorsendasignaltothecamerawhenitsensesmotion,selectClosedcircuitinthedrop-downlist.
TotriggerthecameratostartrecordingwhenitreceivesasignalfromthePIRdetector ,youneedtocreateanactionruleinthe
camera’swebpage.
Howtodetecttamperingwithinputsignal
Thisexampleexplainshowtotriggeranalarmwhentheinputsignalhasbeencutorshort-circuited.Formoreinformationaboutthe
I/Oconnector,seepage24.
1.GotoSettings>System>I/OPortsandenableSupervisedI/O.
Createanactionrule:
1.GotoSettings>System>Eventsandcreateanactionrule.
2.Typeanamefortheactionrule.
3.Fromthelistoftriggers,selectInputSignalandthenDigitalinputport.SelectInput1andsetTamperedtoYes.
4.Fromthelistofschedules,selectAlways.
5.Fromthelistofactions,selectSendNoticationandthenselectarecipientorcreateanewrecipient.
6.ClickOK.
Howtoautomaticallysendanemailifsomeonespraypaintsthelens
1.GotoSystem>Detectors.
2.SelectAlarmfordarkimages.Thiswilltriggeranalarmifthelensissprayed,covered,orrenderedseverelyoutoffocus.
3.SettheMinimumduration.Thevalueindicatesthetimethatmustpassbeforeanemailissent.
4.ClickSave.
Createanactionrule:
5.GotoEvents>Actionrulesandaddanactionrule.
6.Enteranamefortheactionrule.
7.Fromthelistoftriggers,selectDetectorsandthenselectTampering.
8.Fromthelistofactions,selectSendNoticationandthenselectarecipientfromthelistorclickNewRecipient
tocreateanewrecipient.
9.EnterSubjectandMessagefortheemail.
10.ClickOk.
Applications
Aboutapplications
AXISCameraApplicationPlatform(ACAP)isanopenplatformthatenablesthirdpartiestodevelopanalyticsandotherapplications
forAxisproducts.Tondoutmoreaboutavailableapplications,downloads,trialsandlicenses,gotoaxis.com/applications
TondtheusermanualsforAxisapplications,gotoaxis.com
17
Page 18

AXISM30NetworkCameraSeries
Setup
Note
•Severalapplicationscanrunatthesametimebutsomeapplicationsmightnotbecompatiblewitheachother.Certain
combinationsofapplicationsmightrequiretoomuchprocessingpowerormemoryresourceswhenruninparallel.Verify
thattheapplicationsworktogetherbeforedeployment.
18
Page 19

AXISM30NetworkCameraSeries
Troubleshooting
Troubleshooting
Howtoresettofactorydefaultsettings
Important
Resettofactorydefaultshouldbeusedwithcaution.Aresettofactorydefaultresetsallsettings,includingtheIPaddress,to
thefactorydefaultvalues.
Toresettheproducttothefactorydefaultsettings:
1.Disconnectpowerfromtheproduct.
2.Pressandholdthecontrolbuttonwhilereconnectingpower.SeeProductoverviewonpage4.
3.Keepthecontrolbuttonpressedfor15–30secondsuntilthestatusLEDindicatorashesamber.
4.Releasethecontrolbutton.TheprocessiscompletewhenthestatusLEDindicatorturnsgreen.Theproducthasbeenreset
tothefactorydefaultsettings.IfnoDHCPserverisavailableonthenetwork,thedefaultIPaddressis192.168.0.90
5.UsetheinstallationandmanagementsoftwaretoolstoassignanIPaddress,setthepassword,andaccessthevideostream.
Theinstallationandmanagementsoftwaretoolsareavailablefromthesupportpagesonaxis.com/support
1.Pressandholdthecontrolbuttonandthepowerbuttonfor15–30secondsuntilthestatusLEDindicatorashesamber.
SeeProductoverviewonpage4.
2.ReleasethecontrolbuttonbutcontinuetoholddownthepowerbuttonuntilthestatusLEDindicatorturnsgreen.
3.Releasethepowerbuttonandassembletheproduct.
4.Theprocessisnowcomplete.Theproducthasbeenresettothefactorydefaultsettings.IfnoDHCPserverisavailableon
thenetwork,thedefaultIPaddressis192.168.0.90
5.UsingtheinstallationandmanagementsoftwaretoolstoassignanIPaddress,setthepasswordandaccessthevideo
stream.
Itisalsopossibletoresetparameterstofactorydefaultthroughthewebinterface.GotoSettings>System>Maintenanceand
clickDefault.
Howtocheckthecurrentrmware
Firmwareisthesoftwarethatdeterminesthefunctionalityofnetworkdevices.Oneofyourrstactionswhentroubleshootinga
problemshouldbetocheckthecurrentrmwareversion.Thelatestversionmaycontainacorrectionthatxesyourparticular
problem.
Tocheckthecurrentrmware:
1.Gototheproduct’swebpage.
2.Clickonthehelpmenu.
3.ClickAbout.
Howtoupgradethermware
Important
Preconguredandcustomizedsettingsaresavedwhenthermwareisupgraded(providedthatthefeaturesareavailablein
thenewrmware)althoughthisisnotguaranteedbyAxisCommunicationsAB.
19
Page 20

AXISM30NetworkCameraSeries
Troubleshooting
Important
Makesurethecoverisattachedduringupgradetoavoidinstallationfailure.
Important
Makesuretheproductremainsconnectedtothepowersourcethroughouttheupgradeprocess.
Note
Whenyouupgradetheproductwiththelatestrmware,theproductreceivesthelatestfunctionalityavailable.Alwaysread
theupgradeinstructionsandreleasenotesavailablewitheachnewreleasebeforeupgradingthermware.Tondthelatest
rmwareandthereleasenotes,gotoaxis.com/support/rmware
1.Downloadthelatestrmwareletoyourcomputer,availablefreeofchargeataxis.com/support/rmware
2.Logintotheproductasanadministrator.
3.GotoSettings>System>Maintenance.Followtheinstructionsonthepage.Whentheupgradehasnished,the
productrestartsautomatically.
AXISDeviceManagercanbeusedformultipleupgrades.Findoutmoreataxis.com/products/axis-device-manager
Technicalissues,cluesandsolutions
Ifyoucan’tndwhatyou’relookingforhere,trythetroubleshootingsectionataxis.com/support
Problemsupgradingthermware
FirmwareupgradefailureIfthermwareupgradefails,theproductreloadsthepreviousrmware.Themostcommonreason
ProblemssettingtheIPaddress
Theproductislocatedona
differentsubnet
TheIPaddressisbeingused
byanotherdevice
PossibleIPaddressconict
withanotherdeviceonthe
samesubnet
Theproductcannotbeaccessedfromabrowser
Cannotlogin
isthatthewrongrmwarelehasbeenuploaded.Checkthatthenameofthermwarele
correspondstoyourproductandtryagain.
IftheIPaddressintendedfortheproductandtheIPaddressofthecomputerusedtoaccessthe
productarelocatedondifferentsubnets,youcannotsettheIPaddress.Contactyournetwork
administratortoobtainanIPaddress.
DisconnecttheAxisproductfromthenetwork.Runthepingcommand(inaCommand/DOS
window,typepingandtheIPaddressoftheproduct):
•Ifyoureceive:Replyfrom<IPaddress>:bytes=32;time=10...
thismeansthattheIPaddressmayalreadybeinusebyanotherdeviceonthenetwork.
ObtainanewIPaddressfromthenetworkadministratorandreinstalltheproduct.
•Ifyoureceive:Requesttimedout,thismeansthattheIPaddressisavailable
forusewiththeAxisproduct.Checkallcablingandreinstalltheproduct.
ThestaticIPaddressintheAxisproductisusedbeforetheDHCPserversetsadynamicaddress.
ThismeansthatifthesamedefaultstaticIPaddressisalsousedbyanotherdevice,theremay
beproblemsaccessingtheproduct.
WhenHTTPSisenabled,ensurethatthecorrectprotocol(HTTPorHTTPS)isusedwhenattempting
tologin.Youmayneedtomanuallytypehttporhttpsinthebrowser’saddresseld.
Ifthepasswordfortheuserrootislost,theproductmustberesettothefactorydefaultsettings.
SeeHowtoresettofactorydefaultsettingsonpage19.
20
Page 21

AXISM30NetworkCameraSeries
Troubleshooting
TheIPaddresshasbeen
changedbyDHCP
Certicateerrorwhenusing
IEEE802.1X
Theproductisaccessiblelocallybutnotexternally
Routerconguration
Firewallprotection
Problemswithstreaming
MulticastH.264only
accessiblebylocalclients
NomulticastH.264
displayedintheclient
PoorrenderingofH.264
images
Colorsaturationisdifferent
inH.264andMotionJPEG
Lowerframeratethan
expected
IPaddressesobtainedfromaDHCPserveraredynamicandmaychange.IftheIPaddresshasbeen
changed,useAXISIPUtilityorAXISDeviceManagertolocatetheproductonthenetwork.Identify
theproductusingitsmodelorserialnumber,orbytheDNSname(ifthenamehasbeencongured).
Ifrequired,astaticIPaddresscanbeassignedmanually.Forinstructions,gotoaxis.com/support
Forauthenticationtoworkproperly,thedateandtimesettingsintheAxisproductmustbe
synchronizedwithanNTPserver.GotoSettings>System>Dateandtime
CheckthatyourrouterallowsincomingdatatrafctotheAxisproduct.Theroutermustsupport
®
UPnP
.
ChecktheInternetrewallwithyournetworkadministrator.
Checkifyourroutersupportsmulticasting,oriftheroutersettingsbetweentheclientandthe
productneedtobecongured.TheTTL(TimeToLive)valuemayneedtobeincreased.
CheckwithyournetworkadministratorthatthemulticastaddressesusedbytheAxisproduct
arevalidforyournetwork.
Checkwithyournetworkadministratortoseeifthereisarewallpreventingviewing.
Ensurethatyourgraphicscardisusingthelatestdriver .Thelatestdriverscanusuallybe
downloadedfromthemanufacturer’swebsite.
Modifythesettingsforyourgraphicsadapter.Gototheadapter’sdocumentationformore
information.
•SeePerformanceconsiderationsonpage21.
•Reducethenumberofapplicationsrunningontheclientcomputer.
•Limitthenumberofsimultaneousviewers.
•Checkwiththenetworkadministratorthatthereisenoughbandwidthavailable.
•Lowertheimageresolution.
•Themaximumframespersecondisdependentontheutilityfrequency(60/50Hz)of
theAxisproduct.
Performanceconsiderations
Whensettingupyoursystem,itisimportanttoconsiderhowvarioussettingsandsituationsaffecttheperformance.Somefactors
affecttheamountofbandwidth(thebitrate)required,otherscanaffecttheframerate,andsomeaffectboth.Iftheloadonthe
CPUreachesitsmaximum,thisalsoaffectstheframerate.
Thefollowingfactorsarethemostimportanttoconsider:
•Highimageresolutionorlowercompressionlevelsresultinimagescontainingmoredatawhichinturnaffectsthe
bandwidth.
•RotatingthelensmanuallywillresultinbetterperformancecomparedtorotatingtheimagefromtheGUI.
•Removingorattachingthecoverwillrestartthecamera.
•AccessbylargenumbersofMotionJPEGorunicastH.264clientsaffectsthebandwidth.
•Simultaneousviewingofdifferentstreams(resolution,compression)bydifferentclientsaffectsbothframerateand
bandwidth.
Useidenticalstreamswhereverpossibletomaintainahighframerate.Streamprolescanbeusedtoensurethat
streamsareidentical.
21
Page 22

AXISM30NetworkCameraSeries
Troubleshooting
•AccessingMotionJPEGandH.264videostreamssimultaneouslyaffectsbothframerateandbandwidth.
•Heavyusageofeventsettingsaffectstheproduct’sCPUloadwhichinturnaffectstheframerate.
•UsingHTTPSmayreduceframerate,inparticularifstreamingMotionJPEG.
•Heavynetworkutilizationduetopoorinfrastructureaffectsthebandwidth.
•Viewingonpoorlyperformingclientcomputerslowersperceivedperformanceandaffectsframerate.
•RunningmultipleAXISCameraApplicationPlatform(ACAP)applicationssimultaneouslymayaffecttheframerateand
thegeneralperformance.
22
Page 23

AXISM30NetworkCameraSeries
Specifications
Specifications
Tondthelatestversionoftheproduct’sdatasheet,gototheproductpageonaxis.comandlocateSupport&Documentation.
LEDindicators
Note
TheStatusLEDcanbeconguredtoashwhileaneventisactive.
StatusLED
Unlit
GreenShowssteadygreenfor10secondsfornormaloperationafterstartupcompleted.
Amber
Amber/RedFlashesamber/redifnetworkconnectionisunavailableorlost.
RedFirmwareupgradefailure.
Indication
Connectionandnormaloperation.
Steadyduringstartup.Flashesduringrmwareupgradeorresettofactorydefault.
SDcardslot
NO
TICE
NO NO
TICE TICE
•RiskofdamagetoSDcard.Donotusesharptools,metalobjects,orexcessiveforcewheninsertingorremovingthe
SDcard.Useyourngerstoinsertandremovethecard.
•Riskofdatalossandcorruptedrecordings.DonotremovetheSDcardwhiletheproductisrunning.UnmounttheSDcard
fromtheproduct’swebpagebeforeremoval.
ThisproductsupportsmicroSD/microSDHC/microSDXCcards.
ForSDcardrecommendations,seeaxis.com
trademarksorregisteredtrademarksofSD-3C,LLCintheUnitedStates,othercountriesorboth.
microSD,microSDHC,andmicroSDXCLogosaretrademarksofSD-3CLLC.microSD,microSDHC,microSDXCare
Buttons
Controlbutton
Thecontrolbuttonisusedfor:
•Resettingtheproducttofactorydefaultsettings.SeeHowtoresettofactorydefaultsettingsonpage19.
•ConnectingtoanAXISVideoHostingSystemservice.Toconnect,pressandholdthebuttonforabout3secondsuntilthe
statusLEDashesgreen.
Connectors
HDMIconnector
UsetheHDMI
TM
connectortoconnectadisplayorpublicviewmonitor.
23
Page 24

AXISM30NetworkCameraSeries
Specifications
Networkconnector
RJ45EthernetconnectorwithPoweroverEthernet(PoE).
I/Oconnector
UsetheI/Oconnectorwithexternaldevicesincombinationwith,forexample,motiondetection,eventtriggering,andalarm
notications.Inadditiontothe0VDCreferencepointandpower(DCoutput),theI/Oconnectorprovidestheinterfaceto:
Digitalinput-Forconnectingdevicesthatcantogglebetweenanopenandclosedcircuit,forexamplePIRsensors,door/window
contacts,andglassbreakdetectors.
Supervisedinput-Enablespossibilitytodetecttamperingonadigitalinput.
Digitaloutput-ForconnectingexternaldevicessuchasrelaysandLEDs.ConnecteddevicescanbeactivatedbytheVAPIX®
ApplicationProgrammingInterfaceorfromtheproduct’swebpage.
4-pinterminalblock
FunctionPinNotes
DCground
DCoutput
DigitalInputor
SupervisedInput
DigitalOutput
Example
Specications
1
2
3
4
Canbeusedtopowerauxiliaryequipment.
Note:Thispincanonlybeusedaspowerout.
Connecttopin1toactivate,orleaveoating(unconnected)
todeactivate.Tousesupervisedinput,installend-of-line
resistors.Seeconnectiondiagramforinformationabouthow
toconnecttheresistors.
Connecttopin1toactivate,orleaveoating(unconnected)
todeactivate.Ifusedwithaninductiveload,e.g.,arelay,
connectadiodeinparallelwiththeload,toprotectagainst
voltagetransients.
0VDC
12VDC
Maxload=25mA
0tomax30VDC
0tomax30VDC,opendrain,
100mA
24
Page 25

AXISM30NetworkCameraSeries
Specifications
1
DCground
2
DCoutput12V,max25mA
3
I/Osupervisedinput
4
I/Odigitaloutput
25
Page 26

UserManualVer.M1.16
AXISM30NetworkCameraSeries
©AxisCommunicationsAB,2018
Date:April2018
PartNo.T1012321 1
 Loading...