

Page 1

PANEL 6152-O/P
15” INDUSTRIAL TFT LCD M ONITOR
User’s Manual
Page 2

Disclaimers
The information in this manual has been carefully checked and is believed to be
accurate. AXIOMTEK Co., Ltd. assumes no responsibility for any infringements of
patents or other rights of third parties, which may result from its use.
AXIOMTEK assumes no responsibility for any inaccuracies that may be contained in
this document. AXIOMTEK makes no commitment to update or to keep current the
information contained in this manual.
AXIOMTEK reserves the right to make improvements to this document and/or
product at any time and without notice.
No part of this document may be reproduced, stored in a retrieval system, or
transmitted, in any form or by any means, electronic, mechanical, photocopying,
recording, or otherwise, without the prior written permission of AXIOMTEK Co.,
Ltd.
Cop yright 2003 by AXIOMTEK Co. Ltd.,
All rights reserved.
February 2003, Version A1
Printed in Taiwan
ii
Page 3

Safety Approvals
CE Marking
FCC Class A
FCC Compliance
This equipment has been tested and complies with the limits for a
Class A digital device, pursuant to Part 15 of the FCC Rules. These
limits are designed to provide reasonable protection against harmful
interference in a residential installation. If not installed and used in
accordance with proper instructions, this equipment might generate or
radiate radio frequency energy and cause harmful interference to
radio communications. However, there is no guarantee that
interference will not occur in a particular installation. If this equipment
does cause harmful interference to radio or television reception, which
can be determined by turning the equipment off and on, the user is
encouraged to try to correct the interference by one or more of the
following measurers:
1. Reorient or relocate the receiving antenna.
2. Increase the separation between the equipment and
receiver.
3. Connect the equipment into an outlet on a circuit
different from that to which the receiver is connected.
4. Consult the dealer or an experienced radio/TV
technician for help.
Shielded interface cables must be used in order to comply with
emission limits.
iii
Page 4

Safety Precautions
Before getting started, read the following important cautions.
1. The P6152 does not come equipped with an operating
system. An operating system must be loaded first before
installing any software into the computer.
2. Be sure to ground yourself to prevent static charge when
installing the internal components. Use a grounding wrist
strap and place all electronic components in any
static-shielded devices. Most electronic components are
sensitive to static electrical charge.
3. Disconnect the power cord from the P6152 before
making any installation. Be sure both the system and the
external devices are turned OFF. Sudden surge of power
could ruin sensitive components. Make sure the P6152 is
properly grounded.
4. The brightness of the flat panel display decreases with
usage. However, hours of use vary depending on the
application environment.
5. Turn OFF the system power before cleaning. Clean the
system using a cloth only. Do not spray any liquid cleaner
directly onto the screen. The P6152 may come with or
w/o a touchscreen. Although the touchscreen is
chemical resistant, it is recommended that you spray the
liquid cleaner on a cloth first before wiping the screen. In
case your system comes without the touchscreen, you
must follow the same procedure and not spray any
cleaner on the flat panel directly.
6. Avoid using sharp objects to operate the touchscreen.
Scratches on the touchscreen may cause malfunction or
internal failure to the touchscreen.
7. The flat panel display is not susceptible to shock or
vibration. When assembling the P6152, make sure it is
securely installed.
iv
Page 5

8. Do not open the system’s back cover. If opening the
cover for maintenance is a must, only a trained
technician is allowed to do so. Integrated circuits on
computer boards are sensitive to static electricity. To
avoid damaging chips from electrostatic discharge,
observe the following precautions:
Before handling a board or integrated circuit, touch an
unpainted portion of the system unit chassis for a few
seconds. This will help to discharge any static electricity on
your body.
When handling boards and components, wear a
wrist-grounding strap, available from most electronic
component stores.
v
Page 6

This
This page does not contain any information.
page does not contain any information.
This This
page does not contain any information.page does not contain any information.
vi
Page 7

Table of Contents
CCCChhhhaaaapppptttteeeer
1.1 General Description ......................................... 1
1.2 Features........................................................... 2
1.3 Specifications .................................................. 2
1.4 Dimensions ...................................................... 3
1.5 I/O Inputs......................................................... 5
CCCChhhhaaaapppptttteeeer
2.1 System Configuration...................................... 7
2.2 Panel Mounting ............................................... 8
2.3 Wall Mounting (Option)................................... 10
2.4 Rack Mounting (Option) .................................. 12
2.5 Desktop Stand (Option) ..................................13
AAAAppppppppeeeennnnddddiiiix
AAAAppppppppeeeennnnddddiiiix
r 1111 Introduction
Introduction......................
r r
Introduction Introduction
r 2222 Syste m Setup
System Setup.....................
r r
System Setu p System Setu p
x AAAA Supported Input Timing
Supported Input Timing
x x
Supported Input Timing Supported Input Timing
Modes
Modes ...........................
ModesModes
x BBBB OSD Operation
OSD Operation ...............
x x
OSD Operation OSD Operation
...........................15
......................................................
......................1111
............................................
..................... 7777
..........................................
...............17
..............................
15
1515
17
1717
Table of Contents
vii
Page 8

This page does not contain any information.
This page does not contain any information.
This page does not contain any information.This page does not contain any information.
x
Page 9

P6152 Series Panel PC User’s Manual
C h a p t e r 1
Introduction
This chapter contains the general information and the detailed
specifications of the P6152-O/P. Chapter 1 includes the following
sections:
General Description
Features
System Specifi cation
Dimensions
I/O Inputs
1.1 General Description
The Panel 6152, a industrial 15.1 inches view area LCD Monitor
comes with slim, light and reliable features to replace traditional bulky
CRT for Industrial application. Its unique front side design is fit for
open frame mounting (Panel6152-O) or panel mounting
(Panel6152-P). The display interface offers VGA-in standard
interfaces for different input source from PC system or multimedia
system that let you upgrade the display don’t change anything from
your system. Besides, for varied HMI field, you can choose one of
resistive, capacitive touch screen or glass interface to meet your
application. In addition, this monitor has more comfort, safety, and
environmental protection for humanized & health consideration those
would be the benefit that users can get.
This LCD monitor builds in 15.1” color active matrix thin-film-transistor
(TFT) liquid crystal display to provide superior display performance. A
maximum resolution of 1024x768 is ideal for displaying complex
graphics and high definition images. Other outstanding designs that
enhance this LCD monitor ’s performance are Plug & Play
compatibility, and OSD (On Screen Display) controls, especially OSD,
it made you ease adjustment on screen image.
Introduction
1
Page 10

P6152 Series Panel PC User’s Manual
1.2 Features
High contrast color 15.1” XGA TFT LCD display support
resolution up to 1024x768
Stainless steel chassis with NEMA4/IP65-compliant and
Aluminum alloy front panel
Suits with resist ive, capaci tive or tempere d
anti-reflection glass
Multi-scan function supports XGA, SVGA, VGA,
VGA-Text, PC-9801, MAC.
High Brightness and Ultra-wide viewing angle with
anti-glare features
Power management system conforms to VESA DPMS
standard
Advanced OSD control for picture quality adjustment
Supports VESA ARMS, Desktop Stand
Rear, Panel, Wall or Rack mounting
1.3 Specifications
Construction: Heavy-duty aluminum and steel chassis
Control: OSD (On Screen Display) control pad on front
side
Mounting: Panelmout, wallmount(optional). Supports
VESA arm mounting and Rackmount(optional)
Net weight : 5.2 Kgs
Dimension (main body size):
- P6152-P
418.0X310.0X47.0 mm
- P6152-O
385.4X293.4X41.6 mm
Operating Temperatur e Range: 0
Relative Humidity : 20% ~ 90%; non-condensing
o
C ~ 40oC
2
Introduction
Page 11

Introduction
96.00
48.0
158.00
79.00
385.40
1.4 Dimensions
3
Wall Mounting Hole Dim.
386.00
8
418.00
47
39
47 47162 162
P6152 Series Panel PC User’s Manual
73.3163.473.3
Panel Cut-Out Dim.
294.00
310.00
293.40
104 247.70 66.3
P6152-P 15.1" Flat Panel Monitor Dimension (Unit :mm)
Page 12

4
Introduction
385.40
41.6
309.00
CUT-OUT Dim.
232.20
100.00100.00
80.0080.00
154.50
121.00
101.00
185.20
185.20
154.50
121.00
101.00
185.20
192.70
146.70146.70
139.20
116.10
116.10
139.20
293.40
P6152-O 15.1" Open Frame Monitor Dimension (Unit:mm)
P6152 Series Panel PC User’s Manual
Page 13

1.5 I/O Inputs
P6152-P Inputs
P6152-O Inputs
P6152 Series Panel PC User’s Manual
32 1
32 1
1. VGA Port (D-sub): This D-Sub15 connector can be
connected to the system via the external D-Sub15
connector located on the bottom side of the system unit.
2. T/S Port (D-sub optional): This connector will be present only
if a touchscreen is installed. It must be connected to the
RS-232 port of the PC. The touchscreen cable is included
with all orders, which include the touchscreen option.
3. DC +12V::::This connector will be connected to the DC 12V
Switching Power Supply.
Introduction
5
Page 14

This page does not contain any information.
This page does not contain any information.
This page does not contain any information.This page does not contain any information.
6
Page 15

P6152 Series Panel PC User’s Manual
C h a p t e r 2
System Setup
This chapter details the system parts and components with figures.
Sections include
System Configuration
Panel Mounting
Wall Mounting
2.1 System Configuration
The figure below shows the front views of P6152 series.
P6152-P Control Keypad P6152-O Control Keypad
Rack Mounting
Desktop Stand
654321
1. Power LED: When the light is green, the power is on, flash
when the power is active off.
2. Power switch: Press this button to turn on/off the monitor.
3. Menu:
- Press this button to turn on/off the OSD (On Screen Display)
main menu.
- Press this button to activate selected items.
4. SEL+:
- To scroll up the menu.
- To increase the value of selected item.
5. SEL-:
- To scroll down the menu.
- To decrease the value of selected item.
6. Exit: Jump out the selection icon.
System Setup
654321
7
Page 16
P6152 Series Panel PC User’s Manual
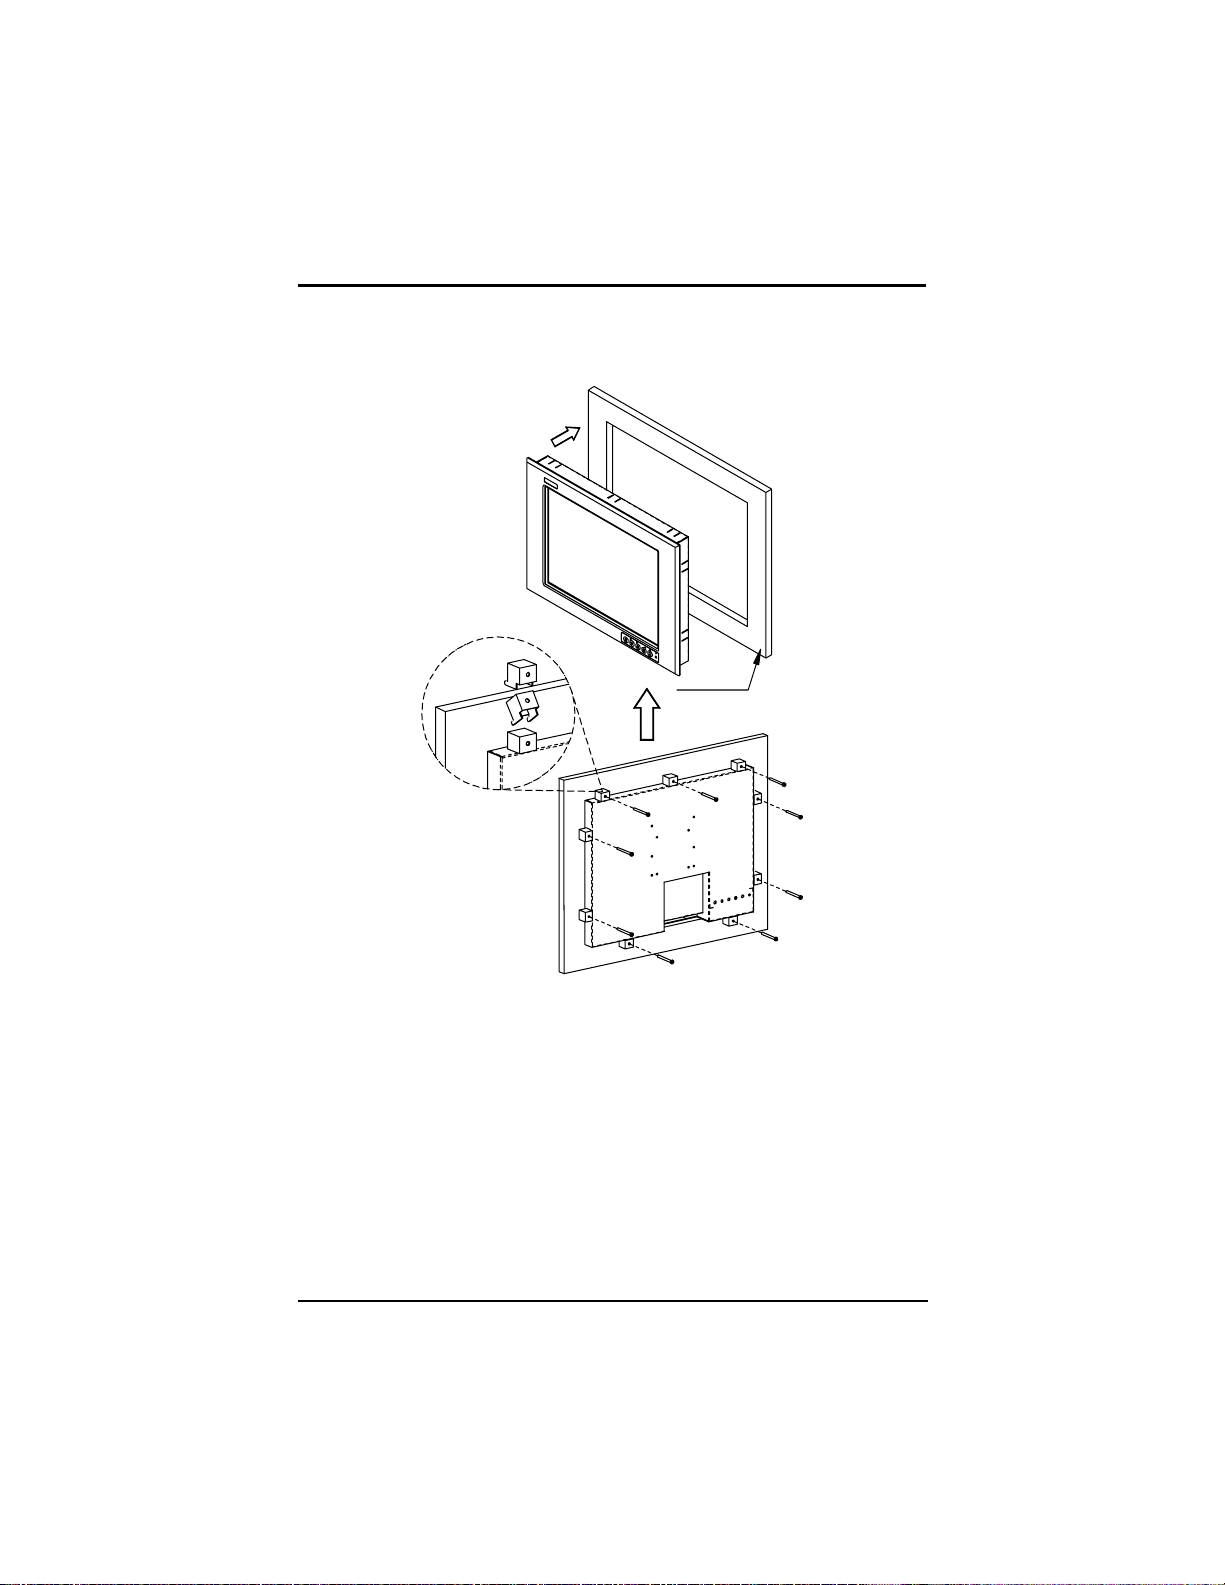
2.2 Panel Mounting
Panel
Two accessory items are needed for this application.
Mounting bracket x 9 pcs
Pan head screws (M4x0.7PxL45.0mm) x 9 pcs
Installation instruction
1. Find a plate and cut off a window, refer the 1.4 P6152-P
Dimensions for the dimension.
2. Screw the mounting bracket to the unit.
3. Combine flange nuts with box head screws and then screw
to the mounting bracket to tighten the unit.
8 System Setup
Page 17

P6152 Series Panel PC User’s Manual
Note: To obtain the maximum degree of moisture resistance, be sure to
mount the P6152 on a smooth, flat surface.
The panel itself can be from 1.6 to 16.0mm thick.
Strengthening may be required for the panel. Be sure to consider the
weight of the P6152 when designing the panel.
1.6~16mm
Note: To enhance the P6152’s maintainability, operability and ventilation,
allow at least 35mm clearance between the P6152 and any other
objects. (The clearance must be large enough to a llow you to insert
or remove expansion boards and to a ttach connectors.)
System Setup
9
Page 18

P6152 Series Panel PC User’s Manual
Side View
35.0
35.0
35.0
35.0
Rear View
35.0
35.0
Unit: mm
2.3 Wall Mounting (Option)
Wall
Bracket
35.0
The unit is designed to su pport wall mounting applicatio n. It let you
to mount the unit on the wall.
Three accessory items to support this feature.
Wall mounting bracket x 1 pcs
10 System Setup
Page 19

P6152 Series Panel PC User’s Manual
Binding head & washer screws (M4x0.7PxL6.0mm) x 4 pcs
Truss head screws (TTS-4, 3.5x10mm-black) x 4 pcs
Installation instruction
1. Refer the hole location on the page 3. Screw the truss
head screws to the hole location on the wall.
Note: Do not tight the screw for mounting the unit. The minimum
space between the wall and t he top of screw is 1.6mm.
2. Mount the wall mounting bracket to the back cover of the
unit.
3. Mount the unit to the wall.
System Setup
11
Page 20
P6152 Series Panel PC User’s Manual
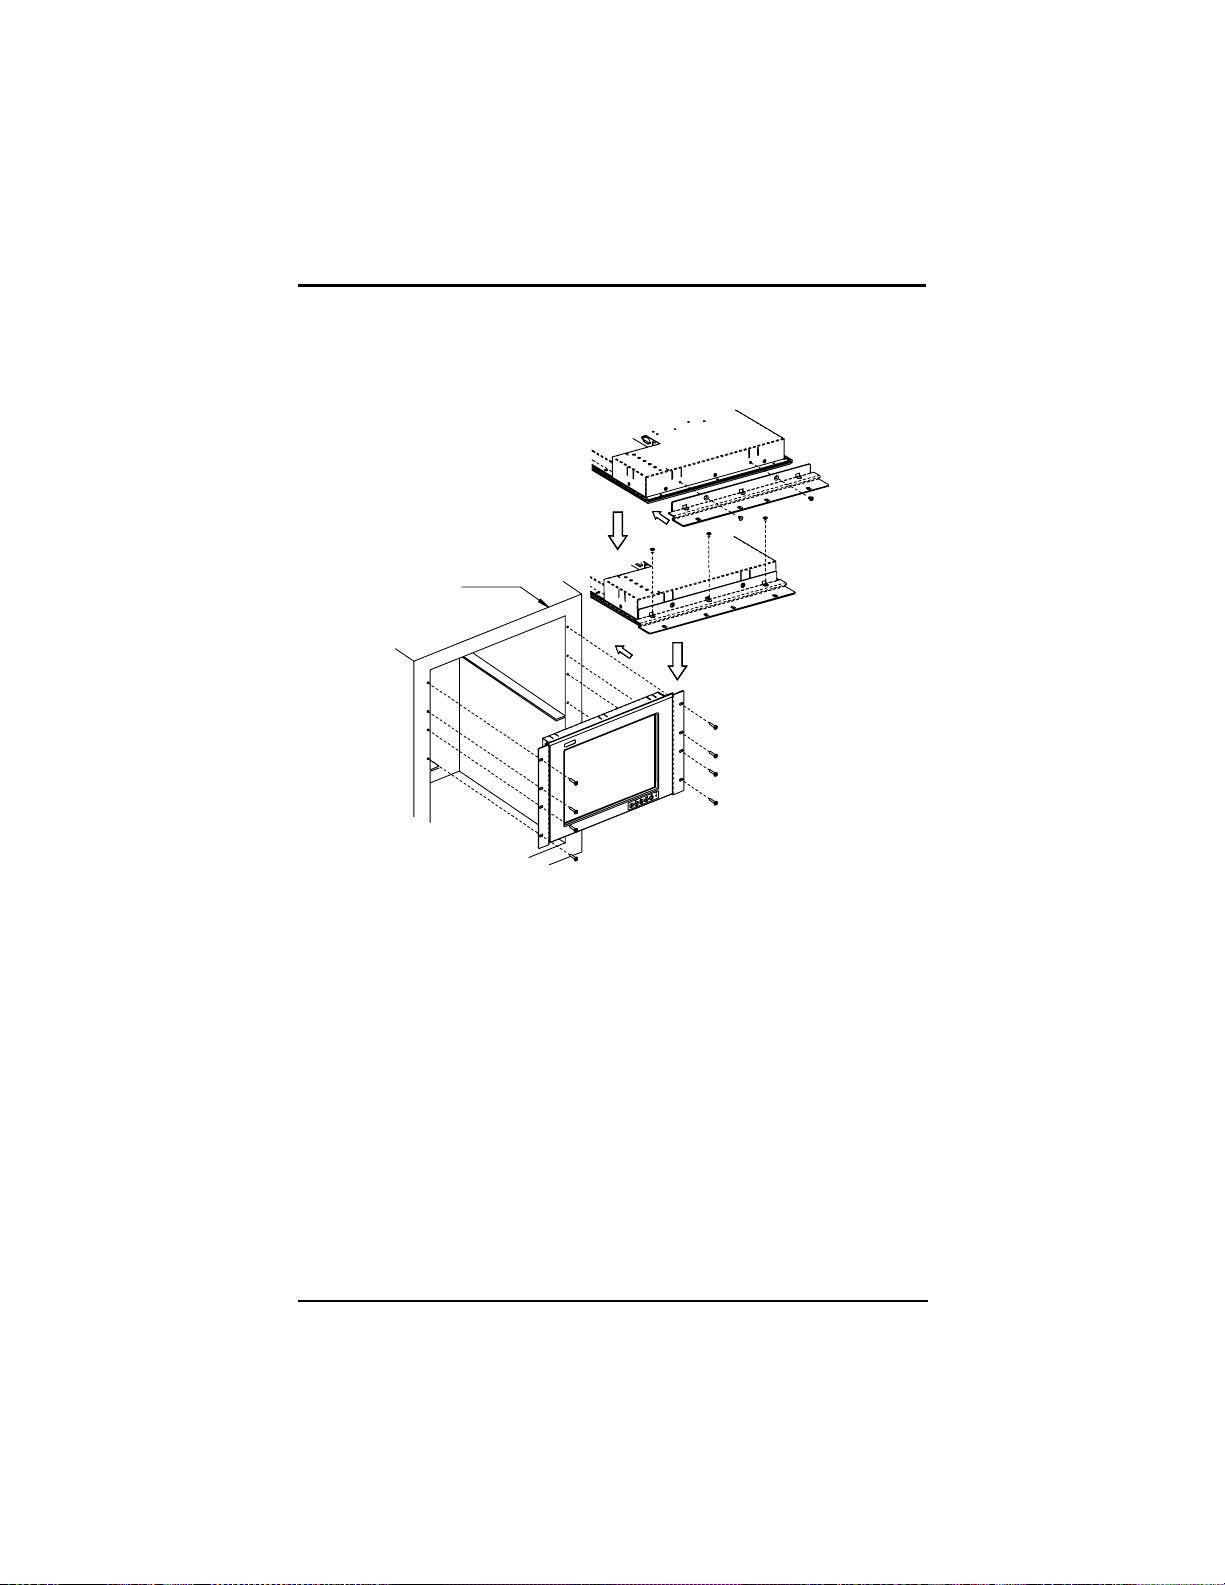
2.4 Rack Mounting (Option)
Rack
Two accessory items to support this feature.
Rack mounting bracket x 1 pcs
Flat head screws (M4x0.7PxL6.0mm) x 10 pcs
Installation instruction
1. Mount the rack mounting bracket to the back cover of the
unit.
2. Screw to the mounting bracket to tighten the unit.
12 System Setup
Page 21

P6152 Series Panel PC User’s Manual
2.5 Desktop Stand (Option)
5
0
.
0
0
Side View
The unit is designed to support desktop stand application.
Two accessory items are needed for this application.
Wall mounting bracket x 1 pcs
Binding head & washer screws (M4x0.7PxL6.0mm) x 2 pcs
Installation instruction
Mounting the wall mounting bracket with the binding header & washer
screws to the back over of the unit and then the unit can stand on the
desktop.
System Setup
13
Page 22

This page does not contain any informatio
This page does not contain any information.
This page does not contain any informatioThis page does not contain any informatio
n.
n.n.
14
Page 23
P6152 Series Panel PC User’s Manual
A p p e n d i x A
Supported Input Timing Modes
Supported Input Timing M odes
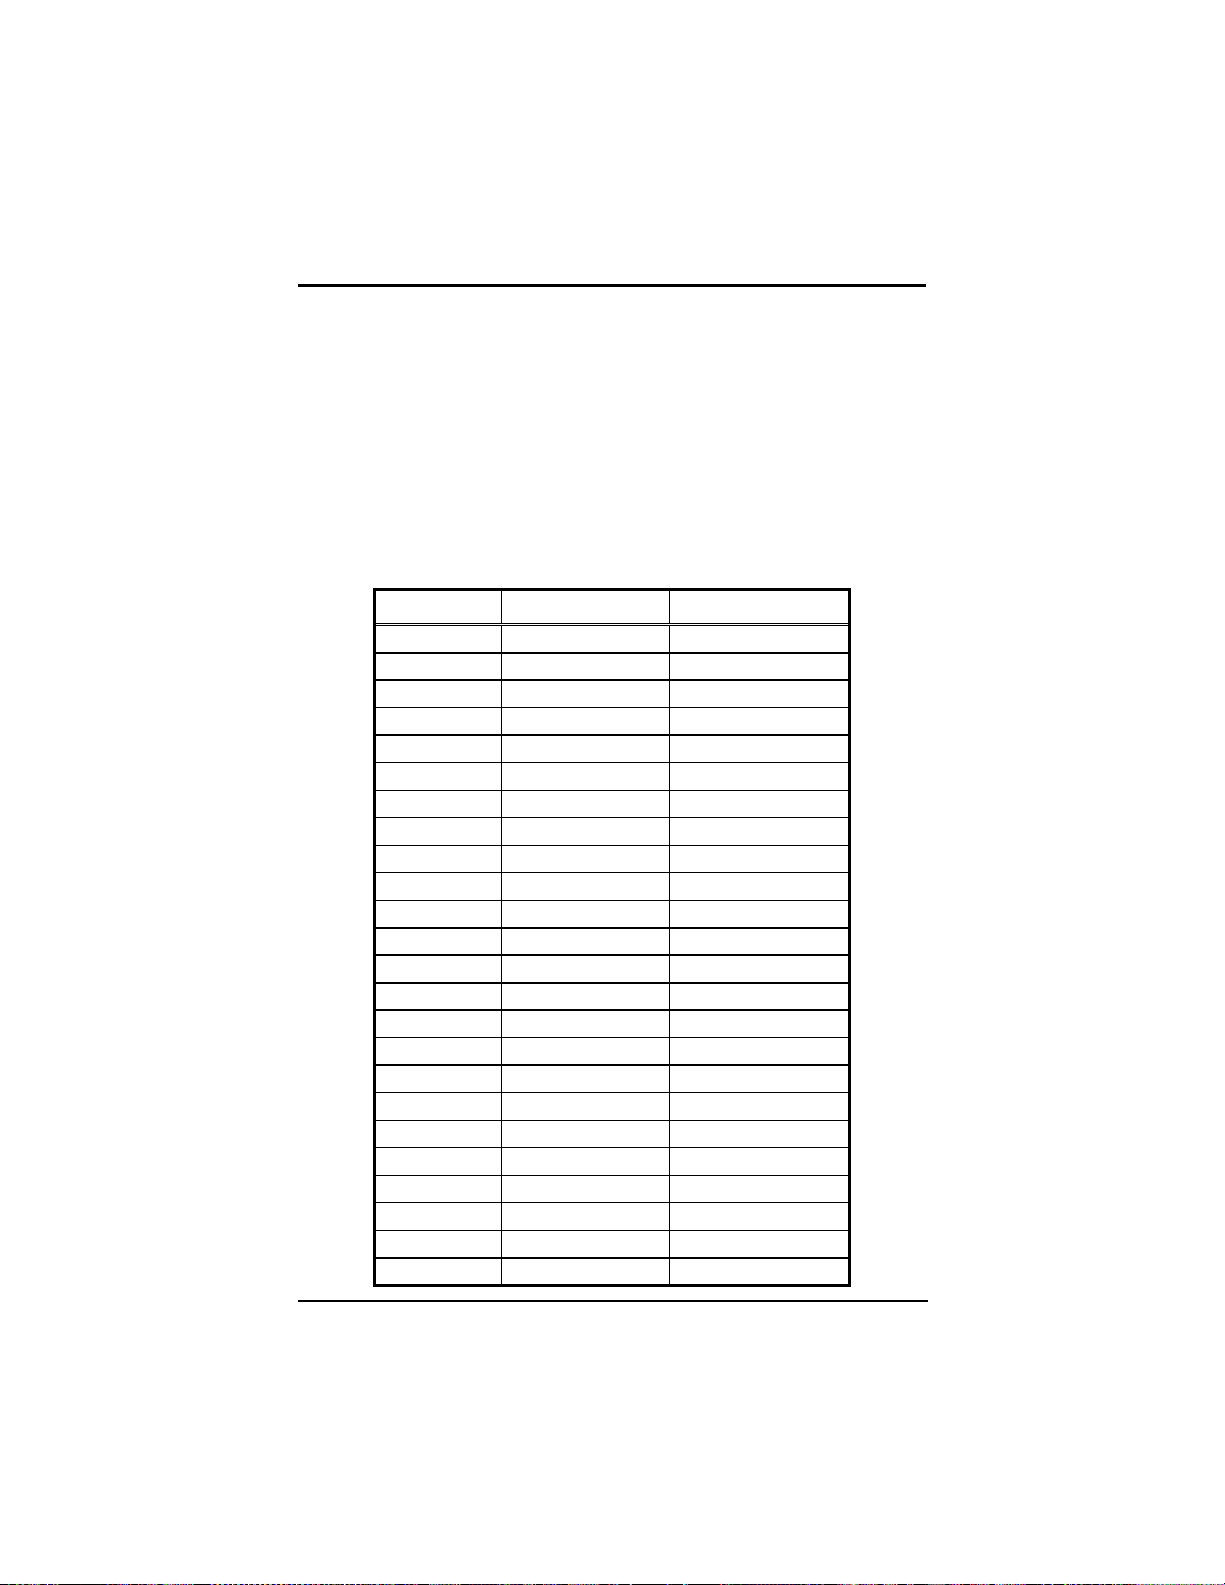
The thirty-eight kinds of timings below are already programmed in this
module. The input synchronous signals are automatically recognized.
Preset No. Display Size Vsync (Hz)
1 640x350 70.087
2 640x400 70.111
3 720x400 70.087
4 640x480 59.941
5 640x480 66.667
6 640x480 70.048
7 640x480 72.809
8 640x480 75.000
9 720x480 59.924
10 720x480 72.808
11 720x576 71.977
12 960x720 59.979
13 960x720 74.993
14 1152x864 60.091
15 1152x864 70.011
16 1280x960 59.989
17 800x600 56.250
18 800x600 60.317
19 800x600 72.000
20 800x600 72.188
21 800x600 75.000
22 832x624 75.087
23 1024x768 59.278
24 1024x768 59.278
Supported Input Timing Modes
15
Page 24
P6152 Series Panel PC User’s Manual
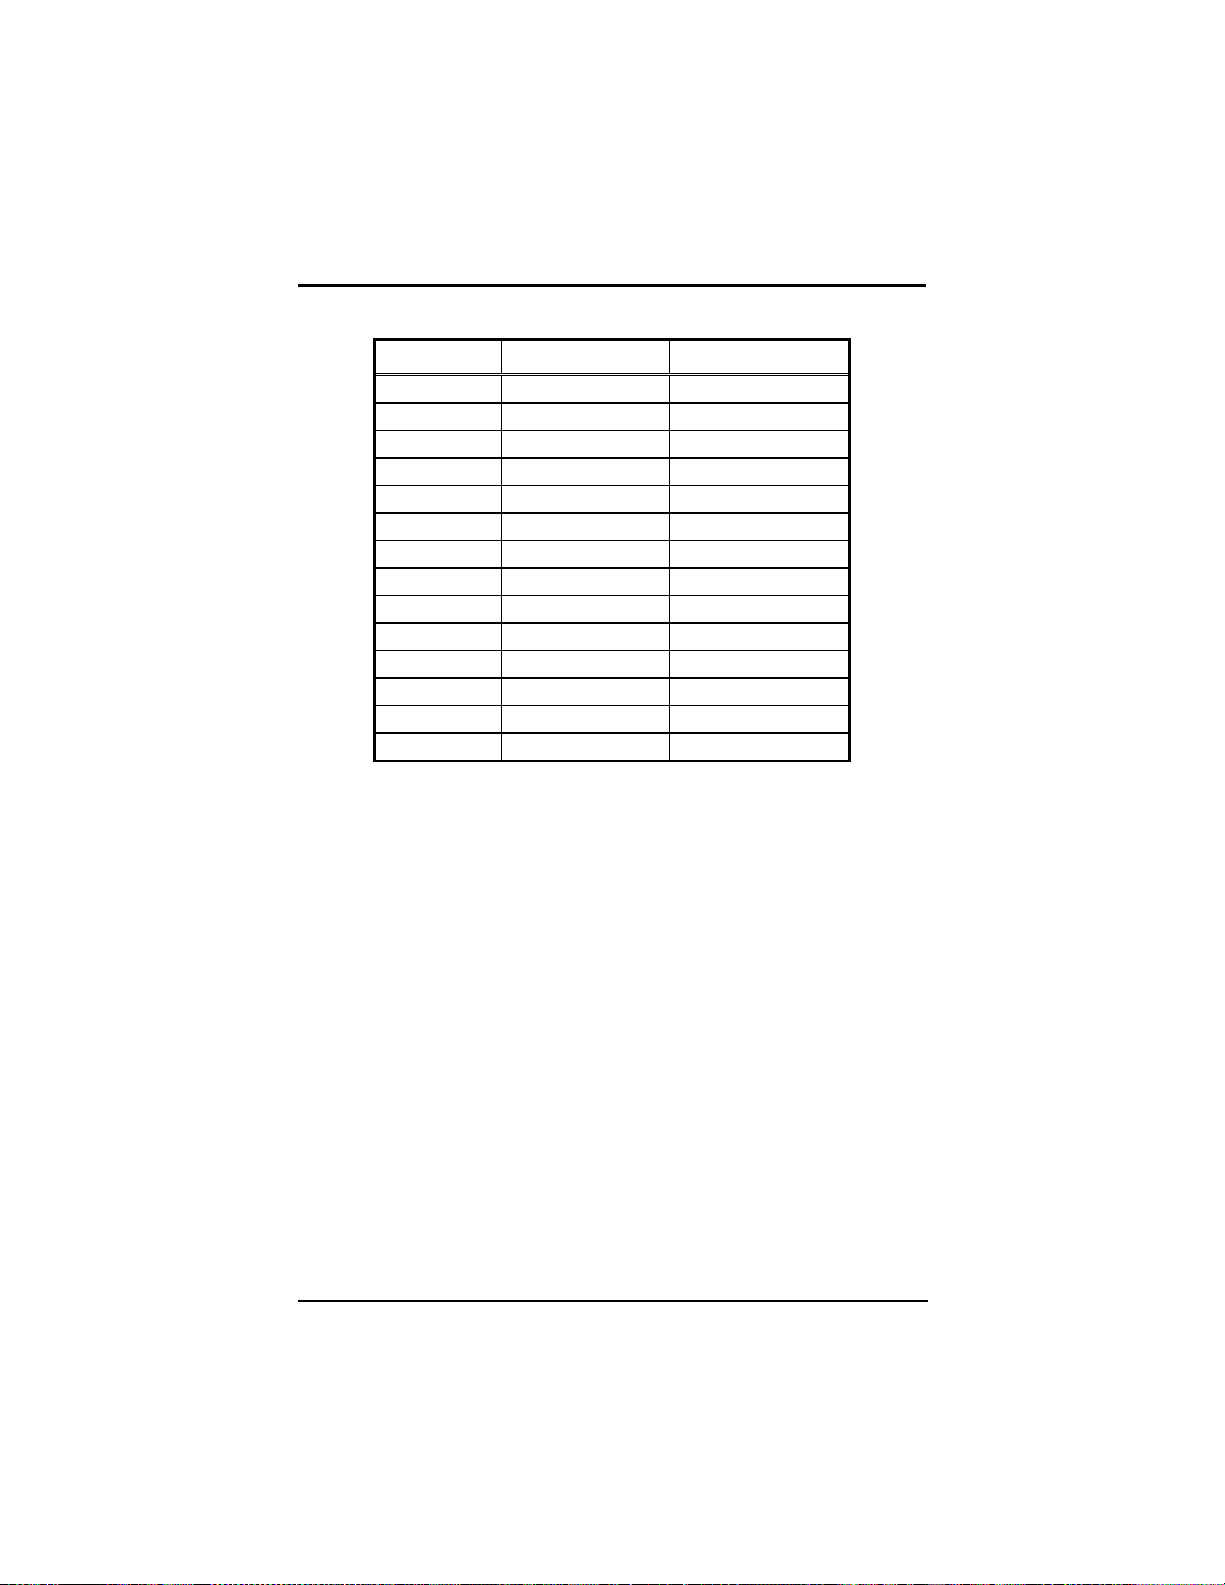
Preset No. Display Size Vsync (Hz)
25 1024x768 60.000
26 1024x768 60.004
27 1024x768 70.008
28 1024x768 70.069
29 1024x768 71.799
30 1024x768 72.000
31 1024x768 74.927
32 1024x768 74.927
33 1024x768 75.020
34 1024x768 75.029
35 1024x768 75.782
36 1184x884 60.000
37 1280x1024 59.979
38 1280x1024 60.020
16
Supported Input Timing Modes
Page 25
P6152 Series Panel PC User’s Manual
A p p e n d i x B
OSD Operation
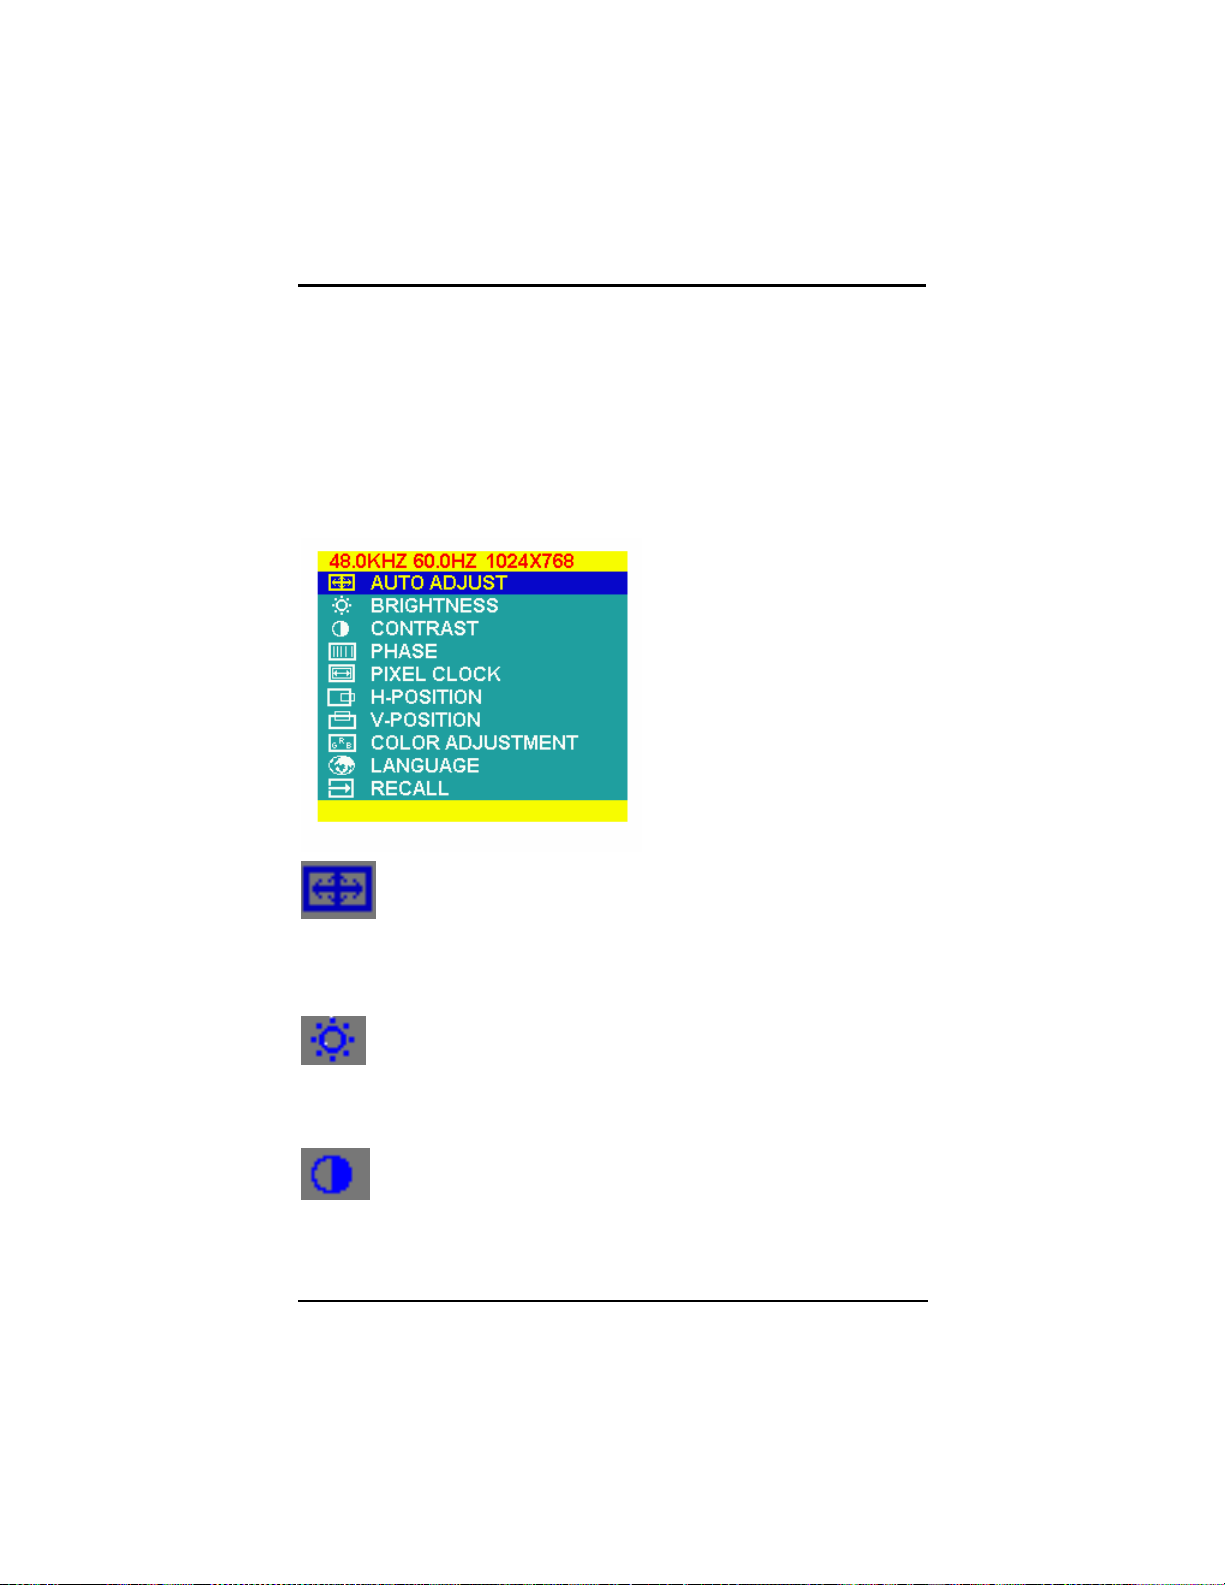
Function Description of OSD M enu
MAIN MENU DISPLAY
Auto Adjust
Automatically adjust Image Position, Horizontal Size
or Fine setting.
Press ▲▲▲▲ or ▼▼▼▼ button to select it then press menu
key again.
Brightness
Controls the intensity of the monitor back-light.
Use ▲▲▲▲ or ▼▼▼▼ button to increase or decrease the
setting.
Contrast
Controls the contrast of the LCD.
Use ▲ or ▼ button to increase or decrease
the setting.
OSD Operation
17
Page 26

P6152 Series Panel PC User’s Manual
Phase (Fine Tuning)
Improves focus, clarity and image stability.
Use ▲▲▲▲ or ▼▼▼▼ button to increase or decrease the
setting.
Pixel Clock
Improves focus, clarity and image stability by
changing the horizontal image size.
Use ▲▲▲▲ or ▼▼▼▼ button to increase or decrease the
setting.
Image Hori. Position
Controls the horizontal image position within the
display of the LCD.
Use the ▲▲▲▲ or ▼▼▼▼ button to move the image right
or left.
Image Vert. Position
Controls the vertical image position within the
display of the LCD.
18
Use the ▲▲▲▲ or ▼▼▼▼ button to move the image up or
down.
Color Temp
Press the ▲▲▲▲ or ▼▼▼▼ button to enter into the Color
temperature
- Provides two preset color adjustment: 9300K
and 6500.
- RGB Adjustment:
Increases or decreases Red, Green or blue color
selected Use ▲▲▲▲ or ▼▼▼▼ button to increase or
decrease the setting.
OSD Operation
Page 27

P6152 Series Panel PC User’s Manual
Language
Provides seven languages for OSD menu.
Select language by using ▲▲▲▲ or ▼▼▼▼ button.
Information
Show the horizontal and vertical frequency.
Recall
Return to the original setting.
NO SIGNAL INPUT
OSD Operation
19
Page 28

This page doe
This page does not contain any information.
This page doeThis page doe
s not contain any information.
s not contain any information.s not contain any information.
20
 Loading...