

Page 1

OPS860-HM Series
Intel Open® Pluggable Specification Box
User’s Manual
Page 2

ii
Disclaimers
This manual has been carefully checked and believed to contain
accurate information. Axiomtek Co., Ltd. assumes no responsibility for
any infringements of patents or any third party’s rights, and any liability
arising from such use.
Axiomtek does not warrant or assume any legal liability or
responsibility for the accuracy, completeness or usefulness of any
information in this document. Axiomtek does not make any
commitment to update the information in this manual.
Axiomtek reserves the right to change or revise this document and/or
product at any time without notice.
No part of this document may be reproduced, stored in a retrieval
system, or transmitted, in any form or by any means, electronic,
mechanical, photocopying, recording, or otherwise, without the prior
written permission of Axiomtek Co., Ltd.
Copyright 2012 Axiomtek Co., Ltd.
All Rights Reserved
April 2012, Version A1
Printed in Taiwan
Page 3

iii
Safety Approvals
CE Marking
FCC Class A
FCC Compliance
This equipment has been tested in compliance with the limits
for a Class A digital device, pursuant to Part 15 of the FCC
Rules. These limits are meant to provide reasonable protection
against harmful interference in a residential installation. If not
installed and used in accordance with proper instructions, this
equipment might generate or radiate radio frequency energy
and cause harmful interference to radio communications.
However, there is no guarantee that interference will not occur
in a particular installation. If this equipment does cause harmful
interference to radio or television reception, which can be
determined by turning the equipment off and on, the user is
encouraged to try to correct the interference by one or more of
the following methods:
1. Increase the separation between the equipment and receiver.
Connect the equipment to another outlet of a circuit that
doesn’t connect with the receiver.
2. Consult the dealer or an experienced radio/TV technician for help.
Shielded interface cables must be used in order to comply with the
emission limits.
Page 4

iv
Safety Precautions
Before getting started, please read the following important
safety precautions.
1. The OPS860-HM does not come equipped with an operating
system. An operating system must be loaded first before
installing any software into the computer.
2. Be sure to ground yourself to prevent static charge when
installing the internal components. Use a grounding wrist strap
and place all electronic components in any static-shielded
devices. Most electronic components are sensitive to static
electrical charge.
3. Disconnect the power cord from the OPS860-HM before any
installation. Be sure both the system and external devices are
turned OFF. A sudden surge of power could ruin sensitive
components that the OPS860-HM must be properly grounded.
4. Make sure it is the correct voltage of the power source before
connecting the equipment to the power outlet.
5. The brightness of the flat panel display will be getting weaker as
a result of frequent usage. However, the operating period varies
depending on the application environment.
6. The flat panel display is not susceptible to shock or vibration.
When assembling the OPS860-HM, make sure it is securely
installed.
7. Do not leave this equipment in an uncontrolled environment
where the storage temperature is below 0℃ or above 40℃. It
may damage the equipment.
8. External equipment intended for connection to signal input/out or
other connectors shall comply with relevant UL/IEC standard.
Page 5

v
9. Do not open the back cover of the system. If opening the
cover for maintenance is a must, only a trained technician
is allowed to do so. Integrated circuits on computer boards
are sensitive to static electricity. To avoid damaging chips
from electrostatic discharge, observe the following
precautions:
Before handling a board or integrated circuit, touch an
unpainted portion of the system unit chassis for a few
seconds. This will help to discharge any static electricity on
your body.
When handling boards and components, wear a wristgrounding strap, available from most electronic component
stores.
Trademarks Acknowledgments
Axiomtek is a trademark of Axiomtek Co., Ltd.
IBM, PC/AT, PS/2, VGA are trademarks of International
Business Machines Corporation.
Intel® and Atom™ are registered trademarks of Intel
Corporation.
MS-DOS, Microsoft C and Quick BASIC are trademarks of
Microsoft Corporation.
VIA is a trademark of VIA Technologies, Inc.
SST is a trademark of Silicon Storage Technology, Inc.
UMC is a trademark of United Microelectronics Corporation.
Other brand names and trademarks are the properties and
registered brands of their respective owners.
Page 6

vi
Table of Contents
Disclaimers .............................................................................................. ii
Safety Approvals ..................................................................................... iii
Safety Precautions ..................................................................................iv
CHAPTER 1 INTRODUCTION ..................................................................... 1
1.1 General Description ............................................................. 1
1.2 System Specifications .......................................................... 3
1.2.1 Main CPU Board .................................................................. 3
1.2.2 I/O System ........................................................................... 4
1.3 Mechanical Assembly .......................................................... 5
1.3.1 Dimensions .......................................................................... 5
1.3.2 I/O out let ............................................................................. 6
1.3.3 Mechanical Specifications ................................................... 7
1.3.4 Reference Design .............................................................. 12
1.4 Package List ...................................................................... 13
CHAPTER 2 HARDWARE INSTALLATION .............................................. 15
2.1 CPU,HDD,DRAM,Wireless Installation .............................. 15
2.2 Pluggble Module Method .................................................. 26
CHAPTER 3 CONNECTORS ..................................................................... 27
3.1 Connectors ........................................................................ 27
3.1.1 JAE TX25 Connector (CN1) ............................................... 29
3.1.2 CPU FAN (CN3) ................................................................ 31
3.1.3 Display Port Connector (CN4) ........................................... 32
3.1.4 VGA Port (CN7) ................................................................. 33
3.1.5 Min Card Slot (SCN1) ....................................................... 34
3.1.6 Battery 2 PIN (BAT1) ......................................................... 35
3.1.7 ATX Auto Power ON/ Clear CMOS (SW1) ........................ 35
3.1.8 RJ45 (WG82579LM) (LAN1) ............................................. 36
3.1.9 USB Port 0/1 (USB1) ......................................................... 36
CHAPTER 4 DRIVERS INSTALLATION .................................................... 37
4.1 System ............................................................................... 37
CHAPTER 5 AMI BIOS SETUP UTILITY ................................................... 39
5.1 Starting .............................................................................. 39
5.2 Navigation Keys ................................................................ 39
5.3 Main Menu ......................................................................... 41
5.4 Advanced Menu ................................................................. 42
5.5 Chipset Menu ..................................................................... 51
5.6 Boot Menu.......................................................................... 55
Page 7

vii
5.7 Security Menu .................................................................... 57
5.8 Save & Exit Menu .............................................................. 59
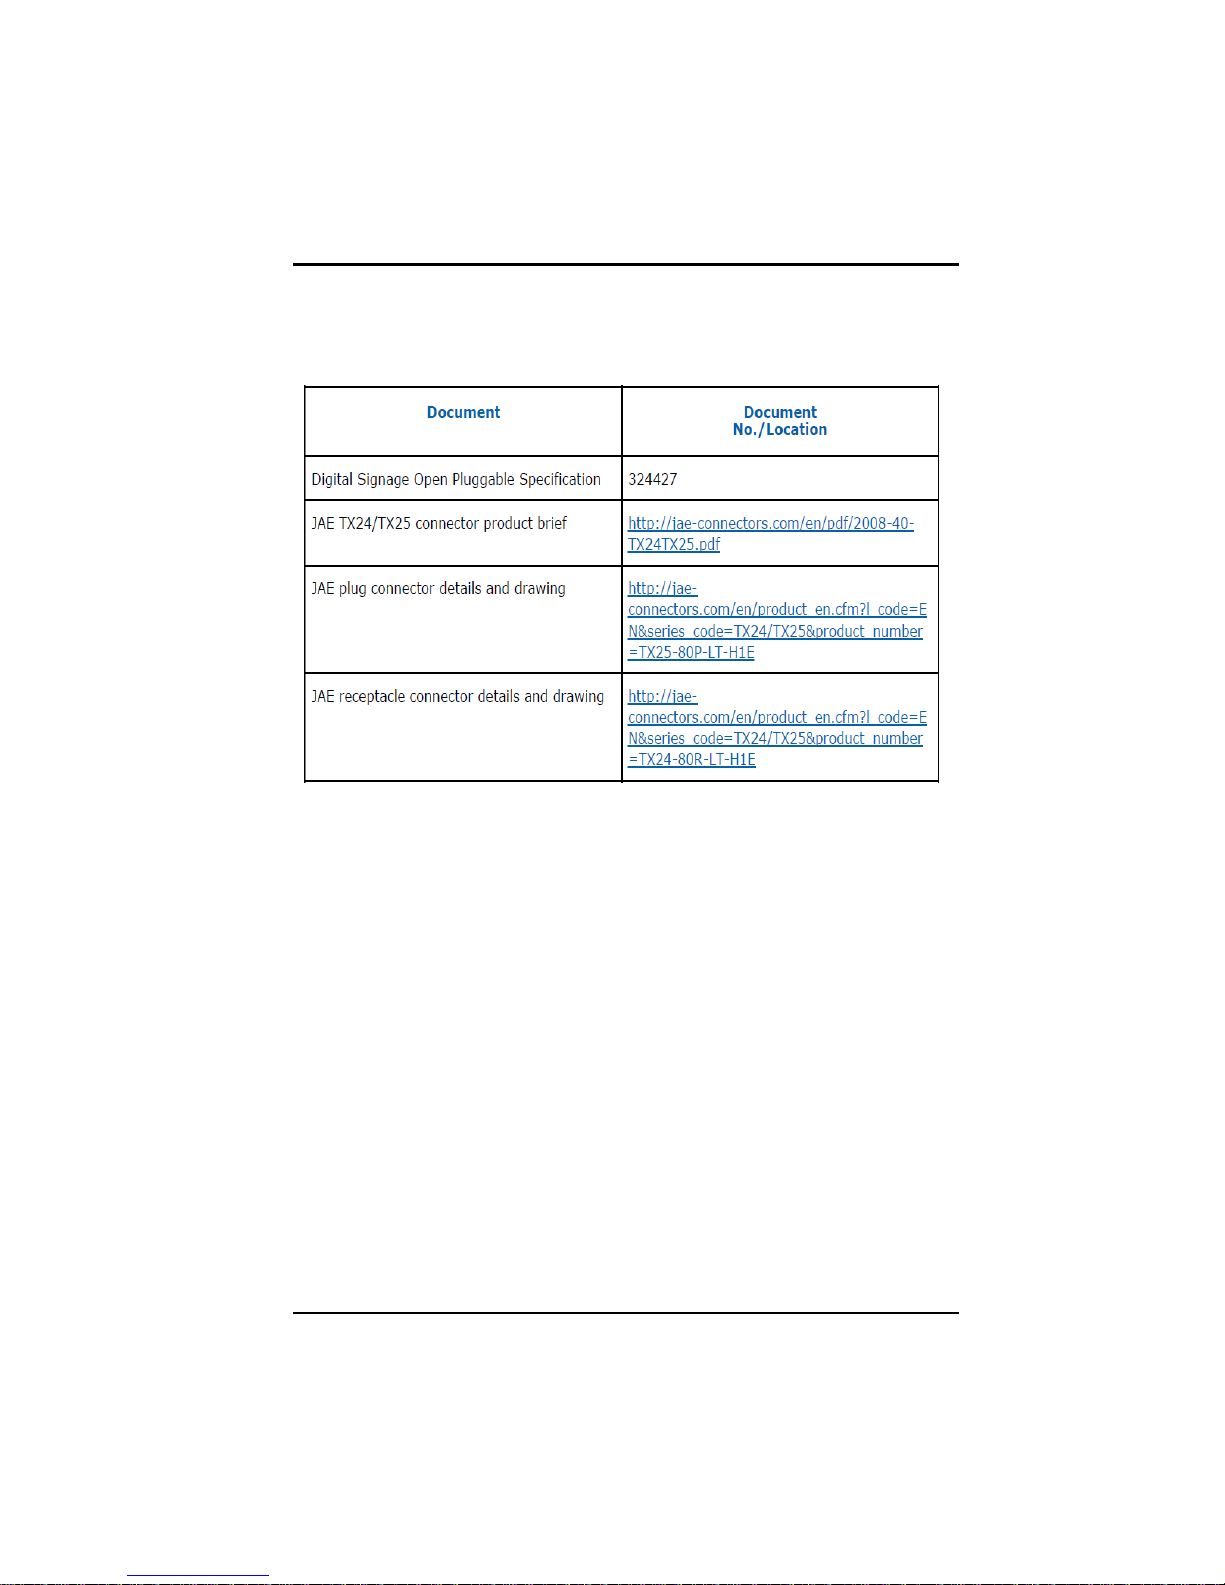
APPENDIX A REFERENCE DOCUMENTS .............................................. 61
APPENDIX B WATCH DOG TIMER ........................................................ 63
Page 8

viii
MEMO:
Page 9

OPS860-HM User’s Manual
1
CHAPTER 1
INTRODUCTION
This chapter contains general information and detailed specifications of
the OPS860-HM Chapter 1 includes the following sections:
General Description
Specification
Dimensions
I/O Outlets
Package List
1.1 General Description
Intel Open® Pluggable Specification (OPS) Compliance
OPS860-HM is based on the Intel® Core™ i5//i3 processor with
Mobile Intel® 6 Series Express Chipset (HM65) platform and also
future products. The Pluggable Module is targeted to provide an
interchangeable solution to the digital signage media players with
compatible connector. This document provides the module form
factor, connector specification, reference thermal solution, and
boundary conditions in order to ensure the functionally of the
module in all compatible display panel system.
OPS860-HM meets Intel Open® Pluggable Specification for design
and development, simplifying system upgrade maintenance for
manufacturers and developers that supports not only Intel® 2nd
Generation Core i family , Pentium Mobile, Celeron Mobile but also
next generation processor (Optional) which is high flexible and
user-friendly digital signage applications.
Introduction
Page 10

OPS860-HM User’s Manual
2
Easy maintenance
OPS860-HM offers a best solution for digital signage market.
Compliant with Intel OPS architecture, digital signage players are
capable of deploying interchangeable systems faster and easing
upgrading/maintenance, while lowering costs for development and
implementation Additionally, having the ability to simply slot-in and
out the unique pluggable engine box makes daily hassle easier
and faster for users.
OPS860-HM has pluggable engine box design; you can change
HDD, DRAM and CPU configurations more easily
Introduction
Page 11

OPS860-HM User’s Manual
3
1.2 System Specifications
1.2.1 Main CPU Board
CPU
The OPS860-HM has four reference solutions as CPU socket type.
Customer can choose what they need.
Intel® Core™ i5-2510E Processor (3M Cache, 2.5 GHz)
Intel® Core™ i3-2330E Processor (3M Cache, 2.2 GHz)
Intel® Celeron® Mobile Processor B810(2M Cache, 1.60 GHz)
System Chipset
Intel® HM65 PCH
BIOS
AMI
System Memory
One socket 204-pin DDR3 SODIMM 1333 system memory up to
Wireless Module (Optional)
Optional IEEE802.11 b/g/n, Bluetooth 2.0
4GB
® BIOS
Introduction
Page 12

OPS860-HM User’s Manual
4
1.2.2 I/O System
Standard I/O
One VGA
Two USB ports 2.0
1 x Power on /Off button
1 x reset button
Ethernet
10/100/1000Mbps Ethernet
Audio
Line-out/ Mic-in
Expansion
One PCI Express Mini Card slot is equipped for optional add
on such as wireless LAN card for 802.11 b/g connections,
GPS, Bluetooth application.
Storage
One 2.5’’SATA HDD
Net Weight
0.9Kg(1.99 lb) without cooler
Dimension (Main Body Size)
179.4 mm(W)x 120mm(D) x 29.4 mm(H)
Operation Temperature
0℃ to 40℃
NOTE All specifications and images are subject to change without
notice.
Introduction
Page 13
OPS860-HM User’s Manual
5
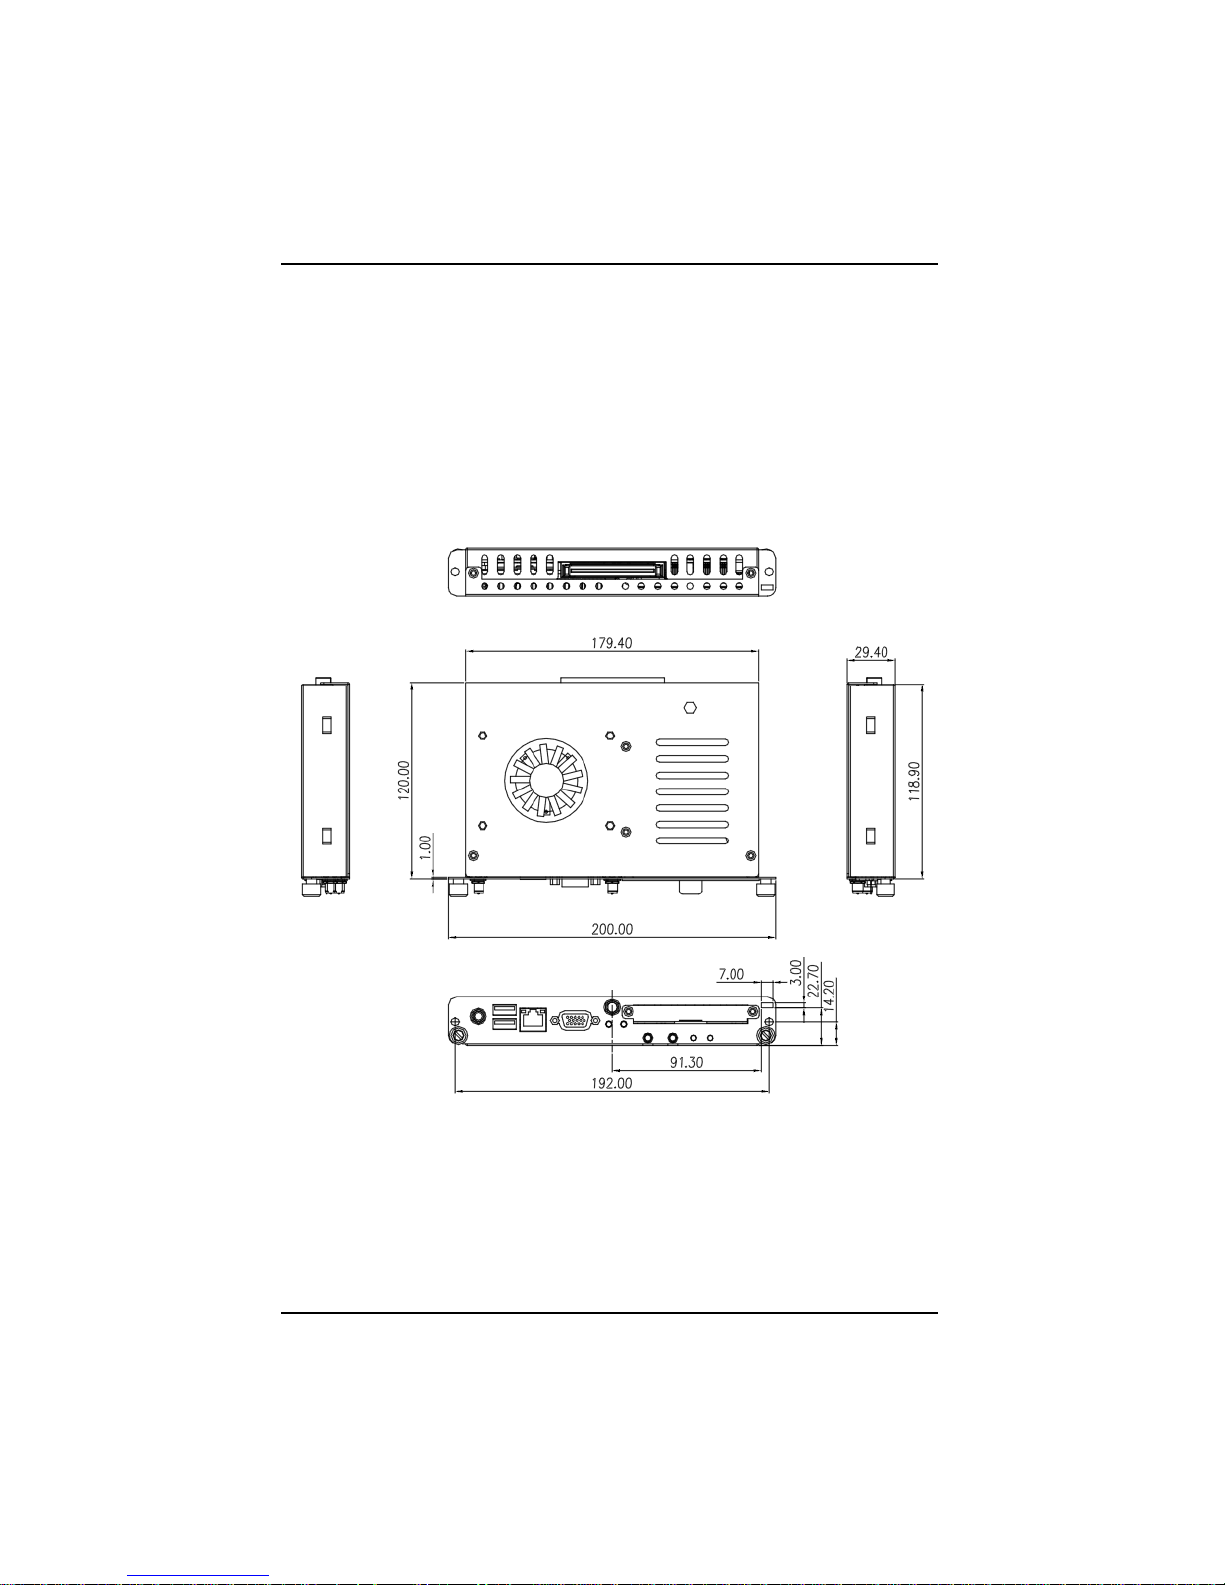
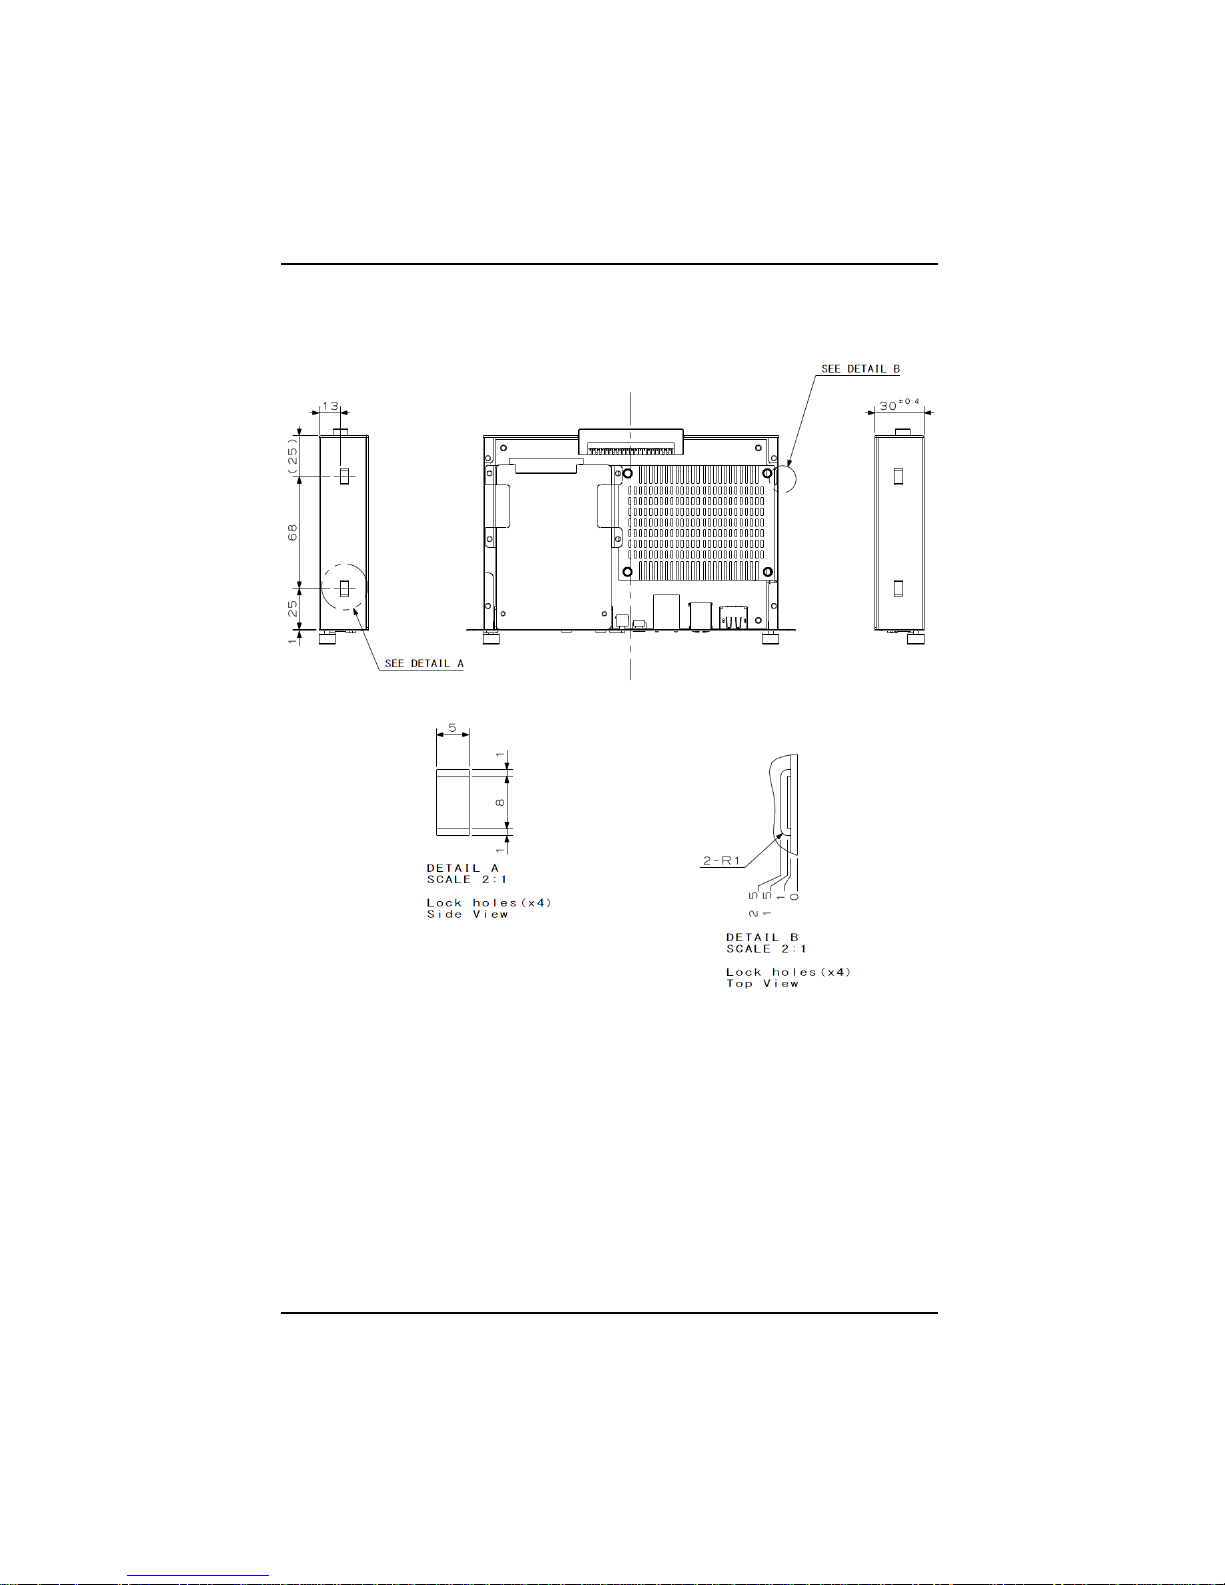
1.3 Mechanical Assembly
1.3.1 Dimensions
This diagram shows you dimensions and outlines of the OPS860HM
The overall dimension of the module including the mounting frame is
200mm x 119mm x 30mm and also shows the location of the front panel
screw holes as well as the security lock.
Introduction
Page 14
OPS860-HM User’s Manual
6
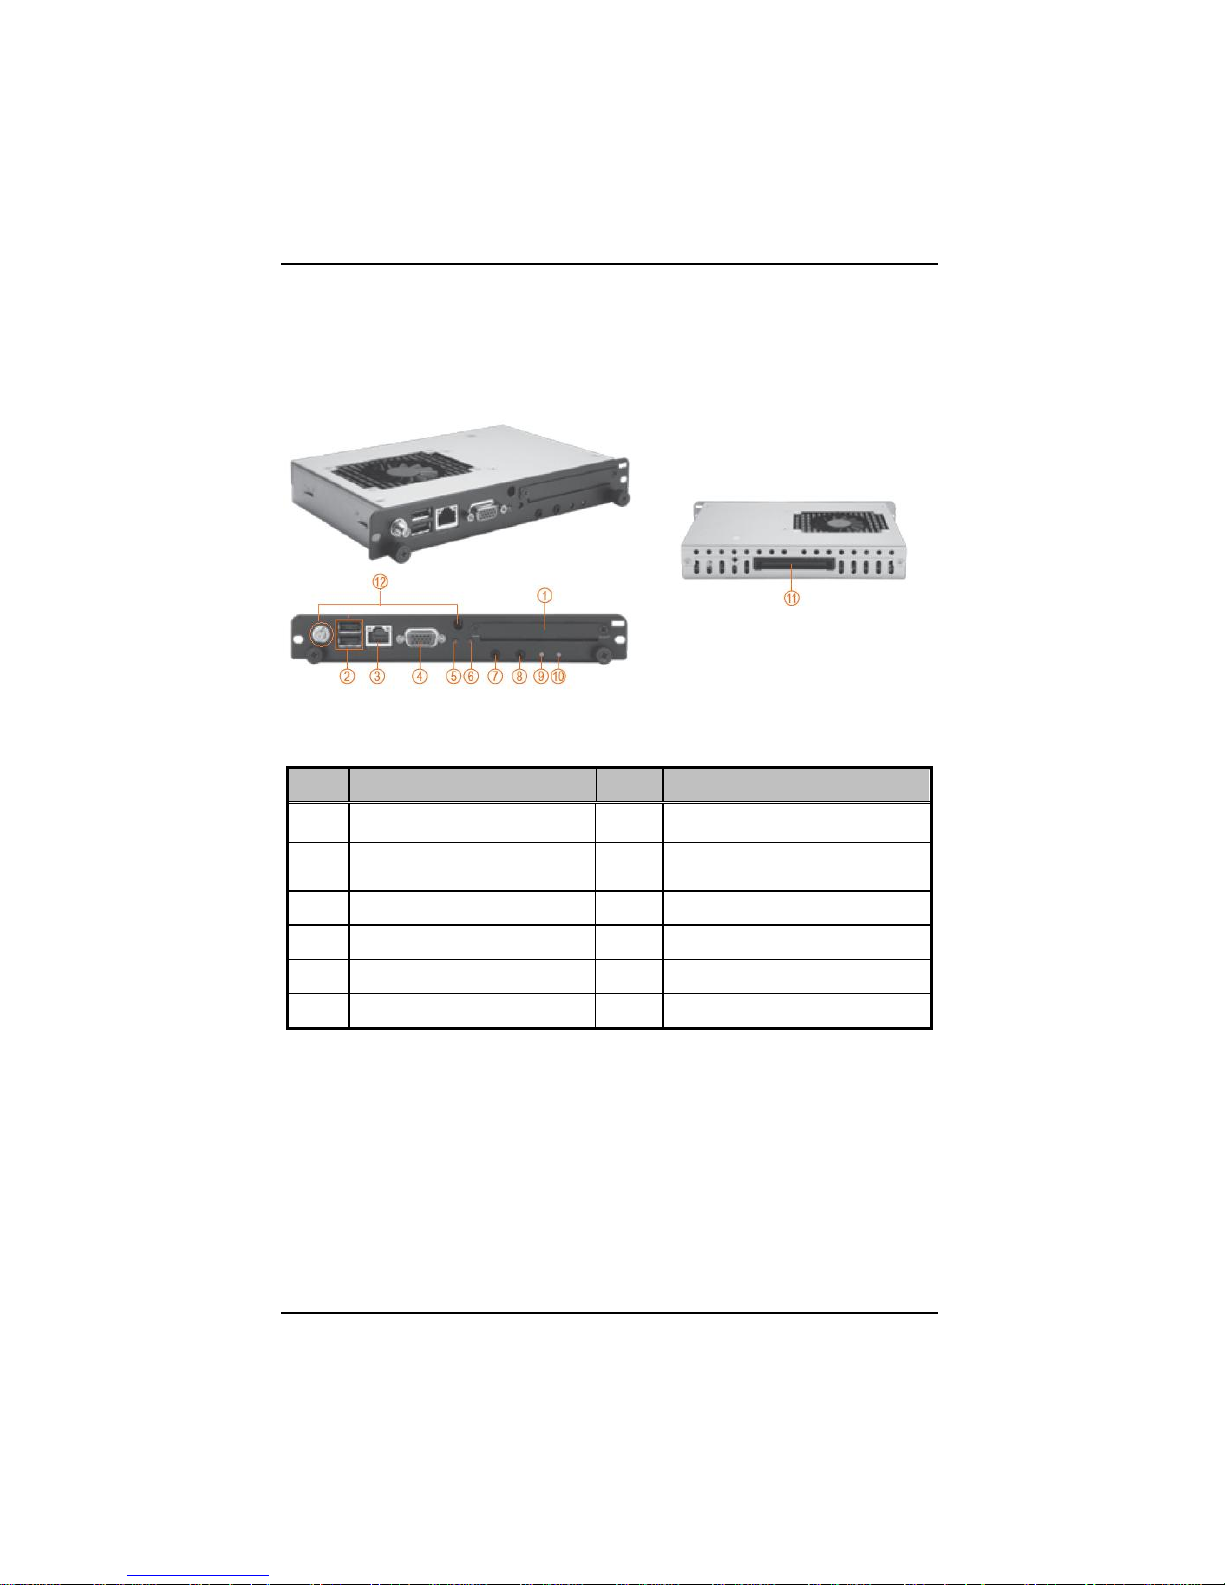
No.
Connector
No.
Connector
1
2.5’’HDD slot
7
Audio(Line-out)
2
USB 2.0 x2
8
Audio(Mic.-in)
3
Ethernet
9
Power indicator
4
VGA
10
HDD indicator
5
Power Switch
11
JAE TX-25
6
Reset
12
Optional Antenna
1.3.2 I/O out let
The following figures show you the locations of the OPS860-HM
I/O outlets.
Introduction
Page 15
OPS860-HM User’s Manual
7
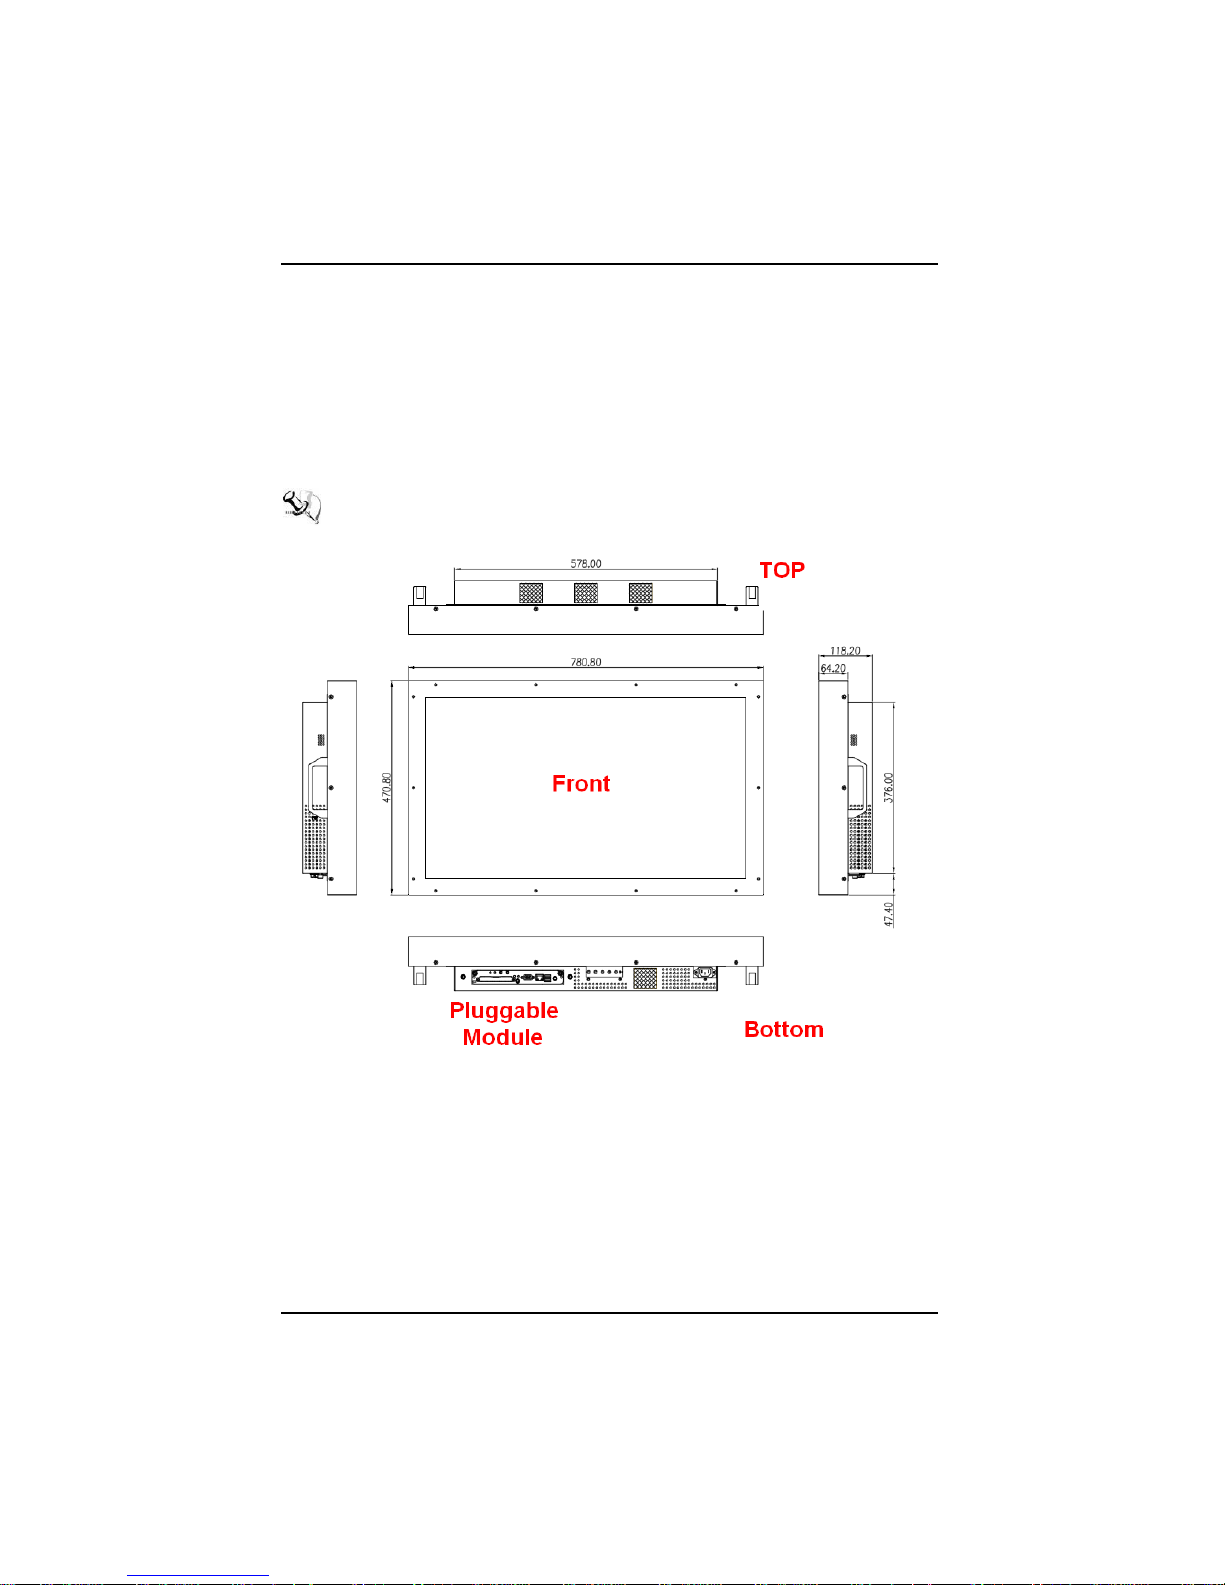
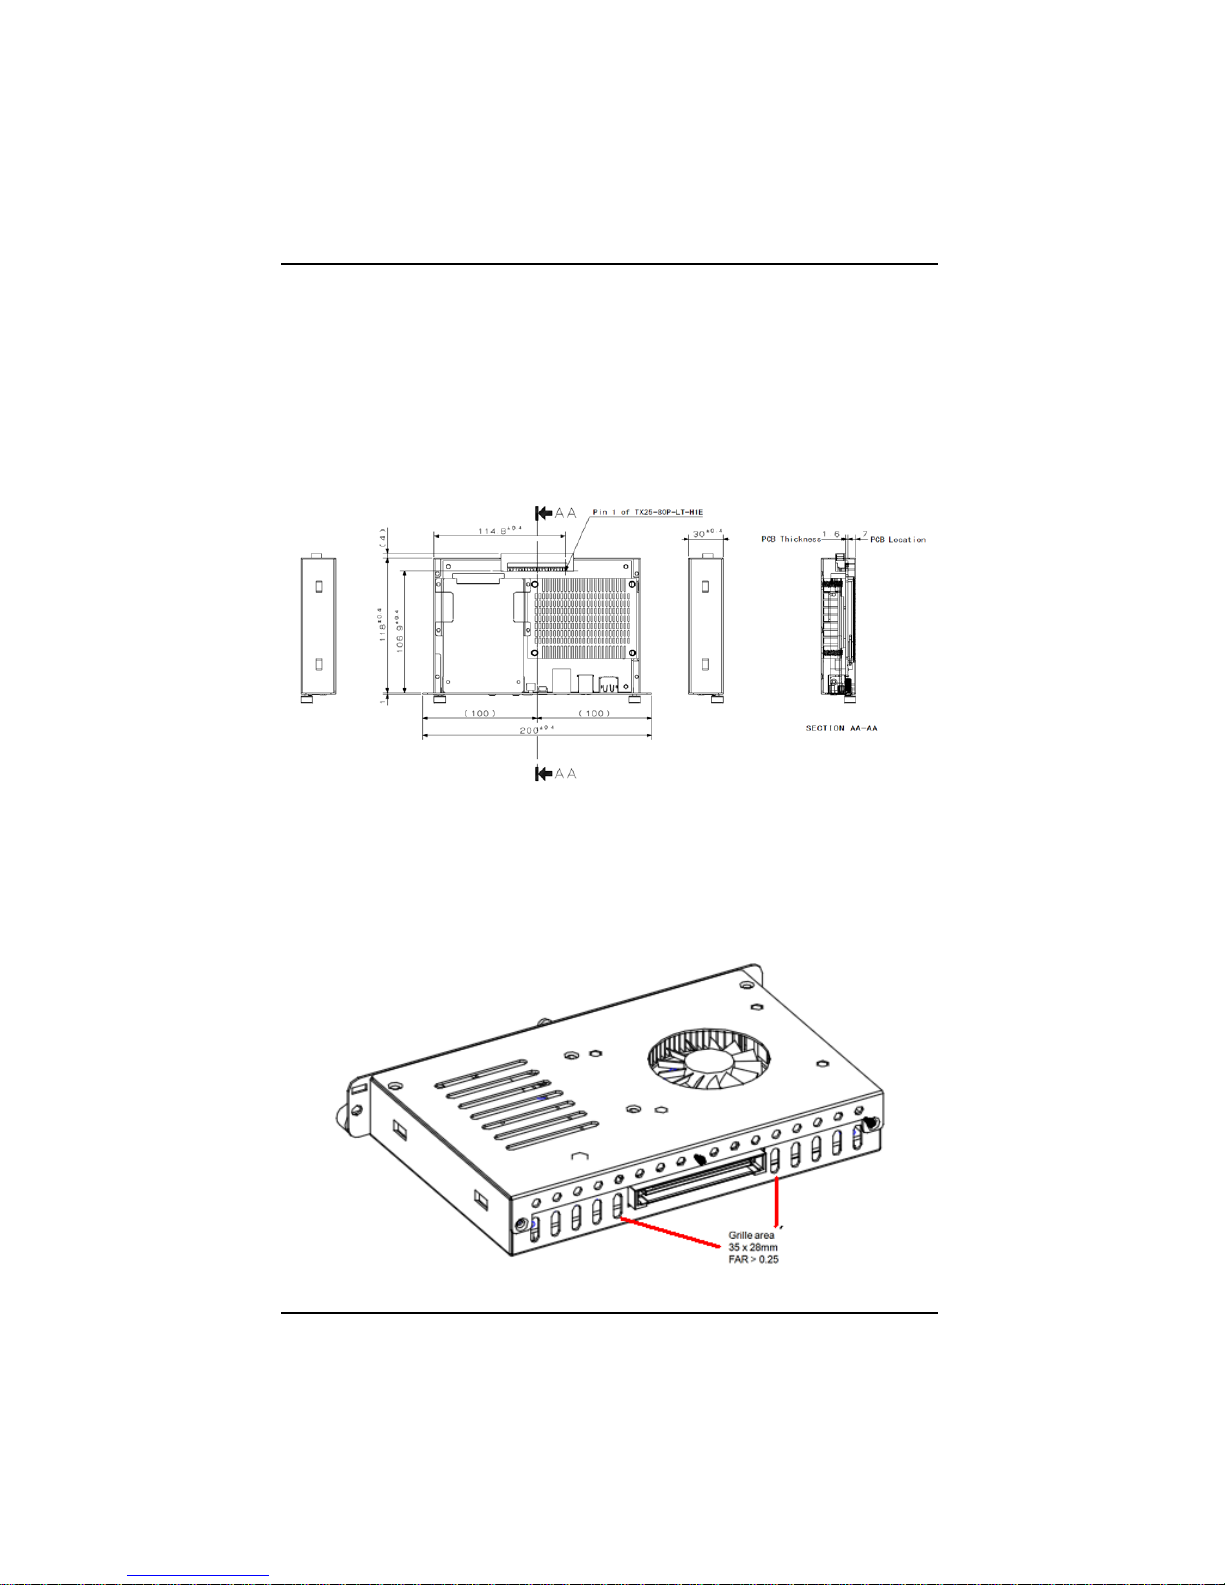
1.3.3 Mechanical Specifications
OPS860-HM Docked in the Reference Display Panel
The OPS 860 Pluggable Module docked at a display panel system.
In this reference design, the module is docked and undocked in
the vertical direction.
NOTE: Please contact Axiomtek for available option display panel.
Introduction
Page 16
OPS860-HM User’s Manual
8
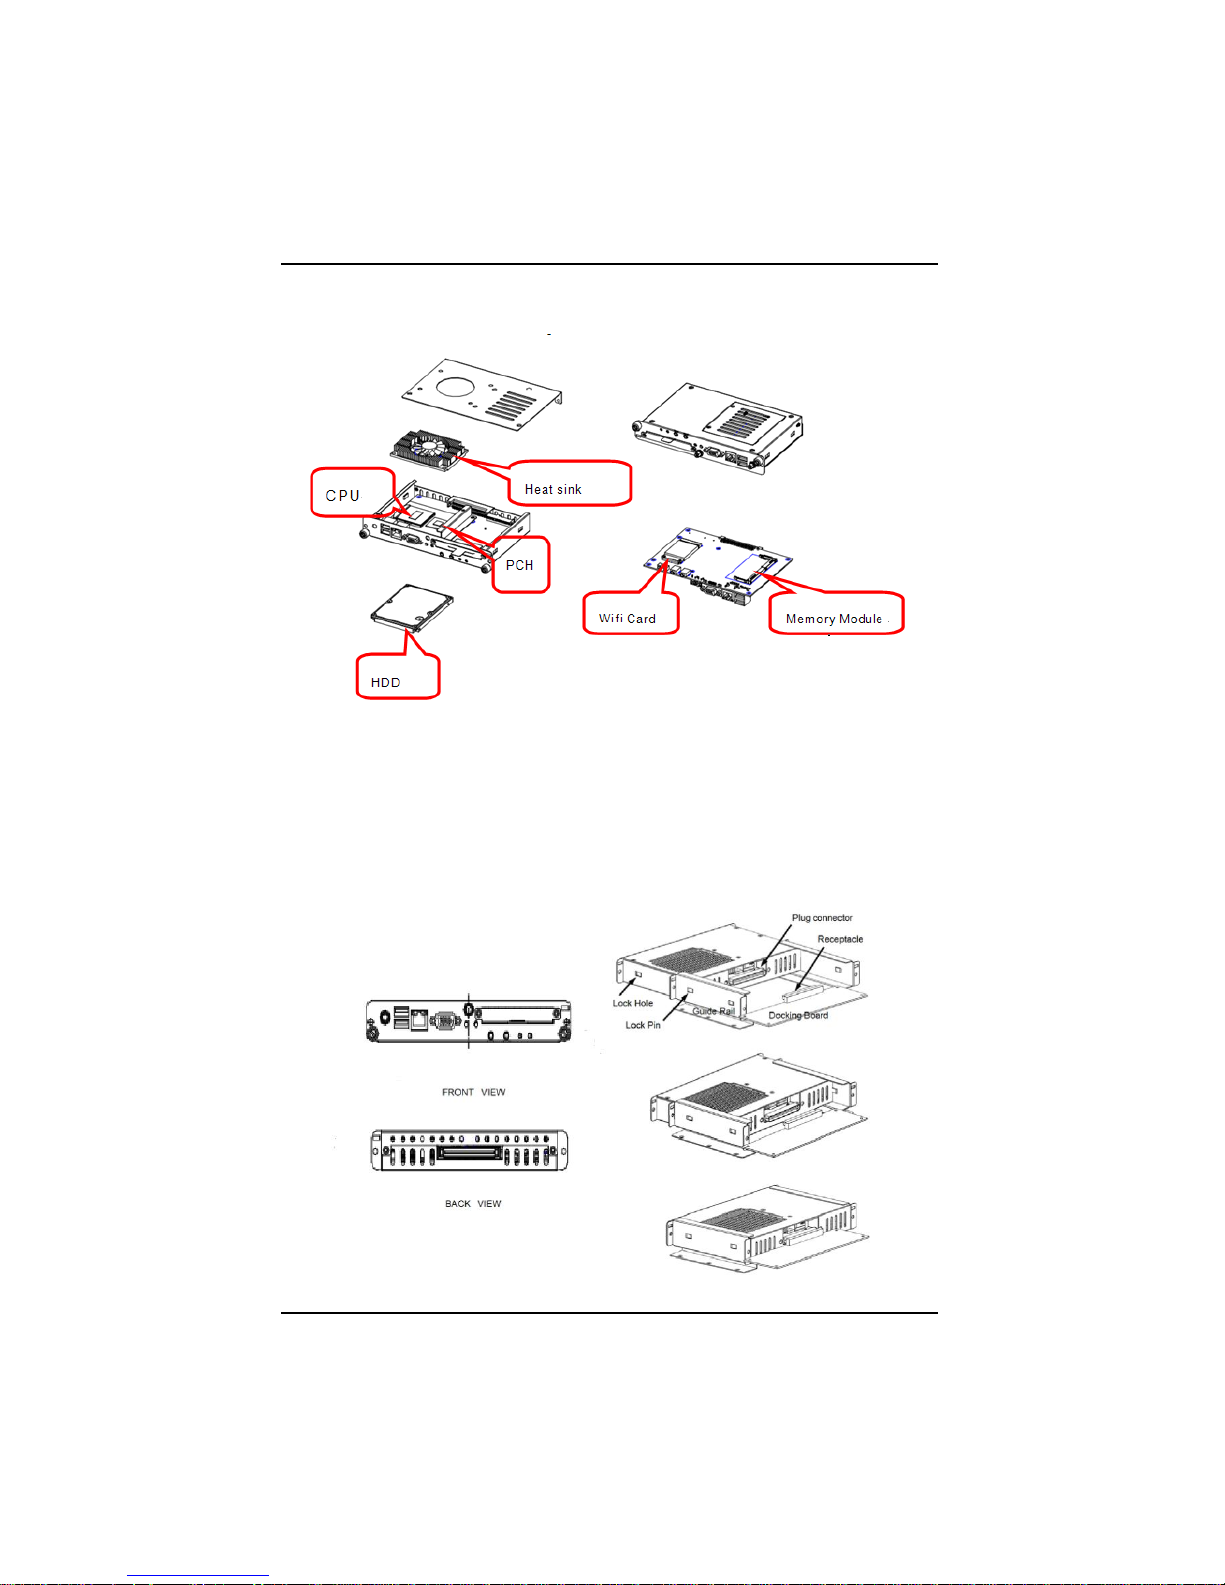
Exploded View of the Pluggable Module
The Guide Rail Mechanism for the OPS860-HM Module
You can use the rails along side of OPS860-HM Module to
dock and undock the plug connector at the back of the module
to connect with docking board. There are two lock pins on
each side of the rail which serve as the locking mechanism to
attach the lock holes on the OPS860-HM Module.
Introduction
Page 17
OPS860-HM User’s Manual
9
Location of Lock Hole on the Pluggable Module
*The drawing is base on Intel Open Pluggable Specification
Introduction
Page 18

OPS860-HM User’s Manual
10
Dimensions of the Guide Rail
Introduction
Page 19
OPS860-HM User’s Manual
11
Location of JAE TX25 Plug Connector
Please refer to the following drawing for location of the JAE
TX25 plug connector. Pin 1 of the connector is located at
114.8 mm from the edge of the module, and 106.9 mm from
the inner side of the front panel. For mating tolerance of TX25
plug connector and TX24 receptacle connector, please refer
to the JAE specification
Vent Holes at the Pluggable Module Back Panel
On the OPS860-HM Module, it is recommended by Intel that
some vent holes be opened at the back so that hot air can
escape more easily from the module that the FAR in on both
sides of the module back panel should be greater than 0.25.
Introduction
Page 20
OPS860-HM User’s Manual
12
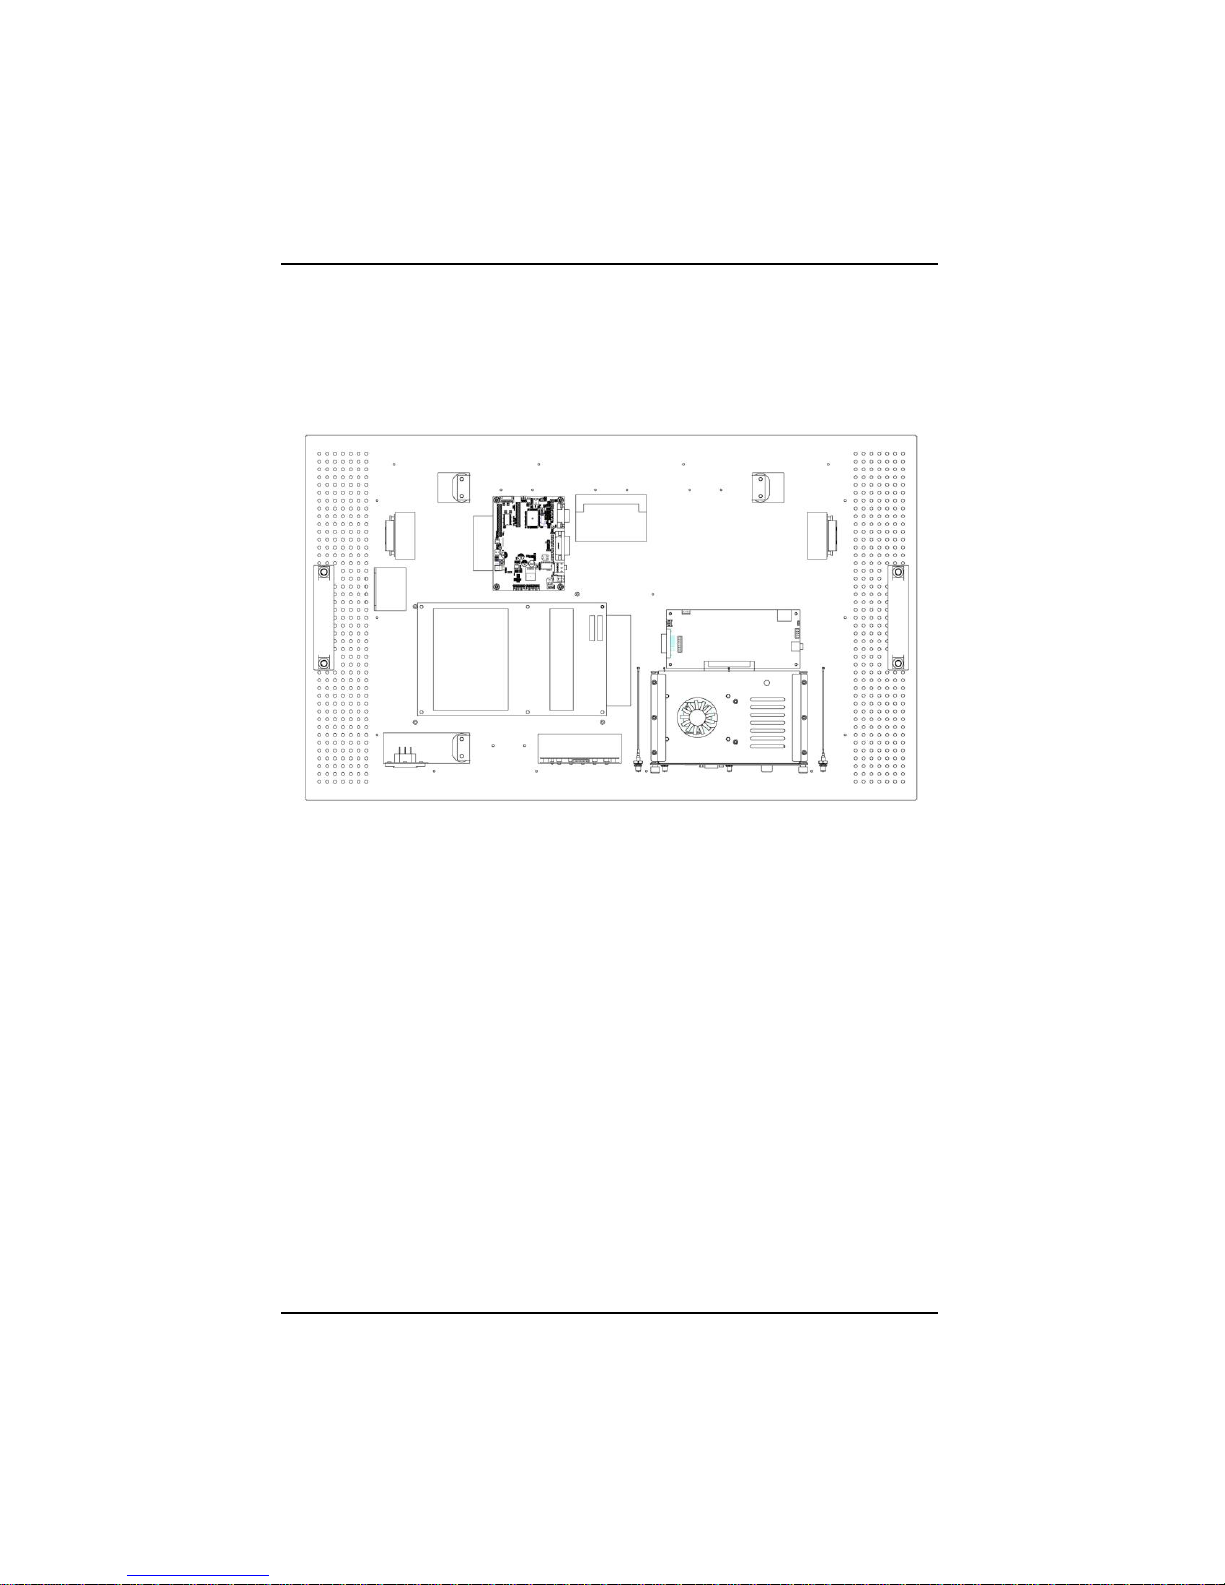
1.3.4 Reference Design
Display Panel Rear View – Internal
The digital signage OPS860-HM prototype is based on a 32”
display panel with the functional blocks illustrated in Figure 18. It
is mainly a 3-board partitioning design consisting of the pluggable
module, docking board and the panel control board.
Introduction
Page 21

OPS860-HM User’s Manual
13
1.4 Package List
When you receive the OPS860-HM, the bundled package should
contain the following items:
OPS860-HM device x 1
CD x 1
HDD Mylar x 1
THERMAL GREASE(Syringe 1G)
M3 x 4 screw x 2
M4 x 6 screw x 2
If you can not find the package or any items are missing, please contact
Axiomtek distributors immediately.
Introduction
Page 22

OPS860-HM User’s Manual
14
MEMO :
Introduction
Page 23

OPS860-HM User’s Manual
15
CHAPTER 2
HARDWARE INSTALLATION
The OPS860-HM is convenient for your various hardware
configurations, such as HDD (Hard Disk Drive), Memory Module.
The chapter 2 will show you how to install the hardware. It
includes:
CPU, Hard disk Drive and DRAM Installation
Pluggable Module Method
2.1 CPU,HDD,DRAM,Wireless Installation
The OPS860-HM model offers a convenient drive bay module for
users to install DRAM, CPU and HDD. Please follow the steps:
Step 1 Turn off the system, Loosen the screws as illustrated.
Hardware Installation
Page 24

OPS860-HM User’s Manual
16
NOTE Please pull out power cable of system fan while installation
Hardware Installation
Page 25

OPS860-HM User’s Manual
17
Step 2 Install CPU
Step 2.1 Loosen the screws of CPU socket
Hardware Installation
Page 26

OPS860-HM User’s Manual
18
Step 2.2 Insert the CPU in to the slot. Please follow the indication on
CPU as mark and slot to ensure the proper insertion of the CPU
Step 2.3 CPU is inserted into the socket and the latch is closed.
Hardware Installation
Page 27

OPS860-HM User’s Manual
19
Step 3 Install DRAM
Step 3.1 Loosen the screws on the real of chassis as illustrated.
Step 3.2 After losing the screws, extract the real of chassis out of the
module.
Hardware Installation
Page 28
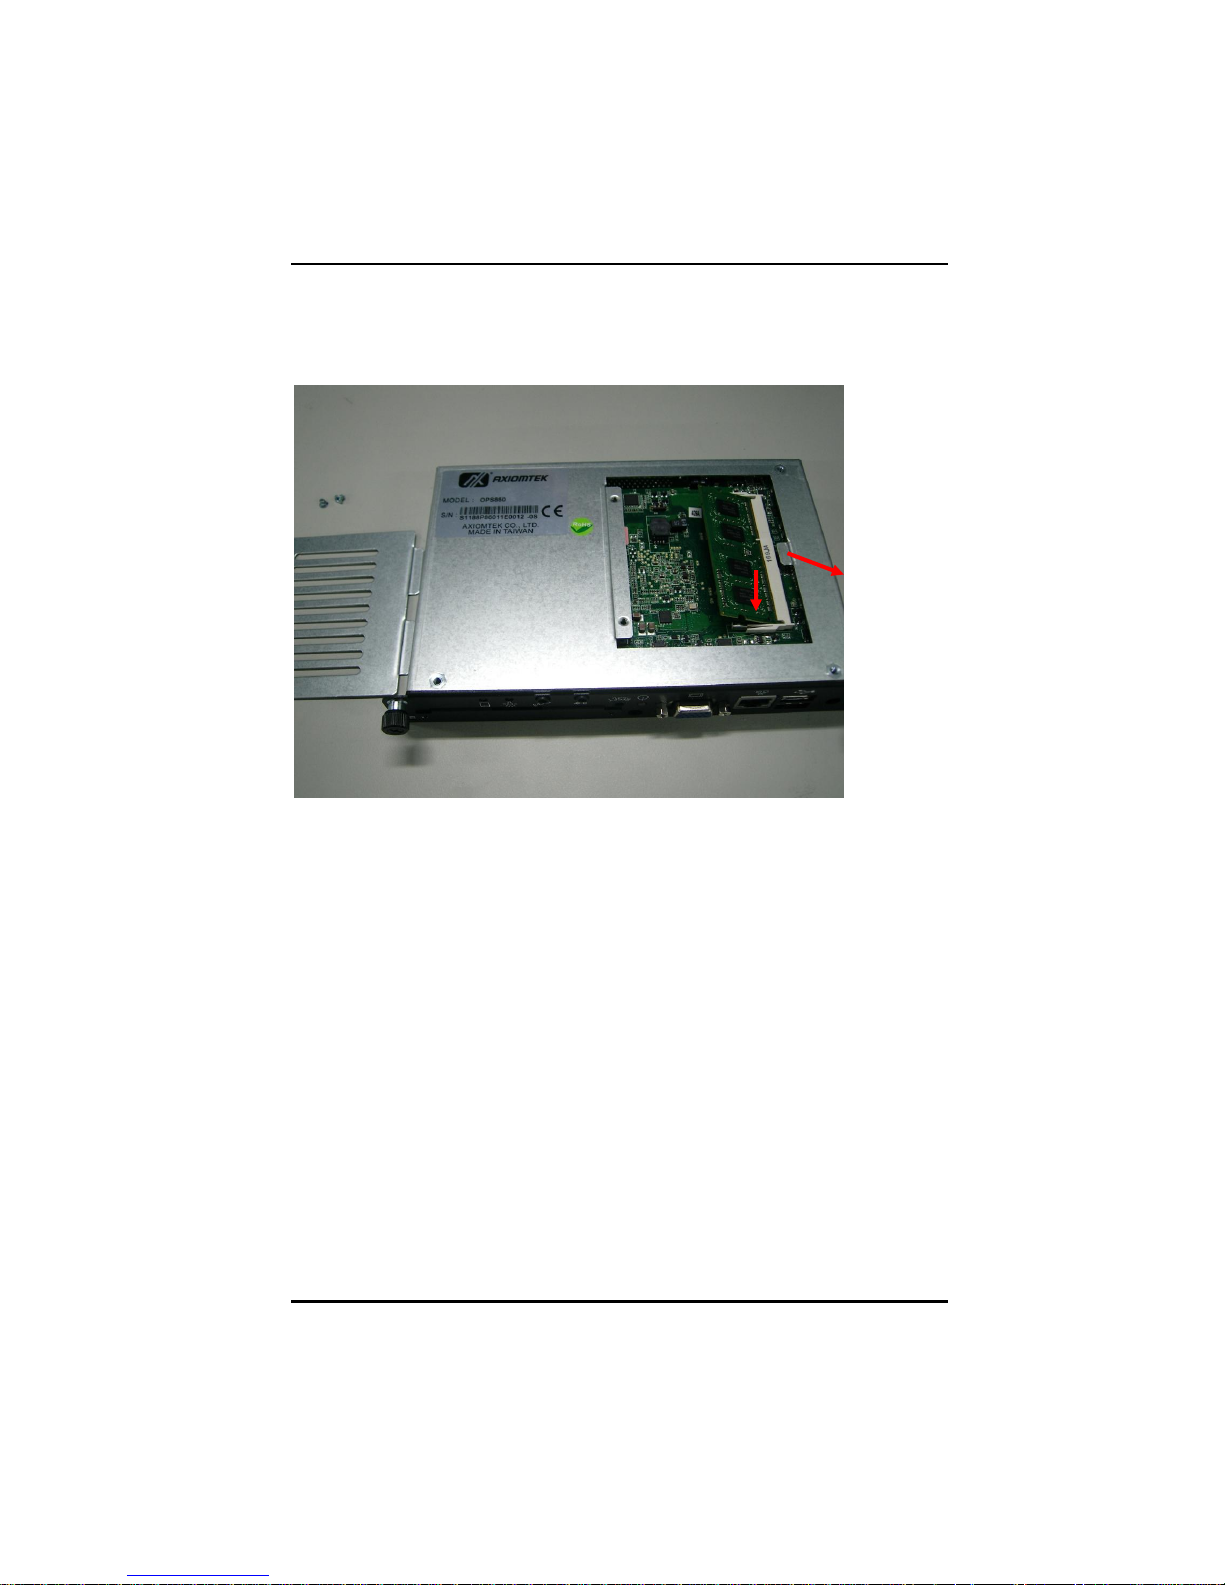
OPS860-HM User’s Manual
20
Step 3.3 Install DRAM module.
Put DRAM. Place the memory module into the socket and press it firmly.
The socket latches are levered upwards and clipped on to the edges of
the DIMM.
Step 4 Install Wireless Modules
The OPS860-HM provides one Mini card slot for user to install one
wireless LAN card. When installing the wireless LAN card, refer to the
following instructions and illustration
Hardware Installation
Page 29

OPS860-HM User’s Manual
21
Step 4.1 Please refer to Step 1 to loosen the screws of the chassis and
PCB board. Turn over the PCB board
Step 4.2 Install Wi-Fi module. Place the Wi-Fi module into the socket
and press it firmly down until it is fully located.
Hardware Installation
Page 30

OPS860-HM User’s Manual
22
Step 4.3 Find the Antenna cable and connect it wireless LAN card.
Screw the antenna connector at expansion I/O side and Install the
antenna on the wireless LAN card
The wireless Module with one antenna application:
The wireless Module with one antenna application:
Hardware Installation
Page 31

OPS860-HM User’s Manual
23
Step 5 Install HDD drive
To enable future remove of HDD drive affix the HDD Mylar sheet to the
HDD drive so that it extends past the length of the HDD at the opposite
end of the HDD to the Connector
Step 5.1 Loosen the screw of HHD driver cover
Step 5.2 Affix the HHD Mylar sheet to the HDD drive
Hardware Installation
Page 32
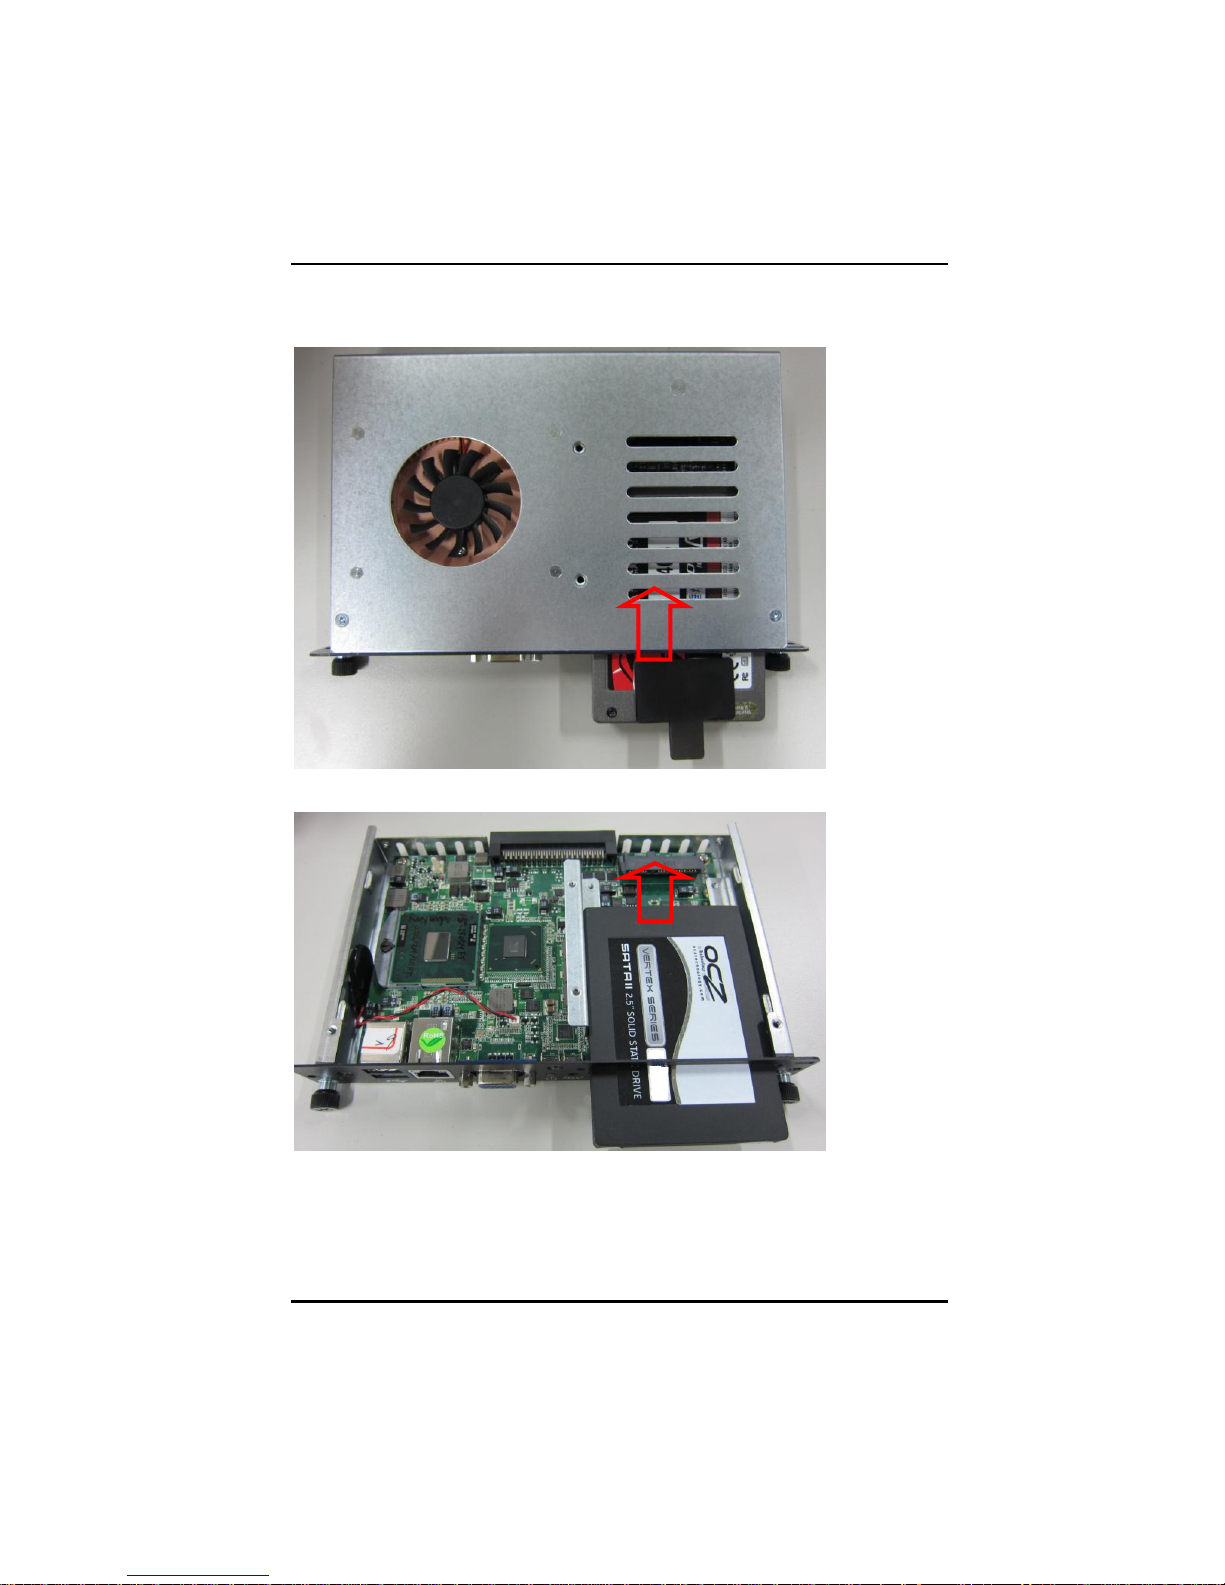
OPS860-HM User’s Manual
24
Step 5.3 Plug HDD drive in to HDD connector
Hardware Installation
Page 33

OPS860-HM User’s Manual
25
Step 5.4 Pull the HDD Mylar to slot-out the HDD drive
Hardware Installation
Page 34
OPS860-HM User’s Manual
26
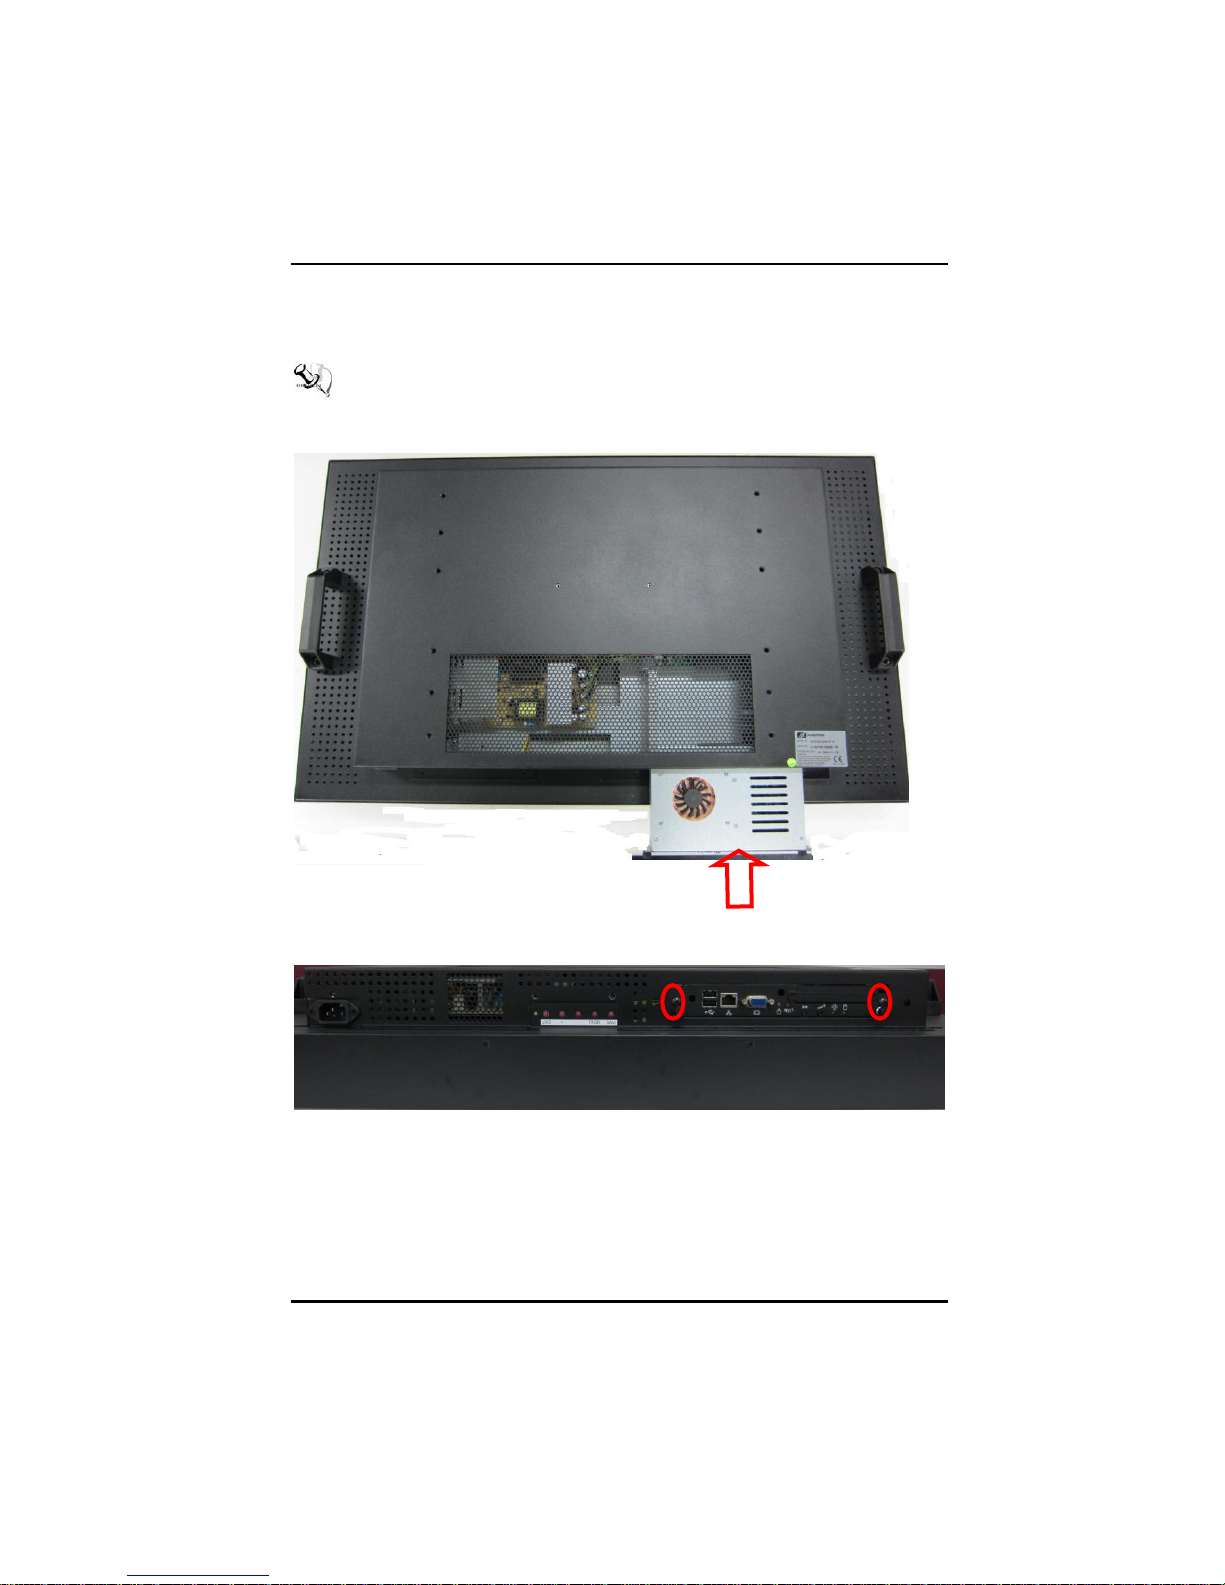
2.2 Pluggble Module Method
NOTE Please contact Axiomtek for the available option display
Step 1 Pluggable the box into display
Step 2 Fasten the screws as illustrated
Hardware Installation
Page 35

OPS860-HM User’s Manual
27
Connector
Label
JAE TX25 Connector
CN1
CPU FAN
CN3
Display Port(Optional)
CN4
POWER BUTTON
CN5
RESET BUTTON
CN6
VGA Port
CN7
Mini Card Slot
SCN1
Audio MIC-IN Connector
SCN3
Audio LINE-OUT Connector
SCN4
Battery 2 PIN
BAT1
ATX Auto Power On (SW-1)
SW1
Clear CMOS (SW -2)
RJ45 (WG82579LM)
LAN1
USB Port 0/1
USB1
HDD LED
SLED1
Power LED
SLED2
CHAPTER 3
CONNECTORS
This chapter provides users with detailed description how to set
up basic system configuration through the AMIBIOS8 BIOS
setup utility.
3.1 Connectors
Connectors connect this board with other parts of the system.
Loose or improper connection might cause problems. Make sure
all connectors are properly and firmly connected.
Here is a summary table shows you all connectors on the board.
Connectors
Page 36

OPS860-HM User’s Manual
28
Connectors
Page 37

OPS860-HM User’s Manual
29
Pin
Signal
Pin
Signal
Pin
Signal
1
DDP_3N
2
DDP_3P
3
GND
4
DDP_2N
5
DDP_2P
6
GND
7
DDP_1N
8
DDP_1P
9
GND
10
DDP_0N
11
DDP_0P
12
GND
13
DDP_AUXN
14
DDP_AUXP
15
DDP_HPD
16
GND
17
TMDS_CLK-
18
TMDS_CLK+
19
GND
20
TMDS0-
21
TMDS0+
22
GND
23
TMDS1-
24
TMDS1+
25
GND
26
TMDS2-
27
TMDS2+
28
GND
29
DVI_DDC_DATA
30
DVI_DDC_CLK
31
DVI_HPD
32
GND
33
+12V~+19V
34
+12V~+19V
35
+12V~+19V
36
+12V~+19V
37
+12V~+19V
38
+12V~+19V
39
+12V~+19V
40
+12V~+19V
41
RSVD(Optional
for PCIE_CN)
42
RSVD(Optional
for PCIE_CP)
43
RSVD(Optional
for PCIE_TP)
44
RSVD(Optional
for PCIE_RP)
45
RSVD(Optional
for PCIE_TN)
46
RSVD(Optional for
PCIE_RN)
47
RSVD(Optional
for DP CTRL CLK)
48
RSVD(Optional for
DP CTRL DATA)
49
SLP_S3(Optional
For PCIE RST)
50
SYS_FAN_CTL
51
UART_RXD
52
UART_TXD
53
GND
54
NC
55
NC
56
GND
57
NC
58
NC
59
GND
60
USB_PN2
3.1.1 JAE TX25 Connector (CN1)
Connector JAE TX25 CN1 is for JAE interface support.
Connectors
Page 38

OPS860-HM User’s Manual
30
Pin
Signal
Pin
Signal
Pin
Signal
61
USB_PP2
62
GND
63
USB_PN1
64
USB_PP1
65
GND
66
USB_PN0
67
USB_PP0
68
GND
69
LINEOUT_L
70
LINEOUT_R
71
NC
(Optional For CEC)
72
PB_DET
73
PS_ON#
74
PWR_STATUS
75
GND
76
GND
77
GND
78
GND
79
GND
80
GND
Connectors
Page 39
31
Pin
Description
1 2
1
GND
2
+5V
3.1.2 CPU FAN (CN3)
OPS860-HM User’s Manual
Connectors
Page 40

OPS860-HM User’s Manual
32
Pin
Signal
CN4
1
DPB_LANE0
2
GND
3
DPB_LANE0#
4
DPB_LANE1
5
GND
6
DPB_LANE1#
7
DPB_LANE2
8
GND
9
DPB_LANE2#
10
DPB_LANE3
11
GND
12
DPB_LANE3#
13
Detect Pin
14
GND
15
DPB_AUX
16
GND
17
DPB_AUX#
18
DPB_HPD
19
GND
20
+3.3V
3.1.3 Display Port Connector (CN4)
CN4 is a standard Display Port Connector co-layout with CN7
(Optional)
Connectors
Page 41
OPS860-HM User’s Manual
33
Pin
Signal
Pin
Signal
Pin
Signal
1
Red
2
Green
3
Blue 4 N.C
5
GND
6
DETECT
7
GND
8
GND
9
VCC
10
GND
11
N.C
12
DDC DATA
13
Horizontal Sync
14
Vertical Sync
15
DDC CLK
15
6
11
10
15
3.1.4 VGA Port (CN7)
DB15 CRT Connector (CN7) Co-layout with CN4
CN7 is a DB15 connector commonly used for the CRT Monitor.
Connectors
Page 42

OPS860-HM User’s Manual
34
Pin
Signal
Pin
Signal
Pin
Signal
1
WAKE#
2
+3.3VAUX
3
RVD1
4
GND
5
RVD2
6
+1.5V
7
CLKREQ#
8
RVD19
9
GND
10
RVD18
11
REFCLK-
12
RVD16
13
REFCLK+
14
RVD15
15
GND
16
RVD14
17
RVD3
18
GND
19
RVD4
20
+3.3VAUX
21
GND
22
PERST#
23
PERN0
24
+3.3VAUX
25
PERP0
26
GND
27
GND
28
+1.5V
29
GND
30
SMB_CLK
31
PETN0
32
SMB_DATA
33
PETP0
34
GND
35
GND
36
USB_D-
37
RVD5
38
USB_D+
39
+3.3VAUX
40
GND
41
+3.3VAUX
42
LED_WWAN#
43
RVD8
44
LED_WLAN#
45
RVD9
46
LED_WPAN#
47
RVD10
48
+1.5V
49
RVD11
50
GND
51
RVD12
52
+3.3VAUX
53
NH1
54
NH2
55
NH3
56
NH4
3.1.5 Min Card Slot (SCN1)
Connectors
Page 43

35
Pin
Description
1
+VBAT
2
GND
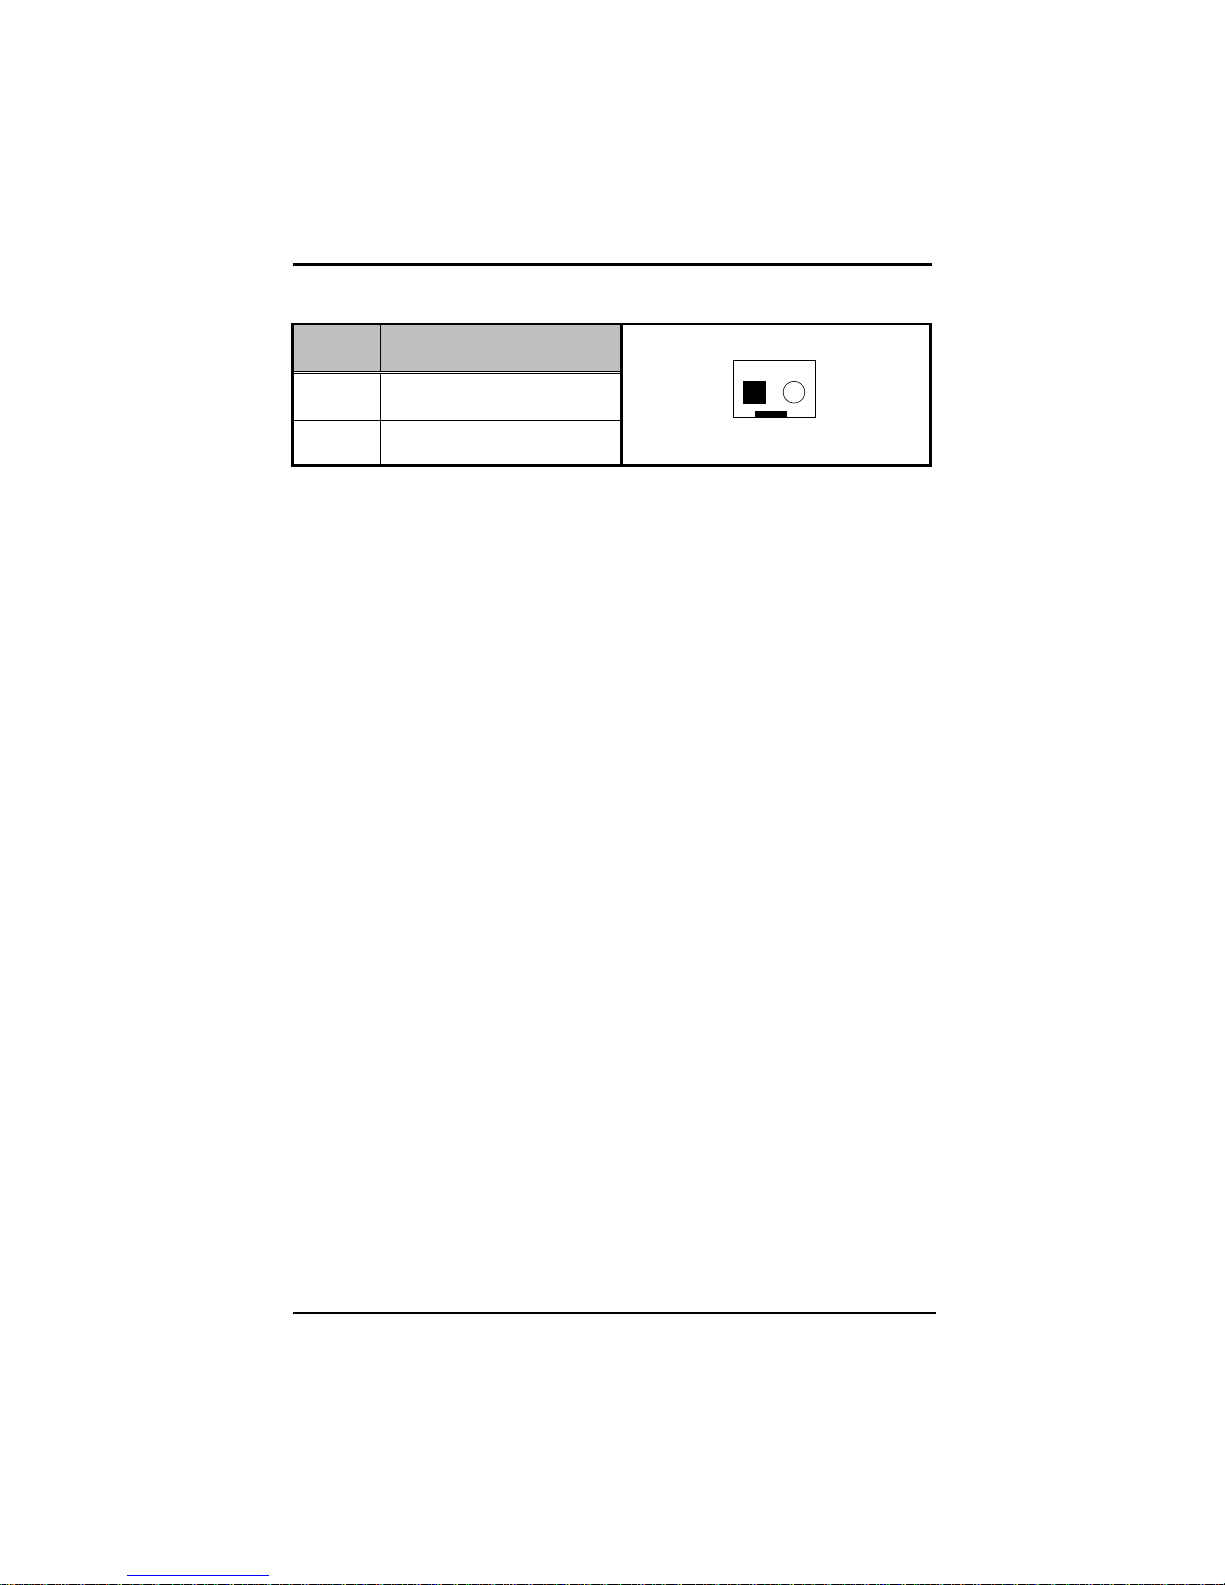
SW
On
Off
1
Auto On
ATX
2
Clear
Normal
3.1.6 Battery 2 PIN (BAT1)
OPS860-HM User’s Manual
3.1.7 ATX Auto Power ON/ Clear CMOS (SW1)
Remark: The product which is shipped after 12/20/2011 is with
the setting shown below. If you are not sure which
date you received your product, please contact
Axiomtek.
Connectors
Page 44
OPS860-HM User’s Manual
36
Pin
Signal
12345678
A B
1
Tx+ (Data transmission positive)
2
Tx- (Data transmission negative)
3
Rx+(Data reception positive)
4
RJ-1(For 1000 base T-Only)
5
RJ-1(For 1000 base T-Only)
6
Rx- (Data reception negative)
7
RJ-1(For 1000 base T-Only)
8
RJ-1(For 1000 base T-Only)
A
Active LED
B
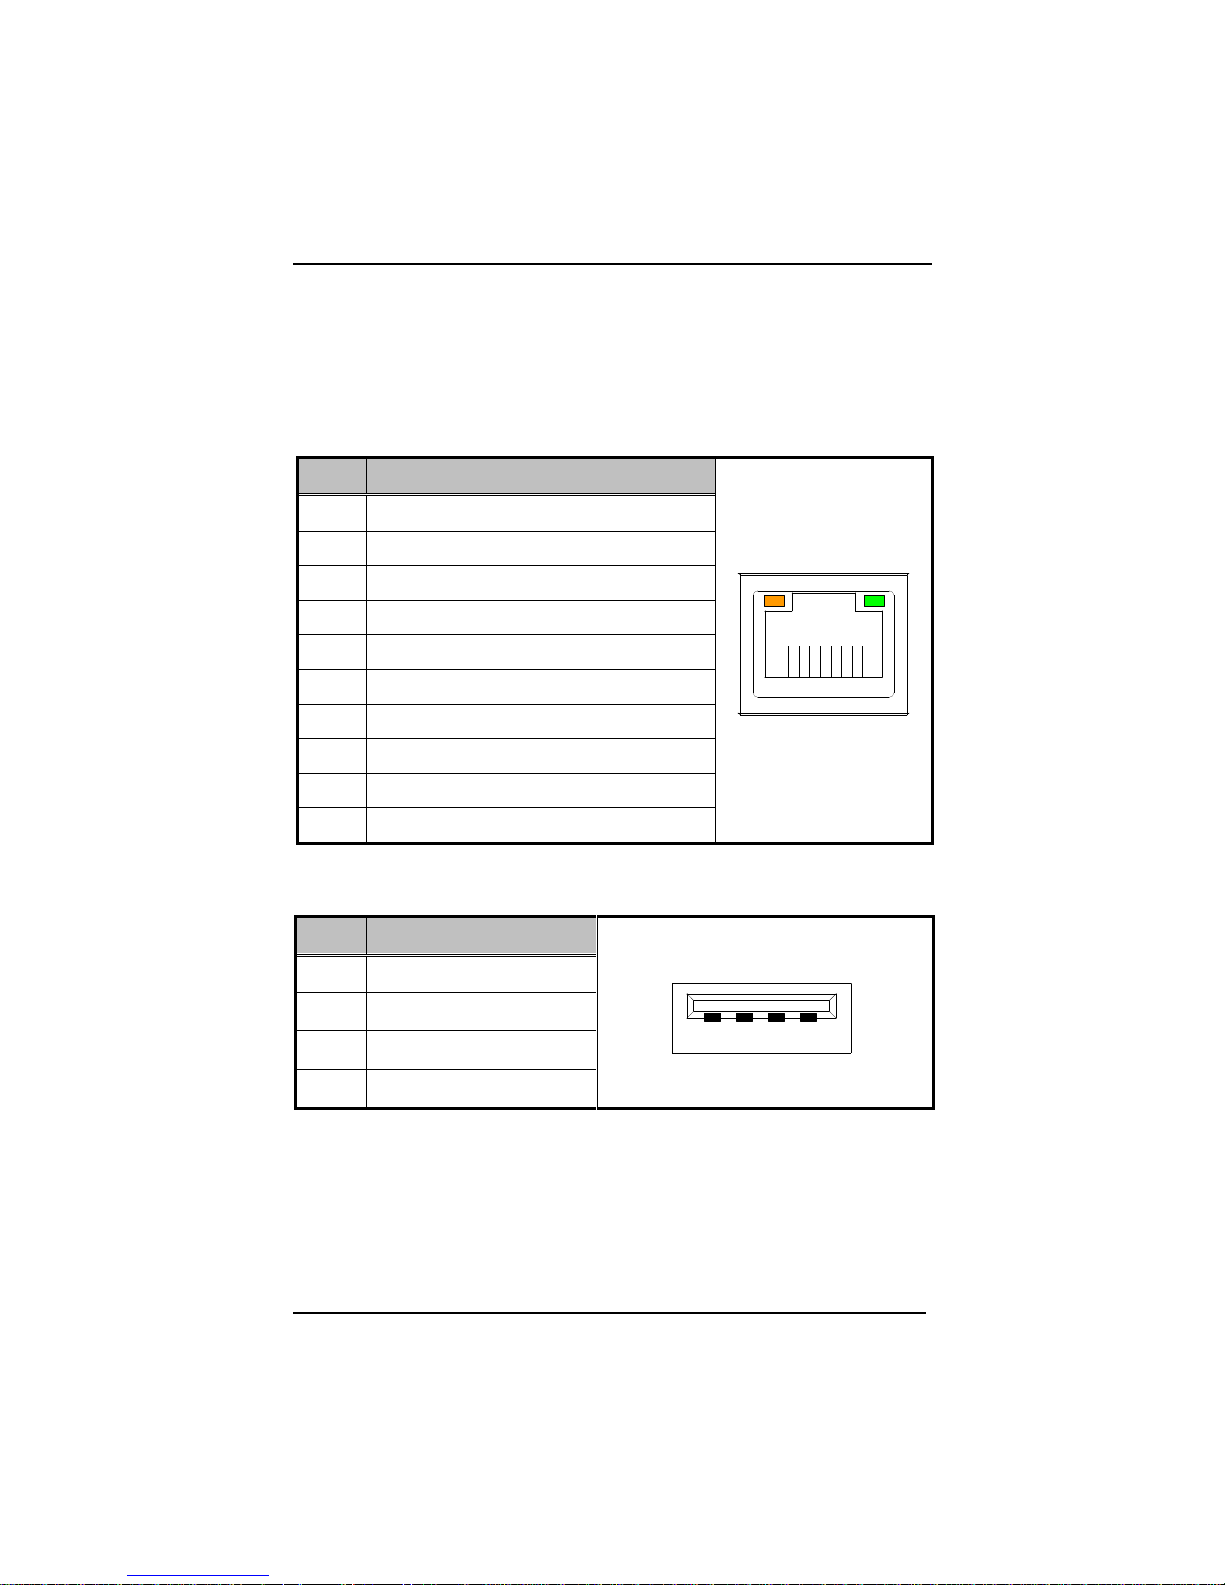
Speed LED
Pin
Signal
1 2 3 4
1
USB_POWER
2
USB -
3
USB +
4
GND
3.1.8 RJ45 (WG82579LM) (LAN1)
The RJ-45 connector LAN1 is for Ethernet. To connect the board
to 100-Base-T or 1000-Base-T hub, just plug one end of the
cable into LAN1 and connect the other end (phone jack) to a
100-Base-T hub or 1000-Base-T hub.
3.1.9 USB Port 0/1 (USB1)
Connectors
Page 45

OPS860-HM User’s Manual
37
CHAPTER 4
DRIVERS INSTALLATION
4.1 System
OPS860-HM supports Windows XP, Win Vista and Window 7. To
facilitate the installation of system driver, please carefully read the
instructions in this chapter before start installing.
1. Insert Intel Express Installer Driver CD and select the
“\Driver\”.
2. Select your operating system driver to install.
3. Select all files and follow the installing procedure.
Drivers Installation
Page 46

OPS860-HM User’s Manual
38
MEMO:
Drivers Installation
Page 47

OPS860-HM User’s Manual
39
Left/Right
The Left <Arrow> keys allow you to select a setup
screen.
Up/Down
The Up and Down <Arrow> keys allow you to select a
setup screen or sub-screen.
+
Plus/Minus
The Plus and Minus <Arrow> keys allow you to change
the field value of a particular setup item.
Tab
The <Tab> key allows you to select setup fields.
F1
The <F1> key allows you to display the General Help
screen.
F2
The <F2> key allows you to Load Previous Values.
F3
The <F3> key allows you to Load Optimized Defaults.
CHAPTER 5
AMI BIOS SETUP UTILITY
This chapter provides users with detailed description how to set up
basic system configuration through the AMIBIOS8 BIOS setup
utility.
5.1 Starting
To enter the setup screens, follow the steps below:
Turn on the computer and press the <F2> key immediately.
After you press the <F2> key, the main BIOS setup menu displays.
You can access the other setup screens from the main BIOS setup
menu, such as the Chipset and Power menus.
5.2 Navigation Keys
The BIOS setup/utility uses a key-based navigation system called
hot keys. Most of the BIOS setup utility hot keys can be used at
any time during the setup navigation process.
These keys include <F1>, <F2>, <Enter>, <ESC>, <Arrow> keys,
and so on.
NOTE: Some of navigation keys differ from one screen to
another.
AMI BIOS Setup Utility
Page 48

OPS860-HM User’s Manual
40
F4
The <F4> key allows you to save any changes you
have made and exit Setup. Press the <F4> key to
save your changes.
Esc
The <Esc> key allows you to discard any changes you
have made and exit the Setup. Press the
<Esc> key to exit the setup without saving your
changes.
Enter
The <Enter> key allows you to display or change the
setup option listed for a particular setup item. The
<Enter> key can also allow you to display the setup
sub- screens.
AMI BIOS Setup Utility
Page 49

OPS860-HM User’s Manual
41
5.3 Main Menu
When you first enter the Setup Utility, you will enter the Main setup
screen. You can always return to the Main setup screen by
selecting the Main tab. There are two Main Setup options. They are
described in this section. The Main BIOS Setup screen is shown
below.
System Date/Time
Use this option to change the system date and time. Highlight
System Date or System Time using the <Arrow> keys. Enter
new values through the keyboard. Press the <Tab> key or the
<Enter> keys to move between fields. The date must be
entered in MM/DD/YY format. The time is entered in
HH:MM:SS format.
AMI BIOS Setup Utility
Page 50

OPS860-HM User’s Manual
42
5.4 Advanced Menu
Launch PXE OpROM
Use this item to enable or disable the Boot ROM function of the
onboard LAN chip when the system boots up.
Launch Storage OpROM
This item can set enable or disable the storage device option ROM
with CF device.
The Advanced menu also allows users to set configuration of the
CPU and other system devices. You can select any of the items in
the left frame of the screen to go to the sub menus:
ACPI Settings
CPU Configuration
SATA Configuration
PCH-FW Configuration
USB Configuration
H/W Monitor
For items marked with “”, please press <Enter> for more options.
AMI BIOS Setup Utility
Page 51
OPS860-HM User’s Manual
43
ACPI Settings
You can use this screen to select options for the ACPI
Configuration, and change the value of the selected option. A
description of the selected item appears on the right side of the
screen.
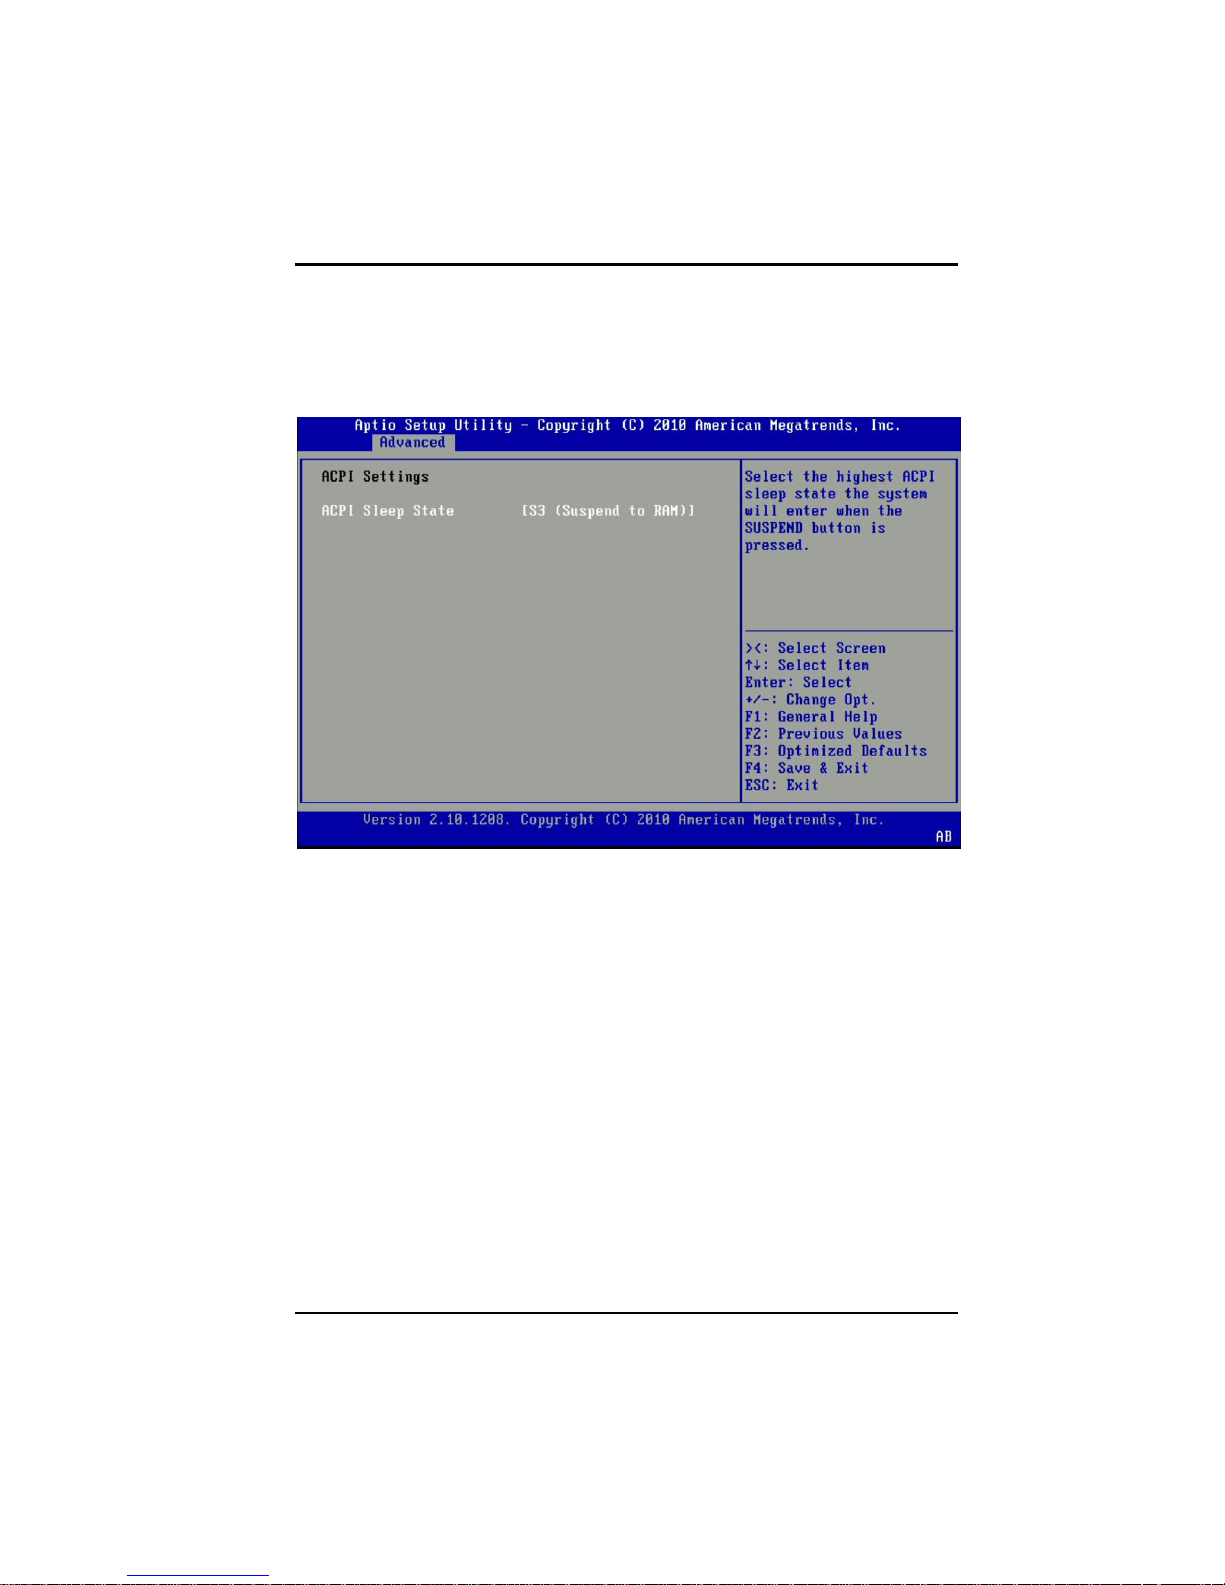
ACPI Sleep State
Allow you to select the Advanced Configuration and Power
Interface (ACPI) state to be used for system suspend. Here
are the options for your selection, S1 (CPU Stop Clock), S3
(Suspend to RAM) and Suspend Disable.
AMI BIOS Setup Utility
Page 52

OPS860-HM User’s Manual
44
CPU Configuration
This screen shows the CPU Configuration, and you can change the
value of the selected option.
Active Processor Cores
This feature controls the number of cores to enable in each
processor package.
Limit CPUID Maximum
This determines the kind of basic information CPUID can
provide the operating system. The maximum CPUID input
value determines the values that operating system can write
to the CPUID’s EAX register to obtain information about
processor.(When the computer is booted up, the operating
system executes the CPUID instruction to identify the
processor and its capabilities. Before it can do so, it must
first query the processor to find out the highest input value
CPUID recognizes.)
AMI BIOS Setup Utility
Page 53

OPS860-HM User’s Manual
45
Execute Disable Bit
Execute Disable Bit is a hardware-based security feature
that can reduce exposure to viruses and malicious-code
attacks and prevent harmful software from executing and
propagating on the server o network
Hardware Prefetcher
Enabling/disabling hardware prefetch mechanisms on
discrete applications can help system integrators and
software developers obtain optimal performance for
solutions running on Intel® Core™ Microarchitecture-based
processors.
Adjacent Cache Line Prefetch
When enabled, the processor will retrieve the currently
requested cache line, as well as the subsequent cache line.
When disabled, the processor will only retrieve the currently
requested cache line
Intel Virtualization Technology
Allows a hardware platform to run multiple operating
systems separately and simultaneously, enabling one
system to virtually function as several systems.
AMI BIOS Setup Utility
Page 54

OPS860-HM User’s Manual
46
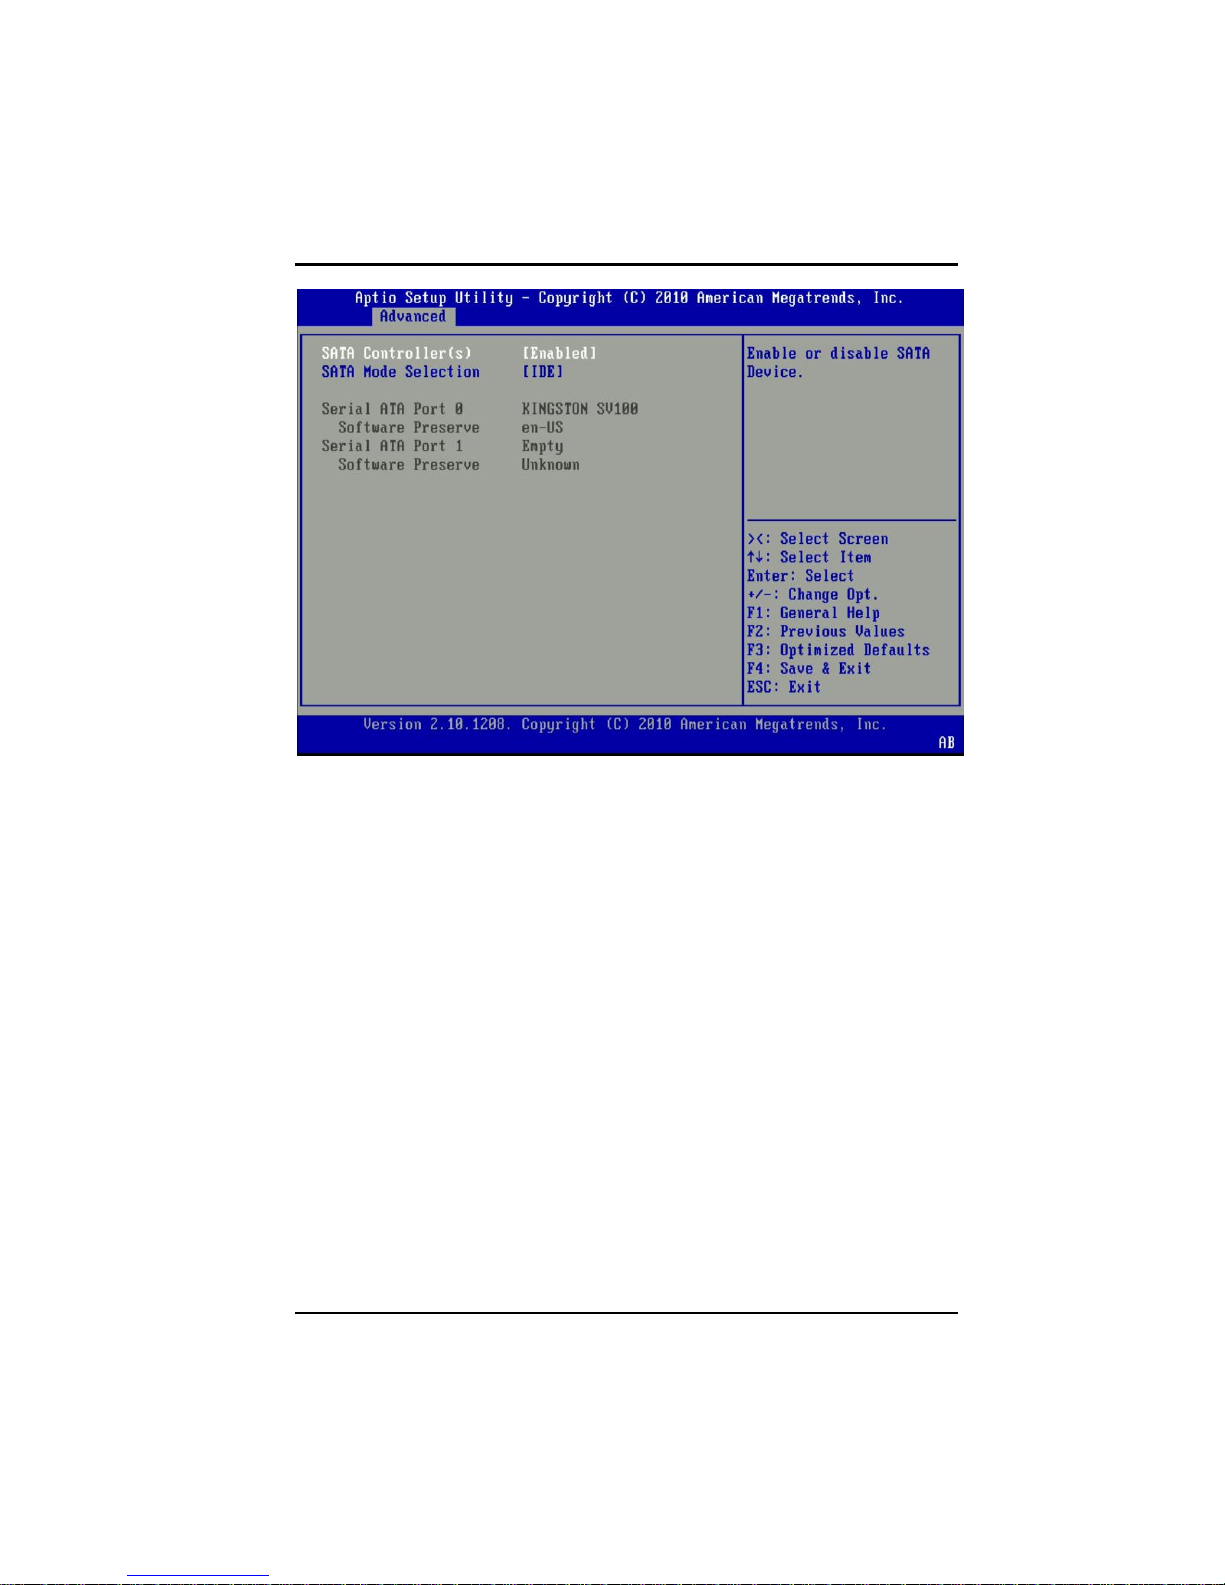
SATA Configuration
You can use this screen to select options for the SATA
Configuration, and change the value of the selected option. A
description of the selected item appears on the right side of the
screen.
AMI BIOS Setup Utility
Page 55
OPS860-HM User’s Manual
47
SATA Mode
Use this item to choose the SATA operation mode. Here are
the options for your selection, IDE Mode, AHCI Mode.
Serial-ATA Controller 0
Use this item to control the onboard SATA controller. Here
are the options for your selection, Compatible, Enhanced
and Disable.
Serial-ATA Controller 1
Use this item to control the onboard SATA controller. Here
are the options for your selection, Enhanced and Disabled.
AMI BIOS Setup Utility
Page 56

OPS860-HM User’s Manual
48
PCH-FW Configuration
You can use this screen to confirm ME Firmware version.
AMI BIOS Setup Utility
Page 57

OPS860-HM User’s Manual
49
USB Configuration
You can use this screen to select options for the USB
Configuration, and change the value of the selected option. A
description of the selected item appears on the right side of the
screen.
Legacy USB Support
This is for supporting USB device under legacy OS such
DOS, when choosing AUTO”, the system will automatically
detect any USB device is plugged into the computer and
enable USB legacy mode when a USB device plugged and
disable USB legacy mode when no USB device is plugged.
AMI BIOS Setup Utility
Page 58

OPS860-HM User’s Manual
50
H/W Monitor
This screen shows the Hardware Health Configuration, and a
description of the selected item appears on the right side of the
screen
AMI BIOS Setup Utility
Page 59

51
5.5 Chipset Menu
OPS860-HM User’s Manual
AMI BIOS Setup Utility
Page 60

OPS860-HM User’s Manual
52
Graphics Configuration
This option allows users to change the integrated graphic device
settings.
Aperture Size
Aperture Size is a video configuration option that
determines the amount of system memory available for
direct access by the graphics device.
DVMT Pre-Allocated
Pre-allocated memory is the small amount of system
memory made available at boot time by the system BIOS for
video. Pre-allocated memory is also known as locked
memory. This is because it is "locked" for video use only
and as such, is invisible and unable to be used by the
operating system.
DVMT Total GFx Mem.
Allow you to allocate a fixed amount of system memory as
graphics memory. Here are the options for your selection,
128MB, 256MB and Maximum DVMT
AMI BIOS Setup Utility
Page 61

53
Memory Information
OPS860-HM User’s Manual
AMI BIOS Setup Utility
Page 62

OPS860-HM User’s Manual
54
Memory Configuration
This screen shows the memory information.
USB Configuration
You can use this item to set the USB Configuration.
AMI BIOS Setup Utility
Page 63

OPS860-HM User’s Manual
55
5.6 Boot Menu
The Boot menu allows users to change boot options of the system.
You can select any of the items in the left frame of the screen to go
to the sub menus:
Setup Prompt Timeout
Boot up Mum Lock State
Quiet Boot
CSM16 Module Version
GateA20 Active
Boot Option Priorities
AMI BIOS Setup Utility
Page 64

OPS860-HM User’s Manual
56
Setup Prompt Timeout
Set the Timeout for wait press key to enter Setup Menu
Boot up Mum Lock State
Use this item to select the power-on state for the Mum Lock. The
default setting is on.
Quiet Boot
Use this item to enable or disable the Quite Boot state. The default
setting is disabling.
Boot Option #1
First Boot Device
Hard Drive BBS Priorities
Prioritize the booting hard drive.
AMI BIOS Setup Utility
Page 65

OPS860-HM User’s Manual
57
5.7 Security Menu
The Security menu allows users to change the security settings for
the system.
AMI BIOS Setup Utility
Page 66

OPS860-HM User’s Manual
58
Administrator Password
This item indicates whether an administrator password has been
set. If the password has been installed, Installed displays. If not,
Not Installed displays.
User Password
This item indicates whether a user password has been set. If the
password has been installed, Installed displays. If not, Not
Installed displays.
HDD Security Configuration
AMI BIOS Setup Utility
Page 67
OPS860-HM User’s Manual
59
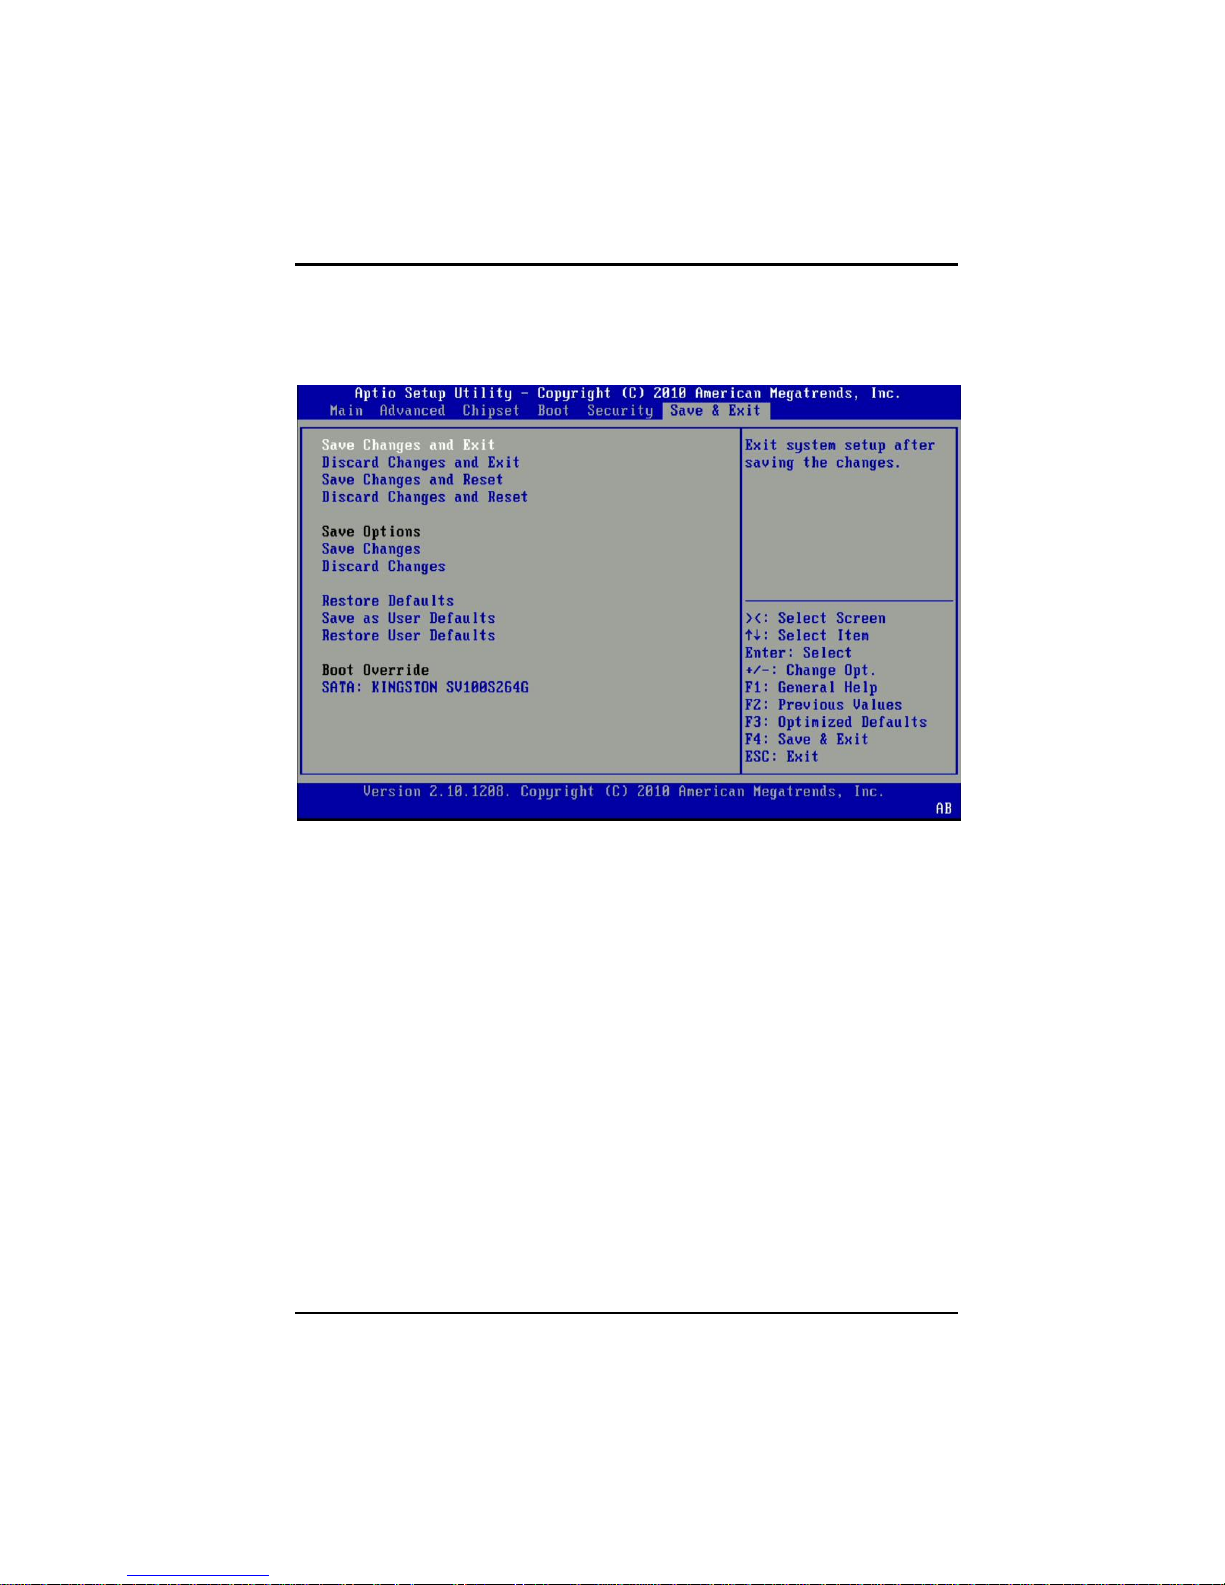
5.8 Save & Exit Menu
The Save & Exit menu allows users to load your system
configuration with optimal or failsafe default values.
Save Changes and Exit
When you have completed the system configuration
changes, select this option to leave Setup and return to
Main Menu. Select Save Changes and Exit from the Save &
Exit menu and press <Enter>. Select Yes to save changes
and exit.
Discard Changes and Exit
Select this option to quit Setup without making any
permanent changes to the system configuration and return
to Main Menu. Select Discard Changes and Exit from the
Save & Exit menu and press <Enter>. Select Yes to discard
changes and exit.
AMI BIOS Setup Utility
Page 68

OPS860-HM User’s Manual
60
Save Changes and Reset
When you have completed the system configuration
changes, select this option to leave Setup and reboot the
computer so the new system configuration parameters can
take effect. Select Save Changes and Reset from the Save
& Exit menu and press <Enter>. Select Yes to save
changes and reset.
Discard Changes and Reset
Select this option to quit Setup without making any
permanent changes to the system configuration and reboot
the computer. Select Discard Changes and Reset from the
Save & Exit menu and press <Enter>. Select Yes to discard
changes and reset.
Save Changes
When you have completed the system configuration
changes, select this option to save changes. Select Save
Changes from the Save & Exit menu and press <Enter>.
Select Yes to save changes.
Discard Changes
Select this option to quit Setup without making any
permanent changes to the system configuration. Select
Discard Changes from the Save & Exit menu and press
<Enter>. Select Yes to discard changes.
Restore Defaults
It automatically sets all Setup options to a complete set of
default settings when you select this option. The Optimal
settings are designed for maximum system performance,
but may not work best for all computer applications. In
particular, do not use the Optimal Setup options if your
computer is experiencing system configuration problems.
Select Restore Defaults from the save & Exit menu and
press <Enter>.
Save as User Defaults
Restore User Default
AMI BIOS Setup Utility
Page 69
OPS860-HM User’s Manual
61
APPENDIX A
REFERENCE DOCUMENTS
Reference Documents
Page 70

OPS860-HM User’s Manual
62
MEMO:
Reference Documents
Page 71

OPS860-HM User’s Manual
63
APPENDIX B
WATCH DOG TIMER
Watchdog Timer Setting
After the system stops working for a while, it can be auto-reset by
the Watchdog Timer. The integrated Watchdog Timer can be set up
in the system reset mode by program.
Using the Watchdog Function Start
1.Enable configuration(Following is example to enable configuration
by using debug)
-O 2E 87
-O 2E 87
2. Select Logic device:
-O 2E 07
-O 2F 07
3. WDT Device Enable
-O 2E 30
-O 2F 01
2. Activate WDT:
-O 2E F0
-O 2F 80
3. Set base timer:
-O 2E F6
-O 2F 0A Set Reset Time (Ex. A: 10 Sec)
4. Set timer unit
-O 2E F5
-O 2F 71(1: Sec ; 9: Minute
Watch Dog Timer
Page 72

OPS860-HM User’s Manual
64
MEMO:
Watch Dog Timer
 Loading...