

Page 1
DEMO9S08EL32 DOC-0410-020
QUICK START GUIDE REV 1.1, 05/2007
DEMO9S08EL32 QUICK START GUIDE
Introduction and Default Settings
This quick start guide will show how to connect the target board to a PC, install the correct version of CodeWarrior
Development Studio, and execute a simple demonstration program loaded in FLASH memory. The default
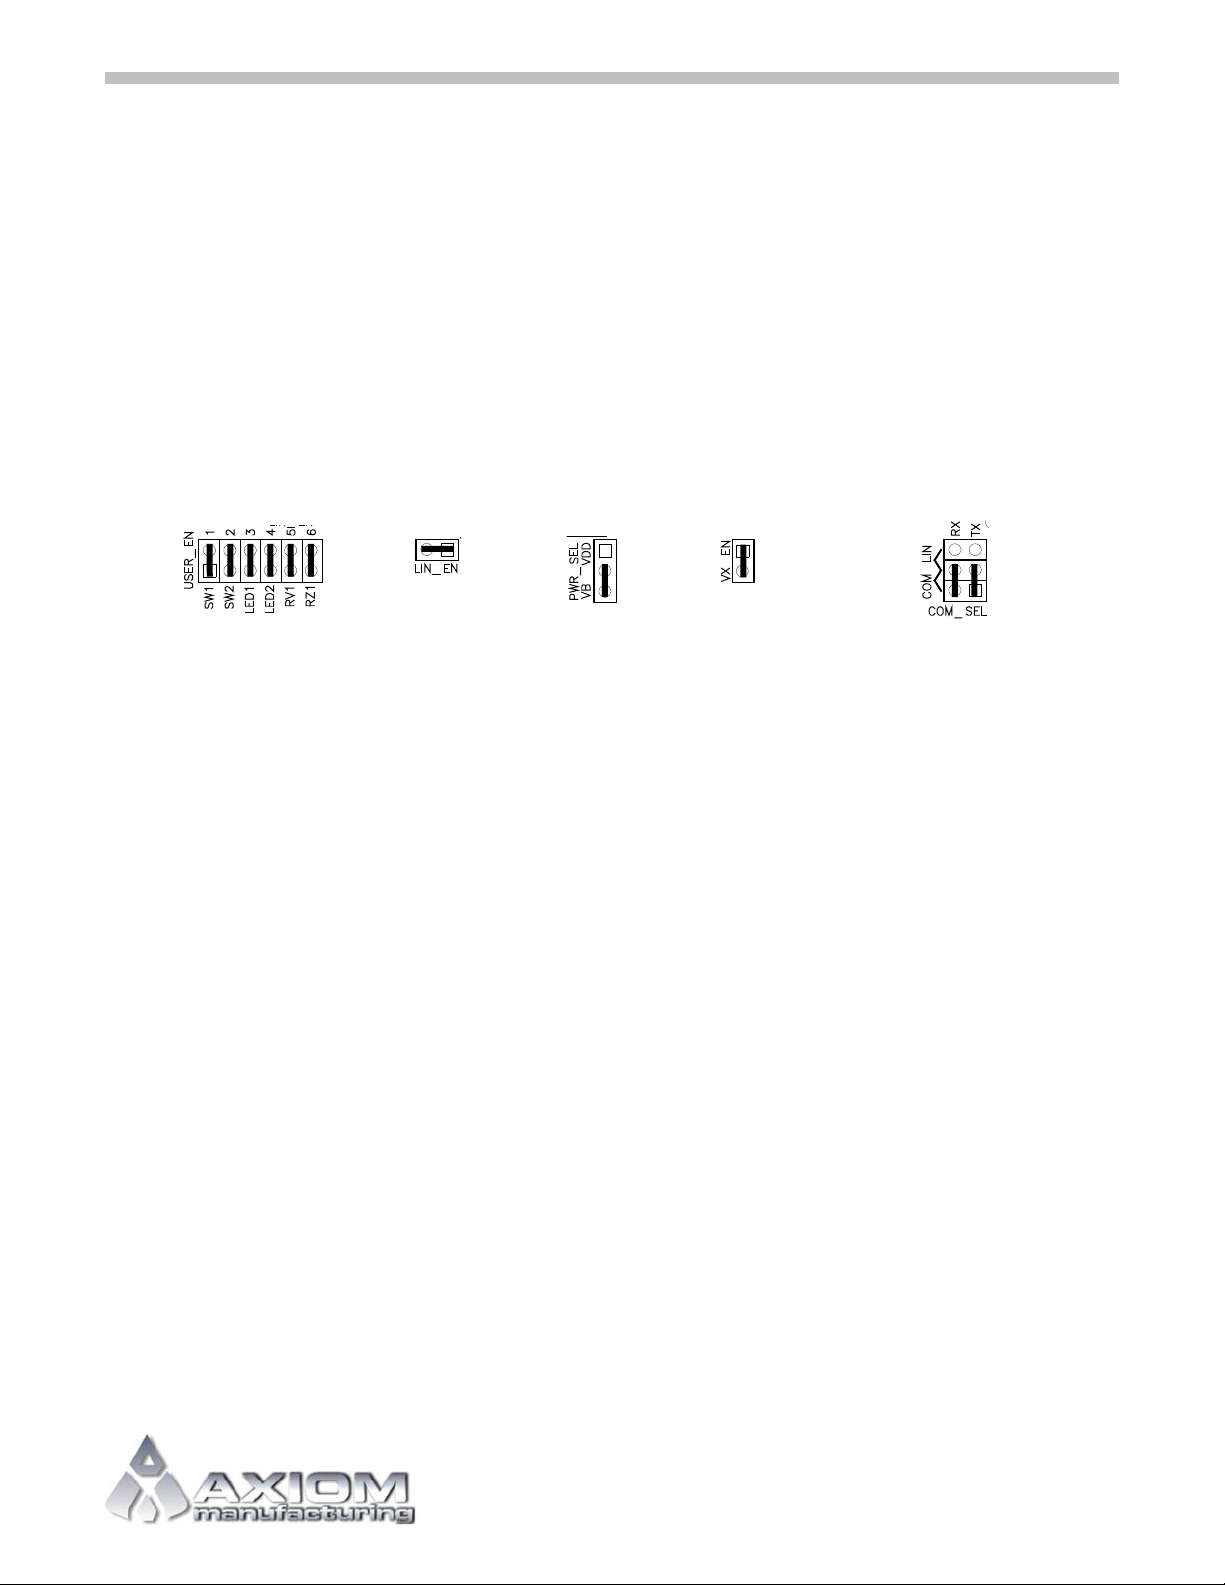
jumper settings for the DEMO9S08EL32 are shown below
Figure 1: DEMO9S08EL32 Default Settings
Install CodeWarrior Development Studio for HC(S)08 Special Edition
The DEMO9S08EL32 board ships with CodeWarrior Development Studio for Microcontrollers, a complete Integrated Development Environment (IDE) that provides a highly visual and automated framework to accelerate the
development of the most complex embedded applications. To install the IDE, refer to the “CodeWarrior Development Studio” DVD case and follow the steps in the included Quick Start Guide.
CodeWarrior Development Studio must be properly installed before attempting to connect the target board to the
host PC. Otherwise, the necessary USB drivers will not be available and the host PC will not recognize the target
board when connected.
Run the LED_DEMO Program
The DEMO9S08EL32 ships with a simple demonstration program loaded into on-chip FLASH memory. This
demonstration program executes when power is applied or when the RESET button is pressed. The source code
for this demo program can be found in the LED_DEMO.zip file on the Axiom Support CD in the /Examples folder.
Follow the steps below to run the LED_DEMO program.
1. Verify the configuration jumpers are set to the default position. Refer to Figure 1 above.
2. Connect the included USB cable between an open USB port on the host PC and the USB connector on the
target board.
3. Follow the on-screen instructions to install the necessary USB drivers.
4. After the USB drivers are properly installed, the USB, POWER OUT, and +5V LED’s will be ON.
5. The LED_DEMO program will execute - LED1 toggles at approximately 4Hz. LED2 toggles each time SW2 is
pressed.
Axiom Manufacturing, 2006. All rights reserved
Spencer Ruggles
Page 2
DEMO9S08EL32 DOC-0410-020
QUICK START GUIDE REV 1.1, 05/2007
Load and run the LED_DEMO Program
The steps below will show how to program the MCU using the CodeWarrior Development Studio for HC(S)08
Special Edition. The program loaded is a series of steps used to verify peripheral functionality.
1. Ensure the target board is connected and the LED_DEMO program is running. Refer above if necessary.
2. Copy and unzip the SCI_DEMO.zip file from the Support CD to the host PC. Make note of where the file is
stored during the unzip process.
3. Find and double-click the SCI_DEMO.mcp project file to open the project in CodeWarrior.
4. Ensure the P&E Multilink/Cyclone Pro build target is selected.
5. Open the MAIN.ASM file to inspect the demonstration code.
6. From the Project menu, select Debug or click the Debug button. The user may also press the F5 key.
7. Click the Connect button when the ICD - Connection Manager pops-up. Click Y
es button at the Erase and
Program Flash? Pop-up window.
8. The SCI_DEMO application program loads into FLASH memory on the target.
9. Connect a serial cable (not provided) between the host PC and the COM port on the target board
10. Open AxIDE, or other terminal emulation program, and configure for 9600, 8, N, 1
11. Press the RESET button on the target board and observe a text display in the AxIDE window.
Troubleshooting
VDD LED does not light
• Ensure PWR_SEL jumper is set to VB position (refer to Figure 1 above)
• Ensure CodeWarrior is properly installed
• Ensure USB drivers loaded when target board connected to PC
Unable to program the target MCU using the USB-BDM
• Follow troubleshooting steps under VDD LED above
No display in terminal window
• Ensure COM_SEL jumpers are set to COM position (refer to Figure 1 above)
• Ensure terminal program is configure to 9600, 8, N, 1
• Ensure serial cable is securely attached to host PC and target board
If the above Troubleshooting Tips fail to correct the problem, please contact Freescale Semiconductors for further
assistance. Please refer to the Technical Information Card (TIC) included in the kit. Assistance may also be
found by contacting Axiom Manufacturing at support@axman.com.
Axiom Manufacturing, 2006. All rights reserved
Spencer Ruggles
 Loading...